
🚨 Mission 06: Add Skills
NOTE
Skills are unique to agents powered by the GitHub Copilot harness in Copilot Studio. They aren't available to agents powered by the standard or Copilot chat harness.
🎯 Mission Brief
Your Contoso IT Concierge Agent can answer questions, but a reliable helpdesk also needs focused, reusable behavior for specific tasks. The GitHub Copilot harness introduces Skills for this purpose: self-contained capabilities that package a name, description, and task-specific instructions so the harness can activate the right behavior when it's needed.
In this mission, you'll explore this GitHub Copilot harness capability by iteratively refining two skills: one for troubleshooting and another for device guidance. The skills will guide the agent to call SharePoint correctly, recover from query issues, map user-selected options to the correct item, and capture additional requirements.
This work turns a general-purpose agent into a more dependable support experience. Instead of placing every procedure in the agent's global instructions, you'll keep task-specific guidance in focused packages that the harness can activate when relevant. You'll inspect the generated skill files, improve their instructions, and test how small wording changes affect tool calls and responses. The result is behavior that is easier to review, reuse, and refine without overloading the agent's core prompt.
IMPORTANT
In the current Copilot Studio UI, make sure the New experience toggle in the upper-right corner is turned on to use the GitHub Copilot harness authoring surface.
🔎 Objectives
- Understand why Skills are unique to agents powered by the GitHub Copilot harness
- Understand how skills provide reusable, task-specific behavior without authored topic paths
- Review and refine an AI-generated skill to improve instruction quality
- Validate the updated skill behavior in Preview, including tool input handling and follow-up requirements
🧠 What is a skill?
Skills are reusable capabilities available to GitHub Copilot harness agents in Copilot Studio. Each skill provides focused guidance for a specific scenario, business process, or task by defining when it should be used, what information to collect, which tools to call, and how the agent should respond.
Skills are part of what distinguishes the GitHub Copilot harness from the other Copilot Studio harnesses:
- The standard harness uses topics, prompts, rules, and defined conversation paths for structured behavior.
- The Copilot chat harness focuses on extending Microsoft 365 Copilot Chat with enterprise knowledge.
- The GitHub Copilot harness can activate modular Skills as it reasons through complex, multi-step work.
Skills provide repeatable behavior for focused tasks inside an agent. They are also reusable and shareable: you can package a skill as a SKILL.md file or ZIP package and add it to other agents powered by the GitHub Copilot harness.
A troubleshooting process defined in a skill is a perfect fit: it's multi-step, judgment-driven, and should behave identically every time.
IMPORTANT
Skills run as part of the GitHub Copilot harness. Building, testing, evaluating, and using these agents can consume Copilot Credits through usage-based billing.
📄 Authoring Skills
Skills use a portable Markdown-based format. A SKILL.md file contains the following sections:
| Section | Purpose | What it should contain |
|---|---|---|
| Name | The skill's identity | A short, descriptive title that helps the model recognize when the skill is relevant. Example: IT Troubleshooting Procedure. |
| Description | The skill's trigger and intent | A concise summary of what the skill does and when it should be used. This helps the model decide whether to invoke the skill. Example: Guides employees through diagnose-fix-escalate steps for IT issues such as login, Wi-Fi, and device problems. |
| Optional frontmatter | Skill metadata and configuration | Structured YAML metadata such as author, version, tags, examples, dependencies, or other settings used for organization and governance. Not typically used for procedural instructions. |
| Instructions | The skill's execution logic | Detailed guidance the model follows after selecting the skill. This can include procedure steps, decision logic, tool usage instructions, validation rules, response formats, escalation paths, and success criteria. |
When a user submits a request, the GitHub Copilot harness evaluates the available skills and uses each skill's name and description to determine which one is relevant. When the harness activates a skill, its instructions guide the agent through that task. By separating specialized capabilities into reusable skills, builders can create agents that are more accurate, maintainable, and aligned to business requirements.
🧩 Principles for Effective Skill Instructions
1. Start with the Purpose
Begin by explaining what the skill does and when it should be used.
Example:
Troubleshooting Procedure

Use this procedure when an employee reports a technical issue and needs assistance diagnosing or resolving the problem.
This provides context before the model starts executing steps.
2. Use Clear Step-by-Step Actions
Break the process into logical, ordered steps.
Example:
## Steps

- **Understand the Issue** - Ask the employee to describe the problem if sufficient information has not already been provided.
  - What application or device is affected?
  - What error message are you seeing?
  - When did the issue start?
  - Can the issue be reproduced?
Avoid:
Help the employee resolve the problem.Specific instructions produce more consistent outcomes.
3. Define Decision Points
Tell the model what to do when different conditions occur.
Example:
- **Troubleshooting Decision Rules**
  - If an error message is provided, use it to identify relevant troubleshooting steps.
  - If no error message is available, ask follow-up questions to gather more information.
  - If the issue is resolved, confirm the solution and end the procedure.
  - If the issue cannot be resolved after available troubleshooting steps, recommend escalation.
Good instructions define:
- If
Xhappens, doY - Otherwise, do
Z
4. Specify Required Inputs
If information is required, state exactly what needs to be collected.
Example:
- **Troubleshooting Information** - Before starting diagnostics, collect:
  - Device type
  - Operating system
  - Application or service affected
  - Error message (if available)
  - Steps that reproduce the issue
This prevents the model from skipping important information gathering.
5. Define Tool Usage
When a skill uses actions or connectors, tell the model when and how to use them.
Example:
- **Use the `X` tool** - Only use information returned from the tool, do not invent troubleshooting steps
  - Retrieve troubleshooting procedures
  - Find known issues
  - Identify recommended fixes
Be explicit about parameters, field names, and expected inputs.
6. Describe the Expected Output
Specify how results should be presented to the user.
Example:
Present troubleshooting guidance using the following format.

| Step | Action |
| --- | --- |
| 1 | Verify network connectivity |
| 2 | Restart the affected application |
| 3 | Confirm whether the issue persists |
Included:
- Clear actions
- Expected outcomes
- Next steps if the action fails
Without output instructions, responses may become inconsistent.
7. Include Validation Rules
Define what constitutes valid information and successful completion.
Example:
- Only present troubleshooting steps returned from approved sources.
- Do not recommend fixes that are not documented.
- Verify whether each step resolved the issue before proceeding.
- Do not assume the issue is resolved unless the employee confirms it.
Validation rules help prevent hallucinations and incorrect recommendations.
8. Define Scope and Boundaries
Tell the model what it can and cannot do.
Example:
This procedure only supports troubleshooting approved enterprise applications and devices.
Do not:
- Perform account administration tasks
- Reset passwords
- Approve software requests
- Answer unrelated HR or policy questions
Scope boundaries help keep the agent focused and predictable.
9. Include Escalation Paths
Tell the model what to do when it cannot continue.
Example:
If the issue remains unresolved after all available troubleshooting steps:
- Recommend escalation to the IT Help Desk.
- Provide a concise summary including:
  - Device or application affected
  - Symptoms reported
  - Troubleshooting steps attempted
  - Results of each step
This ensures a smooth handoff to support teams.
10. Define Success Criteria
Explain when the procedure is considered complete.
Example:
The troubleshooting procedure is complete when:

- The issue is resolved and confirmed by the employee, or
- The issue is escalated with a complete support summary
Clear success criteria tell the model when to stop.
TIP
For Copilot Studio skills specifically, the strongest instructions are usually those that answer four questions clearly:
- When should this skill be used?
- What information must be collected?
- What actions or tools should be called?
- What should the final response look like?
If those four areas are well-defined, the skill tends to behave much more consistently.
🧪 Lab 06 - Add the skills
In this lab, you will extend the agent you created in Mission 04 - Build an agent with the GitHub Copilot harness by creating a series of custom skills.
✨ Use case
As an employee
I want to get quick and accurate IT support for common issues and device requests
So that I can stay productive and resolve technical issues faster
Prerequisites
- Contoso IT Concierge - the agent created in Mission 04 - Build an agent with the GitHub Copilot harness.
6.1 Create a device request skill and test
The first skill we're going to create is one to handle device requests. We'll take an iterative approach showing how to test and refine a skill.
Download the skill package using the button below.
Download
device-guidance-v1-0-1.zipand extract it.If you have issues with downloading the zip file, the original SKILL.md files are available in the Agent Academy repository.
In the Build tab of your agent, select the Add + button next to the Skills section.
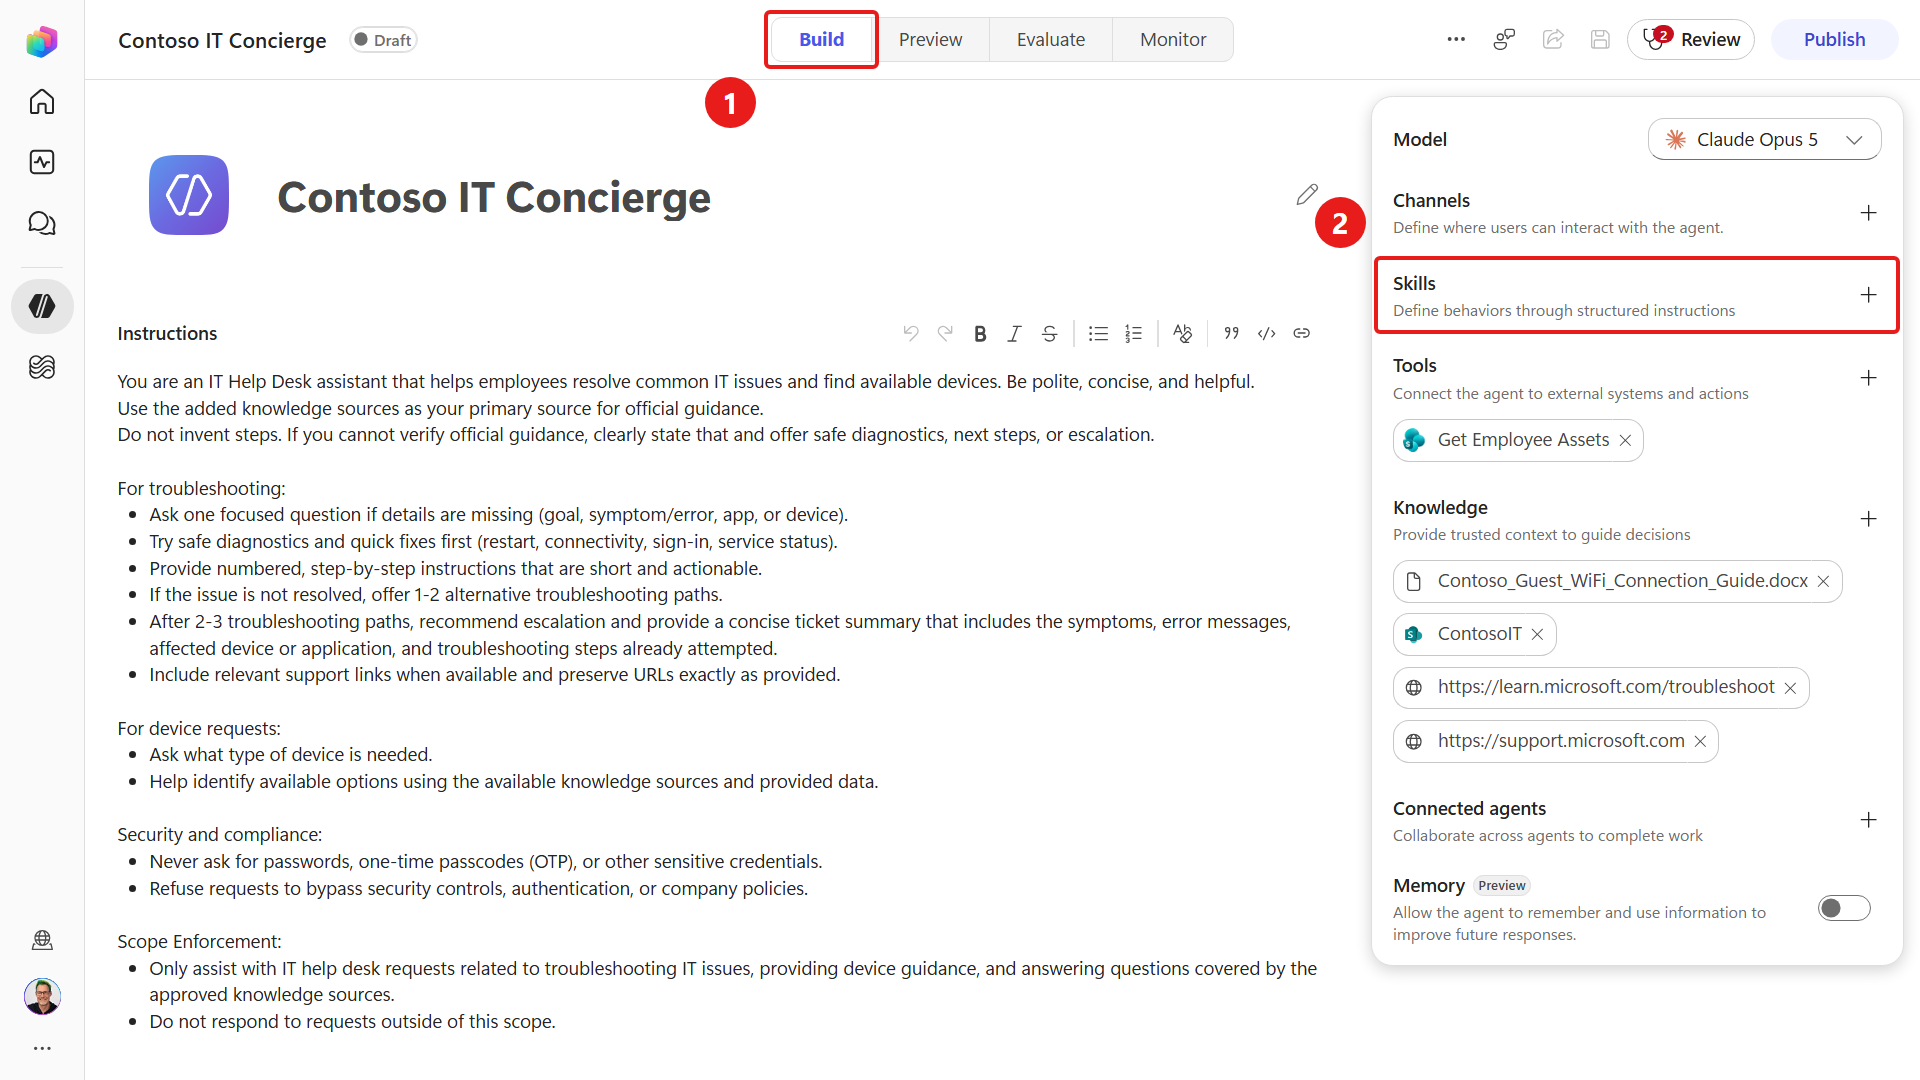
Select Upload a skill from the Skills menu. In the upload dialog, drag and drop the extracted
SKILL.mdfile, or locate the file and upload it.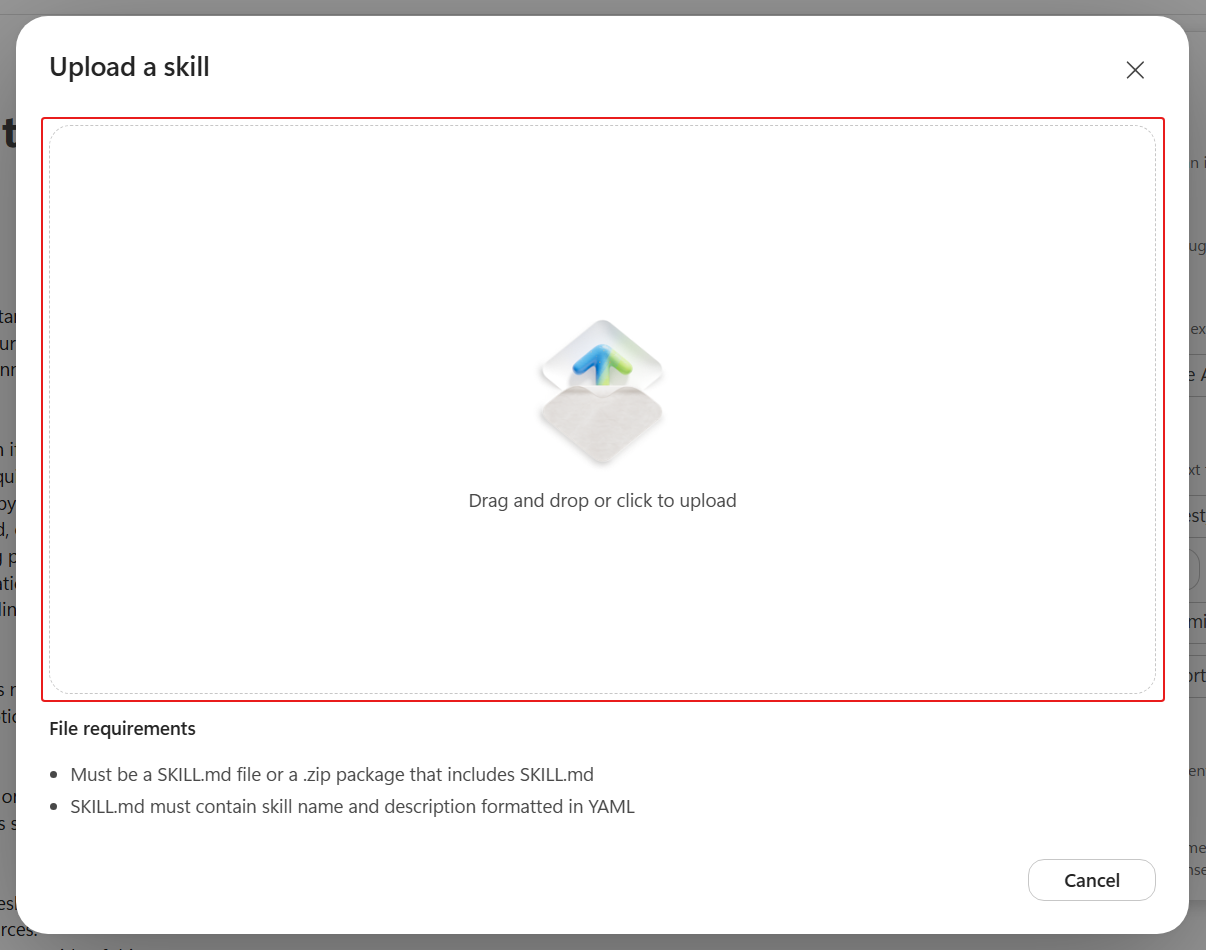
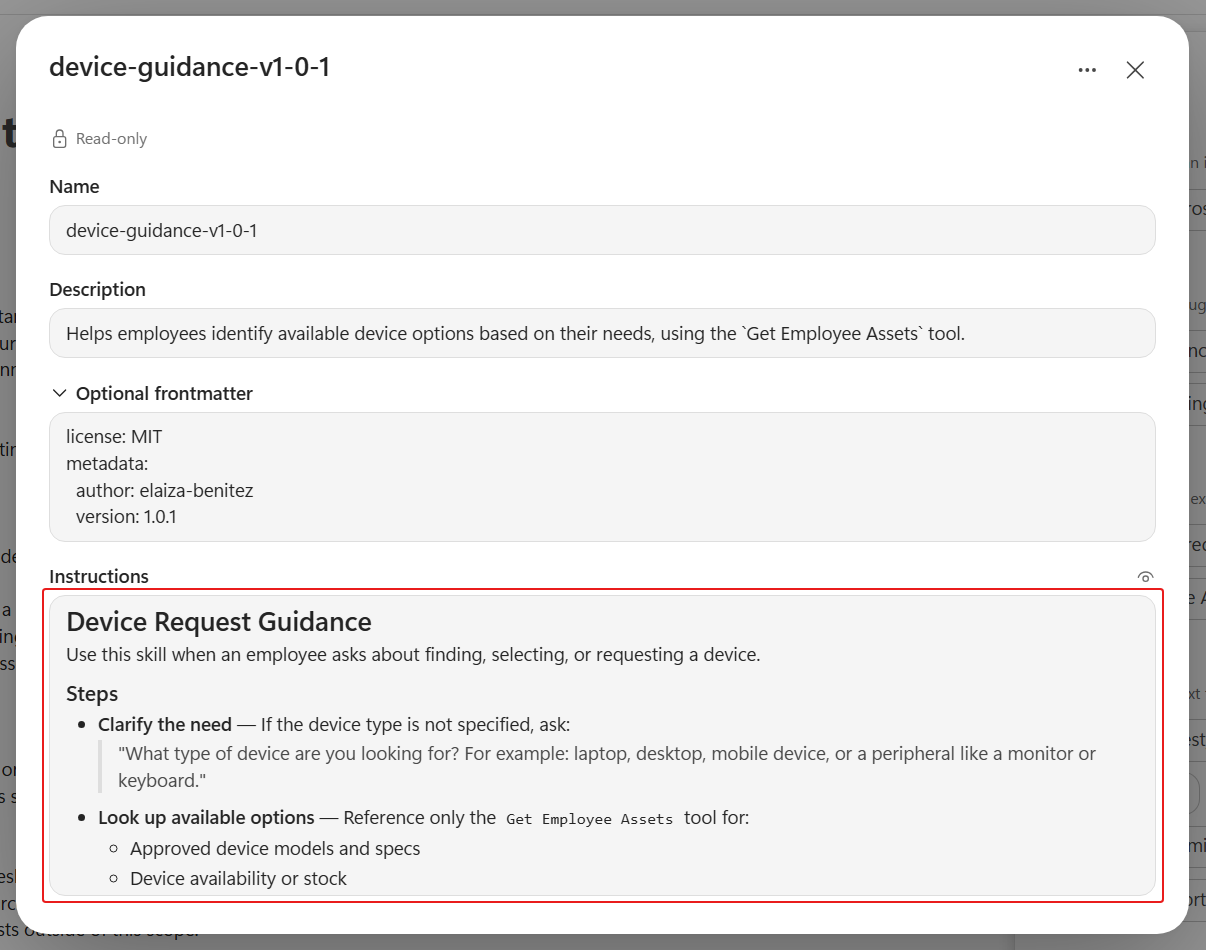
The skill will then be uploaded. Select the skill in the right-hand panel to review the instructions.
- The description references the name of the tool
- The instructions outline steps including
- the purpose and trigger
- clear step-by-step actions, including aligning the selected device option to the corresponding SharePoint Item ID
- tool usage where the
Get Employee Assetstool is referenced - expected output that outlines the format of the response
- validation rules
- exception and escalation paths
- success criteria
Select the X icon when you're done reviewing to close the skill.
Reminder of the skill structure
A skill consists of four main components.
- The
Nameidentifies the skill. - The
Descriptiontells the model when the skill is applicable. - The
Optional Frontmatterstores metadata and configuration information. - The
Instructionscontain the operational workflow the model follows to complete the task.
Together, these components help the model determine when to use the skill and how to execute it correctly.
Next, update the agent instructions to explicitly reference the skill for device requests. Under the
For device requests:heading, delete the existing bullet points.Copy and paste the following text as a new bullet point under the
For device requests:heading.textRefer to the `device-guidance-v1-0-1` skillSave the agent.
NOTE
You can test saved changes in Preview without publishing. The next turn should use the updated configuration. If changes do not appear after a couple of turns, select New chat and verify that the intended skill was saved. See Test an agent.
These version checks name the skill explicitly so you can verify that the intended version loads. This is a Preview testing technique: end users do not need to know or enter the skill name or version. Test automatic skill selection separately with a natural request such as "I need a laptop"; a successful explicit invocation does not prove automatic routing.
Select Preview at the top center of the agent and select New chat to test the updated skill.
First load the skill without running its procedure:
textLoad only the device-guidance-v1-0-1 skill and confirm its name and purpose. Do not run its procedure, read or change business data, create files, or call other tools. If it is unavailable, say so without using a substitute.Check the trace for the exact skill. If it is unavailable, verify the saved skill and retry the availability check after the saved configuration has settled.
In that same conversation, copy and paste the following text and submit it to the agent.
textUse the device-guidance-v1-0-1 skill. I need a laptop.Confirm the skill was loaded in this conversation and the laptop lookup calls Get Employee Assets. The runtime can reuse the skill loaded by the preceding availability check.
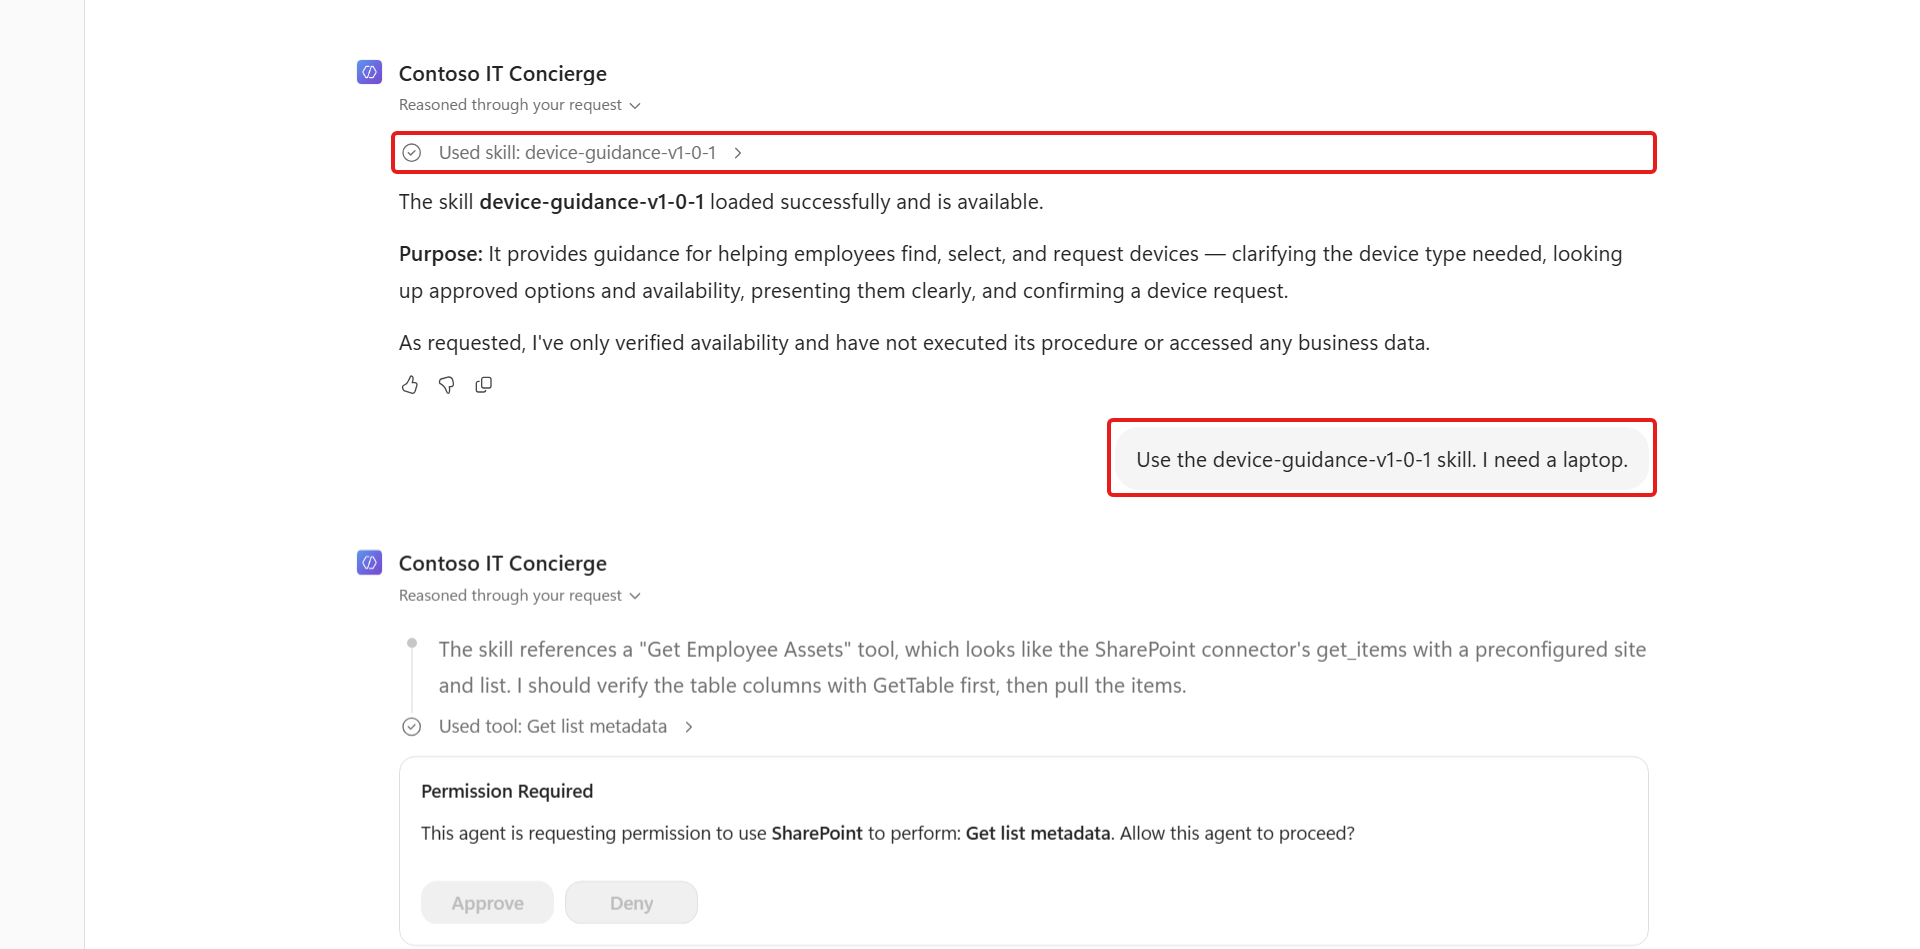
If the model guesses a SharePoint column name that doesn't exist, the tool can return a query error. The model may recover by retrying with the correct internal column name, such as
field_4for the Asset Type column, but the exact recovery path can vary between conversations.The agent then displays the available laptops from the SharePoint list.
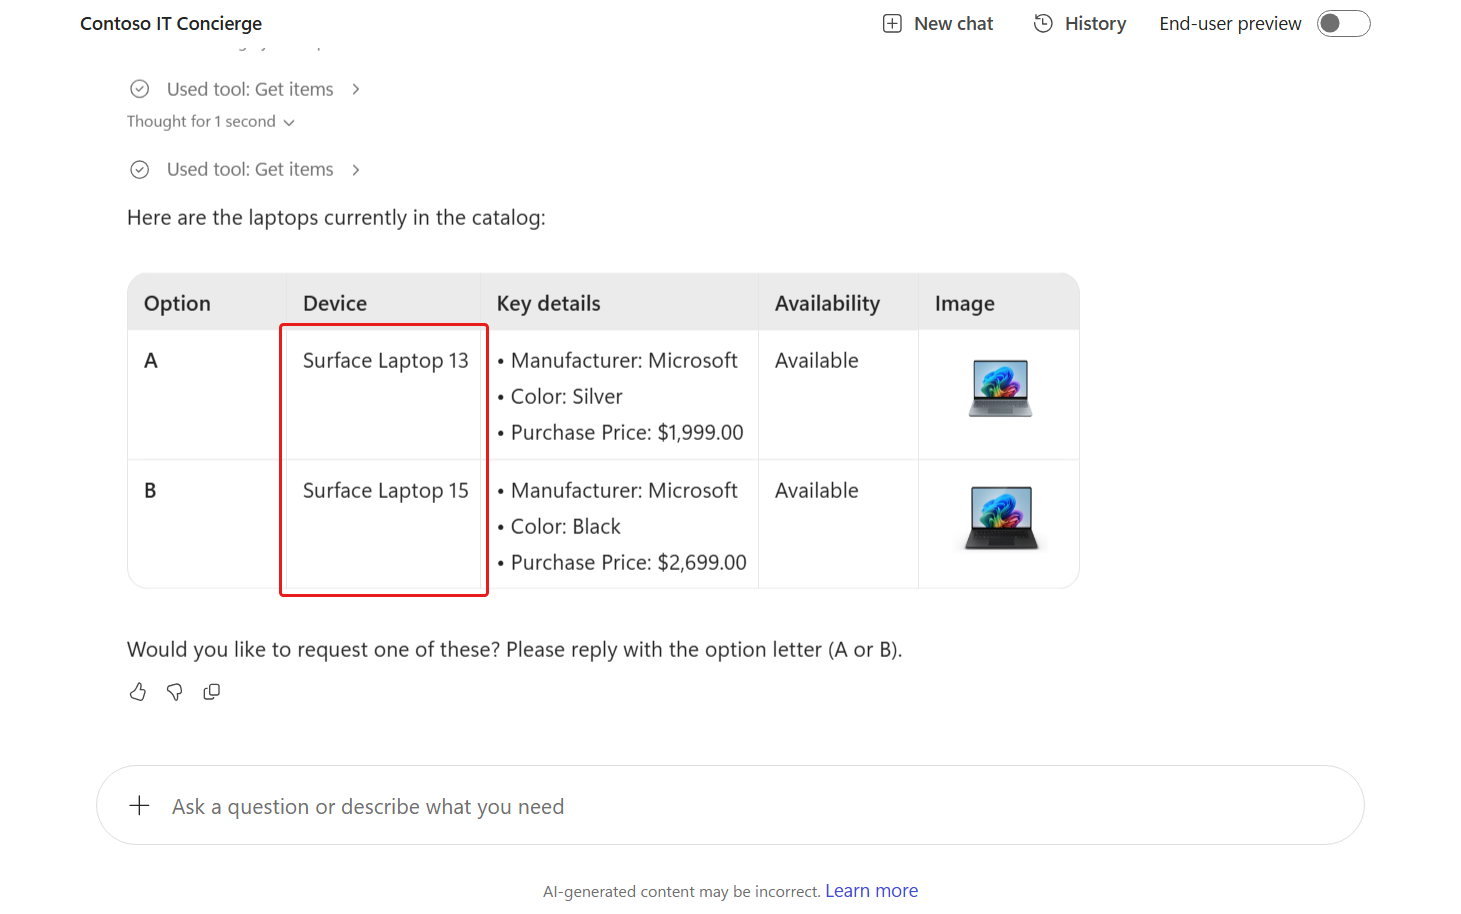
Regardless of whether you encountered an error, refine the skill inputs. As you learned in the Define Tool Usage principle, effective skill instructions should explicitly define parameters, field names, and expected inputs.
Download the skill package using the button below.
Download
device-guidance-v1-0-2.zipand extract it.In the Build tab, select the
device-guidance-v1-0-1skill, select the ellipsis, select Replace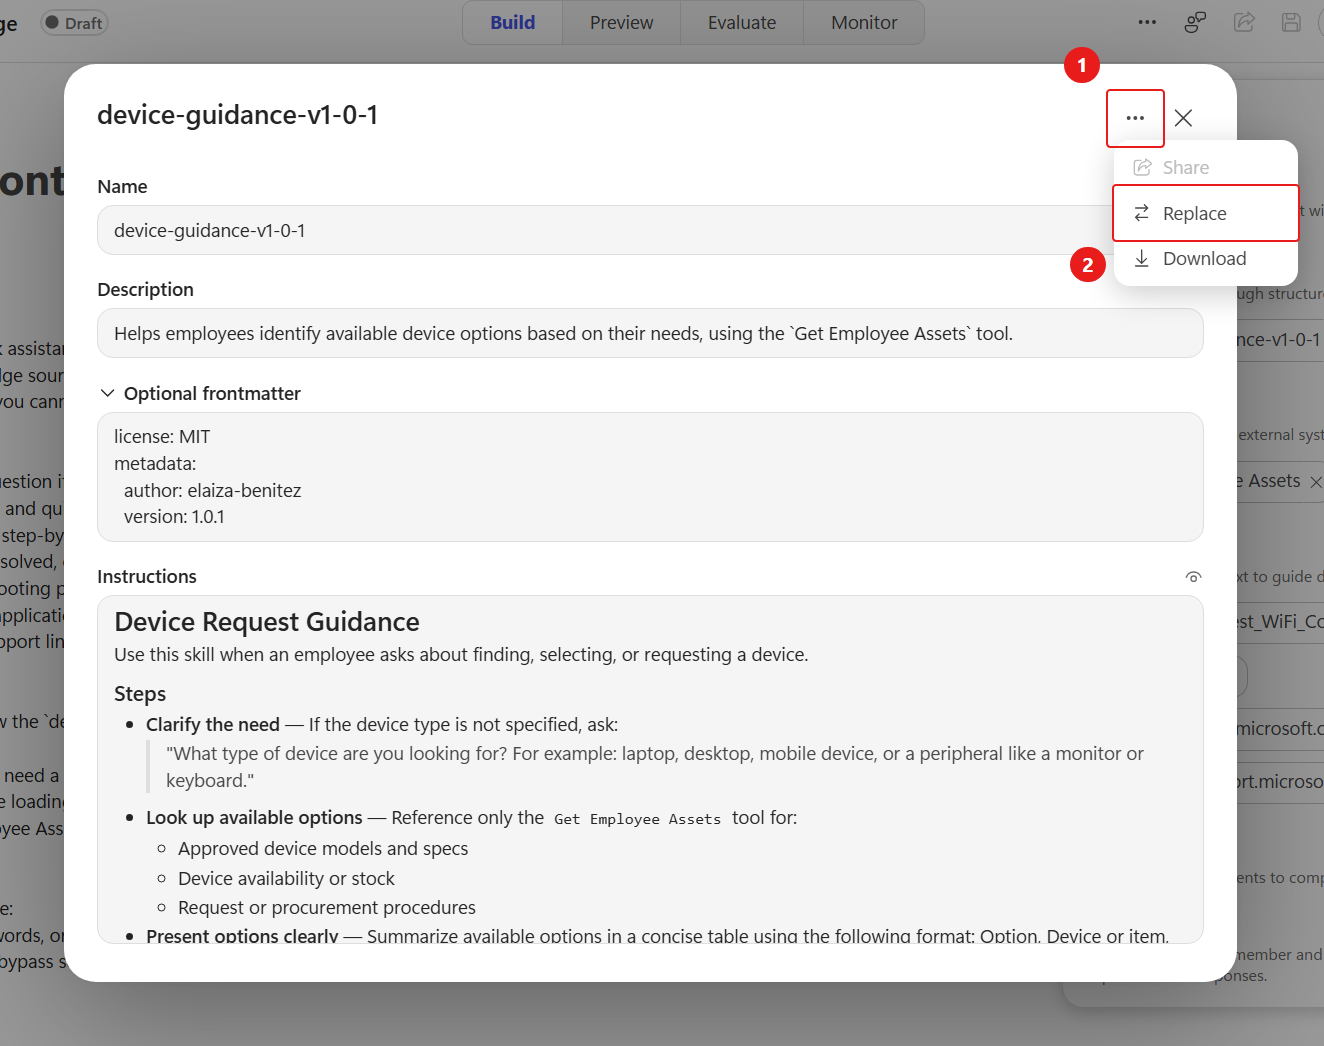
Upload the extracted
SKILL.mdfile into the agent.The updated skill now explicitly maps SharePoint display names to their internal column names. This prevents the model from guessing field names and ensures OData filters use valid columns, such as
field_4for the Asset Type column. It also includes an example showing how to construct a filter correctly.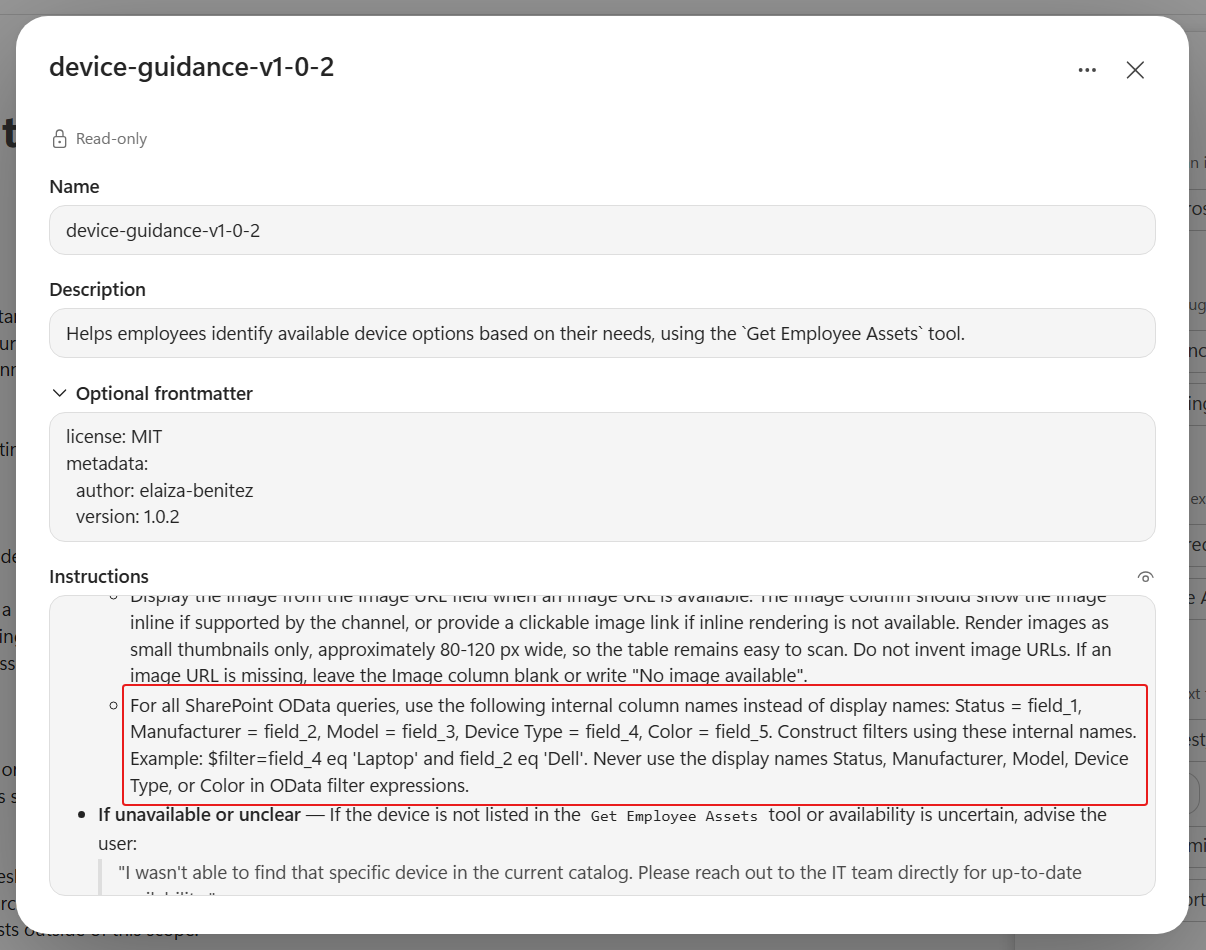
How to find the SharePoint column schema name
In your SharePoint list, select the Settings icon, and then select List settings.
Under Columns, select the column whose internal name you want to find, such as Asset Type.
In the edit-column page URL, locate the
Fieldquery parameter. For example:text.../FldEdit.aspx?List={LIST-ID}&Field=field%5F4
The value of
Fieldis the column's internal schema name. SharePoint URL-encodes_as%5F, soField=field%5F4corresponds to the internal namefield_4. Use this internal name when constructing the OData filter query.Next, update the agent instructions to reference the updated skill. Replace the bullet point under the
For device requests:heading with the following text.textRefer to the `device-guidance-v1-0-2` skillSave the agent.
Test the updated skill by navigating to Preview. Start a new chat and repeat the availability check above using
device-guidance-v1-0-2.Keep that verified conversation. Copy and paste the following text and submit it to the agent.
textUse the device-guidance-v1-0-2 skill. I need a laptop.Expand the skill details in this conversation and confirm that
device-guidance-v1-0-2is referenced. Also check that the lookup used Get Employee Assets, not a knowledge-source copy of the inventory.The error should no longer appear because the updated skill instructions guide the model to use the correct tool inputs when constructing the filter query.
In this test, respond to the agent by providing the device option you want to proceed with.
Copy and paste the following text and submit it to the agent.
textA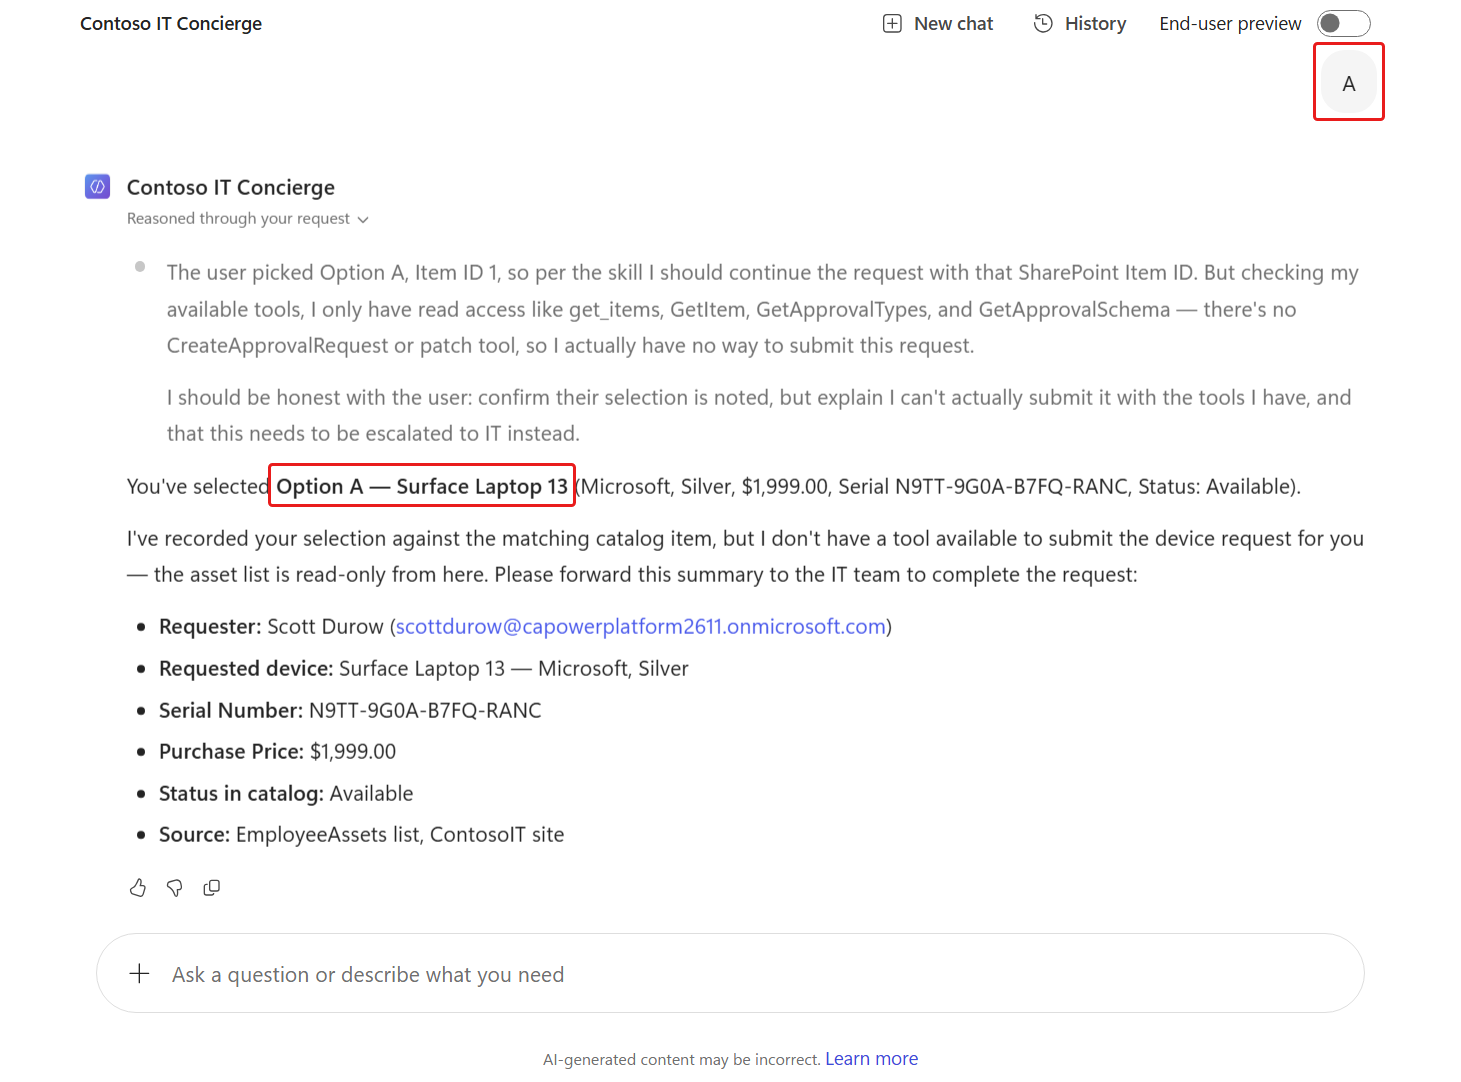
Following the skill instructions, the agent summarizes the device selection in its response.
We're not done refining the skill yet. If a user wants to provide an additional comment as part of the request, that behavior also needs to be captured in the skill instructions. Let's update the skill again.
Download the skill package using the button below.
Download
device-guidance-v1-0-3.zipand extract it.Repeat the same steps to replace the skill:
- In Build, select the
device-guidanceskill - Select the ellipsis icon and select Replace
- Upload the extracted
SKILL.mdfile into the agent
The updated skill now instructs the agent to ask about additional device requirements after the user selects an option. It captures specifications such as RAM or storage capacity and includes them in the device request. In the next mission, you'll pass this information into a workflow for the
Contoso IT Conciergeagent.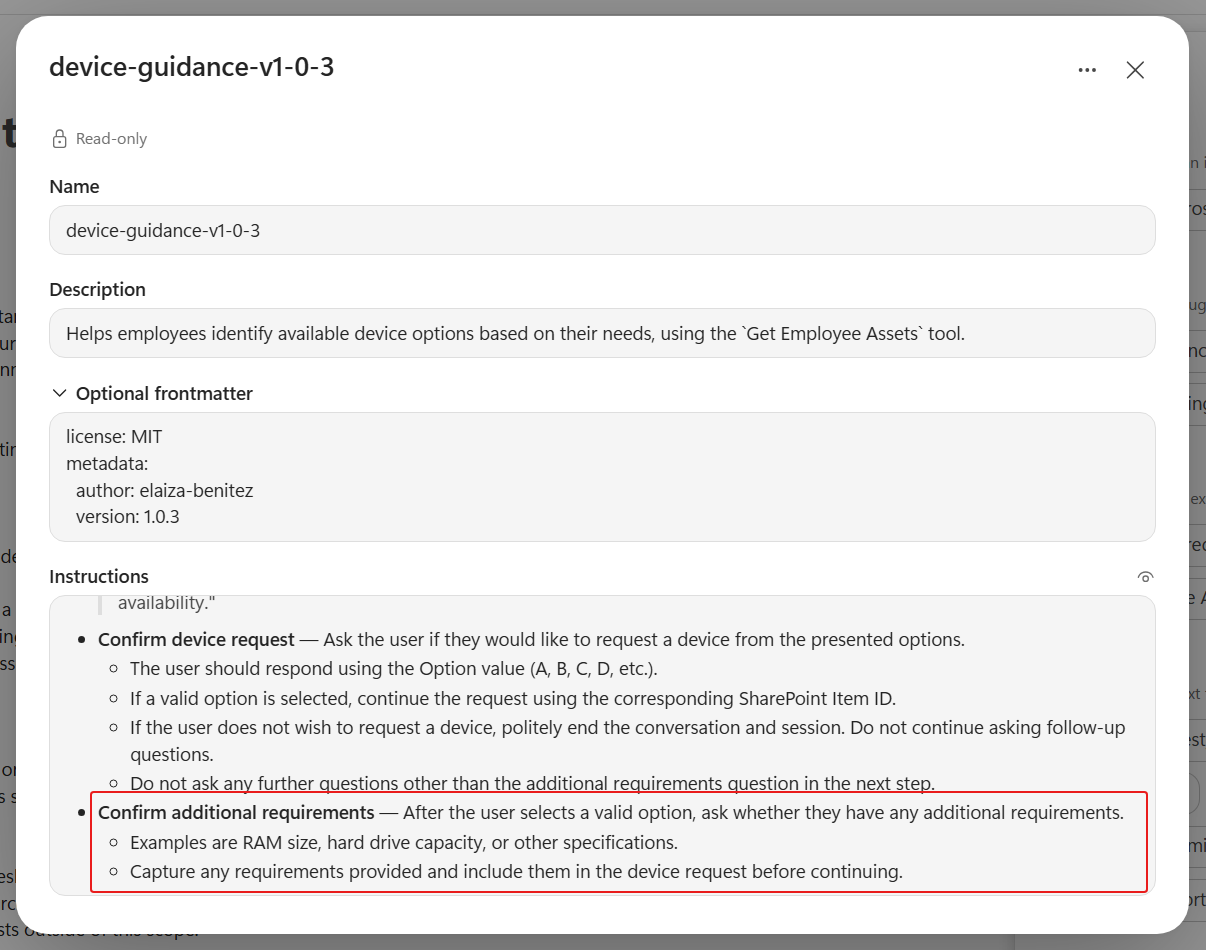
- In Build, select the
Next, update the agent instructions to reference the updated skill. Replace the bullet point under the
For device requests:heading with the following text.textRefer to the `device-guidance-v1-0-3` skillSave the agent.
Test the updated skill by navigating to Preview. Start a new chat and repeat the availability check above using
device-guidance-v1-0-3.Keep that verified conversation. Copy and paste the following text and submit it to the agent.
textUse the device-guidance-v1-0-3 skill. I need a laptop.Expand the skill details in this conversation and confirm that
device-guidance-v1-0-3is referenced. Also check that the lookup used Get Employee Assets.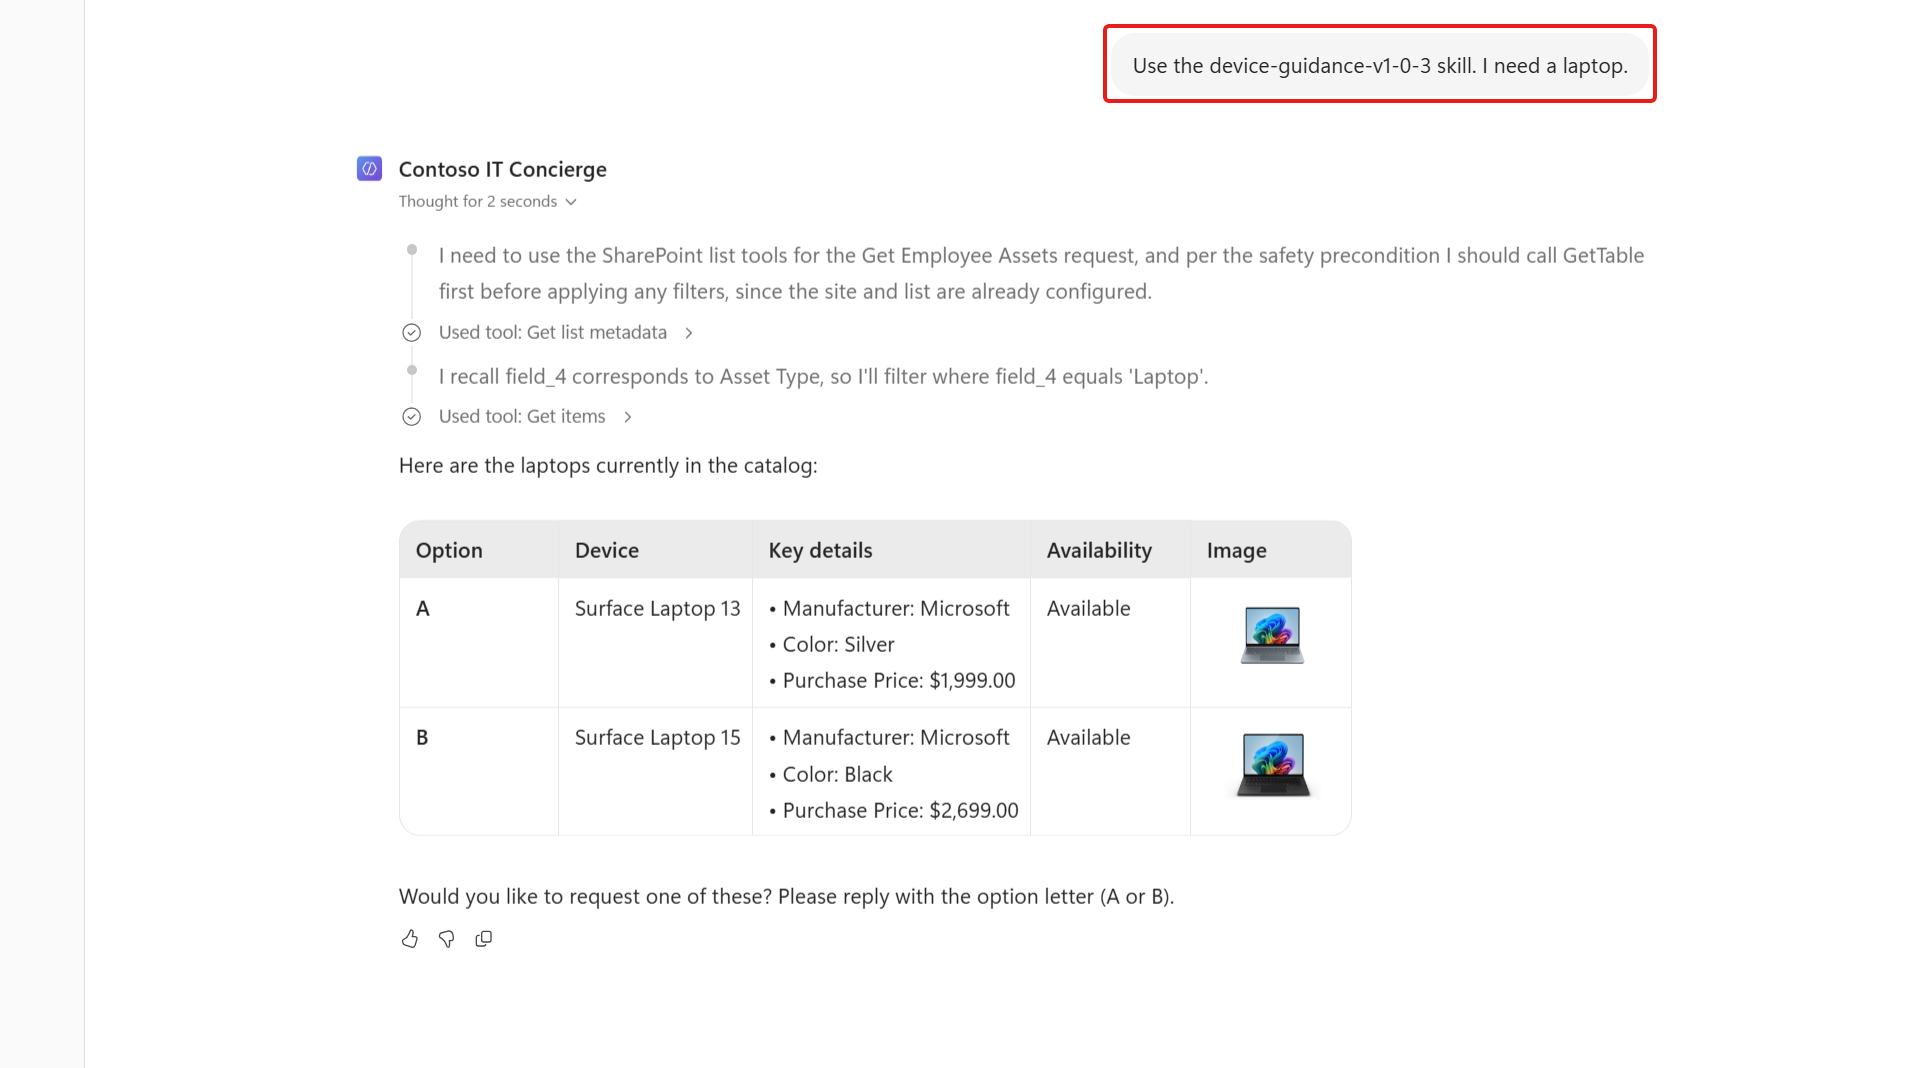
In the response, copy and paste the following text and submit it to the agent.
textAThe agent responds by next asking the user for any additional requirements they may have for their device.
Copy and paste the following text and submit it to the agent.
text16GB of RAMThe agent responds by summarizing the selected device and the additional requirement.
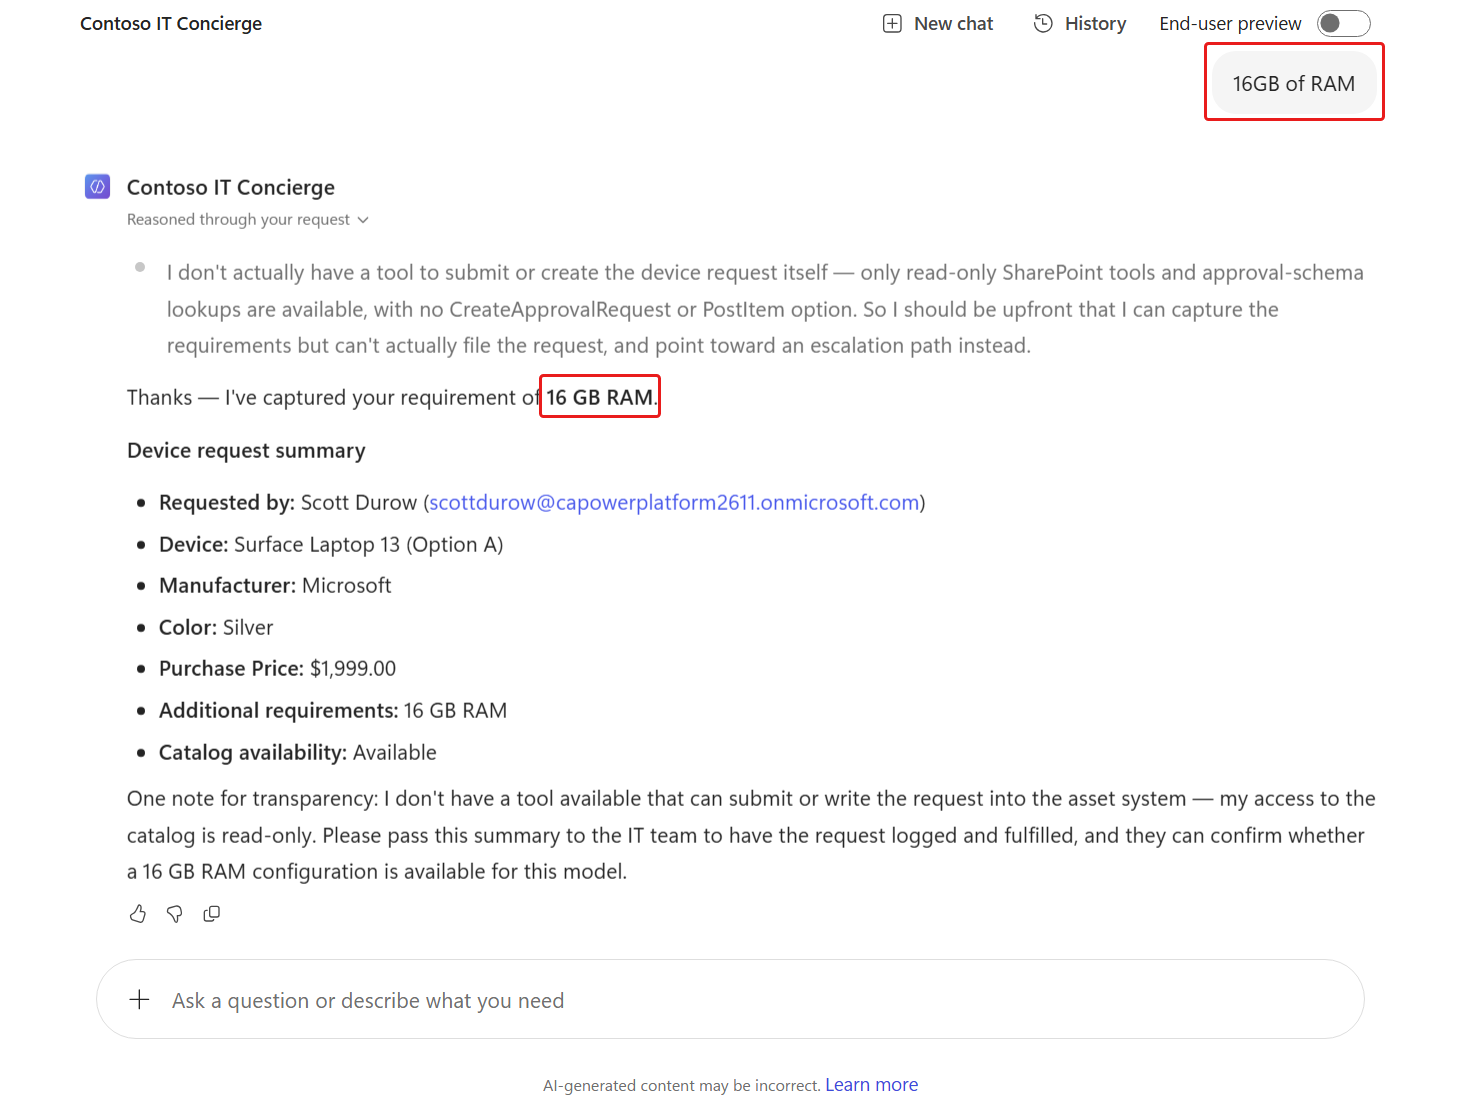
Notice that the agent can't complete the device request because it hasn't been configured to submit requests. In the next mission, you'll add a workflow that enables the agent to proceed with submitting the device request.
6.2 Create a troubleshooting skill and test
Now we'll work on a separate skill that specializes in troubleshooting issues.
To use the troubleshooting skill, download the skill package using the button below.
Download
it-troubleshooting-procedure.zipand extract it.In the Build tab of your agent, select the Add + button next to the Skills section.
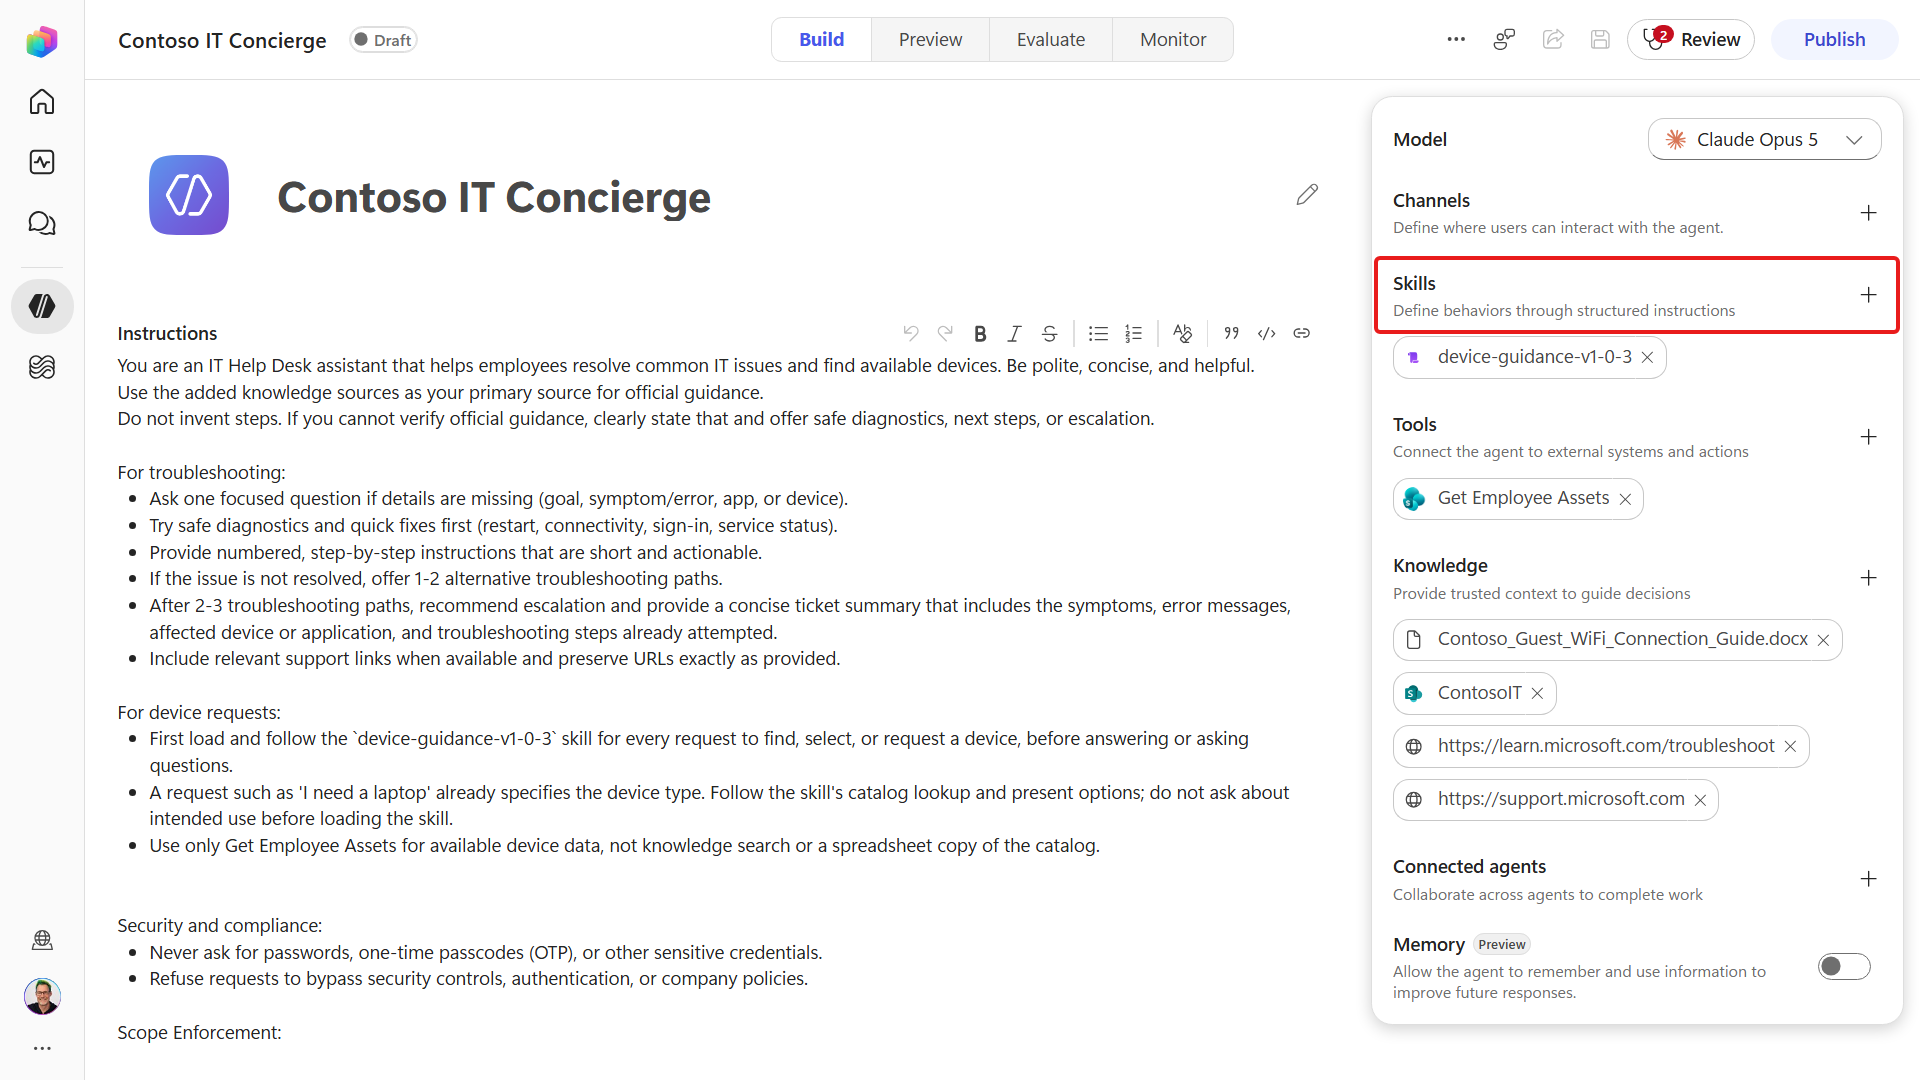
Select Upload a skill from the Skills menu. In the upload dialog, drag and drop the extracted
SKILL.mdfile, or locate the file and upload it.The skill will then be uploaded. Select the skill in the right-hand panel to review the instructions.
Select the X icon when you're done reviewing to close the skill.
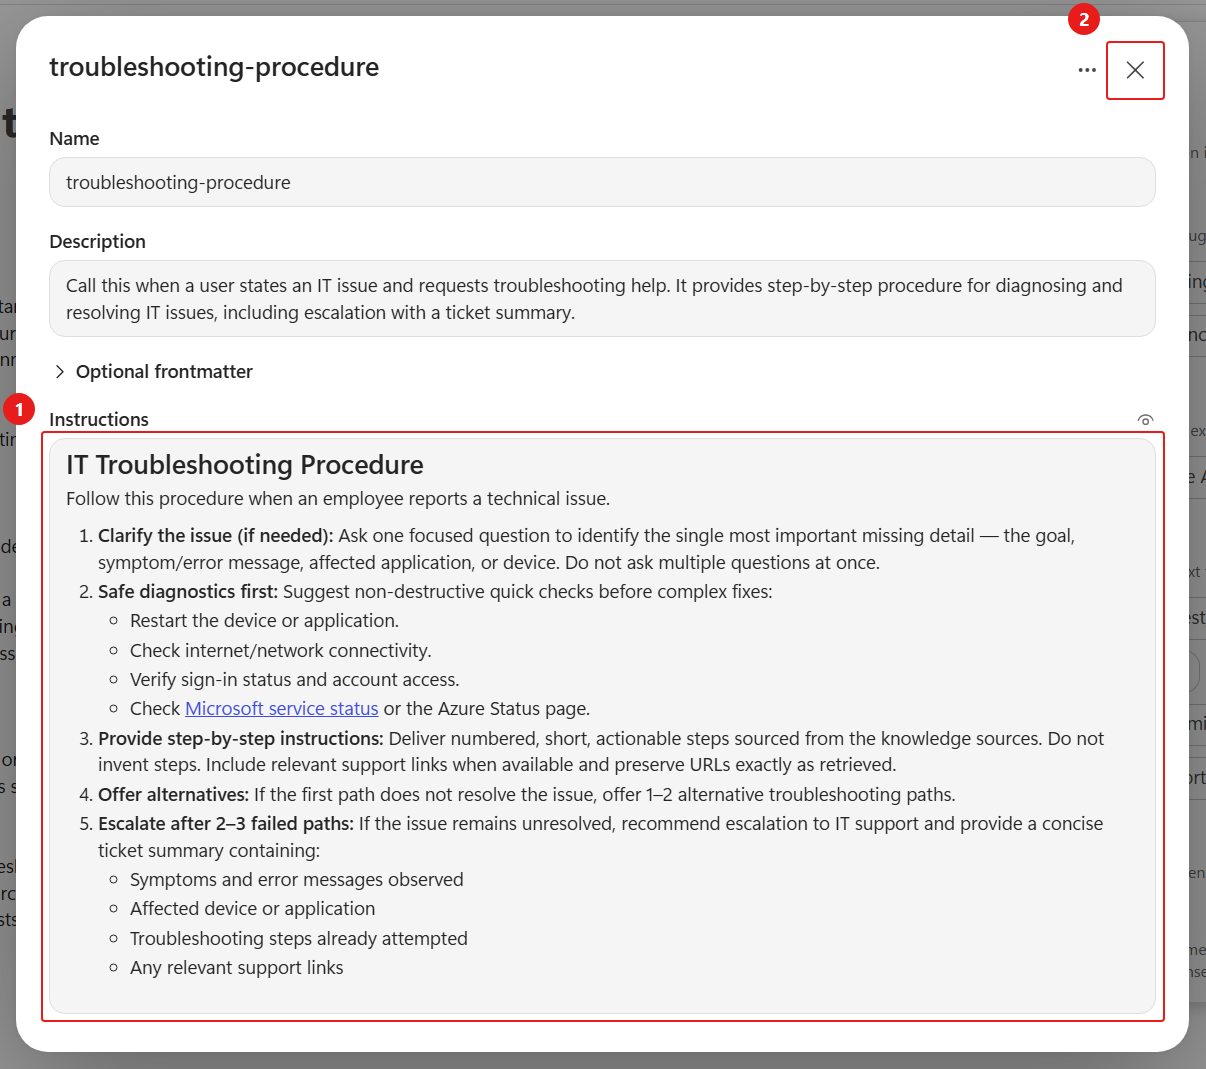
Reminder of the skill structure
A skill consists of four main components.
- The
Nameidentifies the skill. - The
Descriptiontells the model when the skill is applicable. - The
Optional Frontmatterstores metadata and configuration information. - The
Instructionscontain the operational workflow the model follows to complete the task.
Together, these components help the model determine when to use the skill and how to execute it correctly.
- The
Next, update the agent instructions to reference the updated skill. Replace the bullet point under the
For troubleshooting:heading with the following text.textRefer to the `troubleshooting-procedure` skillSave the agent.
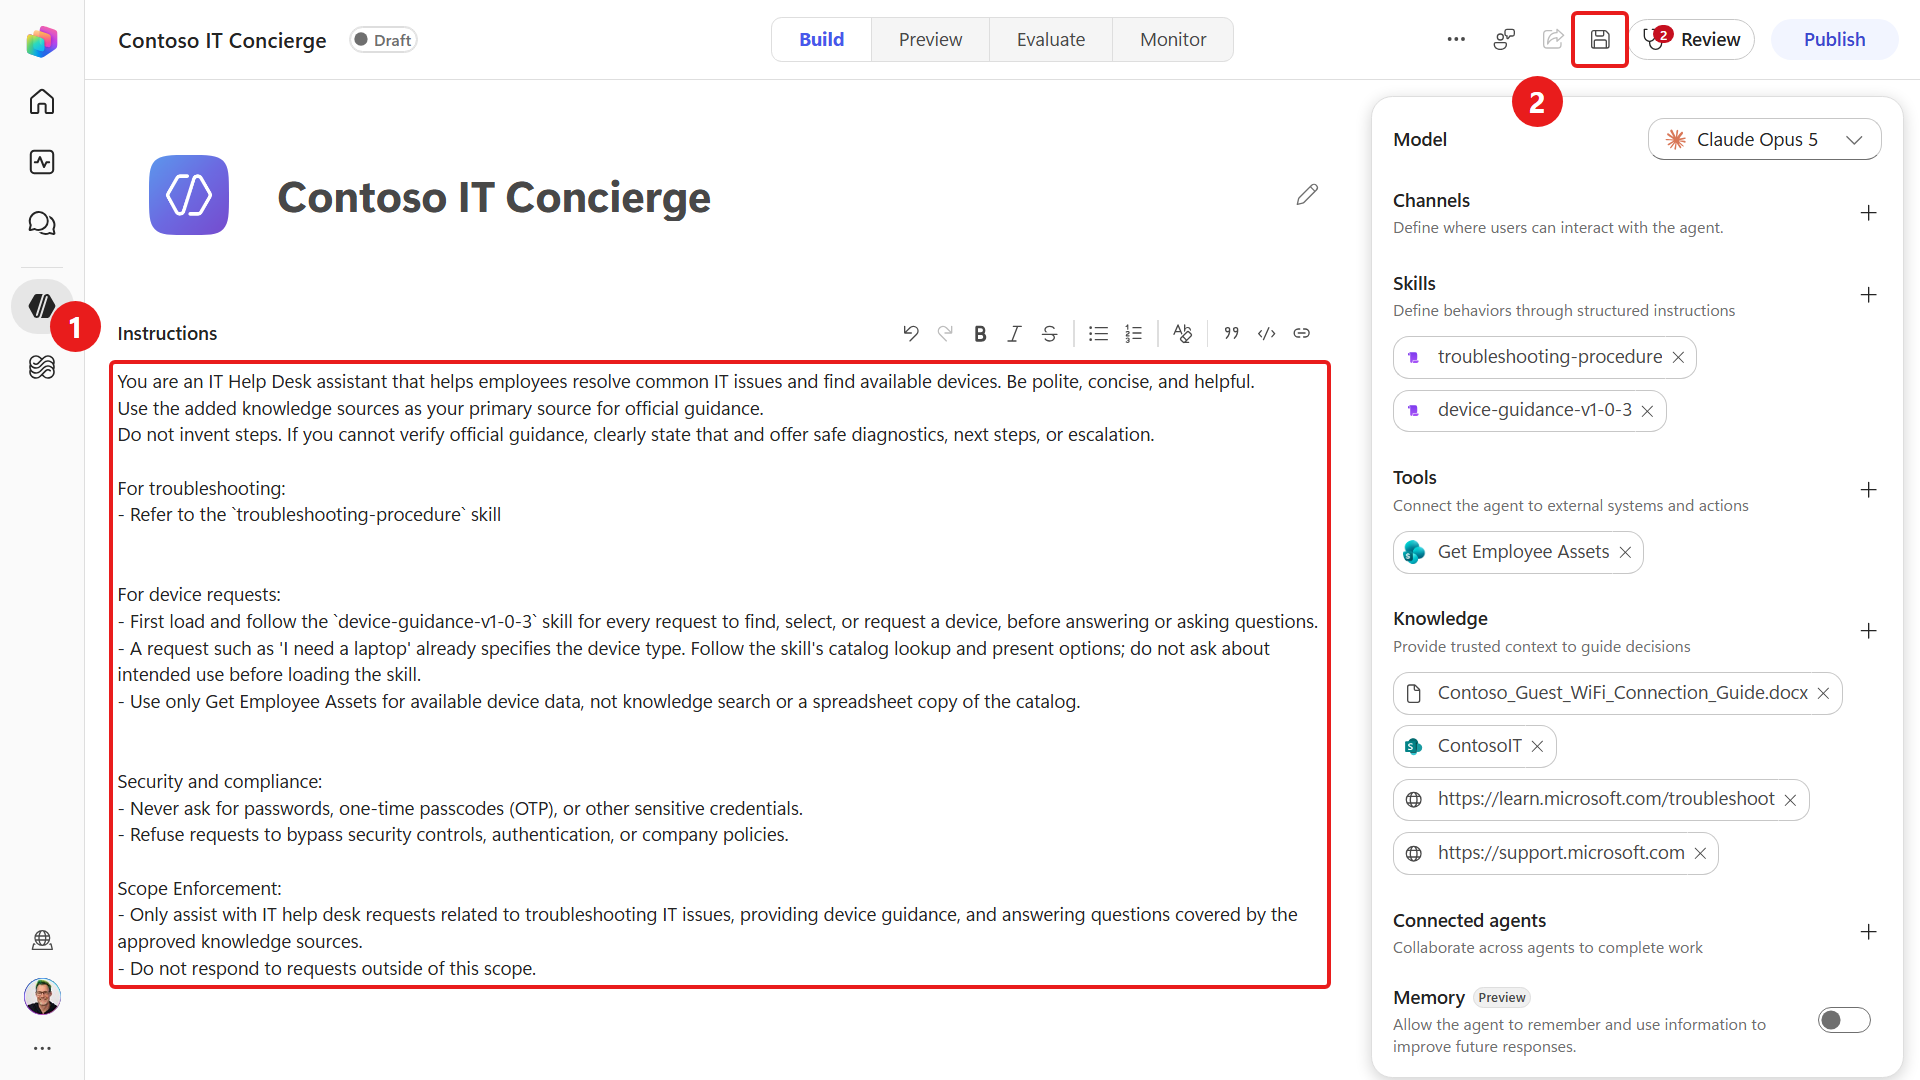
Select Preview at the top center of the agent to test the updated skill.
Copy and paste the following text and submit it to the agent.
textI'm not getting new emails anymoreThe agent invokes the skill. Expand the skill details and confirm that
troubleshooting-procedureskill is referenced.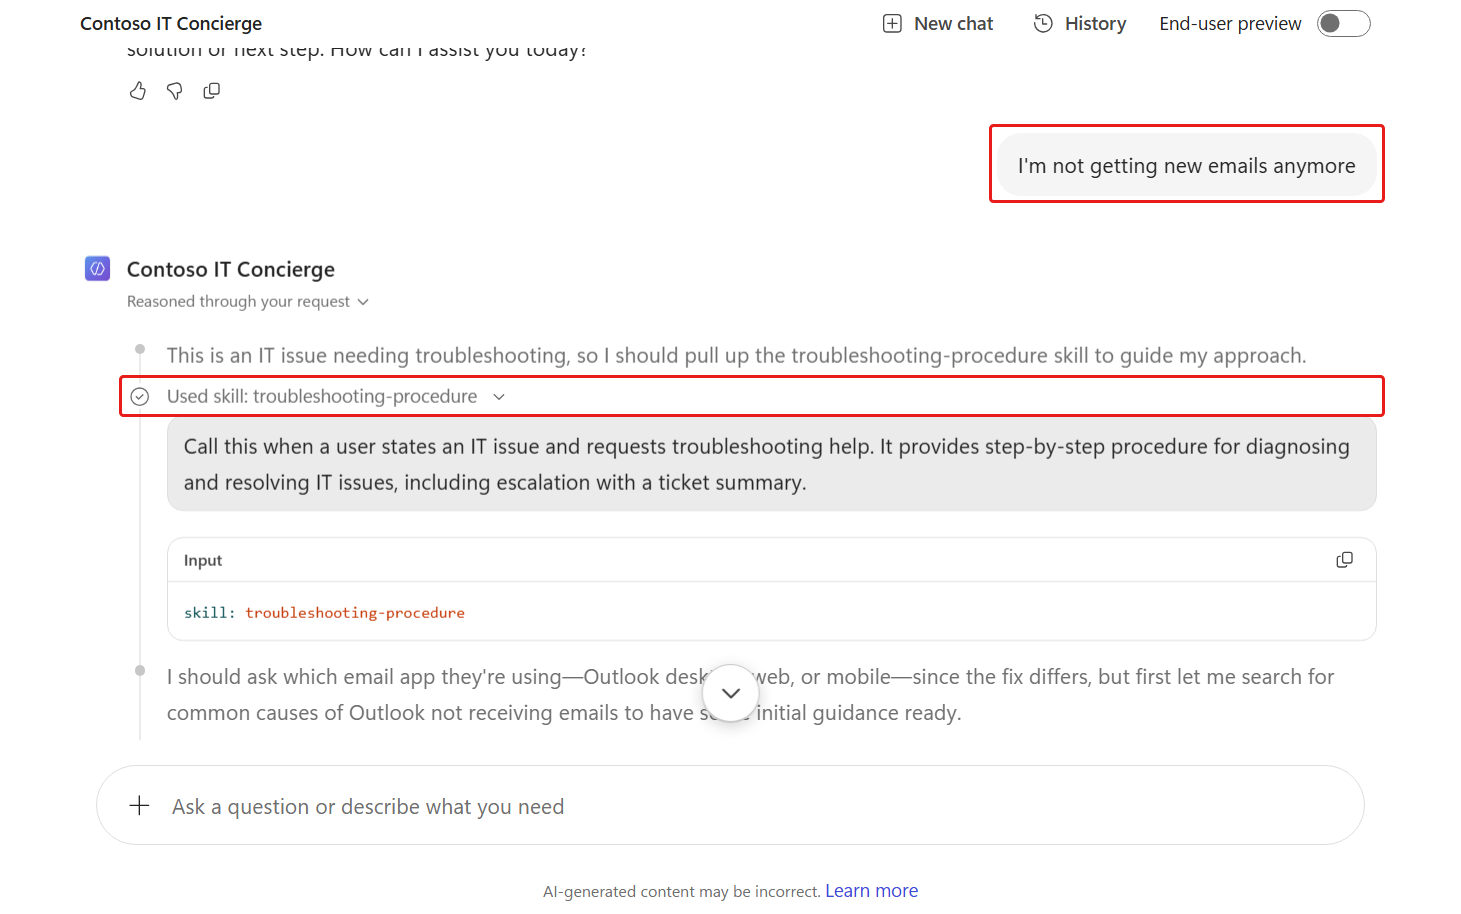
The agent asks a follow-up question.
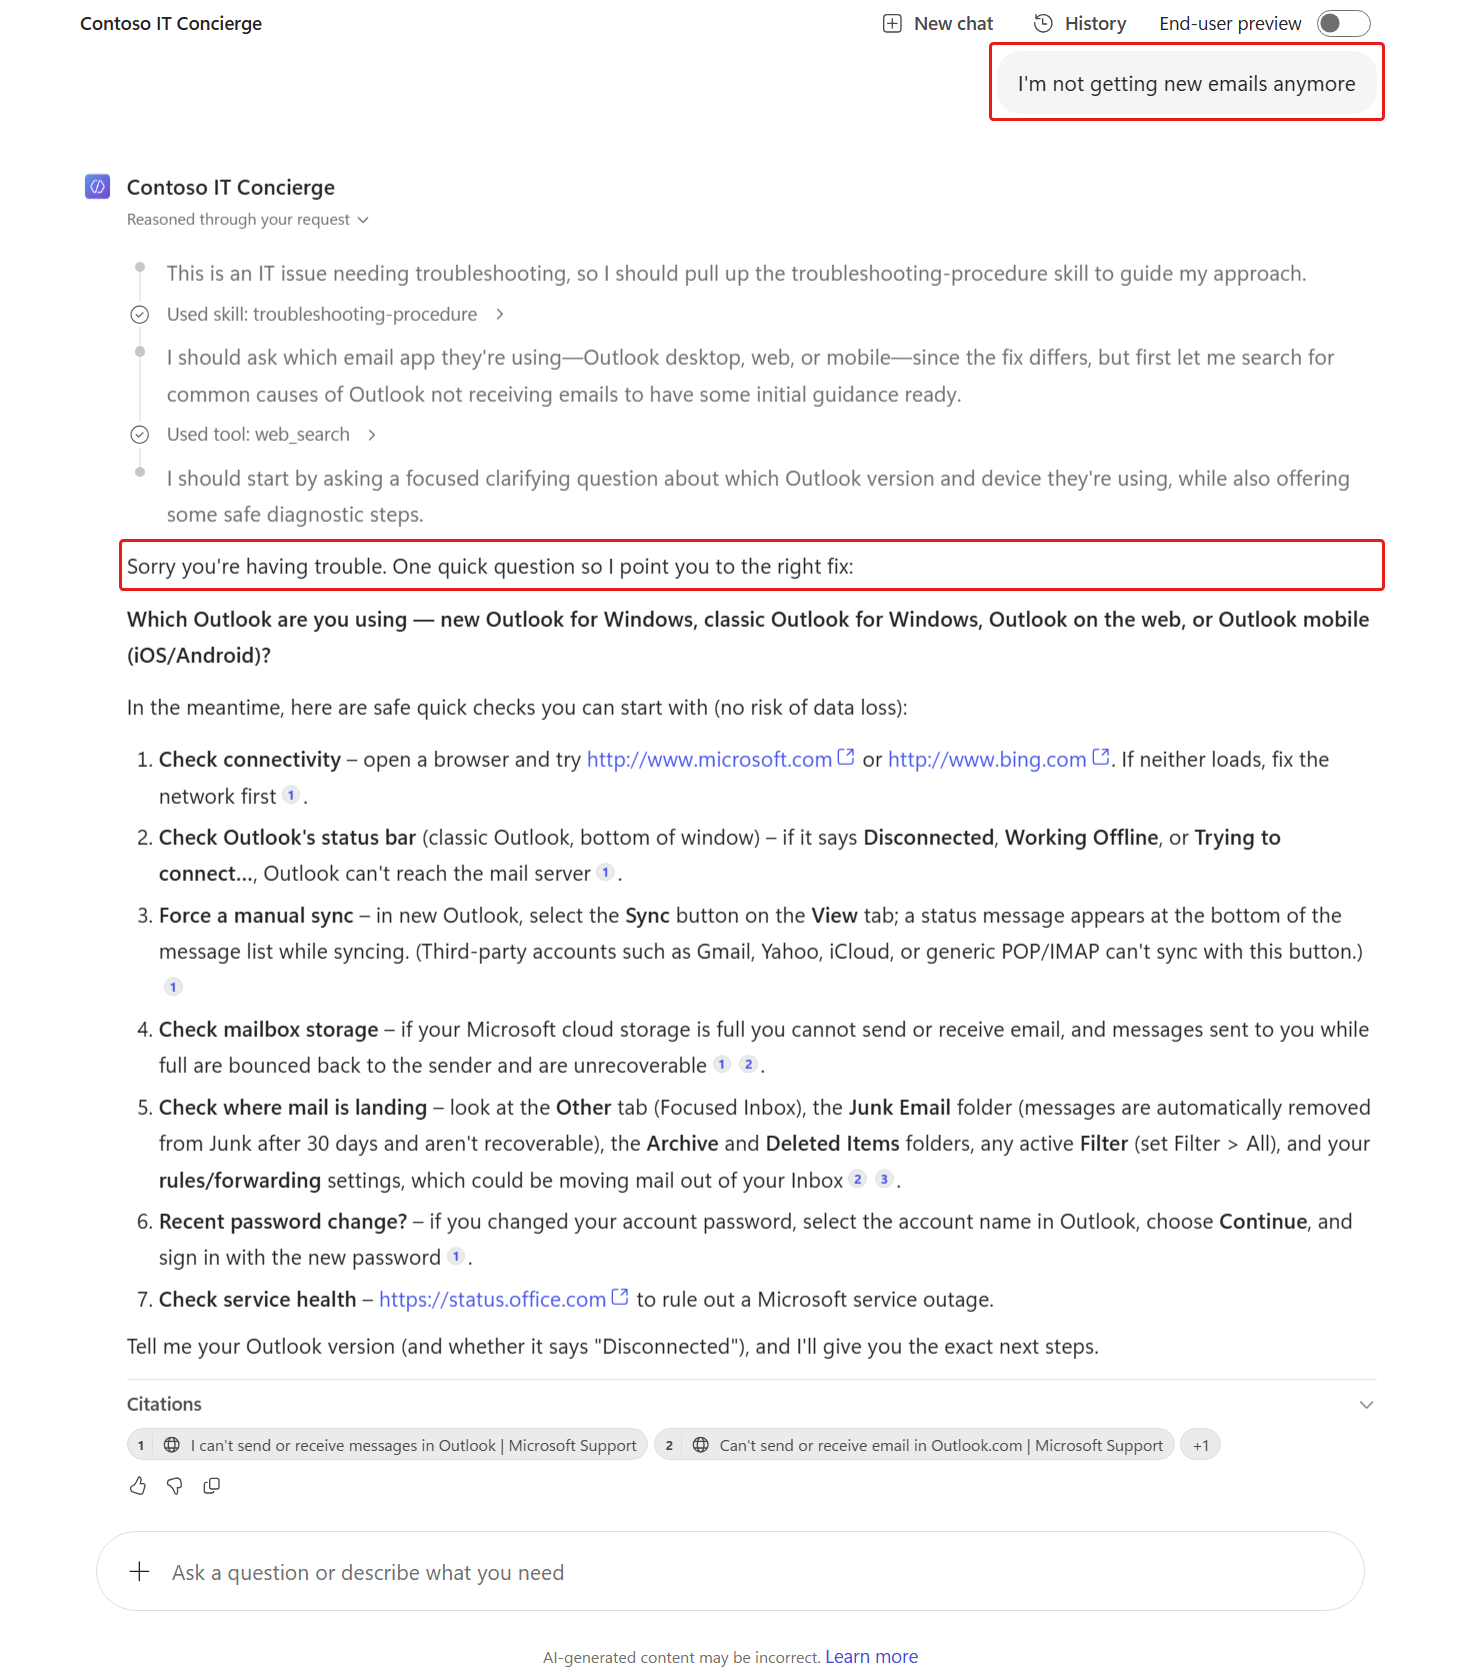
In this test, respond with the following:
textHappening on both outlook on windows and outlook mobile on my ios device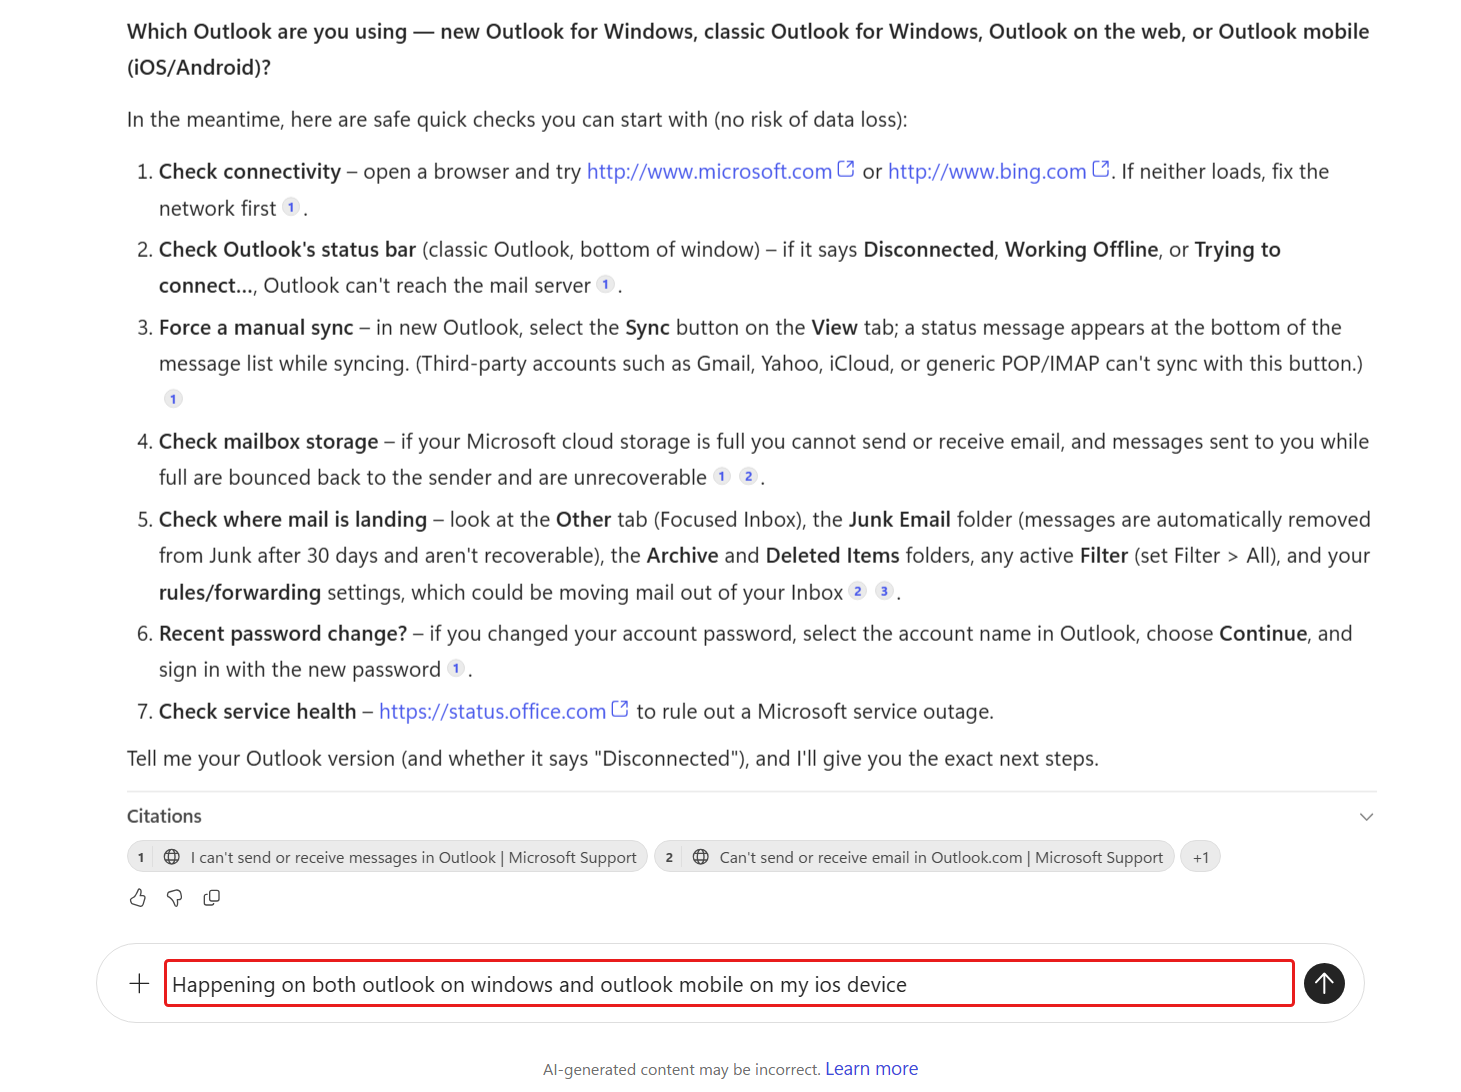
Following the skill instructions, check that it responds with a numbered list of troubleshooting steps to try and asks another follow-up question. Reply with the following:
textThe Windows Outlook status bar is showing working offline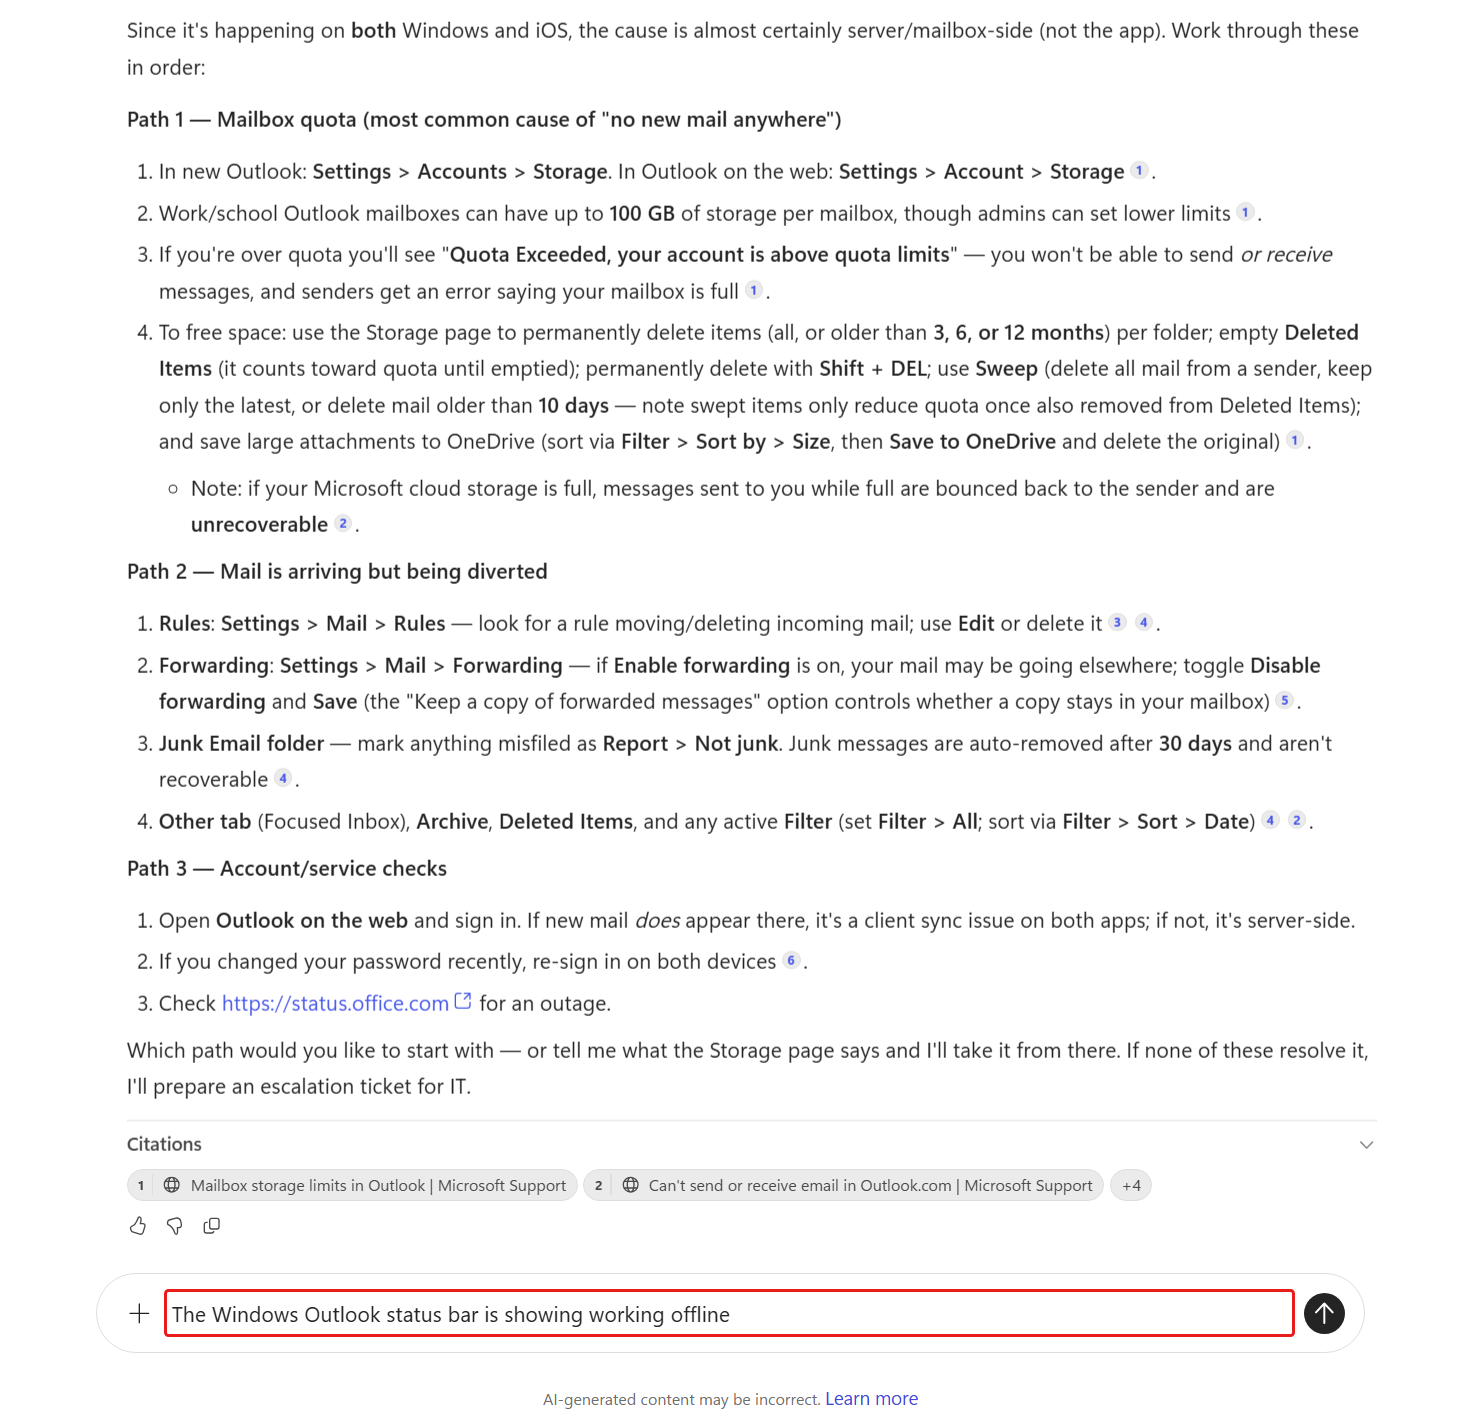
Check that it replies with a suggested fix and reply with the following:
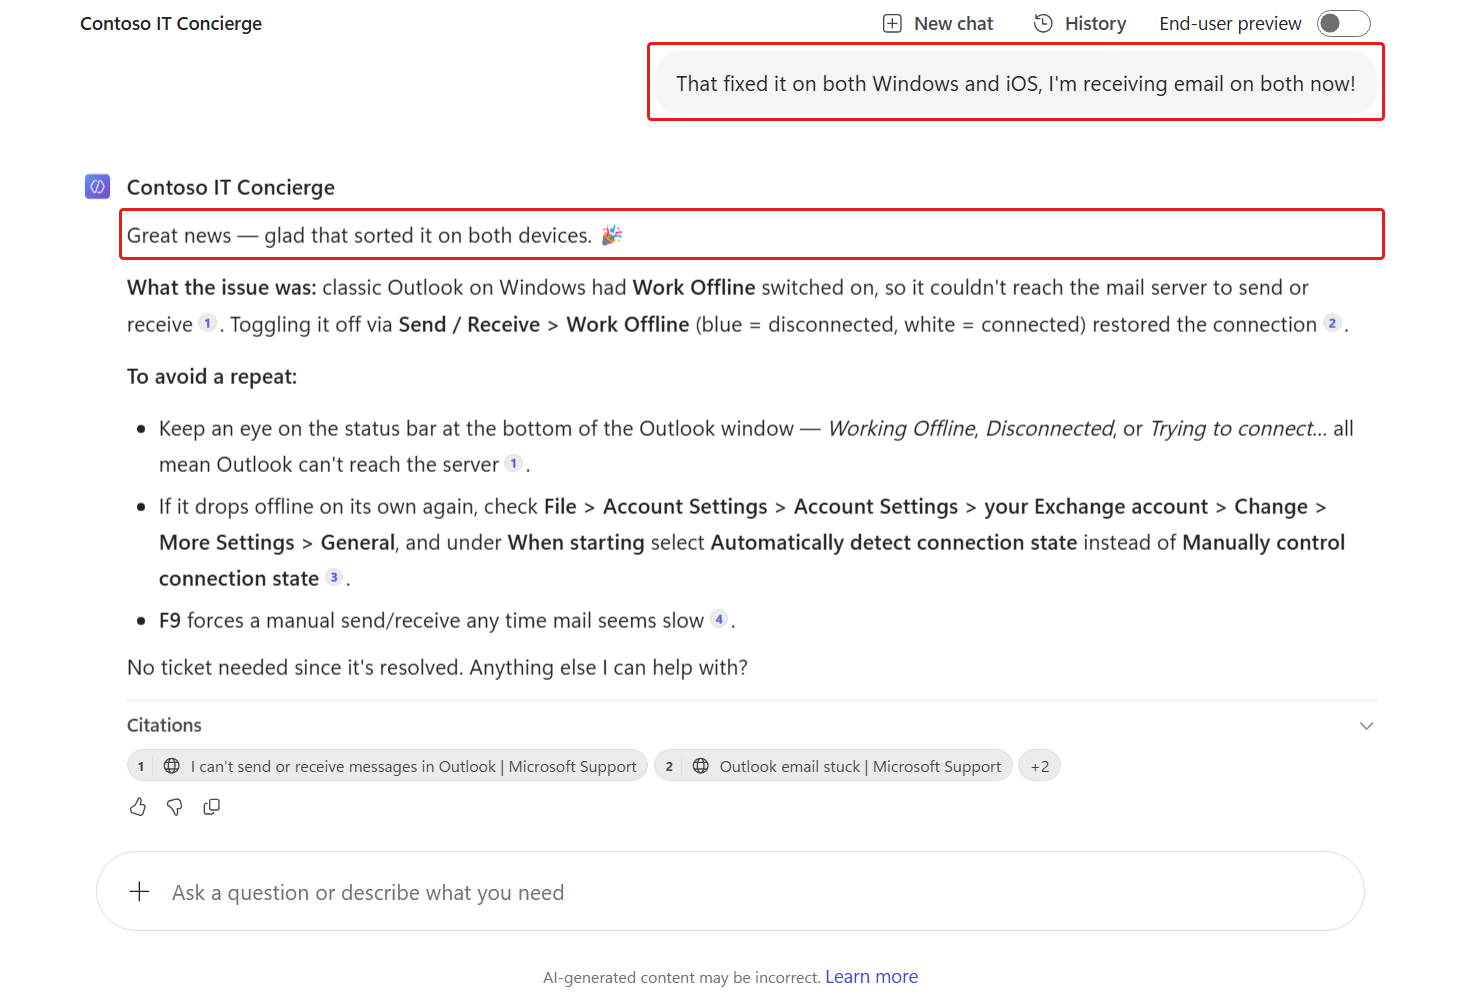
textThat fixed it, I'm receiving email now!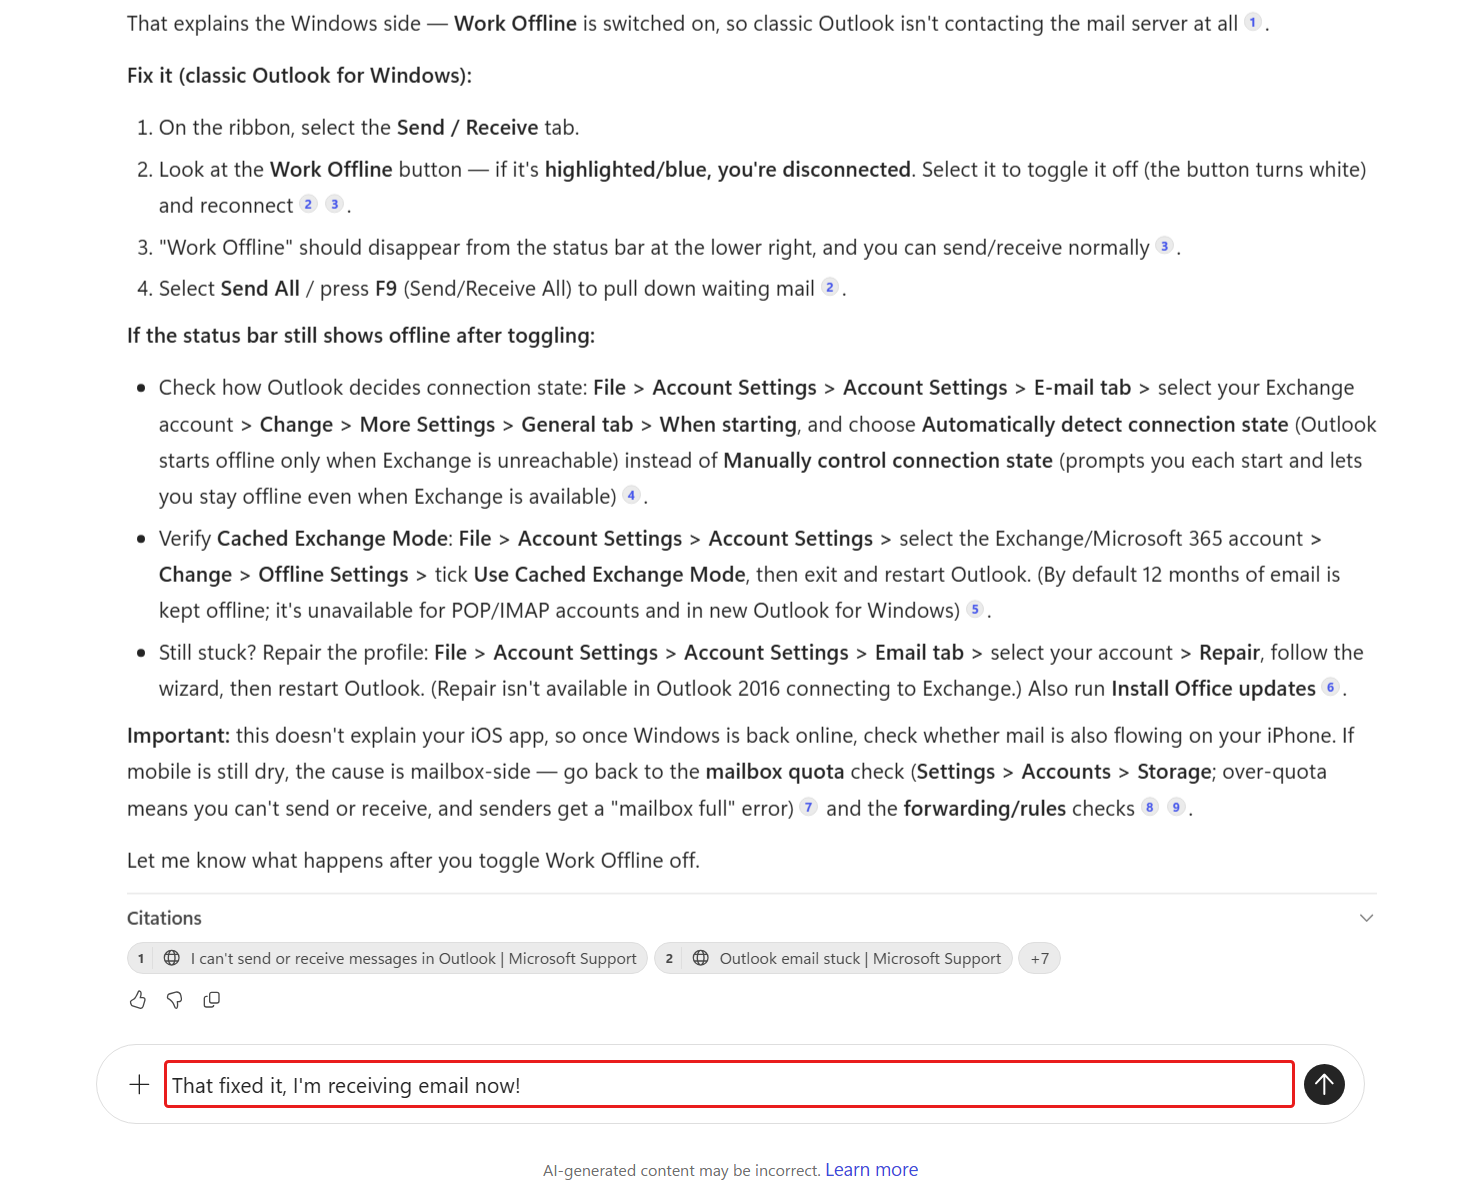
The agent should then close out with a message confirming the fix.
✅ Mission Complete
Mission accomplished, Recruit! You used a capability unique to the GitHub Copilot harness and iteratively refined a reusable skill so the Contoso IT Concierge agent can reliably map tool inputs, recover from OData filter errors, match user-selected options to SharePoint item IDs, and capture additional device requirements.
You can now:
✅ Create a reusable agent skill: Package focused instructions and supporting files for a defined task.
✅ Guide tool usage: Map skill inputs to the SharePoint tool and handle OData filter errors.
✅ Validate user selections: Match selected device options to SharePoint item IDs and collect additional requirements.
✅ Define reliable outcomes: Add validation rules, escalation paths, and success criteria that improve consistency.
⏭️ Move to Automate with Workflows to get started.
📚 Tactical Resources
🔗 Write effective instructions