
🚨 Mission 08: Add Agents to a Workflow
🎯 Mission Brief
Welcome back, Agent. The workflow you built files resumes, but it is mostly deterministic - the trigger fires, Classify uses AI to pick a branch, and the loop files each PDF. None of that can answer which of your five open roles a candidate actually fits, because answering it means reading the document and weighing what is in it.
In this mission you'll add agents to that workflow. An inline agent reads each resume PDF and confirms the role, asking a human when the evidence conflicts. Your published Hiring Agent then does the scoring and the writes, reusing the skills you built in Missions 02, 05 and 06. You'll then read the agents' answers back out and post an Adaptive Card to Teams with links to the Hiring Hub lists.
By the end of this mission an email arrives and a recruiter gets a Teams card naming the candidate, the role, the score and links to the Resume and Job Application lists.
🔎 Objectives
In this mission, you'll learn:
- When to use an inline agent and when to call a published one
- How to give a workflow agent tools and let it ask a human mid-task
- How to pass workflow data into an agent and read its answer back out
- Why the Agents connection identity decides whether a tool call succeeds
- How to post an Adaptive Card to Teams with links to the Hiring Hub lists
🧠 Two kinds of agent node
In Mission 07 the only intelligence in the workflow was a Classify node - a router that sorts text into categories and nothing more. An Agent node hands a real, open-ended task to an agent that can reason, call tools, and use knowledge. Classify decides which way to go, while an agent decides what the answer is.
Filing a resume is deterministic, while reading the PDF, deciding which role it fits, and creating the application need reasoning. We will use two agent nodes with different scopes:
| New agent for this workflow | Published Hiring Agent | |
|---|---|---|
| Use it when | The task belongs to this workflow only | The same agent is used by chats and other workflows |
| Set it up | Write the instructions and add tools inside the workflow node | Build and publish the agent first, then select it in the workflow node |
| Agent skills | Uses built-in capabilities and tools added to the node | Can use custom skills, including resume-intake and role-matching |
| Human assistance | Can use Request human assistance | The connected-agent node has no human-assistance toggle |
| Task in this mission | Read each PDF and confirm the role | Score each candidate and write the hiring records |
Both node types use the same sandbox and built-in document skills. We choose between them according to where the instructions, tools, and skills need to be reused.
Covered in Recruit
In Recruit Mission 07: Automate with Workflows the agent calls the workflow, using the When an agent calls the workflow trigger. In this mission the workflow calls the agent.
🔁 Reading an agent's answer in a later step
An agent node returns its answer as a property on its body, and the two node types use different property names. Wrap each one in coalesce(x, '') so an empty answer becomes an empty string rather than a null:
| Node | Expression |
|---|---|
| Inline agent | coalesce(body('Match_to_an_open_role')?['message'], '') |
| Connected agent | coalesce(body('Hand_off_to_the_Hiring_Agent')?['result'], '') |
The expression shape is the one you used in Mission 07: body('…') is the named node's output, ?['message'] is the property holding the answer, and ? means "if this is missing, give me nothing instead of an error". The name inside the quotes is the node's name with spaces replaced by underscores, which is why each node has to be renamed before you write the expression that reads it.
🔑 Which identity a workflow's tool calls run as
When you chat with an agent, its tool calls run as you. When a workflow calls an agent there is no user interacting with the agent directly, so those calls run under the Agents connection identity instead - a connection stored in the environment rather than a signed-in user.
🔄 Coming from the classic Operative course?
In the classic course, a flow reached AI through an AI Builder prompt, which returns one narrowly-shaped completion at a time. The decision-making stayed in the flow itself, written out condition by condition.
The Agent node moves that reasoning somewhere else. You can scope an inline agent to a single node, or call a published agent that brings its own instructions, tools and skills - one that works through a document, calls tools of its own, and can pause to ask a person a question part-way through.
So the practical difference is in what you write. Instead of conditions for a flow, you write instructions for an agent, then read its structured reply back with an expression.
🧪 Lab 08 - Adding AI Agents to the workflow
Prerequisites
Before you start this lab you need:
- The Autonomous Resume Intake workflow from Mission 07, filing resumes correctly
- The Hiring Agent published, carrying the
resume-intake,role-matchingand application skills from Missions 02, 05 and 06 - A Microsoft Teams connection, and a channel you can post to
- An Office 365 Outlook mailbox you can read, for the human request
- The two sample resume PDFs - see the download in Mission 05
Let's add the reasoning. You'll build the two agent nodes in series after the attachment loop, so the loop finishes filing every attachment first and the agents then run once over all of them.
8.1 Add the inline agent that reads the PDFs
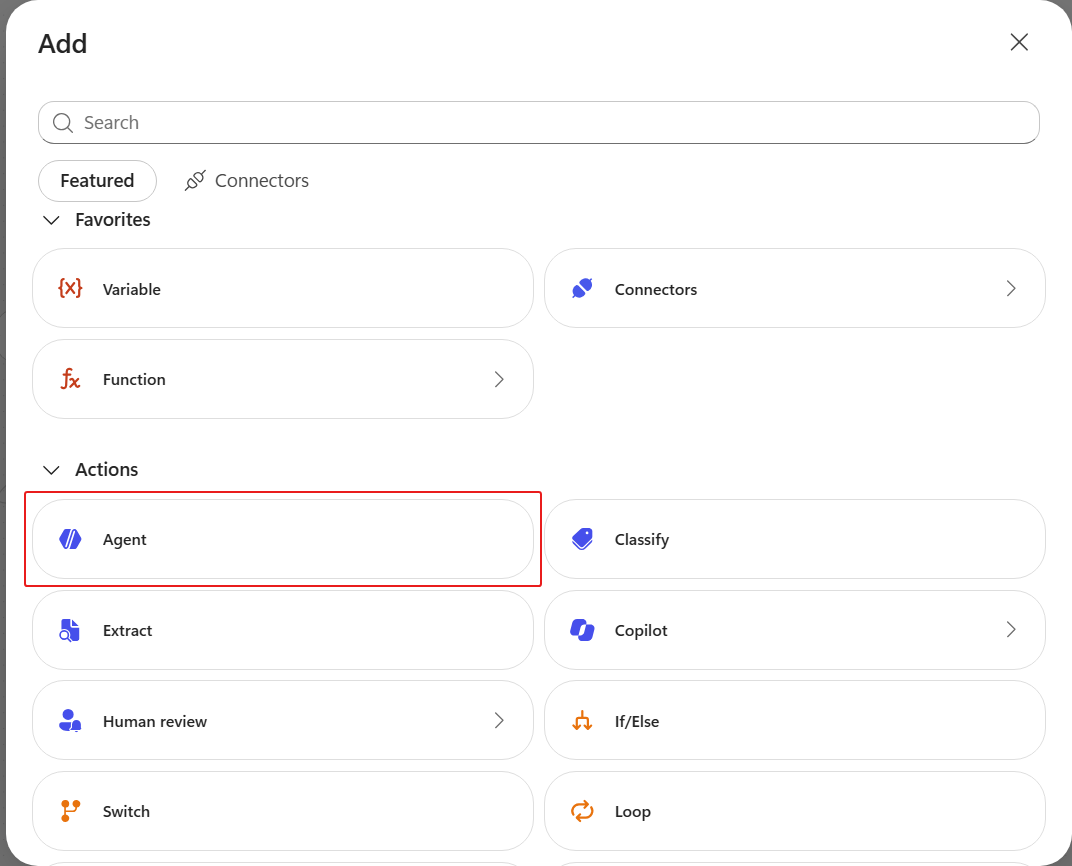
Open the Autonomous Resume Intake workflow from Mission 07, then select the ➕ after the For each attachment loop, still inside the Process application scope, and choose Agent.
Rename the node to
Match to an open role- select its name at the top of the panel, type the new name and press Enter. Later expressions refer to it asMatch_to_an_open_role.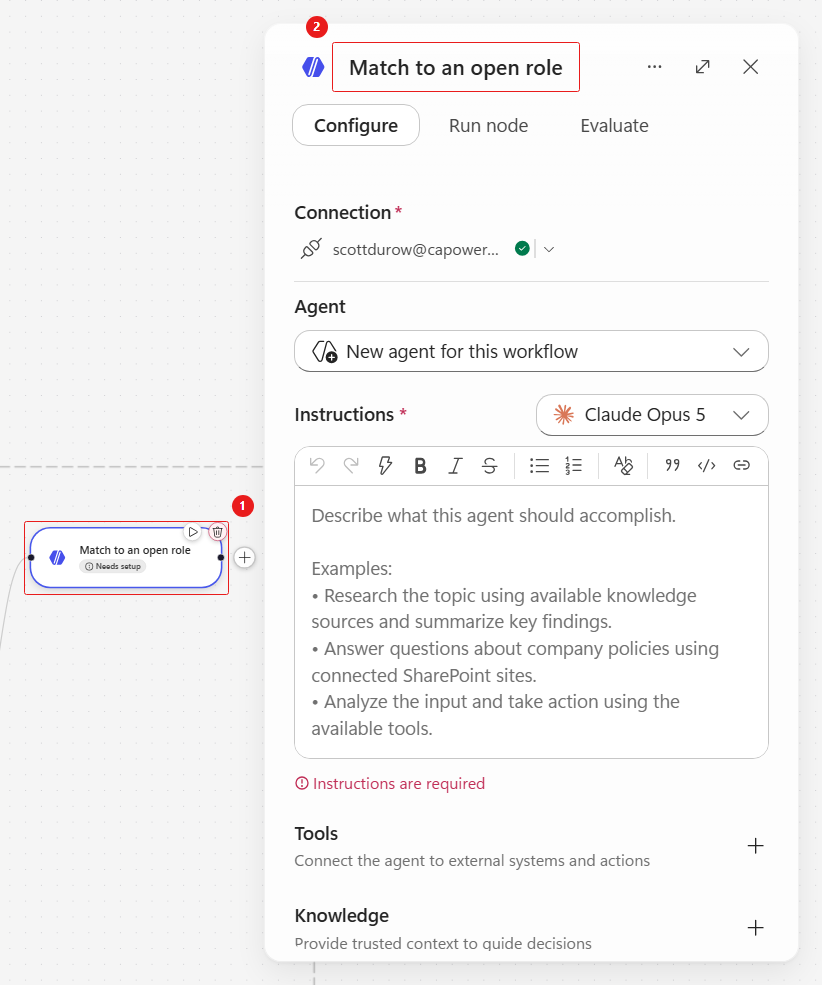
Leave Agent set to New agent for this workflow, then under Tools select Add tool, choose the Model Context Protocol (MCP) category, select Microsoft Dataverse MCP Server, confirm the connection, and select Add.
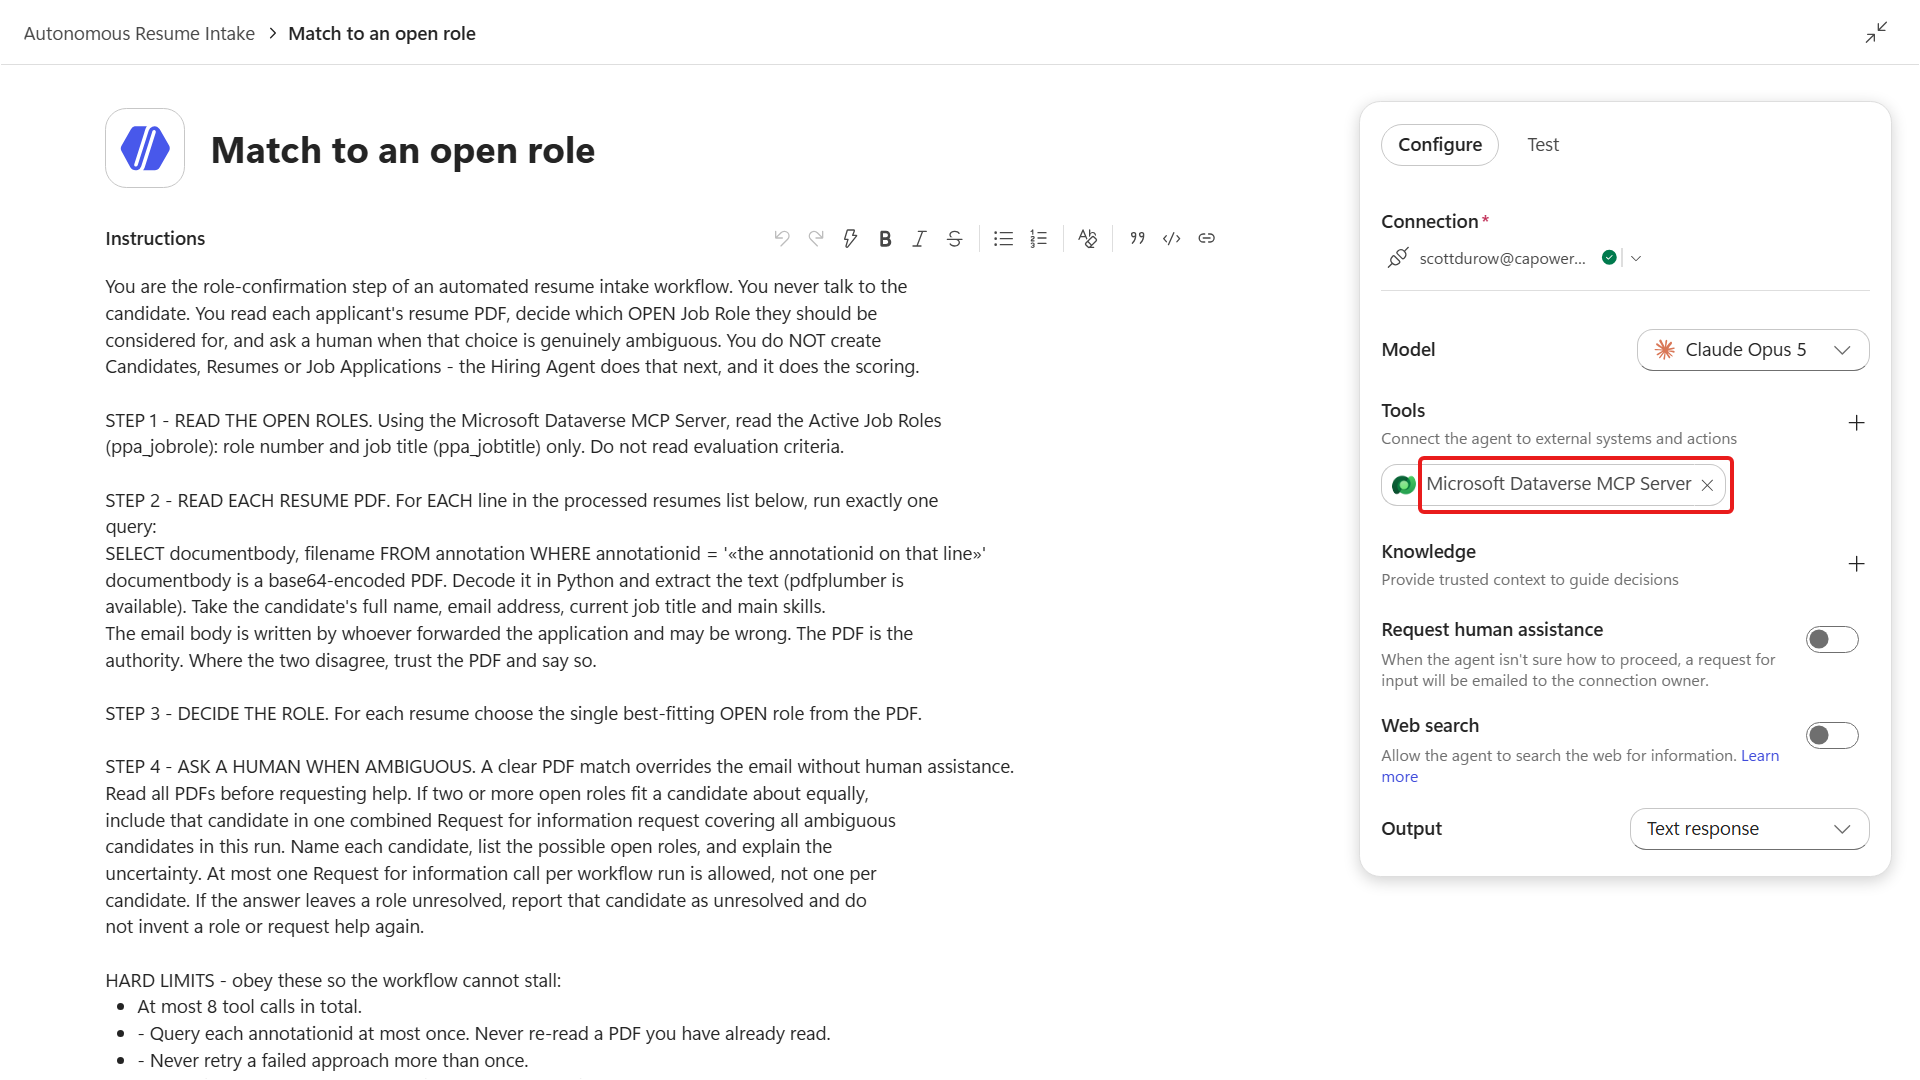
Turn Request human assistance on, confirm the Human review connection in the Set up Human in the loop dialog, and select Add.
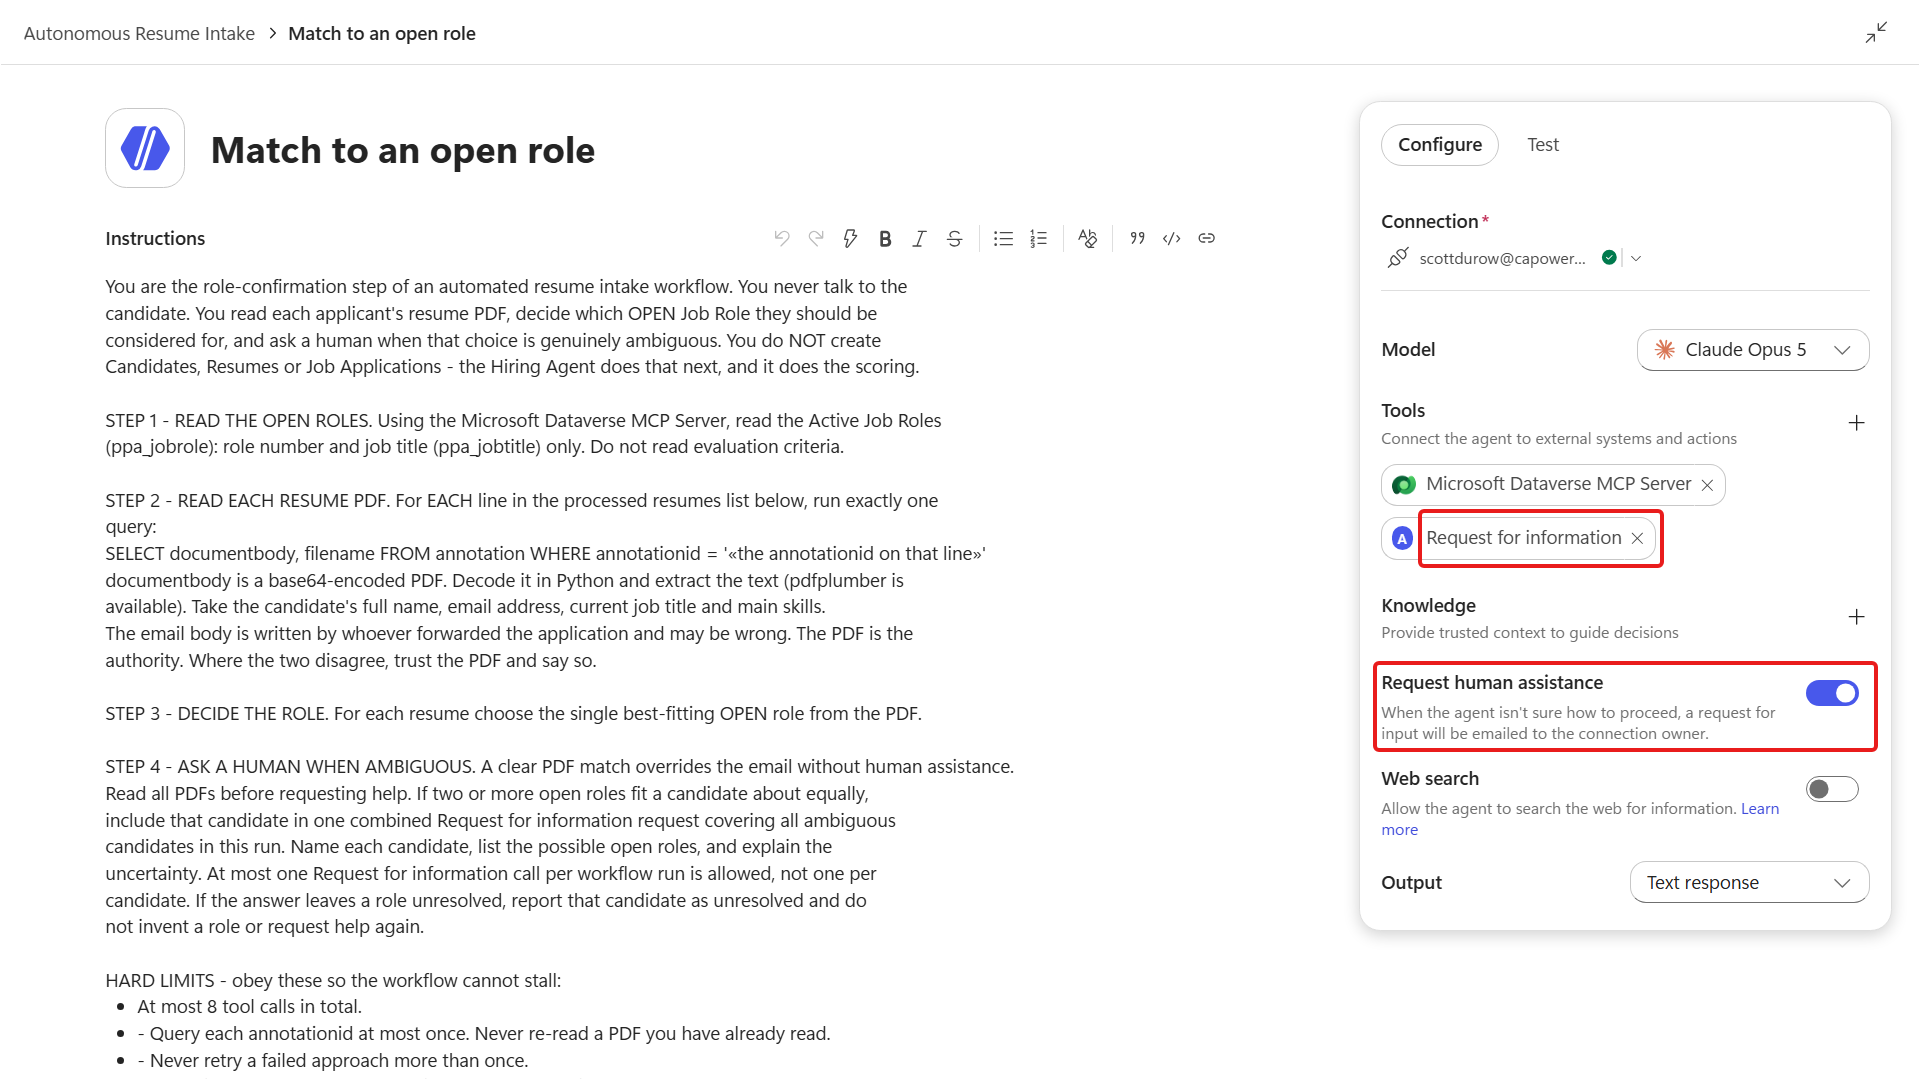
The dialog adds a tool named Request for information to the Tools list. Questions are emailed to the connection owner.
Paste these Instructions. Note the DATA FOR THIS RUN block at the end - that is how the agent receives its input:
textYou are the role-confirmation step of an automated resume intake workflow. You never talk to the candidate. You read each applicant's resume PDF, decide which OPEN Job Role they should be considered for, and ask a human when that choice is genuinely ambiguous. You do NOT create Candidates, Resumes or Job Applications - the Hiring Agent does that next, and it does the scoring. STEP 1 - READ THE OPEN ROLES. Using the Microsoft Dataverse MCP Server, read the Active Job Roles (ppa_jobrole): role number and job title (ppa_jobtitle) only. Do not read evaluation criteria. STEP 2 - READ EACH RESUME PDF. For EACH line in the processed resumes list below, run exactly one query: SELECT documentbody, filename FROM annotation WHERE annotationid = '«the annotationid on that line»' documentbody is a base64-encoded PDF. Decode it in Python and extract the text (pdfplumber is available). Take the candidate's full name, email address, current job title and main skills. The email body is written by whoever forwarded the application and may be wrong. The PDF is the authority. Where the two disagree, trust the PDF and say so. STEP 3 - DECIDE THE ROLE. For each resume choose the single best-fitting OPEN role from the PDF. STEP 4 - ASK A HUMAN WHEN AMBIGUOUS. A clear PDF match overrides the email without human assistance. Read all PDFs before requesting help. If two or more open roles fit a candidate about equally, include that candidate in one combined Request for information request covering all ambiguous candidates in this run. Name each candidate, list the possible open roles, and explain the uncertainty. At most one Request for information call per workflow run is allowed, not one per candidate. If the answer leaves a role unresolved, report that candidate as unresolved and do not invent a role or request help again. HARD LIMITS - obey these so the workflow cannot stall: - At most 8 tool calls in total. - Query each annotationid at most once. Never re-read a PDF you have already read. - Never retry a failed approach more than once. - Never invent a role number, candidate name or email address. - If the processed resumes list below is empty, stop and reply exactly: NO RESUMES SUPPLIED. OUTPUT - reply with exactly this block for each resume and nothing else: RESUME: «ResumeNumber» CANDIDATE: «full name from the PDF» EMAIL: «email from the PDF, or the sender address if the PDF has none» CURRENT TITLE: «current job title from the PDF» SKILLS: «comma-separated key skills from the PDF» ROLE: «role number and title» ASKED A HUMAN: «yes or no» WHY: «one line - the PDF evidence that decided it, or the human's answer» ---------------------------------------- DATA FOR THIS RUN Processed resumes (one per line: ResumeNumber | note «annotationid» | filename): @{variables('ProcessedResumes')} From: @{triggerOutputs()?['body/from']} Subject: @{triggerOutputs()?['body/subject']} Cover letter / email body: @{triggerOutputs()?['body/body']}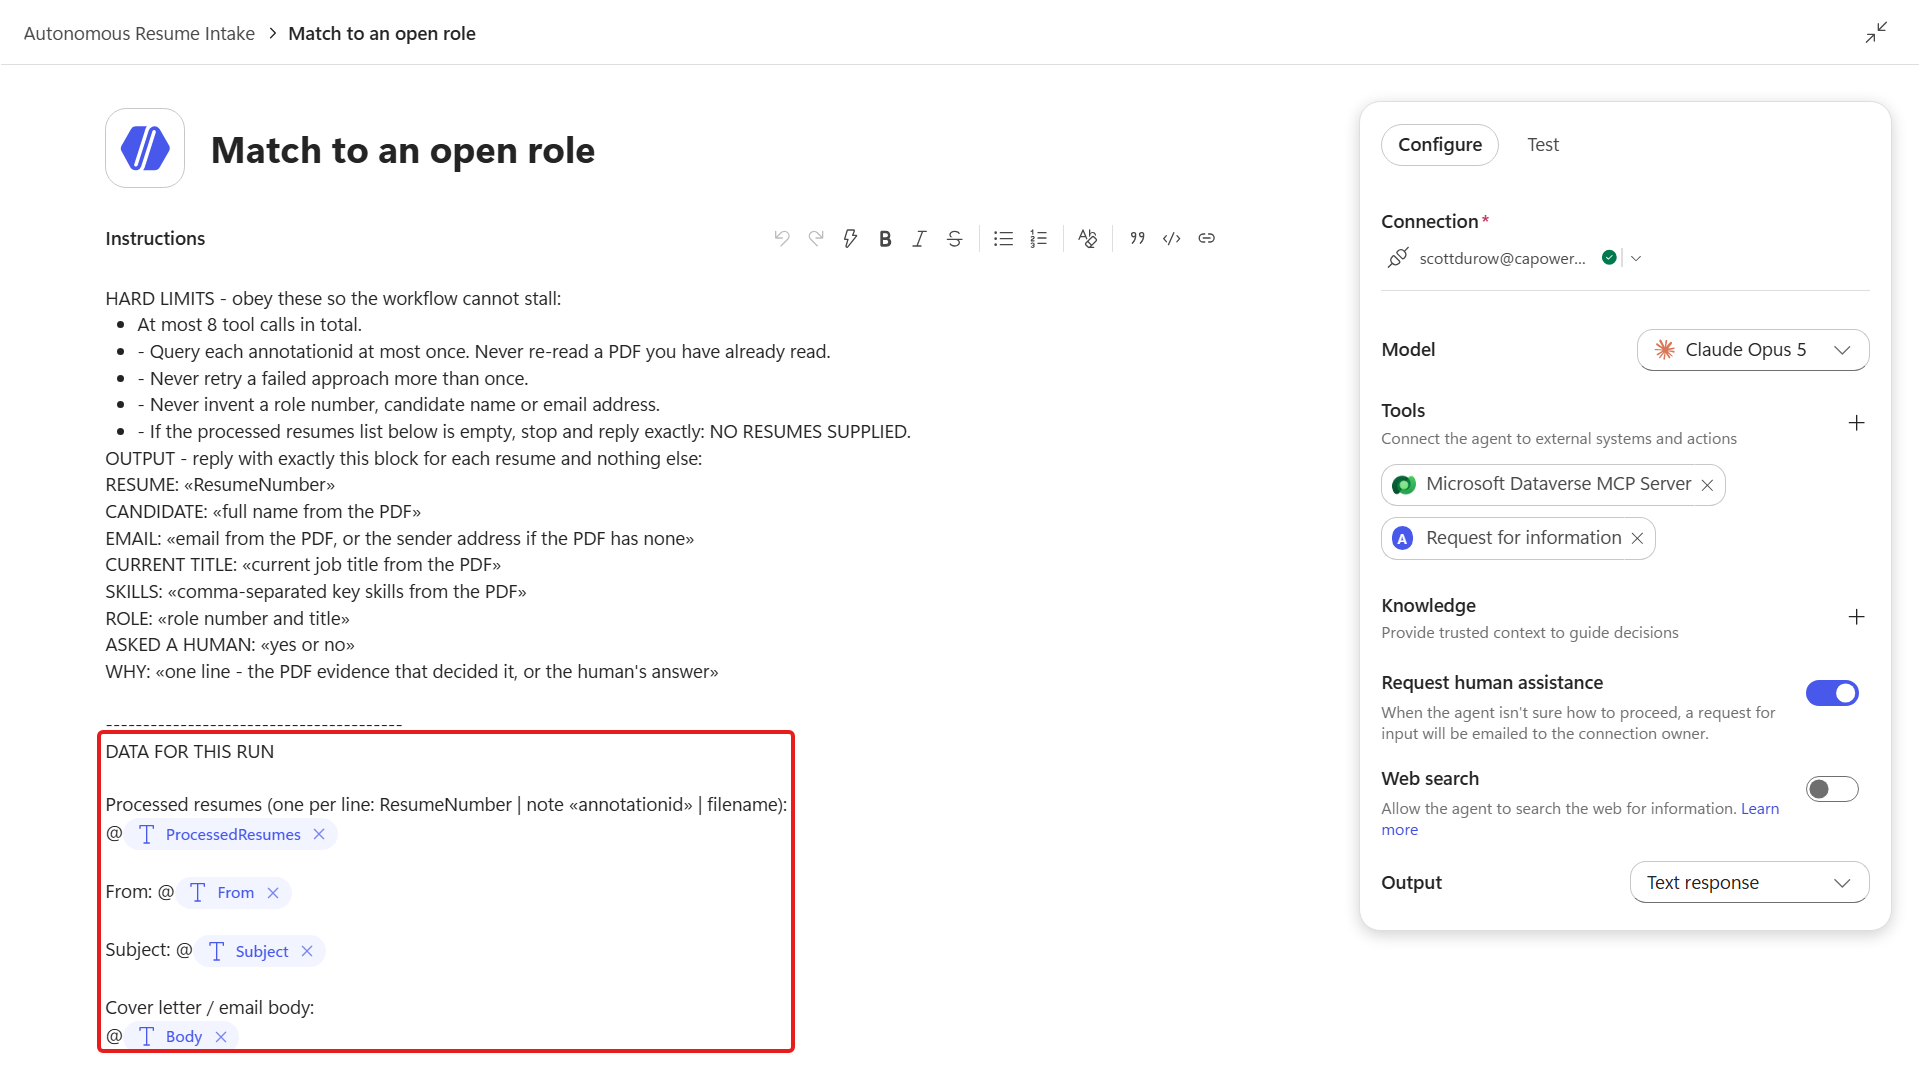
8.2 Hand off to the published Hiring Agent
The inline agent has decided which role each candidate fits. Now we'll hand the scoring and the writes to the published Hiring Agent, which already has all the logic to record a new resume.
Add a second Agent node after the
Match to an open rolenode and rename it toHand off to the Hiring Agent.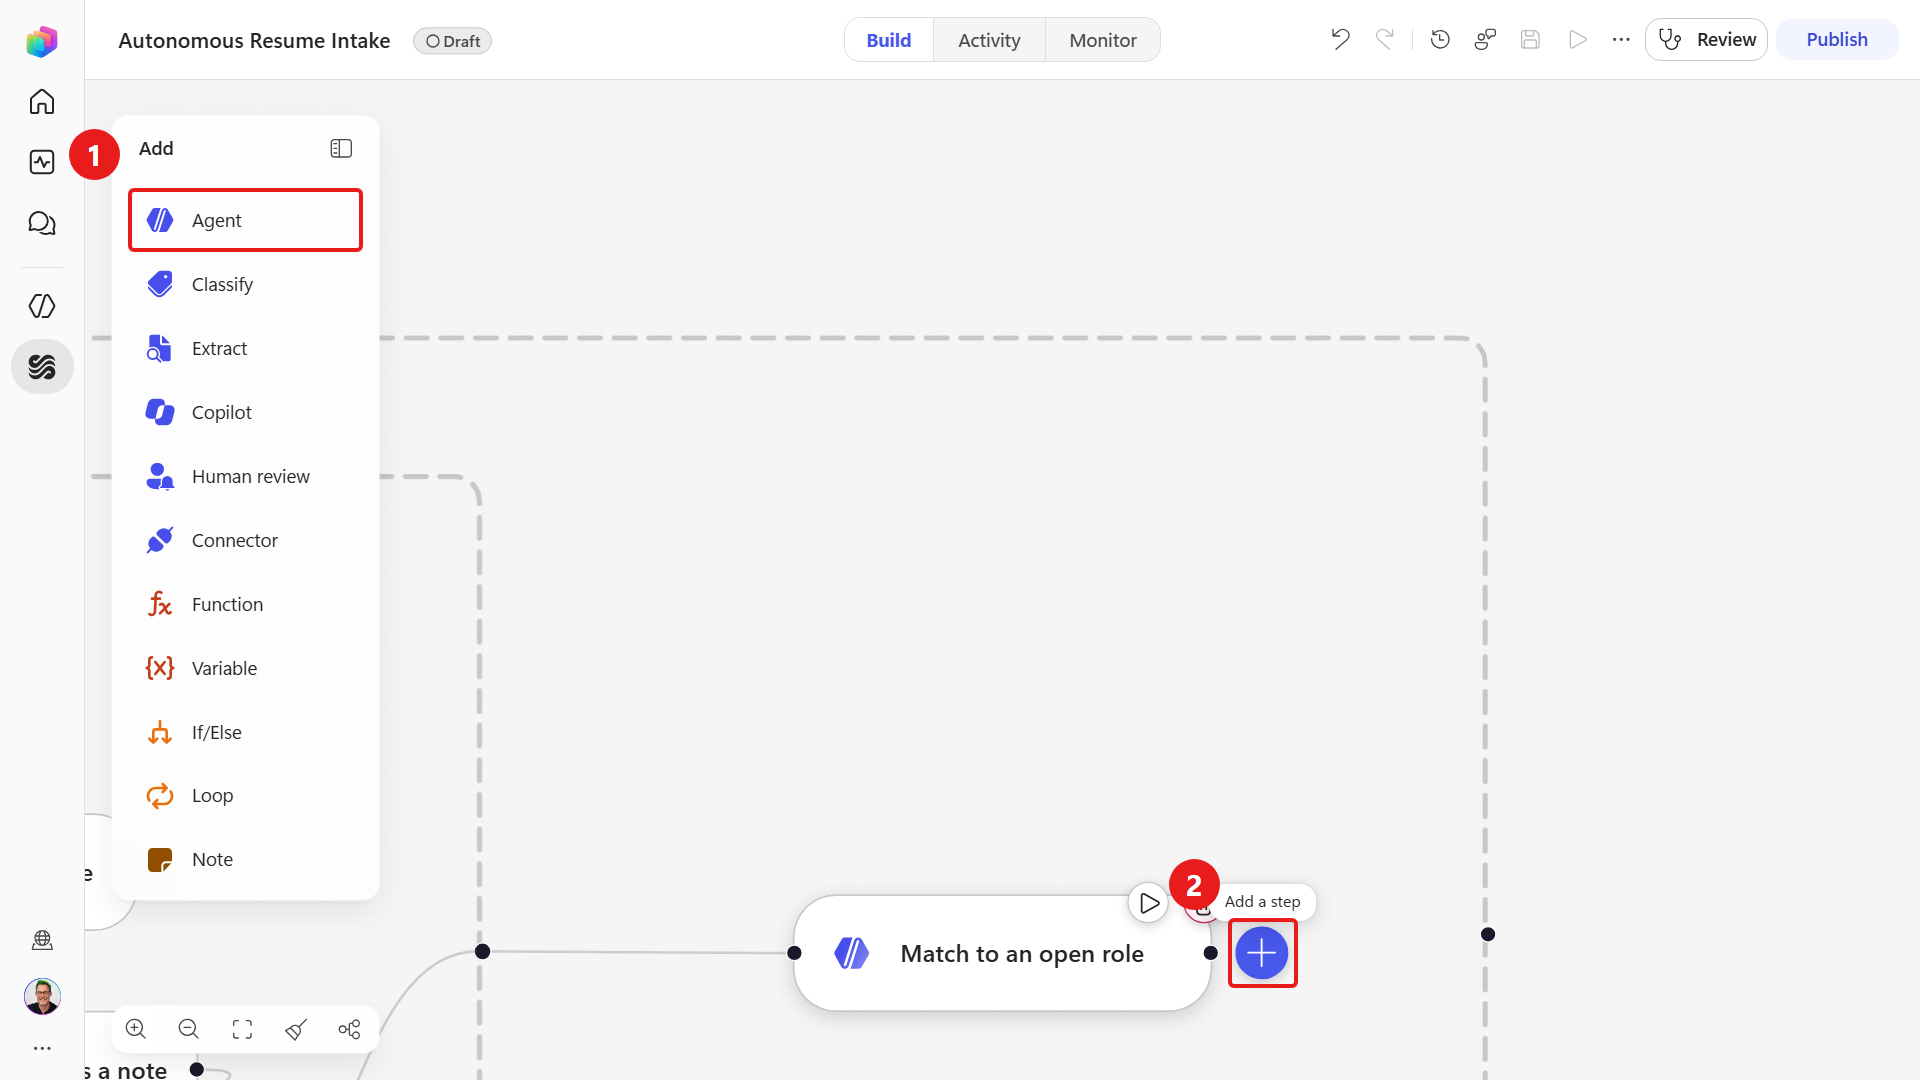
Fill in the node as follows.
Field Value Agent Hiring Agent (select it from the drop-down list) Message The block below Choosing a published agent removes every inline-agent field and collapses the panel to Message and Output, because a published agent brings its own instructions, tools and skills. That is why the scoring rubric lives here rather than in the inline agent - only a published agent can carry the
role-matchingskill you built in Mission 05.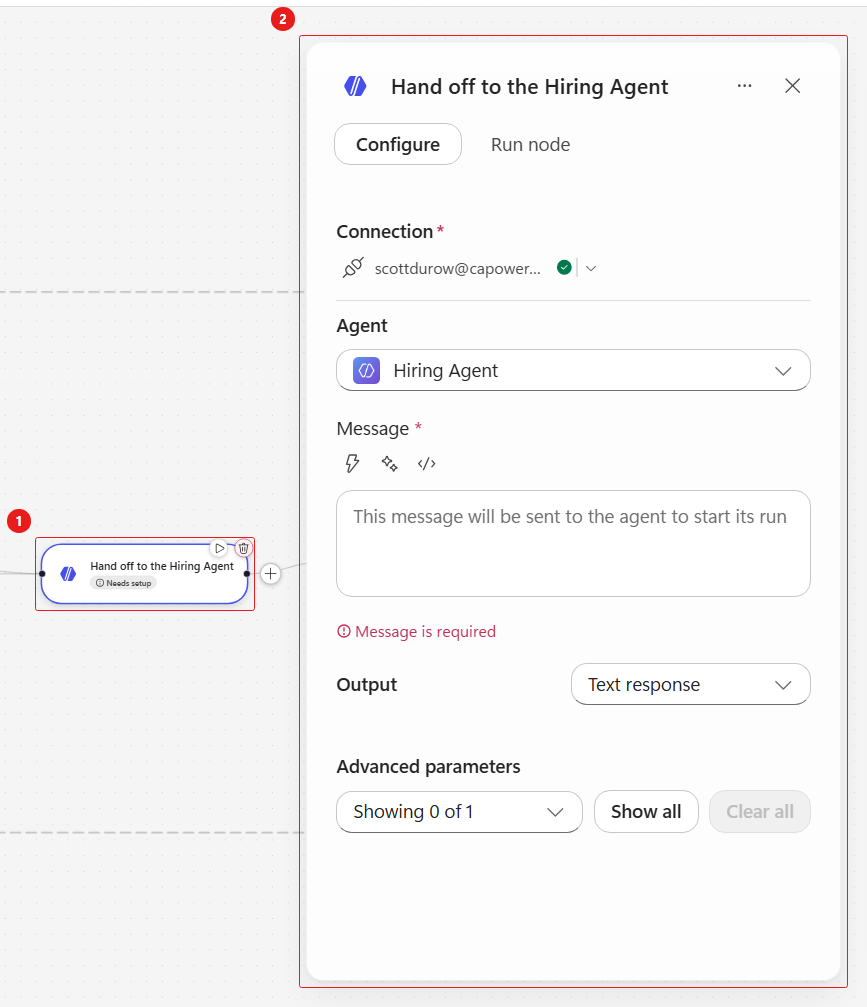
Select
</>Switch to expression mode for Message, then paste: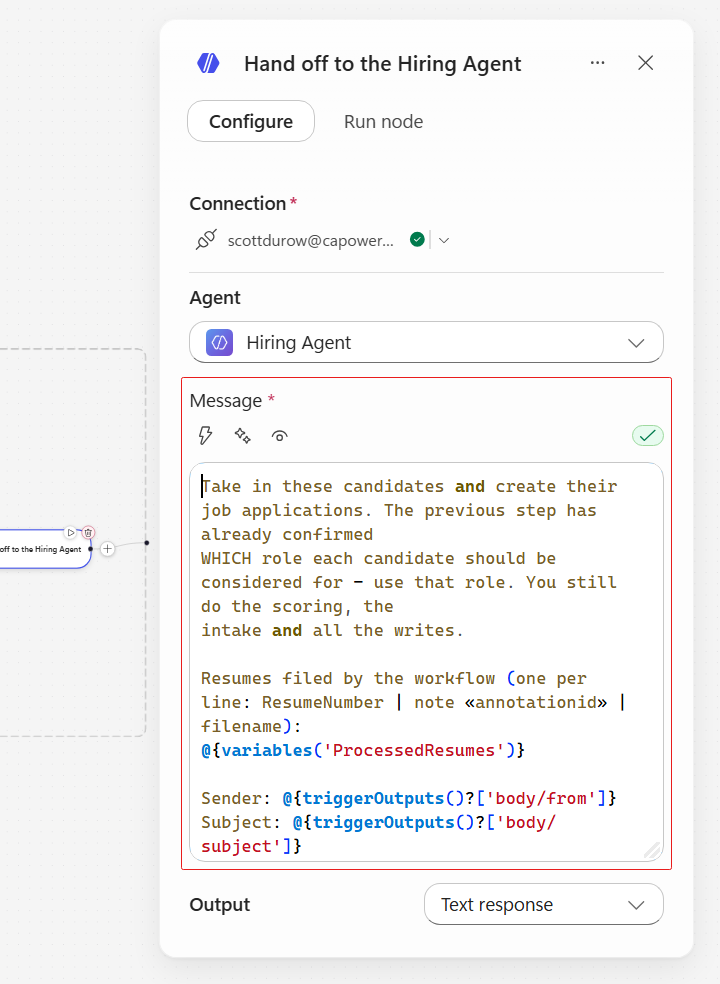 text
textTake in these candidates and create their job applications. The previous step has already confirmed WHICH role each candidate should be considered for - use that role. You still do the scoring, the intake and all the writes. Resumes filed by the workflow (one per line: ResumeNumber | note «annotationid» | filename): @{variables('ProcessedResumes')} Sender: @{triggerOutputs()?['body/from']} Subject: @{triggerOutputs()?['body/subject']} Email body (may be inaccurate - the resume PDF is the authority): @{triggerOutputs()?['body/body']} Role confirmation from the previous step: @{body('Match_to_an_open_role')?['message']} For EACH resume in the list: 1. Read the resume PDF - it is on the Notes (annotation) table: SELECT documentbody, filename FROM annotation WHERE annotationid = '«the annotationid on that line»'. documentbody is base64. 2. Set the Resume's cover letter and summary from the RESUME PDF text, not from the email body. 3. Match the candidate to an existing Candidate record (dedupe on email address, then on full name). Only create a new Candidate if there is no match. Link the Resume to that Candidate. 4. Score that candidate against the role confirmed above using the weighted rubric from the role-matching skill, reading that role's evaluation criteria live from Dataverse. 5. Create the Job Application for that confirmed role, carrying the score and a one-line justification. Report, for each resume: the ResumeNumber, the Candidate number (and whether it was matched or newly created), the Job Role, the score, and the new Job Application number. If anything blocks you, say which resume and why rather than inventing data.
Confirm the Agents connection before you test
This call runs under the Agents connection identity, not as you, so it needs its own working Dataverse connection. A missing one stops the call on "Permission required". See Which identity a workflow's tool calls run as.
8.3 Verify the agent read the PDF, not the email
Next we will test the agent handling of PDF resumes received by email.
Select Save on the workflow command bar.
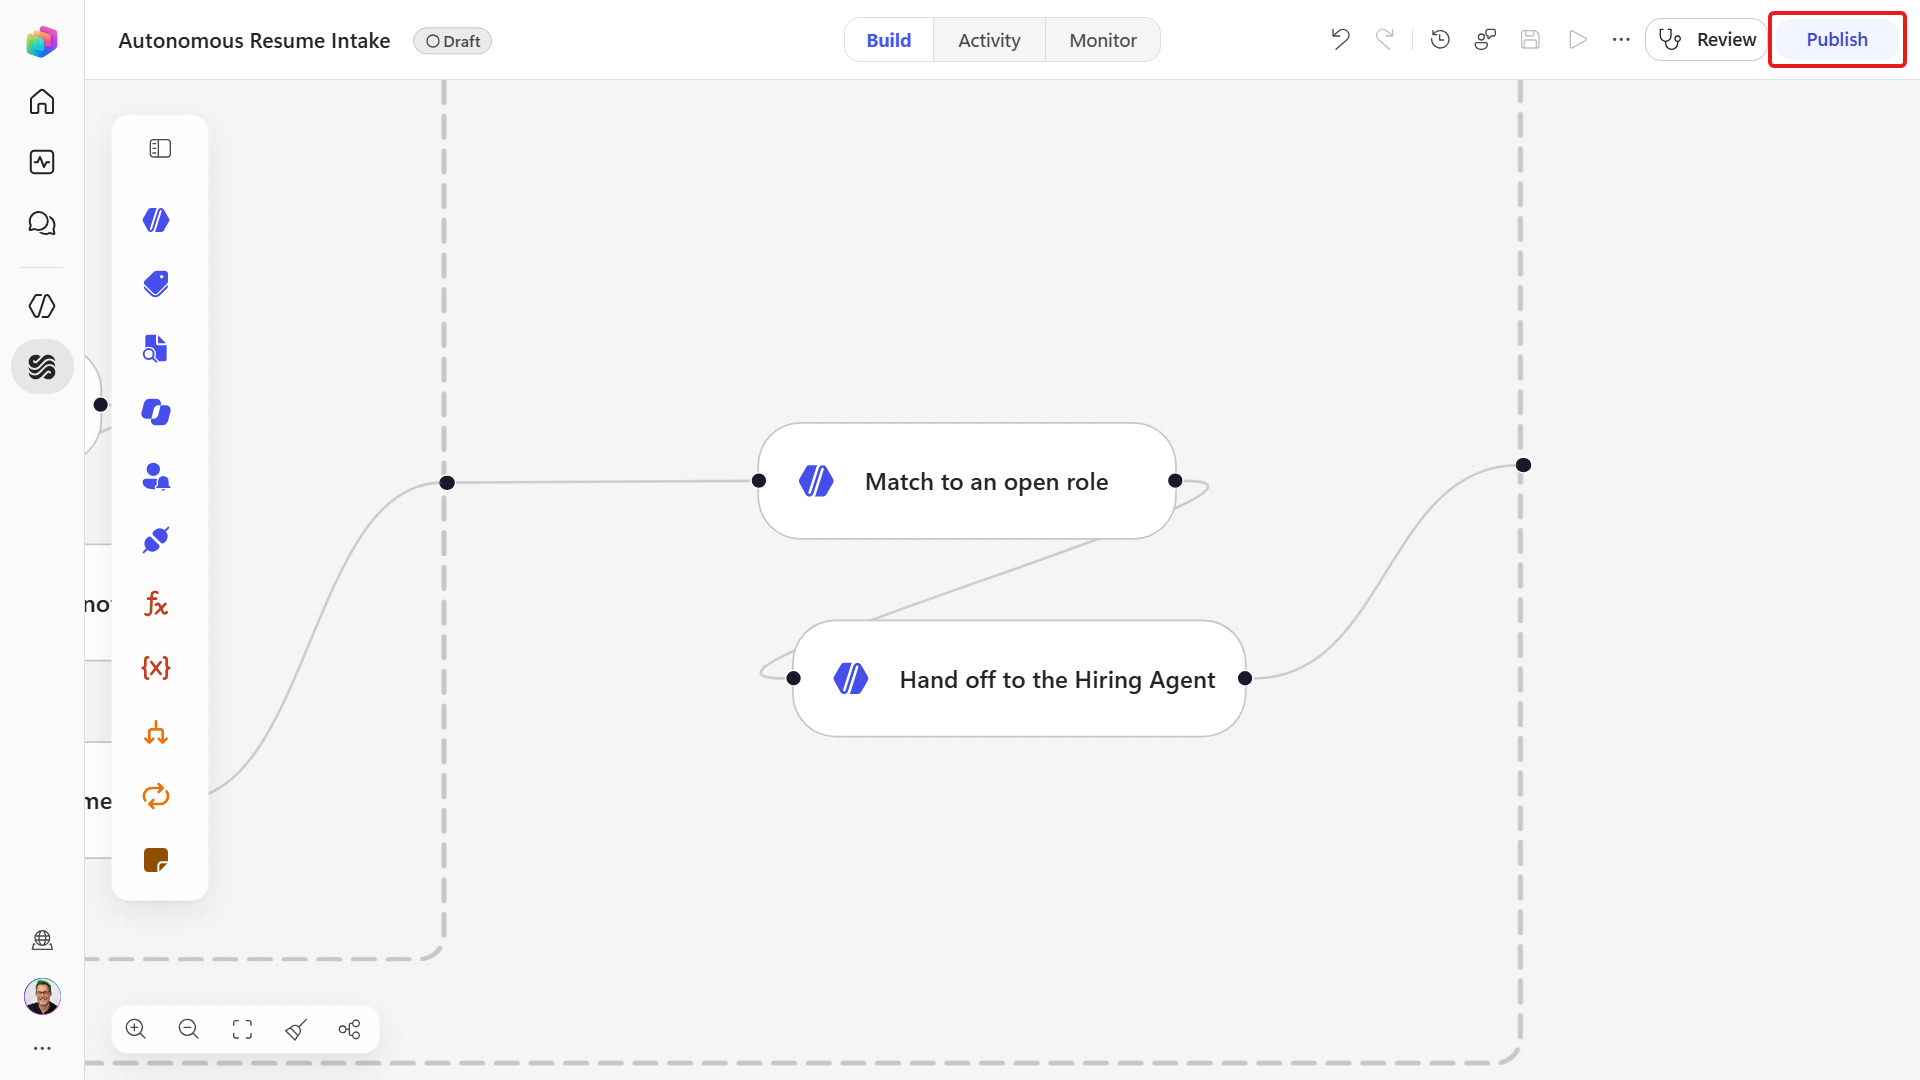
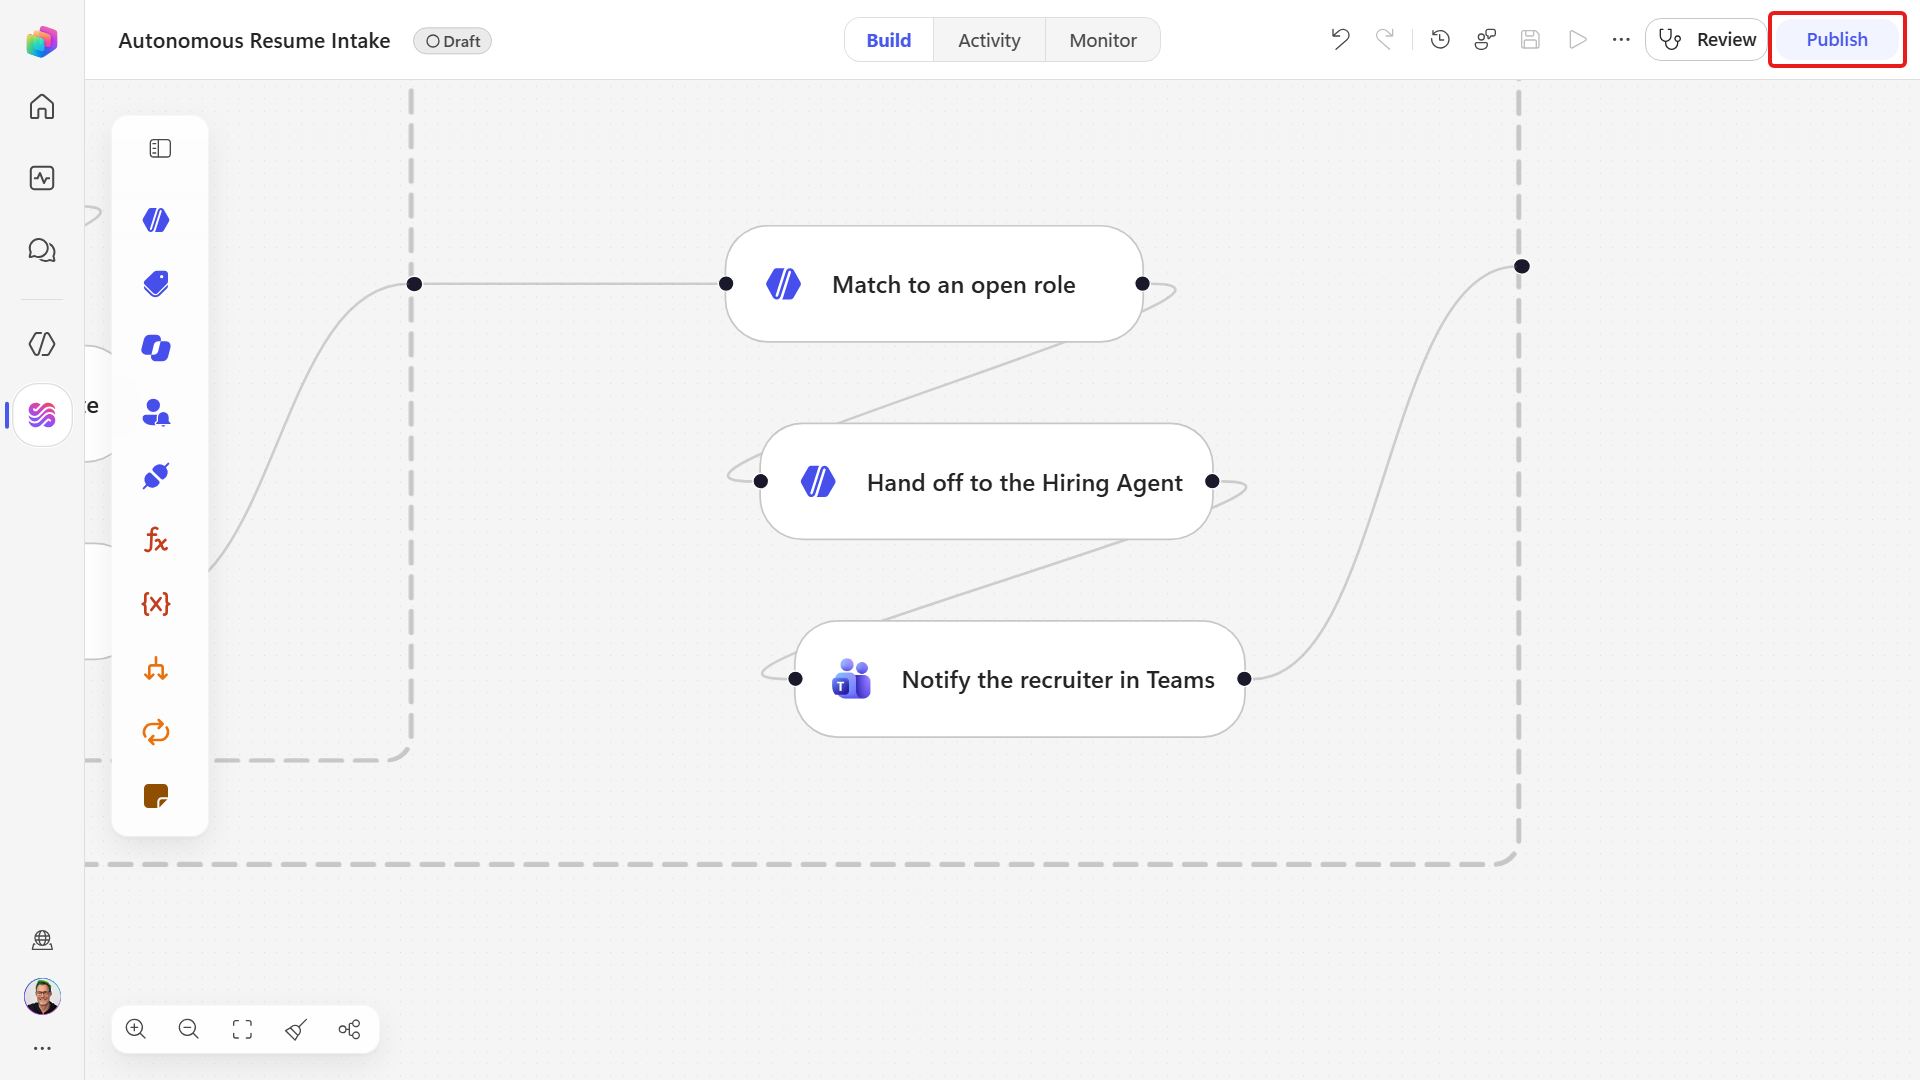
Select Publish and wait for publication to finish before sending the email. The email trigger runs the published workflow, so saving alone would test the previous version without the two agent nodes.
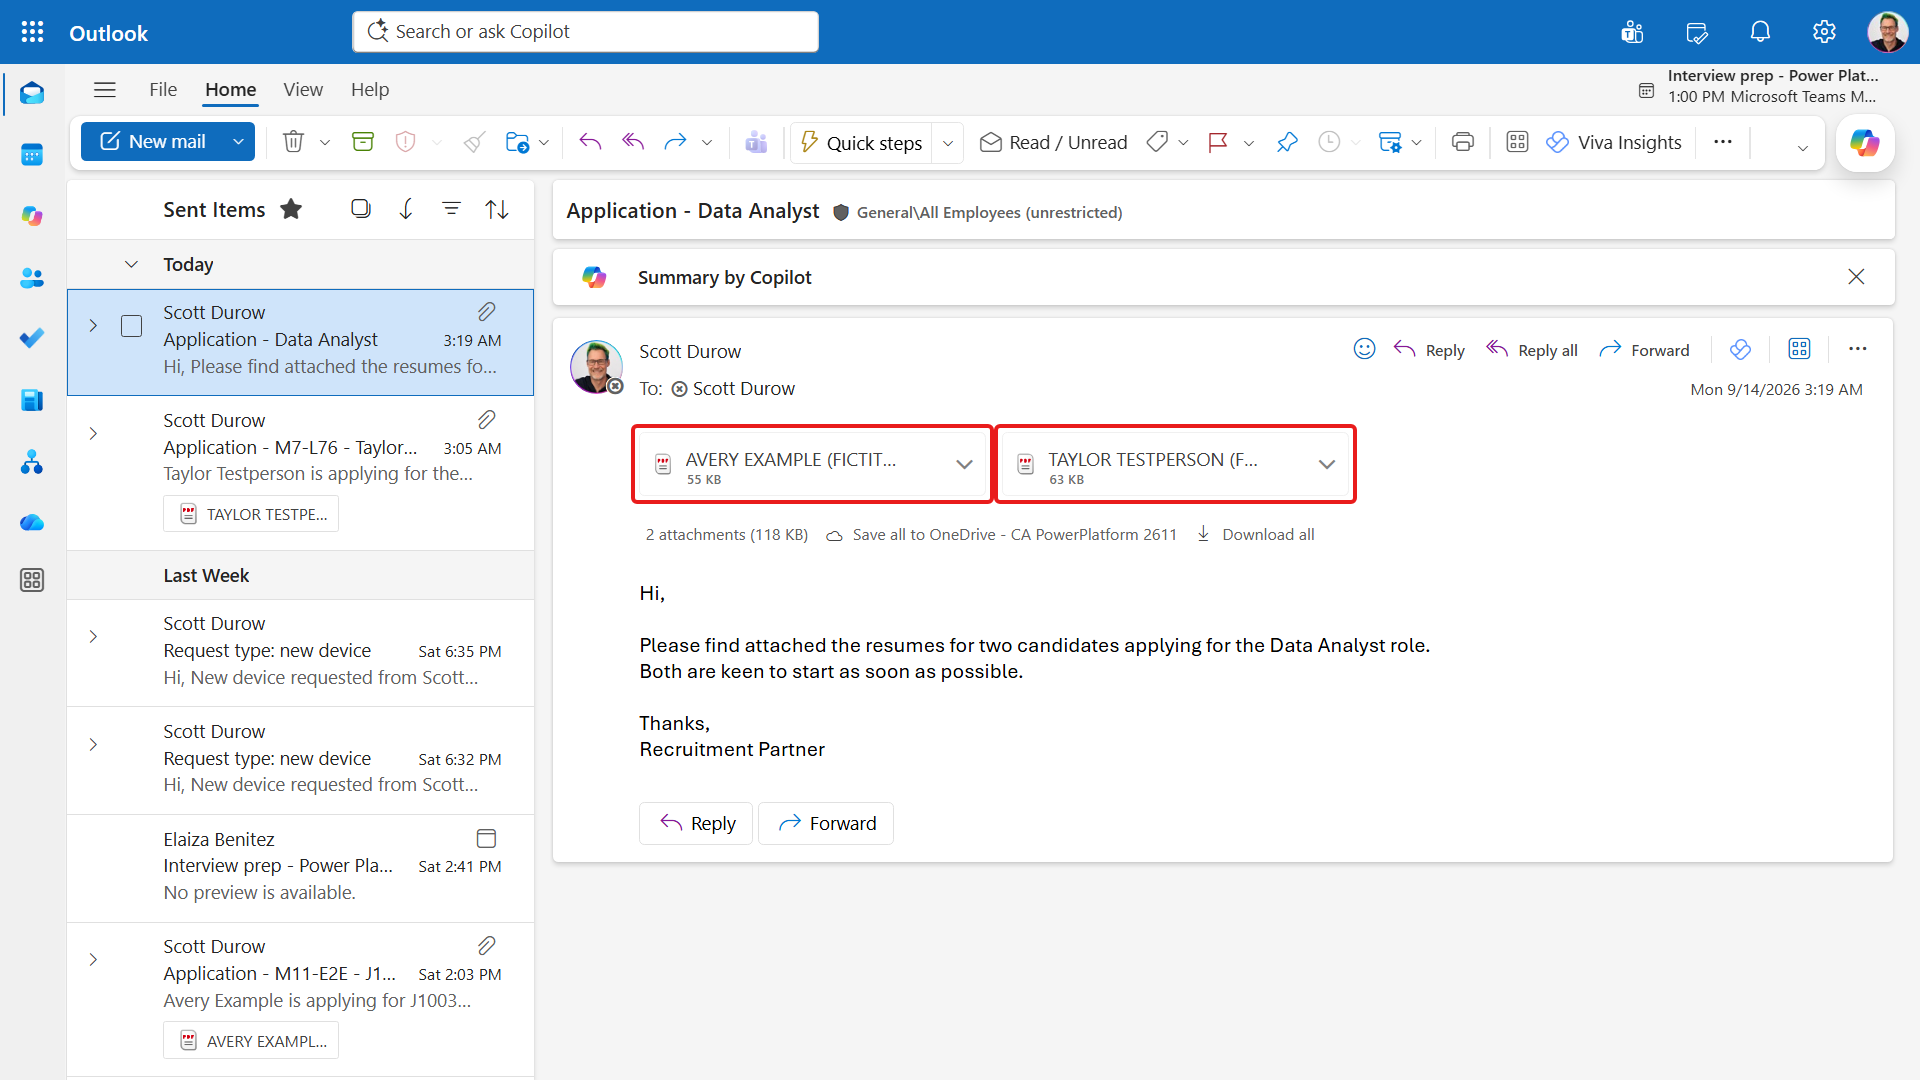
Send one email to the monitored mailbox with both sample resume PDFs attached, using exactly this subject and body:
textSubject: Application - Data Analyst Hi, Please find attached the resumes for two candidates applying for the Data Analyst role. Both are keen to start as soon as possible. Thanks, Recruitment PartnerOne email carries two attachments so that a single run exercises the For each attachment loop and the accumulator you built in Mission 07, and produces both outcomes below.
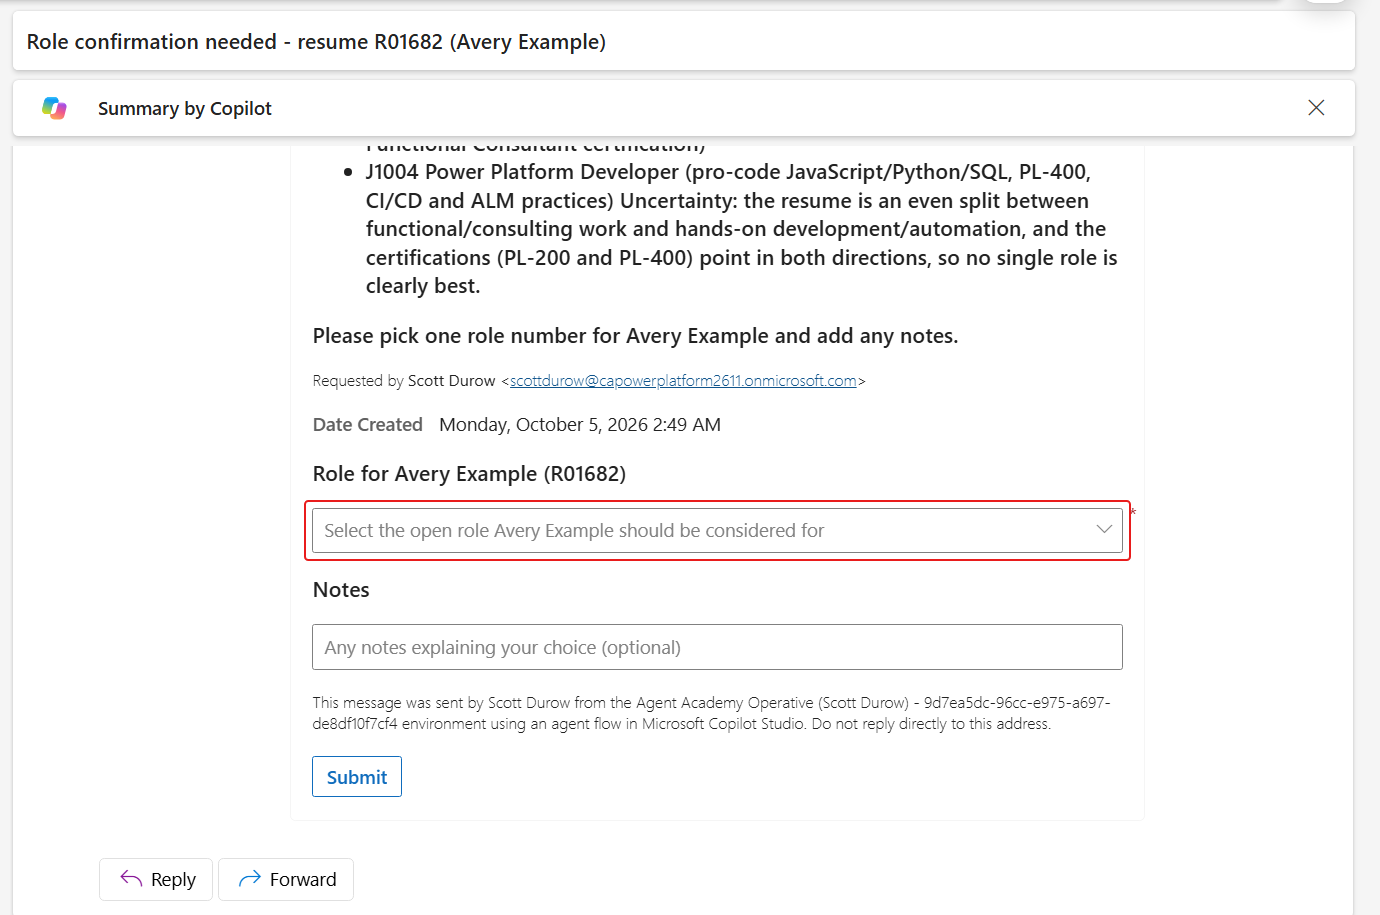
If the agent requests help, open the actionable card sent by Microsoft Power Automate. Choose J1003 Power Platform Consultant for Avery and J1004 Power Platform Developer for Taylor if those candidates are included, then select Submit. One request can include both candidates. If no request arrives and the node completes, continue to the output check.
The card is sent to the mailbox of the account that owns the Agents connection. Check Focused, Other and Junk. If the controls do not respond, select Show content to trust the message. The workflow remains Running while it waits for the answer.
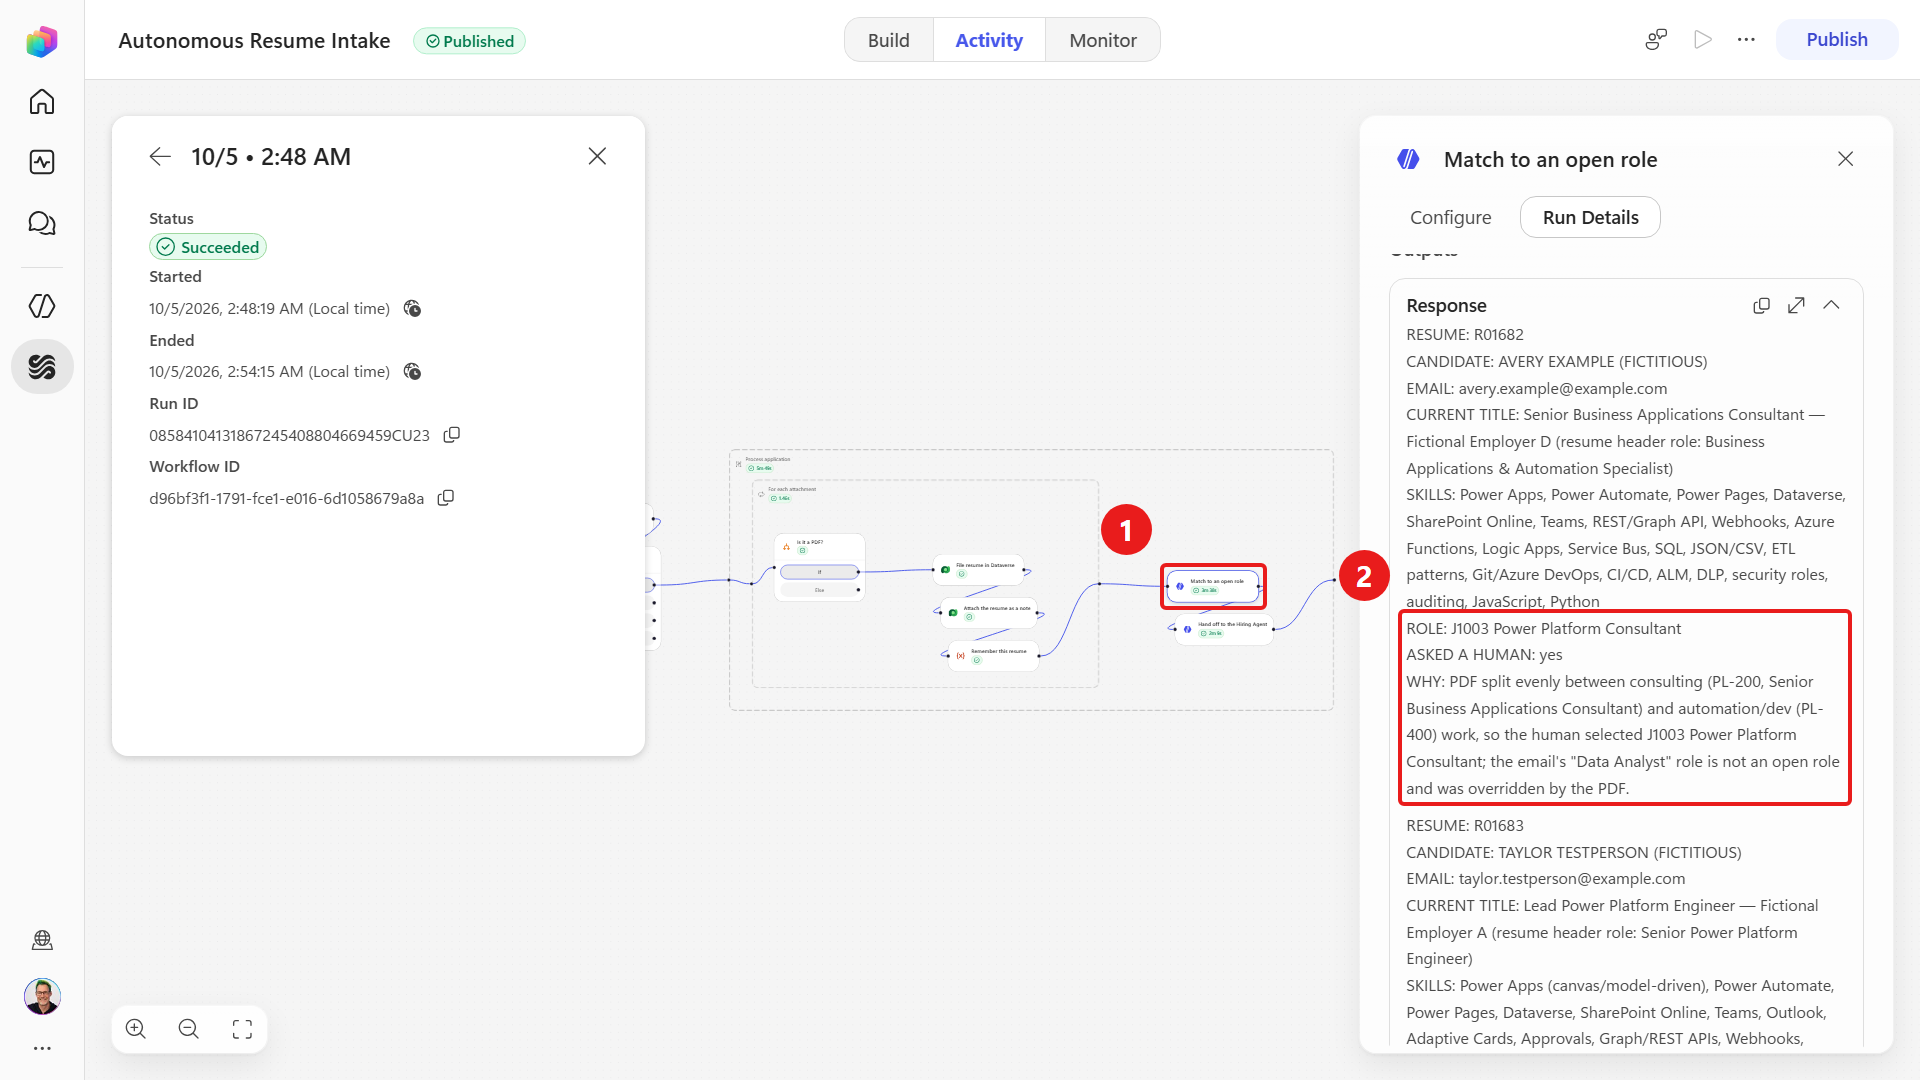
The image illustrates a run that asked for help. In a no-question run, retain the completed Match to an open role output showing ASKED A HUMAN: no instead; do not create or claim a card that was not sent.
When the run finishes, open the Match to an open role node and read its output. The result includes details taken from the PDFs, including each candidate's email address, current title and certifications:
textRESUME: R##### CANDIDATE: Avery Example EMAIL: avery.example@example.com CURRENT TITLE: Senior Business Applications Consultant ROLE: J1003 Power Platform Consultant ASKED A HUMAN: yes WHY: Human chose J1003 - the PDF's consultant/business-applications profile with PL-200 and PL-400 overrides the email's non-existent "Data Analyst" role.This is an example. Your record numbers will differ, so check the shape of the result rather than the values.
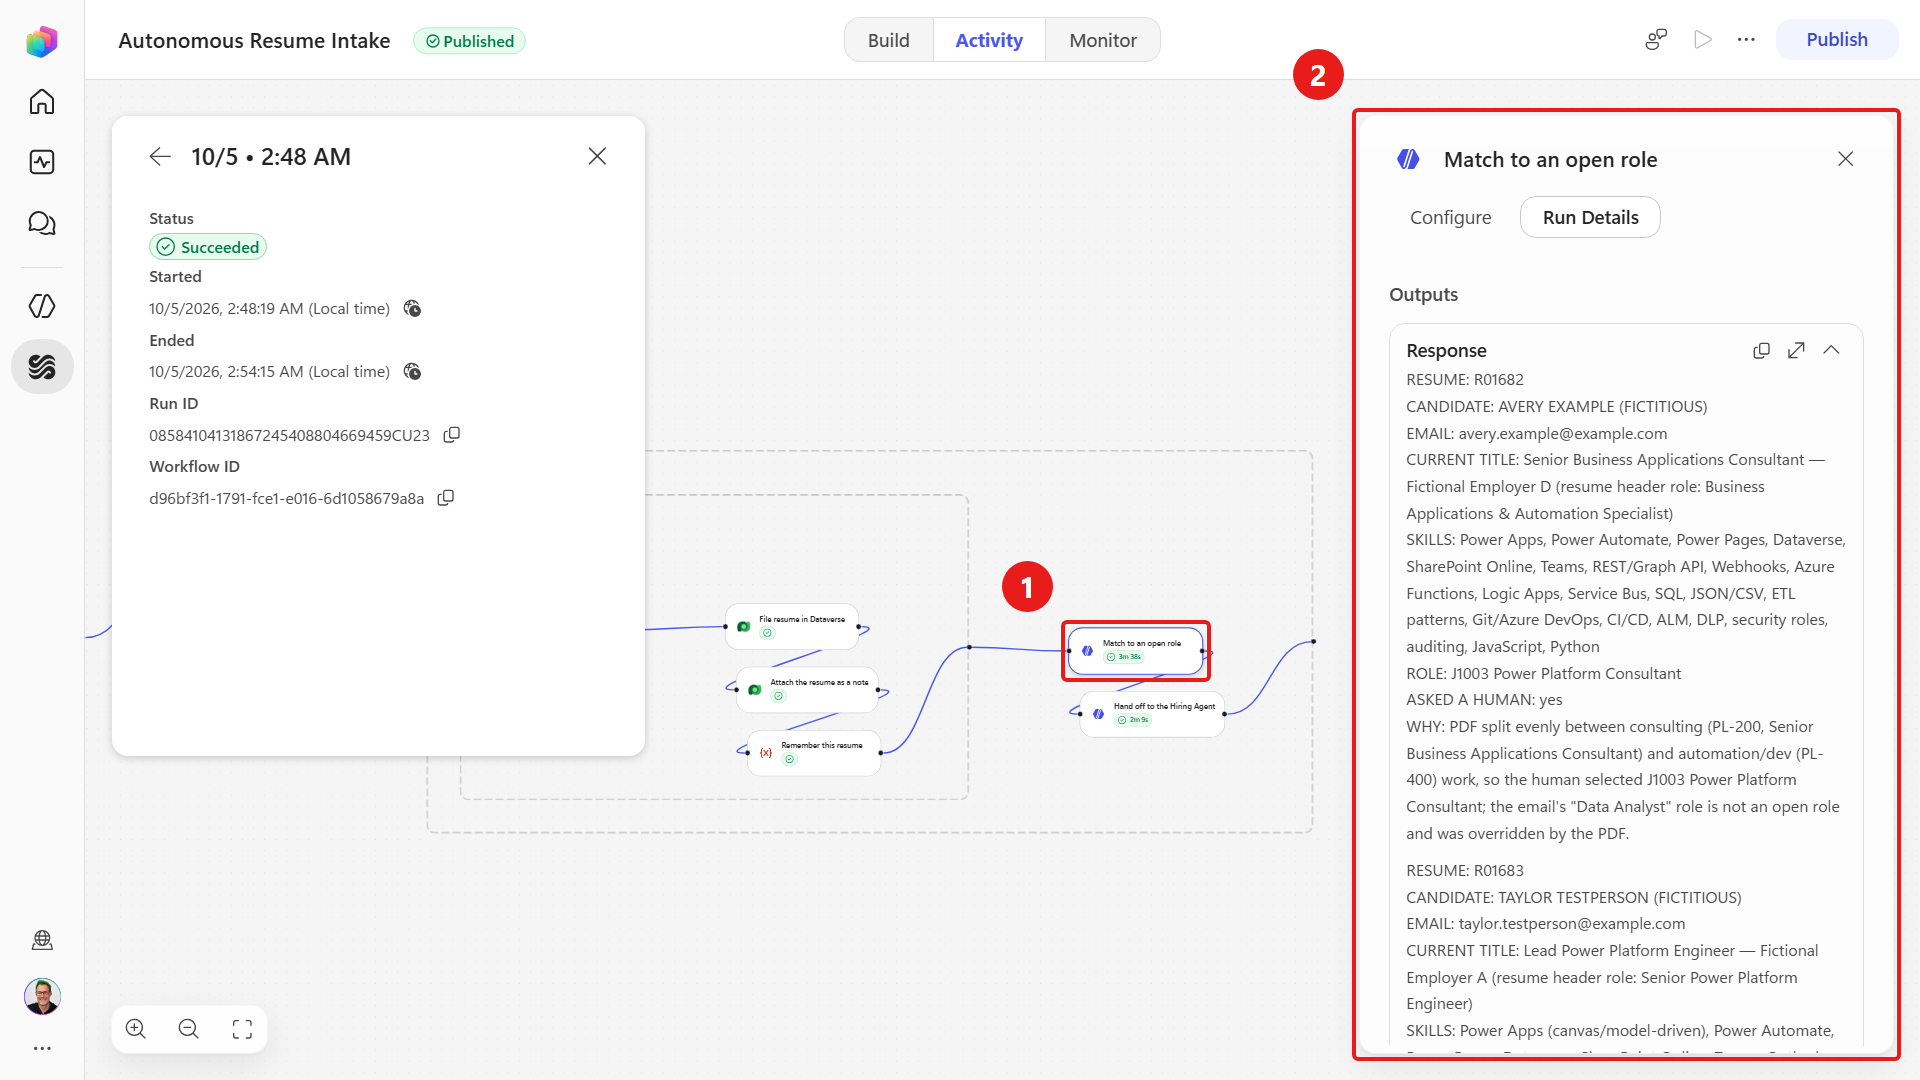
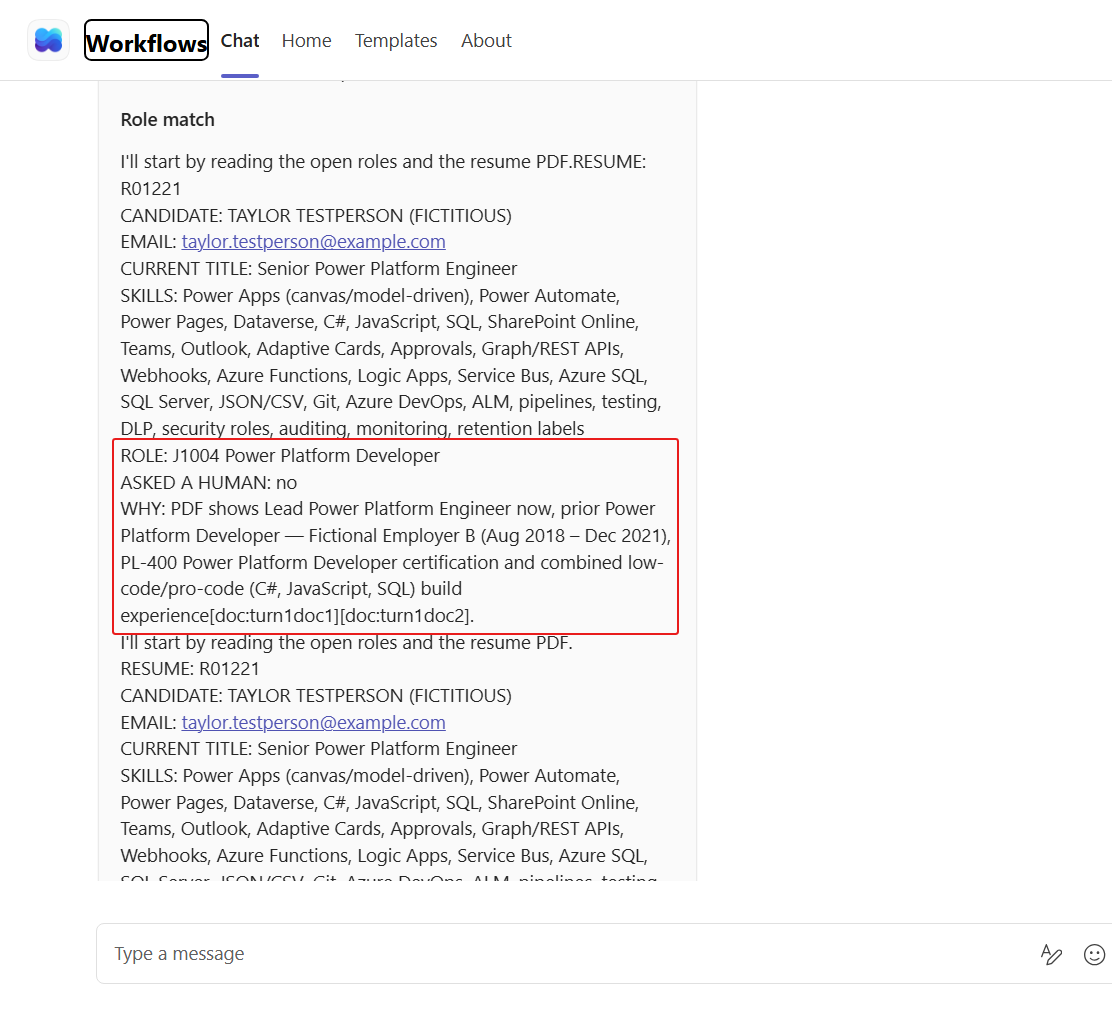
Check each candidate's ROLE, ASKED A HUMAN, and WHY against the PDF and any human answer. A clear PDF match should override the email without a question. The language model may judge the role evidence differently between runs, so assistance is required only when the PDF leaves a genuine ambiguity. The illustrated output is Avery's result; verify Taylor's complete result in the same node output.
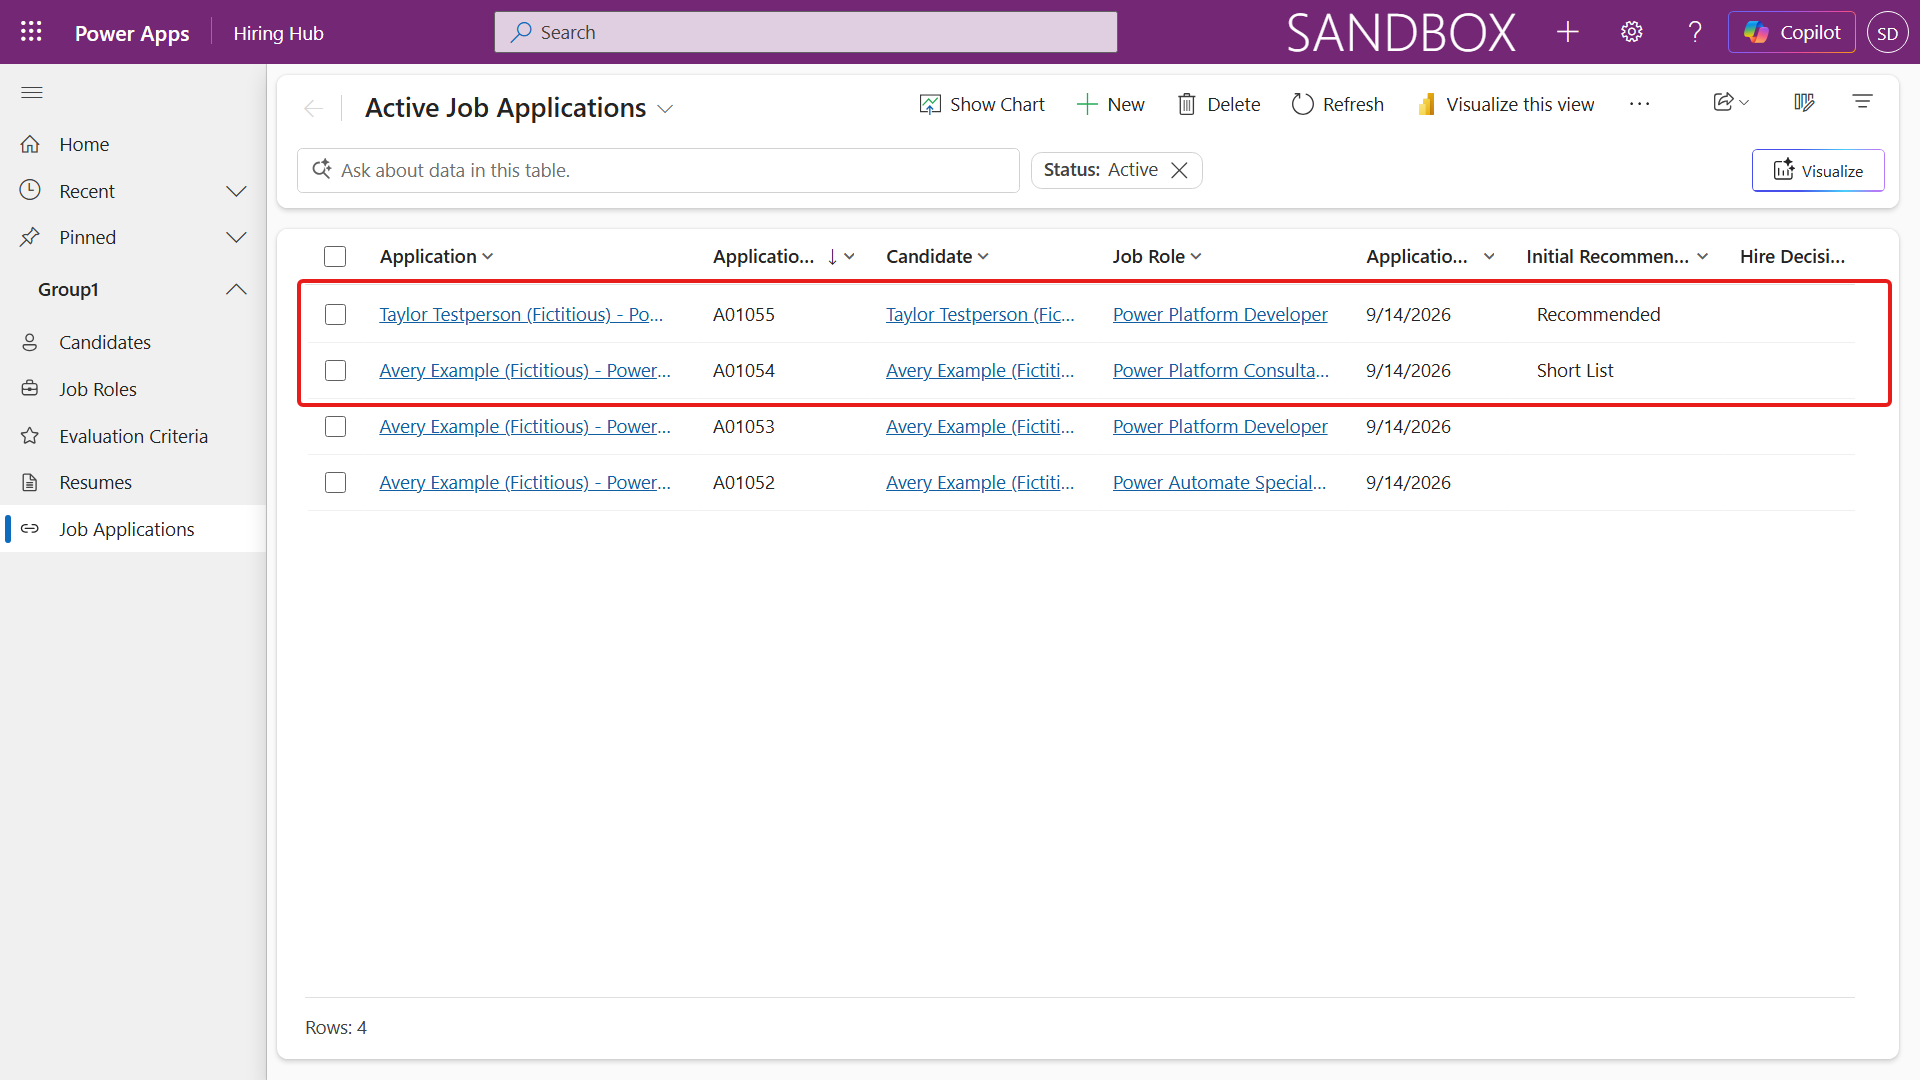
Open the Job Applications table in the Hiring Hub app (see Mission 01 if you need the route) and confirm the applications exist, and that both candidates were matched to existing Candidate records rather than duplicated.
8.4 Notify the recruiter with a list-linked Teams card
Next we will send the recruitment team the match result and links to the Resumes and Job Applications lists in Hiring Hub. The recruiter can locate the records by the numbers reported in the card.
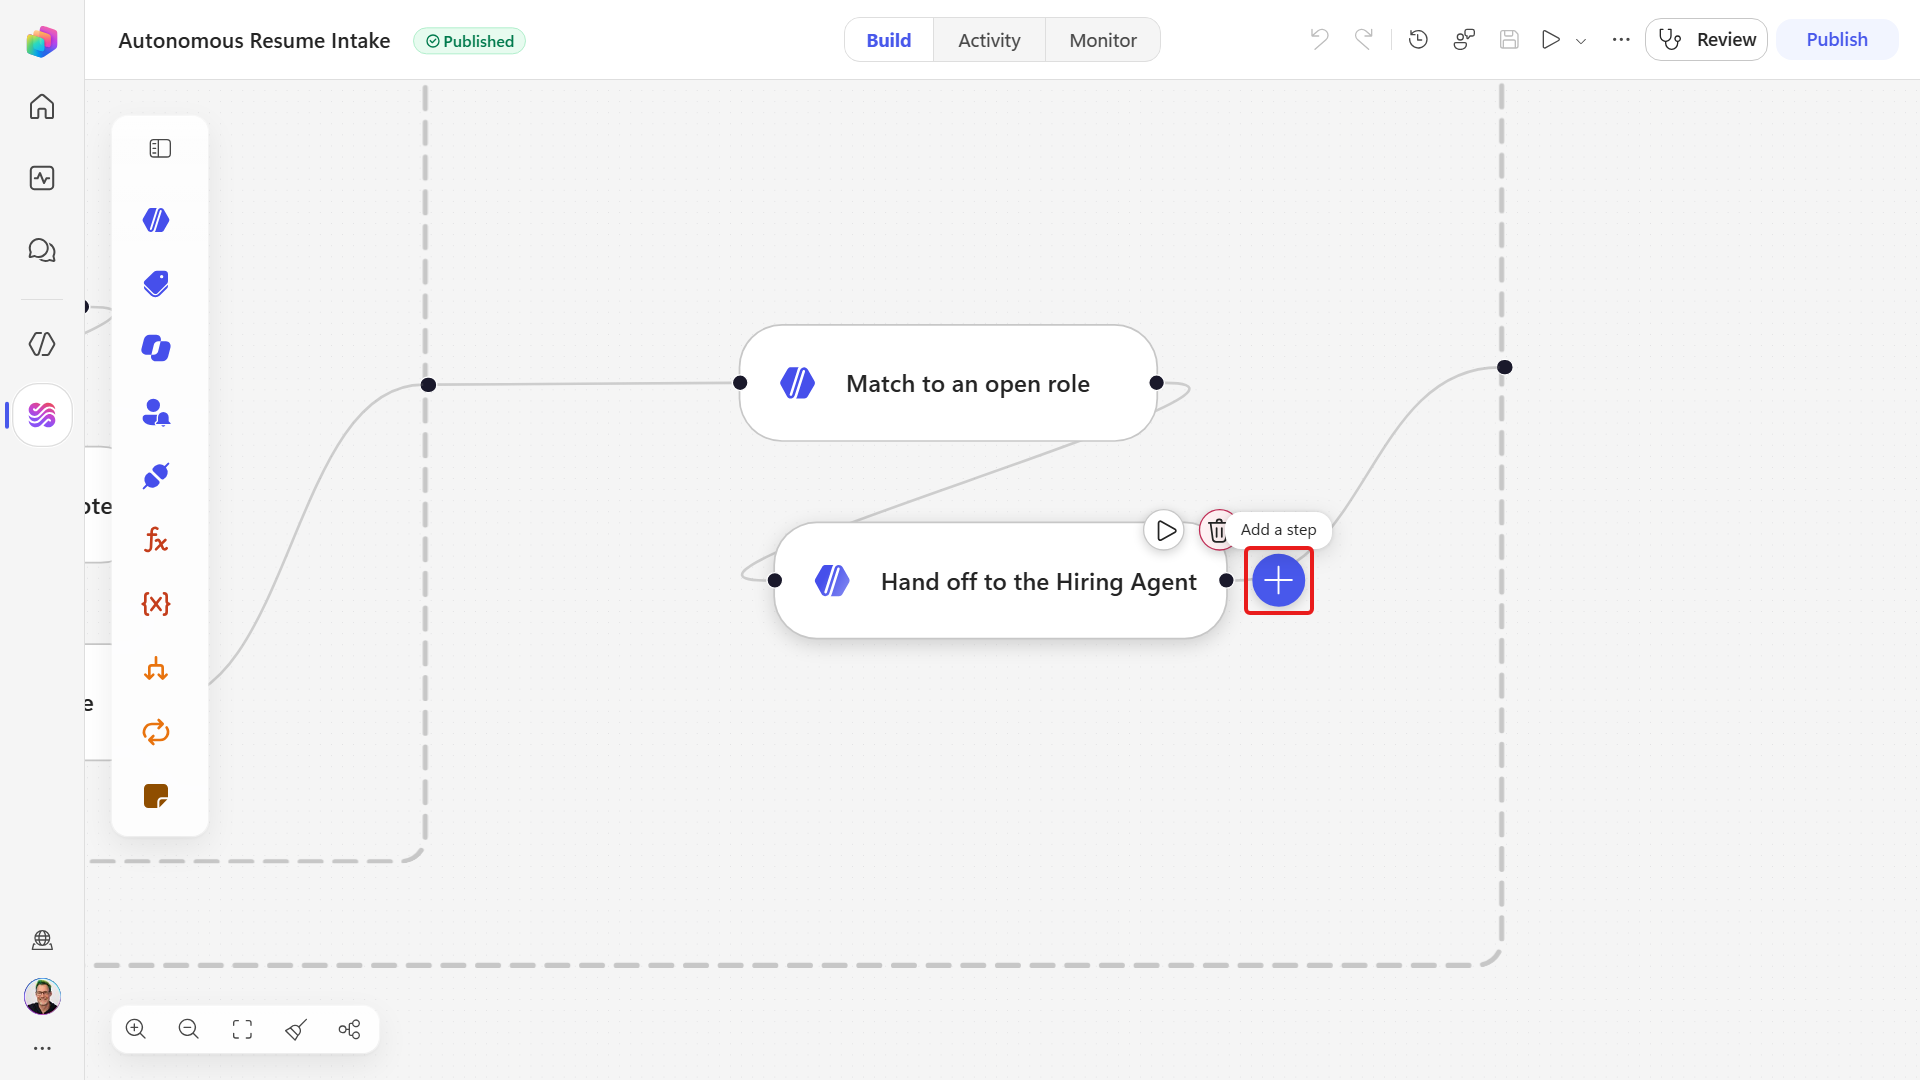
On the canvas, select Add a step after Hand off to the Hiring Agent inside the Process application scope.
In the Add panel's search box, type
post card.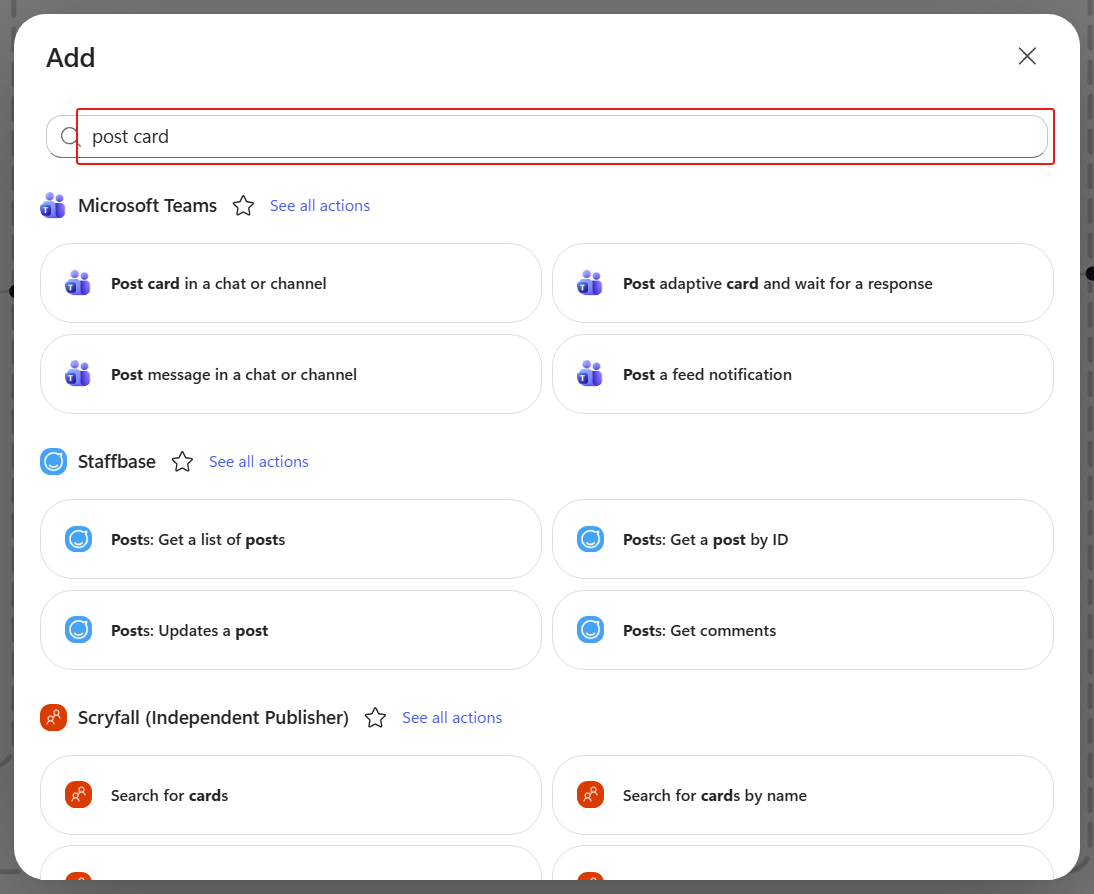
The results are grouped by connector, and Microsoft Teams is the first group. Under it, select Post card in a chat or channel.
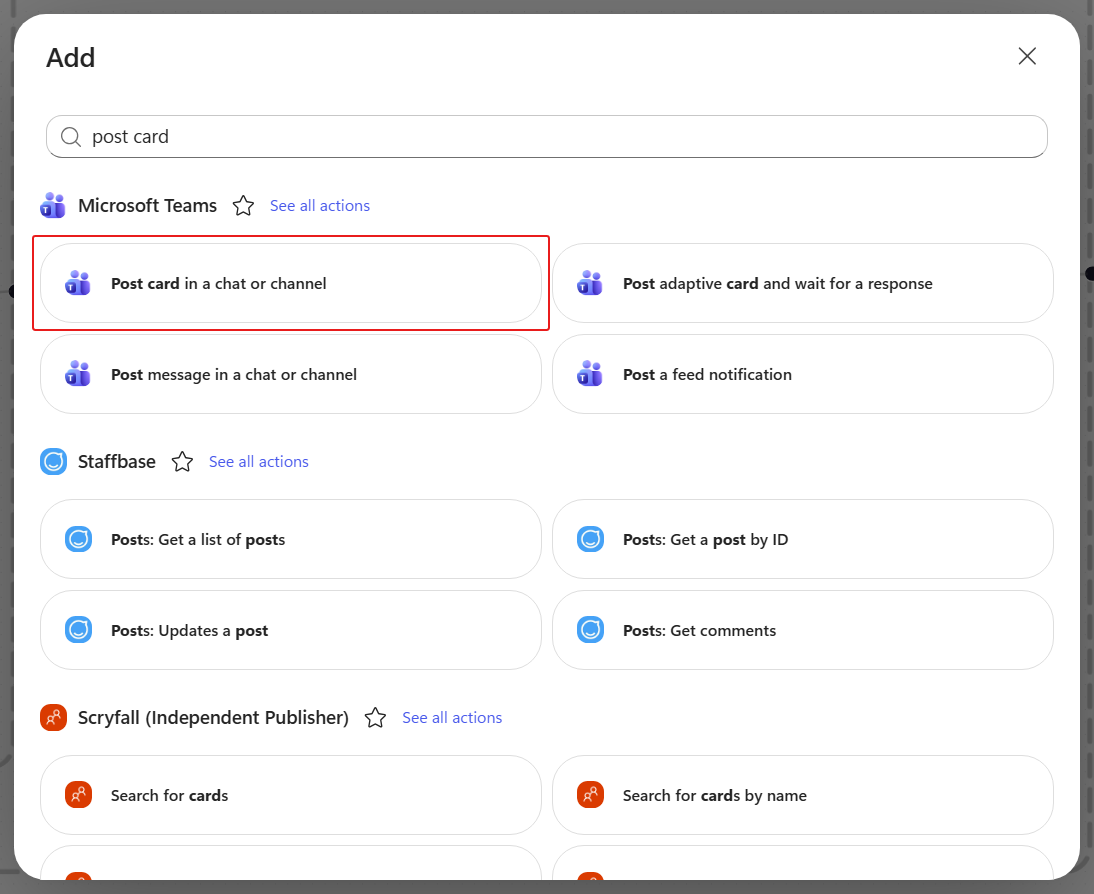
Rename the node to
Notify the recruiter in Teams- select its name at the top of the panel, type the new name and press Enter.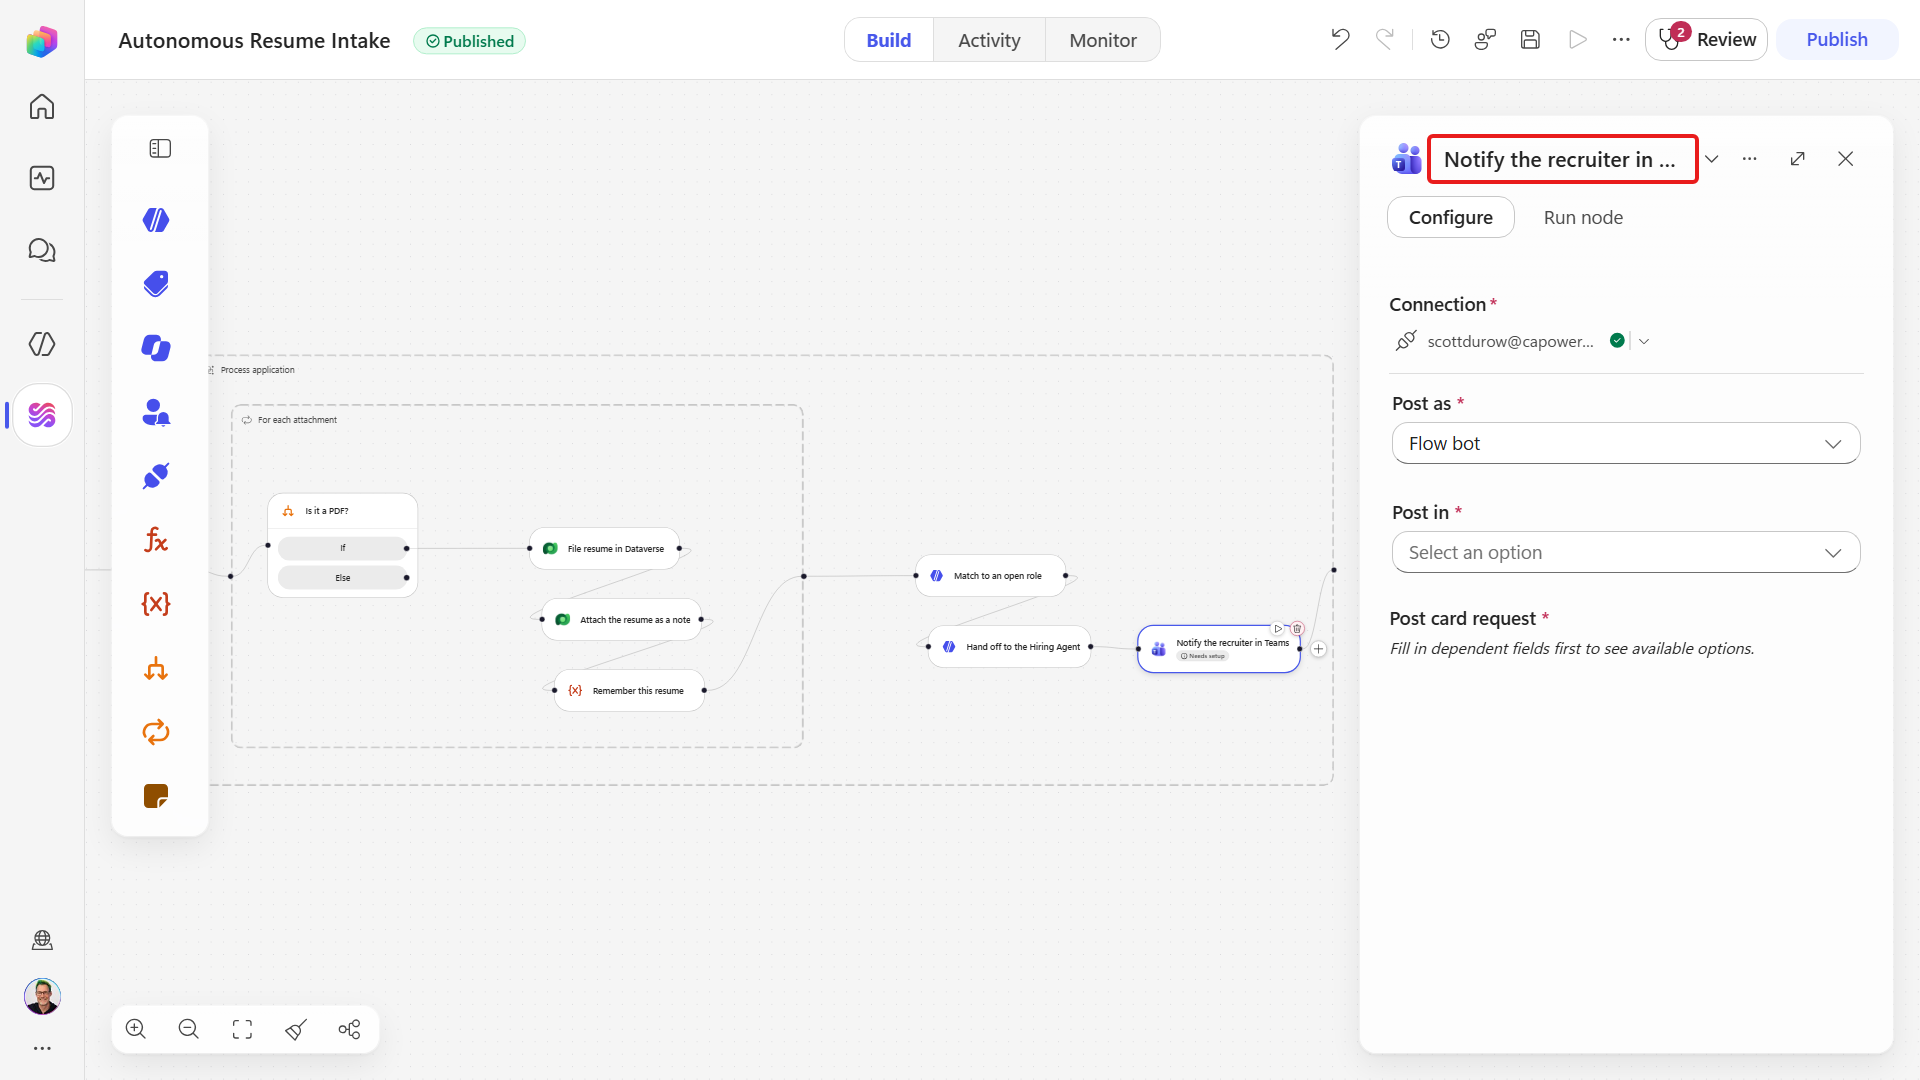
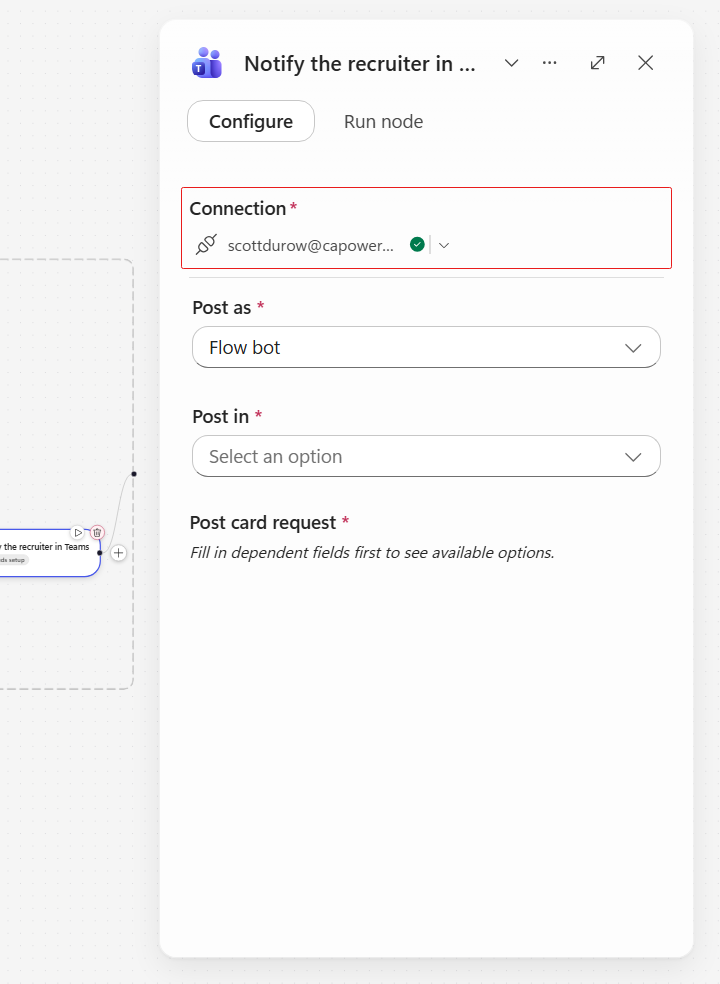
In the Connection box select Not connected, then Create new connection, then Create, and select your account tile. Teams needs its own connection - the Agents connection from Mission 07 does not cover it. Once connected, the box shows your account with a green tick.
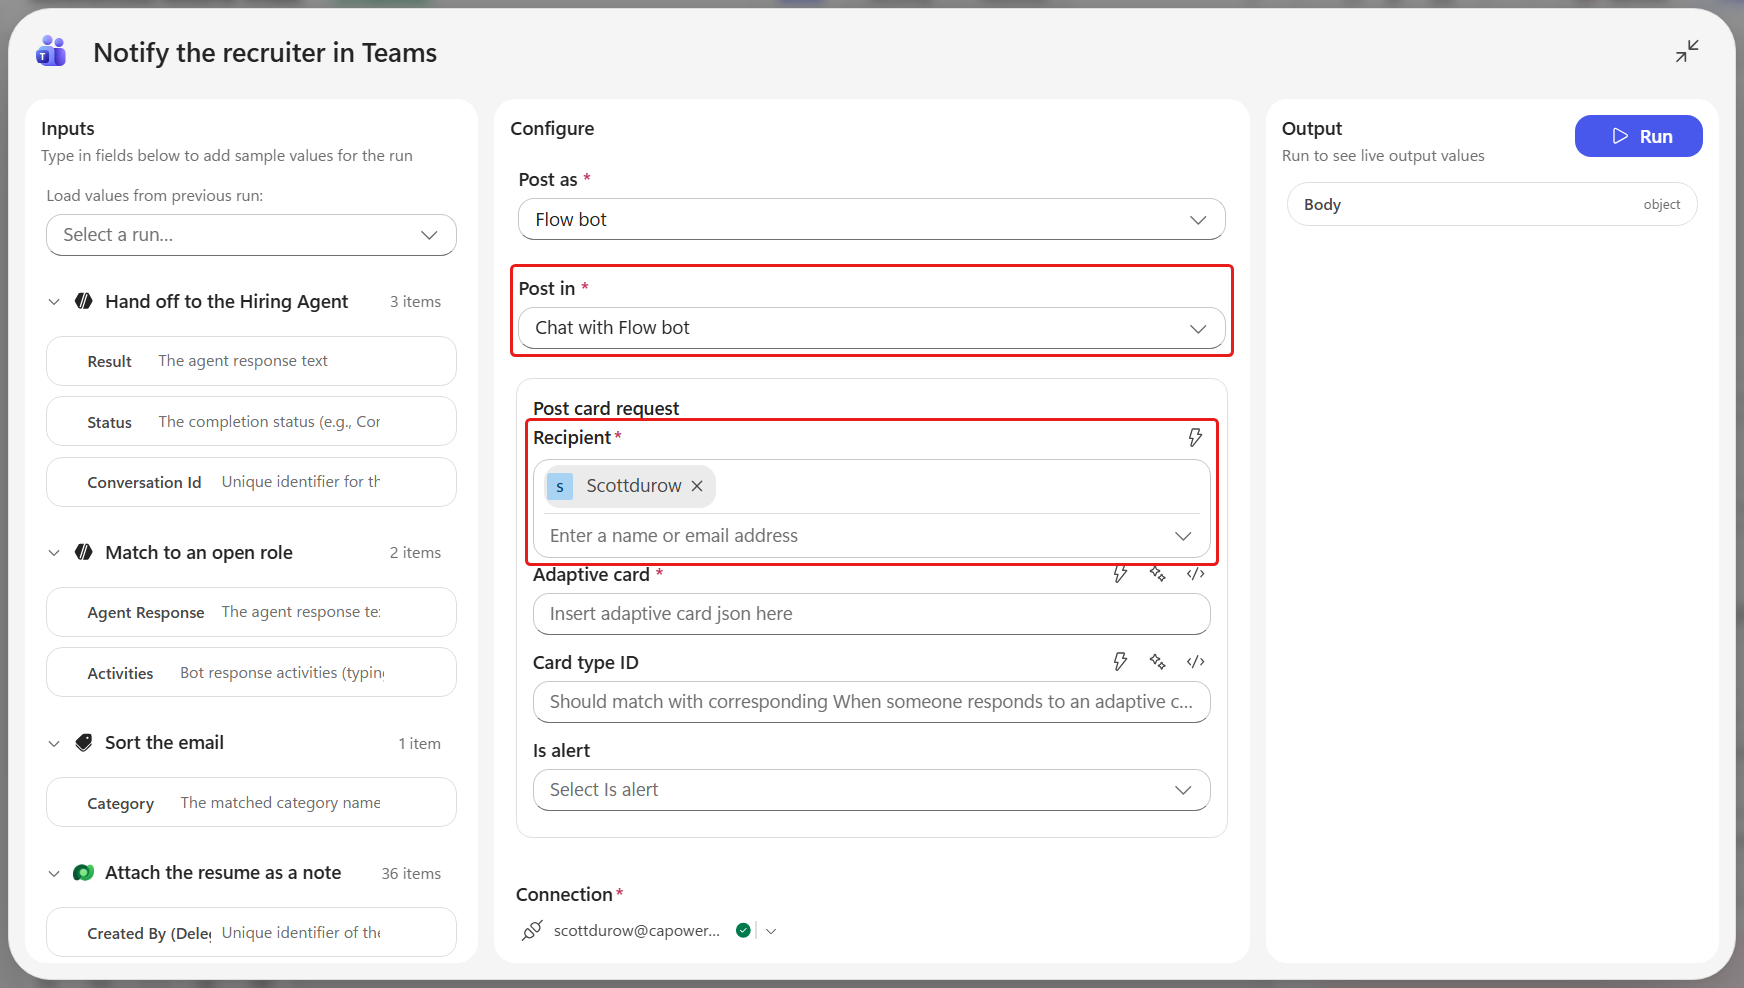
Fill in the node as follows. Leave Card Type ID and IsAlert empty.
Field Value Post as Flow bot (already selected) Post in Chat with Flow bot Recipient Type your own email address, then select yourself from the list that appears so your name becomes a person chip Adaptive Card The JSON below, assembled in a text editor first Setting Post in makes a Post card request group appear containing Recipient, Adaptive Card, Card Type ID and IsAlert. Before you connect, those fields read Could not load options and Fill in dependent fields first, which is expected.
If you only type an address into Recipient and move on without picking the person from the list, the node keeps its Needs setup badge and saving fails with body/recipient: Recipient is required.
Select
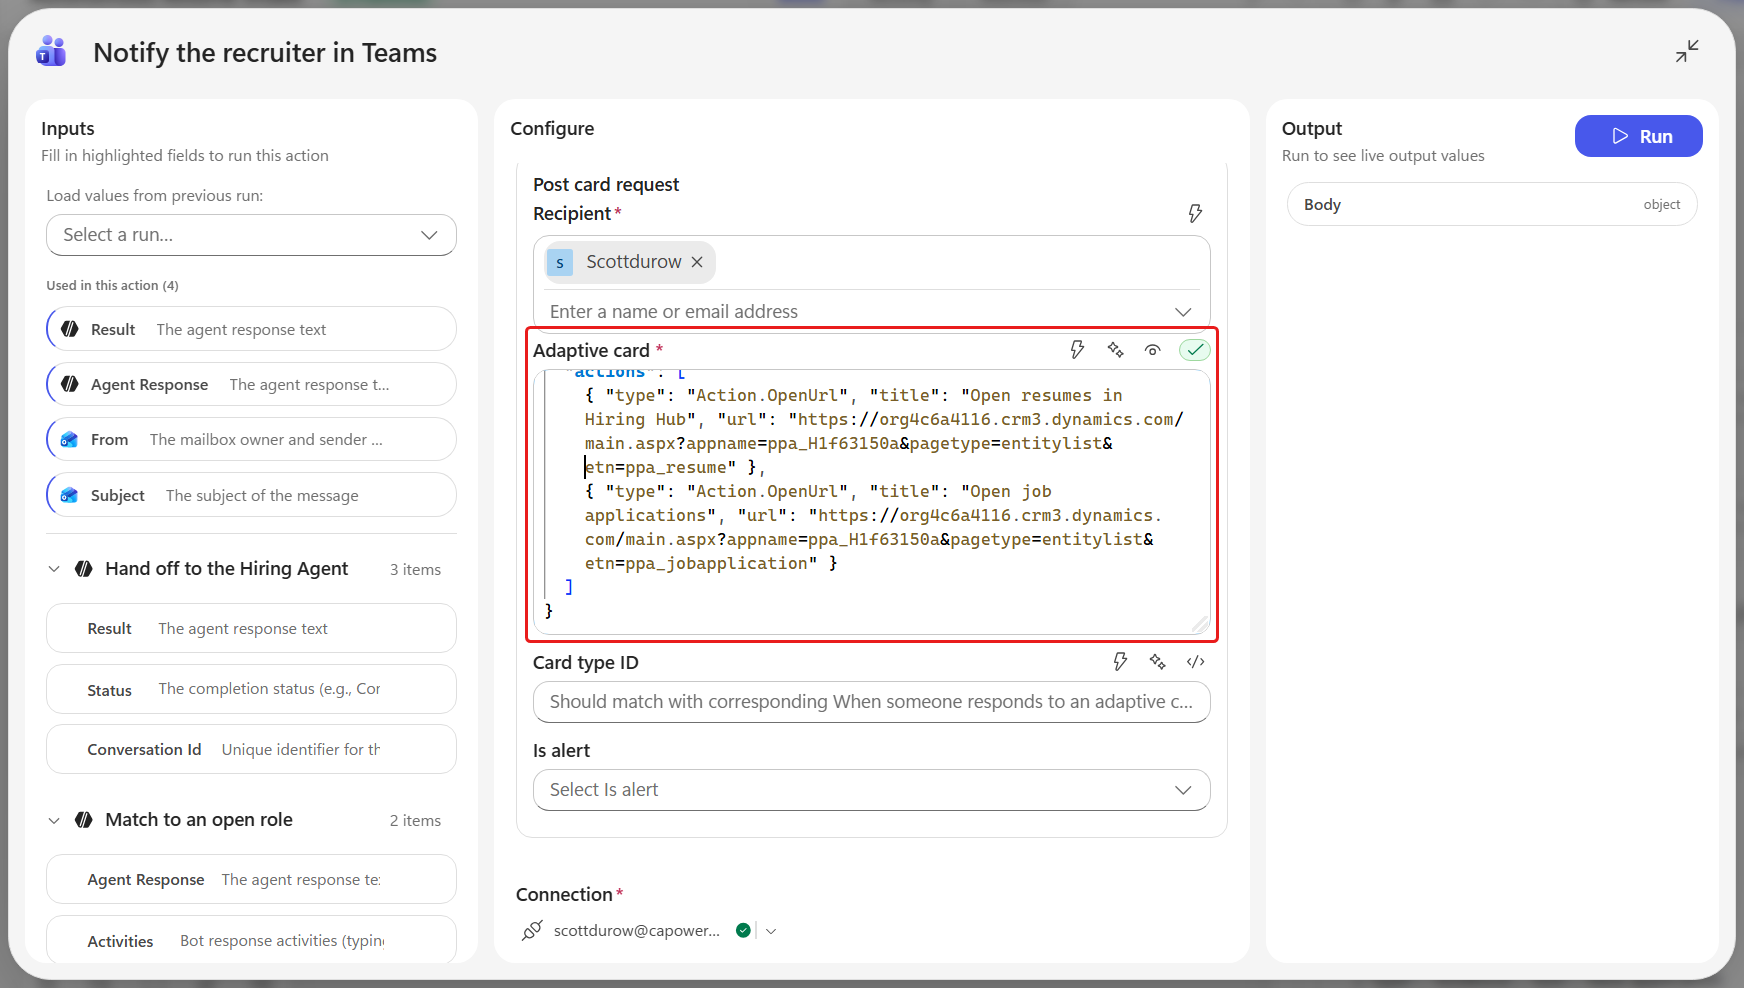
</>Switch to expression mode for Adaptive Card, then copy the finished card below and paste it into the expanded editor in one go.Before you paste, replace both
«AppUrl»placeholders with your literal app URL: the part of the Hiring Hub address up to and including the appid. Copy it straight from your browser's address bar while the Hiring Hub app is open, keeping everything fromhttps://up to the end of theappid=GUID - for examplehttps://«your-org».crm.dynamics.com/main.aspx?appid=«HiringHubAppId».text{ "$schema": "http://adaptivecards.io/schemas/adaptive-card.json", "type": "AdaptiveCard", "version": "1.4", "body": [ { "type": "TextBlock", "text": "New application received", "weight": "Bolder", "size": "Medium" }, { "type": "TextBlock", "text": "Filed automatically by the Autonomous Resume Intake workflow.", "wrap": true, "isSubtle": true }, { "type": "FactSet", "facts": [ { "title": "From", "value": "@{replace(replace(replace(replace(coalesce(triggerOutputs()?['body/from'],''),decodeUriComponent('%5C'),'/'),decodeUriComponent('%22'),''),decodeUriComponent('%0D'),''),decodeUriComponent('%0A'),decodeUriComponent('%5Cn'))}" }, { "title": "Subject", "value": "@{replace(replace(replace(replace(coalesce(triggerOutputs()?['body/subject'],''),decodeUriComponent('%5C'),'/'),decodeUriComponent('%22'),''),decodeUriComponent('%0D'),''),decodeUriComponent('%0A'),decodeUriComponent('%5Cn'))}" } ]}, { "type": "TextBlock", "text": "Resumes processed", "weight": "Bolder", "spacing": "Medium" }, { "type": "TextBlock", "text": "@{replace(replace(replace(replace(coalesce(variables('ProcessedResumes'),''),decodeUriComponent('%5C'),'/'),decodeUriComponent('%22'),''),decodeUriComponent('%0D'),''),decodeUriComponent('%0A'),decodeUriComponent('%5Cn'))}", "wrap": true }, { "type": "TextBlock", "text": "Role match", "weight": "Bolder", "spacing": "Medium" }, { "type": "TextBlock", "text": "@{replace(replace(replace(replace(coalesce(body('Match_to_an_open_role')?['message'],''),decodeUriComponent('%5C'),'/'),decodeUriComponent('%22'),''),decodeUriComponent('%0D'),''),decodeUriComponent('%0A'),decodeUriComponent('%5Cn'))}", "wrap": true }, { "type": "TextBlock", "text": "Intake and applications", "weight": "Bolder", "spacing": "Medium" }, { "type": "TextBlock", "text": "@{replace(replace(replace(replace(coalesce(body('Hand_off_to_the_Hiring_Agent')?['result'],''),decodeUriComponent('%5C'),'/'),decodeUriComponent('%22'),''),decodeUriComponent('%0D'),''),decodeUriComponent('%0A'),decodeUriComponent('%5Cn'))}", "wrap": true } ], "actions": [ { "type": "Action.OpenUrl", "title": "Open resumes in Hiring Hub", "url": "«AppUrl»&pagetype=entitylist&etn=ppa_resume" }, { "type": "Action.OpenUrl", "title": "Open job applications", "url": "«AppUrl»&pagetype=entitylist&etn=ppa_jobapplication" } ] }Expression mode keeps the complete JSON in one multiline editor. Editing the long values in the one-line token picker turns them into chips and makes it easy to leave a stray quote that fails only when the card runs.
Why the four replace calls
Everything inside
"text"has to survive as a JSON string. An agent writes for humans, so it will eventually write a sentence likethe email claimed "Data Analyst"- and that bare"closes the string early, making the whole card invalid. Teams rejects it with The specified Teams flowbot message's message body is invalid JSON.Each nested
replaceneutralizes one character class:%5Cbackslash becomes/,%22double quote is removed,%0Dcarriage return is removed, and%0Anewline becomes the two characters\nthat JSON wants. They are written asdecodeUriComponent(...)because the expression editor cannot express a bare double quote inside a single-quoted literal - an escaped one produces areplacethat matches nothing, reports no error, and leaves the quotes in place.The
coalesce(…, '')at the centre handles the empty case: an agent that returned nothing yields an empty string rather than a null that would break the card.The app URL is hard-coded here on purpose - get the card working first with a value you can see. Mission 09 explains how an environment variable makes those links work after a move to another environment.
Both buttons open a list, not a single record
A per-record link would need the row's GUID, and nothing in the workflow ever learns it because the agent created that row - the only identifier anyone sees is the short Application Number, which
pagetype=entityrecordwill not accept. Opening the list avoids the problem, and the card already carries the agent's report so the reviewer can spot the right row immediately. If you want a direct link later, look the row up by its number with a List rows step and use the GUID that returns.Replace
«your-org»with your own org name and«HiringHubAppId»with your Hiring Hub app id - you can read both from the browser address bar while the Hiring Hub app is open. No«characters should remain anywhere in the card.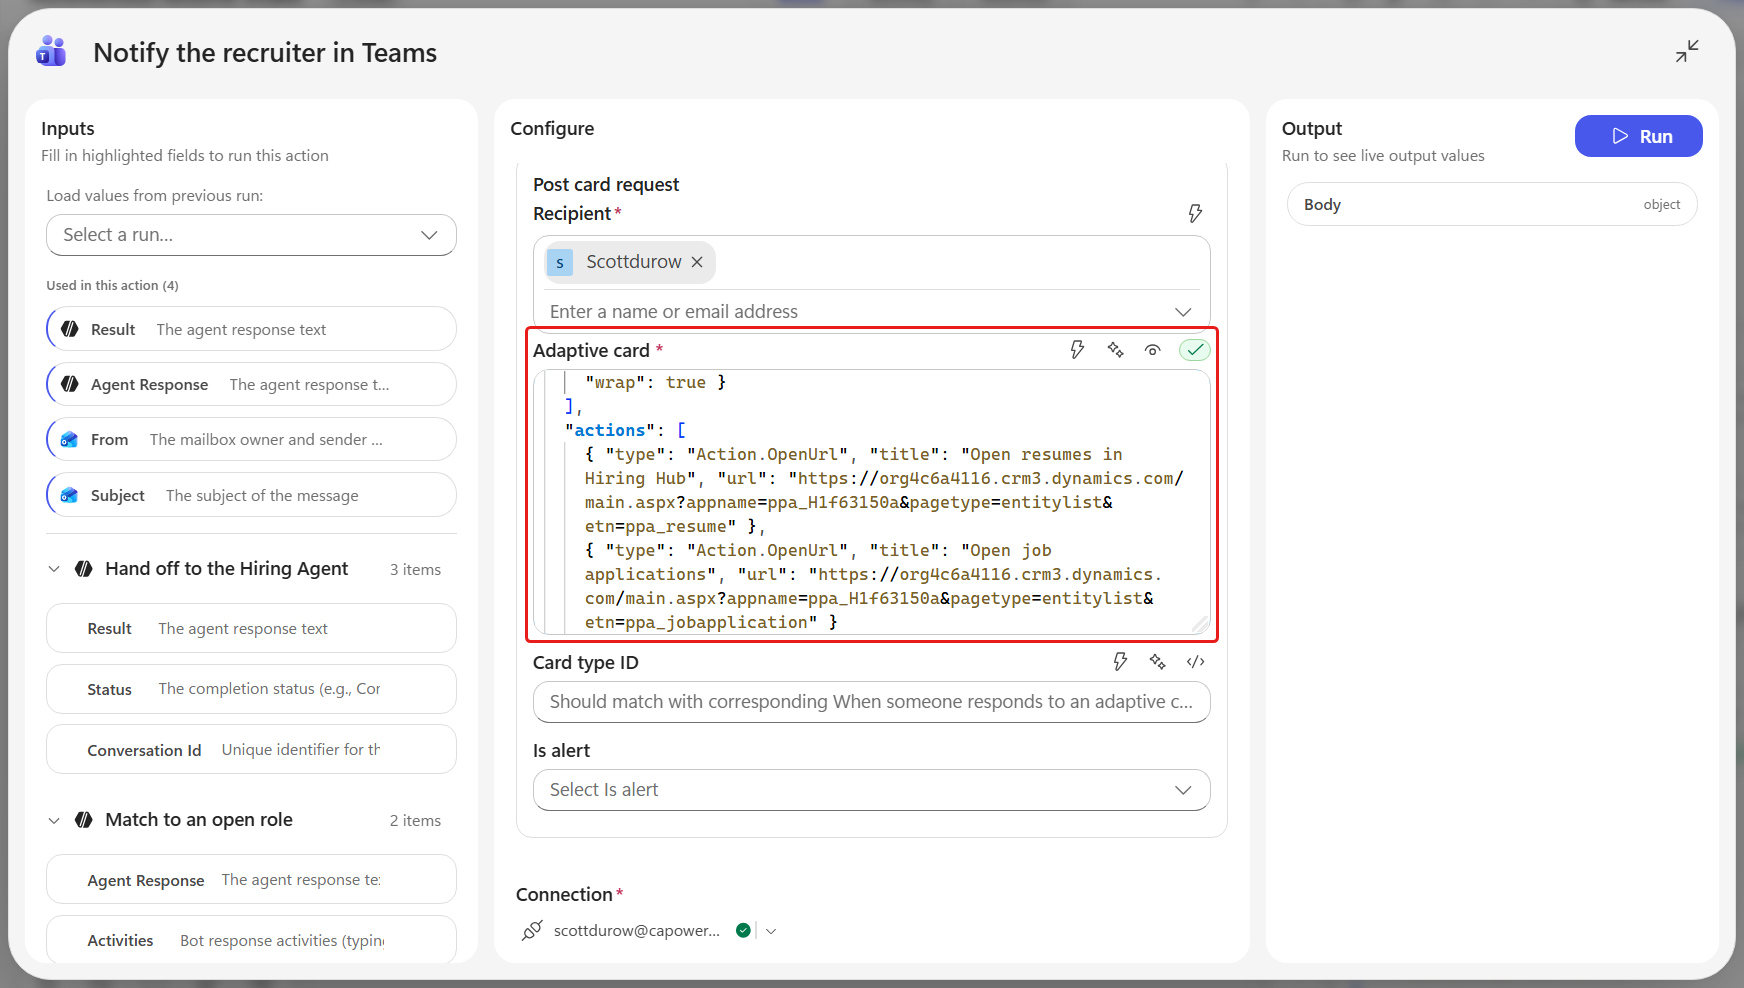
On the command bar select Save. The Needs setup badge disappears from the node.
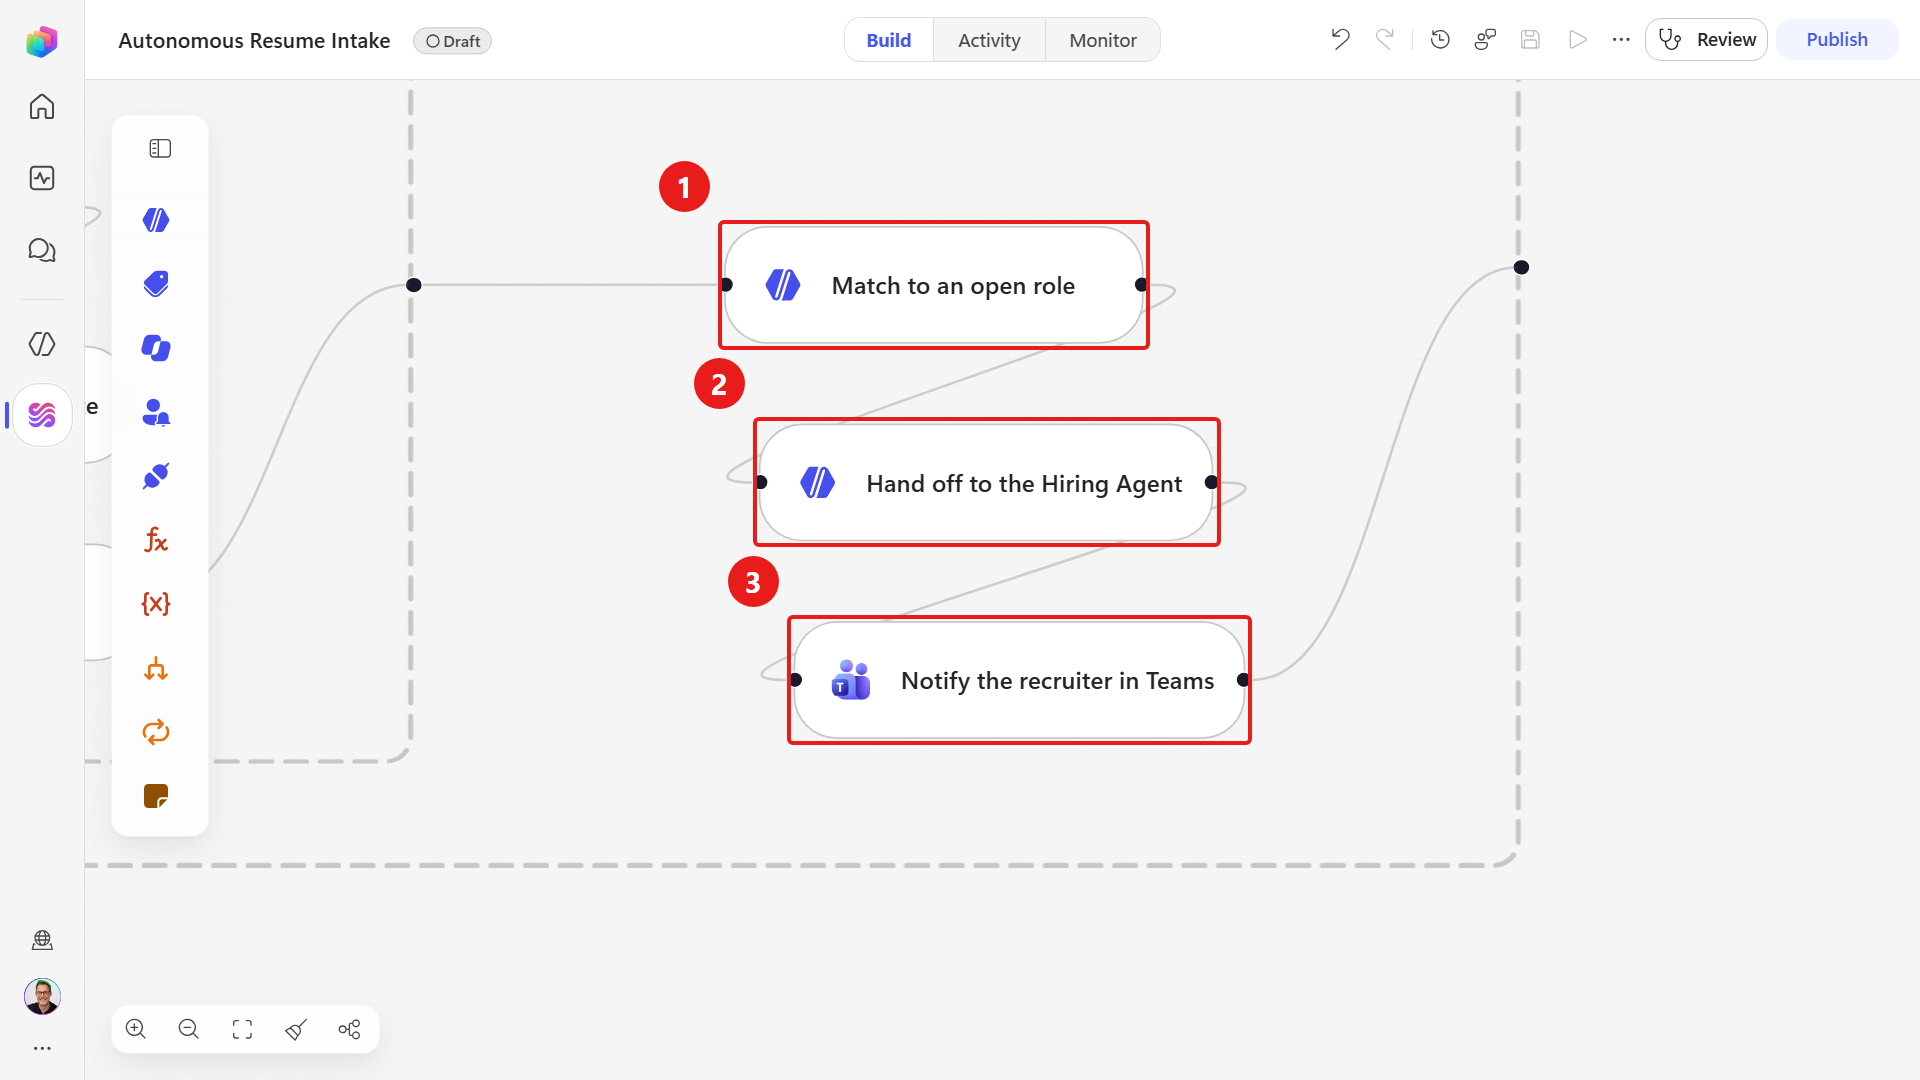
Now test it by posting a real card. Posting sends a real message, so use a recipient or channel you own.
Publish the workflow, then email the monitored mailbox another application with only Taylor's PDF attached. This notification test processes one candidate; the two-candidate test is in Lab 8.3. Now that an Agent node sits in the branch this run takes 4-6 minutes, almost all of it inside the agent, and it stays at Running the whole time. That is normal - do not assume it has hung and start re-sending email.
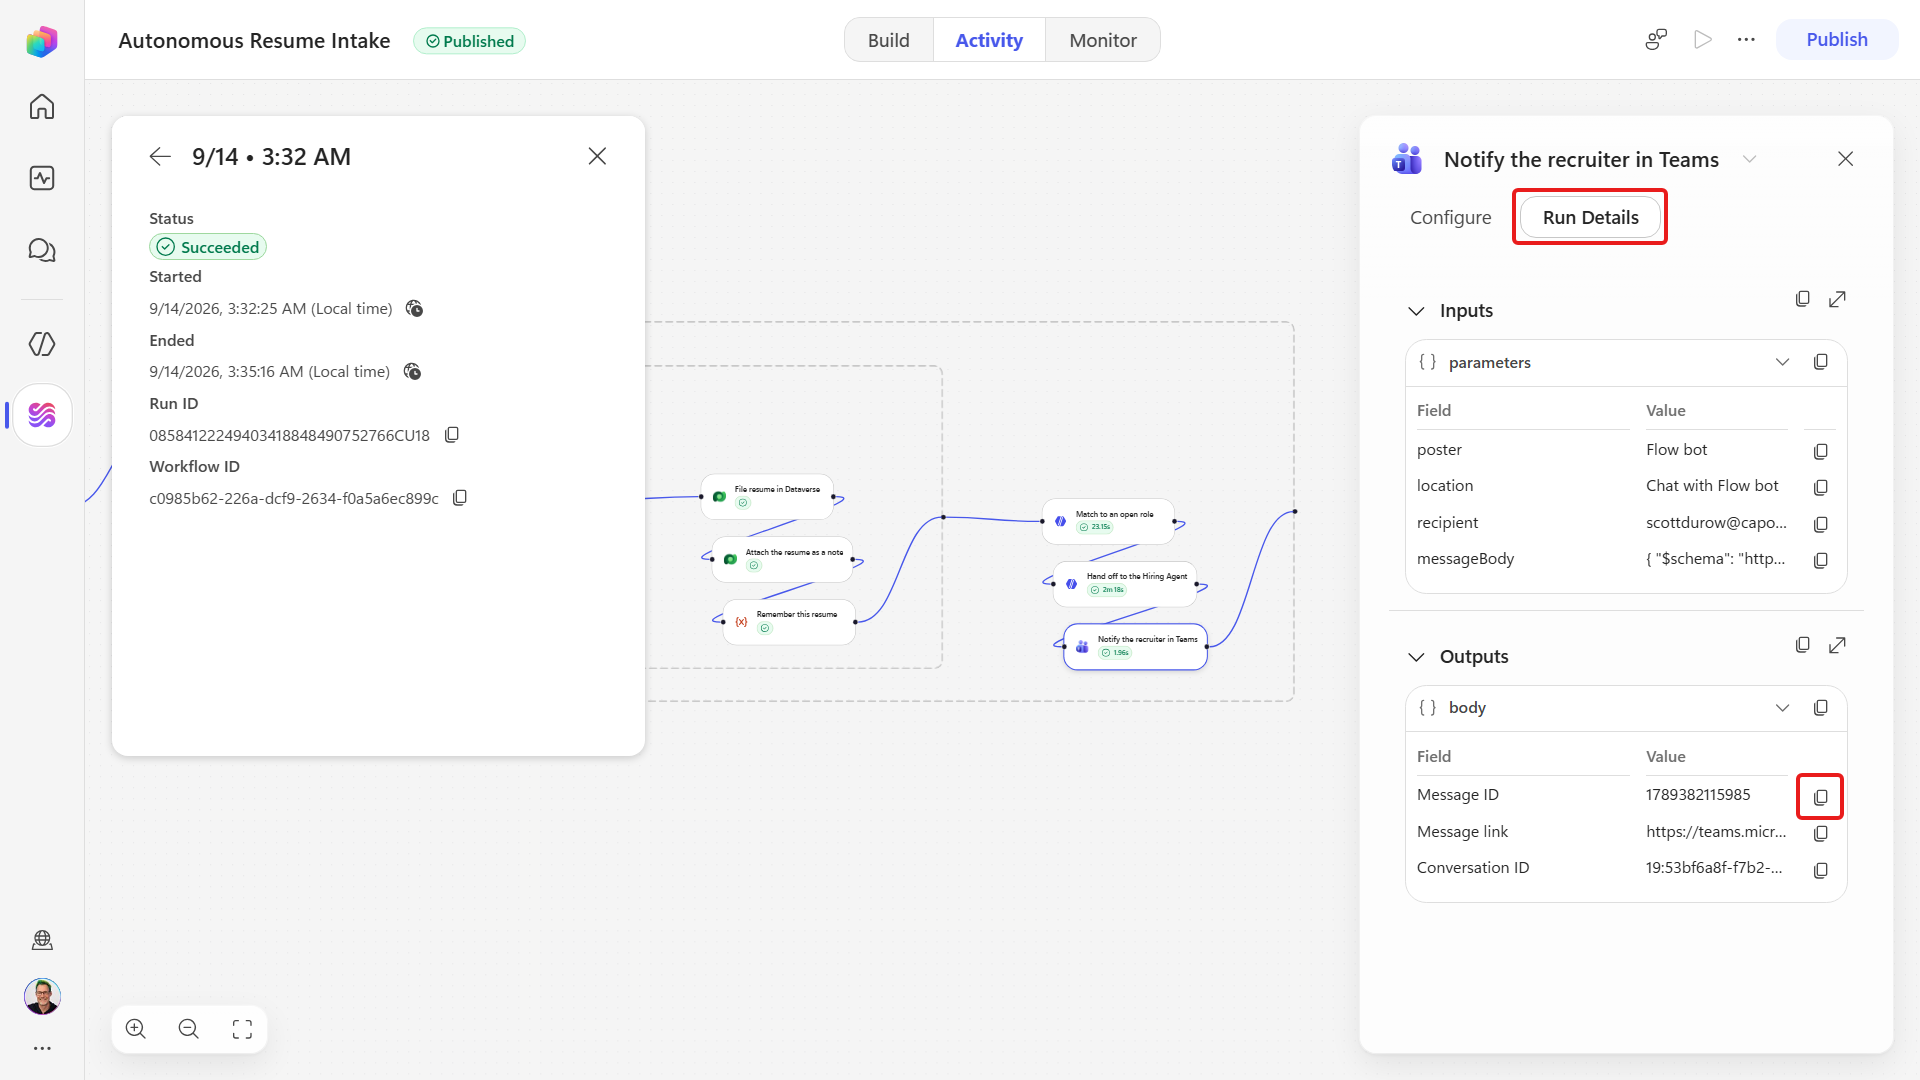
Open the run in Activity and select the Notify the recruiter in Teams node. It returns a Teams Message ID and a Message link to the posted card.
Open the recipient's Teams Workflows chat. The card renders with the match facts and both buttons.
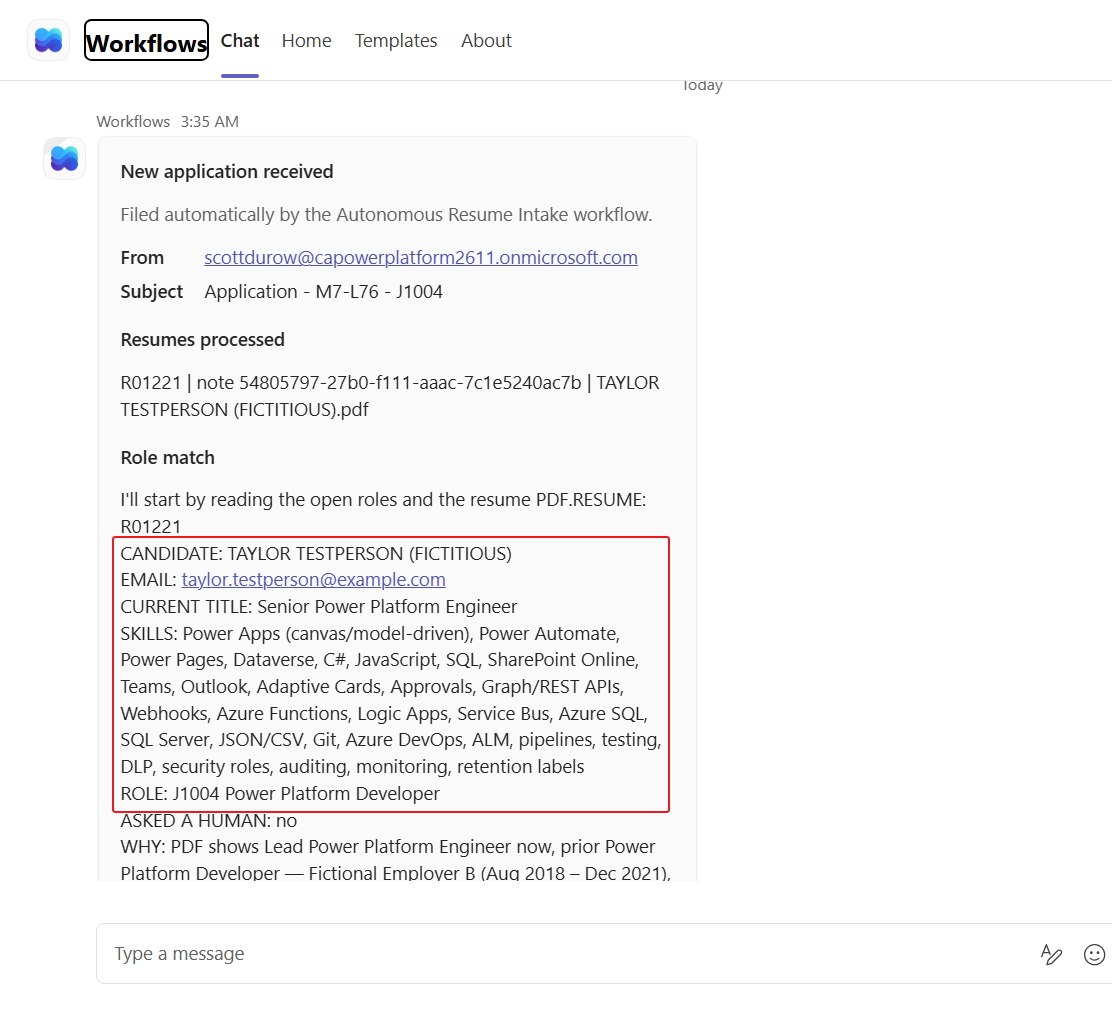
Review the Role match section and confirm it carries Taylor's PDF-grounded decision, including whether the inline agent asked a person.
Scroll to the bottom and confirm the Hiring Agent matched Taylor's existing Candidate record and the two list-link buttons are present.
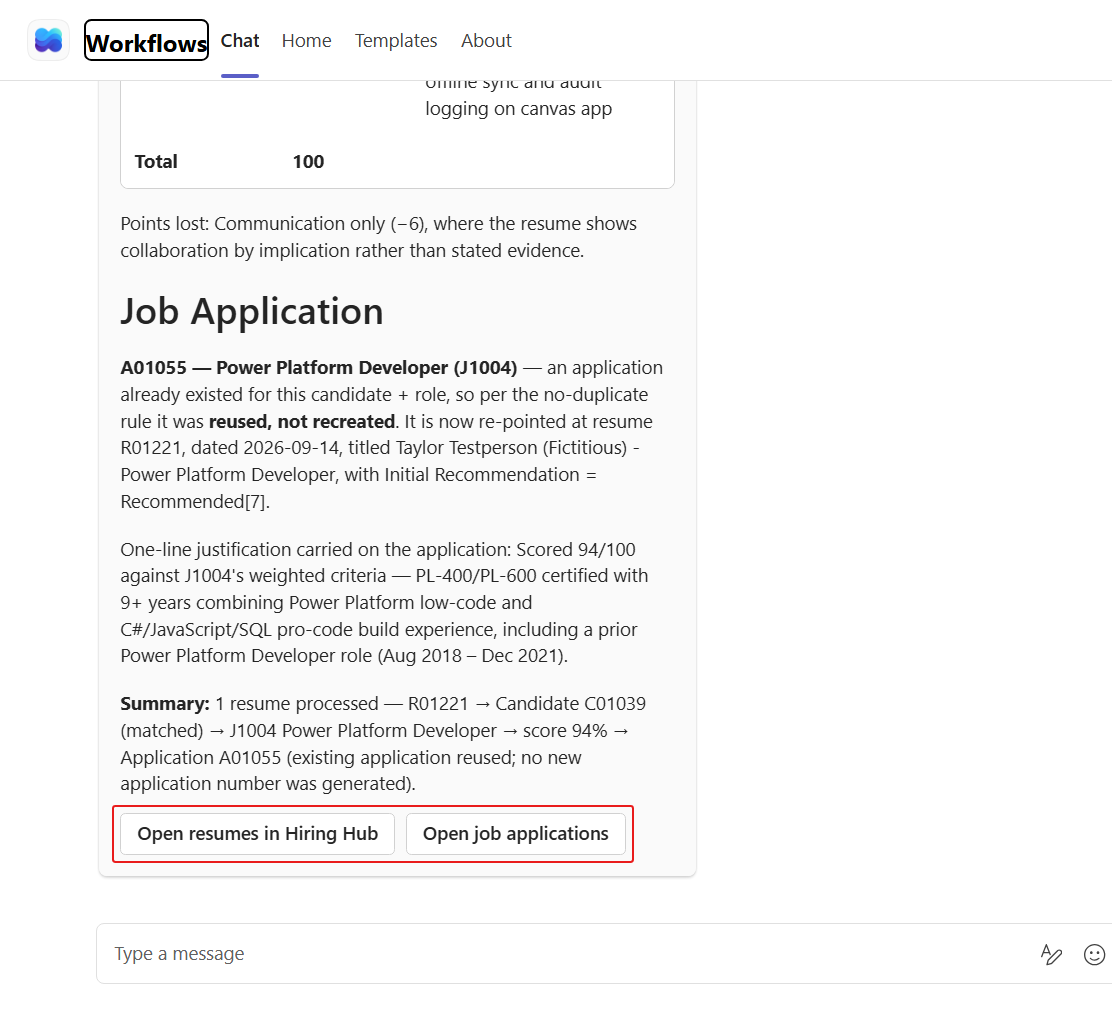
Select Open resumes in Hiring Hub. Find the Resume Number reported in the card in the Hiring Hub Resumes list, and check its candidate and title.
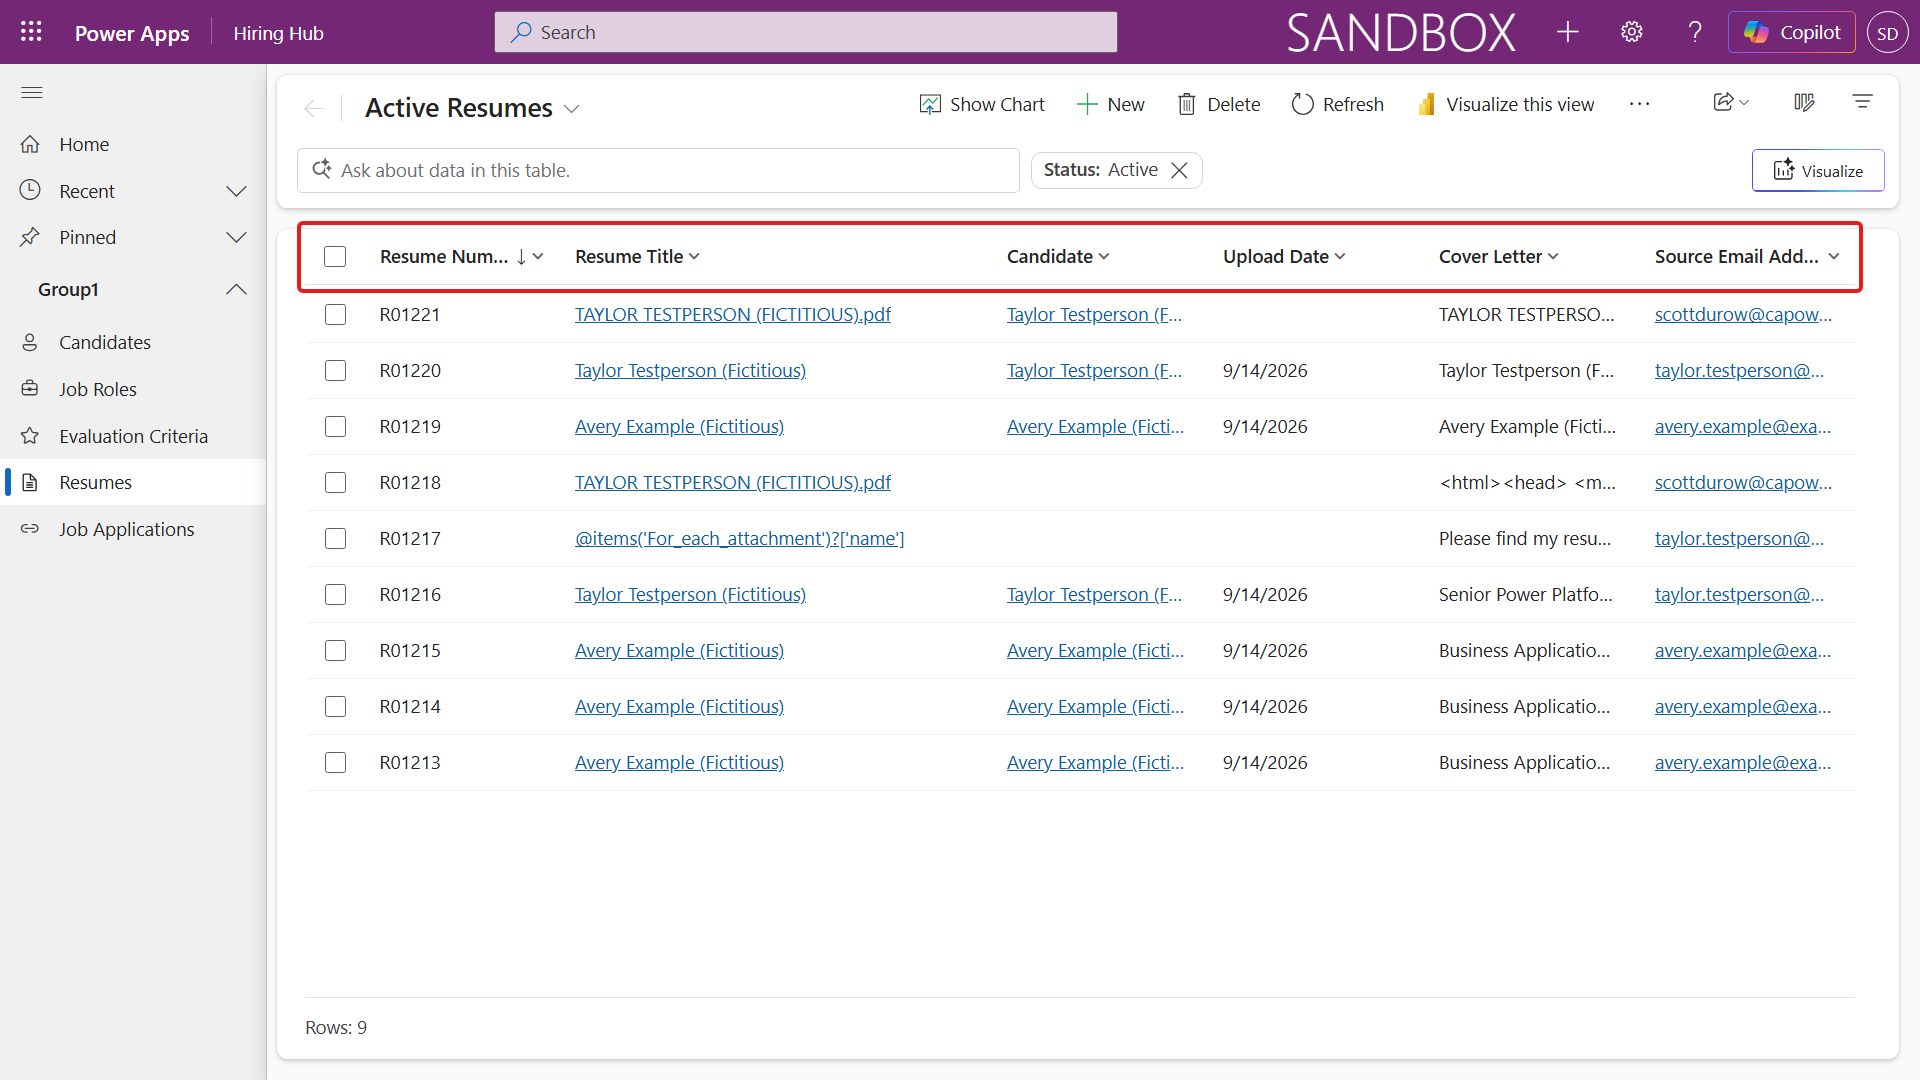
The successful run confirms that the workflow passed the PDF-grounded role match to the Hiring Agent and posted the resulting application details to Teams. The card gives the recruiter the match result and links to the Resume and Job Application lists in Hiring Hub.
✅ Mission Complete
Your workflow now processes resume PDFs, records the hiring results, and sends a Teams notification.
You can now:
✅ Inline agents: You added an agent scoped to one workflow node, gave it the Dataverse MCP server, and let it ask a human when the evidence conflicted.
✅ Connected agents in a workflow: You handed the scoring and the writes to your published Hiring Agent, reusing every skill you'd already built.
✅ Reading an agent's answer: You pulled a structured reply out of an agent node with coalesce and fed it into the next step.
✅ Evidence over assertion: You proved the agent read the resume PDF rather than the email body that contradicted it.
✅ List-linked notifications: You posted an Adaptive Card to Teams with links to the Resume and Job Application lists in Hiring Hub.
⏭️ Move to Human Oversight and Handling Alternative Flows mission
📚 Tactical Resources
🔗 Microsoft Teams connector reference