
🔐 Secure an MCP Server with OAuth 2.0
Welcome, agent. Your mission is Operation Clearance: connect a secured MCP server to a Microsoft Copilot Studio agent, with OAuth 2.0 standing guard at the door. No token, no entry. You'll register the credentials, wire up the authorization code flow, and prove that only authenticated operatives can reach the HR candidate files. 🎯🔑
This mission builds on the concepts from the Microsoft Copilot Studio ❤️ MCP mission. You worked with an unauthenticated MCP server there; here you'll secure a custom MCP server with OAuth 2.0 Authorization.
This mission uses the GitHub Copilot harness
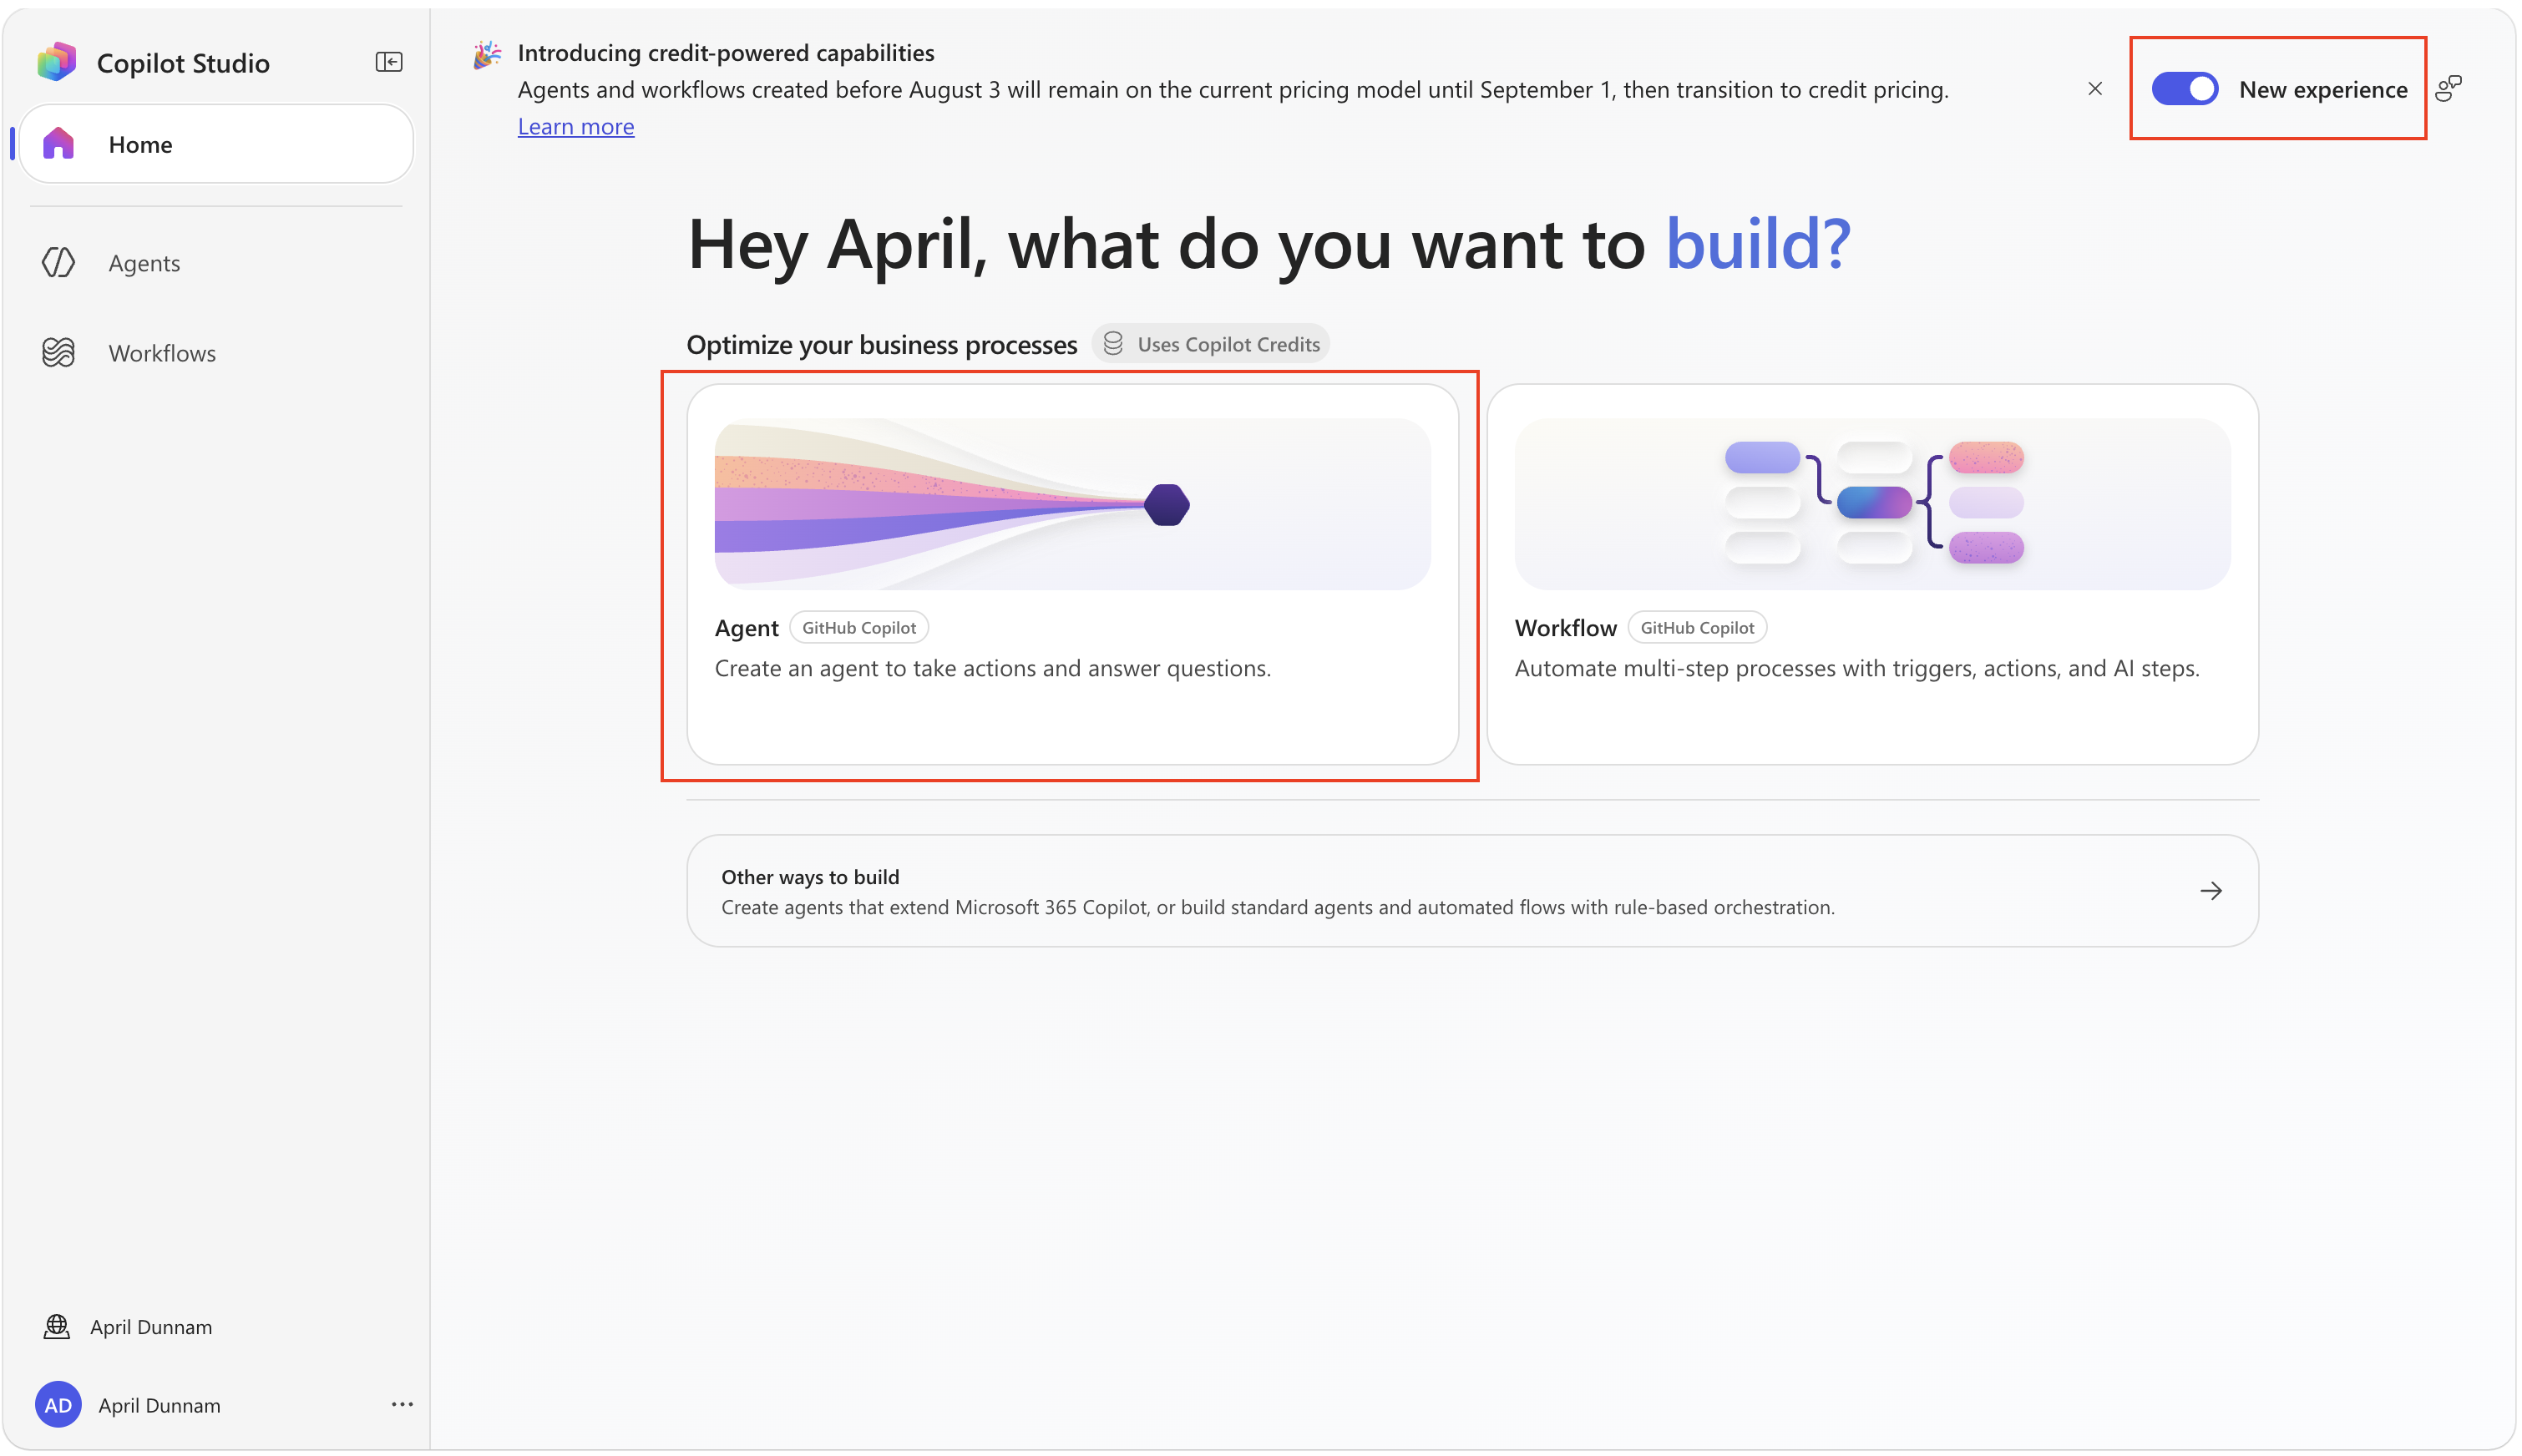
The Copilot Studio steps require an agent powered by the GitHub Copilot harness. Turn on New Experience before you create the agent.
Curriculum credit: This mission adapts material from the Microsoft Copilot Developer Camp. Thanks to Paolo Pialorsi and the Copilot Camp contributors for the original curriculum. This Agent Academy version updates the lab for the GitHub Copilot harness and presents it in the Special Ops format.
🎯 Mission objectives
In this mission, you'll build:
- A pre-built HR MCP server (.NET) that validates OAuth 2.0 JWT bearer tokens
- Two Microsoft Entra ID app registrations — a backend (the API) and a client (Copilot Studio)
- A Copilot Studio agent that consumes the secured MCP tools using OAuth 2.0 Authorization
⚙️ Prerequisites
- Microsoft Copilot Studio trial or paid account with access to the GitHub Copilot harness. If you don't have one, see the course setup instructions.
- Permission to register applications in Microsoft Entra ID (and to grant admin consent).
- Visual Studio Code, the .NET SDK, and the dev tunnel CLI installed locally.
GitHub Copilot harness billing
This mission uses the GitHub Copilot harness in Microsoft Copilot Studio, which uses usage-based billing. Building, testing in Preview, evaluating, and using the agent might consume Copilot Credits. Review the Copilot Credits billing overview before you begin.
What is the OAuth 2.0 authorization code flow?
Think of OAuth 2.0 as the clearance checkpoint for your agent. Here's how the flow plays out in this mission:
- User authentication — when a user triggers an MCP tool in your agent, they're asked to sign in to Microsoft Entra ID.
- Authorization code issued — after login, Entra ID returns an authorization code to Copilot Studio via the redirect URI.
- Token exchange — Copilot Studio exchanges that code (plus client credentials) for an access token.
- API access — Copilot Studio sends the access token to your MCP server, which validates it before processing the request.
This ensures user credentials are never exposed to the server, tokens have limited lifetimes and scopes, and the server can verify identity and permissions.
🎯 The Scenario
Zava's HR team runs a candidate-management MCP server exposing sensitive people data. An unauthenticated endpoint is a non-starter for production. Your job: put OAuth 2.0 in front of it and connect it to a Copilot Studio agent so only authenticated employees can list, search, add, update, or remove candidates.
NOTE
Labs 1.1 and 1.2 run on your local machine and in the Entra admin center. Labs 1.3–1.5 run in Copilot Studio. Keep the server and dev tunnel running for the whole mission.
🧪 Lab 1.1: Set up the secured MCP server
The secured HR MCP server is an OAuth-protected version of a standard HR candidate server. It exposes the same tools:
- list_candidates — return the full list of candidates
- search_candidates — search by name, email, skills, or role
- add_candidate — add a new candidate
- update_candidate — update an existing candidate by email
- remove_candidate — remove a candidate by email
The difference: every request requires a valid OAuth 2.0 access token in the Authorization header, validated as a JWT against your Entra ID tenant.
Open the pre-built secured HR MCP server files in
./assets/hr-mcp-server-secured/.Open the folder in Visual Studio Code. The server is already implemented with OAuth 2.0 security.
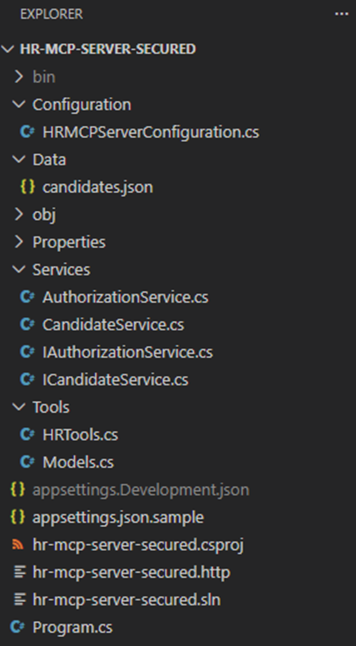
The main elements of the project are:
Configuration/HRMCPServerConfiguration.cs— configuration settings, including OAuthData/candidates.json— the candidate listServices/—ICandidateService.cs/CandidateService.csandIAuthorizationService.cs/AuthorizationService.csTools/HRTools.csandTools/Models.cs— the MCP tools and their data modelsappsettings.json.sample— the configuration templateProgram.cs— entry point, where the MCP server initializes JWT authentication
NOTE
The server includes JWT bearer authentication middleware that validates incoming tokens against your Entra ID tenant, so only authenticated users can reach the HR tools.
🧪 Lab 1.2: Configure Microsoft Entra ID applications
You'll register two applications: one for the HR MCP Server (backend/API) and one for the Copilot Studio client (frontend).
Register the HR MCP Server application (backend)
Open https://entra.microsoft.com with your work account.
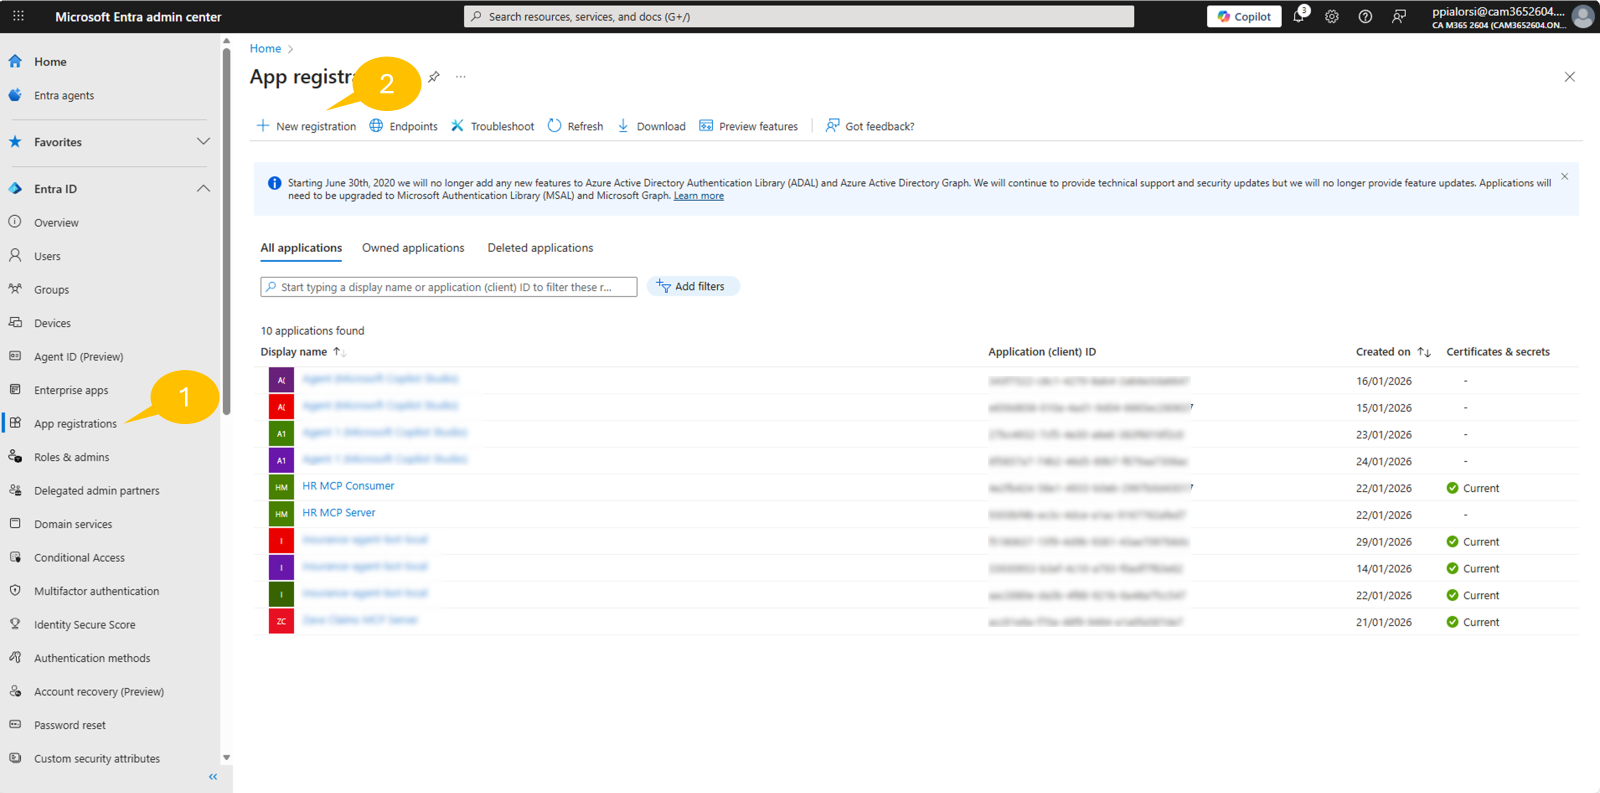
In the left navigation, select App registrations → + New registration.
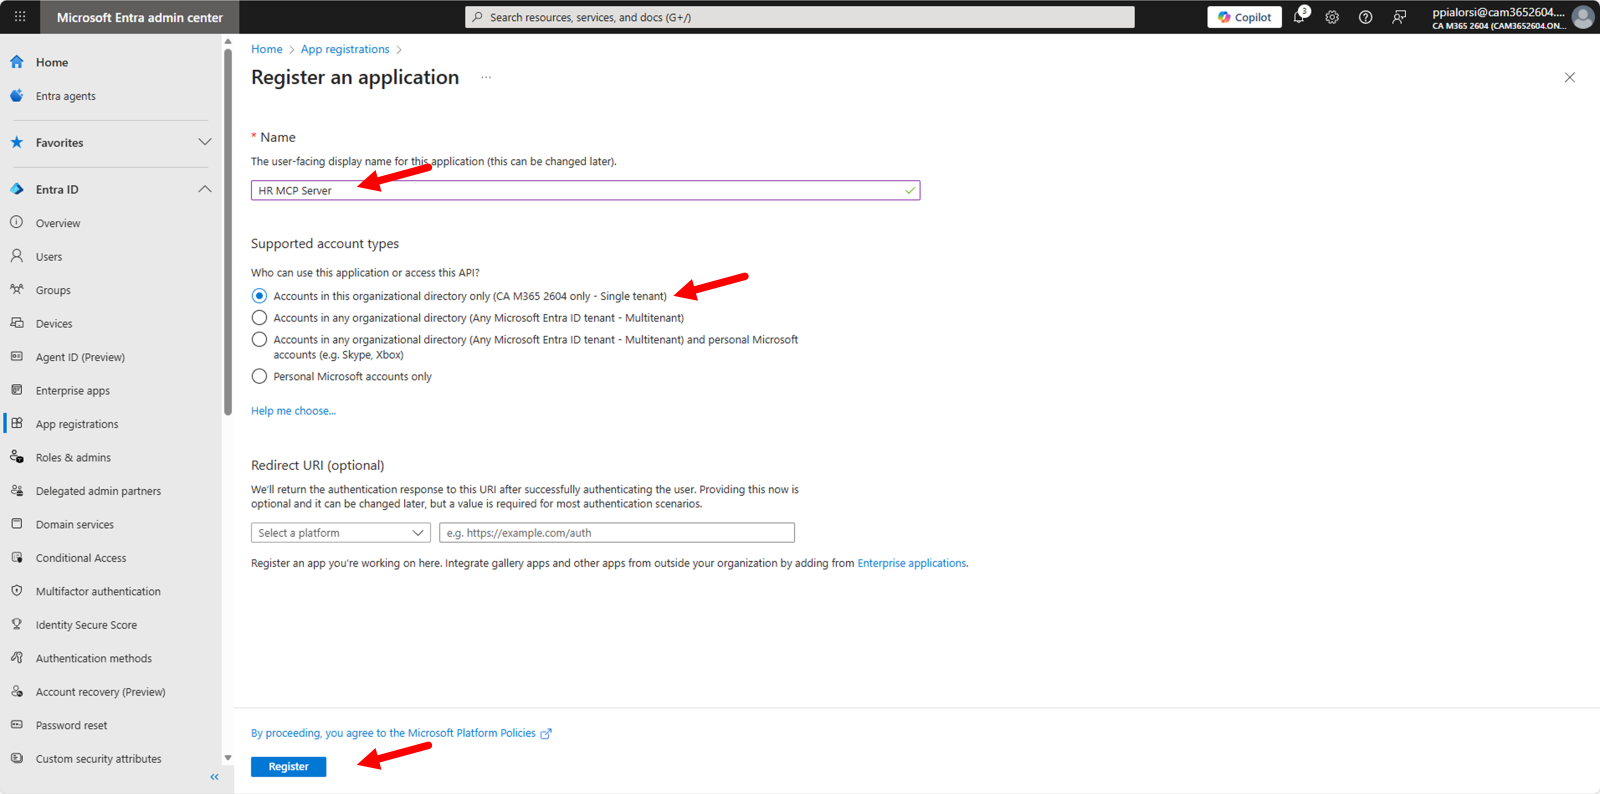
Configure the application with these settings:
- Name:
textHR MCP Server- Supported account types: Accounts in this organizational directory only
- Redirect URI: leave blank for now (we'll configure this later if needed)
Select Register to create the application.
Expose an API on the backend
In the HR MCP Server application, select Expose an API.
Next to Application ID URI, select Add, accept the default (
api://<client-id>), and select Save.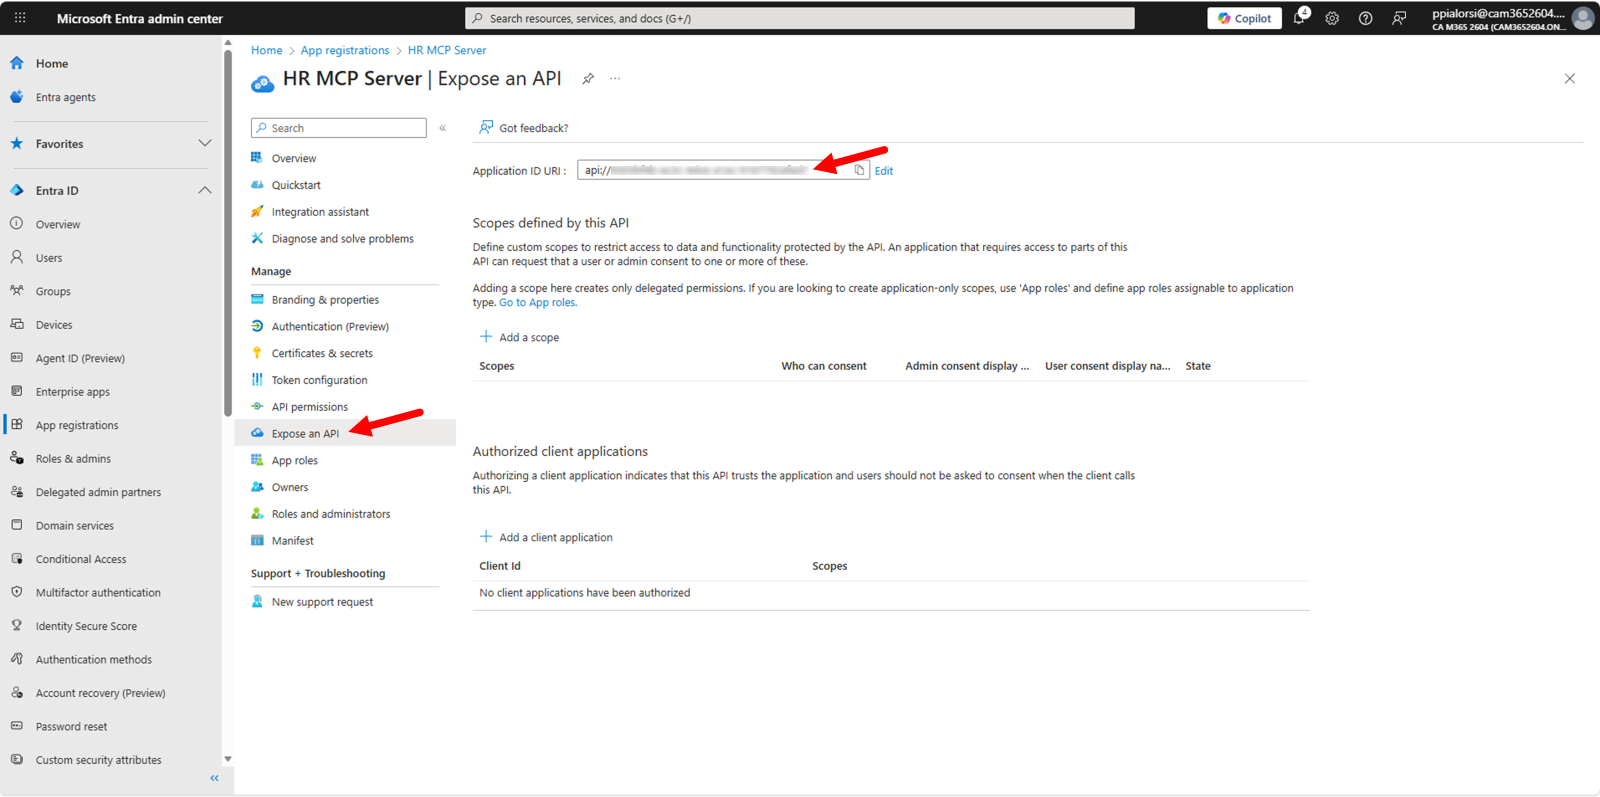
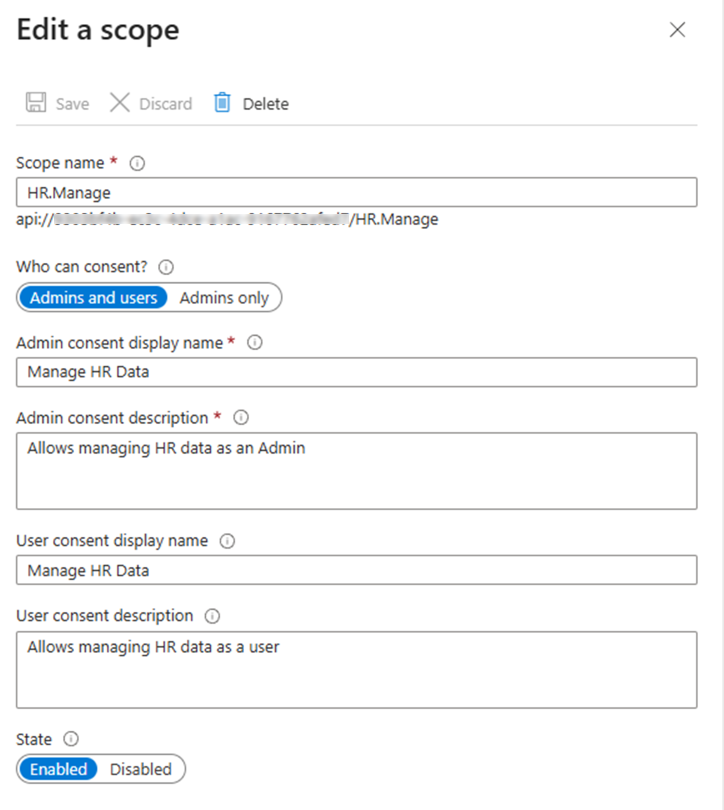
In Scopes defined by this API, select + Add a scope and configure:
Scope name:
HR.ManageWho can consent?: Admins and users
Admin consent display name:
Manage HR dataAdmin consent description:
textAllows managing HR data as an AdminUser consent display name:
Manage HR dataUser consent description:
textAllows managing HR data as a userState: Enabled
Select Add scope.
On the Overview page, record the Application (client) ID and Directory (tenant) ID — you'll need them later.
Register the Copilot Studio client application (frontend)
Now you need to create a second application that represents Copilot Studio as a client consuming the HR MCP Server.
Back in App registrations, select + New registration.
Configure with the following properties and Register:
- Name:
HR MCP Consumer - Supported account types: Accounts in this organizational directory only
- Redirect URI: leave blank (Copilot Studio provides it later)
- Name:
Create a client secret
After registration, configure the client application with the necessary permissions and credentials.
In the HR MCP Consumer application, select Certificates & secrets → + New client secret.
Set a Description and an Expires period (e.g., 12 months), then select Add.
IMPORTANT
Copy the secret Value immediately and store it securely — it will not be shown again.
Configure API permissions
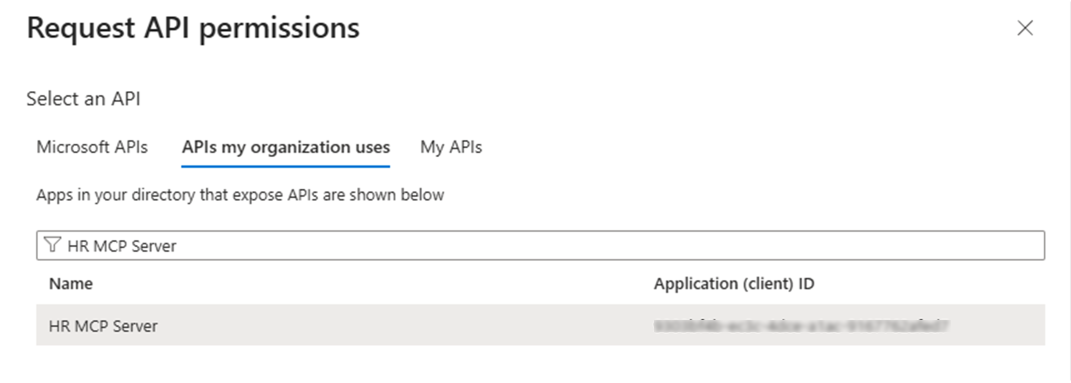
Select API permissions → + Add a permission → APIs my organization uses, search HR MCP Server, and select it.
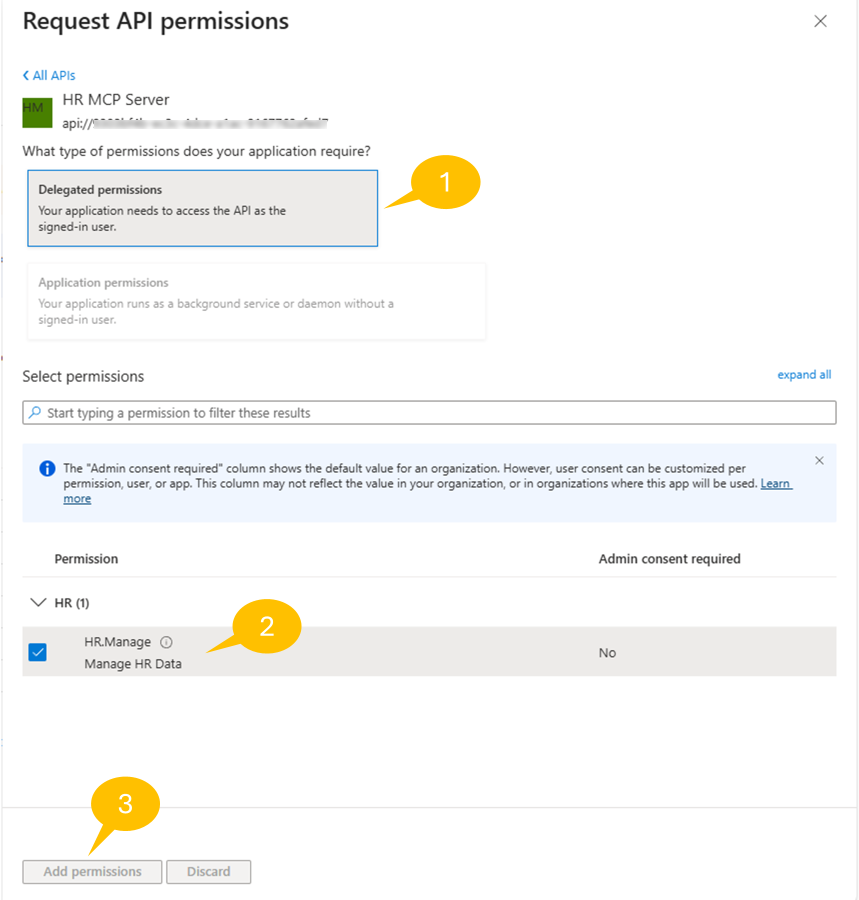
Select Delegated permissions, check HR.Manage, then select Add permissions.
Add Microsoft Graph delegated permissions: + Add a permission → Microsoft Graph → Delegated permissions → select email, openid, profile, User.Read → Add permissions.
Select Grant admin consent for [Your Tenant] and confirm with Yes.
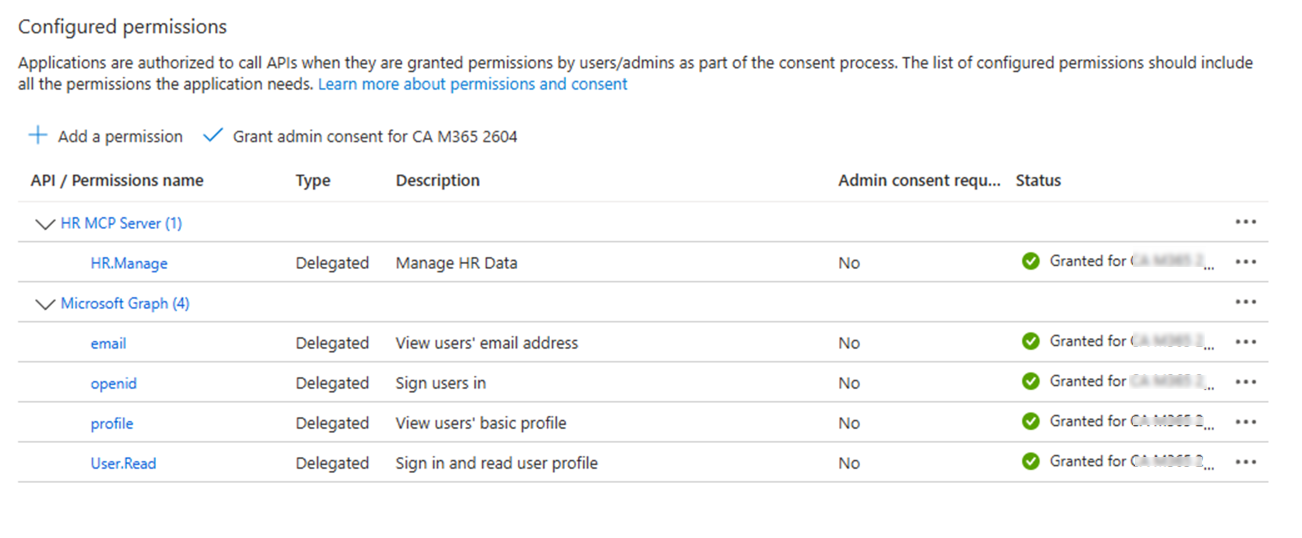
From the Overview page, record the Application (client) ID (you already have the secret value).
Configure and run the MCP server
Copy
appsettings.json.sampleto a new file namedappsettings.jsonand update theAzureAdsection:json{ "AzureAd": { "Instance": "https://login.microsoftonline.com/", "TenantId": "[YOUR_TENANT_ID]", "ClientId": "[YOUR_HR_MCP_SERVER_CLIENT_ID]", "Audience": "[YOUR_HR_MCP_SERVER_CLIENT_ID]", "Scopes": "[YOUR_APPLICATION_ID_URI]/HR.Manage" } }Replace
[YOUR_TENANT_ID]and[YOUR_HR_MCP_SERVER_CLIENT_ID]with the values from the backend app, and[YOUR_APPLICATION_ID_URI]with the Application ID URI (e.g.,api://xxxxxxxx-...).Save the file and start the server:
bashdotnet runAny request without a valid access token is now rejected with 401 Unauthorized.
Expose the server with a dev tunnel
If you haven't installed dev tunnel, follow the dev tunnels get-started guide, then host a tunnel:
IMPORTANT
Replace
hr-mcp-securedwith a unique name (for example,hr-mcp-secured-alex).bashdevtunnel create hr-mcp-secured -a --host-header unchanged devtunnel port create hr-mcp-secured -p 47002 devtunnel host hr-mcp-securedCopy the Connect via browser URL and save it — you'll use it in Copilot Studio and in Entra ID.
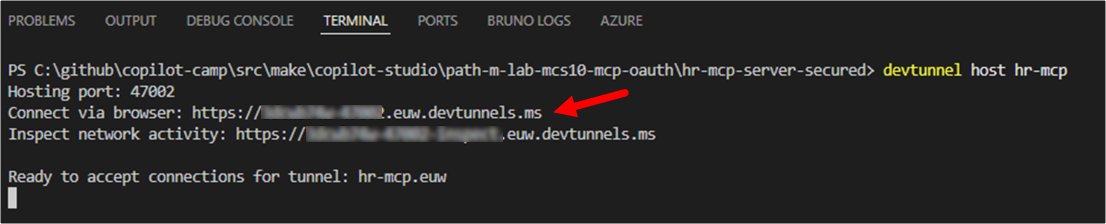
TIP
Keep both the server (dotnet run) and the tunnel (devtunnel host hr-mcp-secured) running throughout the mission.
Update the Application ID URI and configuration
In the Entra admin center, open the HR MCP Server app → Expose an API → next to Application ID URI select Edit, replace
api://<guid>with your dev tunnel URL (no trailing slash, e.g.,https://hr-mcp-secured.devtunnels.ms), and Save.Update
appsettings.jsonsoScopesuses the dev tunnel URL:json{ "AzureAd": { "Instance": "https://login.microsoftonline.com/", "TenantId": "[YOUR_TENANT_ID]", "ClientId": "[YOUR_HR_MCP_SERVER_CLIENT_ID]", "Audience": "[YOUR_HR_MCP_SERVER_CLIENT_ID]", "Scopes": "[YOUR_DEVTUNNEL_URL]/HR.Manage" } }Save, stop the server (
Ctrl+C), and start it again withdotnet run.
🧪 Lab 1.3: Create the agent in Copilot Studio
Now create the agent that will consume the secured MCP server.
Navigate to Microsoft Copilot Studio and sign in. On the home page, select the Agent card. You land directly in the Build editor.
Copy and paste the following as the Name your agent value:
textHR Candidate Management (Secured)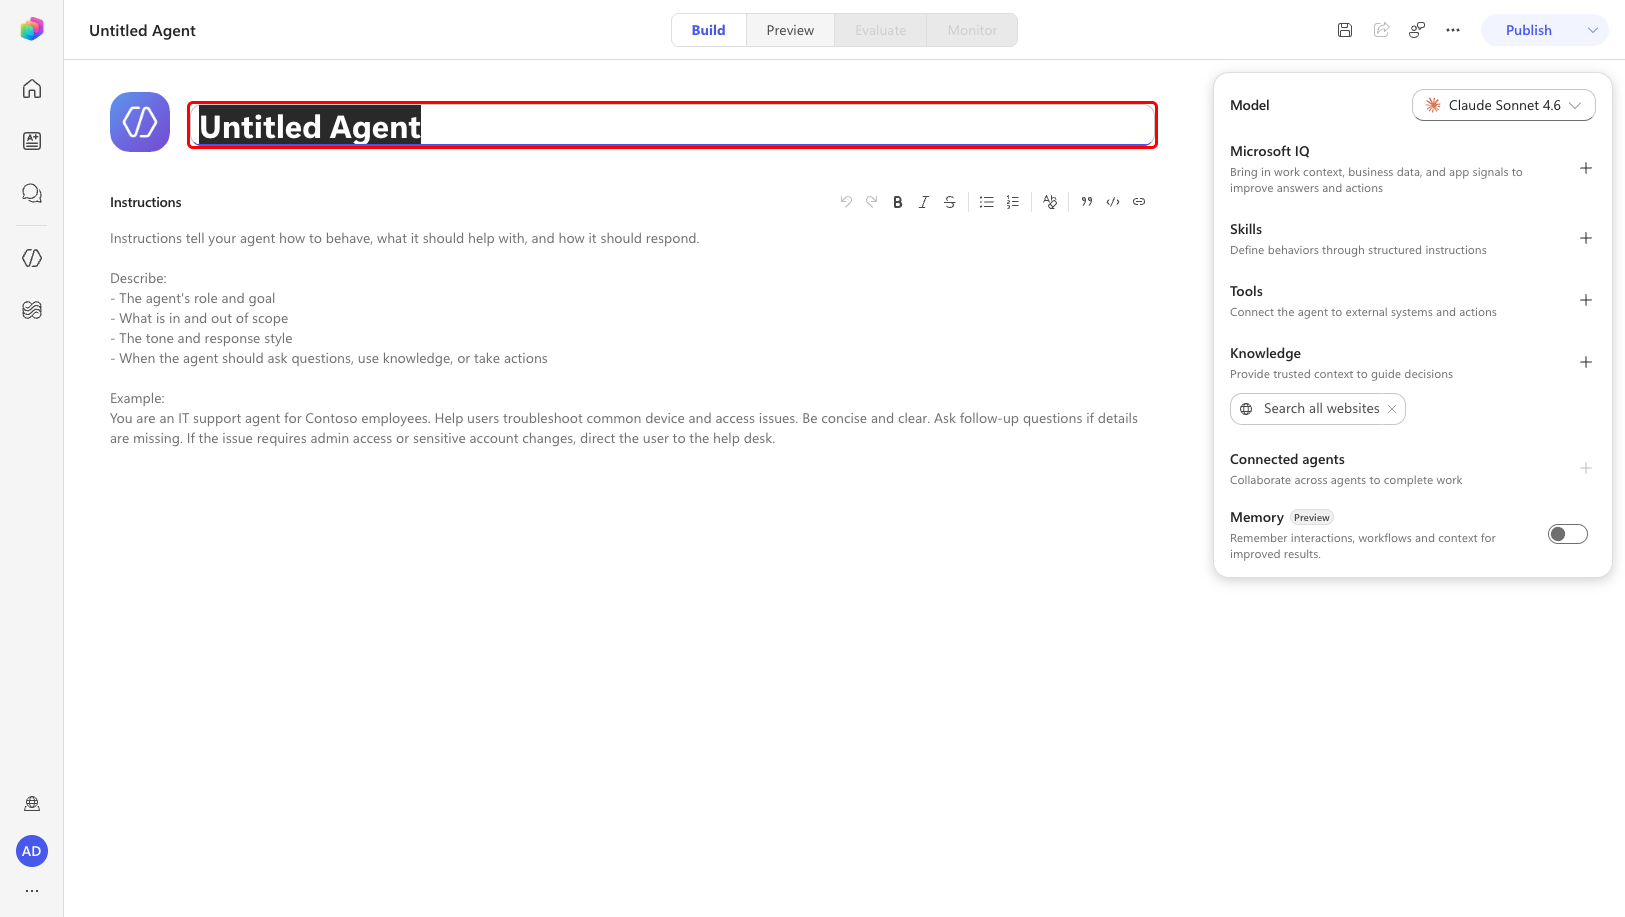
Select the Instructions field on the Build tab and copy and paste the following as the Instructions:
textYou are a helpful HR assistant that specializes in secure candidate management. You can help users search for candidates, check their availability, get detailed candidate information, and add new candidates to the system. All operations require user authentication through OAuth 2.0 to ensure data security and compliance with enterprise policies. Always provide clear and helpful information about candidates, including their skills, experience, contact details, and availability status.In the right-hand configuration panel, open the Model dropdown and select GPT-5 Chat.
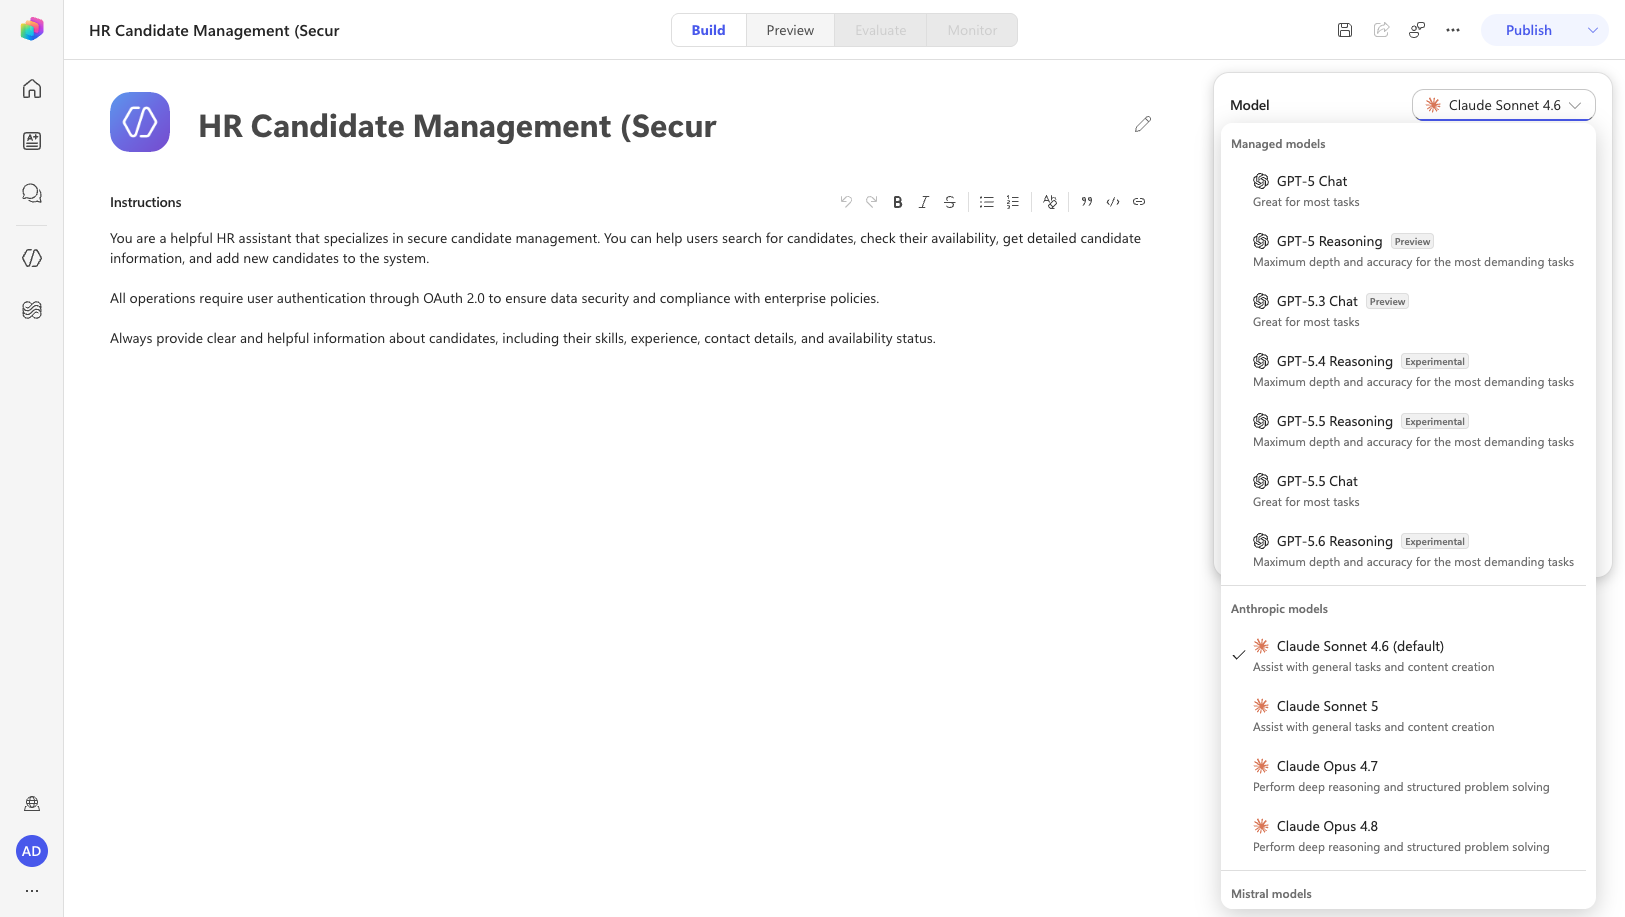
Select Save in the top toolbar.
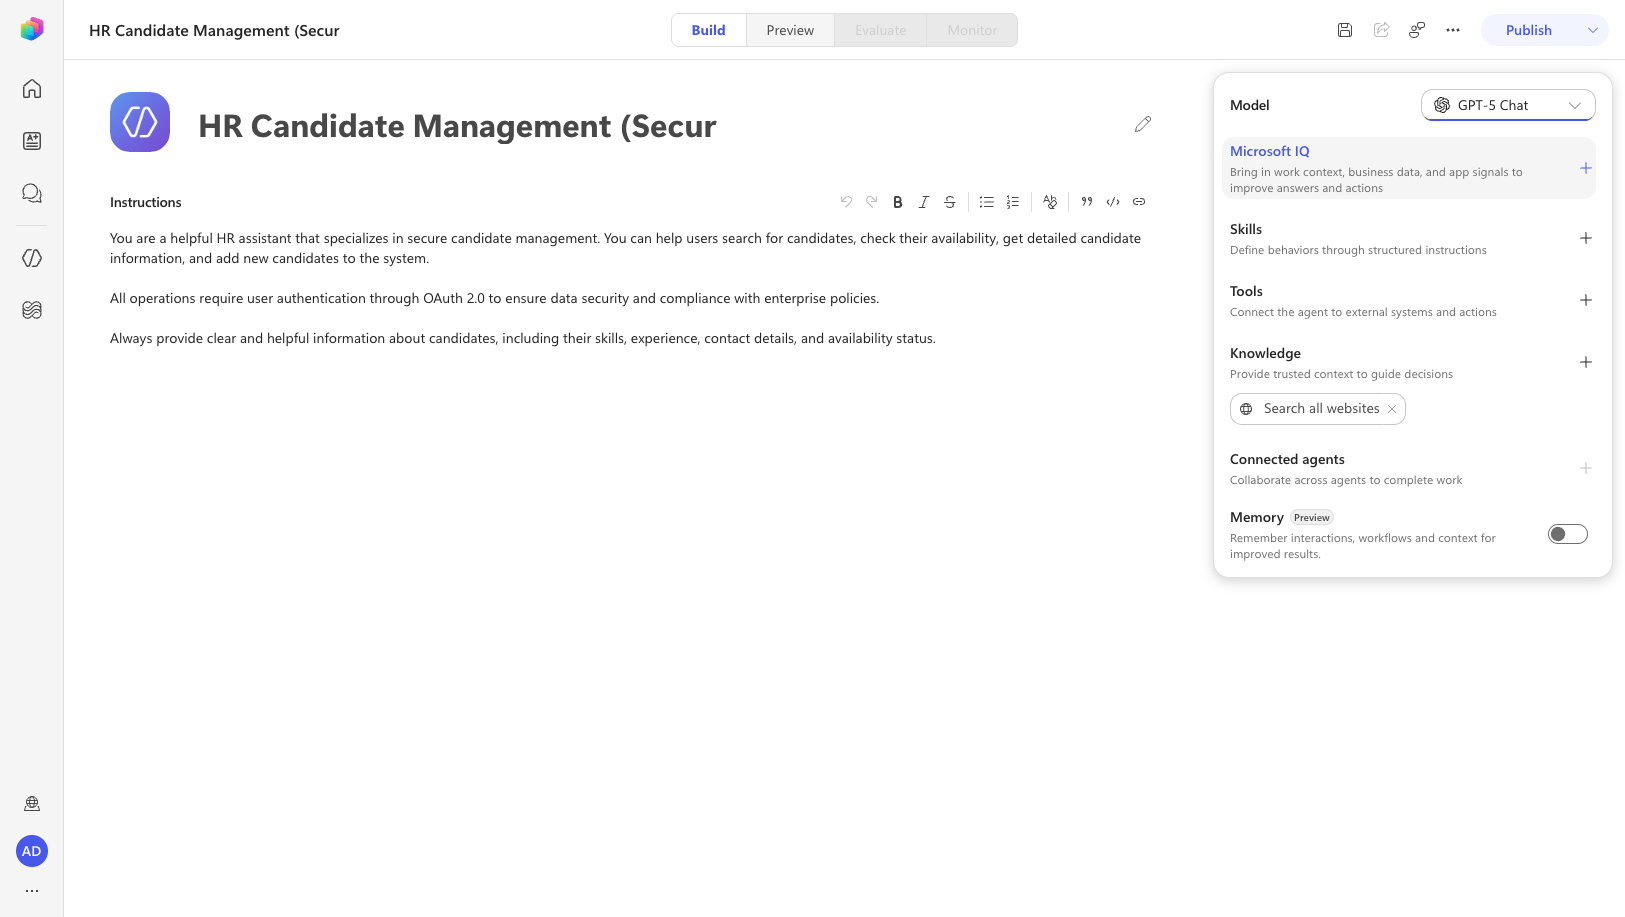
In the Knowledge section on the Build tab, remove the Search all websites source by selecting its X (Remove). This restricts the agent to the tools and knowledge you explicitly configure.
Configure conversation starters. Select More options (…) in the top toolbar → Settings → the Greeting & prompts tab → under Suggested prompts, select Add a suggested prompt and fill in each Title and Message:
- Title:
List all candidates— Message:Show me all candidates in the HR system - Title:
Search candidates— Message:Search for candidates with skills in [SKILL] - Title:
Add new candidate— Message:Add a new candidate with firstname [FIRSTNAME], lastname [LASTNAME], email [EMAIL], role [ROLE], languages [LANGUAGES], and skills [SKILLS]
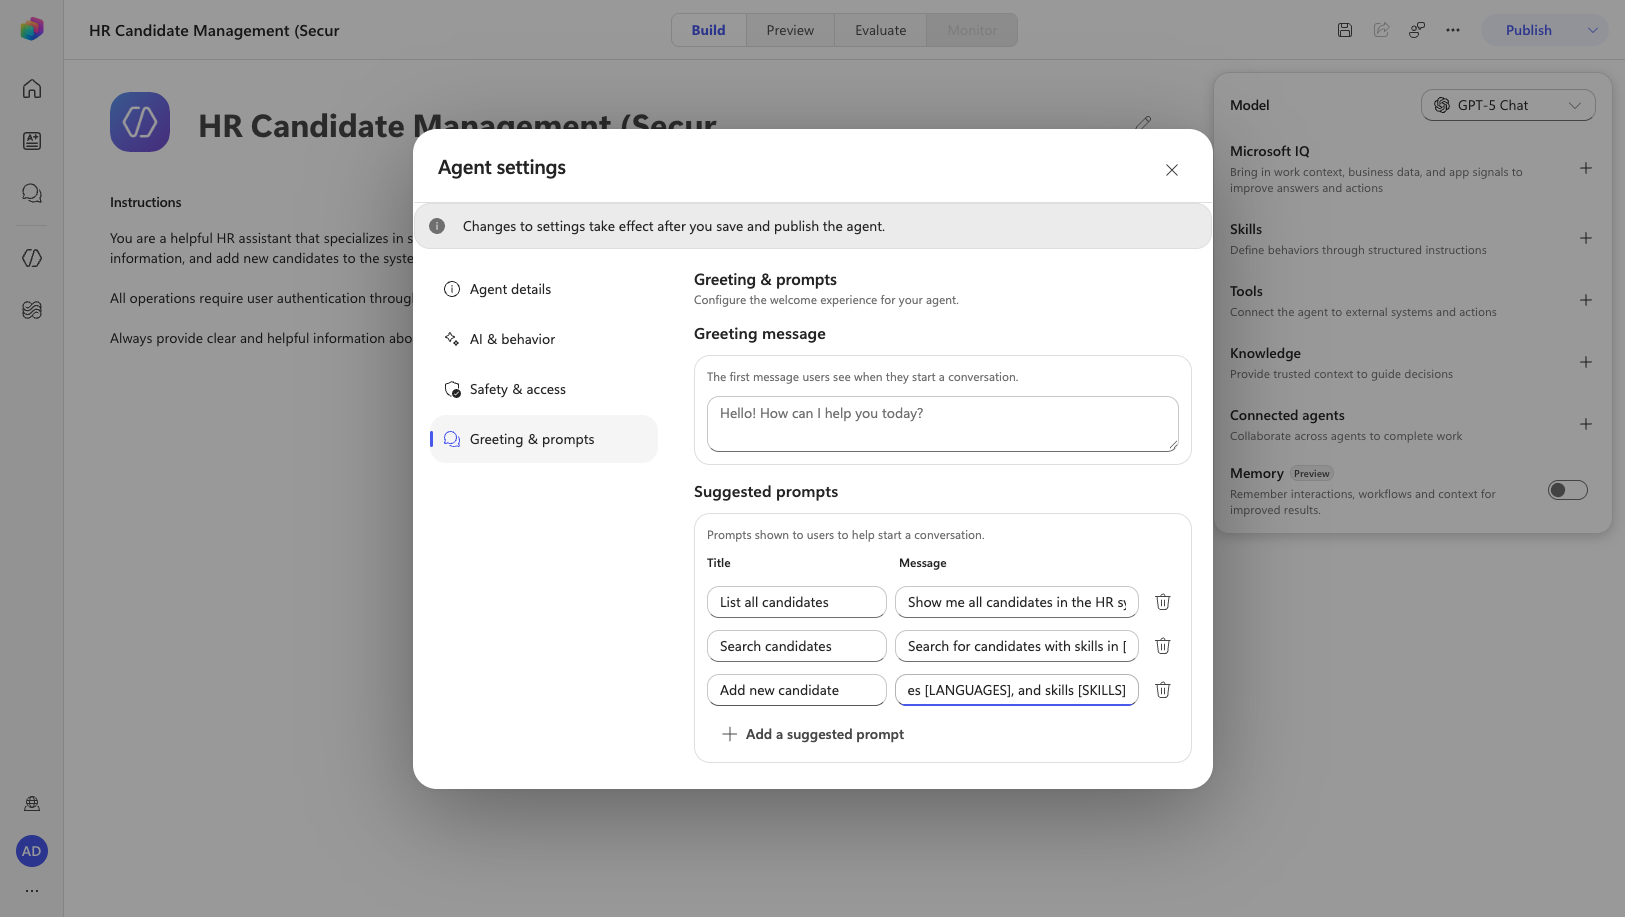
- Title:
Close Settings and select Save.
🧪 Lab 1.4: Register the MCP tool with OAuth 2.0
Now add the secured MCP server as a tool and wire up OAuth 2.0.
In the right-hand configuration panel, on the Tools section, select Add tool. In the Add a tool dialog, select the custom Add (+) control and choose Model Context Protocol (MCP) to create a new custom MCP server.
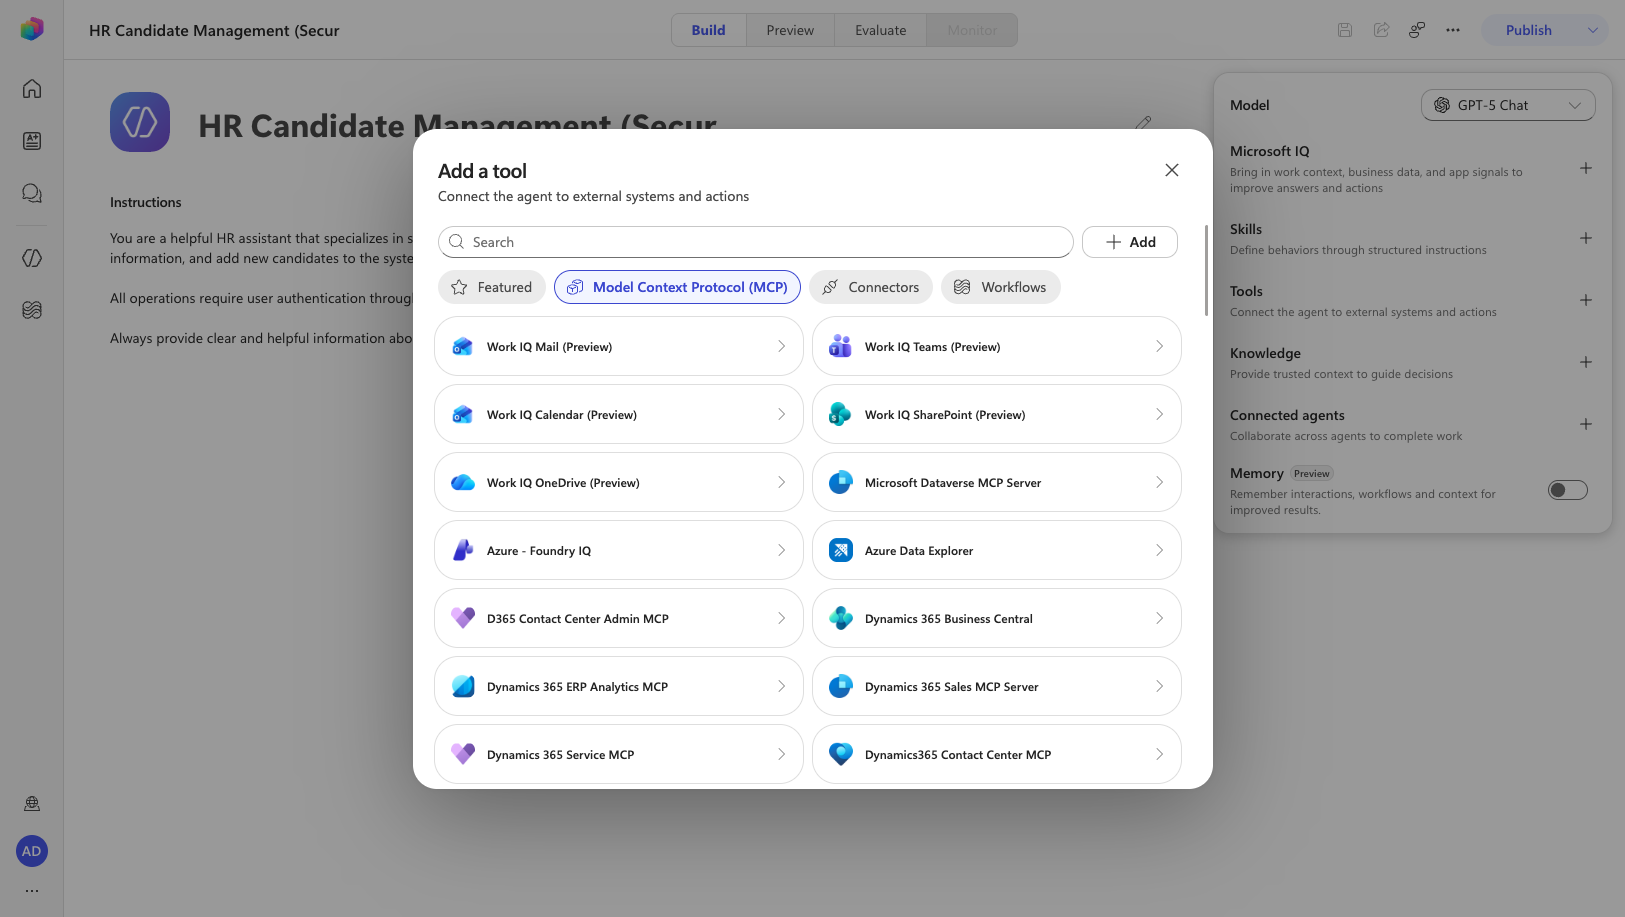
In the Add MCP server dialog, enter the basic settings:
Server name:
textHR MCP Server SecuredServer description:
textSecurely manages HR candidates with OAuth 2.0 authentication for enterprise complianceServer URL: the dev tunnel Connect via browser URL you saved earlier
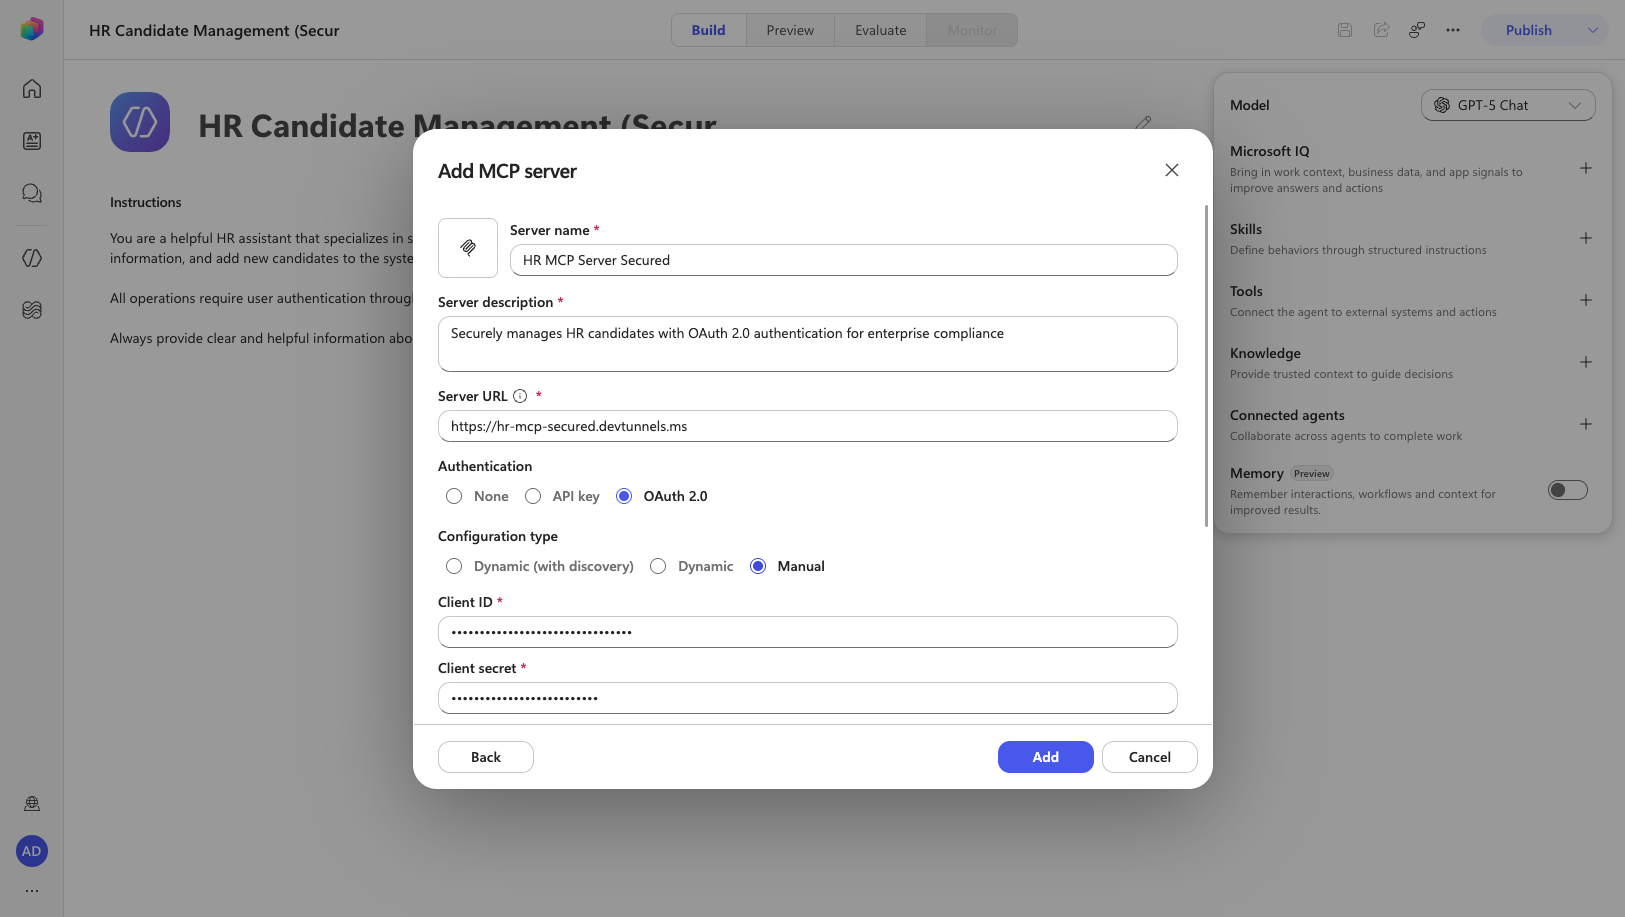
Under Authentication, select OAuth 2.0, then set Configuration type to Manual and configure:
Client ID: the Application (client) ID of your HR MCP Consumer app
Client secret: the client secret Value you saved earlier
Authorization URL:
texthttps://login.microsoftonline.com/[YOUR_TENANT_ID]/oauth2/v2.0/authorizeToken URL:
texthttps://login.microsoftonline.com/[YOUR_TENANT_ID]/oauth2/v2.0/tokenRefresh token URL:
texthttps://login.microsoftonline.com/[YOUR_TENANT_ID]/oauth2/v2.0/tokenScopes: enter these scopes, separated by spaces:
IMPORTANT
These scopes are temporary — you'll replace them with the secured server's real scope (
[YOUR_DEVTUNNEL_URL]/HR.Manage) once the connection is established.
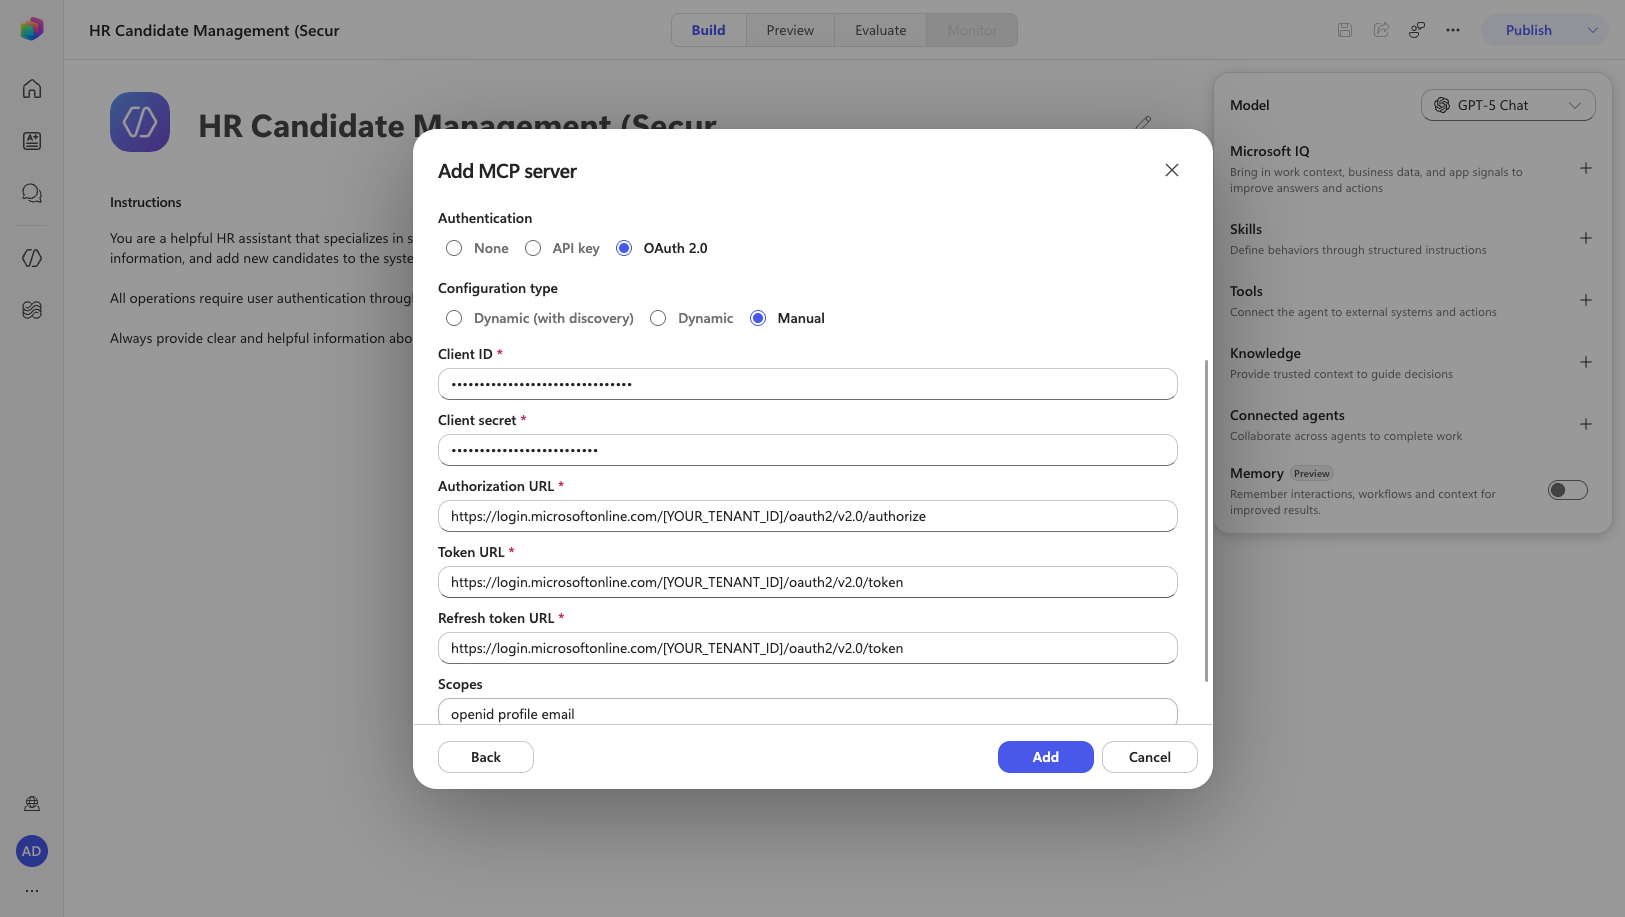
Select Add to create the MCP server configuration.
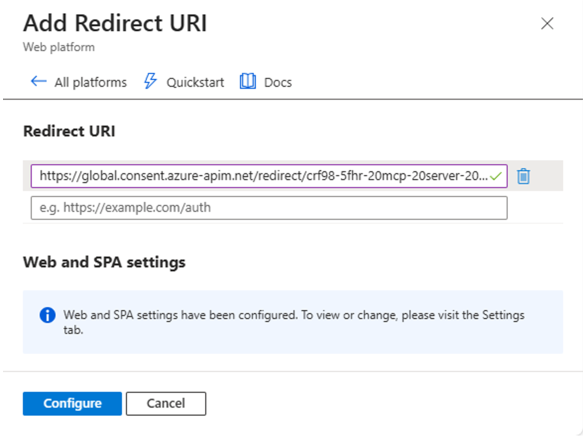
After the tool is created, Copilot Studio generates a Redirect URL. Copy it, then in the Entra admin center open the HR MCP Consumer app → Authentication → + Add a platform/+ Add Redirect URI → Web, paste the Redirect URL, and select Configure.
(Optional) Configure the Power Apps custom connector if your environment requires it. In Power Automate, select the correct environment → More → Discover all → Custom connectors, edit the HR MCP Server Secured connector's Security tab, set the Client Secret, Resource URL (your dev tunnel URL), and Scope (
HR.Manage), then Update connector.Complete the connection: in the tool configuration, select Not connected → Create new connection → Create, authenticate with a valid work account, and grant consent if prompted. Then select Add.
Open the HR MCP Server Secured tool chip to confirm the five available tools:
list_candidates,search_candidates,add_candidate,update_candidate,remove_candidate.
🧪 Lab 1.5: Test the agent
Time to verify that OAuth 2.0 is guarding the door.
Select Publish in the top toolbar and wait for publishing to complete.
Select the Preview tab. Send a prompt, for example by selecting the List all candidates suggested prompt.
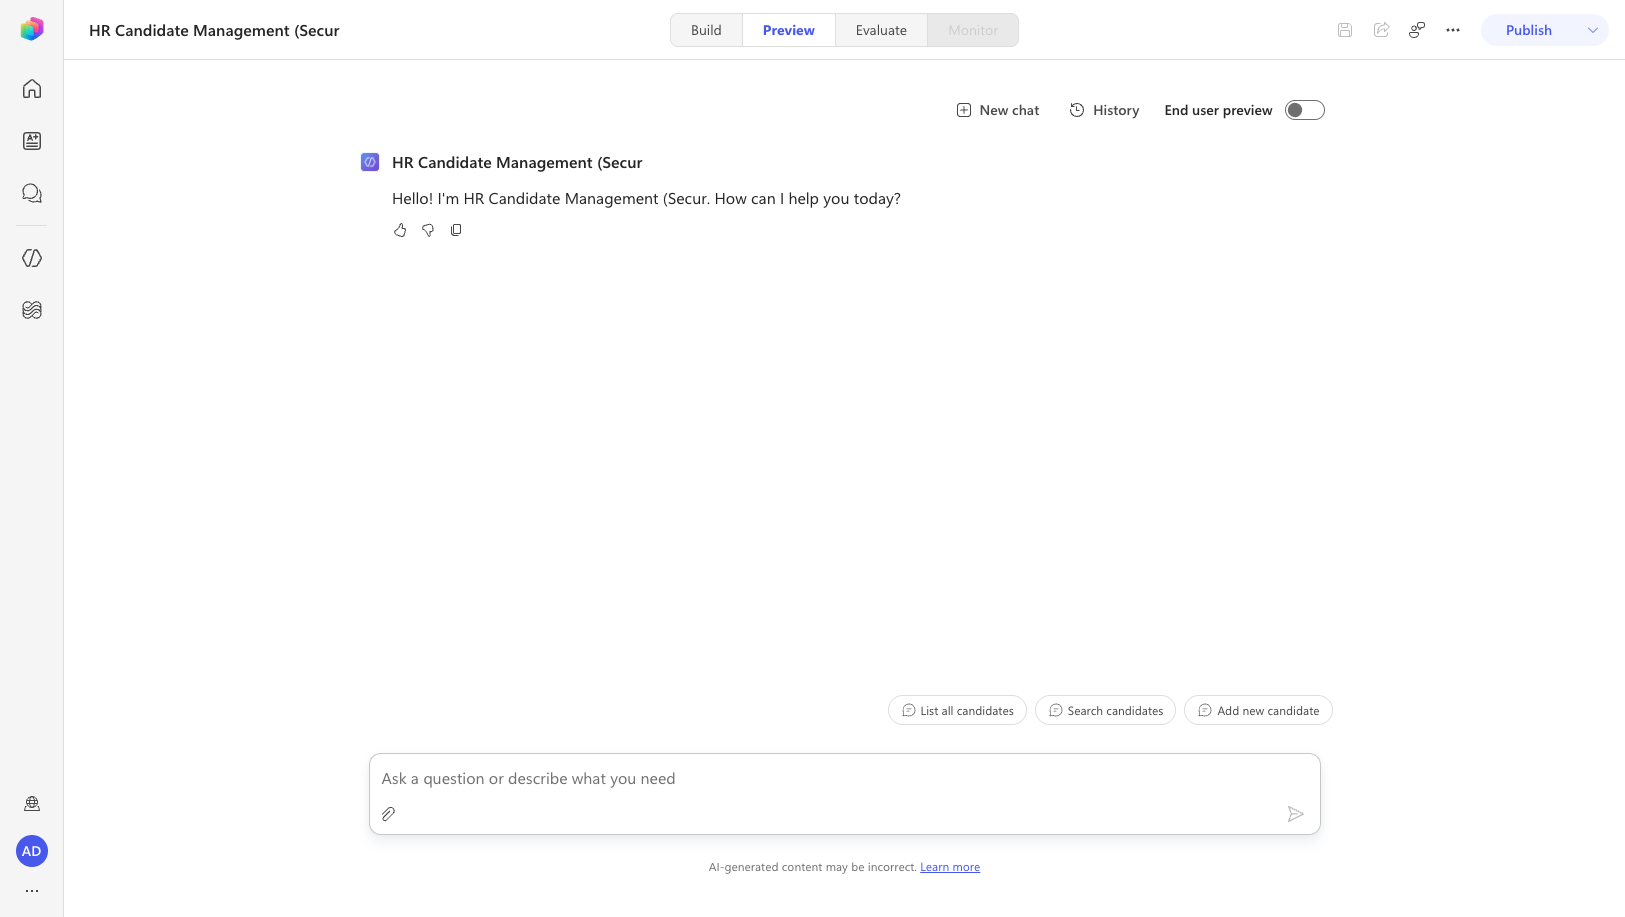
On the first secured tool call, an inline Permission Required card appears asking to use your credentials to access the external server. Select Allow.
NOTE
If your connection is missing or the token has expired, you may instead see Open connection manager. If so, select it, choose Connect, sign in with your work account, grant consent, and confirm the connection shows Connected, then return and re-send your prompt.
Confirm the agent calls the secured MCP server and returns the candidate list. Try more prompts to exercise the other tools:
textSearch for candidates with Training skillstextGet candidate with email bob.brown@example.comTIP
After the first authentication, your access token is cached — you won't re-authenticate on every request unless it expires or is revoked.
NOTE
Monitoring the server: while the agent runs, the .NET terminal logs each tool call along with the incoming Authorization: Bearer header, so you can verify the JWT access token is being sent and validated.
✅ Mission Accomplished
Congrats, agent — Operation Clearance is complete! Your Copilot Studio agent now reaches the HR candidate files only after passing the OAuth 2.0 checkpoint.
In this mission, you accomplished:
✅ Secured MCP: Configured an MCP server with OAuth 2.0 JWT token validation ✅ Entra ID Registrations: Registered backend and client apps for secure API access ✅ Authorization Code Flow: Configured OAuth 2.0 in Copilot Studio end to end ✅ Authenticated Tool Use: Consumed secured MCP tools with enterprise-grade authentication
🏅 Claim your completion badge
Congrats, agent — mission accomplished! Now it's time to claim your badge.
Simply submit the badge request form and answer all required questions:
https://aka.ms/agent-academy-special-ops/mcp-oauth/form
Once your submission is reviewed, you will receive an email from Global AI Community with instructions to claim your badge.
TIP
If you do not see the email, check your spam or junk folder.
📚 Tactical Resources
🔗 Microsoft Learn MCP Server — Connect the hosted Microsoft Learn Docs MCP Server to an agent
🔗 Microsoft Copilot Studio ❤️ MCP — Build and deploy your own custom MCP server
📖 Copilot Studio MCP connections
📖 Microsoft Entra ID app registrations
📖 OAuth 2.0 authorization code flow
📖 Model Context Protocol overview