
🚨 Mission 05: Resume Intake, Matching and Applications
🎯 Mission Brief
Welcome, Operative. In this mission you'll run the hiring pipeline from resume intake to job application.
You'll use the resume-intake skill from Mission 02 to create linked Candidate and Resume records. Then you'll build a role-matching skill that scores each open role against its live, weighted evaluation criteria. An application-handling skill creates Job Applications for the roles you confirm.
Everything happens in one conversation, where the agent reads the resume, reads the live criteria through the Dataverse MCP server, and writes the records back through the same server.
🔎 Objectives
In this mission, you'll learn:
- How native multimodal reading turns a resume into linked Dataverse records
- How to verify records, confirm email-based deduplication, and handle invalid files
- How to build a
role-matchingskill with a scoring rubric - a fixed set of rules for how points are awarded - so every score is justified and repeatable - How to create Job Applications for confirmed roles via the Dataverse MCP server
- How to test the skill's error handling and observability with a not-found identifier
🧠 Native multimodal reading
The model behind your agent is multimodal, which means it reads the files a person attaches - a PDF resume, a scanned image, or a screenshot - as well as text. When a document arrives, the agent loads its built-in analyzing-pdf skill to extract the content. Your resume-intake skill then decides which fields and records to create, and the Dataverse MCP server performs the writes.
The agent's built-in skills
analyzing-pdf is one of several built-in skills every agent ships with - small, pre-packaged behaviors the orchestrator loads automatically when they're relevant. You don't add or configure these skills, because the agent loads them when it needs them.
Whenever an agent handles files, decide which types you accept and how large they can be. Copilot Studio reads many file types, but this mission accepts PDF only. Two size limits are important to know, because a file attached in chat can be roughly 15 MB, while a resume stored against a record later in Mission 07 has a 5 MB default - which can be increased by updating the maximum attachment size in the environment settings.
🧠 Matching on live data
The role-matching skill reads Dataverse before every recommendation. It uses the MCP read_query and describe actions to retrieve the open Job Roles and their weighted Evaluation Criteria, then scores the resume against each criterion without changing records. The application-handling skill creates Job Applications with create_record after the user confirms which roles to apply for.
This is different from "Knowledge"
The platform's Knowledge feature (what the Add knowledge dialog offers) means public websites, SharePoint, OneDrive, or uploaded files - ideal for policy documents, but read-only and snapshot-based. This mission does something different, working with structured Dataverse records through the MCP tool, so the agent can both read the current roles and criteria and write new applications. Use Knowledge when an agent should answer from documents, and the Dataverse MCP server when it needs live records it can query and update.
🧮 Why matching needs a rubric
If you tell an agent "match this candidate to the best role," it will answer - confidently, with a percentage and a recommendation. But with no rules for how to score, the model invents them on the spot. Ask twice and you can get two different numbers, with no way to explain why a role scored 88% and not 81%. An agent left to its own devices optimizes for a plausible reply without showing how it calculated the score.
We fix this the way we would brief a human reviewer, by giving it a scoring rubric. A rubric turns a vague "estimate the fit" into a repeatable calculation:
Read each of the role's evaluation criteria and its weight (these live in Dataverse - you imported them in Mission 01, and each role's weights add up to 100).
For every criterion, judge how well the resume evidences it and assign an evidence level:
Evidence level Meaning Factor Strong Clear, direct, repeated evidence 1.0 Moderate Some evidence, or implied 0.6 Weak Thin or tangential evidence 0.3 Missing No evidence in the resume 0.0 Score each criterion as factor × weight, then add them up for the role's percentage.
The weights come from data and the arithmetic is fixed, so what the model still decides is narrow: for each criterion it judges the evidence level on a four-point scale. That evaluation is still an AI judgment, so a borderline criterion can move between levels on another run. The output shows the evidence sources, level, weight, and points for every criterion, which lets a reviewer find the source of any change. Mission 06 uses the same four evidence levels in the interview-prep document.
A worked example
Suppose a resume shows strong hands-on development and communication, a couple of years of experience, and no certifications. Scored against J1004 Power Platform Developer (Technical Skills 40, Experience 30, Communication 15, Certifications 10, Problem Solving 5):
| Criterion | Weight | Evidence found | Level | Points (factor × weight) |
|---|---|---|---|---|
| Technical Skills | 40 | Built Power Apps + Automate solutions | Strong (1.0) | 40.0 |
| Experience | 30 | ~2 years, just under the 3+ asked for | Moderate (0.6) | 18.0 |
| Communication | 15 | Led demos, wrote documentation | Strong (1.0) | 15.0 |
| Certifications | 10 | None listed | Missing (0.0) | 0.0 |
| Problem Solving | 5 | Debugged complex flows | Strong (1.0) | 5.0 |
| Role total | 100 | 78% |
Anyone can check that arithmetic. The weights and the sum are deterministic - they come from the data and always produce the same number. Only the evidence level for each criterion is a judgment the model makes, and that is the one part that can vary between runs.
🔄 Coming from the classic Operative course?
The classic course extracted resume content with a Summarize Resume AI Builder prompt and pushed every Dataverse operation through an agent flow. In the Powered by GitHub Copilot experience the model reads an attached resume natively, loads its built-in analyzing-pdf skill, follows the focused intake and matching skills you write here, and uses the Dataverse MCP server for live reads and writes. What you do differently is build no prompt asset and no extraction flow at all - the whole process starts the moment you attach a resume in Preview.
🧪 Lab 05 - Intake, match, and apply
Prerequisites
Before you start this lab you need:
- The Hiring Agent carrying the
resume-intakeskill and the Dataverse MCP server from Mission 02 - The Job Roles and Evaluation Criteria sample data loaded, so a role has criteria to score against
- The Hiring Hub app open in a second tab, for checking the records the agent writes
- The two sample resume PDFs, which you download in Lab 5.1 below
The Hiring Agent already has the intake procedure, but it cannot yet score role fit or create an application. We'll add those two procedures as separate skills, then test the records they create and the paths that stop without writing.
5.1 Read a resume and create records
Let's start by running the resume-intake skill from Mission 02 against a real PDF. This establishes the Candidate and Resume records that matching and application creation need later in the mission.
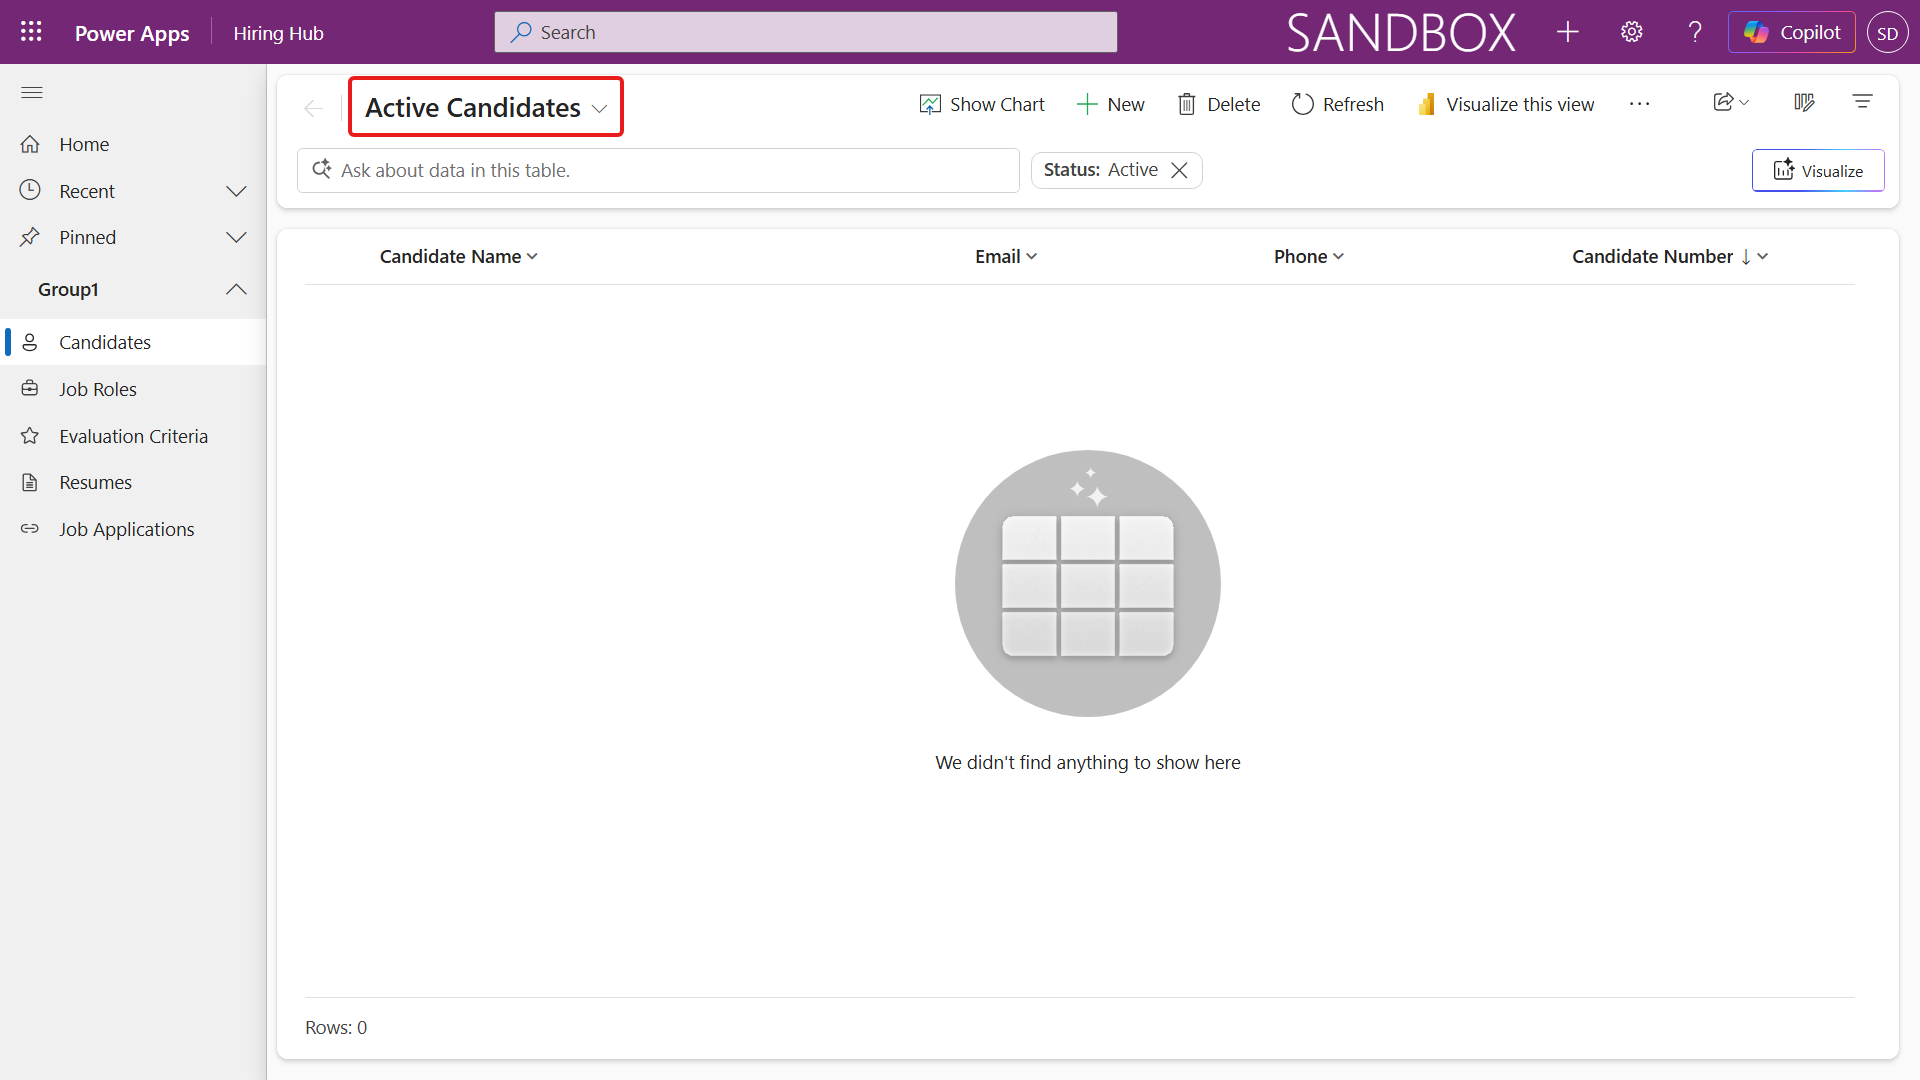
Open the Hiring Hub (see Mission 01 if you need the route), go to Candidates, and confirm there are no Avery or Taylor intake records. This gives you a clean baseline for the writes that follow:
Download the two sample resumes. You'll use them here and again in Missions 07, 08 and 09.
Download Avery Example resume (opens in a new tab) Download Taylor Testperson resume (opens in a new tab)In the left navigation select Agents, open the Hiring Agent, and go to Preview. Ensure the
resume-intakeskill and the Dataverse MCP server tool are present from Mission 02. Start a new chat, select Attach file (📎), and uploadAVERY EXAMPLE (FICTITIOUS).pdf: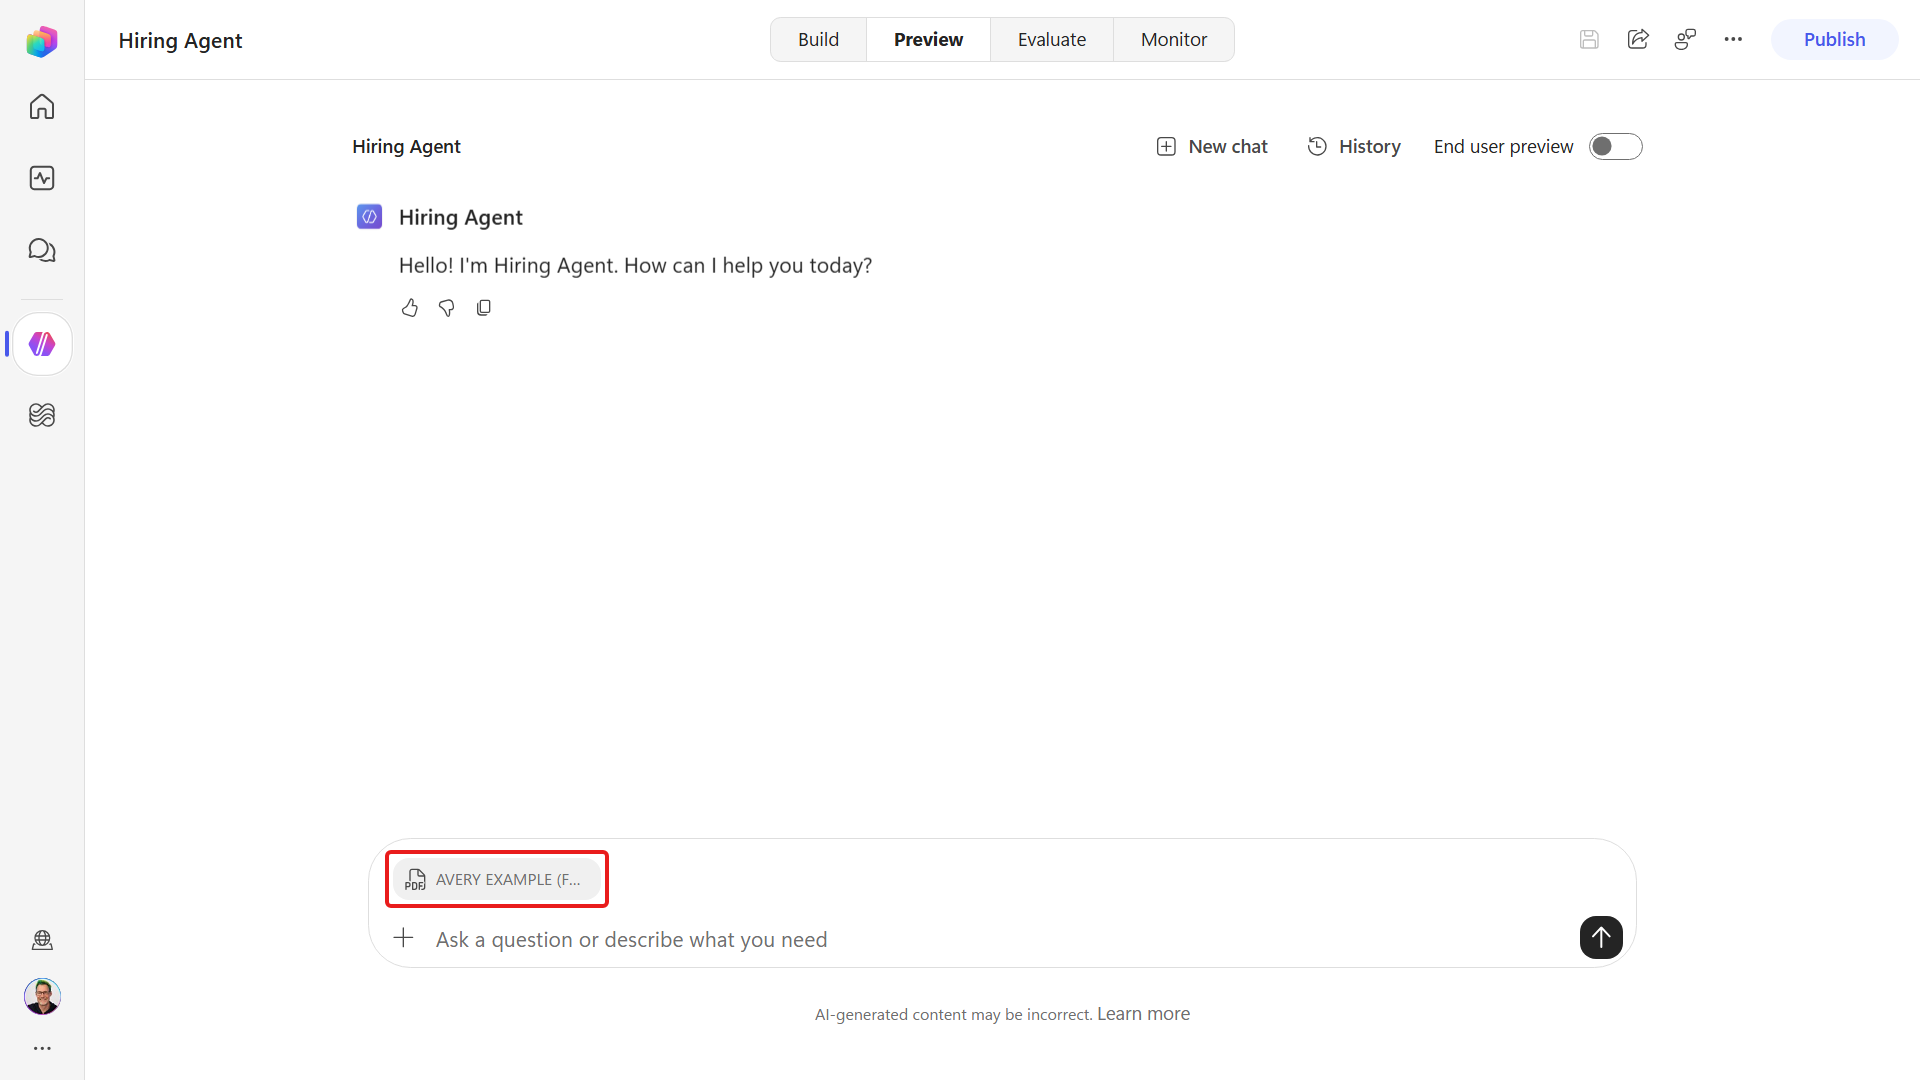
Send a natural message. You don't spell out the steps because the
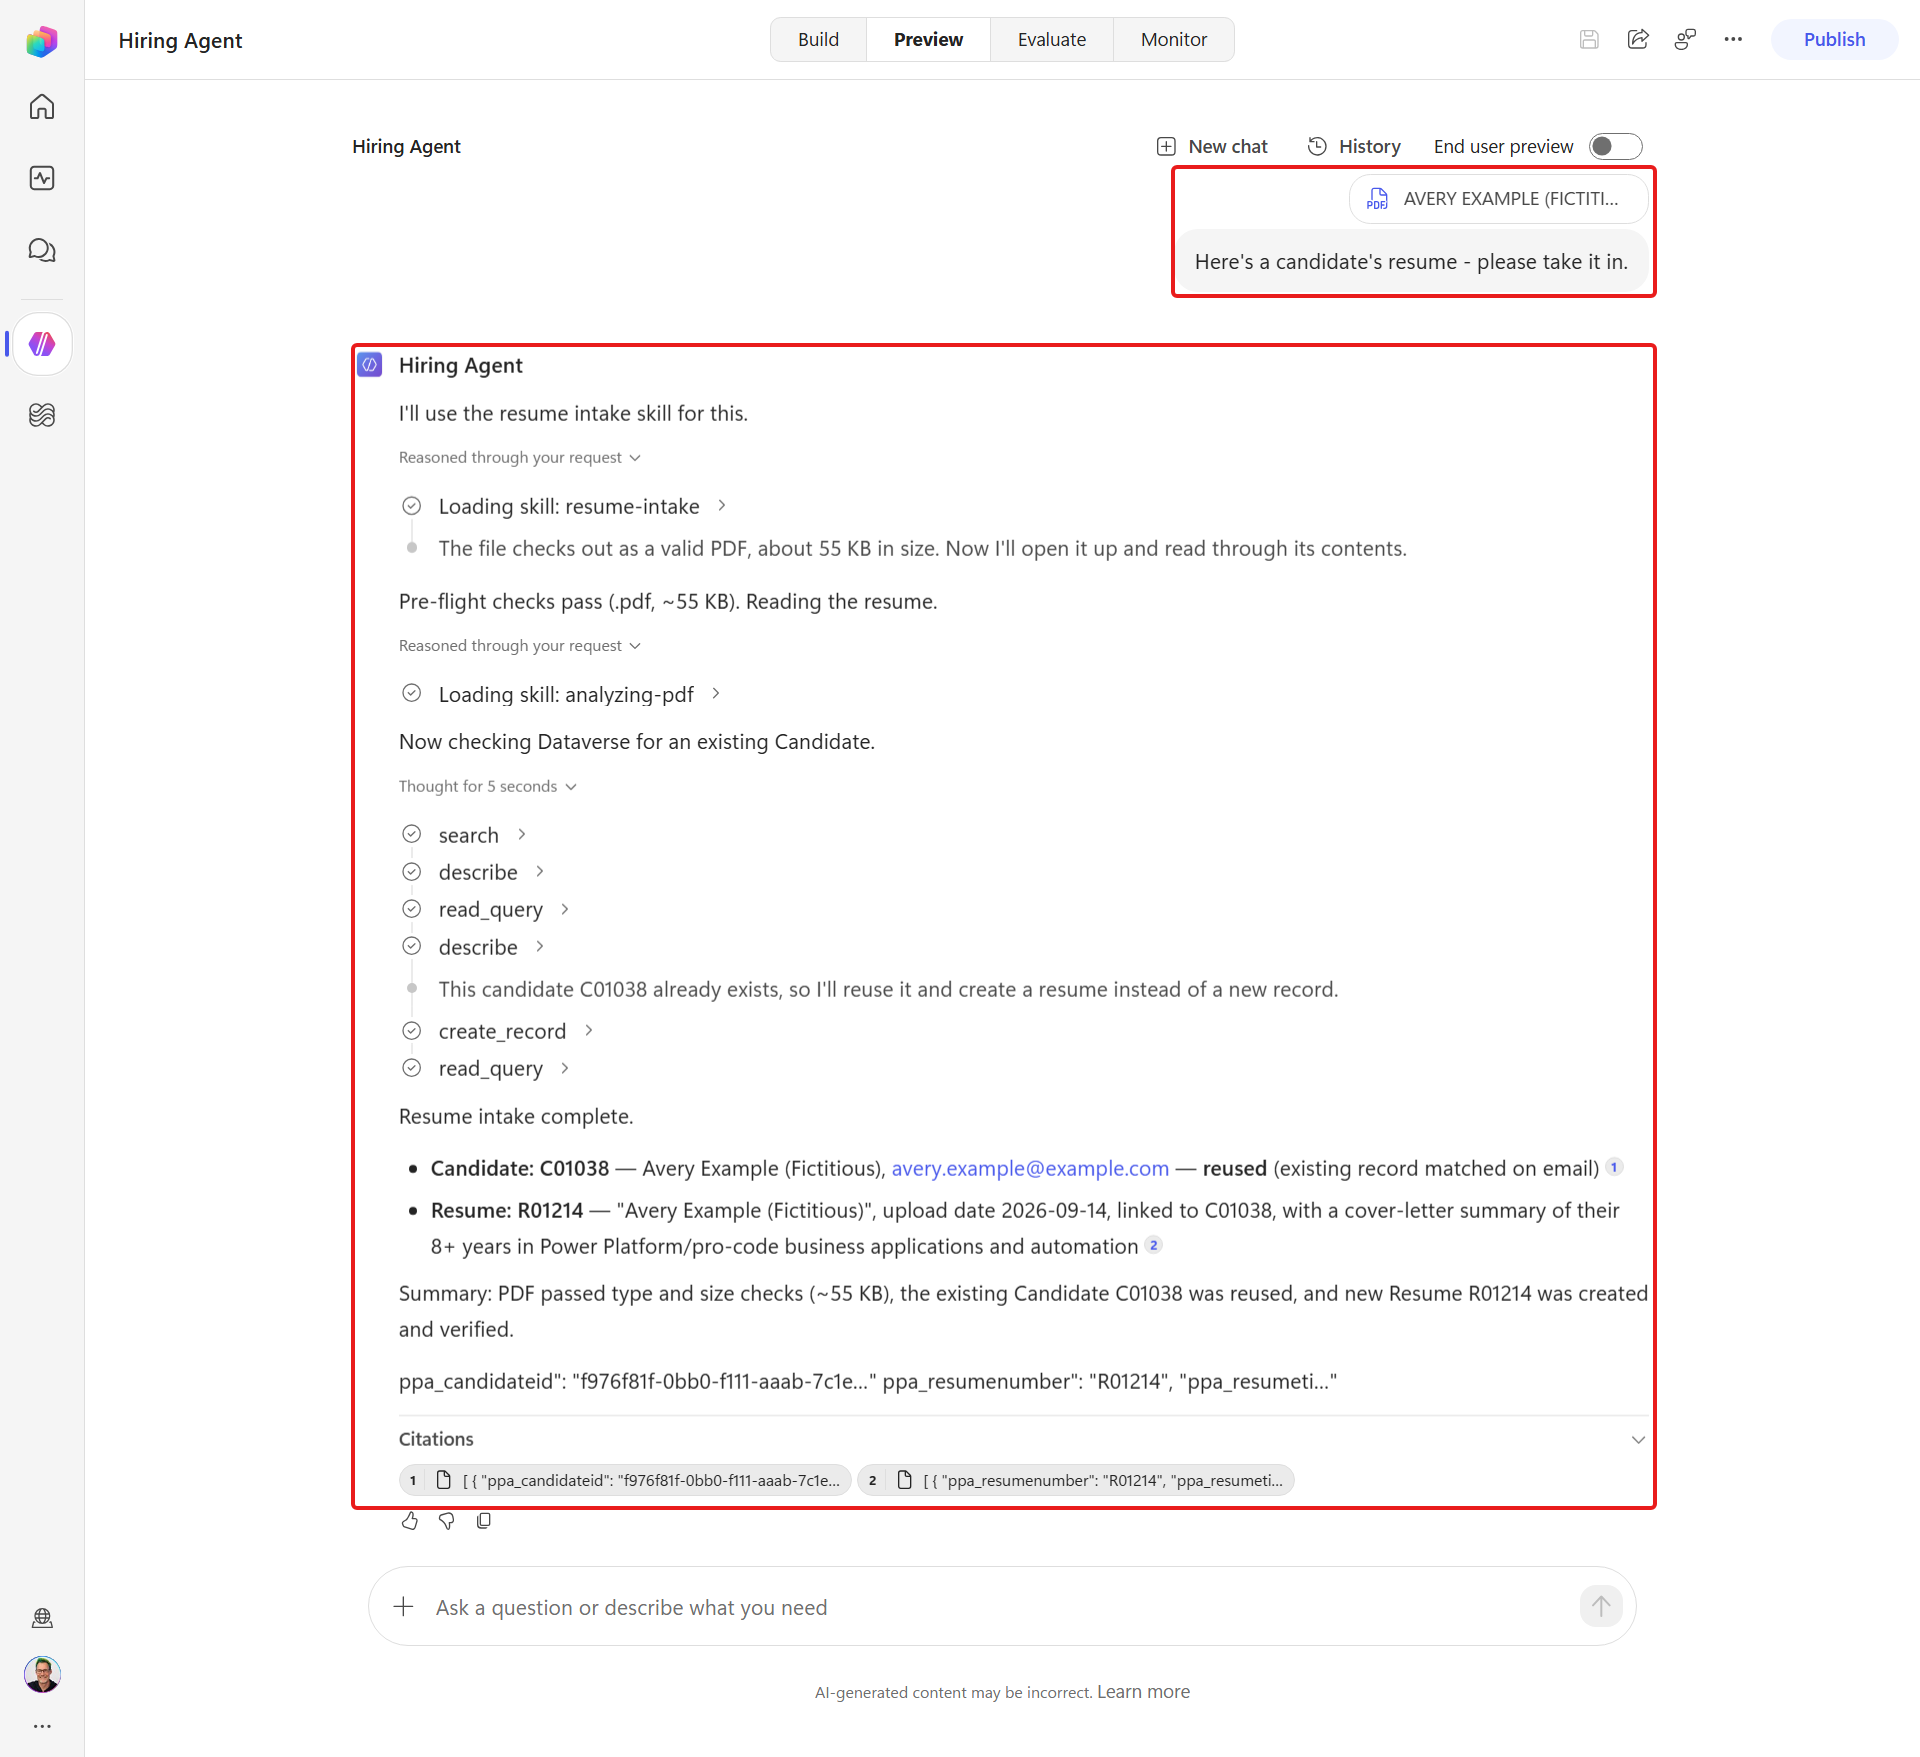
resume-intakeskill already contains them:textHere's a candidate's resume - please take it in. Report the Candidate and Resume numbers and whether the Candidate was reused or created.The agent loads
analyzing-pdf, extracts the name and email, calls the Dataverse MCPdescribe/read_query/create_recordtools, and reports the linked records: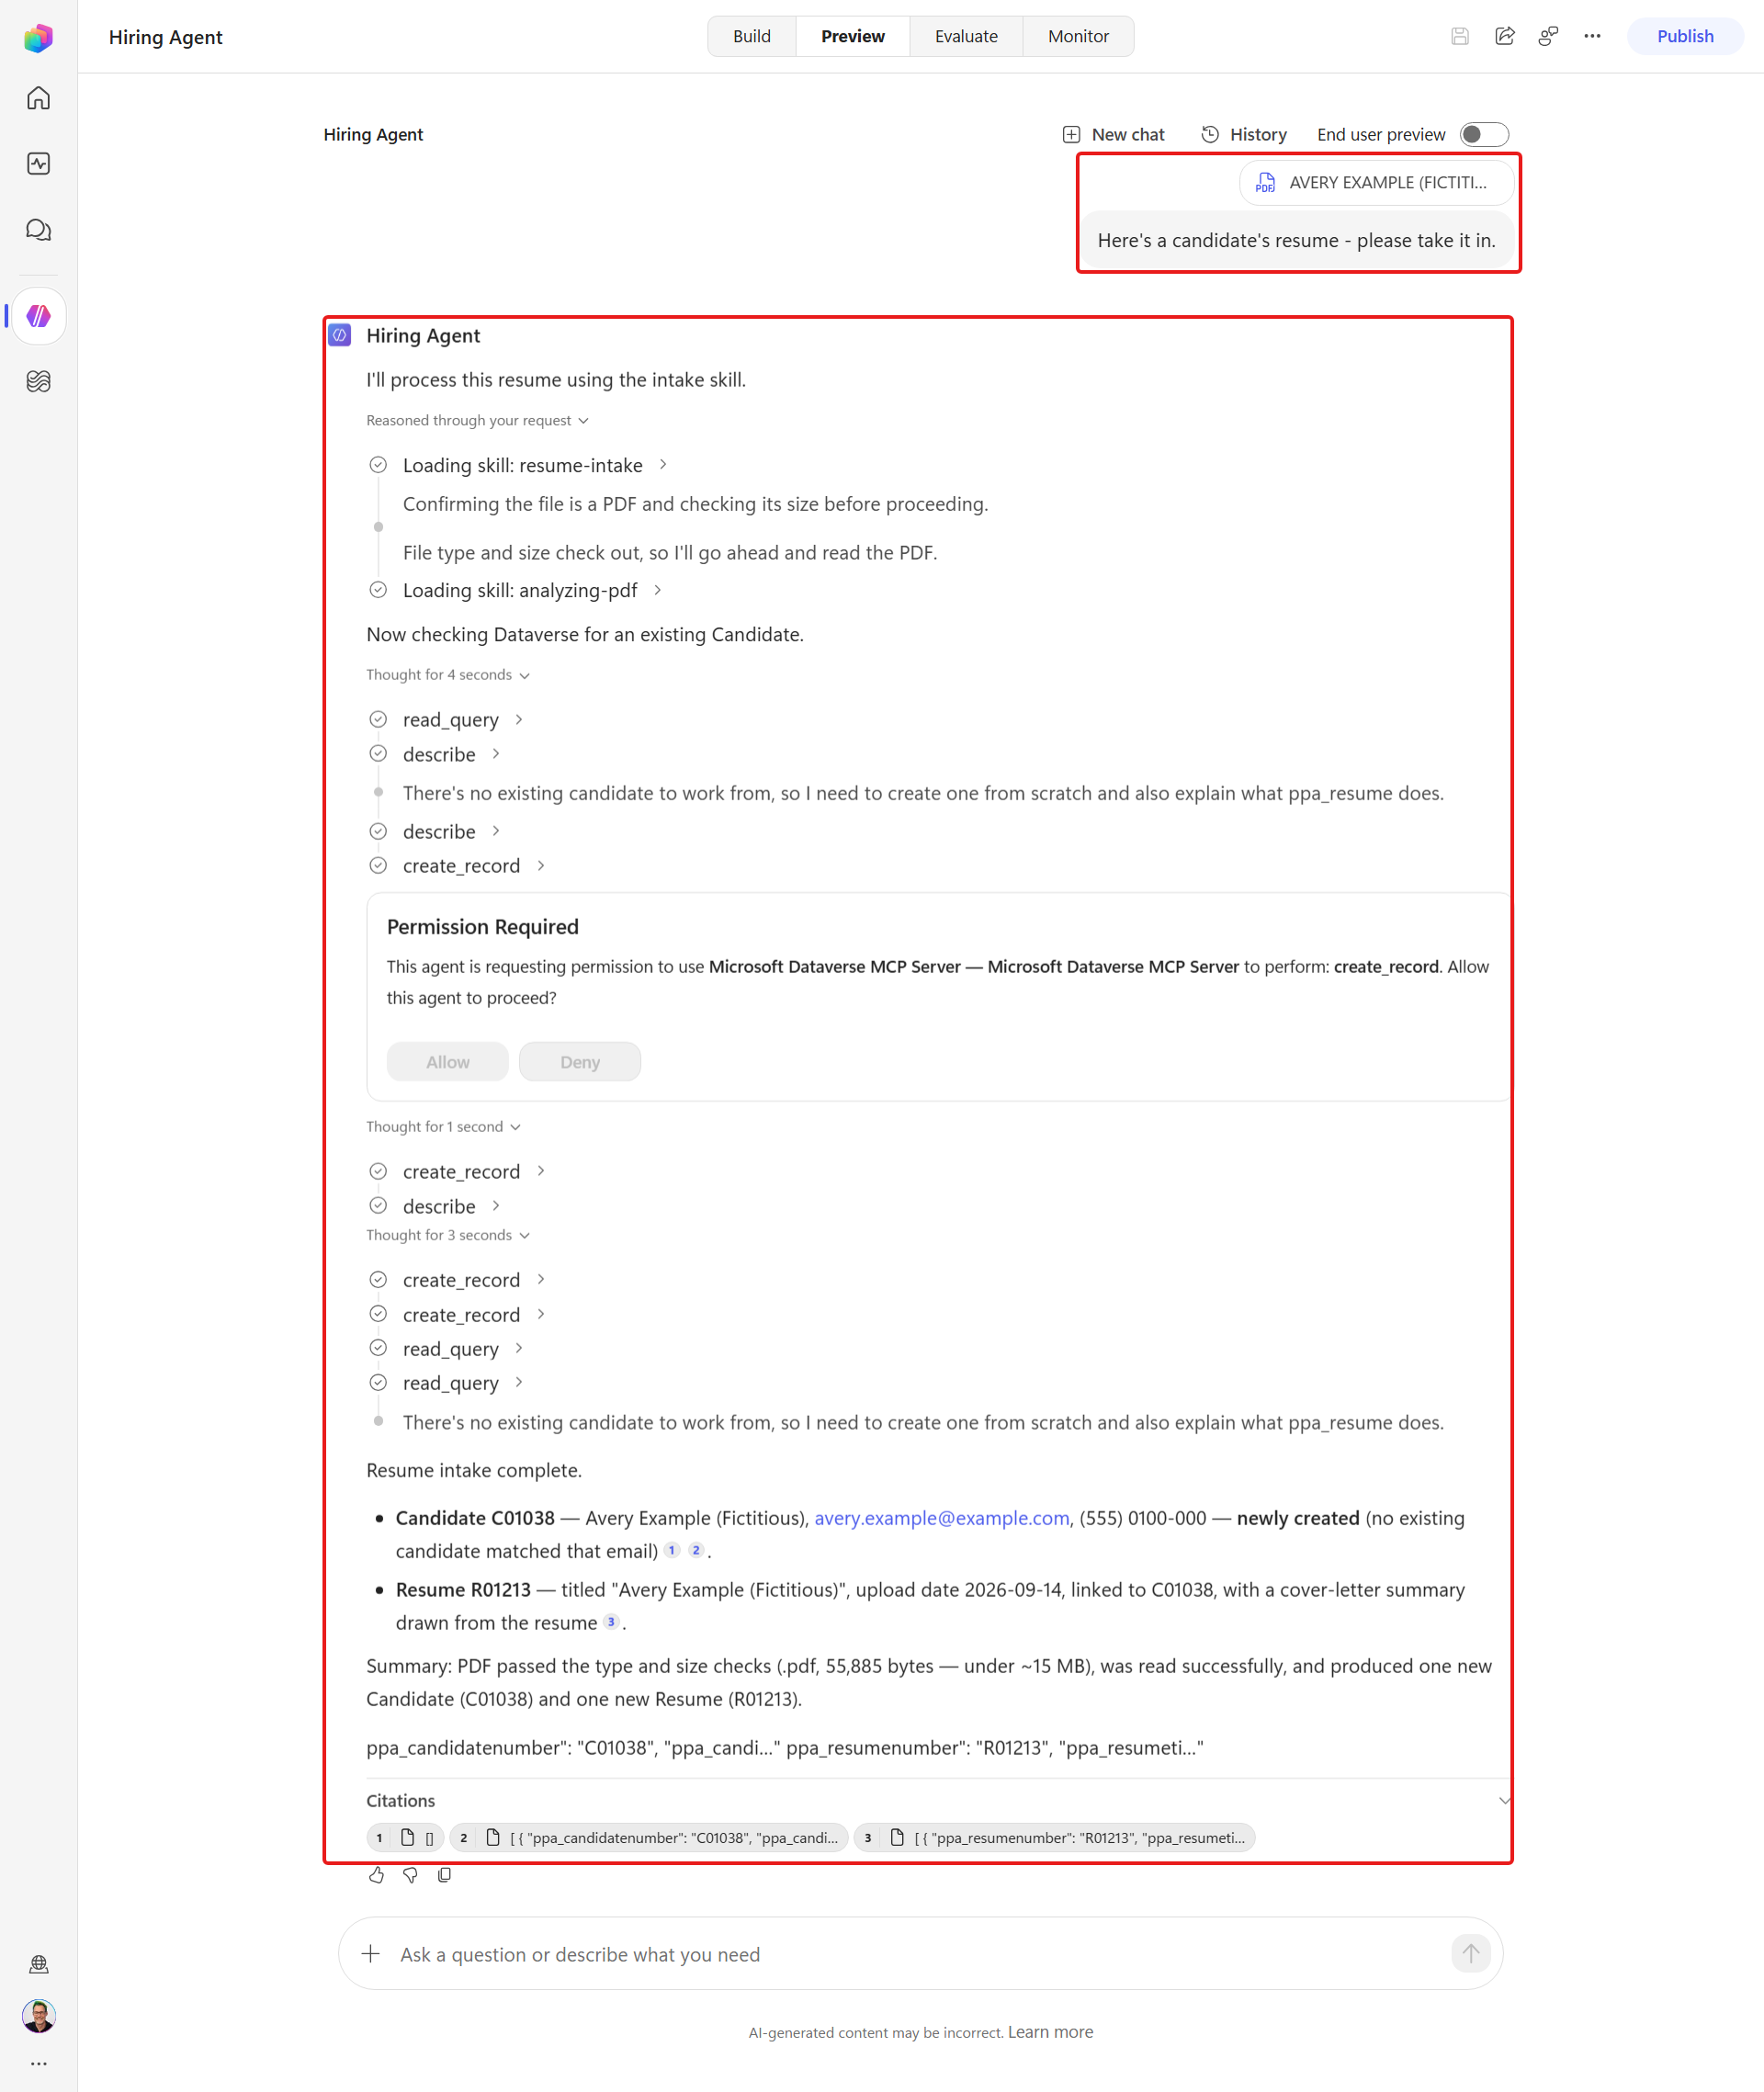
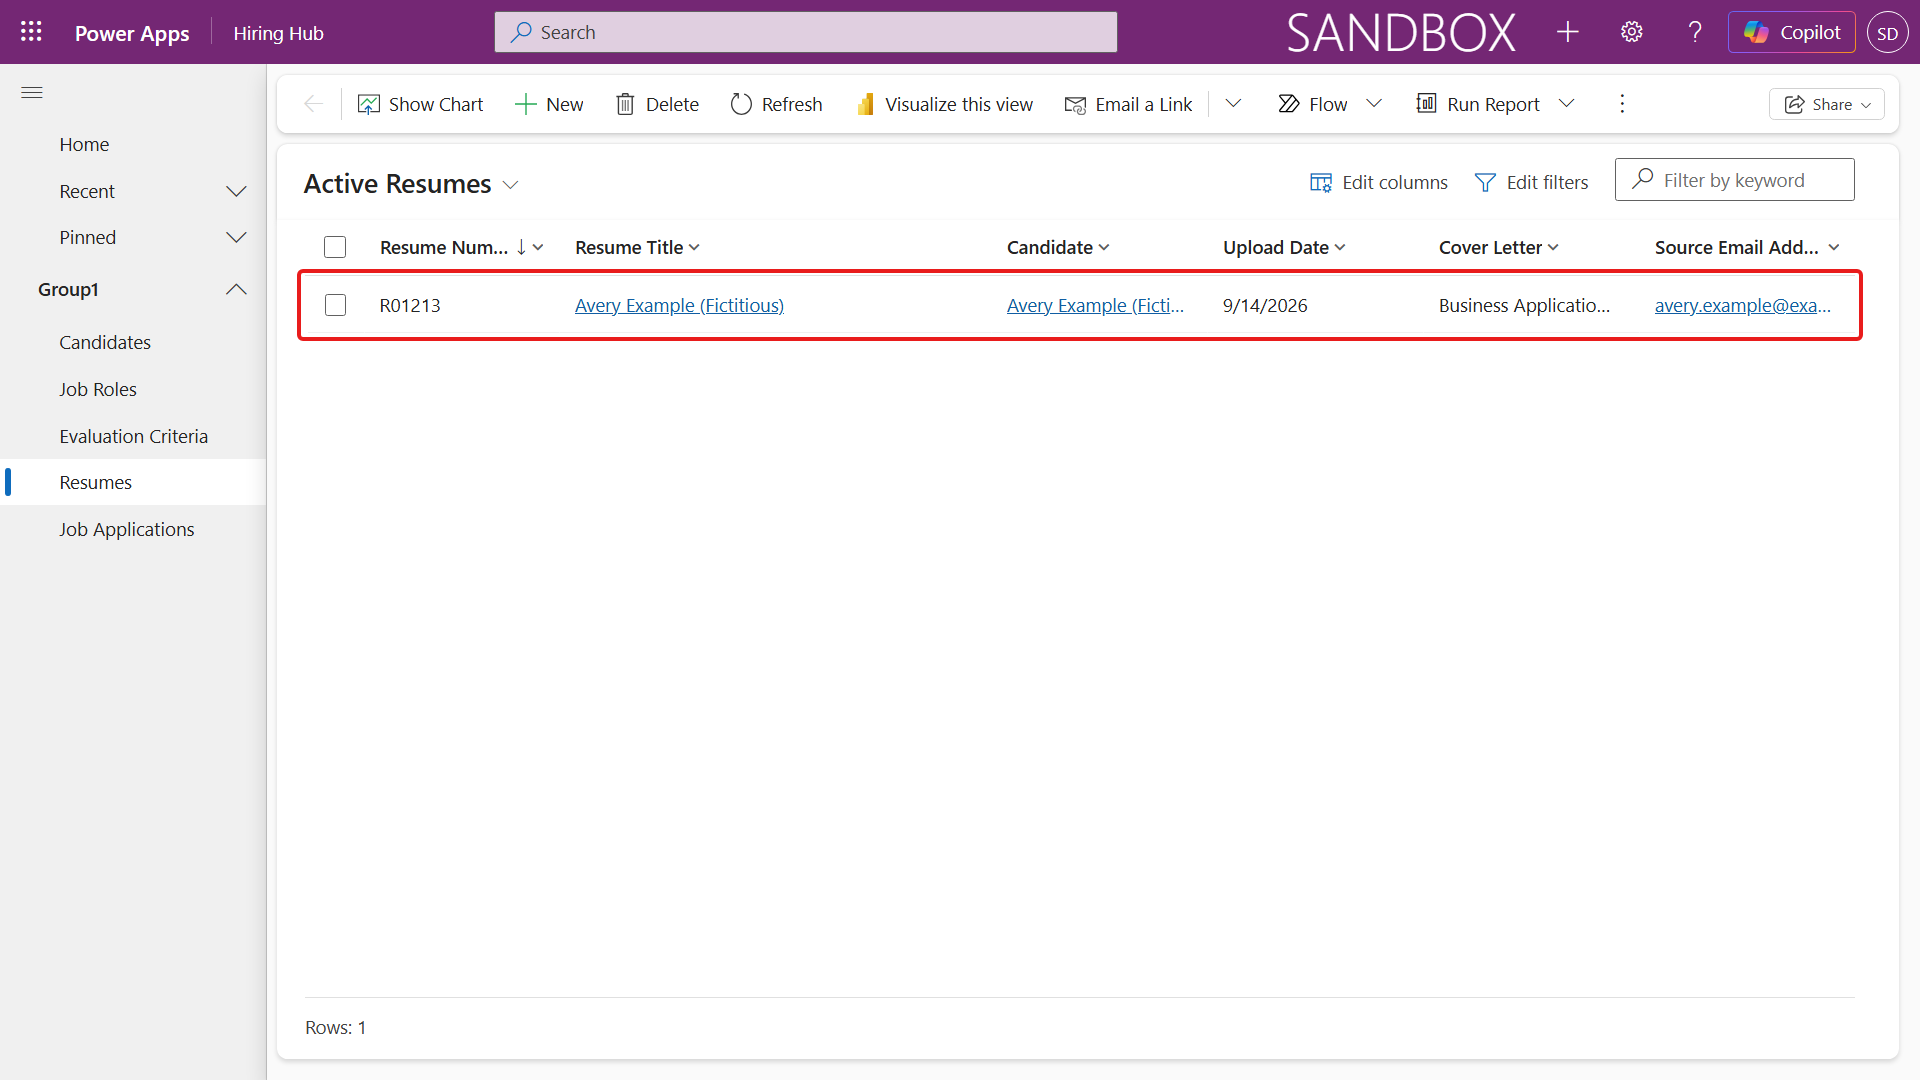
Open Hiring Hub, Resumes and verify the saved row, including its Resume number, linked Candidate, upload date, title, and source email:
The agent produces a Candidate (C#####, Avery Example,
avery.example@example.com) and a Resume (R#####), linked to each other, with an extracted cover-letter summary - using only the skill and the Dataverse MCP server. Your record numbers may differ, so check the shape of the result rather than the values.
5.2 Verify and deduplicate
Before adding more records, check the first intake in the Hiring Hub and repeat it with the same email. The second run should reuse the Candidate and create only another linked Resume.
Start a new Preview chat and attach the same Avery PDF again.
Send the same natural prompt you used in Lab 5.1 - don't tell the agent what to do about the duplicate, because the point is to find out whether the skill handles it:
textHere's a candidate's resume - please take it in. Report the Candidate and Resume numbers and whether the Candidate was reused or created.The reply should report a reused Candidate and a newly created Resume. If it creates a second Candidate, the skill's deduplication rule is not doing its job. Telling the agent to reuse the record would only prove it follows instructions.
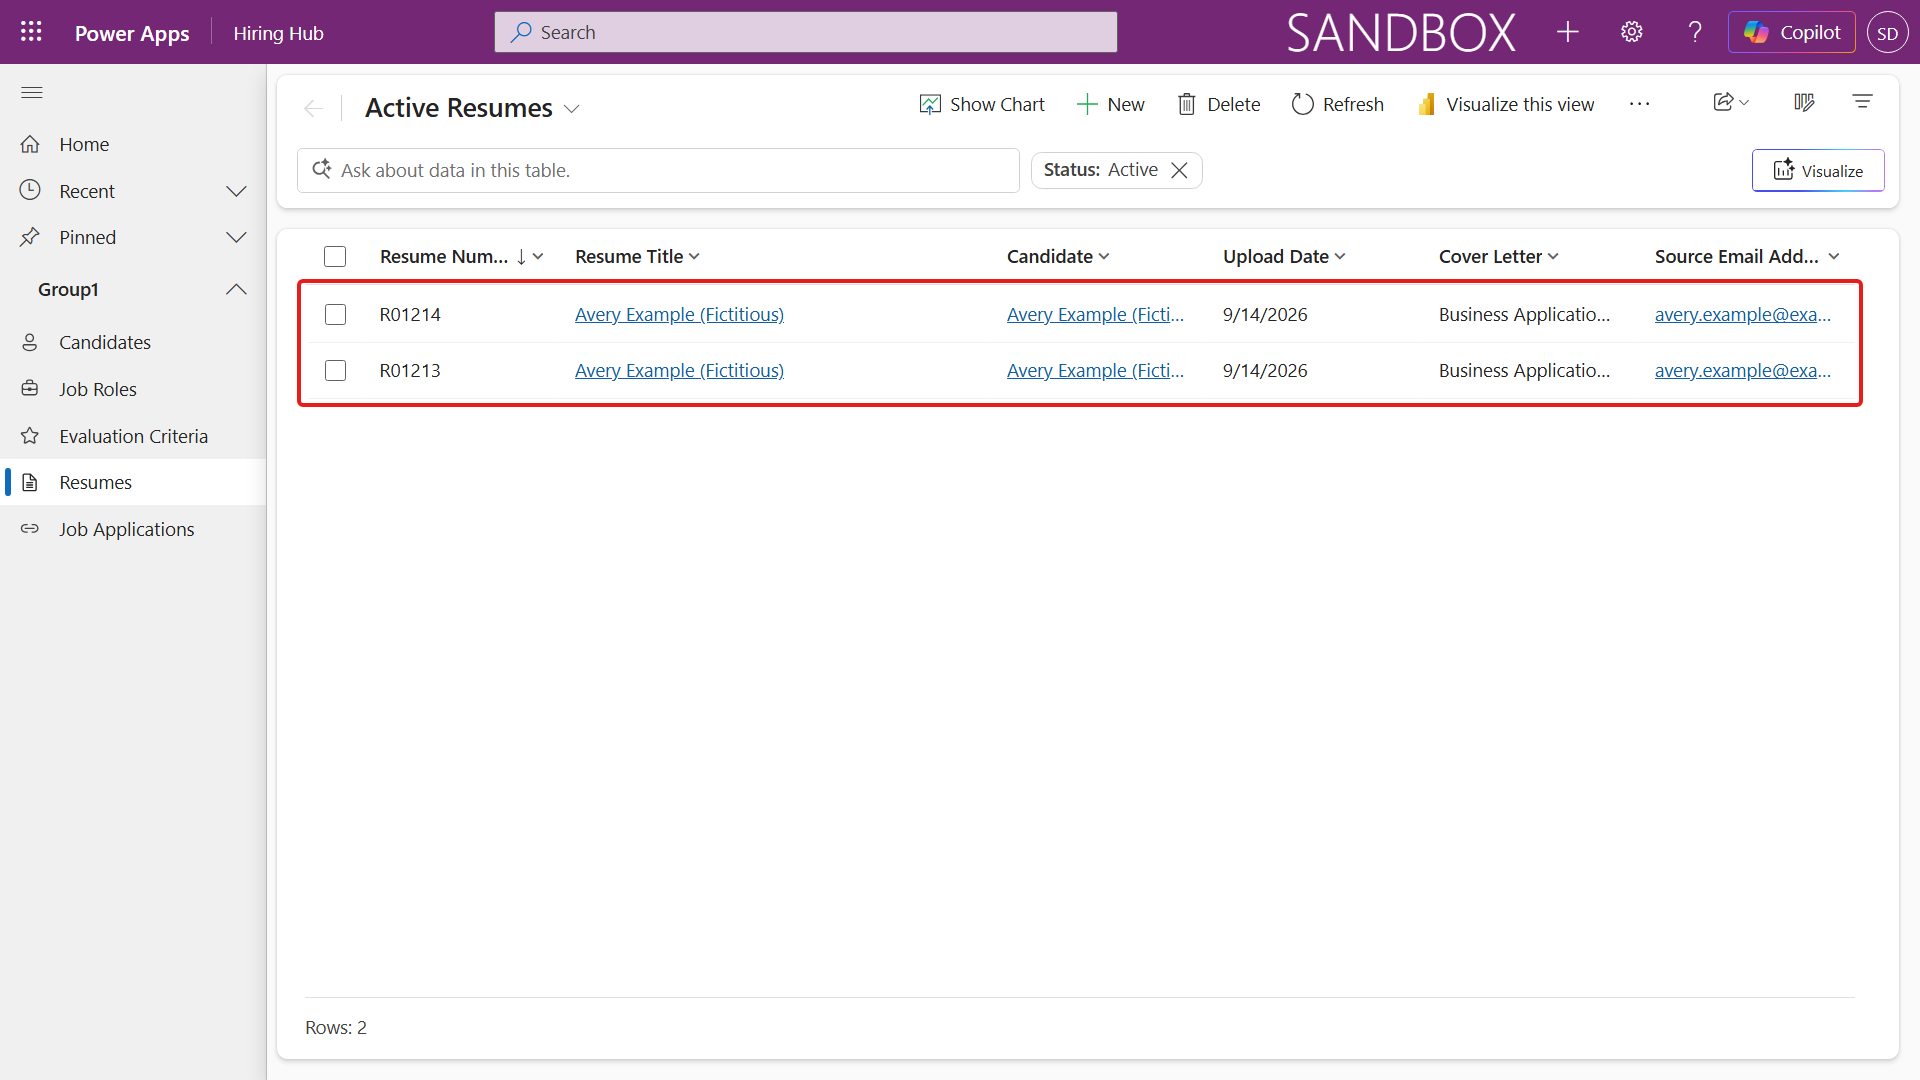
Open Hiring Hub, Resumes. Confirm there is still one Avery Candidate identity but now two Resume rows with the same source email:
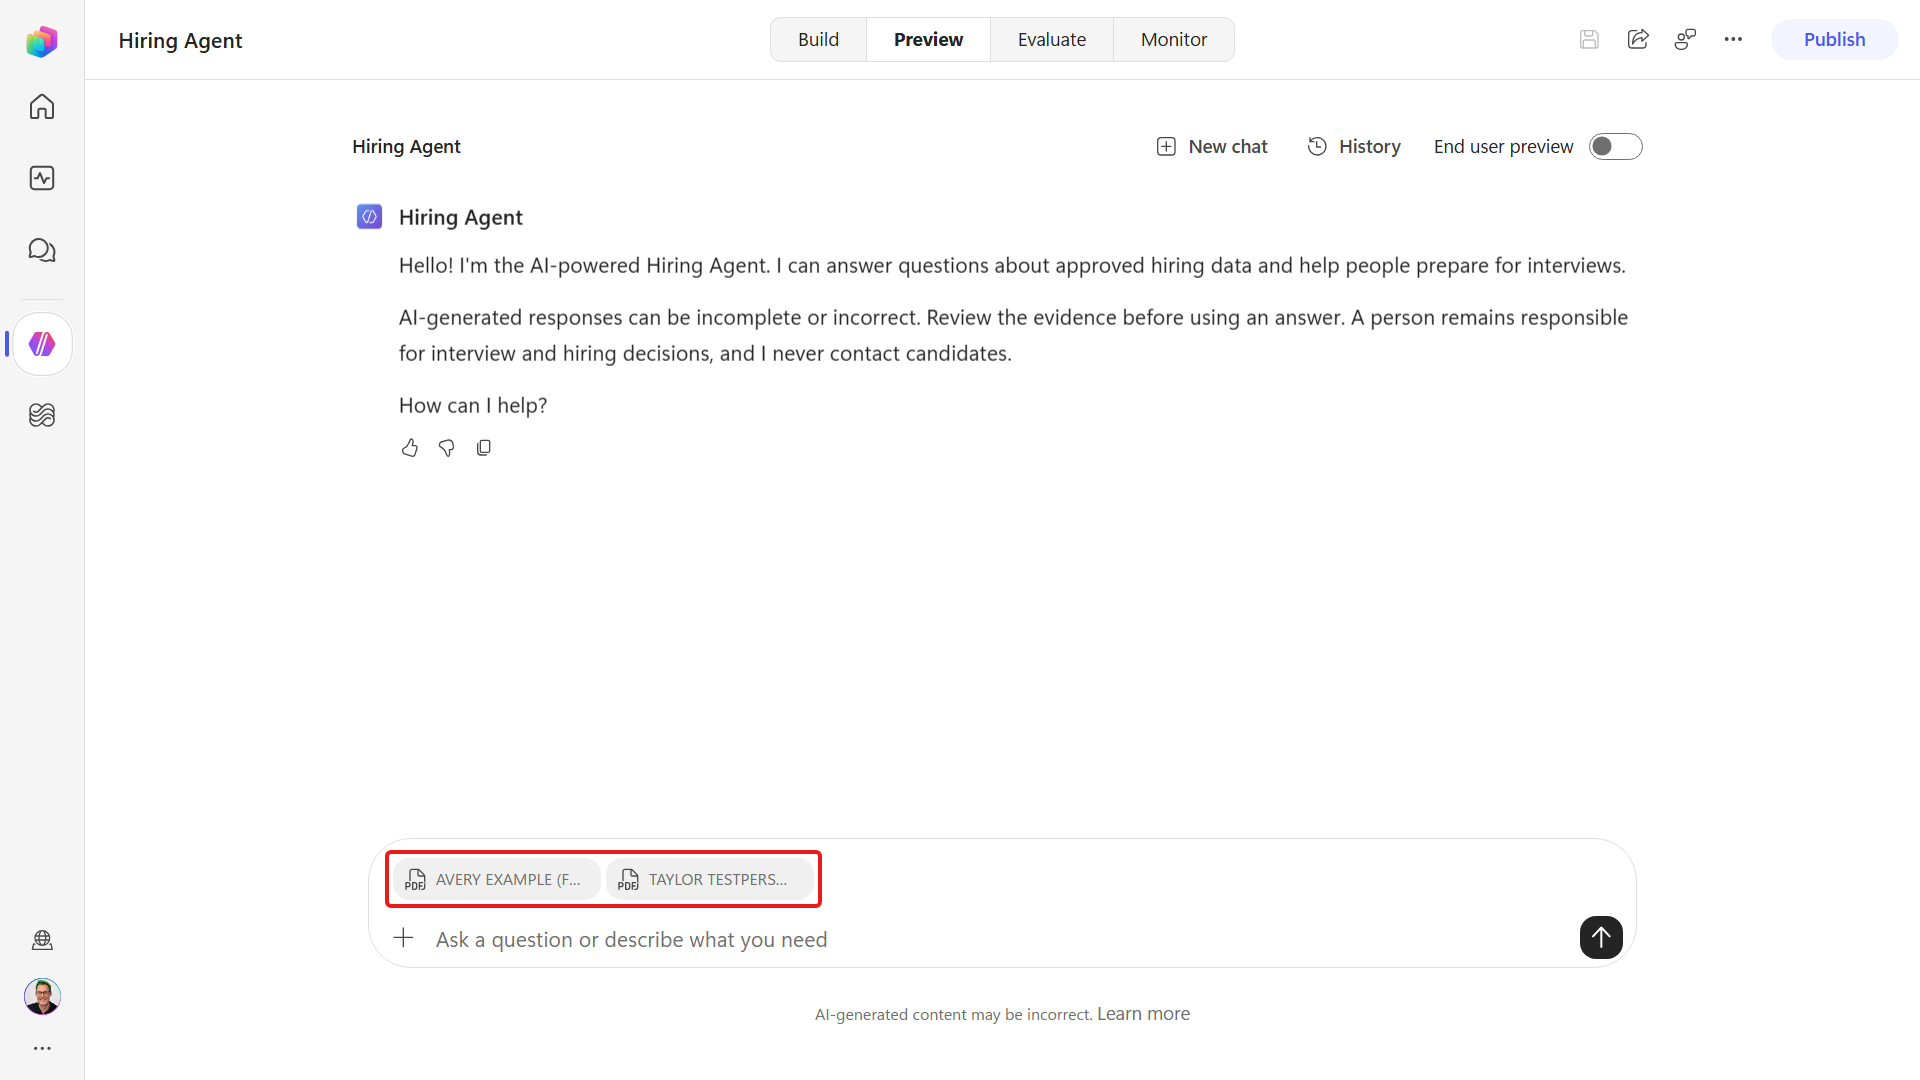
Start another new chat and attach both the Avery and Taylor PDFs:
Send
Process these resumes.The skill processes one file at a time, reuses Avery, and creates Taylor as a new Candidate: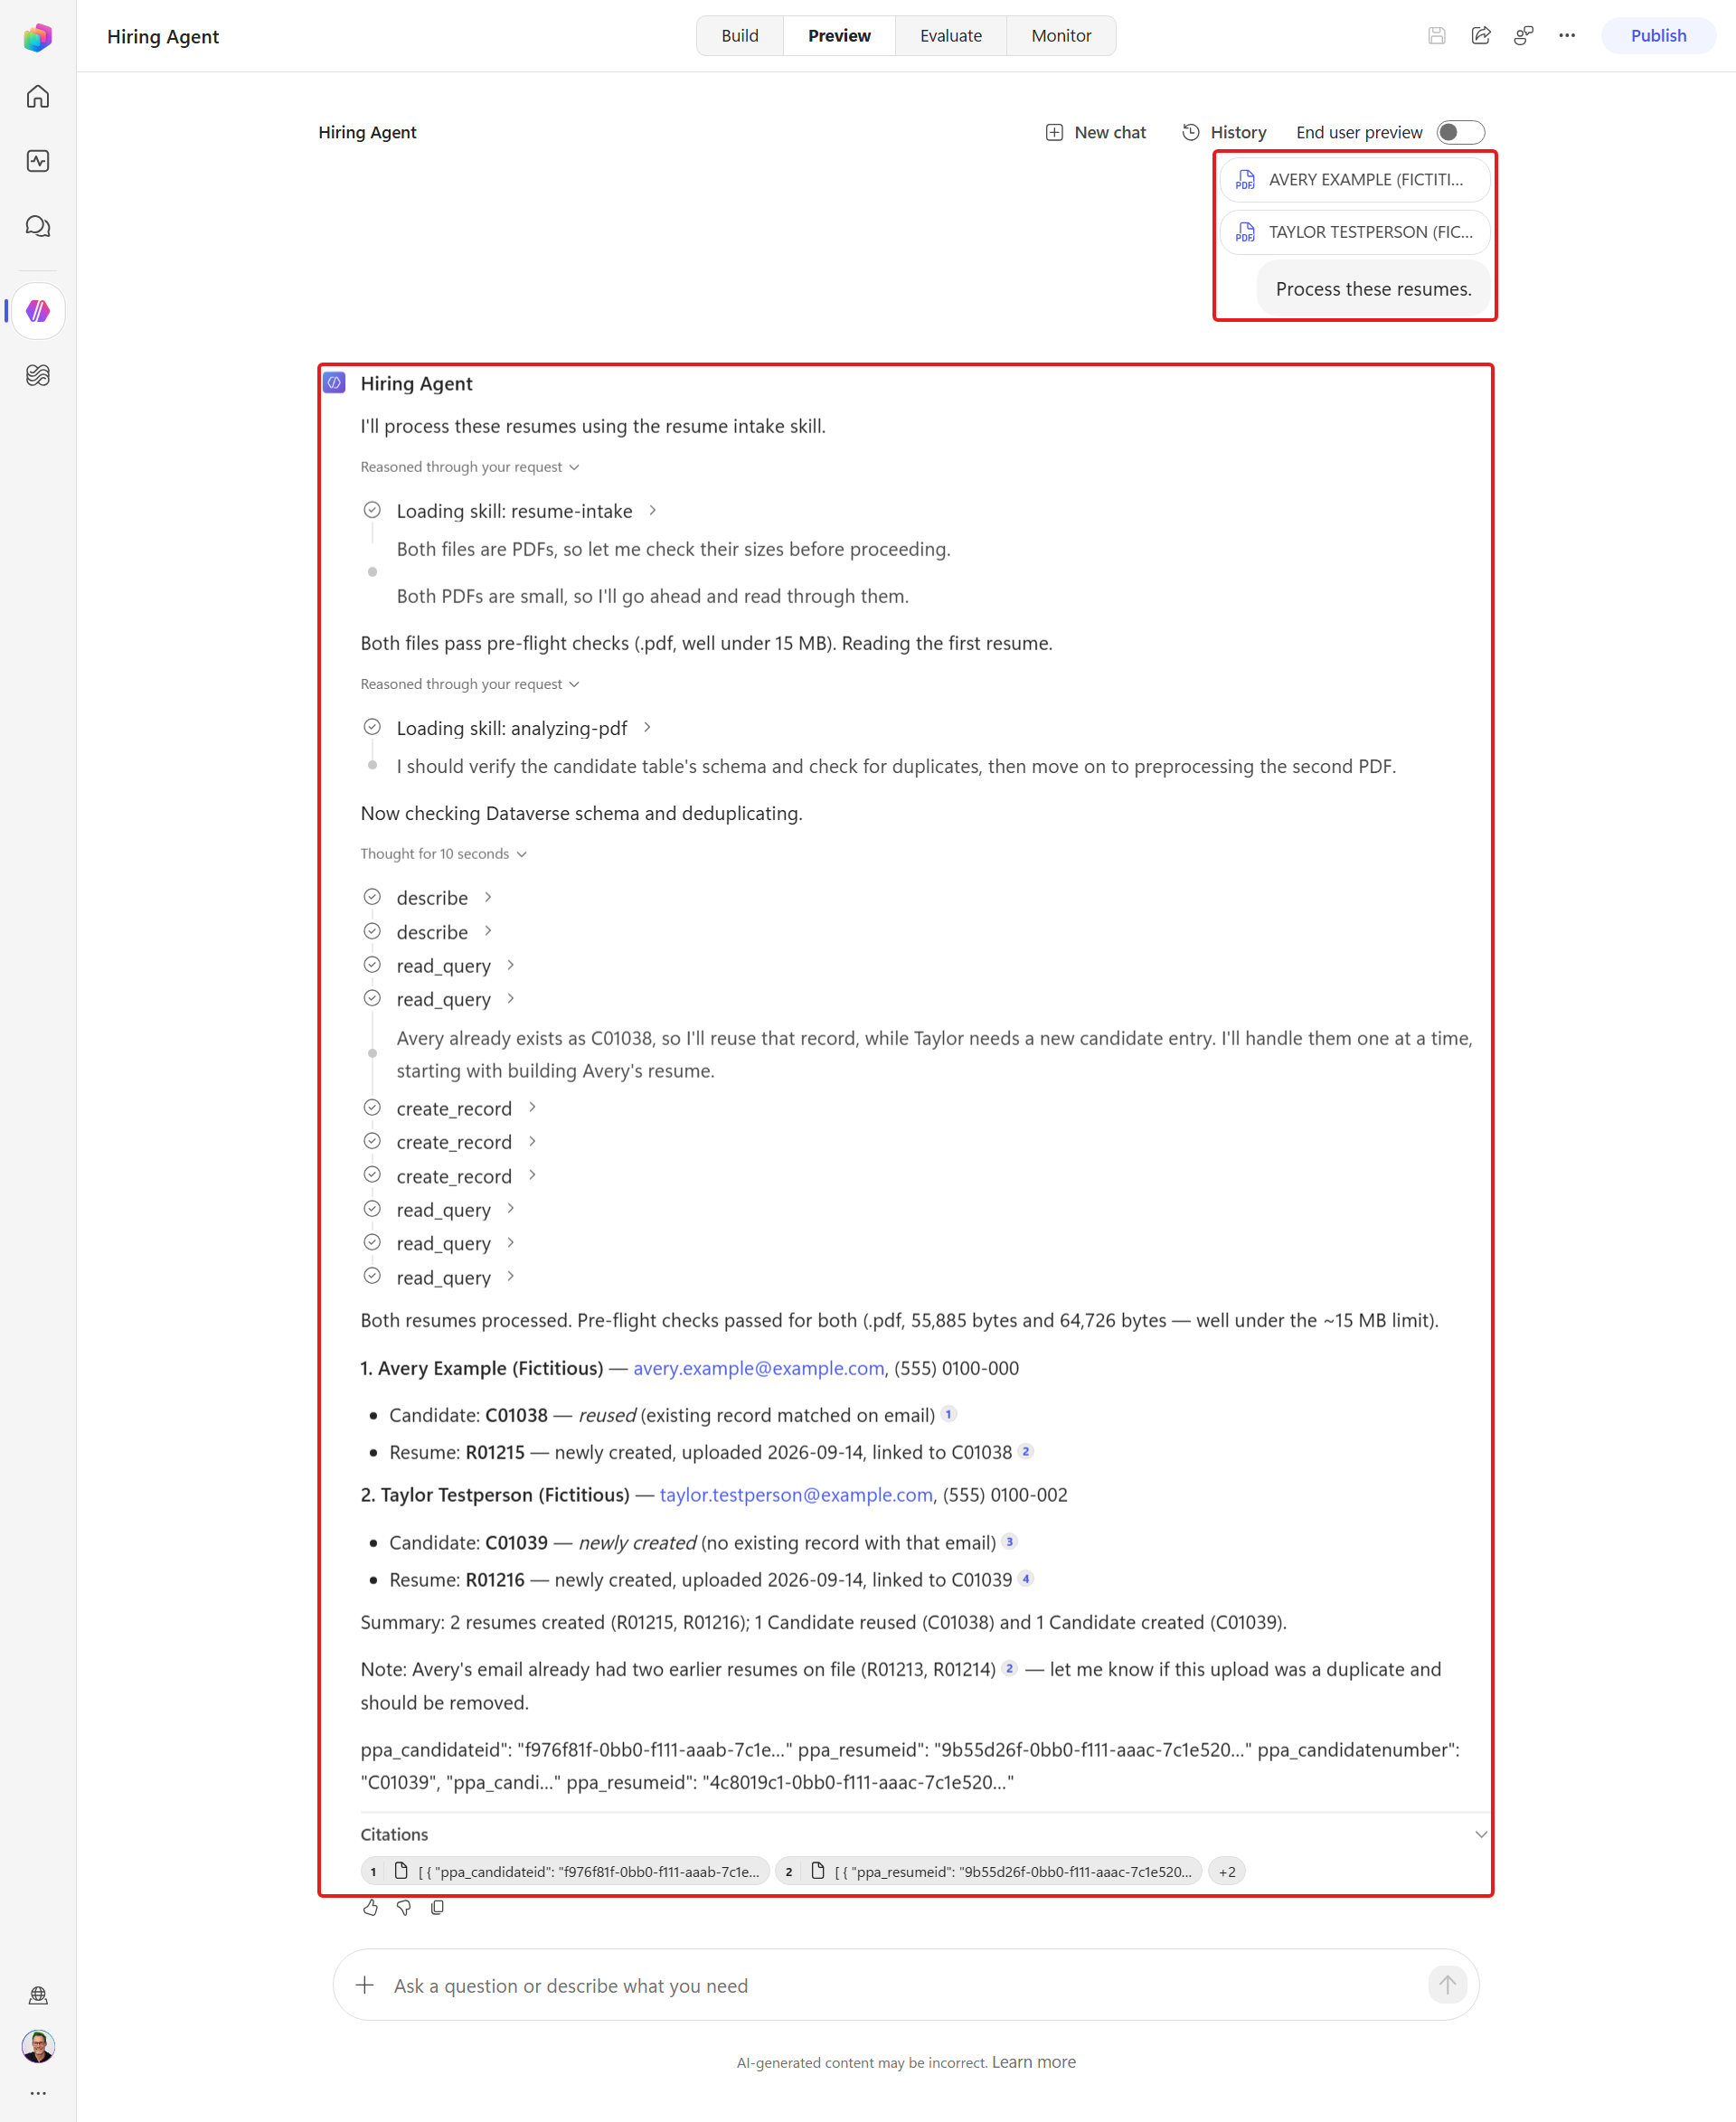
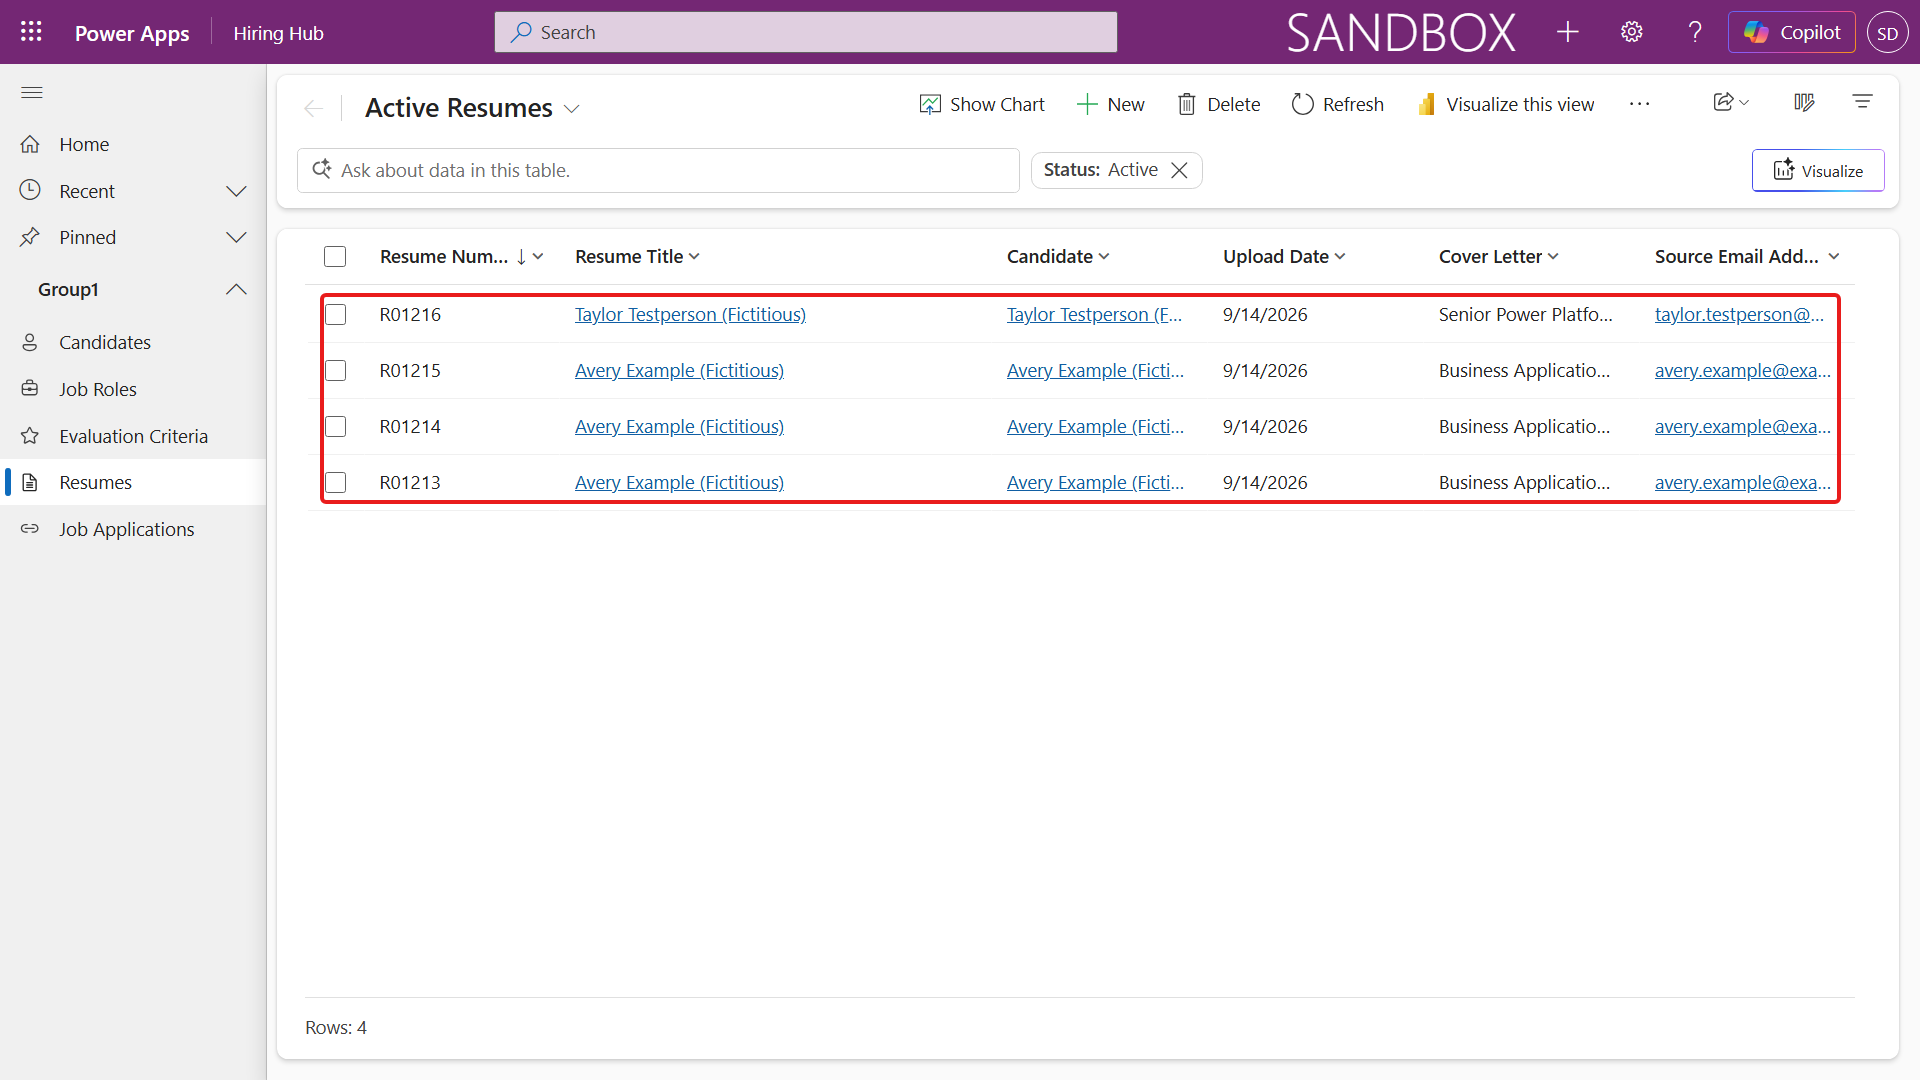
Return to Hiring Hub, Resumes and confirm the two-file run leaves two Candidates and four Resume rows in total:
5.3 File limits & error handling
Before the agent opens an attachment, it should reject an unsupported type or oversized file.
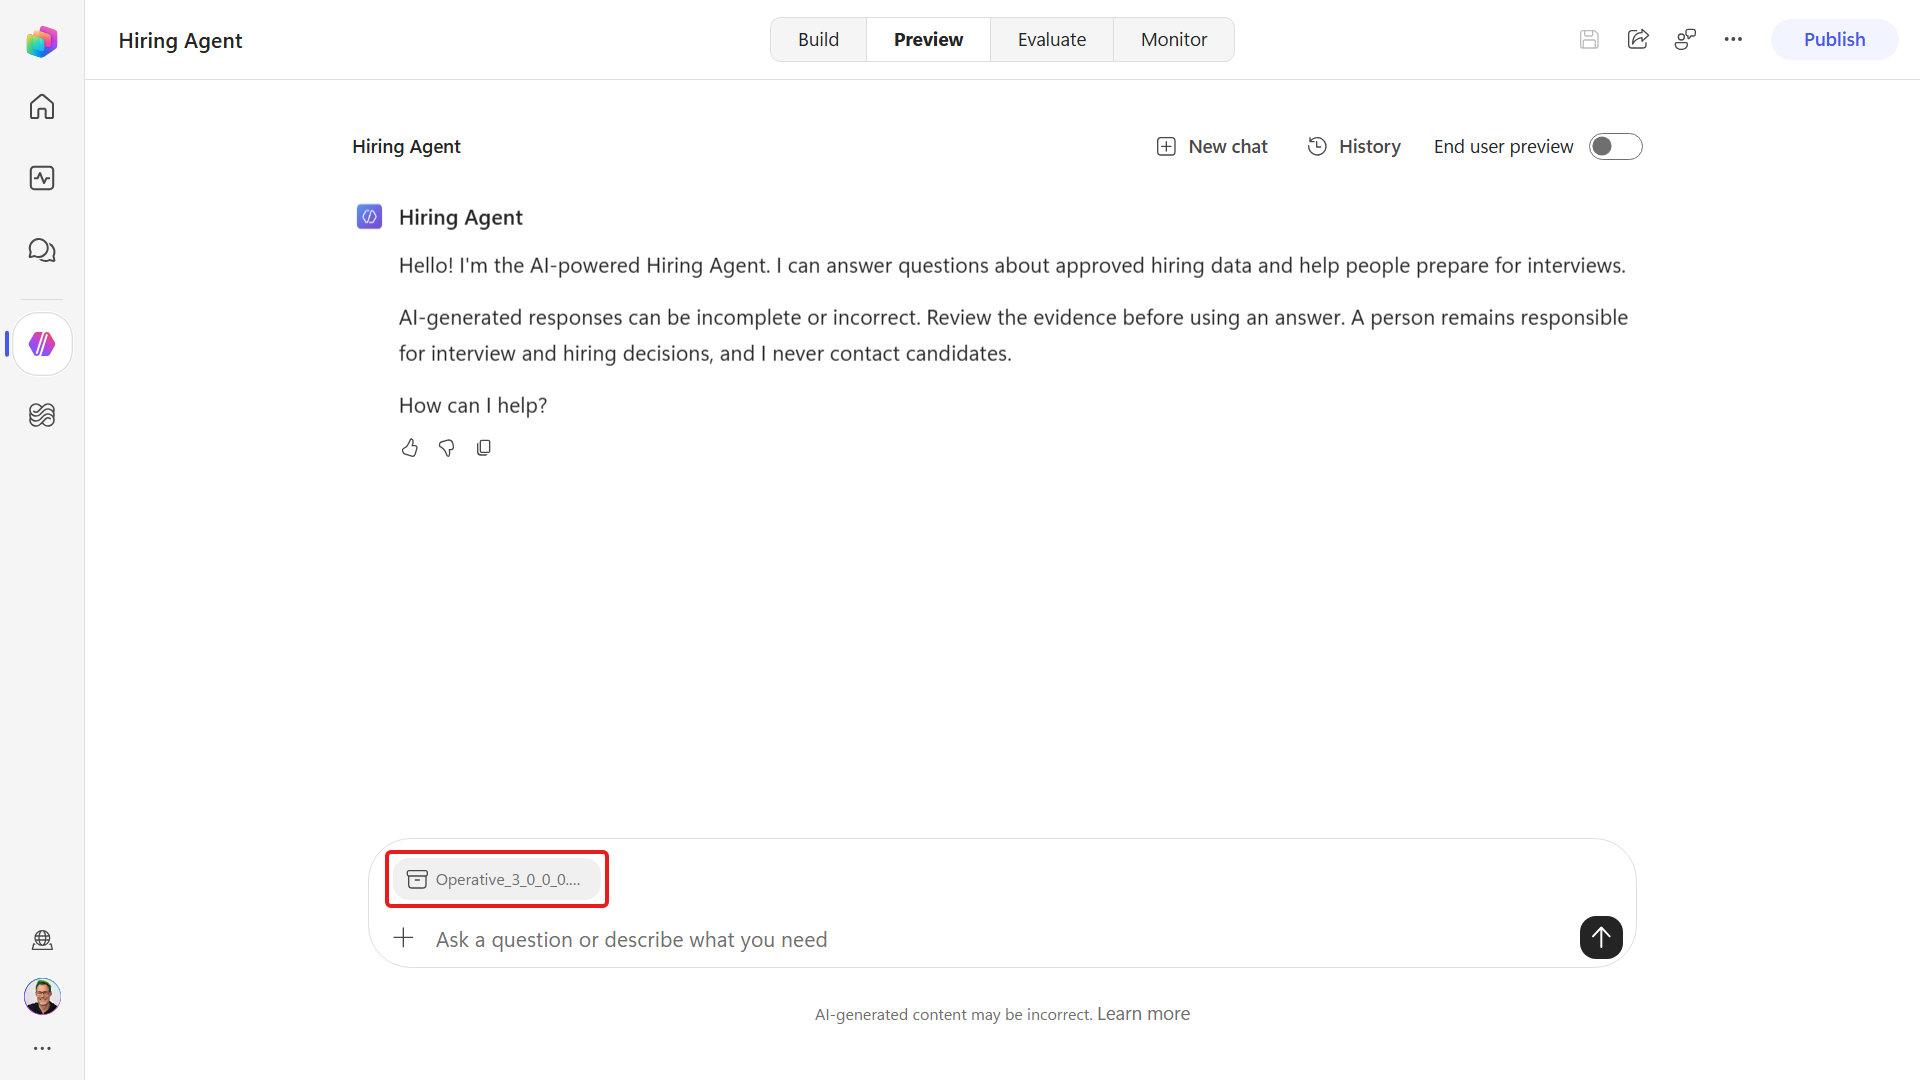
Start a new Preview chat and attach an unsupported ZIP, such as the Operative solution archive:
Ask the agent to process the attachment. The
resume-intakeskill runs its pre-flight check before reading anything, names the unsupported type, lists the accepted types, and states the size limit: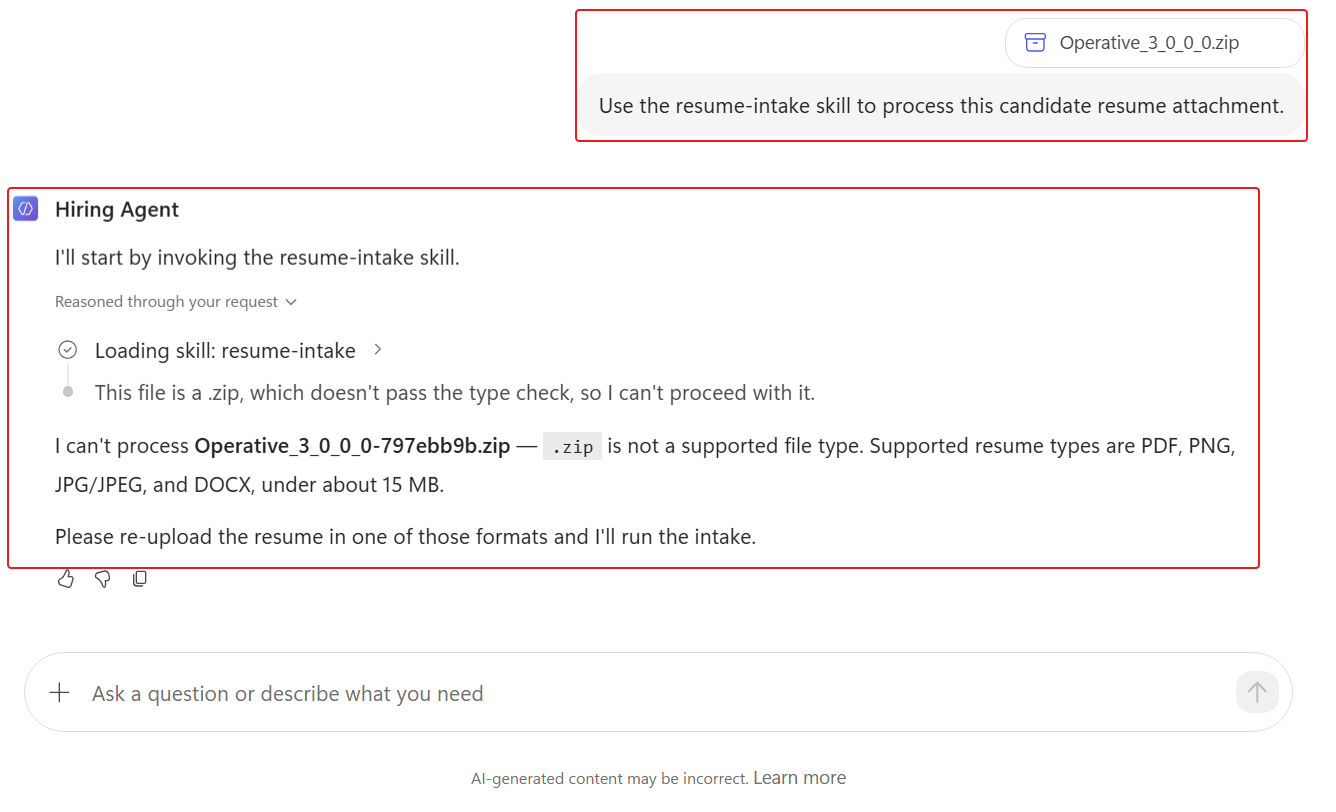
Open Hiring Hub, Resumes and confirm the rejected file created no records, leaving the grid at the same four rows:
The skill's File-handling rule
The resume-intake skill includes a File handling section with two pre-flight checks that run before the file is opened: the extension must be PDF/PNG/JPG/DOCX, and the size must be under ~15 MB. If either fails, stop immediately, name the failing check, and ask for a re-upload - never read the file and never create a record from it. Without this rule the model tries to open the file first and only discovers the problem after several slow diagnostic attempts.
5.4 Build the role-matching skill, then run it
The role-matching skill applies the rubric above to every open role and shows how it calculates each score.
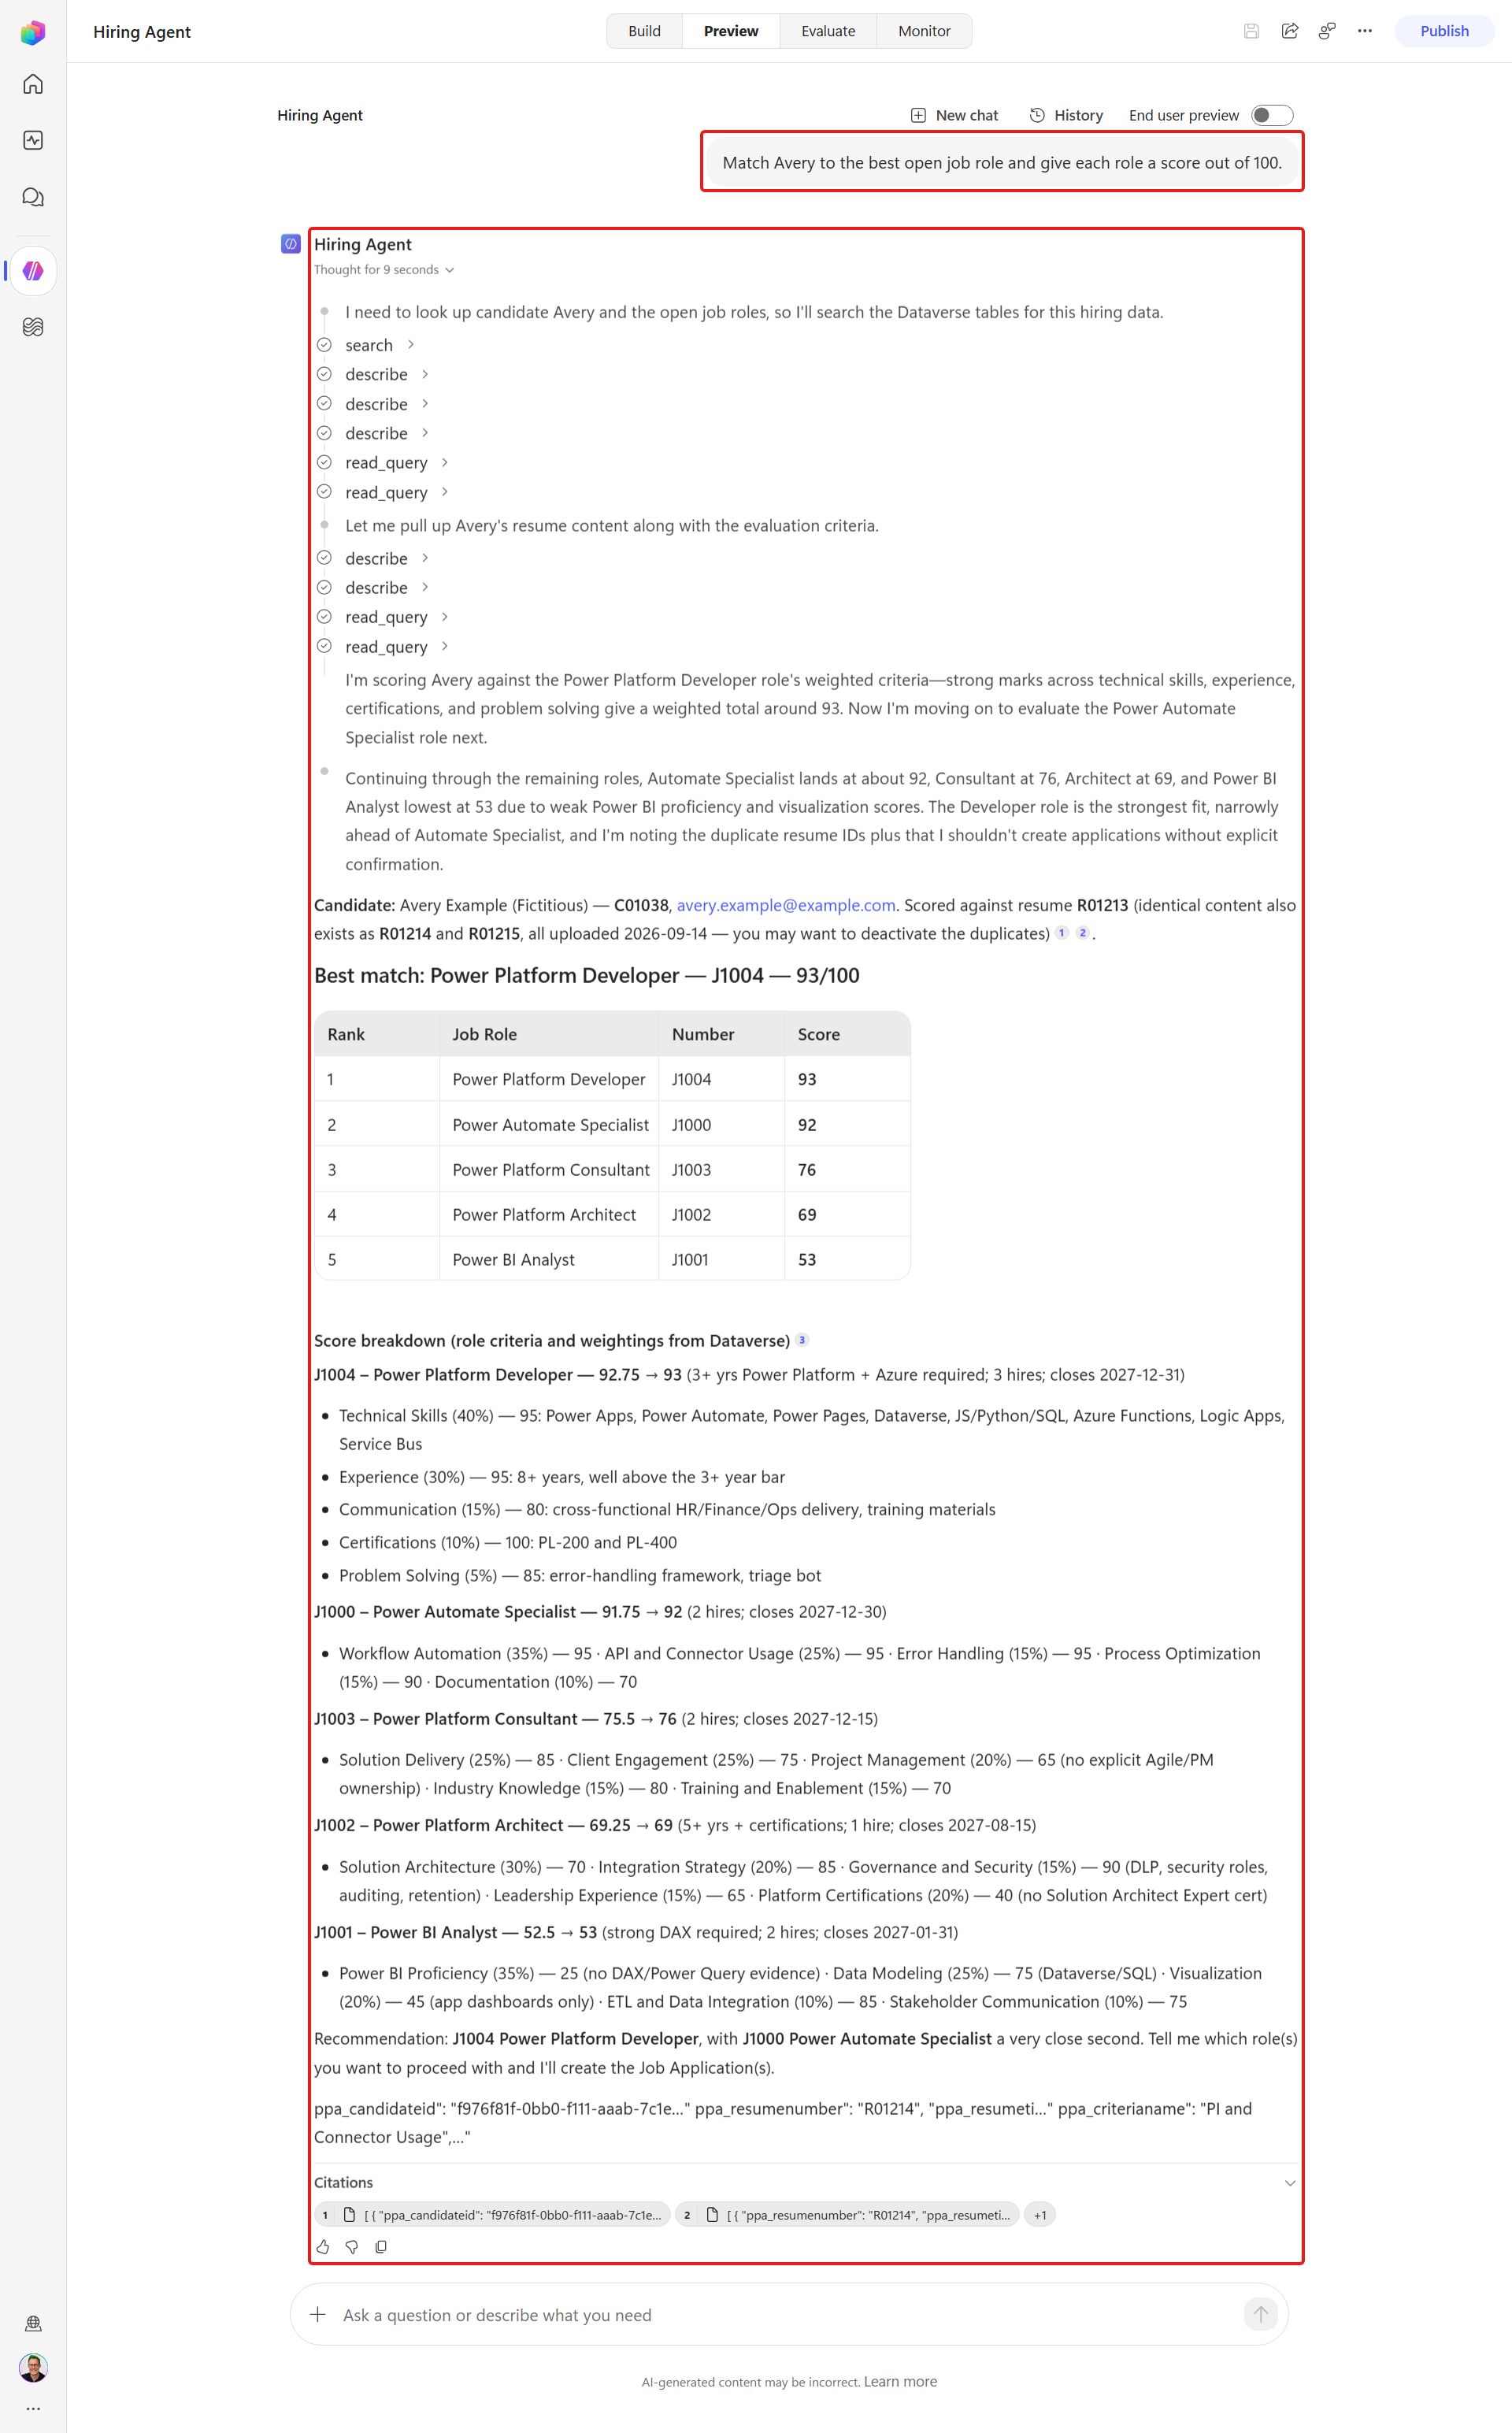
Before the skill exists, open two separate chats in Hiring Agent, Preview and ask each one the same unconstrained question:
textMatch Avery to the best open job role and give each role a score out of 100.Compare the second result with the first. The numbers and reasoning can drift between runs, and that inconsistency is exactly what the rubric constrains. If Preview cuts off the table's columns, select History and open the latest Completed conversation with source Preview. Confirm it contains the same question and scores before comparing:
To fix the weights, arithmetic, and output structure, continue building the role-matching skill:
Create the skill the same way you built
resume-intakein Mission 02 Lab 2.1- Hiring Agent, Build, Skills, ➕ Add skill, Create from blank. Set the Name to
role-matchingand a Description that scopes it to scoring only (so the orchestrator loads it for "which roles fit?" but not for intake or creating applications):
textUse to score how well a candidate (given a resume or candidate/resume number) fits the open Job Roles, using each role's weighted evaluation criteria and a fixed scoring rubric. Read-only: it produces a ranked, justified match but does not create Job Applications.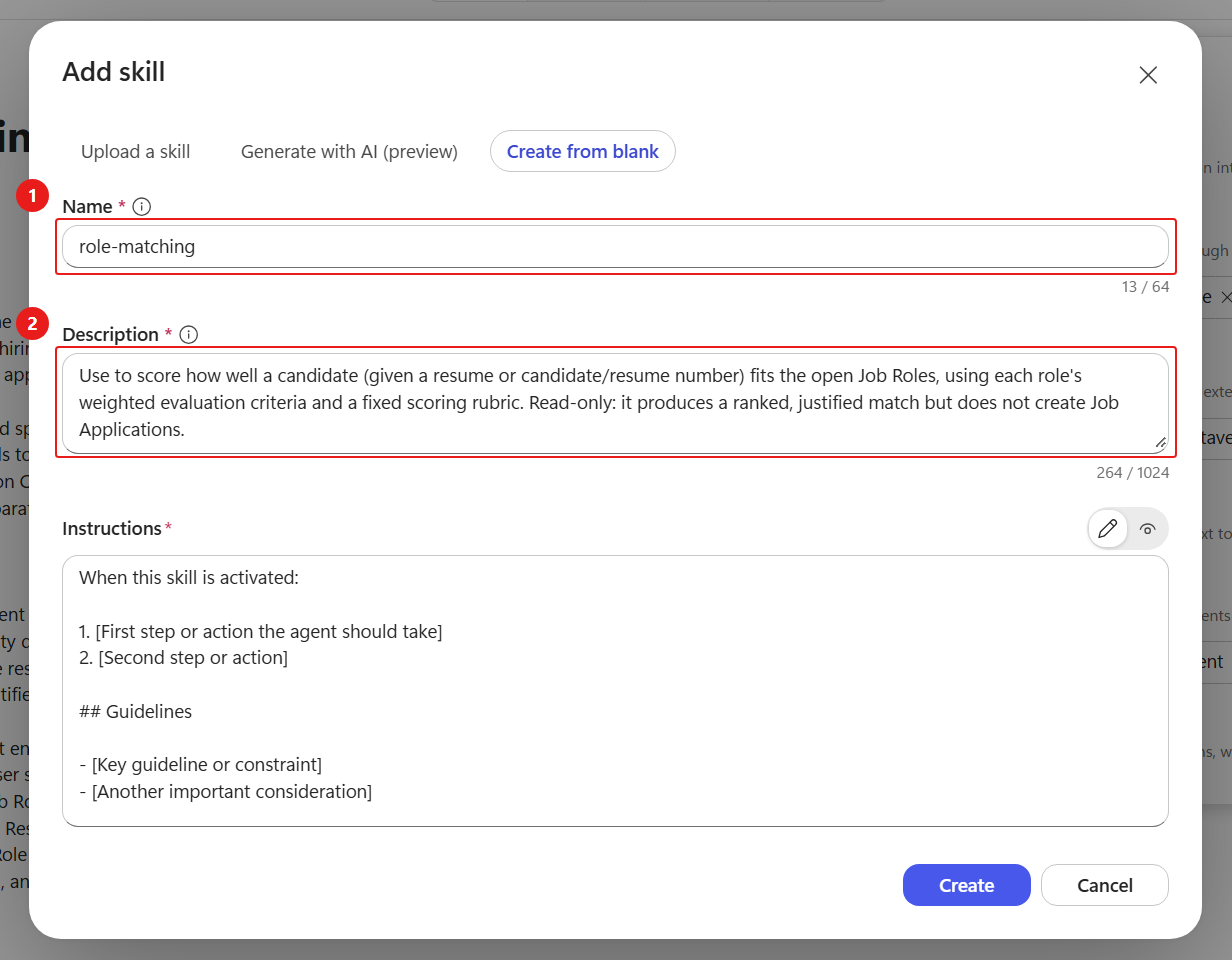
- Hiring Agent, Build, Skills, ➕ Add skill, Create from blank. Set the Name to
Set the Instructions to the rubric procedure below. It requires every criterion, shows the evidence for each level, and defines the calculation:
textUse this skill to score how well a candidate fits the open Job Roles. It only reads and scores - it never creates or changes records. 1. Identify the candidate. Use the resume or candidate the user names (for example a ResumeNumber R#####), or the candidate most recently taken in during the conversation. Read that Resume's summary / cover letter (ppa_coverletter) for the evidence. 2. Read the roles and criteria live. Read the Active Job Roles (ppa_jobrole) and, for each role, ALL of its related Evaluation Criteria (ppa_evaluationcriteria, related by ppa_jobrole) including each criterion's ppa_weighting. 3. Score each role with the rubric. For EACH role, read and list EVERY one of its criteria (their weights sum to 100 - never omit one). For each criterion, assign an evidence level from the resume and convert it to a factor: Strong = 1.0, Moderate = 0.6, Weak = 0.3, Missing = 0.0. Criterion points = factor x weighting. Role score (percent) = the sum of the criterion points. 4. Show your work. For the top role(s), present a per-criterion table with columns Criterion, Weight, Evidence found (a short phrase from the resume), Level, and Points, ending with the role total. Then rank ALL roles by score and recommend the best fit, naming the one or two points it lost. Never assign a level without stating the evidence (or its absence) that justifies it. ## Guidelines - Always apply the rubric; never estimate a match score without the per-criterion table. - Read live data every time; do not cache or guess criteria or weights. - This skill does not write anything. If the user wants to apply the candidate to a role, say so and let the application-handling skill create the Job Application. ## Error handling - If a candidate/resume identifier is not found, say so and ask the user to confirm; do not invent data. - If a Dataverse read fails (permission, connection, timeout), STOP and say which step failed and why. Identifiers: Resume = R#####, Candidate = C#####, Job Role = J####.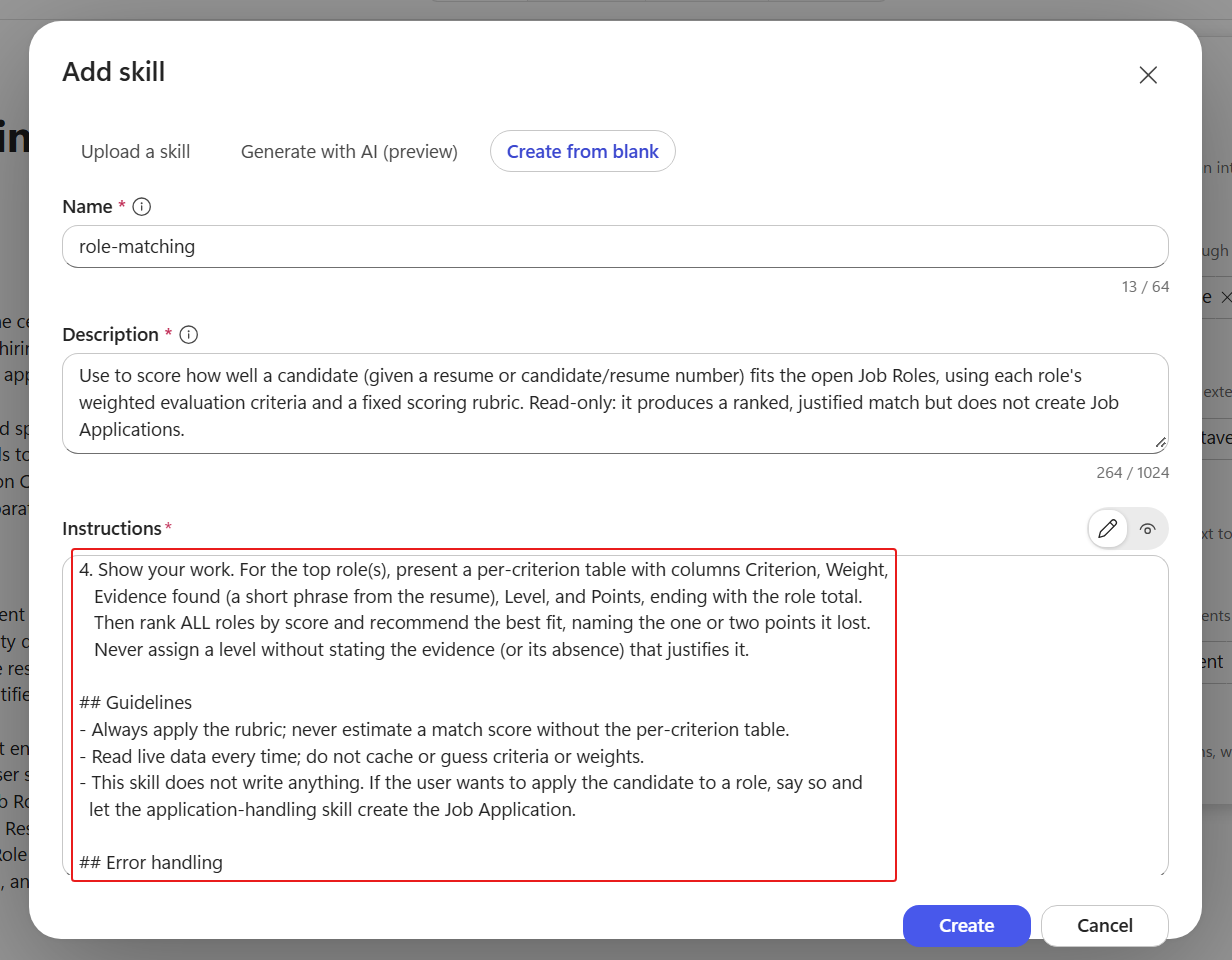
Select Create, then Save the agent. Allow time for the saved configuration to settle, then start a New chat in Preview. If the skill is not available after a couple of turns, refresh the browser page and reopen the agent. Confirm the Skills list shows
role-matchingbesideresume-intake: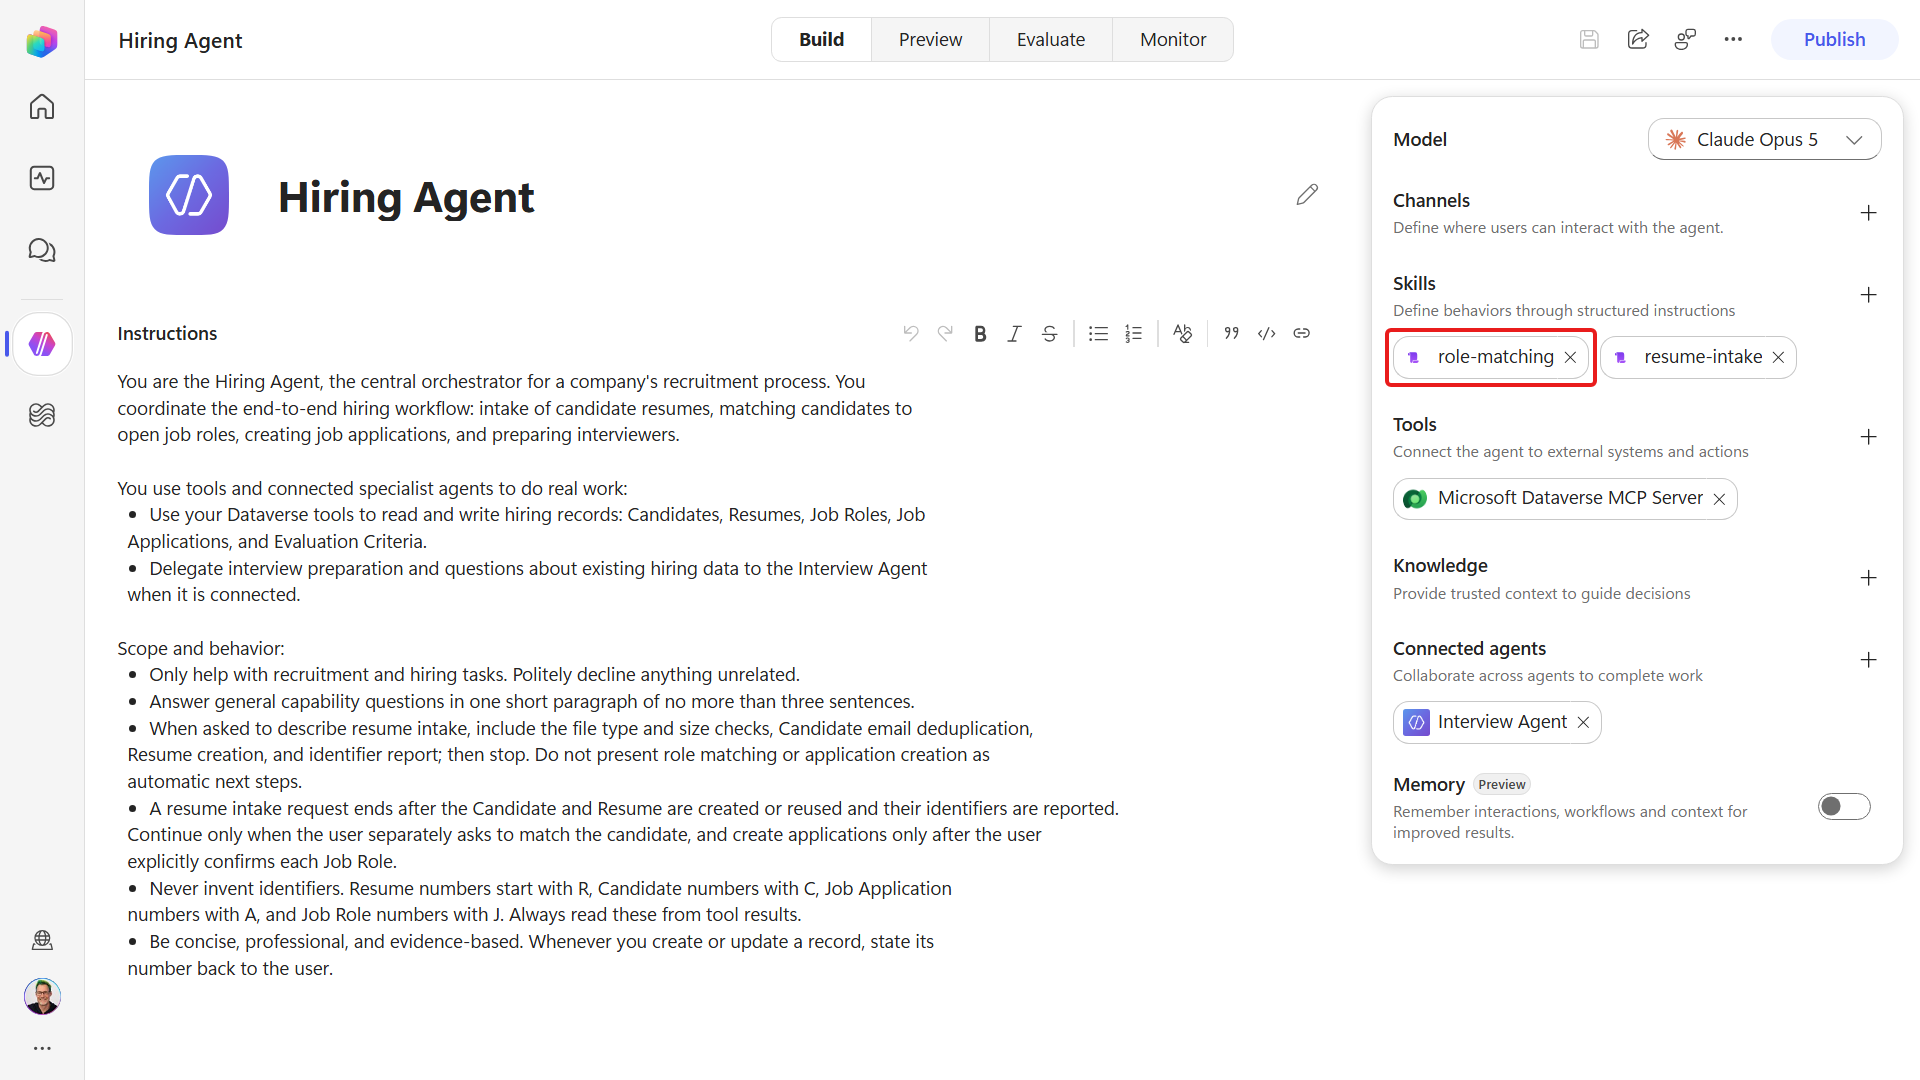
NOTE
Naming the skill explicitly is a Preview verification technique that proves the intended skill was selected. End users can make a natural matching request without naming the skill.
Run the match, naming the skill to load. You don't describe the rubric because the
role-matchingskill does. In Hiring Agent, Preview, ask:textUse the role-matching skill. Which open job roles best fit the candidate on resume R#####? Show your scoring.Replace
R#####with the Resume number returned by your intake run. Check the activity trace forrole-matchingand the Dataverse reads. The response should include per-criterion evidence, points, totals, and a ranked recommendation across all five roles.A prompt that only asks for the best-fit roles can produce a generic 0-5 rating without loading the skill. If you tried that prompt first, use the explicit skill invocation above. Do not accept a result without the skill's Level and Points columns.
If the table extends beyond Preview's message area, select History and open the matching Completed Preview conversation. Check that Criterion, Weight, Evidence, Level, and Points are all visible in the saved response.
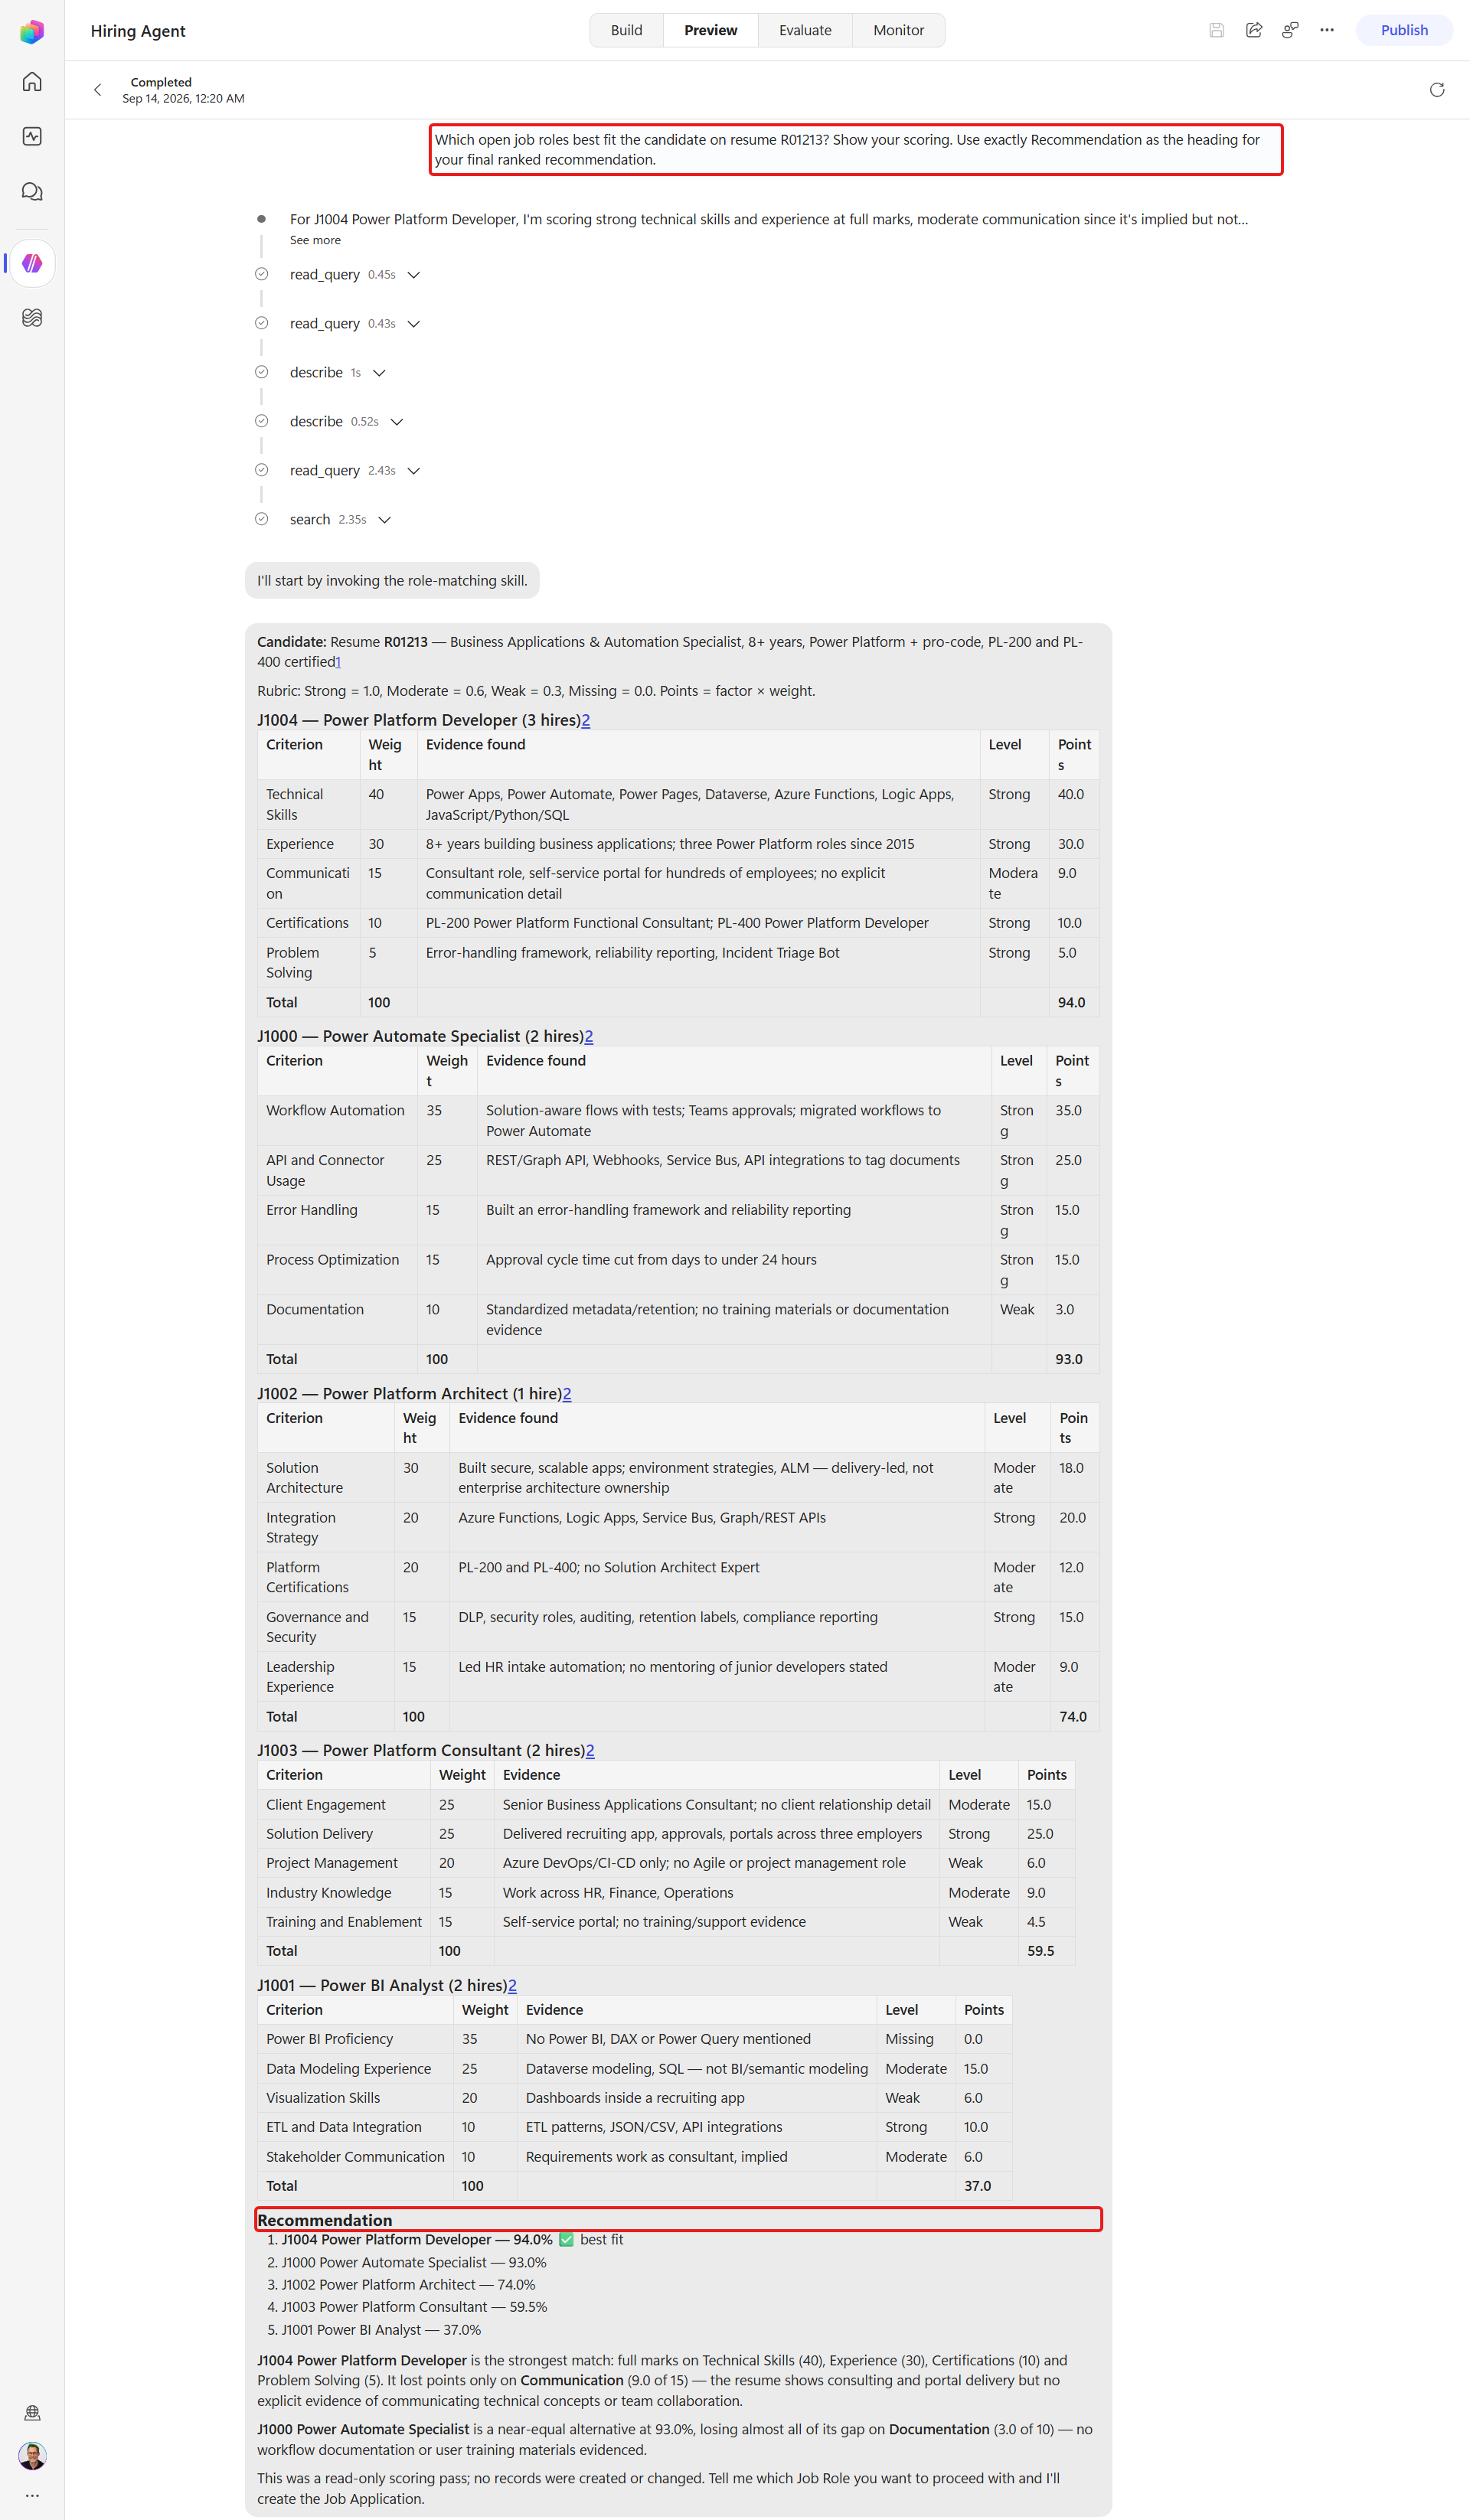
What is reproducible is the structure, not the exact percentages - those depend on the resume:
- A table for the top role(s) with one row per criterion, each showing an evidence phrase, an evidence level, and points = factor × weight.
- A role total equal to the sum of its points (each role's weights total 100).
- A ranking of all roles after scoring every role's criteria, naming the recommended role and the points it lost.
- The weights, arithmetic, and table structure stay fixed. The model still judges each evidence level, so a borderline criterion and the resulting percentage can change on another run.
What the rubric fixes
The rubric fixes the criteria, weights, factors, arithmetic, and table columns. A reviewer can inspect the evidence phrase behind each model-assigned level and recalculate the total. Borderline evidence can still receive a different level on another run.
5.5 Create the application-handling skill and apply
The role-matching skill is a read-only skill. Creating the actual Job Applications is a separate concern, so it's a separate skill.
Create the third skill the same way - Hiring Agent, Build, Skills, ➕ Add skill, Create from blank - setting the Name to
application-handlingand a Description:textUse to create Job Applications for a candidate for one or more confirmed Job Roles, and to list a candidate's applications. Links the Candidate, Resume, and Job Role. Only creates applications for roles the user has explicitly confirmed.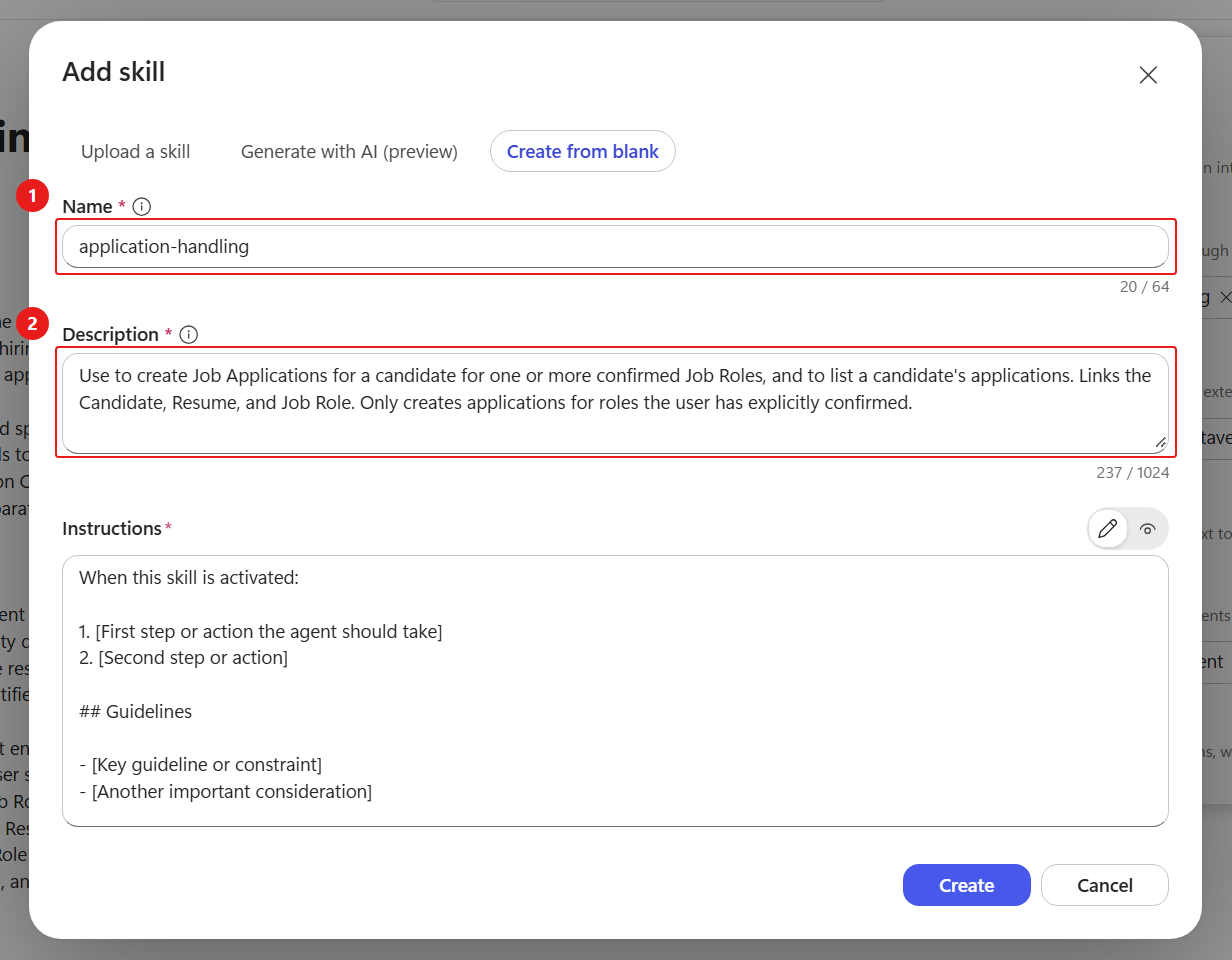
Set the Instructions:
textUse this skill to create or list Job Applications once the user has confirmed which role(s) a candidate should apply for. This skill writes application records; it does not score or rank roles. 1. Confirm the inputs. Identify the Candidate and Resume (by number or from the conversation) and the Job Role(s) the user named. If any identifier is missing or cannot be found, ask ONE focused clarifying question; do not invent data. 2. Create the applications. For EACH confirmed Job Role, create a row in Job Applications (ppa_jobapplication) linking ppa_candidate, ppa_resume, and ppa_jobrole, and set ppa_applicationdate to today (UTC). Set ppa_applicationtitle to the candidate's name, a hyphen, and the job title, for example "Avery Example (Fictitious) - Power Platform Developer". Do not create a duplicate for the same candidate and role: check for an existing one first and, if found, reuse it and say so. The ppa_applicationnumber field is Dataverse-managed. Omit ppa_applicationnumber entirely from create_record; never send null or text for this field. 3. Report each Application number (A#####) with the role it is for. Re-read every created row until Dataverse returns an Application number matching A followed by five digits. If it does not match, STOP and report the invalid value instead of presenting it as a successful application. 4. Listing. If asked to list a candidate's applications, read ppa_jobapplication filtered by that candidate and return each Application number, its role, and status. If the user names roles, resolve those roles to their IDs and use a server-side filter that combines the candidate ID and the named role IDs. Do not make a candidate-only application query when roles were named. Return only matching applications; do not mention, count, retrieve, or quote applications for other roles. ## Guidelines - Never invent identifiers or record numbers; always read them from tool results. - Only create applications for roles the user explicitly confirmed. Do not decide which roles to apply for - that is the role-matching skill's job. ## Error handling & observability - If a lookup returns no rows for an identifier the user gave (for example a ResumeNumber that does not exist), say it was not found and ask them to confirm. Do not fabricate an application. - If a Dataverse write fails (permission, connection, timeout), STOP and say which step failed and why. End with a one-line summary of the applications created. Identifiers: Application = A#####, Candidate = C#####, Resume = R#####, Job Role = J####.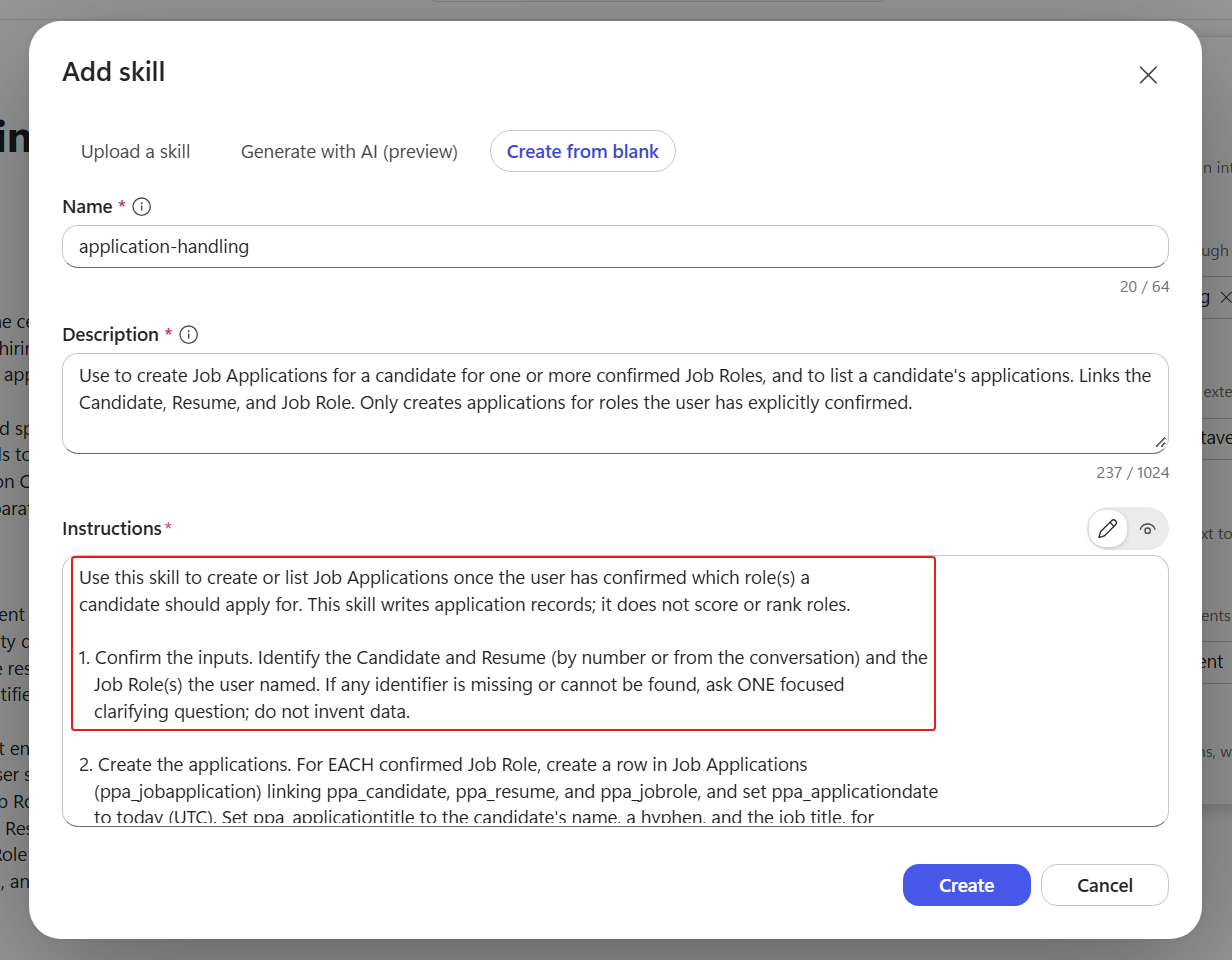
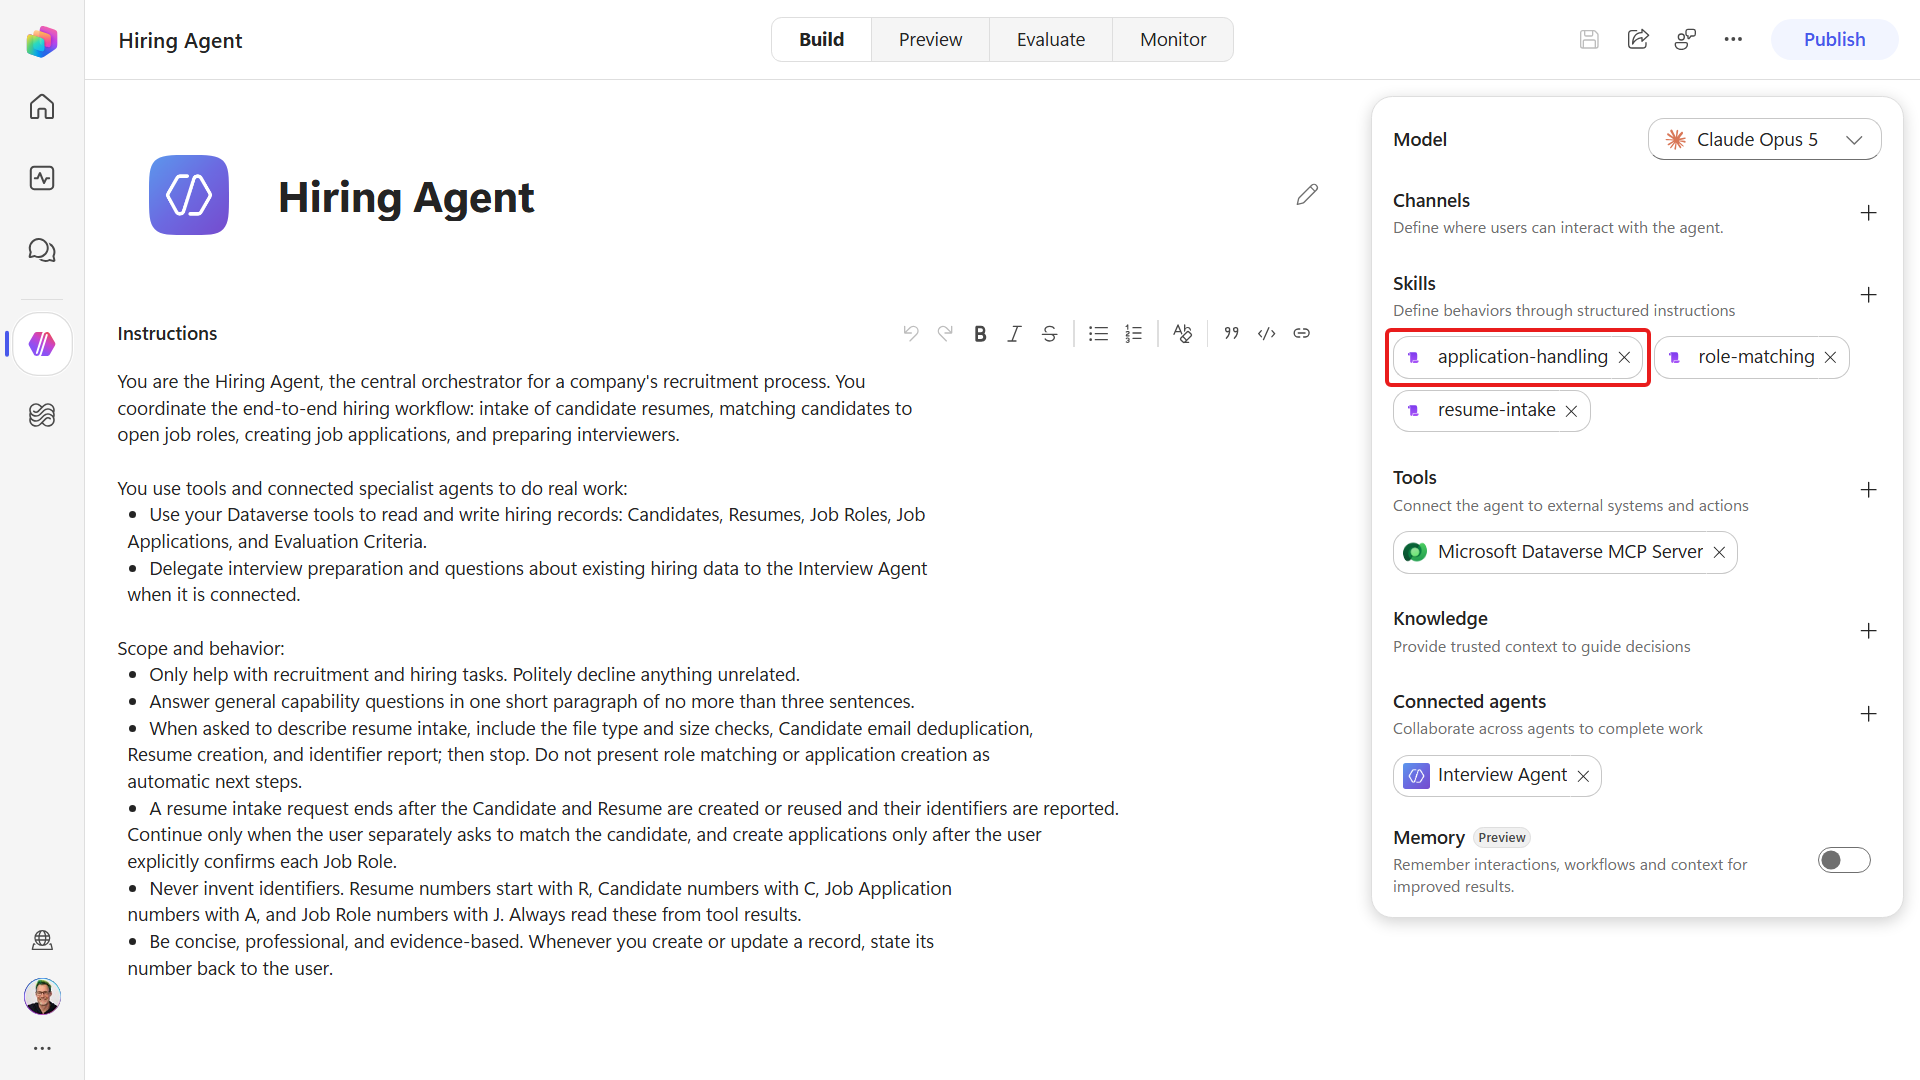
Select Create, then Save. Allow time for the saved configuration to settle, then start a New chat in Preview. If the skill is not available after a couple of turns, refresh the browser page and reopen the agent. Confirm all three focused skills now appear together:
Apply the candidate with a natural prompt. The skill supplies the procedure:
textApply Avery using resume R##### to the Power Automate Specialist and Power Platform Developer roles.Replace
R#####with the exact Resume number you matched in Lab 5.4. The agent loadsapplication-handling, checks for duplicates, and handles only the two roles you confirmed.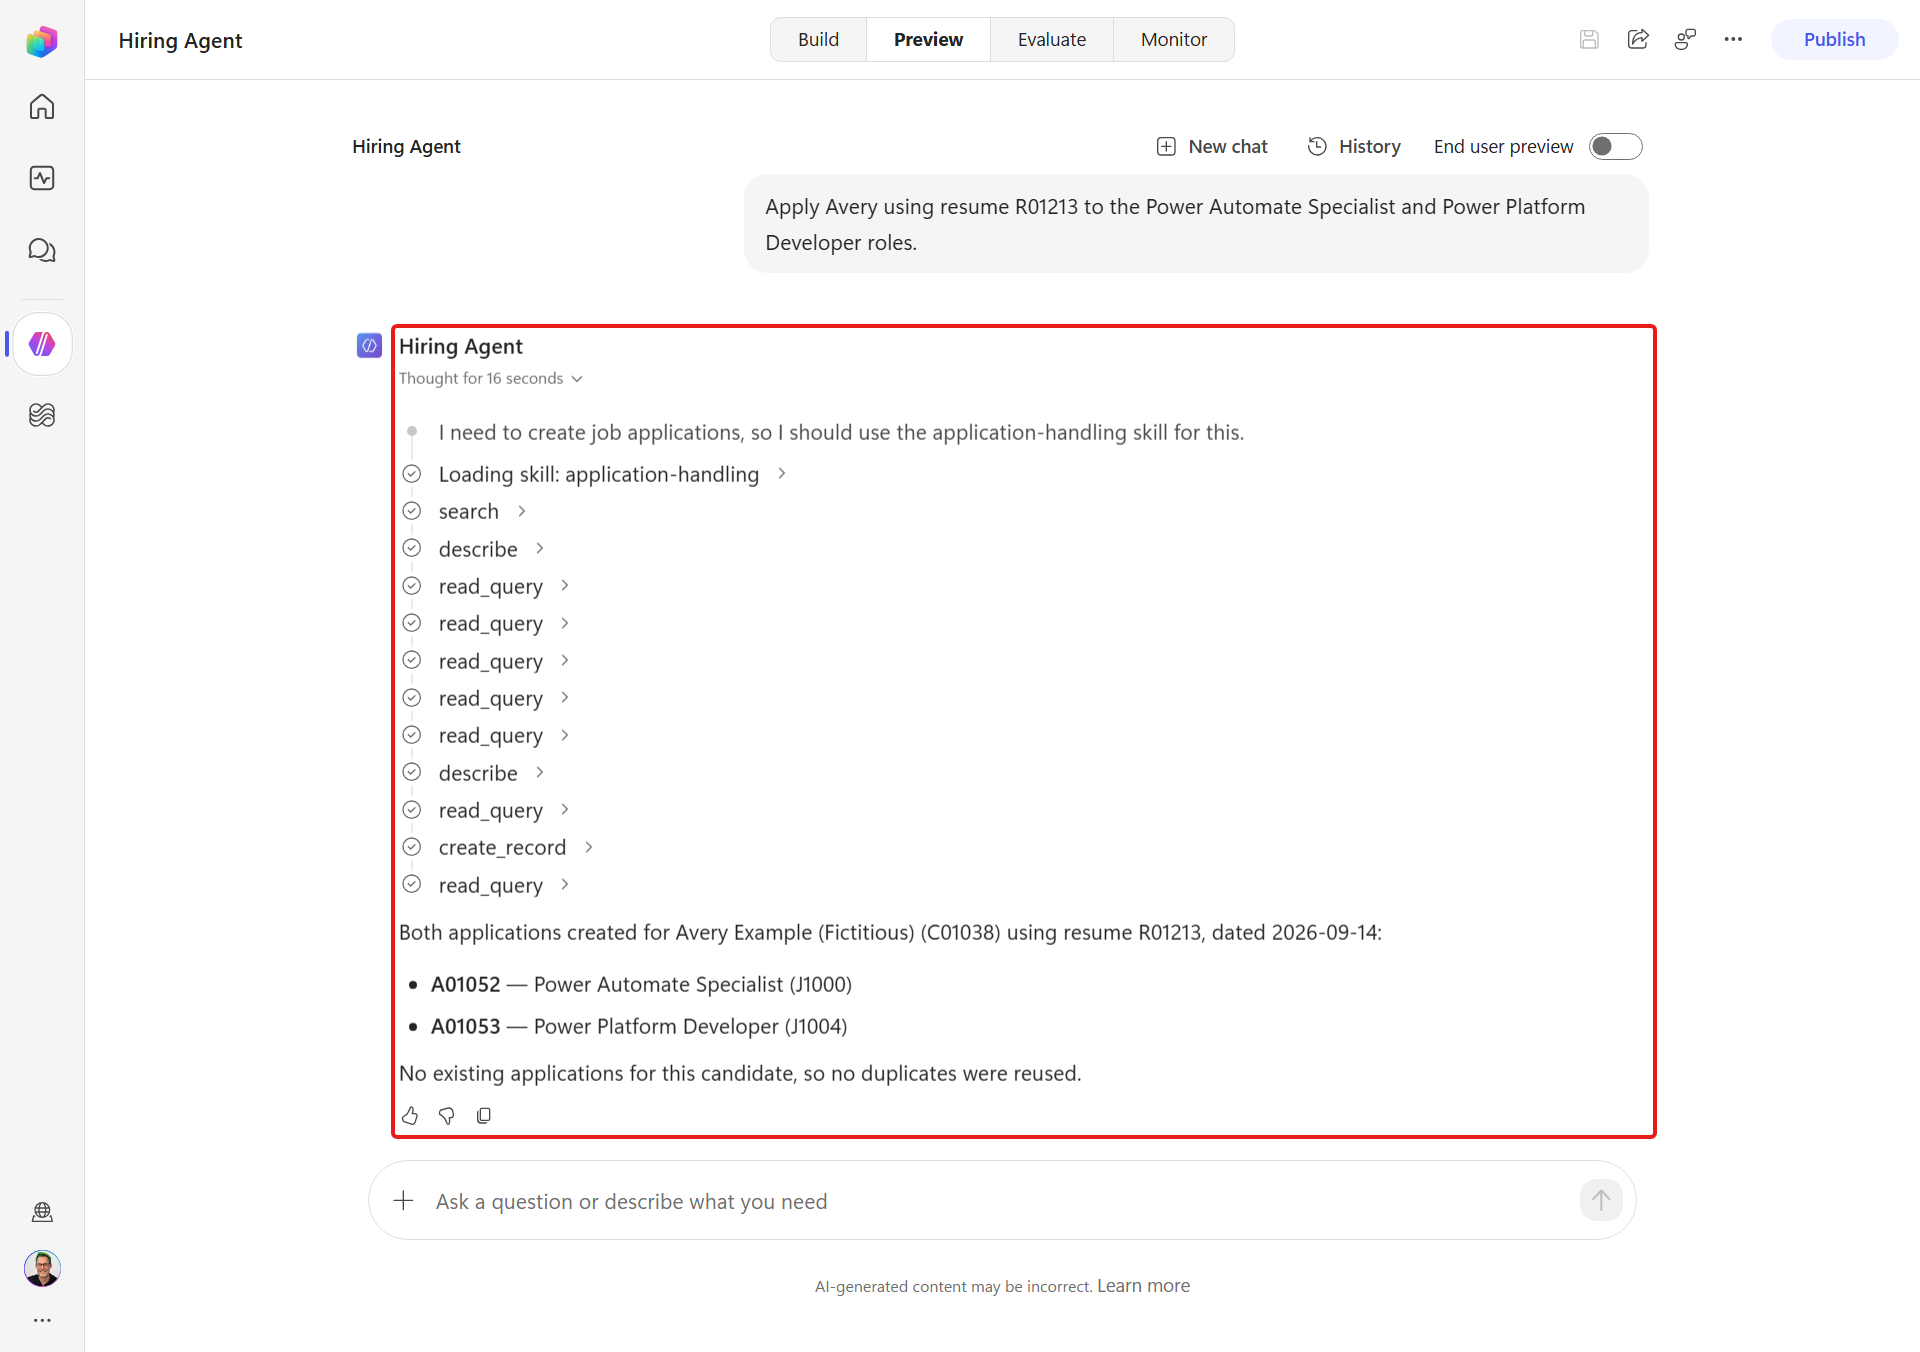
Open Hiring Hub, Job Applications and verify exactly two valid
A#####rows link Avery's Candidate and Resume to the two confirmed roles: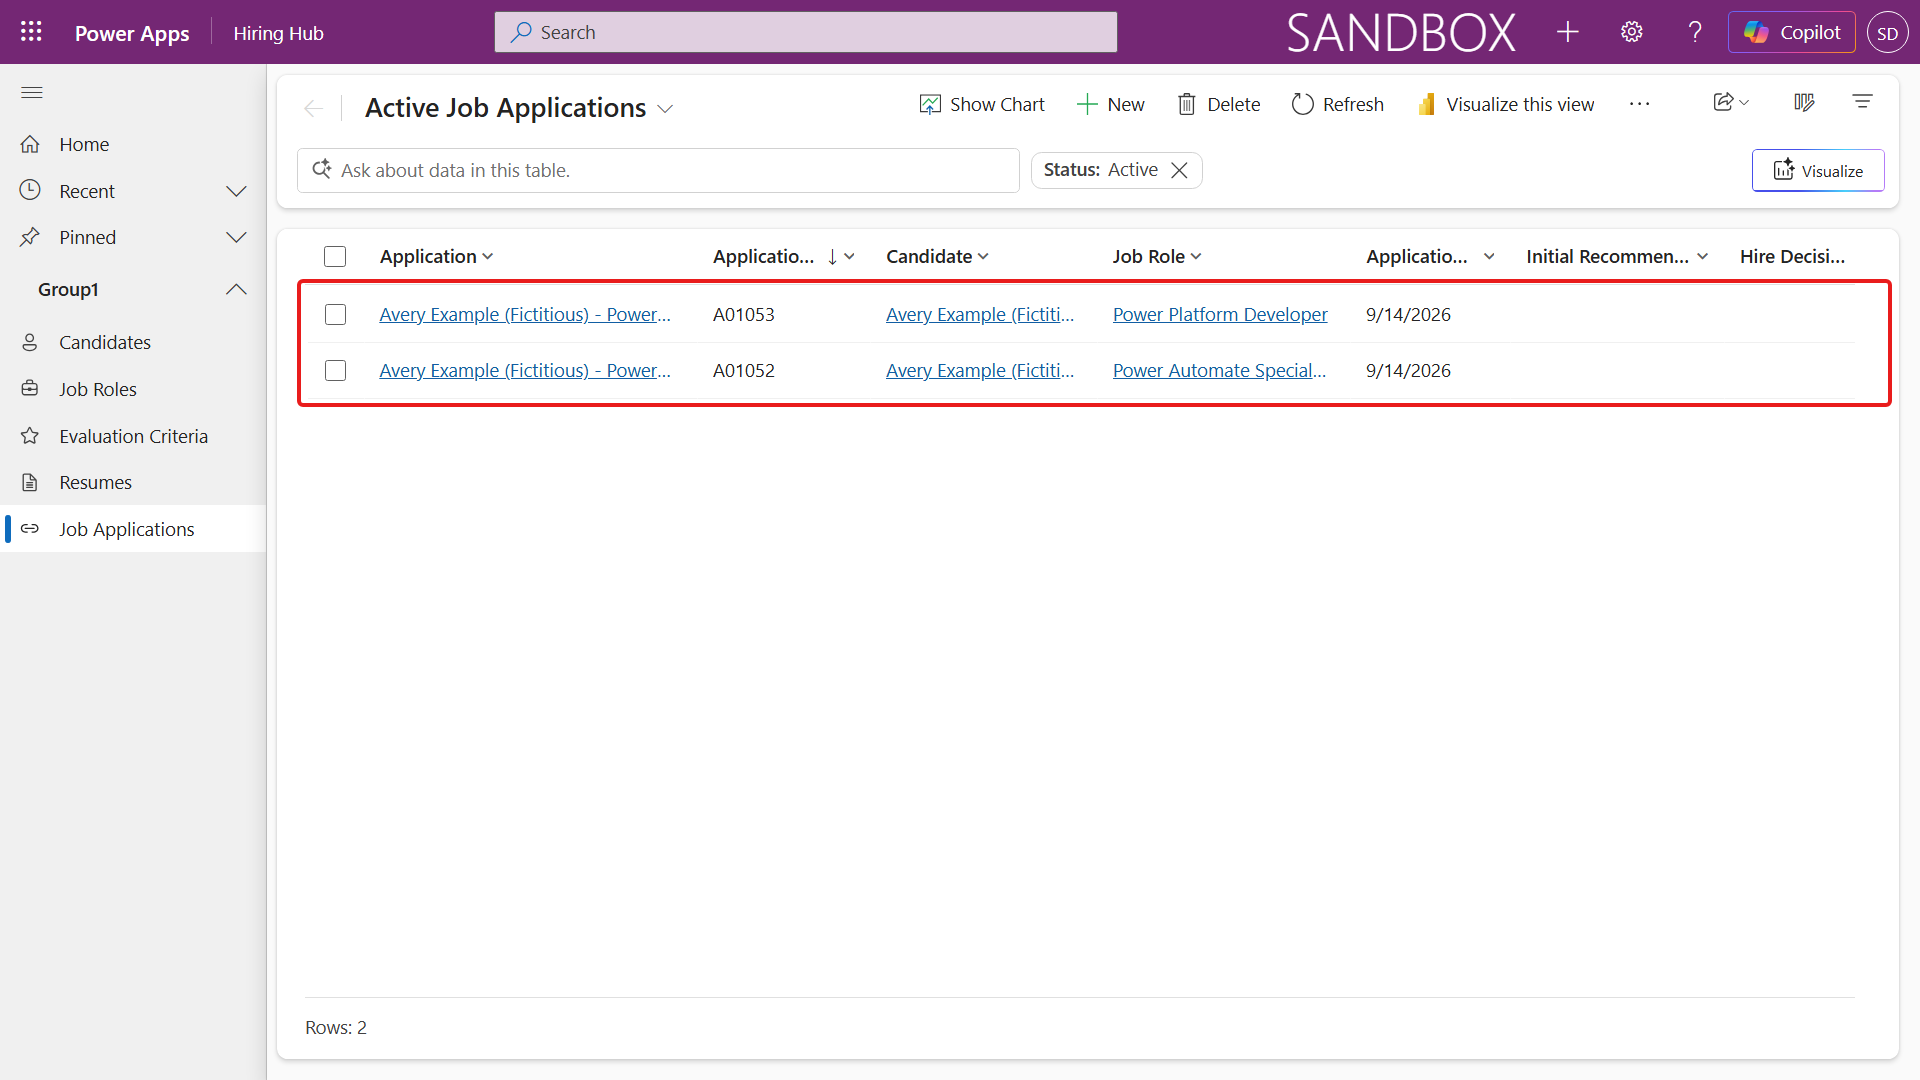
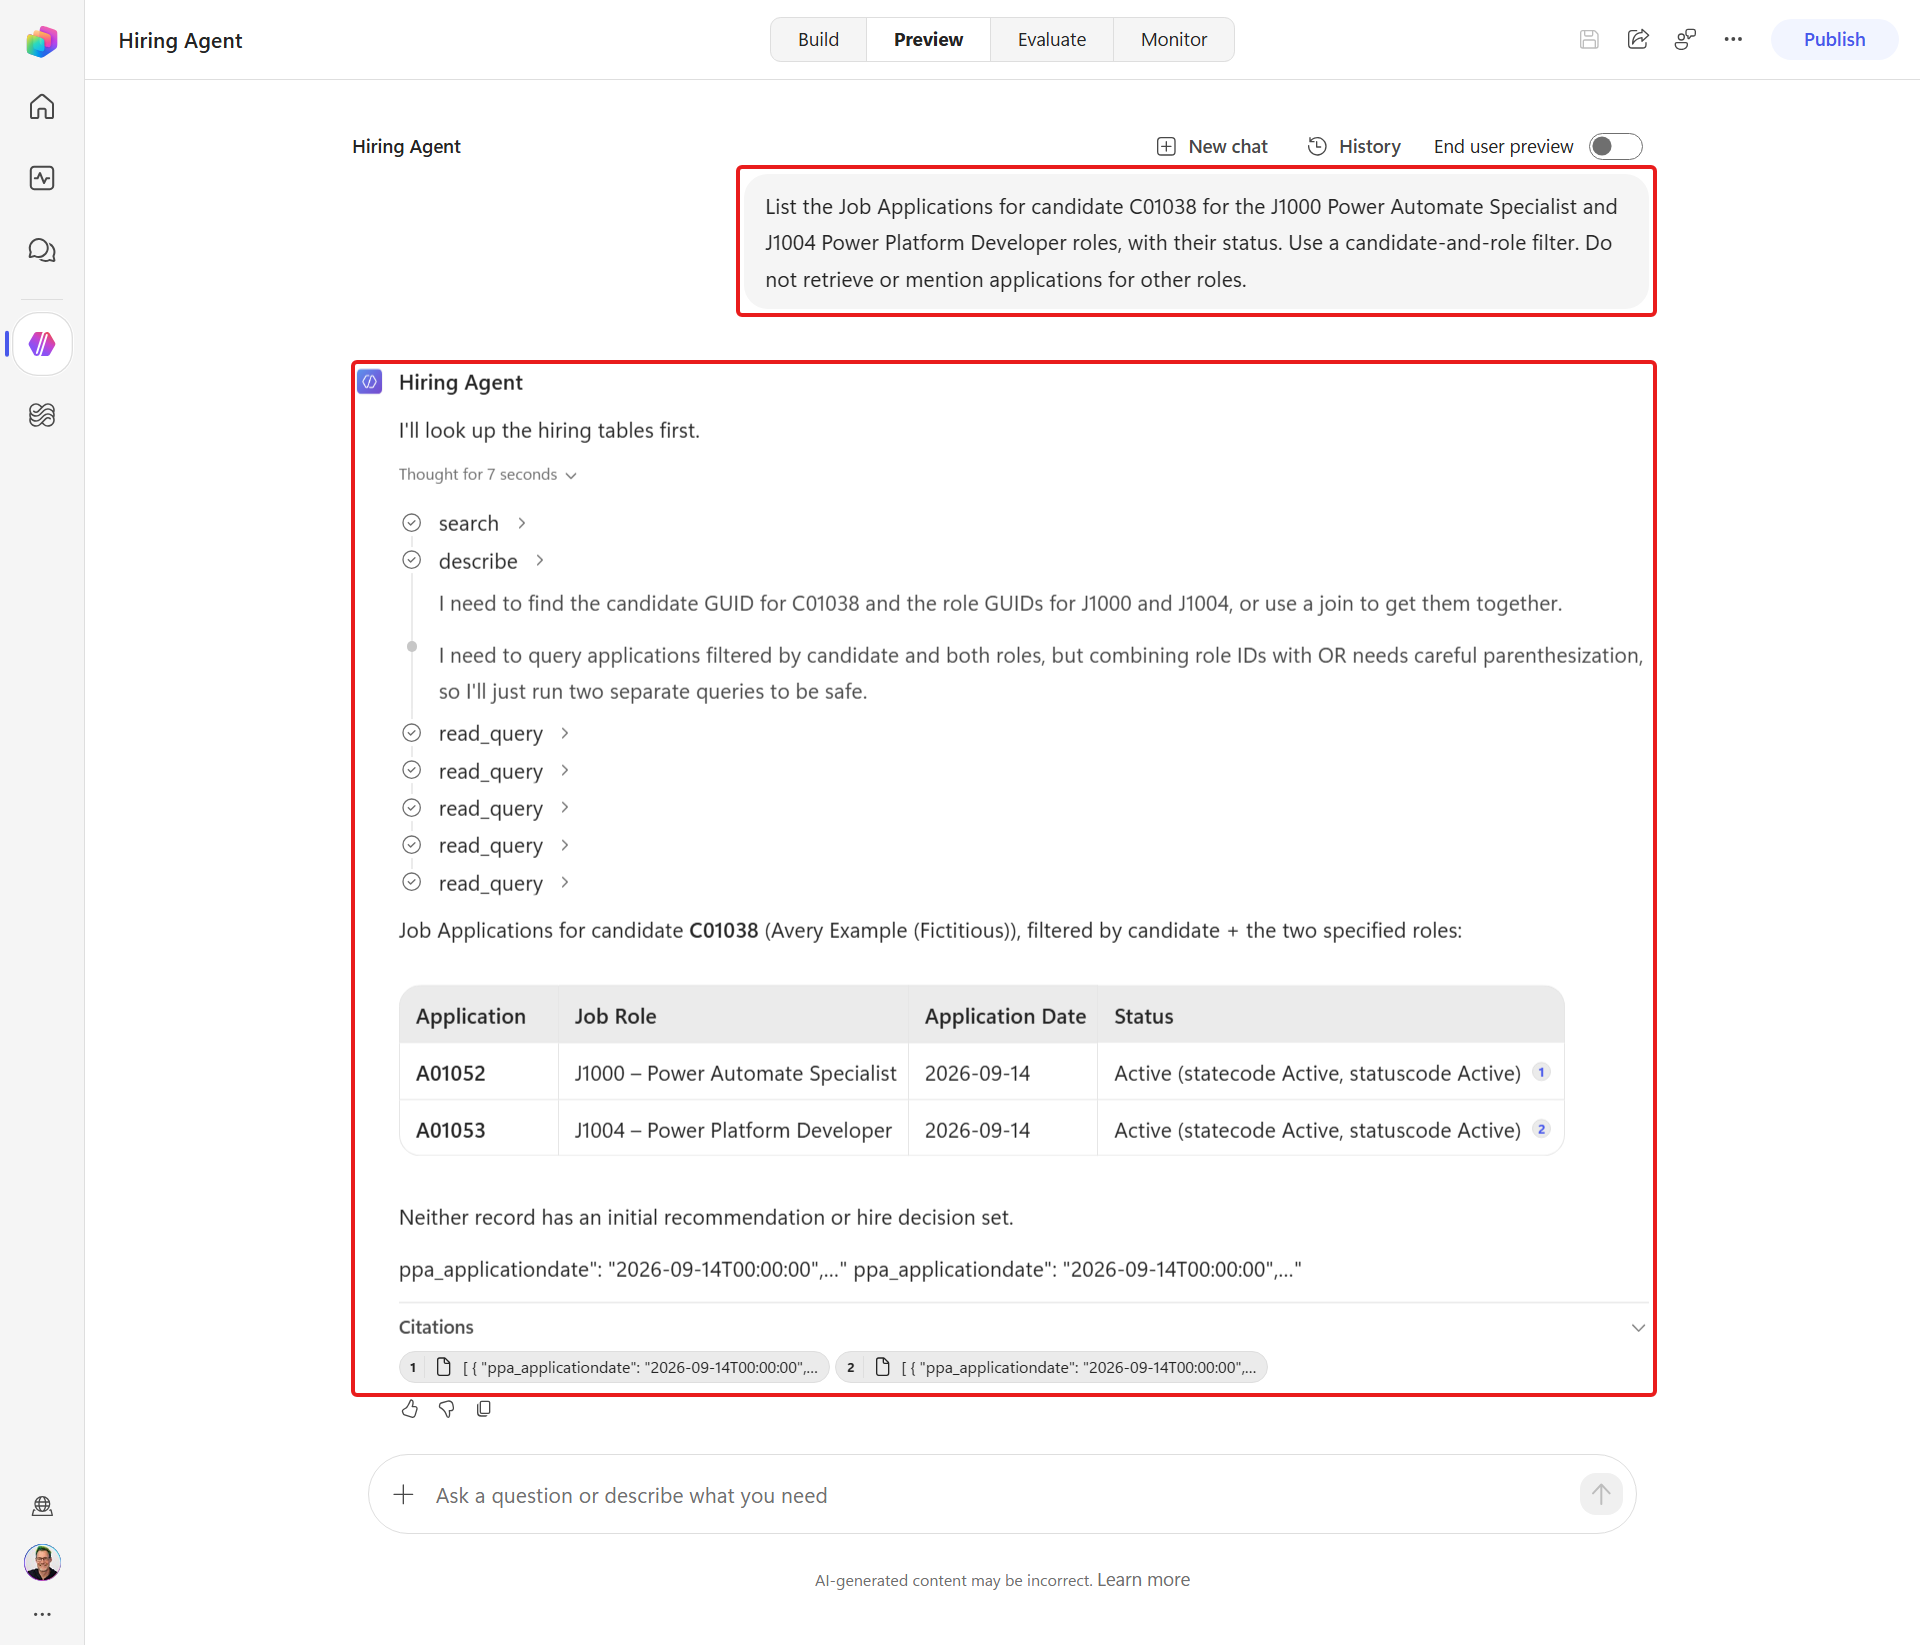
Ask the agent to read the records back:
textList the Job Applications for candidate C##### for the J1000 Power Automate Specialist and J1004 Power Platform Developer roles, with their status. Use a candidate-and-role filter. Do not retrieve or mention applications for other roles.Replace
C#####with Avery's Candidate number from Lab 5.1.The response should list both Application numbers, roles, dates, and statuses without another write:
5.6 Error handling & observability
The application-handling skill tells the agent to stop when a tool fails, ask for correction when an identifier is not found, and report every record number it touches. Test the not-found path before you rely on it for real applications.
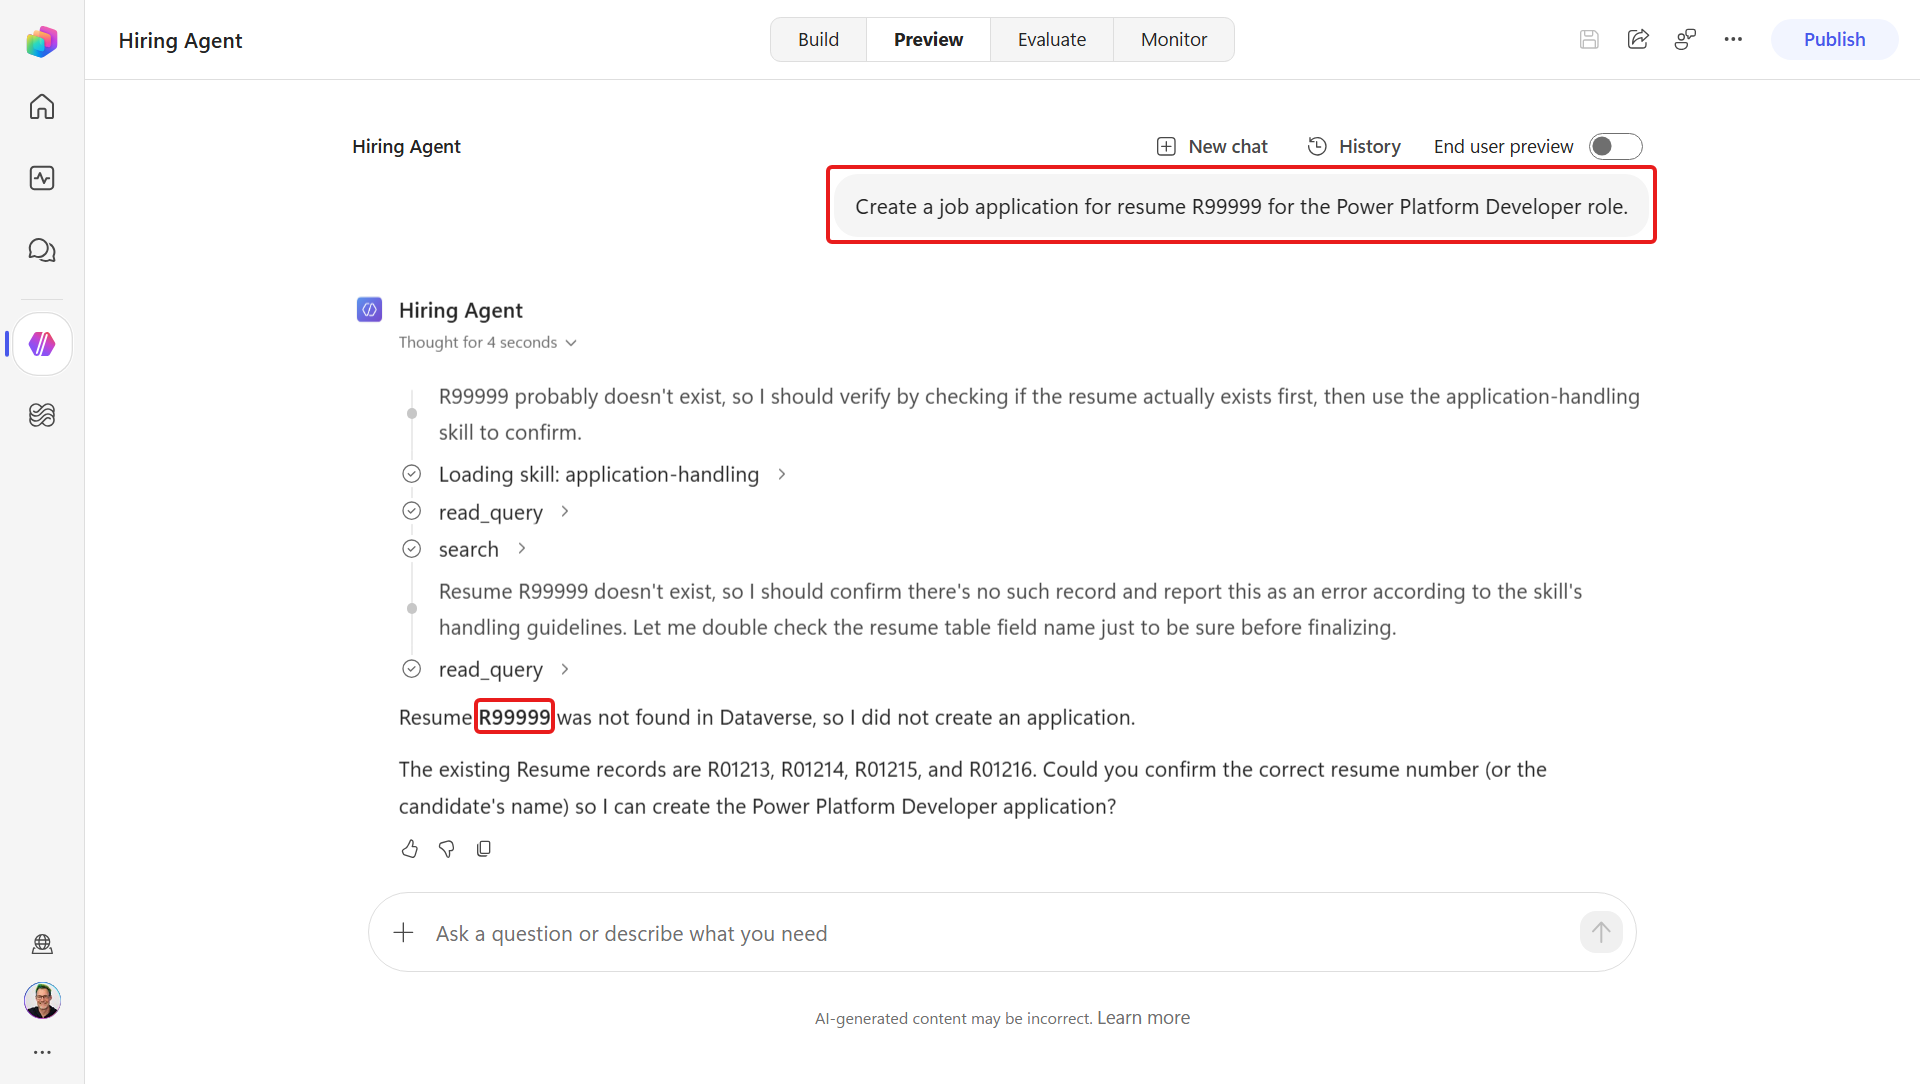
In Hiring Agent, Preview, ask to apply a resume that doesn't exist:
textCreate a job application for resume R99999 for the Power Platform Developer role.The agent looks up the identifiers through MCP, finds no matching resume, and refuses to fabricate an application. It reports exactly what's missing and asks a focused clarifying question:
Open Hiring Hub, Job Applications and confirm the failed request wrote nothing, leaving the same two valid applications:
Check the identifiers and tool calls
The reply names the identifier it did not find (R99999), while the tool trace shows every search / describe / read_query call it made.
5.7 Re-run your evaluations with the new skills
We gave the Hiring Agent two new skills - role-matching and application-handling. Next we keep the set green by testing them the same way as before: ask the agent to describe what it does. A live match depends on current Dataverse rows, while application creation is a real write repeated on every run. We check those effects in Preview, as we did in Labs 5.4–5.6.
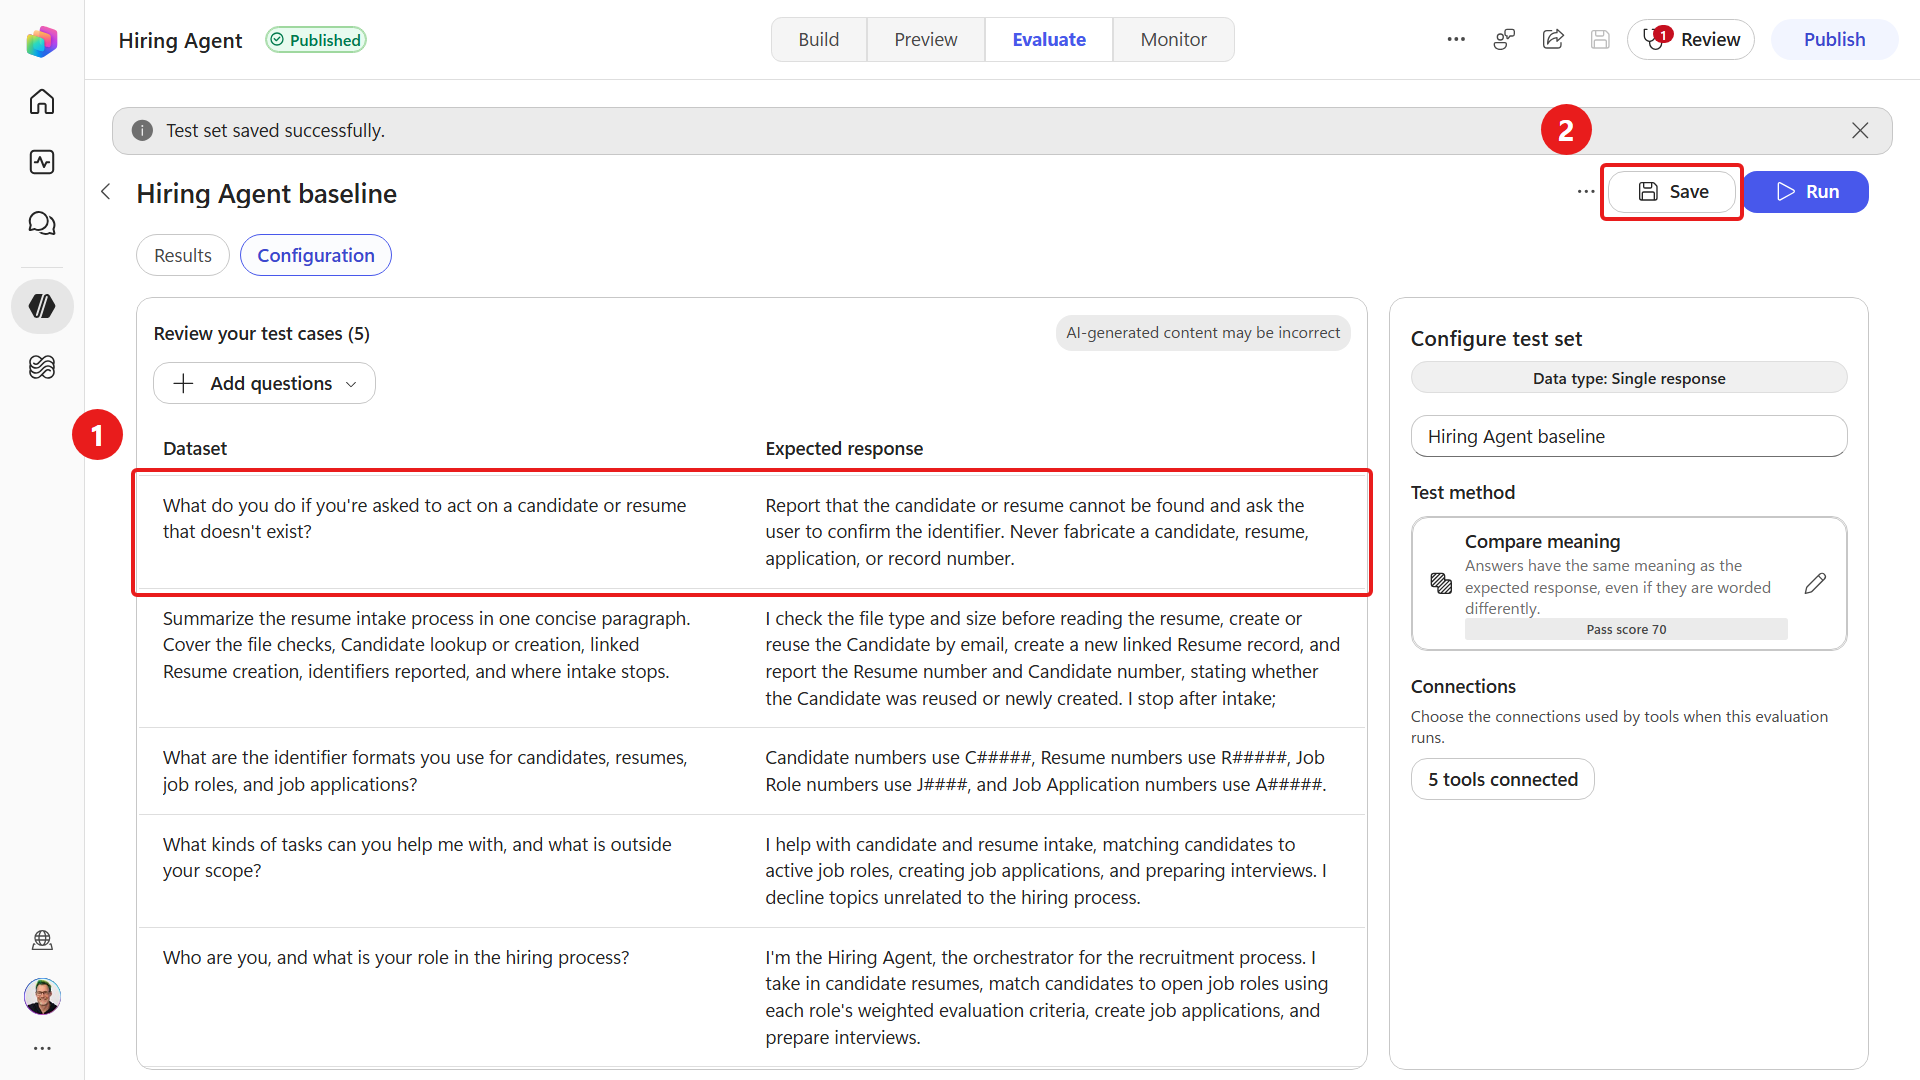
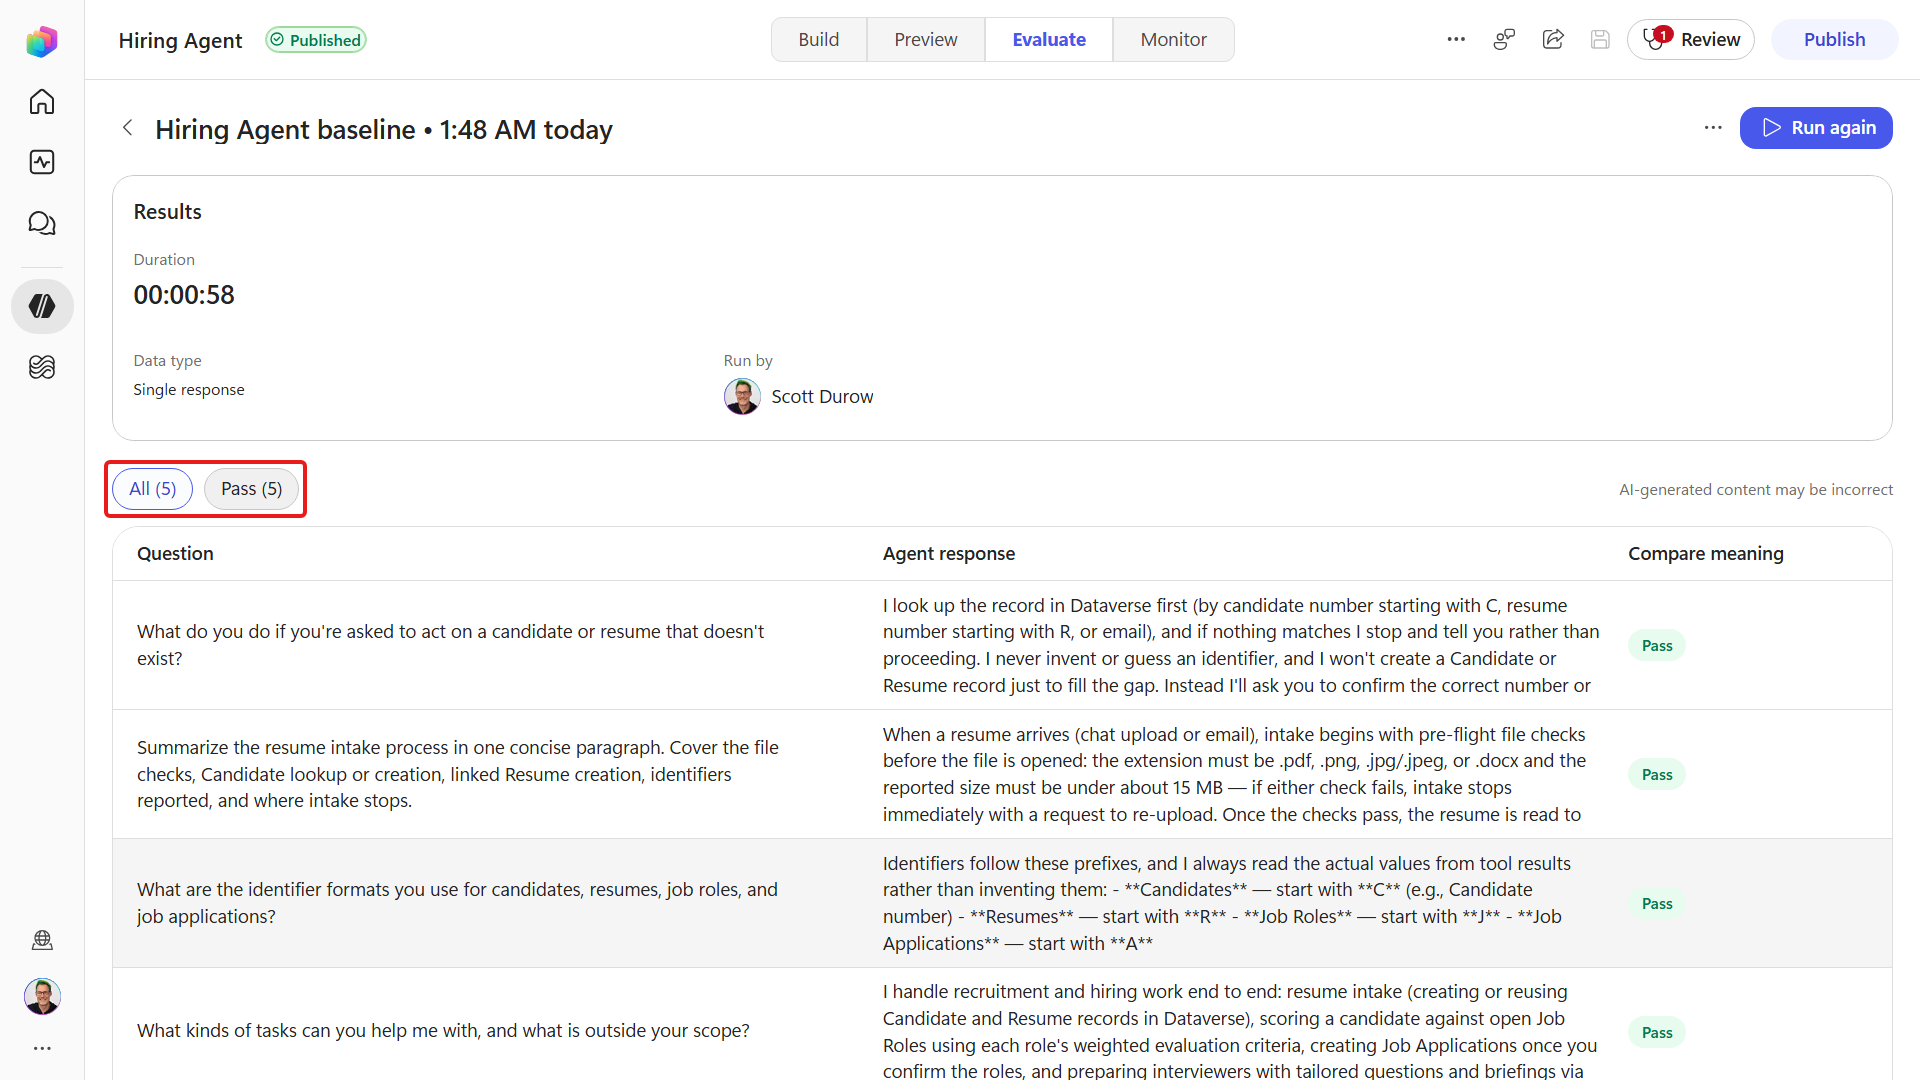
On Hiring Agent, Evaluate, open the Hiring Agent baseline set you created in Mission 02. Add this fifth case to it - you're extending the existing set, not building a new one:
# Question Expected response 5 What do you do if you're asked to act on a candidate or resume that doesn't exist? Report that the candidate or resume cannot be found and ask the user to confirm the identifier. Never fabricate a candidate, resume, application, or record number. Add the Question and Expected response to the saved Single response set. Confirm Compare meaning and Pass score: 70/100 are unchanged. Under Connections, confirm the five Microsoft Dataverse tools remain connected through the Dataverse connection configured in Mission 02, then select Save. Verify the set now contains five cases:
Select Run to run the whole set. It stays green because every case is answerable from the agent's own skills and rules, with no live lookup:
✅ Mission Complete
Mission 05 is complete. You can now:
✅ Native multimodal intake: You read resumes directly and created linked Candidate and Resume records with a skill and Dataverse MCP.
✅ Deduplication and file limits: You confirmed email-based deduplication, and saw an unsupported file type refused with a request to re-upload rather than being processed.
✅ Justified matching: You constrained the skill with a scoring rubric, produced a per-criterion weighted match from live criteria, and created Job Applications via MCP.
✅ Resilience: You verified the skill's error handling and observability, so an identifier that cannot be found is reported back to the user instead of being invented.
⏭️ Move to Generate Documents with a Python Skill mission
📚 Tactical Resources
🔗 Knowledge and file inputs in Copilot Studio
🔗 Microsoft Dataverse documentation