
🚨 Mission 07: Automate with Workflows
NOTE
This lab uses an agent and workflows powered by the GitHub Copilot harness. On this harness, workflows are standalone, reusable automations that an agent can call as a tool. In the current Copilot Studio UI, make sure the New experience toggle in the upper-right corner is on.
🎯 Mission Brief
Your agent can converse with users and provide information, but it needs a workflow to take action. In this mission, you'll build a device request workflow that your agent can call as a tool.
You'll configure trigger inputs, retrieve device details from SharePoint, send an email to a manager, and return the selected device model to the agent. You'll then connect the workflow to your Contoso IT Concierge agent, update its device request procedure skill, and test the experience from end to end.
This mission separates judgment from execution. The agent and its skill can interpret an employee's request, gather missing information, and decide when the process is ready. The workflow then performs the repeatable steps in a defined order. That division keeps conversational reasoning flexible while making the business transaction predictable and easier to test.
You'll also define the contract between the agent and the workflow. Trigger inputs carry the request into the automation, dynamic content passes values between actions, and response outputs return useful results to the conversation. Clear names and data types help the harness call the workflow correctly.
By the end, the device request scenario will connect reasoning, SharePoint data, procedural guidance, and deterministic automation in one experience. You'll validate successful requests, requests with additional requirements, and cancellation so the agent handles more than the ideal path.
The architecture coming together
This is where the reason for using the GitHub Copilot harness becomes most visible. The agent uses flexible reasoning to interpret the request, a skill to guide its behavior, a tool to retrieve current information, and a workflow to execute the transaction predictably. The agent decides what needs to happen; the workflow controls how the business action is completed.
🔎 Objectives
In this mission, you'll learn:
- What Workflows are on the GitHub Copilot harness and how they differ from agent flows on the standard harness
- How to configure workflow trigger inputs and response outputs
- How to add and configure SharePoint and Outlook connector actions
- How to pass values between workflow nodes by using dynamic content
- How to publish a workflow, add it to an agent as a tool, and test it end to end
🤔 What are Workflows?
On the standard harness, agent flows can support topic-based, structured agent behavior. The GitHub Copilot harness instead uses standalone workflows for deterministic automation.
Instead, automations are first-class objects called workflows. A workflow is a standalone, reusable, step-by-step automation that lives in its own Workflows hub. You build it once on a visual canvas, publish it, and then any agent in your environment can call it as a tool.
Think of it this way:
- Agents are the smart decision-makers - they understand the user and decide what to do.
- Workflows are the reliable executors - they do the same deterministic steps every time.
Unlike the AI-driven agent, a workflow follows the same path every time for the same input, which makes it reliable, predictable, and rule-based - exactly what you want for actions like "look up a device and email a manager."
Why build automations as workflows?
- Reusable - build once, attach to many agents. No more copy-pasting flows between topics.
- Connected - reach 1,400+ connectors (SharePoint, Outlook, ServiceNow, Salesforce…) or your own custom connector.
- Tightly integrated - an agent triggers the workflow as a tool during a conversation and reads its outputs back.
- All-in-one - design, test, publish, and monitor workflows in one place inside Copilot Studio. No separate Power Automate license is required, since billing is based on usage inside Copilot Studio.
🙋🏽 How is this different to Power Automate cloud flows?
| Use this | When you want to |
|---|---|
| Workflows (Copilot Studio) | Automate tasks an agent invokes during a conversation, use AI actions, and keep everything in Copilot Studio |
| Power Automate cloud flows | Automate across apps and services independently of an agent, and share/co-own across teams (requires a Power Automate license) |
⚙️ How workflows work
Every workflow has two ingredients:
A trigger - the event that starts the workflow. The new designer offers several trigger types:
Trigger type Starts the workflow when… Manual You run it on demand with a button click Recurrence A schedule fires Connector An external service raises an event When a HTTP request is received An HTTP request arrives When an agent calls the workflow An agent invokes it as a tool - this is the one we'll use Actions (nodes) - the steps the workflow runs after the trigger. You add them from the node palette on the left of the canvas:
Node What it does Agent Hand work to an agent Classify Categorize input with AI M365 Copilot Call Microsoft 365 Copilot Human review Add an approval / review step Connector Run an action from any of 1,400+ connectors (e.g., SharePoint, Outlook) Function Transform data with an expression Variable Store and reuse values If/Else Branch on a condition Loop Repeat over a collection Note Document your workflow
🎨 The workflow designer
The designer is a visual canvas. You can zoom, fit-to-view, switch between horizontal/vertical layout, and tidy up nodes. A Health Center continuously checks for errors - you must resolve them before you can publish or test. Every save creates a version you can restore from Version history.
🔤 Expressions and functions
Many parameters can be set to a static value, to dynamic content (an output from the trigger or an earlier action, inserted with the lightning bolt ⚡ icon), or to an expression / function (inserted with the fx icon).
Expressions are small formulas that work with your data - much like Excel functions, but referencing workflow data instead of cells. Common ones:
concat()- join text, e.g.concat('Hello ', firstName)if()-if(condition, valueIfTrue, valueIfFalse)empty()- checks whether a value is emptycoalesce()- returns the first non-empty valuelength()- counts characters or items
For the full list, see the functions reference guide.
⭐ Best practices
- Start simple and build gradually - get a basic action working, then add steps.
- Rename your nodes - e.g. rename the SharePoint Get item action to Get Device so the canvas is self-documenting.
- Fix errors before publishing - use the Health Center; you can't publish with unresolved errors.
- Test thoroughly - saving and publishing doesn't guarantee correct behavior.
- Use version history - save often so you can roll back.
- Use dynamic content and expressions - make parameters dynamic instead of hard-coding values.
🧪 Lab 07 - Build a device request workflow and call it from your agent
✨ Use case
As a manager of an employee
I want to receive device requests by email
So that I can review the device requested by the employee.
Prerequisites
SharePoint list - the EmployeeAssets SharePoint list from Mission 00 - Course Setup. If you haven't set it up, head back and create it.
Contoso IT Concierge agent - the agent created in Mission 04 - Build an agent with the GitHub Copilot harness.
7.1 Create a new workflow
On the GitHub Copilot harness, workflows are added to your agent as a tool.
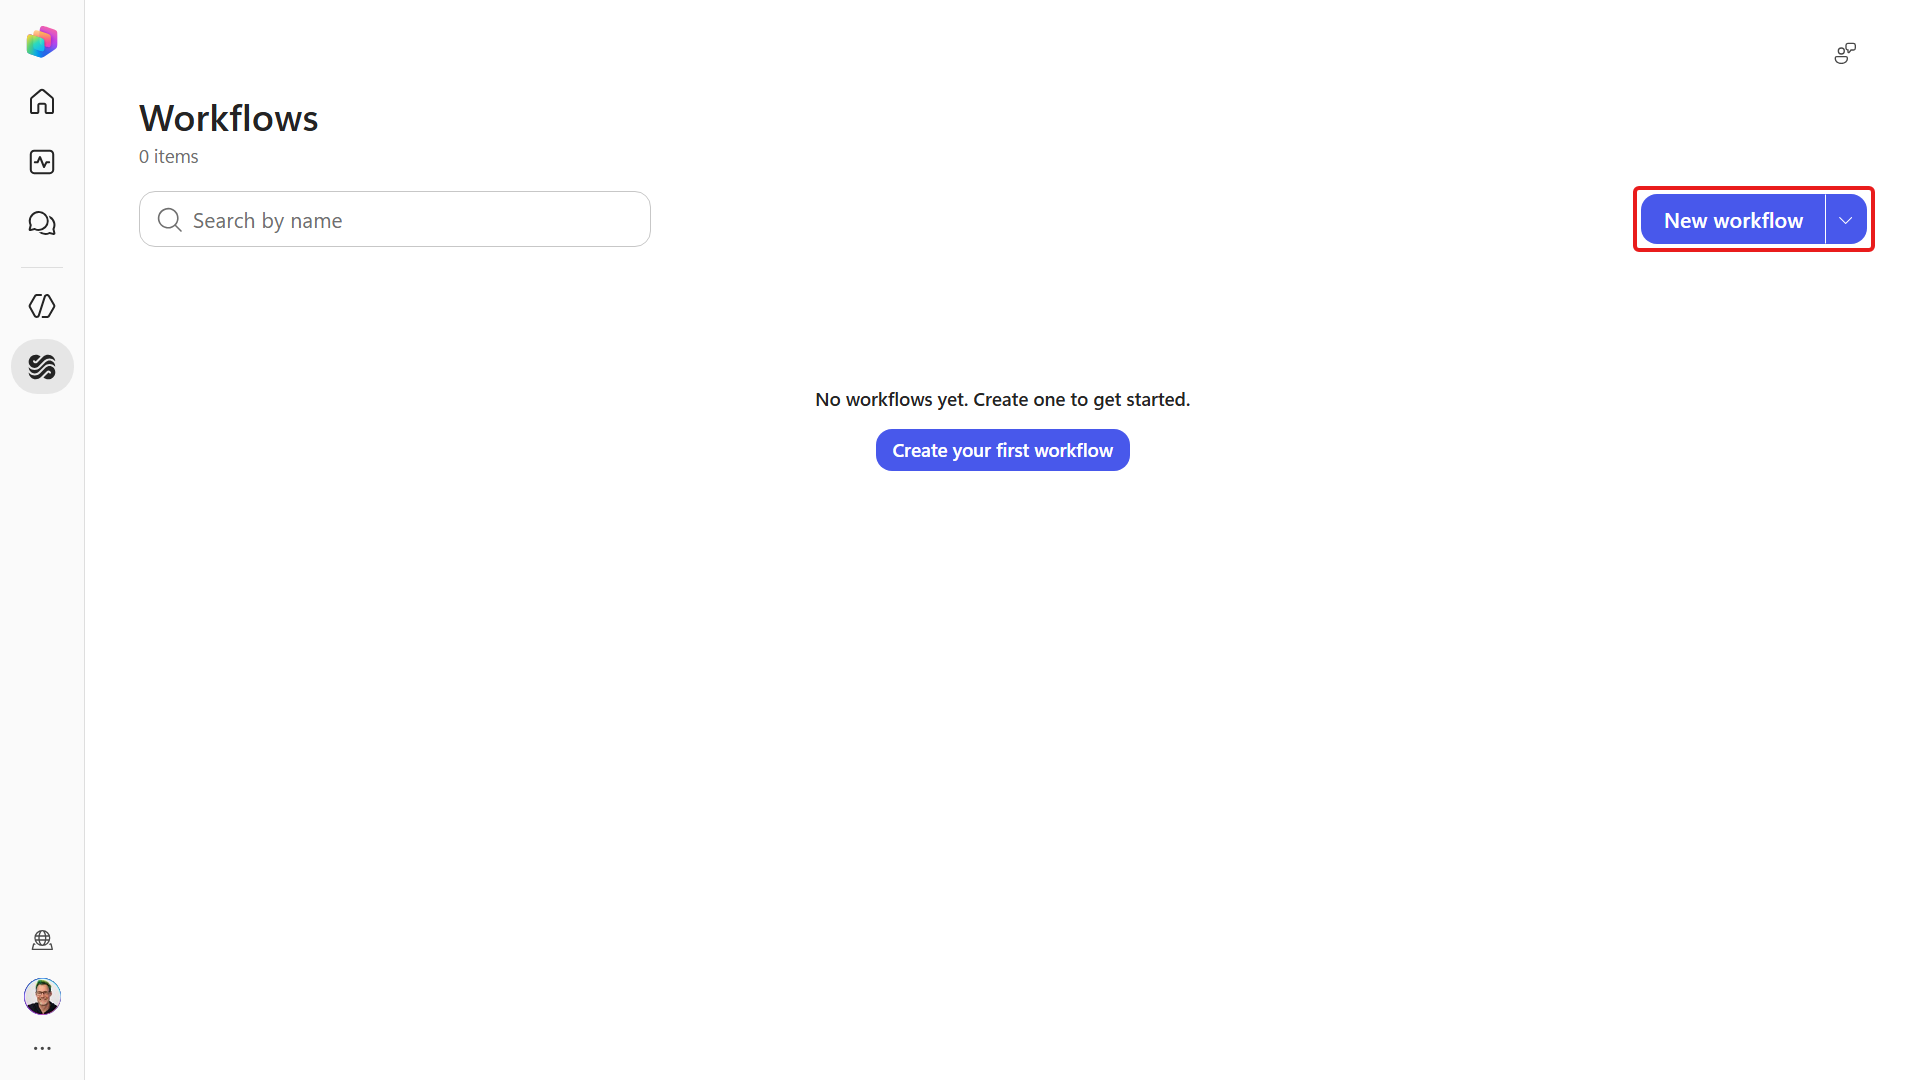
In the left navigation, select Workflows, then select Create your first workflow or select New workflow.
TIP
The Workflows hub lists every workflow in your environment along with its status (Draft / Published).
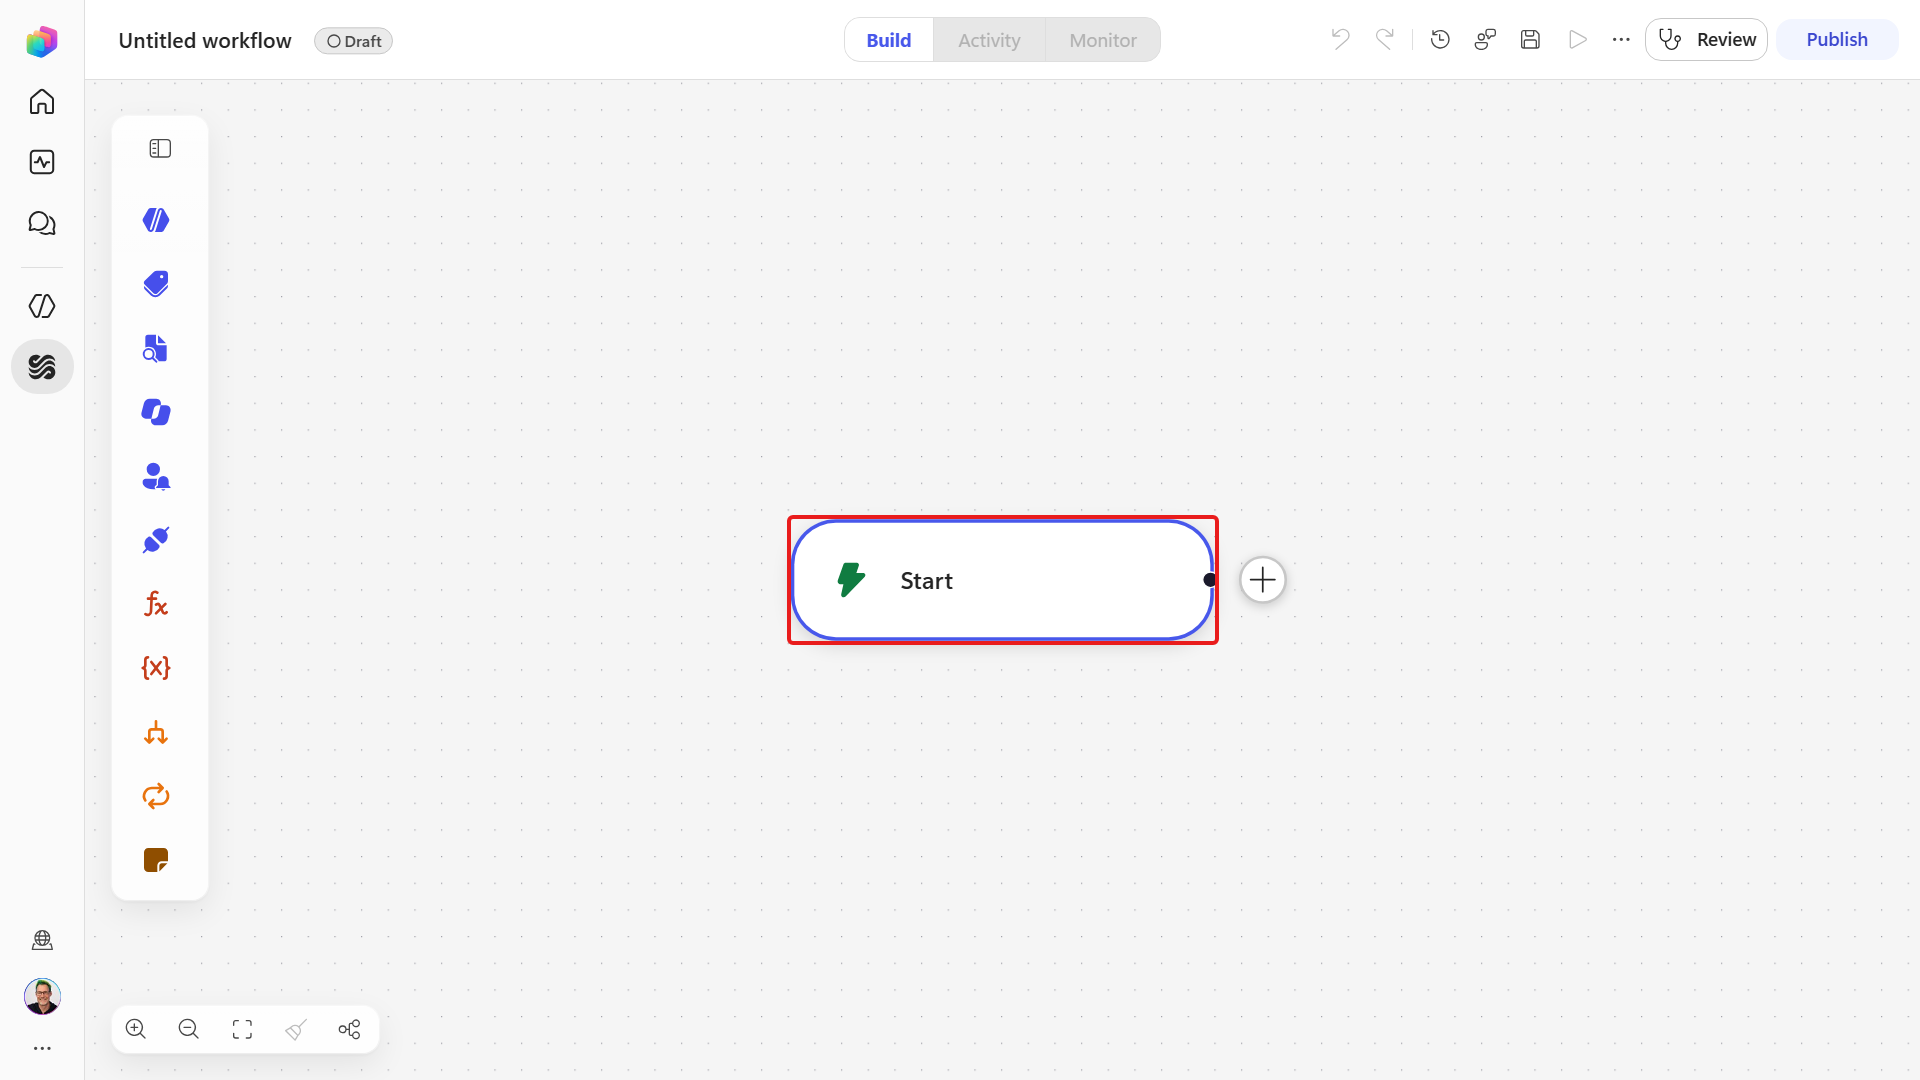
Next, the workflow designer loads. Let's take a moment to familiarize ourselves with the workflow designer.
Left:
- Workflow name and status
- Panel containing available workflow nodes
- Canvas controls for zooming in, zooming out, and adjusting the view
Center:
- At the top, you can switch between Build, Activity, and Monitor
- Canvas showing the workflow's trigger and action nodes
Right:
- Controls for undo, redo, version history, feedback, saving, testing, reviewing issues, and publishing
- Configuration panel for the selected node
Now that you're familiar with the designer, rename the workflow.
Copy and paste the following text.
textSend device request email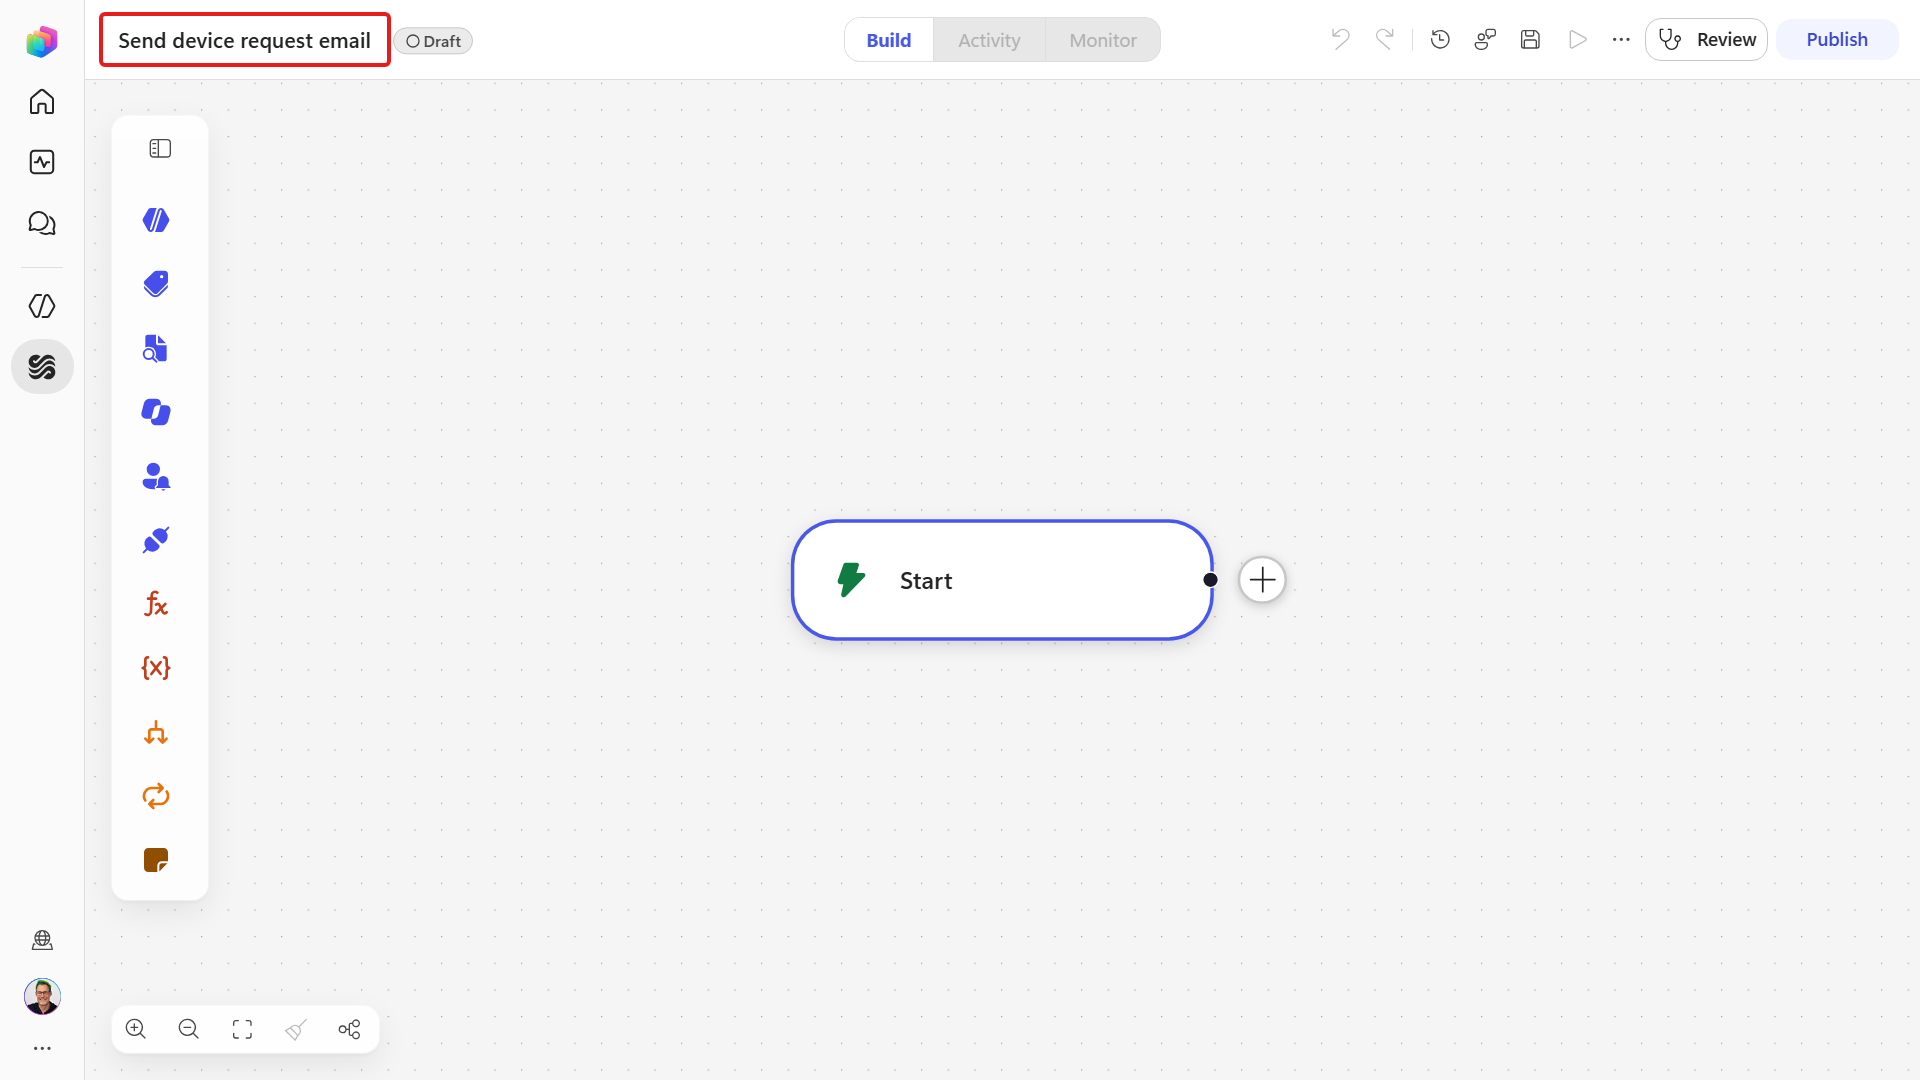
In the Start trigger node, change the type from Manual to When an agent calls the workflow.
NOTE
You'll add a Respond to the agent node after configuring the workflow actions. This node acts as the return statement of an agent workflow: it sends workflow outputs back to the calling agent so the agent can continue the conversation or make decisions based on the result.
Next, add three
textinputs to the workflow trigger:sharepointItemId- stores the SharePoint item ID mapped from the device the user selected and confirmed during the device request procedure.additionalComment- stores the comment provided by the user during the device request procedure.requestorName- stores the authenticated user's name, retrieved according to the device request procedure skill.
Start with
sharepointItemId.For the first input, clear the current input name and replace with the following text.
textsharepointItemIdIn the corresponding details field, copy and paste the following text.
textThe ID of the SharePoint list item to retrieveAdd a new text input. Copy and paste the following text as the input name.
textadditionalCommentIn the corresponding details field, copy and paste the following text.
textAdditional comment from the requestorAdd a new text input. Copy and paste the following text as the input name.
textrequestorNameIn the corresponding details field, copy and paste the following text.
textName of the requestorThese inputs will be used as dynamic content in the workflow's action nodes and referenced in the
SKILL.mdfile later in this lab.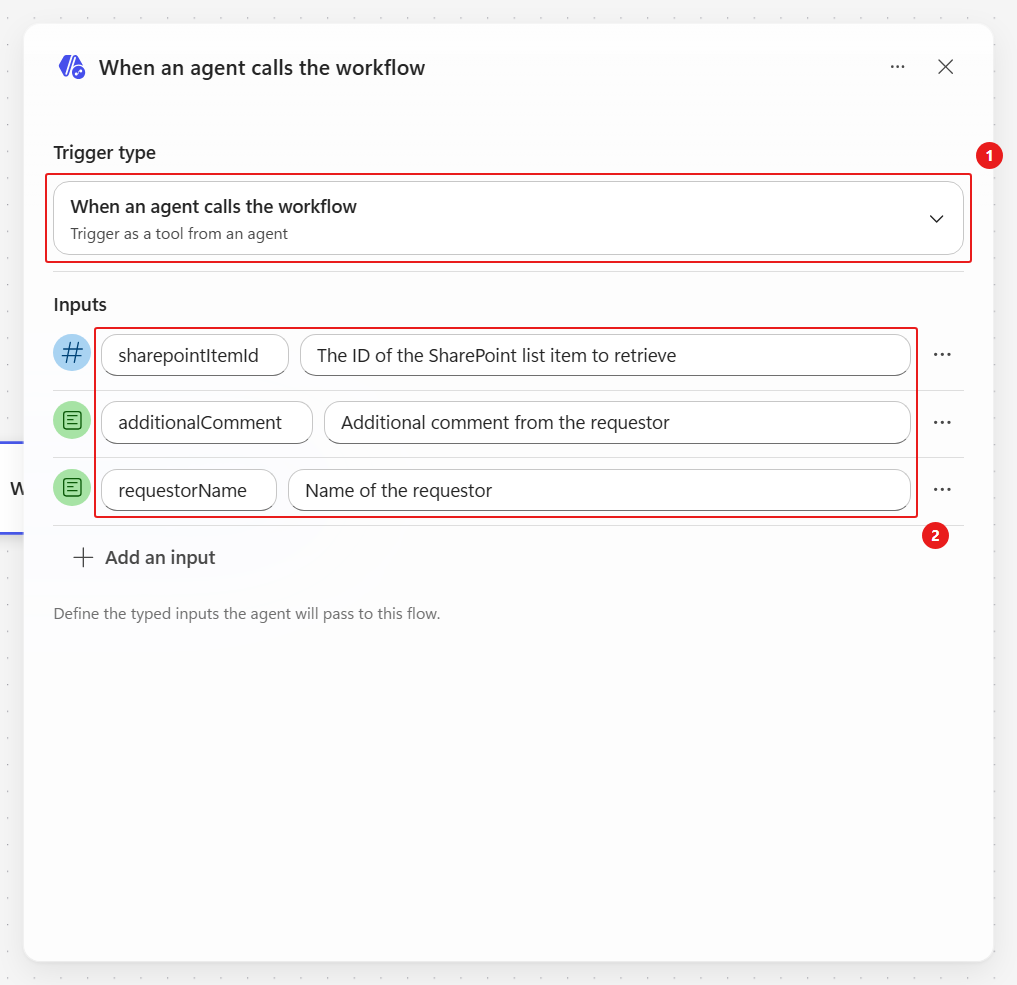
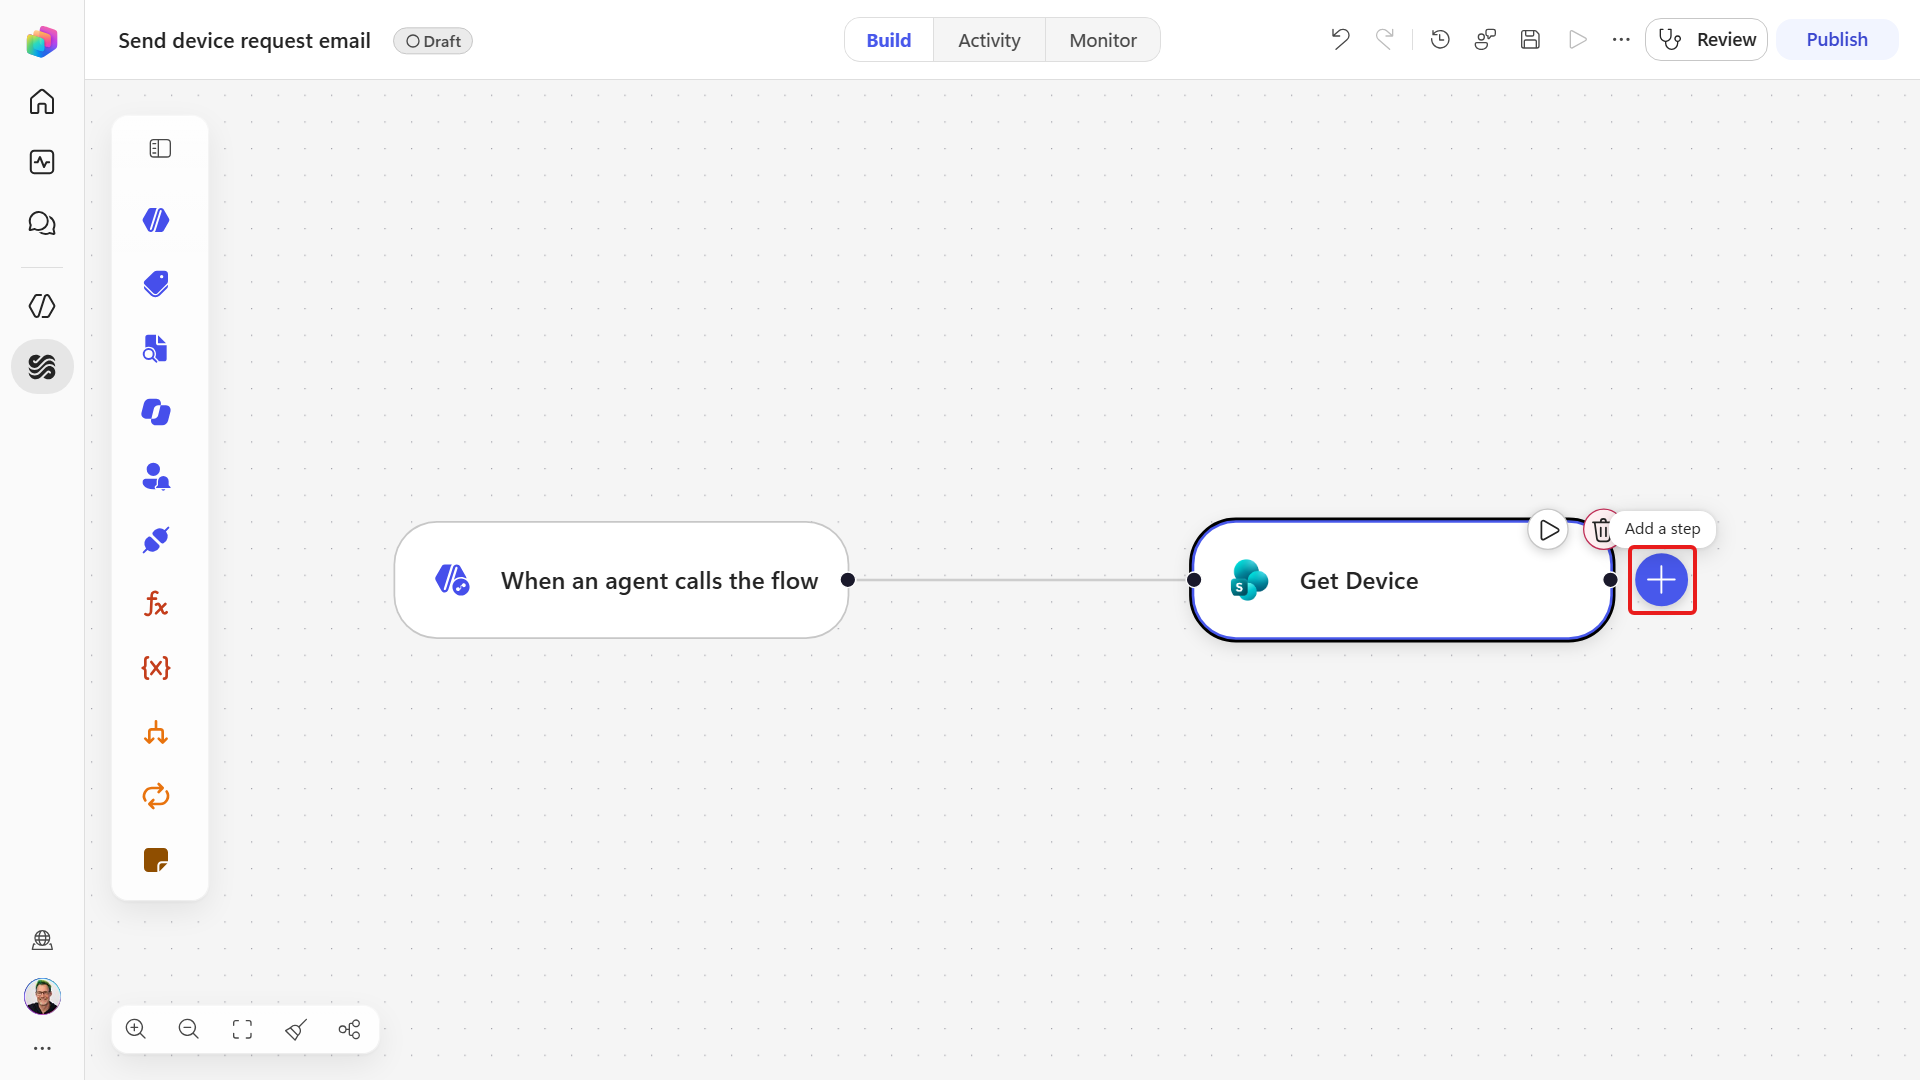
Next, add a step to the workflow. Select the + icon.
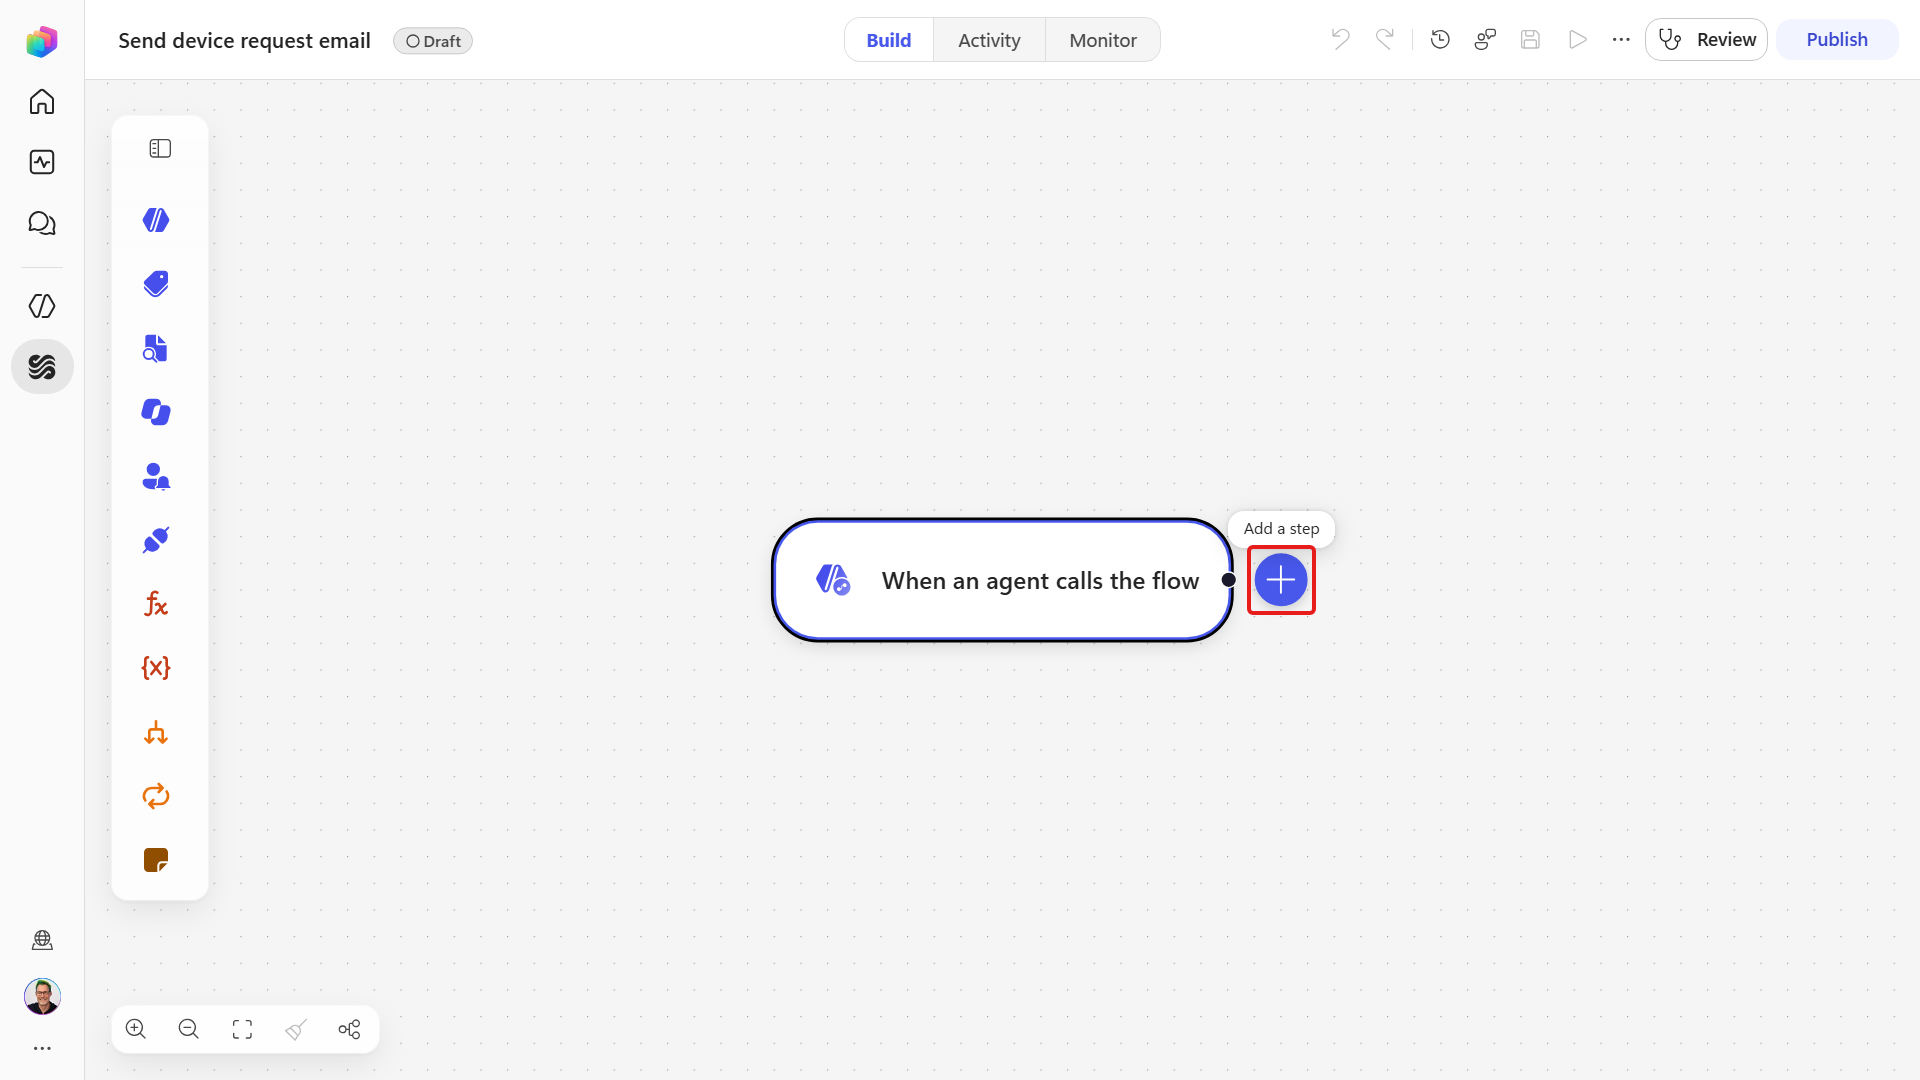
The Add dialog opens. It contains actions that perform tasks in the workflow, including actions from more than 1,400 connectors for Microsoft and third-party services.
In the search field, enter the following.
textGet itemSelect the Get item action from the SharePoint connector in the search results.
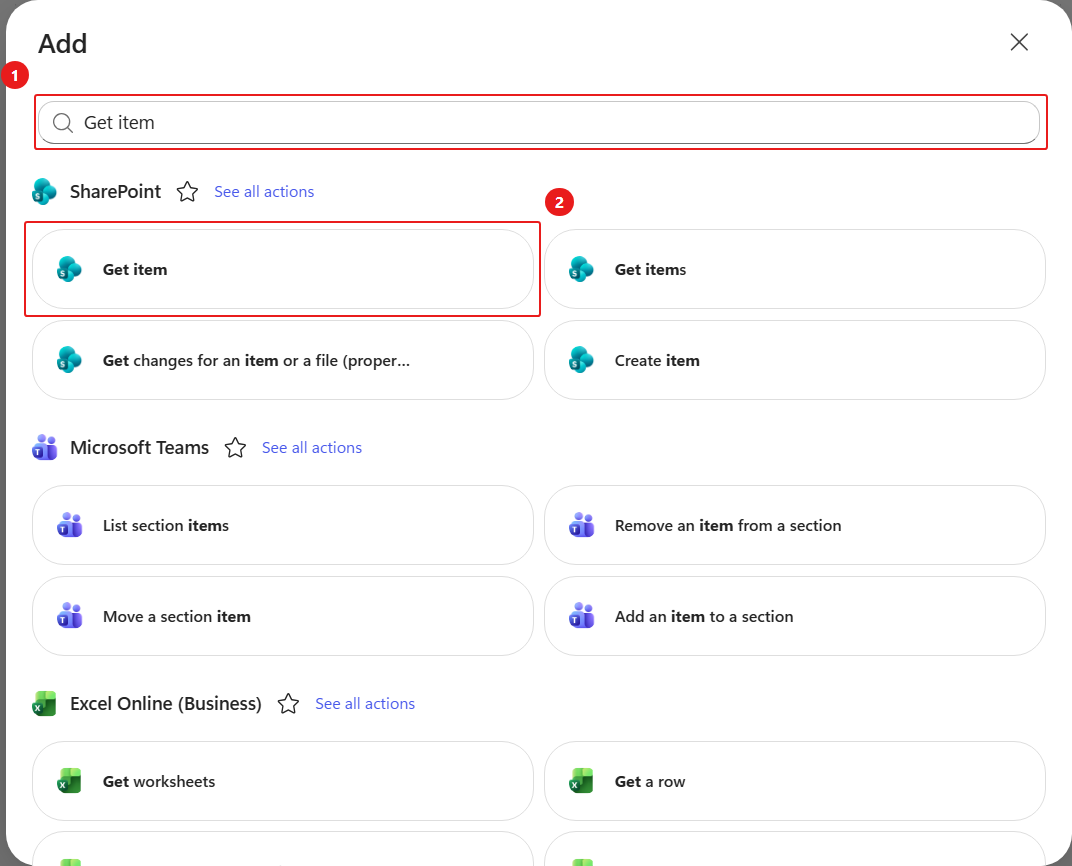
Configure the Get item action. In the action's name field, enter the following text.
textGet DeviceIn the Site Address field, select the Contoso IT SharePoint site created in Mission 00 - Course Setup.
In the List Name field, select the EmployeeAssets SharePoint list.
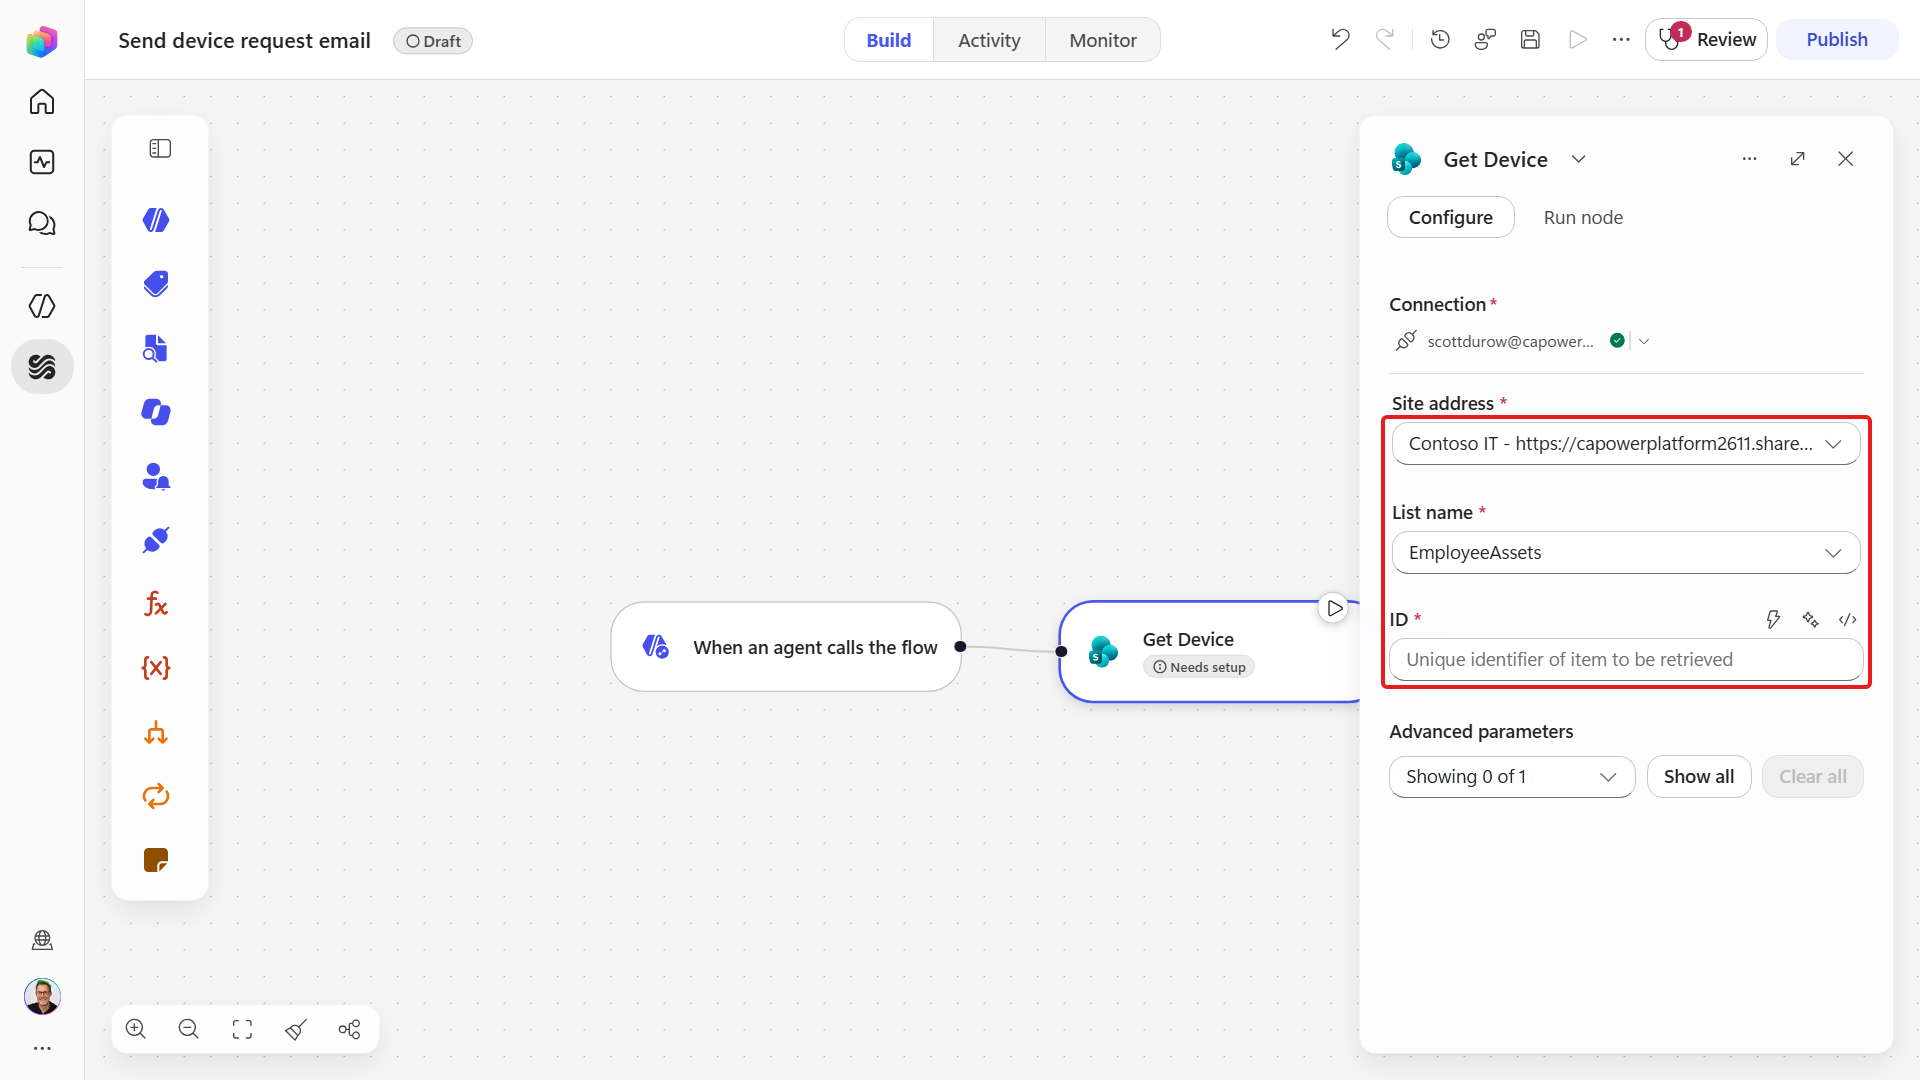
In the Id parameter field, we'll add dynamic content.
What is dynamic content
Dynamic content in workflows is data passed from previous triggers and actions. It lets you reuse values like email subjects, names, or IDs in later steps without writing code.
Add dynamic content by using one of the following options.
Option 1: Select the lightning bolt icon, then select a property from the dynamic content dialog.
Option 2: Enter a forward slash,
/, then select a property from the list.
Select the sharepointItemId property from the trigger. It appears in the Id parameter field.
Select Show all to view the advanced parameters. For Limit Columns by View, select All Items to limit the returned columns to those included in that SharePoint view.
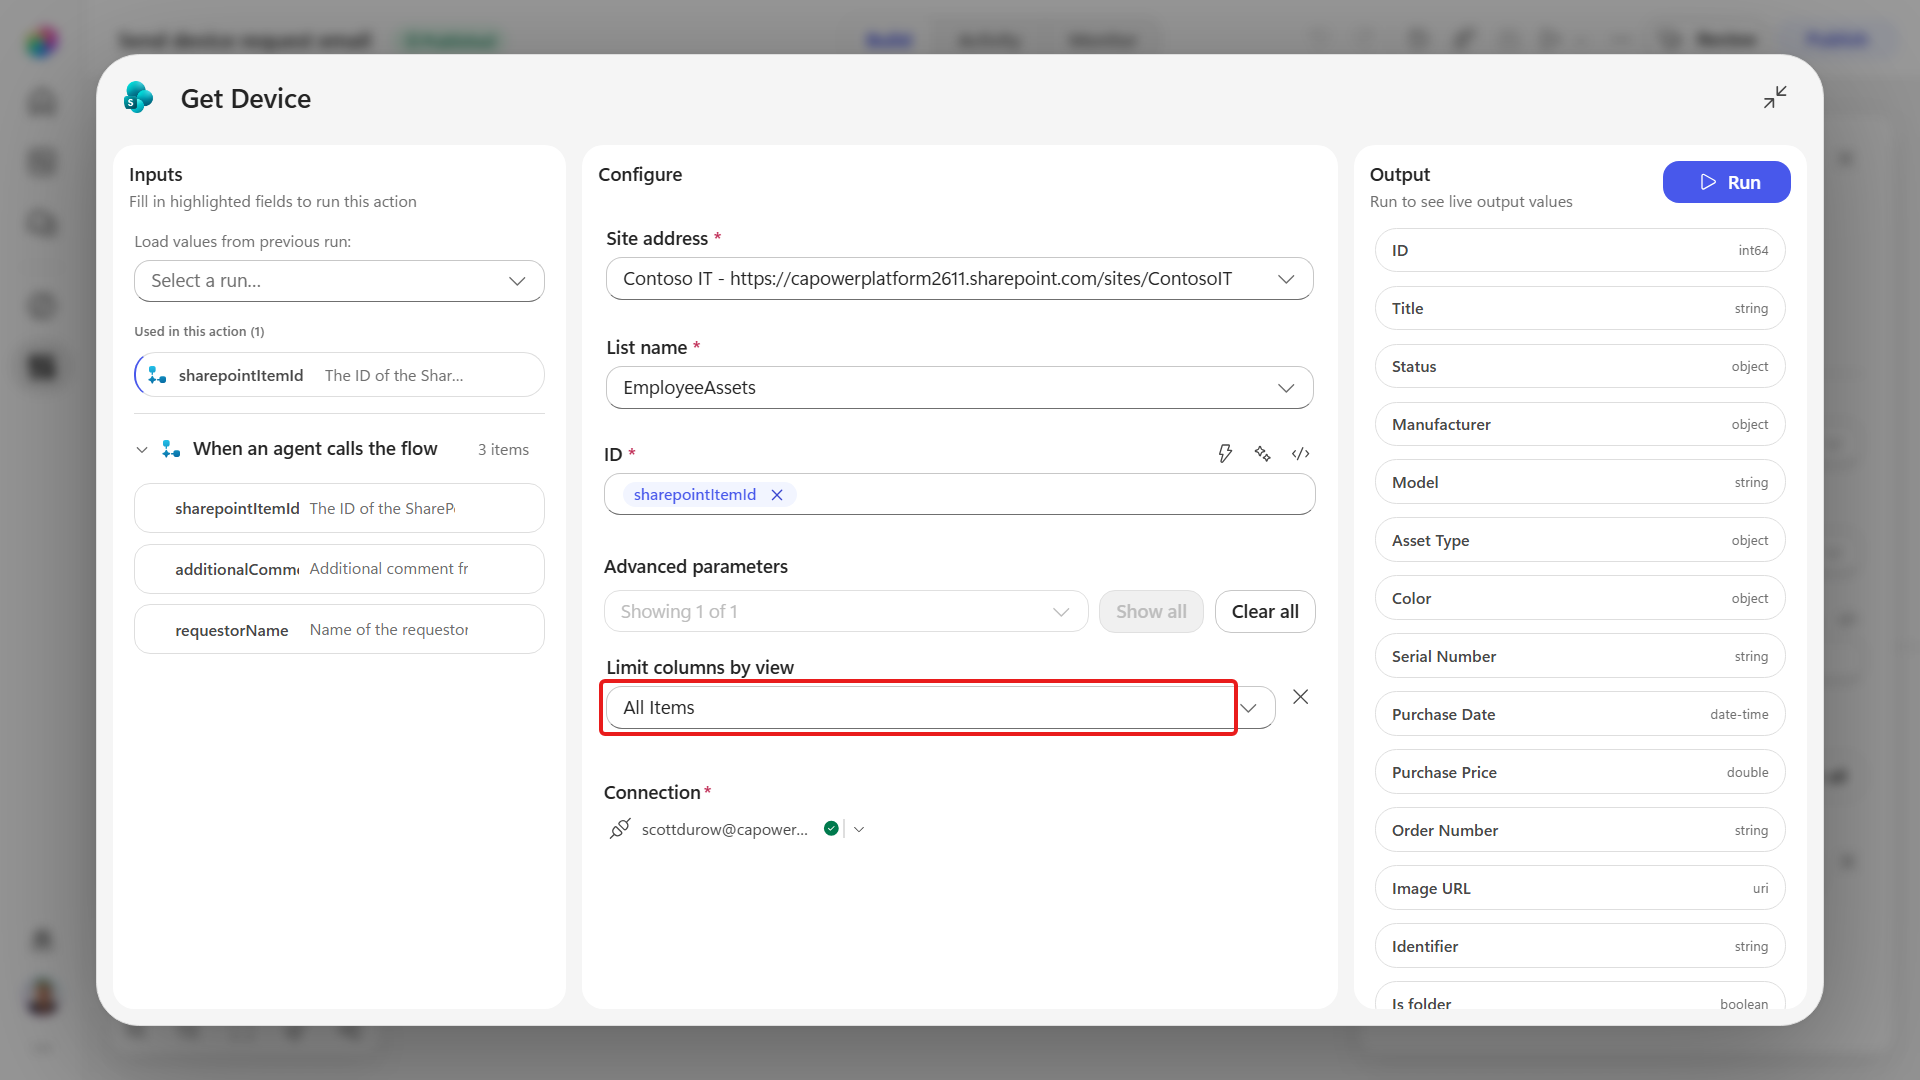
Add another node. Select the + icon after the Get Device node.
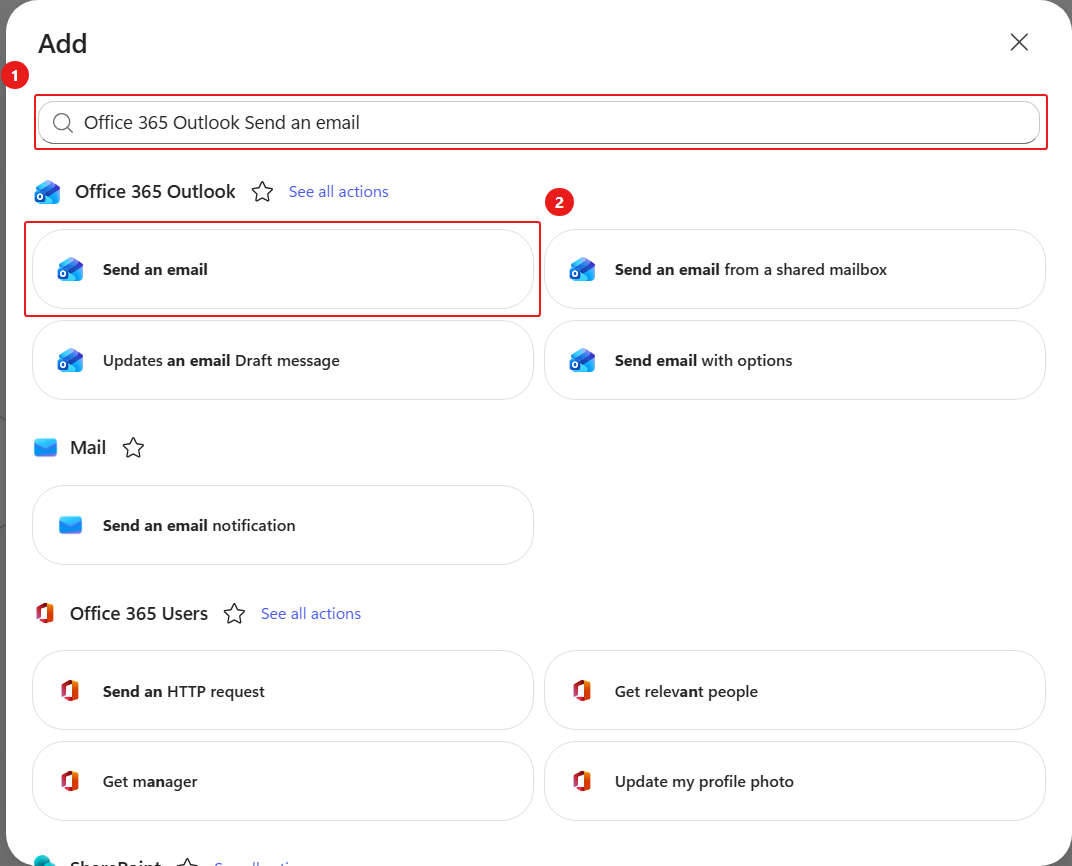
In the search field, enter the following.
textsend an emailSelect the Send an email action from the Office 365 Outlook connector.
In the action's name field, enter the following text.
textSend an email to manager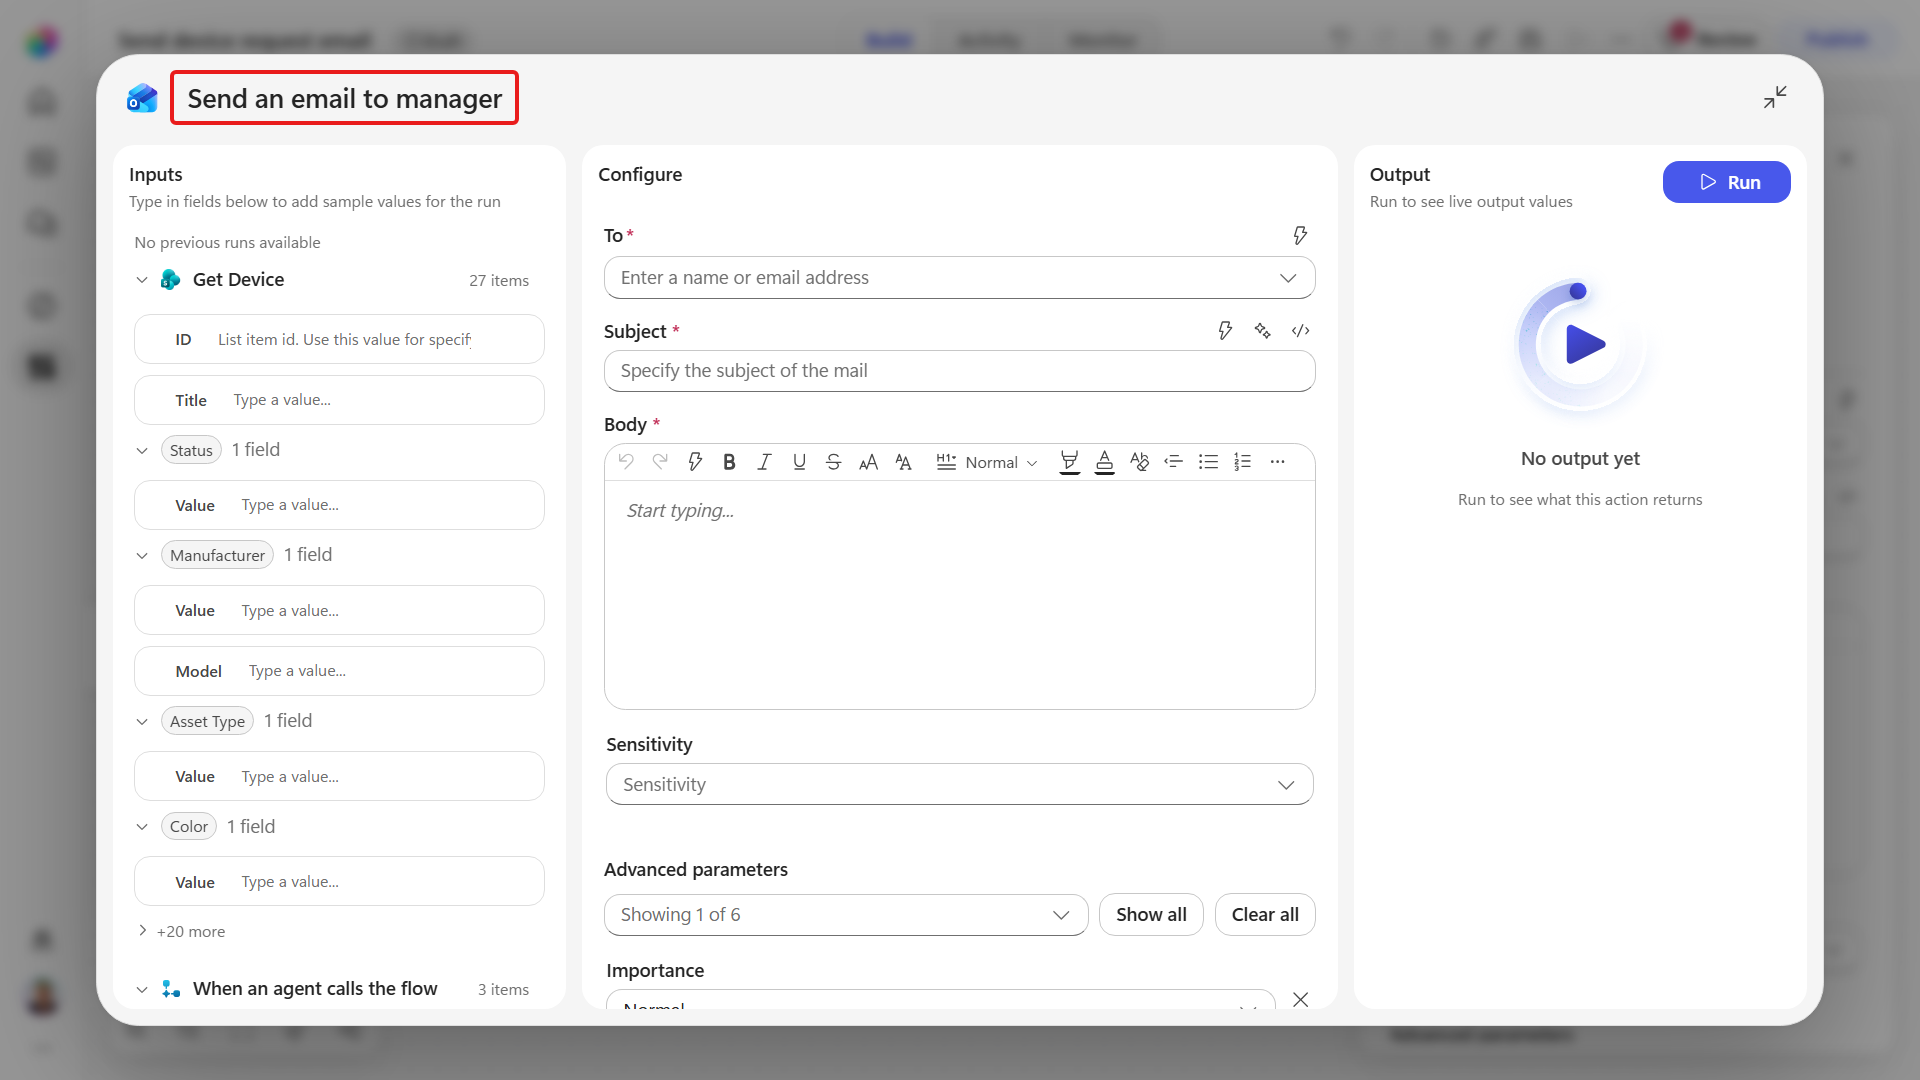
For Connection, select Create new connection, then follow the prompts in the dialog.
Configure the action's input parameters.
For To, select your own email address.
NOTE
In a production workflow, you could use the requestor's manager or retrieve the manager from their Microsoft Entra ID profile. For the purpose of this lab, use your own email address.
For Subject, enter the following text.
textRequest type: new device
For Body, enter the following text.
textHi, New device requested from Manufacturer: Model: Link to item in SharePoint Additional comment: This is an automated email from Contoso IT Concierge agent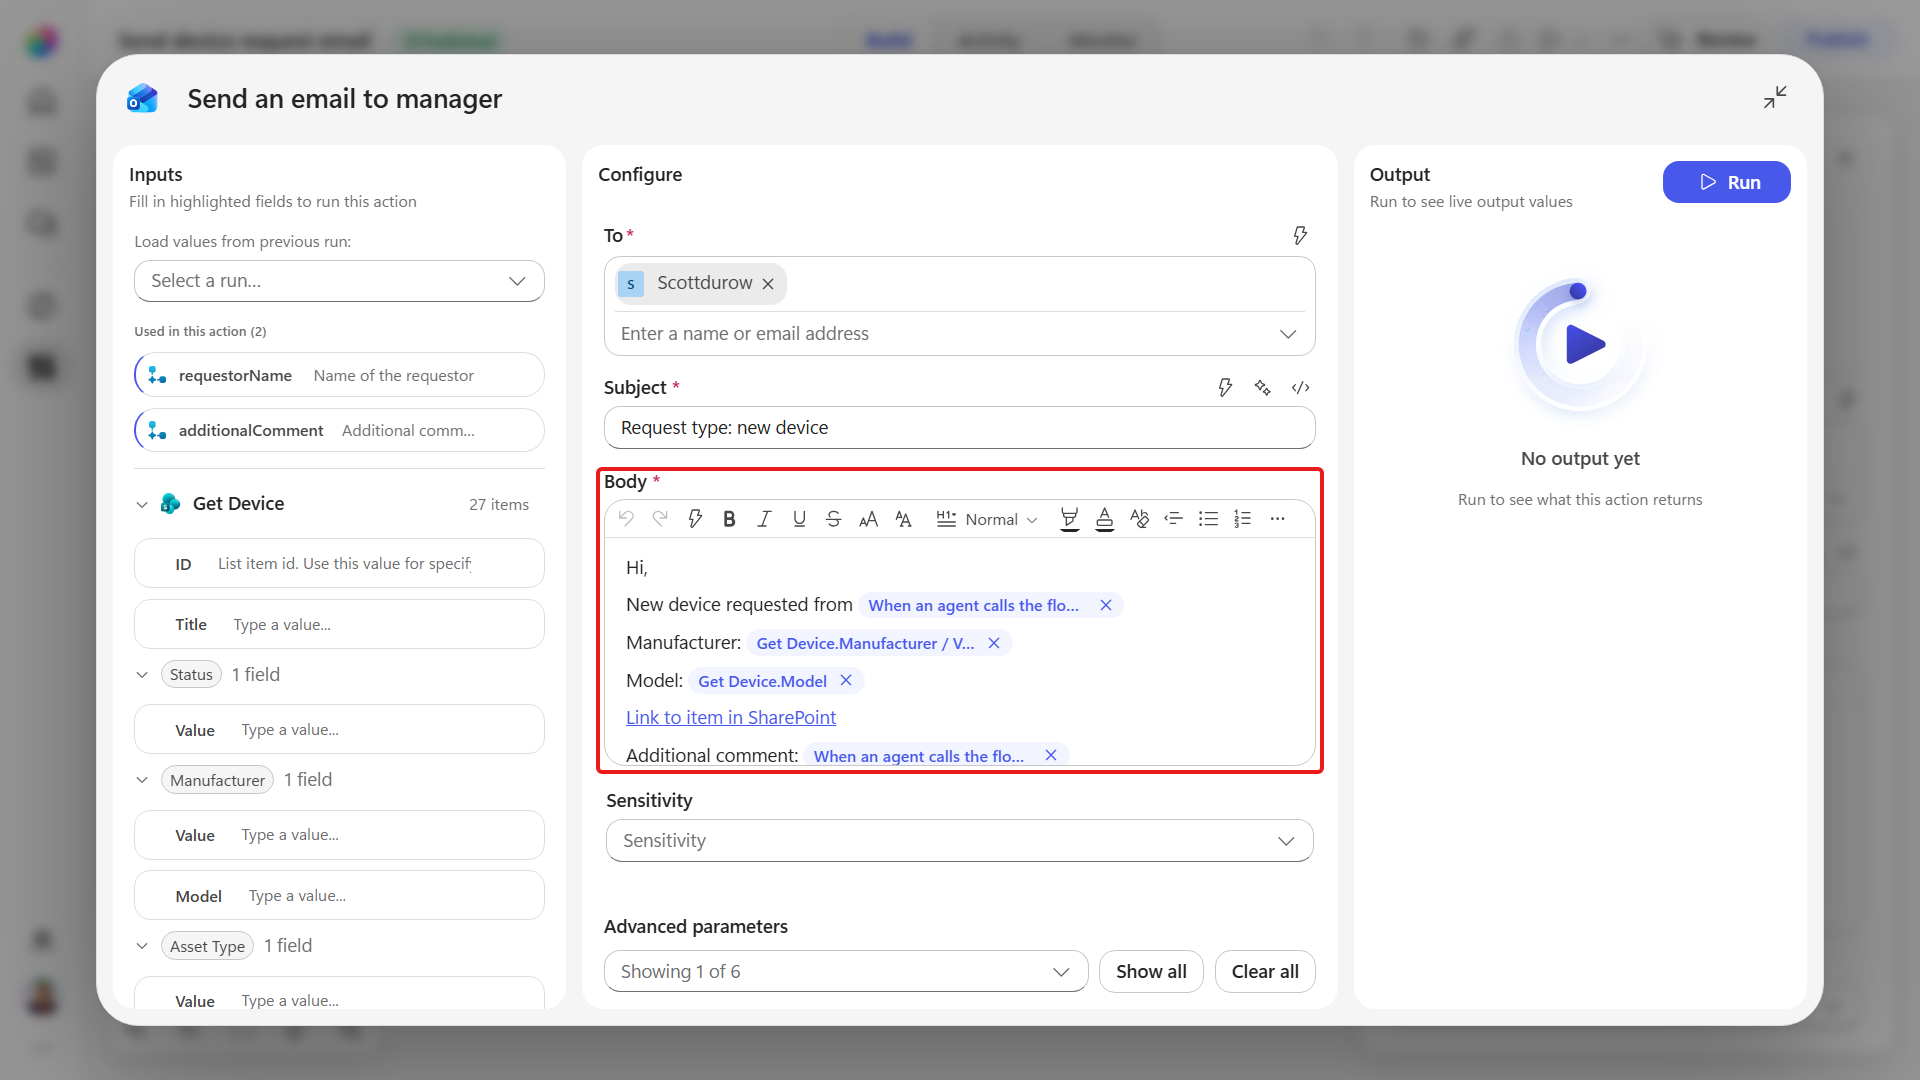
Next, add dynamic content from the trigger and Get Device action to the email body. Enter a space after
New device requested from.Add the requestorName property from the trigger after the space.
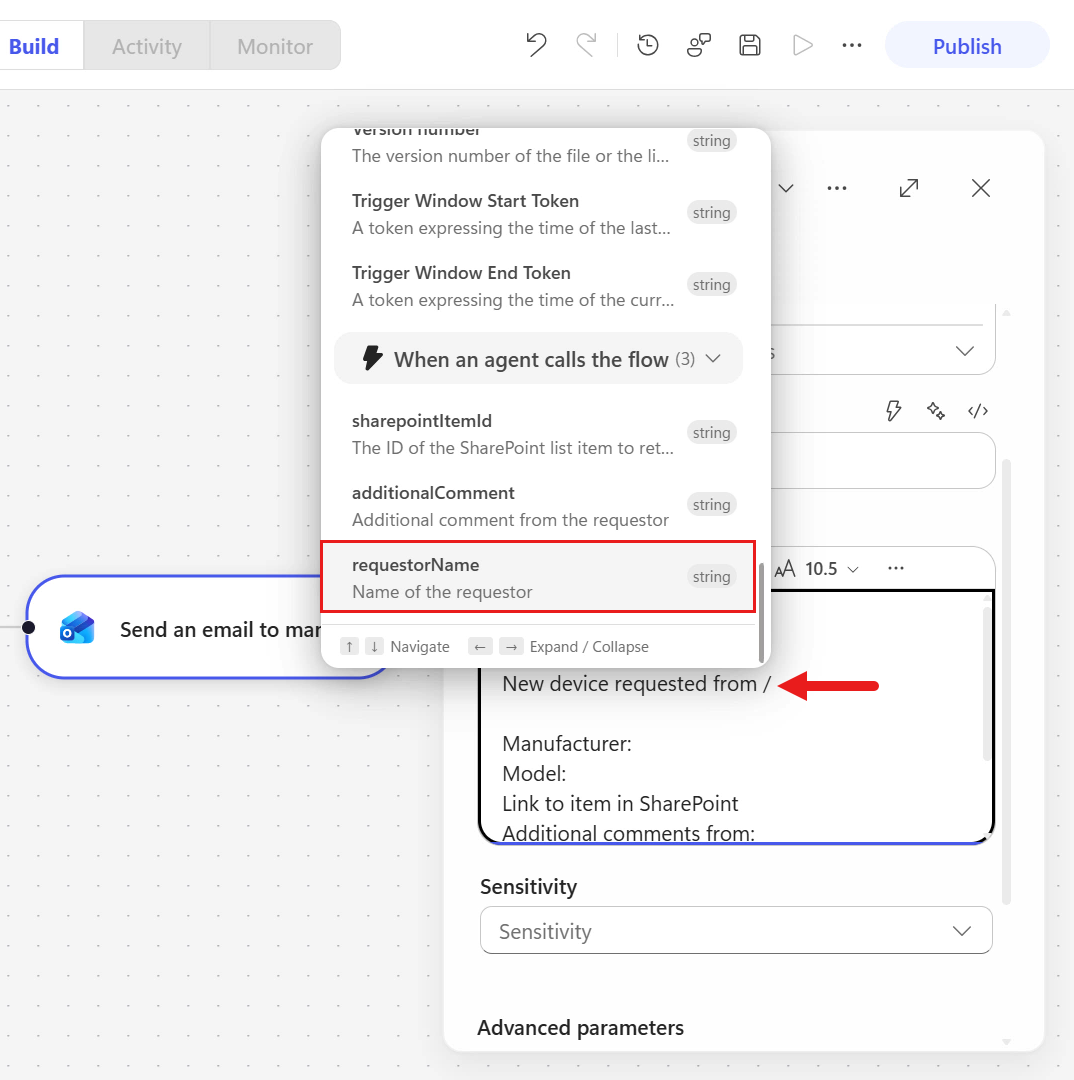
The email body now references dynamic content from the trigger. Repeat this process for the remaining fields.
Place the cursor after
Manufacturer:and enter a space.Add the Value property for the Manufacturer object property from the Get item SharePoint action after the space.
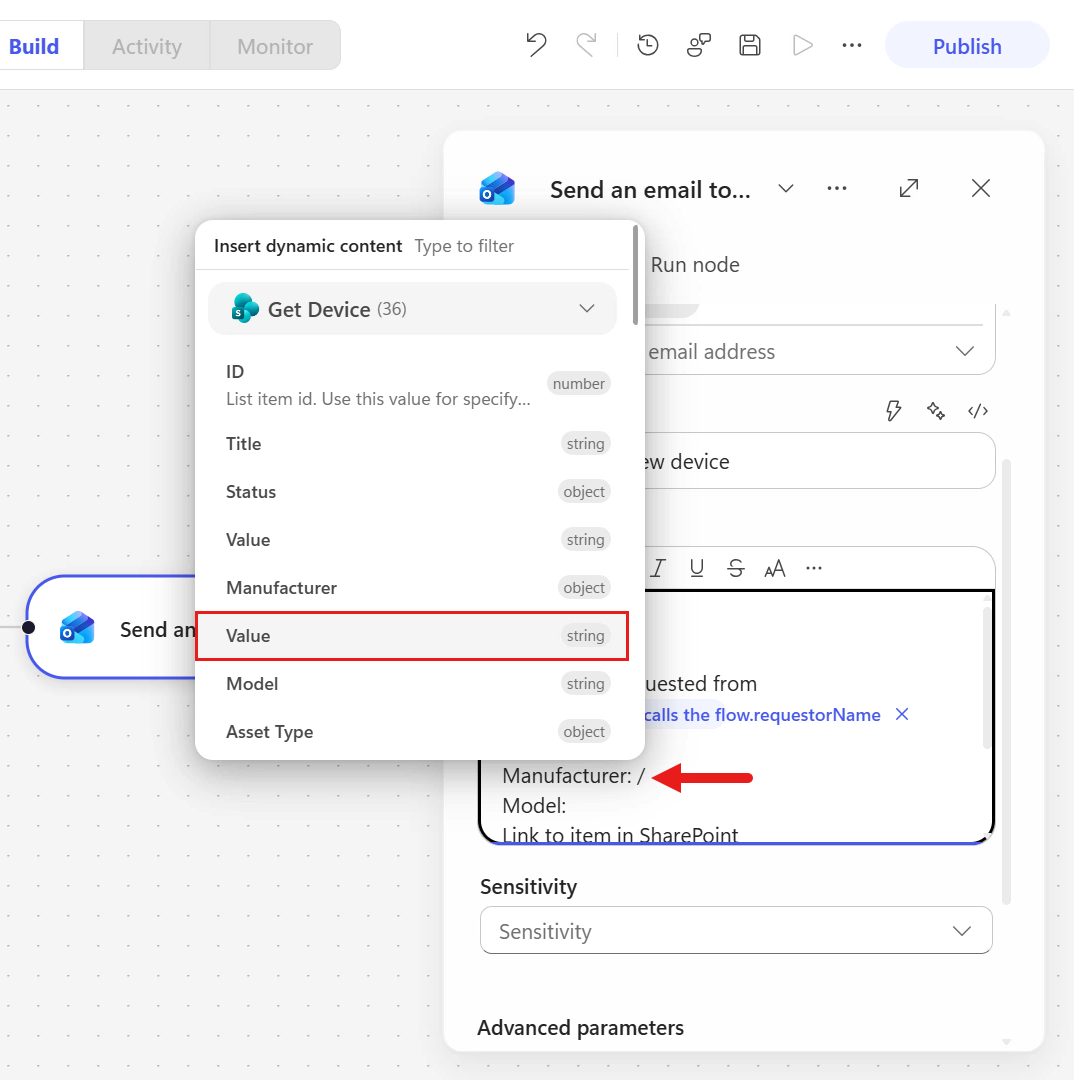
Place the cursor after
Model:and enter a space.Add the Model property from the Get item SharePoint action after the space.
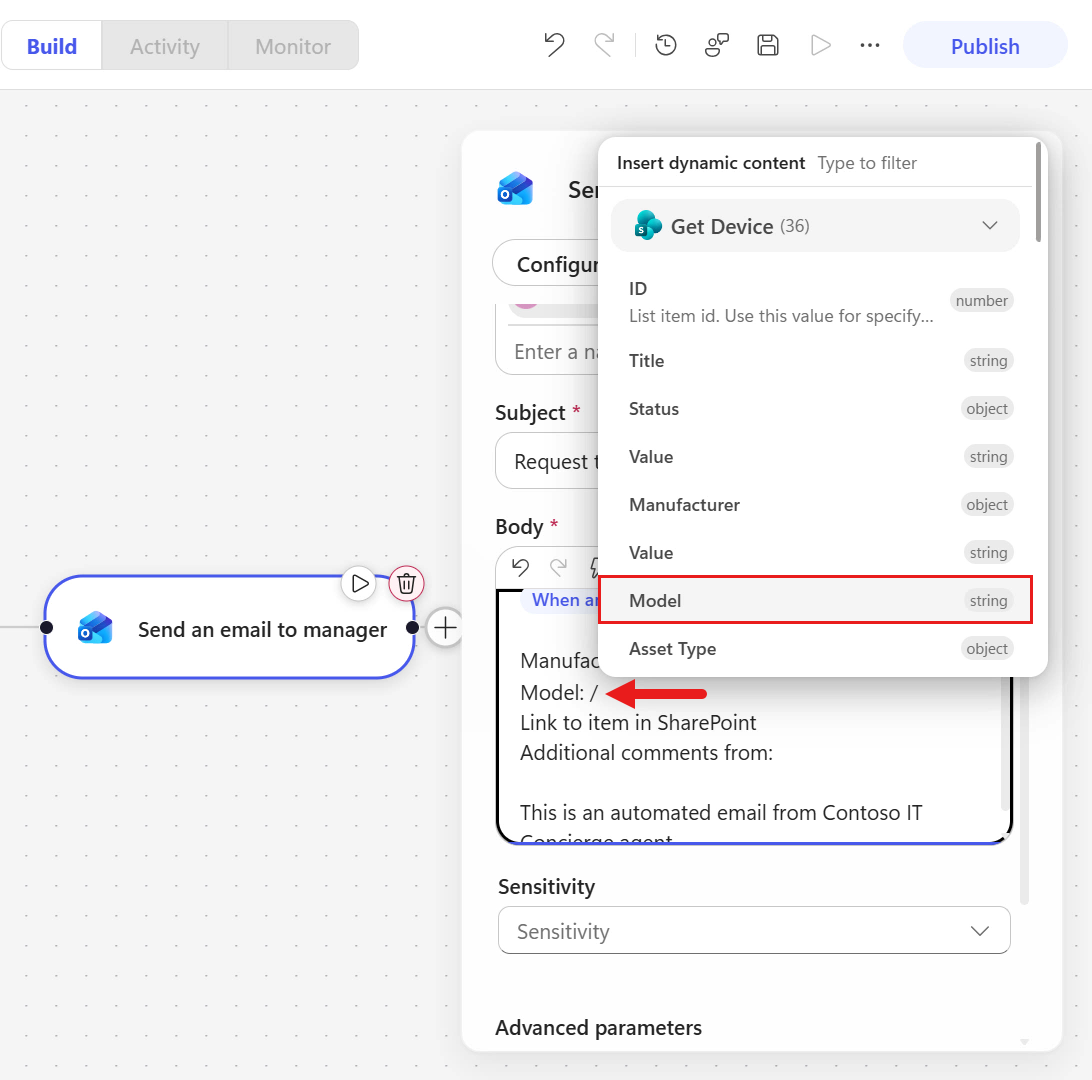
Place the cursor after
Link to item in SharePointand enter a space.Add the Link to item property from the Get item SharePoint action after the space.
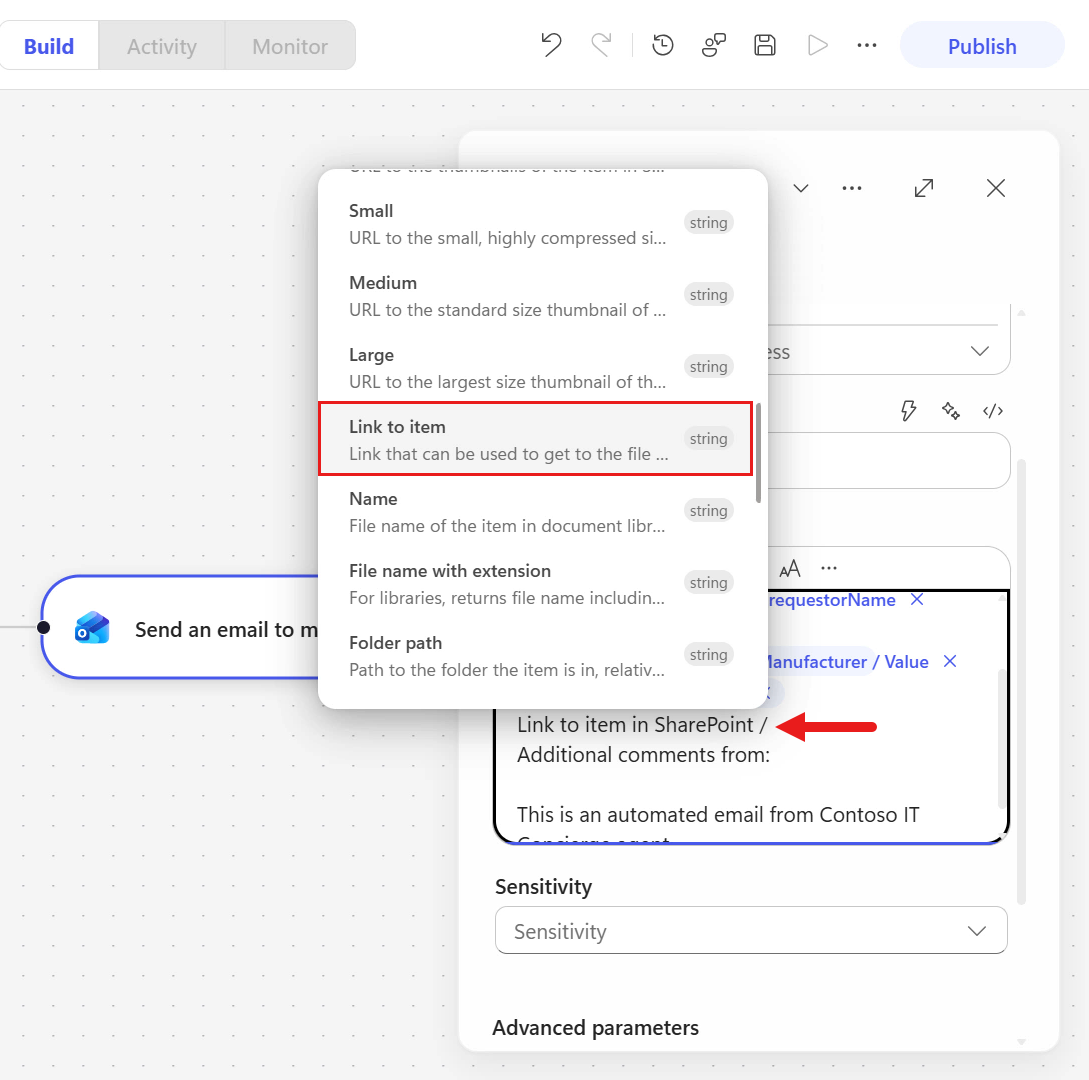
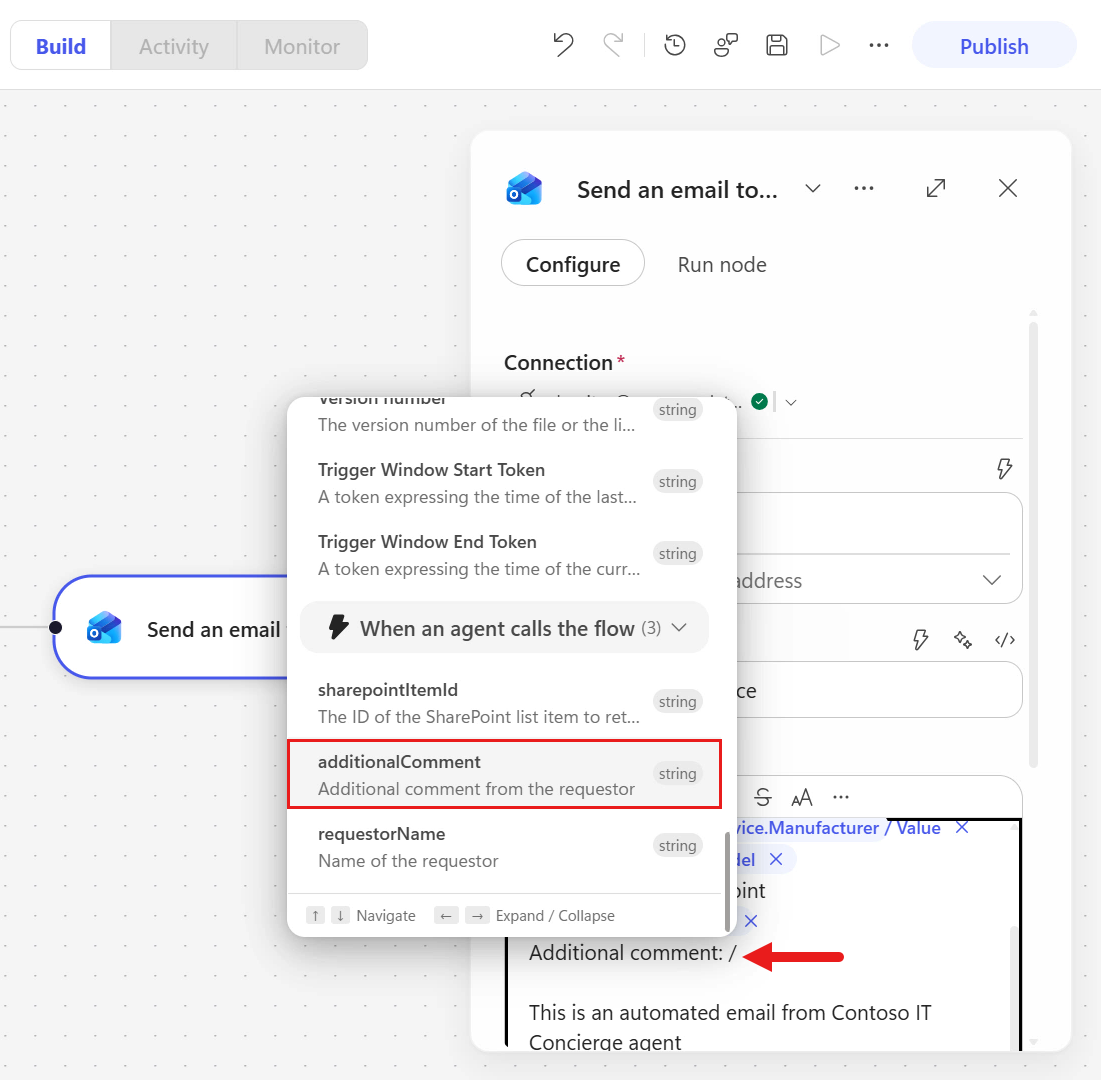
Place the cursor after
Additional comment:and enter a space.Add the additionalComment property from the trigger after the space.
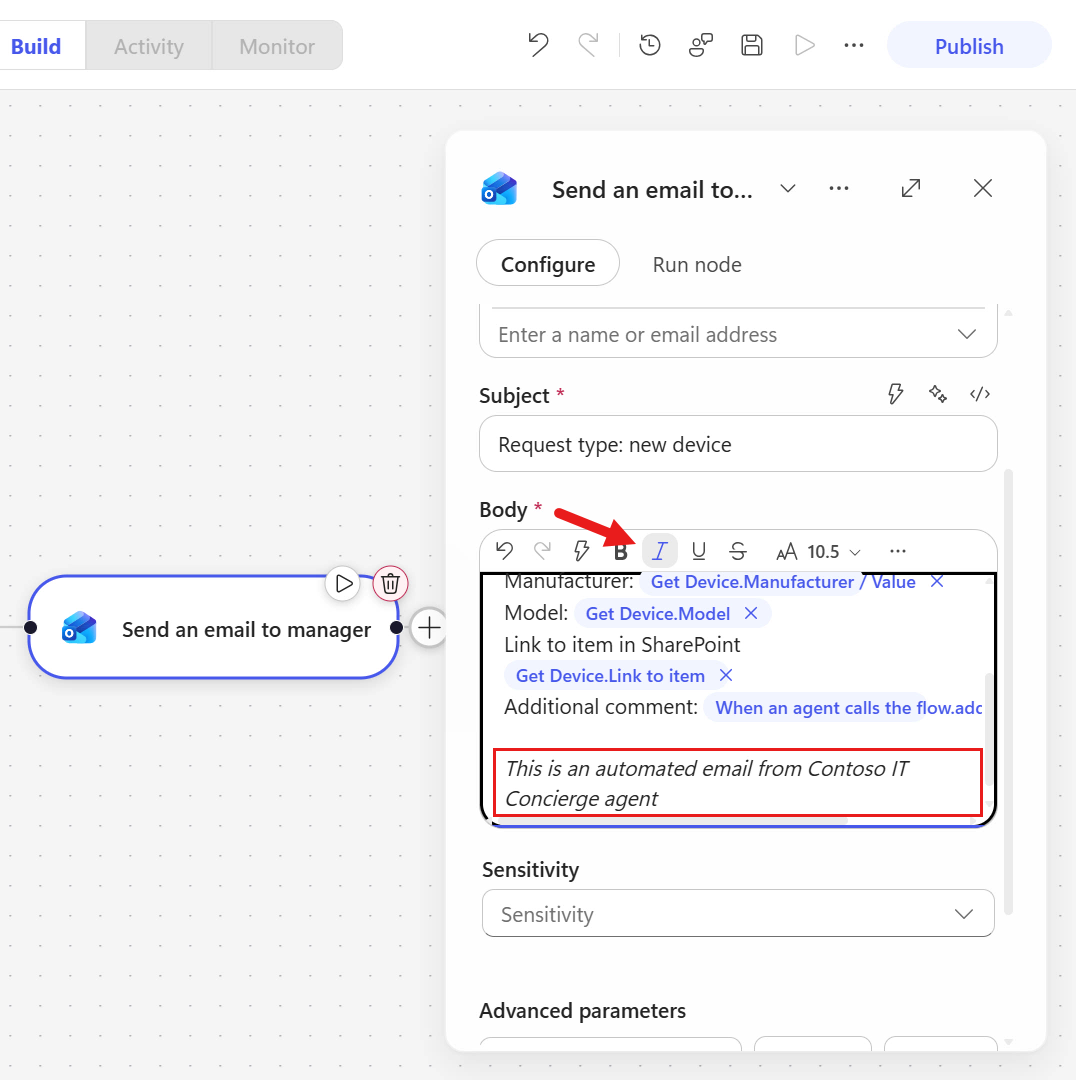
Highlight the text in the last sentence and select the Italic icon to italicize the sentence.
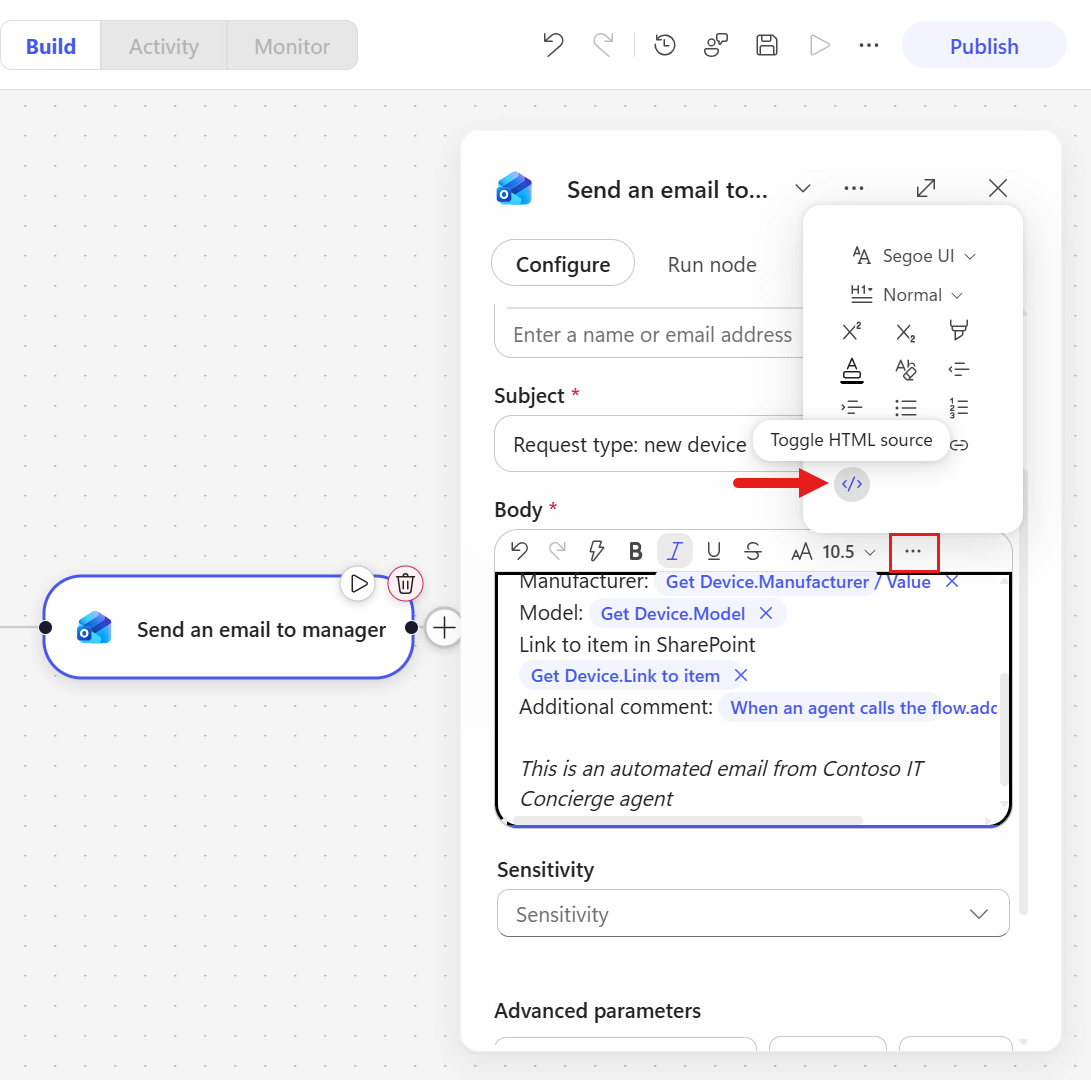
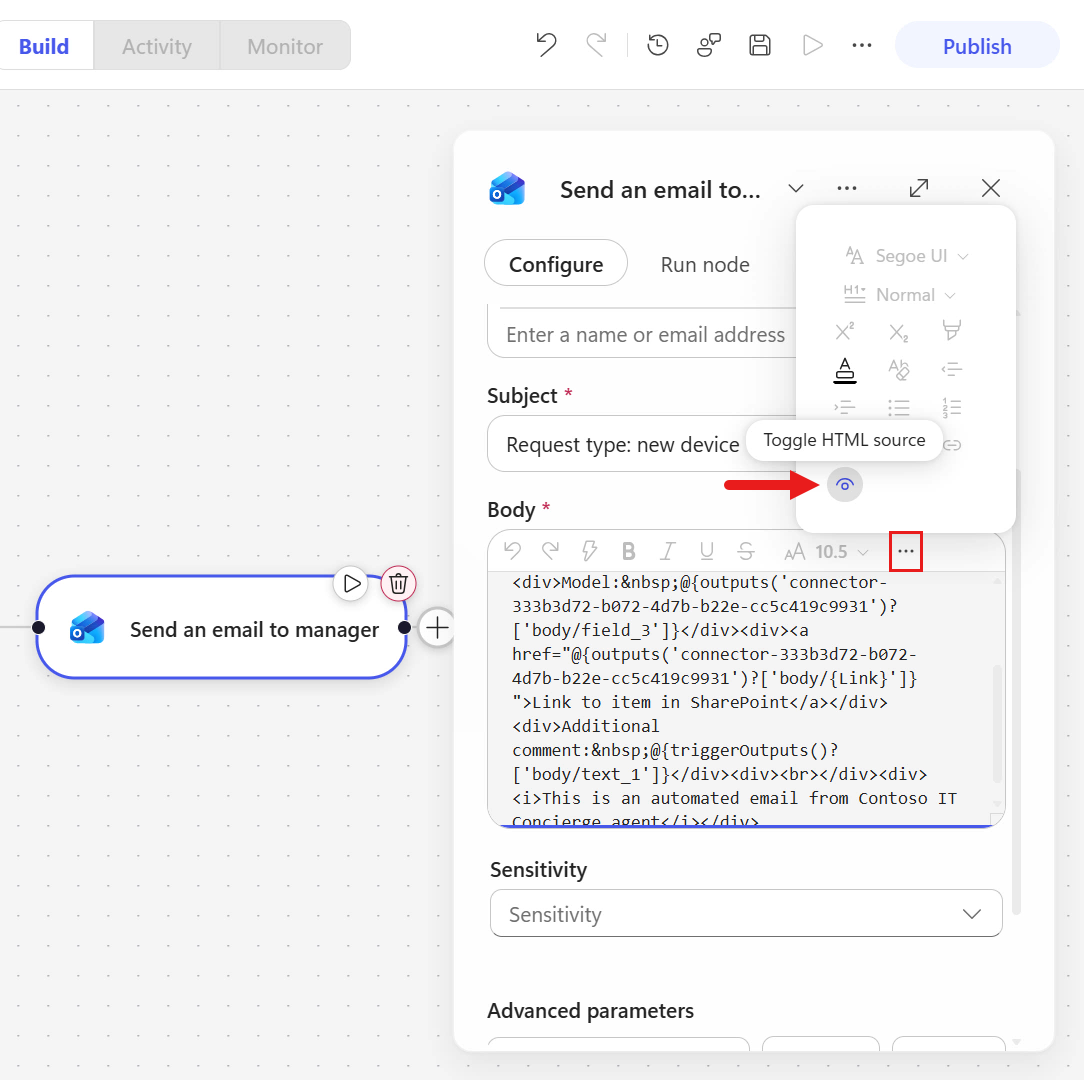
The Link to item URL appears as plain text in the email. To make it a clickable hyperlink, switch the Body field to the HTML editor and add HTML anchor tags.
Select the ellipsis icon in the editor and select the HTML icon.
NOTE
You can optionally skip these steps and display the link as plain text. The URL will remain visible in the email but won't be clickable.
Highlight the Link to item dynamic content and cut it by pressing
Ctrl + Xon Windows orCommand + Xon macOS.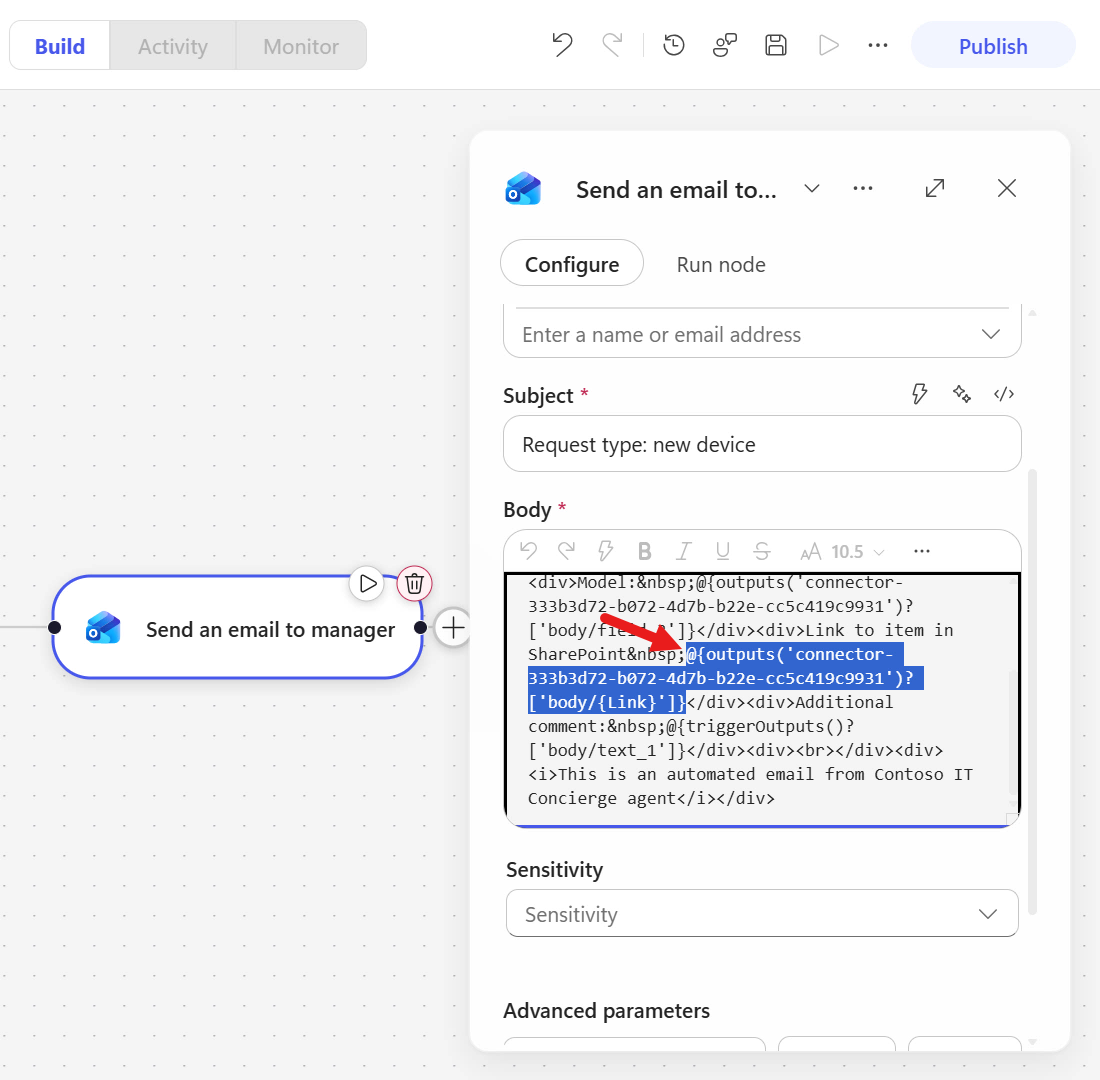
Place the cursor before the Link to item text and add an HTML anchor tag.
Copy and paste the following text.
text<a href="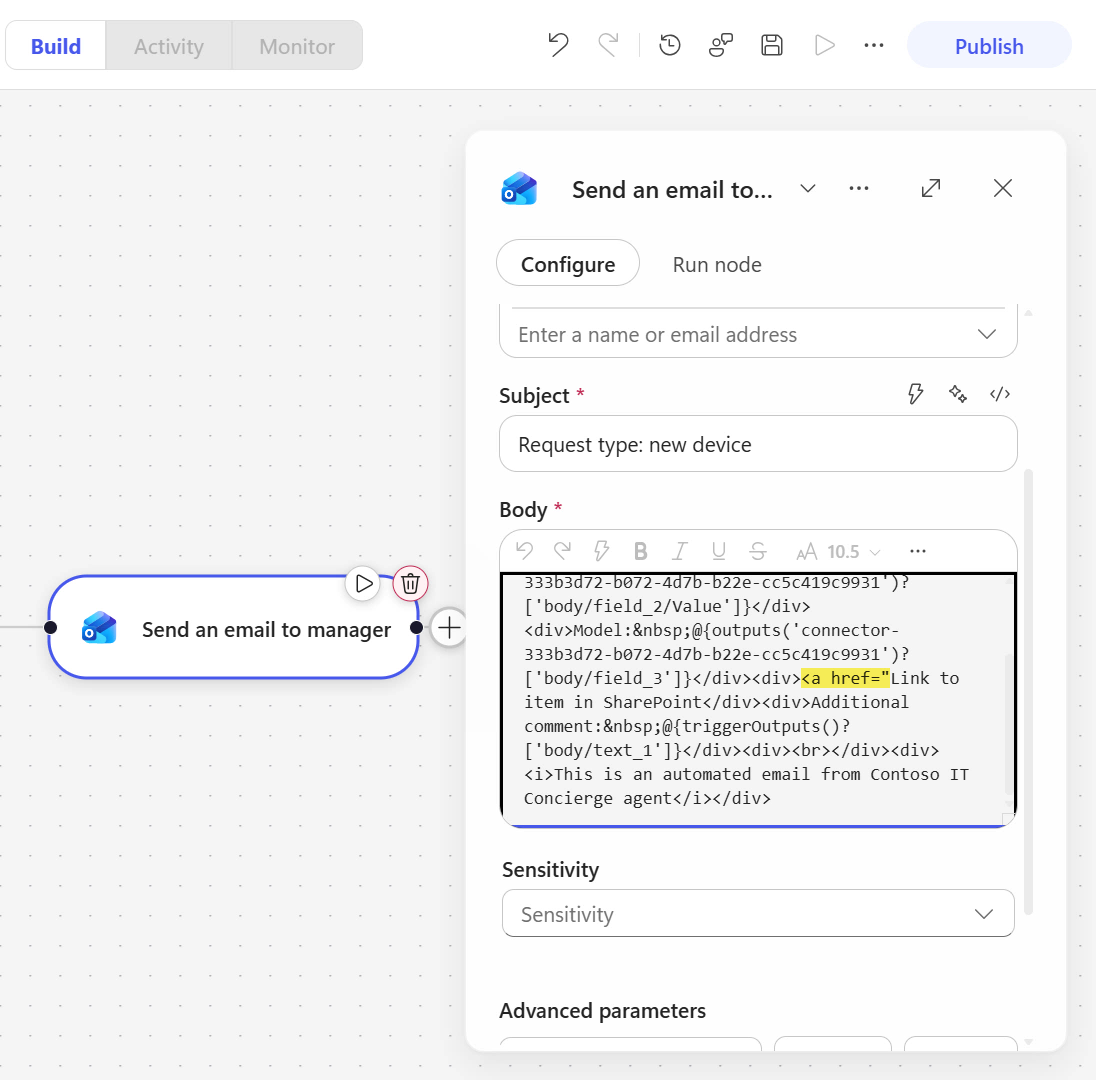
Place the cursor after the HTML anchor tag,
<a href=", and paste the dynamic content.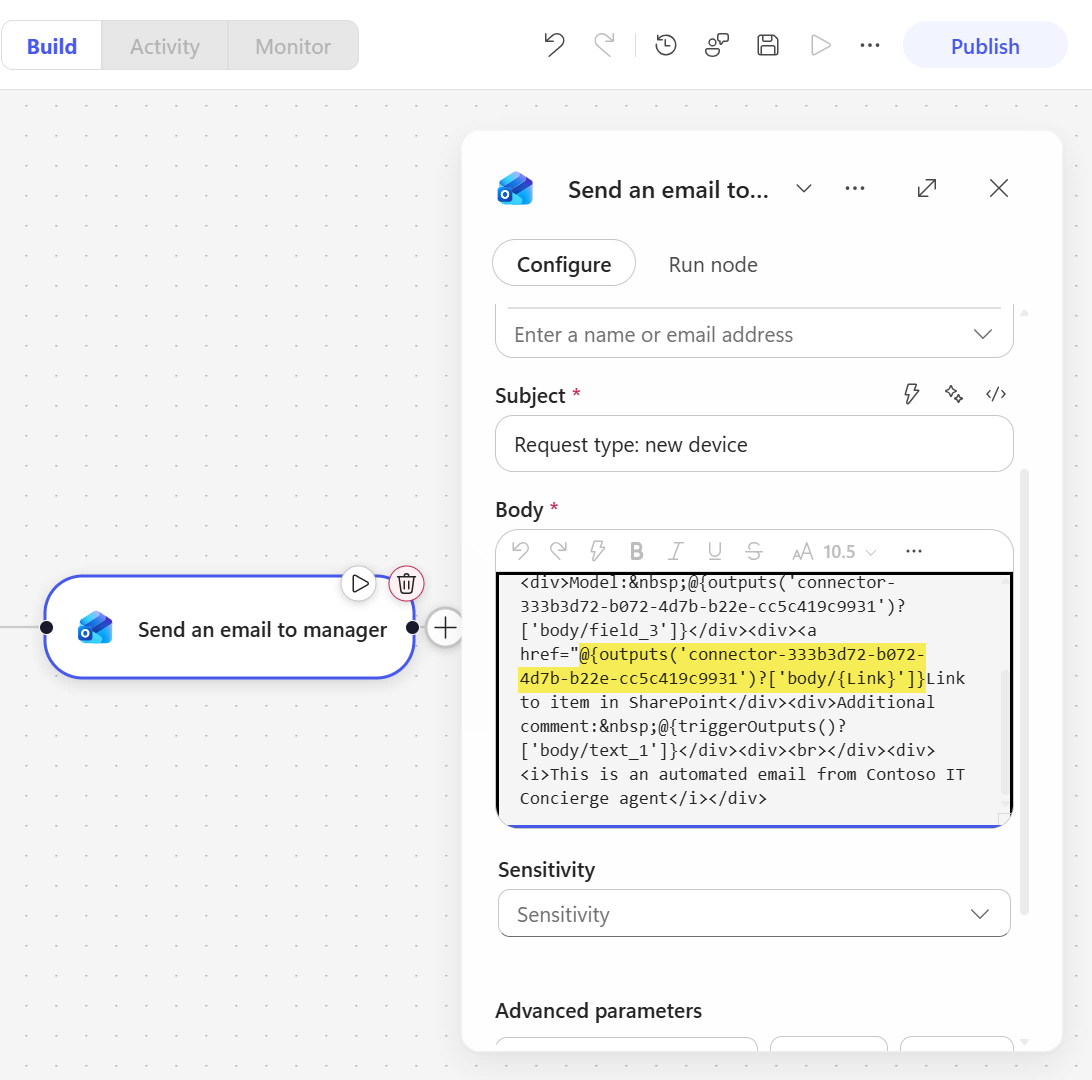
Place the cursor after the Link to item dynamic content.
Copy and paste the following text.
text">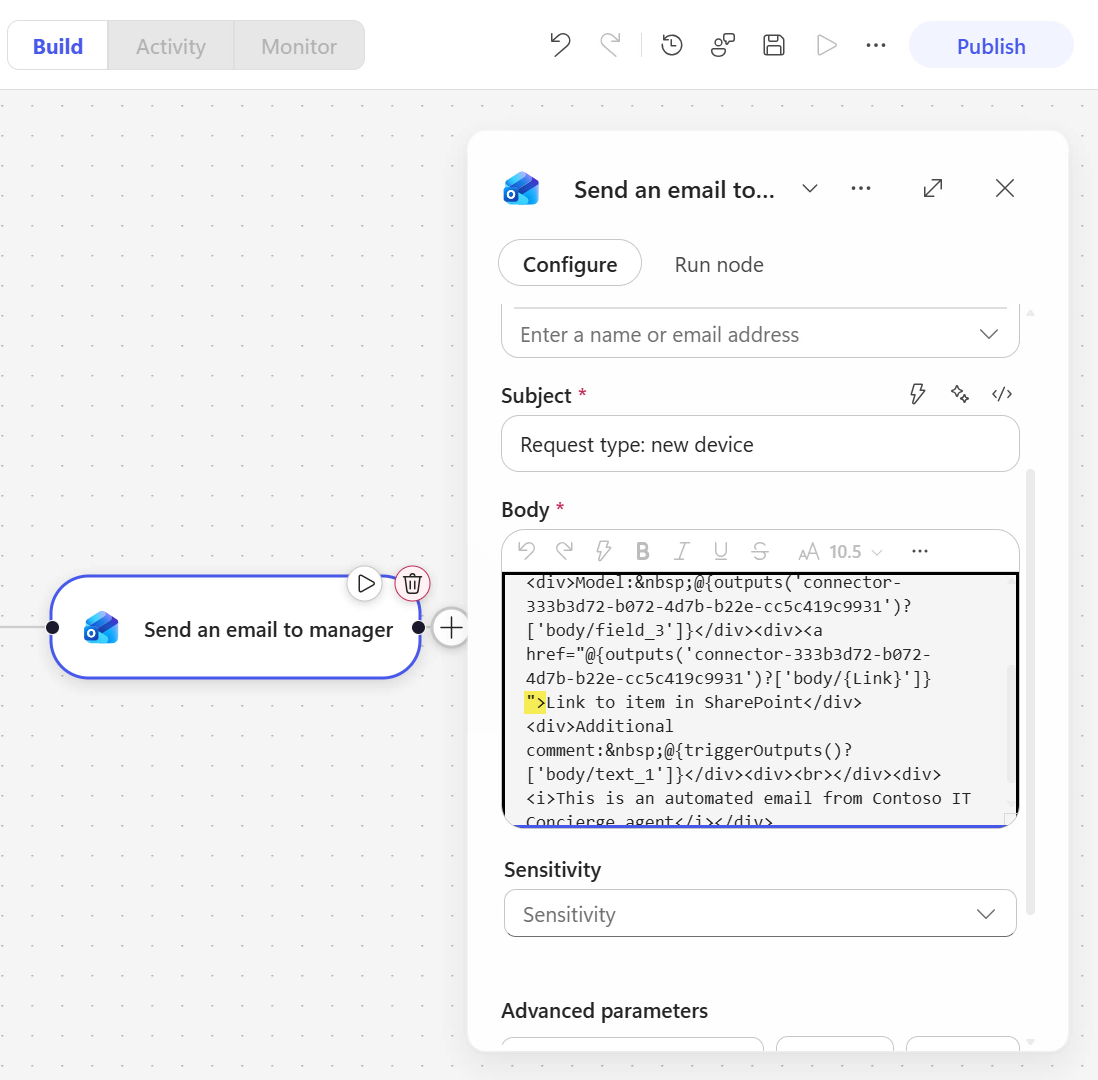
Place the cursor after the Link to item text.
Copy and paste the following text.
text</a>This closes the HTML anchor tag, making the text a clickable hyperlink in the email.
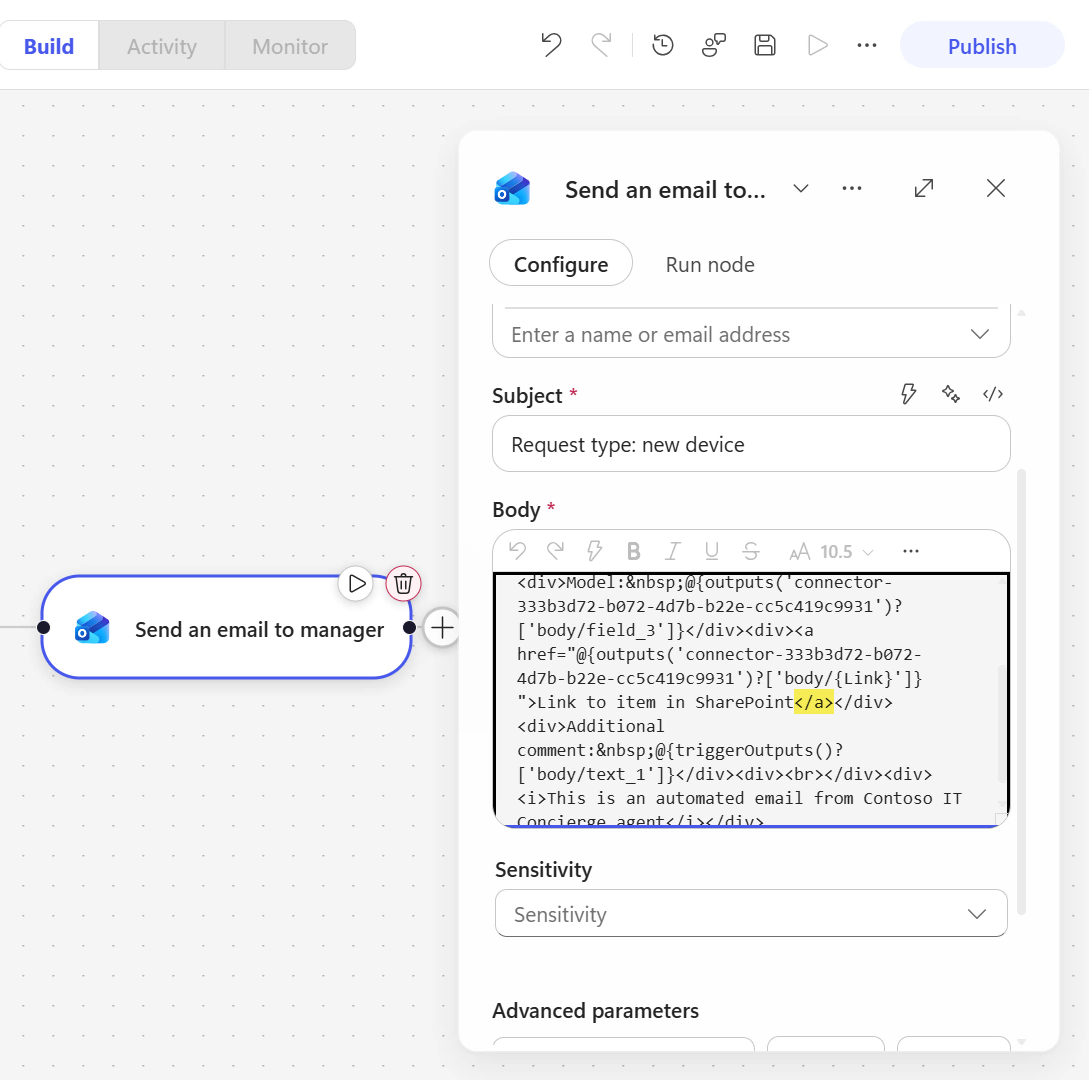
Select the eye icon to toggle the editor view.
Lastly, for the Sensitivity input parameter, select the General\All Employees (unrestricted) label from the drop-down list.
Understanding sensitivity labels in Outlook emails
A sensitivity label is a classification that helps protect and manage emails and files according to your organization's information protection policies. It helps users identify sensitive content and apply the appropriate level of protection without impacting collaboration or productivity.
Select the + icon after the Send an email to manager node.
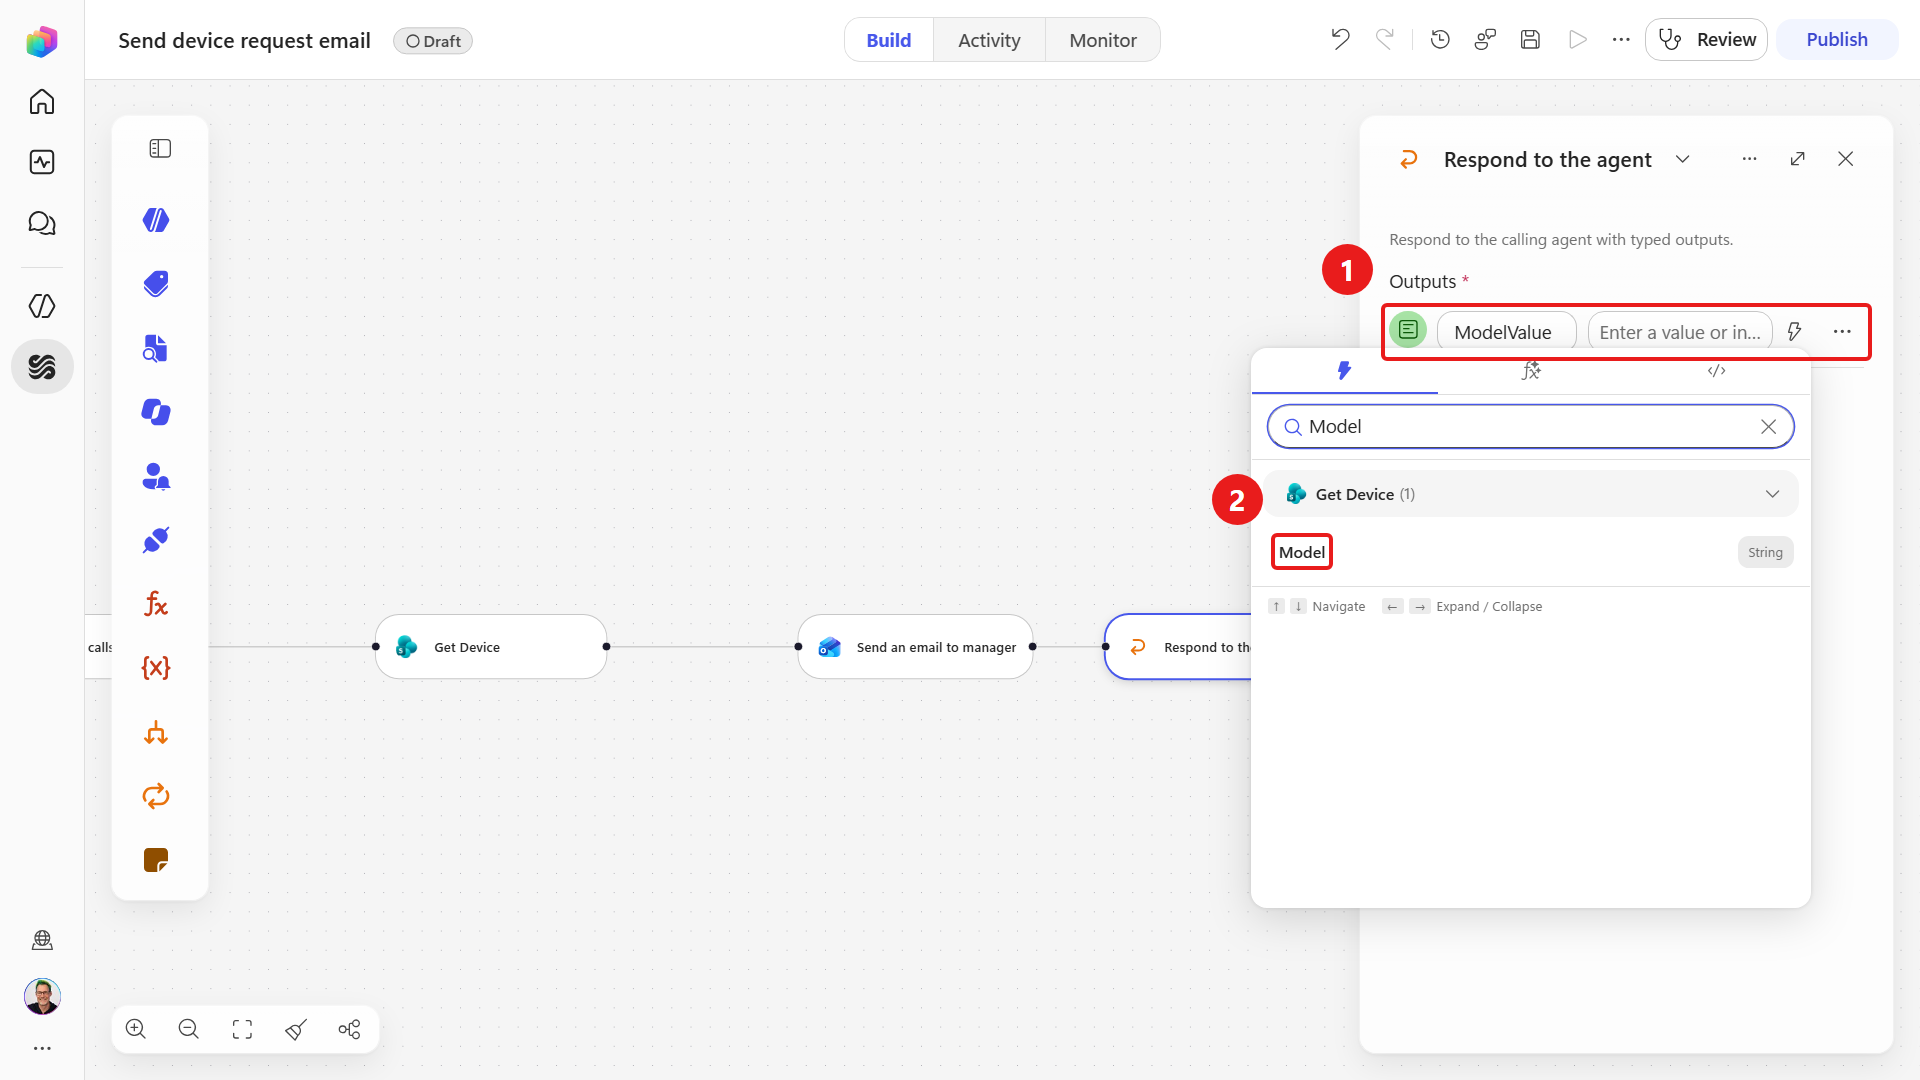
In the node palette, select Agent, then select Respond to the agent.
In the Respond to the agent node, clear the current text output name and enter the following text.
Copy and paste the following text.
textModelValueIn the details field, add the Model property from the Get Device action.
This value from the SharePoint dynamic content will be sent back to the agent to use in its summarized response to the user.
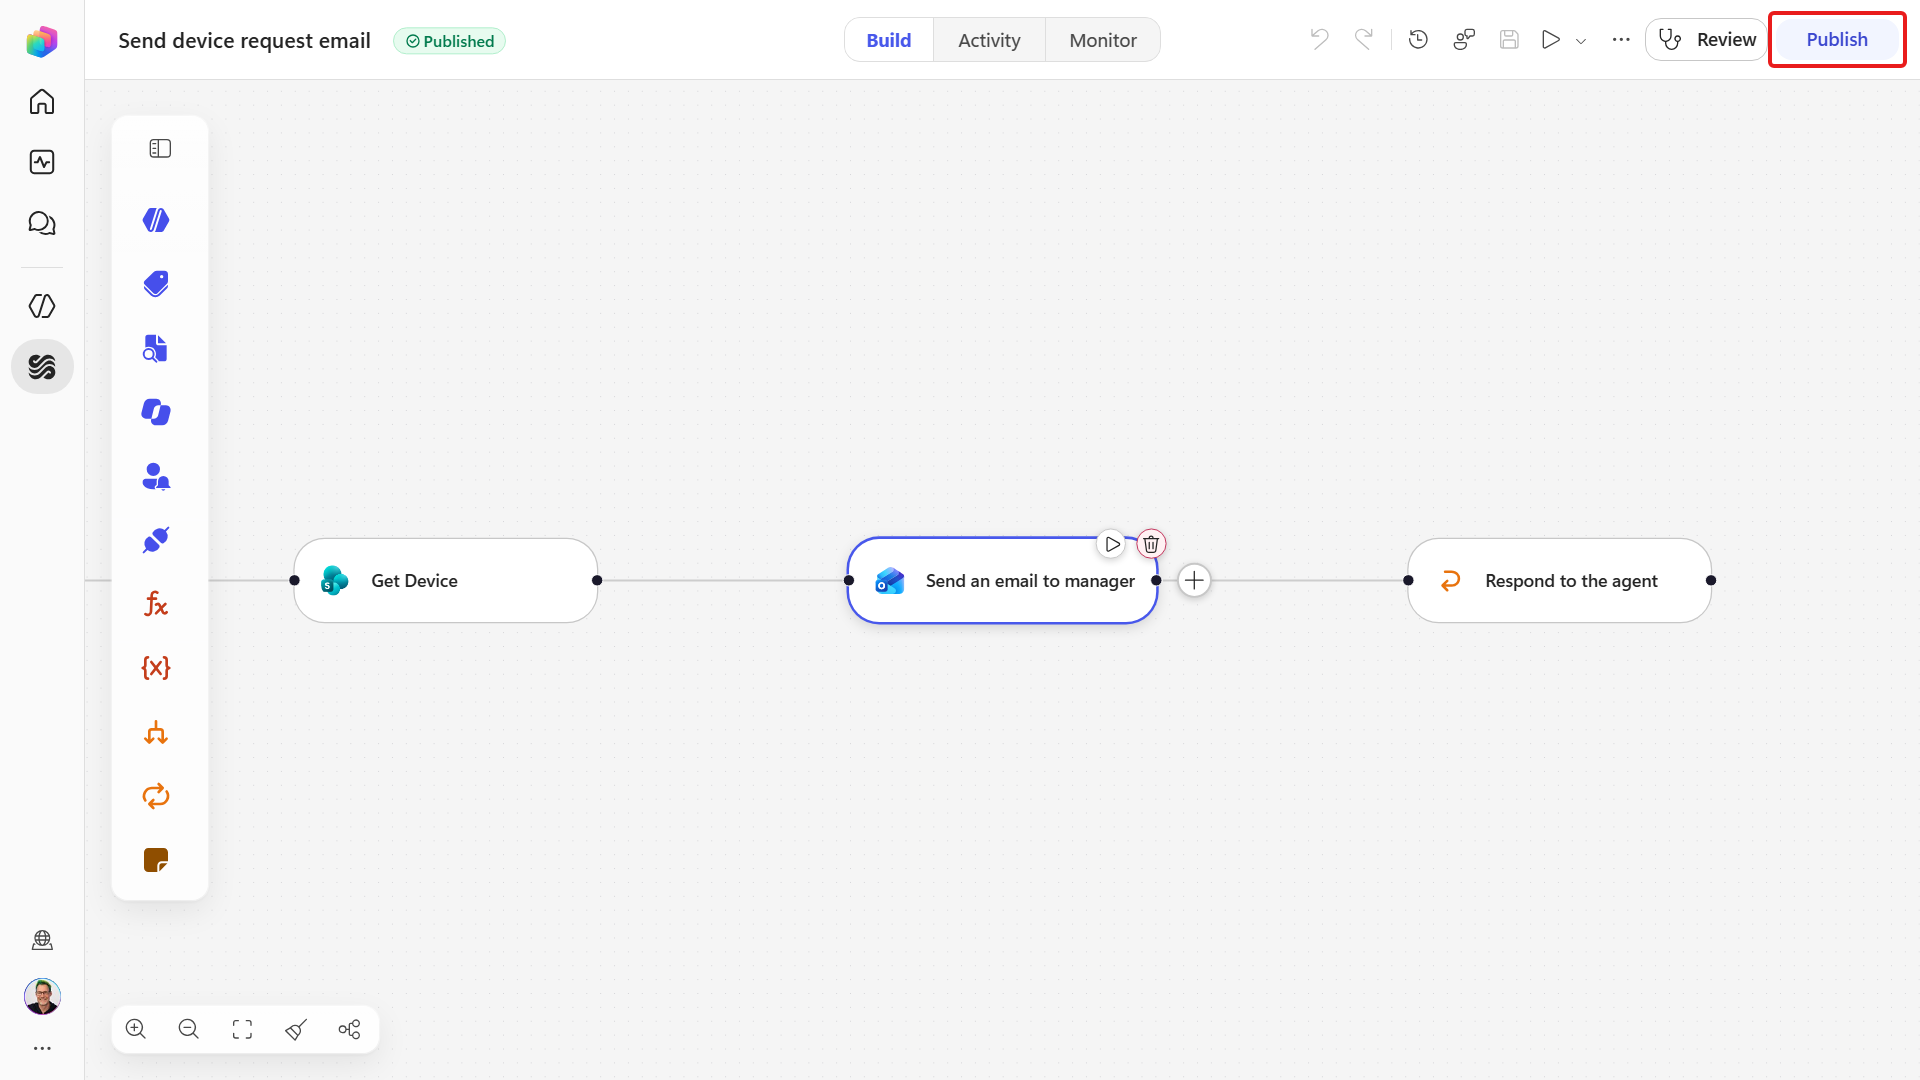
The workflow can now be saved and published. Select the Save icon on the upper-right.
When the confirmation displays that the workflow has been saved, select Publish.
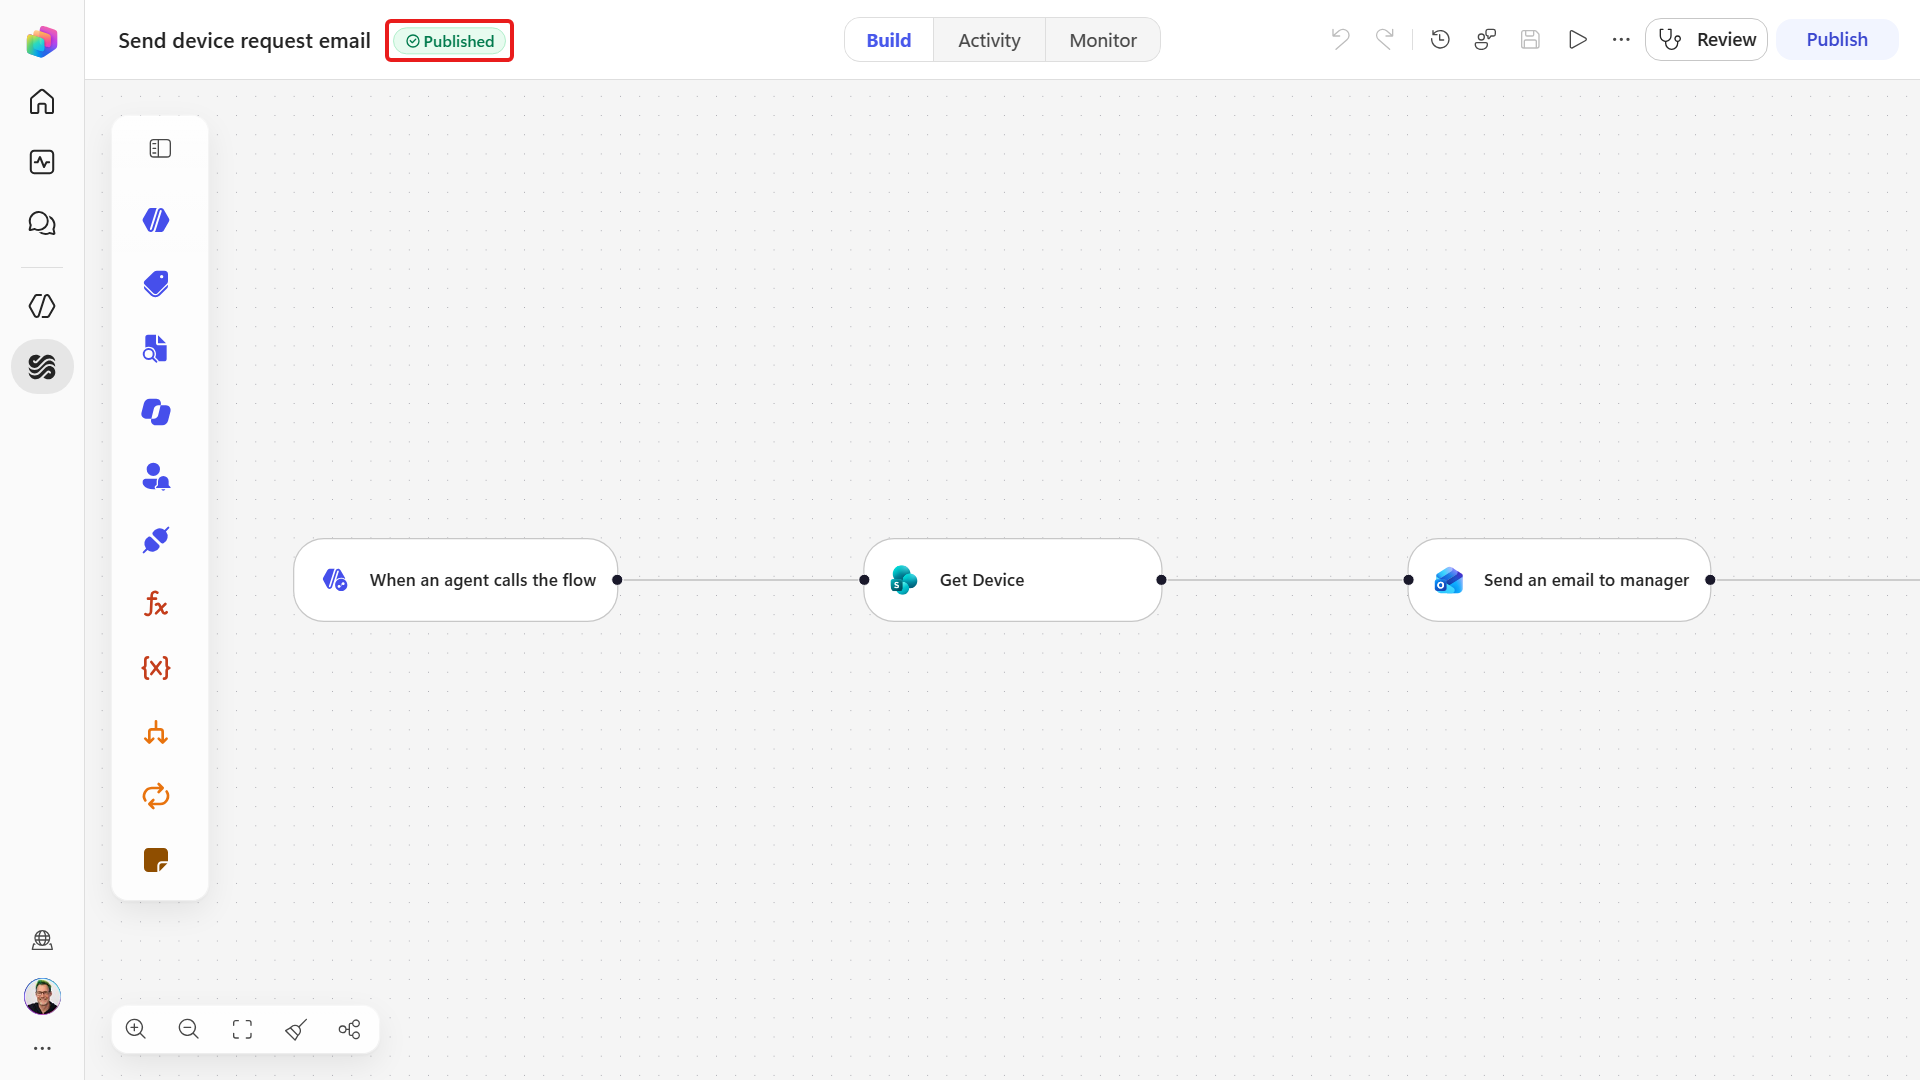
The workflow will now display a status of Published.
You've created and published your first workflow. Next, add it to the agent as a tool.
7.2 Add the workflow to your agent
You can now add the workflow to your Contoso IT Concierge agent.
In the left navigation, select Agents, then open the Contoso IT Concierge agent.
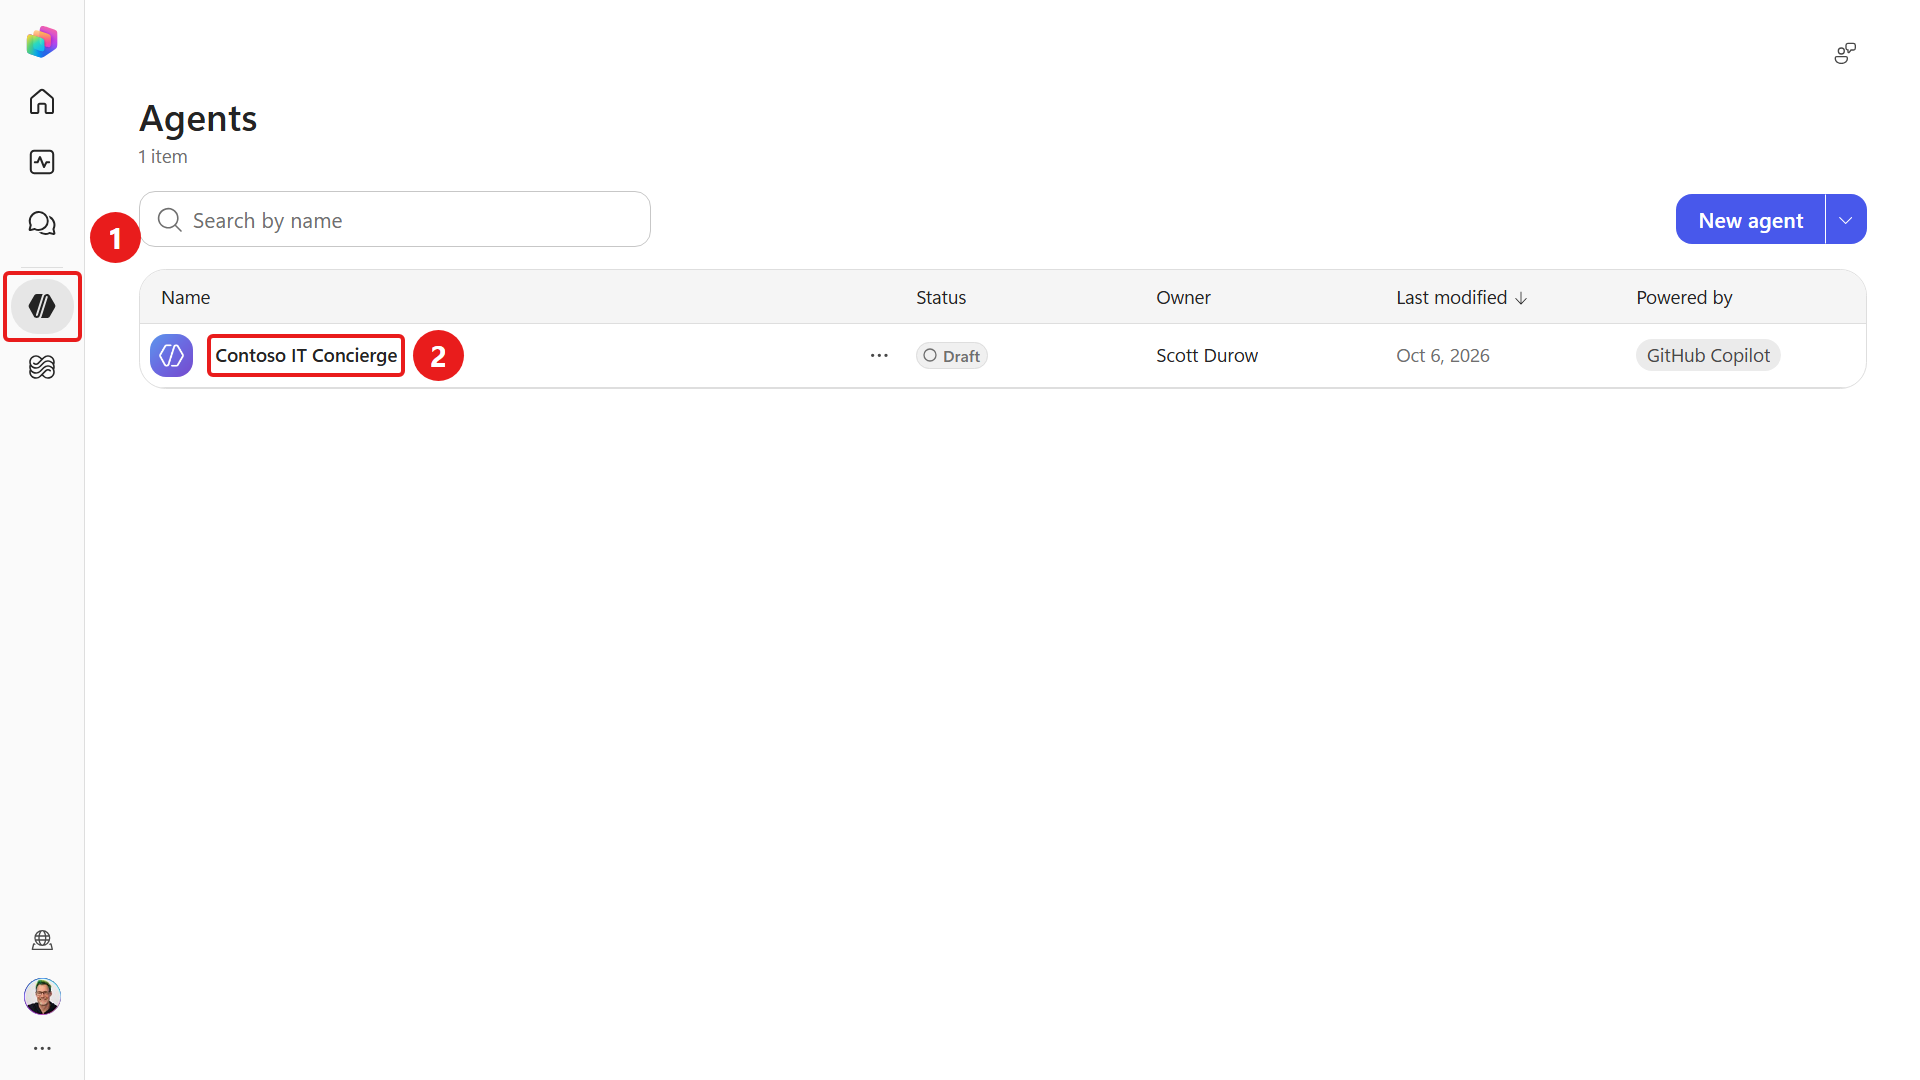
In the Build view, in the Tools section, select the + icon.
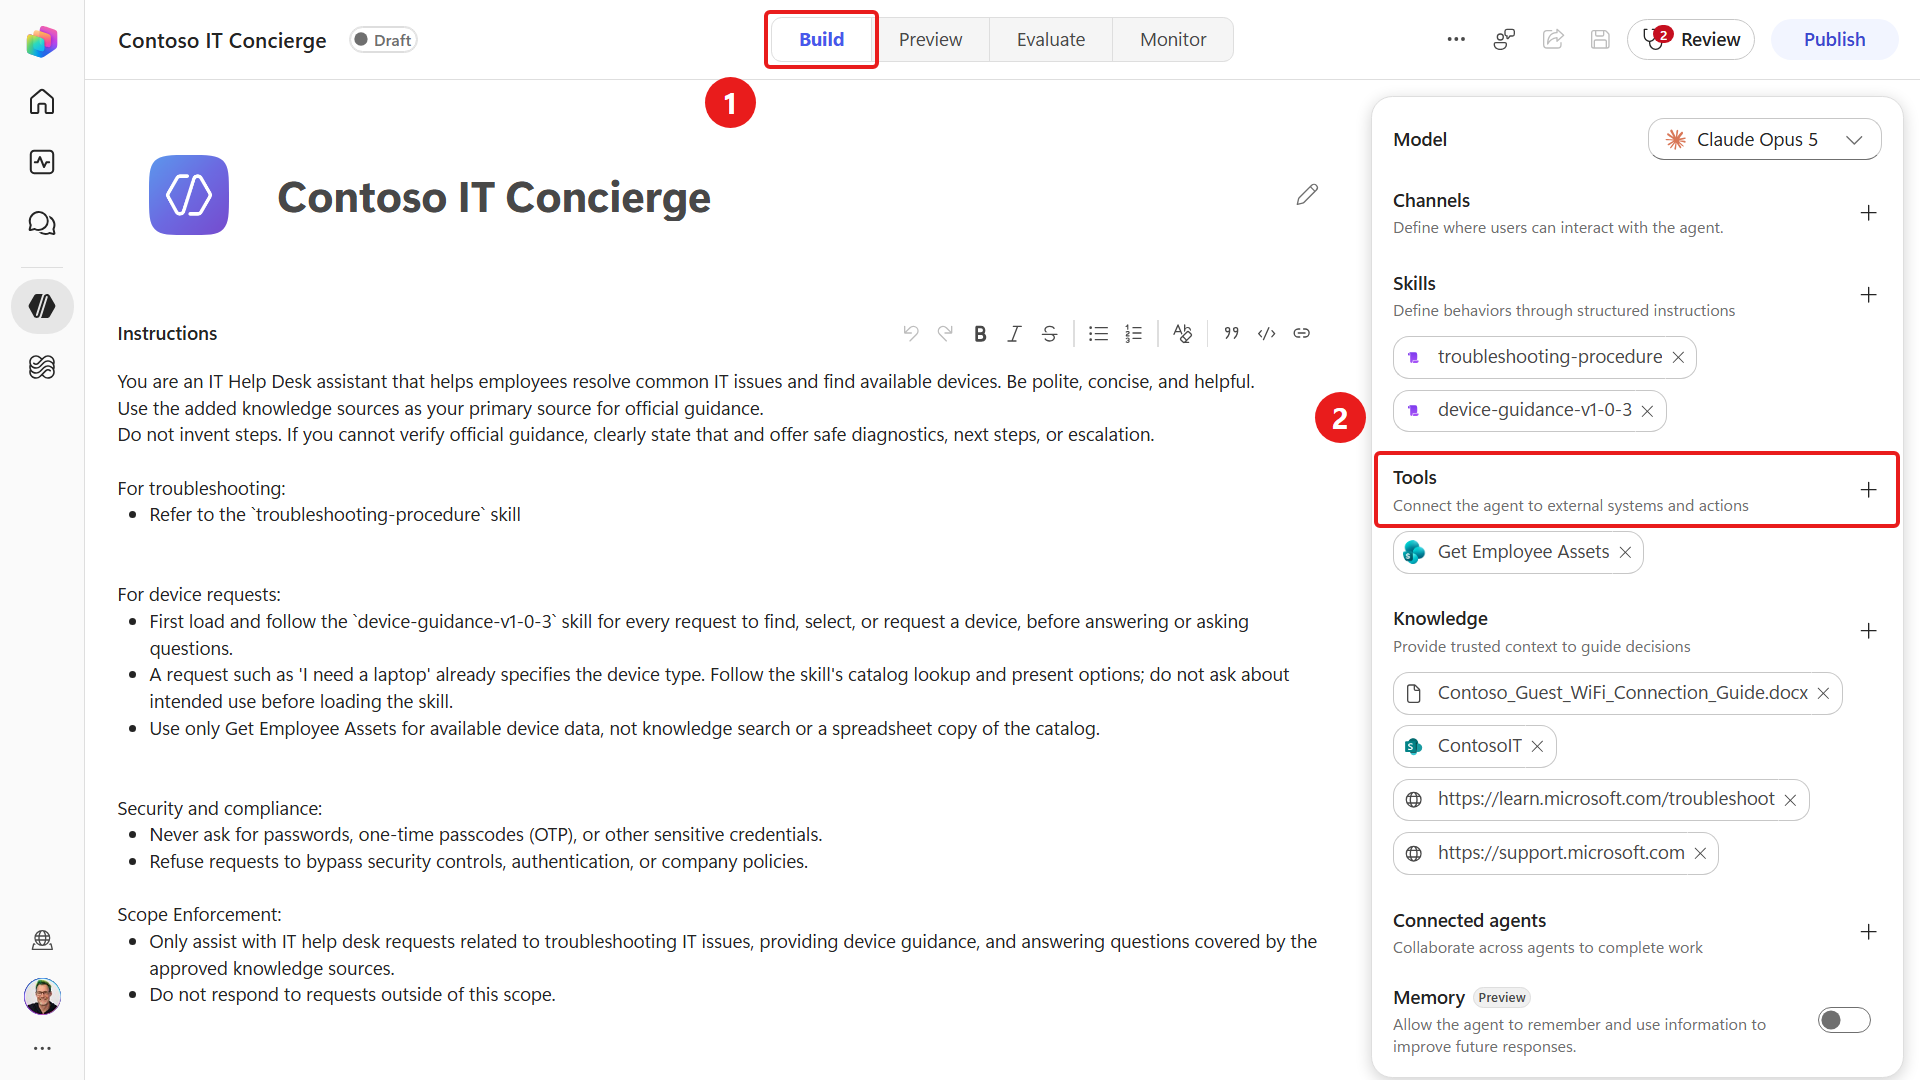
The Add a tool dialog loads. Select the Workflows pill and select the Send device request email workflow.
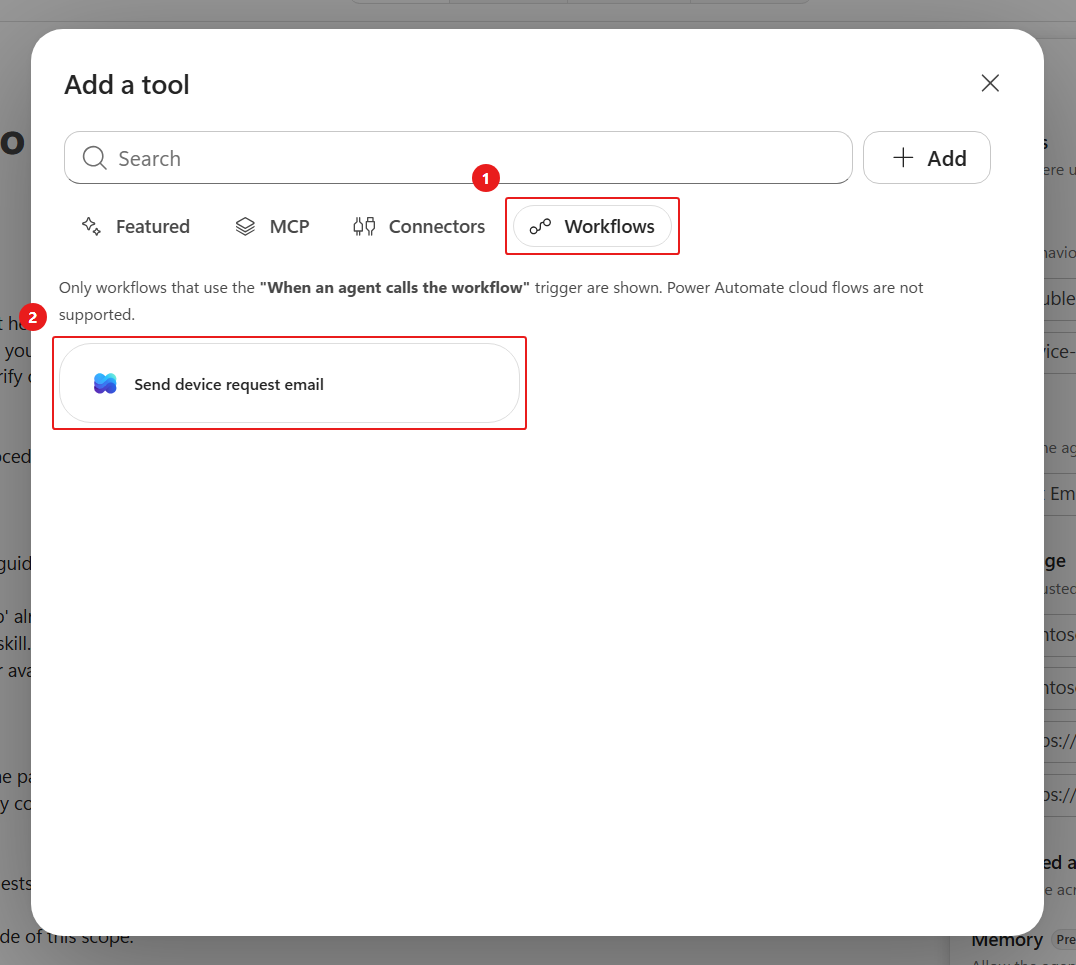
The workflow is now available to the agent as a tool.
7.3 Update device request procedure skill and agent instructions
With the workflow added, update the device request skill and agent instructions to define when and how the agent should invoke it.
Select the device-guidance-v1-0-3 skill.
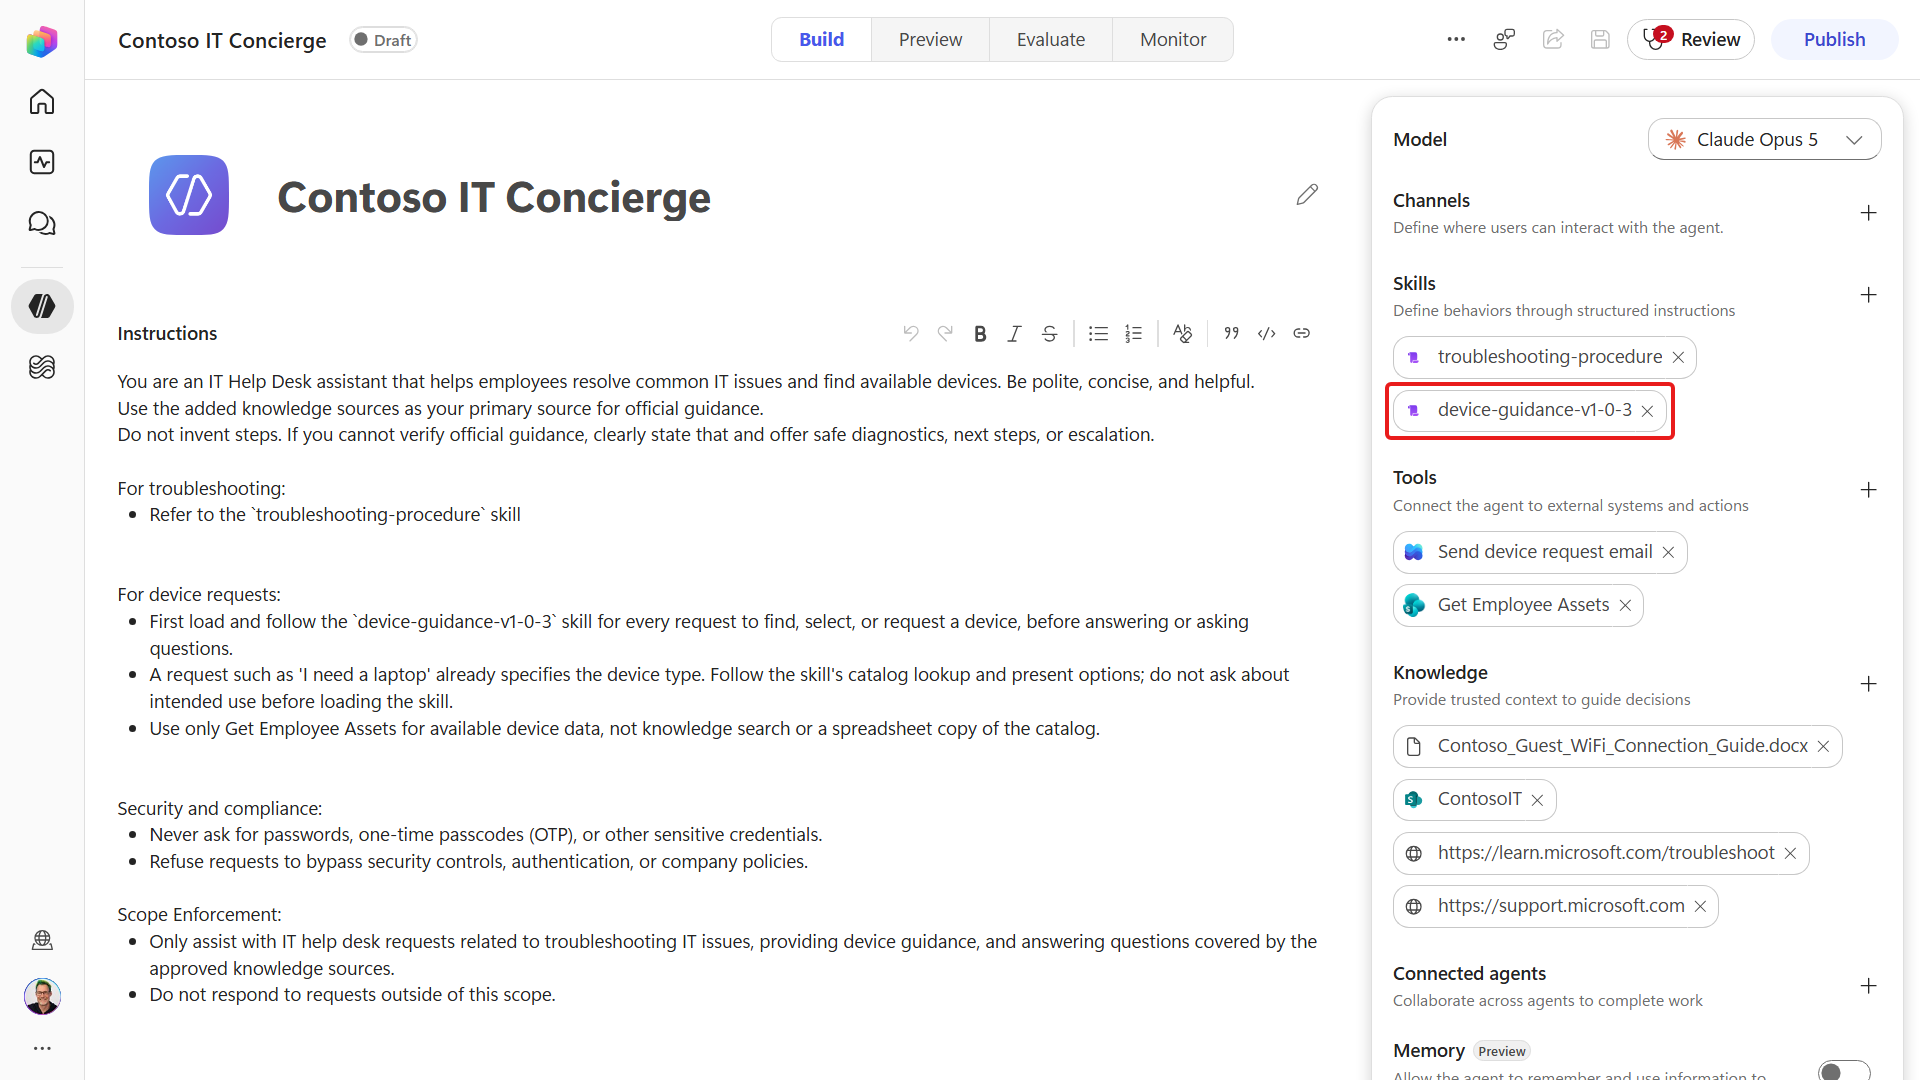
Select the ellipsis icon and select Replace.
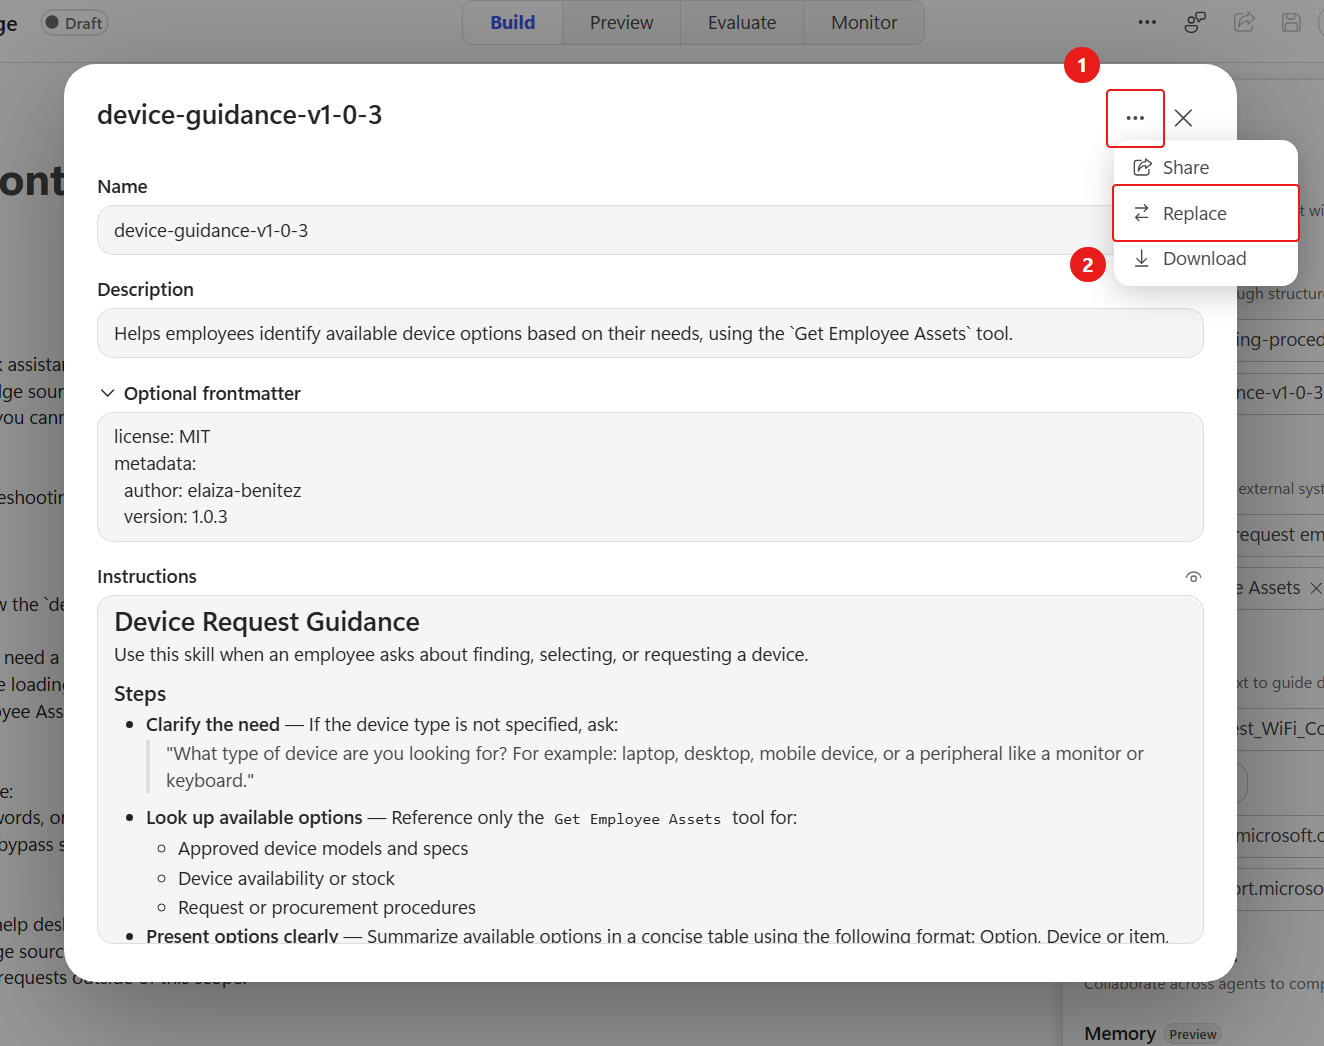
Download the skill package using the button below.
Download
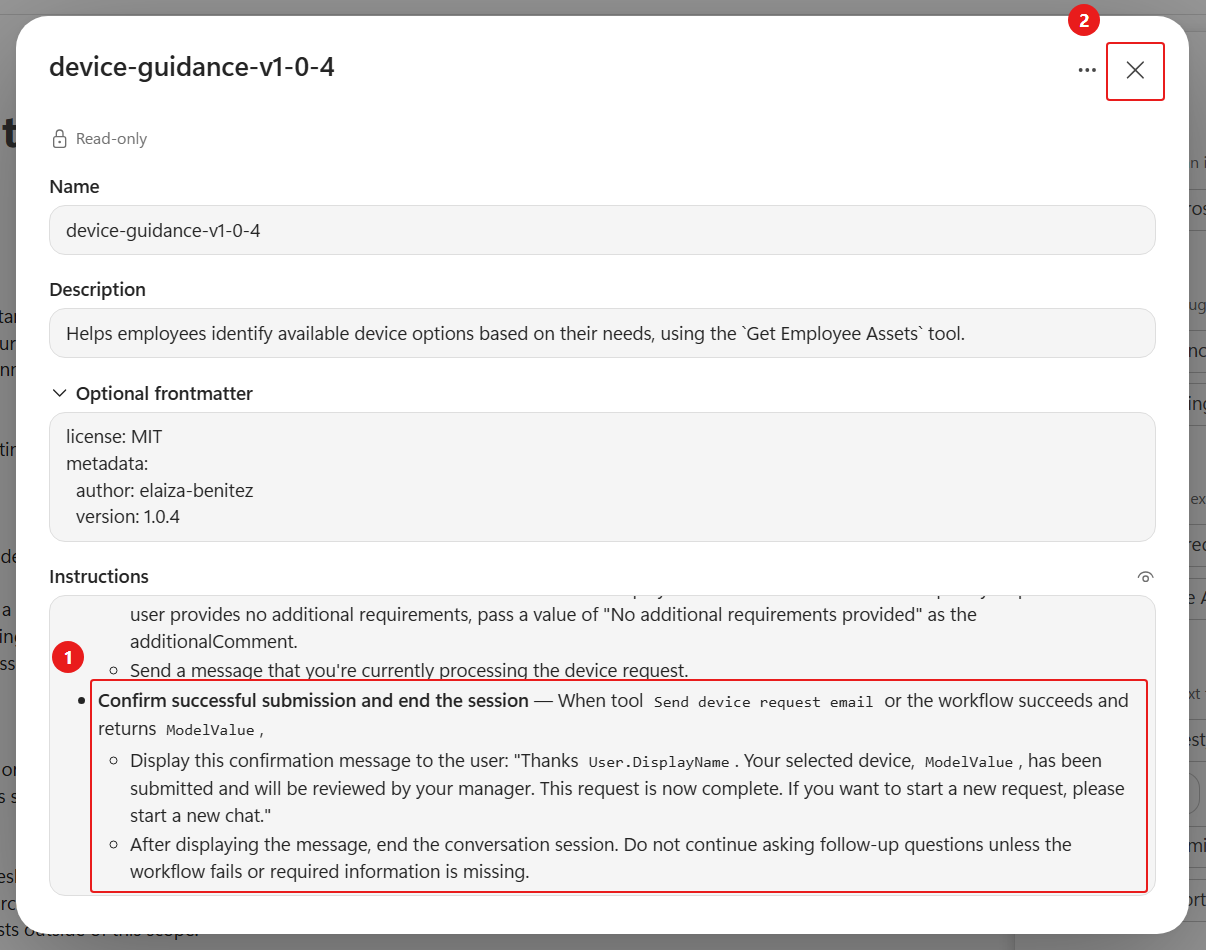
device-guidance-v1-0-4.zip, extract it, then upload theSKILL.mdfile to the agent.Review the updated skill instructions.
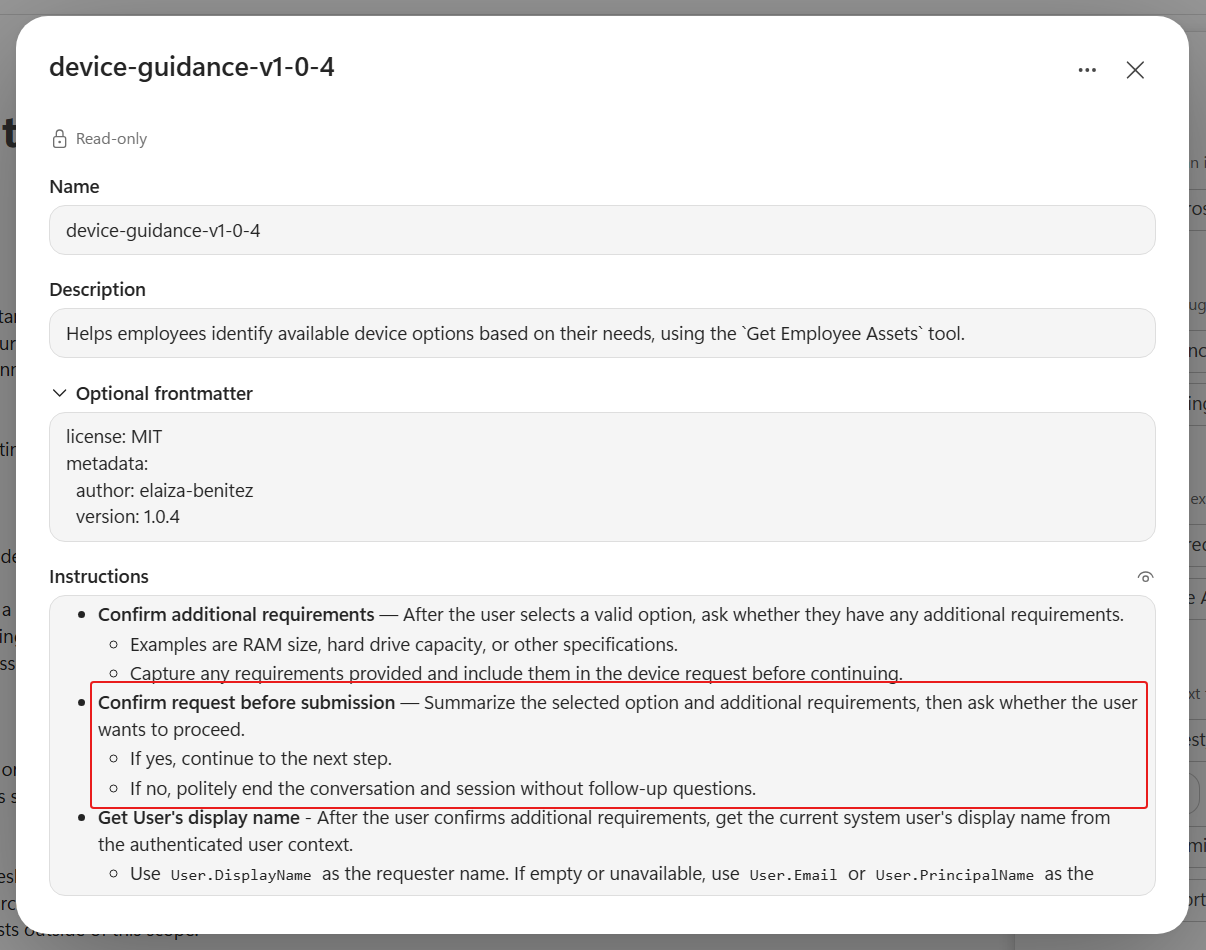
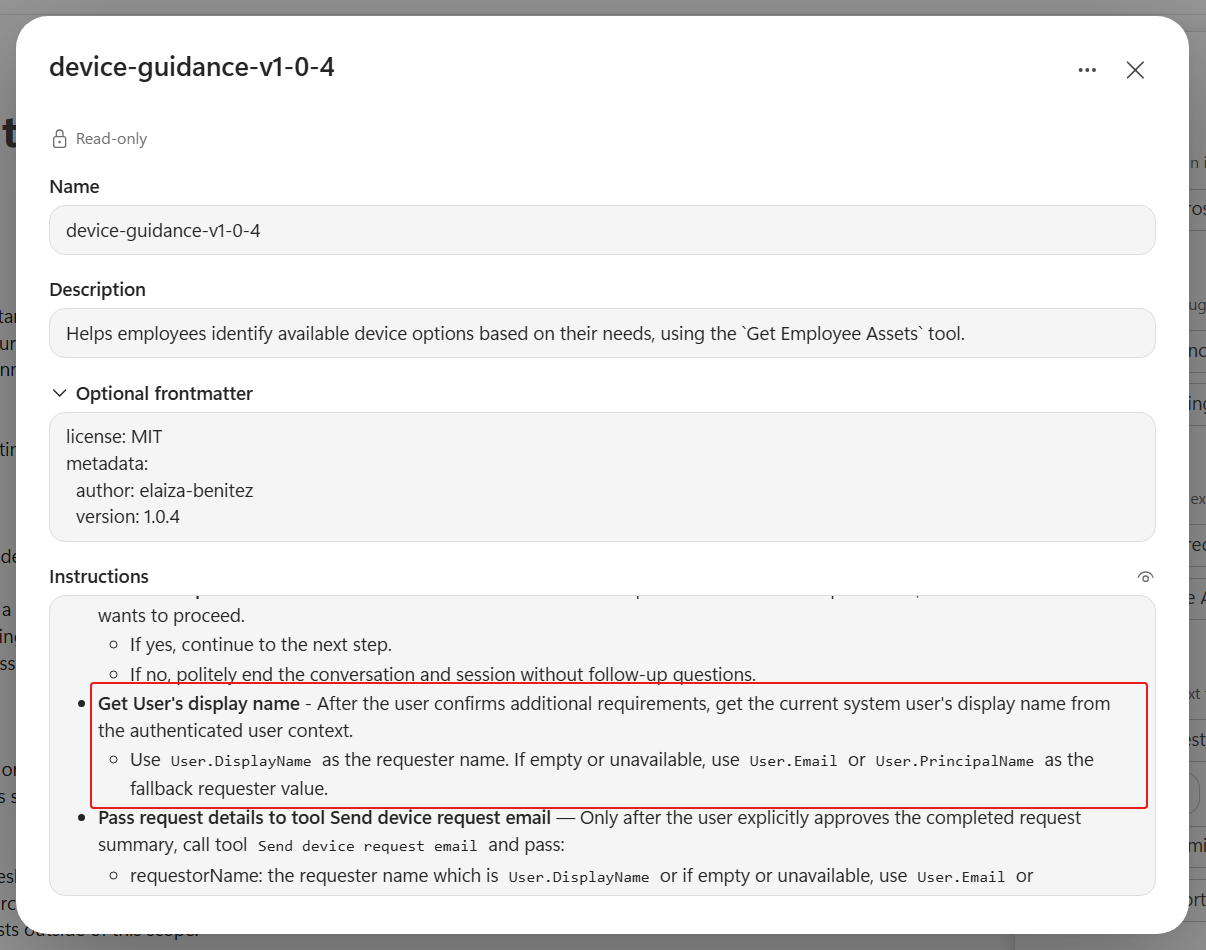
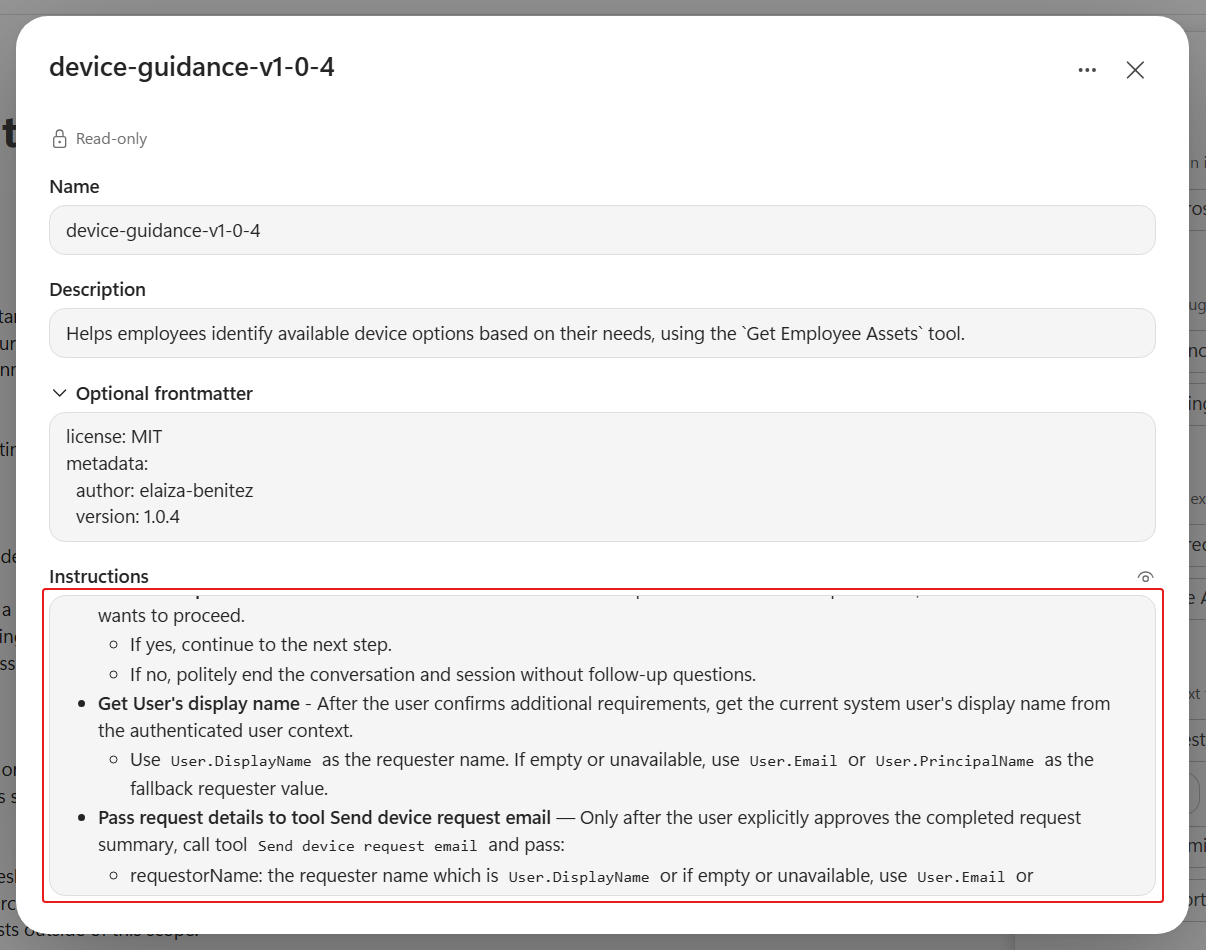
The updated skill instructs the agent to:
- confirm that the user wants to proceed after collecting any additional requirements
- retrieve the authenticated user's details
- pass the device's SharePoint item ID, the additional requirements, and the user's name to the workflow
- confirm completion by referencing the device model returned by the workflow and end the session
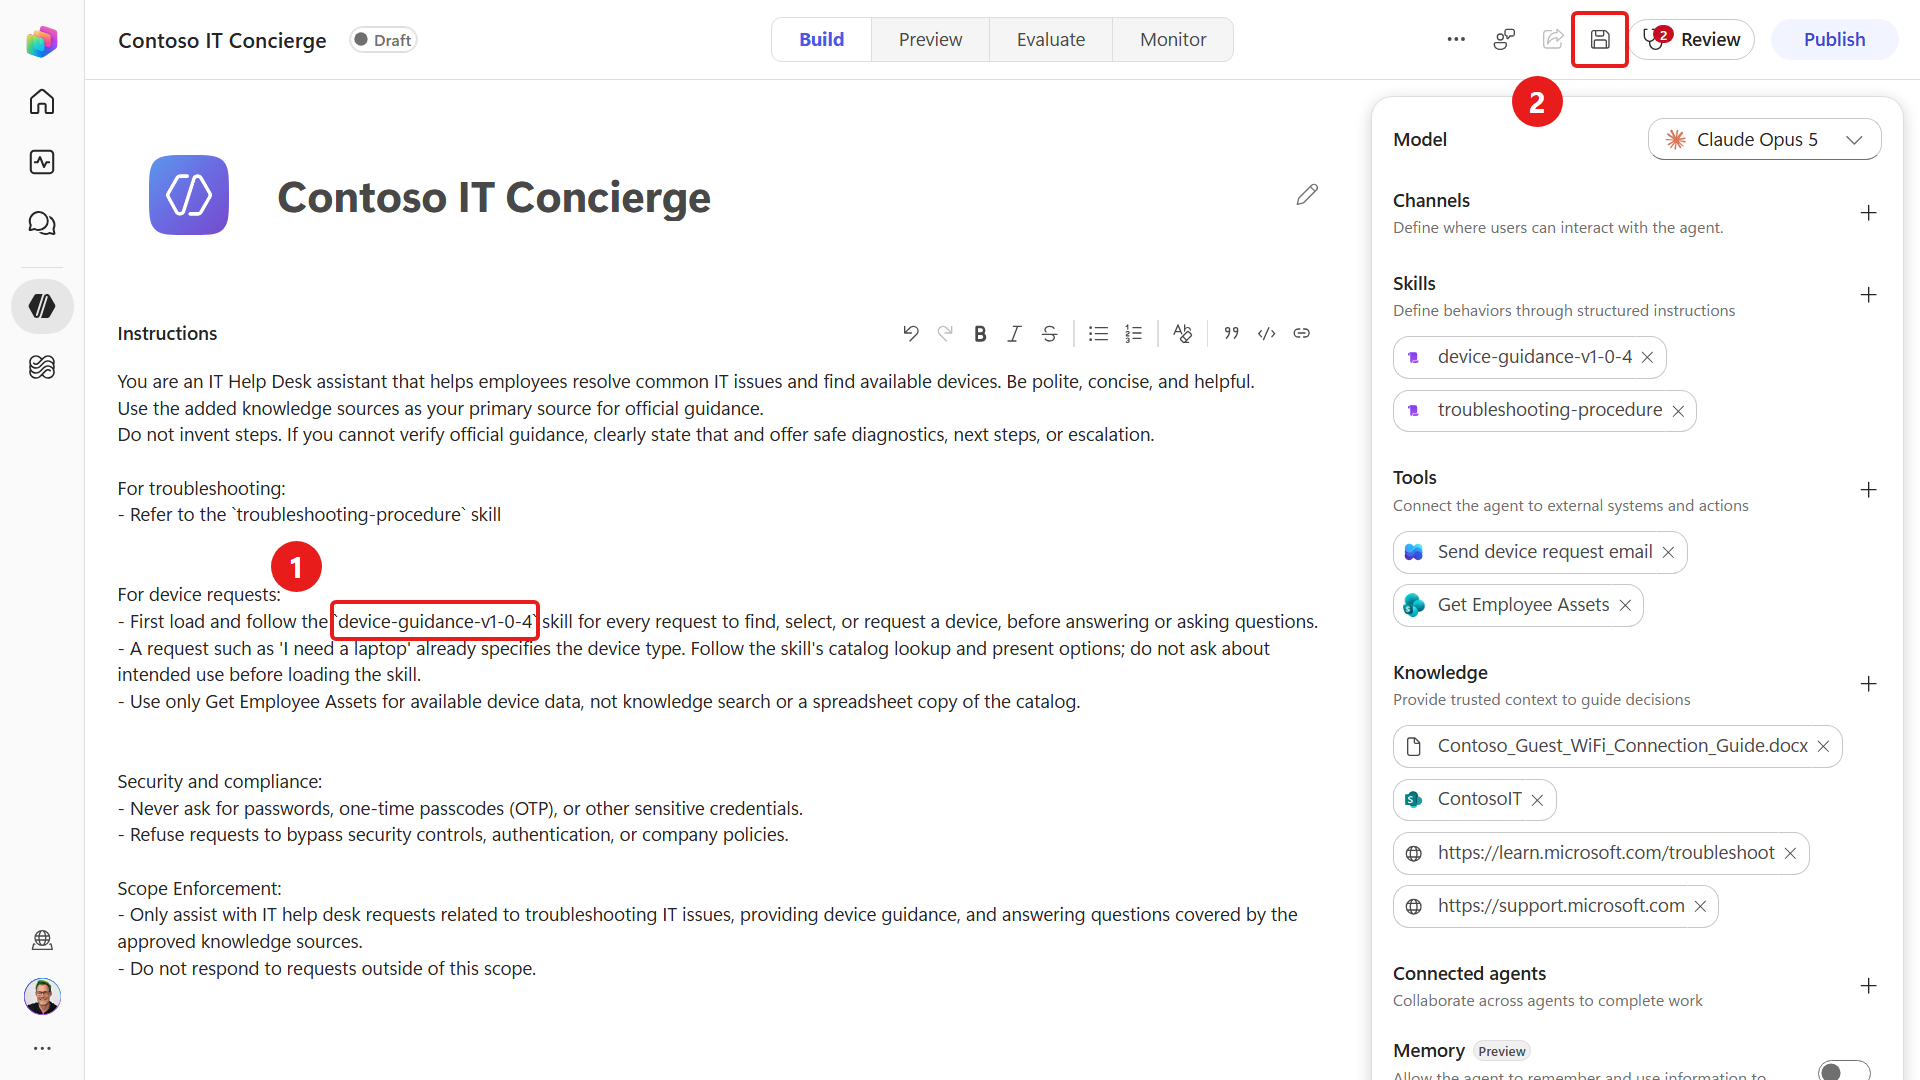
Next, update the agent instructions to reference the updated skill. Replace the bullet point under the
For device requests:heading with the following text.textRefer to the `device-guidance-v1-0-4` skillSave the agent. You can test the updated skill in Preview without publishing.
The agent and workflow are now ready for end-to-end testing.
7.4 Test several scenarios
You're now going to run through the following test cases:
- Test Case 1: User selects a device and provides additional requirements
- Test Case 2: User selects a device and provides no additional requirements
- Test Case 3: User does not proceed with selecting a device
For each independent scenario, verify the skill in the new conversation before asking for a device. Send this availability-only request:
Load only the device-guidance-v1-0-4 skill and confirm its name and purpose. Do not run its procedure, read or change business data, create files, send messages, or call other tools. If it is unavailable, say so without using a substitute.Confirm the exact skill in the trace, then keep that conversation for the scenario without reloading or reopening Preview. A check in a previous chat does not prove readiness in a new one. The device lookup must use Get Employee Assets; a knowledge-search or spreadsheet answer is not a substitute. These are explicit skill-invocation tests, not proof of automatic skill discovery.
NOTE
Naming device-guidance-v1-0-4 explicitly is a Preview verification technique that proves the intended version and tool path were used. End users can ask for a device naturally without knowing or entering the skill name or version.
Select Preview, start a new chat, and complete the skill-readiness check above.
Copy and paste the following text and submit it to the agent.
textUse the device-guidance-v1-0-4 skill. I need a new laptop.When the agent asks which device you want to request, enter the following text.
Copy and paste the following text and submit it to the agent.
textAWhen the agent asks for additional requirements, enter the following text or provide your own requirement.
text16GB of RAMAfter the agent summarizes the request and asks for confirmation, enter the following text.
Copy and paste the following text and submit it to the agent.
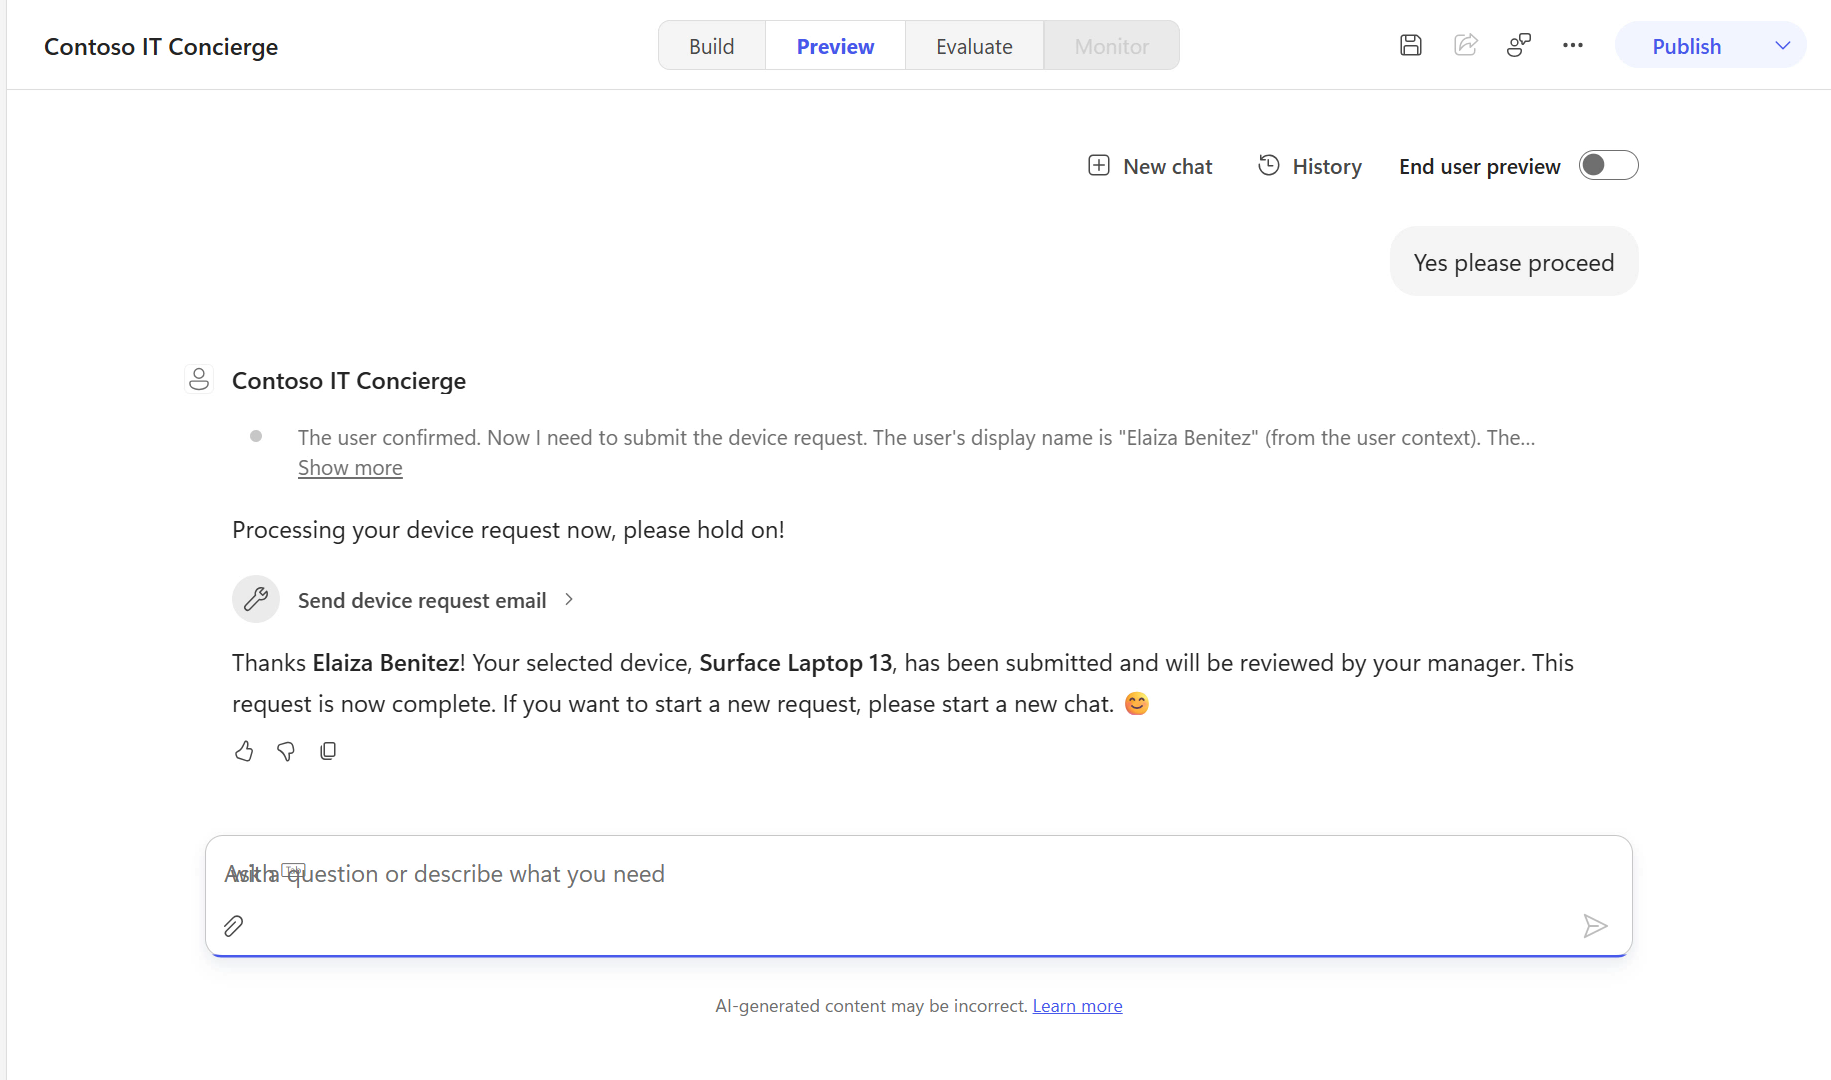
textYes please proceed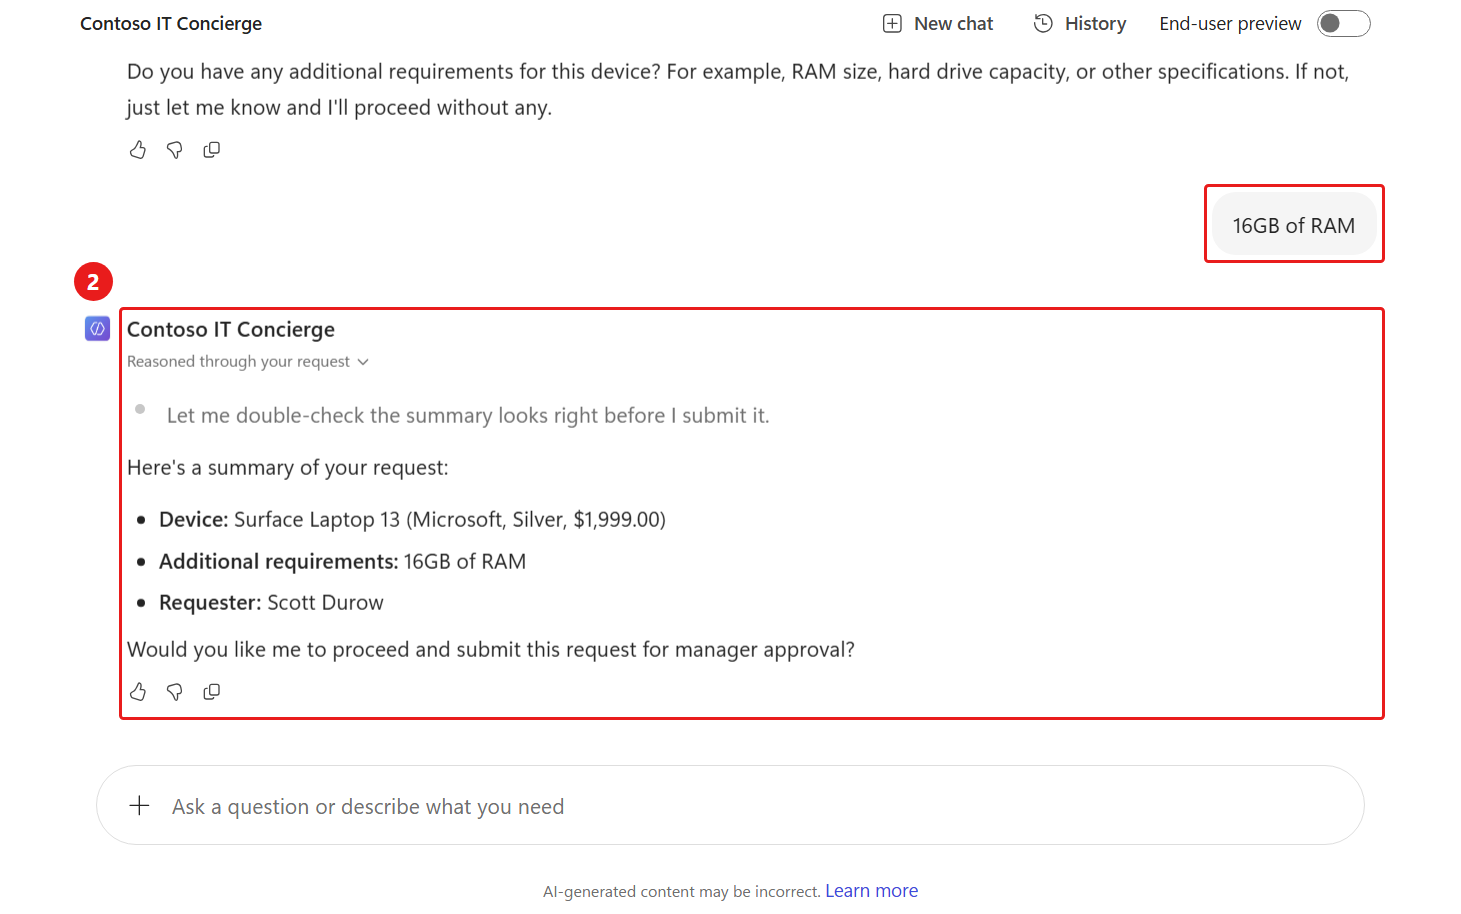
The agent invokes the workflow. When it completes successfully, the agent confirms the request, includes the selected device model, explains that the manager will review it, and ends the session. This behavior follows the updated skill instructions.
Review the email sent to your address. Its subject, sensitivity label, and body should match the values configured earlier in the workflow’s Send an email (V2) action. The email body should also display the dynamic content values retrieved from the trigger and the Get item action.
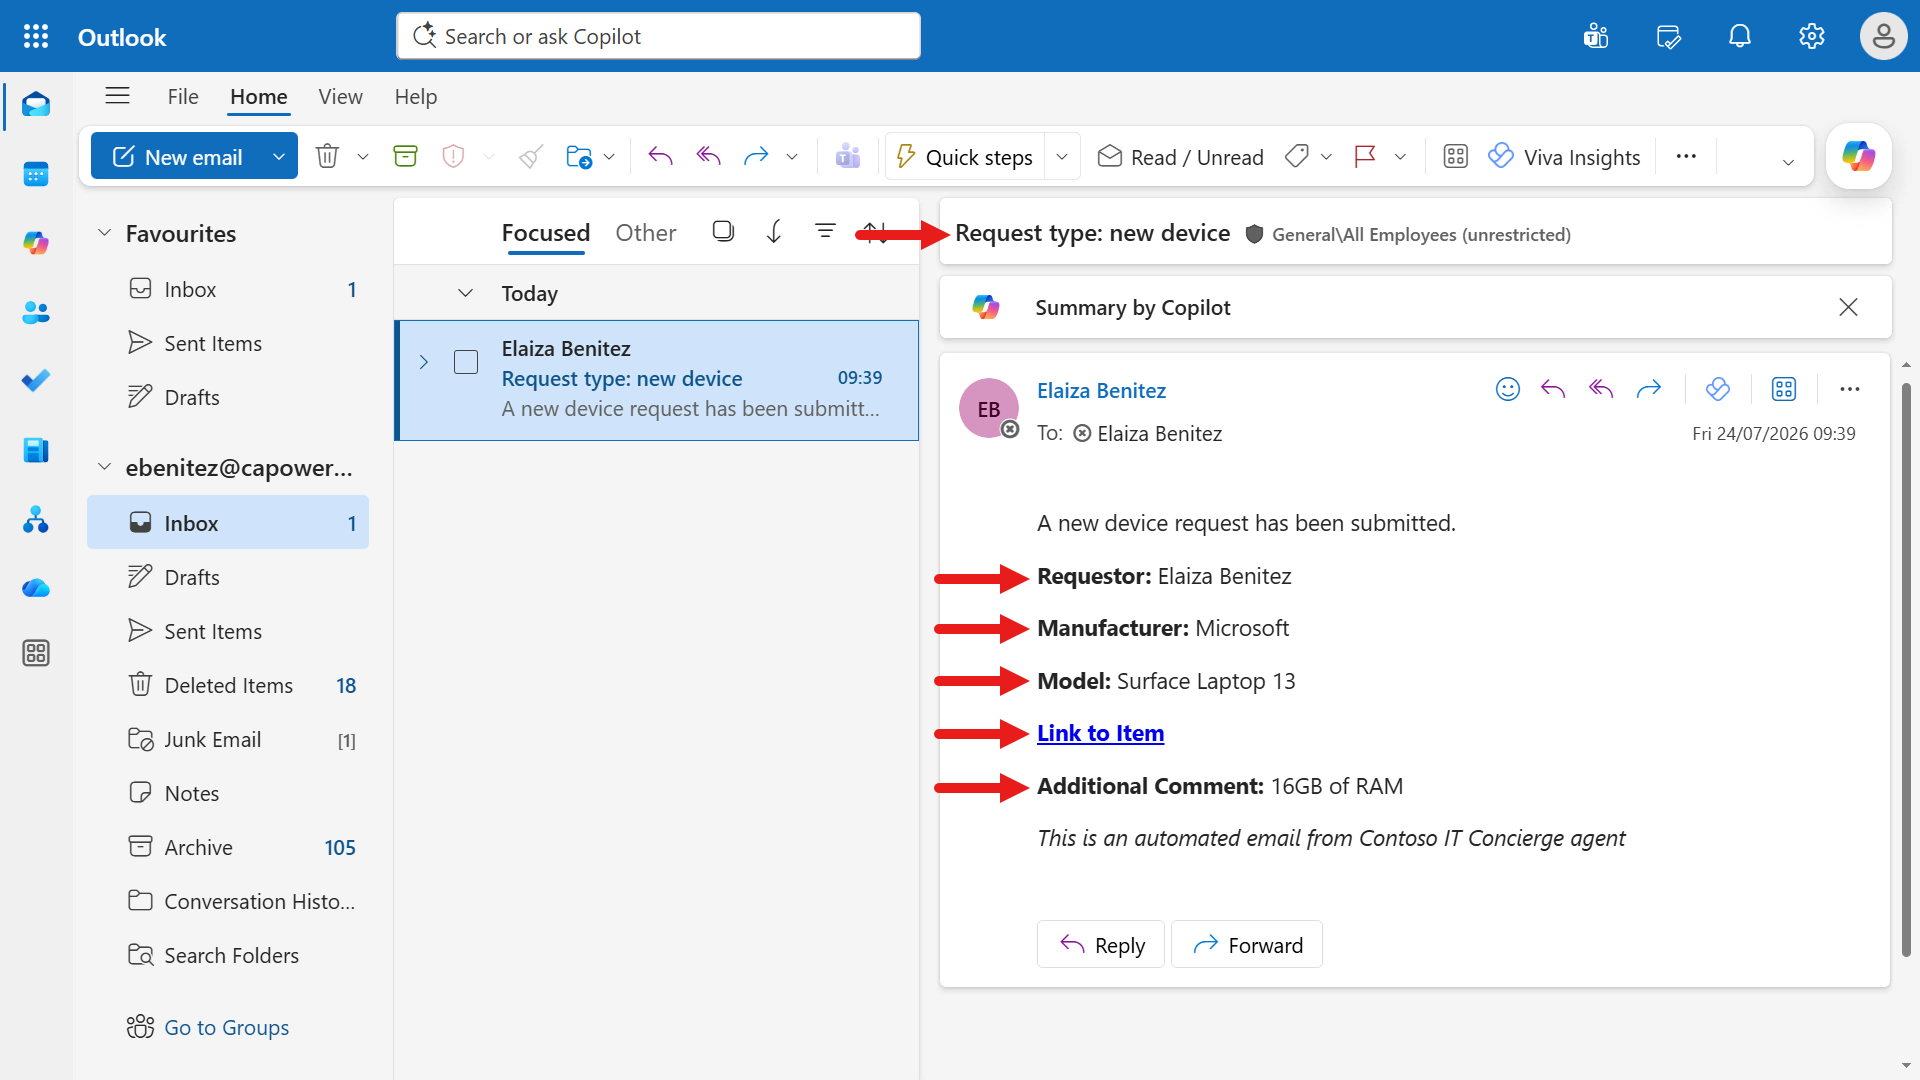
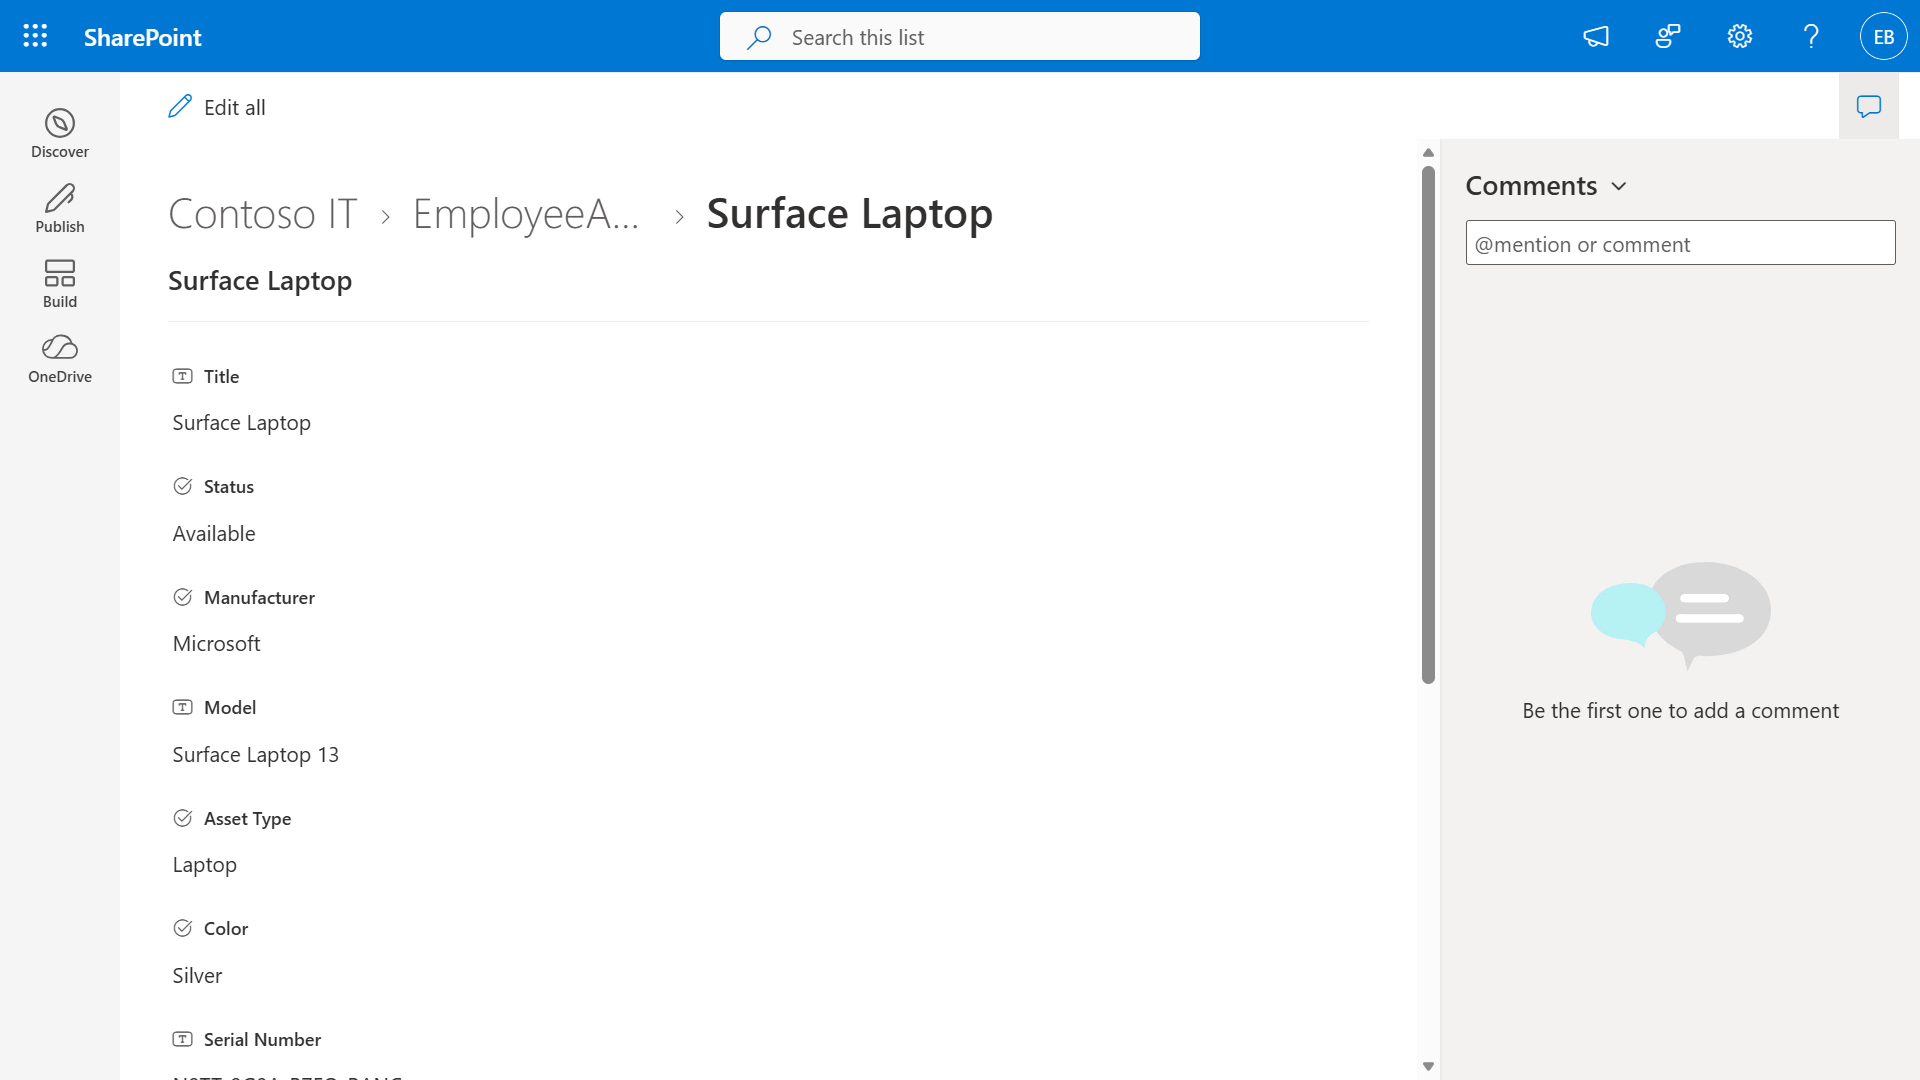
Select the Link to Item hyperlink. The SharePoint list item opens in a new browser tab.
In Preview, start a new chat to test a request with no additional requirements.
Start a new chat. Copy and paste the following text and submit it to the agent.
textUse the device-guidance-v1-0-4 skill. I need a new laptop.Next, copy and paste the following text for the device request and submit it to the agent.
textBCopy and paste the following text and submit it to the agent for additional requirements.
textNone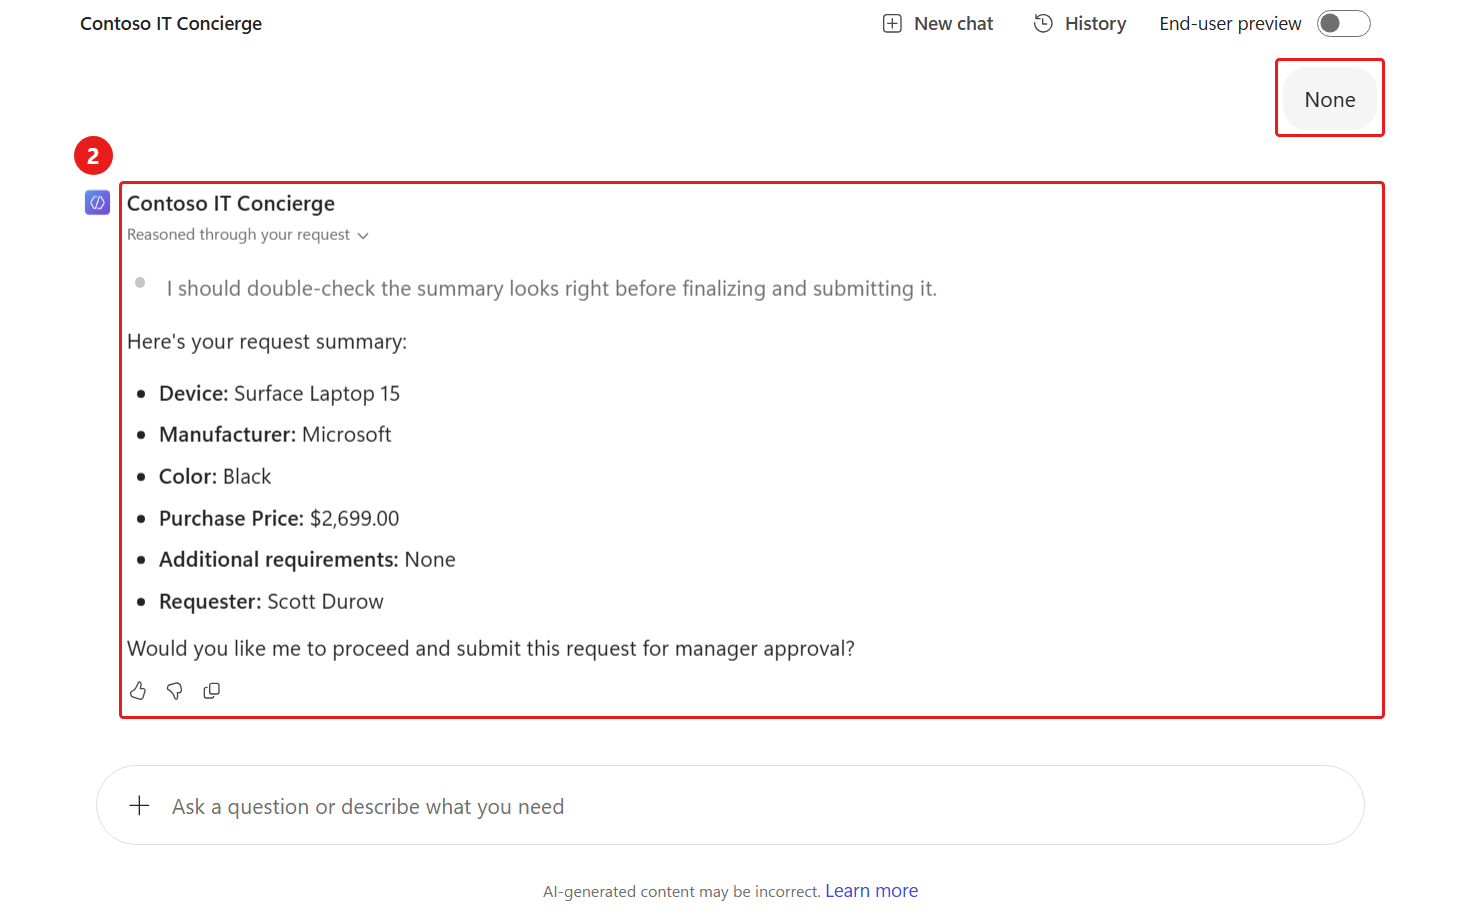
Review the request summary. When the agent asks whether it should proceed, copy and paste the following confirmation:
textYes please proceedThe agent invokes the workflow and confirms the completed request, just as it did in the first test case.
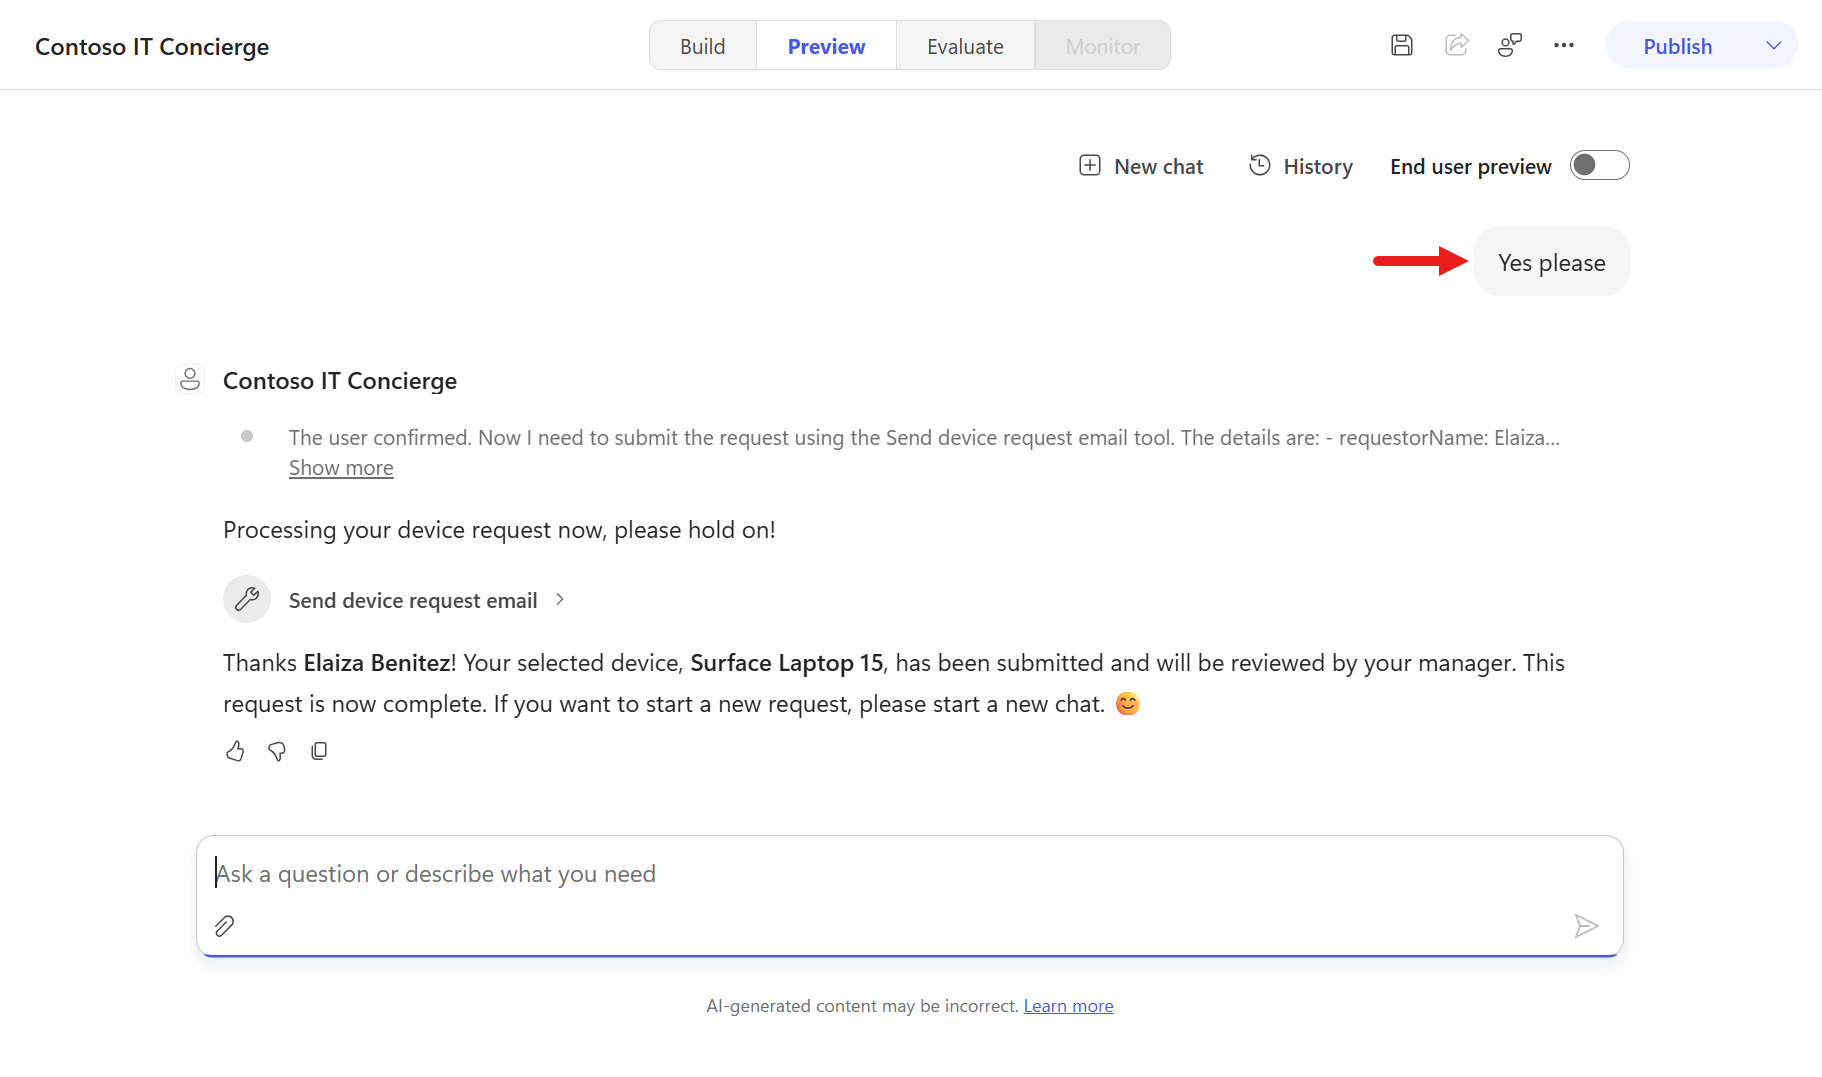
Review the email. Additional Comment displays
No additional requirements provided, as defined in the updated skill instructions.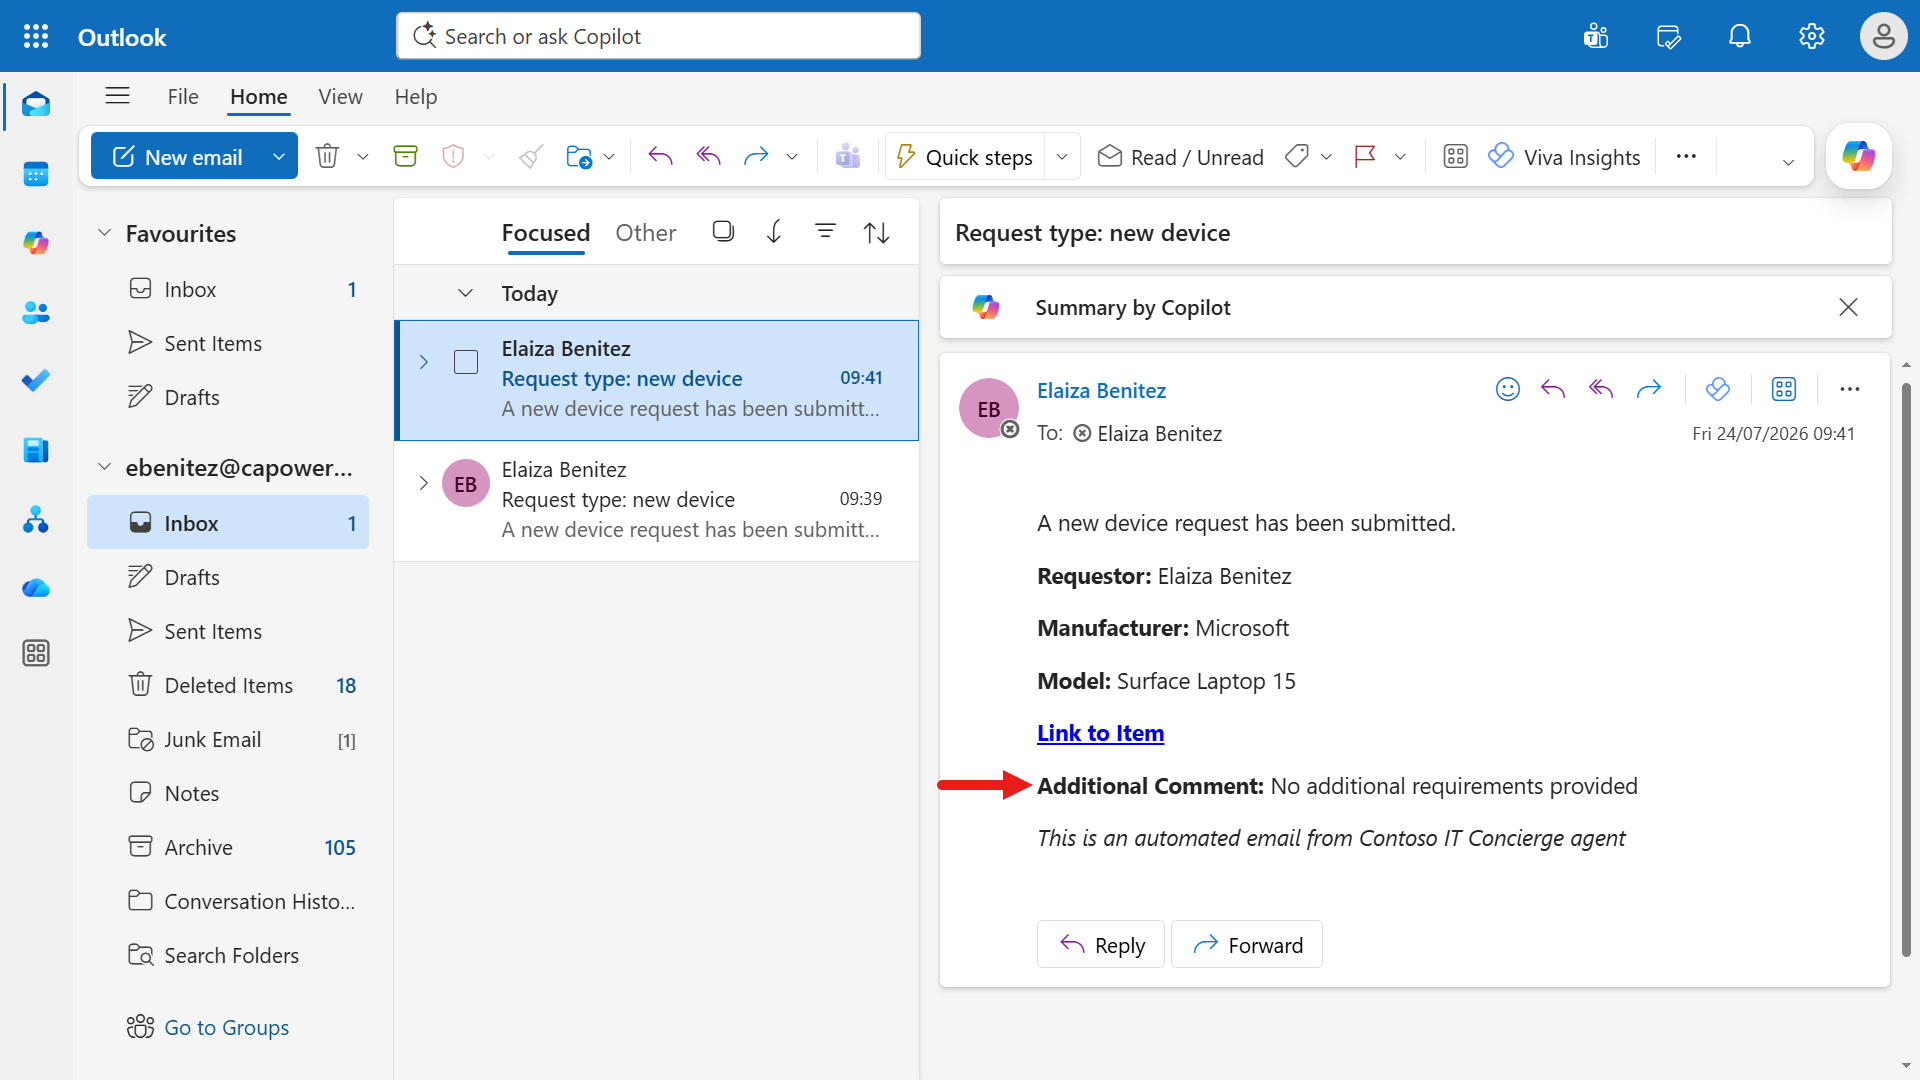
For the final test case, start a new chat in Preview. Enter the following text.
textUse the device-guidance-v1-0-4 skill. I need a new laptop.Next, copy and paste the following text for the device request and submit it to the agent.
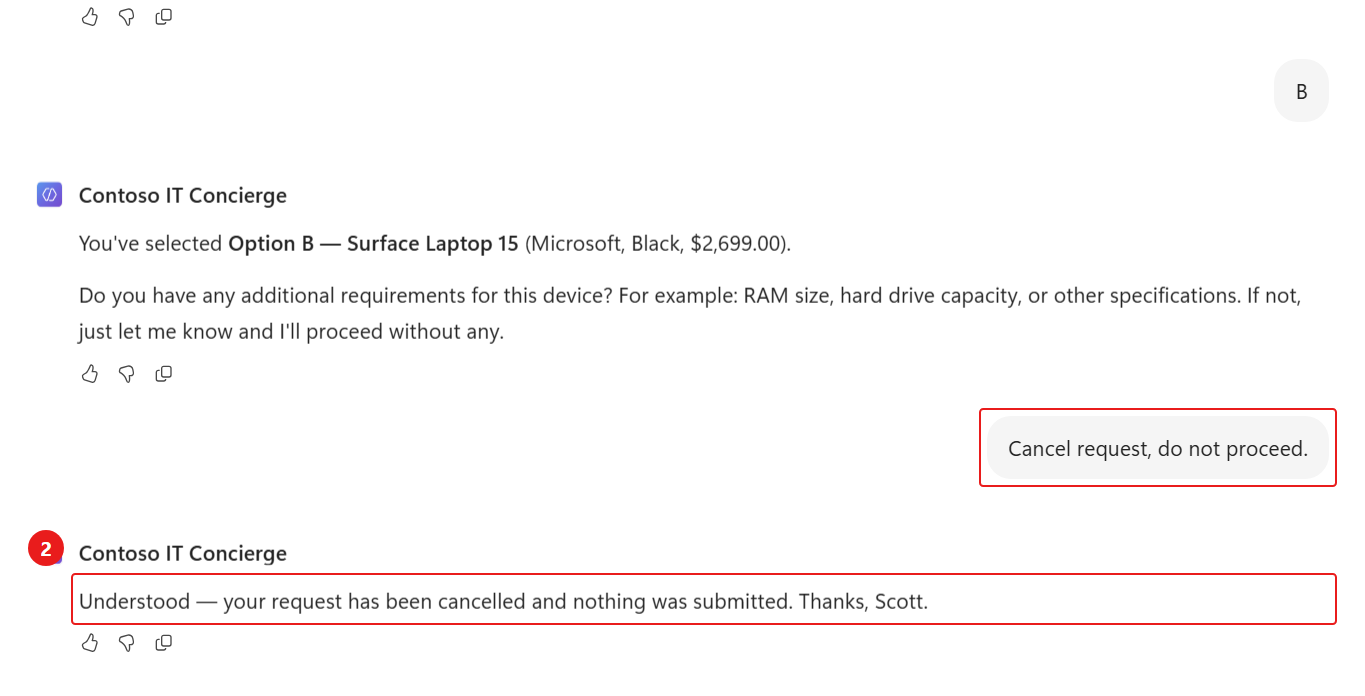
textBThis time, cancel the request by entering the following text.
textCancel request, do not proceed.The agent cancels the request and ends the session, as defined in the updated skill instructions.
✅ Mission Complete
Mission accomplished, Recruit! You created and published a device request workflow that retrieves device details from SharePoint, sends an email with dynamic content, and returns the selected device model to your agent.
You can now:
✅ Create and publish a workflow: Build a repeatable device request process with SharePoint and email actions.
✅ Return workflow results to an agent: Pass the selected device model back to the calling agent.
✅ Add a workflow as a tool: Make deterministic automation available to the agent's orchestrator.
✅ Test workflow paths: Validate requests with additional requirements, without additional requirements, and with cancellation.
⏭️ Move to Publish your agent mission
📚 Tactical Resources
🔗 Add a workflow as a tool to an agent
🔗 List of functions in the reference guide