
🚨 Mission 09: Human Oversight and Handling Alternative Flows
🎯 Mission Brief
Welcome back, Agent. In the previous two missions you built a workflow that files resumes, asks the Hiring Agent to match them, and notifies recruiters in Teams. It works, but it cannot yet ask for help or report a failure.
In this mission you'll add human review for uncertain decisions, then make failed runs visible with a try/catch pattern that raises an alert.
🔎 Objectives
In this mission, you'll learn:
- How to pause for human review, branch on the answer, and end inactive routes cleanly
- How to verify that the role-matching agent asks for help only when its evidence is ambiguous
- How to catch failures with a Scope and Run after condition and raise an alert
- How to break a step on purpose and read what the run history tells you
🧠 Handling alternate flows
Everything you have built so far is the happy path, where the mail arrives carrying a readable PDF and the agent has enough evidence to match it to a role. Real workflows often run off that path.
Handling those alternate flows takes two different techniques, depending on which kind of logic went wrong:
| Deterministic logic | Probabilistic logic |
|---|---|
| Writing a row, uploading a file, posting a card | Classifying an email, matching a resume to a role |
| Retry the transient fault, mark the run failed, then alert a human | Ask a human before acting when the evidence is ambiguous |
| You test it by breaking it on purpose | You test it by feeding it awkward inputs |
This mission builds a route to handle each of these alternative flows to ensure that the hiring data consistency is preserved.
Covered in Recruit
Human review appears in the node palette in Recruit Mission 07: Automate with Workflows but is never configured there. This mission sets one up, decides what it asks, and routes what comes back.
🧪 Lab 09 - Handle the alternate flows
Prerequisites
Before you start this lab you need:
- The Autonomous Resume Intake workflow from Missions 07 and 08, published and filing resumes successfully. Everything here is added on top of it.
- The Hiring Hub app and the Resumes, Job Applications and Tasks tables in Dataverse
- A test mailbox you control - never a shared or production inbox
- The test resume PDFs you used in Mission 08 (for example
AVERY EXAMPLE (FICTITIOUS).pdf)
Your workflow is still watching the mailbox
If you left the workflow Published at the end of Mission 08, it is still polling that mailbox and will run on any email matching its Subject Filter. This mission needs those live runs, so leave it on - but check that the mailbox is a test one you control.
The workflow you carried in from Mission 08 needs a defined response to uncertainty and runtime failure before it can watch a mailbox unattended. Let's add both paths and then break a step on purpose to prove the failure path works.
9.1 Ask a human when the email is ambiguous
We will now handle the emails that do not route cleanly, where the Classify node routes to Other, the resume is unreadable, or the Hiring Agent can't confidently pick a role. In each of these cases we will pause and ask a person with a Human review node.
You end up with two ways to involve a human, and the difference is who decides that a human is needed:
| Human review node (this lab) | Request for information (inline agent, Mission 08) | |
|---|---|---|
| Who decides to ask | You - it is a step on a branch | The agent, mid-reasoning |
| Fires | every time that branch runs | only when the agent judges the evidence ambiguous |
| Question wording | fixed, written by you | written by the agent for that specific case |
| Best for | a known category ("we can't classify this") | a judgment call you can't enumerate up front |
Use the node when you can name the situation in advance, and the agent's request when you cannot. Avery's contradictory Data Analyst email is the second case, because no branch could have predicted it. Taylor's resume is neither, because its role history, PL-400 and pro-code skills map straight to Power Platform Developer with nothing to ask about.
A working agent might make the workflow look like it is stuck!
An agent step publishes its activity log only once it completes, so an agent that is waiting on a human shows nothing at all. Do not cancel the run to "see what it's doing" - cancelling destroys the log you would need to diagnose it. Give it the answer it is waiting for instead.
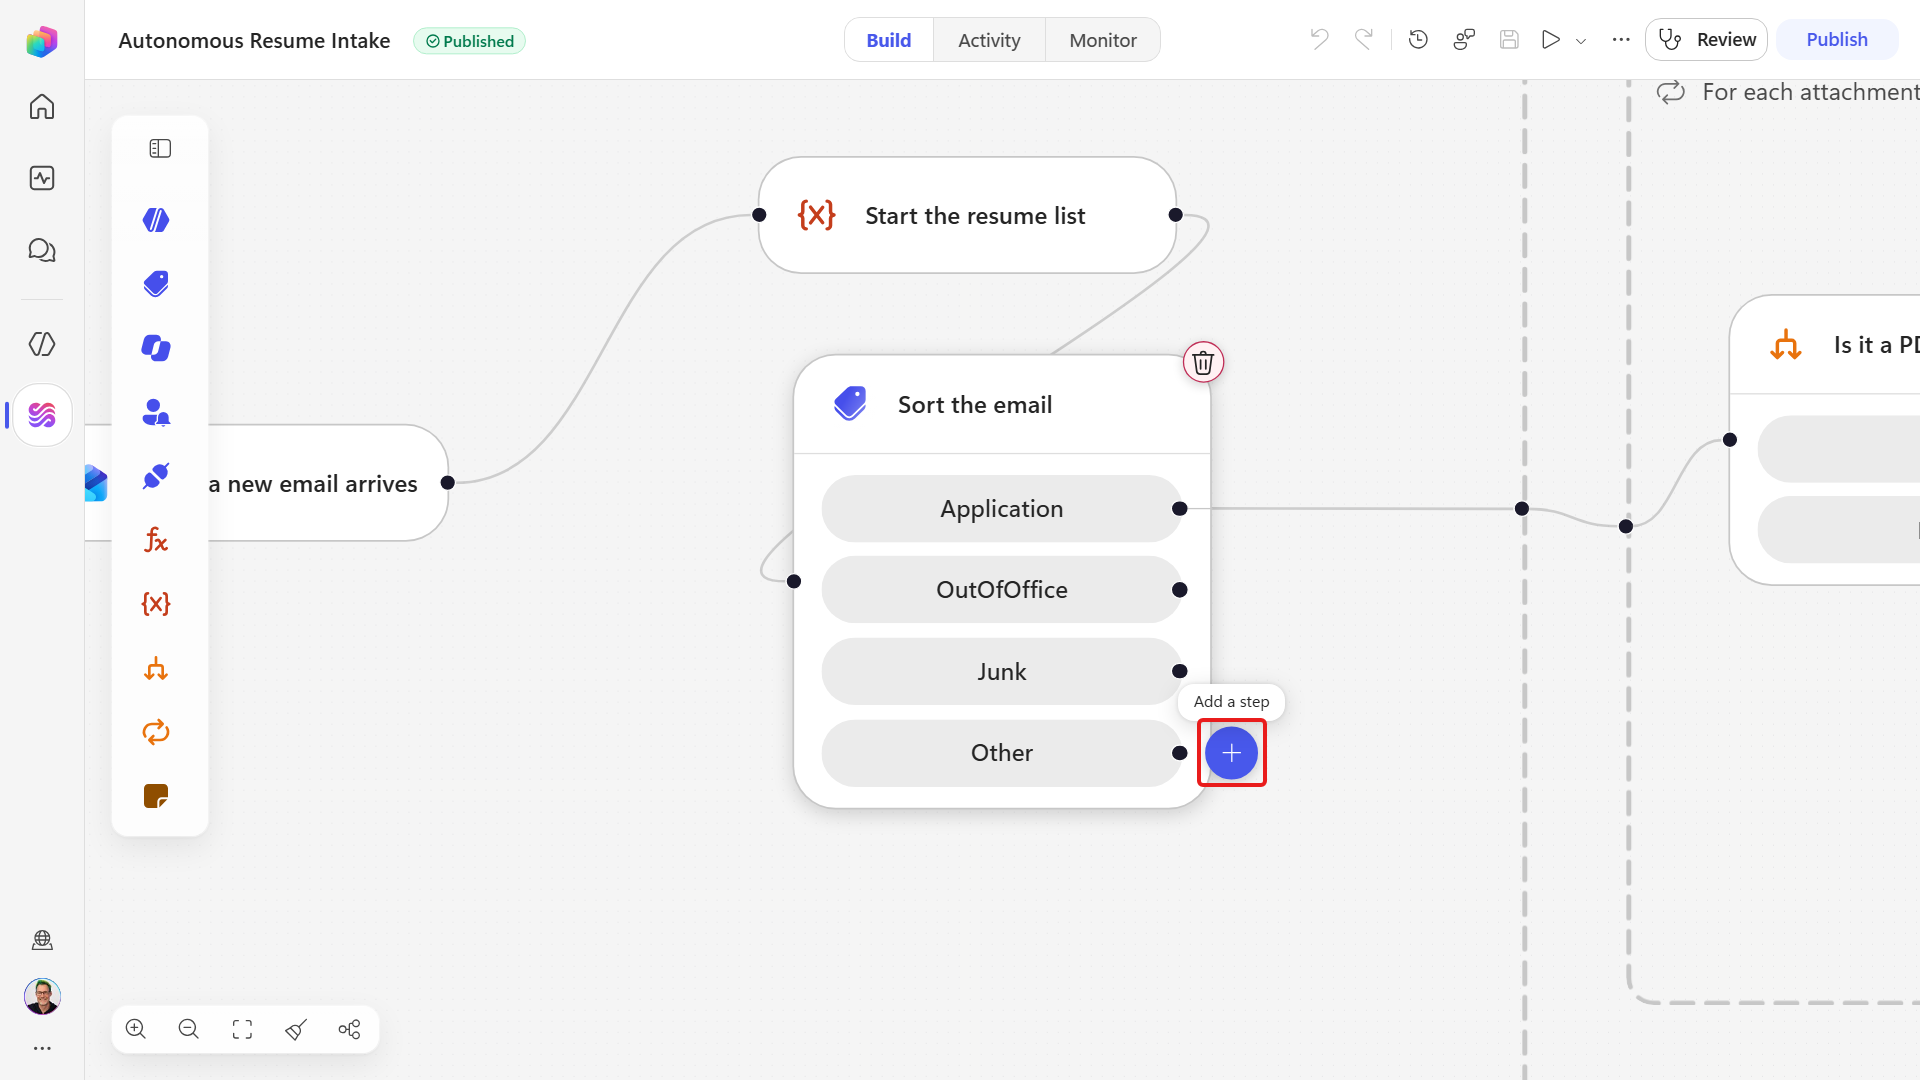
On the canvas, find the Other branch under the Sort the email node and select the ➕ button labeled Add a step after Other.
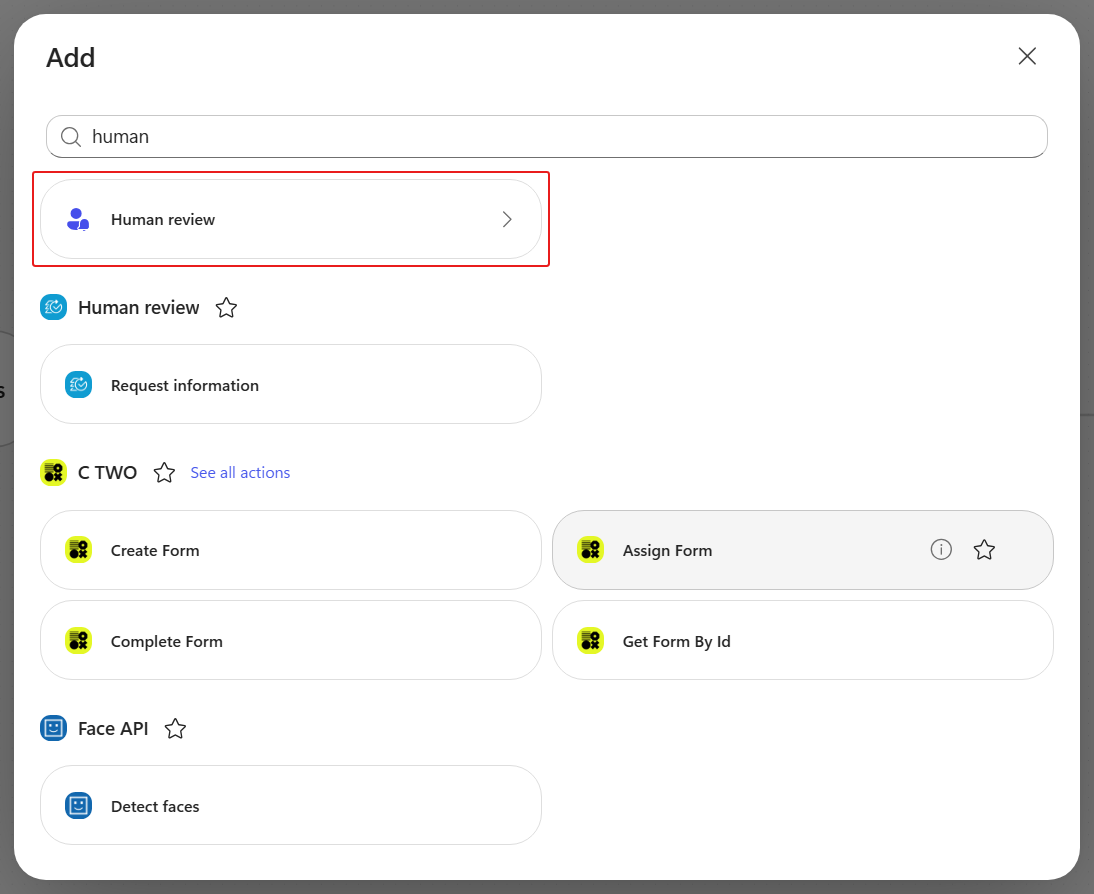
In the Add dialog, under Actions, select Human review.
The node is added straight away - there is no second list of options to choose from.
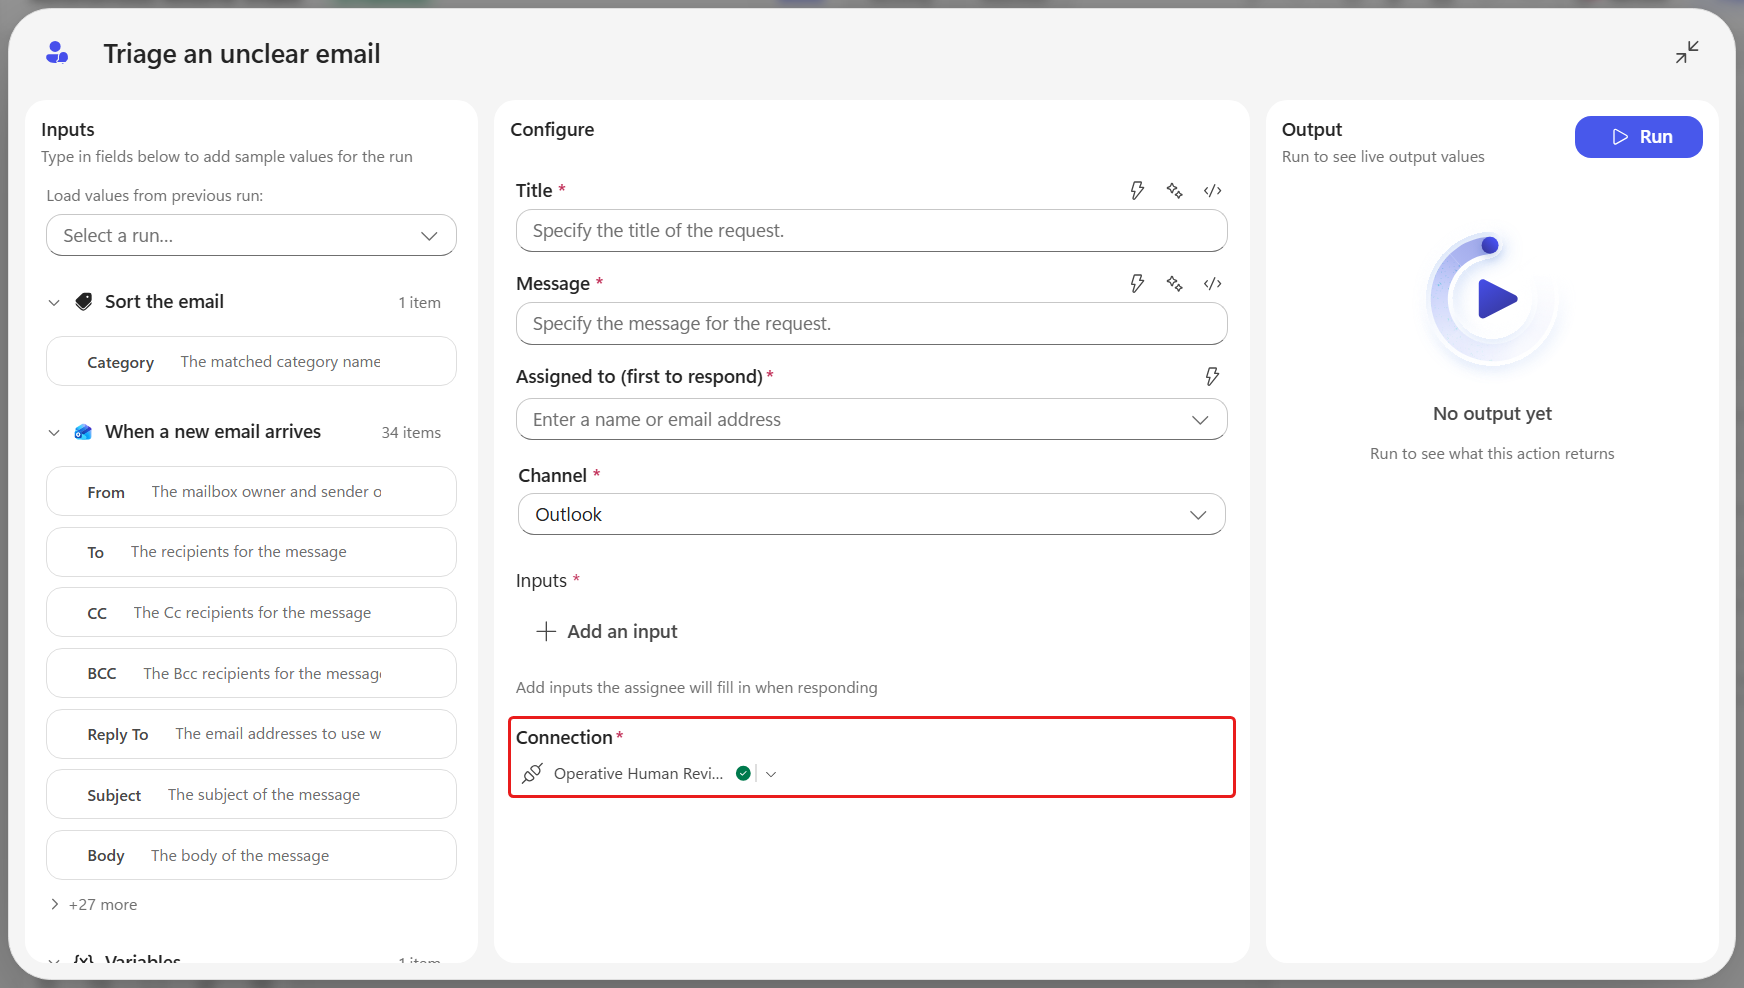
Select the new node to open its panel.
The Connection box reads Human review with a green tick and the word Connected. This connector is created for you the first time you use the node.
Rename the node to
Triage an unclear email- select the name at the top of the panel, type the new name and press Enter.The rest of the mission refers to the node by that name, and its compiled identifier becomes
Triage_an_unclear_email.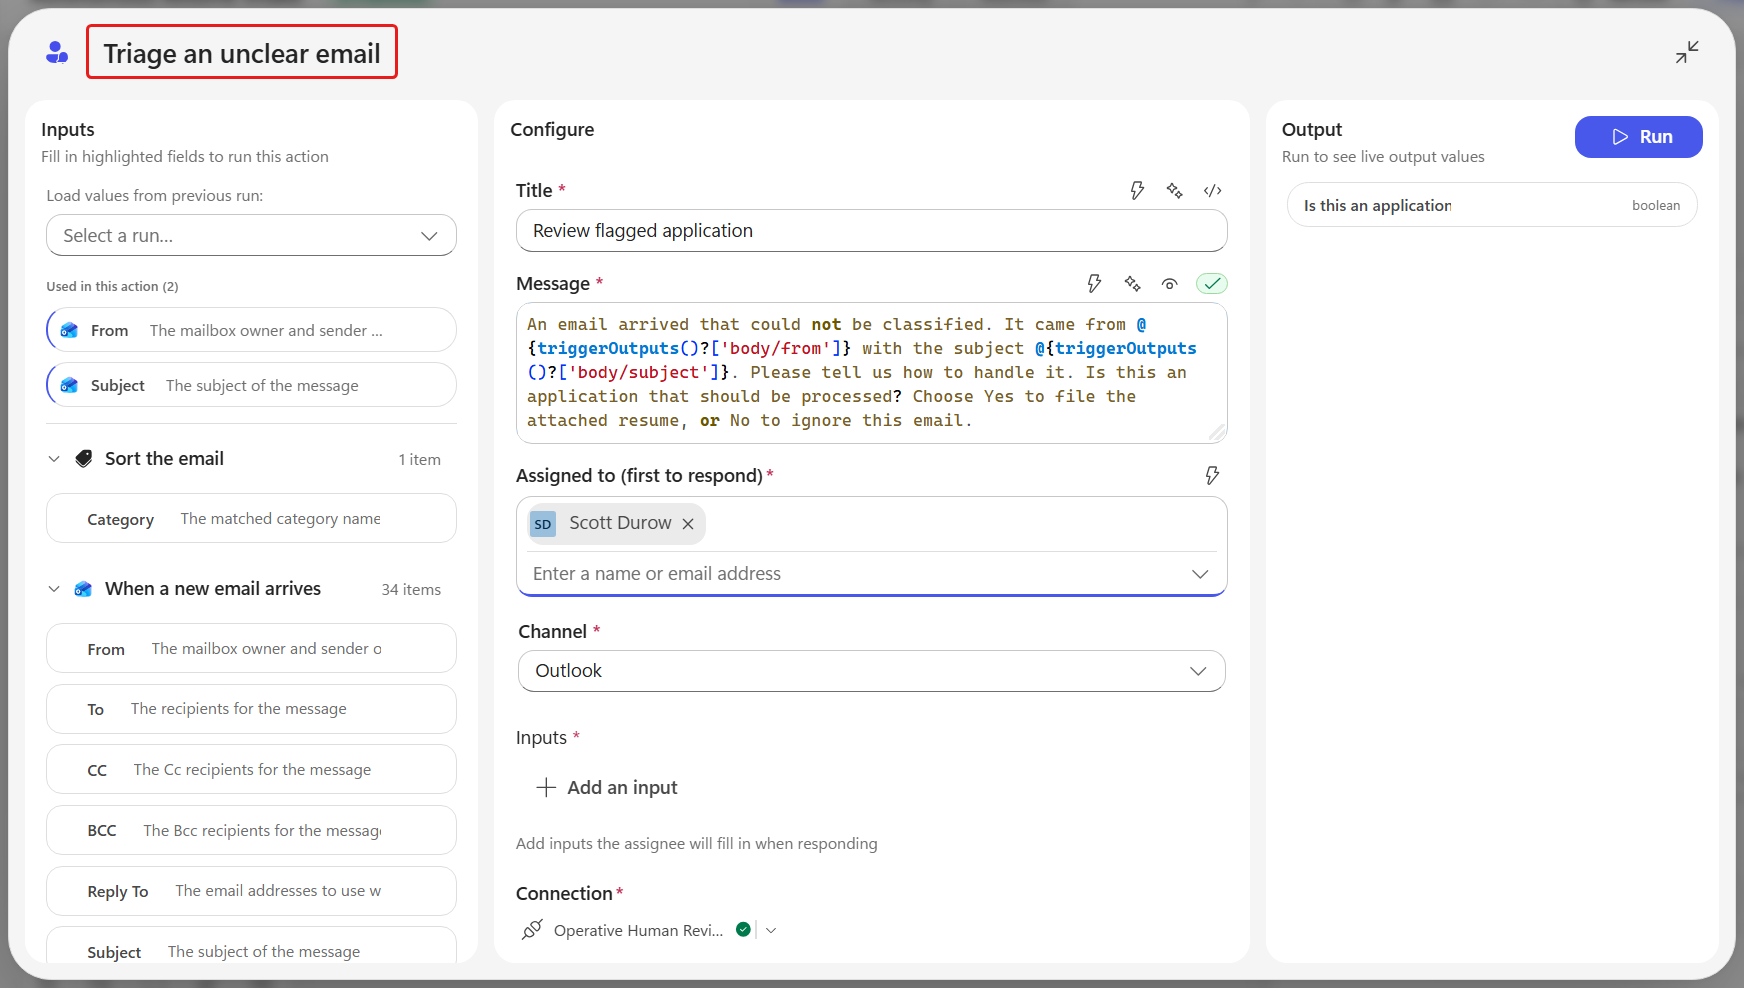
In Title, enter
Review flagged application. This is the subject line the reviewer sees.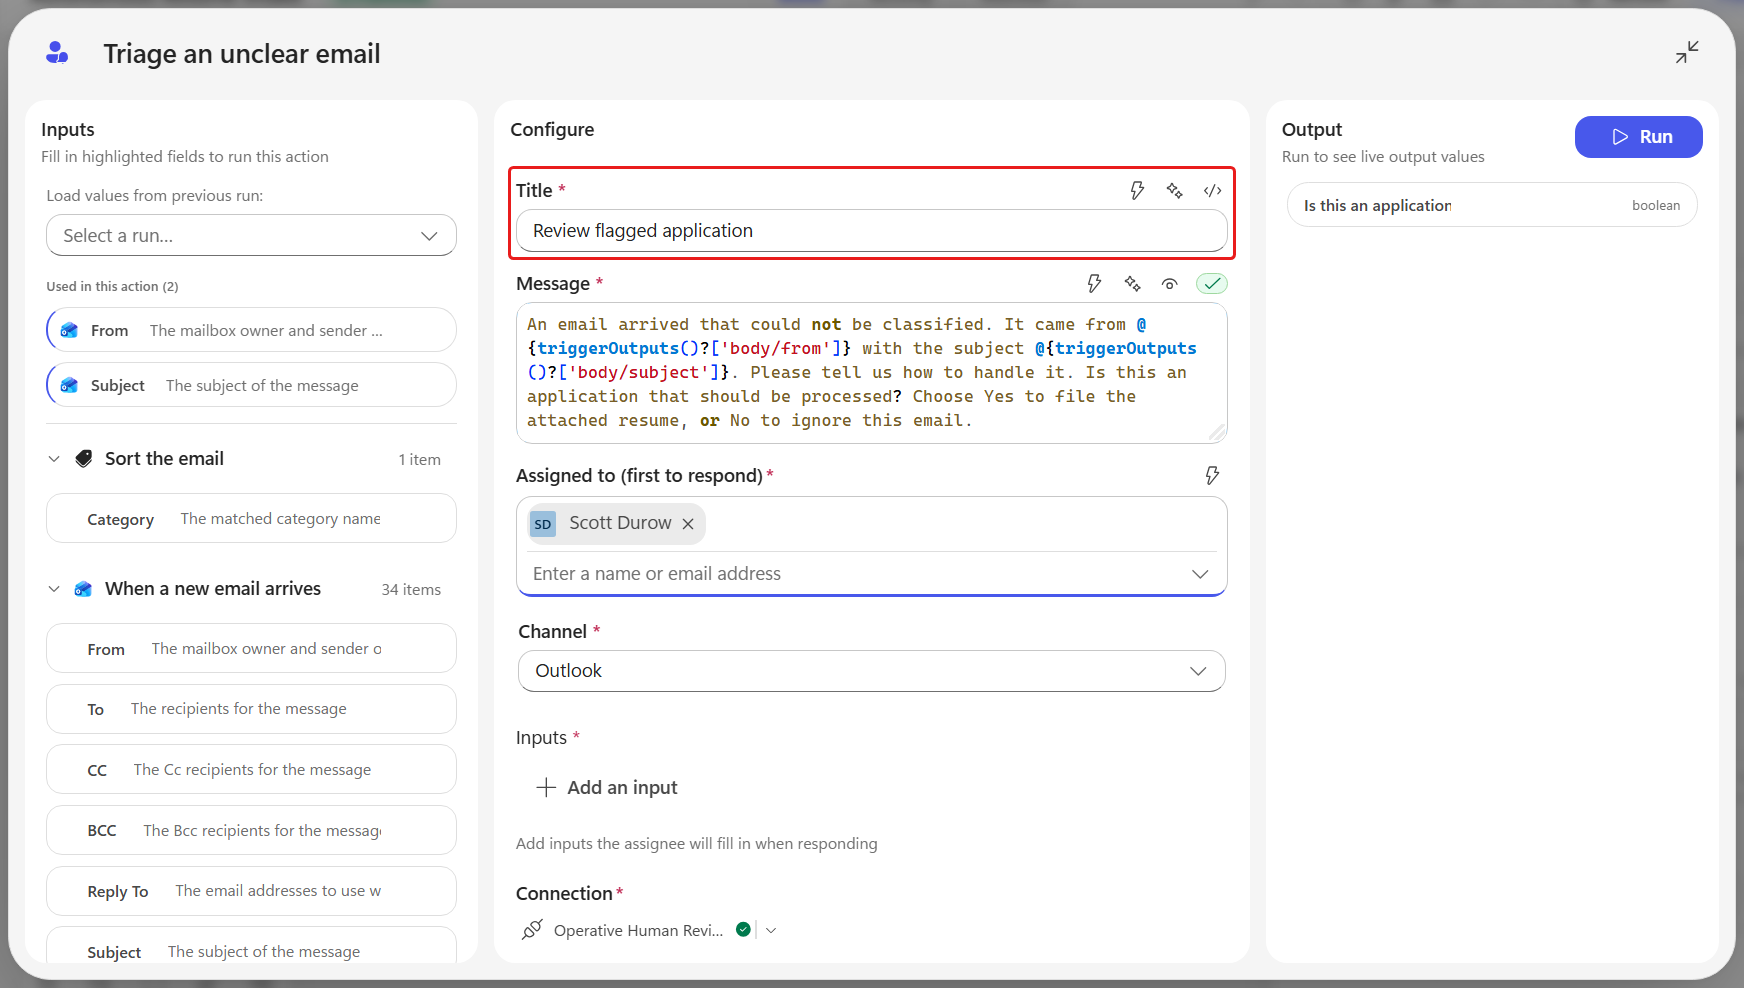
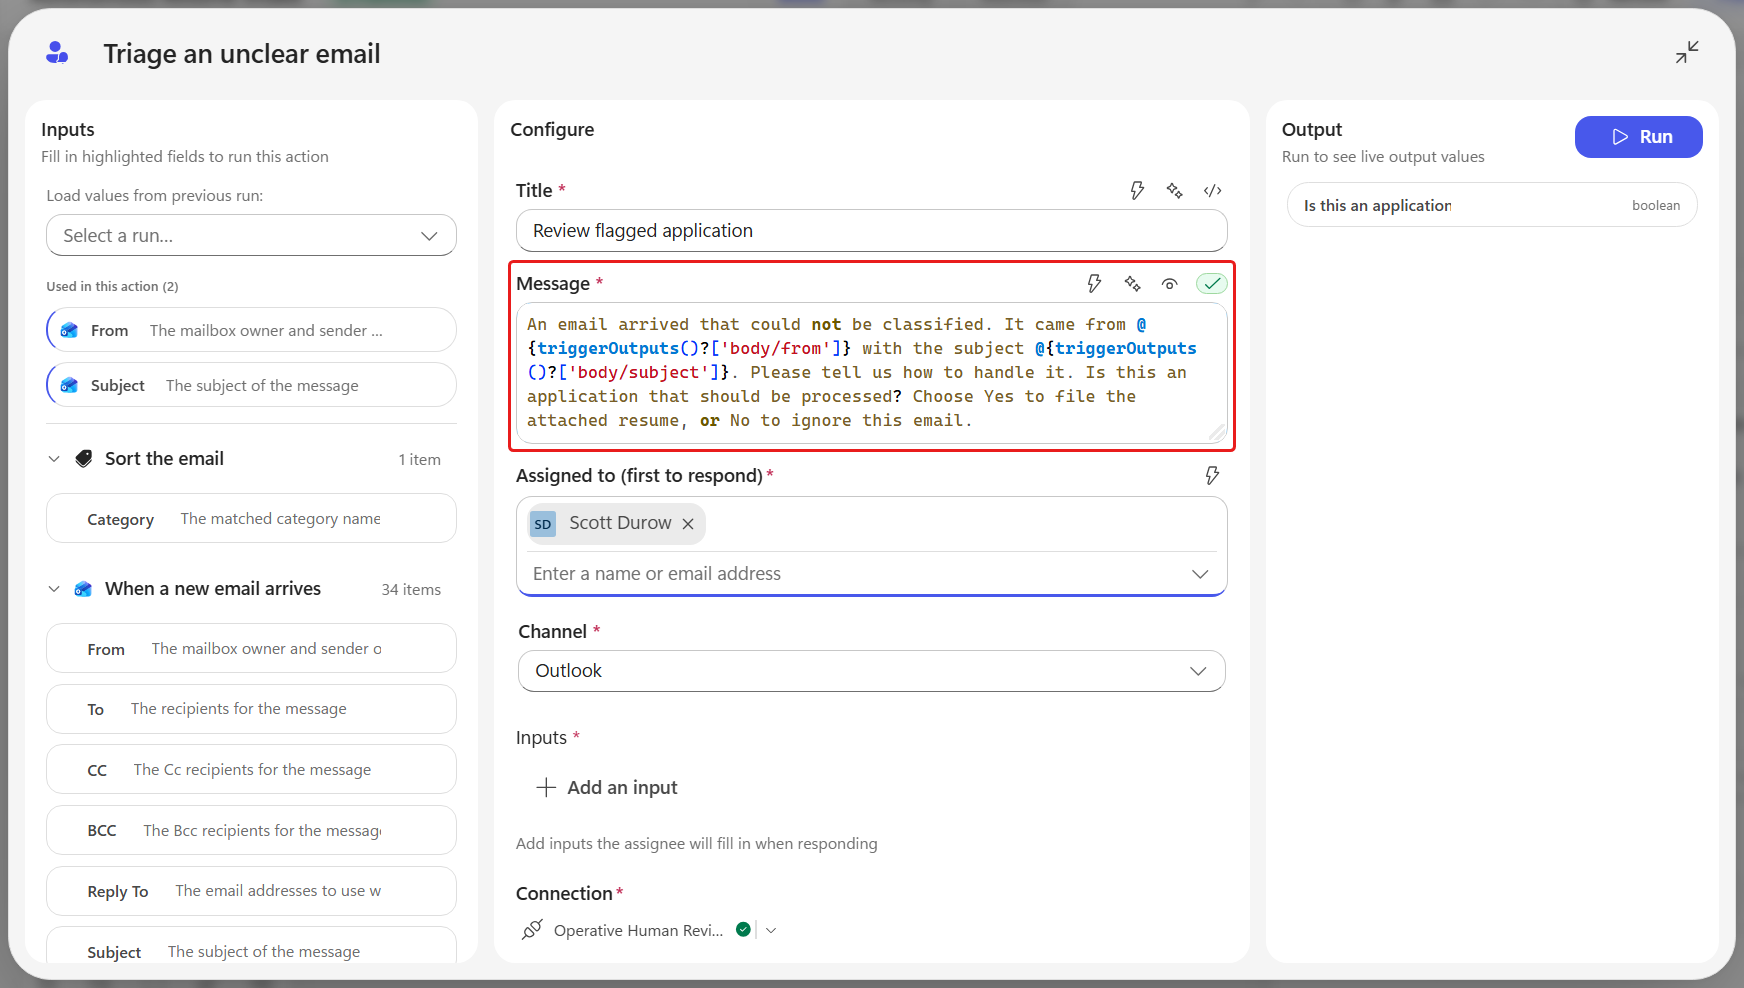
Select
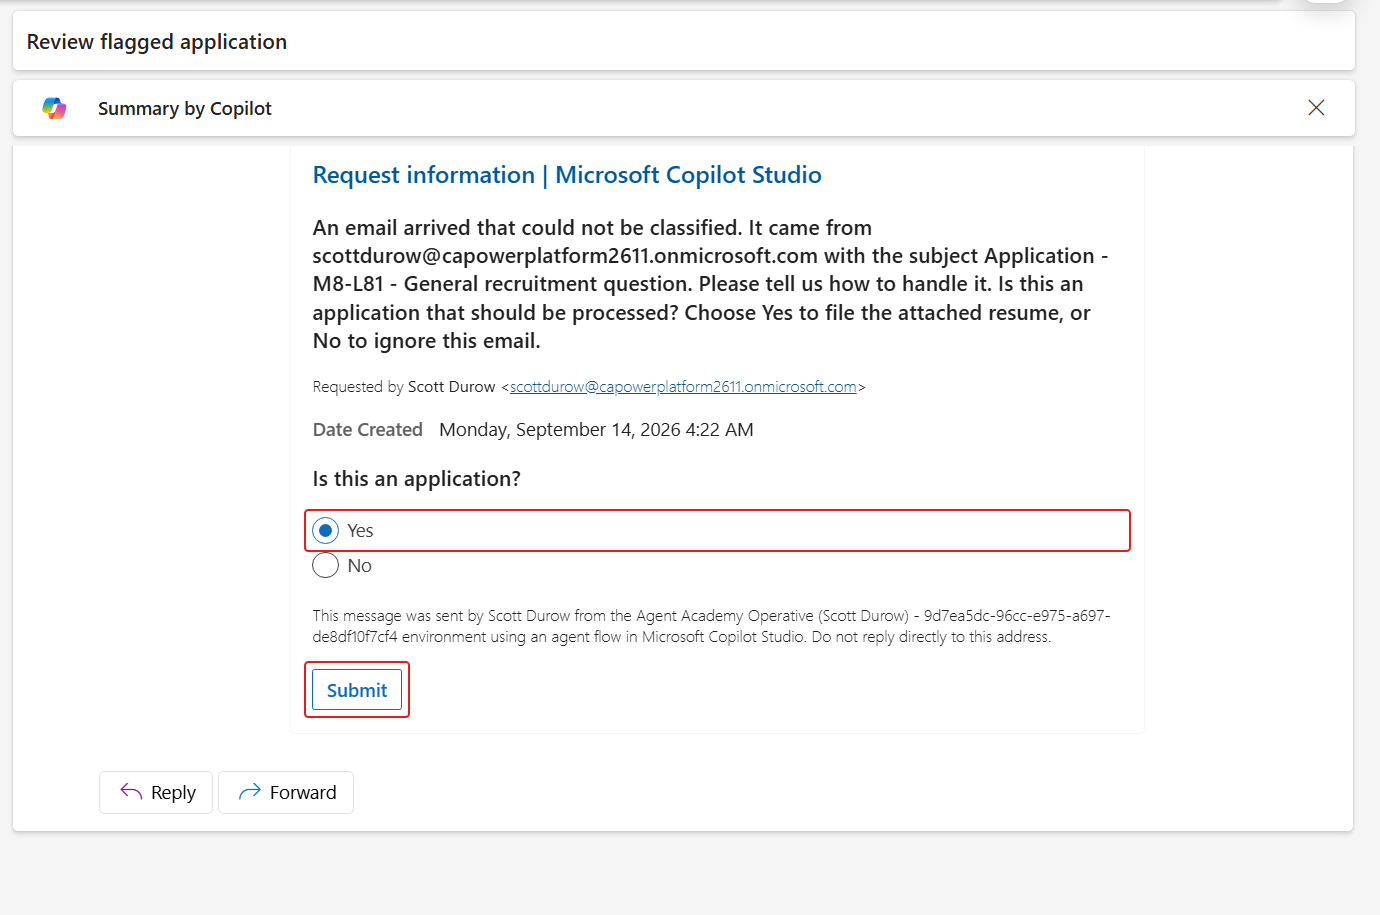
</>Switch to expression mode for Message, then paste the complete review request:textAn email arrived that could not be classified. It came from @{triggerOutputs()?['body/from']} with the subject @{triggerOutputs()?['body/subject']}. Please tell us how to handle it. Is this an application that should be processed? Choose Yes to file the attached resume, or No to ignore this email.The Message field expands into a multiline editor containing the text and both expressions.
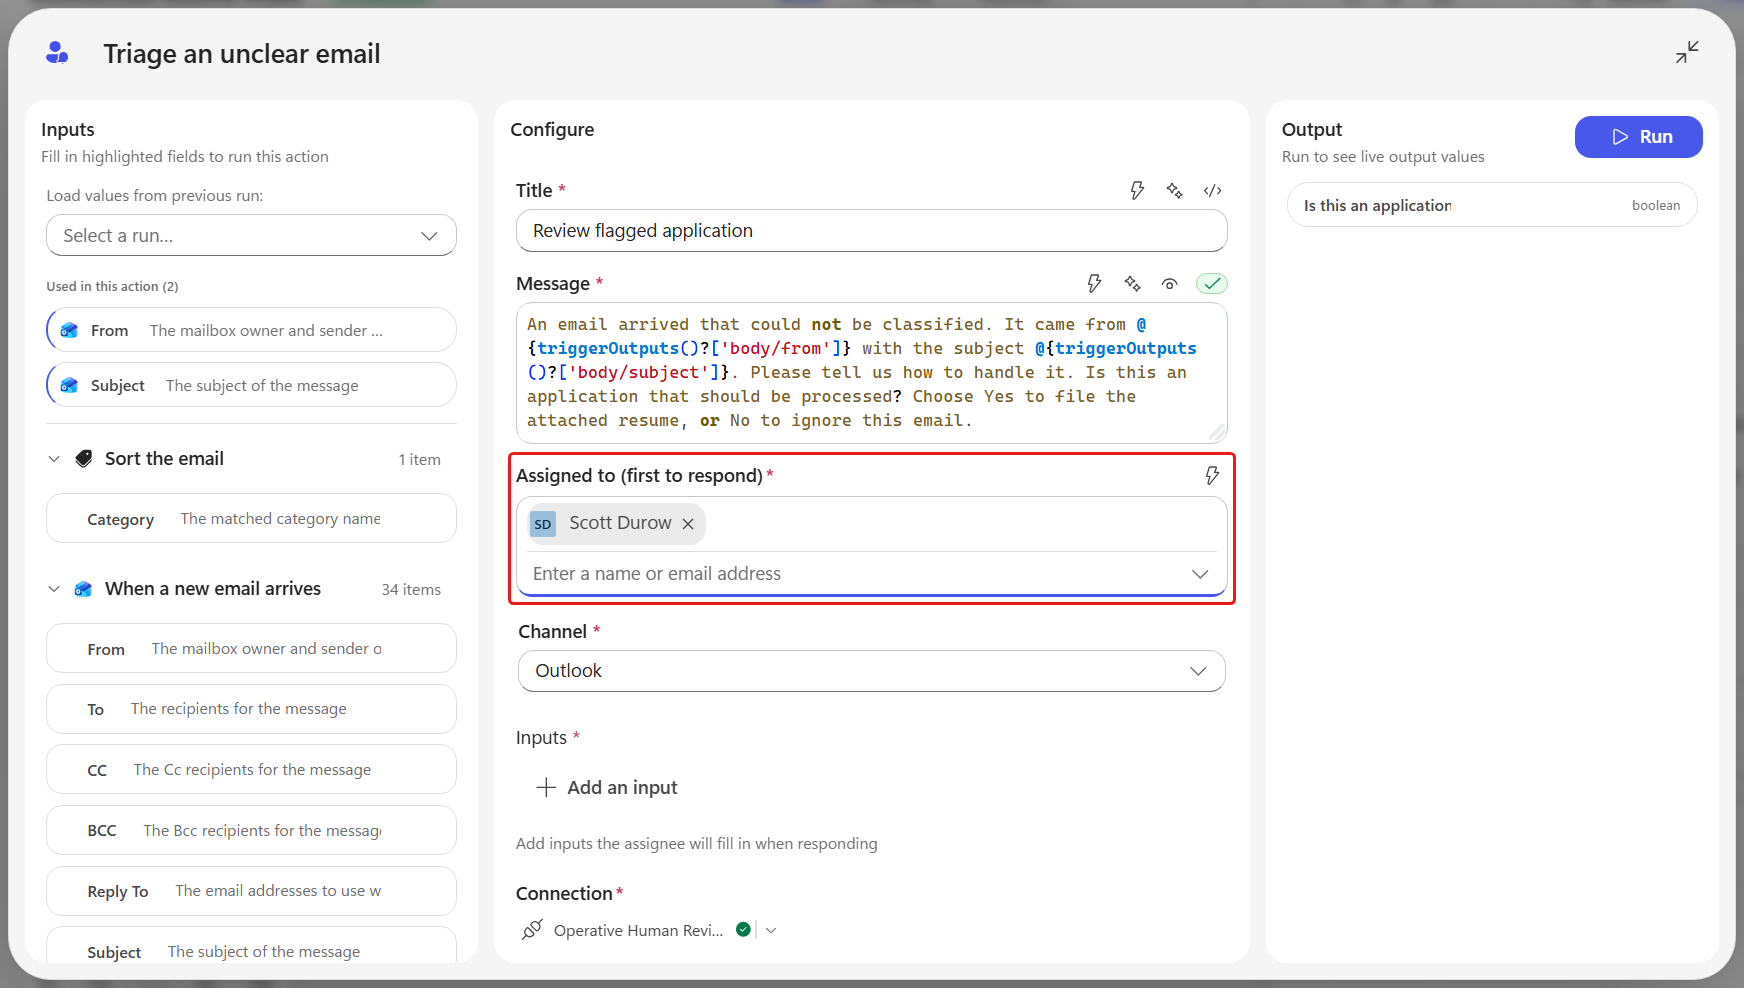
In Assigned to (first to respond), start typing your name or email address, then select yourself from the results.
Confirm your name appears as a chip with your initials. Typing an address without selecting it from the list leaves the field empty.
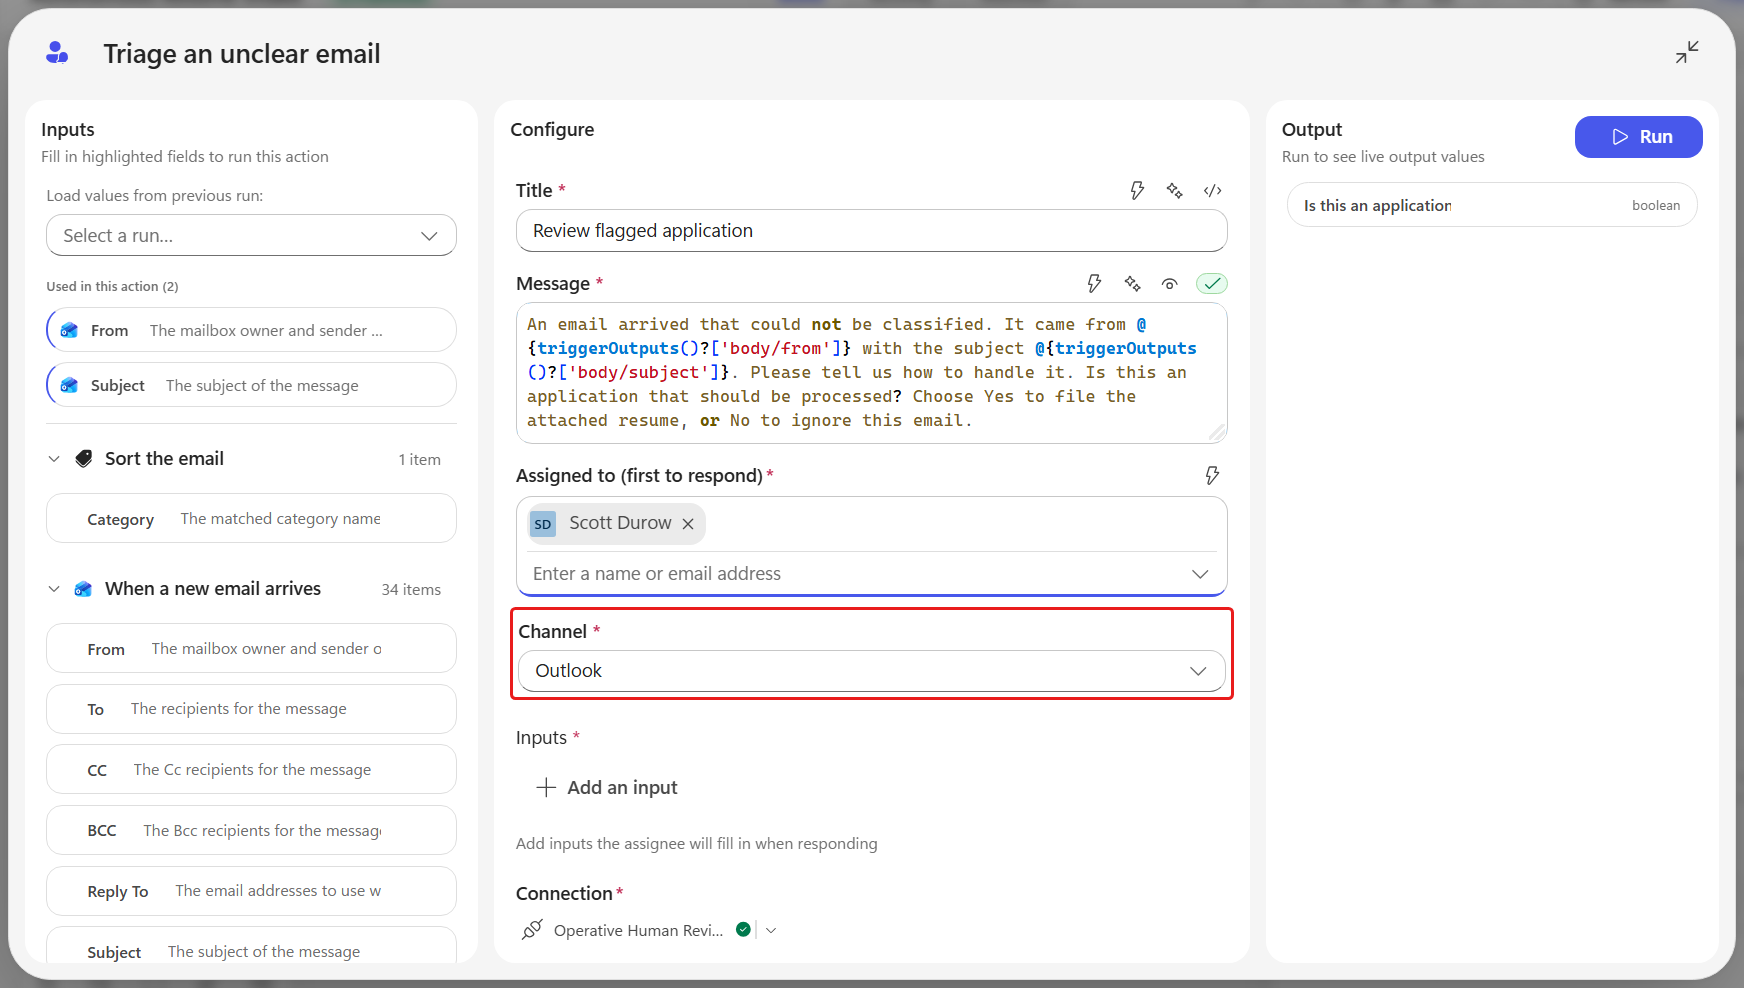
Leave Channel set to Outlook - it is already the default.
Select ➕ Add an input, then choose Yes/No from the Choose the type of user input menu.
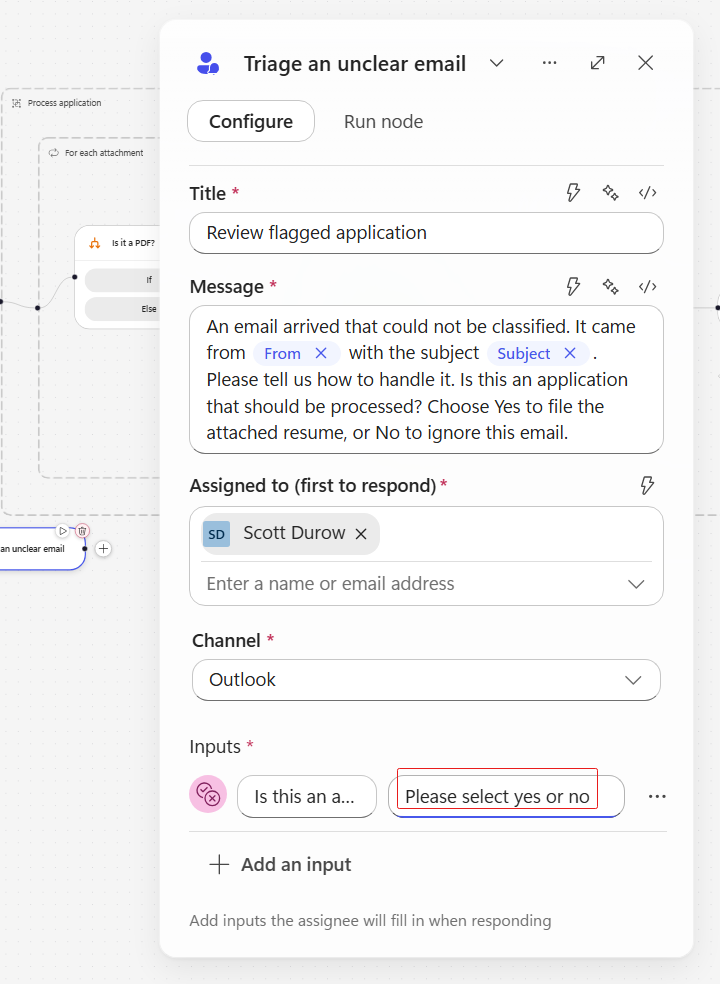
Select the box next to the type and replace the placeholder with
Is this an application?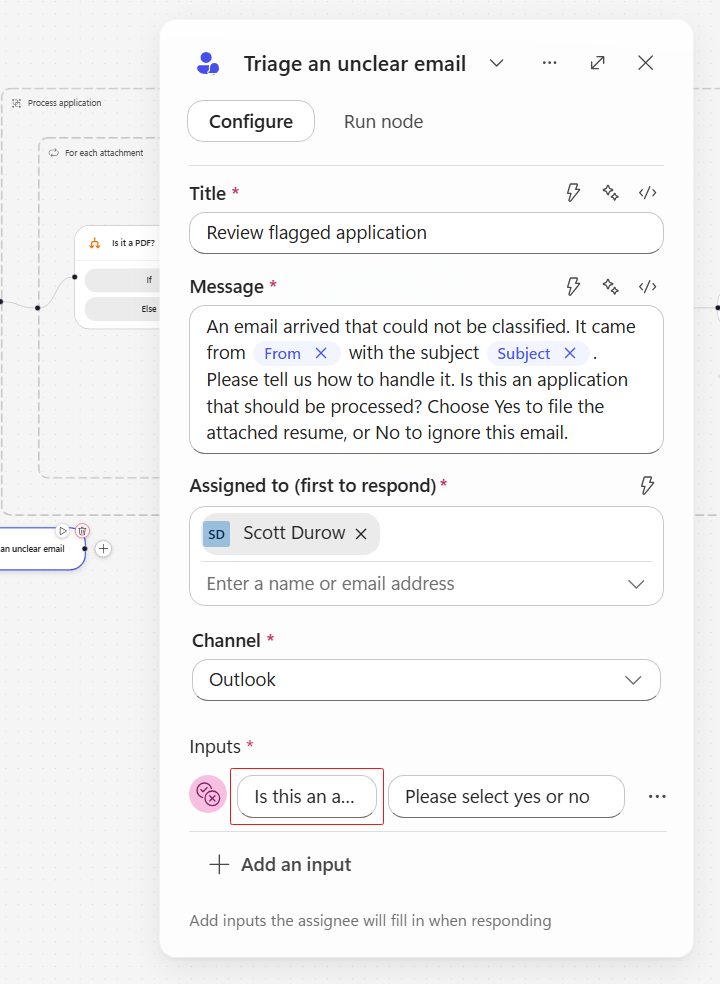
An input's type is fixed
The type drop-down list looks editable, but switching it does not re-type the underlying input. If you choose the wrong type, delete the input row and add a new one. Delete lives on the row's the more options menu - and for Text inputs only, so does Add dropdown, if you want to offer a fixed list of answers.
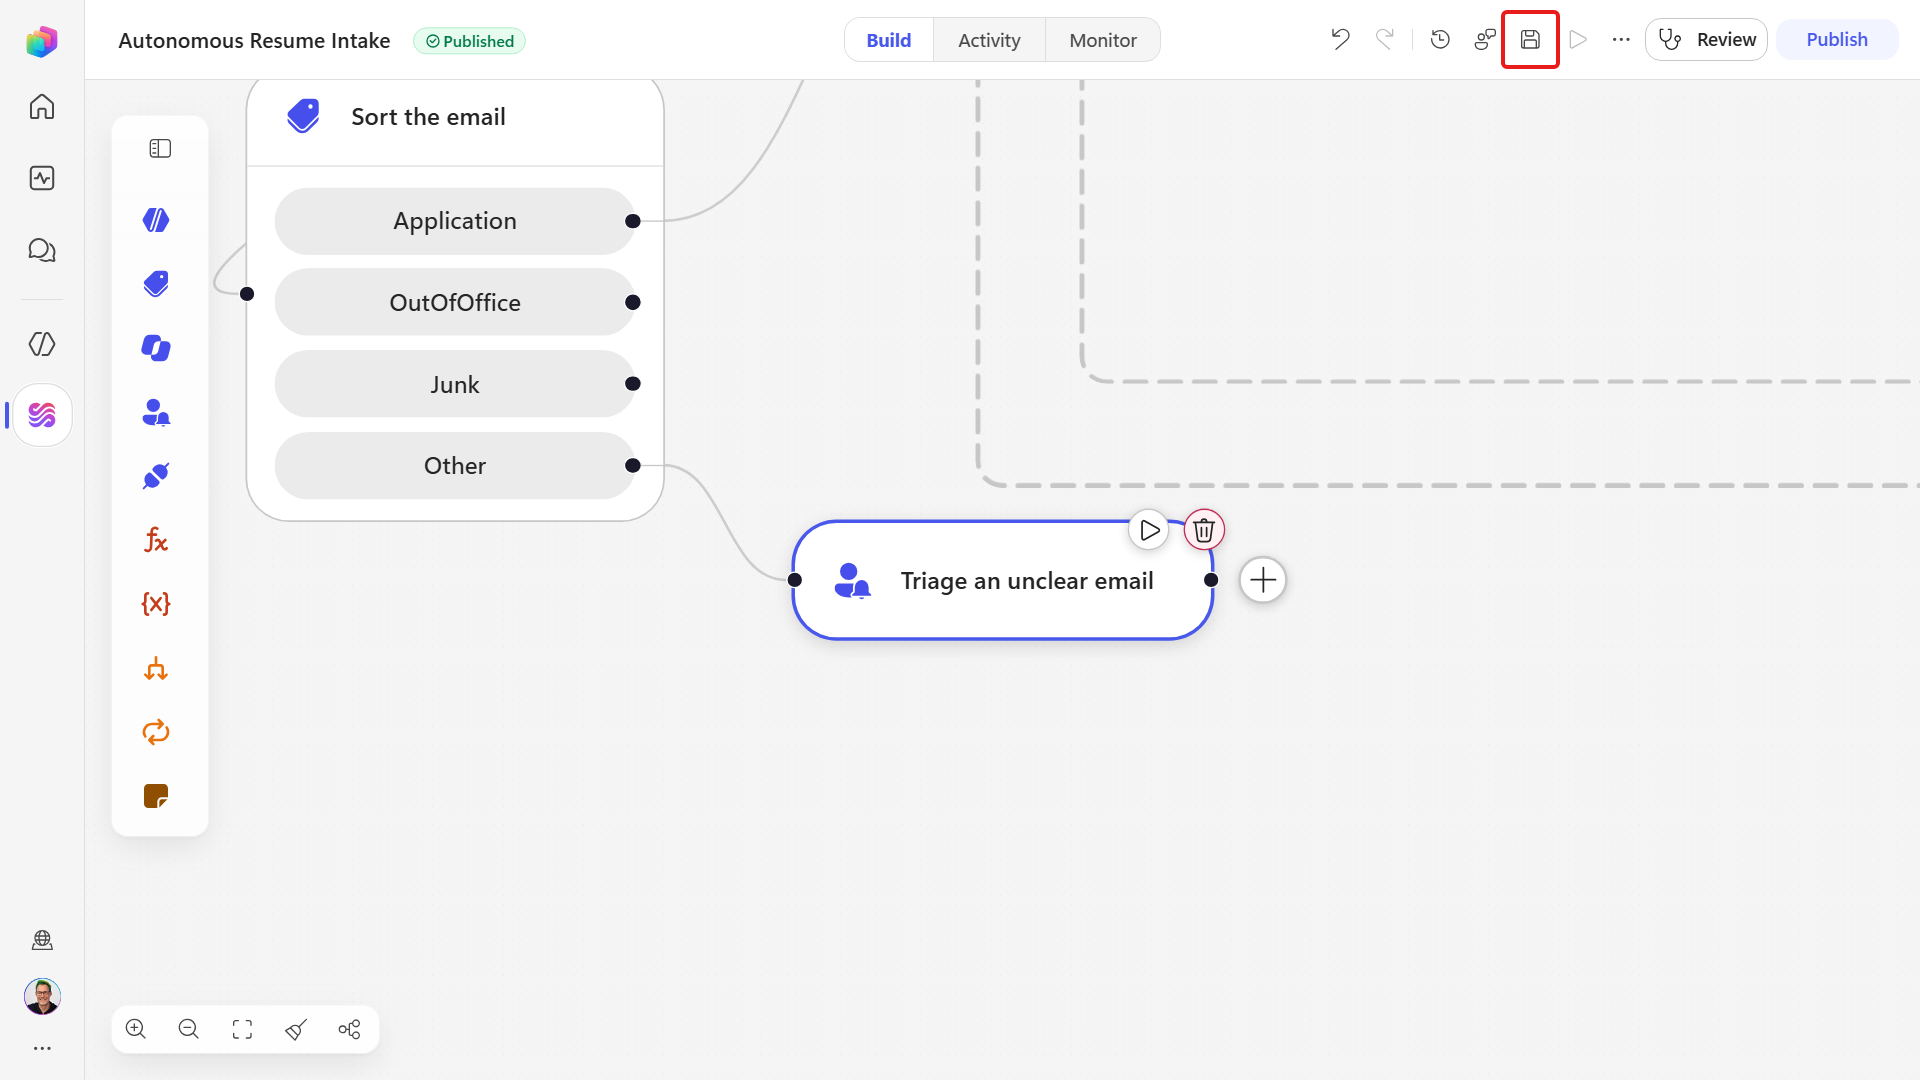
On the command bar select Save.
9.2 Route the answer and end the dead branches
Right now the reviewer's answer is recorded and then thrown away - the run ends either way. We will now branch on the answer so that Yes files the resume through the same pipeline the Application branch uses, and No stops the run.
On the Other branch, hover the Triage an unclear email node and select the ➕ labeled Add a step after Triage an unclear email.
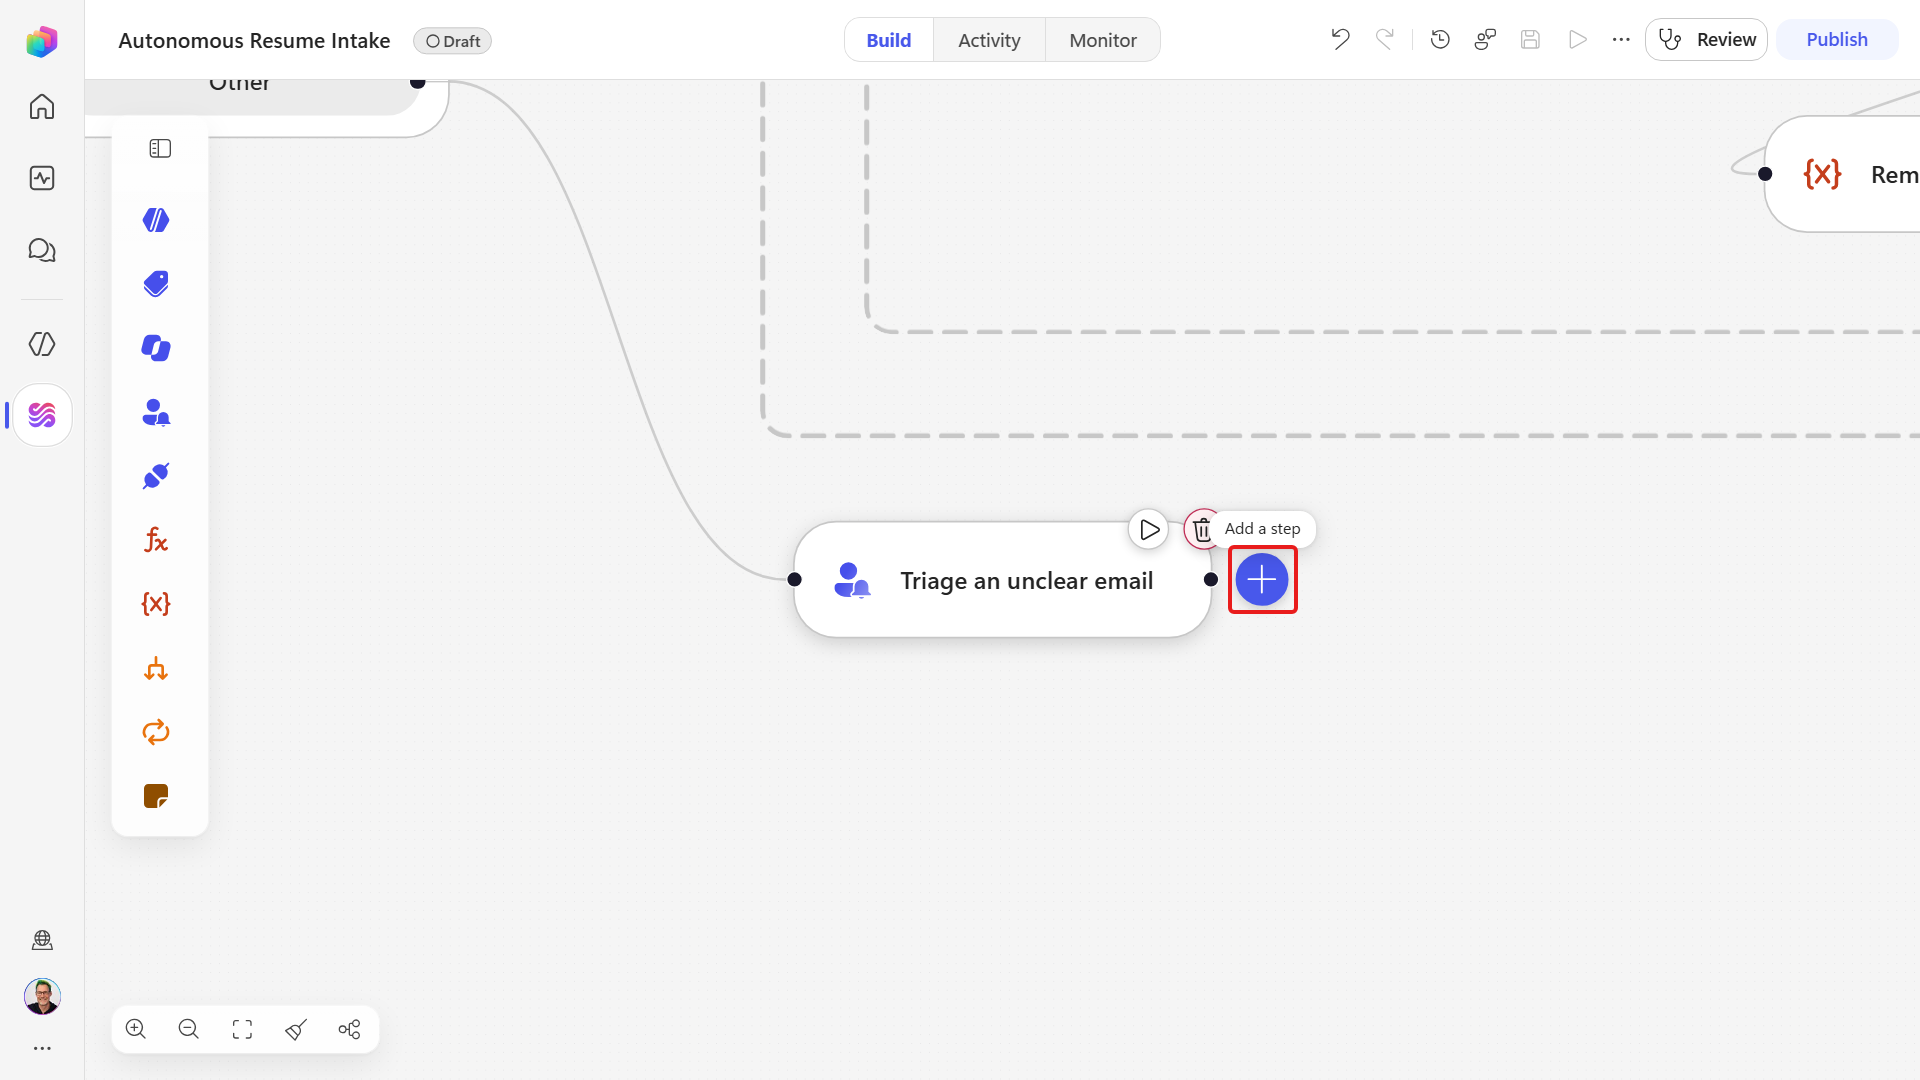
In the Add dialog, search for
if, then select If/Else under Other.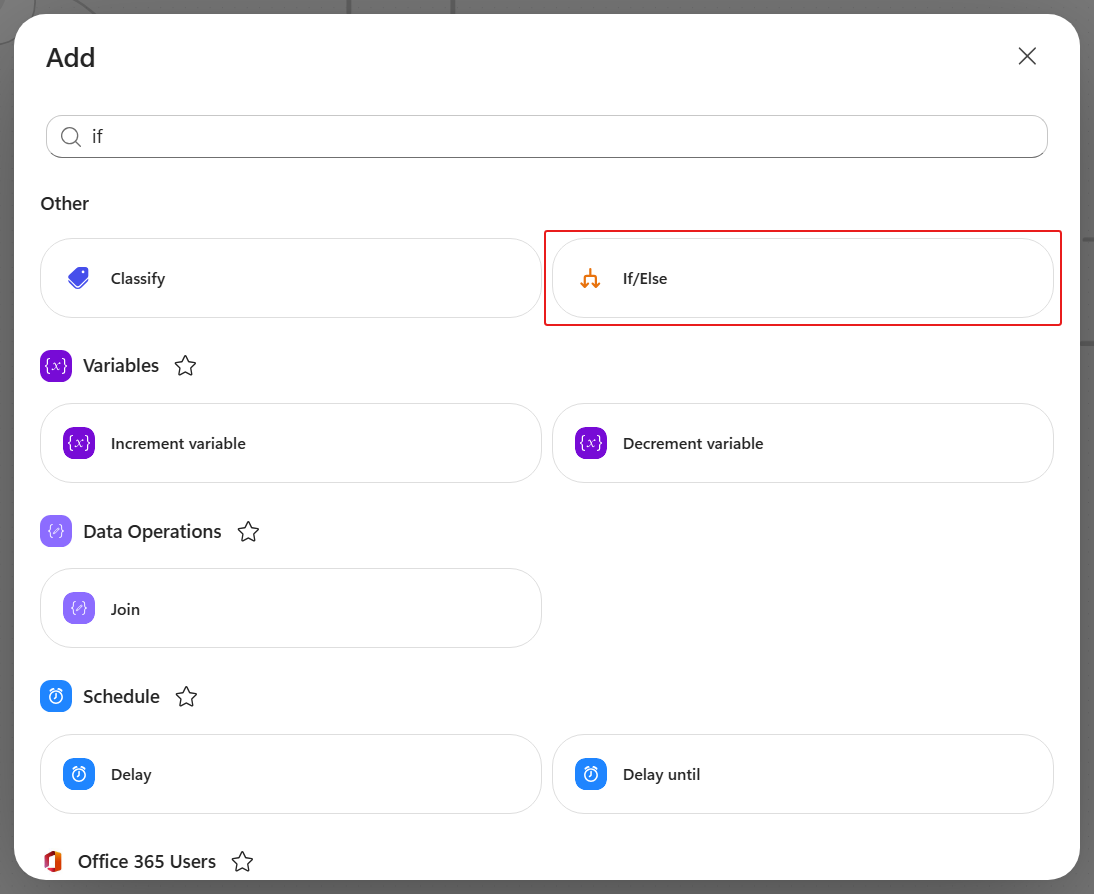
Select the new node, select its name at the top of the panel, and rename it to
Did the reviewer confirm it. Press Enter.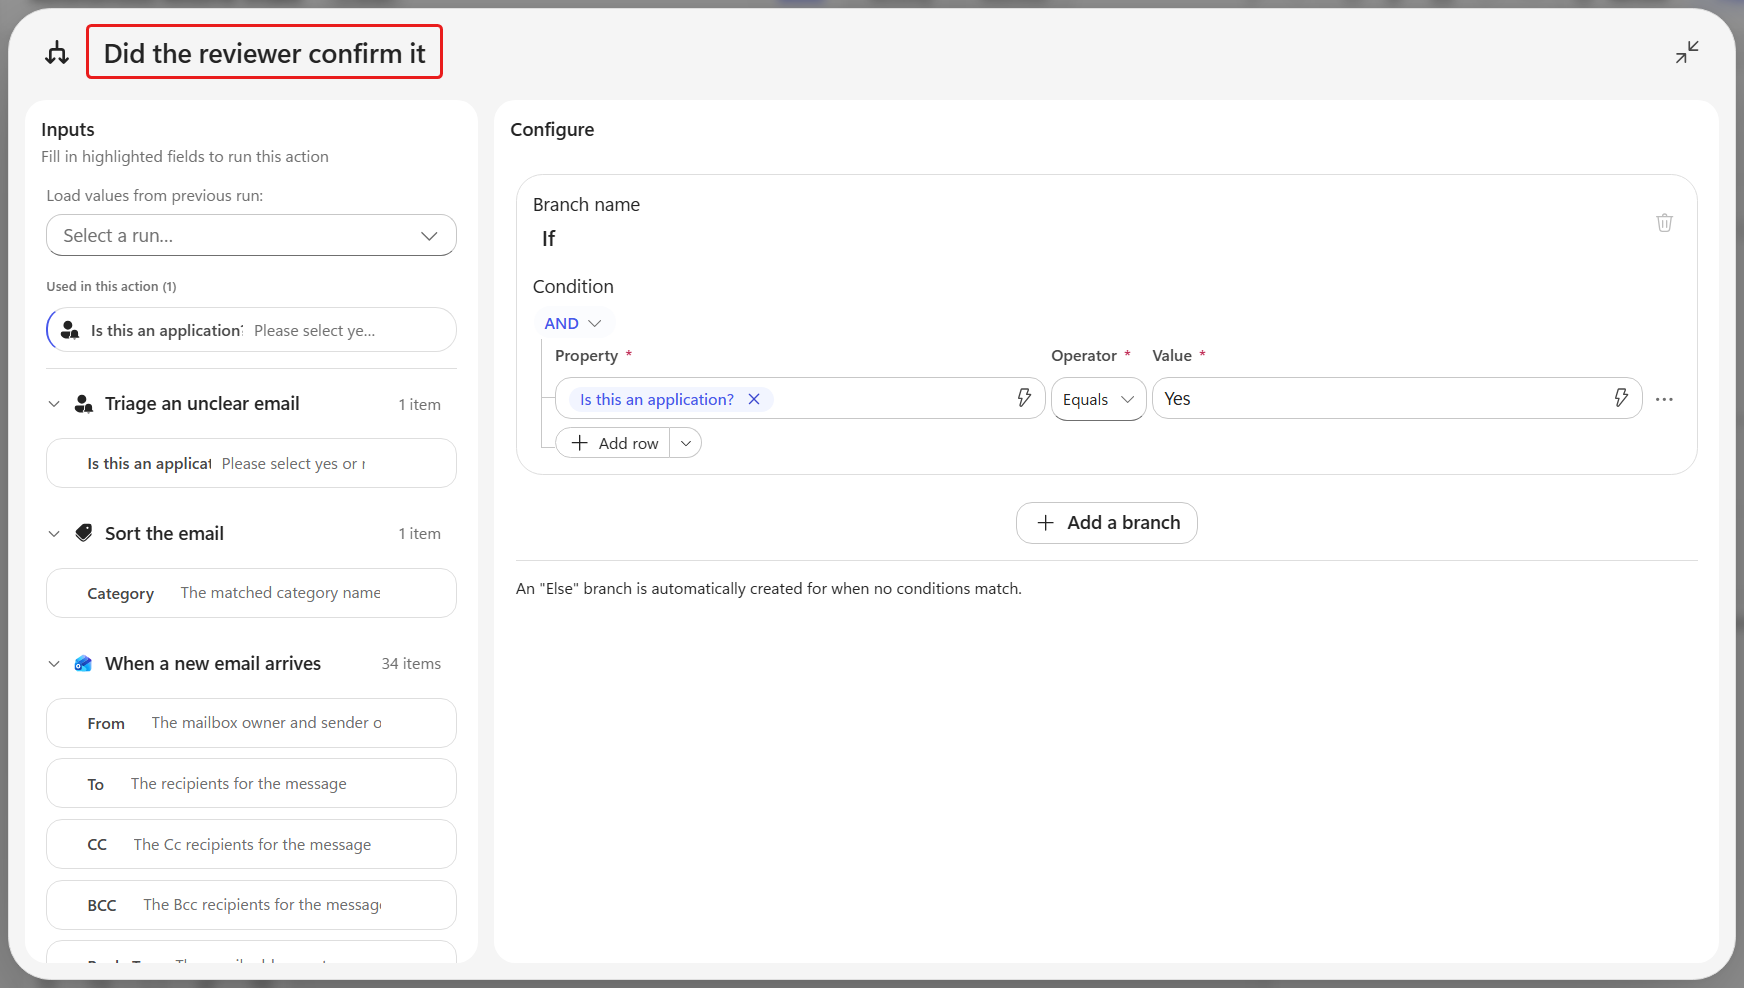
Fill in the condition as follows.
Field Value Property Select ⚡ Insert dynamic content and choose the Is this an application? output of Triage an unclear email Operator Equals (leave as-is) Value Yes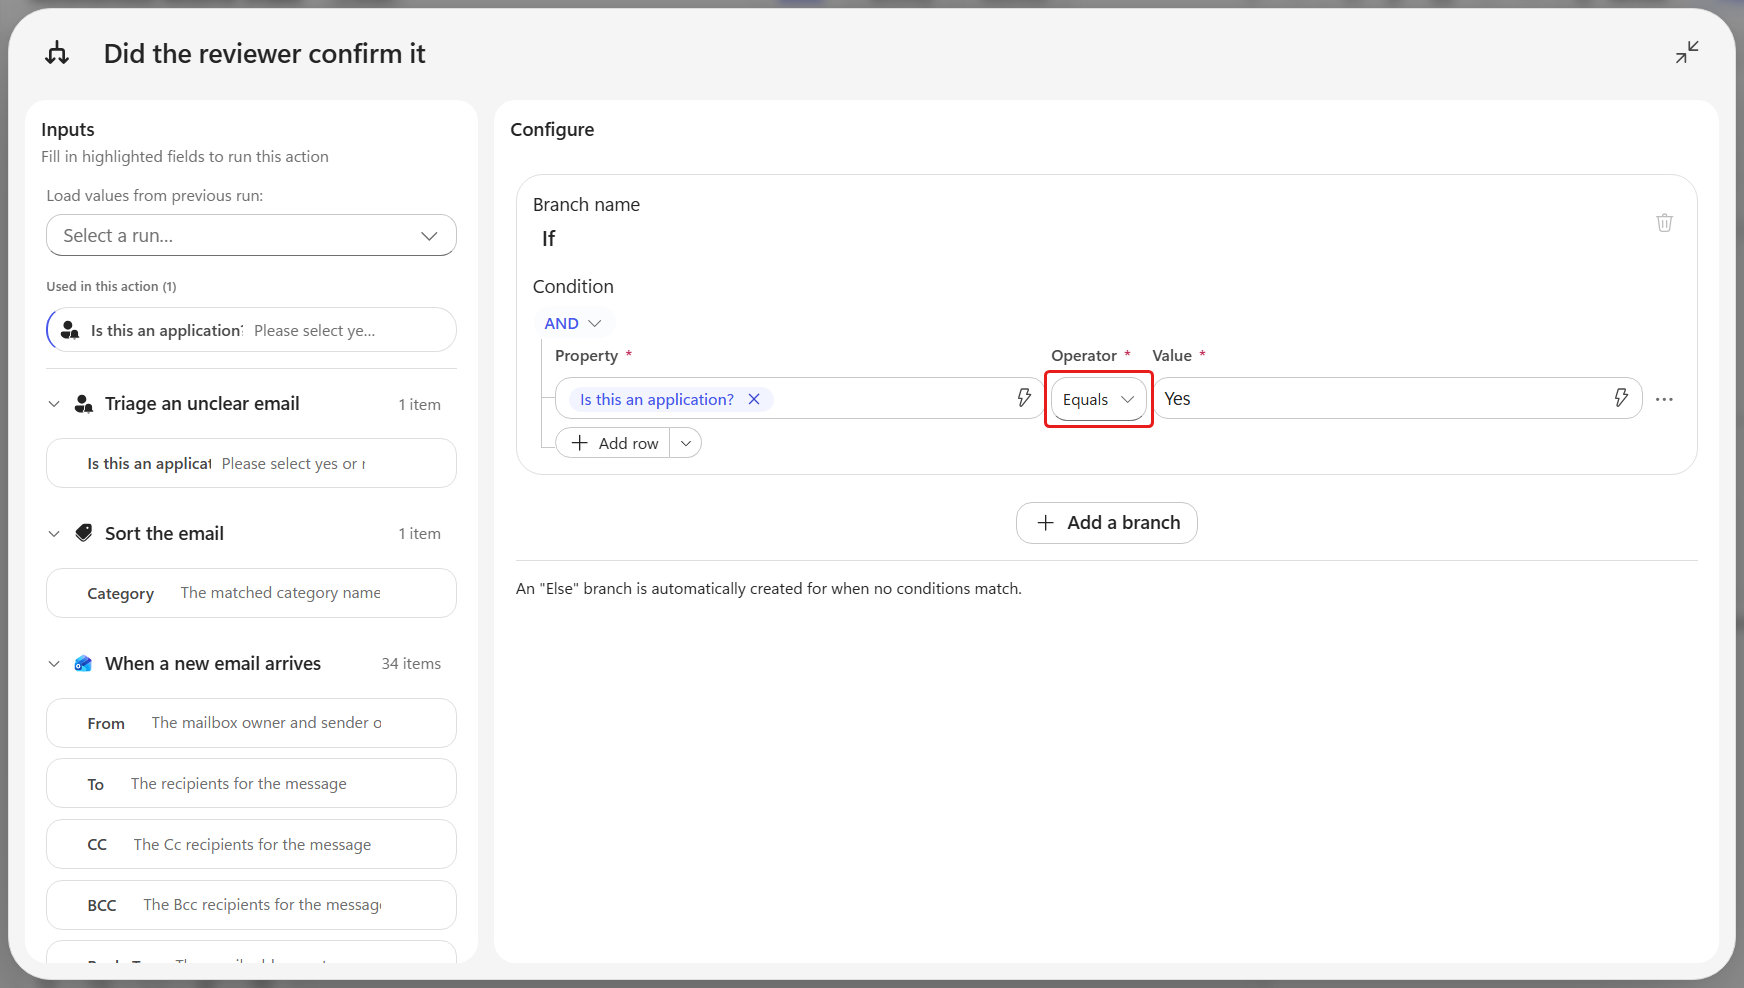
Enter Yes, not true
The input type is Yes/No, but its output is named Is this an application?. The designer accepts a comparison against the boolean
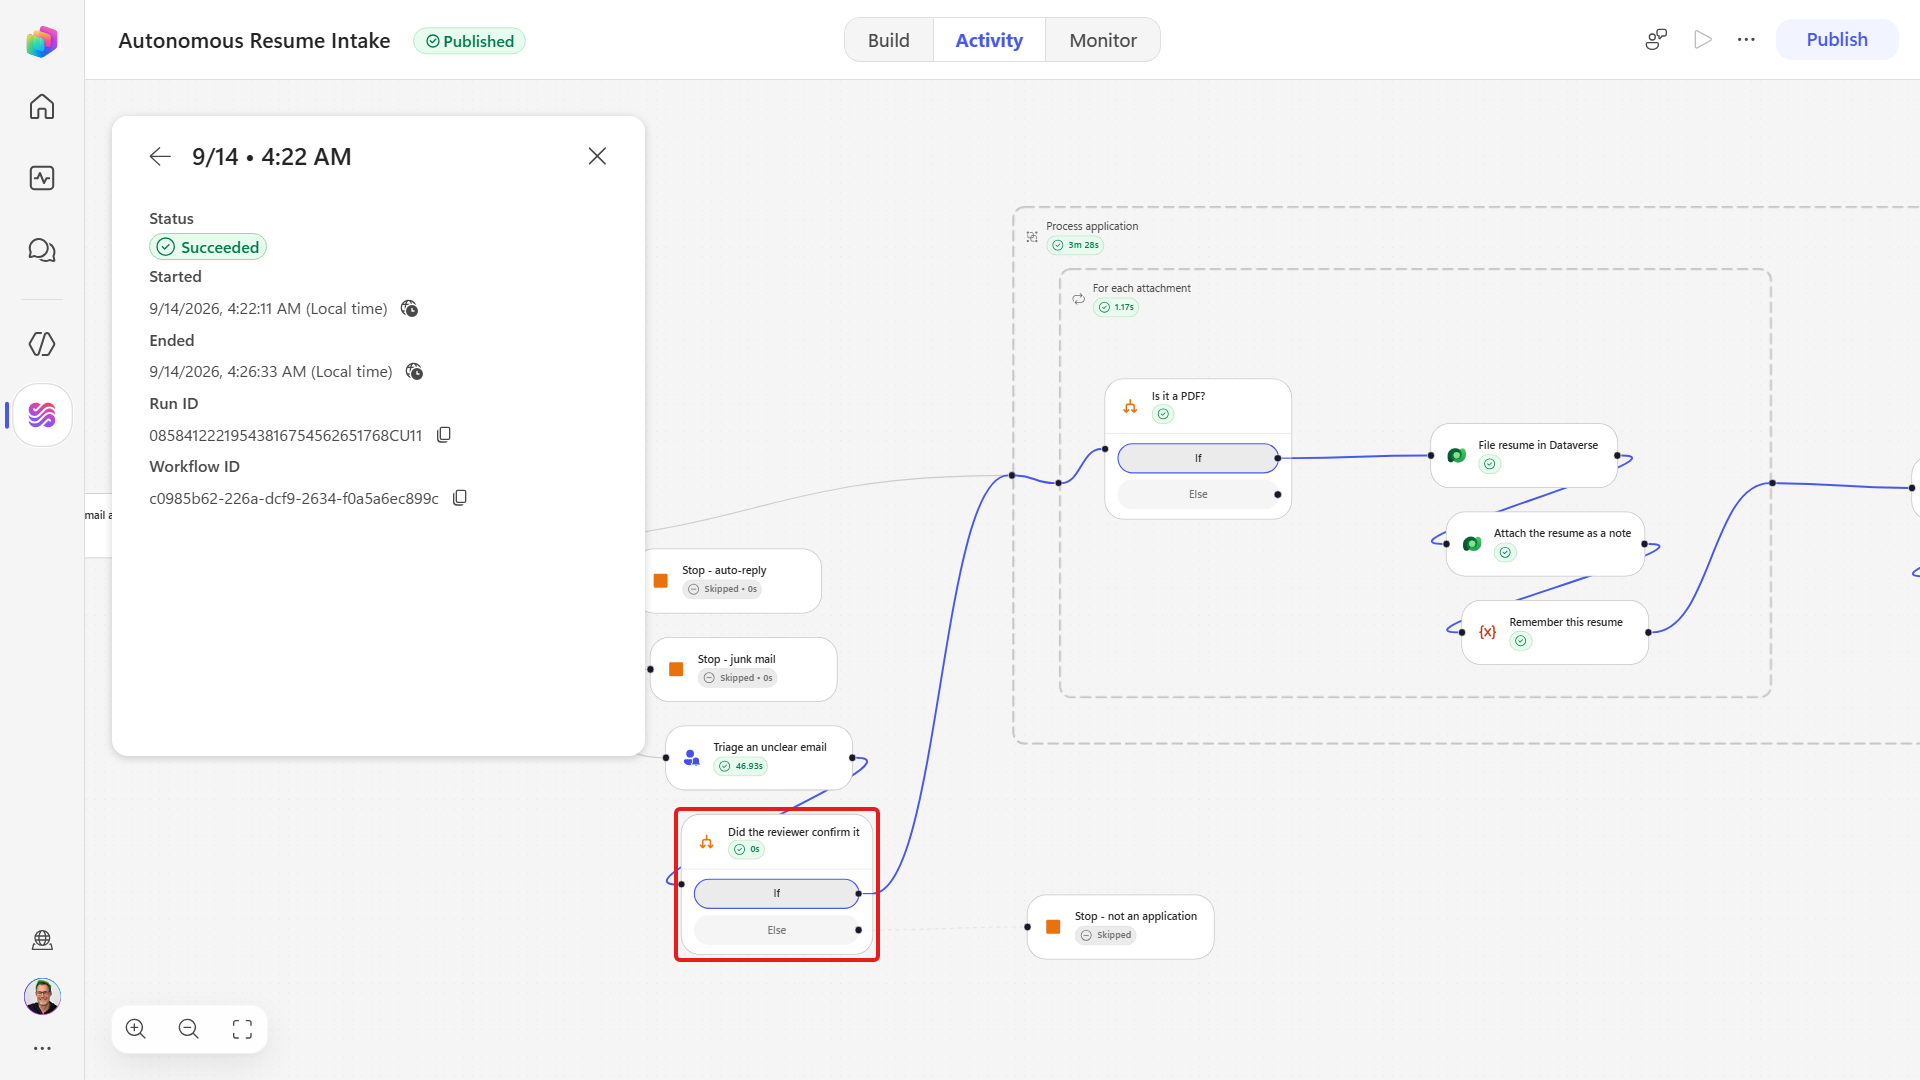
true. It looks right and publishes cleanly, but at runtime the node returns the string"Yes"or"No", soequals(..., true)is always false - including when the reviewer answered Yes. Nothing errors, but the branch never fires and nothing tells you why. After a run, the step's Outputs read{ "boolean": "Yes", ... }, and the quotes mean text.Now join the If lane to the work that already exists. Drag from the output handle on the right-hand edge of the Did the reviewer confirm it node onto the left-hand edge of the Process application scope, so a new connector is drawn between them.
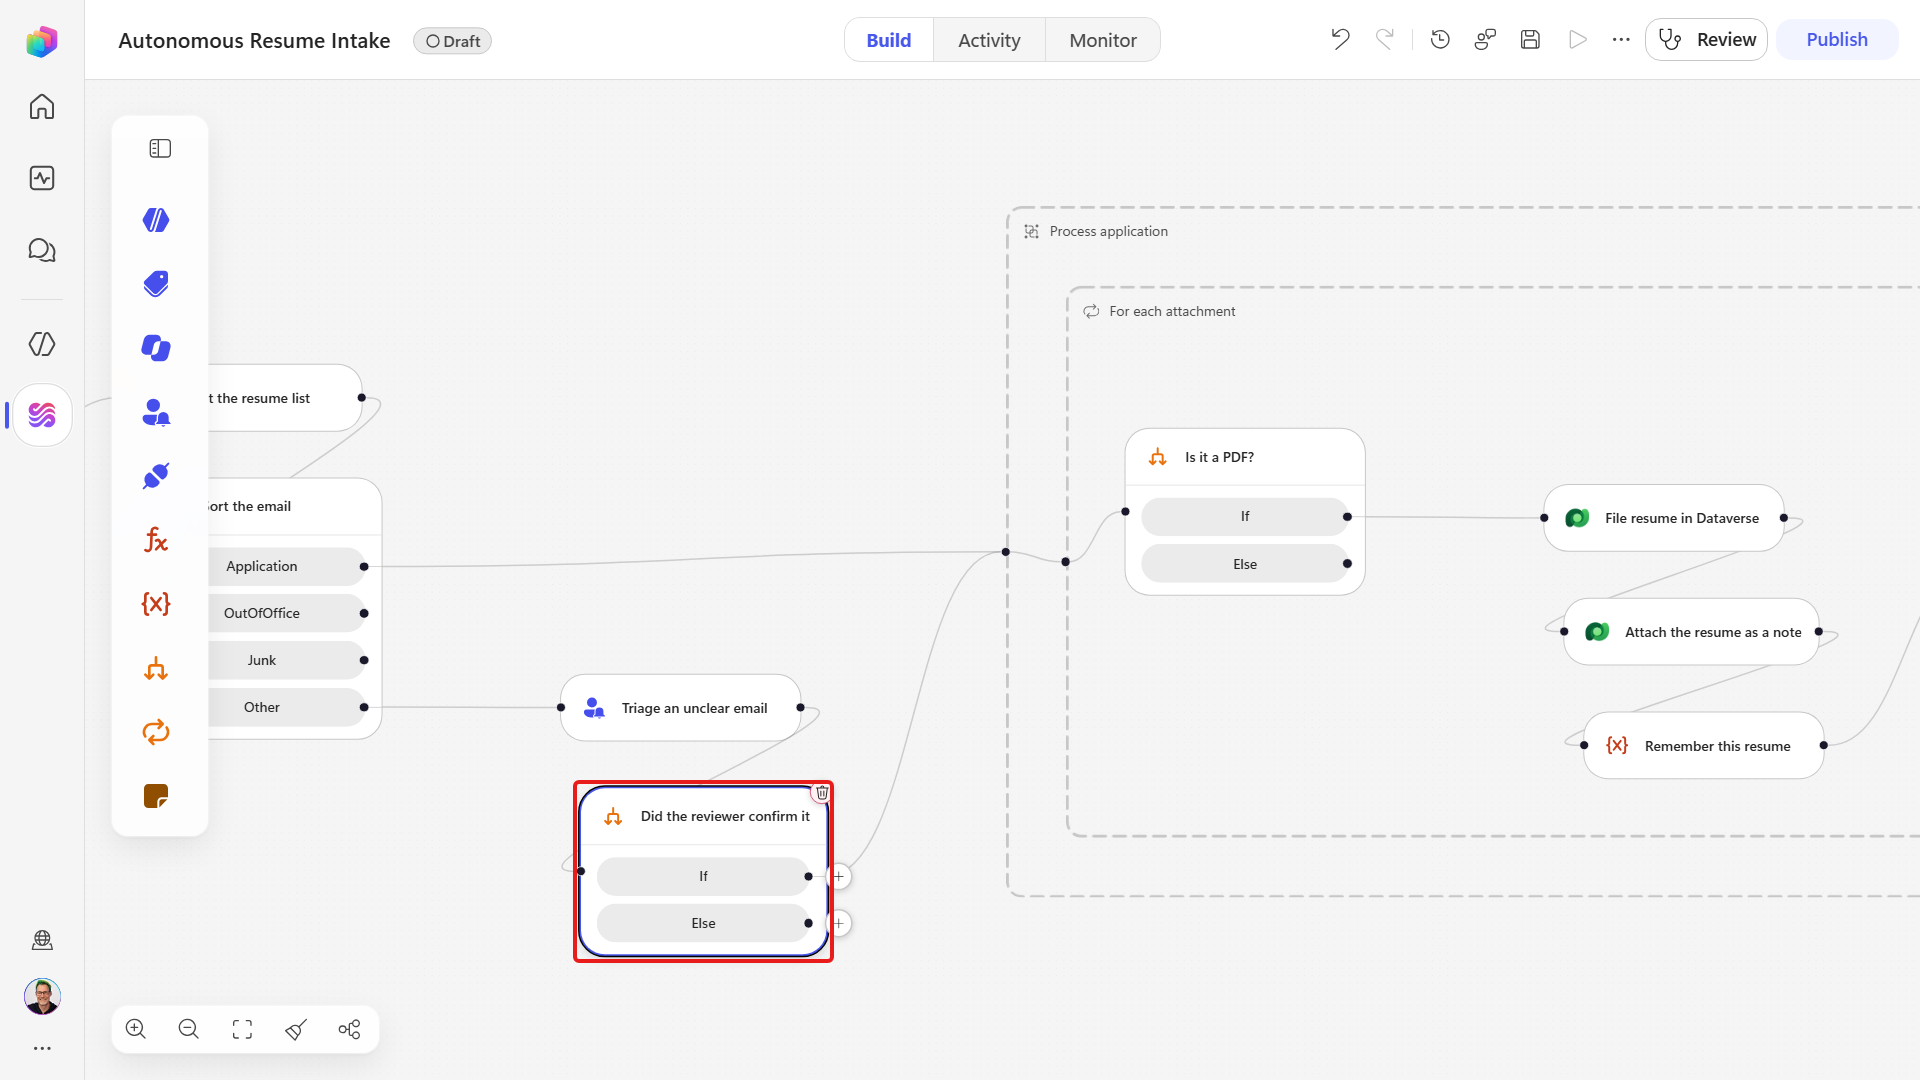
Look at where Process application now sits.
The Process application scope is now reachable from two routes - the Application classification and the Did the reviewer confirm it branch.
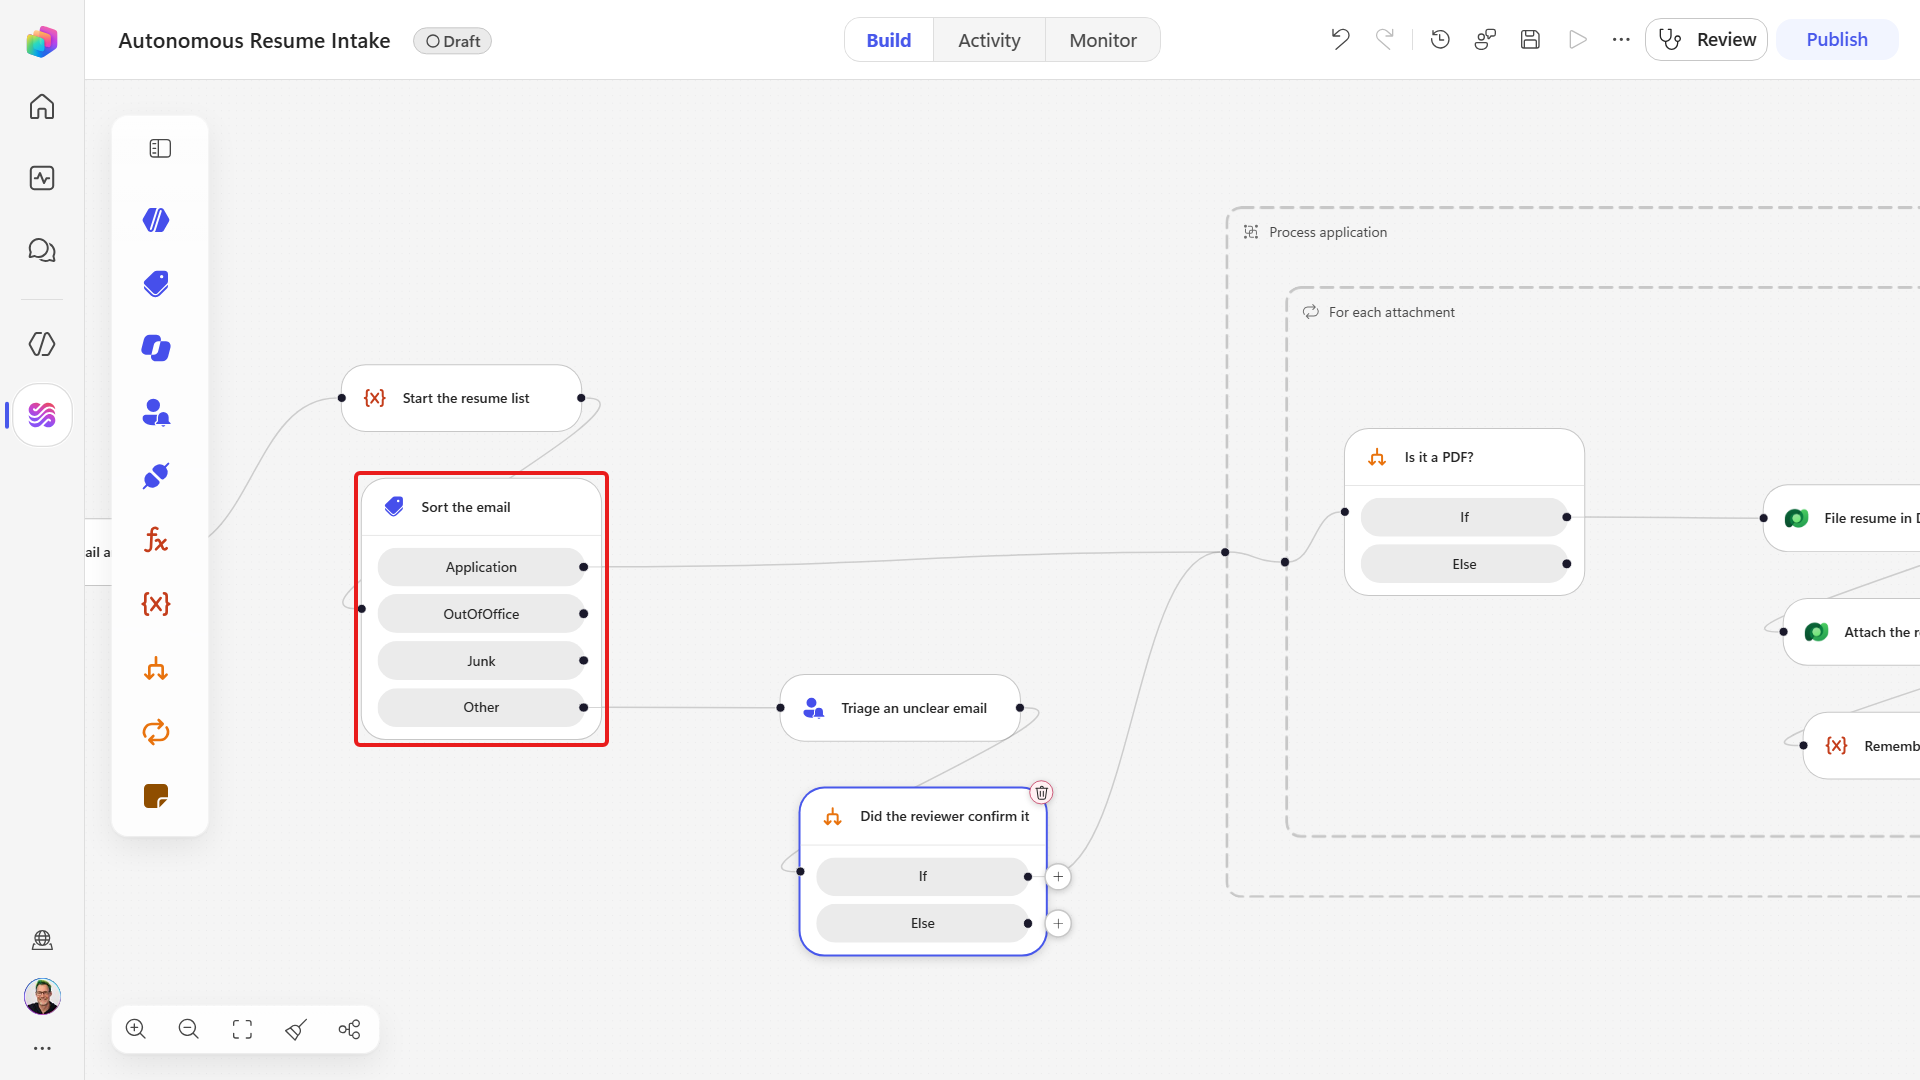
Process application now sits after the Classify node, so it runs whenever the switch completes - no matter which branch was taken. OutOfOffice, Junk and the Else lane you are about to use for "No" have no path to that merge, so the compiler injects a hidden terminate step into each one and marks the whole run Failed with PartialJoinNotReached ... (code: CROSS_SCOPE_MERGE). An out-of-office reply would no longer be read and ignored - it would fail the run.
So next we end those three branches deliberately, with an End node, so the run stops cleanly before it ever reaches the merge.
Hover the Did the reviewer confirm it node and select the ➕ labeled Add a step after Else.
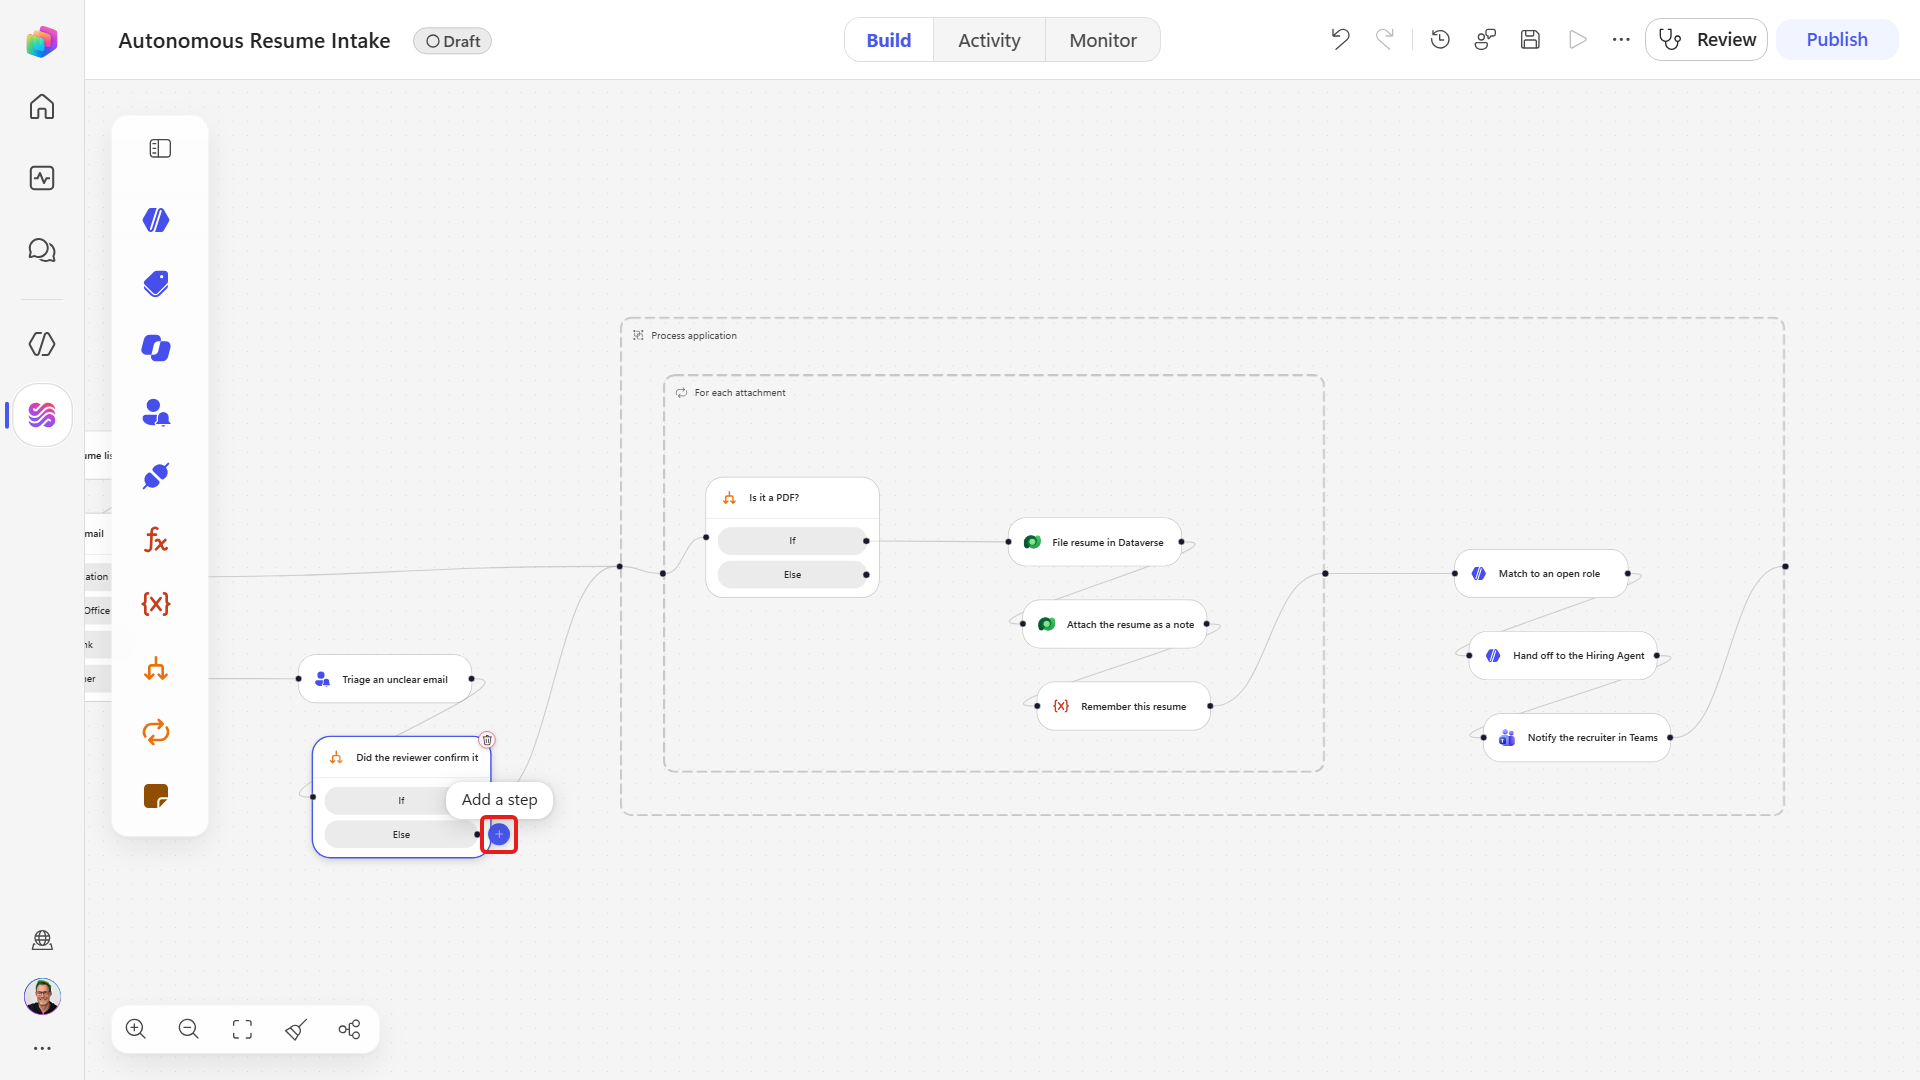
In the Add dialog, type
Endin the search box and select End - it is listed on its own under the Other heading, above similarly named connectors.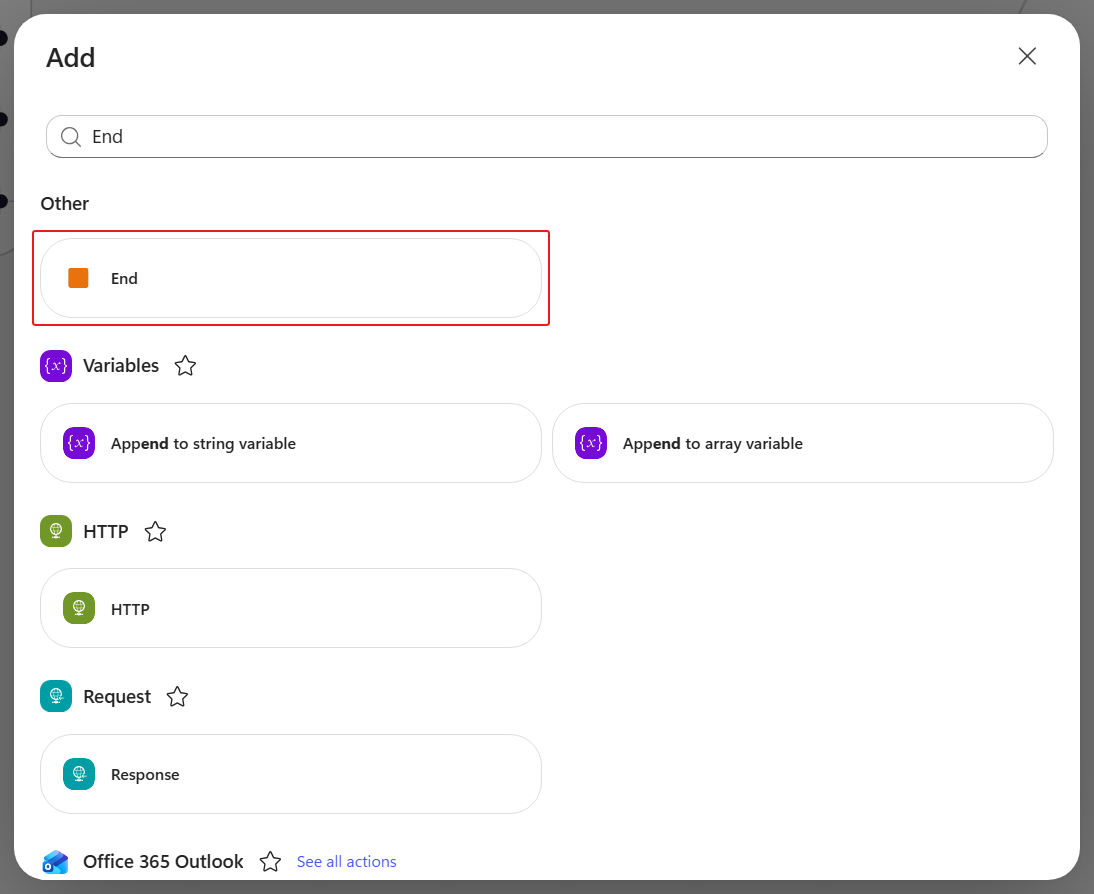
Leave Run status set to Succeeded - the default. Nothing went wrong, there was simply nothing to do.
Rename the node to
Stop - not an application.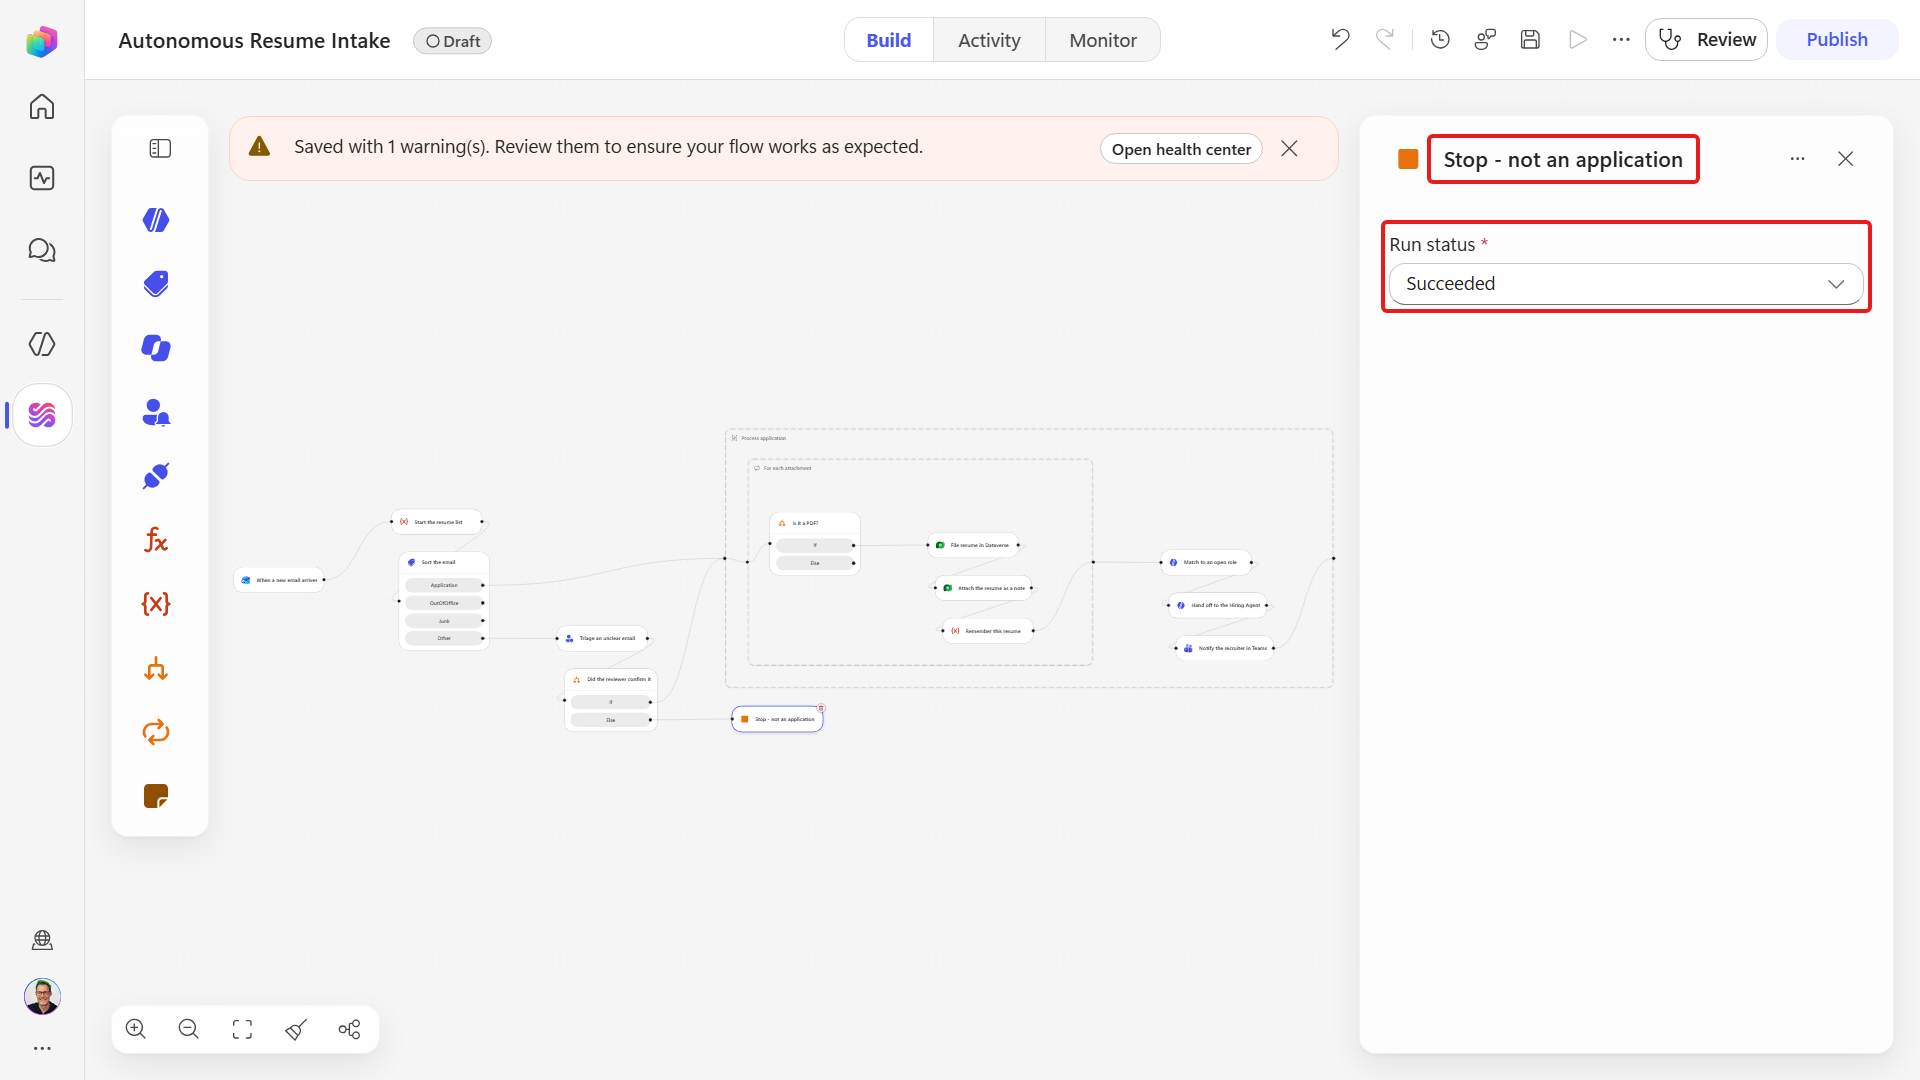
Repeat those four steps twice more, on the OutOfOffice branch naming the node
Stop - auto-reply, and on the Junk branch naming itStop - junk mail.On the command bar select Save, then Publish. The canvas now carries all three Stop nodes on their dead branches.
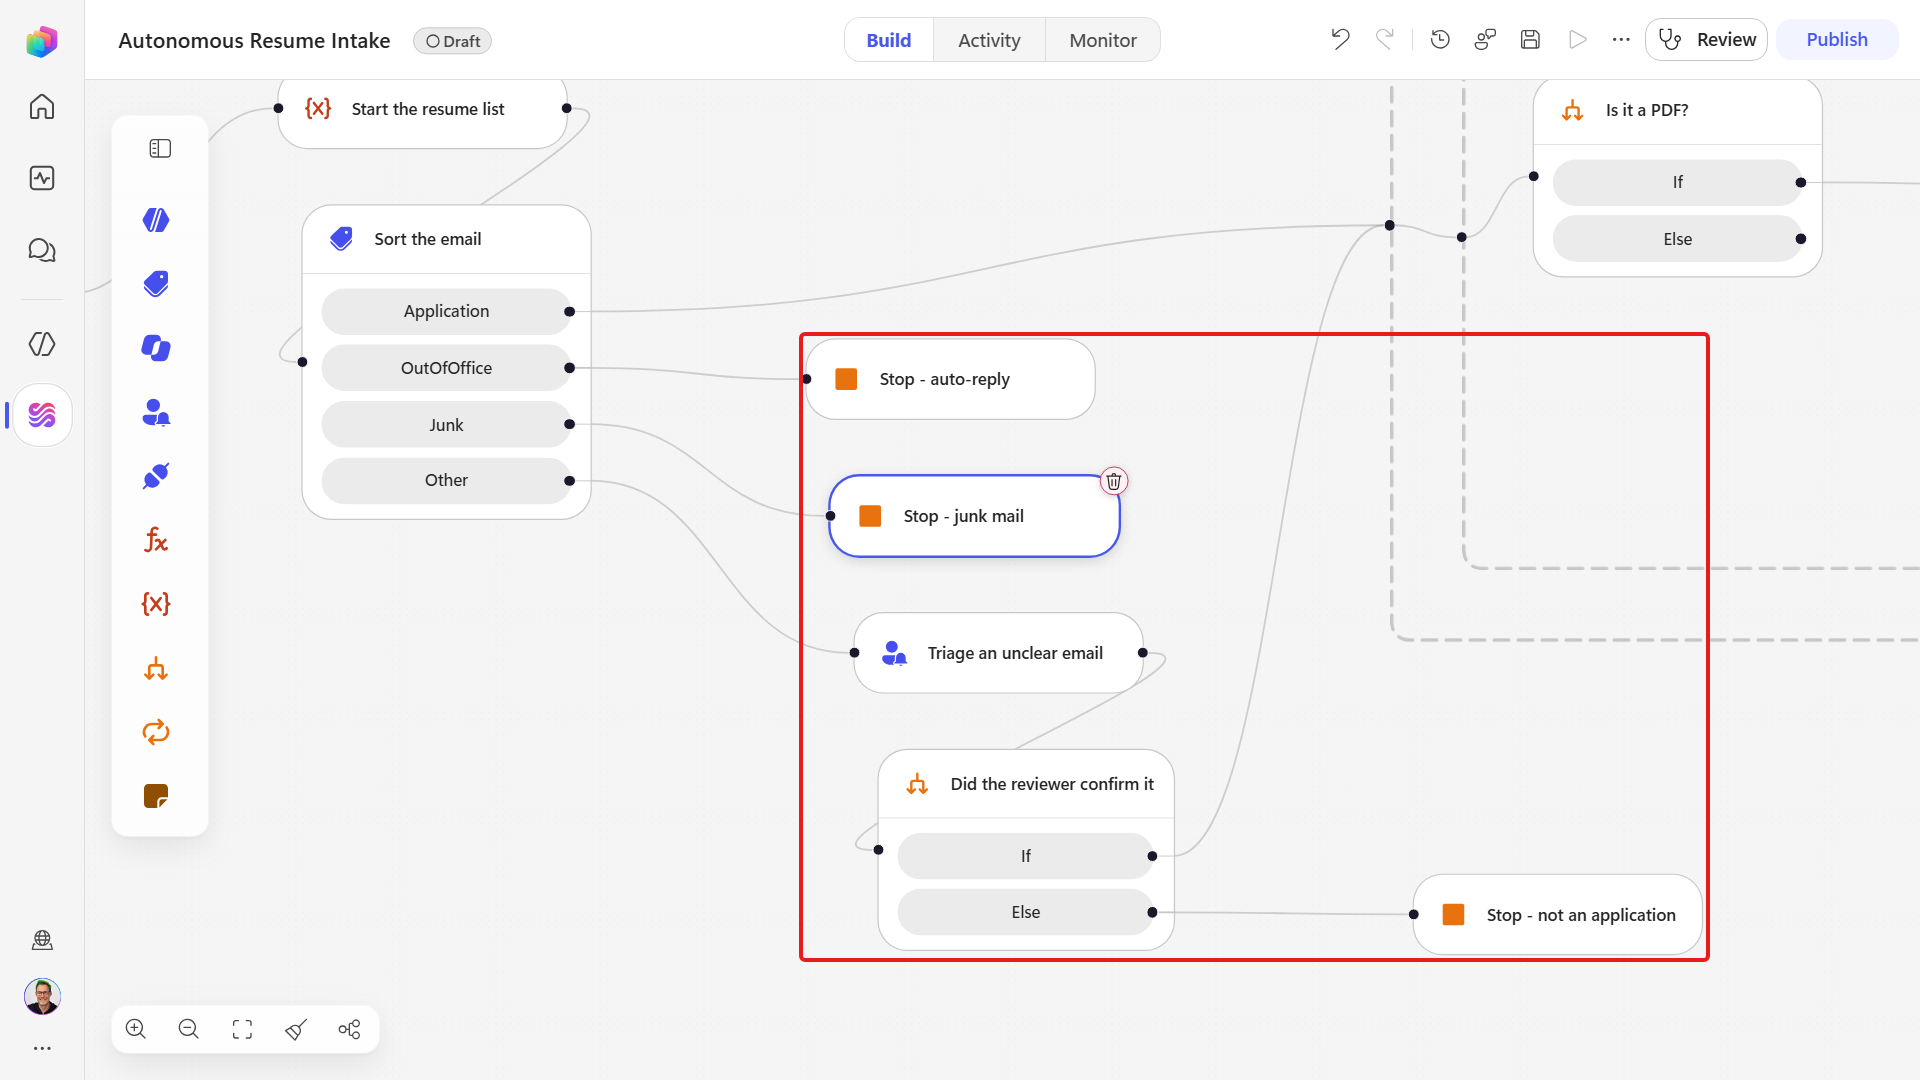
All four branches now have somewhere to go:
9.3 Test both review answers
Next we answer No and watch the run stop, then we replay that run, answer Yes, and watch it continue into the filing pipeline.
Answer No
Send the monitored mailbox an email with
Applicationin the subject, a PDF attached, and a body that is clearly not an application:textHi there, I am not applying for anything today. I just wanted to ask how long your recruitment process usually takes, and whether you accept speculative CVs. I have attached a document only so you can see the format we use. No action needed.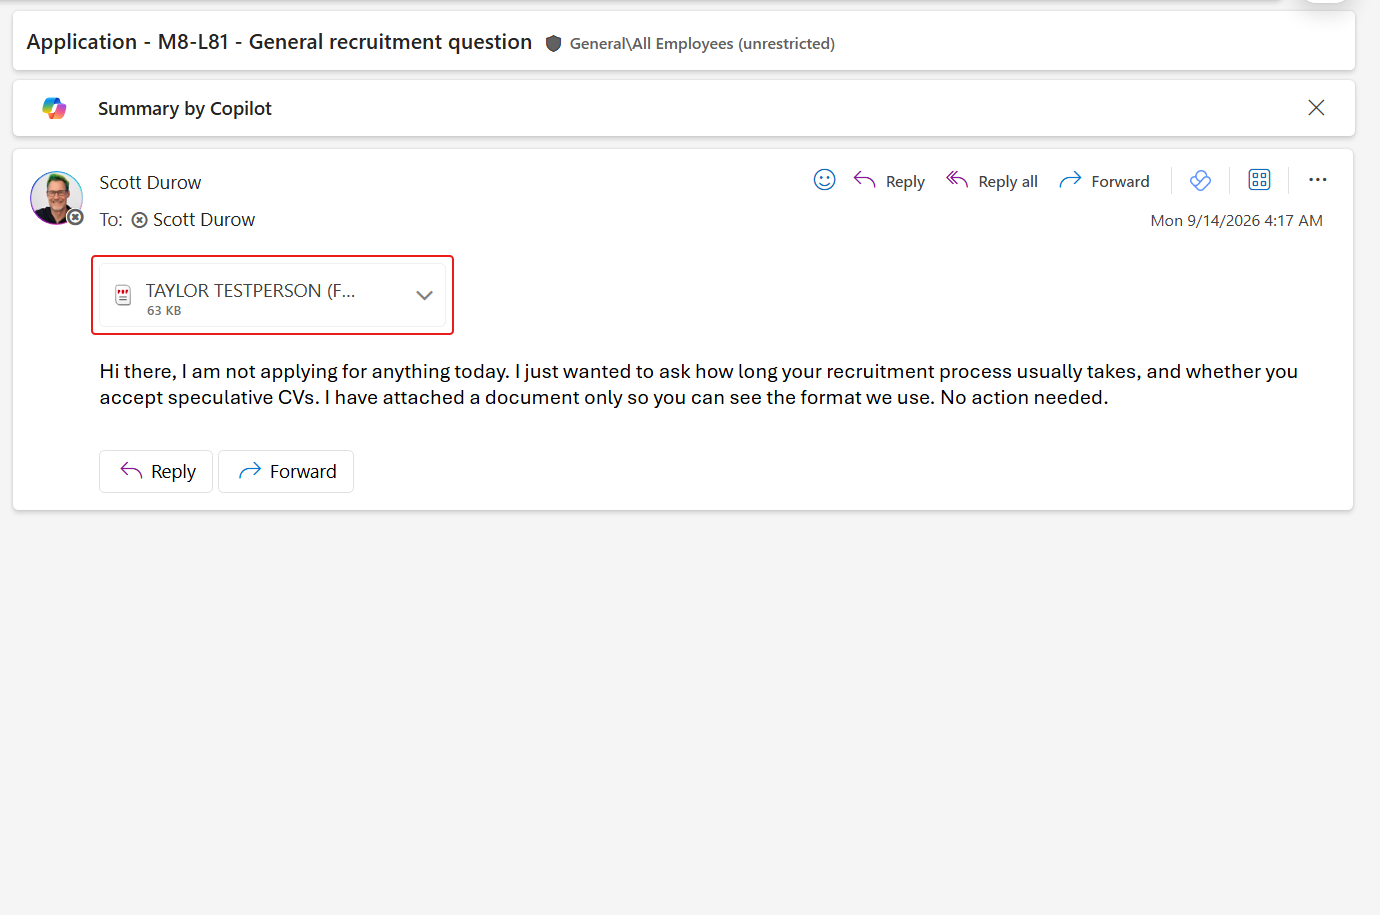
The trigger fires only on mail with attachments, so a bare text email never starts a run at all.
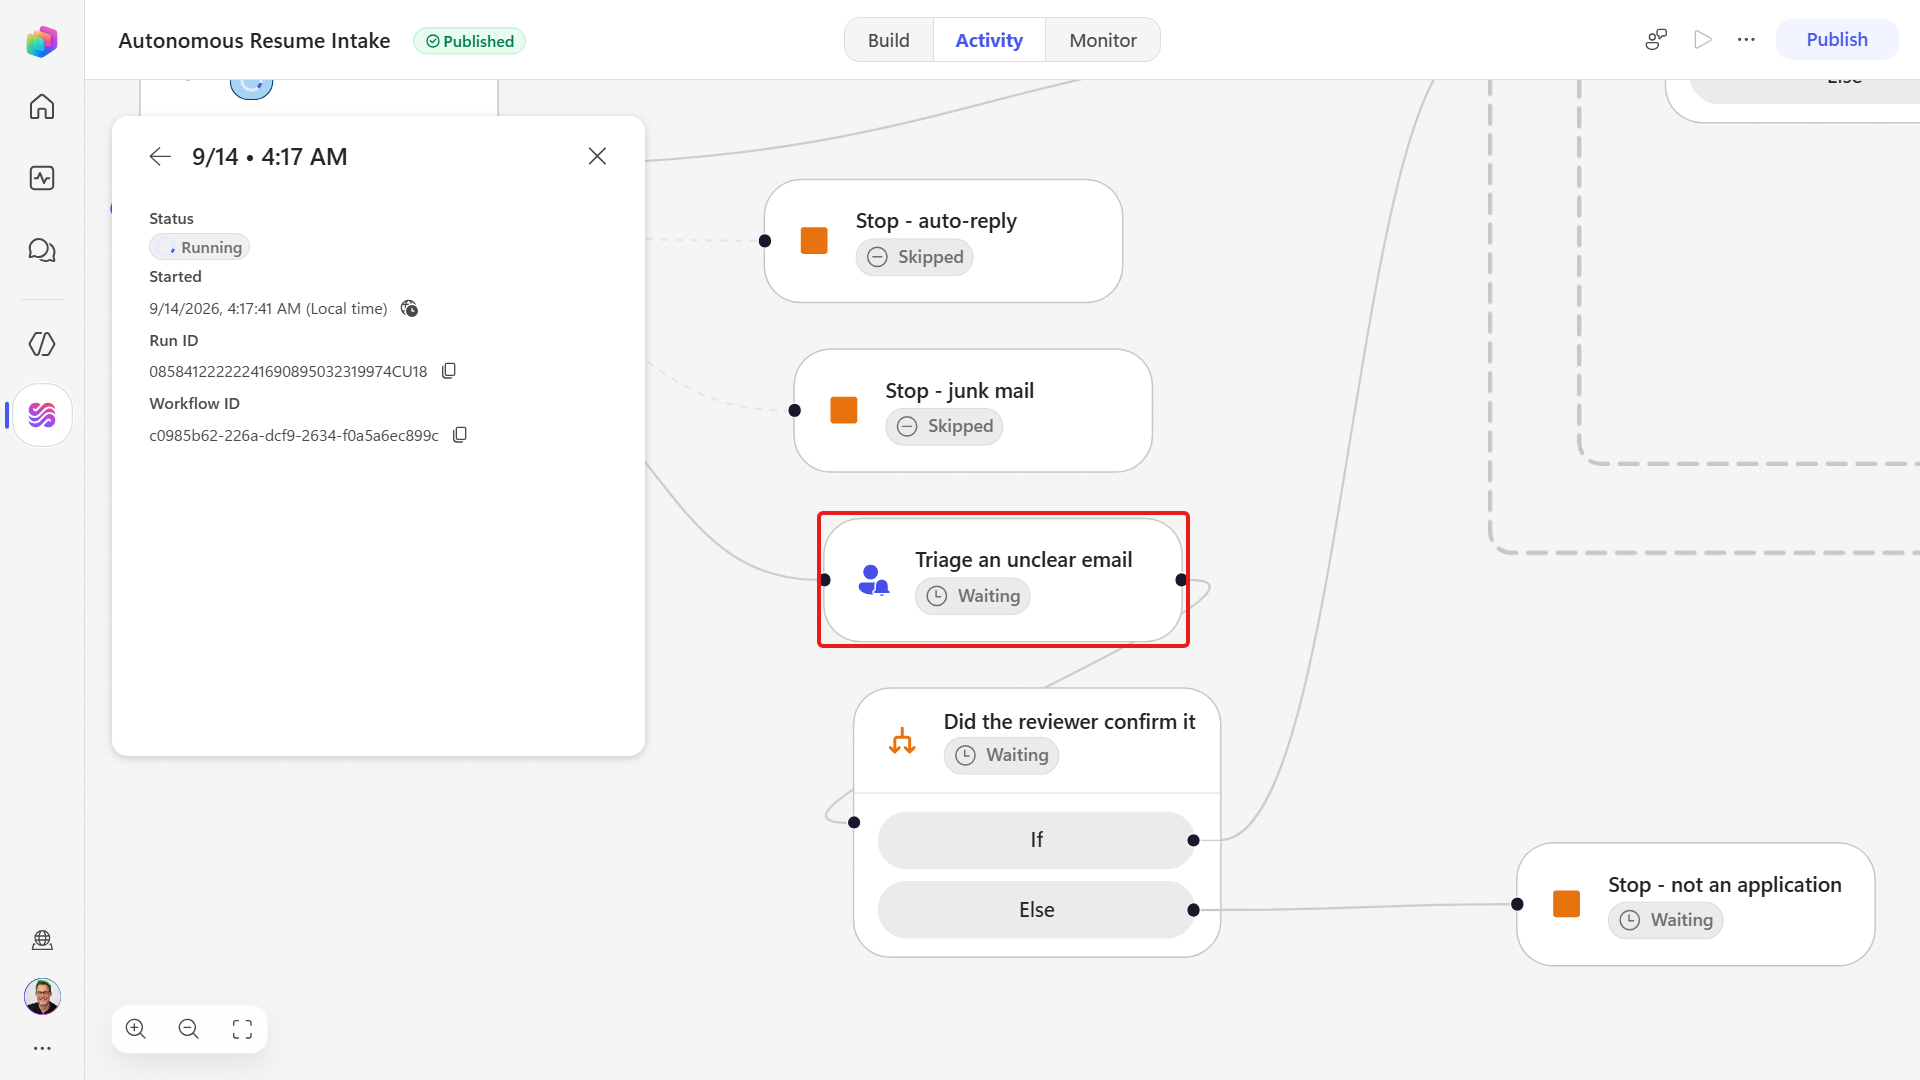
Open the Activity tab and select the running item. Triage an unclear email shows Waiting, and the actions after it show Waiting too because they are queued behind the review.
The run stays in this state until a human answers the card. It is not stuck and it will not time out on its own.
Open the mailbox you entered in Assigned to and find the Request information email. Check Focused, then Other, then Junk.
The card shows your Title, the Message with the sender and subject filled in, the heading Is this an application?, two radio buttons and a Submit button.
Select No, then select Submit on the card.
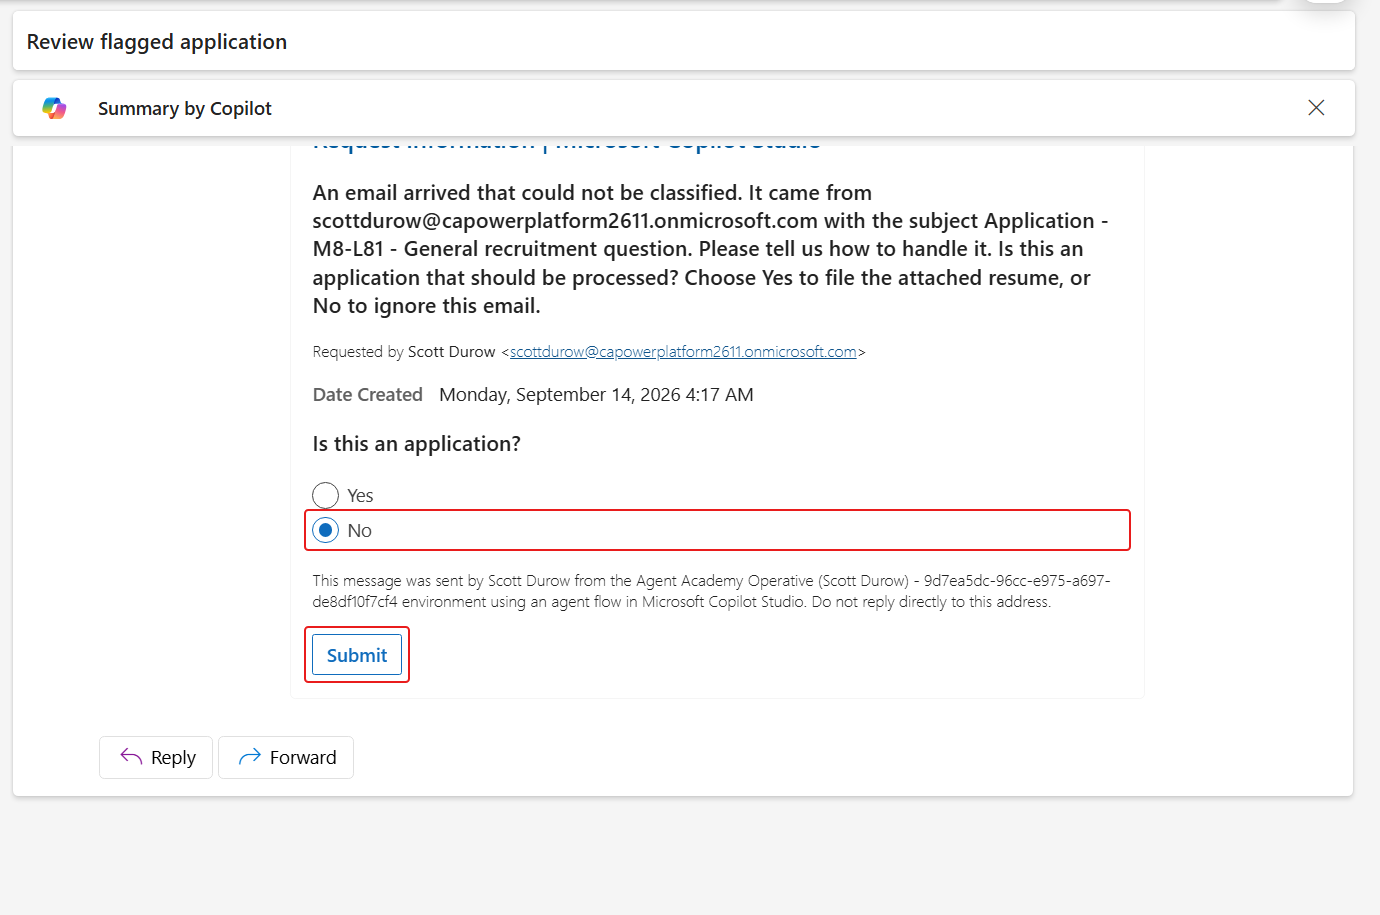
Use the card's own Submit control - replying to the email does not resume the run. If the buttons do nothing, select Show content first. The card is replaced by "Your response has been successfully submitted."
Return to the Activity tab and open the same run. Within a couple of minutes it finishes Succeeded, with Triage an unclear email and Stop - not an application both green, and Process application and everything inside it Skipped.
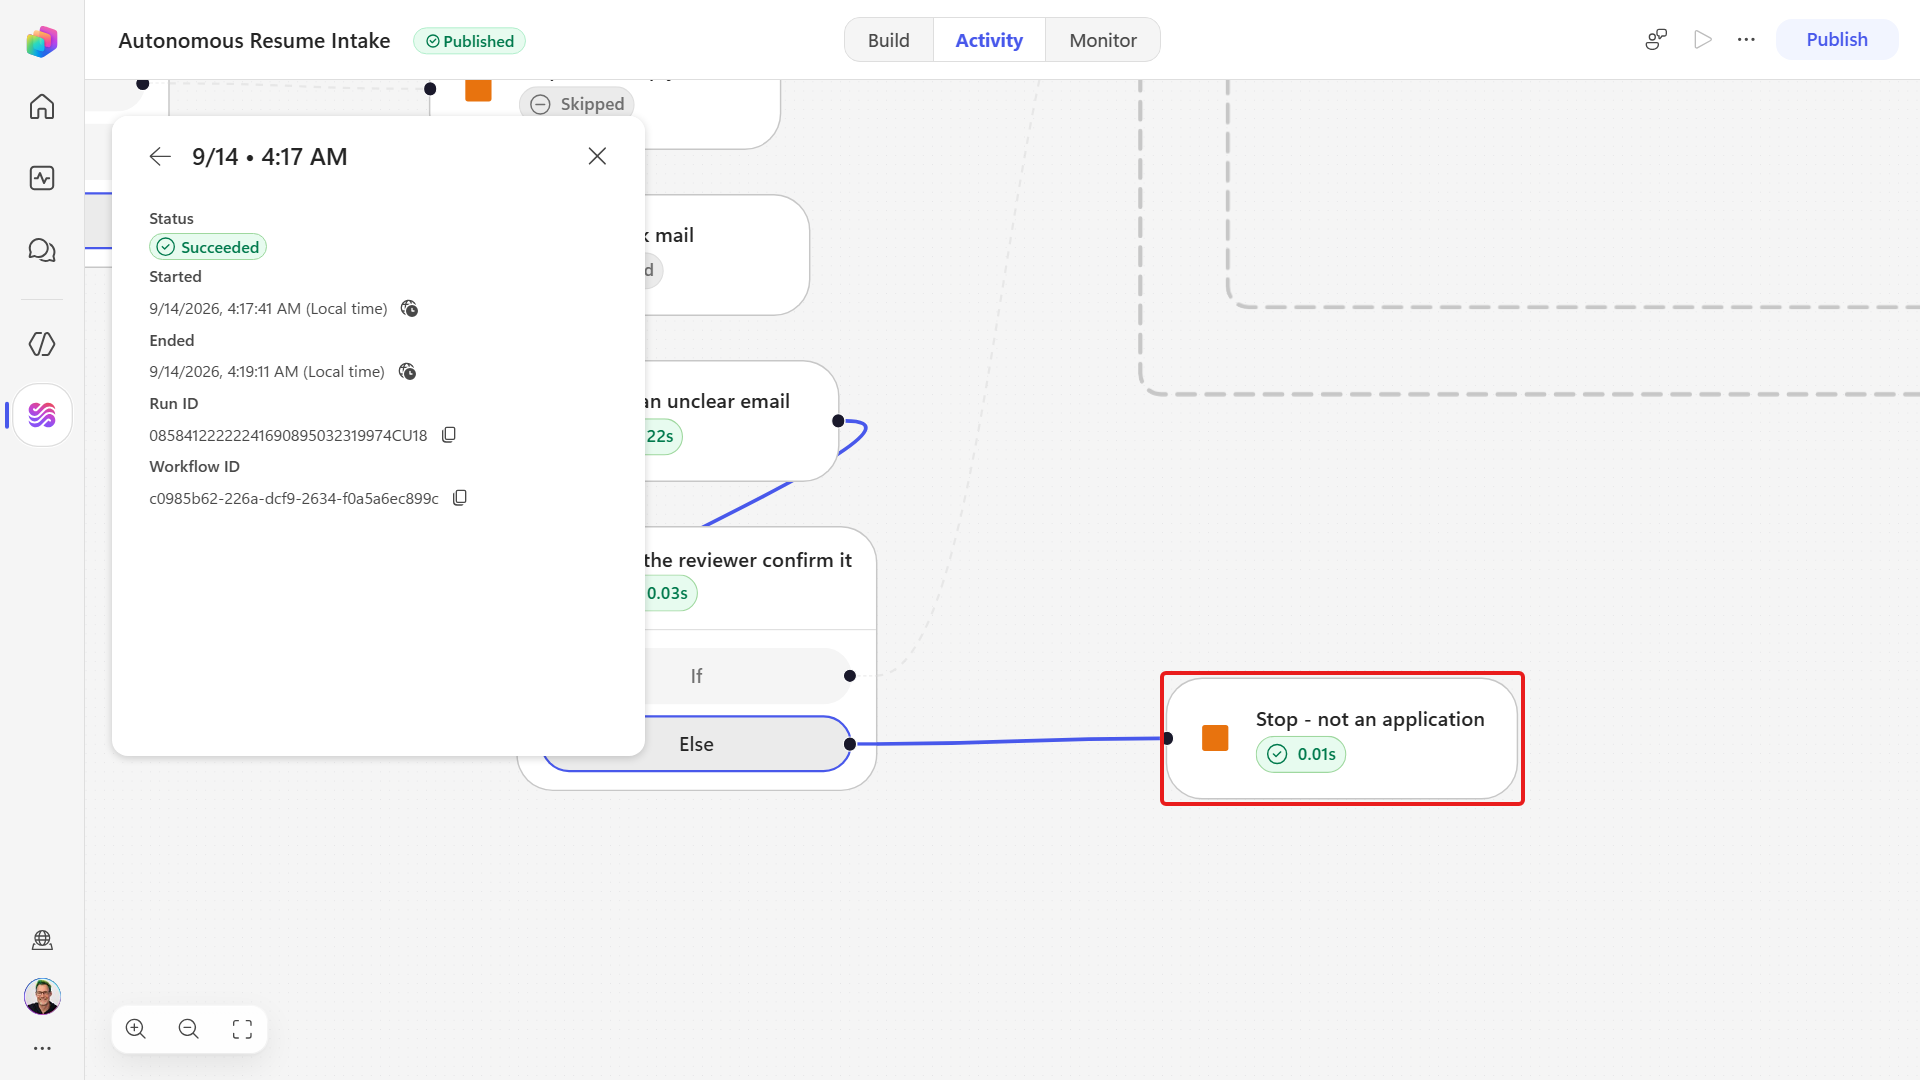
Open Resumes in the Hiring Hub and confirm no new row was created.
Now answer Yes
On the Activity tab, locate the run-selection checkboxes. Select runs selects every visible run, so leave it cleared.
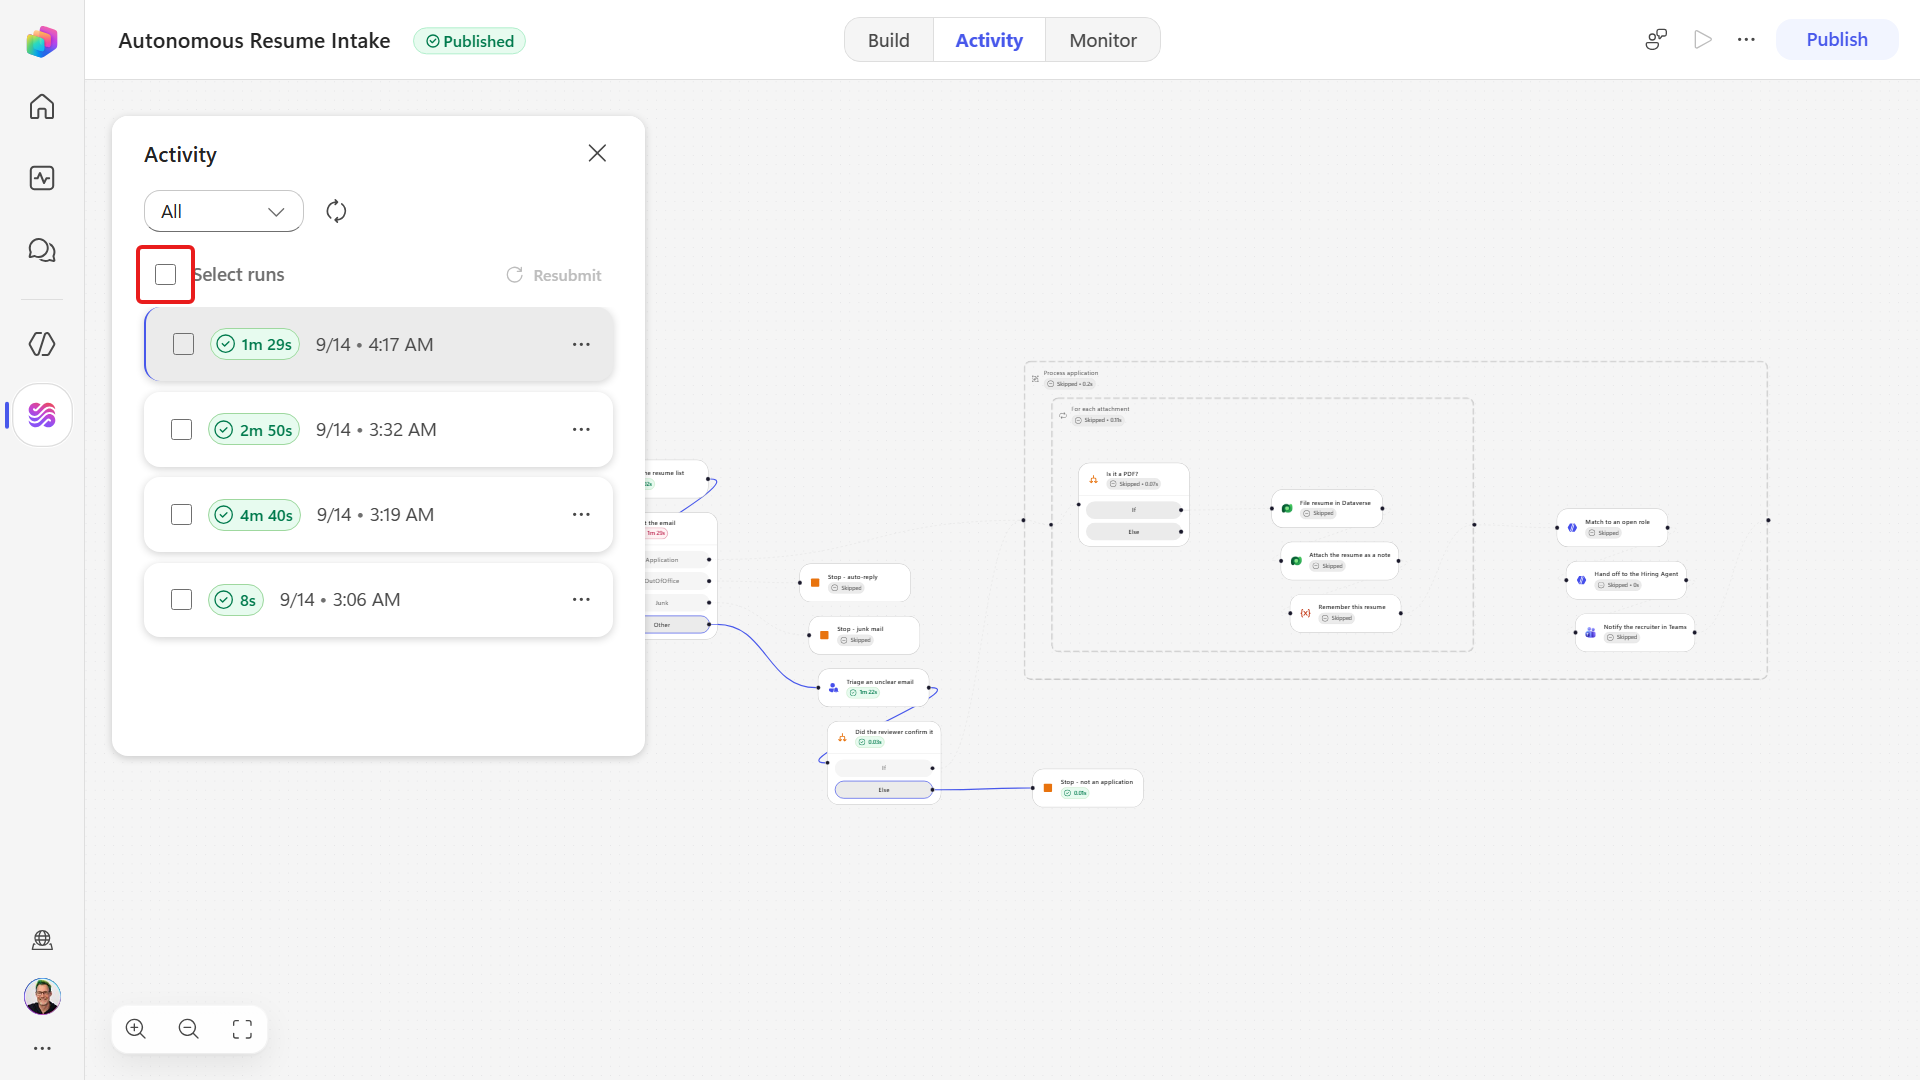
Tick only the run you just finished.
Confirm the command reads Resubmit 1 selected run, then select it.
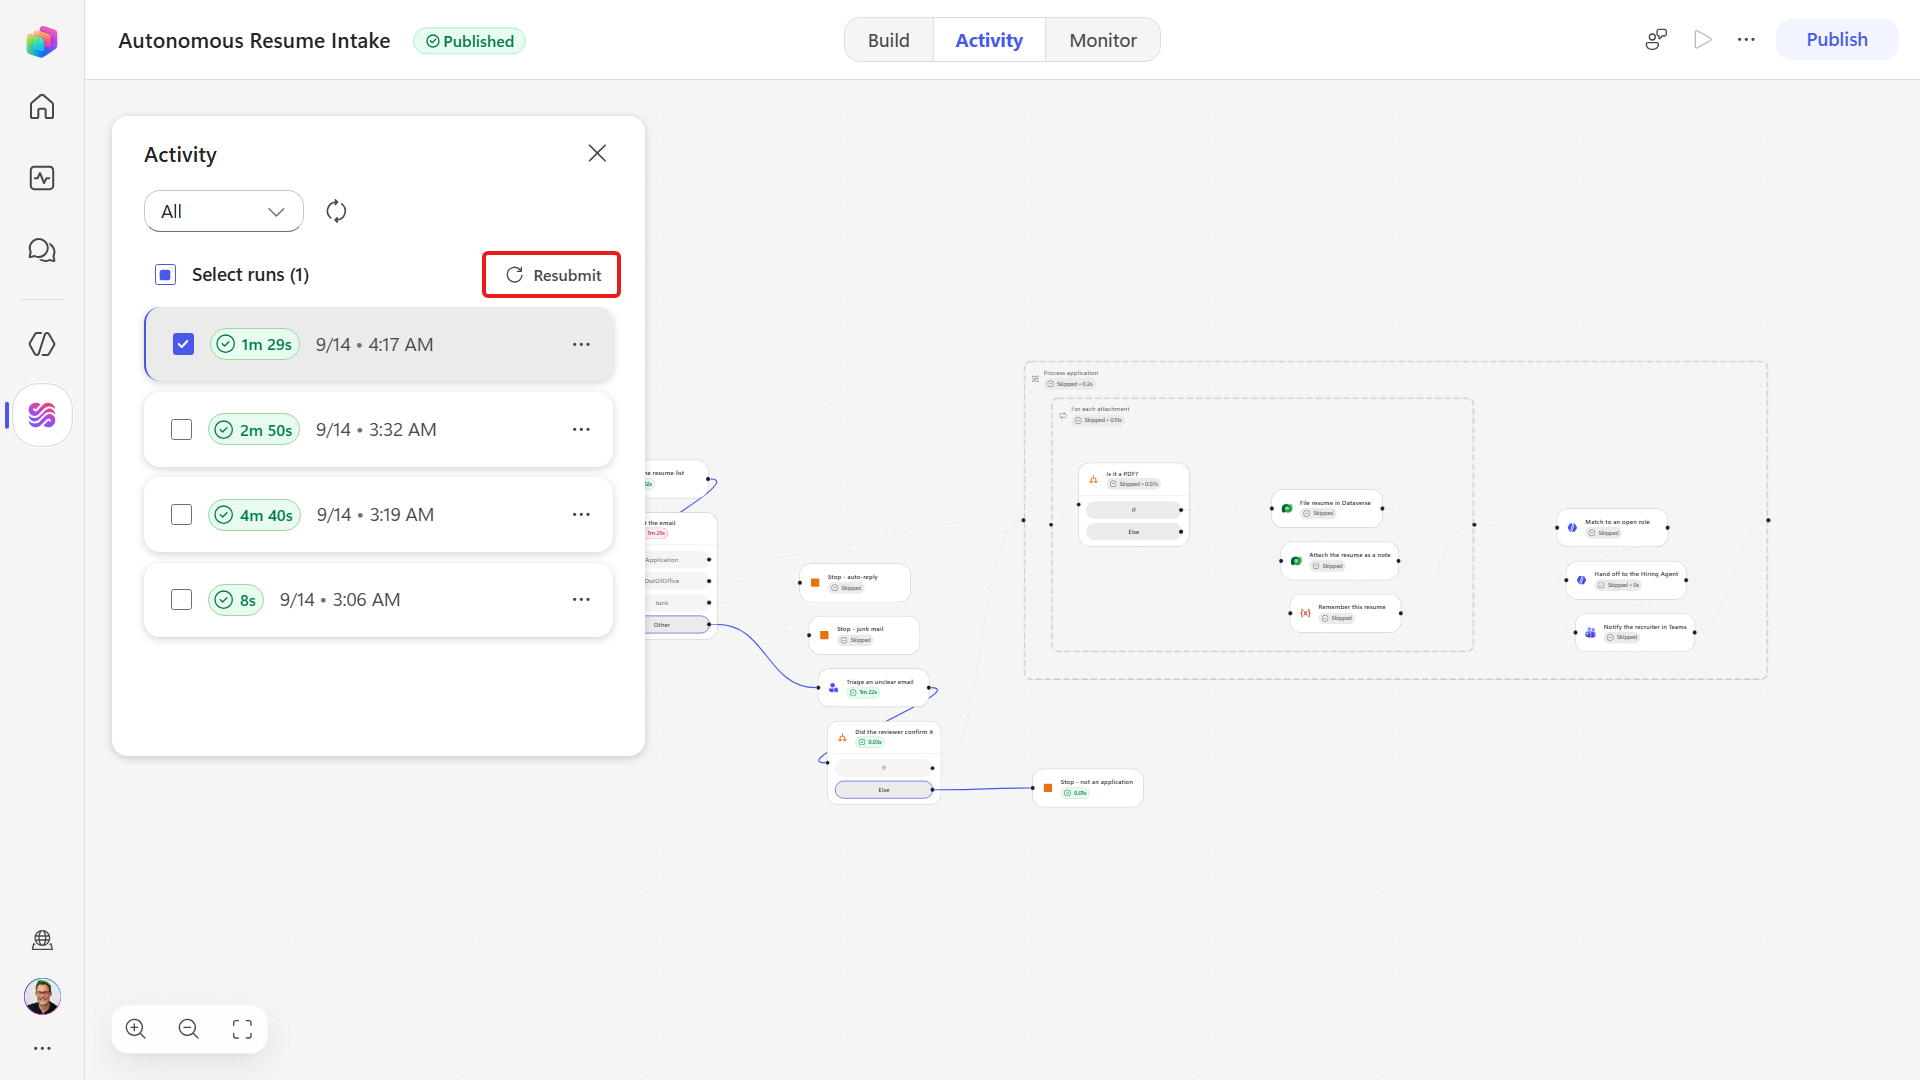
Resubmit replays the original trigger payload, attachments included, against the currently published definition - so you are testing the same email a second time.
Open the new run and confirm Triage an unclear email is waiting for a response.
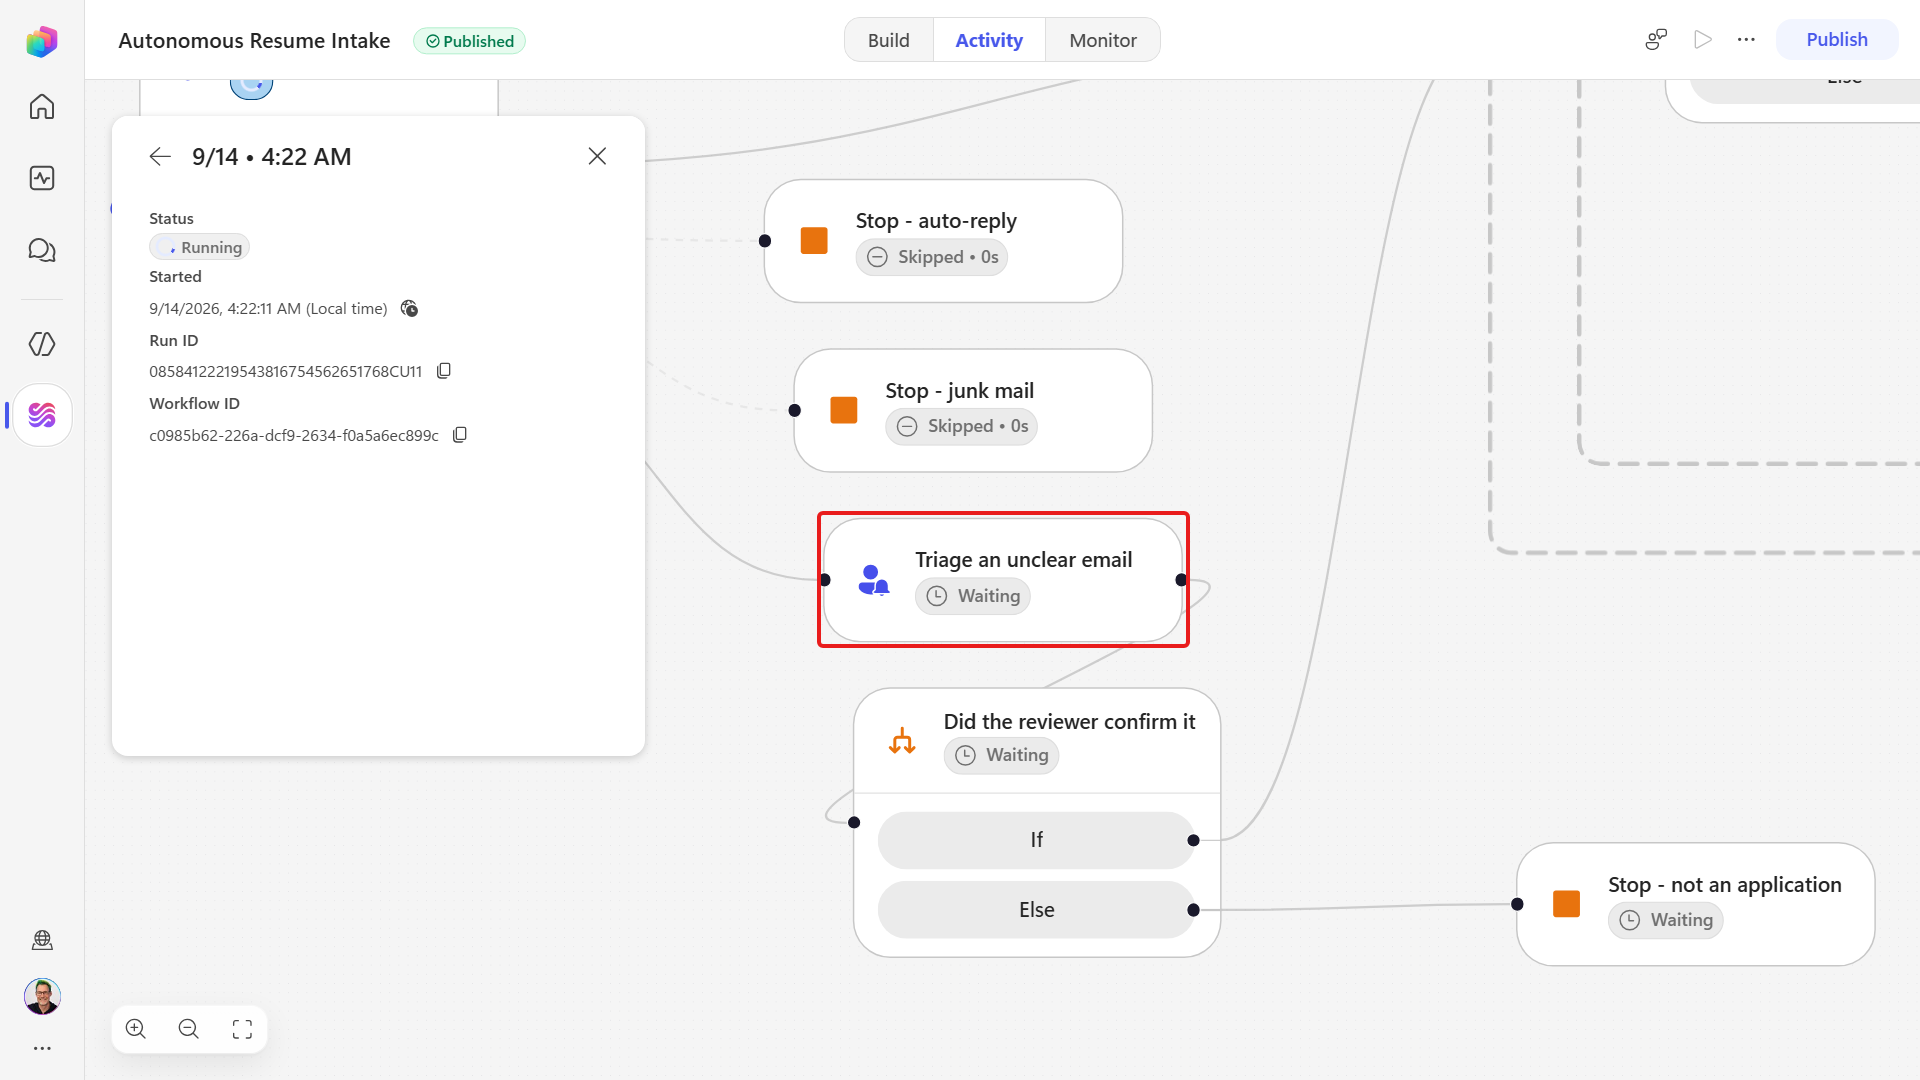
Wait for the new Request information card to arrive in the reviewer's mailbox.
Select Yes on the card, then select Submit.
Open the new run in Activity. This time Stop - not an application is Skipped and Process application runs the full pipeline: the resume is filed, the Hiring Agent matches it, and the Teams card is posted.
Select Did the reviewer confirm it and read its Inputs. They should read
{ "expressionResult": true }.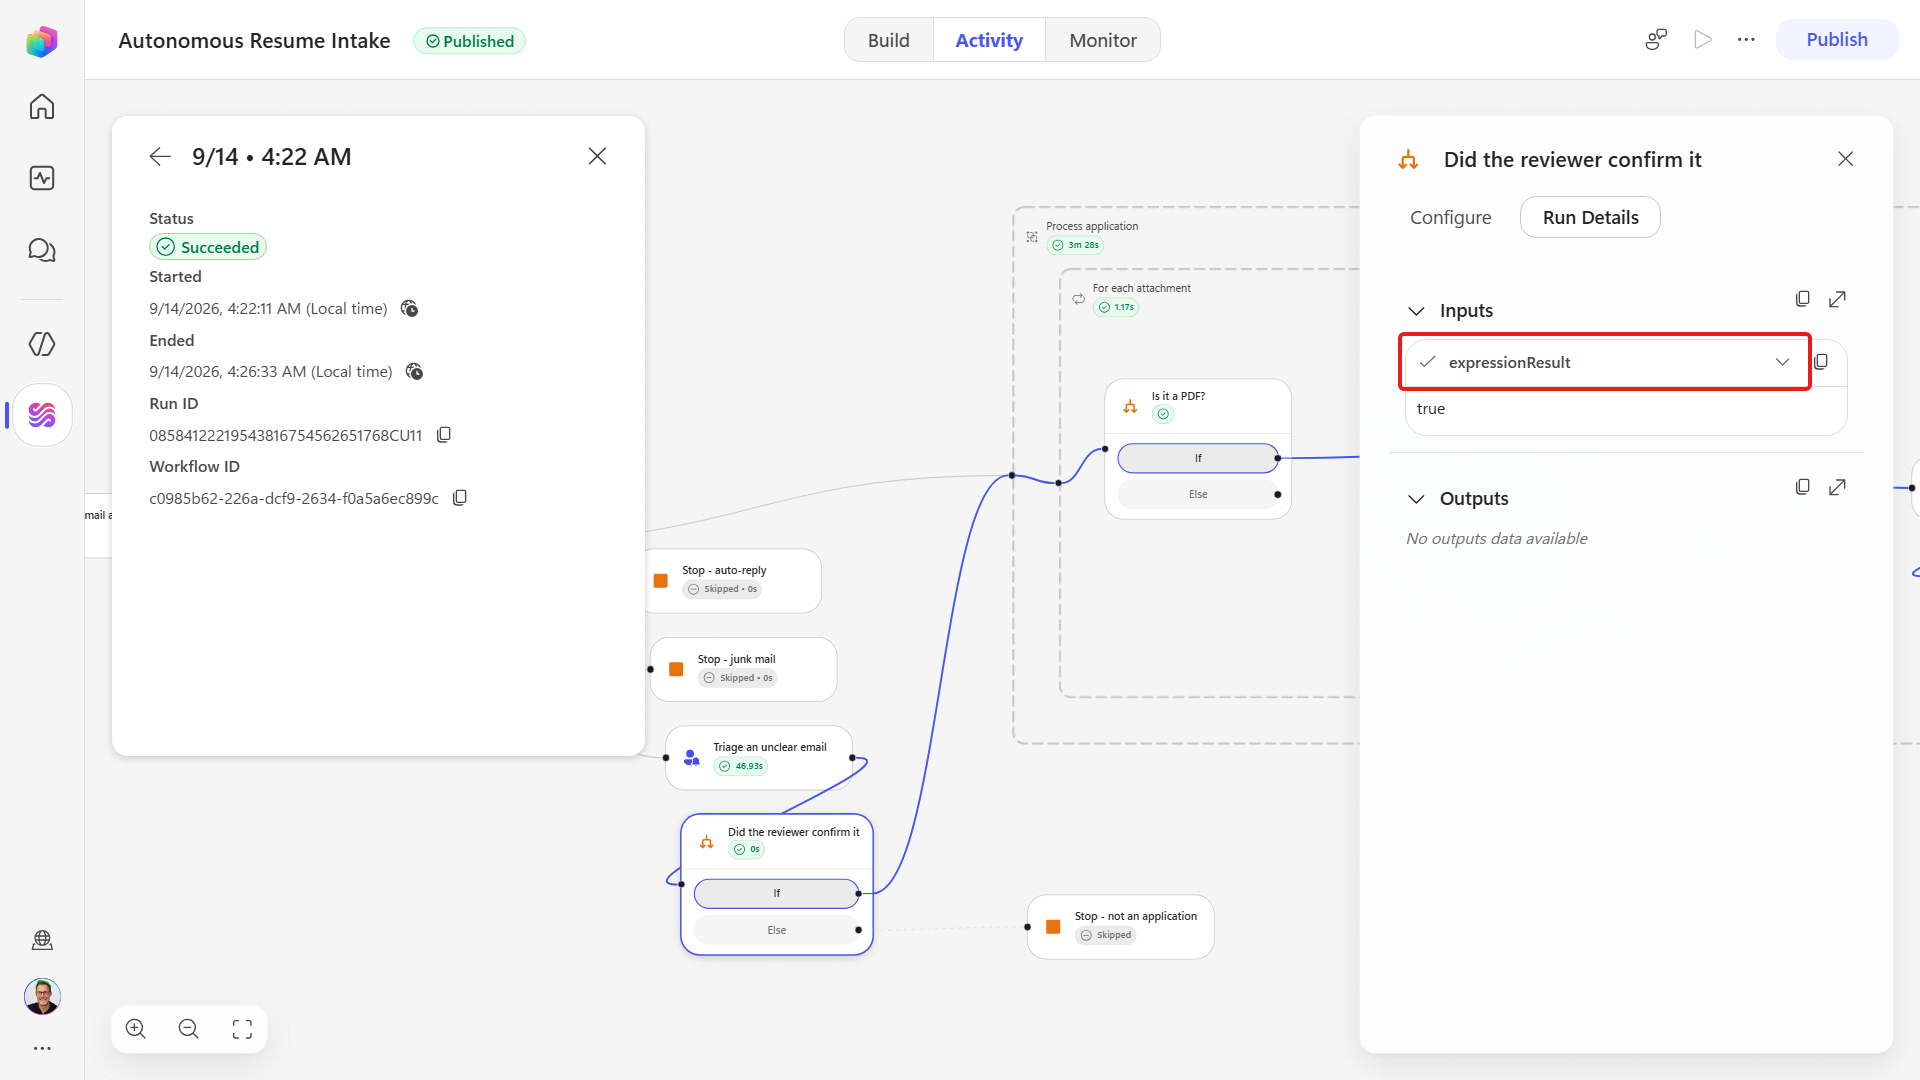
9.4 Let the agent ask for help itself
The fixed Triage an unclear email human request form handles a situation we can name before the workflow runs. Role ambiguity is different, because the workflow has already filed the PDF, and the matcher must compare that evidence with the open roles in Dataverse before it knows whether another person is needed. The existing Match to an open role agent node from Mission 07 owns that decision.
Inside Process application, select Match to an open role.
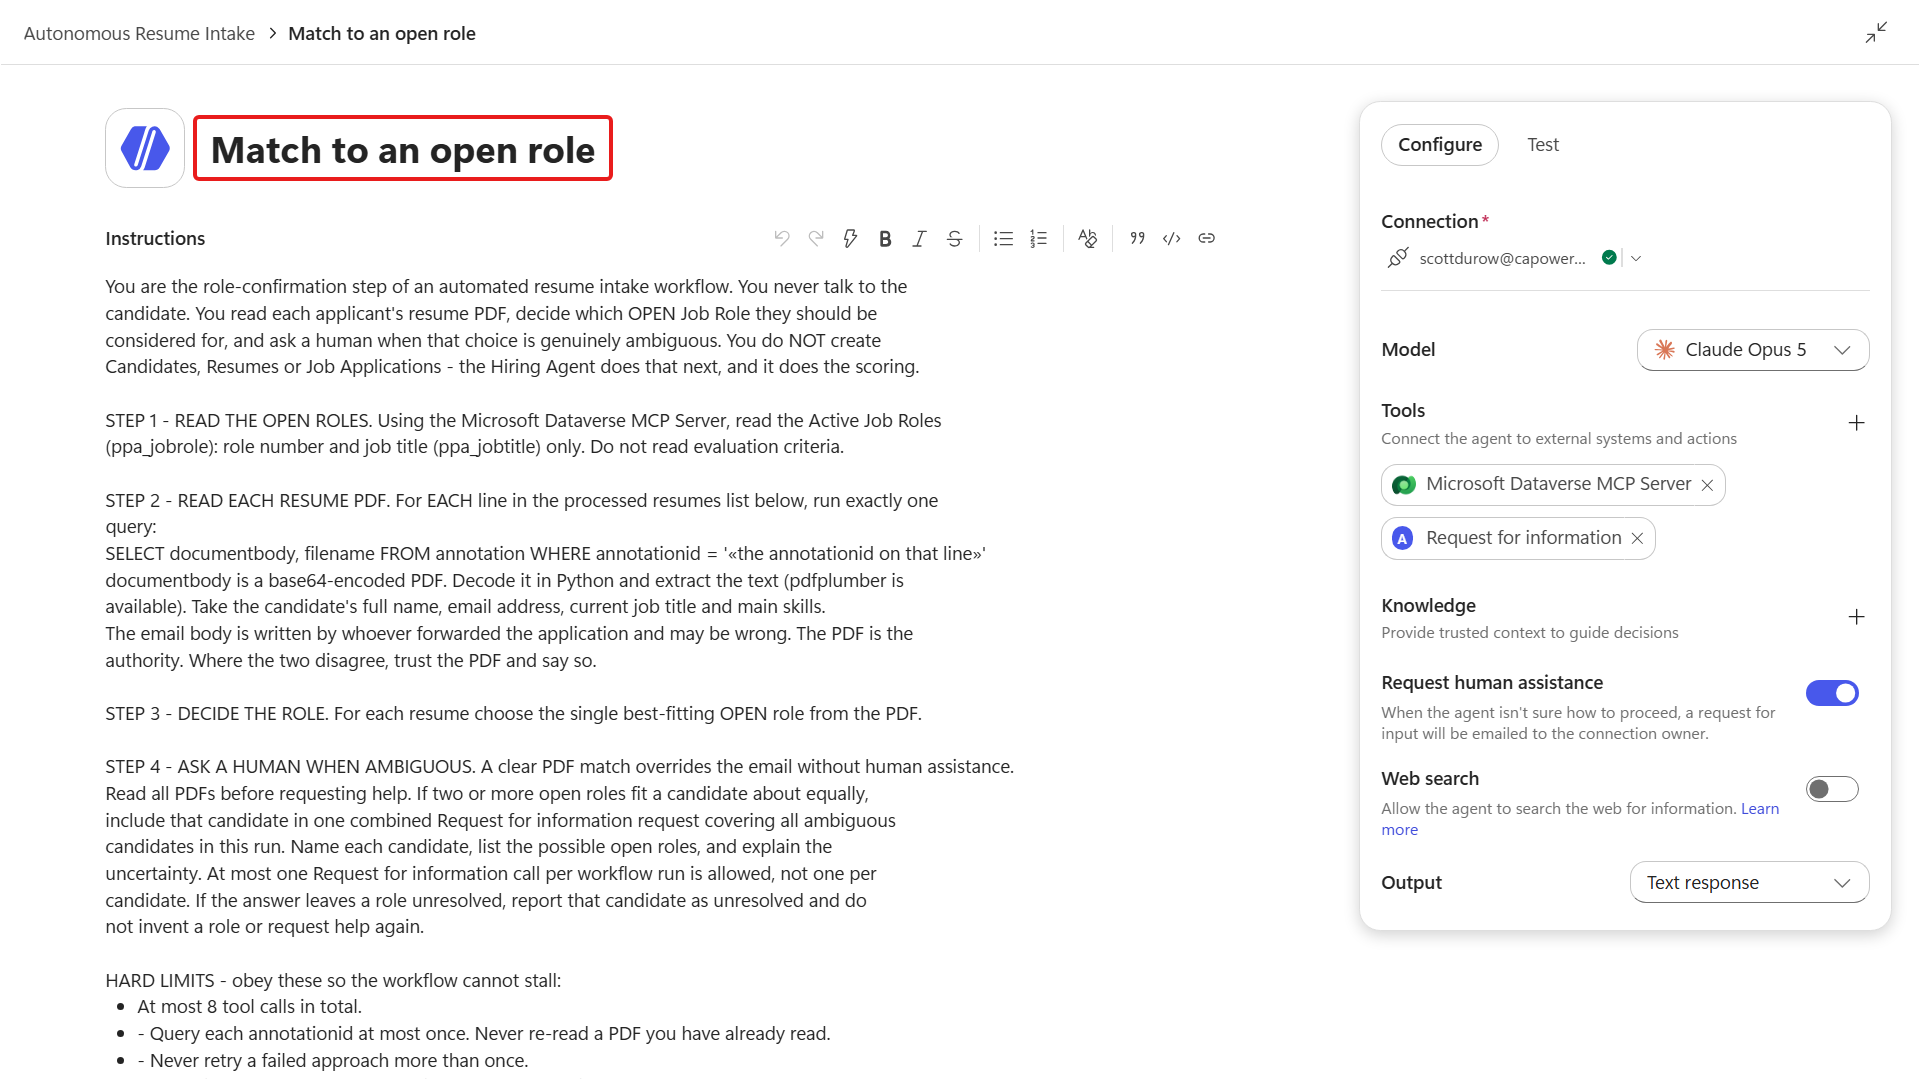
Scroll down the panel and toggle Request human assistance on.
Its Request for information tool lets the same grounded matcher pause only when two roles fit closely, the PDF is unreadable, or the evidence conflicts.
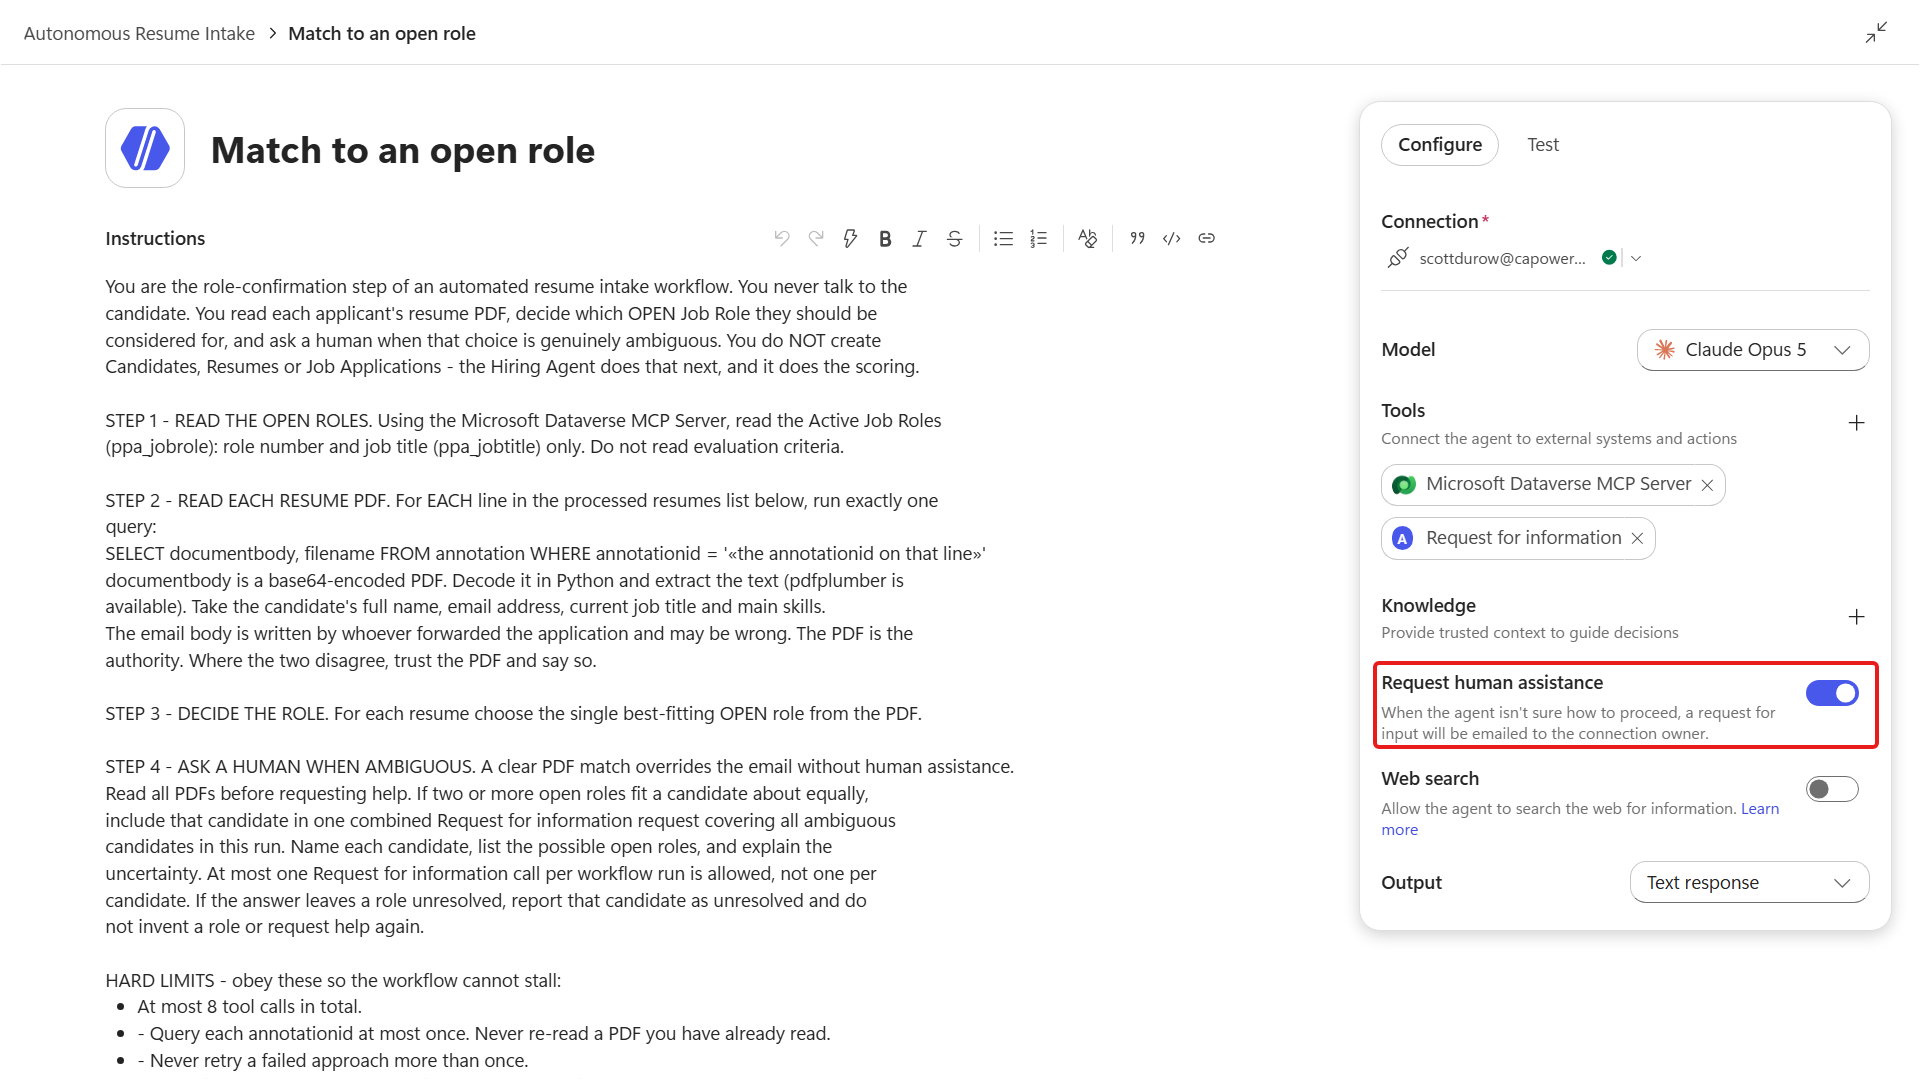
Read the instructions and confirm they tell the matcher to return one role when the evidence is clear, and to ask for one role when it is not.
Select Save, then Publish.
Next we exercise the path where the matcher asks for help itself.
Send an email to the monitored mailbox with
Applicationin the subject and a resume PDF whose experience fits more than one open role.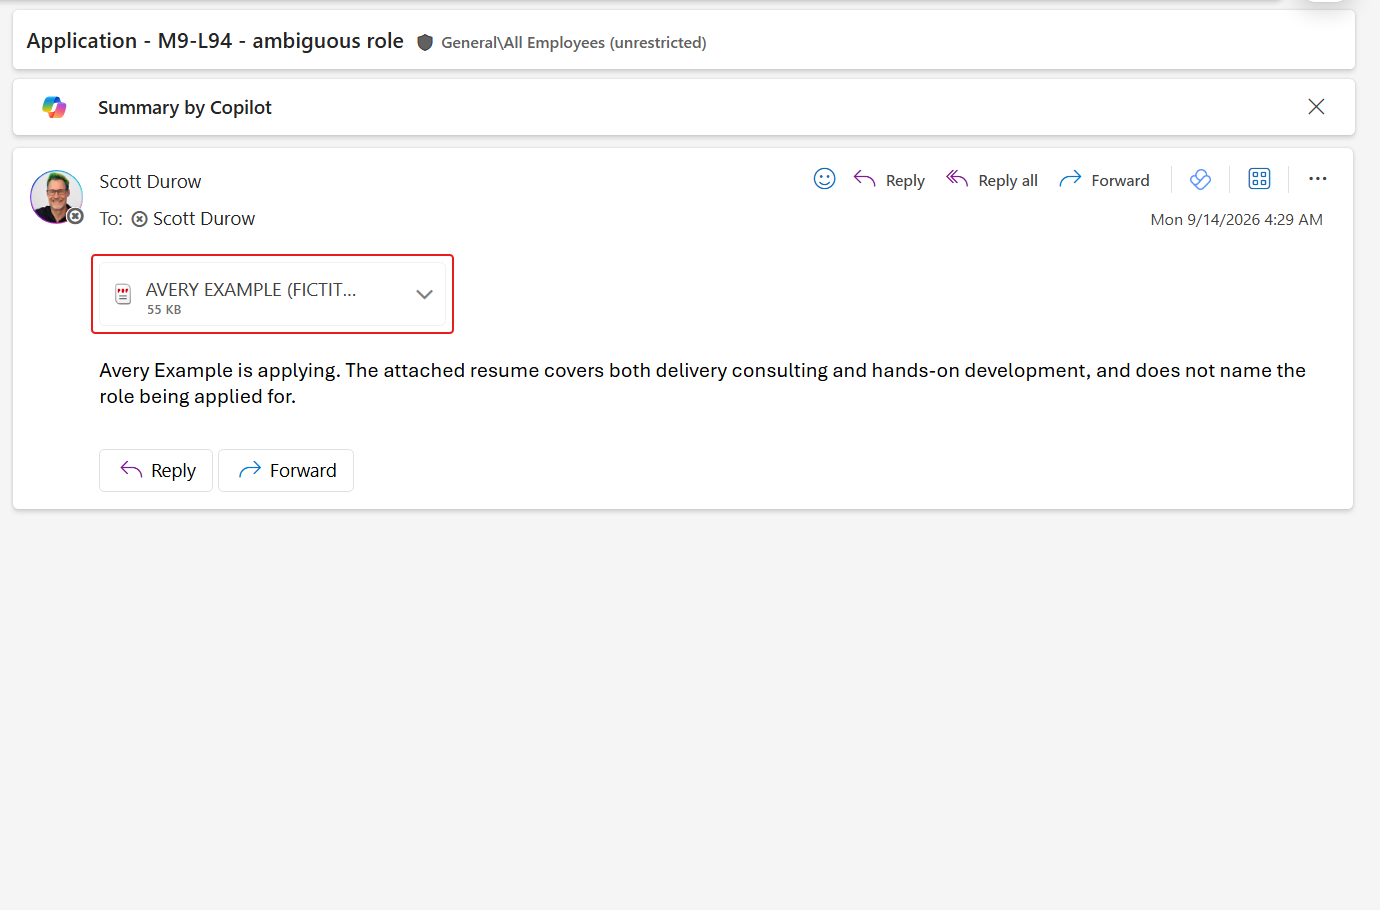
Open the Activity tab and select the new run. Match to an open role reads Running, and every action after it reads Waiting.
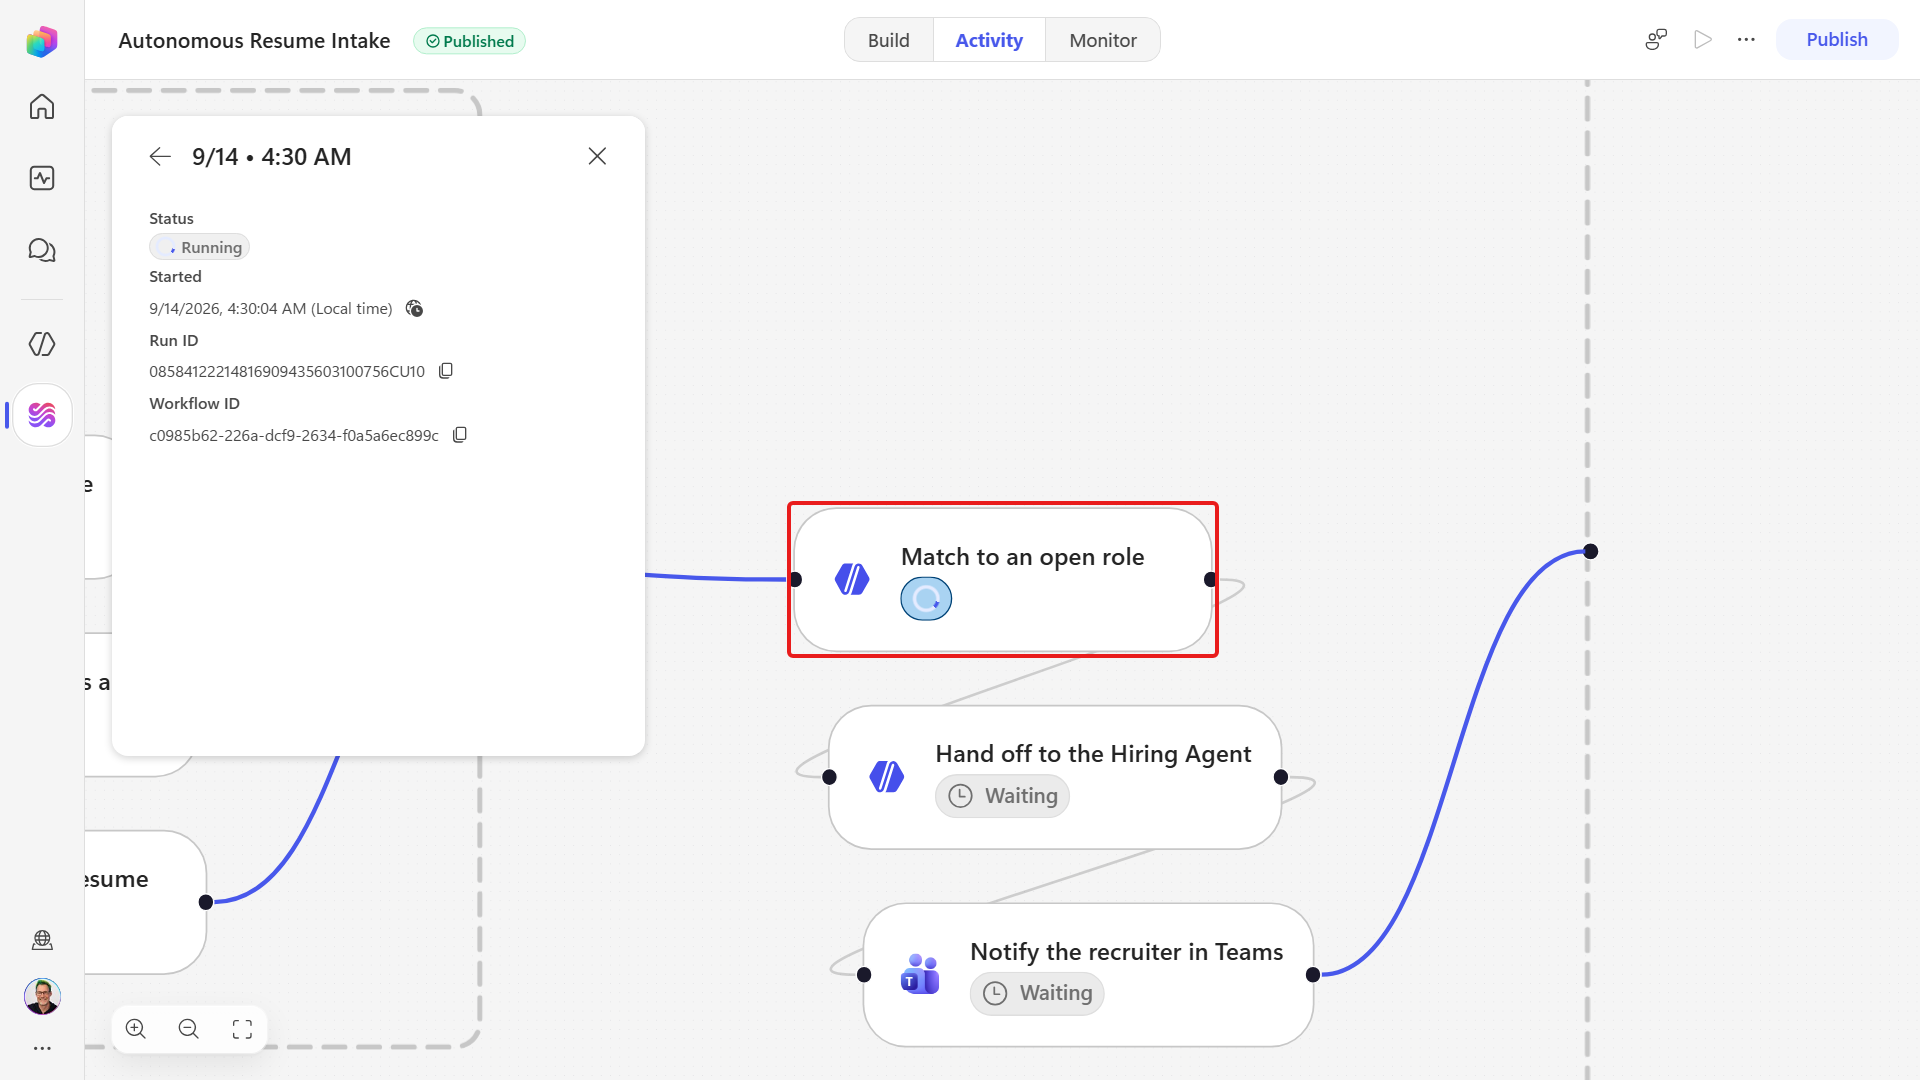
Open the mailbox you assigned the reviewer, find the newest Which open role for candidate... card, choose one Job Role, then select Submit. The card replaces its form with a confirmation once your answer is in.
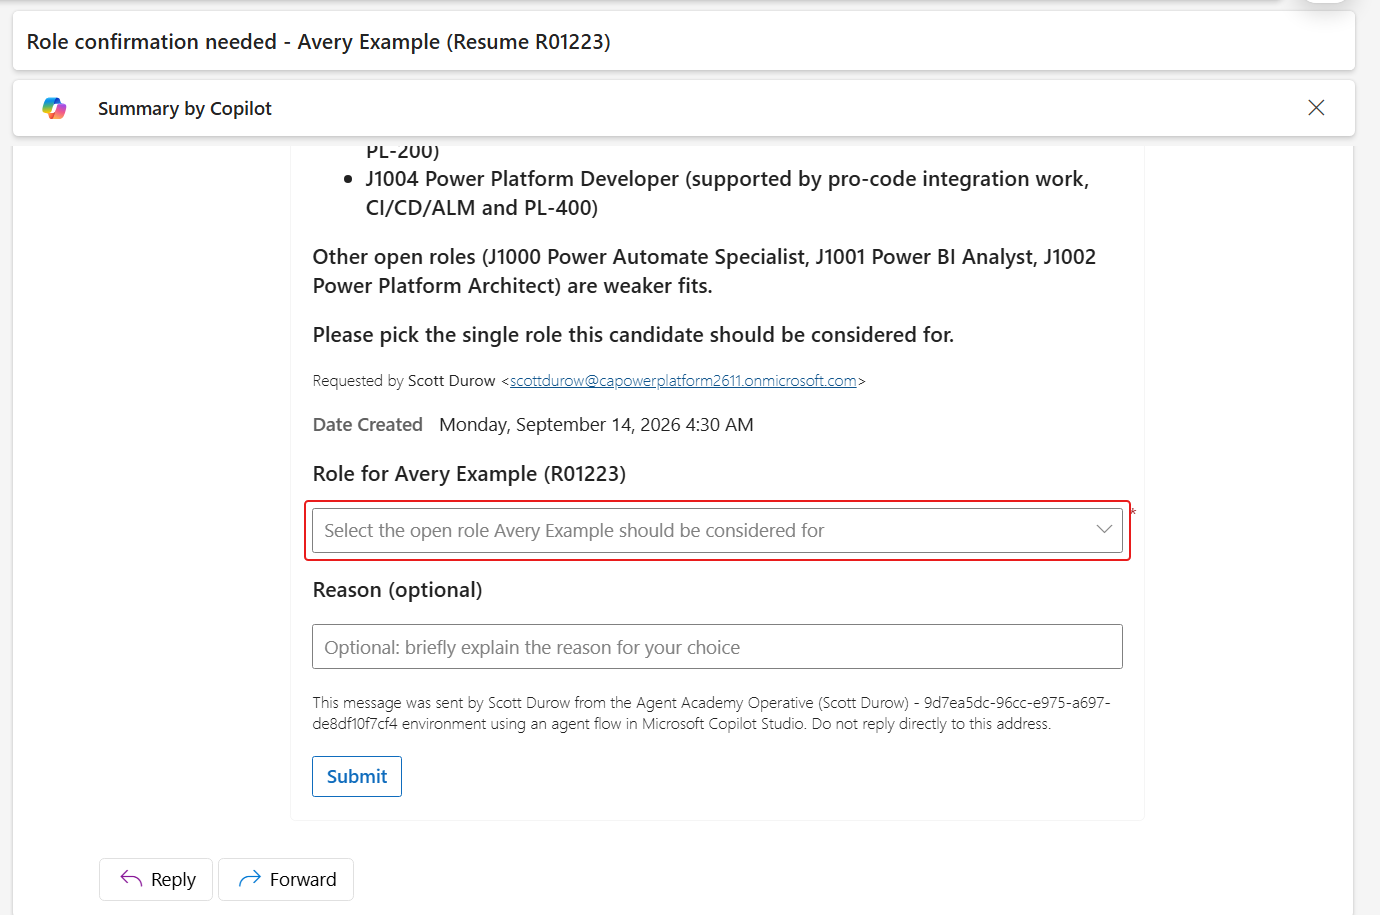
Return to the Activity tab and confirm the matcher resumed with that answer, and that Hand off to the Hiring Agent then created and scored the application.
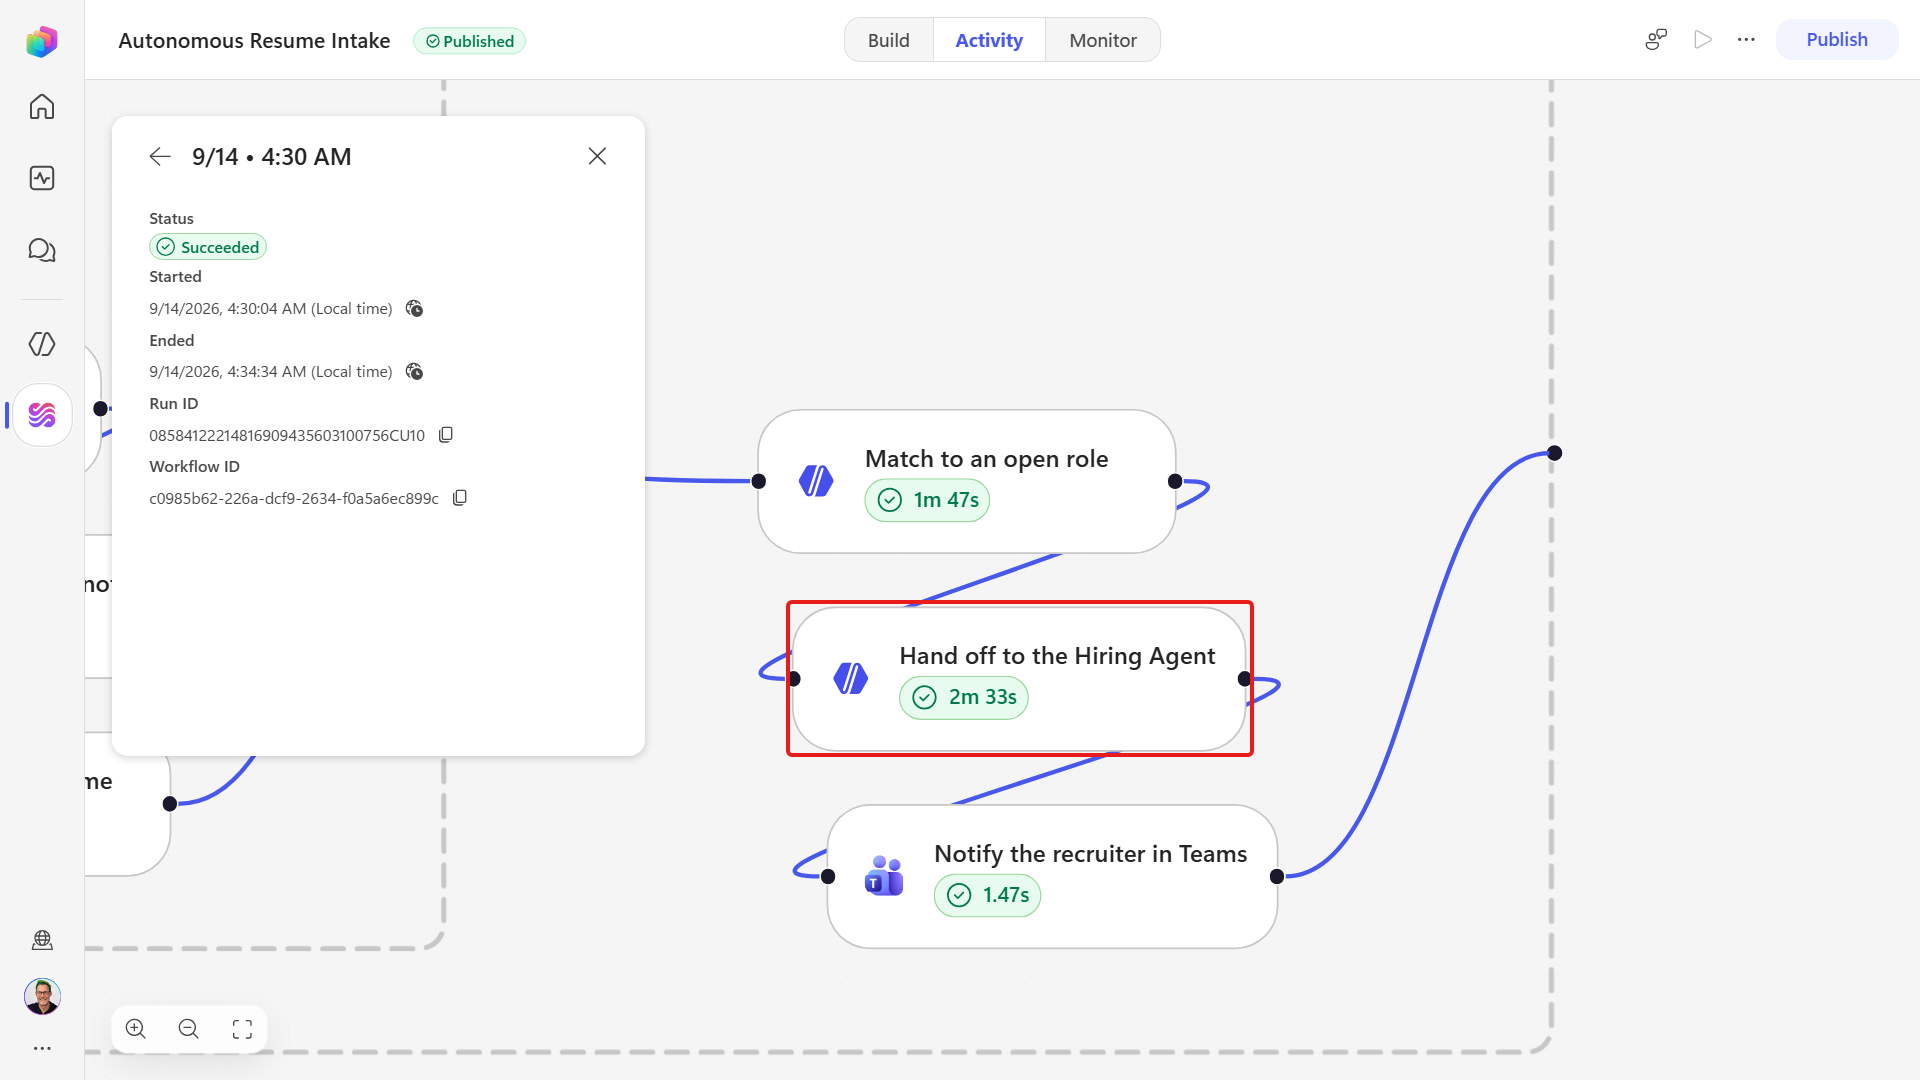
That run shows the second kind of human involvement. Nothing on the canvas told the workflow to ask - Match to an open role compared the PDF against the open Job Roles, found more than one that fitted, and raised the question itself. The run waited at that node until you answered, then carried on into Hand off to the Hiring Agent with the role you chose.
9.5 Catch a failed run and raise an alert
Right now the Application branch has nowhere to go when a step fails. Dataverse refuses a write, the branch stops, and nobody is told.
The fix is a try/catch. You already have the try: the Process application Scope you built in Mission 07, a box drawn around the work that might fail. Now you add the catch - a second Scope that runs only if the first one failed, posts a message to Teams, and marks the run Failed.
Because a Scope reports Failed if any action inside it fails, this one catch covers the row write, the PDF upload, the agent call and the Teams card.
First, look at the settings the connector already gives you. Every action has its own Settings panel, which you open from the node's more options menu.
On the canvas, select the File resume in Dataverse node.
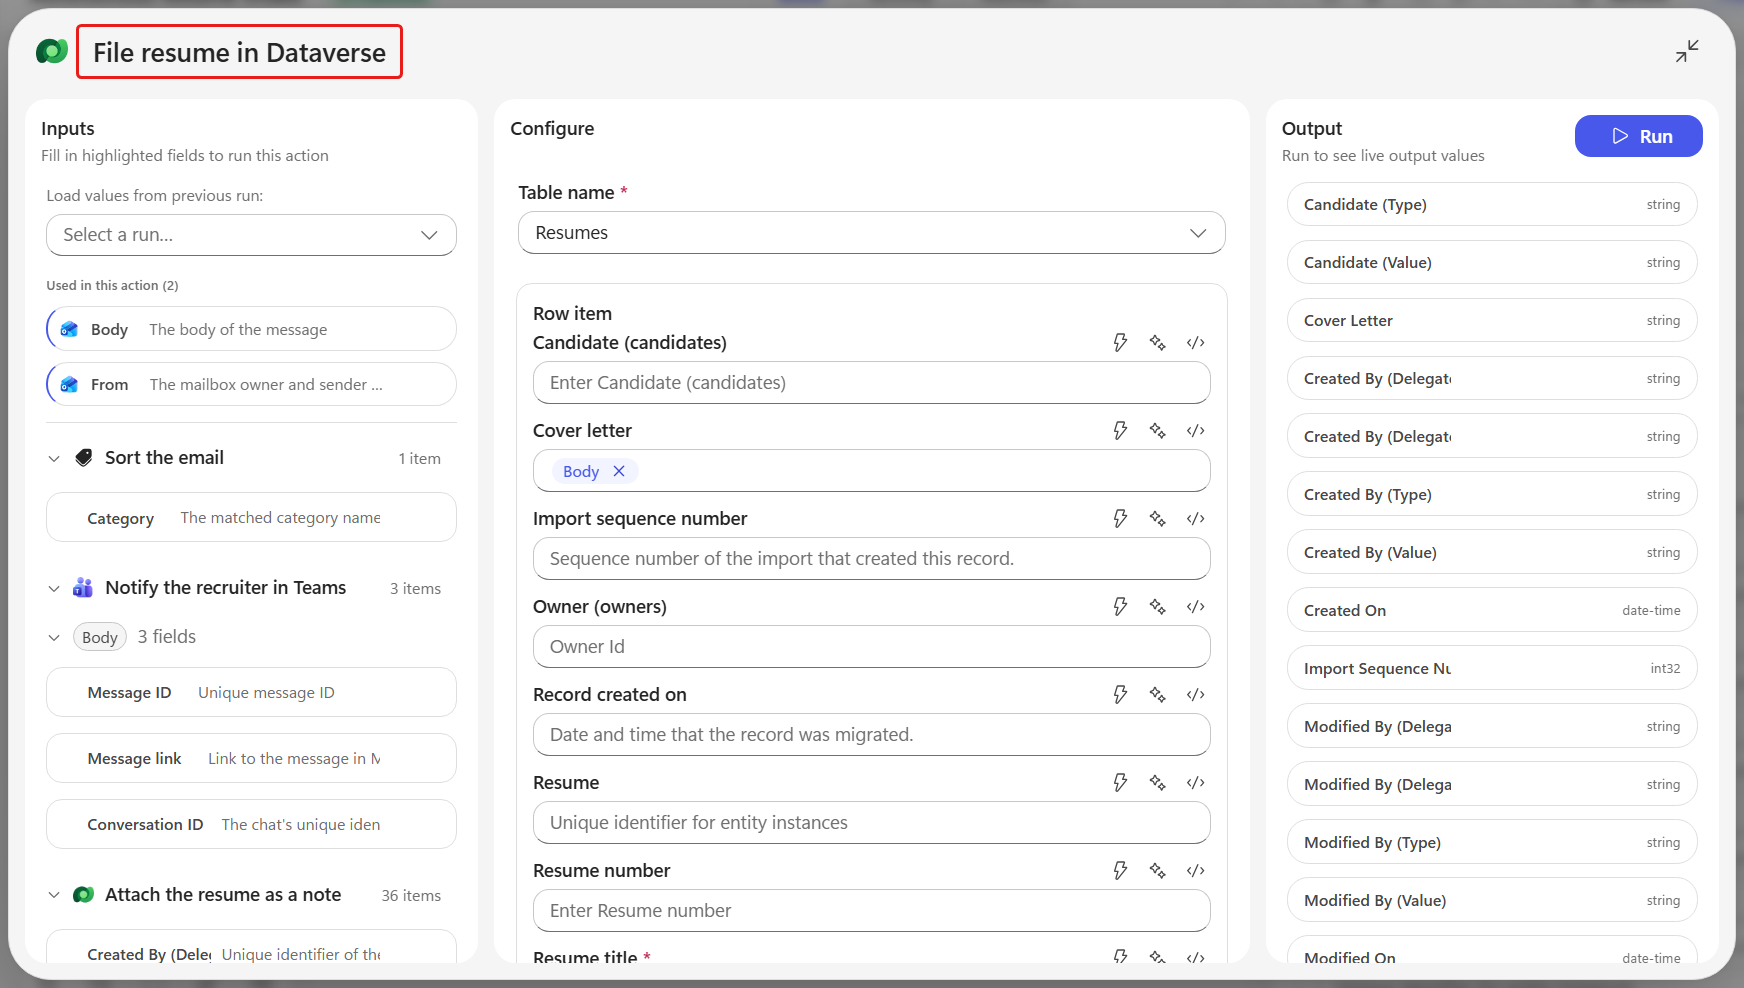
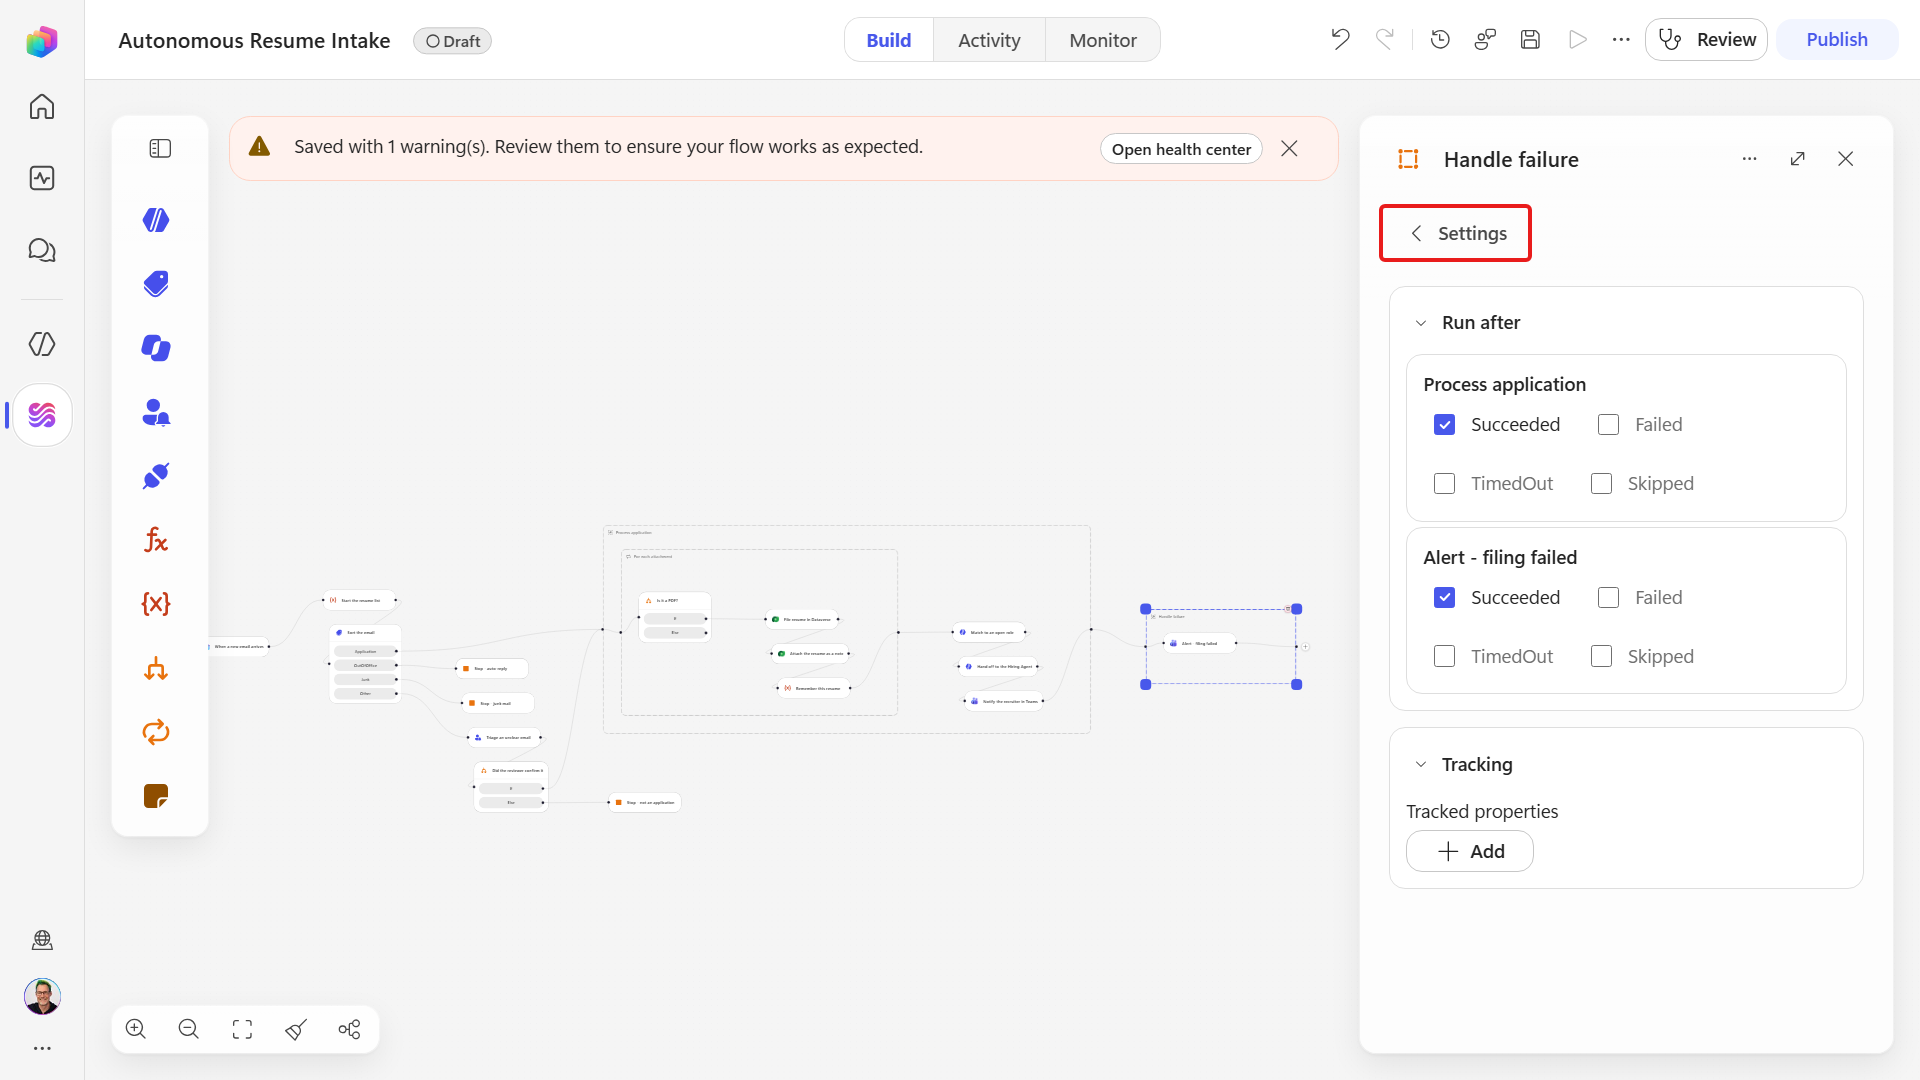
At the top of its panel select the more options menu, then Settings. The panel is headed ‹ Settings and every section is already open: Networking, Run after, Security and Tracking.
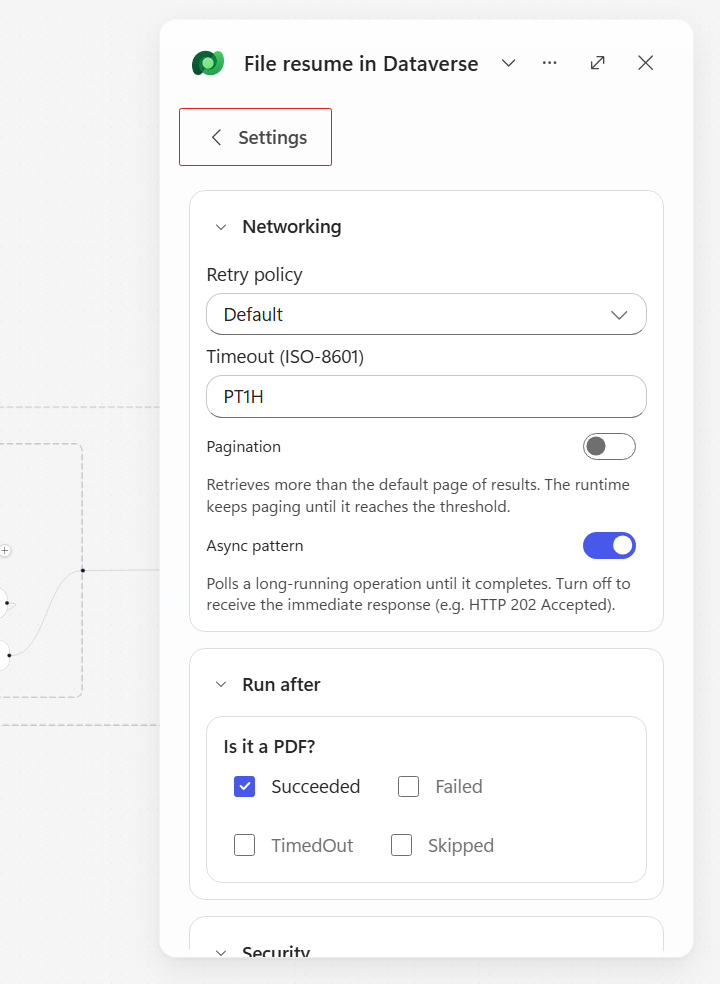
Read the Networking section without changing anything:
Setting What you should see What it means Retry policy Default Transient failures are already retried for you. Timeout (ISO-8601) PT1H An hour is the ceiling this action is given before it is abandoned. Pagination off Only fetches the first page of results. Async pattern on Long-running calls are polled until they finish. The connector already supplies a retry policy and a one-hour timeout, so leave both at their defaults for this workflow.
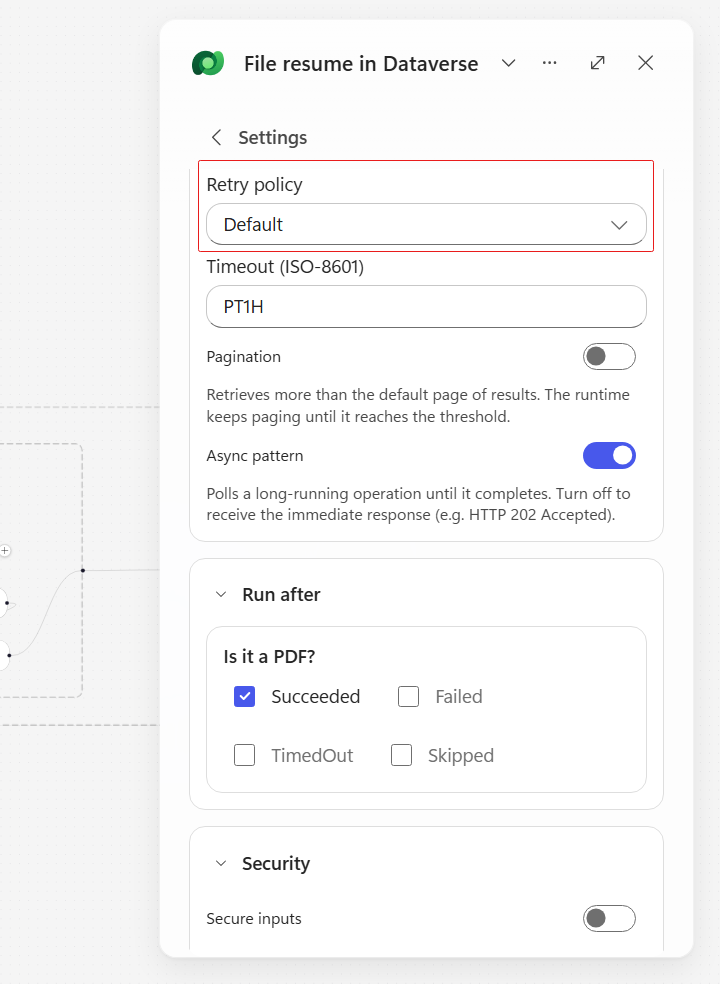
Select the ‹ chevron next to Settings to go back to the node panel.
On the canvas, hover the Process application container and select the ➕ on its right-hand edge, labeled Add a step after Process application.
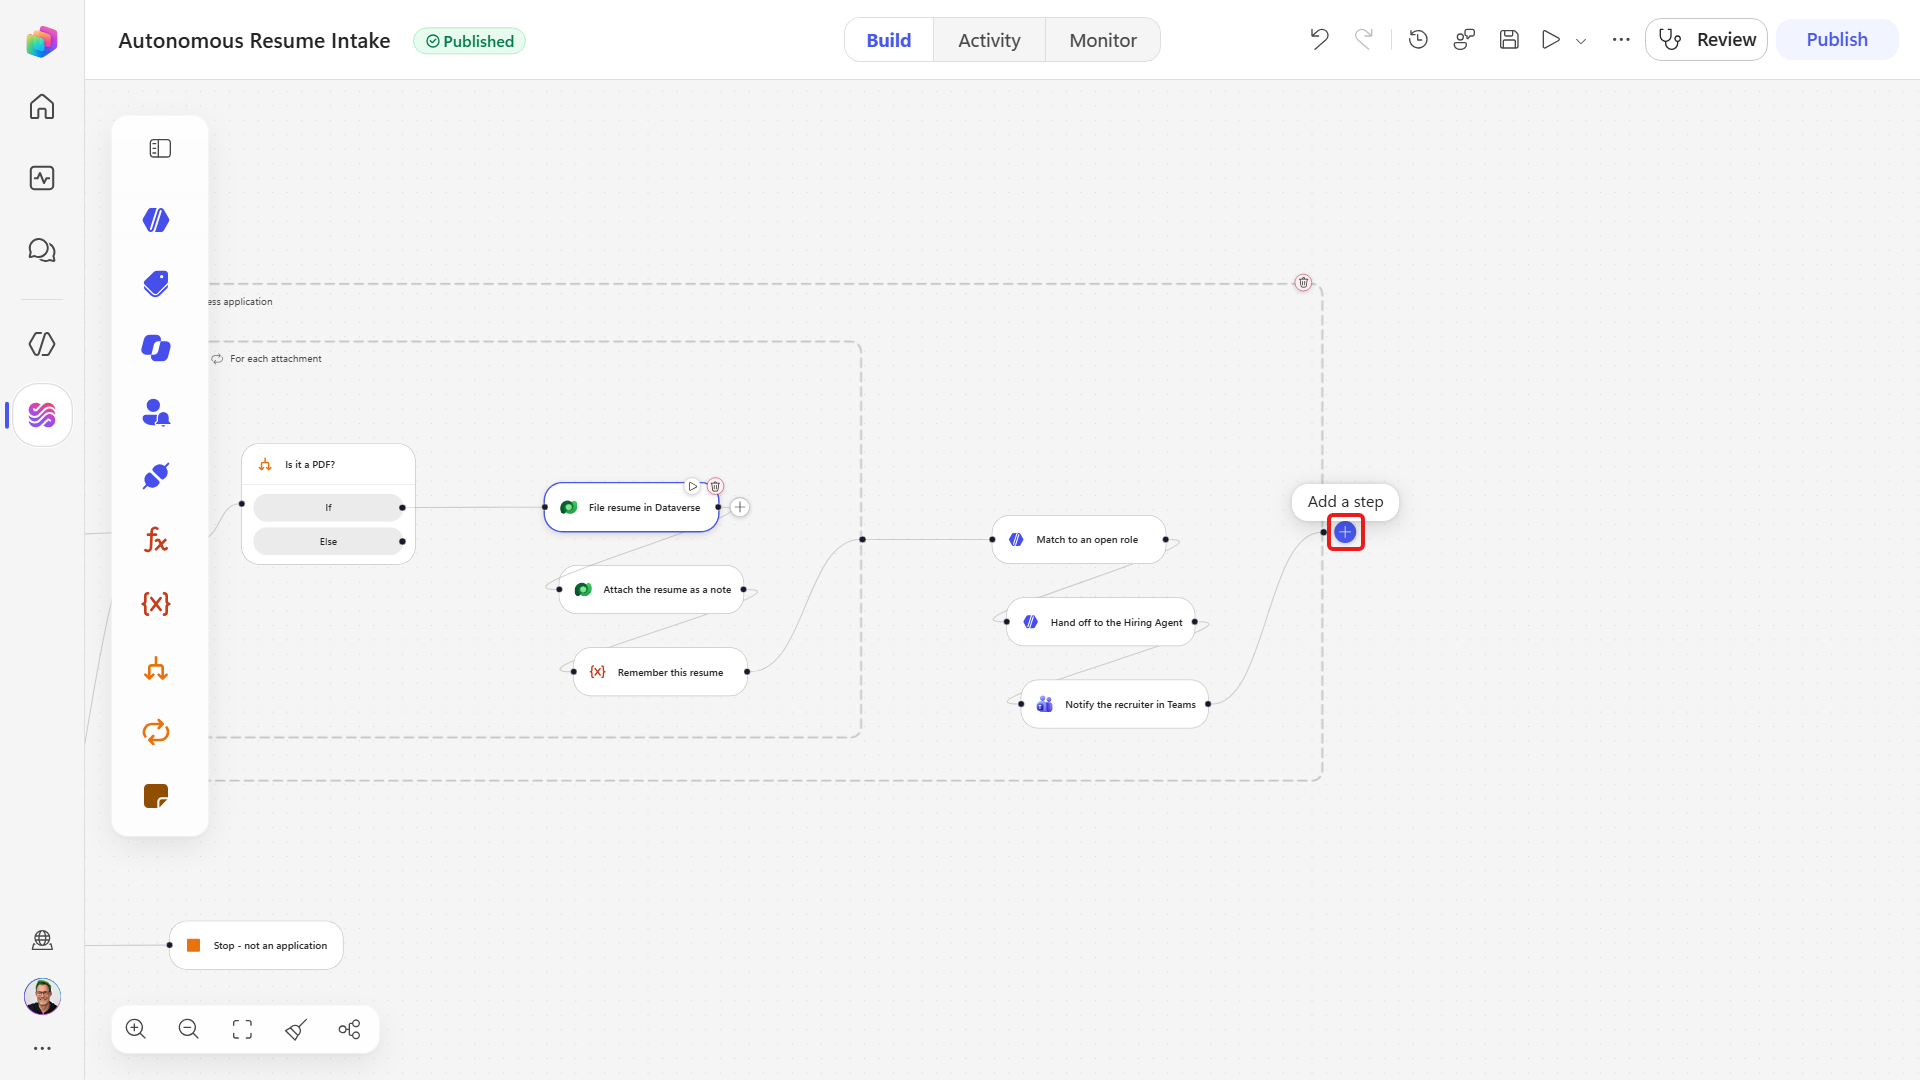
In the Add dialog, search for
scope, then select Scope under Other.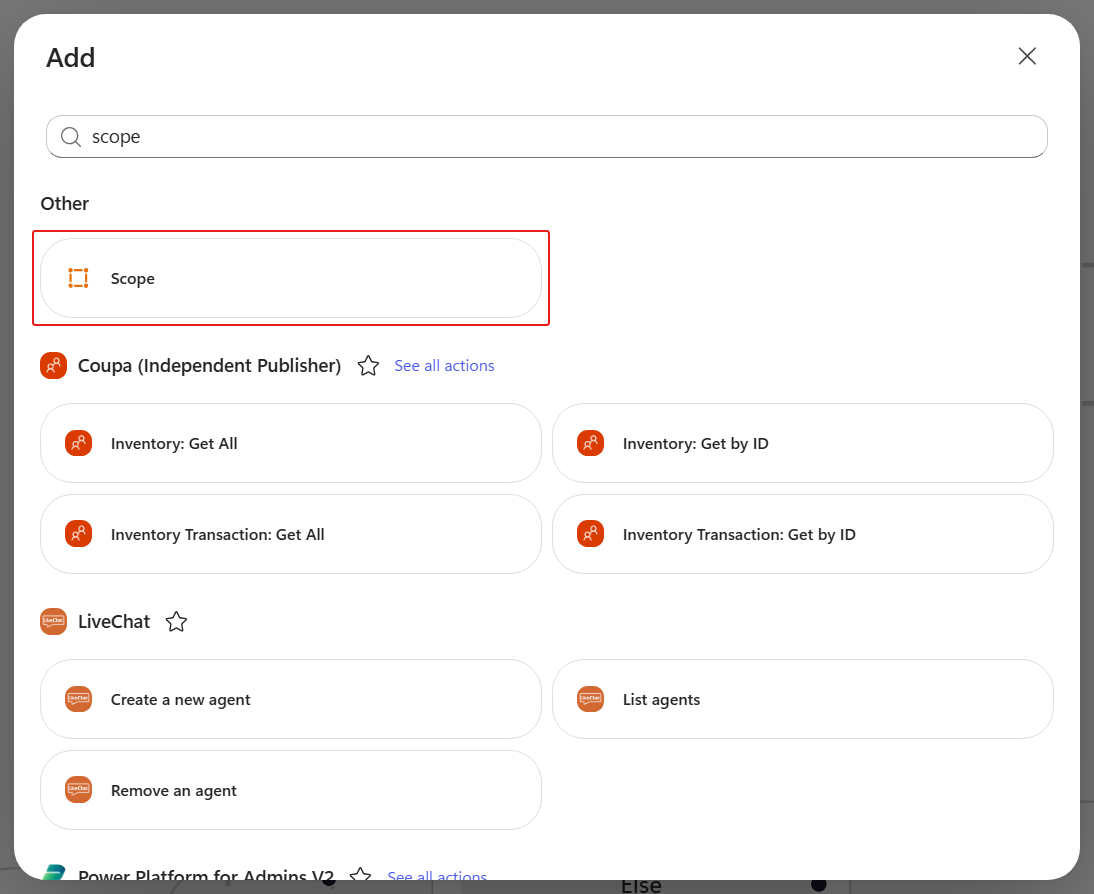
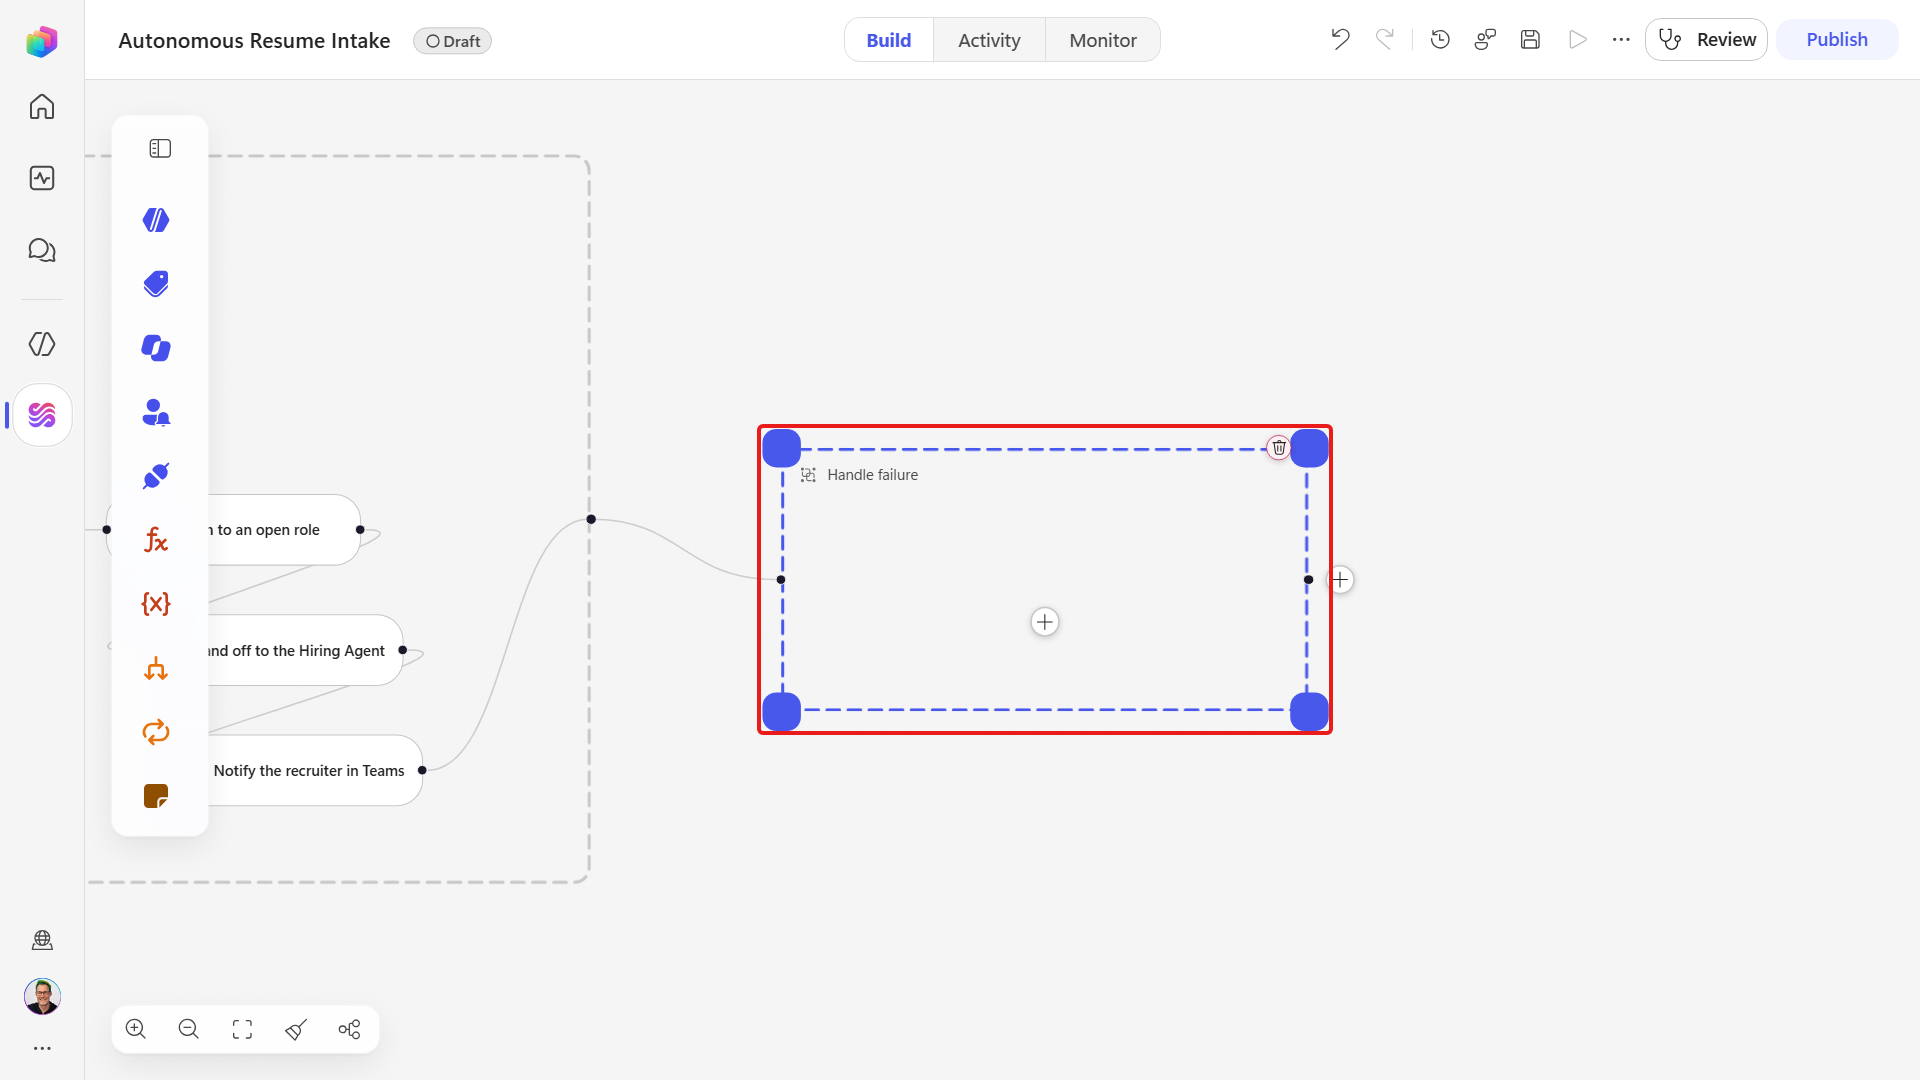
Select the name Scope at the top of the panel, rename it to
Handle failure, and press Enter.The Application branch now reads Process application → Handle failure, with the second box empty.
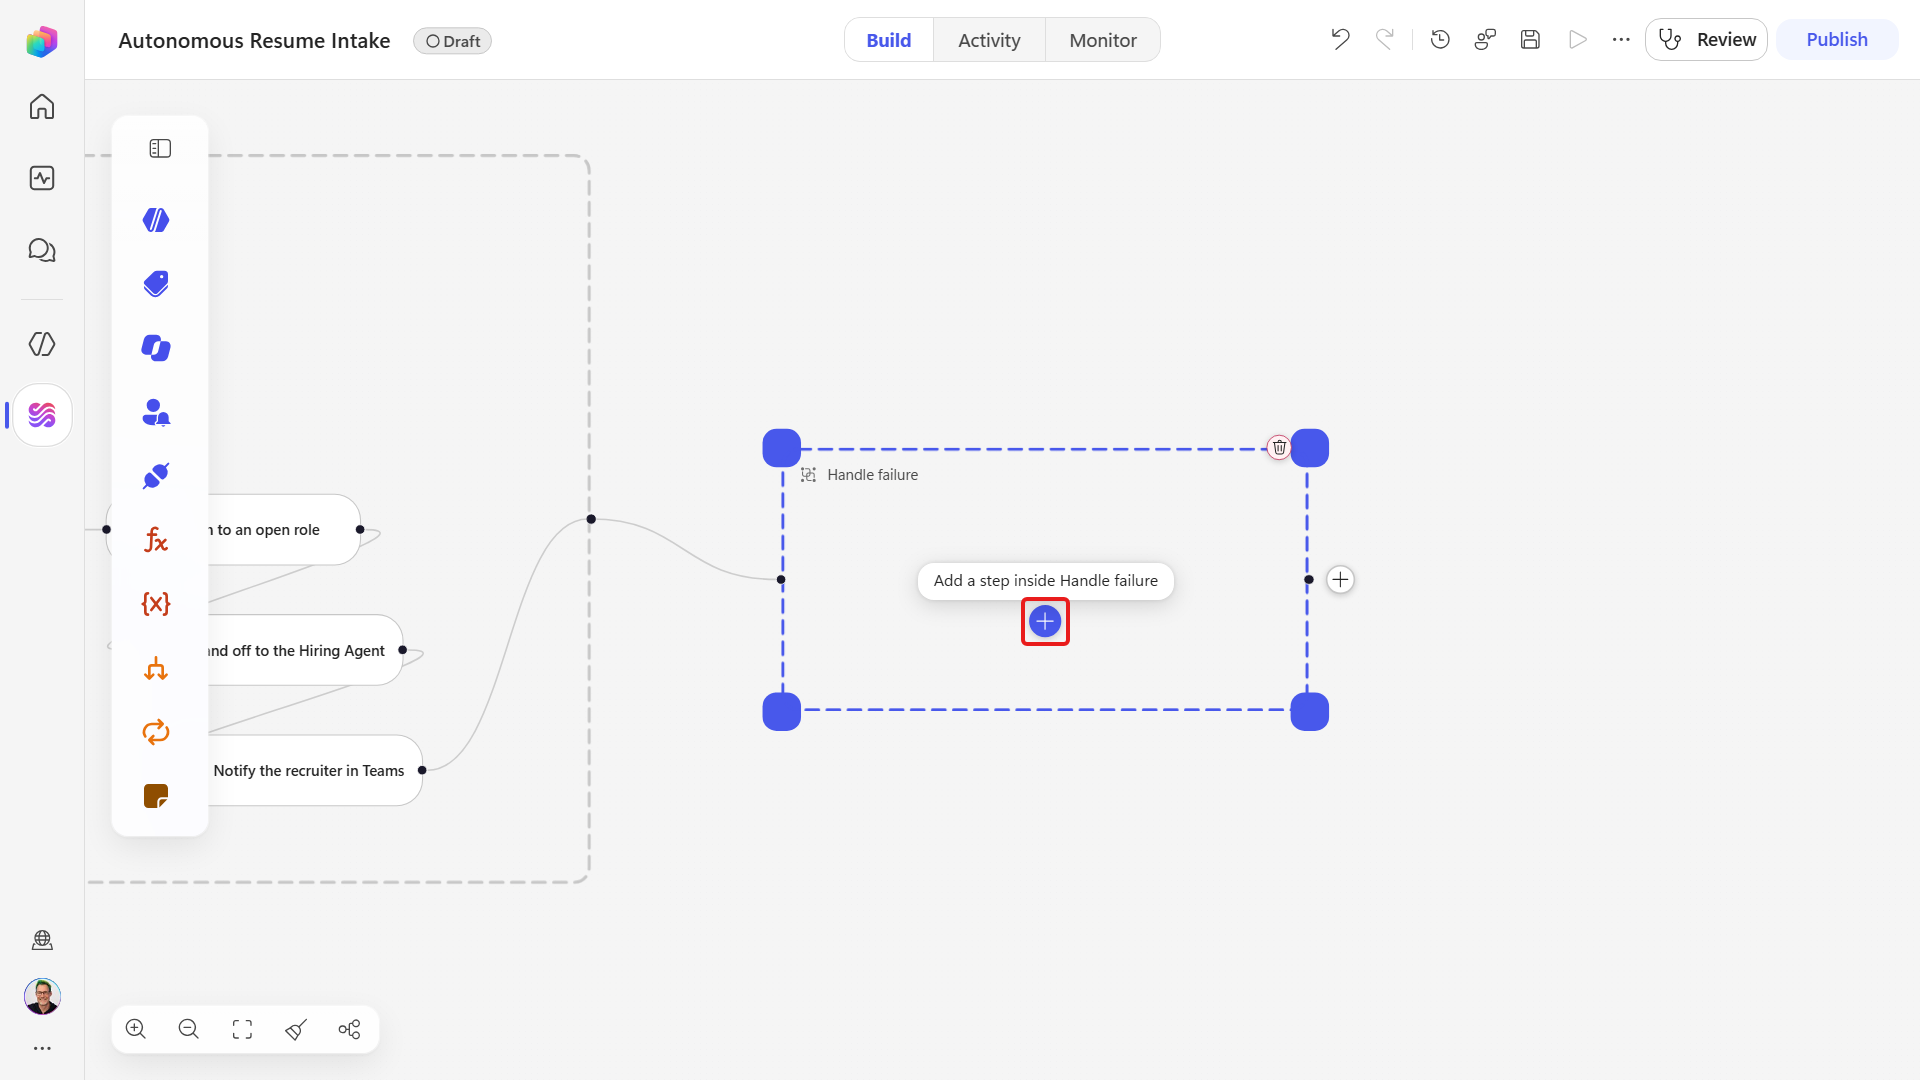
Put the alert inside the catch. Hover the Handle failure container and select the ➕ labeled Add a step inside Handle failure.
In the Add dialog's search box, type
post message.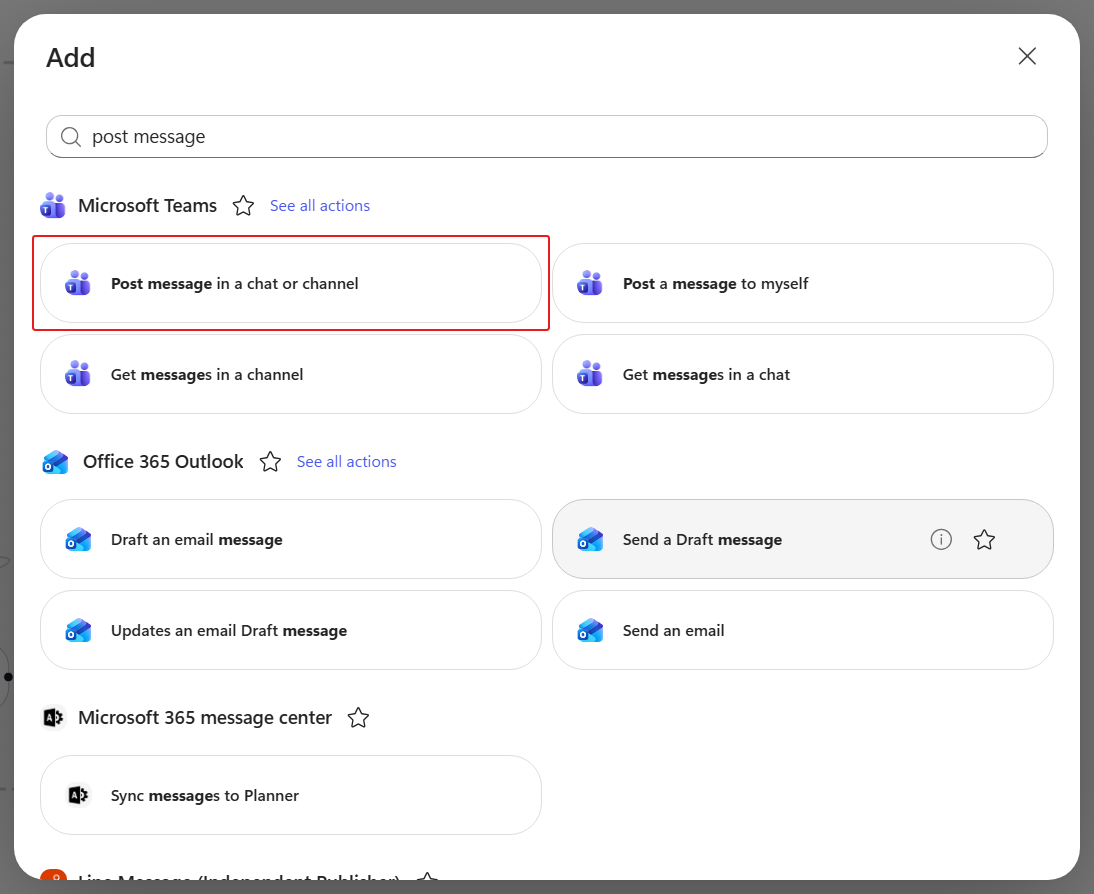
Under the Microsoft Teams heading, select Post message in a chat or channel.
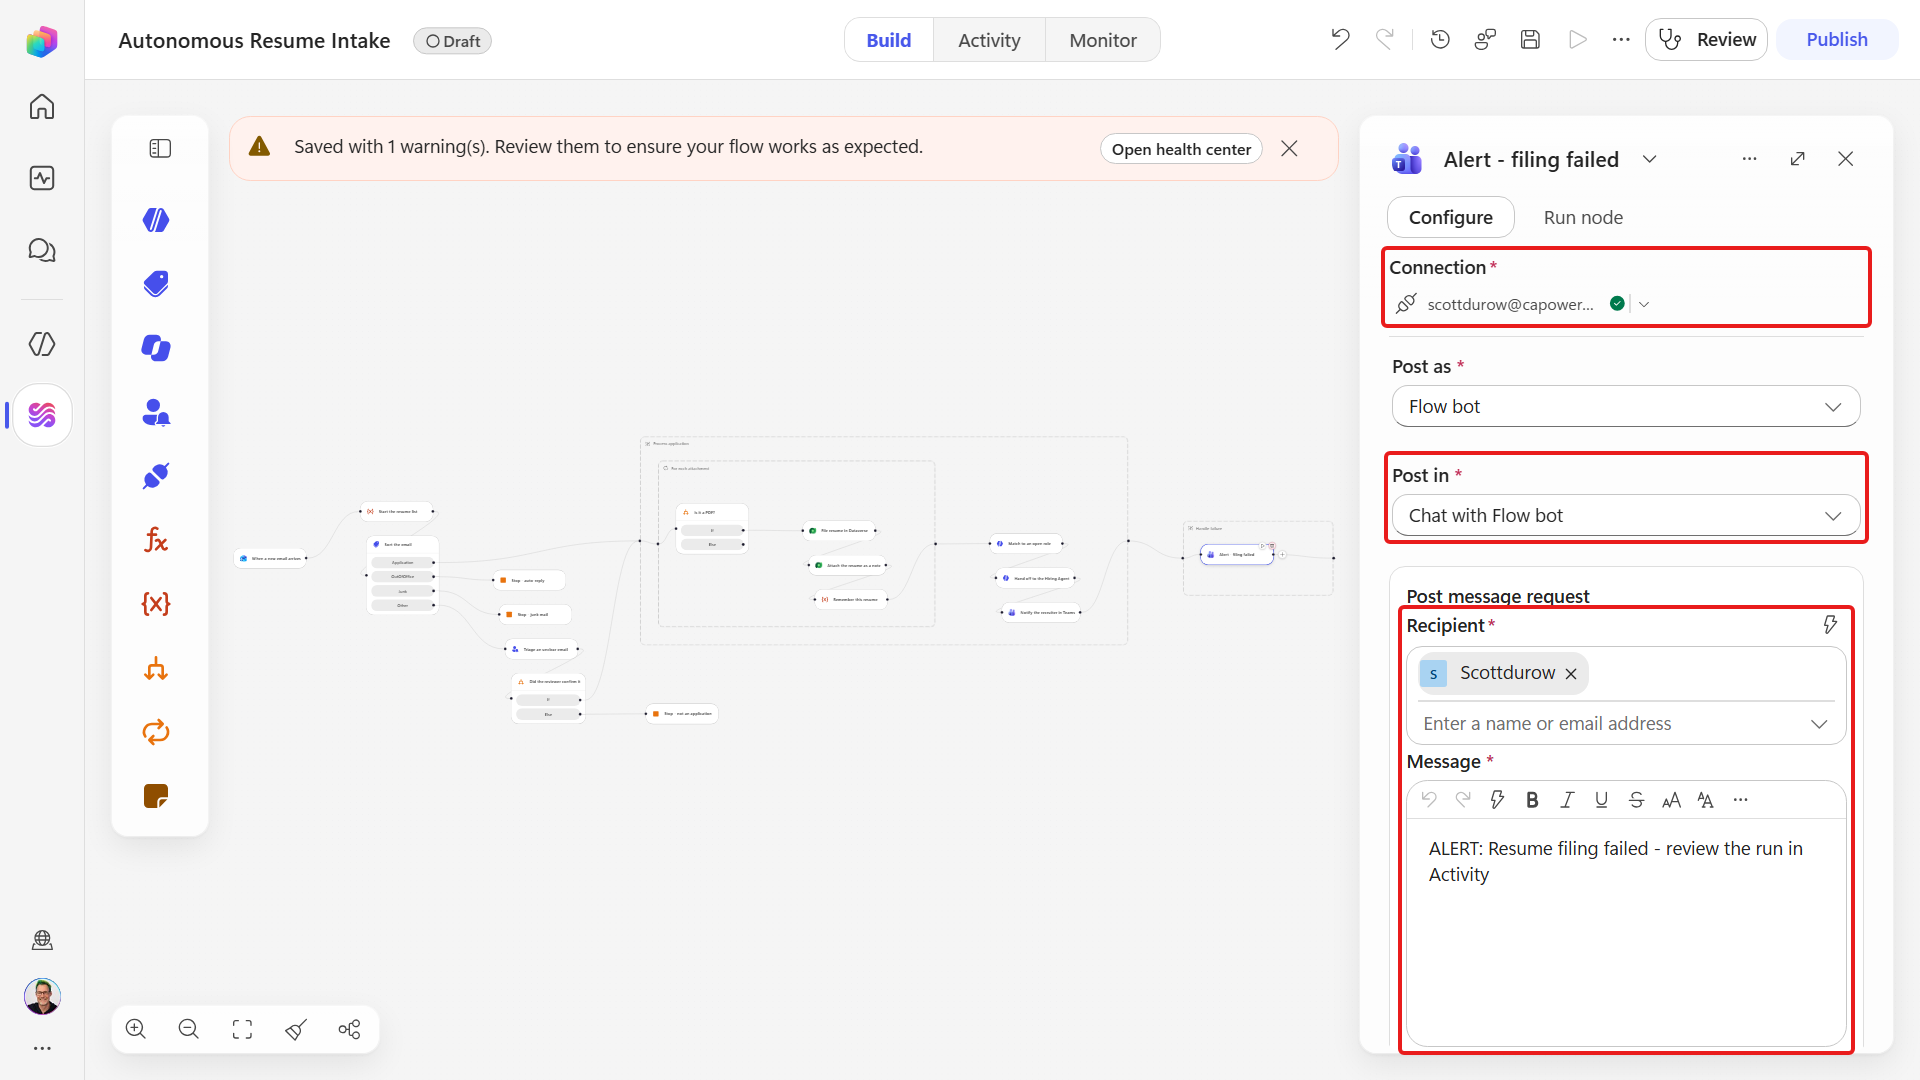
Rename the node to
Alert - filing failed- select the catalog name at the top of the panel, type the new name and press Enter.Fill in the node as follows.
Field Value Post as Flow bot (leave as-is) Post in Chat with Flow bot Recipient your own account Message ALERT: Resume filing failed - review the run in ActivitySelect Save. Handle failure now contains a single step, Alert - filing failed.
Make the catch run only on failure. On the canvas select the Handle failure container, choose the more options menu, then Settings.
Find the Run after section. The first card is headed Process application - the step that runs before this one. Edit only this card. A second card underneath is headed Alert - filing failed, which is the alert step inside this scope.
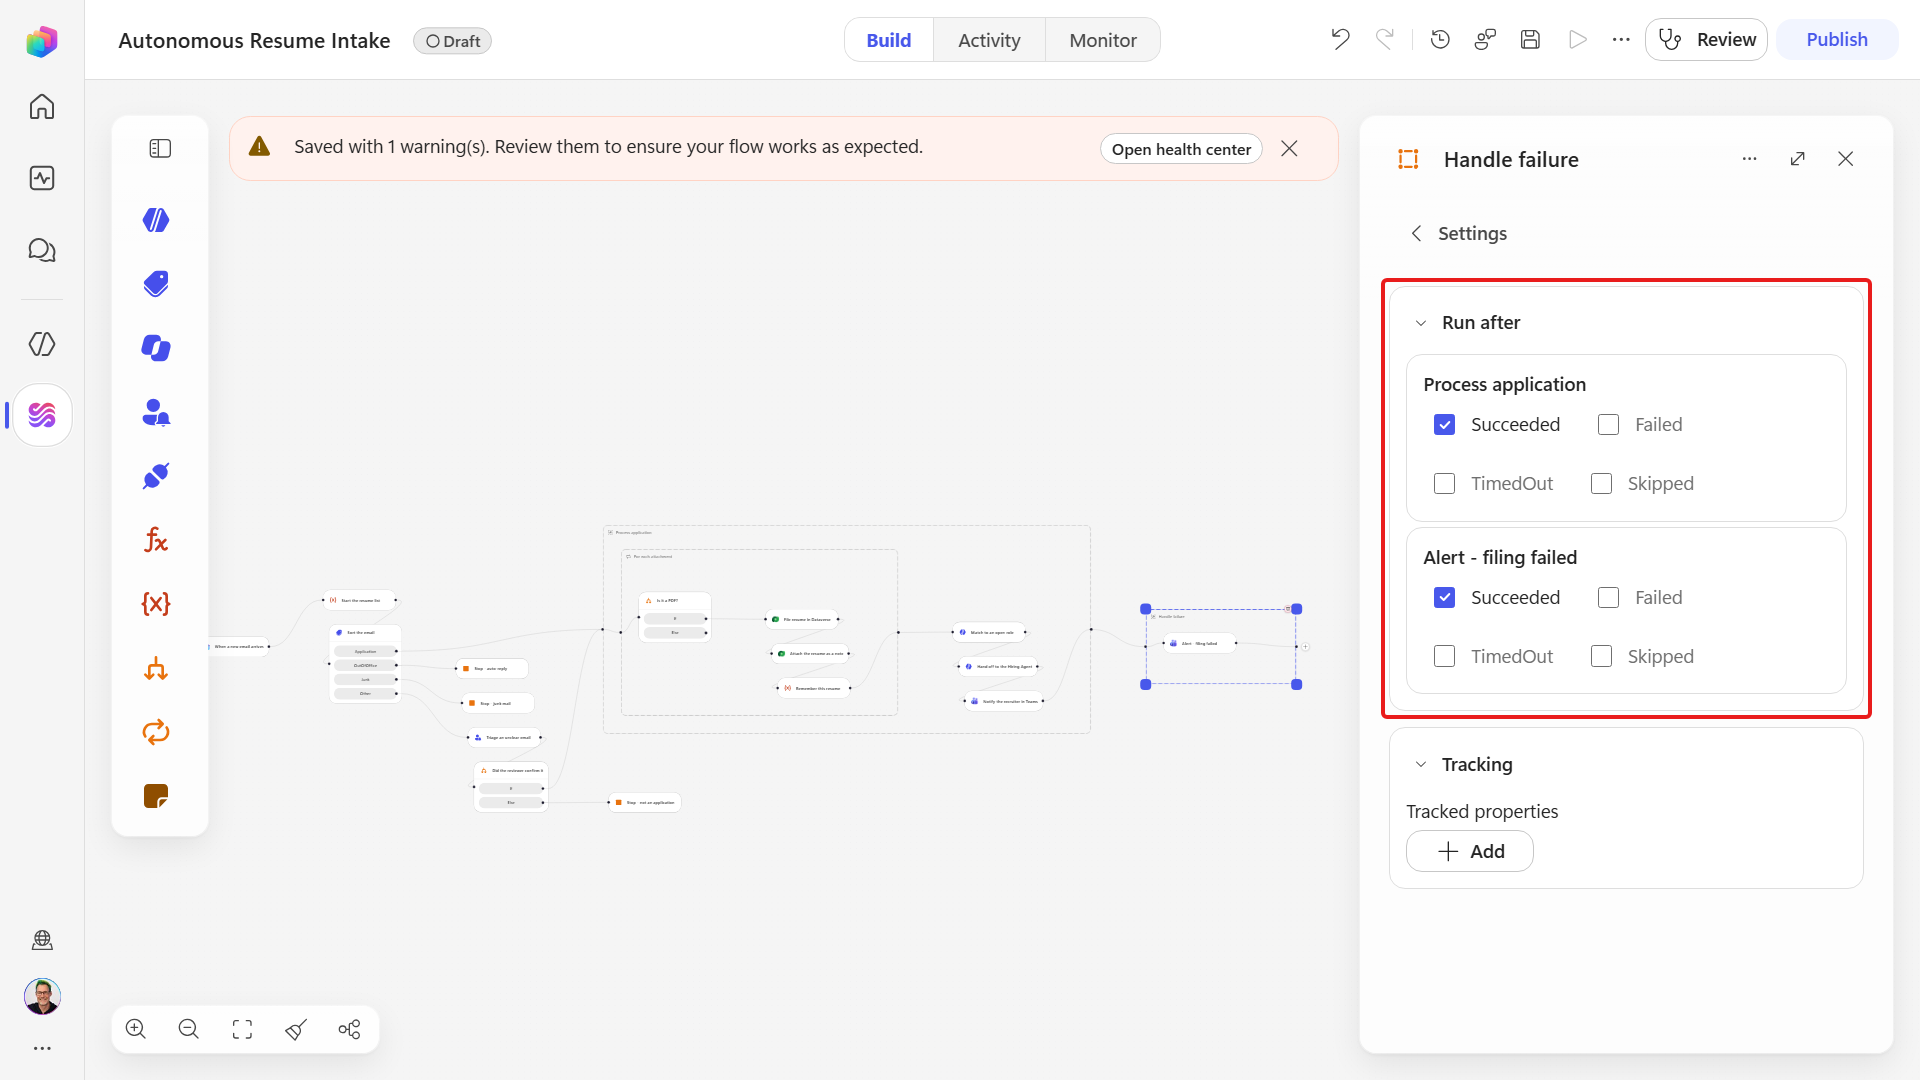
Set the four states on the Process application card as follows, so the alert fires only when something inside Process application breaks.
State Setting Succeeded clear the checkbox (it’s selected by default) Failed tick TimedOut tick Skipped leave it cleared 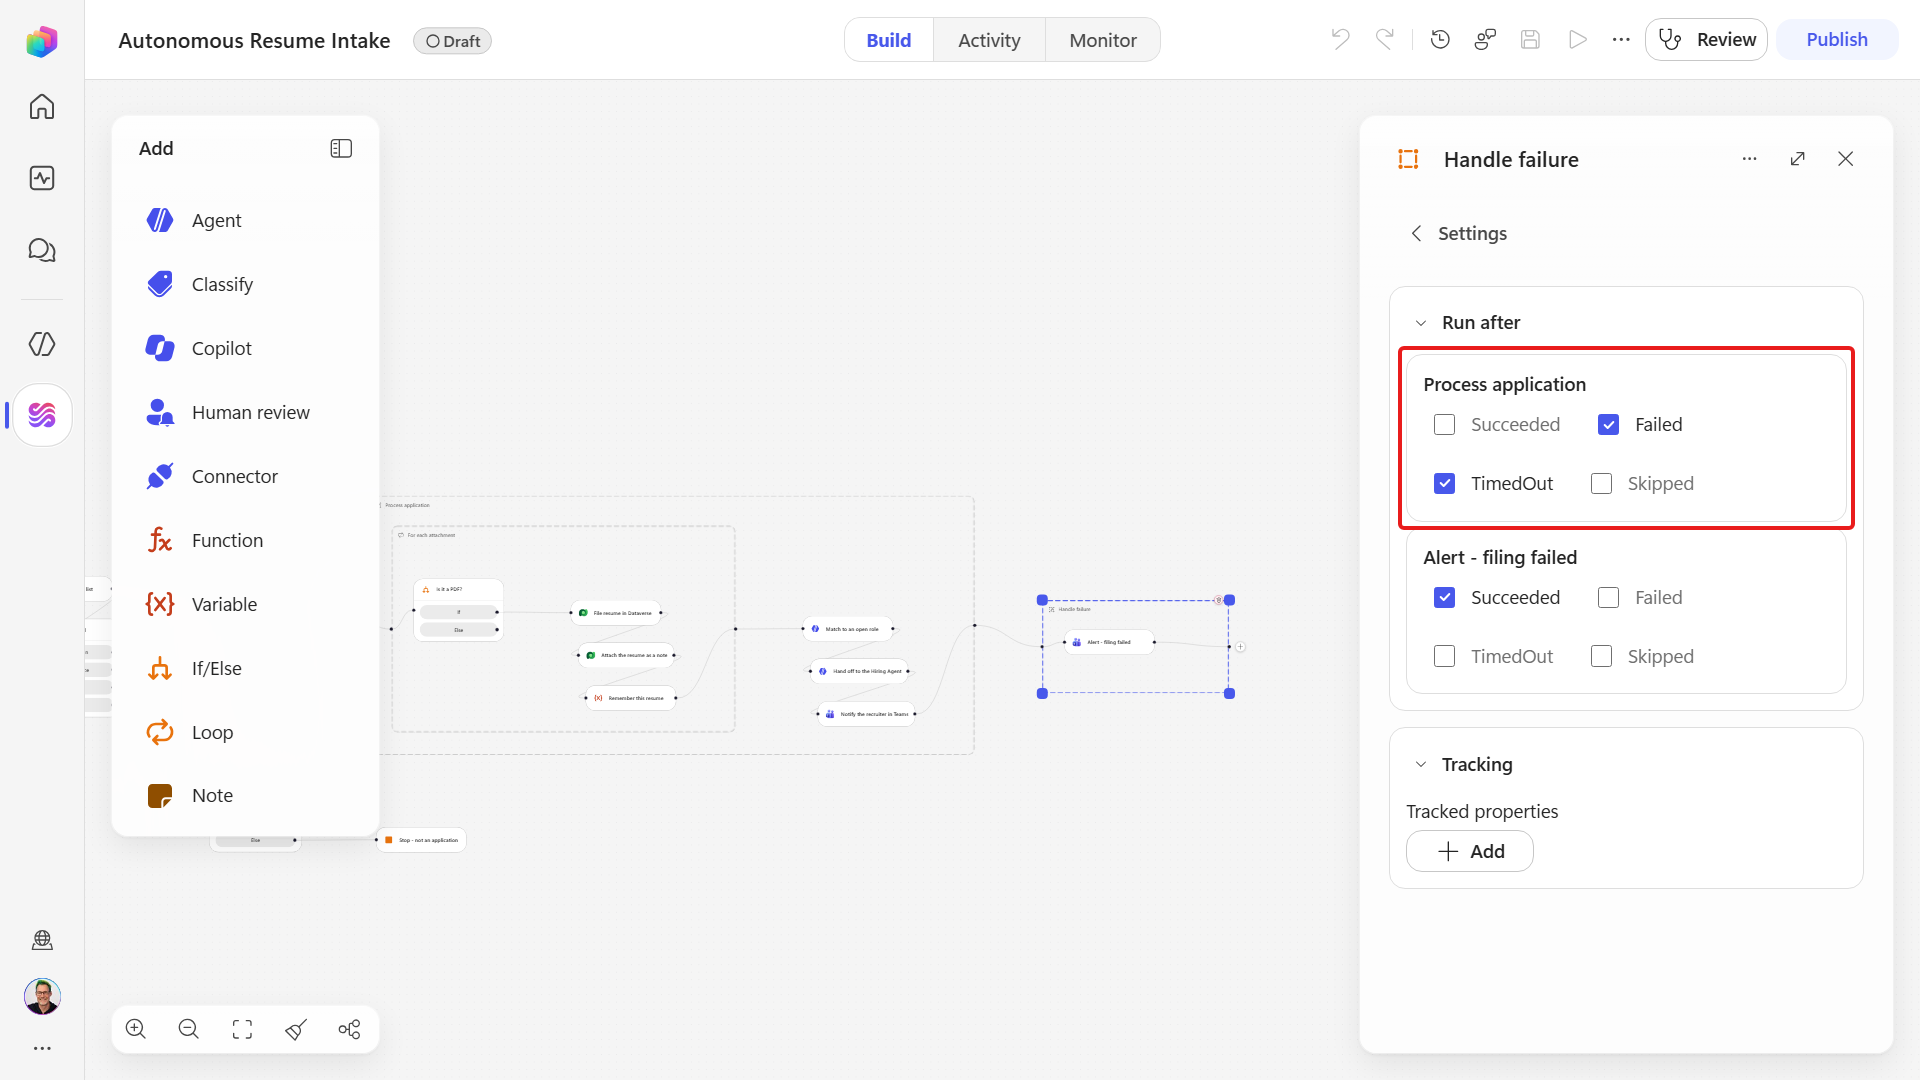
Select the ‹ chevron next to Settings, then select Save.
Keep the catch as the last step on the branch. A step that runs after a skipped step is skipped too, so on a healthy run - where Handle failure is skipped - anything placed after it would be skipped as well, and the run would still report Succeeded while doing nothing at all. If you ever do need a step after a catch, open its Run after and tick Skipped as well as Succeeded, which is the finally half of the pattern.
Catching the error is only half the job. You still want the run recorded as a failure, so it shows up in the Activity list, in run-history filters and in any monitoring built on run status.
On the canvas, select ➕ Add a step after Alert - filing failed - so the alert is sent first, and the run ends after it.
In the Add dialog, search for
end, then select End under Other. The node is called End, not Stop or Terminate - searching forterminatereturns only unrelated third-party connector actions.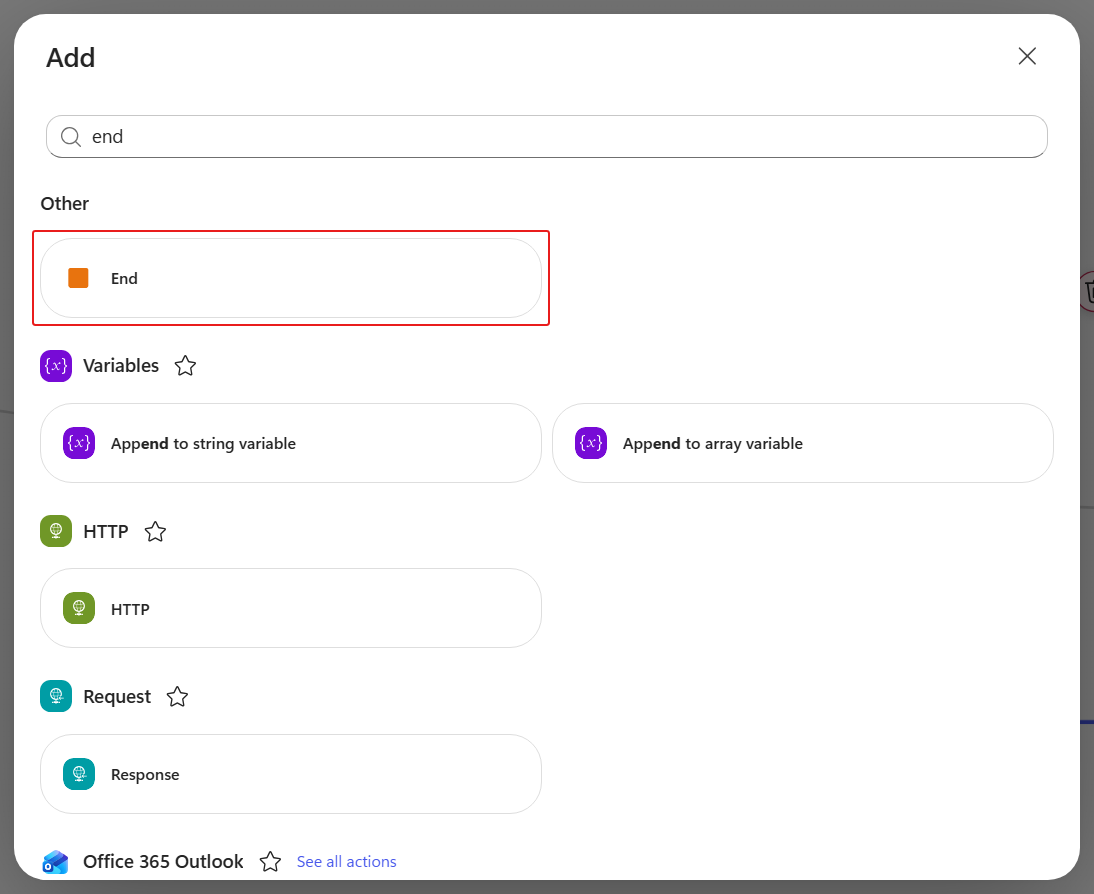
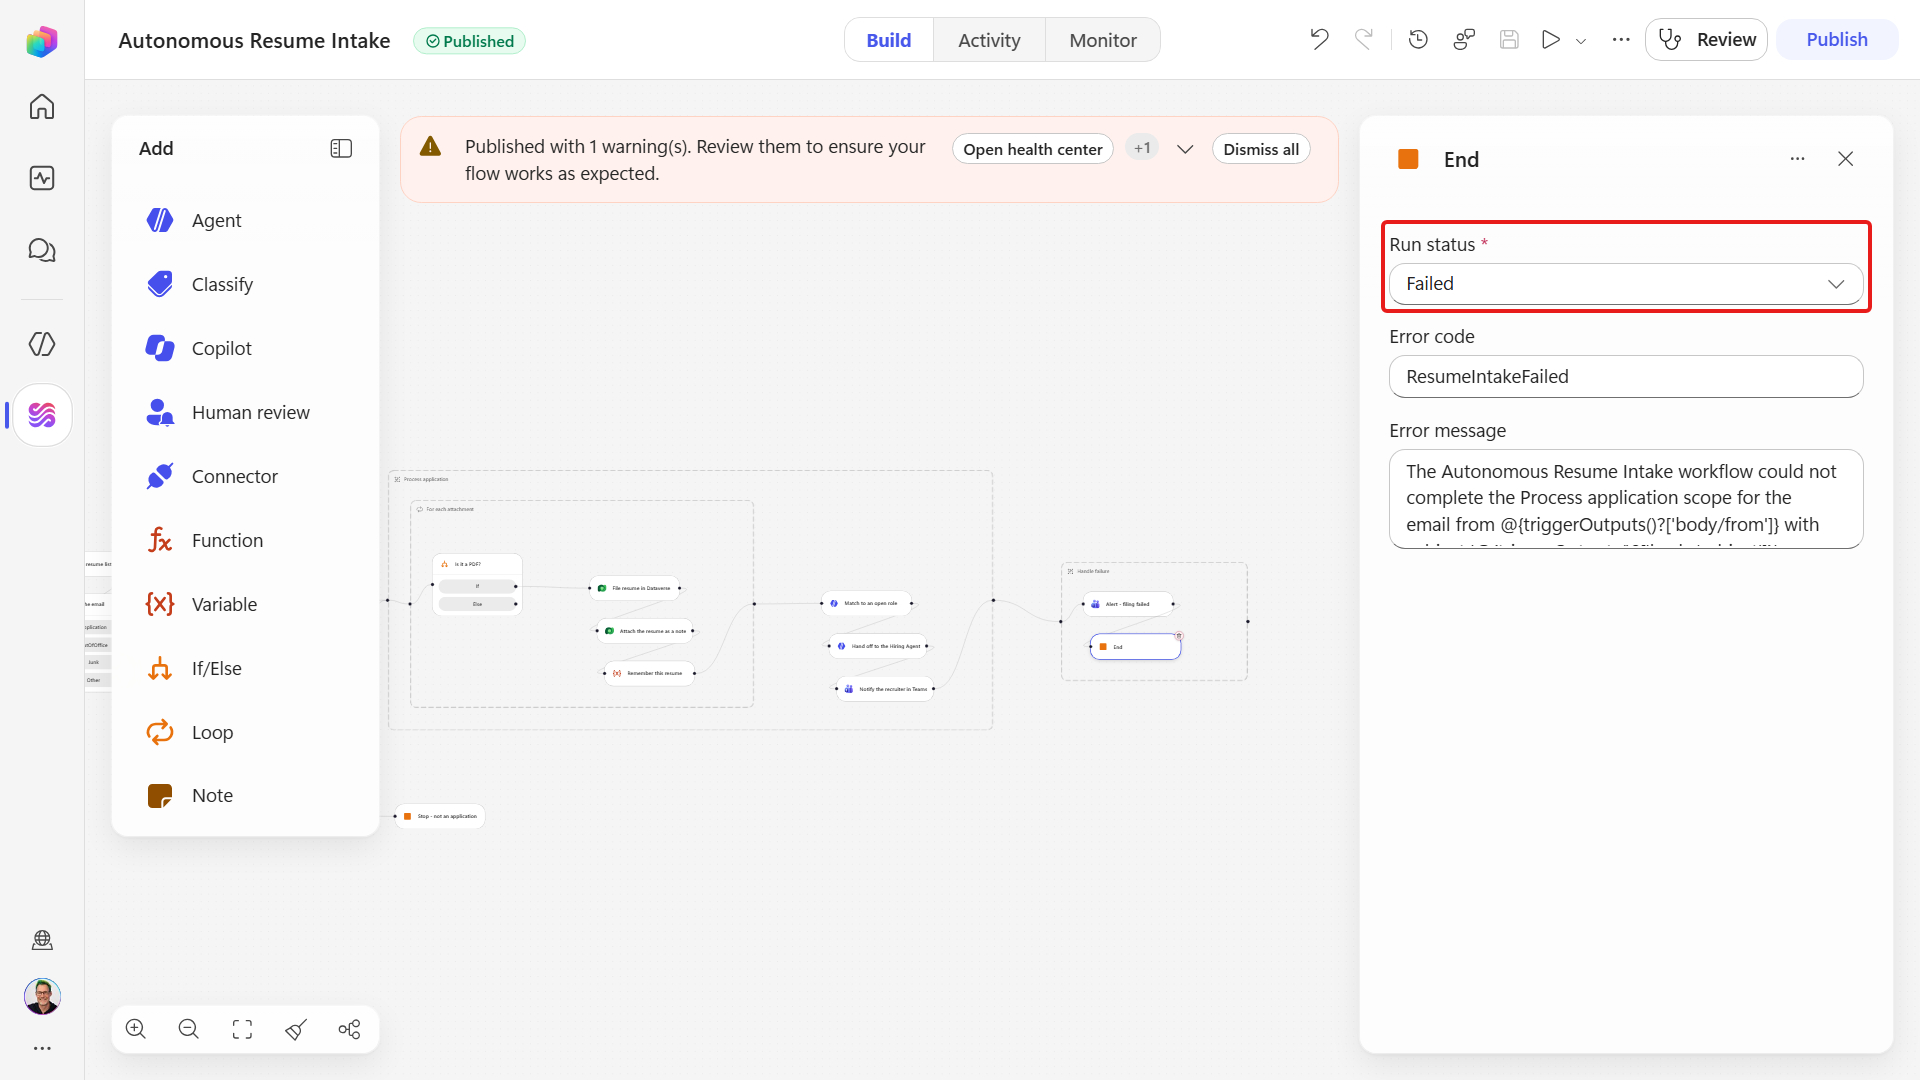
Fill in the node as follows.
Field Value Run status Failed - the field is labeled Run status, not Status, and offers Succeeded, Cancelled and Failed code ResumeIntakeFailed- a short, easy-to-search, machine-readable labelmessage The block below - include the offending email so the failure identifies itself without anyone opening the run textThe Autonomous Resume Intake workflow could not complete the Process application scope for the email from @{triggerOutputs()?['body/from']} with subject '@{triggerOutputs()?['body/subject']}'. A recruiter alert has been sent. Open this run and check the per-action statuses inside Process application to find the failing step.The code and message boxes appear only once Run status is Failed. Neither of the other two statuses represents a fault, so neither takes error detail.
Save.
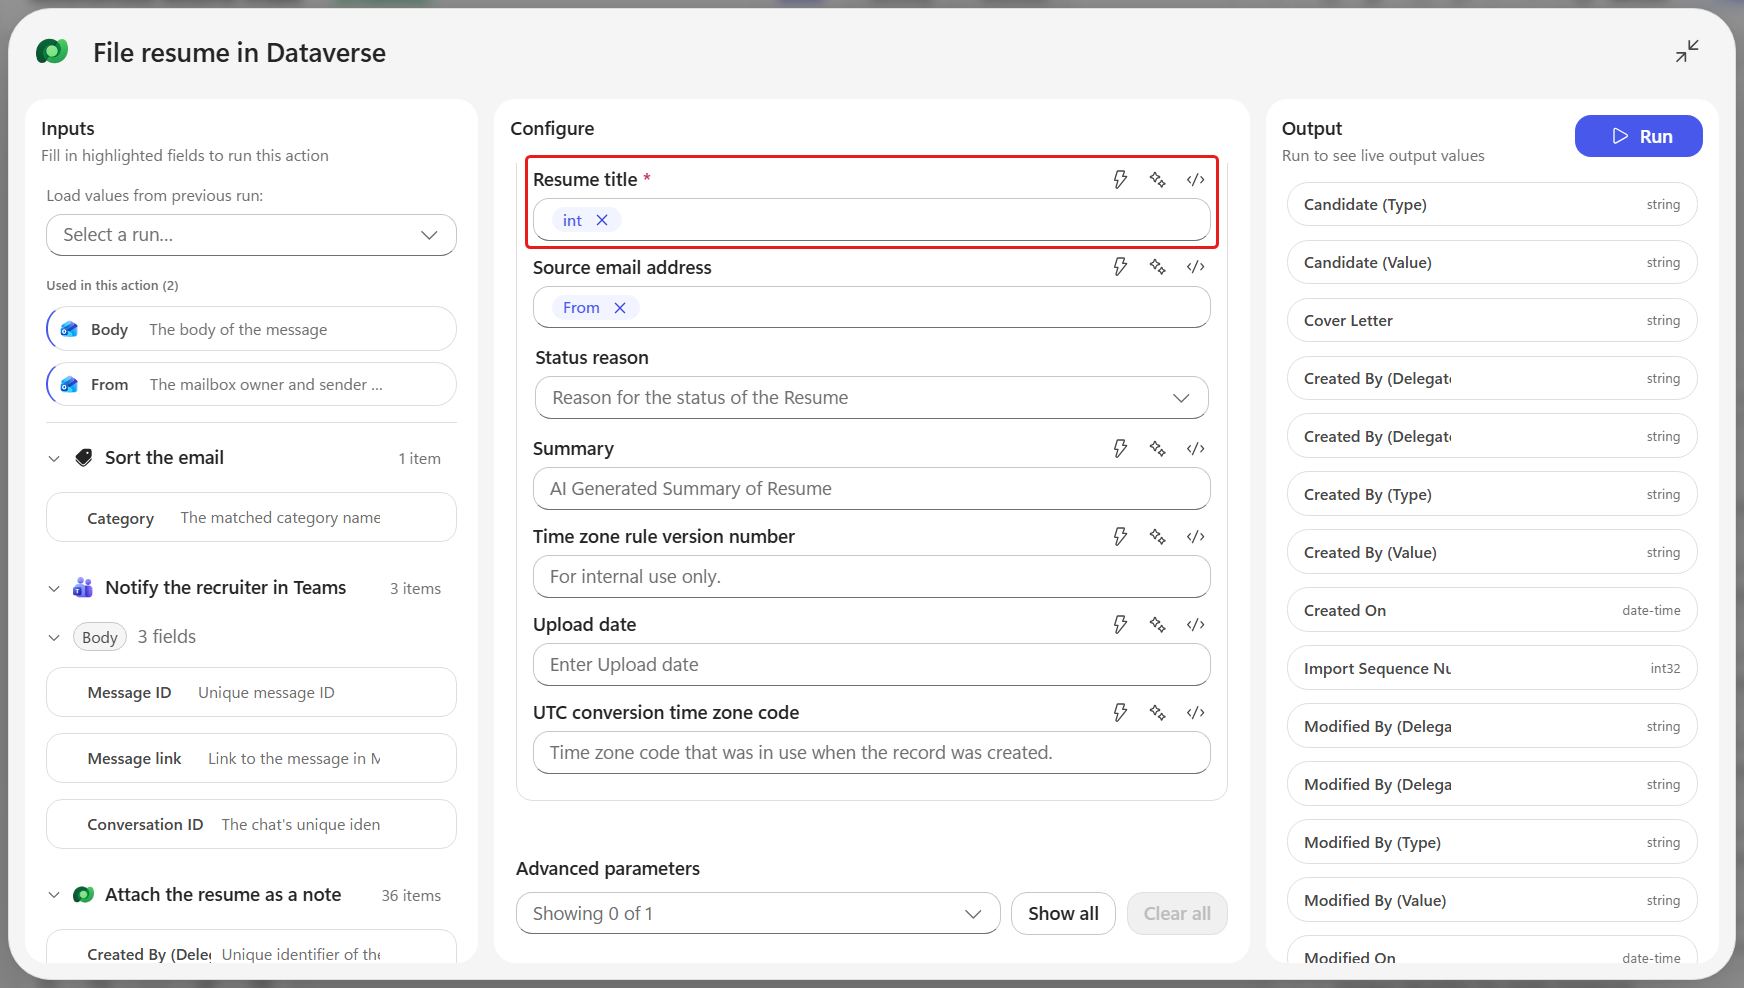
Now test the catch. You need a step inside Process application to fail while the workflow is running, so next you break the Resume Title expression on File resume in Dataverse.
Inside Process application, select the File resume in Dataverse node.
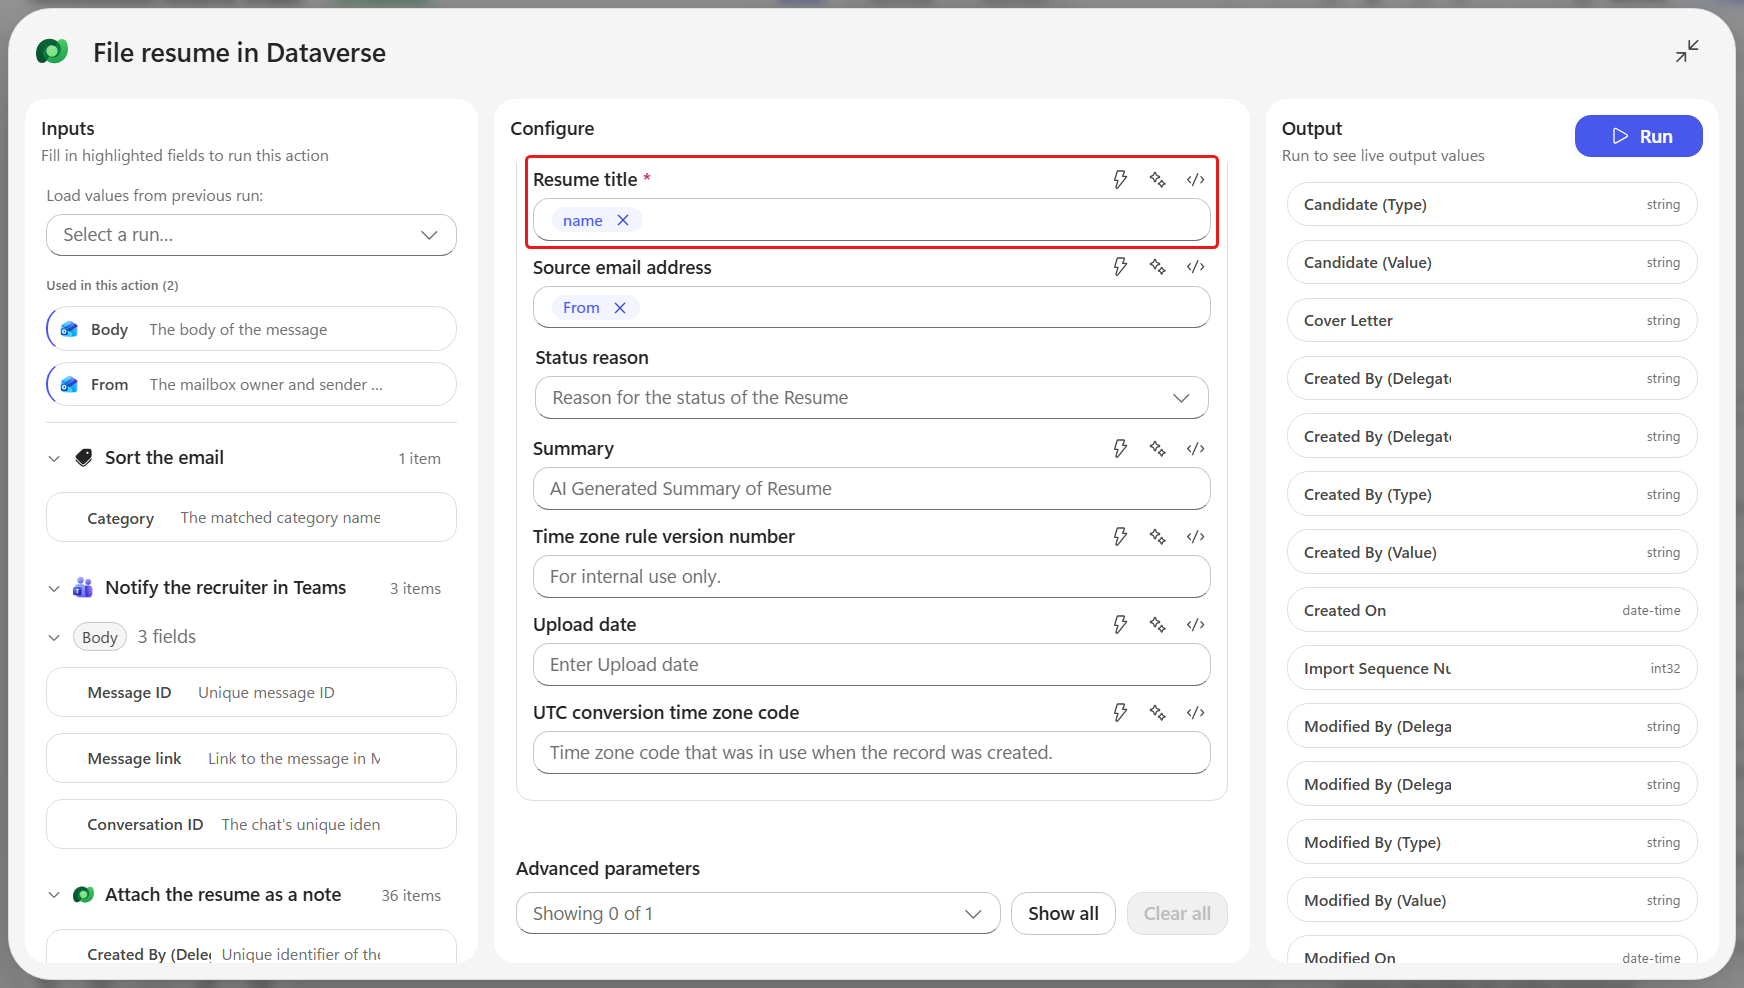
In Resume Title, remove the Name token, then select Switch to expression mode (
</>).Enter the following expression, then select Switch to token picker to commit it:
textint('not-a-number')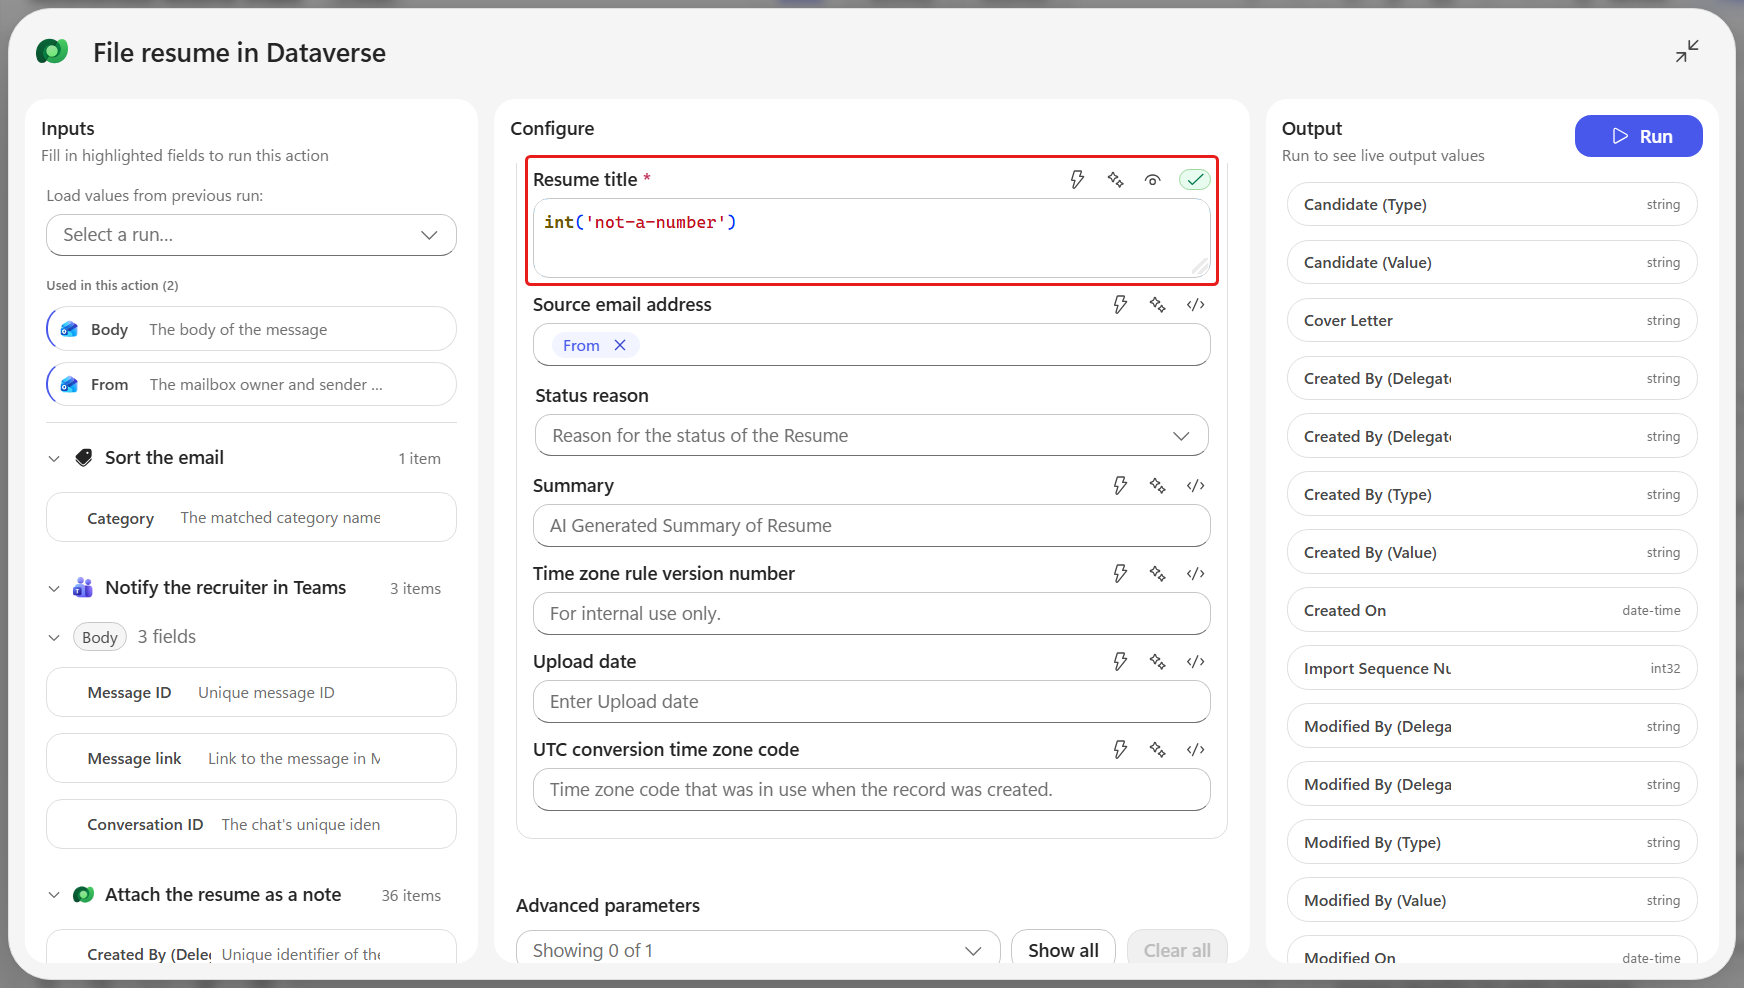
The expression is valid, so the designer saves and publishes it. At runtime,
not-a-numbercannot be converted to an integer. The filing action fails withInvalidTemplatebefore its Dataverse connector call begins.Select Save, then Publish. The header changes from Draft to Published.
If it stays on Draft, open the health center - something else is still unresolved.
Email the monitored mailbox with a short subject beginning with
Application, a one- or two-sentence body, and a resume PDF attached. UseApplication - J1003as the subject, and write the body as a genuine application - for example,Avery Example is applying for J1003 Power Platform Consultant. The attached PDF is the authoritative resume.The attachment is required because Only with Attachments is on - an email without a file never starts a run.
Use that application wording so Sort the email routes directly to Application. The failure this lab is testing comes from the expression above.
Wait for the trigger to poll, then open Activity and select the newest run.
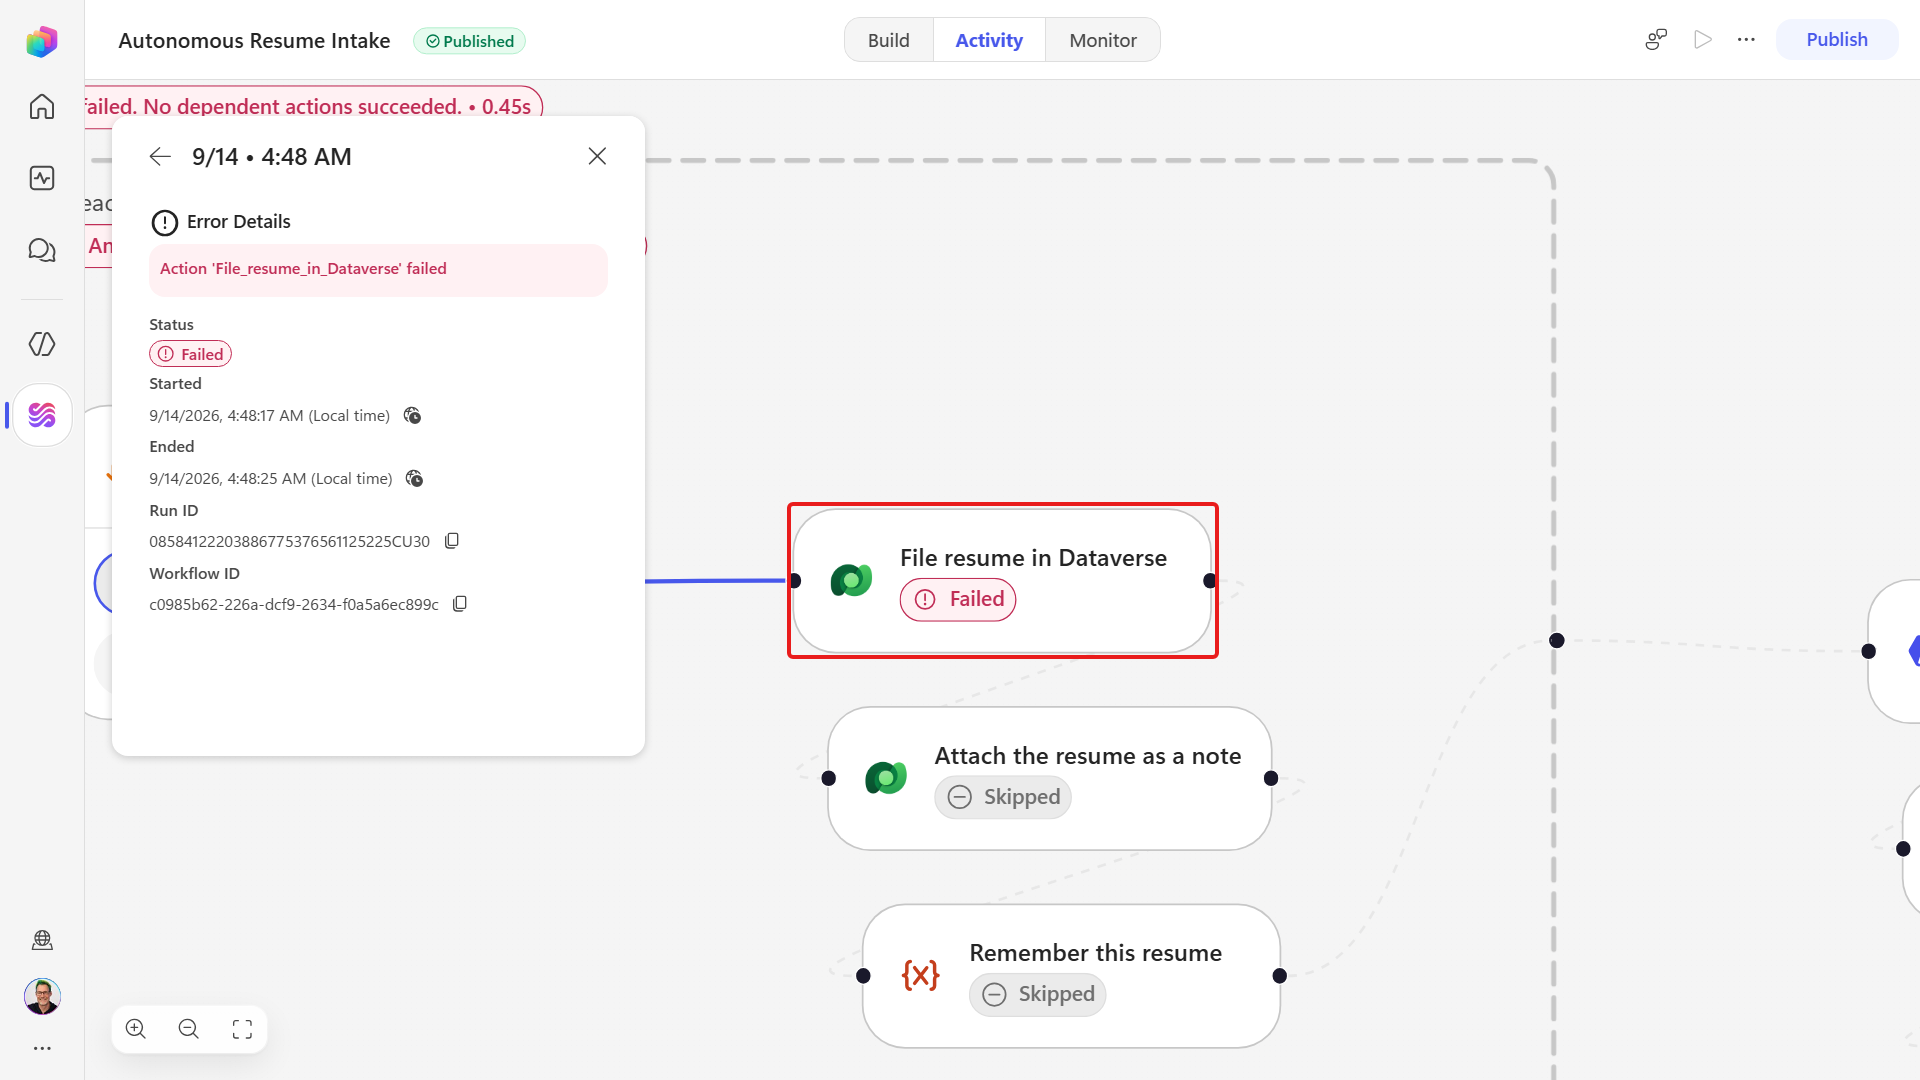
Read the node statuses. Process application and File resume in Dataverse are Failed, while Alert - filing failed and End are Succeeded.
The containing Handle failure scope reads Cancelled, not Succeeded, because the End action terminates its own container after creating the alert.
Select the failed File resume in Dataverse node and open Run Details.
It shows
InvalidTemplatebecauseintcannot convertnot-a-numberto an integer. Inputs and Outputs both say No data available, because expression evaluation failed before the connector ever received an input.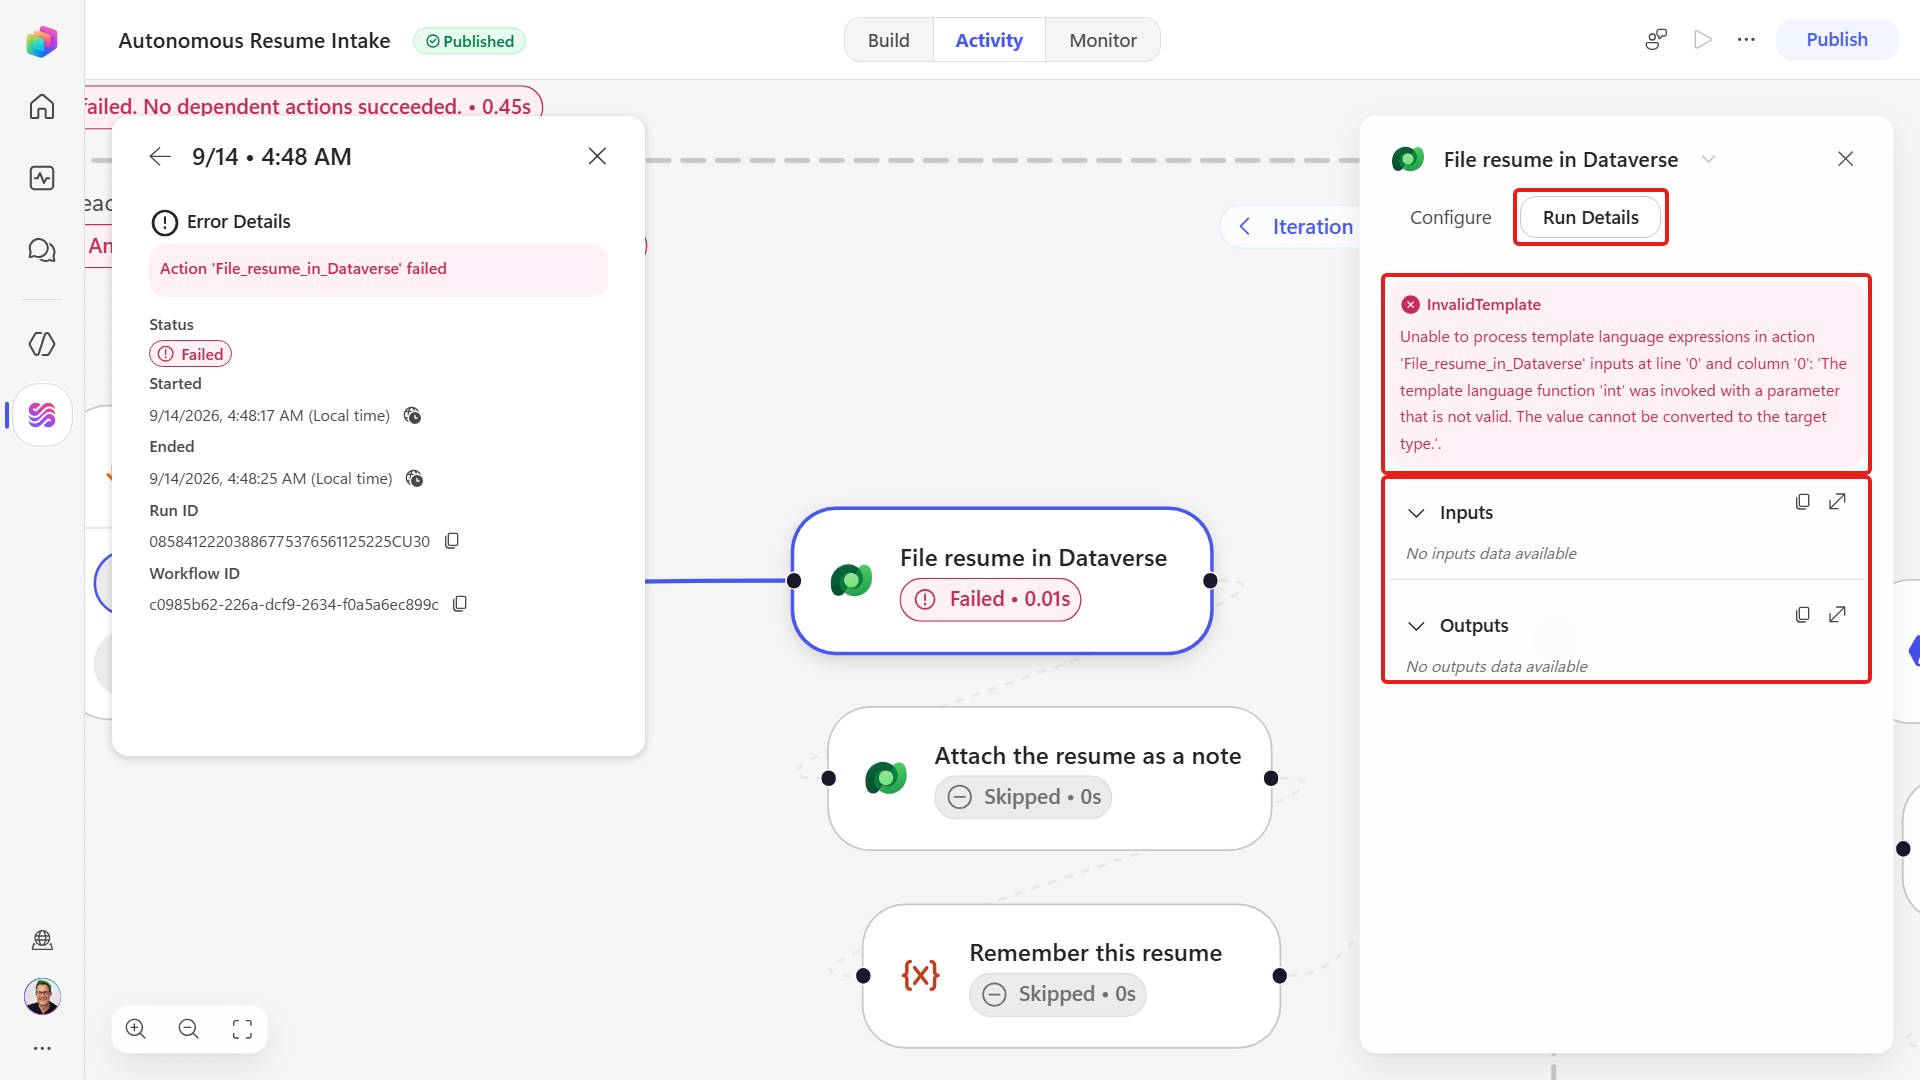
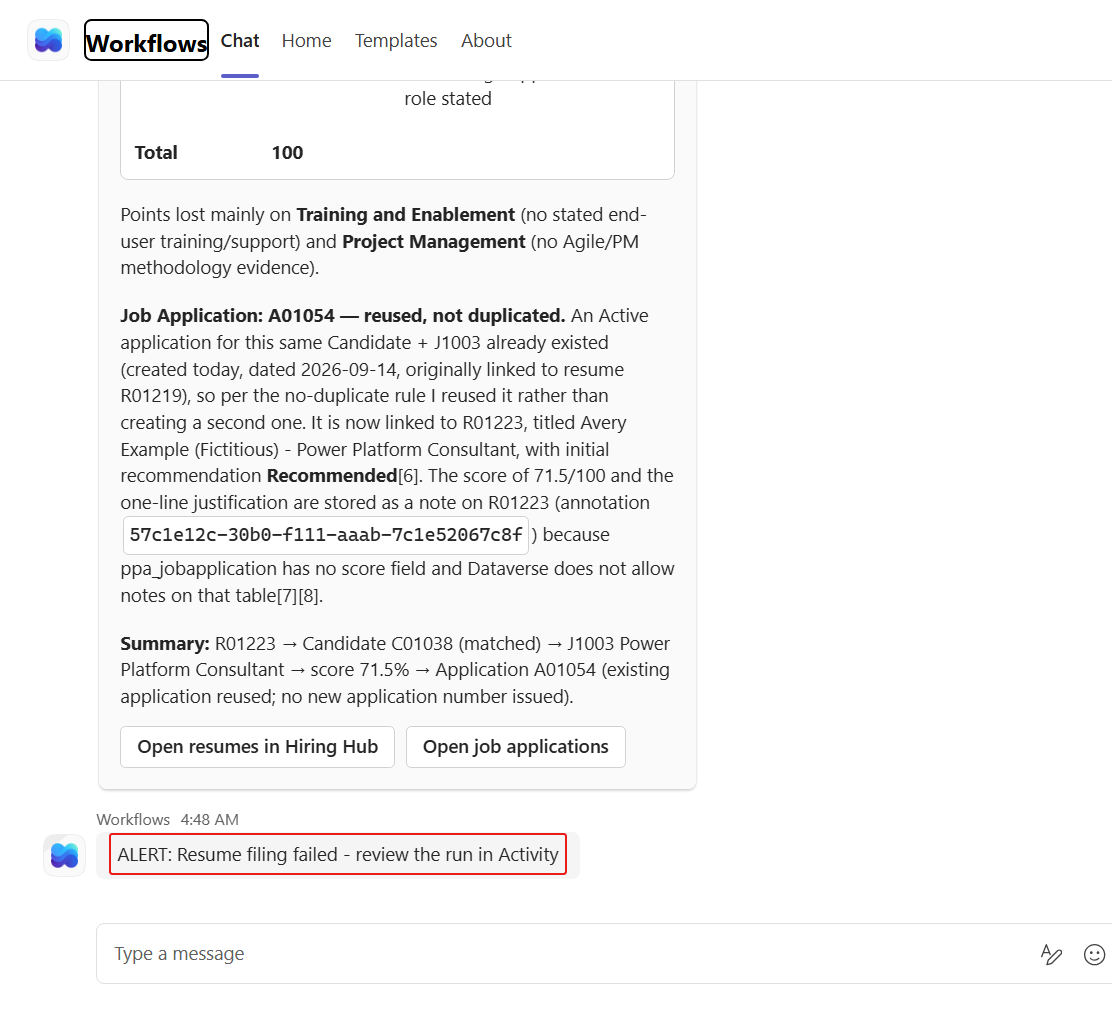
Check Teams. The Flow bot chat now carries the message ALERT: Resume filing failed - review the run in Activity.
Now undo the break.
Inside Process application, select File resume in Dataverse again.
In Resume Title, select Switch to expression mode, replace the int expression with the following expression, then select Switch to token picker:
textitems('For_each_attachment')?['name']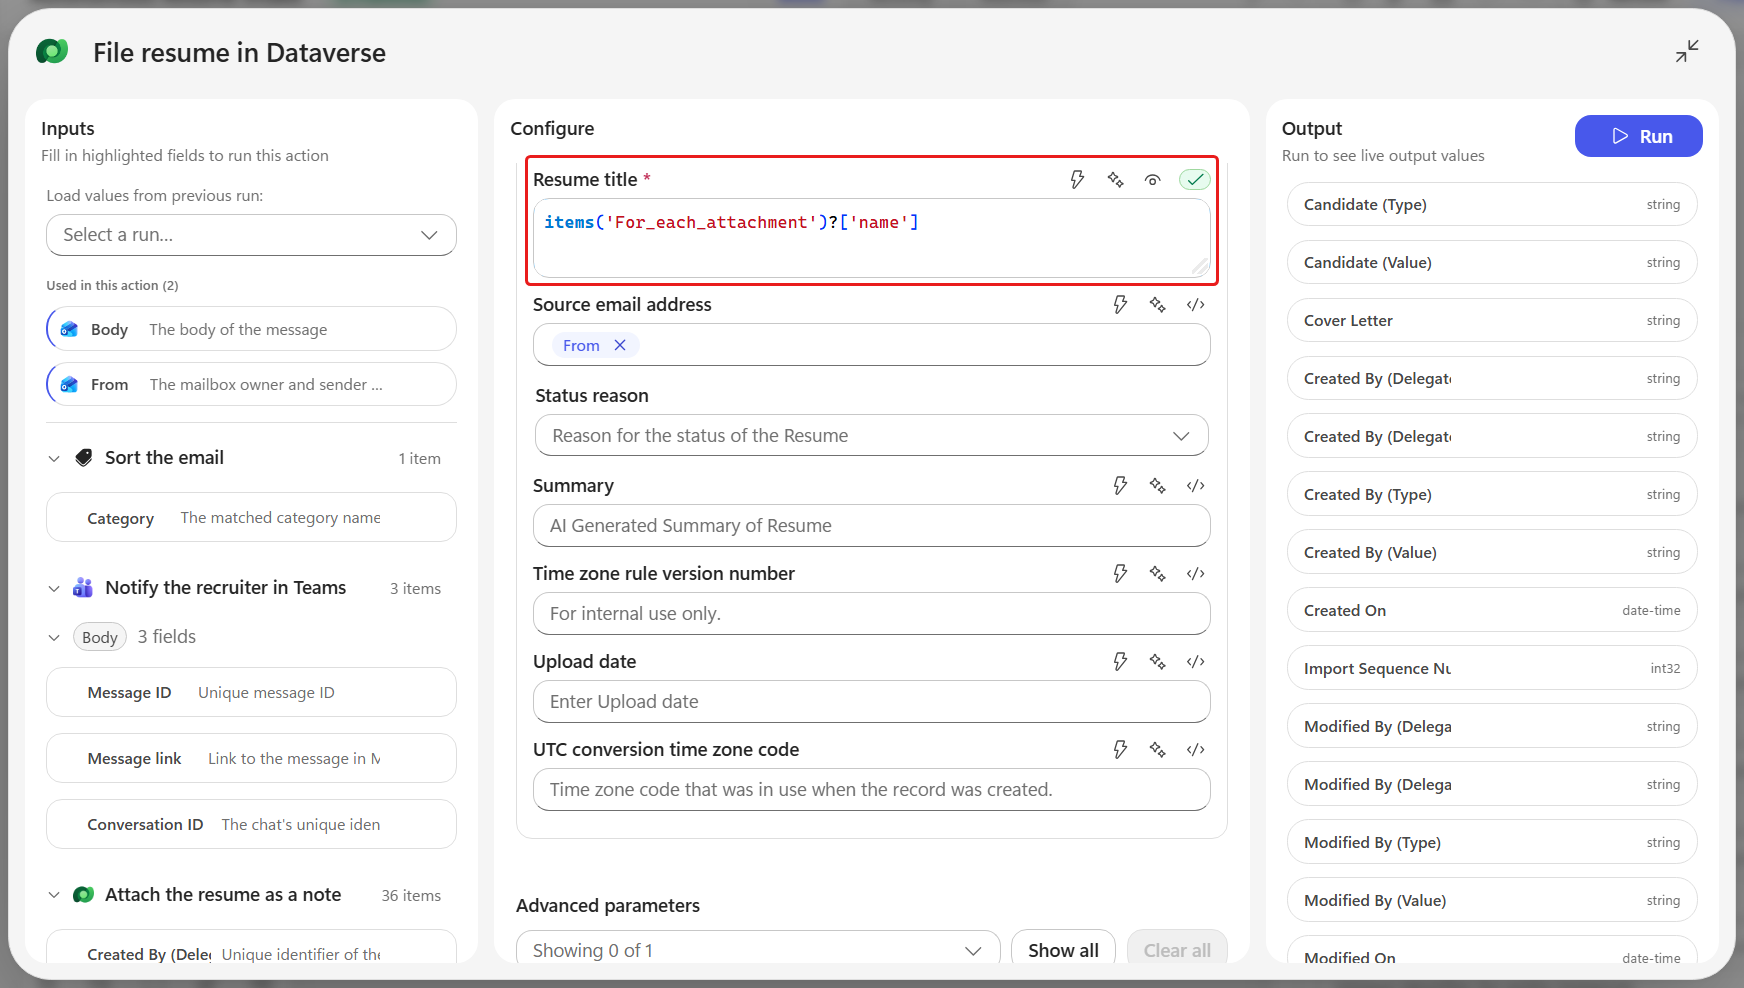
Check that Resume Title shows the Name token again.
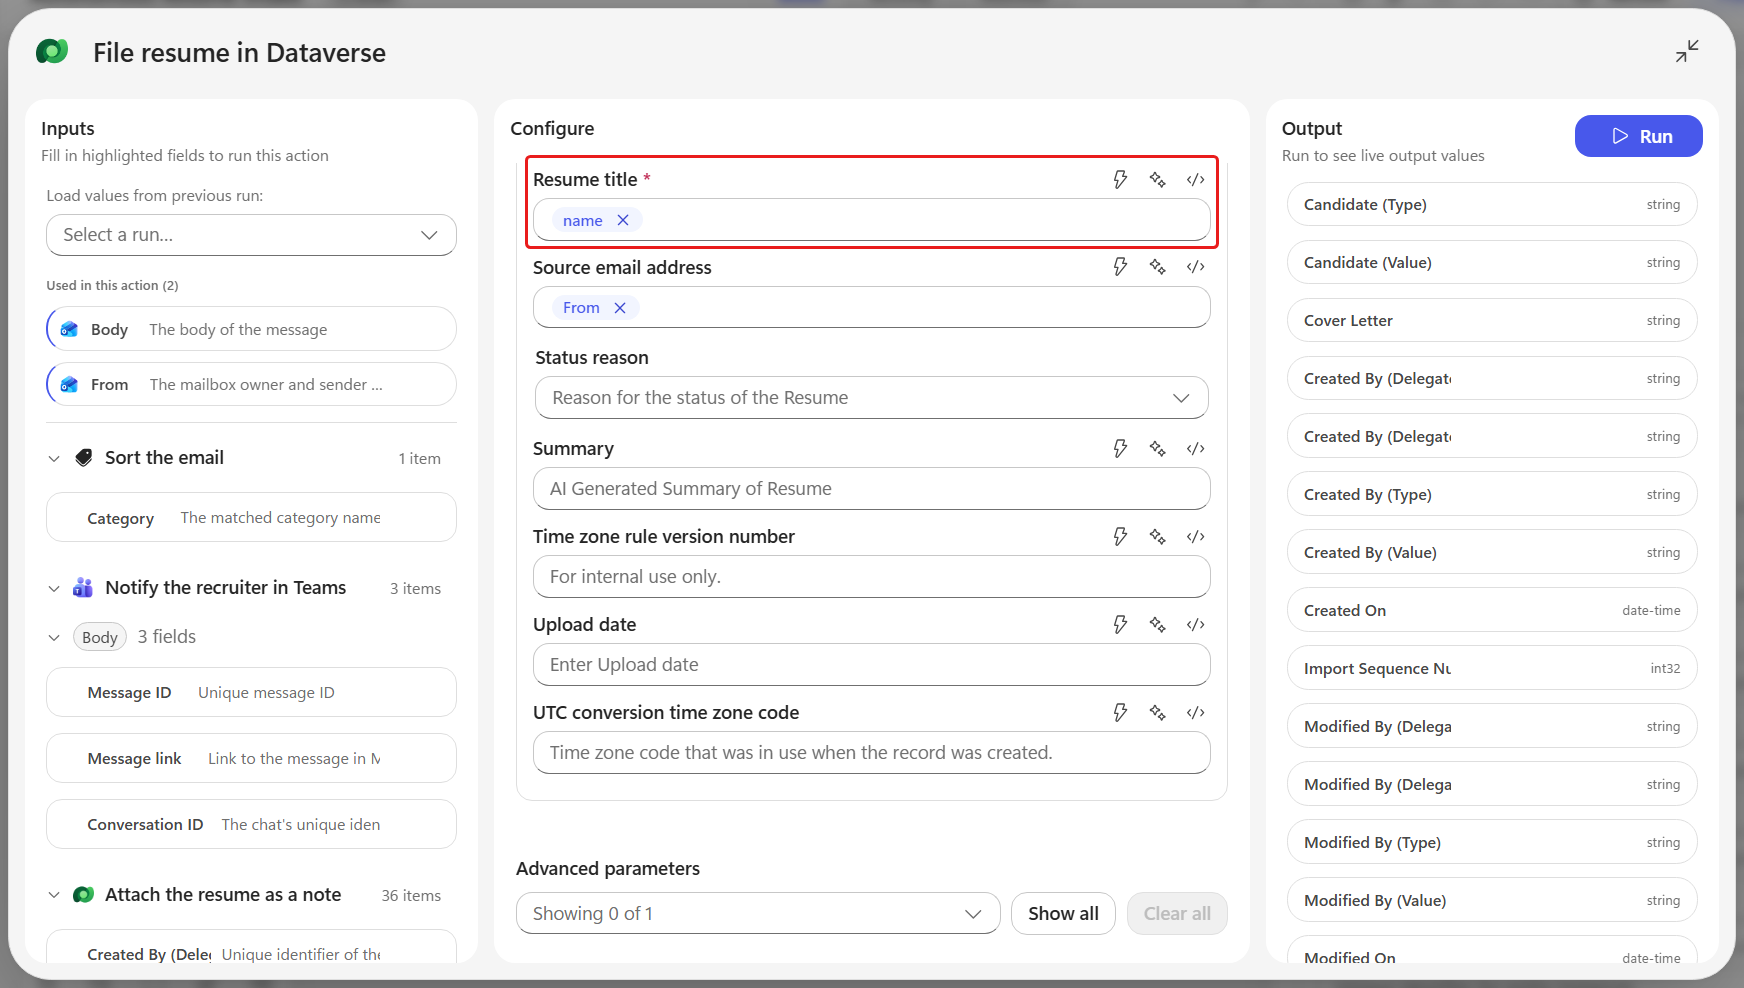
That is the attachment's file name from the loop's current item, not the email Subject. After a clean run the column should read exactly
AVERY EXAMPLE (FICTITIOUS).pdf.Select Save, then Publish.
Turning the workflow off when you are done with it
Leave the workflow Published for now - Mission 10 uses it. A published workflow keeps polling the mailbox, so when you no longer need it running, open the Workflows list, hover the Autonomous Resume Intake row, select the more actions menu and choose Turn off. Its Status then reads Draft, and selecting Publish starts it again.
✅ Mission Complete
Mission 09 is complete. Your workflow now pauses for a person when it should, names every step, and tells someone when a write fails.
You can now:
✅ Human oversight: You added fixed and agent-generated review requests before the workflow acts.
✅ Readable automation: You named each node so the canvas and run history explain the process.
✅ Failure handling: You used a Scope and Run after condition to surface failed writes.
✅ Observability: You broke a step on purpose, read the run details, and confirmed the alert it raised.
⏭️ Move to Schedule Interviews with Work IQ mission
📚 Tactical Resources
🔗 Error handling and retry policies