
🚨 Mission 07: Automate Resume Intake with a Workflow
🎯 Mission Brief
Welcome back, Agent. So far your agents respond to people. In this mission you'll make the hiring system run on its own.
When an applicant emails a resume, a Workflow screens out junk and automatic replies, then files the resume and its PDF in Dataverse - with nobody watching.
A Workflow is an automation you build inside Copilot Studio. It follows a configured graph of steps when something triggers it, which here is an email arriving. Connector, branch, and loop nodes do the filing, and a Classify node uses a language model to read the email and decide which branch to take.
By the end of this mission an email lands in the mailbox and a resume appears in Dataverse with its PDF attached, unattended.
🔎 Objectives
In this mission, you'll learn:
- What Workflows are and the triggers available
- How to route inbound email with a Classify node
- How to group work in a Scope and loop over an email's attachments
- How to file a Dataverse row and attach the original PDF as a note
- How to test individual nodes and inspect runs in the Activity tab
🧠 Workflows and their triggers
A Workflow is a standalone, versioned automation built as a graph of nodes. Its configured sequence, conditions, loops, and connector operations define how it executes, but a node can call a language model whose answer may vary. It's the new home for the "when X happens, do Y" automation that used to live in agent flows and event-triggered Power Automate: you build, test, publish, and version it inside Copilot Studio.
The division of labor runs through the next two missions:
- Use a Workflow to orchestrate the steps - evaluate conditions, loop over attachments, file a record, send mail, post a card, or wait for an approval. These operations follow configured rules; a model-based node such as Classify makes a probabilistic decision within that graph.
- Use an agent (called from a workflow Agent node) for the reasoning work - reading a resume, matching it to a role, deciding the best fit.
This mission builds the trigger, model-based email routing, and connector-driven filing. Mission 08 adds agent reasoning for resume intake and matching.
Covered in Recruit
Revisit Recruit Mission 07: Automate with Workflows for how a workflow differs from a Power Automate cloud flow, and for the Health Center and version history you work with while building one.
What's in a workflow - the node palette
You assemble a workflow from a small set of node types, all of them in the left Add panel:
| The node | What you'd use it for |
|---|---|
| Connector | The trigger itself, plus 1400+ connector actions - Outlook When a new email arrives, Dataverse Add a new row, Teams Post adaptive card. |
| Classify | A built-in AI intent router: give it some text and a few category names, and it decides which one fits. |
| Agent | Hands an open-ended task to an agent and reads its structured result back. |
| Human review | Pauses and waits for a person to approve something or fill in a gap. |
| If/Else | Splits the flow two ways on a condition. |
| Loop | Repeats over a list - each attachment, say - or until a condition is met. |
| Variable / Function | Stash a value to use further down, or do small string and array transforms. |
One node you will need is not in that palette. Scope - a labeled box that groups several actions so they succeed or fail as one - appears only in the Add dialog, in the Actions group below Loop. You create it in Lab 7.3, and it becomes the foundation of the error handling you build in Mission 09.
The triggers you can choose
Every workflow starts with exactly one trigger that decides when it runs - you choose it on the Start node:
| Trigger | Fires when… | Use it when |
|---|---|---|
| Manual | You run it by hand | Building and testing while you develop |
| Recurrence | On a schedule | Periodic jobs - a nightly digest, a weekly cleanup |
| Connector event (e.g. Outlook When a new email arrives) | An external system raises an event | Reacting to the outside world - this mission's pattern |
| When an HTTP request is received | Something calls the workflow's URL | Wiring up a webhook or a custom caller |
| When an agent calls the workflow | An agent invokes it as a tool | Letting the Hiring Agent kick off the automation on demand |
This mission uses a Connector event trigger - When a new email arrives - so a resume emailed to the recruitment mailbox files itself with no one watching.
Classify - the AI router
Classify is a lightweight AI router. It only sorts text into the named categories you define, drawing one branch per category on the canvas plus an automatic Other. It has no tools, knowledge, or memory - it just decides which branch to take. You use it in Lab 7.2.
Classify's language-model decision is probabilistic: the same message can receive a different category across runs or models. Clear category descriptions and representative test messages help you assess routing quality; passing a few samples does not guarantee every future classification. Once a category is returned, the workflow follows the configured branch.
🔢 How expressions refer to other nodes
Recruit Mission 07 introduced the expression editor and the functions used most often - concat(), if(), empty(), coalesce(), length().
Several steps in this mission read a value that an earlier node produced. Workflows do that with an expression, and they all follow one shape:
outputs('File_resume_in_Dataverse')?['body/ppa_resumeid']Read it from the outside in:
outputs('…')is the output of the node named inside the quotes. Some nodes usebody('…')instead, which is the same idea one level deeper.- The name in quotes is the node's expression identifier. Use the verified identifiers shown in these labs:
Is it a PDF?becomesIs_it_a_PDF_, andAlert - filing failedbecomesAlert_-_filing_failed. In these examples, spaces and the question mark become underscores, but the hyphen is preserved. Rename a node before writing an expression that mentions it; a hand-written reference can still point at the old identifier after a rename. ?is safe navigation. It means "if this piece is missing, give me nothing rather than an error", which keeps a run from failing on an email that had no such field.['body/field']selects one field out of that output.
Two practical notes. The expression editor auto-closes brackets and quotes, so paste an expression in one go rather than typing it character by character. And it commits when focus leaves the field - select outside the box before you look for a Save button, or your edit is still sitting uncommitted.
How to fill in a field
Most fields in a node panel accept three different kinds of value, and the small row of icons above the box is how you choose between them. Every lab in this mission uses at least one of them, so it is worth a moment here.
Type straight into the box and the field holds exactly what you typed - a literal value such as
Inboxorapplication/pdf. The row above it holds three buttons: ⚡ Insert dynamic content, ✨ Ask Copilot to generate an expression, and</>Switch to expression mode.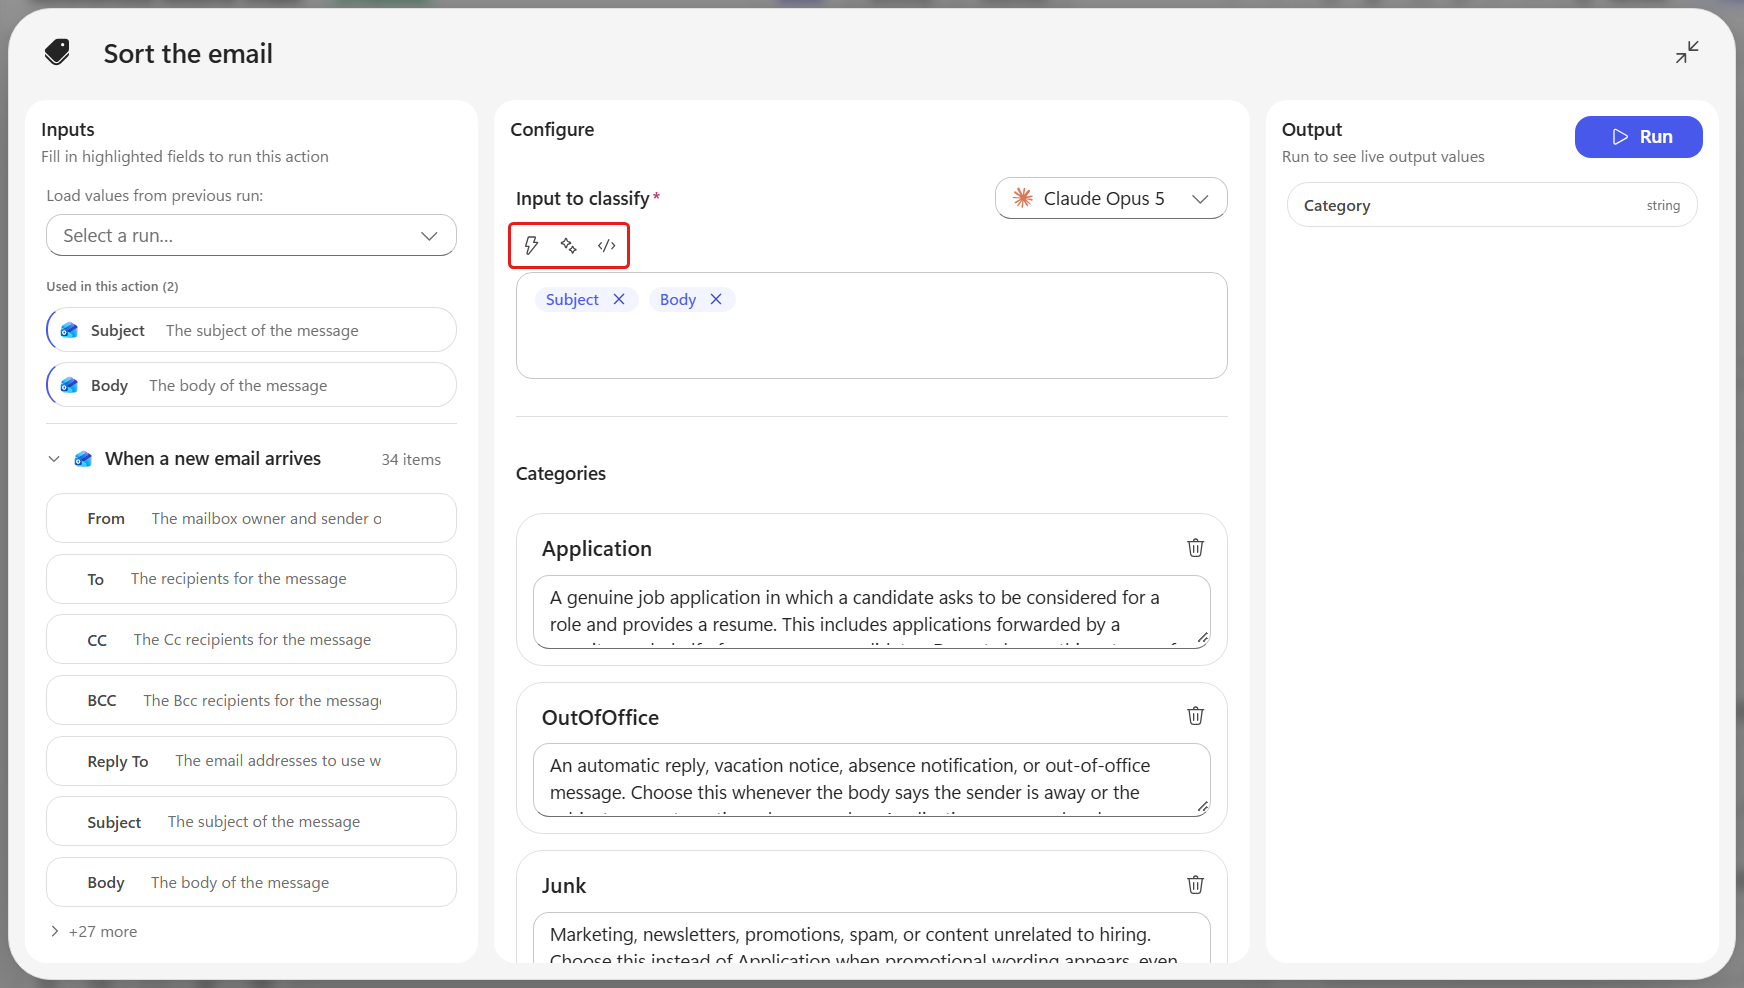
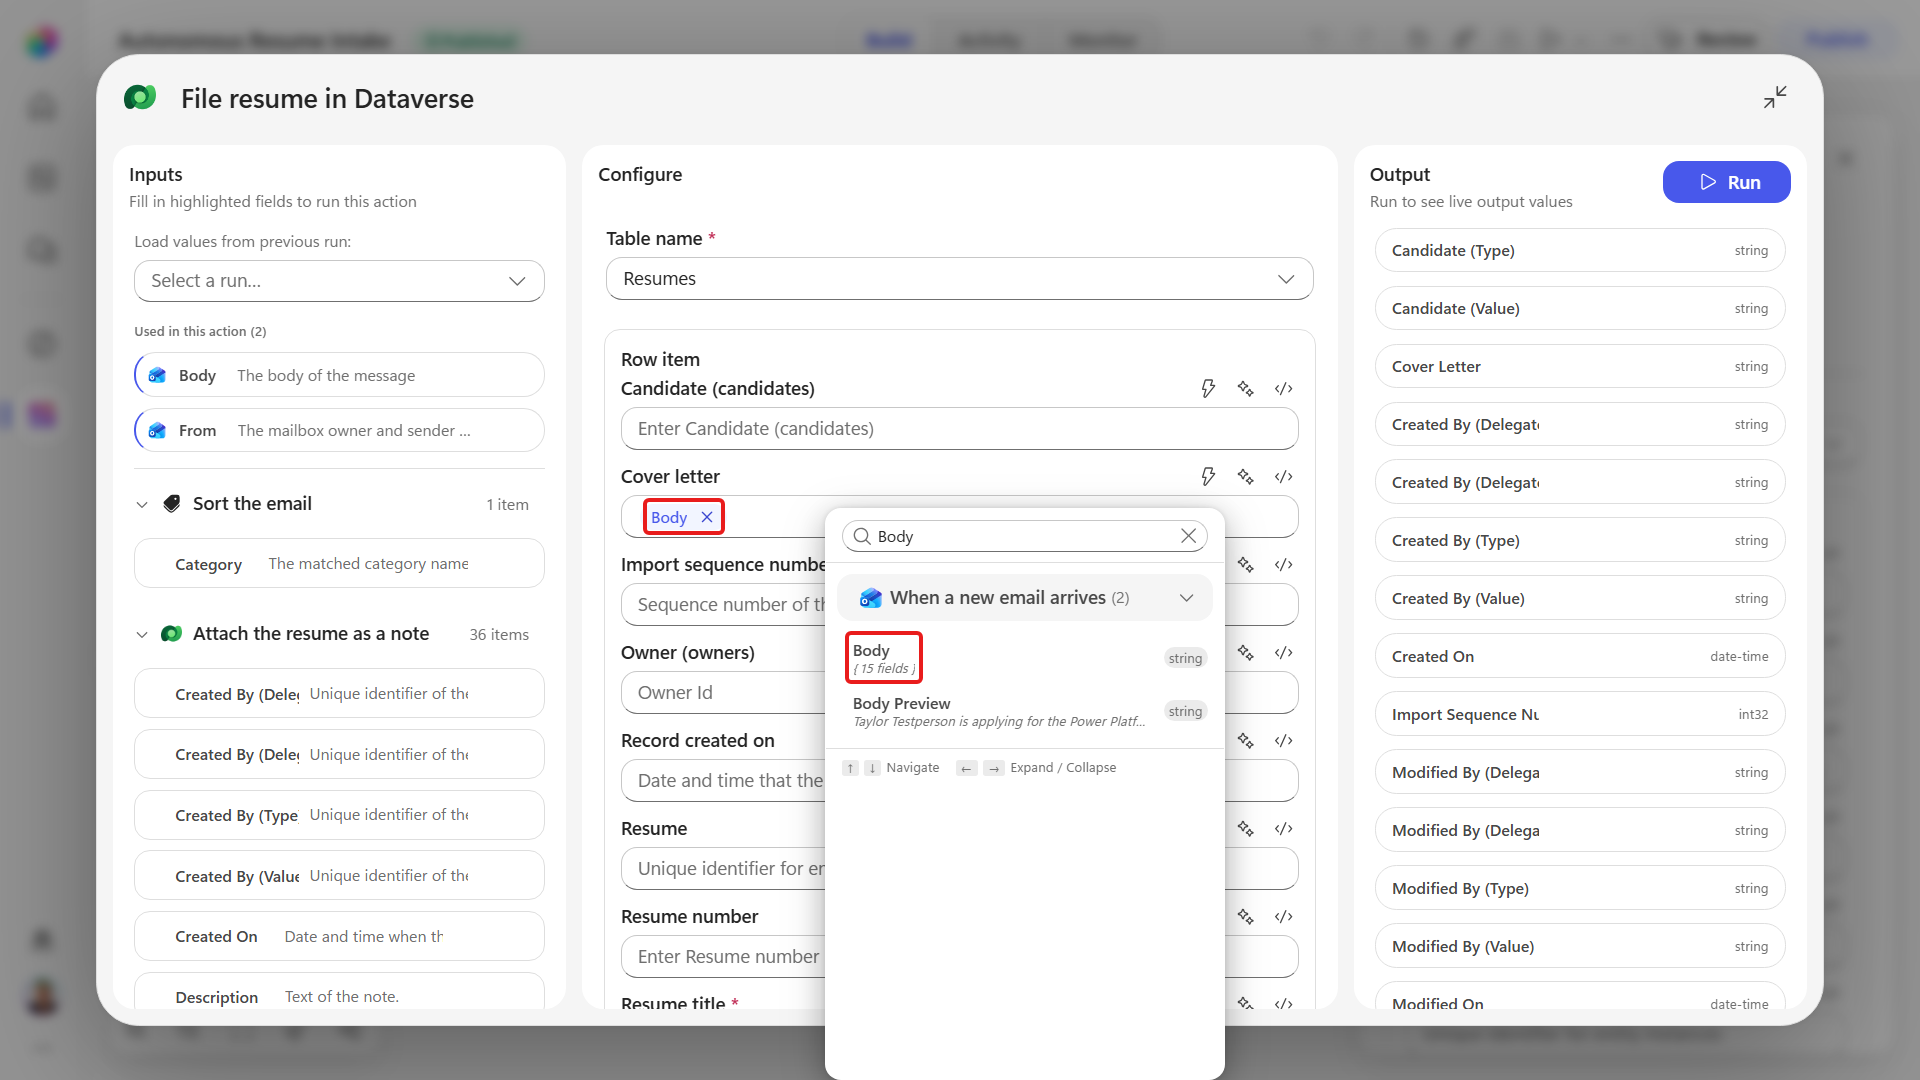
⚡ Insert dynamic content lists the values earlier nodes produced - the email's Subject, an attachment's Name. Choosing one drops a blue token into the box. Tokens and typed text mix freely in the same field, which is how Lab 7.5 builds a value out of both.
</>Switch to expression mode turns the box into a formula editor for the workflow expression language, so you can call functions such asconcat()andbase64ToString()instead of picking a single value. This is what a lab means when it tells you to switch the field to expression mode.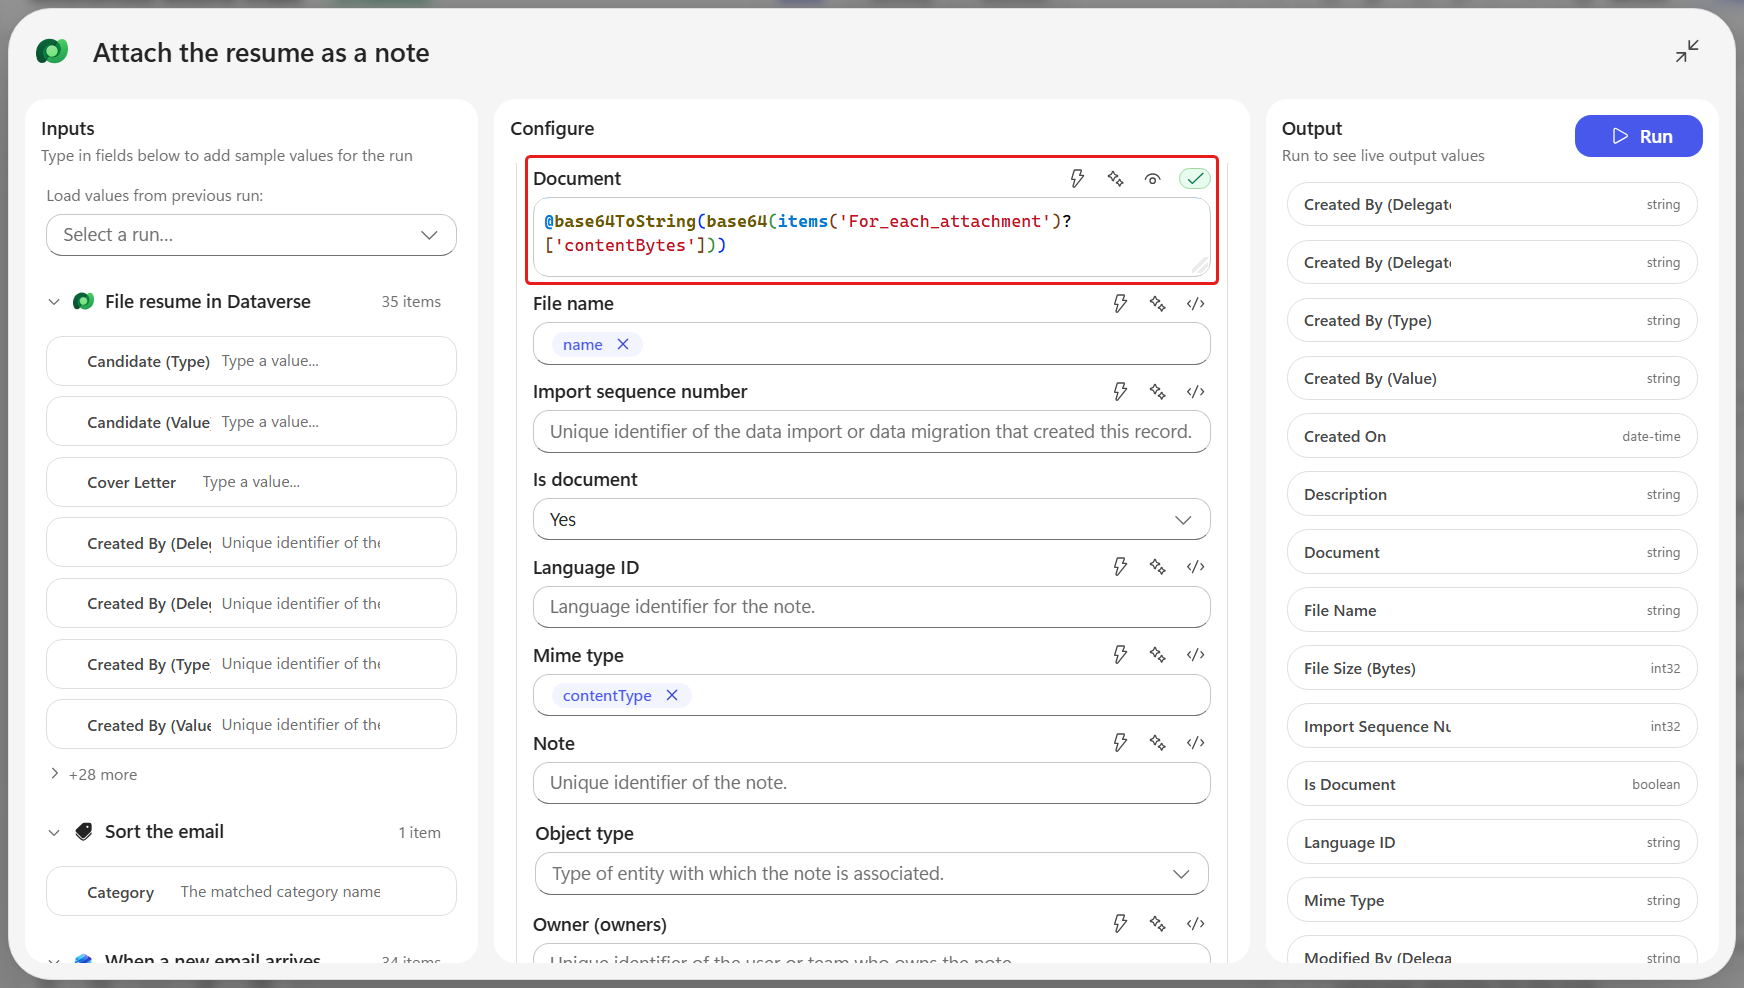
✨ Ask Copilot writes an expression from a description of what you want. The labs give you every expression you need, so you will not need it here.
🔄 Coming from the classic Operative course?
In classic Mission 04: Add Event Triggers to act autonomously, an event trigger handed the automation to Power Automate, where you assembled it from Compose, Condition and connector actions in a separate designer with its own publish cycle - which is still how the standard harness works. Workflows replace that: you build, test, publish and version the automation inside Copilot Studio, and Variable or Function takes the place of Compose while If/Else takes the place of Condition. That one classic mission is now split in two - this mission builds the email routing and filing pipeline, and Mission 08 adds resume-processing agents. The genuinely new part here is Classify, an AI intent router that reads the email and picks a branch, work that classic solutions did with brittle keyword conditions or not at all. And you can test a single action inside the designer with Run node, instead of running the whole flow.
🧪 Lab 07 - Build the autonomous intake
Prerequisites
Before you start this lab you need:
- The Operative solution and the Hiring Hub app from Mission 01
- A mailbox you can send to and receive in, reachable with an Office 365 Outlook connection
- The two sample resume PDFs used from Lab 7.6 onward - see the download in Mission 05
Let's build the email routing and filing workflow. Work through the sub-labs in order, because later expressions refer to the names and outputs of earlier nodes, so renaming a node can break references to it.
This is the shape you are about to build - the email trigger, the Classify router and its four branches, and the filing steps that run inside the Process application Scope. Those steps sit three levels deep: Scope, then loop, then guard.
7.1 Create the email-triggered workflow
Next we are going to create the workflow itself and point it at the recruitment mailbox with Office 365 Outlook. Nothing else can run until the trigger is in place.
In the left navigation select Workflows. The list of workflows in this environment opens - this is where every workflow you build lives.
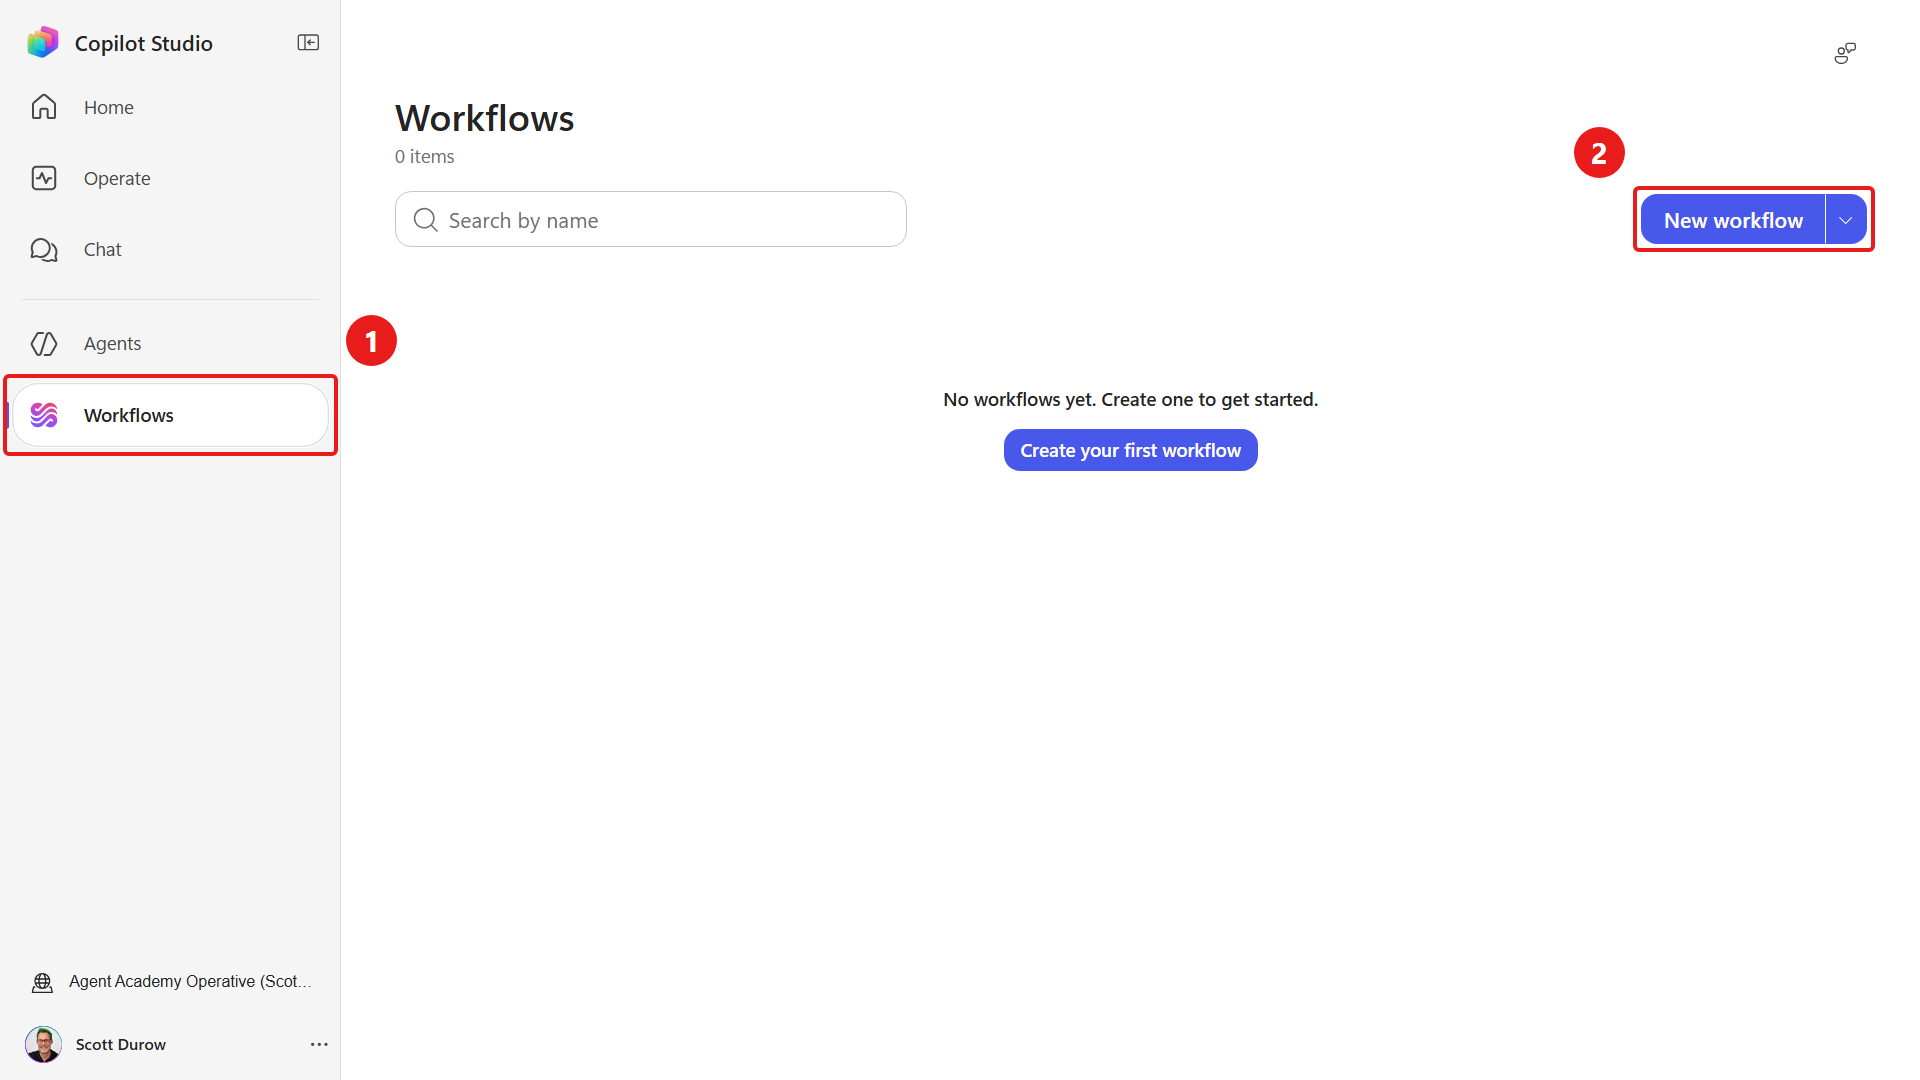
On the command bar select New workflow. The canvas opens with a single Start node whose trigger is Manual.
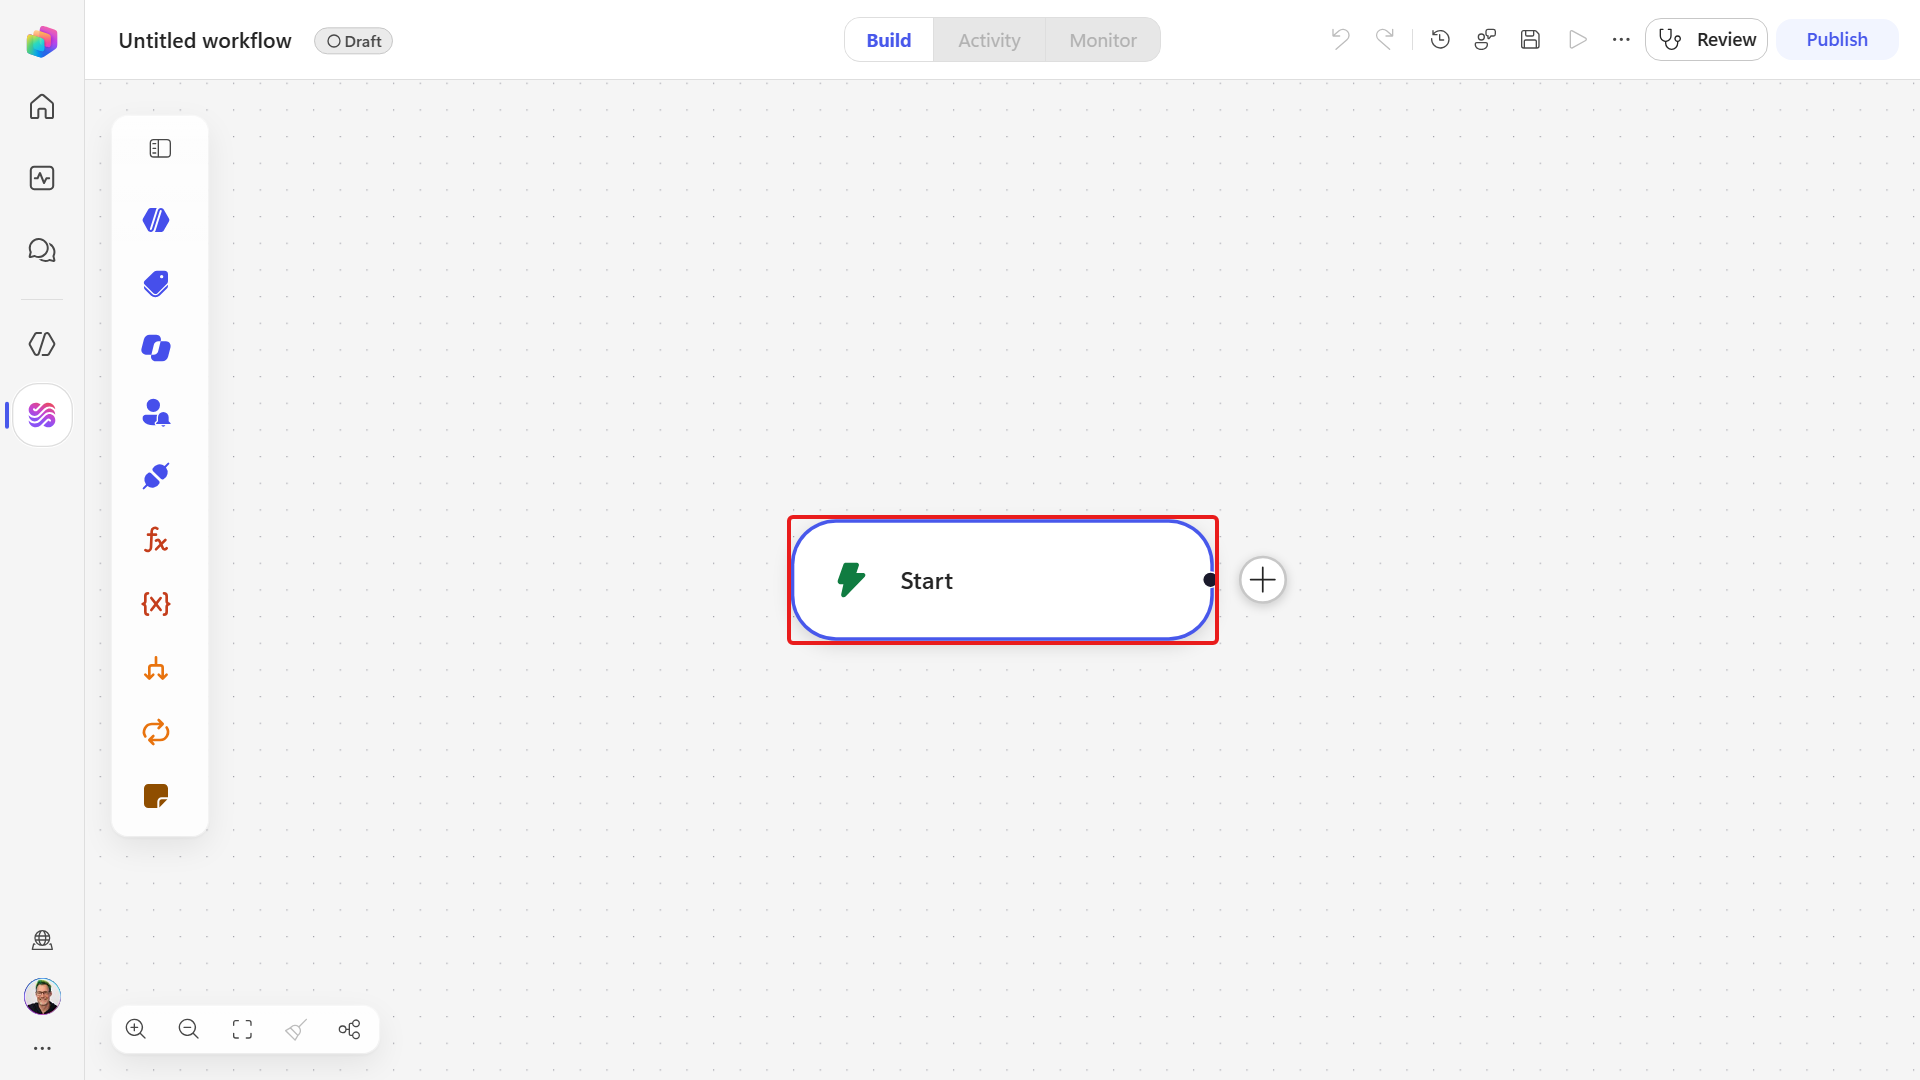
At the top left, select the name Untitled workflow, type
Autonomous Resume Intake, and press Enter.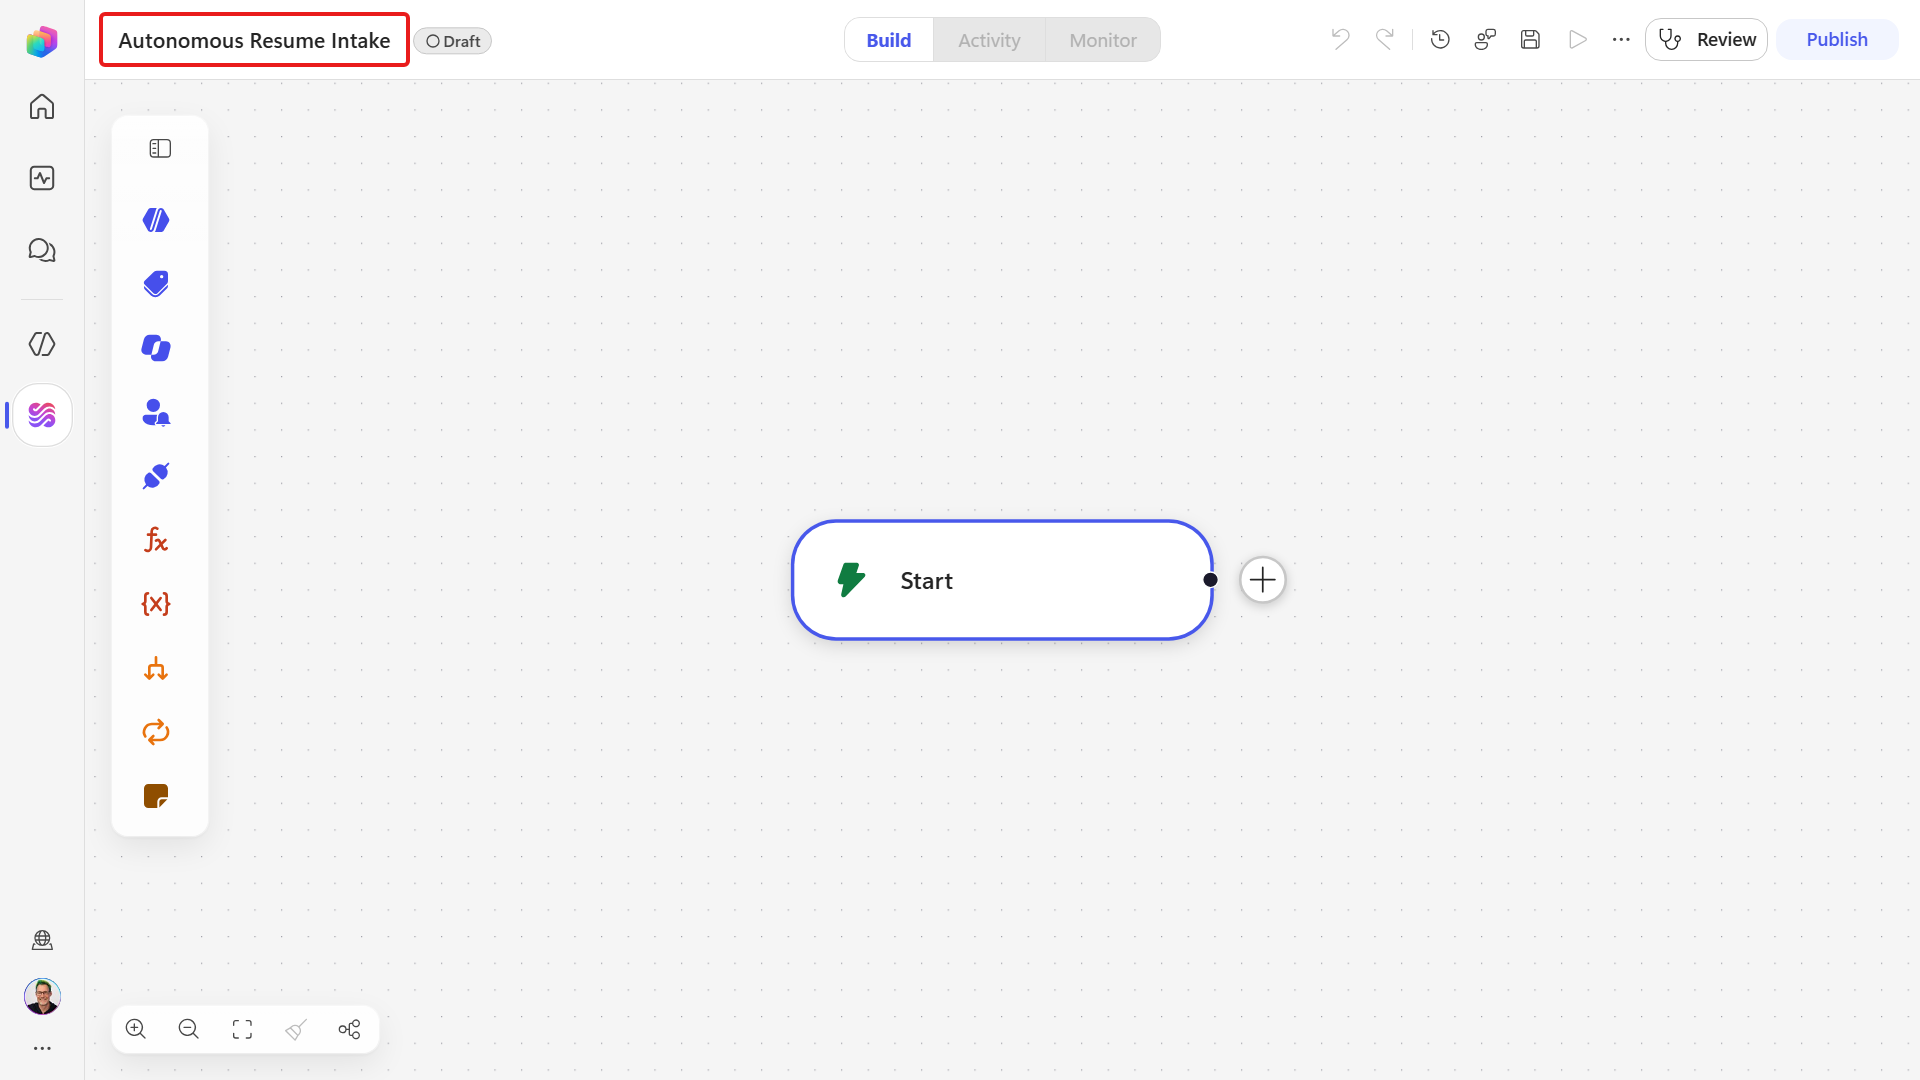
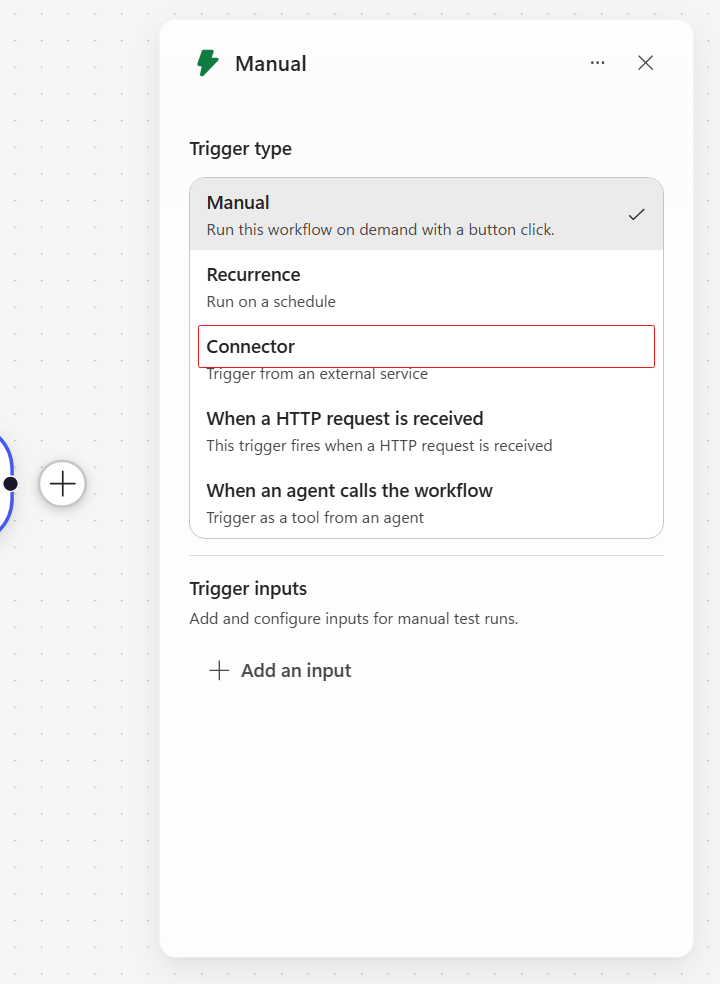
Select the Start node to open its panel on the right, then select the Trigger type box - it currently reads Manual. A list of five trigger types opens: Manual, Recurrence, Connector, When a HTTP request is received, and When an agent calls the workflow. Select Connector.
A Select a trigger dialog opens. In its Search box, type
Office 365 Outlook.The Office 365 Outlook group previews four triggers, but that preview set can change between openings.
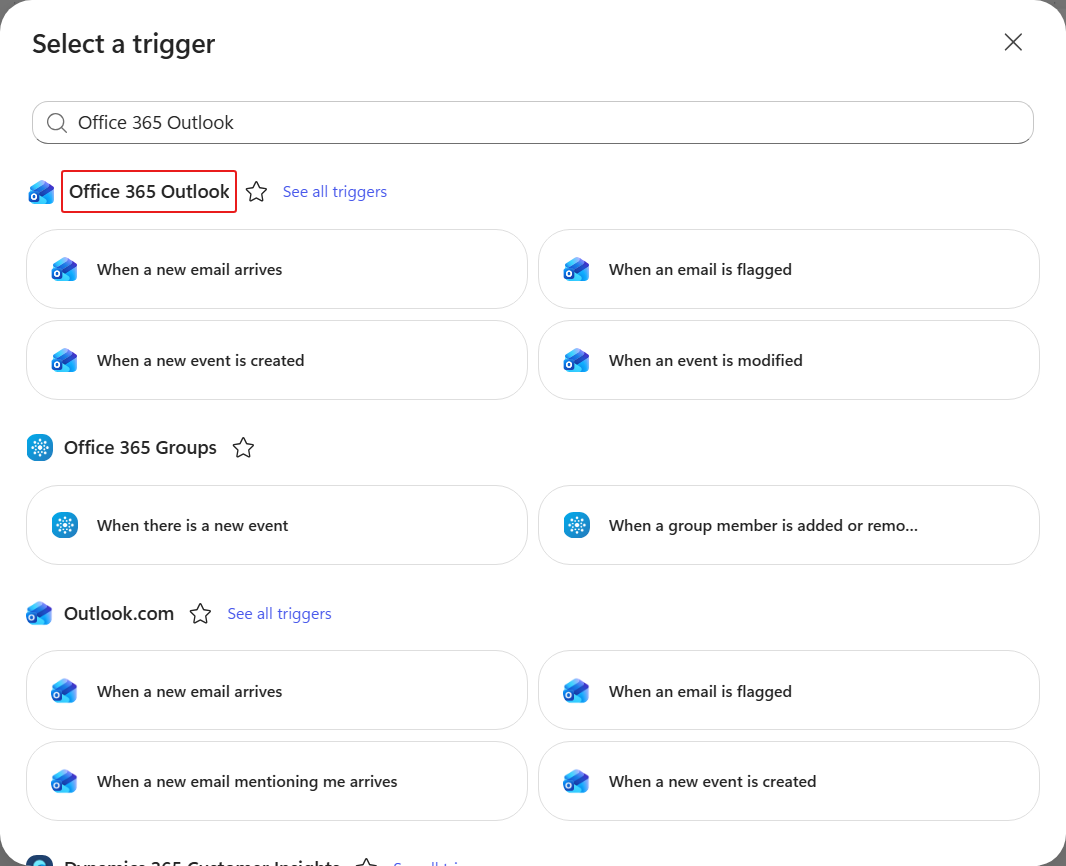
Under the Office 365 Outlook heading, select See all triggers. The dialog switches to the connector's own page and lists all eight Office 365 Outlook triggers in a stable list. Select When a new email arrives - not When a new email arrives in a shared mailbox, which needs a separate shared mailbox and its own permissions. This one watches the mailbox of the account you connect with, which we will use to receive resumes into for this mission.
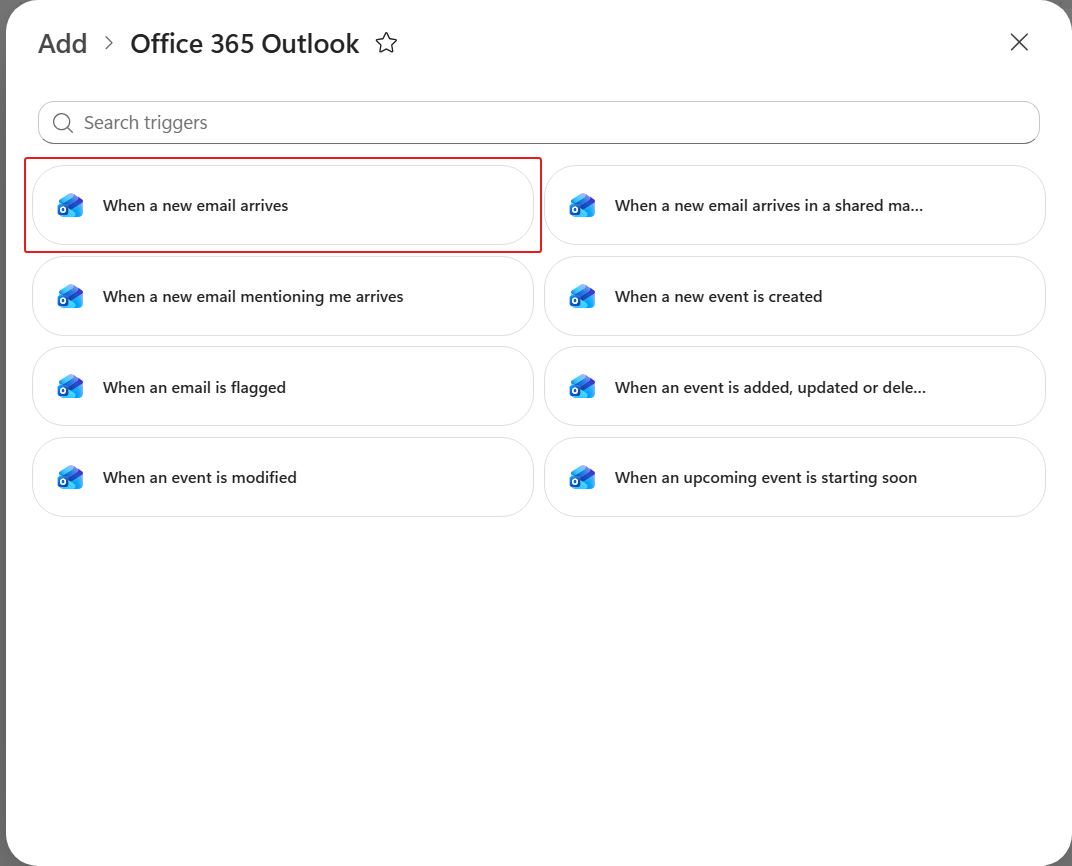
The dialog closes and the trigger's own panel opens. The Start node is now the When a new email arrives trigger, carrying a Needs setup badge until you finish configuring it.
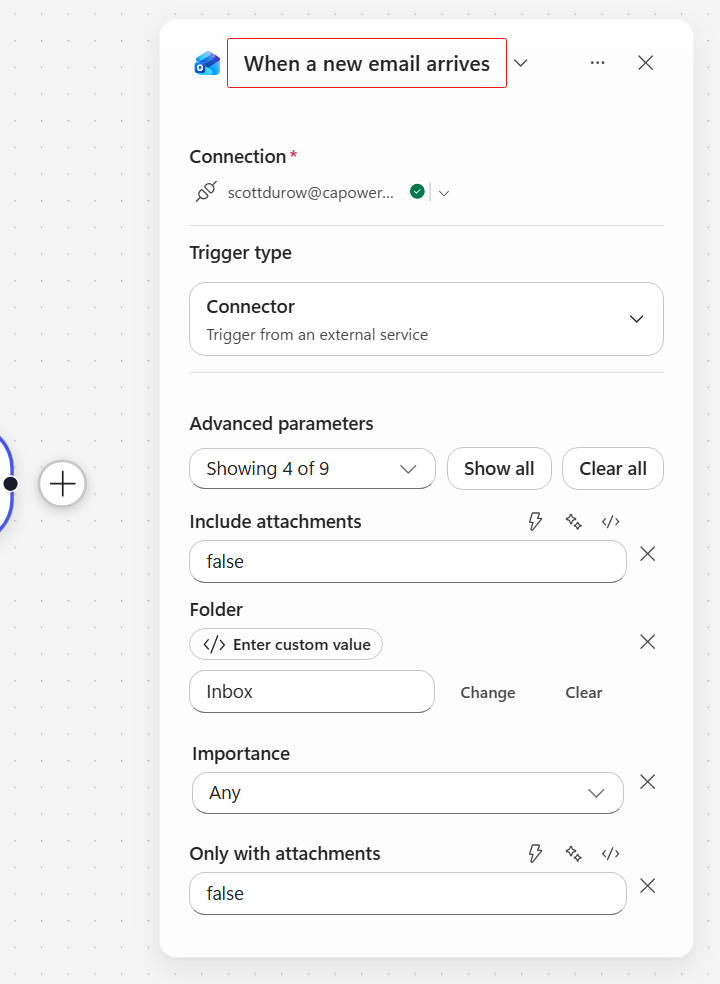
Look at the Connection box at the top of the panel. If it already shows your account, the environment has an Office 365 Outlook connection and you can move on. If it shows a warning instead, select Create new connection, select your account tile, and complete the sign-in prompt.
If the panel asks for an Original Mailbox Address you picked the shared-mailbox trigger by mistake - go back and choose When a new email arrives.
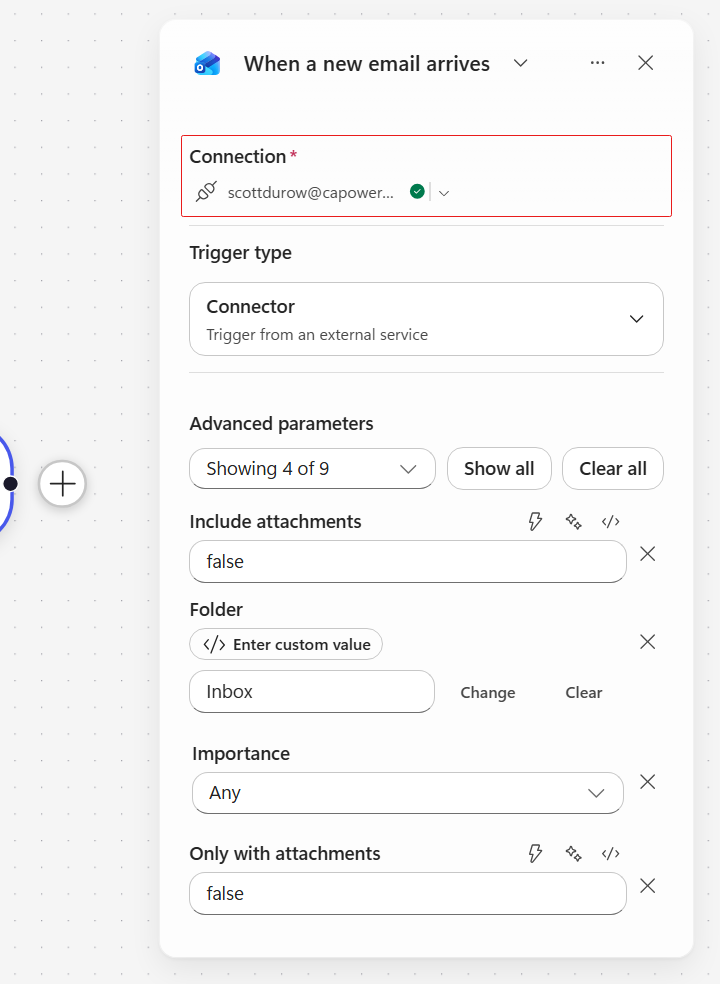
Below the connection, select Show all to reveal every trigger parameter. The count changes from Showing 4 of 9 to Showing 9 of 9. Set the values below and preserve the other defaults, including Importance at Any. Leave unused optional filters empty.
Field Value Folder Inbox(already set by default - just check it)Subject Filter ApplicationInclude Attachments Enabled (Yes or true, depending on the editor) - so the email's files come through with the triggerOnly with Attachments Enabled (Yes or true, depending on the editor) - so an email with no file never starts a run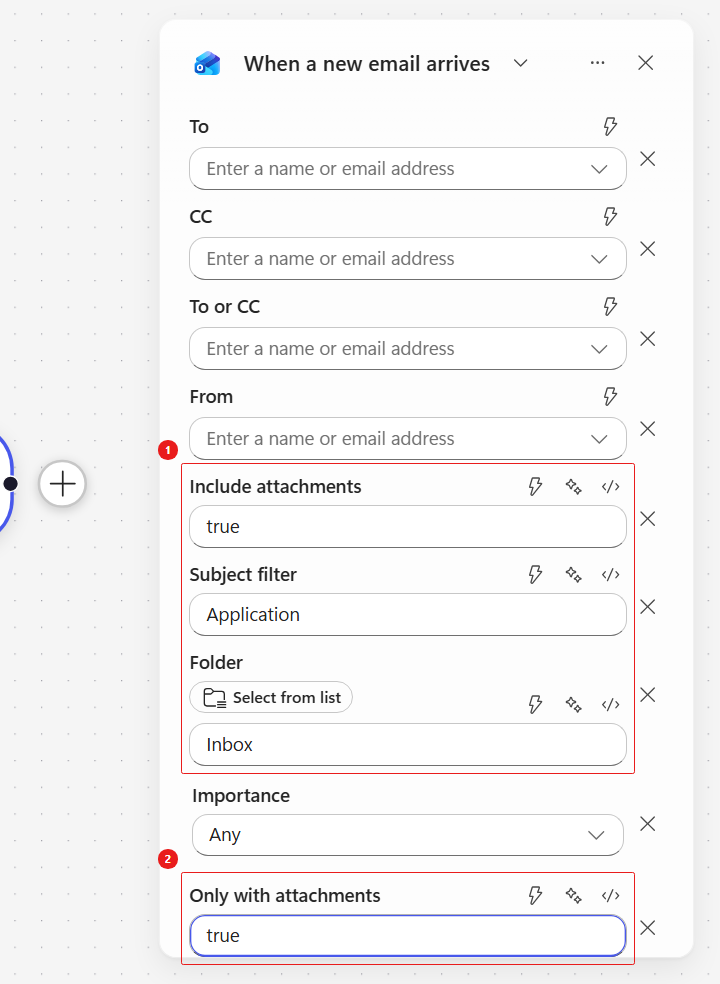
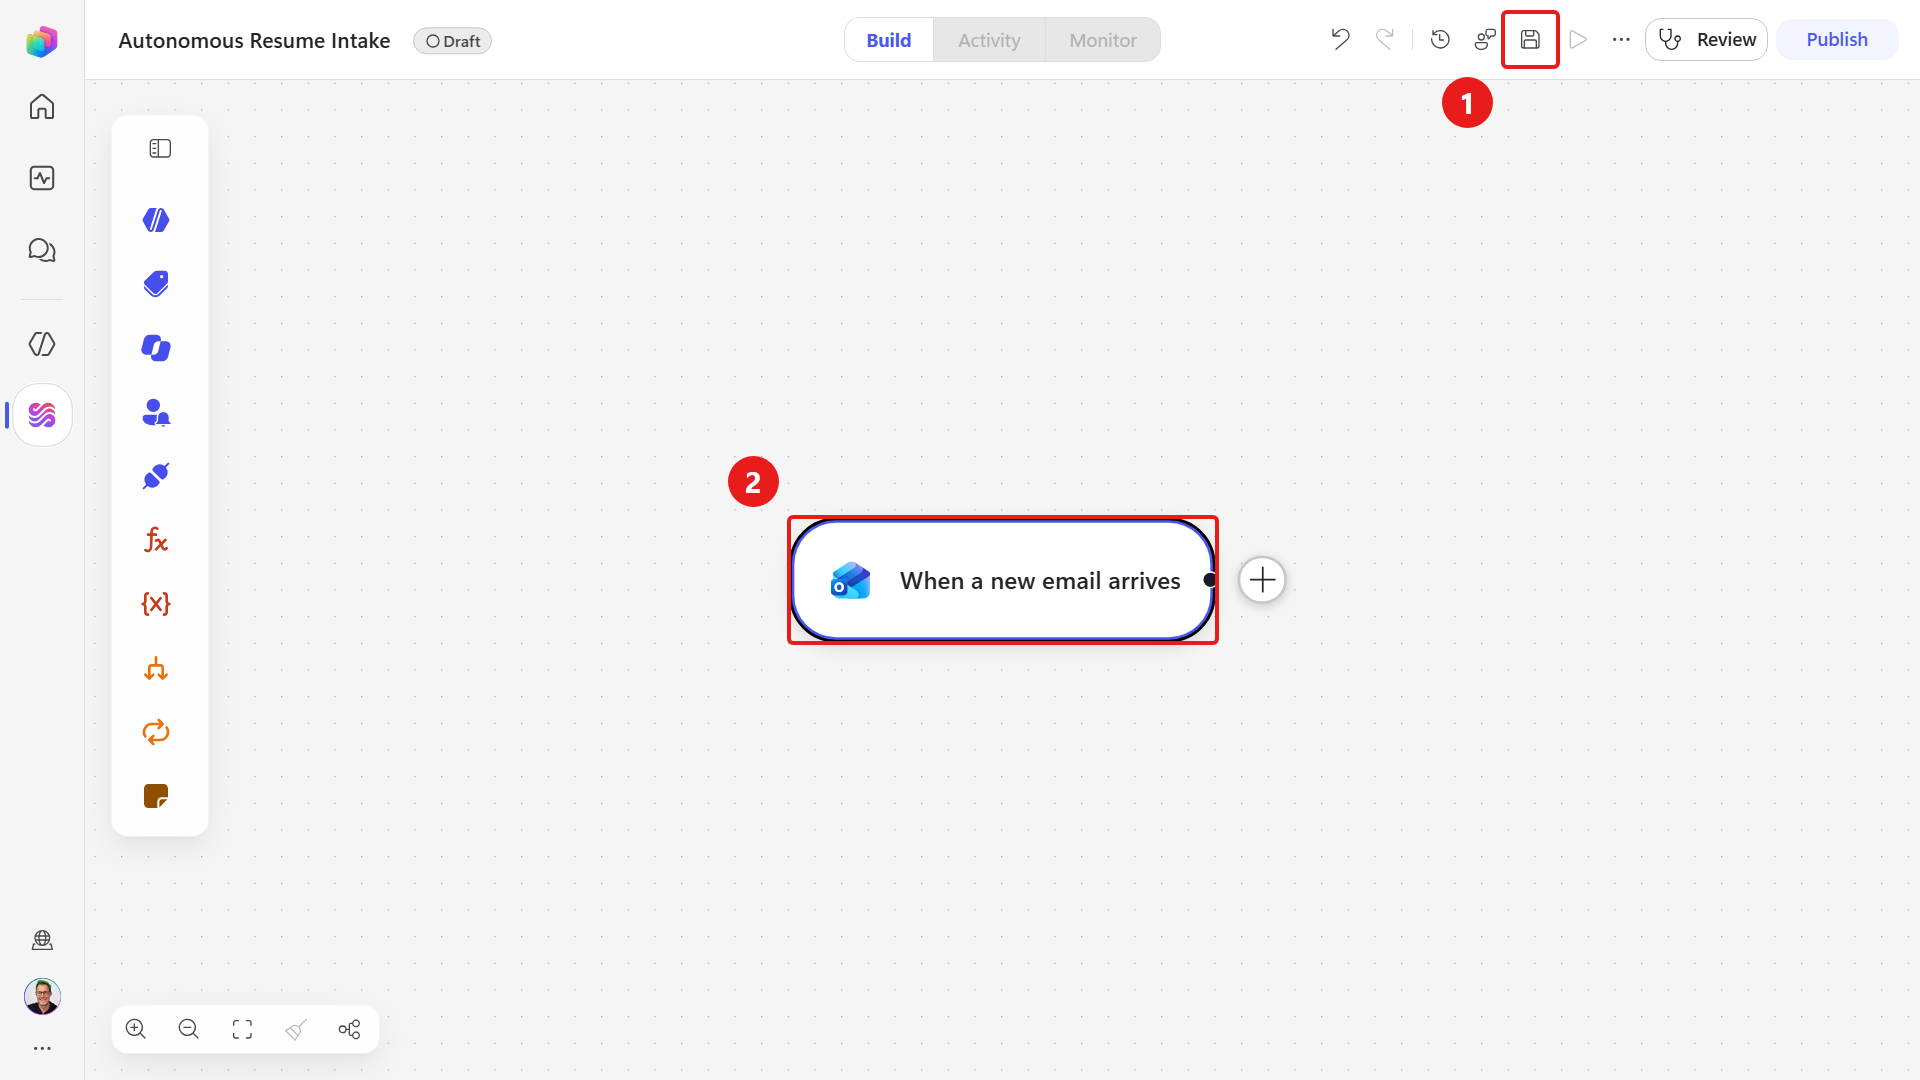
On the command bar select Save - it is the disk icon, not a text button.
The Start node is now titled When a new email arrives and the Needs setup badge has gone.
7.2 Screen the inbox with Classify
A monitored mailbox receives more than applications: out-of-office auto-replies, newsletters, and junk mail that can be ignored. We only want to process the genuine application emails. Next we are going to add a Classify node, which uses a language model to read the message and work out what it is, rather than matching exact text.
Let's add that node and teach it the three kinds of mail this inbox receives.
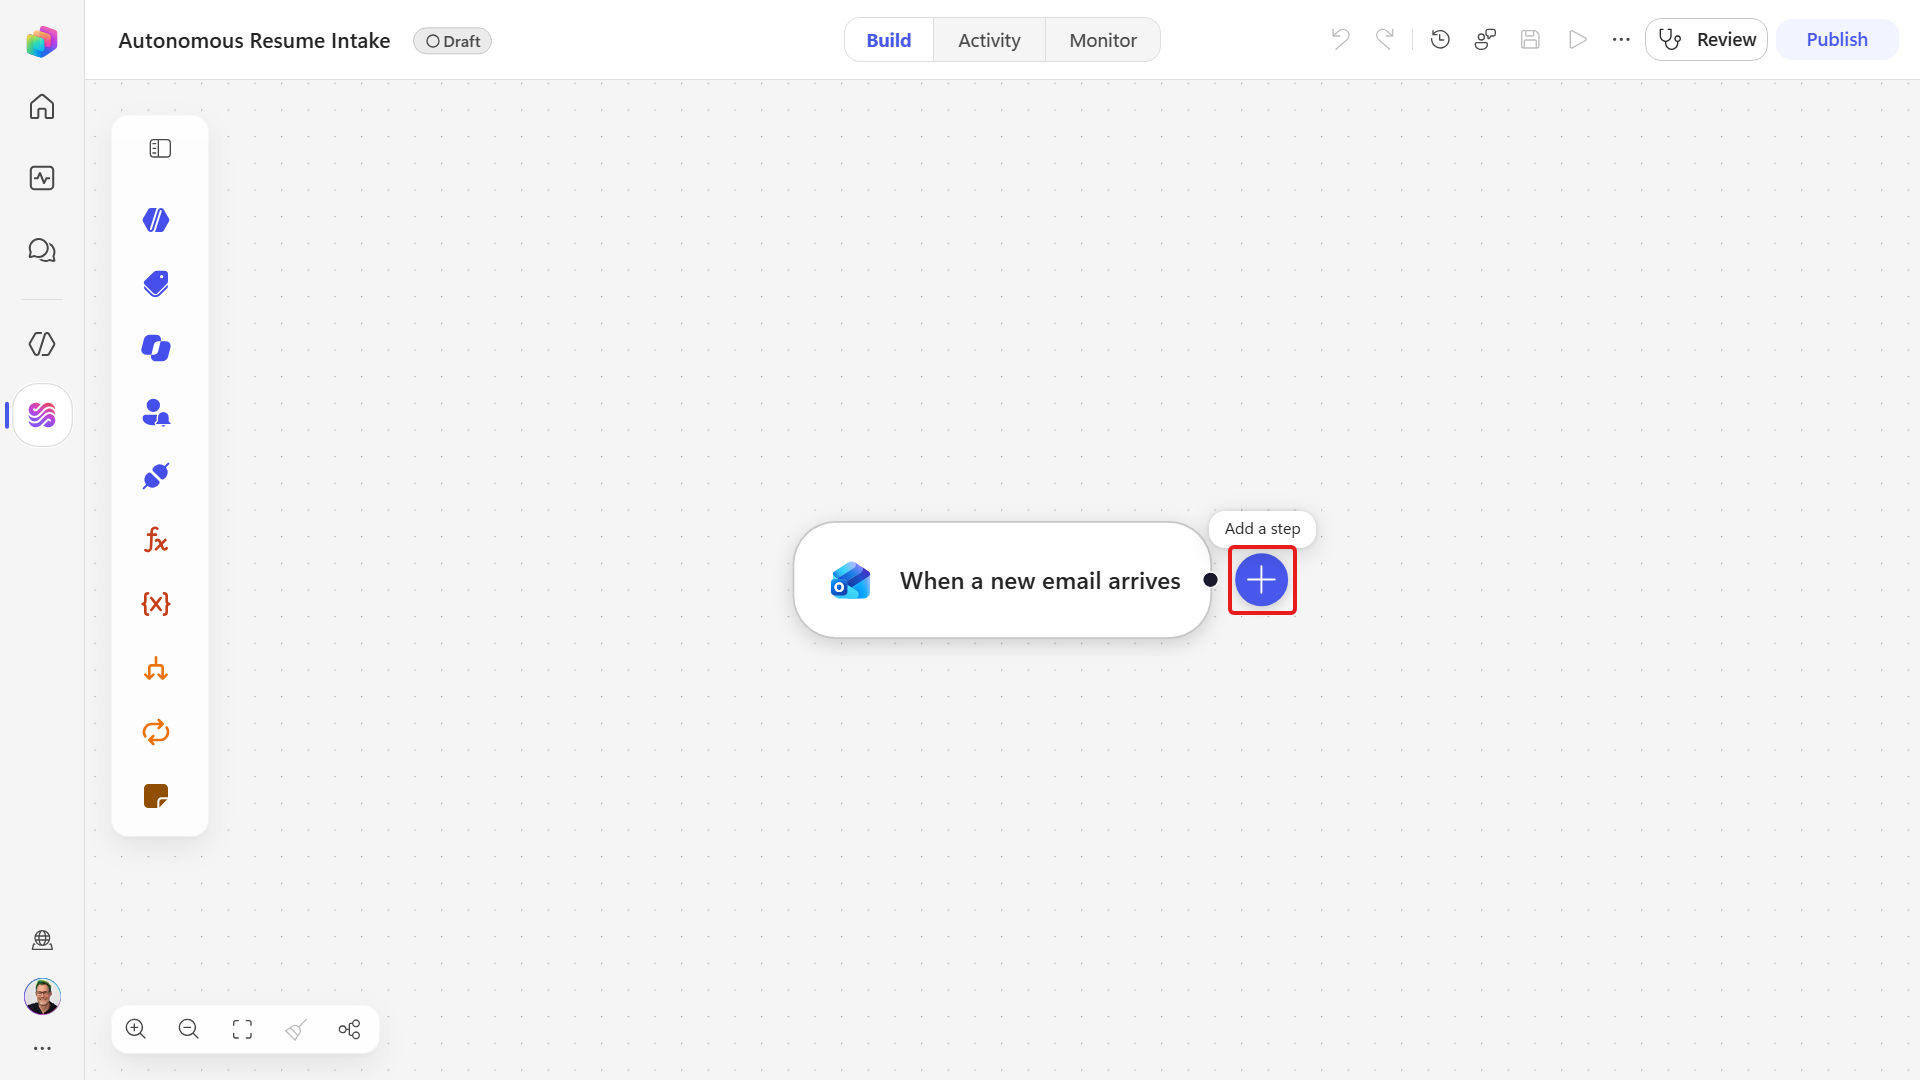
On the canvas, select the + immediately after the When a new email arrives node. The Add dialog opens on its Actions group.
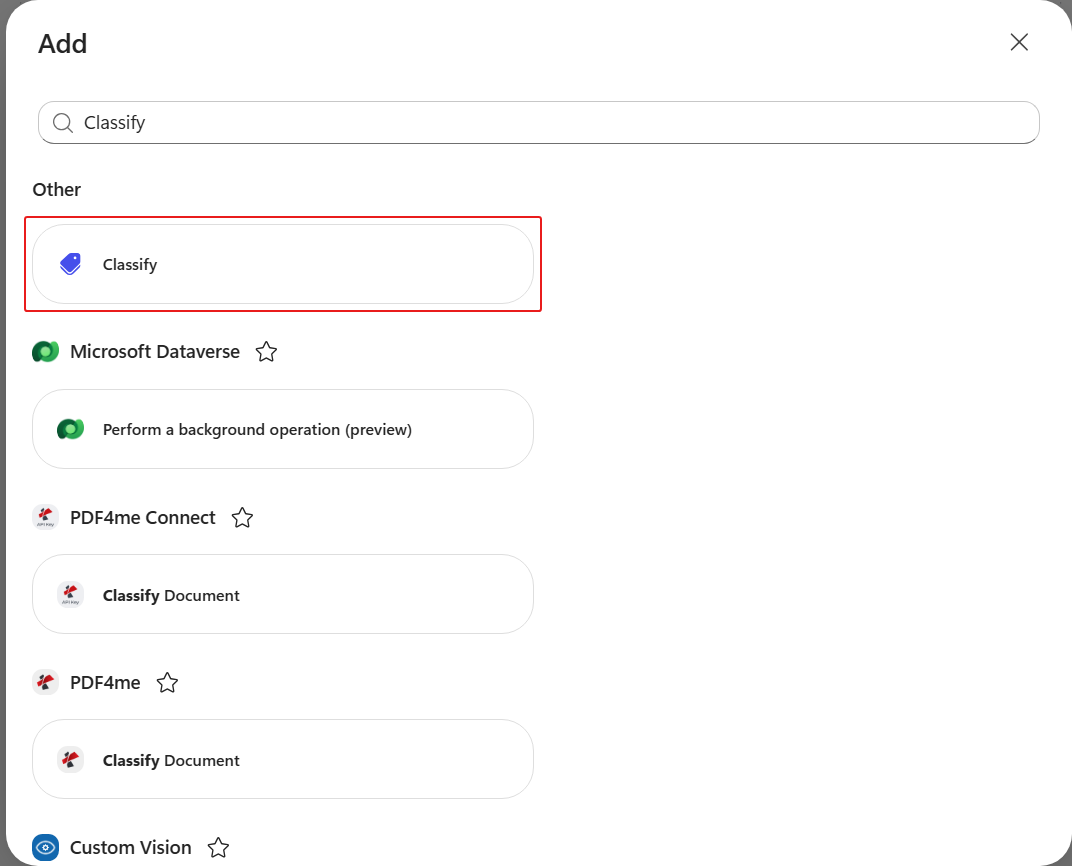
In the Add dialog's search box, type
Classify. Many third-party connectors ship an action with Classify in its name, so the results are crowded. The one you want is the first result, listed on its own under the Other heading with a purple tag icon and no connector name beneath it. Select it.The node is inserted with a Needs setup badge and three empty branches beneath it - Category 1, Category 2 and Other.
Rename the node to
Sort the email- select the node's name at the top of its panel, type the new name and press Enter.Use that name exactly. Missions 07 and 08 both refer to this node by it, and an expression that mentions a node quotes the node's name.
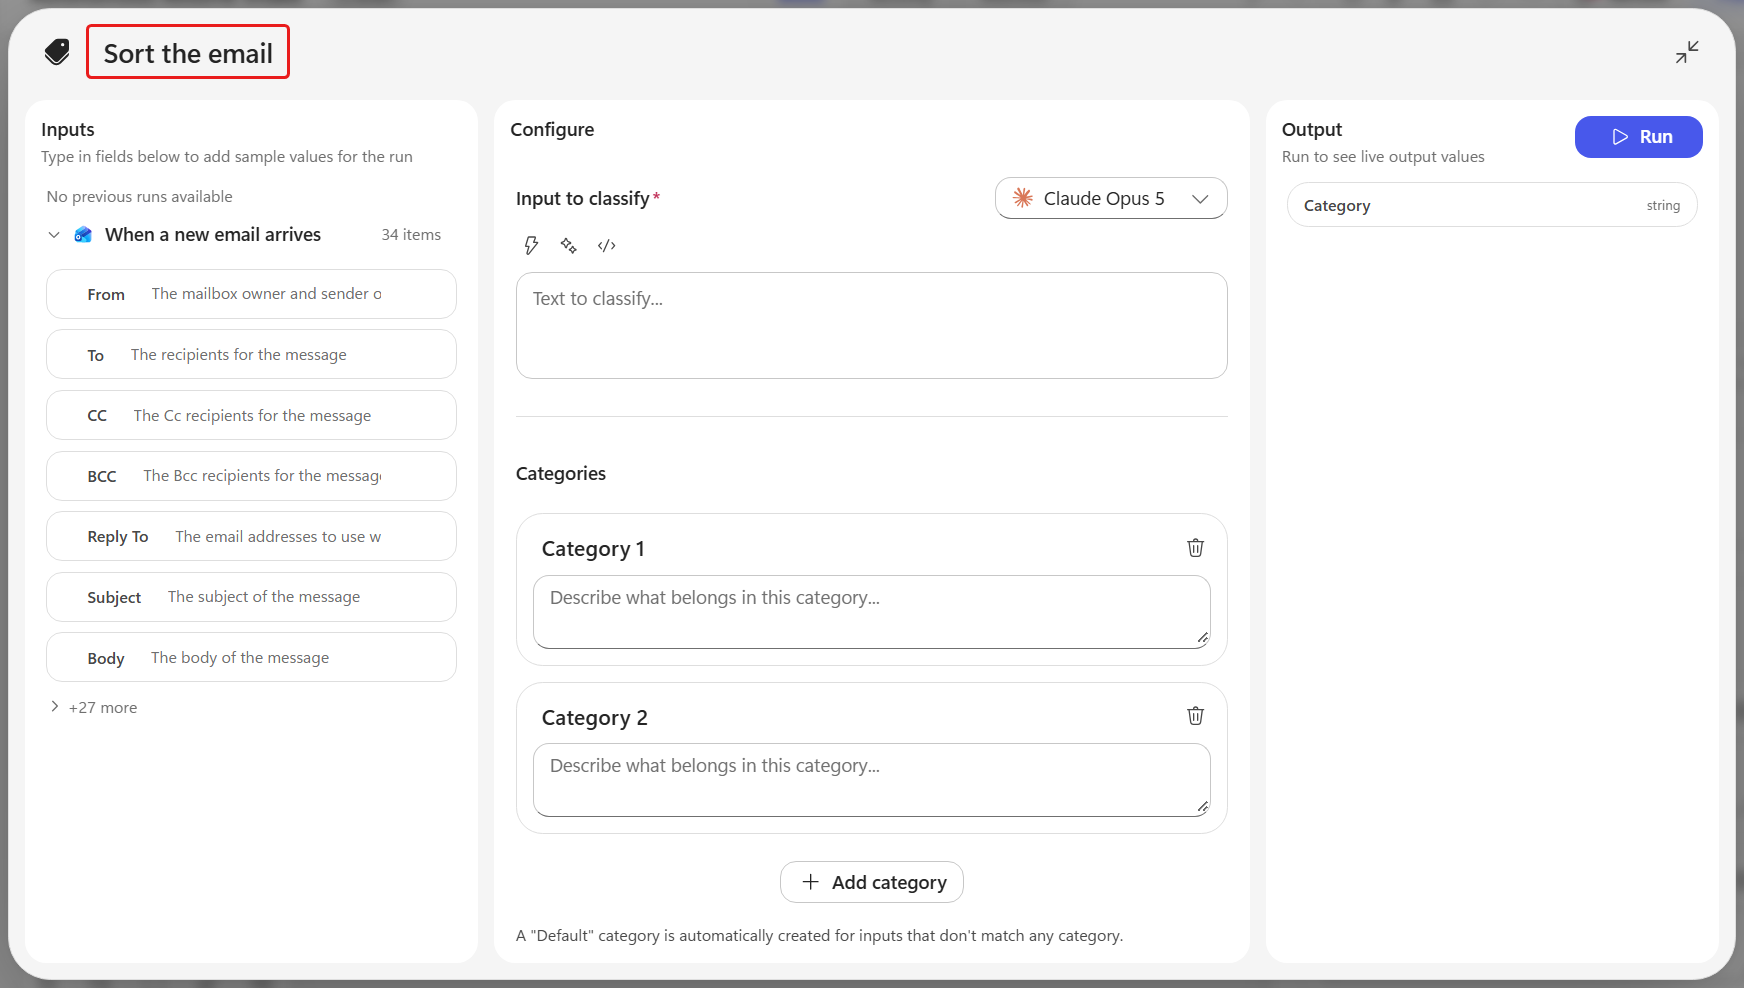
Classify runs on a language model. Check the model picker beside Input to classify and leave it at its default selection. The models available to your environment can change, so the model name in your panel may differ from the screenshot.
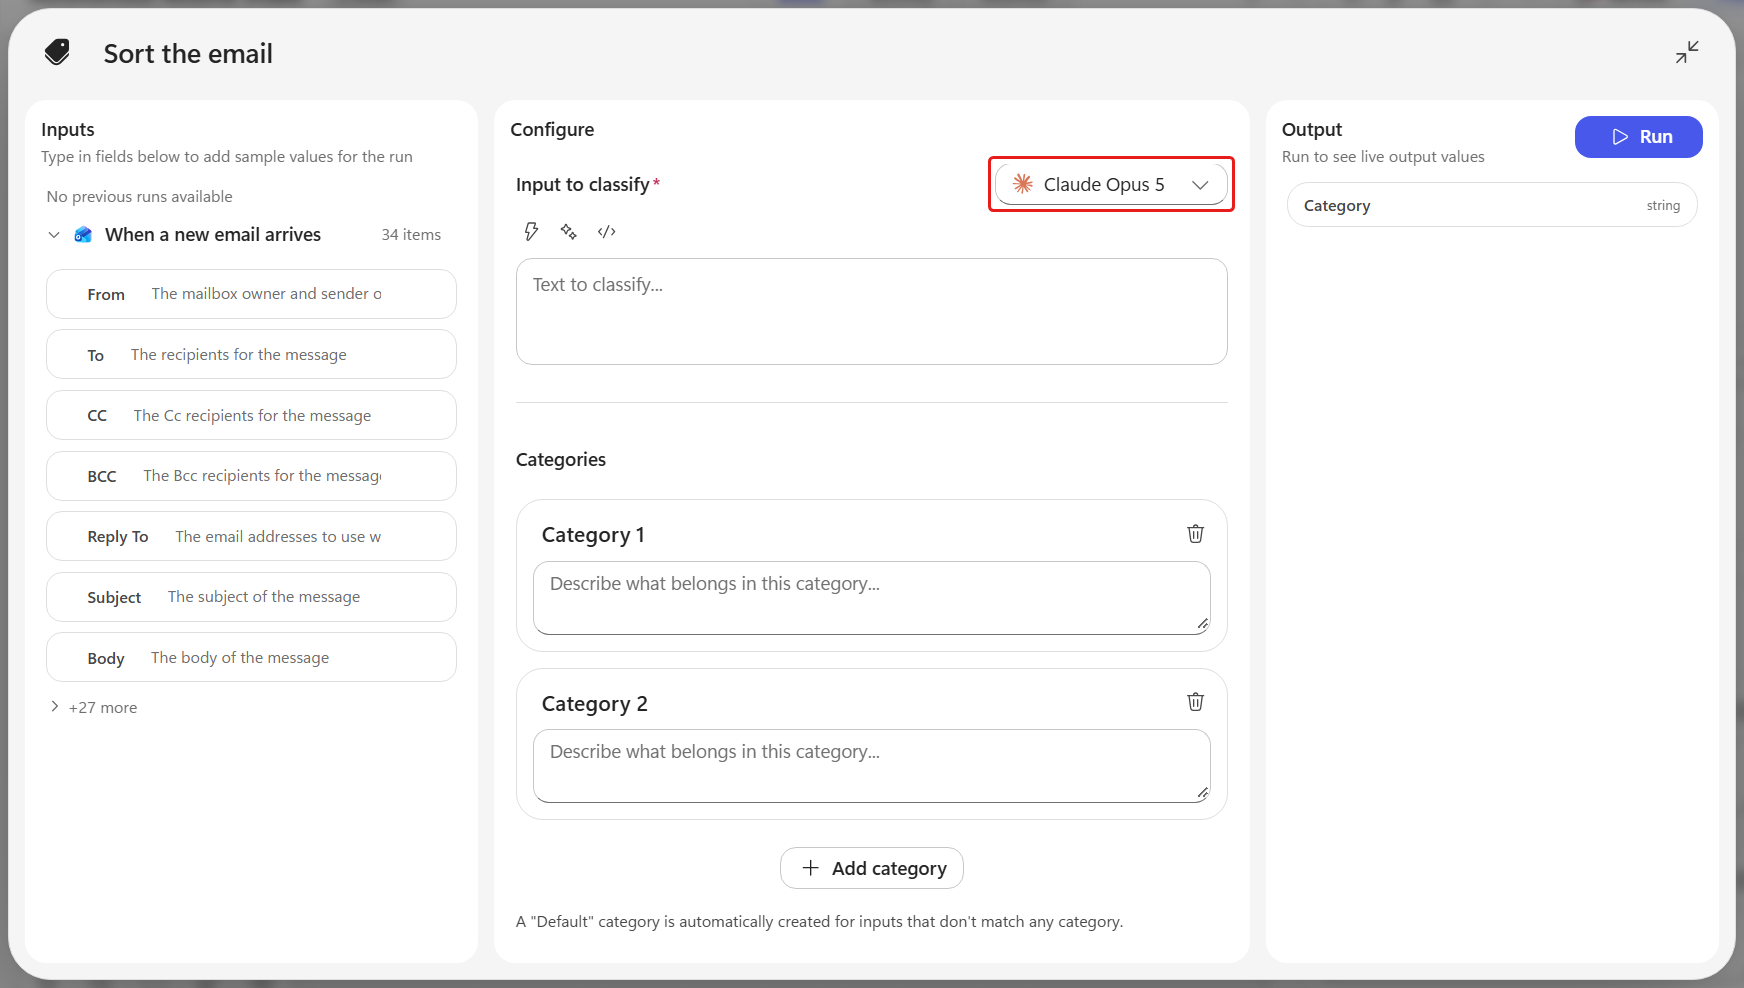
Select
</>Switch to expression mode for Input to classify, then enter the message's subject and body so the model reads both:text@{triggerOutputs()?['body/subject']} @{triggerOutputs()?['body/body']}The field expands into a multiline expression editor. Leave the model picker - the button to the right of the Input to classify label - at its default.
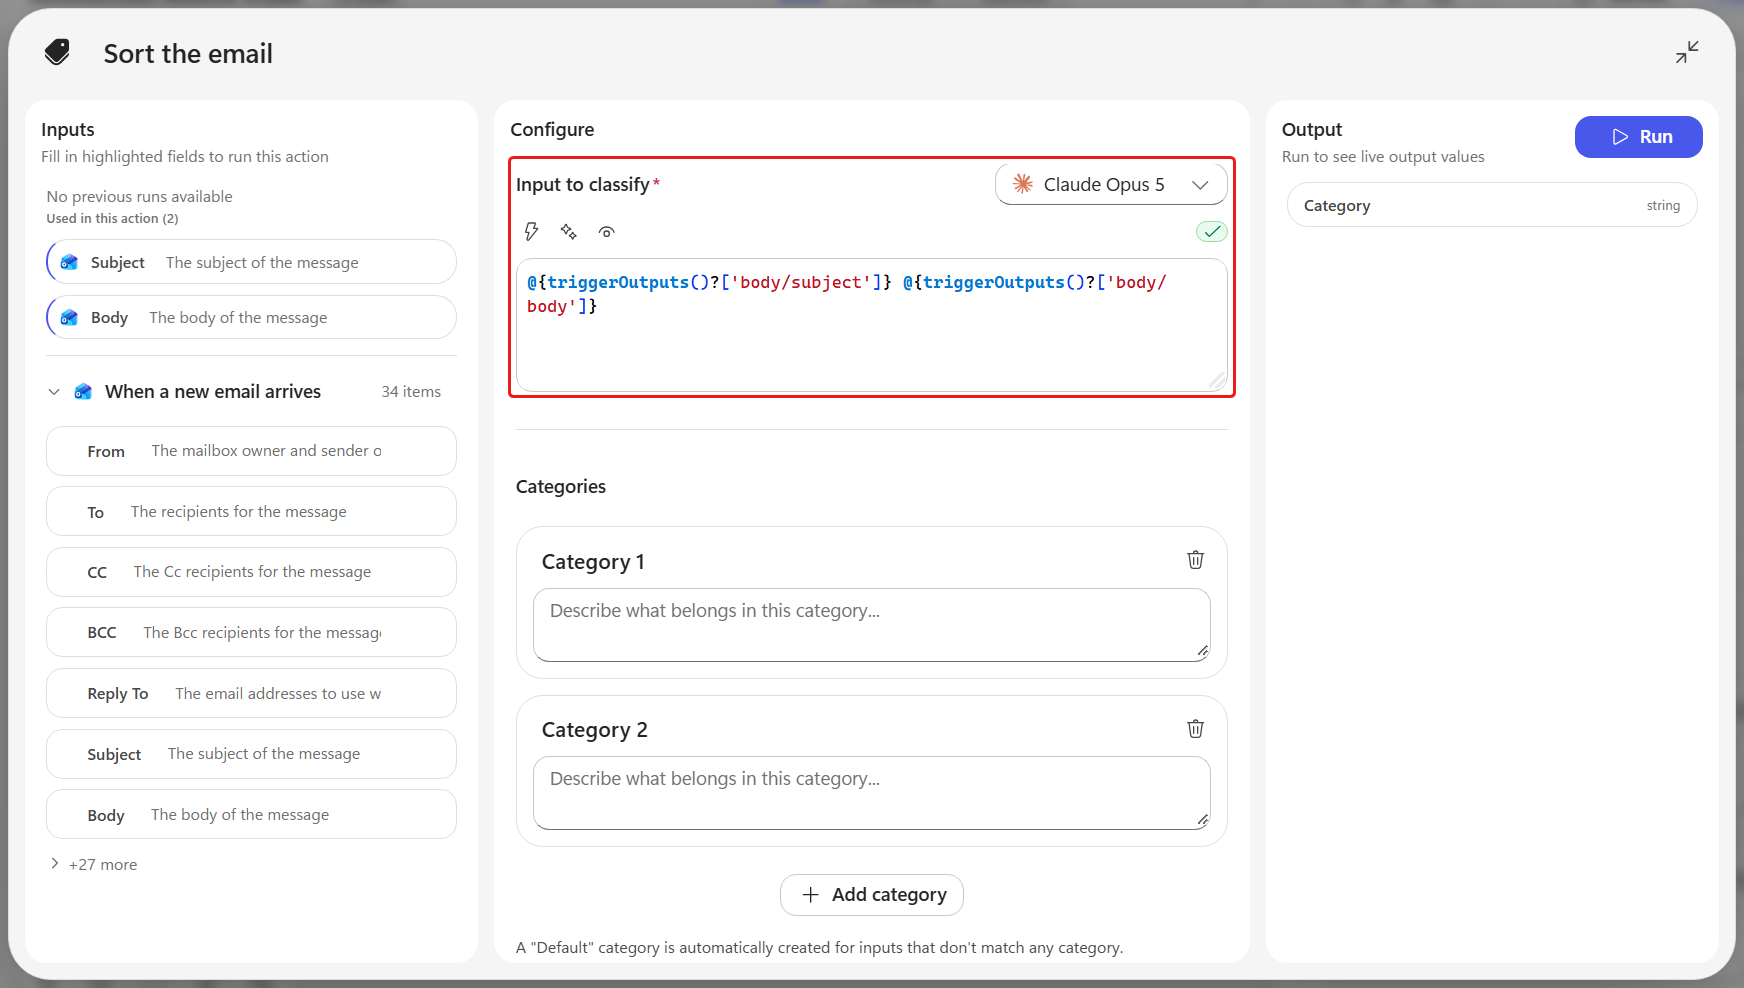
In the Categories list, select the Category 1 heading. A category name is a select-to-edit heading rather than a field that is always visible, so it turns into an editable box with the placeholder Category name. Select Add category so the list holds three, then name and describe each one as follows. Select a heading to type its name, and use the Describe what belongs in this category… box underneath it for the description.
Type each Category name exactly as written here. Later steps and Mission 08 refer to these names, and the branch labels on the canvas come straight from them. The description is what the model routes on, so keep each one specific.
Category name Describe what belongs in this category… ApplicationA genuine job application in which a candidate asks to be considered for a role and provides a resume. This includes applications forwarded by a recruiter on behalf of one or more candidates. Do not choose this category for automatic replies, even when the subject contains Application. Do not choose it when the sender says they are not applying, asks a general question about the recruitment process, or sends a speculative or sample document rather than applying for a role - those belong in Other, even when the subject contains Application and a file is attached.OutOfOfficeAn automatic reply, vacation notice, absence notification, or out-of-office message. Choose this whenever the body says the sender is away or the subject says automatic reply, even when Application appears elsewhere.JunkMarketing, newsletters, promotions, spam, or content unrelated to hiring. Choose this instead of Application when promotional wording appears, even when the subject contains Application.Select Expand to full screen in the panel's upper-right corner before checking the finished categories. Full screen is worth using for any node with a lot to configure - it gives every box room to show its whole value instead of clipping it - and the rest of this mission uses it wherever a node offers it. The panel then lists three named categories, and the note underneath explains that a Default category is created automatically for inputs that match none of them - that is the Other branch on the canvas.
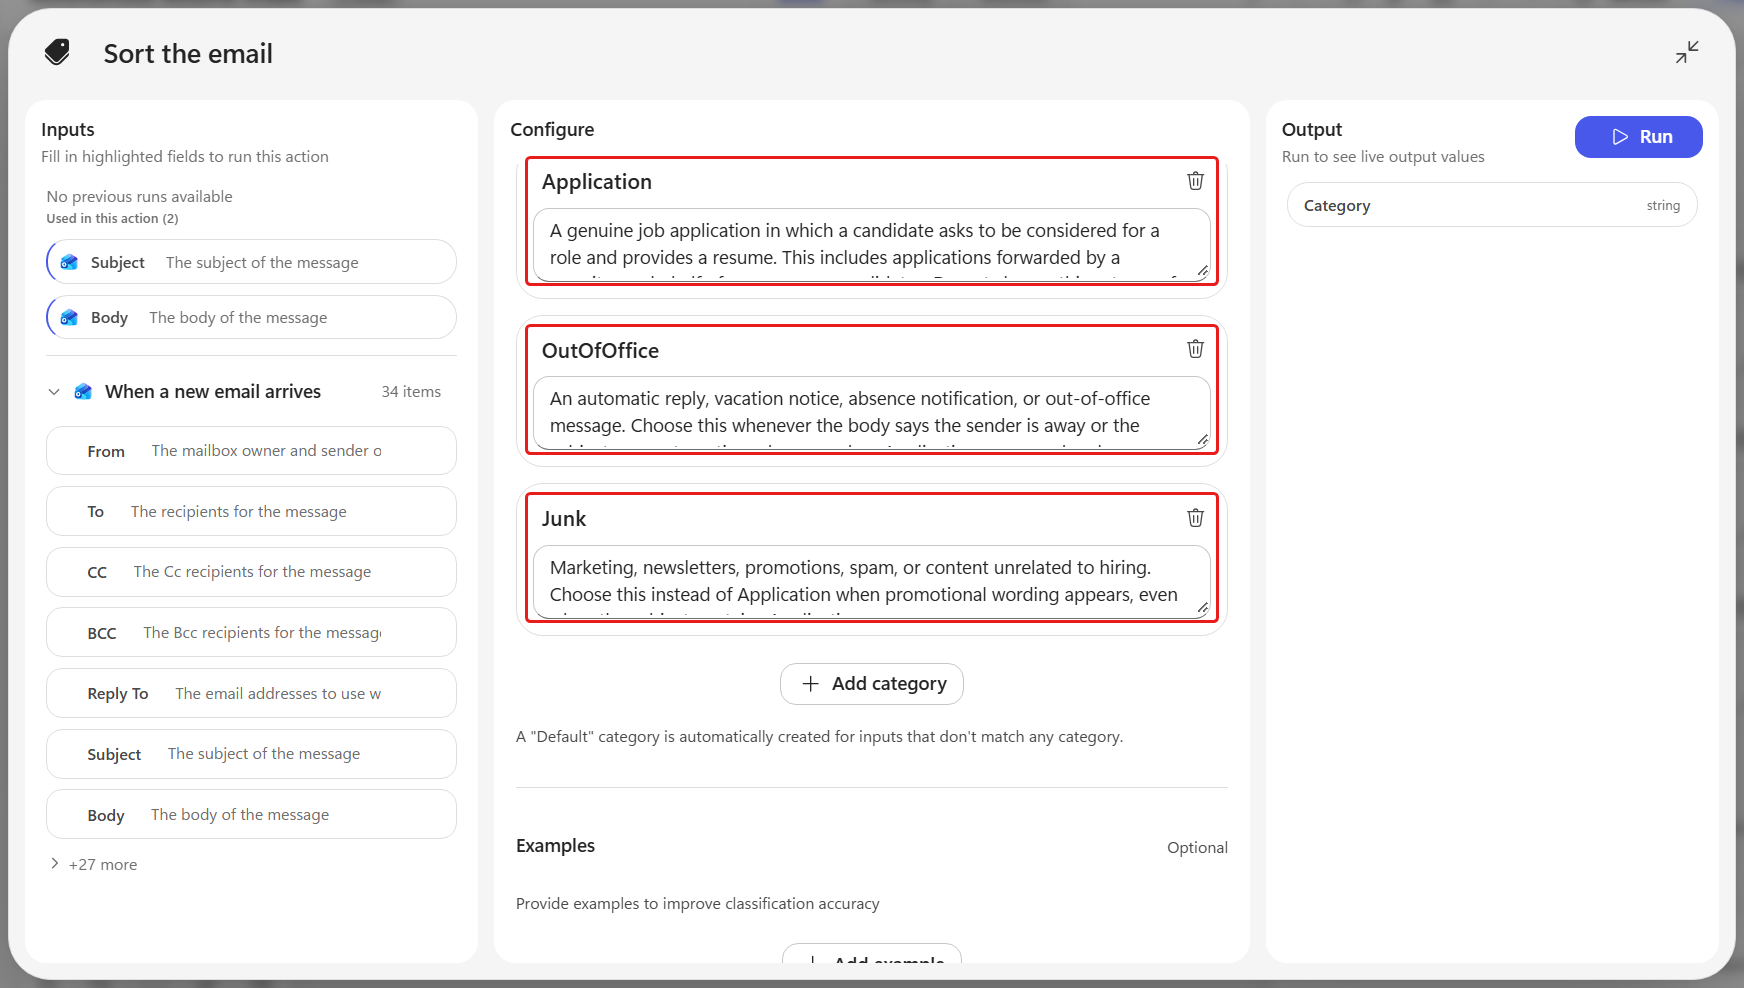
Collapse the full screen view, then on the command bar select Save. The canvas branch labels change from Category 1/2/3 to Application, OutOfOffice and Junk, with Other still last.
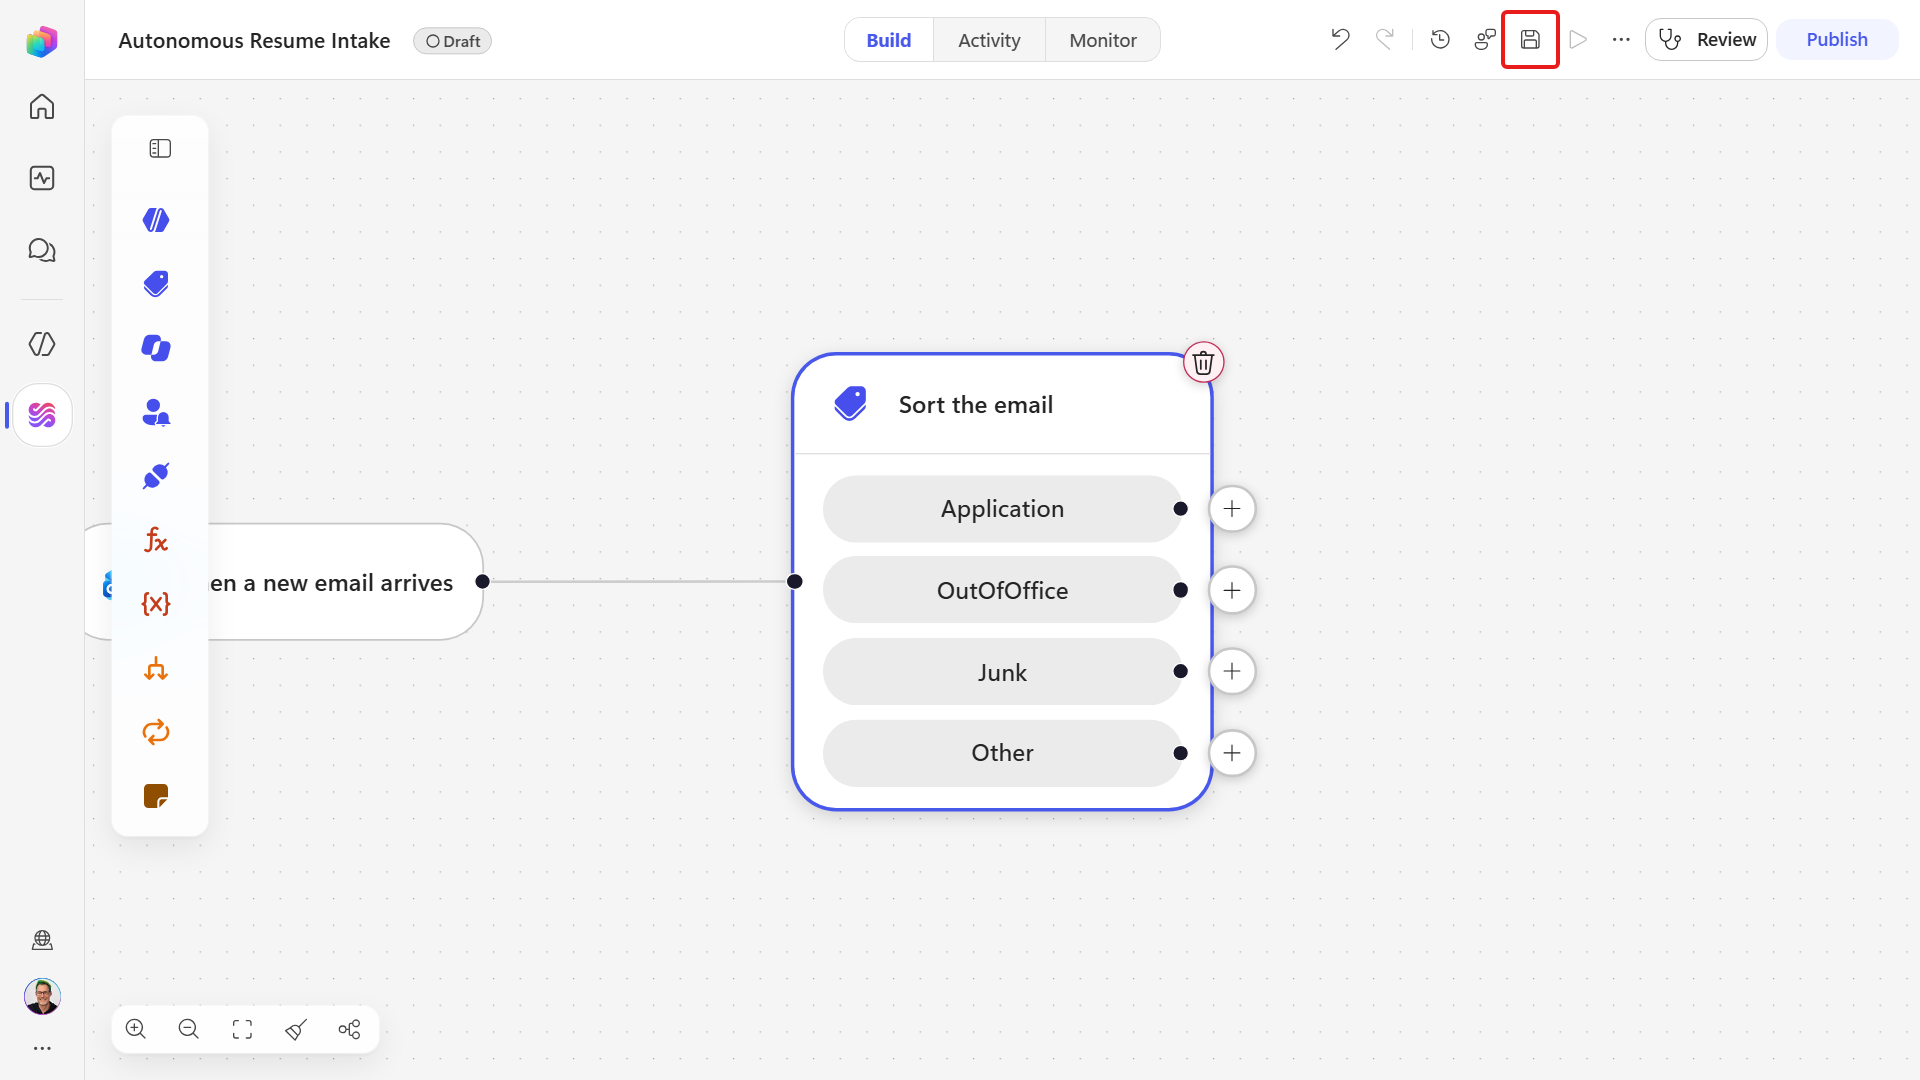
Wherever a node can be run on its own, test it there rather than waiting for a whole run. Open the Sort the email node again and select the Run node tab, next to Configure. It executes just the node you have selected against sample values you type in, so you get an answer in seconds instead of publishing the workflow and emailing the mailbox.
Select Expand to full screen and the tab lays the test out in three columns: the Inputs you supply on the left, the node's own configuration in the centre, and its Output on the right.
The node's inputs here are Subject and Body rather than one combined box. Fill both in with an out-of-office message, then select Run and read the Output - it names the chosen category. This sample returns OutOfOffice.
Field Value Subject RE: Application - Automatic replyBody I am currently out of the office until Monday and will respond on my return.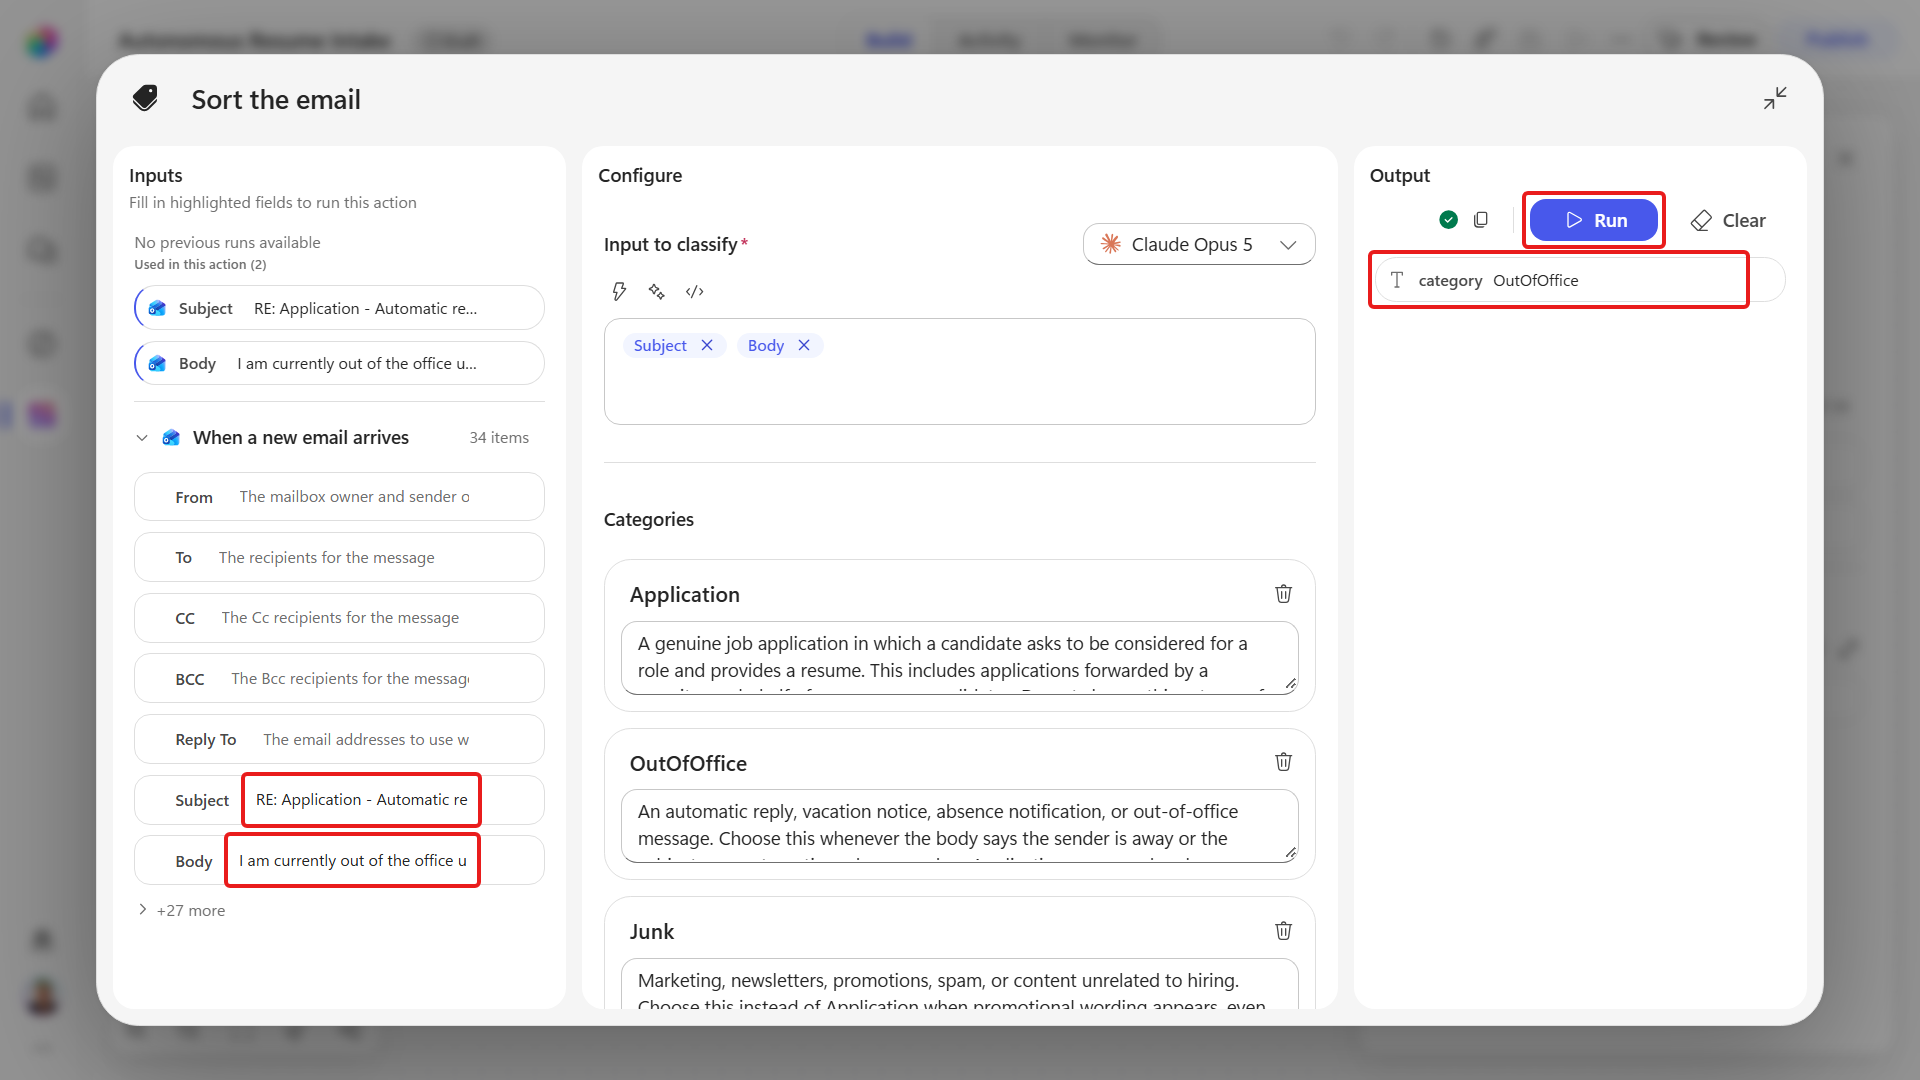
Select Clear, then repeat with a genuine application and confirm it returns Application:
Field Value Subject Application - Power Platform ConsultantBody Please find my resume attached for the opening.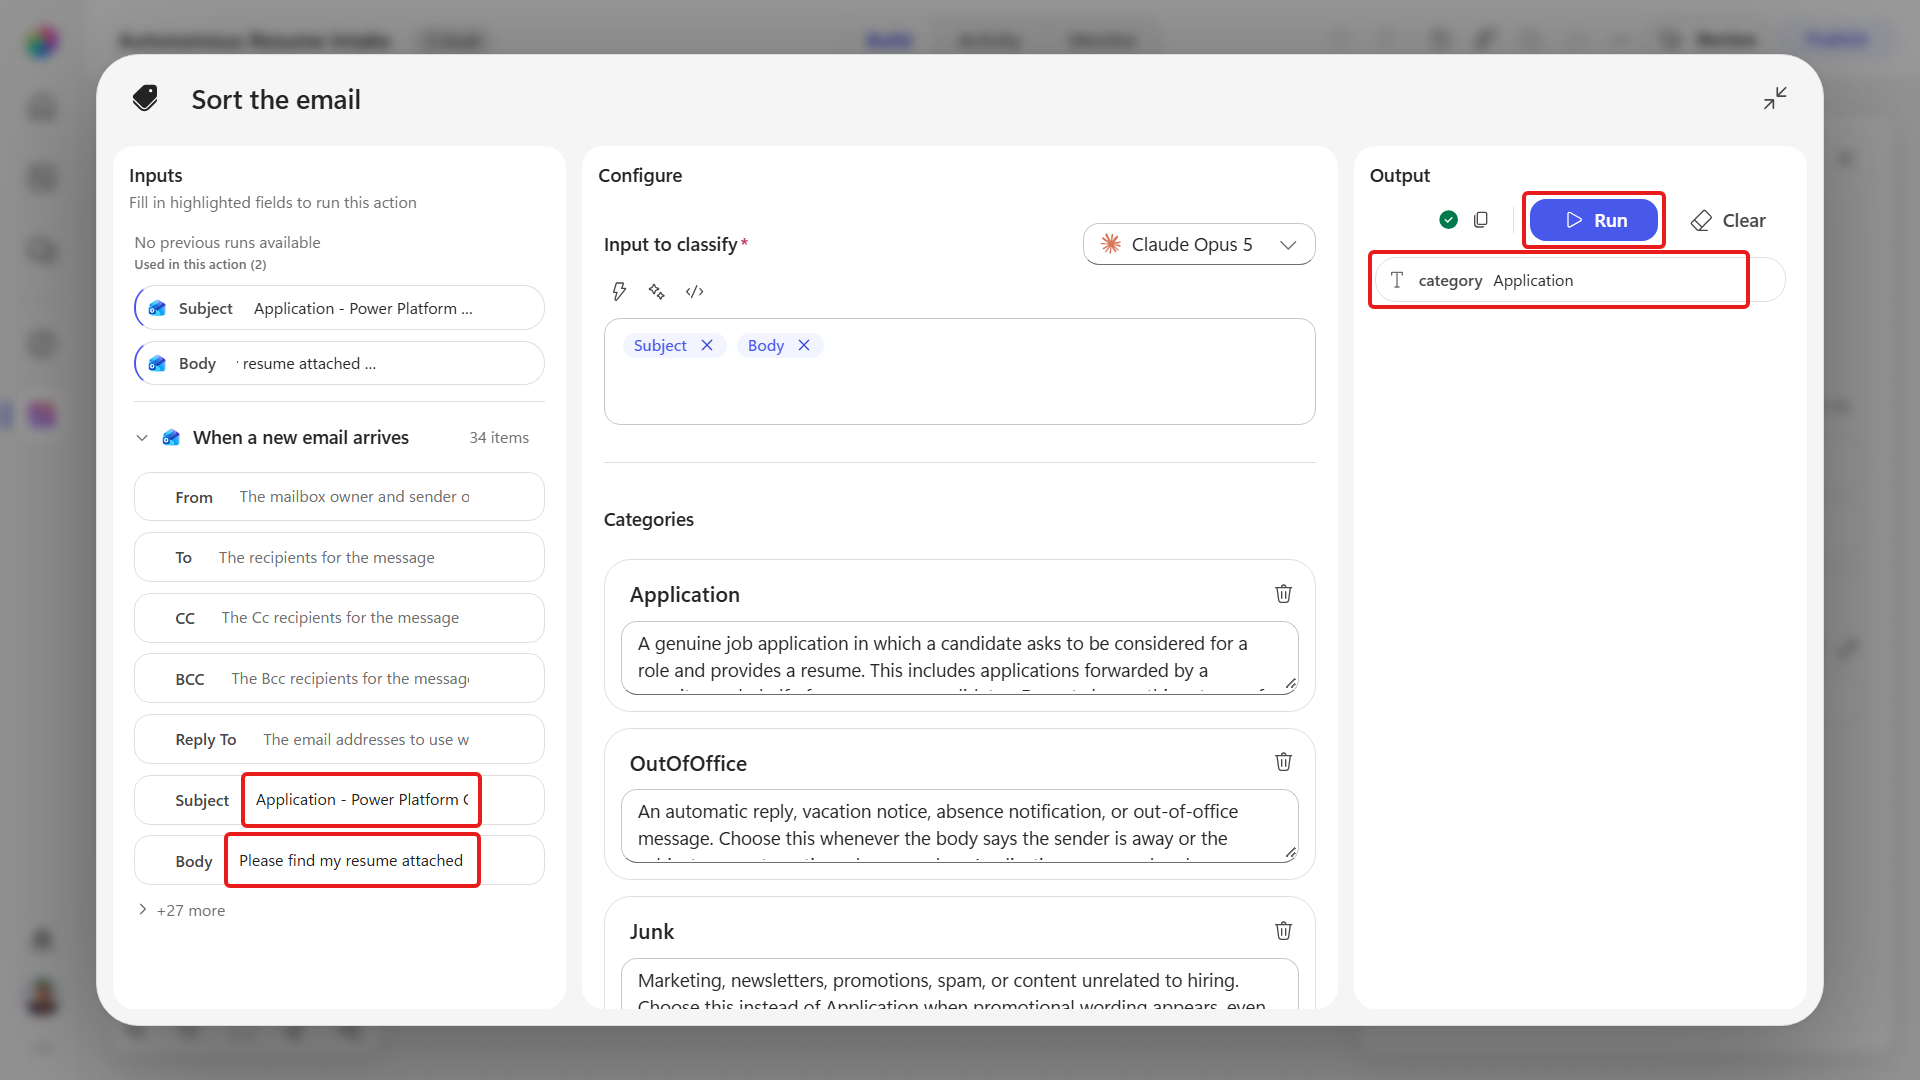
Select Clear, then repeat once more with obvious marketing text and confirm it returns Junk:
Field Value Subject Application - Product newsletterBody Limited-time marketing offer. Subscribe now for product promotions and event news.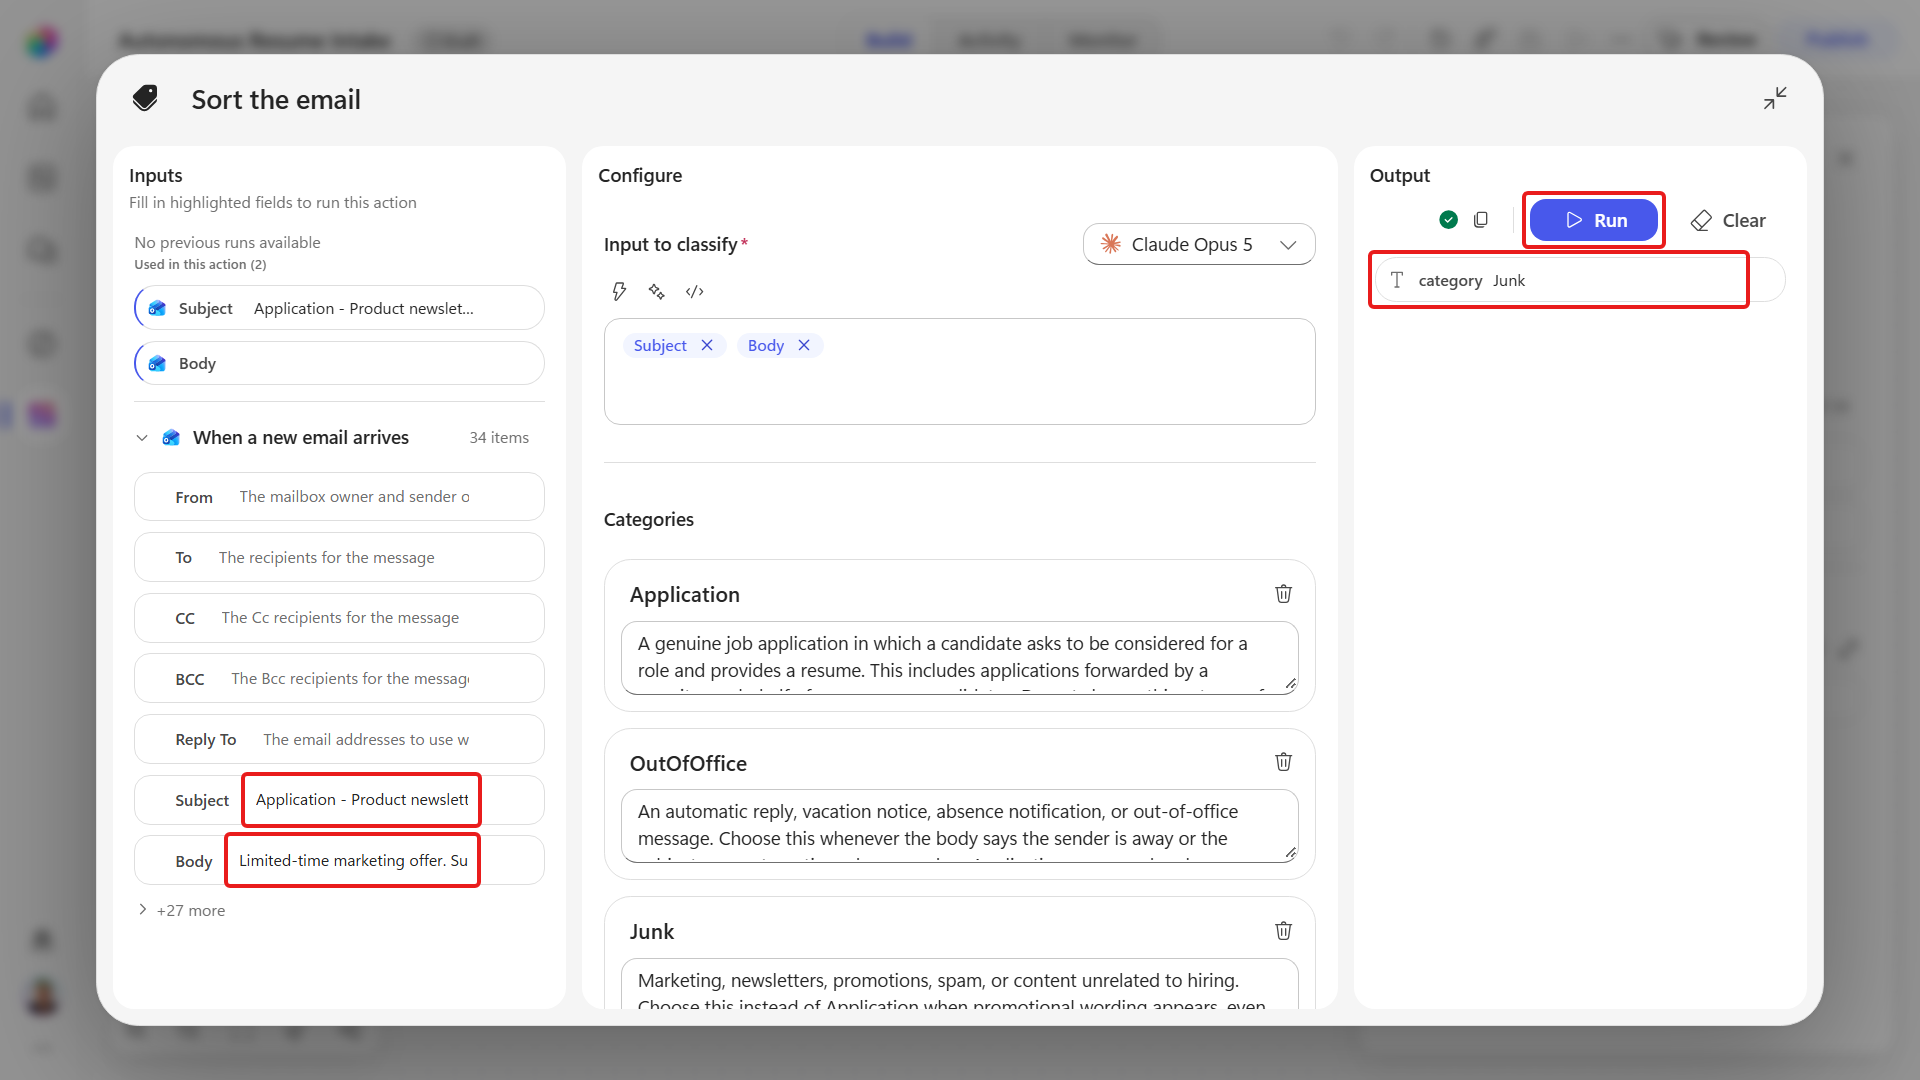
Each sample should return its intended category. Change a category description, run the same sample again, and see the effect straight away - no publishing, no email, no waiting for a trigger. If an auto-reply comes back as Application, sharpen the descriptions and re-run until every sample lands where it should.
7.3 Add the Process application scope
The Sort the email node now sorts the mail, but every branch is empty. Next we are going to put everything that actually processes an application on the Application branch, inside a Scope - a labeled box that groups actions together. We will build the Scope first, before anything goes in it.
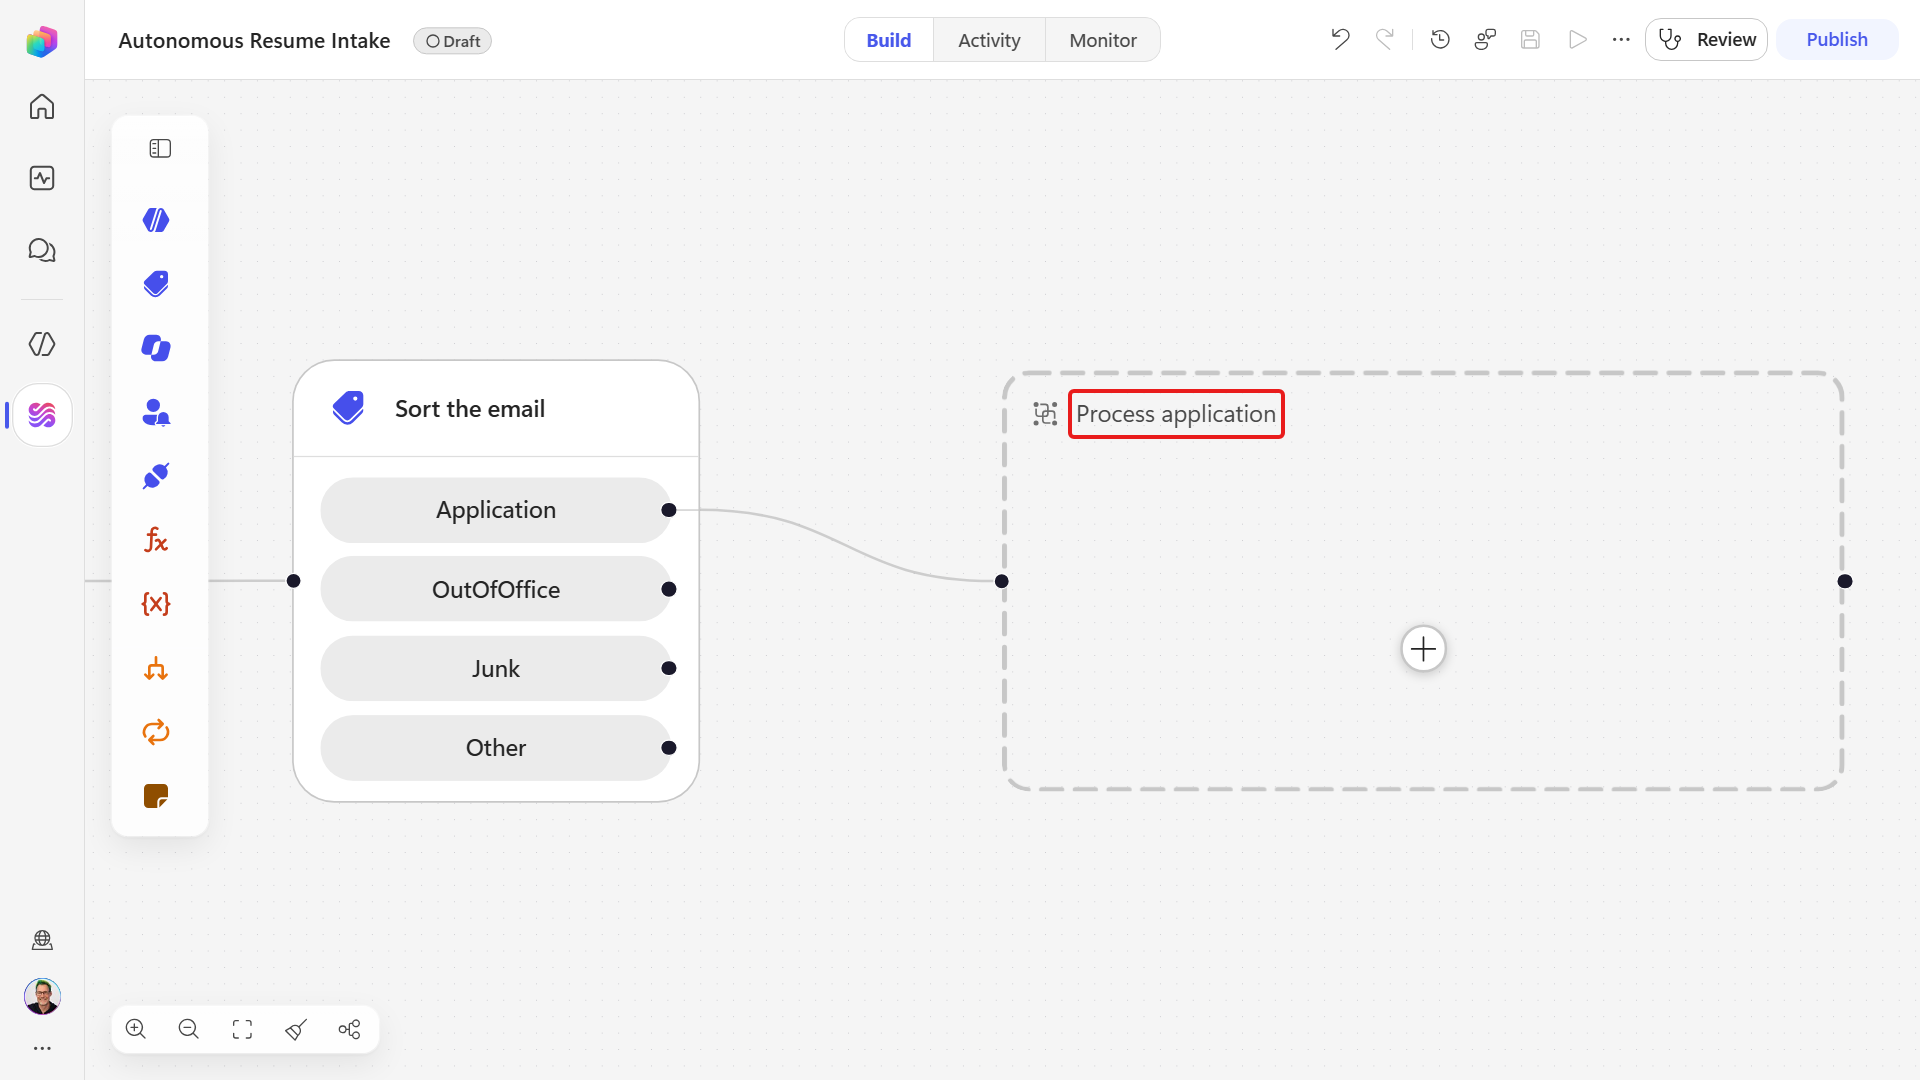
On the Application branch, select the + (its tooltip reads Add a step).
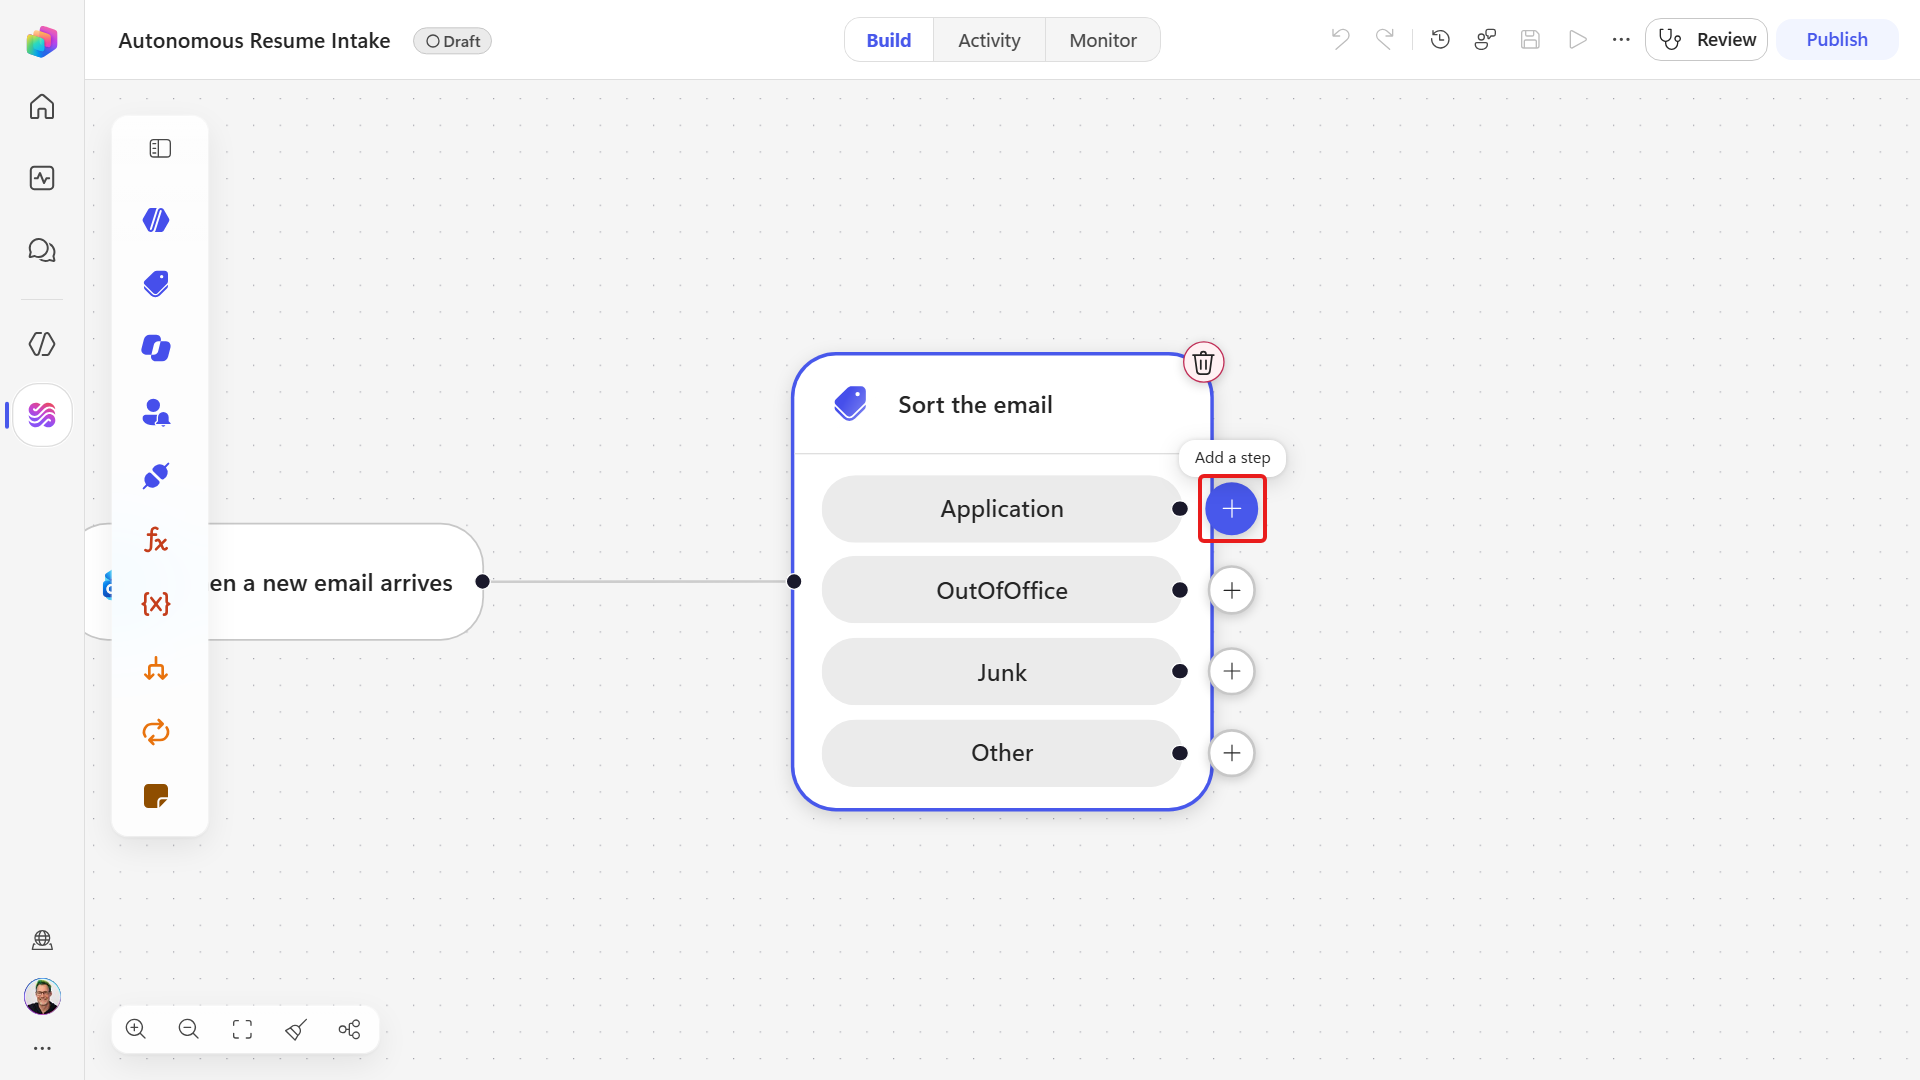
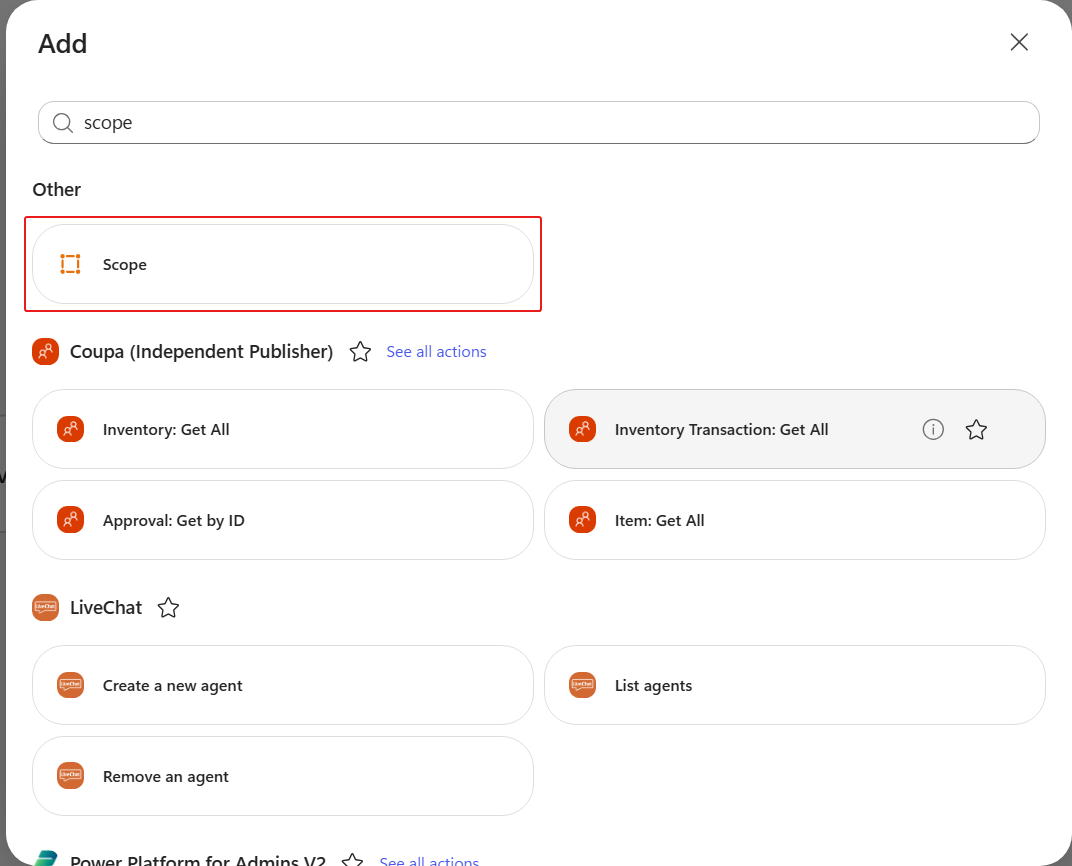
In the Add dialog, leave the search box empty, scroll the Actions group past If/Else, Switch and Loop, and select Scope. If you would rather search than scroll, type
scopeand select the entry listed on its own under Other.A dashed container appears on the Application branch. A Scope succeeds or fails as one unit, so if any action inside it fails, the whole Scope is marked failed. Mission 09 builds its error handling on exactly that.
At the top of the Scope's panel, select the name Scope - it turns into an editable box - and change it to
Process application. Press Enter. Leave the OutOfOffice and Junk branches empty, so those emails are read and then ignored, and leave Other empty for now - we will be attaching the human step to it in Mission 09.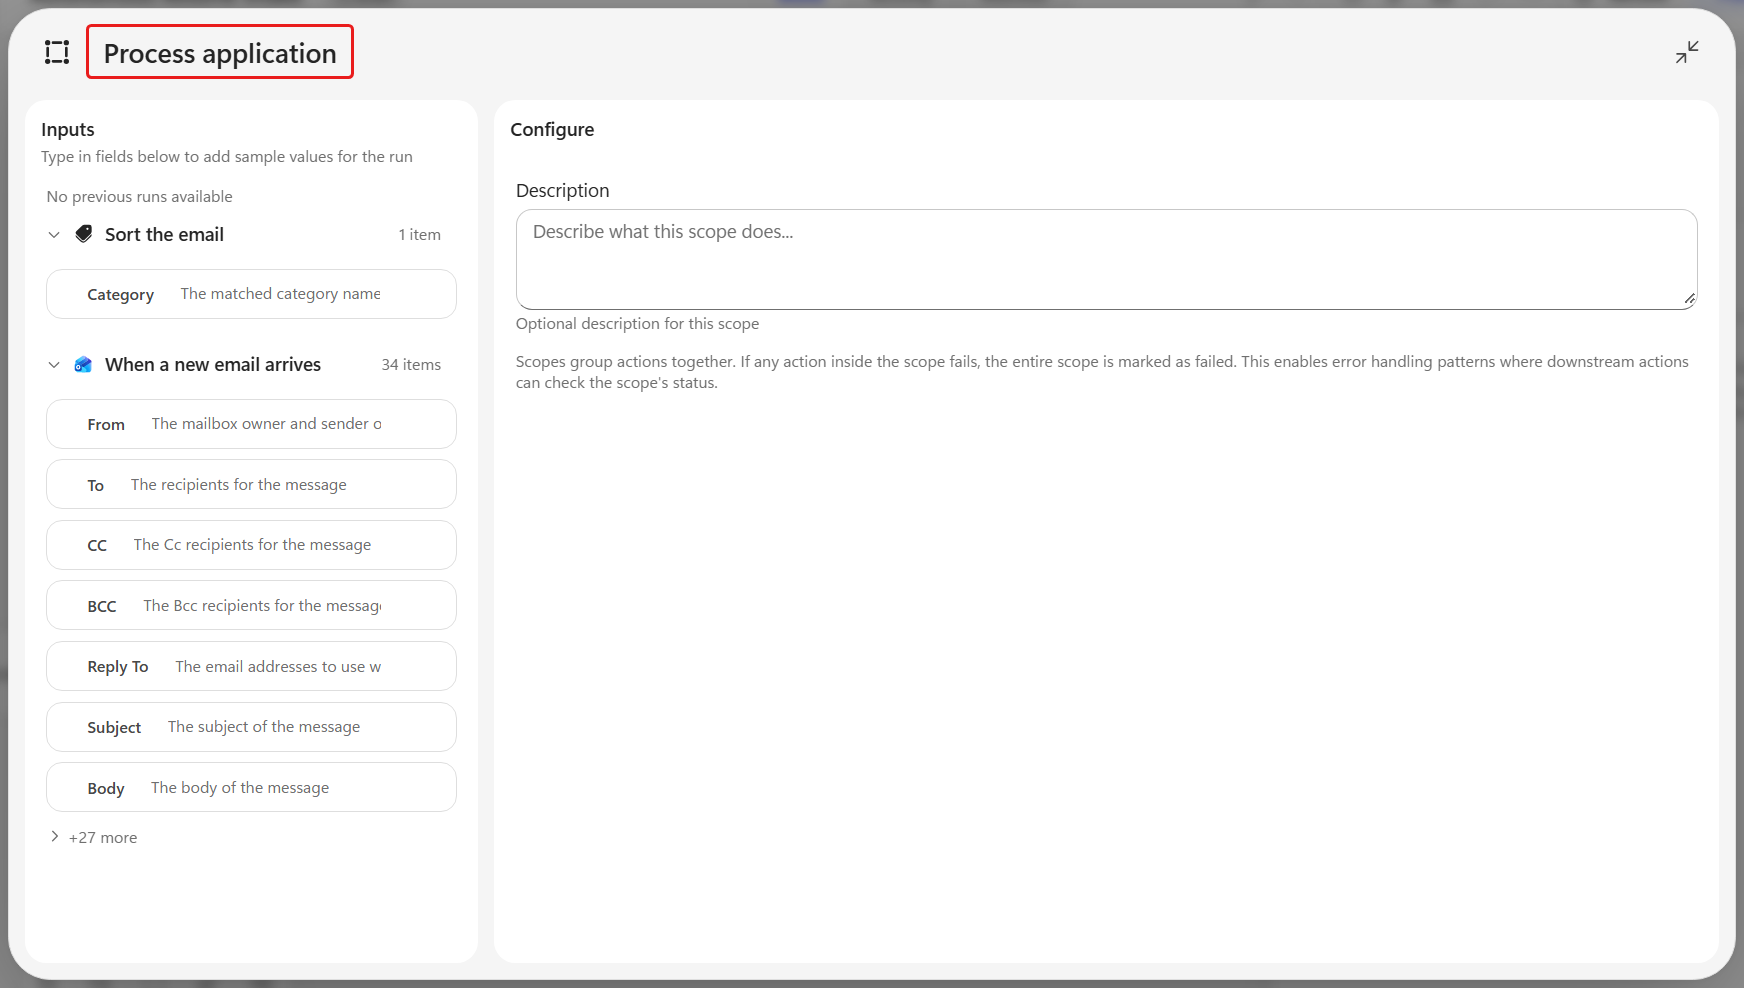
On the command bar select Save.
The Sort the email node now shows four branches, and only Application carries the still-empty Process application box.
7.4 Add the loop and the PDF guard
One email can carry more than one resume, so the workflow loops over every attachment and files each one separately. Not every attachment is a resume, though - an inline signature image or a .docx would otherwise produce a meaningless Resume row - so each attachment first passes a guard that checks its file type and skips anything that is not a PDF.
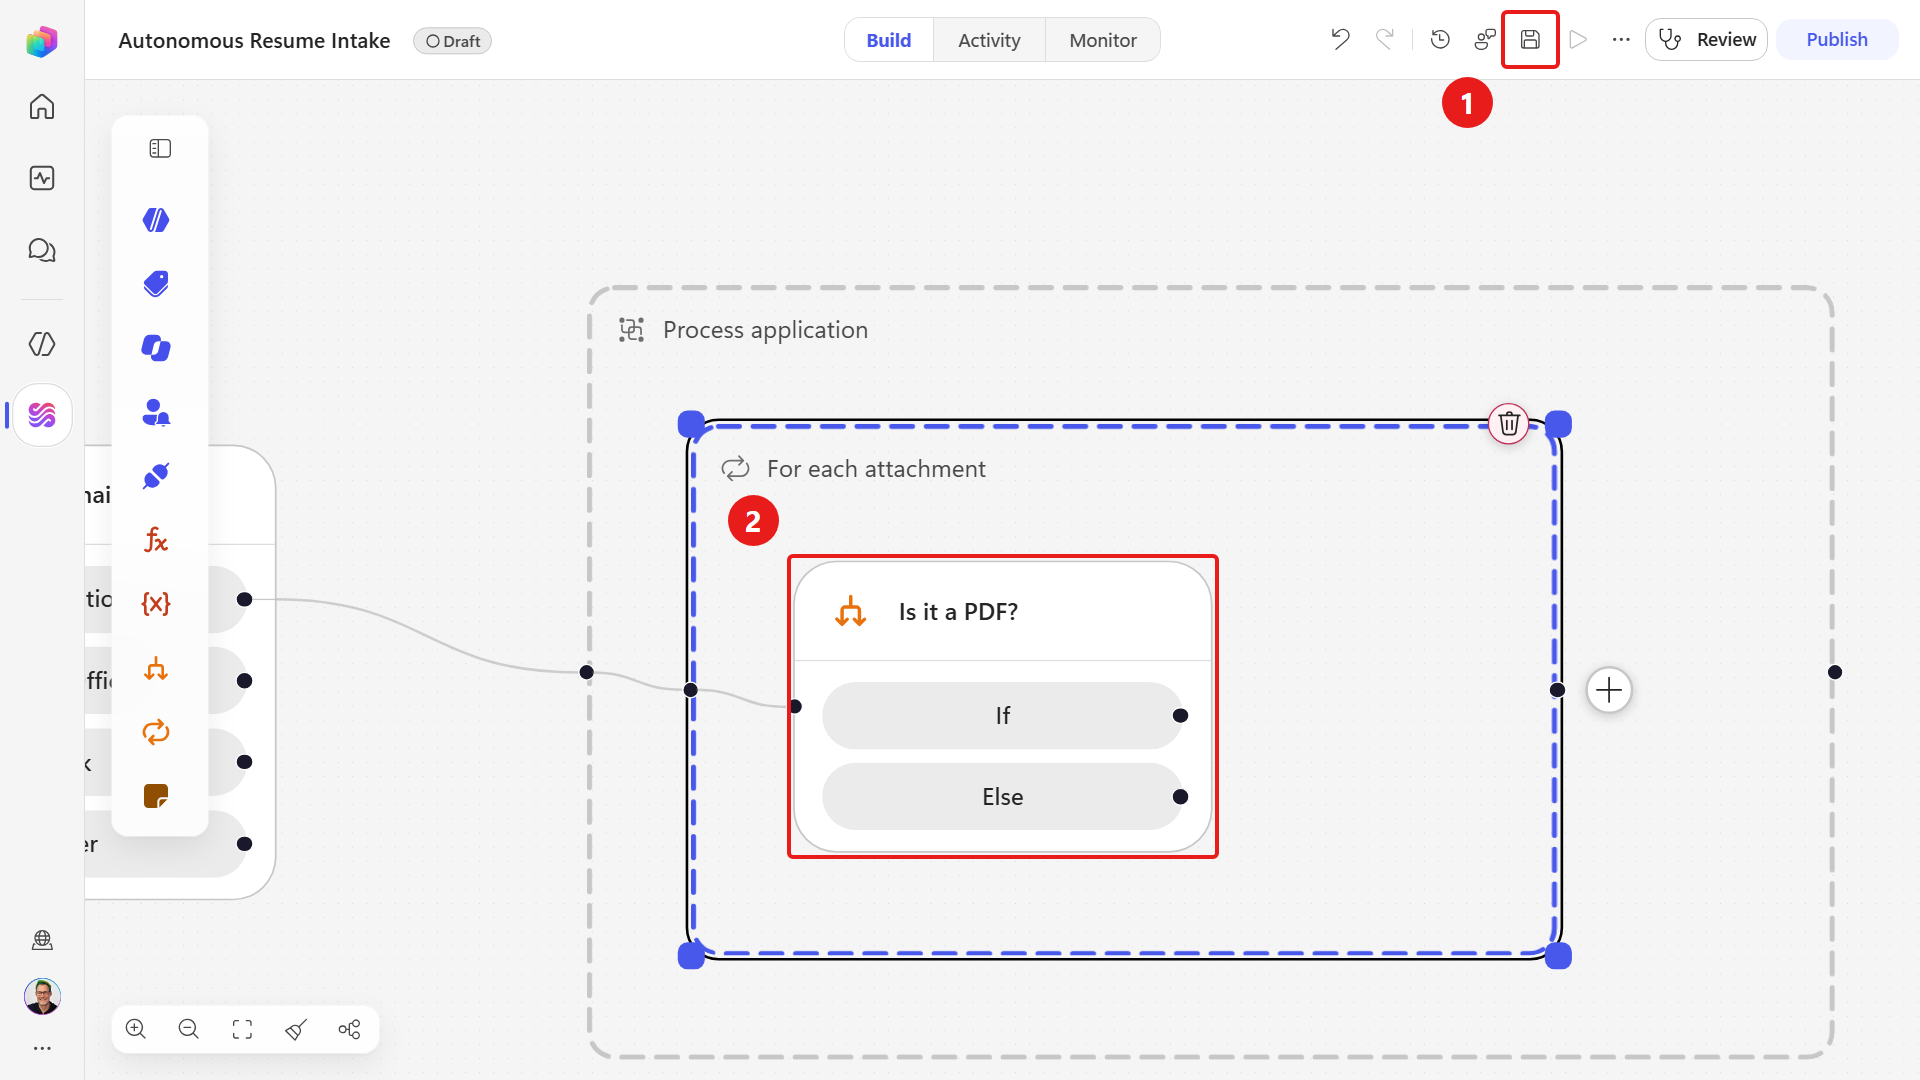
Next we are going to build that guard and a loop for each attachment. The attachment loop is added automatically by the designer because the condition reads one of the attachments carried by the triggering email. We will then fill the guard with the filing steps in the next lab.
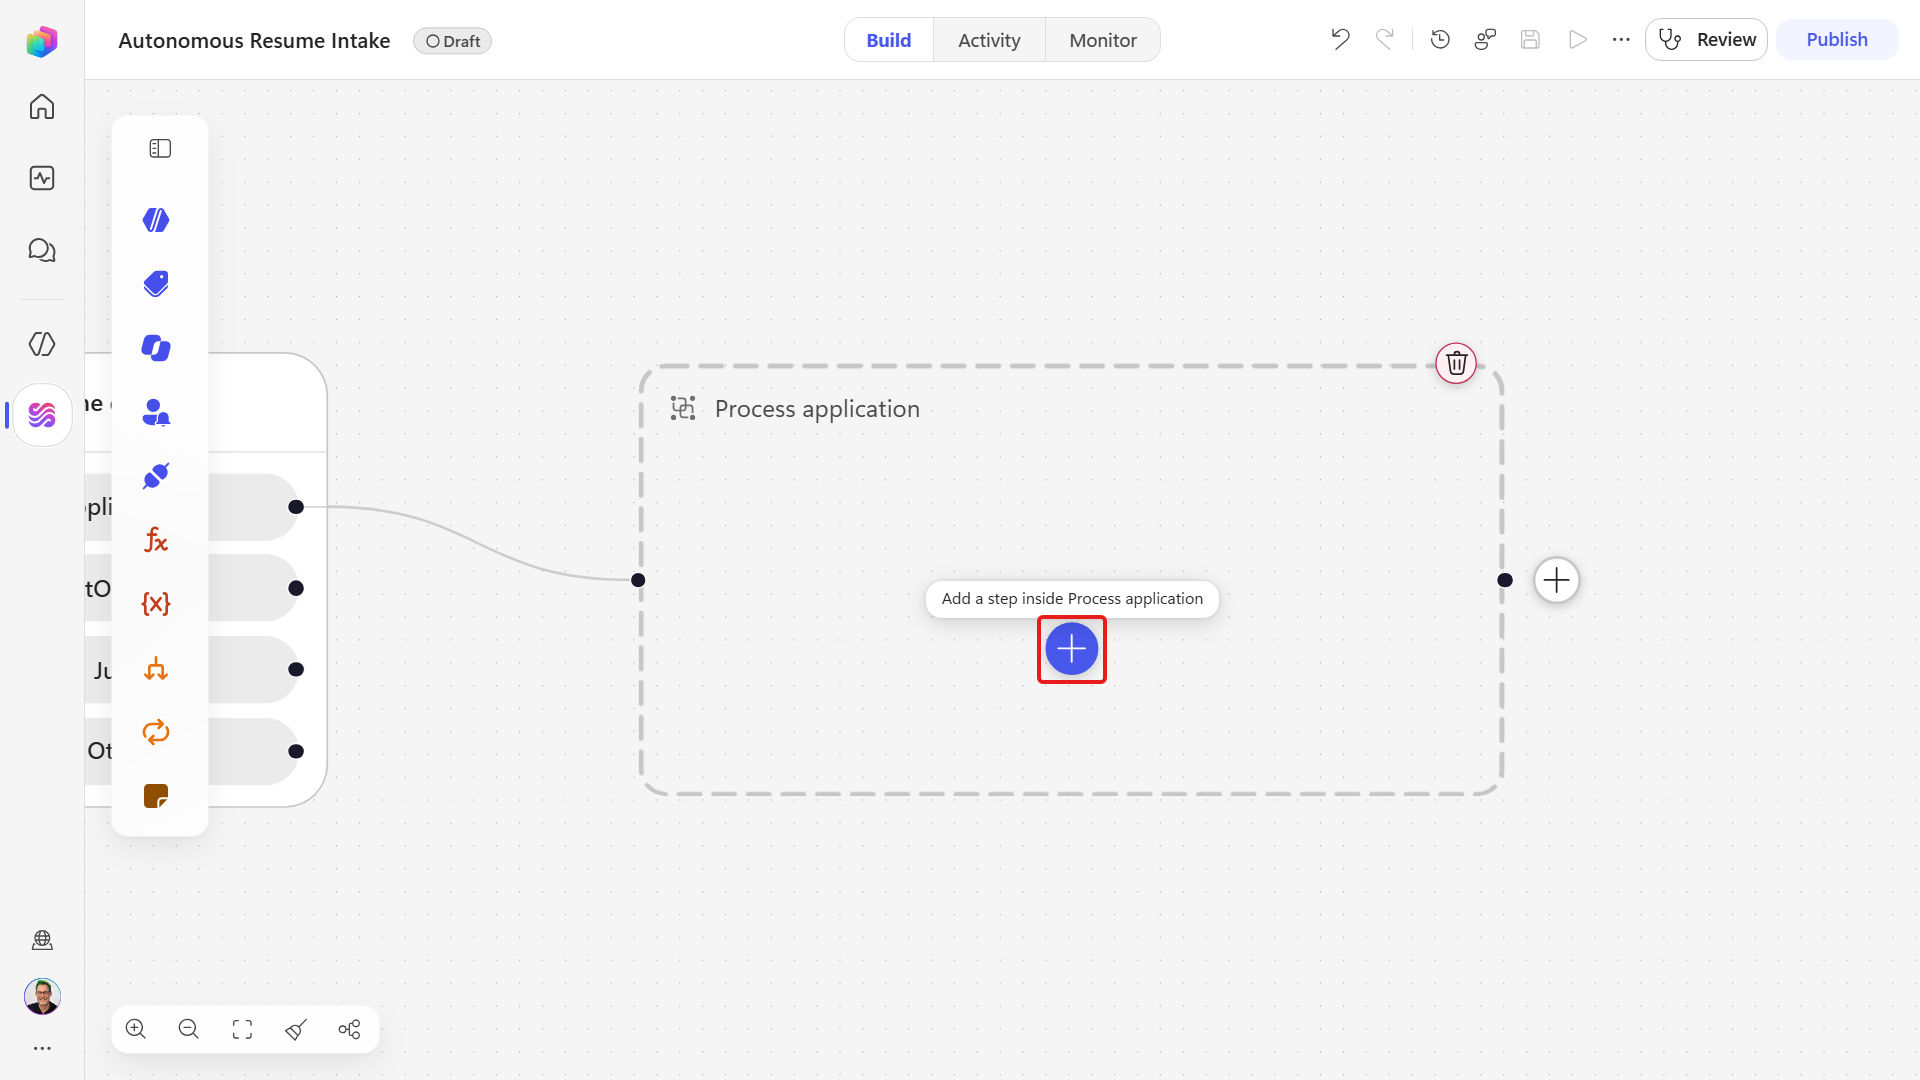
Hover the Process application container and select the ➕ labeled Add a step inside Process application. The plus on the container's right-hand edge reads Add a step after Process application and would put the node next to the box rather than in it.
In the Add dialog, under Actions, select If/Else. By default, the node is configured with two branches, labeled If and Else.
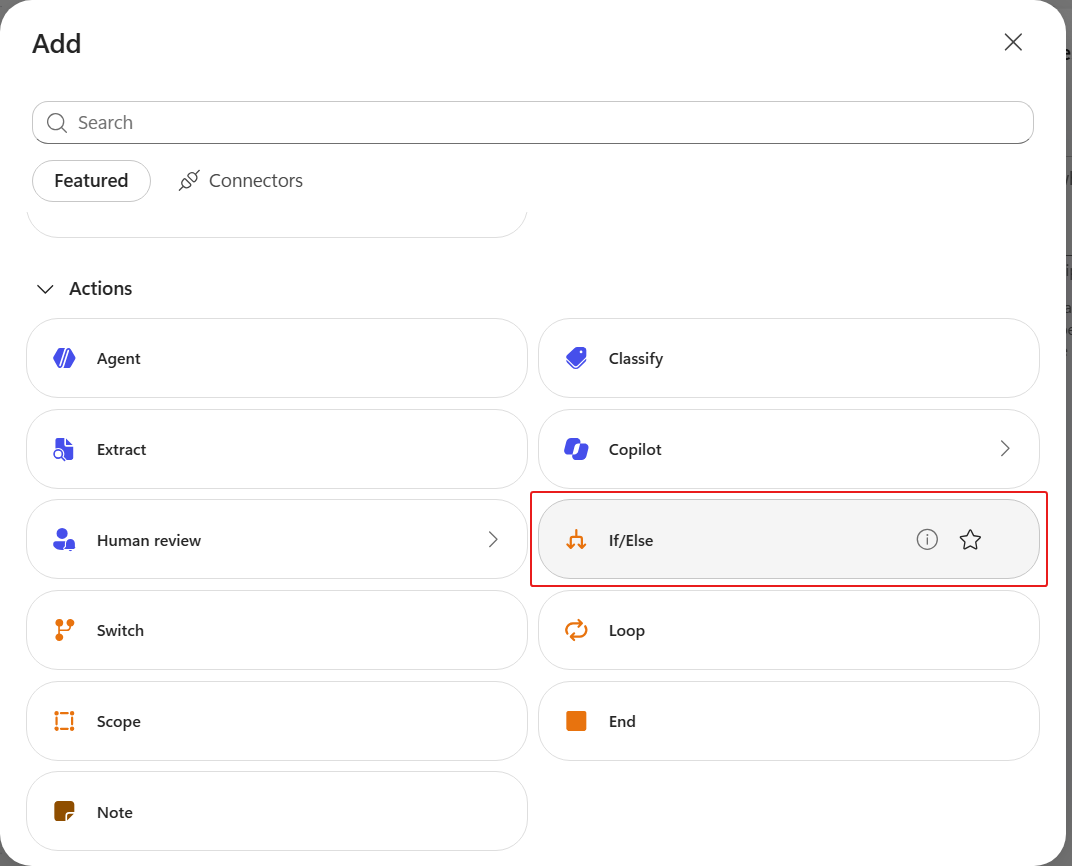
Select the If/Else node and rename it to
Is it a PDF?- select its name at the top of the panel, type the new name and press Enter. Do this before you write the condition, so every later expression can quote the finished name.Select Expand to full screen in the panel's upper-right corner and keep that view open while you fill the condition.
A node's name is how expressions refer to it
Later steps read a node's output with an expression such as
outputs('File_resume_in_Dataverse')?['body/ppa_resumeid']. The name inside the quotes is the verified expression identifier:Is it a PDF?becomesIs_it_a_PDF_andAlert - filing failedbecomesAlert_-_filing_failed. Spaces and the question mark become underscores in these examples; the hyphen is preserved.Name each node exactly as these labs tell you, and before you write any expression that mentions it. Then you can paste every expression that follows verbatim. Rename a node afterwards and any expression you typed by hand still points at the old name.
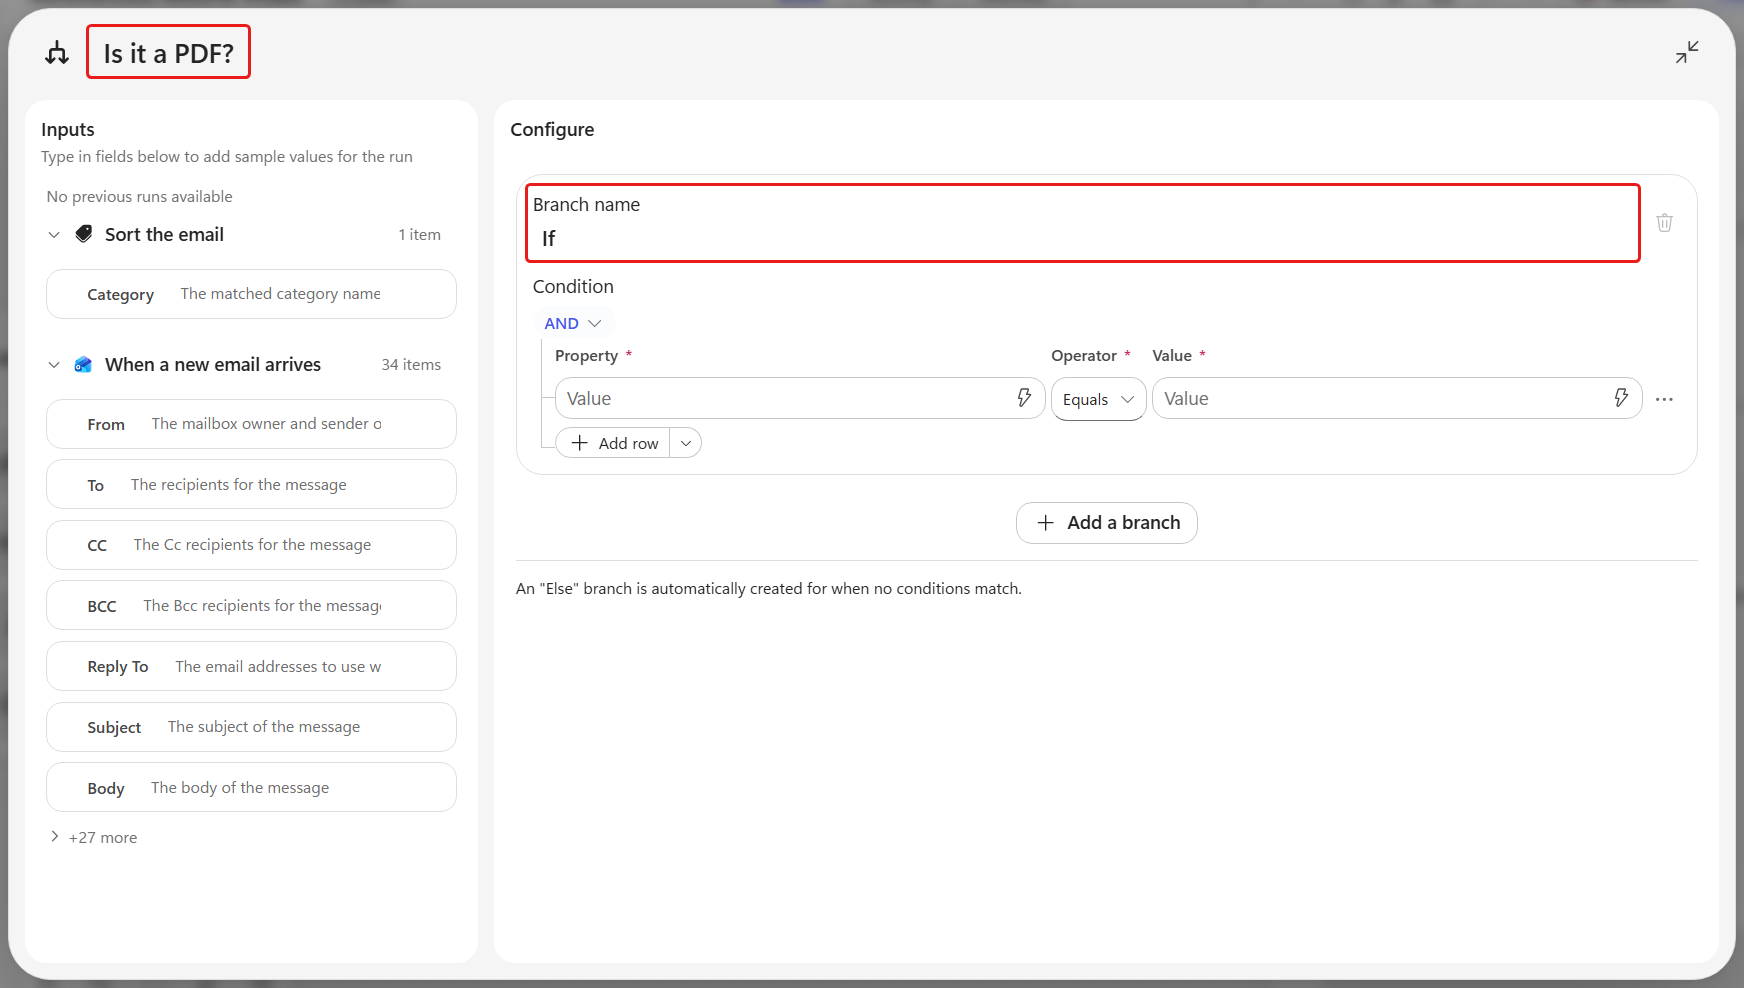
Build the condition that lets a PDF through:
- In Property, select ⚡ Insert dynamic content, search for
Content-Type, and choose Content-Type (Attachment content type). - Leave Operator set to Equals.
- Enter
application/pdfin Value.
Content-Type is a property in the array of attachments that arrives with the triggering email, so the designer automatically wraps this node in a loop over those attachments. The condition now reads Content-Type Equals
application/pdf, with the token showing in Property as a chip labeled contentType. The panel also notes that an Else branch is created automatically for when no condition matches.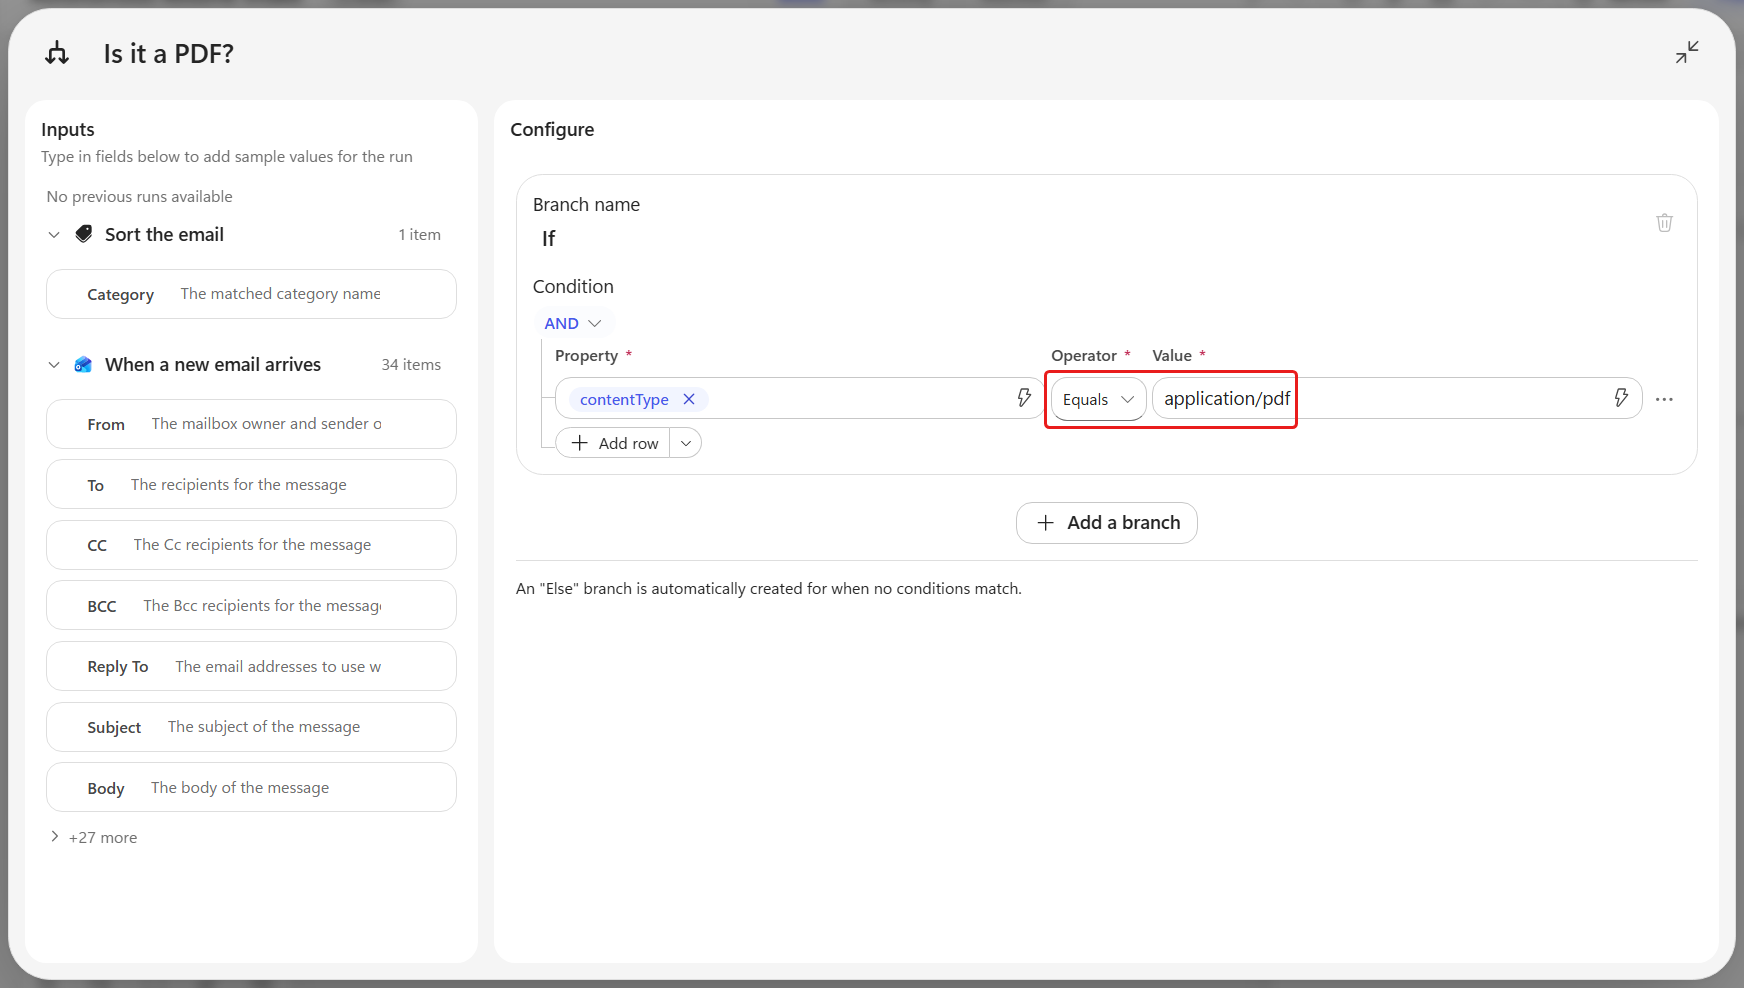
- In Property, select ⚡ Insert dynamic content, search for
Rename the surrounding automatically created loop to
For each attachment.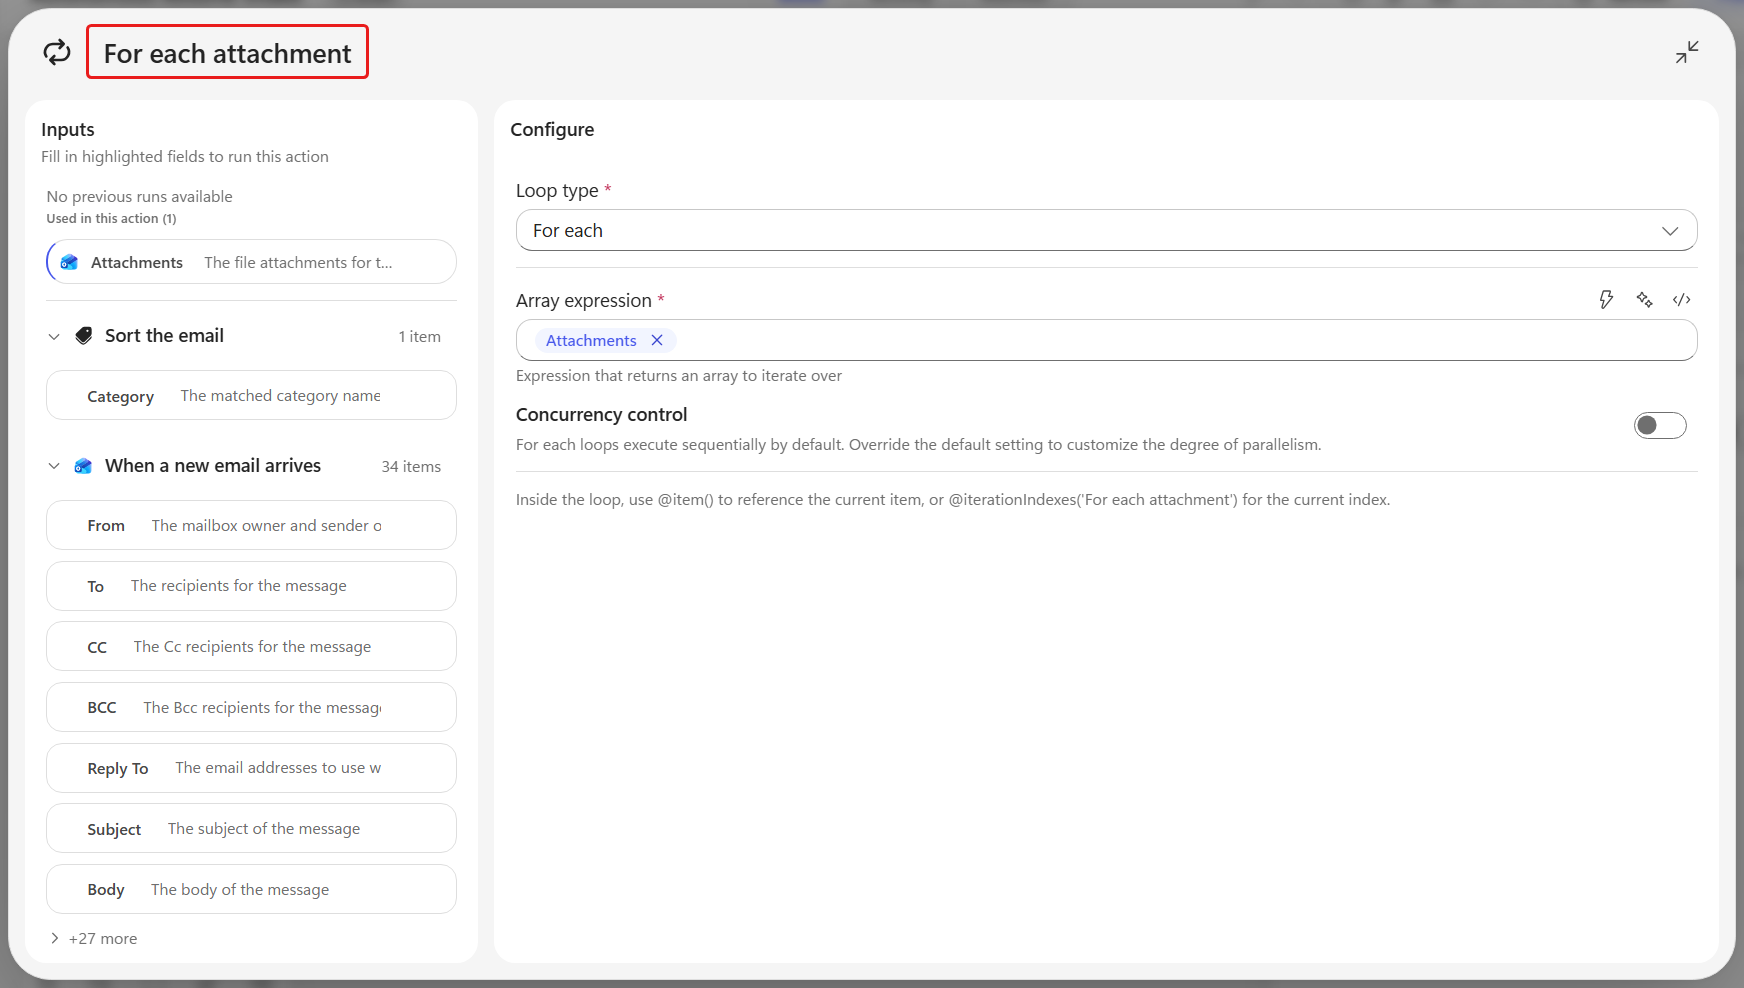
On the command bar select Save.
Process application now holds the For each attachment loop, and inside that the Is it a PDF? guard with its empty If and Else branches. We fill the If branch with the filing steps in the next lab. The Else branch stays empty, so an attachment that is not a PDF does nothing and the loop moves straight on to the next attachment.
7.5 File the resume and attach its PDF as a note
The PDF branch is still empty. Next we are going to fill it with two ordinary Dataverse connector actions that run without an agent - one to create the Resume row, and one to store the attached PDF as a Note on that row.
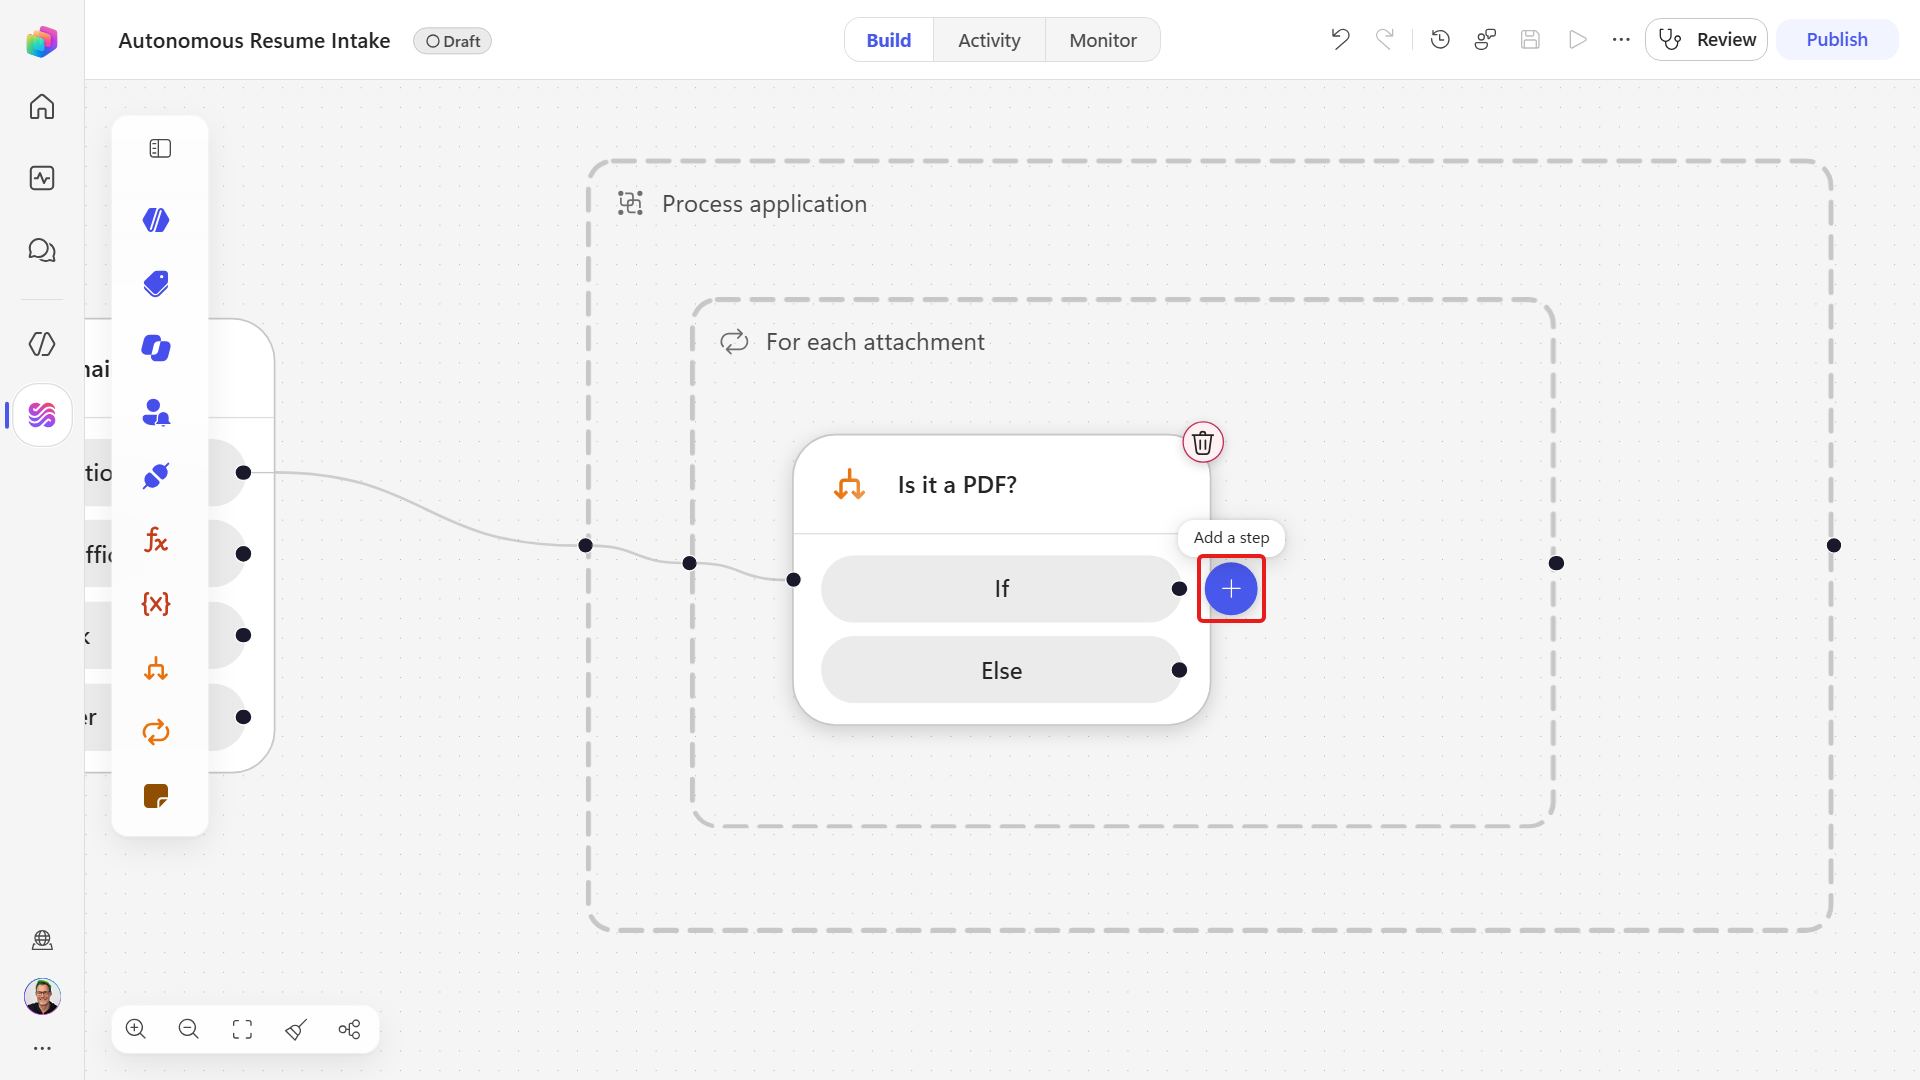
Everything in this lab goes inside the If branch of the Is it a PDF? guard we built in Lab 7.4. Because that branch sits inside the loop, every step we add here runs once per attachment, so each resume gets its own Resume row, its own number and its own Note.
As we go you will see a small ⚡ icon on many fields. That is the dynamic content picker from How to fill in a field - a menu of values that earlier steps produced. From the email trigger we get From, Subject, Body and Attachments, and inside the loop each attachment's Name, Content-Type and Content Bytes (the raw file).
Inside the Is it a PDF? guard, select the ➕ labeled Add a step after If. That button adds the step into the If branch. Use it for every step in this lab.
In the Add panel's search box, type
add a new row, then select Microsoft Dataverse, Add a new row. The node is added inside the If branch with its Connection already showing your Dataverse account as Connected.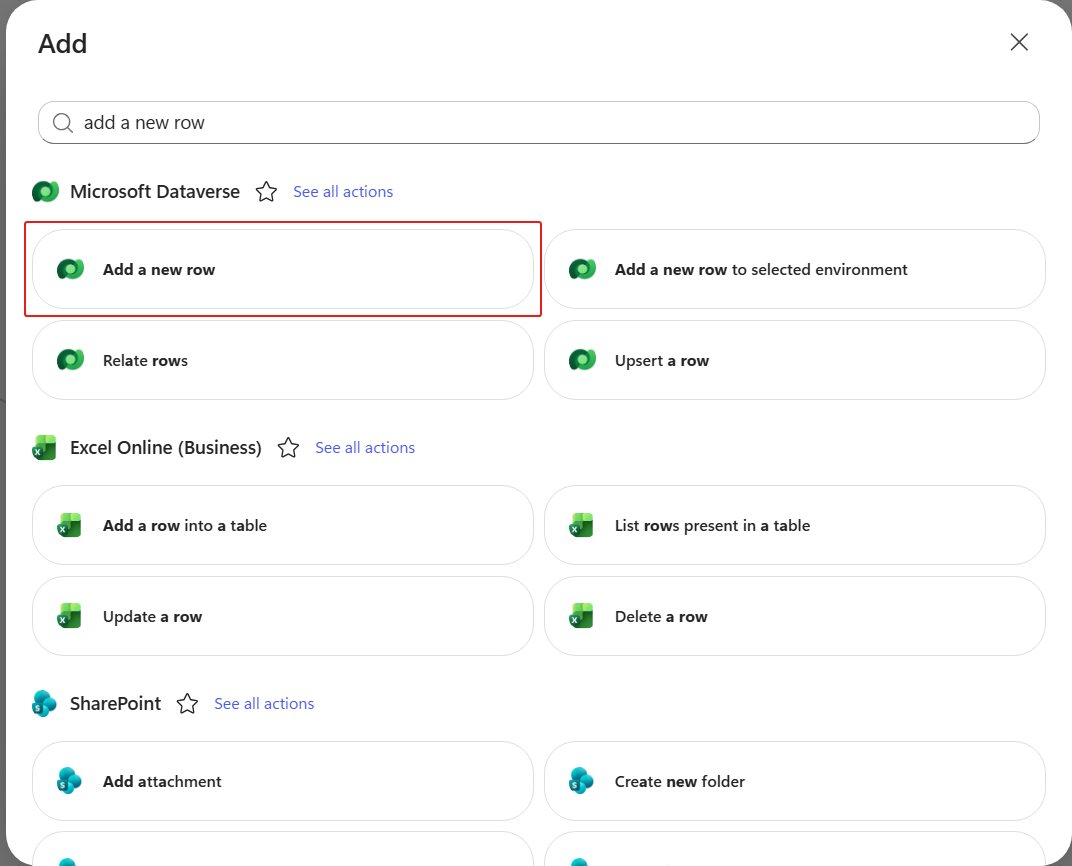
Rename it to
File resume in Dataverse- select its name at the top of the panel, type the new name and press Enter. Do this before you set any field, because every later expression refers to the node asoutputs('File_resume_in_Dataverse').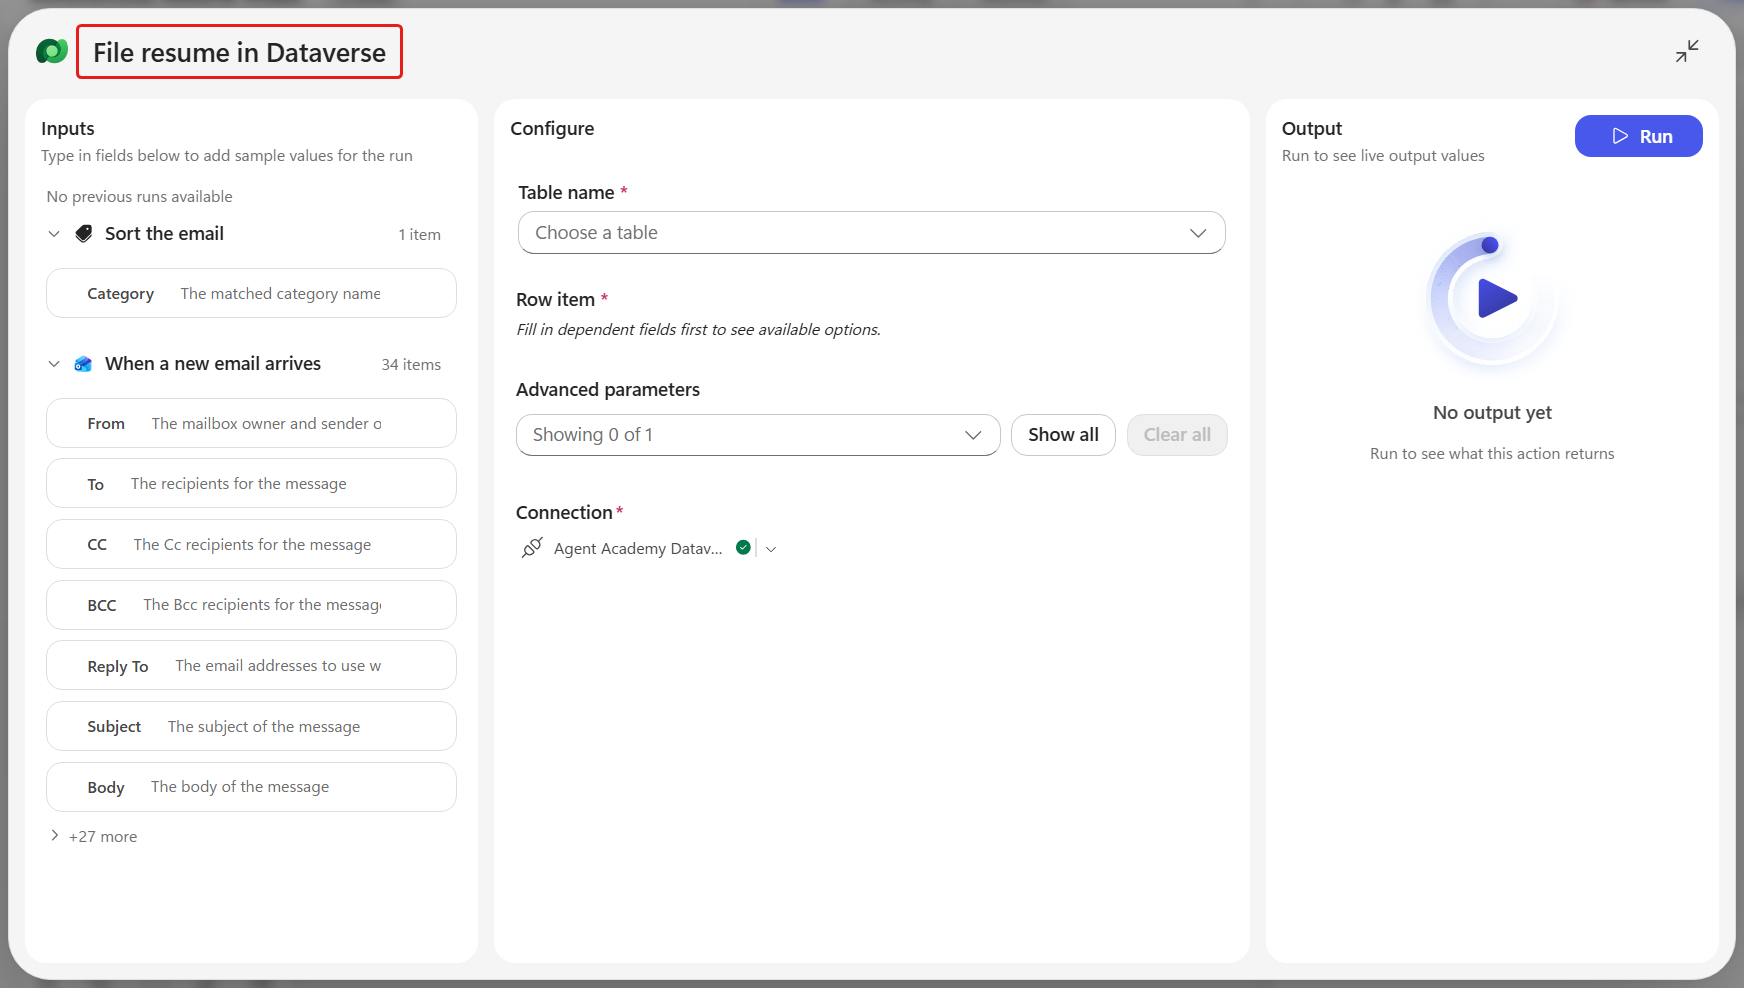
Open Table name and select Resumes from the drop-down list.
Once a table is chosen, its columns appear under Row Item, listed alphabetically. Only Resume Title is marked required, because it is defined as Required in the Dataverse table definition.
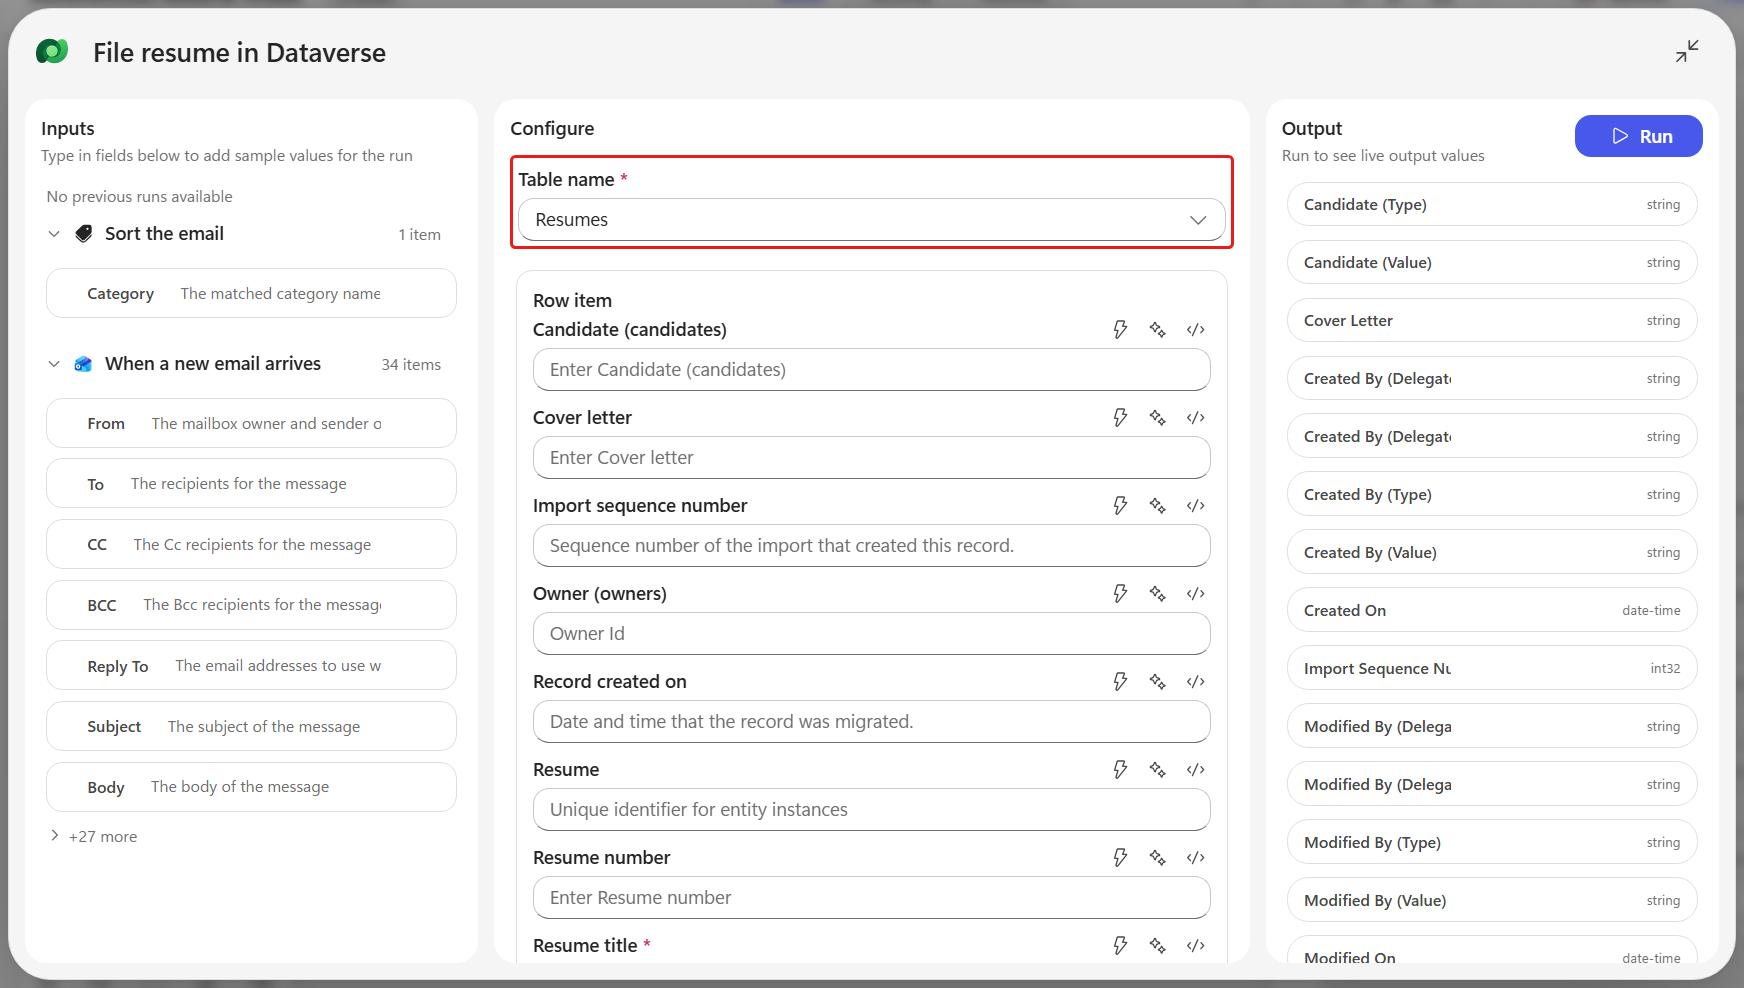
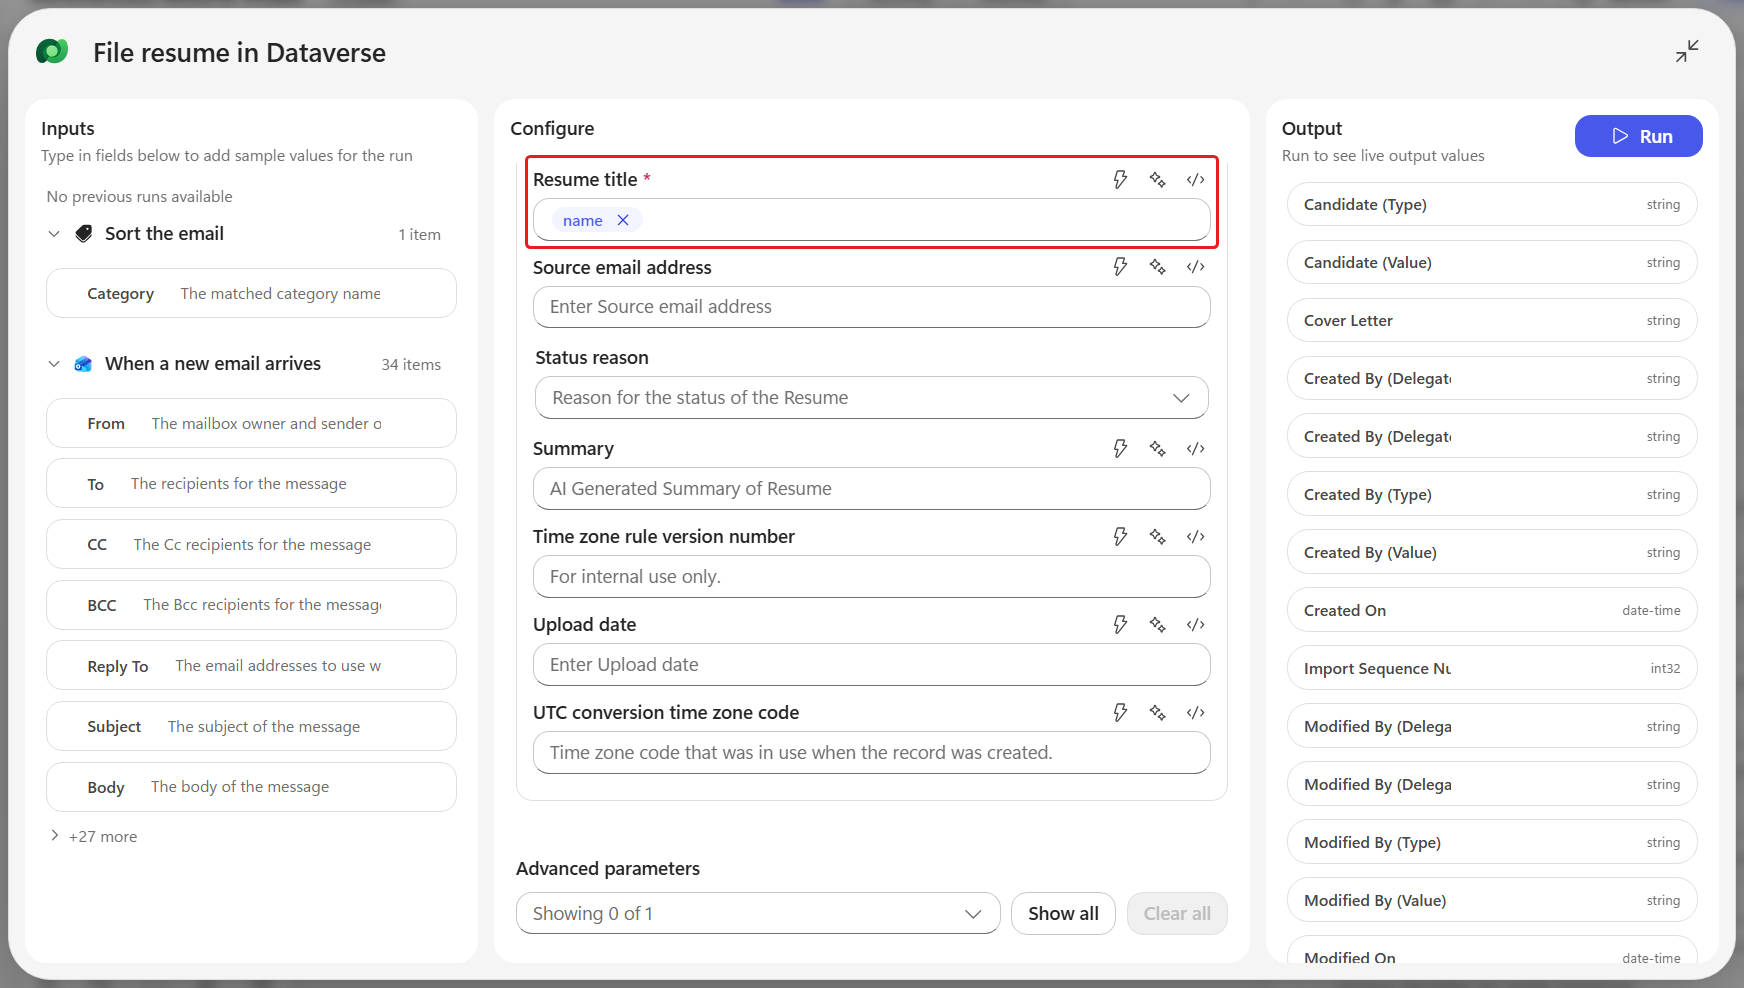
In Resume Title, select ⚡ Insert dynamic content, search for
Name, and choose the attachment's Name from the picker.Resume Title takes the attachment's Name rather than the email subject, because two resumes in one email share a subject and this row has to identify a single attachment.
There is more than one way to insert a value
You can also drag a value out of the Inputs panel on the left and drop it straight into a field, which is quicker once you know where a value lives. This course always uses the ⚡ Insert dynamic content picker instead, because it names the value you are choosing and behaves the same way on every field.
In Cover Letter, select ⚡ Insert dynamic content, search for
Body, and choose Body.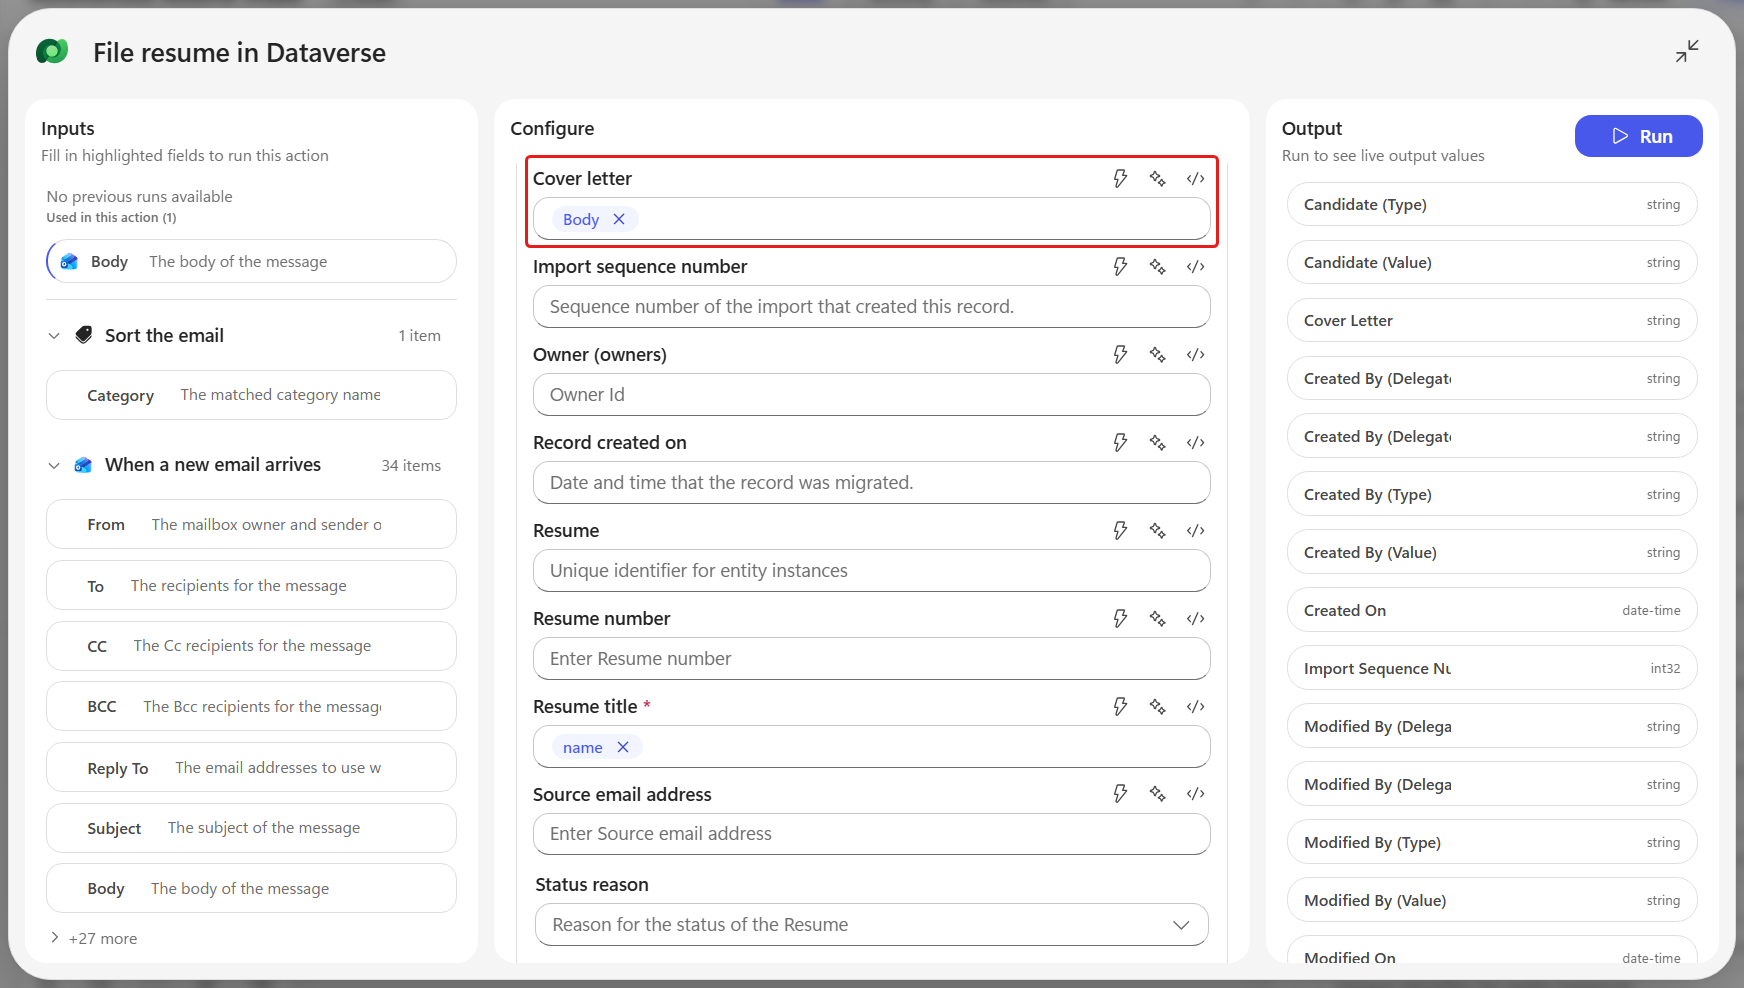
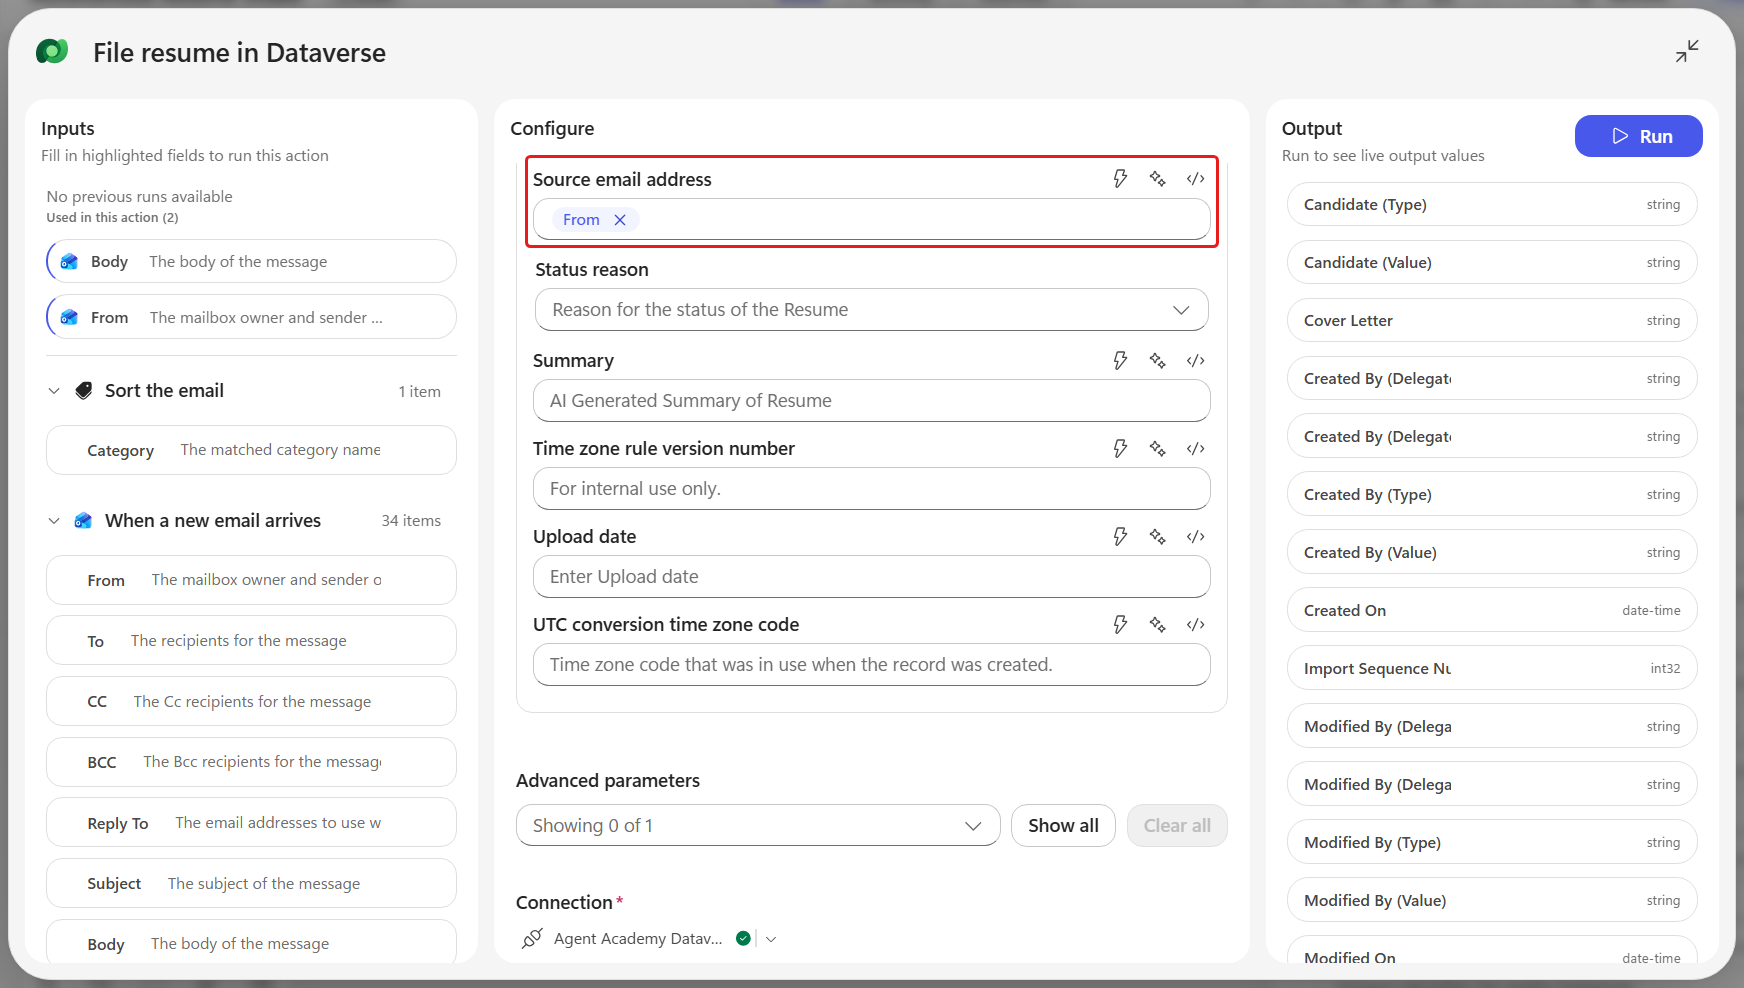
In Source Email Address, select ⚡ Insert dynamic content, search for
From, and choose From.Those three boxes now show blue tokens - Name, From and Body - and the Needs setup badge disappears from the node, because we have now filled in all of its required parameters.
Now we will upload the attached PDF as a Note on that Resume row. Select the ➕ after the File resume in Dataverse node - it is inside the If branch - then choose Connector, Microsoft Dataverse, Add a new row. Rename the node to
Attach the resume as a notestraight away, then open Table name and select Notes.Notes live in Dataverse's
annotationtable, and the file's bytes sit in itsdocumentbodycolumn - which is where the agent you add in Mission 08 reads them from.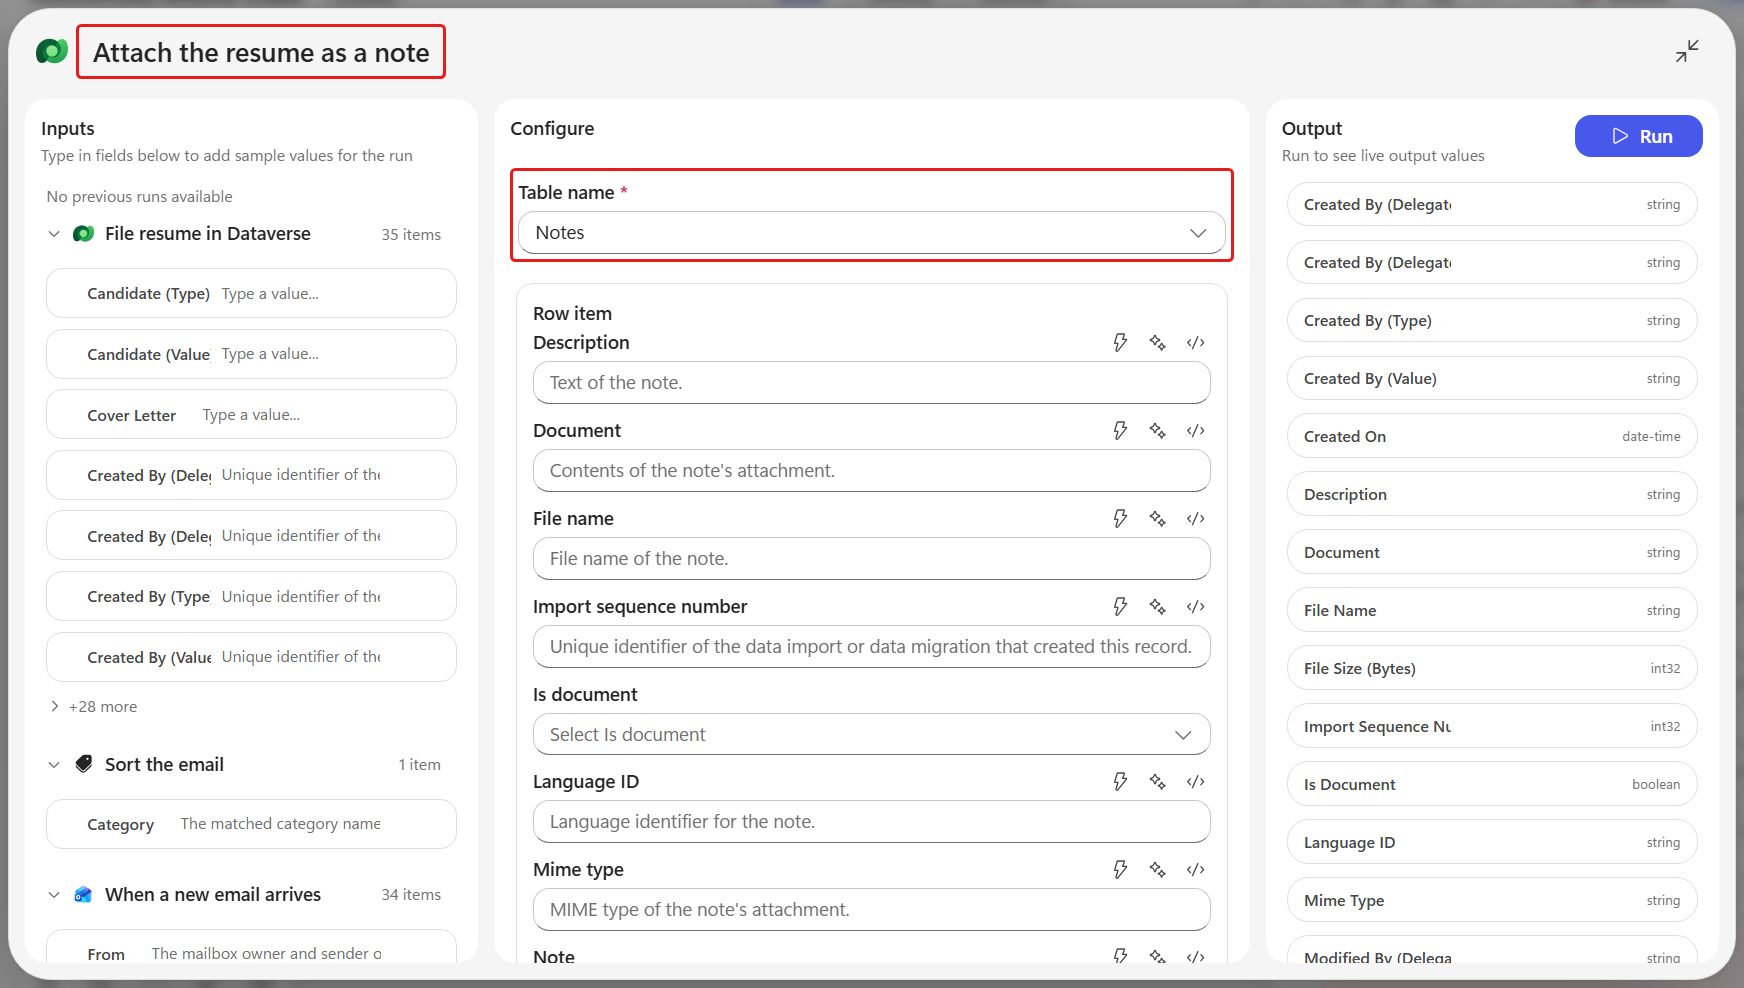
In Title, select ⚡ Insert dynamic content, search for
Name, and choose Name (Attachment name).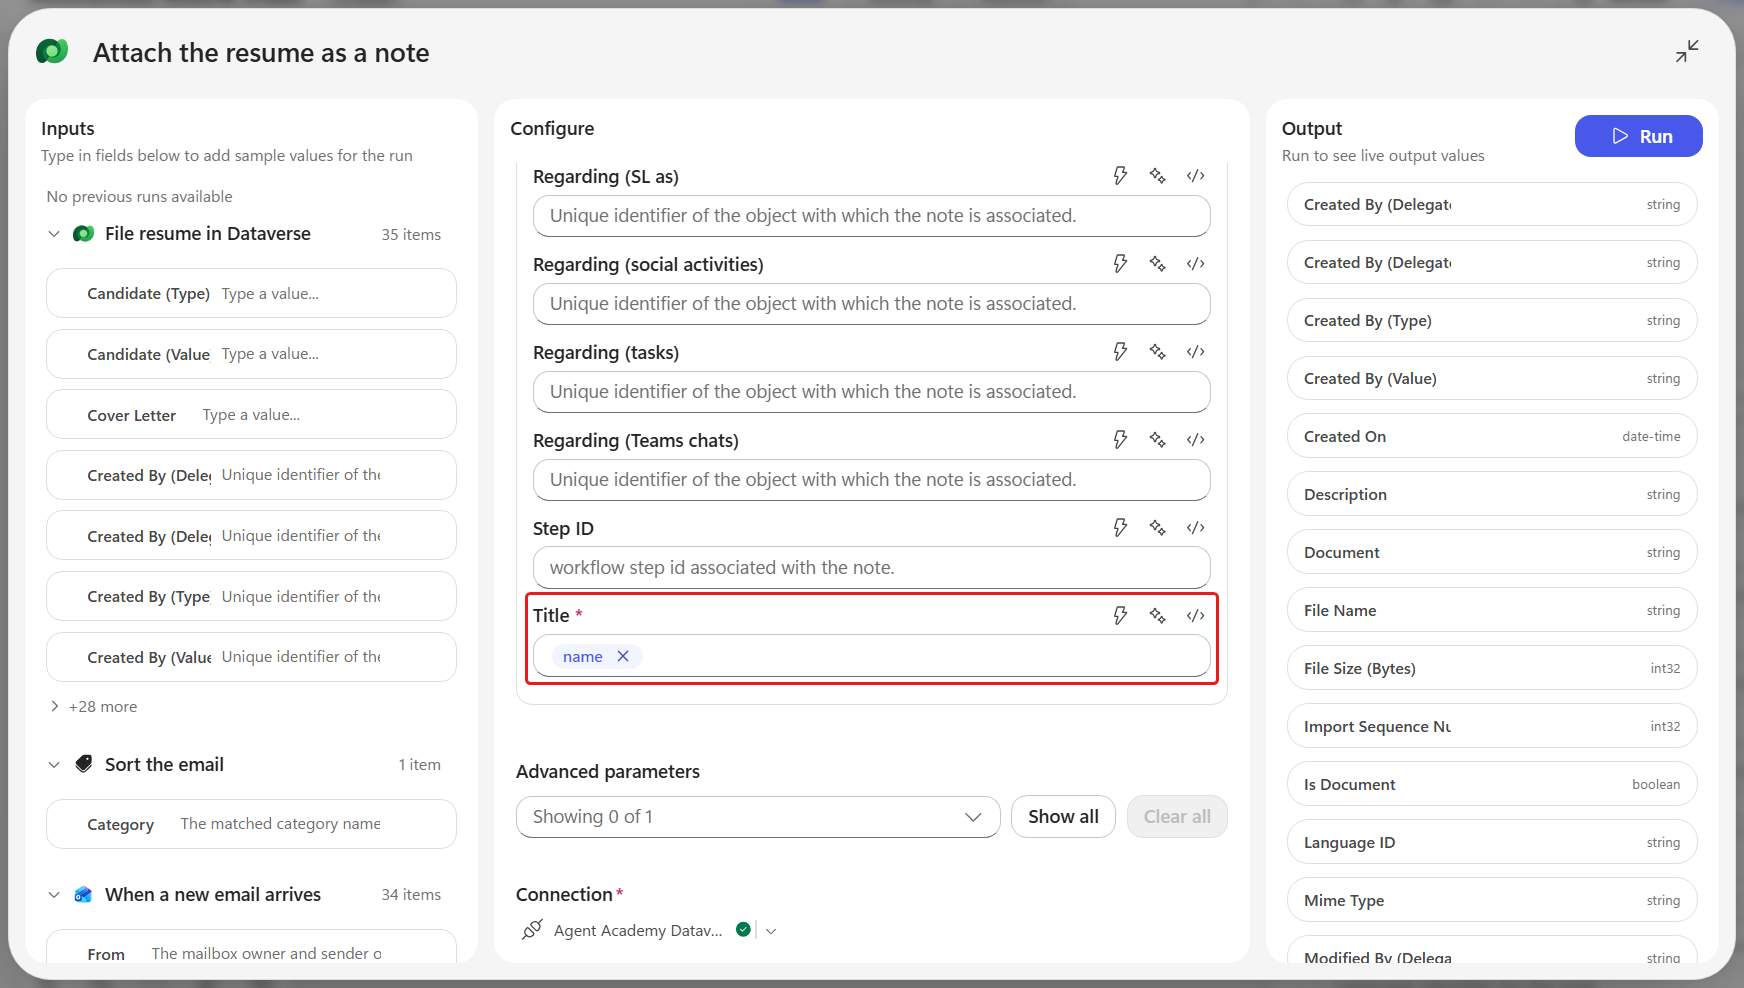
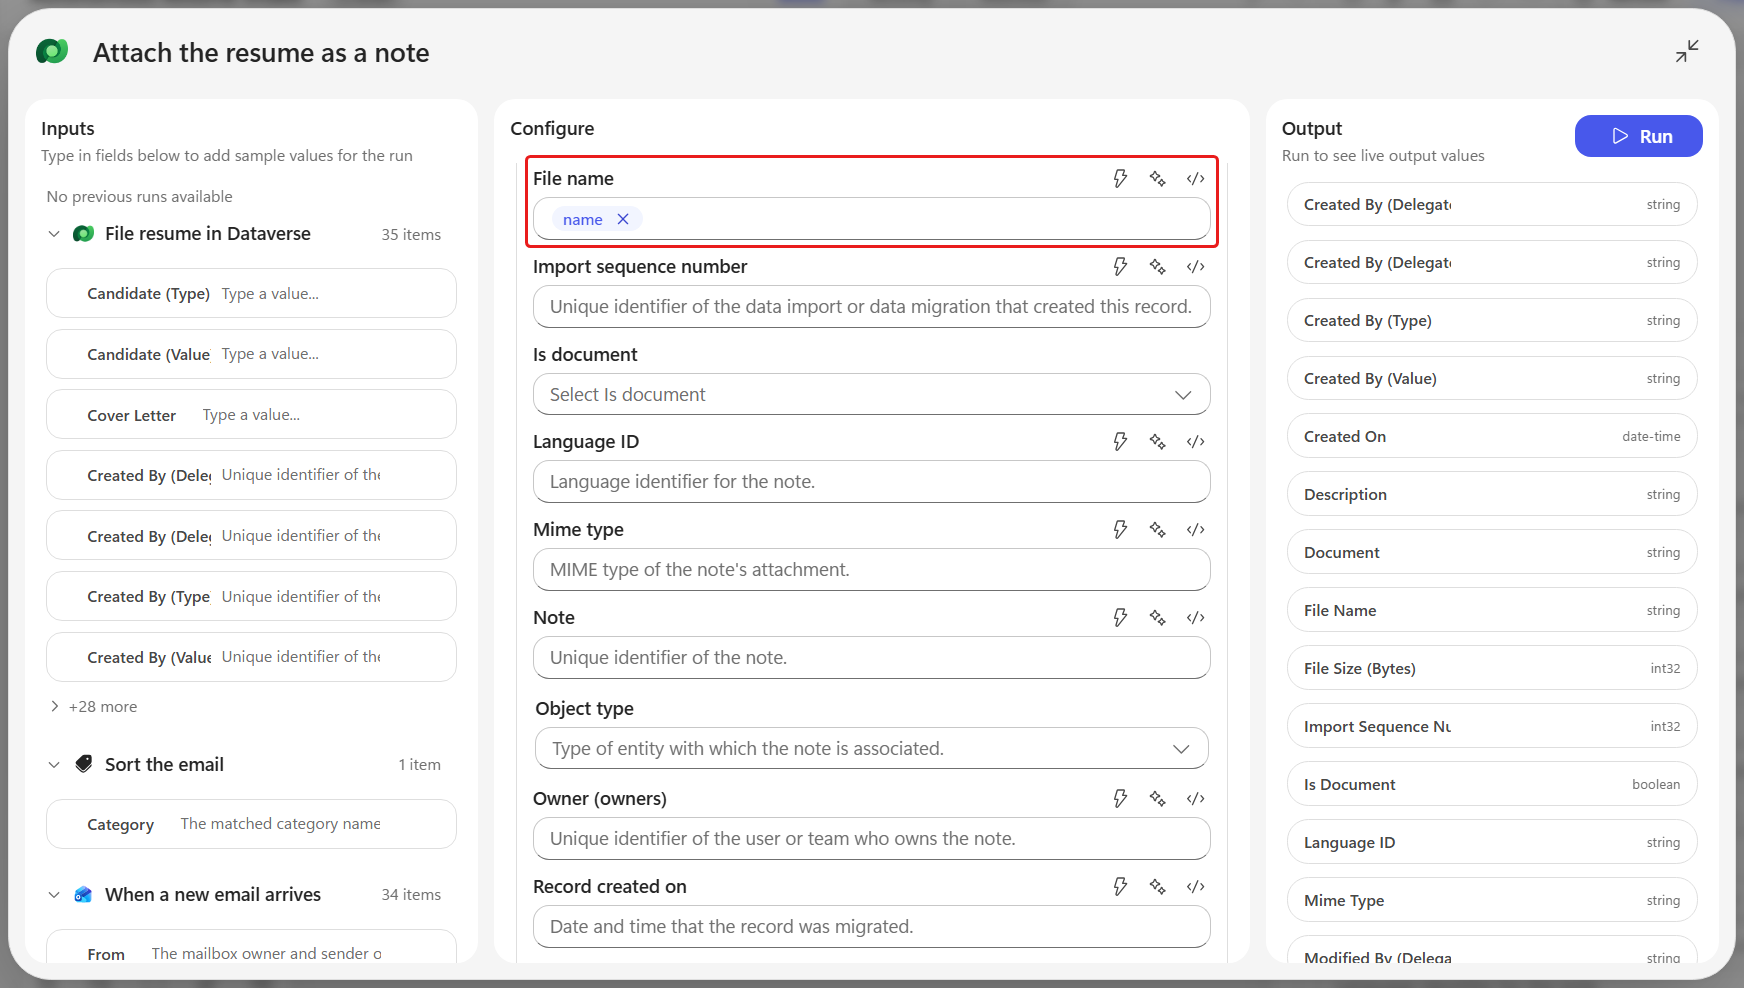
In File Name, insert the same Name token.
Configure the Note's file content:
- Set Is document to Yes.
- In Mime type (
MimeType), select ⚡ Insert dynamic content, search forContent-Type, and choose Content-Type (Attachment content type). The field shows acontentTypechip. - Switch Document to expression mode - the
</>button from How to fill in a field - and paste this expression:
textbase64ToString(base64(items('For_each_attachment')?['contentBytes']))File content and encoding
Base64 represents binary file content as text so it can travel in a JSON payload. Dataverse stores a Note's file content in
documentbody; its file name and MIME type describe that content. Encoding changes the representation, not the file format. Use the demonstrated expression here, then verify the linked Note and open its downloaded PDF in Lab 7.6 to check the mapping end to end.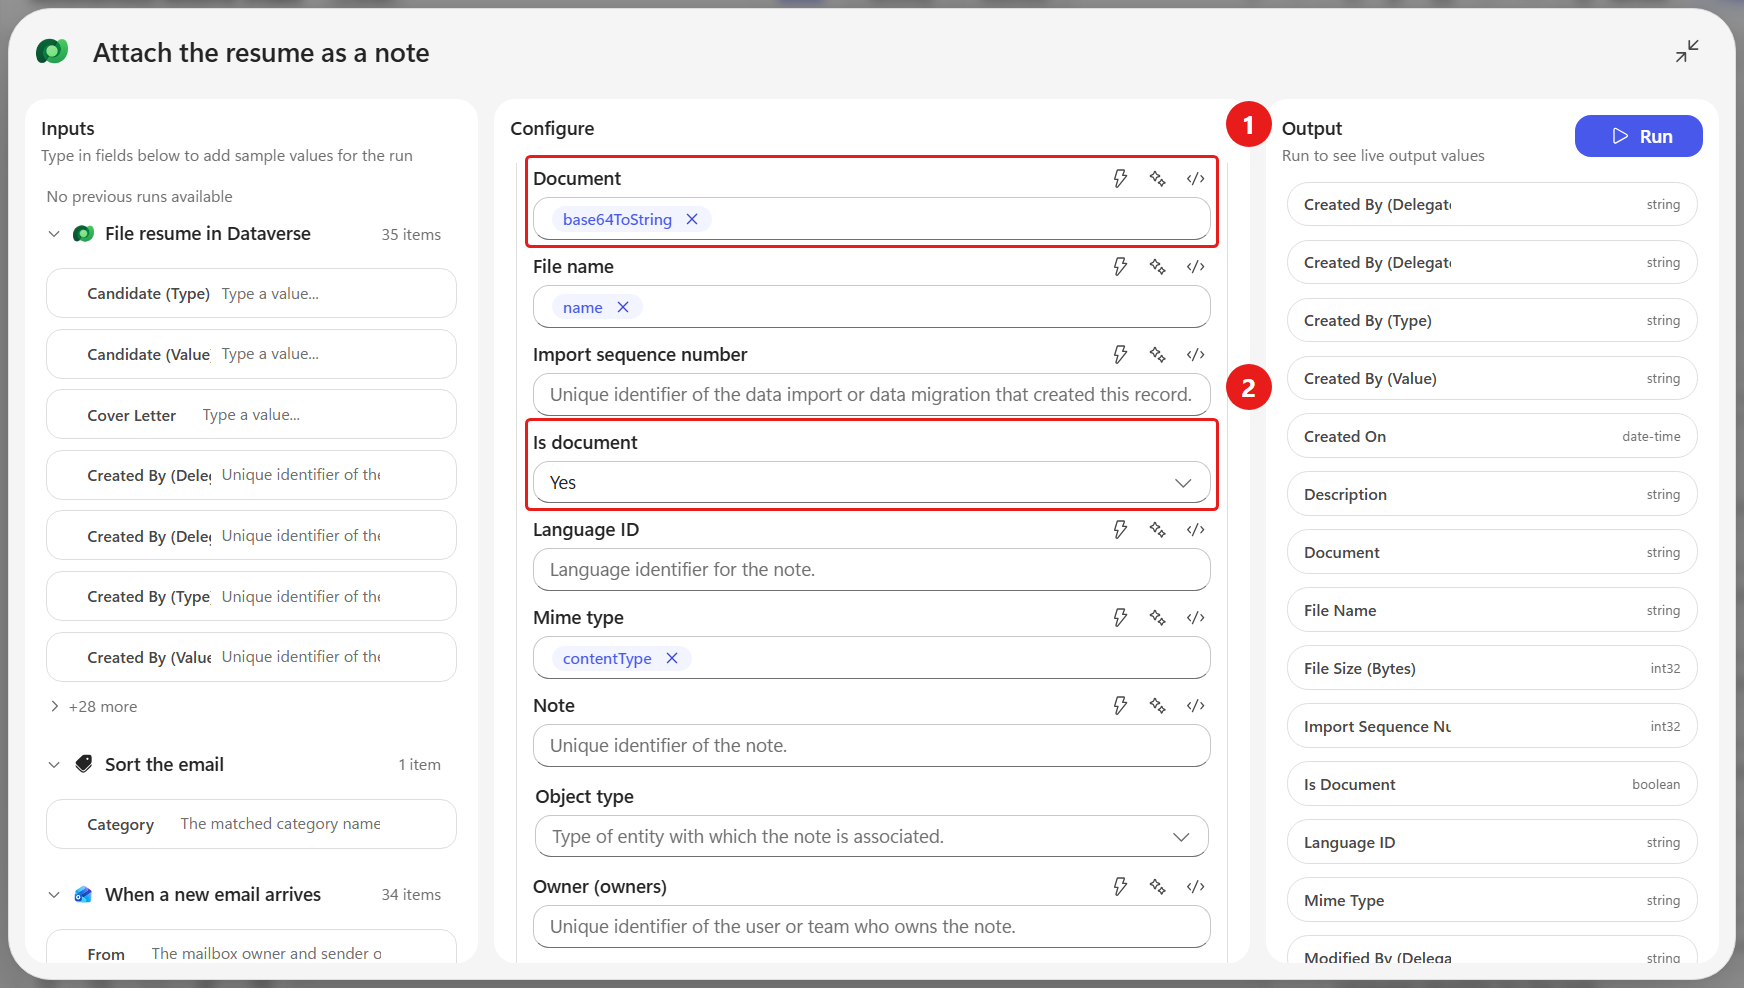
Build the Regarding (Resumes) value:
- Select the field and type
/ppa_resumes(- just the text, nothing else yet. - Select ⚡ Insert dynamic content, and under File resume in Dataverse choose the Resume token (its description reads Unique identifier for entity instances). A chip appears inside your typed text.
- Type
)after the chip to close the bracket.
The field reads
/ppa_resumes(«Resume chip»). On the command bar select Save.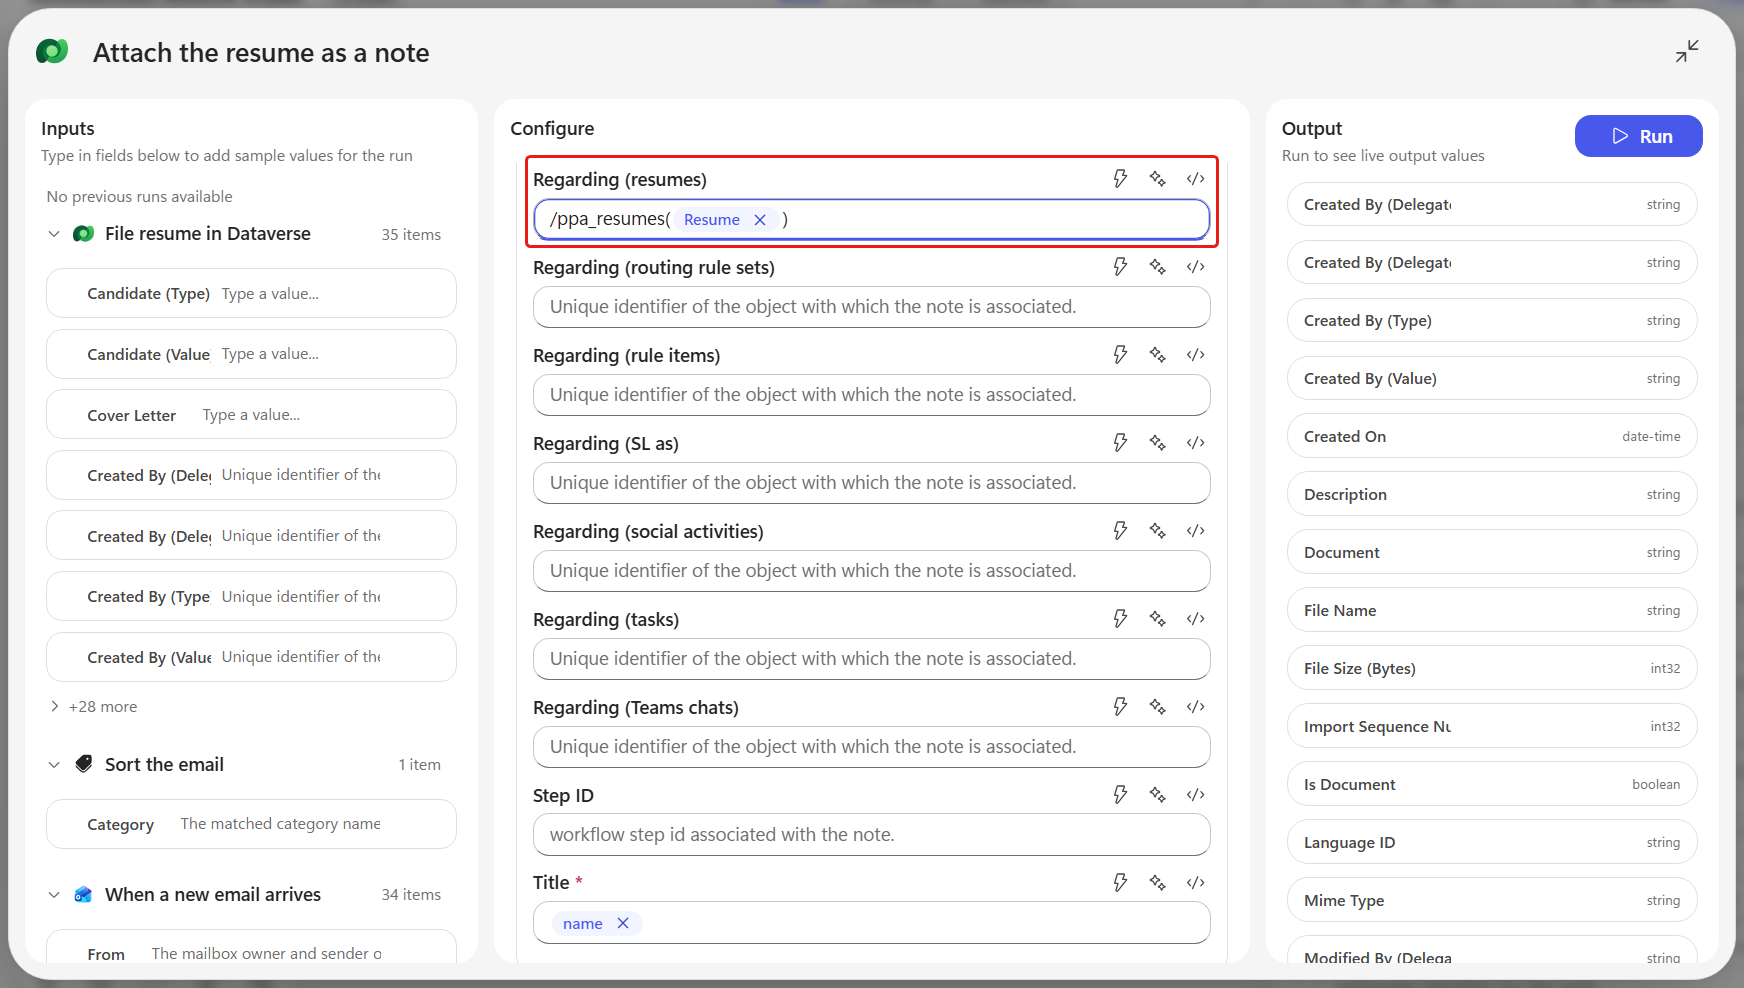
- Select the field and type
Each turn of the loop files one resume on its own, and nothing outside the loop can see what an earlier turn did. The agents in Mission 08 need to see them all together as a single list - the resume number, the id of the Note holding its PDF, and the file name, one line per resume - so we build that list up as the loop runs, in a variable.
A variable has to be initialized at the top level of the workflow, once, before anything reads it, and you cannot initialize one inside a loop or a branch. Select the ➕ immediately after the When a new email arrives trigger, outside and before everything else.
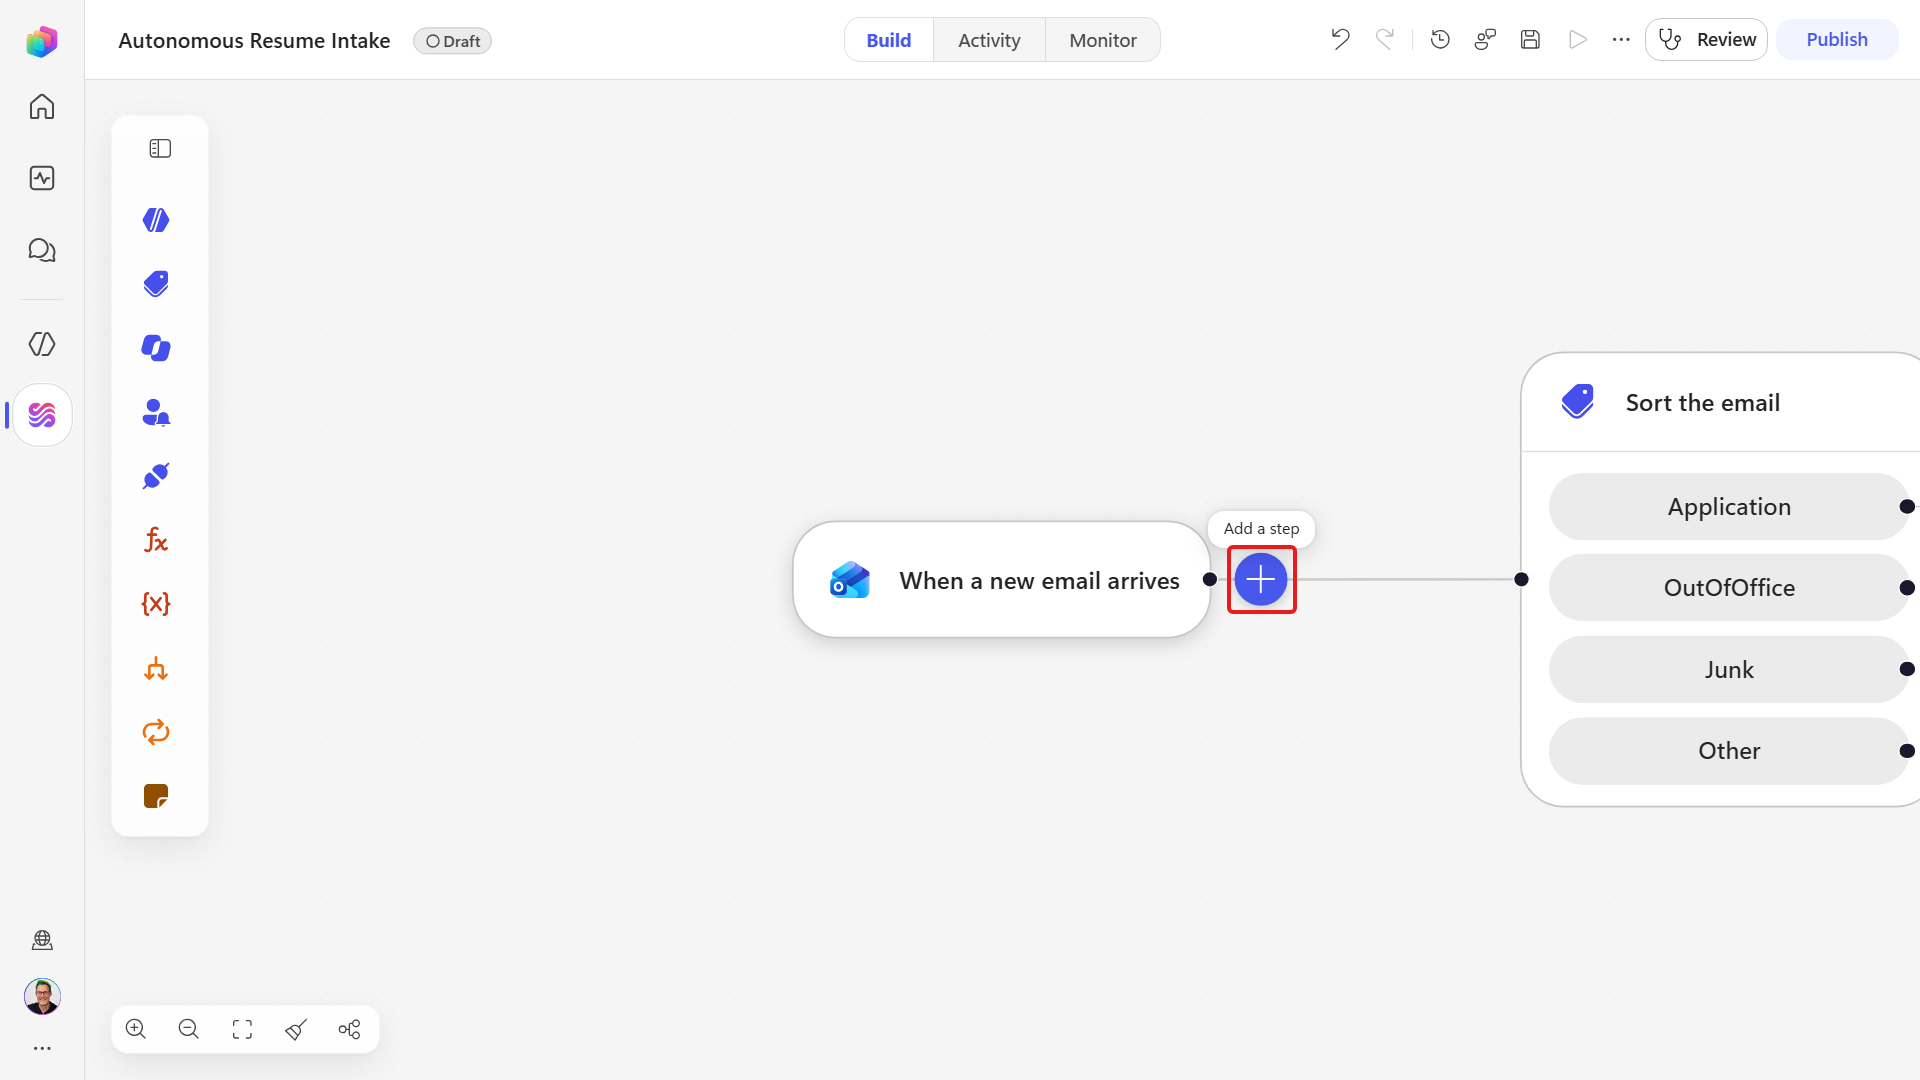
Add Variable, choose Initialize Variable, then rename the node to
Start the resume listand fill it in as follows.Field Value Variable name ProcessedResumesType String Value Leave empty - the placeholder Type / to insert dynamic content stays as it is 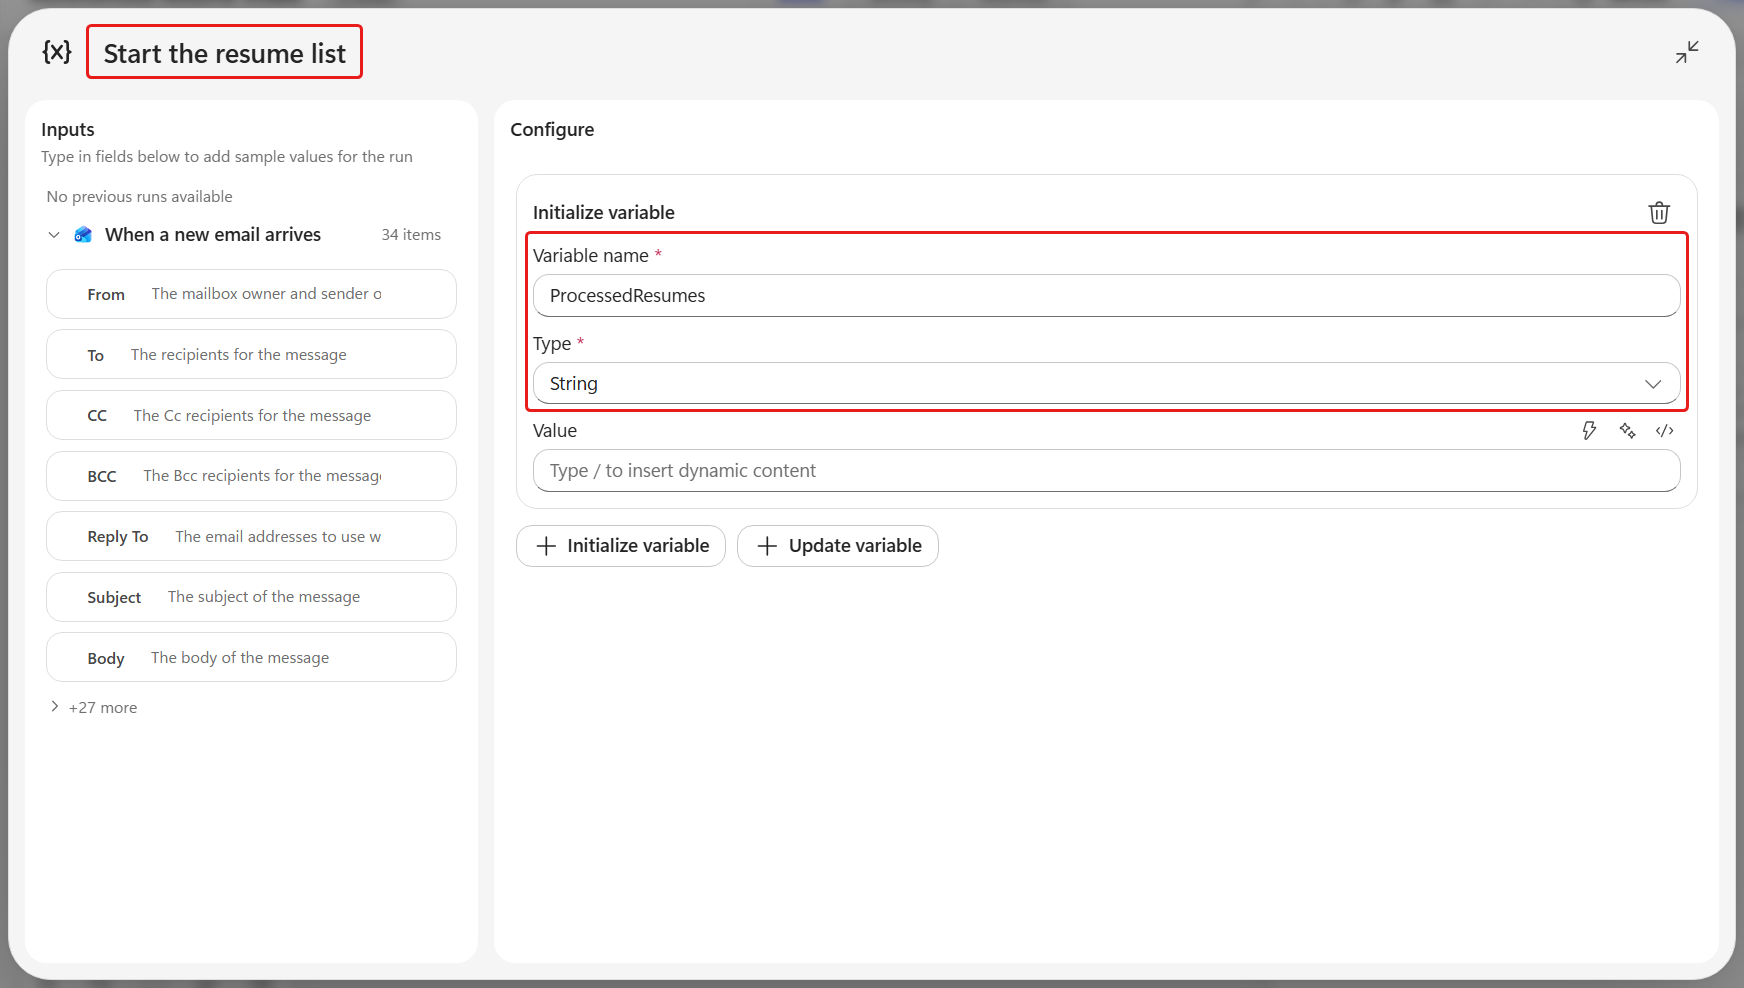
Now go back inside the loop, below Attach the resume as a note, and select the ➕ there. In the Add panel search for
Variableand select it.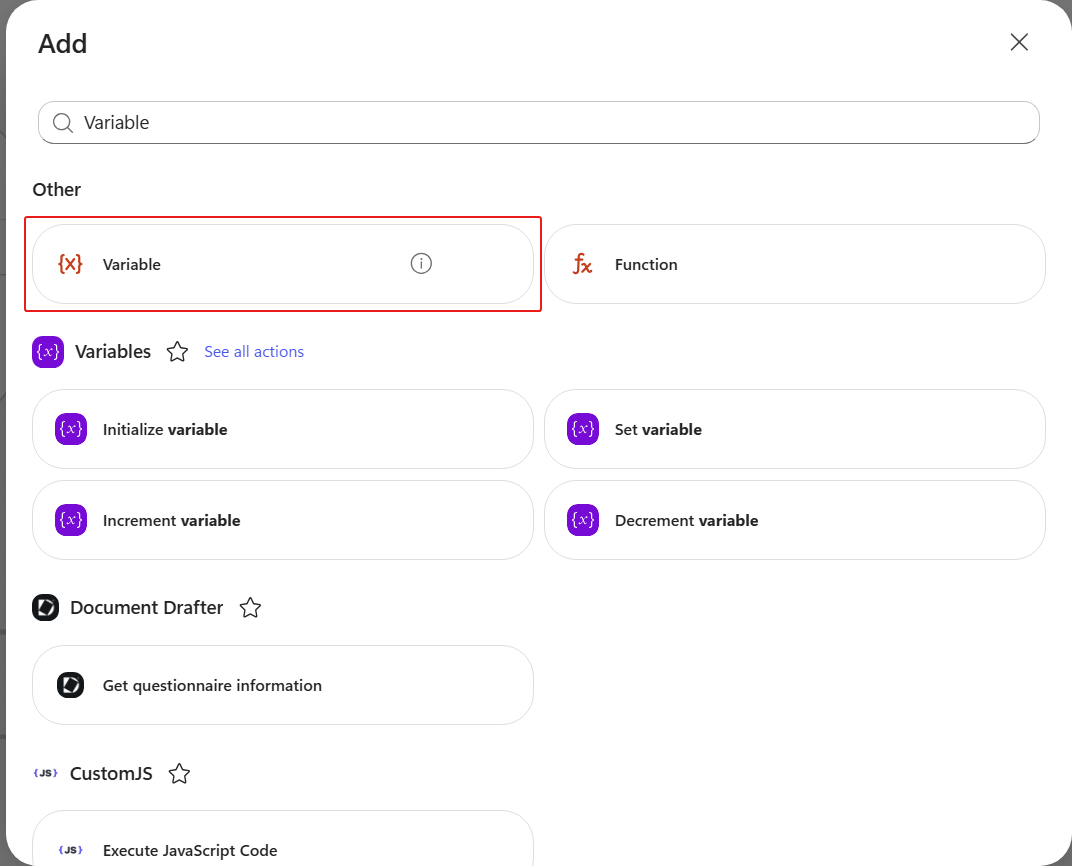
Configure the Variable node you just added:
- The panel opens on Choose an operation with two buttons - Initialize Variable and Update Variable. Select Update Variable (there is no button called Set Variable).
- Rename the node to
Remember this resume. - Open the Variable drop-down list and select
ProcessedResumes. - Set Operation to Append to string.
- Switch Value to expression mode and enter this expression:
textconcat(outputs('File_resume_in_Dataverse')?['body/ppa_resumenumber'], ' | note ', outputs('Attach_the_resume_as_a_note')?['body/annotationid'], ' | ', items('For_each_attachment')?['name'], decodeUriComponent('%0A'))The expression stitches together three values this turn of the loop has just produced - the Resume Number of the row we filed, the annotationid of the Note holding its PDF, and the attachment's file name - separated by
|, and finishes with a line break. Run the workflow against an email carrying two attachments andProcessedResumesends up holding two lines, one per resume:textR01047 | note 6baf778e-8a89-f111-8077-6045bd015278 | AVERY EXAMPLE (FICTITIOUS).pdf R01048 | note 4b180b90-8a89-f111-8077-70a8a5b2f7b1 | TAYLOR TESTPERSON (FICTITIOUS).pdf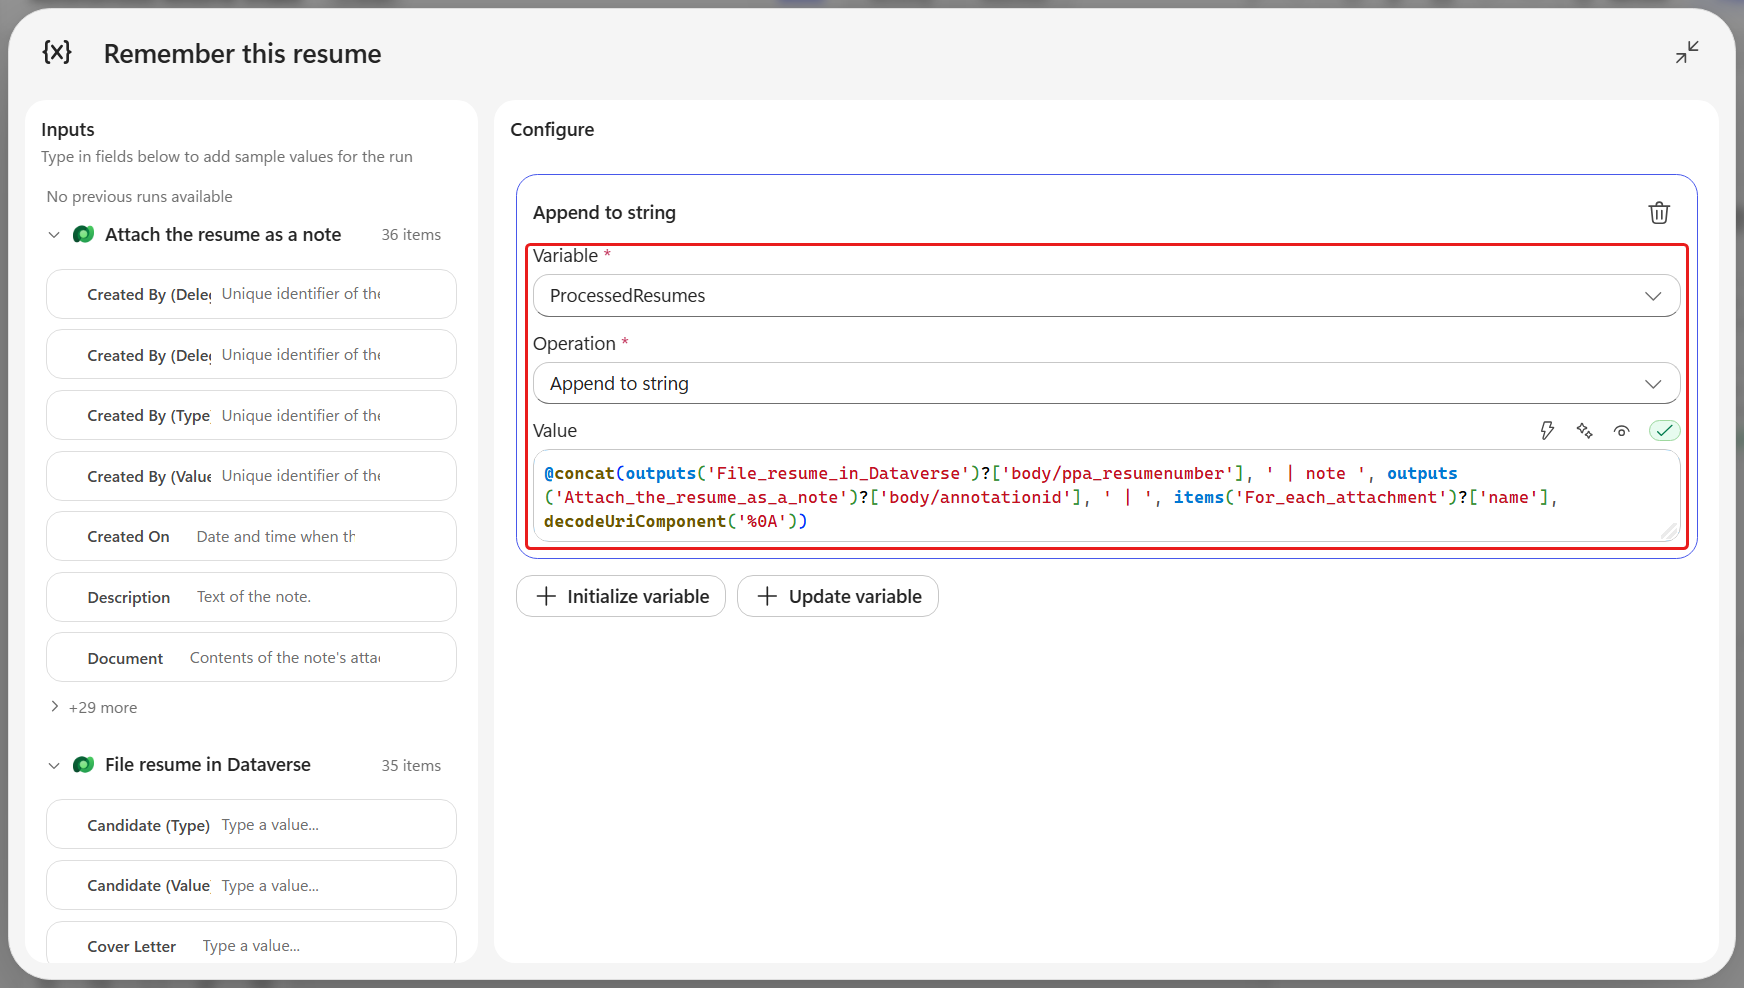
Why do we need this variable?
The loop handles one attachment at a time, and each turn forgets the one before it. Without somewhere to write them down, the resume numbers and note ids the loop produced are gone by the time it ends. The variable is that notepad. Every turn appends its line, and when the loop finishes a single value holds everything that was filed.
Because ProcessedResumes is a String, the Operation list offers only Set variable and Append to string. Append to string is the one that works: you supply just the new line and the platform joins it onto what is already there.
Set variable cannot do this job. Its value would have to be concat(variables('ProcessedResumes'), …) - the variable reading itself - and the designer reports "A variable cannot reference itself when updating its value. Read it into a Compose action first."
The line ending is written as decodeUriComponent('%0A') because the expression editor gives you no way to type a literal newline.
One caveat. Appending reads the variable and writes it back, so if two attachments were processed at the same time they could both read the same starting value and one line would be lost. For each loops run one iteration at a time by default, so this is safe as written - just leave the loop's Concurrency control alone, or set Degree of parallelism to 1 if it is already switched on. If you ever do need parallel iterations, this accumulator has to go: have each iteration write its line to a child table instead, and read them back after the loop.
7.6 Test the workflow end to end
Next we are going to test what we have built in two stages: a quick check on a single node first, then the real end-to-end run that starts from an email.
We can do the quick check without publishing anything and without sending any email, just like when we used the Run node tab on Sort the email in Lab 7.2. It tells us whether the Dataverse connection, the table and the column mappings are right before the trigger is involved at all.
On the canvas, select the File resume in Dataverse node, open the Run node tab next to Configure, and select Expand to full screen.
The Inputs column asks for a sample value for each earlier output this action actually reads - here that is just From and Body from the trigger. Fill in those two and leave the rest, which are collapsed behind Show all 16 other fields.
Field Value From taylor.testperson@example.comBody Please find my resume attached.Load values from a previous run
The Load values from previous run drop-down at the top of the Inputs column fills every box from a run that already happened, which saves a lot of typing once a workflow has some history. This one has never run, so there is nothing to load and we type the two values in by hand.
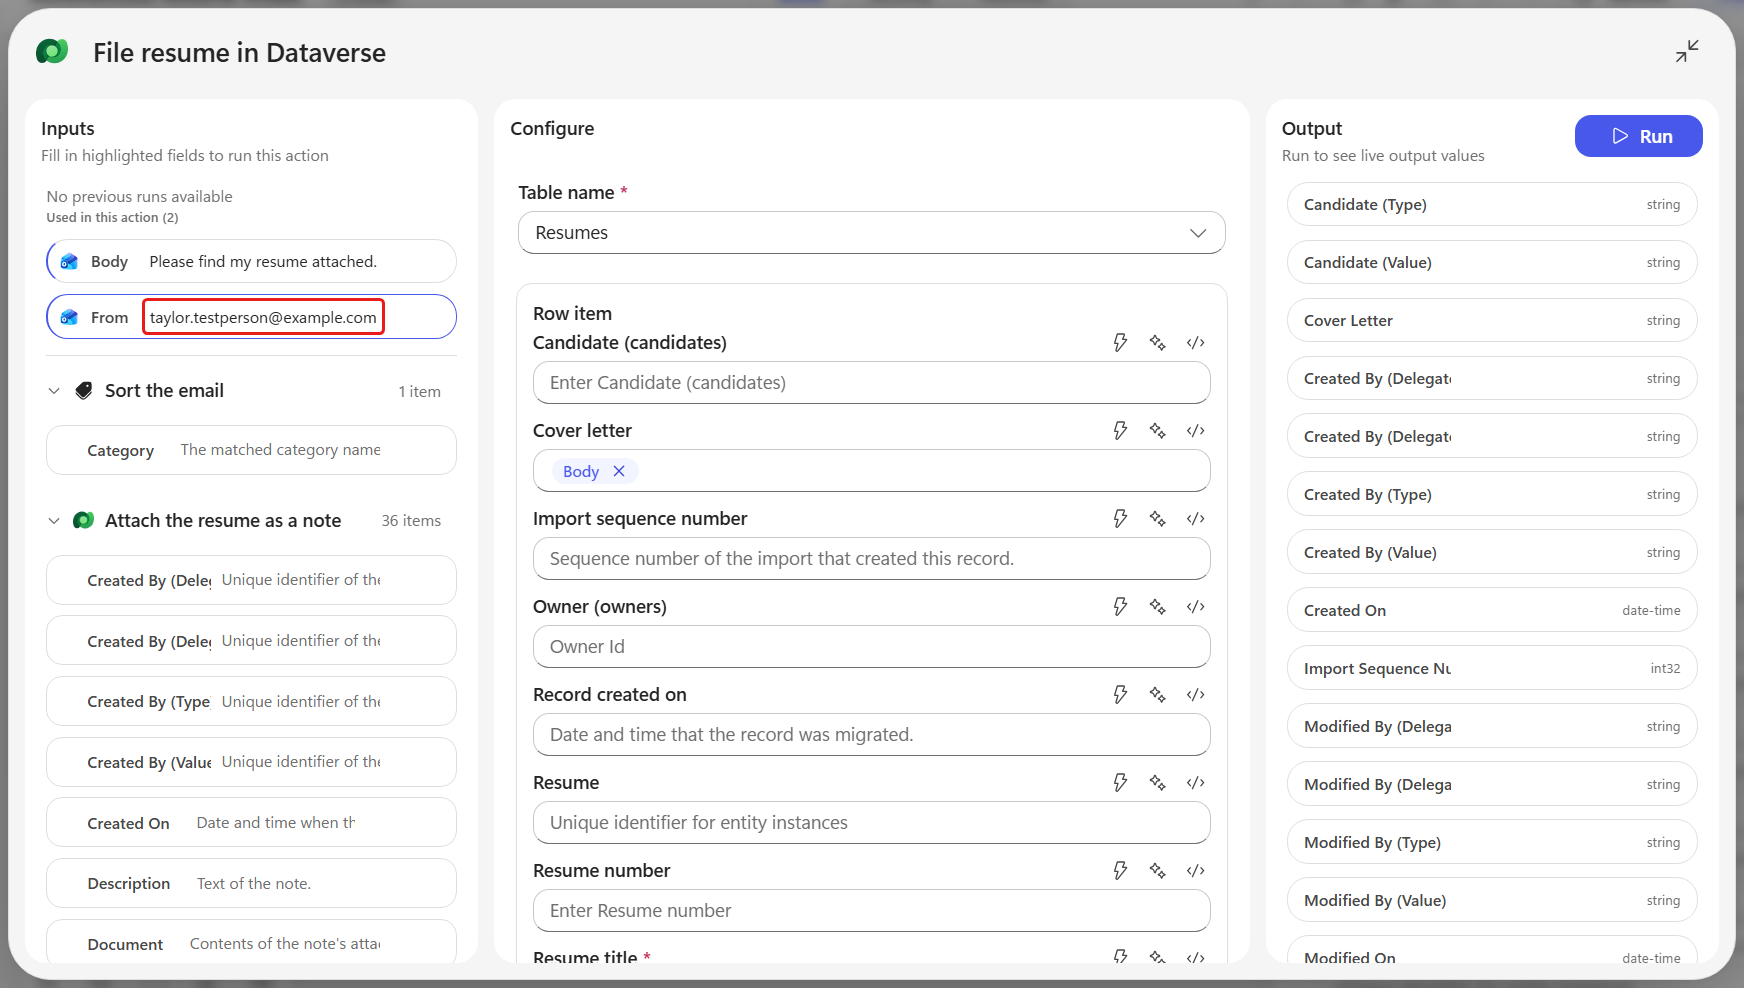
Select Run, then review the action's Output after the green check appears. The list shows every column on the row that was just created, with Cover Letter holding the sample Body value you entered. Scroll the Output list down to the Resume columns: Resume Number holds a generated value such as
R01064and Source Email Address holds your sample value, while Resume Title is blank. The PDF is not here either - it is stored as a note by the next step, and Run node runs only the action you selected.That row is real data. Open the Hiring Hub app afterwards - it is in the environment's app list, and Mission 01 has the full route if you need it - go to Resumes, select the new row, and delete it, so a half-filled resume does not sit in your Resumes list.
Why Resume Title comes out empty
Run node lets you type sample values for earlier steps, but not for the current item of a loop. Resume Title is mapped from
items('For_each_attachment')?['name'], so there is no box for it and the created row has a blank title. This check exercises the connection, the table, and the two trigger-driven columns, and the loop is covered by the full run below.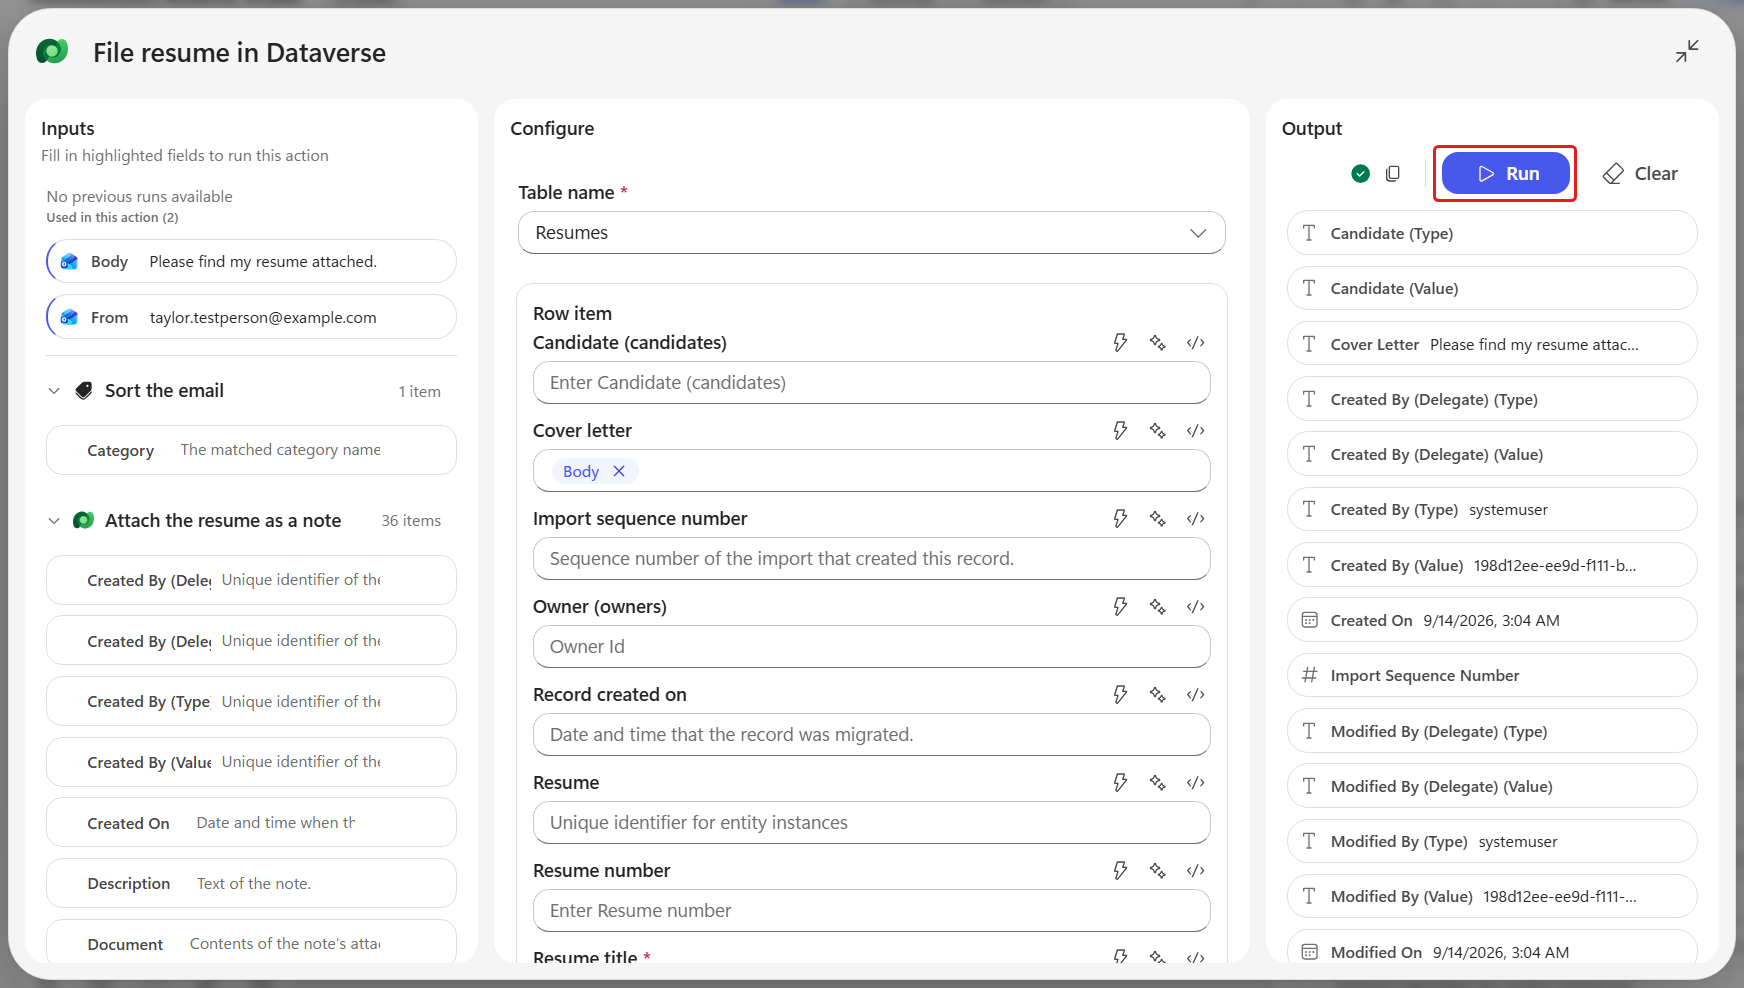
Now run the full end-to-end test, which is the only way to exercise the trigger and the note attachment together. On the command bar select Publish and wait for it to finish.
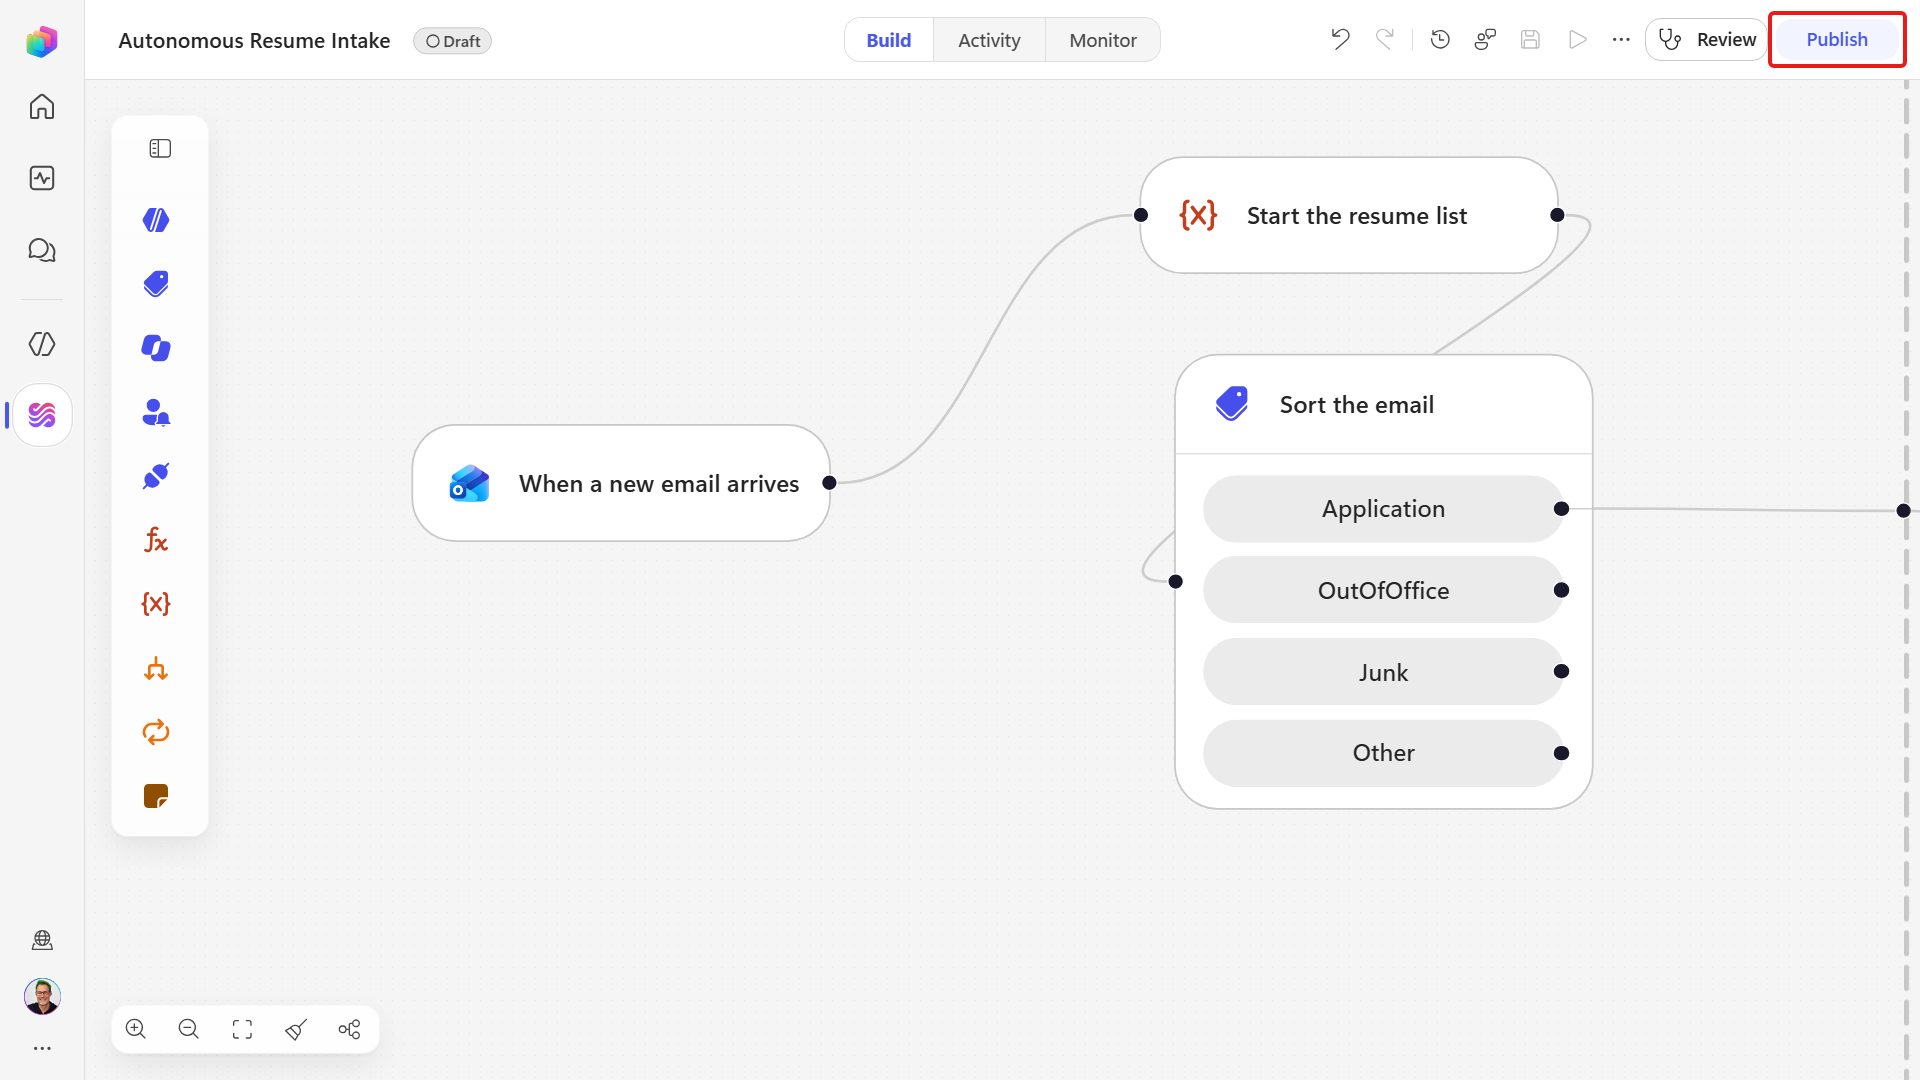
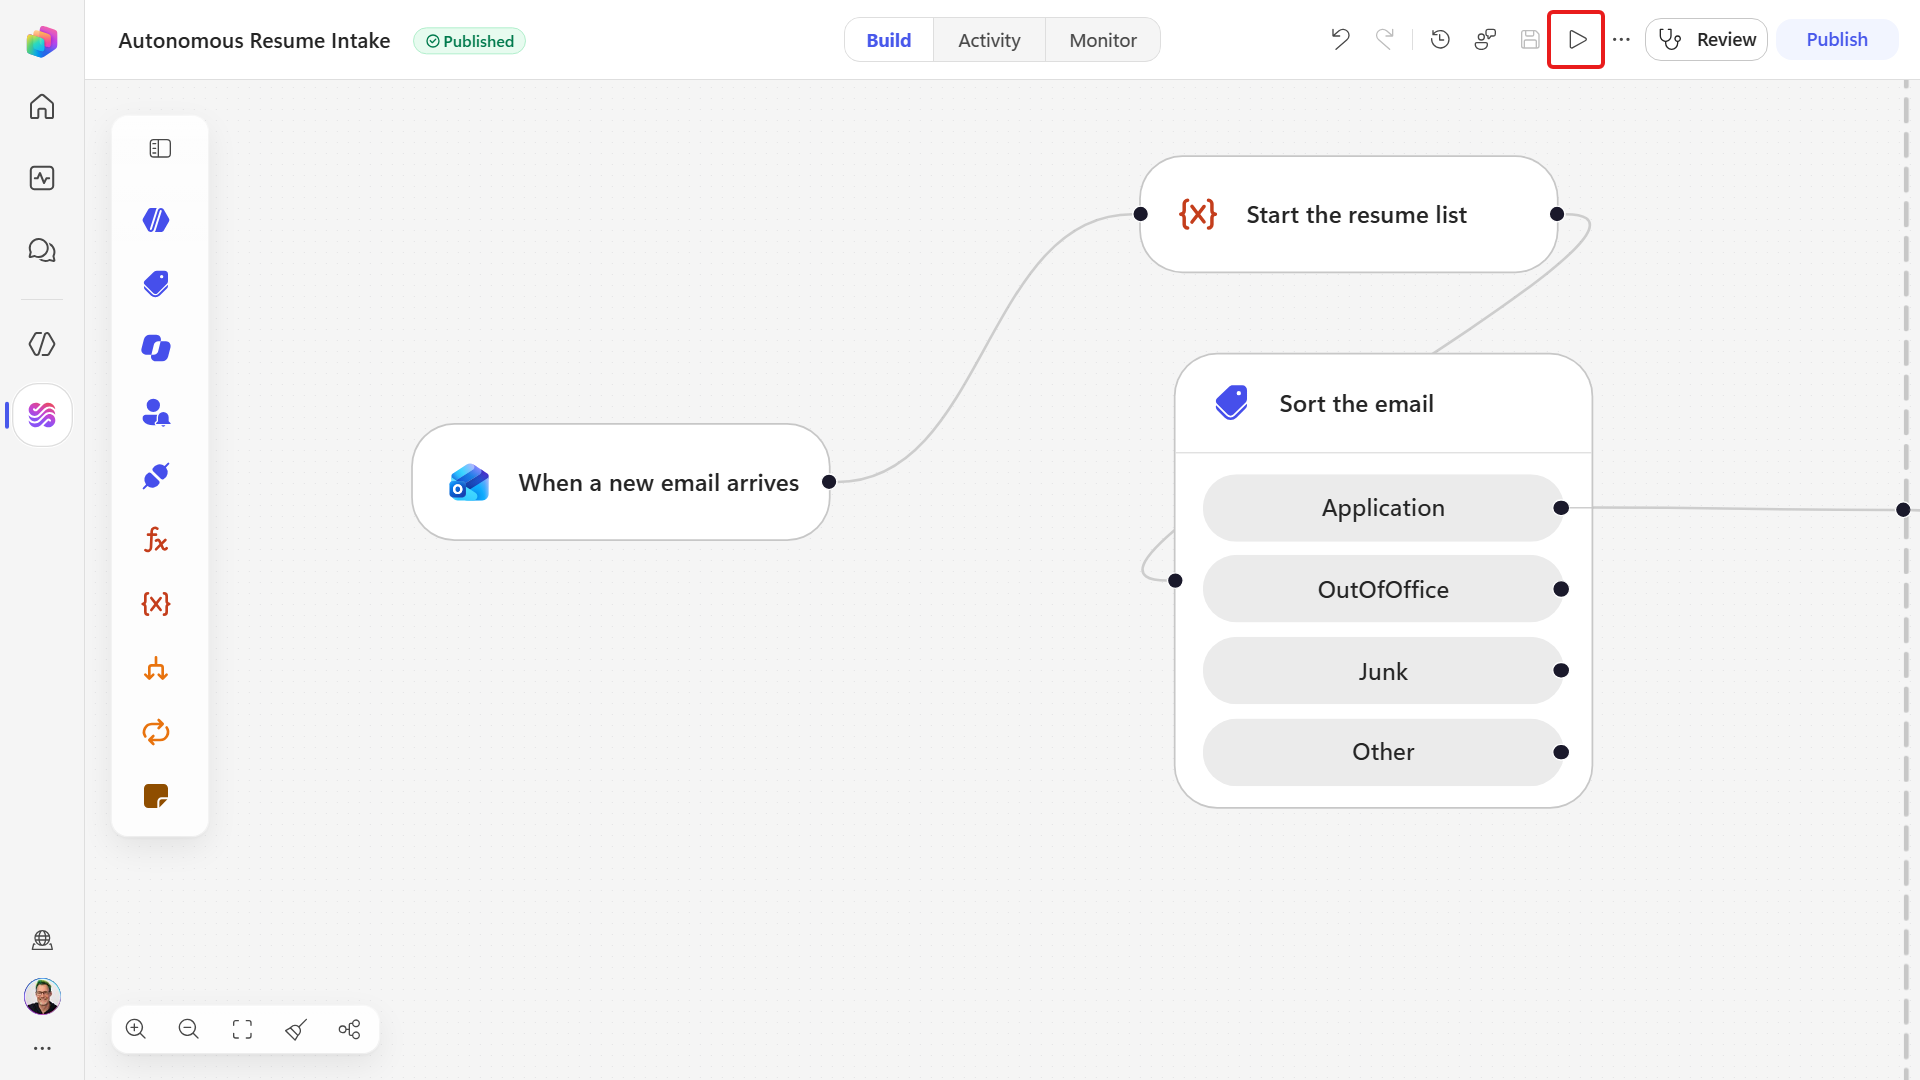
Select Run on the command bar - it is the triangular control immediately to the right of Save.
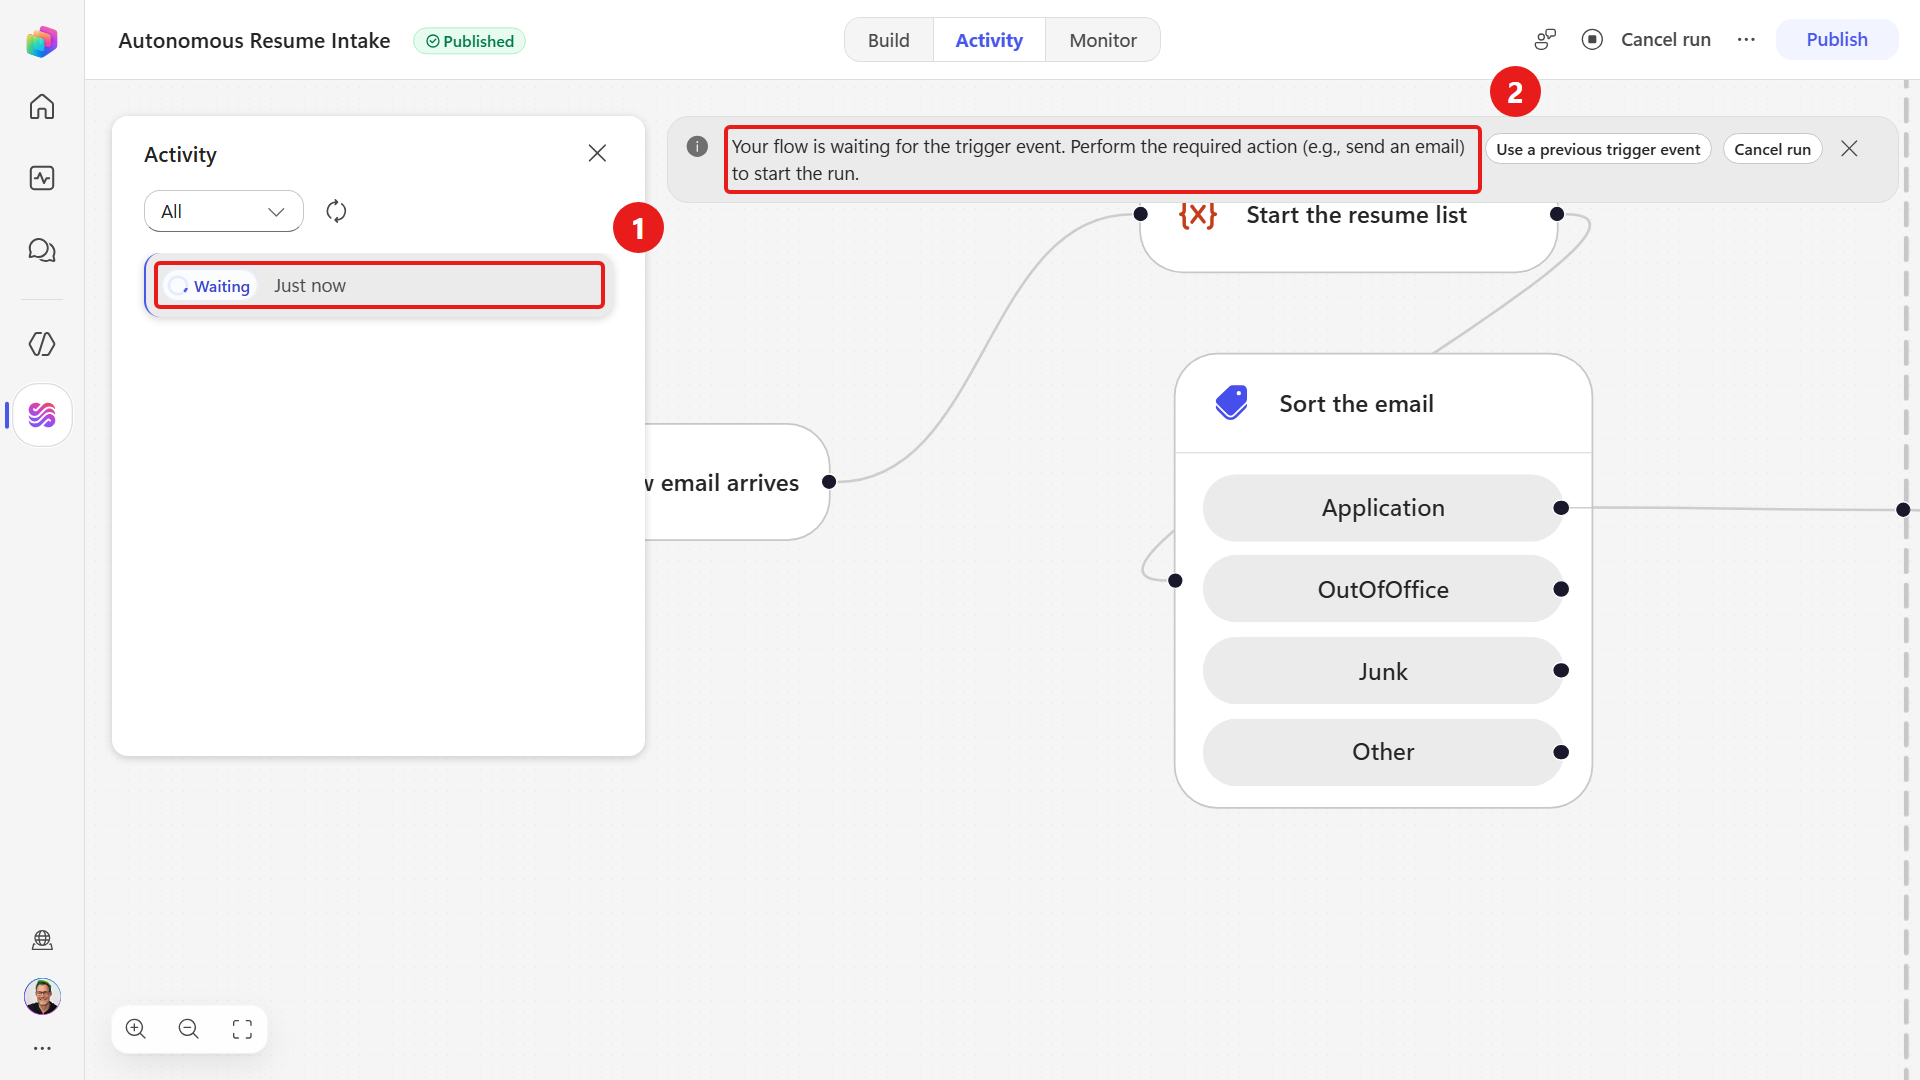
Wait for the banner that reads Your flow is waiting for the trigger event. Leave the workflow waiting while you send the email in the next step.
From another mailbox (or send to yourself if you don't have another mailbox to use), prepare an email to the monitored mailbox with
Applicationin the subject and one resume PDF attached - use one of the sample resumes you downloaded in Mission 05 - then select Send while the workflow is still waiting.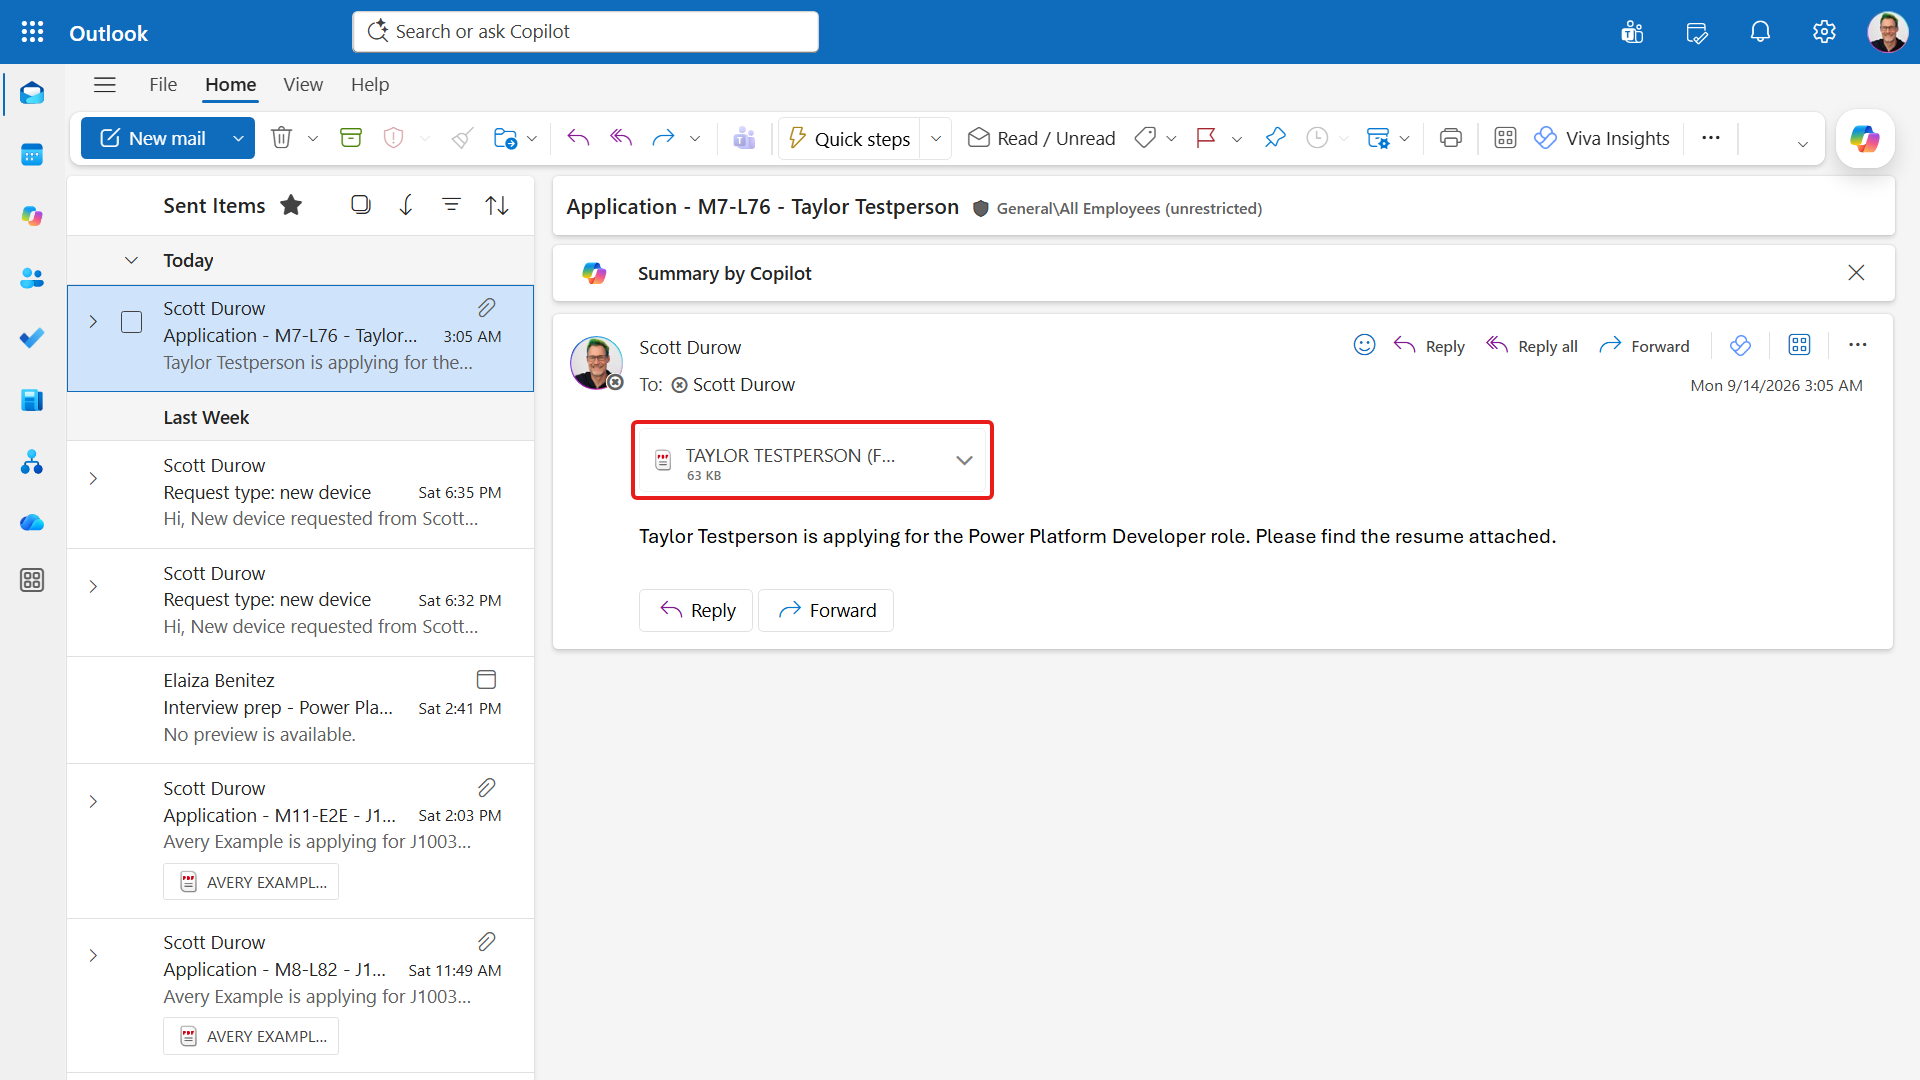
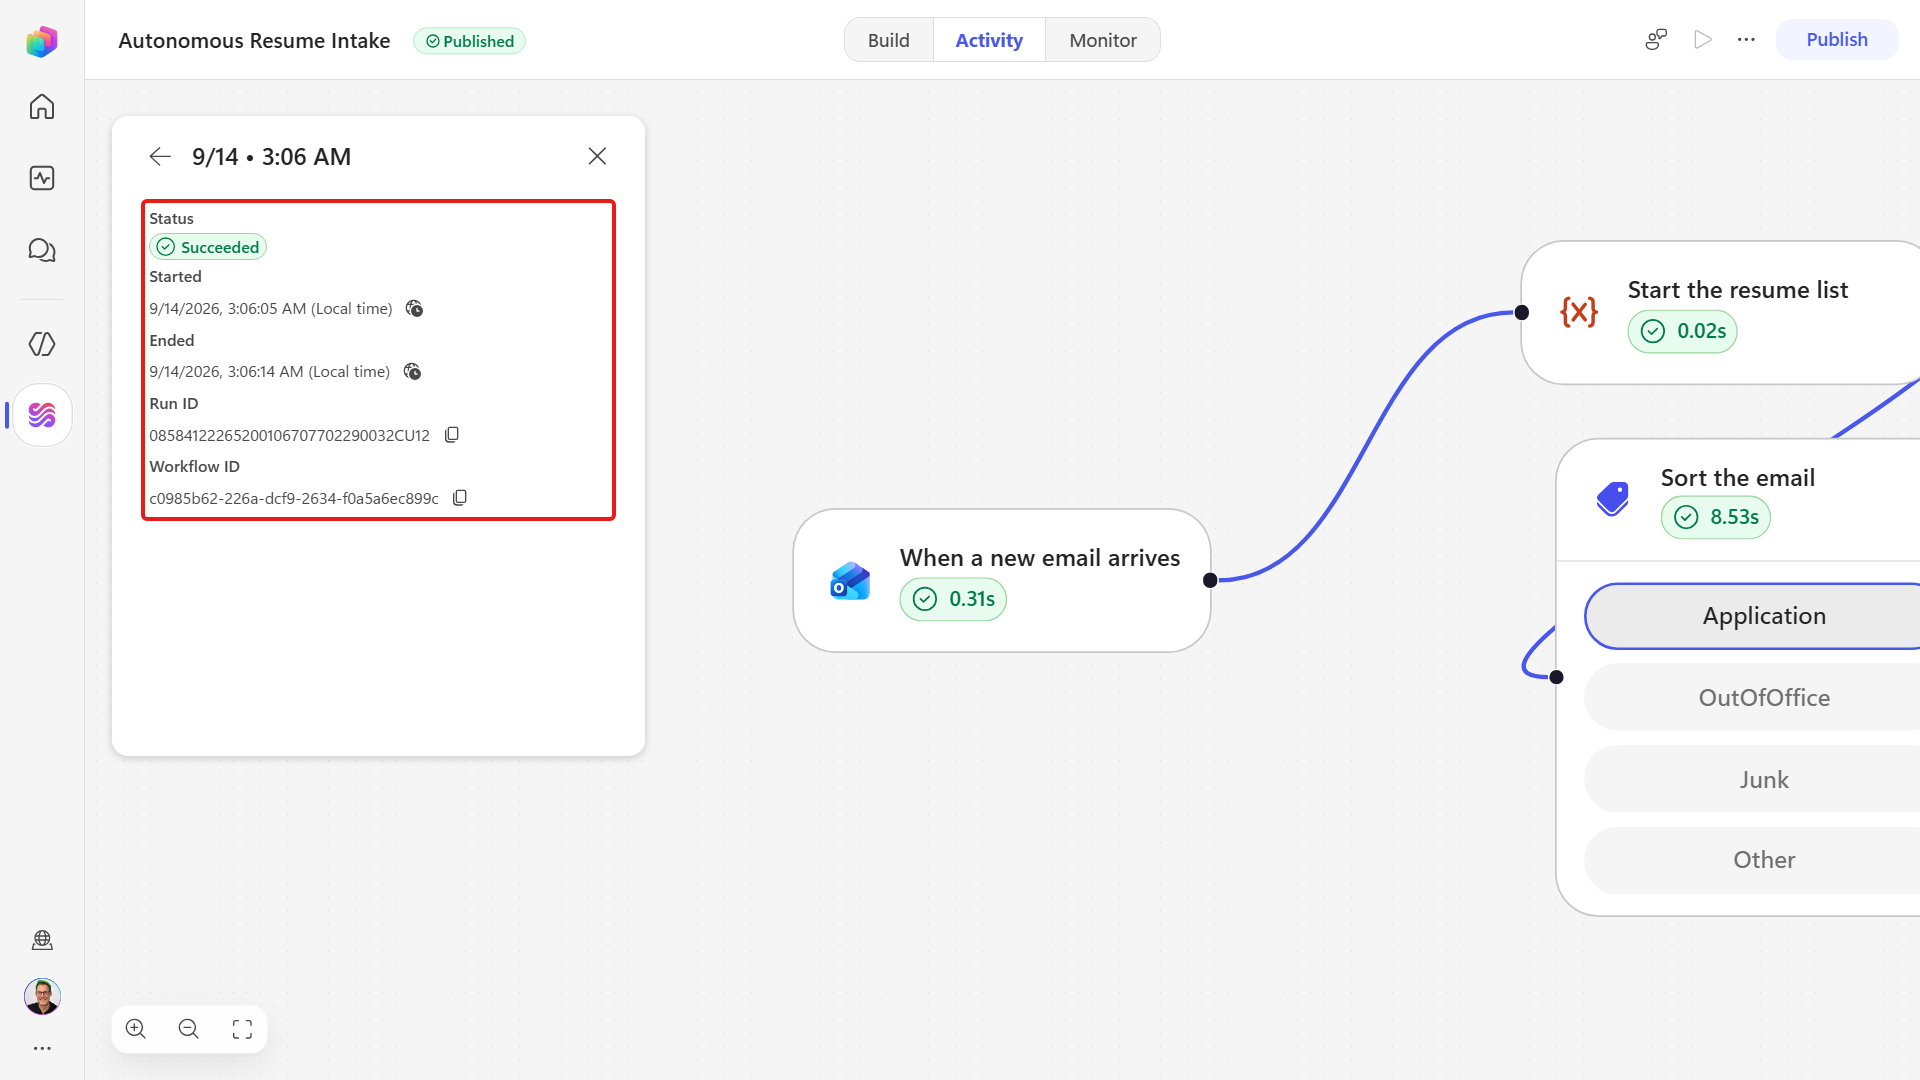
Wait for the trigger to poll. A brand-new connector trigger can take a couple of minutes on its first run. When it fires, a run appears in the Activity tab.
Why your test email may never start a run
The When a new email arrives trigger node checks the mailbox on a schedule rather than the moment mail arrives, and it slows that schedule to once an hour while the mailbox is quiet. Publishing the workflow - or turning it off and on again - re-creates the subscription and moves its marker forward to the newest matching email without running anything, so an email you sent just before publishing is skipped. Restarting the workflow to "kick it" skips the next one too.
Two habits avoid the wait:
- Arm the trigger before you send, which is what the last two steps did. The banner reads "Your flow is waiting for the trigger event", so send your email while it is up and the run starts within a minute or so. After a page reload the Run button can lose its tooltip and label, but it is still the control immediately right of Save.
- Use Resubmit as your test loop. In the Activity tab choose Select runs, tick one previous run, then select Resubmit. It replays that run's real trigger payload - attachments and all - against your newly published definition, starting immediately. Send a fresh email only when you want to test the trigger itself. Select runs ticks every run, so clear the selection first or you will resubmit your whole run history at once.
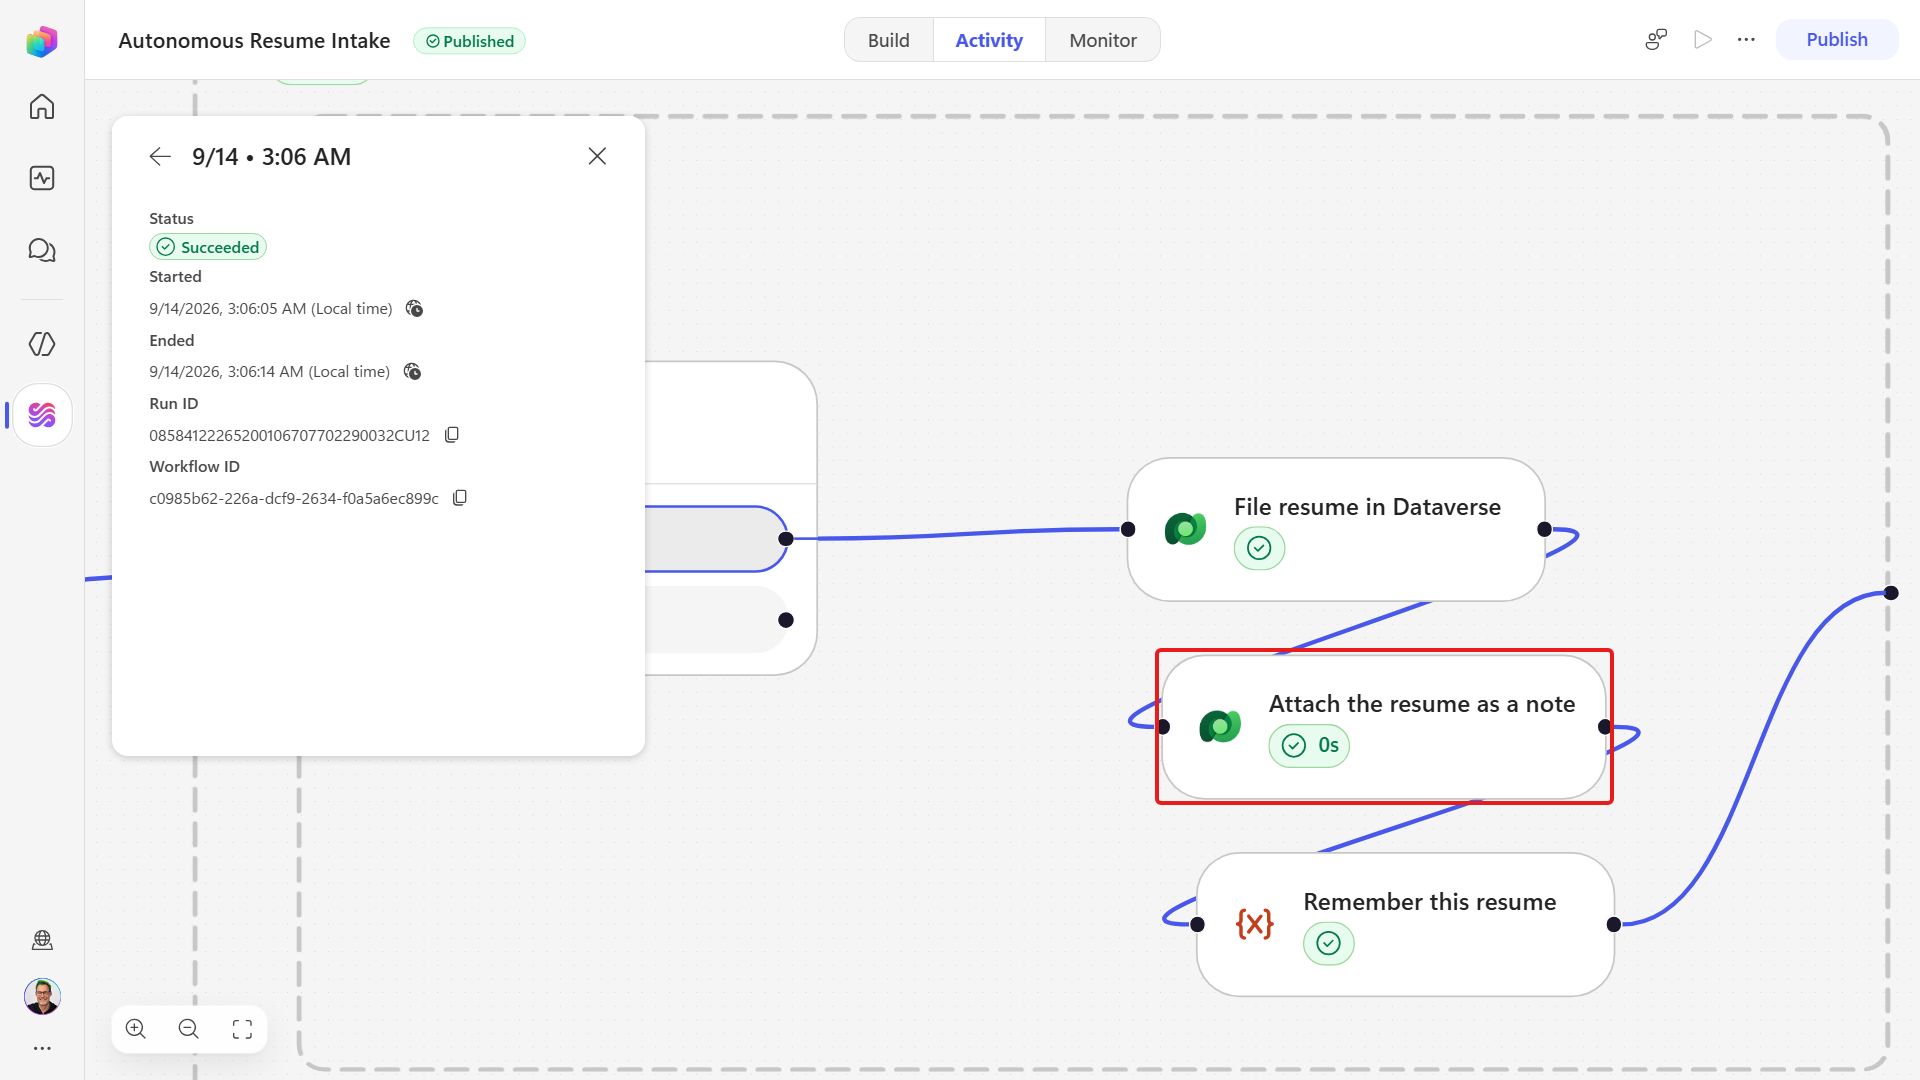
Open the Activity tab and select the newest run. Every node shows Succeeded. Expand the Process application path and confirm Is it a PDF?, File resume in Dataverse and Attach the resume as a note all show Succeeded.
Select the Attach the resume as a note node inside that run. Inspect its Inputs for the attachment's file name, MIME type, documentbody, and Resume link, then inspect its Outputs for an annotationid. Confirm the resulting Note and readable PDF in the steps below. Select Remember this resume and confirm it also shows Succeeded, because that step appended the Resume number, Note id, and file name to
ProcessedResumesfor the agent steps in the next mission.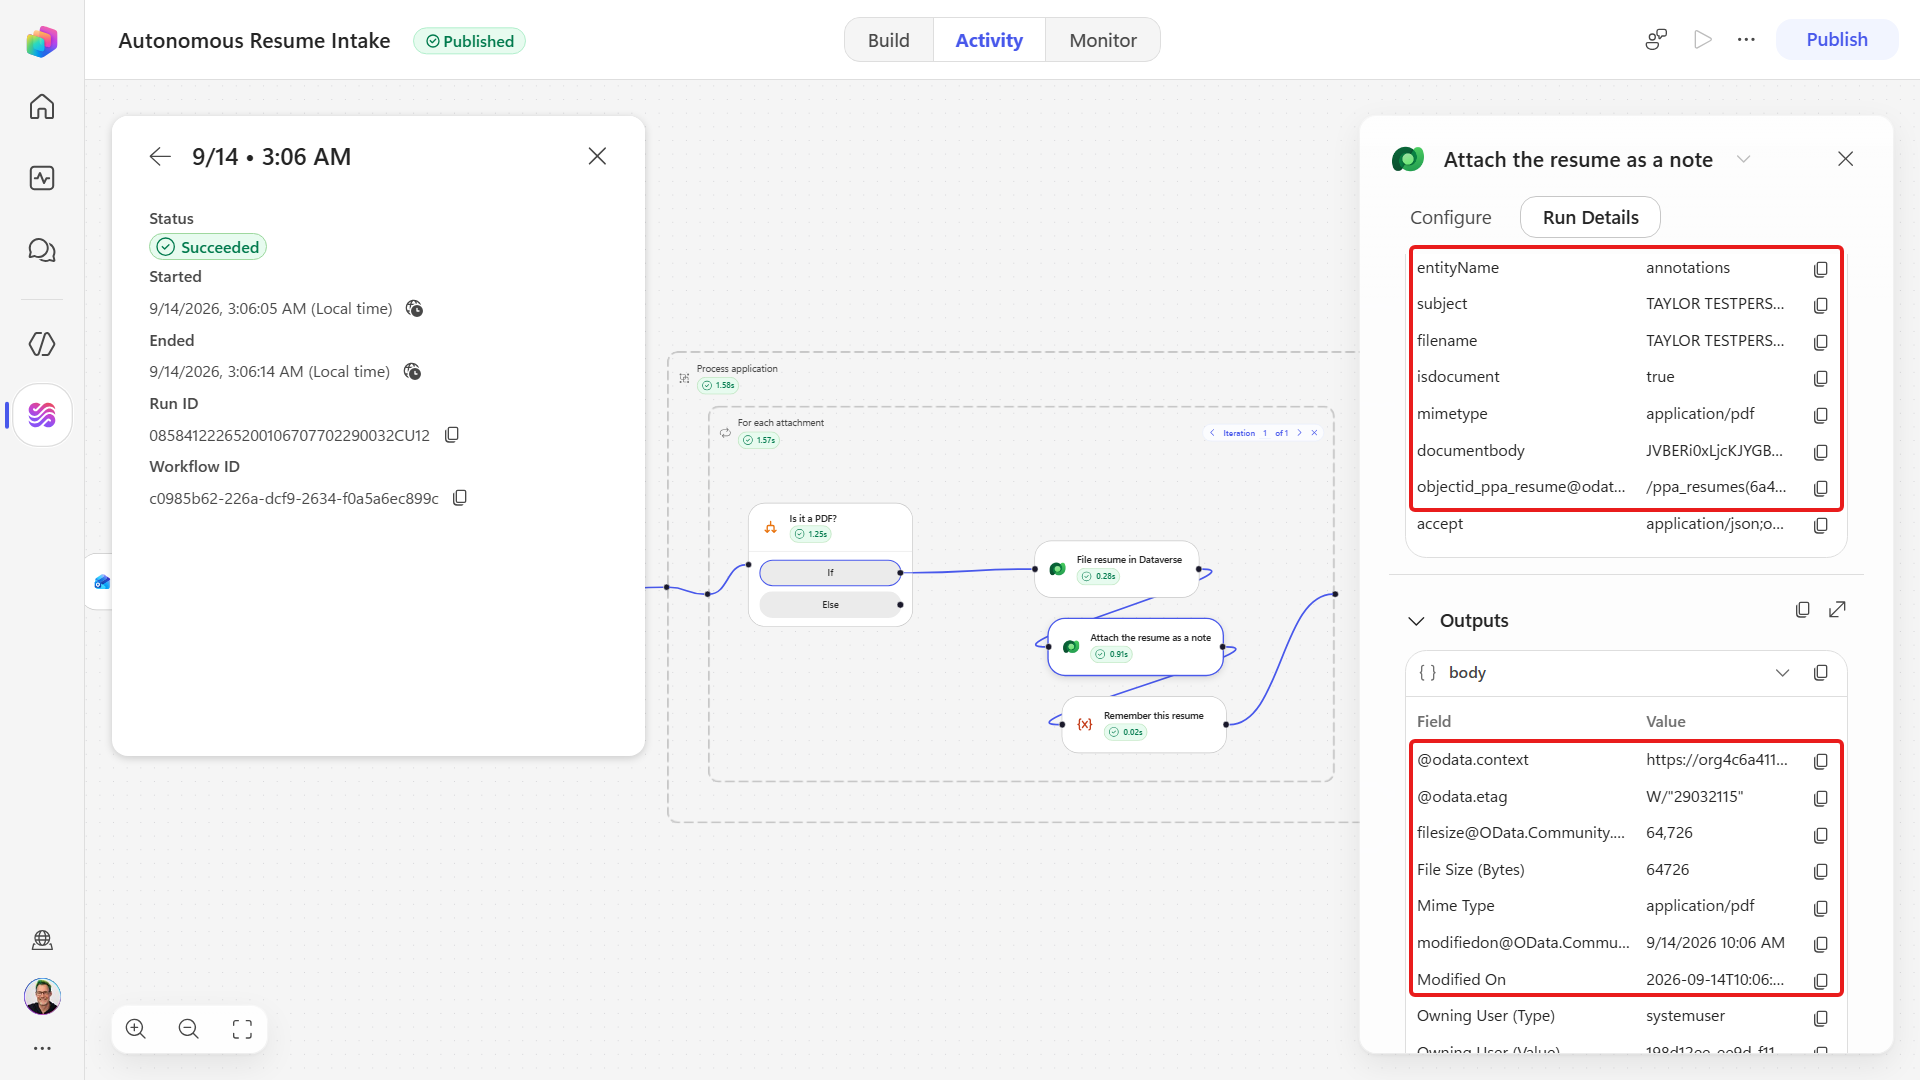
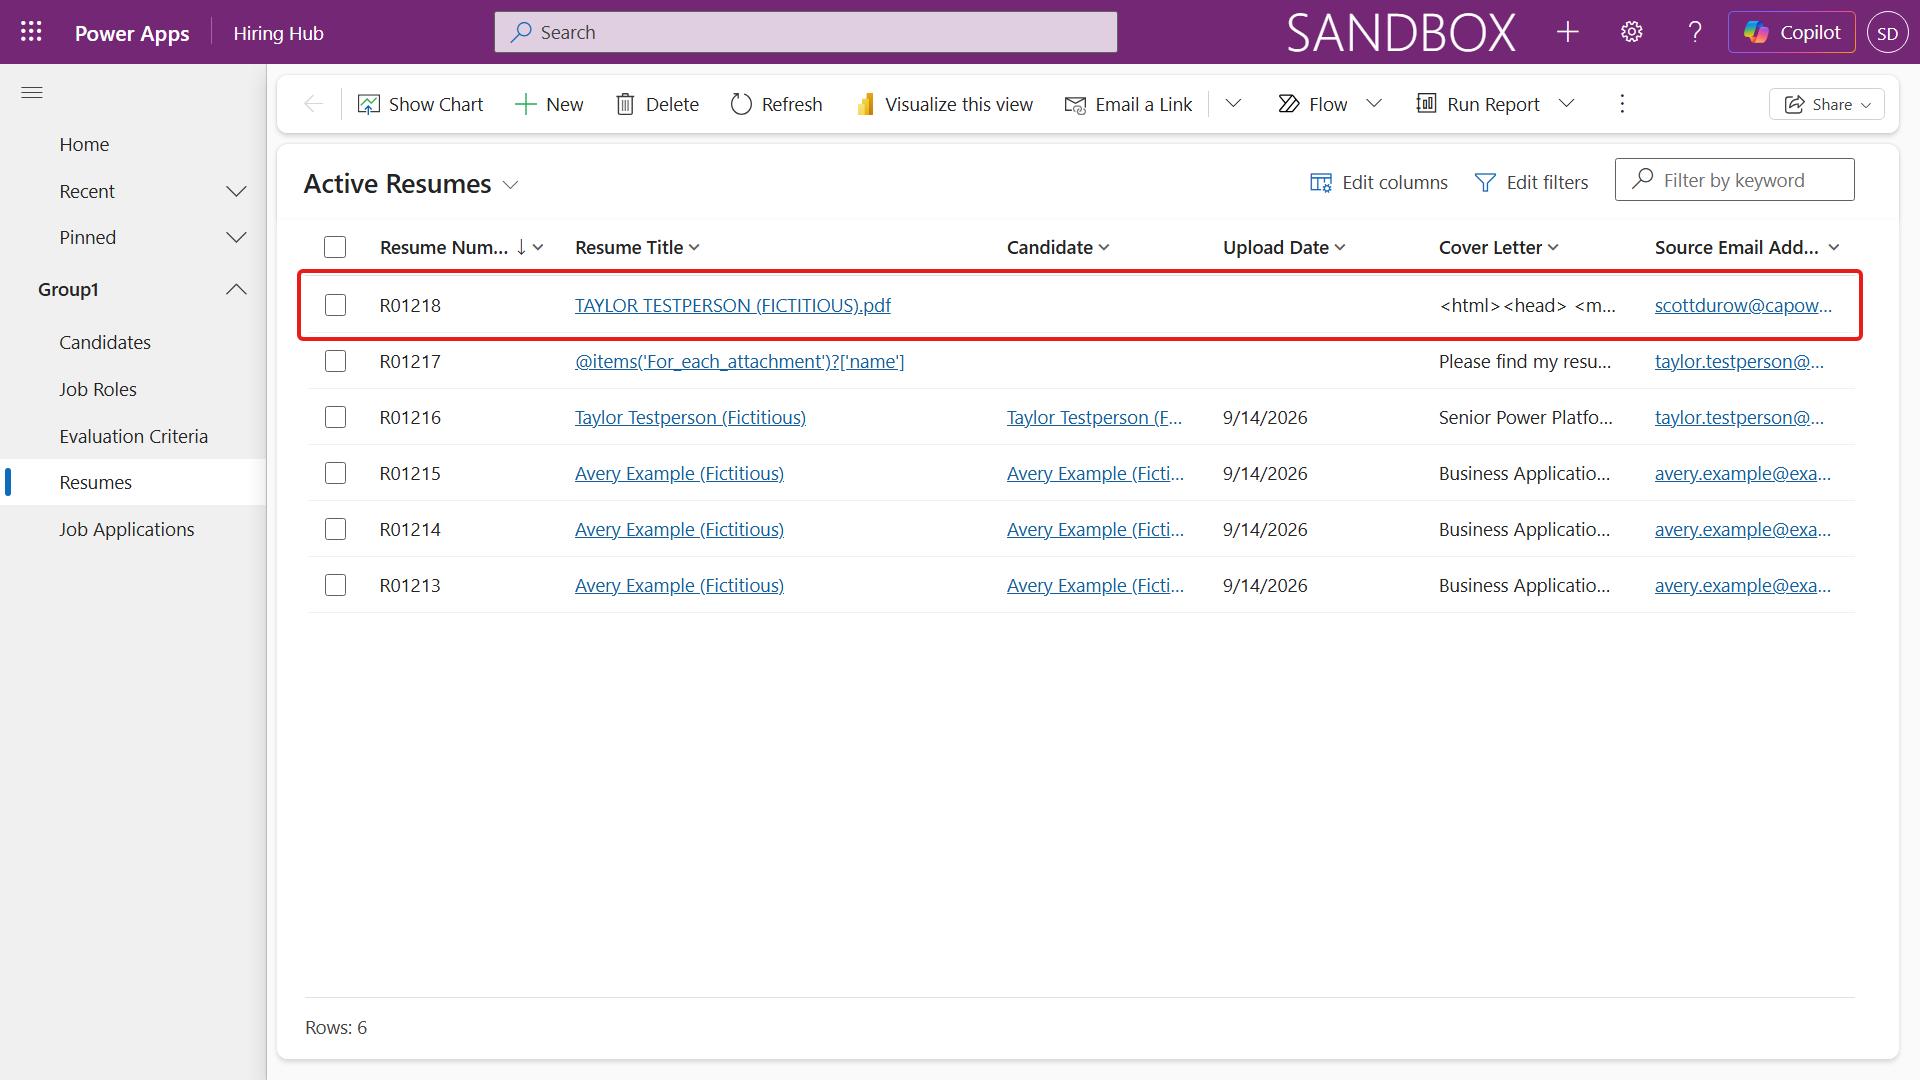
Open the Hiring Hub app and go to Resumes. The list is sorted by Resume Number descending, so the row the workflow just filed is at the top.
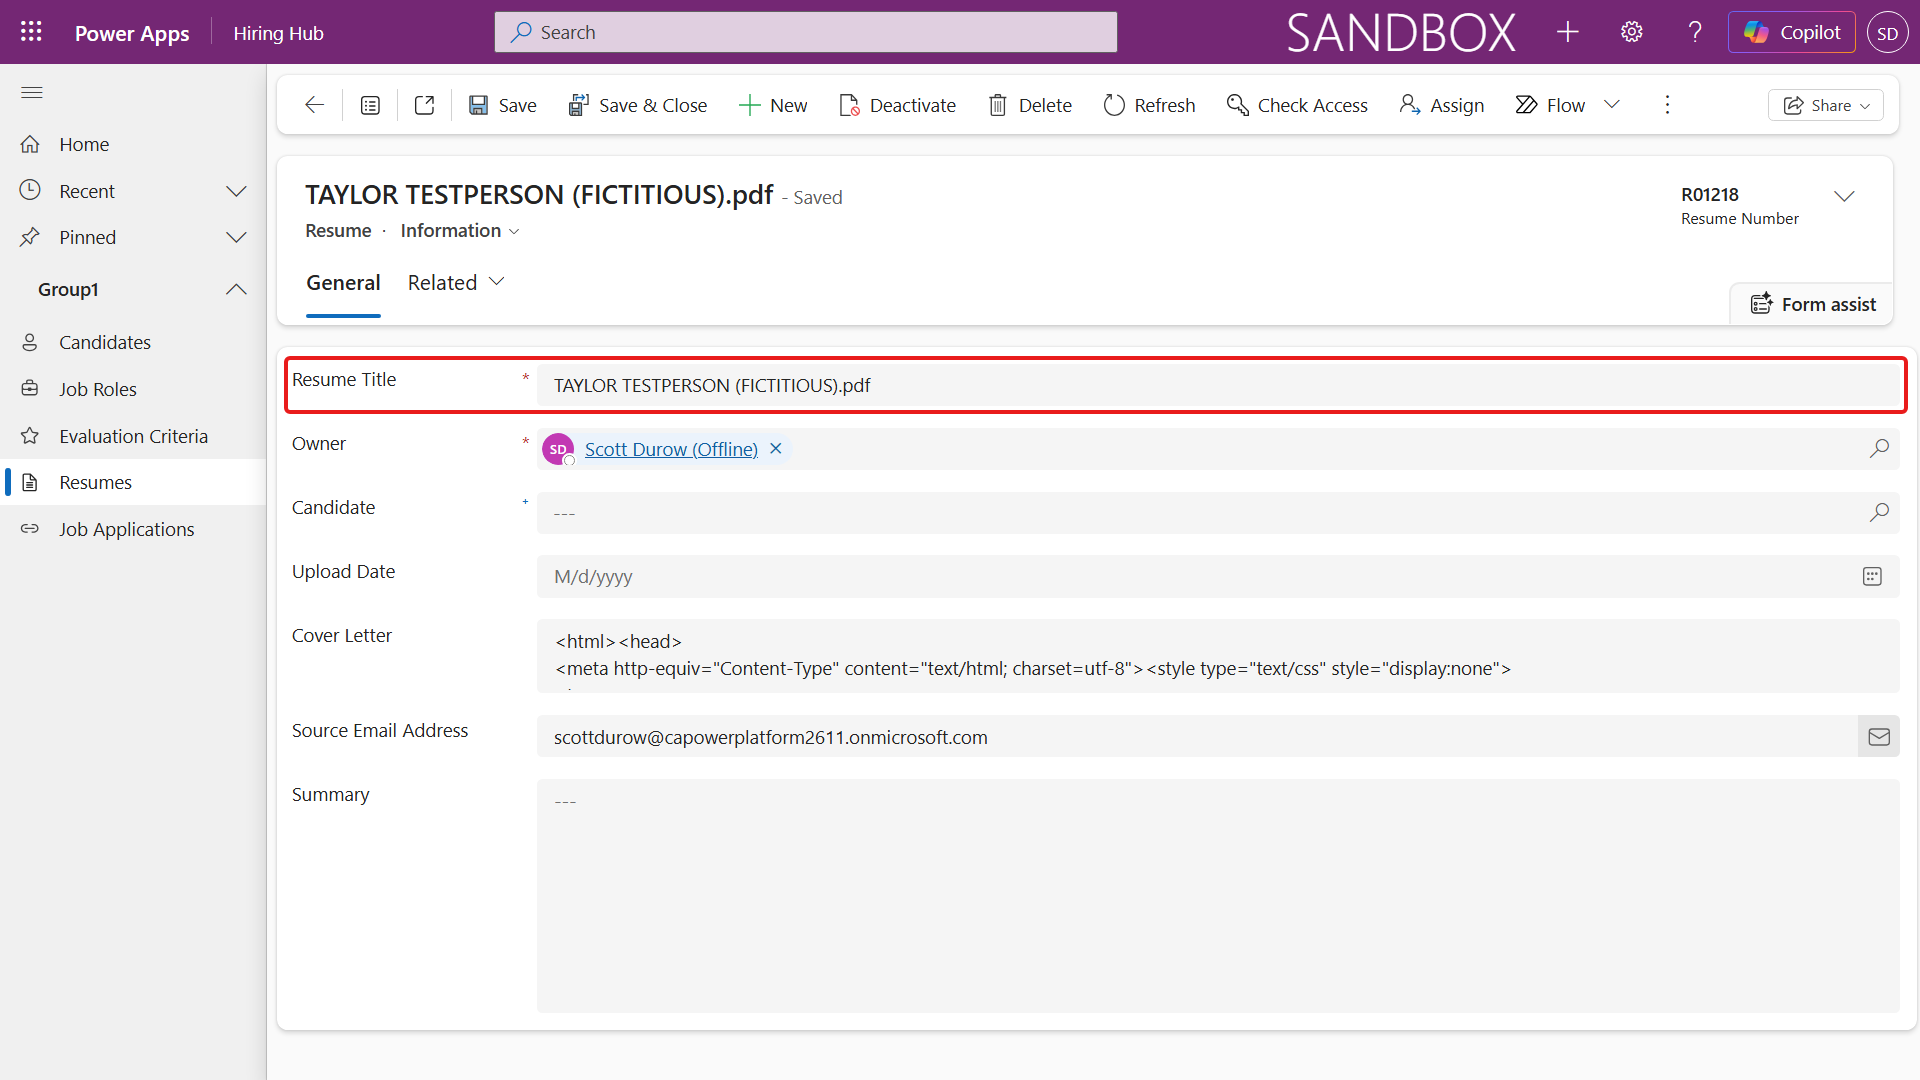
Open that row. Confirm Source Email Address matches the sender and Resume Title matches the attachment's file name. Cover Letter stores the email body as HTML; the screenshot shows its opening markup. Scroll within the field to inspect the message text and compare it with the email you sent.
Check the record's Attachments subgrid: the attached PDF is listed there as a note, named after the file.
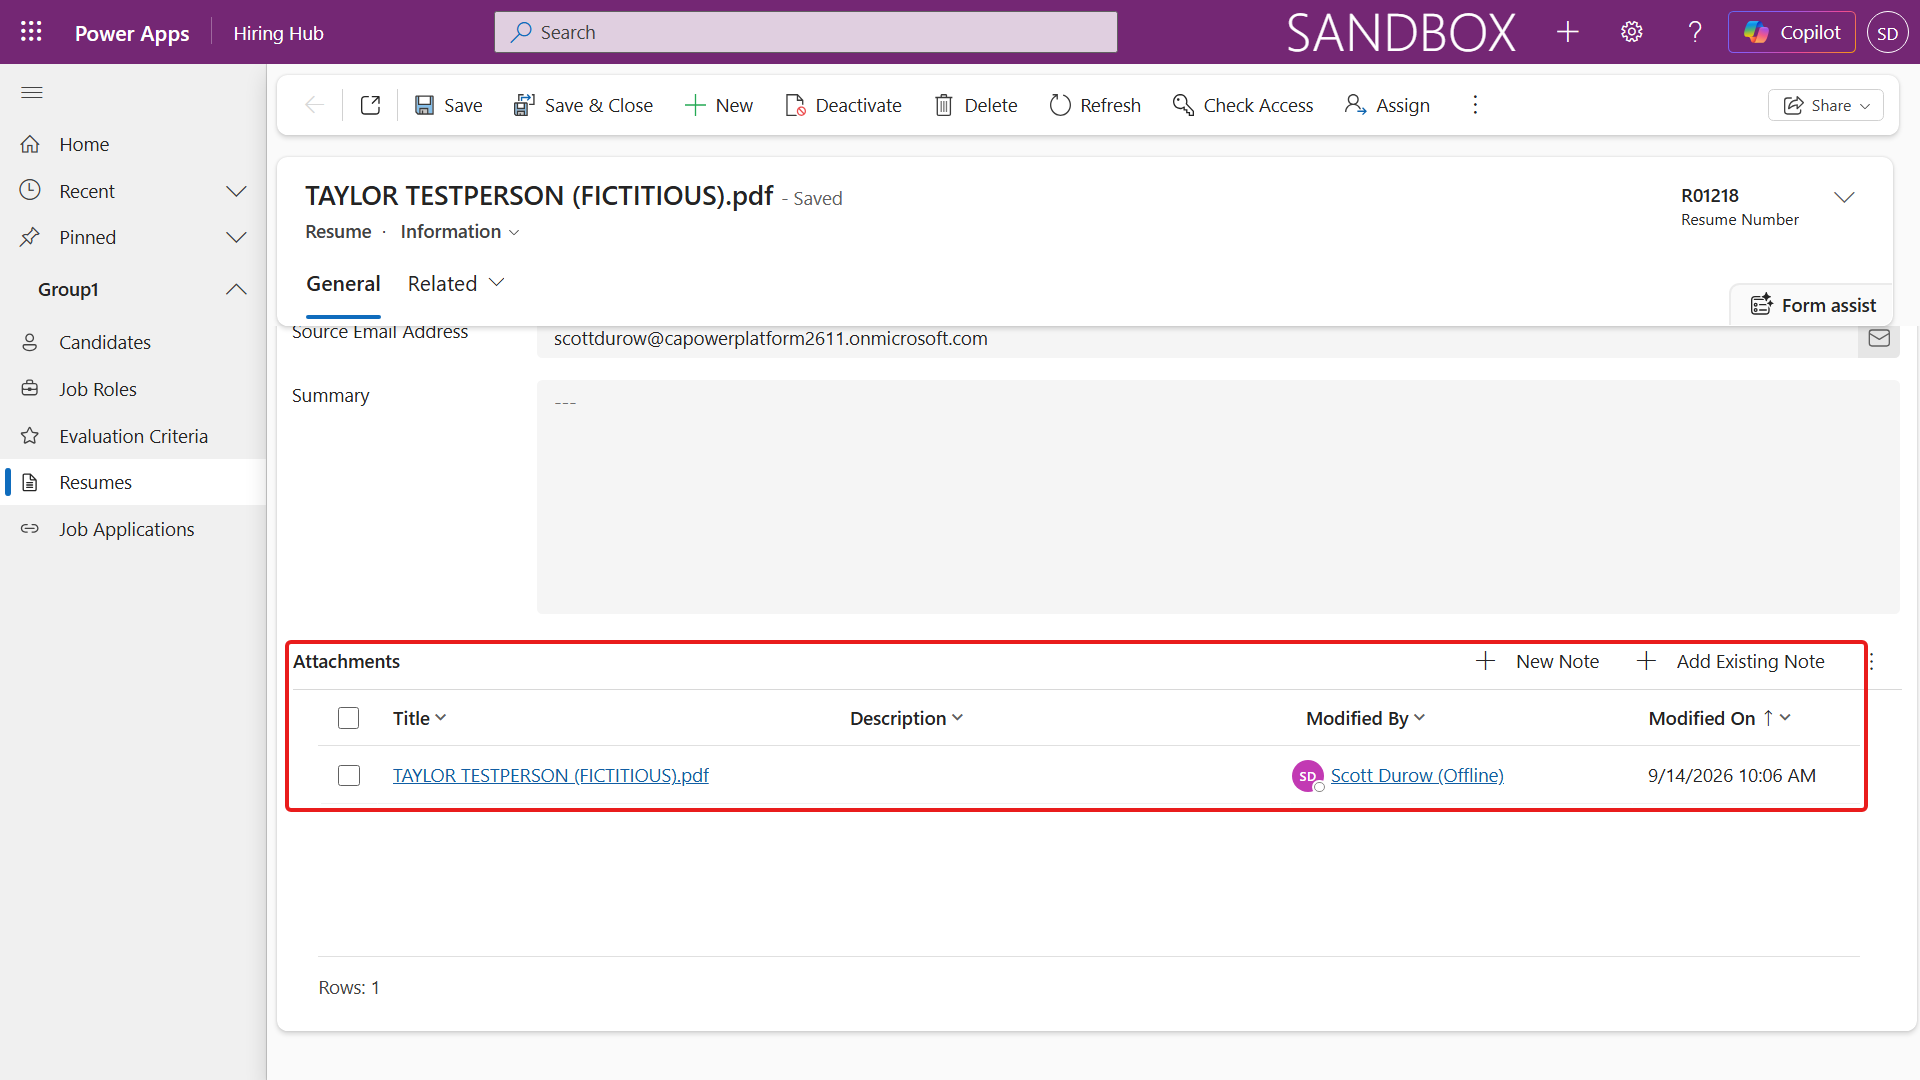
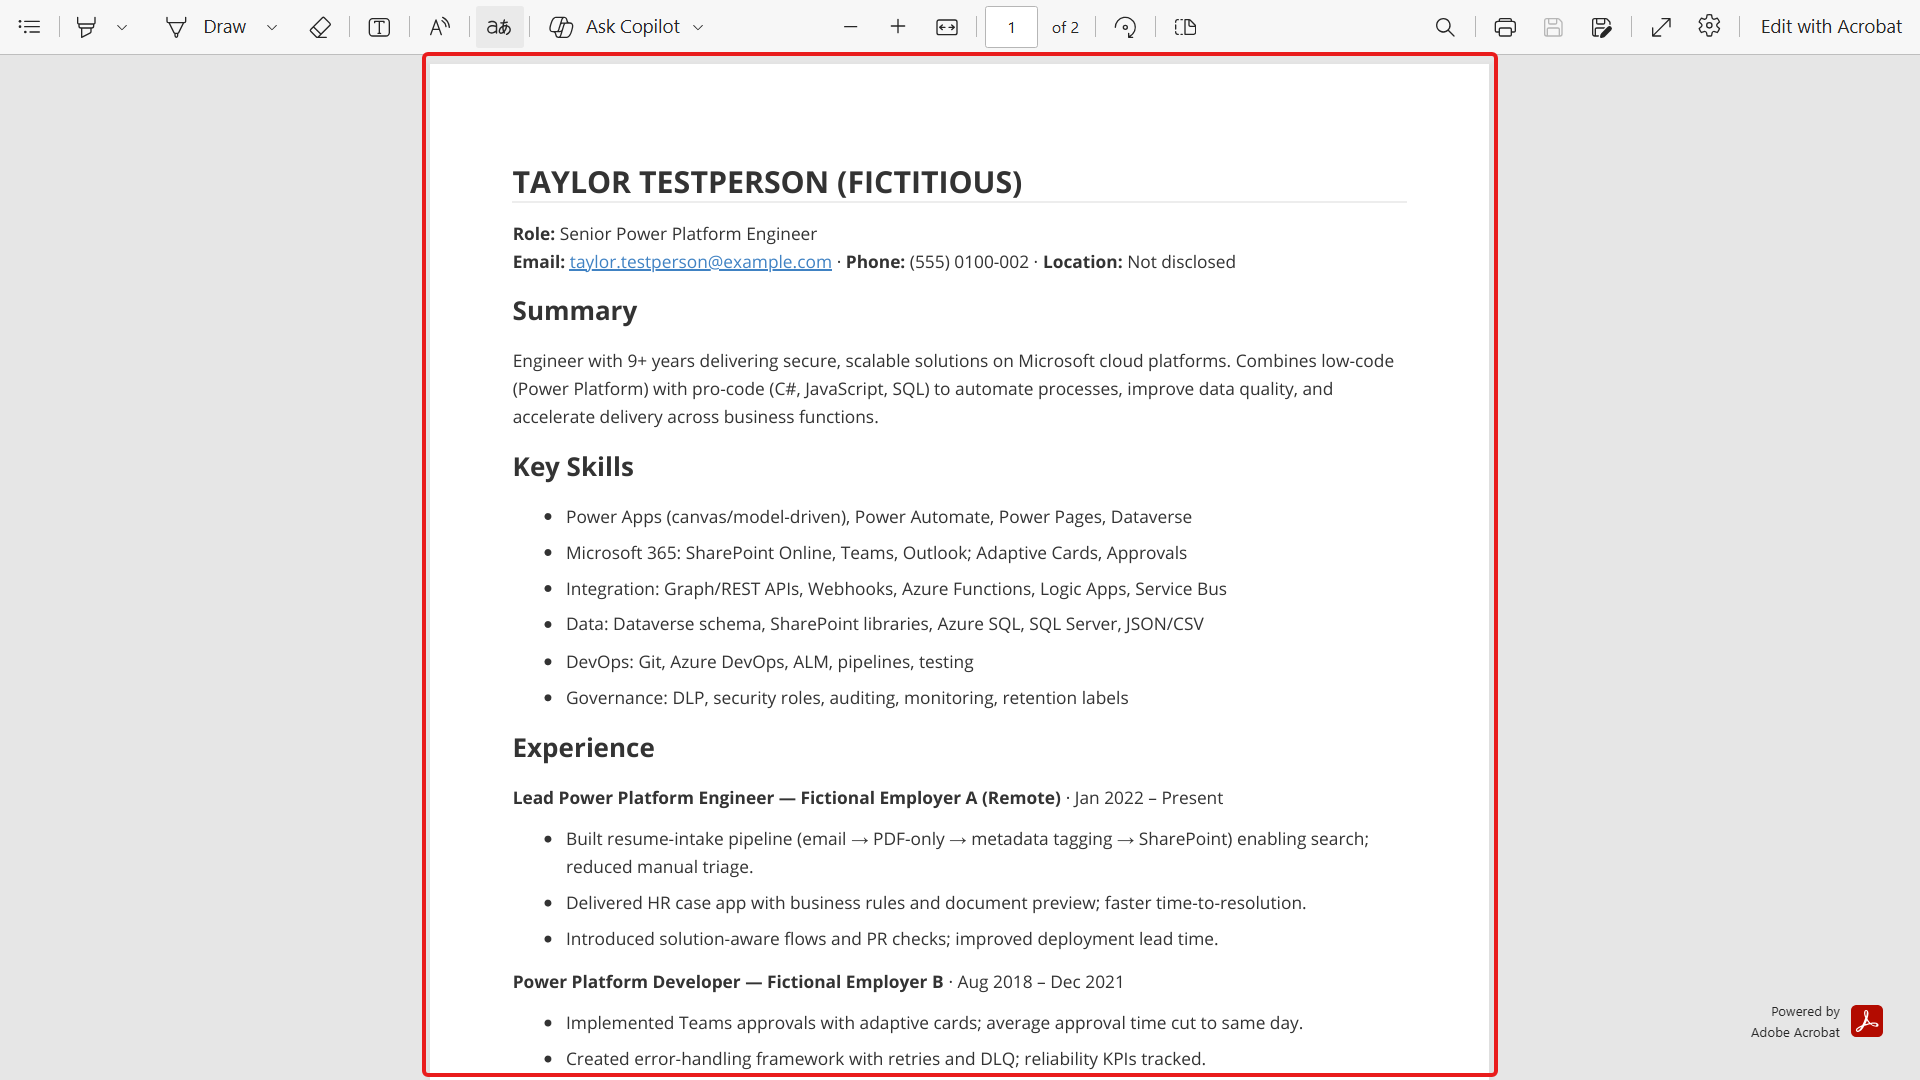
Open that note, select the linked file name, then open the downloaded PDF. The document viewer should show the same resume that arrived with the email. A run can show Succeeded even when a value was mapped to the wrong field, so this last look at the created row, its note, and the readable PDF is what actually proves the mapping.
✅ Mission Complete
An email carrying a resume now files itself in Dataverse without anyone watching it happen.
You can now:
✅ Workflow automation: You built an email-triggered workflow entirely inside Copilot Studio.
✅ Inbox screening: You used a Classify node to route messages by intent, and left the branches that should do nothing empty.
✅ Scoped, guarded filing: You grouped the filing work in a Scope, looped over every attachment, and accepted only PDFs.
✅ Dataverse writes from a workflow: You created a Resume row and attached the original PDF to it as a note.
✅ Node-level testing: You exercised single nodes with Run node and read a whole run back in the Activity tab.
⏭️ Move to Add Agents to a Workflow mission
📚 Tactical Resources
🔗 Office 365 Outlook connector reference
🔗 Microsoft Dataverse connector reference
🔗 Copilot Studio documentation