第5章:アプリ設定 (Configuration)
- appsettings.json / 環境別設定(Development / Production 等)
- 環境変数 / コマンドライン引数 / シークレット管理
- IOptions<T> / オプションバインディング
- 設定のオーバーライド順序と仕組み
- 参考ドキュメント
1. appsettings.json / 環境別設定(Development / Production 等)
Section titled “1. appsettings.json / 環境別設定(Development / Production 等)”appsettings.json の基本構造
Section titled “appsettings.json の基本構造”ASP.NET Core アプリケーションでは、設定値を JSON ファイル や環境変数、コマンドライン引数など複数のソースから読み込む仕組みが標準で組み込まれています。
最も基本となる設定ファイルが appsettings.json であり、ASP.NET Core プロジェクトテンプレートにより最初から生成されています。
appsettings.json は JSON 形式の階層構造 を持ち、ログレベルや接続文字列、アプリケーション固有の設定値をプロジェクトルートに配置して管理します。
次に示すのは既定で作成される appsettings.json です。
{ "Logging": { "LogLevel": { "Default": "Information", "Microsoft.AspNetCore": "Warning" } }, "AllowedHosts": "*"}独自の設定値は次のように設定します。
{ "Logging": { "LogLevel": { "Default": "Information", "Microsoft.AspNetCore": "Warning" } }, "AllowedHosts": "*" "AllowedHosts": "*", "ConnectionStrings": { "DefaultConnection": "Server=localhost;Database=MyDb;Trusted_Connection=True;" }, "MyFeature": { "Title": "Hello", "Enabled": true, "MaxItems": 100 }}appsettings.json はアプリケーションの起動時に読み込まれ、変更を検知して自動的に再読み込みを行う reloadOnChange: true 設定が既定で有効です。
なお appsettings.json はソースコードリポジトリにコミットされるため、データベースのパスワードや API キーなどの機密情報は記述しないよう注意が必要です(機密情報の管理については「2. 環境変数 / コマンドライン引数 / シークレット管理」節を参照)。
IConfiguration による設定値の取得
Section titled “IConfiguration による設定値の取得”appsettings.json の設定値はアプリケーション内で IConfiguration インターフェイスを通じて取得できます。
階層構造を持つキーは コロン( : )区切り で指定します。
例えば上記の appsettings.json の場合、 "MyFeature:Title" で "Hello" が取得できます。
再掲
{ "Logging": { "LogLevel": { "Default": "Information", "Microsoft.AspNetCore": "Warning" } }, "AllowedHosts": "*", "ConnectionStrings": { "DefaultConnection": "Server=localhost;Database=MyDb;Trusted_Connection=True;" }, "MyFeature": { "Title": "Hello", "Enabled": true, "MaxItems": 100 }}// Program.cs(または DI 経由でサービスやコントローラーに注入して使用)var builder = WebApplication.CreateBuilder(args);
// IConfiguration には builder.Configuration でアクセスするvar title = builder.Configuration["MyFeature:Title"]; // "Hello"var maxItems = builder.Configuration.GetValue<int>("MyFeature:MaxItems"); // 100var connStr = builder.Configuration.GetConnectionString("DefaultConnection"); // 接続文字列(ConnectionStrings:DefaultConnection の省略形)GetValue<T>(key) はキーに対応する値を指定した型で取得するメソッドです。キーが存在しない場合は型の既定値を返します。
GetConnectionString(name) は appsettings.json 内の ConnectionStrings:{name} を読み込む省略記法です。
また、 GetSection(key) でネストしたセクションを IConfigurationSection として取り出し、さらにそのセクション配下のキーを参照することもできます。
// セクションを取り出してキーを参照する例var section = builder.Configuration.GetSection("MyFeature");var enabled = section.GetValue<bool>("Enabled"); // true環境別設定ファイル
Section titled “環境別設定ファイル”ASP.NET Core では、 appsettings.json に加え appsettings.{Environment}.json という環境別設定ファイルが利用できます。
例えば appsettings.Development.json や appsettings.Production.json を用意することで、実行環境ごとに設定値を上書きできます。
📁 プロジェクトルート/├── 📄 appsettings.json # 全環境共通の基本設定├── 📄 appsettings.Development.json # 開発環境でのみ上書きされる設定├── 📄 appsettings.Production.json # 本番環境でのみ上書きされる設定└── 📄 appsettings.Staging.json # ステージング環境でのみ上書きされる設定(任意)環境別設定ファイルは基本の appsettings.json の 上書き(マージ) として機能します。
同じキーがある場合は環境別ファイルの値が優先され、 appsettings.json にしかないキーはそのまま維持されます。
例えば appsettings.Development.json で接続文字列だけ開発用 DB に書き換えれば、その他の設定は appsettings.json を引き継ぎます。
// appsettings.Development.json(開発環境専用の上書き){ "Logging": { "LogLevel": { "Default": "Debug" } }, "ConnectionStrings": { "DefaultConnection": "Server=localhost;Database=MyDb_Dev;Trusted_Connection=True;" }}実行環境の切り替え
Section titled “実行環境の切り替え”読み込む環境別設定ファイルは実行環境名(EnvironmentName)によって決まり、ローカル開発では環境変数 ASPNETCORE_ENVIRONMENT を使って指定するのが一般的です。
この変数に Development / Staging / Production などの値を設定することで、対応する appsettings.{Environment}.json が読み込まれます。
未設定の場合は Production として動作します。
ASPNETCORE_ENVIRONMENT はローカル開発では Properties/launchSettings.json で管理するのが一般的です(詳しくは 第2章:ソリューションとプロジェクト構成 - デバッグ設定・起動構成の管理 を参照)。
// Properties/launchSettings.json(抜粋){ "profiles": { "https": { "commandName": "Project", "dotnetRunMessages": true, "launchBrowser": true, "applicationUrl": "https://localhost:7001;http://localhost:5001", "environmentVariables": { "ASPNETCORE_ENVIRONMENT": "Development" } } }}本番環境やコンテナー環境では、OS の環境変数として ASPNETCORE_ENVIRONMENT に Production を設定します。
# Bash(Linux / macOS)export ASPNETCORE_ENVIRONMENT=Production# PowerShell(Windows)$env:ASPNETCORE_ENVIRONMENT = "Production"コード内で現在の実行環境を判定するには IWebHostEnvironment(または IHostEnvironment)を使用します。
// Program.cs でのアクセス例if (app.Environment.IsDevelopment()){ app.UseDeveloperExceptionPage(); // 開発環境専用の詳細エラーページを有効化}// DI 経由でコントローラーやサービスに注入して使う例public class MyService{ private readonly IWebHostEnvironment _env;
public MyService(IWebHostEnvironment env) { _env = env; }
public void DoSomething() { if (_env.IsProduction()) { // 本番環境のみの処理 } }}| 環境名 | IsDevelopment() | IsStaging() | IsProduction() |
|---|---|---|---|
Development | true | false | false |
Staging | false | true | false |
Production | false | false | true |
カスタム(例: Testing) | false | false | false |
カスタム環境名(例えば Testing や QA など)を使用することも可能です。その場合は app.Environment.IsEnvironment("Testing") のように IsEnvironment(name) で判定します。
2. 環境変数 / コマンドライン引数 / シークレット管理
Section titled “2. 環境変数 / コマンドライン引数 / シークレット管理”環境変数 は appsettings.json の設定値を上書きするための主要な手段の一つです。
コンテナー(Docker、Kubernetes)やクラウドプラットフォーム(Azure App Service、AWS など)でのデプロイ時に設定値を外部から注入する場合によく利用されます。
ASP.NET Core では環境変数で設定を定義する際、 階層的なキーの区切り文字として __(アンダースコア 2 つ) を使用します。
これは : が OS によっては環境変数のキー名として利用できない場合があるためです。
再掲
{ "Logging": { "LogLevel": { "Default": "Information", "Microsoft.AspNetCore": "Warning" } }, "AllowedHosts": "*", "ConnectionStrings": { "DefaultConnection": "Server=localhost;Database=MyDb;Trusted_Connection=True;" }, "MyFeature": { "Title": "Hello", "Enabled": true, "MaxItems": 100 }}Bash
# Bash(Linux / macOS)# appsettings.json の "MyFeature:Title" を上書きする環境変数export MyFeature__Title=OverrideValue
# 接続文字列を上書きするexport ConnectionStrings__DefaultConnection="Server=prod;Database=MyDb;"
PowerShell
# Windows(PowerShell)$env:MyFeature__Title = "OverrideValue"$env:ConnectionStrings__DefaultConnection = "Server=prod;Database=MyDb;"AddEnvironmentVariables(prefix: "...") を使うと、その呼び出しで追加される環境変数プロバイダ は、指定したプレフィックスを持つ環境変数だけを対象にします。
このとき、設定キーとして登録される際にはプレフィックス部分は取り除かれます。これにより、他のアプリケーション向けの環境変数と名前空間を分けやすくなります。
// このプロバイダでは "MYAPP_" プレフィックスを持つ環境変数だけを対象にするbuilder.Configuration.AddEnvironmentVariables(prefix: "MYAPP_");// → "MYAPP_MyFeature__Title" という環境変数が "MyFeature:Title" として読み込まれるコマンドライン引数
Section titled “コマンドライン引数”アプリケーション起動時に コマンドライン引数 で設定値を渡すことができます。
コマンドライン引数は既定での優先度が最も高く(詳細は 4. 設定のオーバーライド順序と仕組み を参照)、 appsettings.json や環境変数の値を上書きします。
主にローカルでの試験や CI/CD でのパラメータ渡しに利用します。
# dotnet run でコマンドライン引数を渡す例(-- の後に引数を指定)dotnet run -- --MyFeature:Title=OverrideValue
# スラッシュ形式でも記述可能dotnet run -- /MyFeature:Title=OverrideValue
# スペース区切りでも記述可能dotnet run -- --MyFeature:Title OverrideValue
また、短いエイリアスを定義したい場合は スイッチマッピング を使用できます。
var builder = WebApplication.CreateBuilder(args);
var switchMappings = new Dictionary<string, string>{    ["-t"] = "MyFeature:Title",    ["-m"] = "MyFeature:MaxItems"};
builder.Configuration.AddCommandLine(args, switchMappings);
ただし、この実装はお薦めできません。 WebApplication.CreateBuilder(args) の既定処理と AddCommandLine(args, switchMappings) をそのまま併用すると、同じ args がアプリ構成で二重に解釈される可能性があります。
実装パターンは次の 2 つです。
- パターン A(簡単):
CreateBuilder()+AddCommandLine(args, switchMappings)
この場合、短縮キーは扱いやすくなりますが、--environmentや--contentRootなどのホスト側標準引数は反映されません。 - パターン B(推奨):
CreateBuilder(args)を維持しつつ、アプリ構成の既定コマンドラインプロバイダだけを差し替える
これにより、ホスト側標準引数を有効に保ちながら、スイッチマッピングも利用できます。パターン B の実装例は以下の通りです。
// Program.cs でスイッチマッピングを使う場合の推奨例// ホスト側標準引数は CreateBuilder(args) で処理し、// アプリ構成の既定コマンドラインプロバイダだけを差し替えるusing Microsoft.Extensions.Configuration.CommandLine;
var builder = WebApplication.CreateBuilder(args);
var switchMappings = new Dictionary<string, string>{    ["-t"] = "MyFeature:Title",    ["-m"] = "MyFeature:MaxItems"};
for (var i = builder.Configuration.Sources.Count - 1; i >= 0; i--){    if (builder.Configuration.Sources[i] is CommandLineConfigurationSource)    {        builder.Configuration.Sources.RemoveAt(i);    }}
builder.Configuration.AddCommandLine(args, switchMappings);// → dotnet run -- -t=OverrideValue のように短縮形で指定できる
呼び出し例(スイッチマッピング適用時)
# 短縮キーのみを使うdotnet run -- -t=OverrideValue -m=42
# 元のキー名を使う(そのまま利用できる)dotnet run -- --MyFeature:Title=LongForm --MyFeature:MaxItems=55
# 短縮キーと元のキー名を混在させるdotnet run -- -t=MixedTitle --MyFeature:MaxItems=100
# スイッチマッピングで指定していないキーも同時に渡せるdotnet run -- -t=MappedTitle --Logging:LogLevel:Default=Debugシークレット管理(User Secrets)
Section titled “シークレット管理(User Secrets)”データベースのパスワードや API キーなどの 機密情報 をソースコードやリポジトリに含めることはセキュリティ上のリスクとなります。
ASP.NET Core では開発環境専用の機密情報管理として ユーザーシークレット(User Secrets) が用意されています。
ユーザーシークレットはプロジェクトファイルとは無関係な場所(OS の個人フォルダ配下)に保存されるため、 ソースコードリポジトリにコミットされることなく 、開発者の手元だけで機密情報を管理できます。
| OS | 保存場所 |
|---|---|
| Windows | %APPDATA%\Microsoft\UserSecrets\{UserSecretsId}\secrets.json |
| Linux / macOS | ~/.microsoft/usersecrets/{UserSecretsId}/secrets.json |
初期化と使い方
Section titled “初期化と使い方”ユーザーシークレットを使用するには、まず dotnet user-secrets init を実行することでプロジェクトに UserSecretsId を設定します。
CLI または VS Code(C# Dev Kit)
# プロジェクトフォルダで実行(.csproj がある場所)dotnet user-secrets init
# シークレットを設定するdotnet user-secrets set "ConnectionStrings:DefaultConnection" "Server=dev;Database=MyDb_Dev;"dotnet user-secrets set "ExternalApi:ApiKey" "my-secret-api-key"
# 設定されているシークレット一覧を表示するdotnet user-secrets list
# 特定のシークレットを削除するdotnet user-secrets remove "ExternalApi:ApiKey"
# 全シークレットを削除するdotnet user-secrets clear
VS Code(C# Dev Kit)では専用 GUI はありません。統合ターミナルを開き、 dotnet user-secrets コマンドを実行してシークレットを管理します。
Visual Studio
ソリューション エクスプローラーでプロジェクトを右クリックし、「ユーザー シークレットの管理」を選択します。
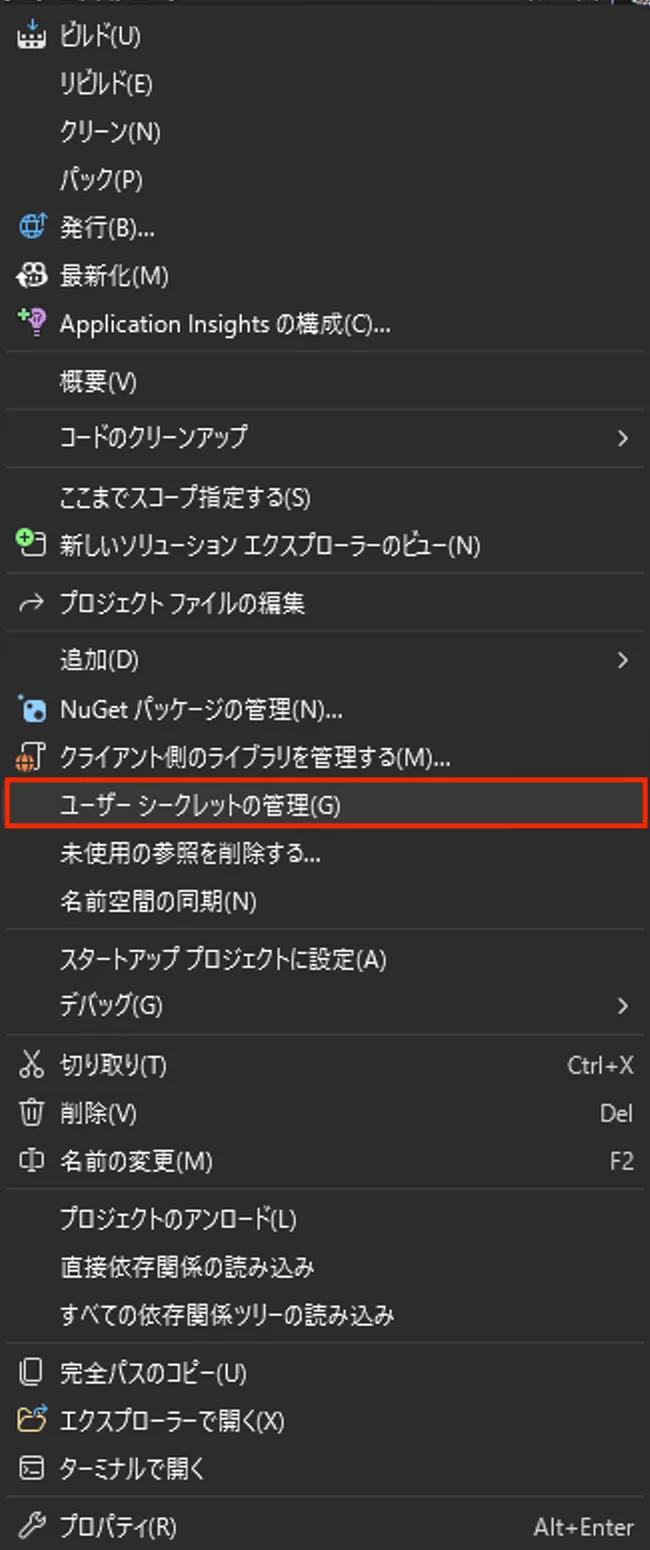
secrets.json ファイルがエディタで直接開かれ、JSON 形式でシークレットを編集できます。
dotnet user-secrets init による初期化も、この操作の初回実行時に自動で行われます。
dotnet user-secrets init を実行すると、プロジェクトファイル(.csproj)に UserSecretsId が追加されます。(Visual Studio を使用する場合は自動的に追加されるため、この操作は不要です)
<!-- dotnet user-secrets init 実行後の .csproj(抜粋) --><PropertyGroup> <TargetFramework>net10.0</TargetFramework> <UserSecretsId>xxxxxxxx-xxxx-xxxx-xxxx-xxxxxxxxxxxx</UserSecretsId></PropertyGroup>ユーザーシークレットは Development 環境かつ UserSecretsId が設定されている場合に自動的に読み込まれます。
コード上では appsettings.json と同じインターフェイスで設定値にアクセスできます。
// appsettings.json と同じ方法でシークレットにアクセスできるvar apiKey = builder.Configuration["ExternalApi:ApiKey"];var connStr = builder.Configuration.GetConnectionString("DefaultConnection");3. IOptions<T> / オプションバインディング
Section titled “3. IOptions<T> / オプションバインディング”オプションパターンとは
Section titled “オプションパターンとは”設定値を直接 IConfiguration["Key"] で取得する方法は手軽ですが、大規模なアプリケーションでは「どのキーがどこで使われているか分からない」「型の不一致に気付きにくい」といった問題が発生しがちです。
こうした課題を解決するのが オプションパターン(Options Pattern) です。
オプションパターンでは、設定セクションを POCO(Plain Old CLR Object)クラス にバインドし、DI コンテナー経由で型安全に設定値を利用します。
これにより、設定値へのアクセスがクラスのプロパティとして強く型付けされ、IDE の補完やリファクタリングが有効になります。
オプションクラスの定義と登録
Section titled “オプションクラスの定義と登録”まず、設定セクションに対応する オプションクラス(POCO) を定義します。
プロパティ名は appsettings.json のキー名と一致させます(大文字・小文字は区別されません)。
public class MyFeatureOptions{    // セクション名を定数として持つと登録時に使いやすい    public const string SectionName = "MyFeature";
    public string Title { get; set; } = string.Empty;    public bool Enabled { get; set; }    public int MaxItems { get; set; }}
// appsettings.json の一部(再掲){ "MyFeature": { "Title": "Hello", "Enabled": true, "MaxItems": 100 }}次に Program.cs でオプションクラスを DI コンテナーに登録します。
var builder = WebApplication.CreateBuilder(args);
// MyFeature セクションを MyFeatureOptions クラスにバインドして DI に登録するbuilder.Services.Configure<MyFeatureOptions>(    builder.Configuration.GetSection(MyFeatureOptions.SectionName));
これだけで、 IOptions<MyFeatureOptions> を DI 経由で注入して利用できるようになります。
IOptions<T>・IOptionsSnapshot<T>・IOptionsMonitor<T>
Section titled “IOptions<T>・IOptionsSnapshot<T>・IOptionsMonitor<T>”設定値の注入には IOptions<T> 、 IOptionsSnapshot<T> 、 IOptionsMonitor<T> の 3 種類のインターフェイスが用意されています。
それぞれ特性が異なるため、用途に合わせて使い分けます。
| インターフェイス | DI ライフタイム | 再読み込み | 主な用途 |
|---|---|---|---|
IOptions<T> | シングルトン | なし(初回アクセス時に生成され、以後は同じ値を参照) | 起動後に変更されない設定値の参照 |
IOptionsSnapshot<T> | スコープ | スコープ(通常はリクエスト)ごとに新しいインスタンス(構成変更があれば次のリクエストで反映され得る) | HTTP リクエスト単位で最新値を参照したい、あるいはリクエスト毎に設定値を計算する場合 |
IOptionsMonitor<T> | シングルトン | 変更通知に対応(更新を検知できる構成プロバイダ使用時に最新値を反映) | 常に最新の設定値を参照したい場合 |
IOptions<T>の実装例
Controller で DI する例 (IOptions<T>)
Section titled “Controller で DI する例 (IOptions<T>)”// Controller で IOptions<T> を DI する例public class MyController : ControllerBase{ private readonly MyFeatureOptions _options;
public MyController(IOptions<MyFeatureOptions> options) { _options = options.Value; // 最初の .Value アクセスで生成され、以後は同じ値を参照 }
[HttpGet("/feature")] public IActionResult GetFeature() { return Ok(new { _options.Title, _options.MaxItems }); }}Minimal API の ルートハンドラで DI する例 (IOptions<T>)
Section titled “Minimal API の ルートハンドラで DI する例 (IOptions<T>)”// Minimal API での IOptions<T> の使用例// ルートハンドラのパラメータに直接 IOptions<T> を宣言すると DI から自動注入されるapp.MapGet("/feature", (IOptions<MyFeatureOptions> options) =>{ var opt = options.Value; // .Value で設定値にアクセス return Results.Ok(new { opt.Title, opt.MaxItems });});IOptionsSnapshot<T>の実装例
Controller で DI する例 (IOptionsSnapshot<T>)
Section titled “Controller で DI する例 (IOptionsSnapshot<T>)”// IOptionsSnapshot<T>:HTTP リクエストごとに最新値を取得(スコープ)public class MyController : ControllerBase{ private readonly MyFeatureOptions _options;
public MyController(IOptionsSnapshot<MyFeatureOptions> snapshot) { _options = snapshot.Value; // リクエストのたびに最新値が取得される }
[HttpGet("/feature")] public IActionResult GetFeature() { return Ok(new { _options.Title, _options.MaxItems }); }}Minimal API の ルートハンドラで DI する例 (IOptionsSnapshot<T>)
Section titled “Minimal API の ルートハンドラで DI する例 (IOptionsSnapshot<T>)”// Minimal API のルートハンドラはリクエストスコープ内で実行されるため、IOptionsSnapshot<T> を直接注入できるapp.MapGet("/feature/snapshot", (IOptionsSnapshot<MyFeatureOptions> snapshot) =>{ var opt = snapshot.Value; // リクエストごとに最新値が取得される return Results.Ok(new { opt.Title, opt.Enabled });});IOptionsMonitor<T>の実装例
Controller で DI する例 (IOptionsMonitor<T>)
Section titled “Controller で DI する例 (IOptionsMonitor<T>)”public class MyController : ControllerBase{ private readonly IOptionsMonitor<MyFeatureOptions> _monitor;
public MyController(IOptionsMonitor<MyFeatureOptions> monitor) { _monitor = monitor; }
[HttpGet("/feature/monitor")] public IActionResult GetFeature() { var opt = _monitor.CurrentValue; // .CurrentValue で常に最新値を参照 return Ok(new { opt.Title, opt.MaxItems }); }}Minimal API の ルートハンドラで DI する例 (IOptionsMonitor<T>)
Section titled “Minimal API の ルートハンドラで DI する例 (IOptionsMonitor<T>)”// IOptionsMonitor<T> はシングルトンのため、Minimal API のルートハンドラにも直接注入できるapp.MapGet("/feature/monitor", (IOptionsMonitor<MyFeatureOptions> monitor) =>{ var opt = monitor.CurrentValue; // .CurrentValue で常に最新値を参照 return Results.Ok(new { opt.Title, opt.MaxItems });});Controller やルートハンドラ以外での DI
Section titled “Controller やルートハンドラ以外での DI”次のようにサービスレイヤーのクラスで DI して受け取ることも可能です。(IOptions<T>, IOptionsSnapshot<T>, IOptionsMonitor<T> いずれも DI で受け取る方法は同じ)
// IOptions<T>:最初の .Value アクセスで生成され、以後は同じ値を参照public class MyService{    private readonly MyFeatureOptions _options;
    public MyService(IOptions<MyFeatureOptions> options)    {        _options = options.Value;  // .Value で設定値にアクセス    }
public string GetTitle() => _options.Title;}名前付きオプション
Section titled “名前付きオプション”同一のオプション型に複数の設定セクションをバインドする 名前付きオプション も利用できます。
例えば複数の外部サービス設定を 1 つのクラスで扱いたい場合に便利です。
// appsettings.json(抜粋){ "Auth": { "Google": { "ClientId": "google-client-id", "ClientSecret": "google-secret" }, "GitHub": { "ClientId": "github-client-id", "ClientSecret": "github-secret" } }}// オプションクラス定義public class OAuthOptions{ public string ClientId { get; set; } = string.Empty; public string ClientSecret { get; set; } = string.Empty;}
// 名前付きで登録builder.Services.Configure<OAuthOptions>("Google", builder.Configuration.GetSection("Auth:Google"));builder.Services.Configure<OAuthOptions>("GitHub", builder.Configuration.GetSection("Auth:GitHub"));// IOptionsMonitor<T>.Get(name) で名前を指定して取得public class AuthService{ private readonly IOptionsMonitor<OAuthOptions> _monitor;
public AuthService(IOptionsMonitor<OAuthOptions> monitor) { _monitor = monitor; }
public OAuthOptions GetGoogleOptions() => _monitor.Get("Google"); public OAuthOptions GetGitHubOptions() => _monitor.Get("GitHub");}バリデーション
Section titled “バリデーション”オプション値の検証には複数の方式があります。
1. DataAnnotations を使用した検証
Section titled “1. DataAnnotations を使用した検証”オプションクラスのプロパティに DataAnnotations 属性 を付与することで、設定値の検証を行えます。
// Options/MyFeatureOptions.cs(バリデーション属性を追加)using System.ComponentModel.DataAnnotations;
public class MyFeatureOptions{    public const string SectionName = "MyFeature";
    [Required(ErrorMessage = "Title は必須です")]    public string Title { get; set; } = string.Empty;
    public bool Enabled { get; set; }
    [Range(1, 1000, ErrorMessage = "MaxItems は 1 から 1000 の範囲で指定してください")]    public int MaxItems { get; set; }}
// Program.cs でバリデーションを有効化するbuilder.Services.AddOptions<MyFeatureOptions>() .BindConfiguration(MyFeatureOptions.SectionName) .ValidateDataAnnotations(); // DataAnnotations による検証を有効化2. ラムダ式によるカスタムバリデーション
Section titled “2. ラムダ式によるカスタムバリデーション”.Validate() メソッドで直接カスタムバリデーションロジックを記述できます。複雑なバリデーションルール(複数プロパティ間の比較など)が必要な場合に有効です。
builder.Services.AddOptions<MyFeatureOptions>() .BindConfiguration(MyFeatureOptions.SectionName) .ValidateDataAnnotations() .Validate(options => { // 複数プロパティ間のバリデーション if (options.Title.Length > 100) { return false; } return true; }, "Title の長さは 100 文字以内である必要があります");3. 専用バリデーションクラス(IValidateOptions)
Section titled “3. 専用バリデーションクラス(IValidateOptions)”複雑なバリデーションロジックを専用クラスに分離する場合は、IValidateOptions<TOptions> を実装します。
using Microsoft.Extensions.Options;
public class MyFeatureOptionsValidation : IValidateOptions<MyFeatureOptions>{    public ValidateOptionsResult Validate(string? name, MyFeatureOptions options)    {        if (string.IsNullOrEmpty(options.Title))        {            return ValidateOptionsResult.Fail("Title は必須です");        }
        if (options.MaxItems < 1 || options.MaxItems > 1000)        {            return ValidateOptionsResult.Fail("MaxItems は 1 から 1000 の範囲で指定してください");        }
        return ValidateOptionsResult.Success;    }}
// Program.cs で登録builder.Services.AddOptions<MyFeatureOptions>() .BindConfiguration(MyFeatureOptions.SectionName);
// バリデーションクラスを登録builder.Services.AddSingleton<IValidateOptions<MyFeatureOptions>, MyFeatureOptionsValidation>();バリデーションのタイミング
Section titled “バリデーションのタイミング”ValidateOnStart() を指定するとアプリケーション起動時に検証が実行され、設定値が不正な場合は起動時点で例外がスローされます(デプロイ後に問題が顕在化するのを防ぐ効果があります)。
builder.Services.AddOptions<MyFeatureOptions>() .BindConfiguration(MyFeatureOptions.SectionName) .ValidateDataAnnotations() .ValidateOnStart(); // アプリ起動時に検証を実行(.NET 6 以降)ValidateOnStart() を付けない場合、バリデーションは遅延実行されます。
つまり、IOptions<T> の .Value、IOptionsSnapshot<T> の .Value、IOptionsMonitor<T> の .CurrentValue / .Get(name) に初めてアクセスした時点で検証され、無効な値なら OptionsValidationException がスローされます。
バリデーションするときは上記の通り、DataAnnotations 属性と ValidateDataAnnotations()、.Validate() ラムダ、IValidateOptions<T> を活用するのが推奨です。MVC モデルのバリデーション や Minimal API のモデルバインディング で使用される IValidatableObject インターフェイスをオプション検証に流用することもできますが、次の点に留意してください。
ValidateDataAnnotations()を使う場合 → 内部ではValidator.TryValidateObject()が利用されます。IValidatableObject.Validate()の呼び出しタイミングは実装詳細に依存するため、順序に依存した設計は避けるのが安全です.Validate()ラムダを使う場合 →IValidatableObjectは自動連携されないため、必要であれば明示的に呼び出す実装が必要ですIValidateOptions<T>を使う場合 →IValidatableObjectは自動連携されないため、必要であれば明示的に呼び出す実装が必要です
そもそも IValidatableObject は MVC / Minimal API のモデル検証を主な想定シナリオとしたインターフェイスであり、オプション検証とは用途が異なります。さらに、モデル(この場合はオプションクラス)自身に検証ロジックを持たせる設計になるため、設定値を表す責務と検証する責務が同じクラスに混在しやすいという課題があります。
IValidateOptions<T> は、この責務分離をしやすくするためのオプション検証向けアーキテクチャです。IValidateOptions<T> の実装クラスを AddSingleton<IValidateOptions<T>, MyValidator>() のように DI サービスとして登録すれば、MyValidator のコンストラクタでリポジトリや外部 API クライアントなどのサービスを受け取れます。これにより、DB 上の設定値との照合や外部 API を使った妥当性確認など、柔軟なバリデーションを実装できます。
DI を使わない直接バインド
Section titled “DI を使わない直接バインド”DI を使わずにオプションクラスへ直接バインドする方法もあります。
Program.cs の起動処理など、DI コンテナーが構築される前の段階で設定値を読みたい場合に便利です。
// GetSection().Get<T>() でオプションクラスへ直接取得する(DI 不要)var options = builder.Configuration    .GetSection(MyFeatureOptions.SectionName)    .Get<MyFeatureOptions>();
Console.WriteLine(options?.Title);  // "Hello"
// Bind() メソッドを使った方法(既存インスタンスに値をセットする)var options = new MyFeatureOptions();builder.Configuration.GetSection(MyFeatureOptions.SectionName).Bind(options);4. 設定のオーバーライド順序と仕組み
Section titled “4. 設定のオーバーライド順序と仕組み”構成プロバイダの仕組み
Section titled “構成プロバイダの仕組み”ASP.NET Core の設定は 構成プロバイダ(Configuration Provider) と呼ばれる拡張可能な仕組みで構築されています。
各プロバイダはキーと値のペアのコレクションを提供し、複数のプロバイダが 登録された順に結合 されます。
同一キーに複数のプロバイダが値を持つ場合、 後から登録されたプロバイダの値が優先(上書き) されます(“last-wins” 方式)。
flowchart TB
    subgraph providers ["登録されたプロバイダ(下に行くほど優先度が高い)"]
        P1["① appsettings.json"]
        P2["② appsettings.{Environment}.json"]
        P3["③ ユーザーシークレット\n(Development 環境のみ)"]
        P4["④ 環境変数"]
        P5["⑤ コマンドライン引数"]
    end
    P1 --> P2 --> P3 --> P4 --> P5
    P5 --> Result["最終的な設定値\n(同一キーは後勝ち)"]
WebApplication.CreateBuilder() 既定のプロバイダ一覧と優先順位
Section titled “WebApplication.CreateBuilder() 既定のプロバイダ一覧と優先順位”WebApplication.CreateBuilder(args) を呼び出すと、以下のプロバイダが既定で順番に登録されます。
| 優先度(低→高) | プロバイダ | 説明 |
|---|---|---|
| 1 | appsettings.json | プロジェクトルートの基本設定ファイル |
| 2 | appsettings.{Environment}.json | 環境別の上書き設定ファイル |
| 3 | ユーザーシークレット | Development 環境かつ UserSecretsId 設定時のみ |
| 4 | 環境変数 | OS の環境変数( __ 区切りで階層を表現) |
| 5 | コマンドライン引数 | 最高優先度(他のすべてのプロバイダを上書き可能) |
この優先順位により、例えば appsettings.json に設定されたデータベース接続文字列を、本番環境では環境変数で安全に上書きするといった運用が実現できます。
flowchart LR
    J["appsettings.json\n(基本設定)"]
    JE["appsettings.Development.json\n(開発環境上書き)"]
    US["ユーザーシークレット\n(開発環境の機密情報)"]
    EV["環境変数\n(コンテナー / 本番環境)"]
    CL["コマンドライン引数\n(起動時パラメータ)"]
    J -->|上書き| JE
    JE -->|上書き| US
    US -->|上書き| EV
    EV -->|上書き| CL
    CL --> Final["最終的な設定値"]
具体例として、接続文字列が複数のプロバイダで定義されている場合の優先順位を示します。
{ "ConnectionStrings": { "DefaultConnection": "Server=default;" } }{ "ConnectionStrings": { "DefaultConnection": "Server=dev;" } }# 環境変数(Bash の場合)export ConnectionStrings__DefaultConnection="Server=prod;"# 環境変数(PowerShell の場合)$env:ConnectionStrings__DefaultConnection = "Server=prod;"# コマンドライン引数dotnet run -- --ConnectionStrings:DefaultConnection="Server=override;"この場合、最終的に使用される接続文字列は "Server=override;" (コマンドライン引数の値)になります。
プロバイダのカスタマイズ
Section titled “プロバイダのカスタマイズ”既定のプロバイダ構成を変更したい場合は、 builder.Configuration の Sources を操作します。
例えば既定プロバイダをすべて削除して独自の順序で再登録したり、独自のプロバイダを追加したりできます。
// 既定のプロバイダを削除して順序を明示的に再定義する例builder.Configuration.Sources.Clear();  // 既定のプロバイダをすべて削除
builder.Configuration    .AddJsonFile("appsettings.json", optional: false, reloadOnChange: true)    .AddJsonFile($"appsettings.{builder.Environment.EnvironmentName}.json",        optional: true, reloadOnChange: true);
if (builder.Environment.IsDevelopment()){    builder.Configuration.AddUserSecrets<Program>(optional: true);  // Development 環境でのみ追加}
builder.Configuration    .AddEnvironmentVariables()    .AddCommandLine(args);
プロバイダ追加時の主なオプションは以下の通りです。
| オプション | 説明 |
|---|---|
optional: false(既定) | ファイルが存在しない場合に例外をスロー |
optional: true | ファイルが存在しない場合もスキップ(エラーにしない) |
reloadOnChange: true | ファイルの変更を監視し、変更時に設定を自動再読み込み |
また、.NET 8 以降で利用できる WebApplication.CreateSlimBuilder() は Web アプリケーションのトリミング(Tree Shaking)や AOT(Ahead of Time)コンパイルに対応した最小構成の WebApplicationBuilder です。
このビルダーは WebApplication.CreateBuilder() と同様に appsettings.json / appsettings.{Environment}.json の読み込みおよびユーザーシークレット(Development 環境のみ)を既定で読み込みます。一方、HTTPS エンドポイント、IIS 統合、Windows EventLog ロギングなど一部の機能は含まれません。Native AOT / トリミングを必要としない通常の Web アプリケーション開発では WebApplication.CreateBuilder() を使用してください。
5. 参考ドキュメント
Section titled “5. 参考ドキュメント”- ASP.NET Core の構成 | Microsoft Learn
- ASP.NET Core のオプション パターン | Microsoft Learn
- ASP.NET Core での開発におけるアプリ シークレットの安全な保存 | Microsoft Learn
- ASP.NET Core で複数の環境を使用する | Microsoft Learn
- .NET の構成 | Microsoft Learn
- .NET の構成プロバイダ | Microsoft Learn
- OptionsBuilderExtensions.ValidateOnStart | Microsoft Learn
- IValidateOptions
| Microsoft Learn - ValidateOptionsResult | Microsoft Learn