Copilot Studio Tools
Copilot Studio Tools
Learn how to extend your agents with tools including connectors, agent flows, MCP servers, and custom prompts in Microsoft Copilot Studio.
Content last updated:
Copilot Studio Tools
Learn how to extend your agents with powerful tools including connectors, MCP servers, and custom prompts in Microsoft Copilot Studio.
Lab Details
| Level | Persona | Duration | Purpose |
|---|---|---|---|
| 300 | Maker | 30 minutes | After completing this lab, participants will be able to use connectors to integrate external services and connect MCP servers for live data access. Optional extra credit sections cover creating custom prompts for structured responses and using Computer Using Agents (CUA) for legacy system automation. |
Table of Contents
- Why This Matters
- Introduction
- Core Concepts Overview
- Documentation and Additional Training Links
- Prerequisites
- Summary of Targets
- Use Cases Covered
- Instructions by Use Case
Why This Matters
Makers and Developers - Want to know how to go beyond basic agent capabilities and connect your agents to real data, business logic, and external systems?
Think of tools as the hands and feet of your agent:
- Without Tools: Your agent can only respond based on its knowledge sources and instructions - it can’t take action, access live data, or execute business logic
- With Tools: Your agent becomes a true assistant that can query databases, run calculations, call APIs, interact with legacy systems, and deliver structured, actionable responses
Common challenges solved by this lab:
- “My agent can answer questions but can’t actually do anything”
- “I need my agent to access live data from Dataverse and other systems”
- “I need to connect to legacy systems that don’t have APIs”
In about 30 minutes, you’ll learn two core ways to extend your agents with tools - giving you the skills to build agents that don’t just talk, but take action. Optional extra credit sections go further with custom prompts and Computer Using Agents.
Introduction
Tools are what transform a conversational agent into a powerful business assistant. Microsoft Copilot Studio offers multiple types of tools, each designed for different integration scenarios. Connectors provide pre-built integrations with hundreds of services. MCP (Model Context Protocol) servers provide real-time access to data sources like Dataverse. Custom prompts structure agent responses for consistent, business-relevant outputs. And for systems without APIs, Computer Using Agents (CUA) can simulate human interaction with graphical interfaces.
Real-world example: A sales organization needs an agent that can look up account details from Dataverse in real time (MCP server), send notifications through Teams or email (connectors), present data in a consistent format (custom prompts), and even pull data from a legacy portfolio system with no API (CUA). Each tool type addresses a different integration need, and together they create a comprehensive, capable agent.
This lab teaches you how to use each tool type through hands-on scenarios.
Core Concepts Overview
| Concept | Why it matters |
|---|---|
| Connectors | Pre-built integrations with hundreds of Microsoft and third-party services, enabling agents to take actions like sending emails, creating records, or querying external APIs |
| MCP Servers | Model Context Protocol servers that provide real-time, dynamic access to data sources like Dataverse, enabling natural language queries against live business data |
| Custom Prompts | Structured prompt templates that standardize agent responses by pulling specific fields from data sources, ensuring consistent and relevant output formats |
| Computer Using Agents (CUA) | Agents that simulate human interaction with graphical user interfaces, enabling automation of legacy systems that lack API connectivity |
Documentation and Additional Training Links
- Tools overview in Copilot Studio
- Connect to Dataverse with Model Context Protocol (MCP)
- Use prompts to make your agent perform specific tasks
- Use connectors in Copilot Studio
- Create a custom connector from scratch
- Free Dictionary API
- Automate web and desktop apps with Computer use
Prerequisites
- Access to Microsoft Copilot Studio with appropriate licensing
- Power Platform environment enabled for Copilot Studio
- Basic familiarity with the Copilot Studio interface
- Office 365 environment with Outlook integration enabled (for CUA extra credit)
Summary of Targets
In this lab, you’ll extend agents with multiple tool types to address different integration scenarios. By the end of the lab, you will:
- Use connectors to integrate external services with your agent
- Connect a Dataverse MCP server for real-time natural language data access
- (Extra Credit) Create custom prompts that structure agent responses with specific data fields
- (Extra Credit) Configure a Computer Using Agent to automate a legacy system without API access
Use Cases Covered
| Step | Use Case | Value added | Effort |
|---|---|---|---|
| 1 | Extend Your Agent with Connectors | Integrate external services and take actions through pre-built connectors | 15 min |
| 2 | Connect an MCP Server for Live Data Access | Enable natural language queries against live Dataverse business data | 15 min |
| EC | Extra Credit: Create Custom Prompts for Structured Responses | Standardize agent outputs for consistent, business-relevant responses (Optional) | 10 min |
| EC | Extra Credit: Automate Legacy Systems with CUA | Automate systems that lack API connectivity using desktop simulation (Optional) | ~20 min |
Instructions by Use Case
Use Case #1: Extend Your Agent with Connectors
Create a custom connector for the Free Dictionary API and use it as a tool in your agent to look up word definitions.
| Use case | Value added | Estimated effort |
|---|---|---|
| Extend Your Agent with Connectors | Build a custom connector and use it as a tool to integrate an external API | 15 minutes |
Summary of tasks
In this section, you’ll learn how to create a custom connector from a public API, define its actions and response schema, add it as a tool in your agent, and test natural language queries against it.
Scenario: Your organization needs a Dictionary Agent that can look up word definitions, origins, and pronunciations on demand. The Free Dictionary API provides this data, but there’s no pre-built connector for it. You’ll create a custom connector and wire it into your agent as a tool.
Objective
Create a custom connector for the Free Dictionary API, add it as a tool in your agent, and test word lookups through natural language conversation.
Step-by-step instructions
Create the Dictionary Agent
-
Go to Microsoft Copilot Studio and make sure you are in your development environment.
-
Select Agents on the left navigation. Make sure you are in the New Copilot Studio experience — if a banner or toggle offers it, select Try now (or turn the New experience toggle ON).
-
Select New agent to create an autonomous agent. This opens the agent designer.
-
In the Name your agent field, enter
Dictionary Agent. -
In the Instructions field, enter the following:
This agent allows a user to lookup the definition of a word -
Select Save.
Create the Custom Connector
-
Navigate to Power Apps and confirm you are in the correct environment (check the environment selector in the top-right).
-
In the left navigation menu, select … More and choose Custom connectors. If Custom connectors isn’t listed, select Discover all, then select Custom connectors (you can pin it for quicker access next time).
-
In the top navigation, Select New custom connector.
-
Select Create from blank.
-
Enter Lookup Word in Dictionary into the Connector name field
-
Select Continue.
-
In the Host field, enter api.dictionaryapi.dev
-
In the Base URL field, enter /api/v2/
-
Select Security at the bottom.
[!NOTE] This API doesn’t require authentication, but this is where you would select the authentication type for APIs that do.
-
Make sure the authentication type is set to No authentication and Select Definition.
Define the API Action
-
Select + New action in the Actions section.
-
In the Summary field, enter Word Lookup
- In the Description field, enter:
Lookup a word in the dictionary[!TIP] The description will later be used as the tool description, which allows the orchestrator to know when to use this tool. Make sure you are descriptive here to allow the best conversation routing.
-
In the Operation ID field, enter WordLookup
-
Under Request, Select Import from sample.
-
Select Get as the Verb.
-
In the URL field, enter:
https://api.dictionaryapi.dev/api/v2/entries/en/{word} -
Select Import.
-
Select the down arrow next to word and Select Edit.
-
In the Description field, enter:
The word that you want to lookup the definition of - Select Back at the top of the form.
Define the Response Schema
-
Select default in the Response section.
-
Select Import from sample.
-
This JSON is an array containing a dictionary entry for the word “hello,” including its spelling, pronunciation (text and audio), origin, and its meanings broken down by part of speech (exclamation, noun, and verb) with definitions and examples. It helps give the agent the needed context. In the Body field, copy and paste the following JSON sample:
[ { "word": "hello", "phonetic": "həˈləʊ", "phonetics": [ { "text": "həˈləʊ", "audio": "//ssl.gstatic.com/dictionary/static/sounds/20200429/hello--_gb_1.mp3" }, { "text": "hɛˈləʊ" } ], "origin": "early 19th century: variant of earlier hollo ; related to holla.", "meanings": [ { "partOfSpeech": "exclamation", "definitions": [ { "definition": "used as a greeting or to begin a phone conversation.", "example": "hello there, Katie!", "synonyms": [], "antonyms": [] } ] }, { "partOfSpeech": "noun", "definitions": [ { "definition": "an utterance of 'hello'; a greeting.", "example": "she was getting polite nods and hellos from people", "synonyms": [], "antonyms": [] } ] }, { "partOfSpeech": "verb", "definitions": [ { "definition": "say or shout 'hello'.", "example": "I pressed the phone button and helloed", "synonyms": [], "antonyms": [] } ] } ] } ] -
Select Import.
-
Update the following body items by selecting the down arrow on each and selecting Edit, change the data and then select back:
- origin
- Title:
origin - Description:
Where the word originated from including data such as the definition, part of speech, example of its use, synonyms, antonyms. It includes all potential uses of the word in part of speech such as if it is used as a verb, noun, or an exclamation what the meaning is when used in that way.
- Title:
- phonetic
- Title:
phonetic - Description:
How to pronounce the word including the audio file of it being spoken.
- Title:
- word
- Title:
word - Description:
The word that was looked up
- Title:
- Select Create connector on the top menu.
Add the Custom Connector as a Tool
-
Go back to the browser tab with Copilot Studio and open your Dictionary Agent.
-
In the agent designer’s Tools section, select Add tool, then enter the following into the search box and press Enter:
Lookup a word in the dictionary[!NOTE] It can sometimes take a few minutes for a new connector to sync to Copilot Studio. If you don’t see it, try refreshing the page.
-
Select the Word Lookup connector from the search results.
-
Select Add. The connection is set up automatically for this connector. If you are prompted to select a connection, create one and confirm your student credentials if asked.
[!TIP] This connector uses Maker-provided credentials, so end users don’t need to create their own connection for the unauthenticated Dictionary API. You can review a tool’s settings any time by selecting it in the Tools section.
-
The Word Lookup tool now appears in the Tools section of the agent designer.
Test Your Dictionary Agent
-
In the agent designer’s Knowledge section, remove the Search all websites knowledge (select Remove next to it) so the agent doesn’t answer from the web.
[!NOTE] Removing web knowledge helps make sure that only your custom connector API provides answers, not the underlying language model. To further restrict general knowledge, select More options (…) > Settings > AI & behavior and disable ungrounded responses.
-
Select Save.
-
Select the Preview tab and try the following queries in the chat pane:
What is the meaning of the word copilot?How about the word amazing?How do I pronounce the word "leverage" in English? -
Verify that the agent uses your custom connector tool to retrieve definitions, origins, and phonetic information from the Free Dictionary API.
Congratulations! You’ve completed Use Case #1!
Test your understanding
Key takeaways:
- Custom Connectors - You can create connectors from any REST API, giving your agent access to virtually any external service
- Descriptive Metadata - Detailed descriptions on actions, parameters, and response fields help the orchestrator route conversations correctly and improve tool selection
- Maker-Provided Credentials - For unauthenticated APIs, use maker-provided credentials so end users don’t need to create connections
Lessons learned & troubleshooting tips:
- New custom connectors may take a few minutes to sync to Copilot Studio - refresh your browser if the connector doesn’t appear immediately
- Disabling general knowledge forces the agent to rely solely on your tools, which is useful for validating that the connector works correctly
- Always define response schemas with descriptive titles and descriptions so the agent can present results meaningfully
Use Case #2: Connect an MCP Server for Live Data Access
Create a Copilot Agent that connects to the Dataverse MCP Server for real-time natural language access to business data.
| Use case | Value added | Estimated effort |
|---|---|---|
| Connect an MCP Server for Live Data Access | Enable natural language queries against live Dataverse business data | 15 minutes |
Summary of tasks
In this section, you’ll learn how to create a Copilot Agent, configure it with proper instructions and suggested prompts, integrate the Dataverse MCP Server as a tool, and test natural language queries against live Account and Contact data.
Scenario: A sales team at Contoso needs to quickly access and update account and contact information without leaving their Teams environment. The Dataverse MCP Server enables natural language access to critical business data stored in Dataverse.
Objective
Create and configure a Copilot Agent with Dataverse MCP Server integration that can read and query account and contact information using natural language.
Step-by-step instructions
Create and Configure the Agent
-
Go to Copilot Studio. Make sure you are logged in using the credentials for the lab and are in the correct environment, and that you are in the New Copilot Studio experience — if a banner or toggle offers it, select Try now (or turn the New experience toggle ON).
-
Select New agent to create an autonomous agent. This opens the agent designer.
-
In the Name your agent field, enter
Contoso Agent. -
In the Instructions field, enter the following instructions:
This agent will help Contoso sales reps update their accounts and contacts using the Dataverse MCP Server. This agent will: Read accounts and contact information from the Account and Contact Tables in Dataverse using the Dataverse MCP Server. Update accounts and contact information from the Account and Contact Tables in Dataverse using the Dataverse MCP Server. Create new accounts and contact information in the Account and Opportunity Tables in Dataverse using the Dataverse MCP Server. Do not use outside knowledge. Only use the Dataverse MCP Tool to create, read, update and delete. -
Select Save
-
Add suggested prompts: select More options (the … menu in the upper right of the designer), select Settings, then open the Greeting & prompts tab. Under Suggested prompts, select Add and enter the following, then close the settings dialog:
-
Title: Account Search Prompt: List all accounts in Redmond -
Title: Contact Search Prompt: List all contacts from Coho Winery
[!TIP] You can configure up to six suggested prompts that customers can choose from to start a conversation. In Teams and in Copilot Chat, suggested prompts appear on the agent’s welcome page before you start a new chat. You can’t see or use them when you test your agent in Copilot Studio.
-
Add the Dataverse MCP Server as a Tool
-
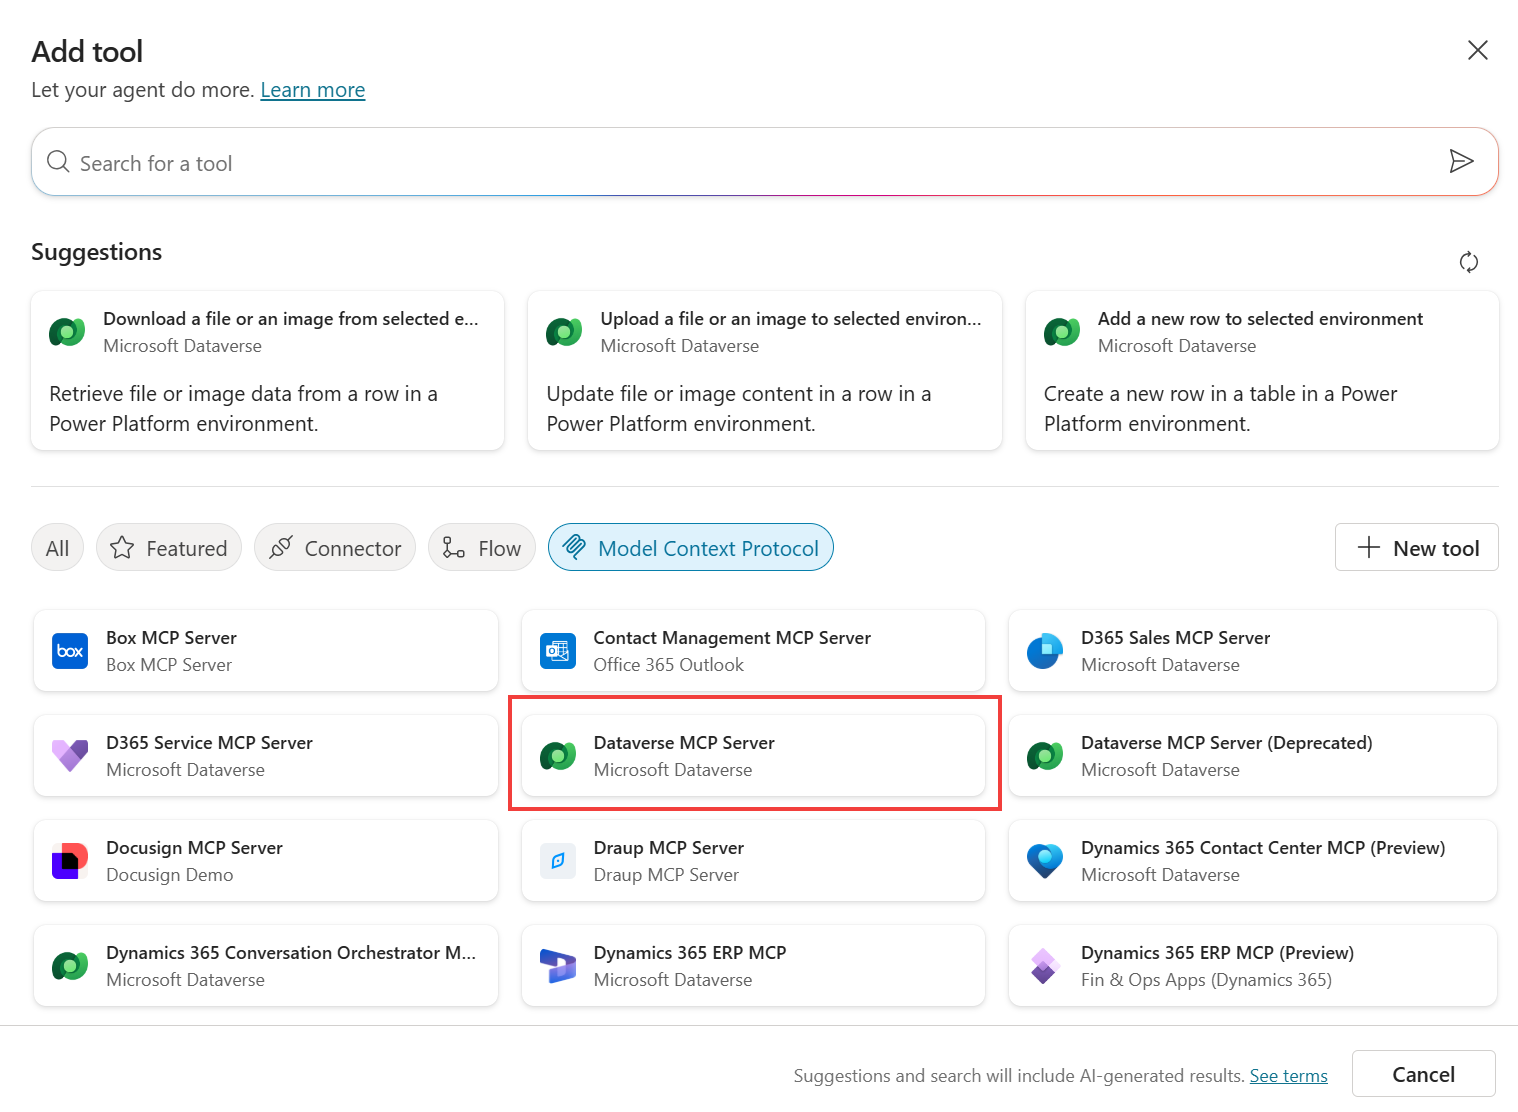
In the agent designer’s Tools section, select Add tool.
-
Select the Model Context Protocol (MCP) tab, search for Dataverse, and select Microsoft Dataverse MCP Server from the results. If there are multiple, do not select the deprecated ones and do not select the one that has (Preview) in its name.
-
On the Select a connection step, the Connection is usually populated automatically with your signed-in student account. If it shows Not connected, select the field, create a connection, and confirm your student credentials if prompted.
[!IMPORTANT] The Dataverse MCP Server will allow you natural language access to your tables in Dataverse. We have sample data in the Accounts and Contacts tables that we will use. The tools available are: list tables, describe table, read data, create record, update record, list prompts, execute prompt, list knowledge sources, and retrieve knowledge.
-
Select Add.
-
The Microsoft Dataverse MCP Server now appears in the Tools section of the agent designer. Select it to review the individual tools available. You can enable or disable which tools are available to the agent; when a tool is executed, the list is dynamically updated from the MCP Server.
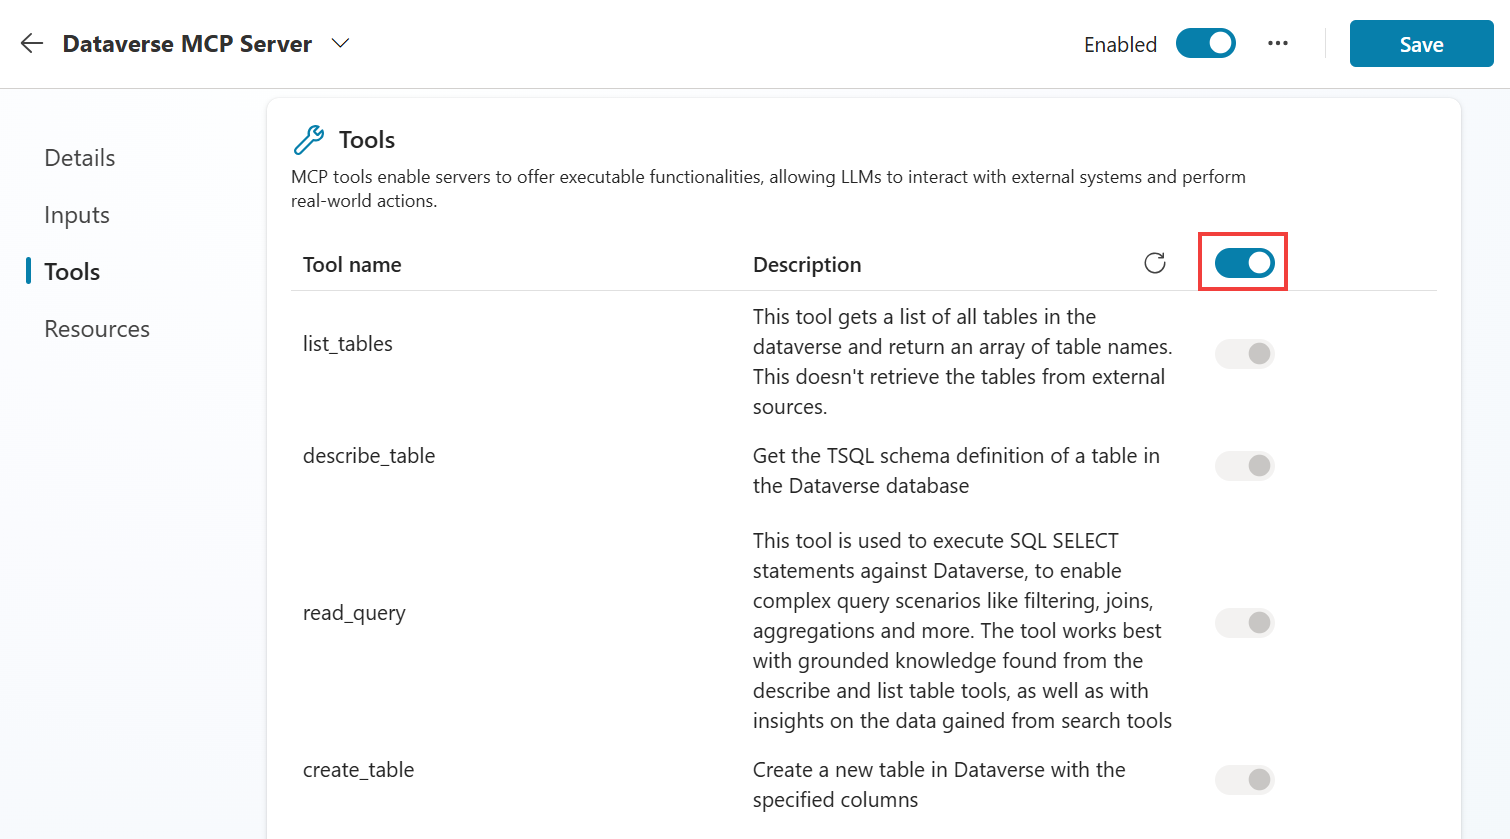
[!NOTE] You cannot call an MCP Server from a Topic. MCP tools are invoked by the agent’s orchestrator during natural language conversations.
Test Your Agent
-
Select the Preview tab at the top of the agent designer. In the chat pane, ask the following question: List the accounts in the state of WA.
[!NOTE] If you are using Service Principals or Client Certification Auth to connect to Dataverse, you may need to use Maker-provided credentials. To change this, select the Microsoft Dataverse MCP Server in the agent designer’s Tools section, then under Additional details set Credentials to use to Maker-provided credentials.
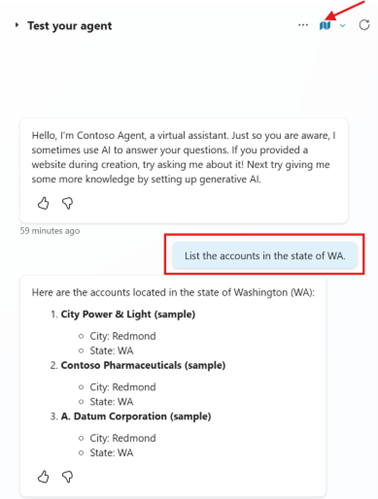
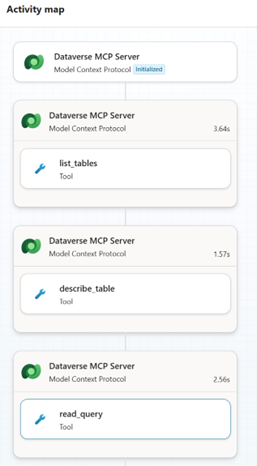
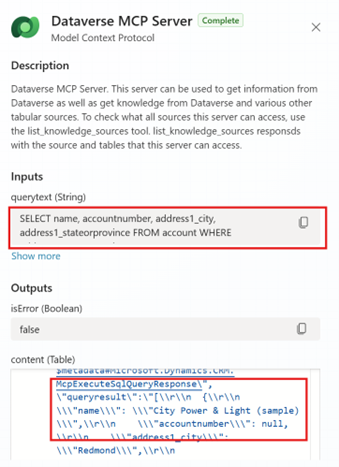
[!TIP] Select the Activity Map at the top of the agent testing panel to track what topics or tools the agent is using. You can see that the Dataverse MCP server is initiated and then which tools are being used - list_tables, describe_tables, read_query.
-
If you expand the tool that was used, you will see the Inputs and Outputs of the tool.
-
If no accounts are found, try running the following prompt to create some test data. and then retry your previous prompt:
Create 10 account rows with test data for the common fields, include some accounts with a State of WA -
Use the following prompt to add some contacts to each account:
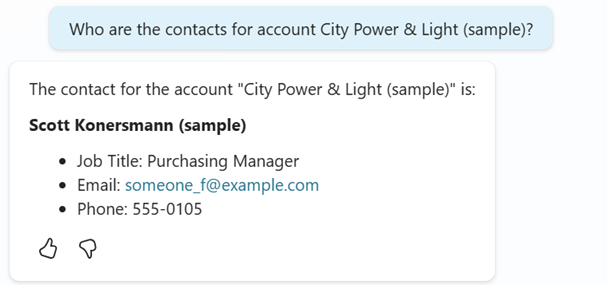
for each account create a test contact associated with the accountObserve the contacts created. If they are not shown in the chat pane, ask: Who are the contacts for each account.
Congratulations! You’ve completed Use Case #2!
Test your understanding
Key takeaways:
- MCP Server Integration - The Dataverse MCP Server provides dynamic, real-time access to business data through natural language queries
- Activity Tracking - The Activity Map helps troubleshoot agent behavior by showing which tools are executed and their inputs/outputs
- Agent Configuration - Proper instructions and descriptions help the agent understand its role and limitations, ensuring it uses only the specified tools
Lessons learned & troubleshooting tips:
- You must create your agent before adding MCP Servers as tools
- Use Activity Map to debug and understand tool execution flow
- Suggested prompts help guide users but don’t appear in Copilot Studio testing
Extra Credit: Create Custom Prompts for Structured Responses
[!NOTE] Optional - Extra Credit (~10 minutes): This use case is optional and not included in the core lab time. Complete it if you have additional time or want to explore prompt-based tools and model selection.
Create a custom prompt tool that controls how your agent responds to conversations, including selecting which AI model to use.
| Use case | Value added | Estimated effort |
|---|---|---|
| Create Custom Prompts for Structured Responses | Control agent response behavior with prompt-based tools and model selection | 10 minutes |
Summary of tasks
In this section, you’ll learn how to create a custom prompt tool with specific response instructions, configure text inputs and sample data, select and compare different AI models, and wire the prompt into your agent using system variables.
Scenario: Your organization wants an agent that handles casual chit chat conversations in a friendly and professional manner, while staying focused on appropriate topics. A custom prompt tool gives you fine-grained control over exactly how the agent responds, including the ability to select which AI model powers the responses.
Objective
Create a Chit Chat Agent with a custom prompt tool that controls response behavior, test with different AI models, and validate that the agent stays within defined boundaries.
Step-by-step instructions
Create the Chit Chat Agent
-
Go to Copilot Studio. Make sure you are logged in using the credentials for the lab and are in the correct environment.
-
Select Agents in the left navigation, then select the down-arrow (chevron) next to New Agent and choose New classic agent. In the Name your agent dialog, enter
Chit Chat Agentand select Create. -
Once the agent is provisioned, confirm its name is Chit Chat Agent. If you need to change it, select Edit in the Details section.
-
Enter the following as the Description:
This agent allows a user to chit chat and have general conversation -
Select Save.
Create the Chit Chat Prompt Tool
-
Select Tools in the top navigation.
-
Select Add a tool.
-
Select Prompt under Create new.
-
Select the prompt name (it will show “Custom prompt” followed by the date) and change it to Chit Chat Prompt.
-
In the Instructions field, paste the following text:
Respond to this (Replace this text) with an appropriate chit chat response. Do not leverage any information within the model to provide details outside of a simple chit chat response to the question. You should make the response be friendly and professional. It should never talk about politics, religion, or anything that is not just simple chit chat type discussion such as "Hello", "How are you?", or "How old are you?". Do not ask follow up questions as part of your response. -
Select (Replace this text) with your mouse and replace it with a text input by Selecting Add content and selecting Text.
-
Select the Text input in your instructions and set the Name to Query
-
In the Sample data field, enter the following text:
Hey there. I like cats do you? -
Select Close.
[!NOTE] The sample data is used for testing within the Prompt Builder interface. It simulates what a user might say so you can preview how the prompt responds.
Test and Select an AI Model
-
Select Test to test your prompt.
-
Review the response in the Model response section.
-
Select the down arrow next to GPT-4.1 mini to see the list of available model options.
-
Select a different model and Select Test again.
-
Notice how the response style changes depending on the model selected.
[!NOTE] You can also add additional models from Foundry if needed. Different models may produce different response styles and levels of detail.
-
Change the model back to GPT-4.1 mini as it is the most cost-effective and fastest option.
-
Select Save.
-
Select Add and configure.
Configure the Prompt Tool
-
Change the Description to the following text:
This tool provides capabilities to allow the user to do chit chat with this agent. It should stay focused to only handle simple chit chat scenarios like "Hello" or "How old are you?" type of things but stay away from any non-chit chat related topics. Do not use this topic for things like "Goodbye". -
In the Inputs section, change the Query input’s Fill Using setting to Custom value.
-
In the Value field, Select the … button, then Select System and select Activity.Text.
[!TIP] System.Activity.Text stores the last thing the user said to the agent. This automatically passes the user’s message into your custom prompt.
-
Select Save on your Chit Chat Prompt tool.
Disable General Knowledge
-
On the Overview page, scroll down to the Knowledge section and turn off Web Search.
-
Select Settings in the upper right-hand corner.
-
In the Generative AI menu, turn off Allow ungrounded responses.
-
Verify that Use information from the web is also turned off.
[!NOTE] The Use information from the web setting here is the same as the Web Search toggle on the Overview page. Changing it in one place updates it in the other.
[!TIP] To limit hallucinations, it is common practice to turn off these settings. This restricts the agent to only the tools and knowledge you have provided, preventing it from generating responses based on general knowledge or web results.
-
Select Save.
-
Close the Settings menu using the X in the upper right corner.
Test Your Chit Chat Agent
-
In the test pane, try the following chit chat queries:
Hey do you like cats? I have a tabbyHow old are you?The weather is great today. -
Verify that the agent responds with friendly, professional chit chat responses.
-
Now test that the agent stays within its defined boundaries by asking non-chit-chat questions:
How tall is the Empire State Building?
Who is the president of the United States?
- Verify that the agent does not answer these factual questions and instead keeps the conversation within chit chat boundaries.
Congratulations! You’ve completed the Custom Prompts Extra Credit section!
Test your understanding
Key takeaways:
- Custom Prompts as Tools - Prompts give you fine-grained control over how your agent responds, allowing you to define tone, boundaries, and behavior
- Model Selection - You can choose and compare different AI models for your prompt, balancing cost, speed, and response quality
- System Variables - Using System.Activity.Text automatically passes the user’s latest message into your prompt, eliminating the need for manual input mapping
Lessons learned & troubleshooting tips:
- Use detailed prompt instructions to define both what the agent should and should not do
- Test with boundary cases to make sure the agent stays within its defined scope
- GPT-4.1 mini is typically the most cost-effective choice for simple conversational scenarios
- Disabling general knowledge helps validate that your prompt tool is handling responses correctly
Extra Credit: Automate Legacy Systems with Computer Using Agents (CUA)
[!NOTE] Optional - Extra Credit (~20 minutes): This use case is optional and not included in the core lab time. Complete it if you have additional time or want to explore advanced autonomous agent capabilities.
Build an autonomous agent that retrieves financial portfolio data from a legacy system without API connectivity using Computer Using Agents (CUA).
| Use case | Value added | Estimated effort |
|---|---|---|
| Automate Legacy Systems with CUA | Automate systems that lack API connectivity using desktop simulation | ~20 minutes |
Summary of tasks
In this section, you’ll learn how to create an autonomous agent with email triggers, configure the Computer use tool to simulate GUI-based data retrieval, set up email response capabilities, and test the complete workflow.
Scenario: A financial advisor needs quick access to portfolio details - such as client name, portfolio value, and assigned manager - but the data resides in a legacy system that lacks an API. Traditional RPA tools rely on fragile screen-scraping and require constant maintenance. Computer Using Agents provide a smarter, more resilient approach to automating legacy system access.
Objective
Create an autonomous agent that uses the Computer use tool to retrieve portfolio data from a legacy web interface and responds via email.
Step-by-step instructions
Create the Agent and Configure Email Trigger
-
Go to copilotstudio.microsoft.com.
-
Select Agents in the left navigation, then select the down-arrow (chevron) next to New Agent and choose New classic agent. In the Name your agent dialog, enter
Portfolio Lookup Agentand select Create. -
Once the agent is provisioned, confirm its name is Portfolio Lookup Agent. If you need to change it, select Edit in the Details section and select Save.
Configure Email Triggers
-
Scroll down to the triggers section and Select + Add trigger.
-
Search and select
When a new email arrives (V3) (Office 365 Outlook). -
Select Next.
-
Rename the trigger to When a portfolio lookup email arrives.
-
Select Next.
-
In the Subject Filter (Optional) field, enter Portfolio to filter emails that contain the word “Portfolio” in the subject line.
-
Select Create trigger.
-
Select Close.
Configure the Computer Use Tool
-
Go to Tools in the top-level menu.
-
Select + Add a tool.
-
Select + New tool.
-
Select Computer use.
-
Enter the following into the Instructions:
1. Go to https://computerusedemos.blob.core.windows.net/web/Portfolio/index.html. 2. Enter the Portfolio ID in the "Enter Portfolio ID" search field and Select the "Search" button. 3. Retrieve the "Client Name", "Portfolio Value" and "Manager" values exactly as shown. 4. Return those three values as the final output. If no portfolio data is found, reply that you couldn't find a portfolio with the specified ID. -
Keep Use hosted browser enabled to create a connection to the hosted browser.
-
Update the Name of the Computer use tool to
Look up portfolio data. -
Update the Description to
Search and retrieve financial portfolio data. -
In the Inputs section, select + Add input.
-
Enter name
Portfolio IDand descriptionThe ID of the portfolioand select Done. -
Select Save.
[!TIP] During execution, Computer use combines your instructions with the input values to complete the task.
Test the Computer Use Tool
-
In the Instructions section, select the Test now button on the right.
-
Add the sample value
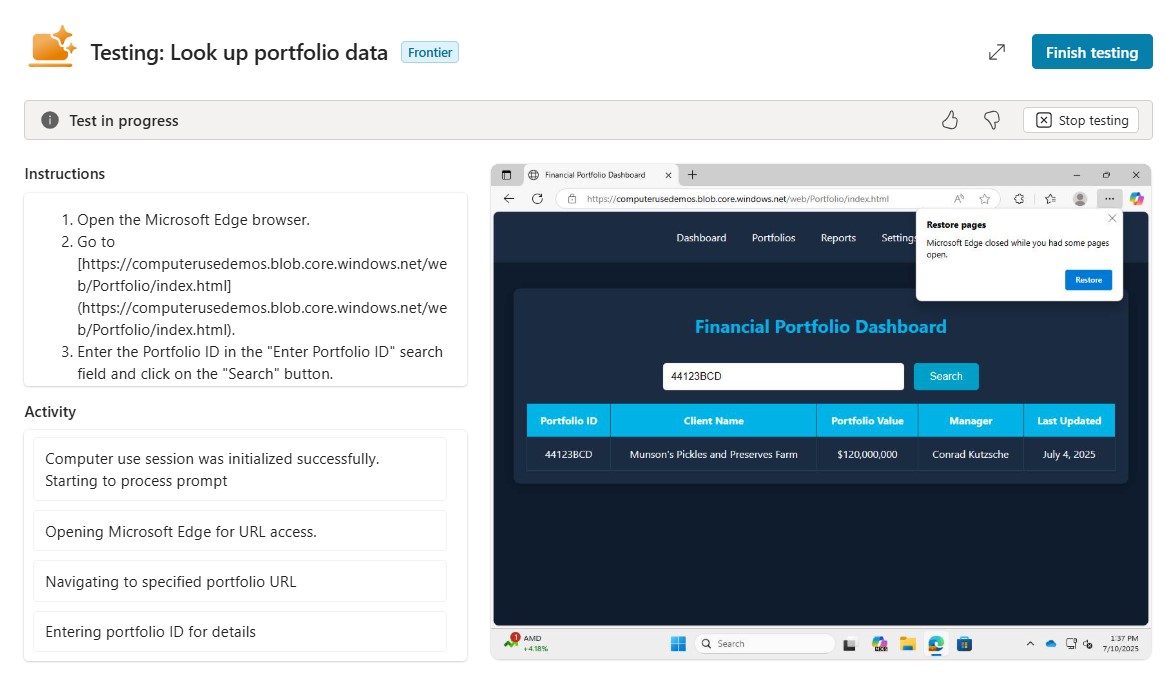
44123BCDand select Test now. - Observe the Computer use tool logging into the computer and performing the requested actions:
- The left panel shows your instructions and a step-by-step log of the tool’s reasoning and actions
- The right panel shows a preview of the actions on the machine
-
Close the test window.
[!TIP] If the result isn’t what you expect, refine your instructions with more details and test again. Allow sufficient time between tests to make sure the previous Computer use task has been fully completed before starting a new one.
Set Up Email Response
-
Return to the Tools tab and select + Add a tool.
-
Search for
Send an email (V2) (Office 365 Outlook)and select it. -
Select Add and configure.
-
Update the name to
Reply to email. -
Update the description to:
Use this operation to reply to the email received -
Under Additional details, set Credentials to use to Maker-provided credentials.
- Customize the input descriptions:
- To:
Use the "from" email of the triggering received email. - Subject:
Write the email subject. - Body:
Write the email body using HTML and highlight the requested data.
- To:
- Select Save.
Configure Agent Instructions
-
Go to the Overview tab and Select Edit on the Instructions.
-
Enter the following instructions:
When a financial portfolio related request is received, identify the Portfolio ID and search for the requested data using (replace this text). Once you have gathered the financial portfolio information, use the (replace this text) tool to reply to the original email you received. Do not respond with data beyond what was requested. - For each
(replace this text)placeholder in the instructions, select the placeholder, type/to open the dropdown menu, and select the corresponding tool:- First placeholder: Select Look up portfolio data
- Second placeholder: Select Reply to email
[!IMPORTANT] Using the
/reference technique creates a direct link between your instructions and the configured tools, ensuring the agent knows exactly which tools to invoke.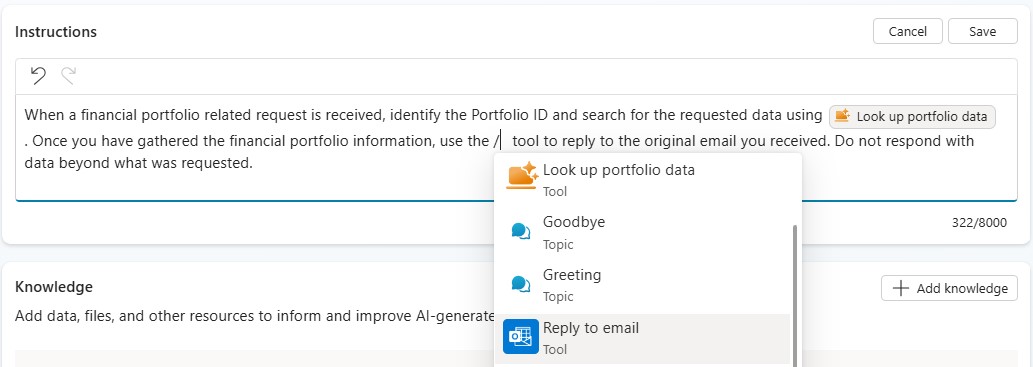
-
Save the instructions.
-
Go to the agent’s Settings, and in the Knowledge section disable the Use general knowledge option to ground agent responses only to data retrieved from CUA.
- Save the settings.
Test the Complete Workflow
- Send a test email from an email address of your preference to your training user’s email account with:
- Subject:
Portfolio data request - Body:
Hi! I hope you're doing well! I'm looking for the portfolio manager and value of portfolio #44123BCD. Much appreciated. Thanks! - Subject:
-
Make sure you receive the email in your training user’s inbox at outlook.office.com.
-
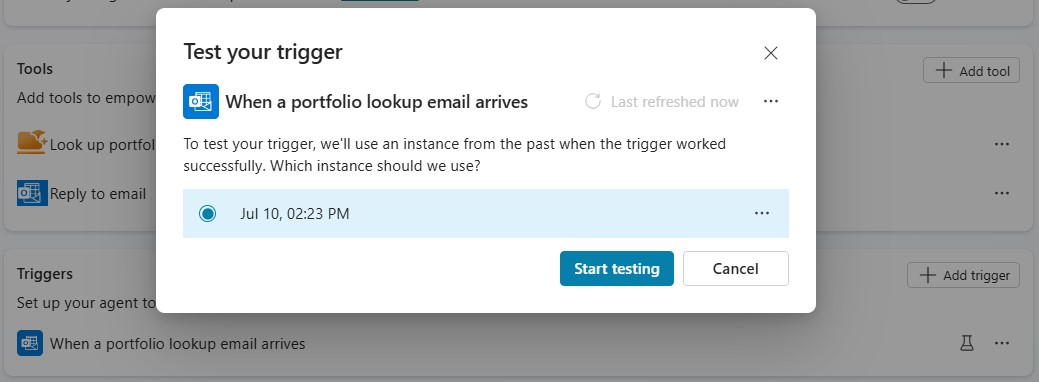
In the Overview tab, go to the Triggers section and select Test trigger.
-
Select the trigger instance and then Start testing.
-
Check your emails for the agent’s reply.
[!TIP]
- Monitor the Computer use tool’s actions in the Test chat window or through the agent’s Activity page.
- In the Activity page, select the current run and switch from Activity map to Transcript for a real-time view of all Computer use tool steps with screenshots.
Congratulations! You’ve completed the CUA Extra Credit section!
Summary of learnings
True learning comes from doing, questioning, and reflecting - so let’s put your skills to the test.
To maximize the impact of tools in Copilot Studio:
- Choose the Right Tool Type - Connectors for pre-built service integrations, MCP servers for live data access, custom prompts for structured responses, and CUA for legacy system automation
- Leverage MCP for Real-Time Data - The Dataverse MCP Server provides natural language access to live business data without building custom APIs or connectors
- Standardize with Custom Prompts - Use structured prompts to make sure all users get consistent, relevant responses with the specific data fields they need
- Test Thoroughly - Use the Activity Map to understand tool execution flow, validate calculations with edge cases, and verify end-to-end workflows
Conclusions and recommendations
Copilot Studio tools golden rules:
- Match the tool type to the integration need - don’t force one approach for all scenarios
- Always configure proper agent instructions that specify which tools to use and when
- Use Activity Map to debug and optimize tool execution
- Test with realistic data and edge cases before deploying
- Structure agent responses with custom prompts when consistency matters for business decisions
By following these principles, you’ll build agents that go beyond conversation - they take action, access live data, execute business logic, and integrate with the systems your organization relies on.