Azure Managed Identity & Service Connection Setup
A complete, end-to-end walkthrough for setting up Azure AD-based authentication for Microbots running in Azure Pipelines. By the end of this guide, your pipeline will obtain Azure AD tokens automatically — no secrets, no API keys, no manual rotation.
Who is this for? Anyone running Microbots in an Azure DevOps pipeline who wants to authenticate against Azure OpenAI using workload identity federation — the modern, secret-less way to do CI/CD auth on Azure. No API keys, no
.envfiles, no rotation cron.
What You'll Build
Azure Pipeline (running Microbots)
        │
        │ uses
        ▼
ADO Service Connection (Workload Identity Federation)
        │
        │ federated trust
        ▼
User-Assigned Managed Identity
        │
        │ RBAC role assignment
        ▼
Azure OpenAI
The pipeline never sees a secret. Azure DevOps exchanges its OIDC token for an Azure AD token tied to the managed identity, which has Cognitive Services OpenAI User on your Azure OpenAI resource — and Microbots picks that token up via DefaultAzureCredential.
Part 1 — Create a User-Assigned Managed Identity
We use a User-Assigned Managed Identity (UAMI) (not system-assigned) because it can be federated with Azure DevOps and reused across multiple pipelines and resources.
Option A — Azure Portal
-
In the Azure portal, search for "Managed Identities" and click + Create. For the full reference, see the official Azure portal walkthrough.
-
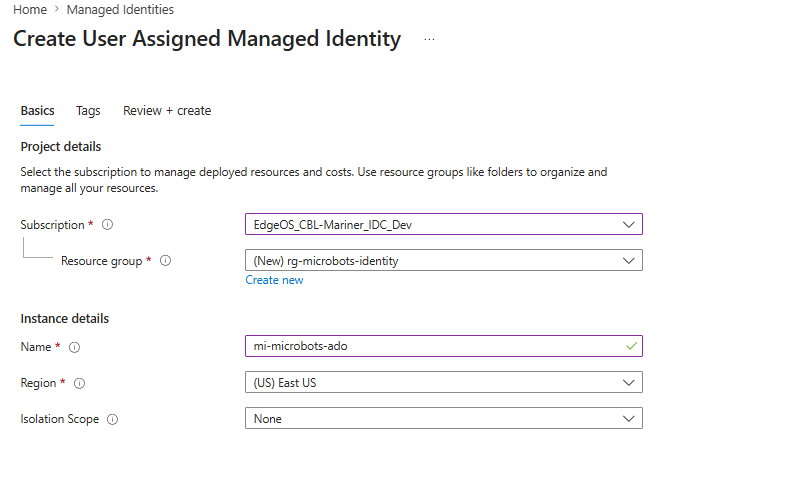
Fill in the Basics tab:
- Subscription — your subscription
- Resource group — pick or create one (e.g.
rg-microbots-identity) - Region — same region as your target resource is fine
- Name — e.g.
mi-microbots-ado
-
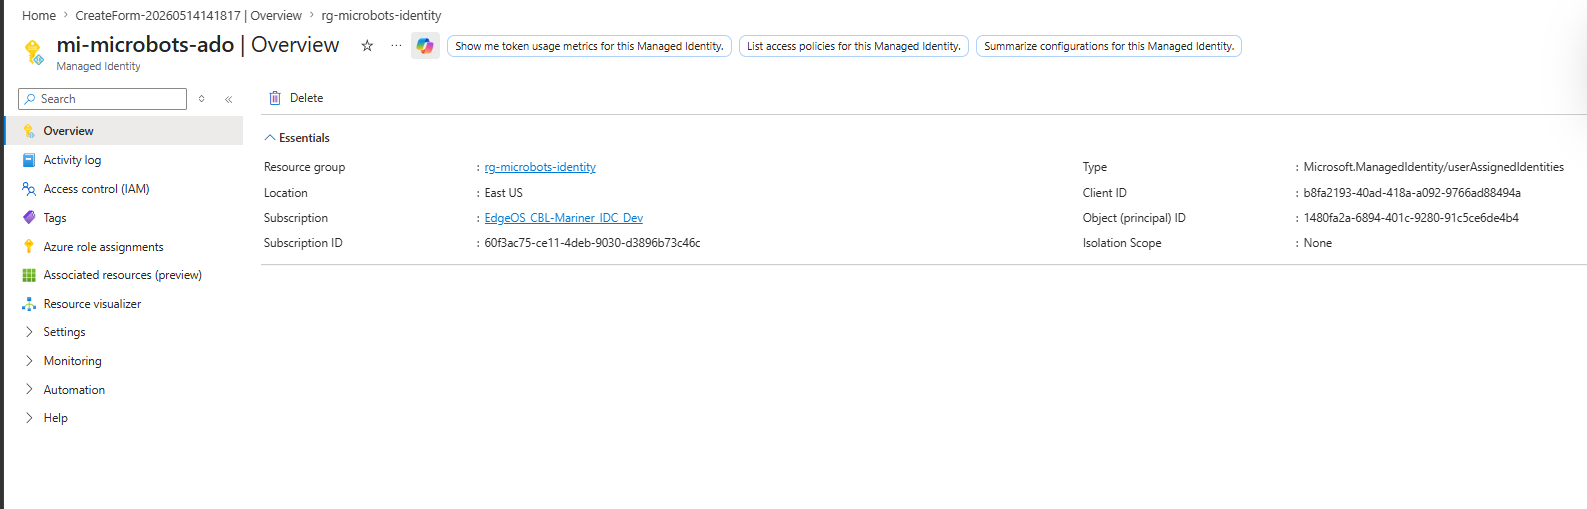
Click Review + create, then Create. After deployment, open the resource and copy three values from the Overview blade — you'll need them later:
- Client ID
- Object (principal) ID
- Subscription ID and Tenant ID
Option B — Azure CLI
The script below mirrors the steps in the official Azure CLI walkthrough.
# Variables
SUB_ID=$(az account show --query id -o tsv)
TENANT_ID=$(az account show --query tenantId -o tsv)
RG="rg-microbots-identity"
LOCATION="eastus"
MI_NAME="mi-microbots-ado"

# Create resource group (skip if it exists)
az group create -n "$RG" -l "$LOCATION"

# Create the user-assigned managed identity
az identity create -g "$RG" -n "$MI_NAME" -l "$LOCATION"

# Capture the IDs we'll need later
MI_CLIENT_ID=$(az identity show -g "$RG" -n "$MI_NAME" --query clientId -o tsv)
MI_PRINCIPAL_ID=$(az identity show -g "$RG" -n "$MI_NAME" --query principalId -o tsv)
MI_RESOURCE_ID=$(az identity show -g "$RG" -n "$MI_NAME" --query id -o tsv)

echo "Client ID:    $MI_CLIENT_ID"
echo "Principal ID: $MI_PRINCIPAL_ID"
echo "Resource ID:  $MI_RESOURCE_ID"
For PowerShell, ARM, Bicep, Terraform, or REST, refer to the Microsoft Learn docs on managed identities — the rest of this guide is the same regardless of how the identity is created.
Part 2 — Assign an RBAC Role to the Managed Identity
The managed identity needs permission on the target resource. For Microbots talking to Azure OpenAI, the least-privilege role is Cognitive Services OpenAI User.
See Understanding RBAC & Authentication for the full breakdown of roles and trade-offs.
Option A — Azure Portal
-
Open your Azure OpenAI (or target) resource → Access control (IAM) → + Add → Add role assignment. For the full reference, see Assign a managed identity access to a resource using the Azure portal.
-
On the Role tab, search for and select Cognitive Services OpenAI User → Next.
-
On Members, choose Managed identity → + Select members → filter by User-assigned managed identity, pick
mi-microbots-ado, then Select → Next → Review + assign. -
Confirm the assignment appears under Role assignments.
Option B — Azure CLI
# Target resource
AOAI_NAME="my-openai-resource"
AOAI_RG="rg-openai"

# Build & store the scope (resource ID) for reuse
AOAI_SCOPE=$(az cognitiveservices account show \
  -g "$AOAI_RG" -n "$AOAI_NAME" --query id -o tsv)

echo "Scope: $AOAI_SCOPE"

# Assign the role
az role assignment create \
  --assignee $MI_PRINCIPAL_ID \
  --role "Cognitive Services OpenAI User" \
  --scope $AOAI_SCOPE
Tip:
$MI_PRINCIPAL_IDis the managed identity's Principal (Object) ID captured in Part 1.$AOAI_SCOPEis the full ARM resource ID of your Azure OpenAI account — storing it once lets you reuse the same variable if your Microbots pipeline needs access to additional Azure OpenAI resources (see Reusing This Setup for Other Microbots Pipelines below).
Part 3 — Create the Azure DevOps Service Connection
This is the bridge: an ADO service connection of type Azure Resource Manager → Managed Identity → Workload identity federation that points at the UAMI from Part 1.
-
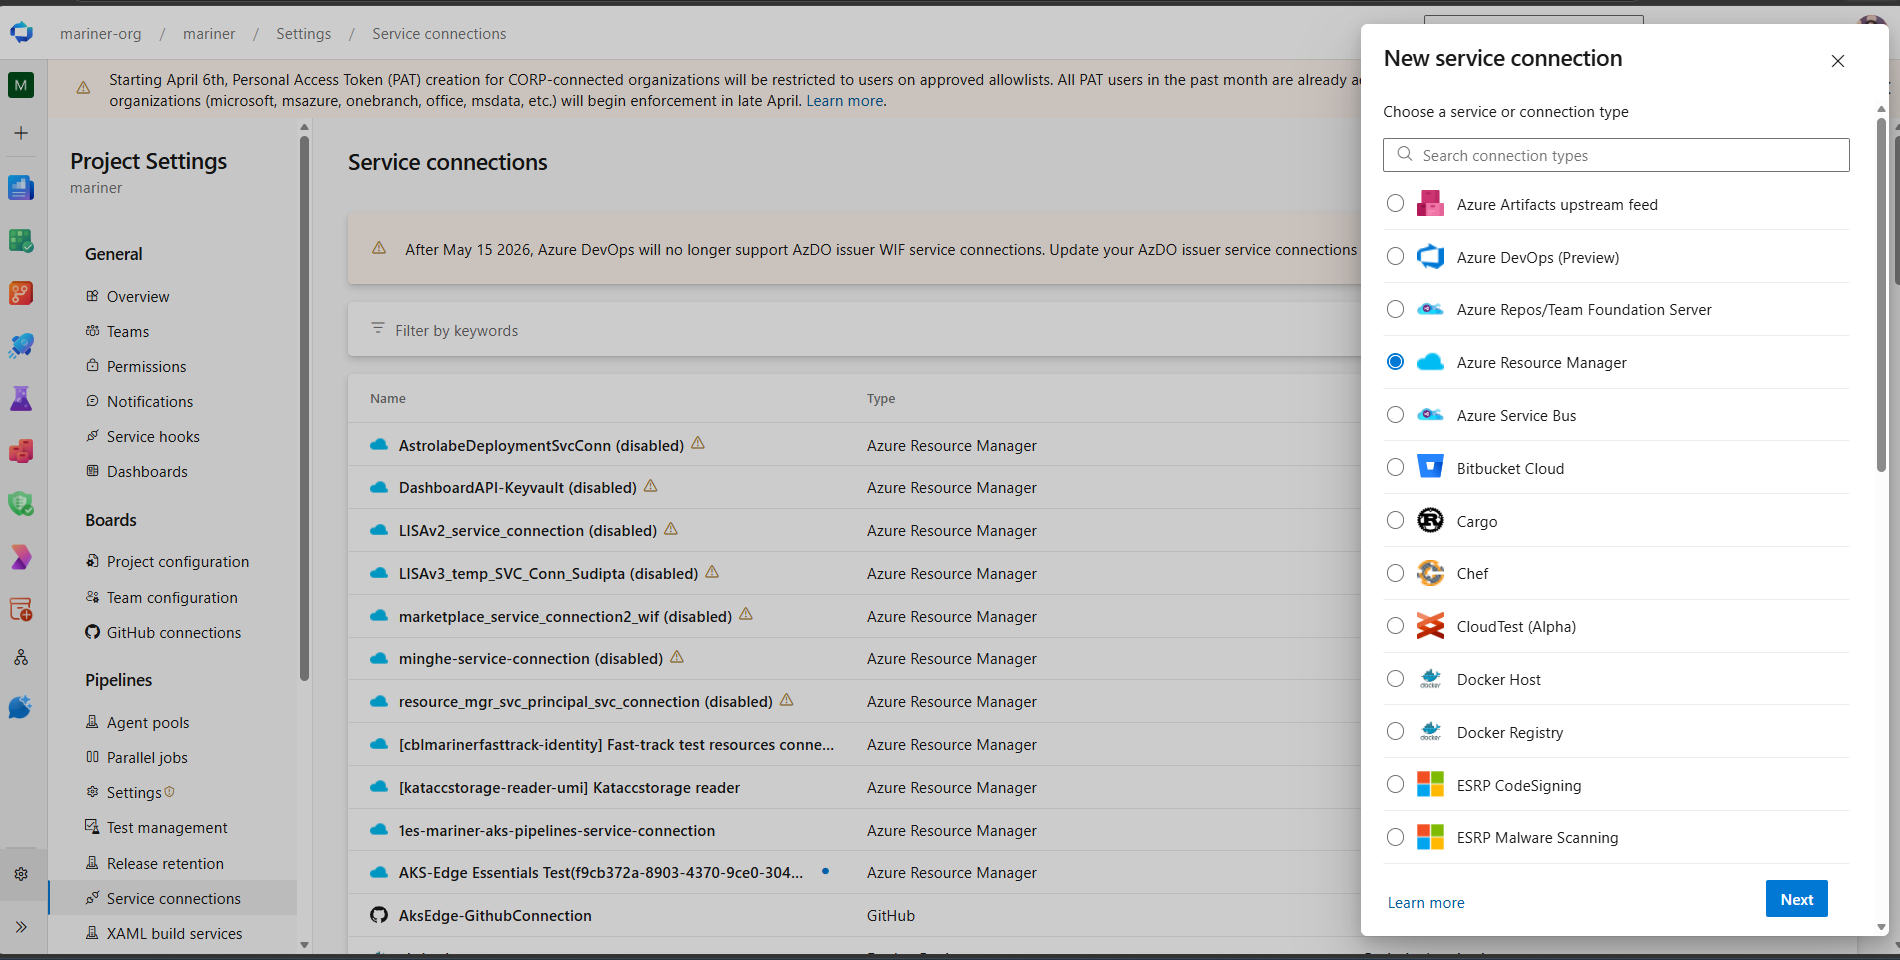
In Azure DevOps: Project Settings → Service connections → New service connection. Select Azure Resource Manager → Next.
-
Identity type: select
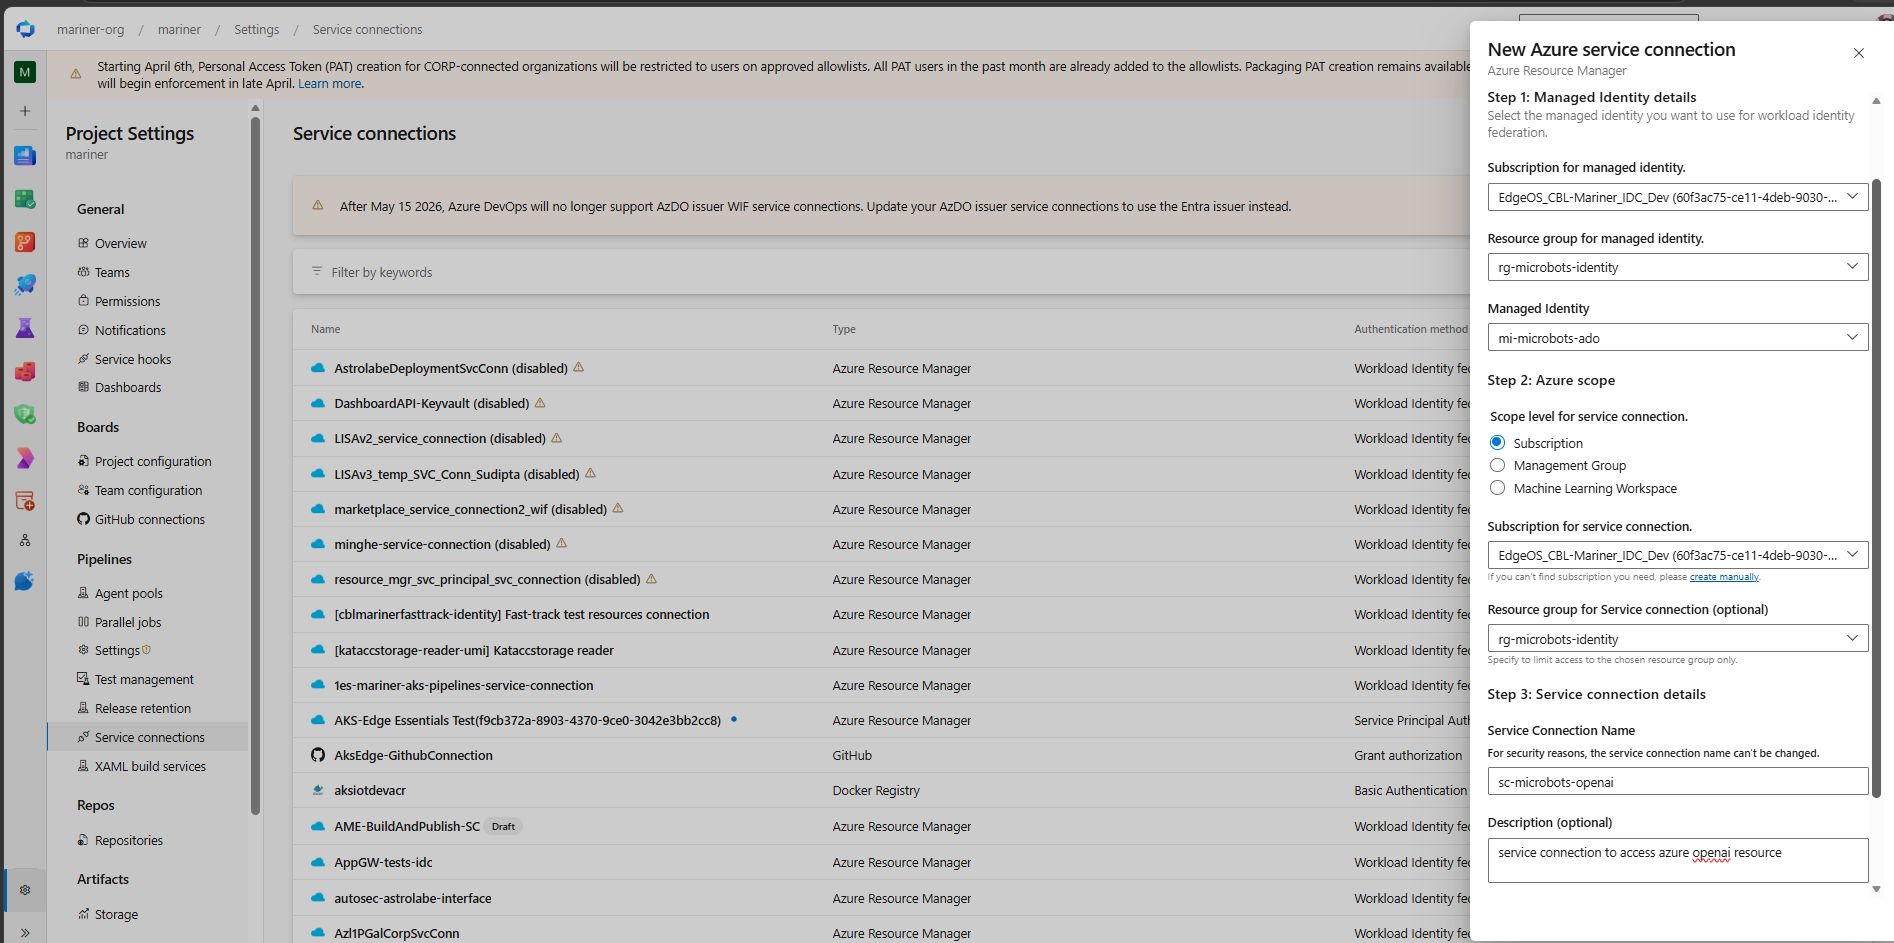
Managed identity. The form rearranges into the three steps shown below. -
Step 1 — Managed Identity details: point ADO at the UAMI you created in Part 1.
- Subscription for managed identity — the sub where the UAMI lives (
$SUB_ID) - Resource group for managed identity —
rg-microbots-identity(from Part 1) - Managed Identity — pick
mi-microbots-adofrom the dropdown
- Subscription for managed identity — the sub where the UAMI lives (
-
Step 2 — Azure scope: the scope the service connection grants pipelines access to (separate from where the MI lives).
- Scope level —
Subscription - Subscription for service connection — the subscription containing your Azure OpenAI resource
- Resource group for service connection — pick the resource group containing your Azure OpenAI resource. The Portal nags you to set this for a reason: it limits what pipelines using this connection can touch.
- Scope level —
-
Step 3 — Service connection details:
- Service connection name — e.g.
sc-microbots-openai(can't be changed later) - Description — optional
- Security — leave Grant access permission to all pipelines unchecked (you'll authorize per-pipeline on first use)
- Service connection name — e.g.
-
Click Save. ADO creates the service connection and wires up the federated credential on your UAMI for you — no manual issuer/subject paste needed. The connection appears in the list, ready to use.
Part 4 — Use the Service Connection in an Azure Pipeline
Add an AzureCLI@2 (or AzurePowerShell@5) task that references the service connection. Inside the task, Azure DevOps automatically logs in as the managed identity — az commands and the AZURE_CLIENT_ID, AZURE_TENANT_ID, AZURE_SUBSCRIPTION_ID, idToken environment variables are available.
# azure-pipelines.yml
trigger:
  - main

pool:
  vmImage: ubuntu-latest

variables:
  AZURE_SERVICE_CONNECTION: sc-microbots-openai
  AZURE_OPENAI_ENDPOINT: https://my-openai-resource.openai.azure.com
  AZURE_OPENAI_DEPLOYMENT_NAME: gpt-4o
  AZURE_OPENAI_API_VERSION: 2025-03-01-preview

steps:
  - checkout: self

  - task: UsePythonVersion@0
    inputs:
      versionSpec: '3.11'

  - script: |
      python -m pip install --upgrade pip
      pip install microbots
    displayName: Install Microbots

  - task: AzureCLI@2
    displayName: Run Microbots with federated identity
    inputs:
      azureSubscription: $(AZURE_SERVICE_CONNECTION)
      scriptType: bash
      scriptLocation: inlineScript
      addSpnToEnvironment: true   # exposes servicePrincipalId / tenantId / idToken
      inlineScript: |
        set -euo pipefail

        # Sanity check: confirm we're signed in as the managed identity
        az account show --query '{name:name, user:user.name}' -o table

        # Run your script — Microbots' DefaultAzureCredential picks up the
        # AzureCLI login automatically; no secrets needed.
        python scripts/run_bot.py
      workingDirectory: $(Build.SourcesDirectory)
A minimal scripts/run_bot.py to validate the end-to-end flow:
from azure.identity import DefaultAzureCredential, get_bearer_token_provider
from microbots.MicroBot import MicroBot

token_provider = get_bearer_token_provider(
    DefaultAzureCredential(),
    "https://cognitiveservices.azure.com/.default",
)

bot = MicroBot(
    model="azure-openai/gpt-4o",
    folder_to_mount="/path/in/repo",
    token_provider=token_provider,
)
print(bot.run(task="Summarize README.md").response)
Verifying the Whole Flow
Run the pipeline. In the AzureCLI@2 task logs you should see:
az account showreportinguser.namematching your managed identity's Client ID- No
Sharing access tokens with all installed extensions-style warnings - The Python step completing without
ClientAuthenticationError
Reusing This Setup for Other Microbots Pipelines
The same managed identity + service connection can authenticate multiple Microbots pipelines — different repos, different bots, different Azure OpenAI deployments. Just add another role assignment for each Azure OpenAI resource your bots need to reach:
# Second Azure OpenAI resource for another Microbots pipeline
AOAI_NAME_2="my-other-openai-resource"
AOAI_RG_2="rg-openai-team-b"

AOAI_SCOPE_2=$(az cognitiveservices account show \
  -g "$AOAI_RG_2" -n "$AOAI_NAME_2" --query id -o tsv)

az role assignment create \
  --assignee $MI_PRINCIPAL_ID \
  --role "Cognitive Services OpenAI User" \
  --scope $AOAI_SCOPE_2
One identity, one service connection, many Microbots pipelines.
Next Steps
- Conceptual background → Understanding RBAC & Authentication
- All authentication options → Authentication Setup
- Why secret-less matters → Microbots: Safety First Agentic Workflow