Introduction
Welcome to the Mu Tiano Platforms book. This book documents the two virtual platforms maintained in the
mu_tiano_platforms repository and the workflows used to build,
debug, and validate them.
The primary purpose of mu_tiano_platforms is to provide readily available, free, and feature-rich reference platforms
built with Project Mu that target the open-source QEMU
processor emulator. These platforms serve as an example for feature enablement and validation — demonstrating how a
single firmware codebase can be shared across multiple products and architectures, promoting serviceable, maintainable,
up-to-date, and secure firmware. A goal of this repository is to reduce the overhead of testing and evaluating common
functionality before deployment to physical hardware.
QemuQ35Pkg in this repository was originally derived from
OvmfPkg in TianoCore. The package is considered stable, so
regular syncing is not performed with the upstream; select changes are cherry-picked based on functional or security
importance.
Platforms:
- QEMU Q35 - an IA32/X64 platform based on the Intel Q35 chipset.
- QEMU Arm Virt - an AArch64 platform based on the QEMU ARM Virtual Machine.
What is in this book
This book is organized into the following sections:
- Building and Debugging - Setting up your environment, compiling the firmware, running it in QEMU, and connecting a debugger to inspect the boot flow.
- Common Features - Project Mu features enabled across both QEMU platforms:
DFCI, Front Page, memory protection, telemetry (WHEA), TPM, the platform testing framework, and the shared
QemuRunnerplugin. - Q35 Features - Q35-specific features including CodeQL static analysis, the Color Bar device-state indicator, the configuration (setup data) framework, Platform Runtime Mechanism (PRM), and TPM Replay.
- Trusted Platform Module (TPM) - Deep dives on the TPM 2.0 stack for each platform, including
the FF-A based dual-CRB architecture on Arm Virt and the direct CRB/TIS path on Q35, plus guidance for running
TpmShellAppon both. - Templates - Reusable templates for feature-branch documentation.
Related Documentation
- Project Mu - the main Project Mu documentation site.
- Project Mu on GitHub - hosts all Project Mu repositories, including
this one,
mu_basecore,mu_plus,mu_oem_sample, and the feature repos consumed as submodules here. - QEMU - the open-source processor emulator these platforms target.
- How to Build in EDK II with Stuart - background on the Stuart build system used throughout this repository.
- Releases, Discussions, Issues, and the security policy for this repository.
QemuQ35Pkg
QemuQ35Pkg...
- Is a derivative of OvmfPkg.
- Will not support Legacy BIOS or CSM.
- WIll not support S3 sleep functionality.
- Has a 32-bit PEI phase and a 64-bit DXE phase.
- Seeks to enable a tightly constrained virtual platform based on the QEMU Q35 machine type.
By solely focusing on the Q35 chipset, this package can be optimized such that it is allowed to break compatibility with other QEMU supported chipsets. The Q35 chipset can be paired with an IA32 or X64 processor to enable a machine that can emulate PC class hardware with industry standard features like SMM and PCI-E.
Table of Contents
Q35 Platform
Q35 is a machine type that QEMU emulates. Below is a diagram from Qemu.org about the Q35 chipset which emulates a ICH9 (I/O controller hub).
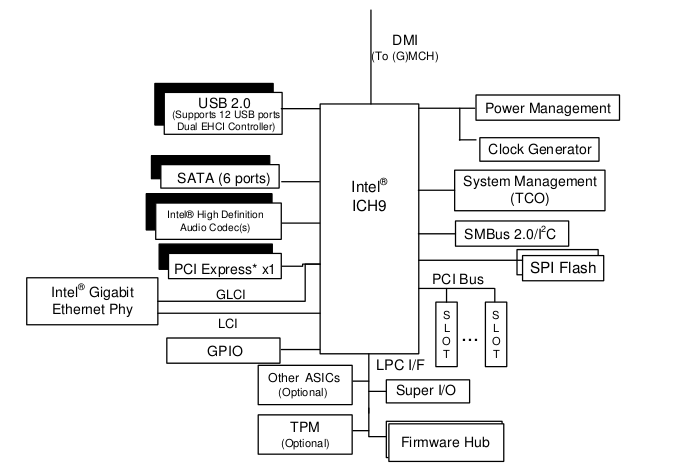
The advantages of the ICH9 over the I440FX (which is what QEMU often emulates) is that it has PCI-E instead of just PCI as well as having an integrated AHCI controller and no ISA bus.
Visit the feature wiki detailing QEMU Q35 for more information: https://wiki.qemu.org/Features/Q35
Compiling and Running QEMU
QemuQ35Pkg uses the Project Mu repositories and Edk2 PyTools for its build operations. Specific details can be found here Development/building.md
Firmware Features
QemuQ35Pkg is a great environment to demonstrate Project Mu features without any restricted or costly physical hardware. Current QEMU Q35 platform supports the following features provided by Project Mu:
CodeQL
CodeQL is open source and free for open-source projects. It is maintained by GitHub and naturally has excellent integration with GitHub projects. CodeQL uses a semantic code analysis engine to discover vulnerabilities in a number of programming languages (both compiled and interpreted).
Project Mu (and TianoCore) use CodeQL C/C++ queries to find common programming errors and security vulnerabilities in
firmware code. This platform leverages the CodeQL build plugin from Mu Basecore that makes it very easy to run CodeQL
against this platform. You simply use provide the --codeql argument in your normal stuart_update and stuart_build
commands.
Color Bar
Color bars are used to quickly convey the Device state, based upon the DeviceStateLib. Color bars are displayed by the ColorBarDisplayDeviceStateLib.
Config
Project Mu offers a UEFI configuration feature with example implementation in QemuQ35Pkg. Background about the
features and more details about its integration in this repo are available in the detailed readme.
Device Firmware Configuration Interface (DFCI)
The DFCI feature enables cloud management services (MDM services like Microsoft Intune) to manage some PC bios settings securely. DFCI is a foundational feature that provides a shared identity and ownership model between the device firmware and the cloud. Once a device is enrolled this shared identity can be used to securely communicate across untrusted mediums (network or usb).
Mu Front Page
This feature enables the Project Mu OEM sample "front page".
This is a touch friendly, graphical, UEFI HII based UI application that allows basic platform and boot device configuration.
Mu Telemetry / WHEA / HwErrorRecord
The Mu Telemetry feature is an extension of the PI spec defined report status code. The feature is designed to collect critical (platform defined) status codes, record them into a HwErrRecord, and then transfer them through the Microsoft WHEA pipeline. From there an OEM can use Microsoft provided reports to check on in market device health. *Some work still pending completion.
Platform Runtime Mechanism (PRM)
Platform Runtime Mechanism (PRM) introduces the capability of moving certain classes of SMM code out of SMM and into a code module that executes within OS context. This feature adds the PRM infrastructure to the firmware that enables loading PRM modules which in turn are exposed to the OS for invocation. To accomplish this, a set of open source sample PRM modules are used to demonstrate the feature and show how additional modules can be added.
Trusted Platform Module (TPM)
QEMU TPM emulation implements a TPM TIS hardware interface that follows the Trusted Computing Group's TCG PC Client
Specific TPM Interface Specification (TIS) in addition to a TPM CRB interface that follows the TCG PC Client Platform
TPM Profile (PTP) Specification. QemuQ35Pkg has support to include TPM drivers and connect to the software TPM socket
interface. Usage is covered in the detailed feature readme.
Trusted Platform Module (TPM) Replay
An OS and firmware developer feature that allows a custom crafted TPM event log to be created and replayed during boot. Any PCRs specified in the input TPM Replay event log are exclusively extended to the PCR (any other firmware measurements that would normally target the PCR are blocked). This feature can be useful to test a wide range of inputs to OS and firmware features dependent on TPM measurements
UEFI Memory Protections
UEFI Memory Protections add safety functionality such as page and pool guards, stack guard, and null pointer detection. The settings are split between MM and DXE environments for modularity.
Mu Customized Components
Modules
| Modules | Link to Documentation |
|---|---|
| QemuVideoDxe | QEMU Video Controller |
Libraries
| Libraries | Link to Documentation |
|---|---|
| MsPlatformDevicesLib | MsPlatformDevicesLib |
| PlatformDebugLibIoPort | PlatformDebugLibIoPort |
| PlatformThemeLib | PlatformThemeLib |
QemuArmVirtPkg
QemuArmVirtPkg...
- Is another derivative of OvmfPkg based on EDK2 QEMU ARM Virt machine type.
- Will not support Legacy BIOS or CSM.
- WIll not support S3 sleep functionality.
- Has 64-bit for SEC and DXE phase, and no PEI phase.
- Seeks to enable a tightly constrained virtual platform based on the QEMU ARM CPUs.
By solely focusing on the ARM chipset, this package can be optimized such that it is allowed to break compatibility with other QEMU supported chipsets. The ARM chipset can be paired with an AARCH64 processor to enable a machine that can emulate ARM based hardware with industry standard features like TrustZone and PCI-E.
QEMU ARM Virt Platform
An ARM Virt machine is an ARM based machine type that QEMU emulates.
The advantages of the virtual ARM platform over the previous SBSA platforms (which is also what QEMU emulates) is that it has better ARM based flexible configuration options for devices and more modern hardware support. In addition, the corresponding trusted-firmware entities are more mature and feature-rich.
Compiling and Running QEMU
QemuArmVirtPkg uses the Project Mu repositories and Edk2 PyTools for its build operations. Specific details can be found here Development/building.md
Firmware Features
QemuArmVirtPkg is a great environment to demonstrate Project Mu features without any restricted or costly physical hardware. Current QEMU ARM Virt platform supports the following features provided by Project Mu:
Mu Front Page
Enable the Project Mu OEM sample "front page". This is a touch friendly, graphical, UEFI HII based UI application that allows basic platform and boot device configuration.
Device Firmware Configuration Interface
The DFCI feature enables cloud management services (MDM services like Microsoft Intune) to manage some PC bios settings securely. DFCI is a foundational feature that provides a shared identity and ownership model between the device firmware and the cloud. Once a device is enrolled this shared identity can be used to securely communicate across untrusted mediums (network or usb).
Mu Telemetry / WHEA / HwErrorRecord
The Mu Telemetry feature is an extension of the PI spec defined report status code. The feature is designed to collect critical (platform defined) status codes, record them into a HwErrRecord, and then transfer them through the Microsoft WHEA pipeline. From there an OEM can use Microsoft provided reports to check on in market device health. *Some work still pending completion.
Trusted Platform Module (TPM)
QEMU TPM emulation implements a TPM TIS hardware interface that follows the Trusted Computing Group's TCG PC Client
Specific TPM Interface Specification (TIS) in addition to a TPM CRB interface that follows the TCG PC Client Platform
TPM Profile (PTP) Specification. QemuArmVirtPkg has support to include TPM drivers and connect to the software TPM
socket interface. Usage is covered in the detailed feature readme.
Mu Customized Components
Modules
| Modules | Link to Documentation |
|---|---|
| QemuVideoDxe | QEMU Video Controller |
Libraries
| Libraries | Link to Documentation |
|---|---|
| MsPlatformDevicesLib | MsPlatformDevicesLib |
Building
Steps to setup your environment, compile, and run QemuQ35Pkg and QemuArmVirtPkg.
Developer environment
This is a Project Mu platform and thus the default environment requirements can be found here at the Project Mu Prerequisites page.
QEMU is used to run the locally compiled firmware on a virtual platform. If you are on windows, no action is needed, we provide an external dependency that includes the necessary QEMU binaries. If you are on Linux, install it.
This build uses edk2-pytools for functionality. Documentation can be found here. On most Linux distros this requires an extra step for mono and nuget support. https://github.com/tianocore/edk2-pytool-extensions/blob/master/docs/usability/using_extdep.md#a-note-on-nuget-on-linux
Building with Pytools
-
[Optional] Create a Python Virtual Environment - generally once per workspace
python -m venv <name of virtual environment> -
[Optional] Activate Virtual Environment - each time new shell opened
-
Linux
source <name of virtual environment>/bin/activate -
Windows
<name of virtual environment>/Scripts/activate.bat
-
-
Install Pytools - generally once per virtual env or whenever pip-requirements.txt changes
pip install --upgrade -r pip-requirements.txt -
Initialize & Update Submodules - only when submodules updated
stuart_setup -c Platforms/<Package>/PlatformBuild.py TOOL_CHAIN_TAG=<TOOL_CHAIN_TAG>TOOL_CHAIN_TAGbeing the toolchain you want to build with, currentlyVS2019,VS2022, andGCC5are supported values. Q35 can be built withGCC5,VS2019, andVS2022toolchains. ArmVirt can be built withGCC5.- NOTE: Building with GCC5 targeting AARCH64 requires the setup to export
GCC5_AARCH64_PREFIX.GCC5_AARCH64_PREFIXshould contain the path and the prefix to the gcc/objcopy tools, and needs to match the tool chain that is being used by the platform. The below example is for the gcc-aarch64-linux-gnu tool chain, but other tool chains can be used. As an example,export GCC5_AARCH64_PREFIX=/usr/bin/aarch64-linux-gnu- - NOTE: Since mu release 202511, the toolchain
GCCis also supported for building both Q35 and ArmVirt. Accordingly,GCC5_AARCH64_PREFIXshould be replaced withGCC_AARCH64_PREFIXwhen building for ArmVirt.
-
Initialize & Update Dependencies - only as needed when ext_deps change
stuart_update -c Platforms/<Package>/PlatformBuild.py TOOL_CHAIN_TAG=<TOOL_CHAIN_TAG> -
Compile Firmware
stuart_build -c Platforms/<Package>/PlatformBuild.py TOOL_CHAIN_TAG=<TOOL_CHAIN_TAG>- use
stuart_build -c Platforms/<Package>/PlatformBuild.py -hoption to see additional options like--clean
- use
-
Running Emulator
-
You can add
--FlashRomto the end of your build command and the emulator will run after the build is complete. -
or use the
--FlashOnlyfeature to just run the emulator.stuart_build -c Platforms/<Package>/PlatformBuild.py TOOL_CHAIN_TAG=<TOOL_CHAIN_TAG> --FlashOnly
-
-
Alternative Options
-
All the commands specified here can use a shortcut, which is to invoke the Build file directly. For example:
py Platforms/<Package>/PlatformBuild.py TOOL_CHAIN_TAG=<TOOL_CHAIN_TAG> --FlashOnly -
Setup and update can be done by passing it in
py Platforms/<Package>/PlatformBuild.py TOOL_CHAIN_TAG=<TOOL_CHAIN_TAG> --setuppy Platforms/<Package>/PlatformBuild.py TOOL_CHAIN_TAG=<TOOL_CHAIN_TAG> --update -
Under the hood, it just does the invocation of Stuart for you.
-
Notes
- QEMU is provided on windows via an external dependency located at QemuPkg/Binaries; Qemu must be manually downloaded on linux.
- QEMU for linux requires at least version 9.0.2 when booting an operating system; if you are only booting to shell, matching the version to the windows external dependency is acceptable.
- If you want to override the external dependency on windows, or the installed version on linux, you can use
QEMU_PATH = <path>on the command line.
NOTE: Logging the execution output will be in the normal stuart log as well as to your console (if you have the correct logging level set, by default it doesn't output to console).
Custom Build Options
SHUTDOWN_AFTER_RUN=TRUE will output a startup.nsh file to the location mapped as fs0 with reset -s as the final
line. This is used in CI in combination with the --FlashOnly feature to run QEMU to the UEFI shell and then execute
the contents of startup.nsh.
QEMU_PATH Can specify the path to a specific QEMU binary to use.
QEMU_HEADLESS=TRUE Since CI servers run headless QEMU must be told to run with no display otherwise an error occurs. Locally you don't need to set this.
GDB_SERVER=<TCP Port> Enables the GDB port in the QEMU instance at the provided TCP port.
SERIAL_PORT=<Serial Port> Enables the specified serial port to be used as console.
ENABLE_NETWORK=TRUE will enable networking (currently supported on the QEMU Q35 platform). If DFCI_VAR_STORE is
set, networking will also be enabled with TCP ports 8270 and 8271 forwarded for the robot framework.
Passing Build Defines
To pass build defines through stuart_build, prepend BLD_*_ to the define name and pass it on the command-line.
stuart_build currently requires values to be assigned, so add a =1 suffix for bare defines. For example, to enable
the E1000 network support, instead of the traditional "-D E1000_ENABLE", the stuart_build command-line would be:
stuart_build -c Platforms/<Package>/PlatformBuild.py BLD_*_E1000_ENABLE=1
References
Debugger QEMU Platforms
This document described different ways to debug on the QEMU platforms.
Debugging using UEFI debugger
Both Q35 and ArmVirt are setup to debug debugged using the MU debugger package. for more details on using this debugger, see the FeatureDebuggerPkg Readme.
By default the debugger is enabled to break in on exceptions, but not to break in on an initial breakpoint. To enable the initial breakpoint in DXE, you must pass:
stuart_build -c Platforms\QemuQ35Pkg\PlatformBuild.py BLD_*_DXE_DBG_BRK=TRUE --FlashRom
On Q35 this allows for debugging over a different port then the usual debug output because Q35 has a seperate serial
port available to it. On ArmVirt the serial port will be shared with the logging output. On both platforms, if
SERIAL_PORT=
Currently this will only enable the DXE debugger. The MM debugger will be added to Q35 once it support supervised Standalone MM.
When an exception occurs, the debugger will break in and wait for a debugger client to connect. This makes Q35 and ArmVirt very debuggable, because they will break in on exceptions always, meaning a reboot is not required.
Debugging using QEMU GDB Server
QEMU has the ability to expose a GDB port for debugging. This can be leveraged several ways. To start enable the GDB server, add the following parameter when launched QEMU through the QEMU runner.
GDB_SERVER=<port number>
Example ports can be: 1234, 5000, 5001, etc.
Windbg Integration
Windbg supports source debugging QEMU through an EXDI interface with the GDB port. Details can be found on the github readme. This supplies a EXDI server binary, a configuration file, and a script to start Windbg bound to the EXDI interface.
Once Windbg is connected, following the instruction in the readme, the symbols and source can be loaded. This is most easily done using the UEFI debugger extension. This can also be done manually by scanning memory for images using the image scan command. For example:
kd> r rip
rip=000000007d1fc64b
kd> .imgscan /l /r 0x07d000000 0x07e000000
This will scan for image headers between the specified addresses and load their symbols. More information on this command can be found in the Windbg help window.
Debugging Using GDB in VS Code
For GCC builds, GDB can be used to debug instead. The symbols can be loaded by running
source MU_BASECORE/BaseTools/Scripts/efi_gdb.py from within GDB while stopped. To connect GDB to the built in VS Code
debugger, you can use the following launch configuration to connect to a running instance of QEMU.
{
    "name": "Connect to GDB Server (X64)",
    "type": "cppdbg",
    "request": "launch",
    "program": "${workspaceRoot}/Build/QemuQ35Pkg/DEBUG_GCC5/X64/DxeCore.debug",
    "miDebuggerServerAddress": "localhost:1234",
    "cwd": "${workspaceRoot}",
    "environment": [],
    "MIMode": "gdb",
    "miDebuggerPath": "gdb",
    "stopAtConnect": true
},
{
    "name": "Connect to GDB Server (AARCH64)",
    "type": "cppdbg",
    "request": "launch",
    "program": "${workspaceRoot}/Build/QemuArmVirtPkg/DEBUG_GCC5/AARCH64/DxeCore.debug",
    "miDebuggerServerAddress": "localhost:1234",
    "cwd": "${workspaceRoot}",
    "environment": [],
    "MIMode": "gdb",
    "miDebuggerPath": "gdb-multiarch",
    "stopAtConnect": true
},
Note that the program value must be a legitimate binary, but does not seem to have any affect on the debugging.
Additionally, gdb may need to be used instead of gdb if debugging x64 from an x64 machine.
Once attached, you can stop and run -exec source MU_BASECORE/BaseTools/Scripts/efi_gdb.py from the DEBUG CONSOLE tab
to load the EFI symbols and commands. You may need to single step after this for symbols to take affect.
Debugging Windows on QEMU
Boot to OS
In order to kernel debug the OS, once need to boot to OS first.
-
Download original OS image in the format of VHDX or QCOW2. If the image has never been booted before, one can boot this image using Hyper-V once to get through the OOBE process, if any. Related reads:
-
Although QEMU supports both VHDX and QCOW2 images. For the sake of fail proof, it is recommended to use QCOW2 format image, which can be converted from VHDX image with:
qemu-img convert -f vhdx -p -c -O qcow2 foo.vhdx foo.qcow2 -
With the above QCOW2 image, set up the
PATH_TO_OSparameter when launching QemuRunner.py:PATH_TO_OS=<absolute path to your OS image> SERIAL_PORT=<port number>- More details on the
<port number>in the corresponding section
- More details on the
Debug Windows with WinDbg on QEMU
Unlike EXDI debugger introduced above, this method will enlighten the target OS and debug the Windows more "traditionally", where Windows can communicate to the attached debugger with proper transports.
Configurations on Target QEMU
After booting to the desktop or command prompt of target Windows by following above steps, issue below commands:
bcdedit /dbgsettings serial debugport:1 baudrate:115200
bcdedit /set {default} debug on
# One can potentially enable boot debugger as well
bcdedit /set {default} bootdebug on
Configurations on Host that runs QEMU
Once the QEMU boots to the point where the target is accepting debugger commands, launch the WinDbg using:
windbg.exe -k com:ipport=<port number>,port=127.0.0.1 -v
where the <port number> is the number you set when launching QEMU
Serial Console for UEFI
Launch terminal application such as Putty or Tera Term to connect to <port number> you set when
launching QEMU at 127.0.0.1 through raw TCP/IP protocol.
Note:
- One needs to release this console in order for the KD to attach.
- Some terminal software would enable "local line editing" for raw connection, this needs to be turned off to prevent garbage keystrokes.
Device Firmware Configuration Interface (DFCI)
Todo
Front Page
The Project Mu graphical front page provides access to system information, boot option configuration, and DFCI configuration settings.
For more information about front page, refer to its documentation - OemPkg - Front Page.
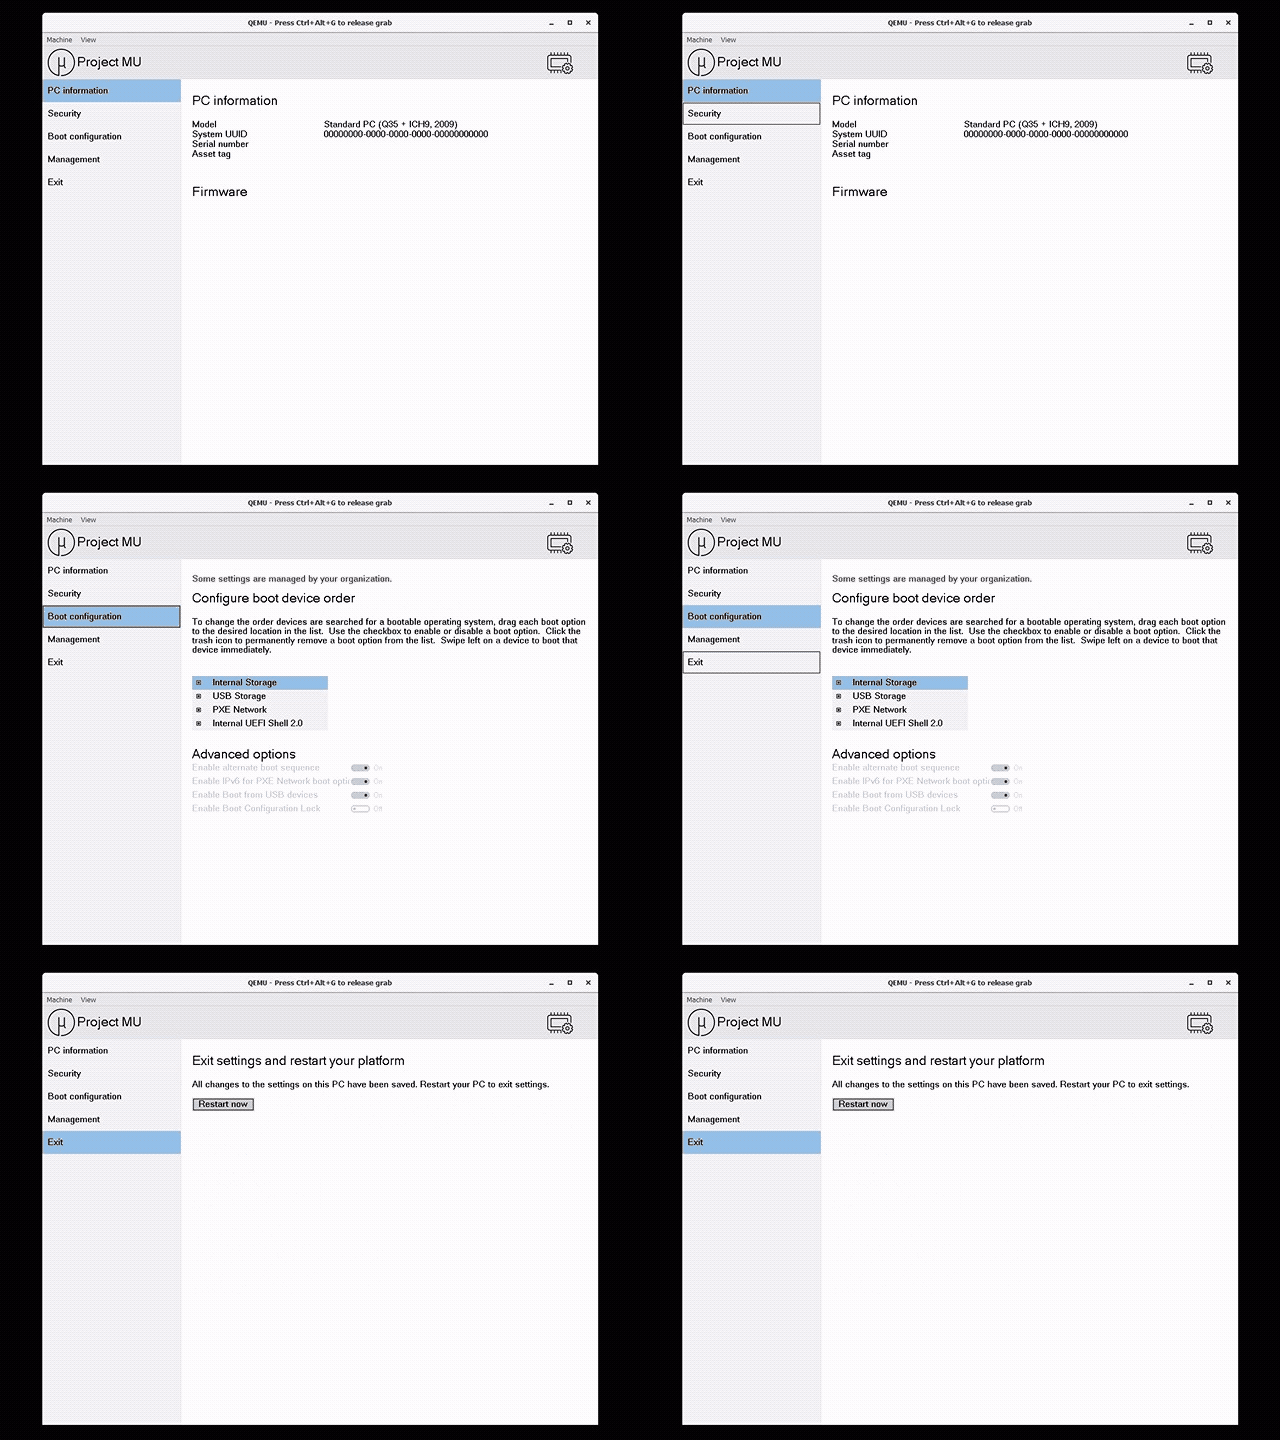
Entering Front Page
Two build variables are available that influence how front page is built and loaded.
-
BLD_*_GUI_FRONT_PAGE=TRUE- Builds the front page application shown here instead of alternative non-GUI applications that act as the front page. The default value for this variable isFALSE, therefore it must be set toTRUE. -
BOOT_TO_FRONT_PAGE=TRUE- Simulates pressing the Vol+ button which indicates that the boot should prioritize the front page boot option. If this is not done, but (1) is set toTRUE, this front page can still be entered but it is not loaded automatically. Instead, the boot will likely boot to the EFI shell and then exiting the shell (with theexitcommand), will switch to this front page.Once in front page, the boot option order can be configured as desired. This front page's boot option entry is named "Mu UEFI UI Front Page".
The default value for this variable is
FALSE.
Memory Protection
For in-depth technical details on Memory Protection in Project Mu, see feature_memory_protection.md
Memory protections are important because Unified Extensible Firmware Interface (UEFI) standard accounts for the firmware design implemented in 80 to 90 percent of the of PCs and servers sold worldwide. Developed and supported by more than 250 industry-leading companies, UEFI firmware is responsible for booting and securing billions of devices spanning device classes from embedded applications to multi-role server systems.
While considerable attention has been devoted to hardware trust anchors and operating system security, attackers have discovered that UEFI firmware is lacking basic memory protections that have been present in other system software for over a decade. Coupled with the inconsistency of security capabilities inherit to vendor firmware implementations, UEFI firmware has become an increasingly attractive system attack vector.
QemuQ35Pkg and QemuArmVirtPkg allow experimentation with the memory protections being offered in physical platforms.
Memory protections are ON by default on Q35 and Arm Virt. To disable memory protection add
BLD_*_MEMORY_PROTECTION=FALSE to your stuart_build command. Example:
stuart_build -c .\Platforms\<Platform>\PlatformBuild.py BLD_*_MEMORY_PROTECTION=FALSE --FlashRom
Because MEMORY_PROTECTION is a build flag, the platform will need to be rebuilt for a change to the value to take
effect (meaning --FlashOnly will not work).
QemuRunner_plug_in
The QEMU runner plugin supports easy execution of the QEMU emulator running the locally compiled firmware. This runner also supports easy local and server execution of UEFI shell based tests. It can automatically collect compiled UEFI shell based unit tests, mount a VHD or map a folder as a drive, and then parse the results once QEMU has finished.
Configuration
The plugin has numerous configuration options to support the Arm Virt and Q35 Platforms. These can be set when calling
stuart_build or platform_build by adding <name>=<value> to the command line.
Example setting up unit test to run automatically
stuart_build -c Platforms/<Platform>/PlatformBuild.py SHUTDOWN_AFTER_RUN=TRUE RUN_TESTS=TRUE
QEMU_HEADLESS
Boolean string value to indicate if QEMU should be configured to run headless/no graphics. By default graphics will be used but in some server/remote scenarios headless is required.
TRUE: configure QEMU to run headless or with no graphics
FALSE: configure QEMU for local graphics (default)
FILE_REGEX
Comma separated regular expressions to configure the plugin on how to identify a file to automatically move to the
provided virtual drive. If RUN_TEST=TRUE, then these files will be treated as UEFI shell based unit test.
Example: FILE_REGEX=MyTestOne.efi,*UefiShellApp.efi
RUN_TESTS
Boolean string value to indicate the plugin should write all shell-based unit tests located with FILE_REGEX to
startup.nsh.This startup.nsh is a special file that executes when the UEFI shell loads. See UEFI shell specification
for more details. Unless SHUTDOWN_AFTER_RUN=FALSE is also passed, QEMU will shutdown after executing to parse and
display the XML based results.
TRUE: find, execute, and evaluate UEFI shell unit tests
FALSE: do not (default)
SHUTDOWN_AFTER_RUN
Boolean string value to indicate that QEMU should be shutdown once it has finished running. The system is finished
running when it has booted to shell or all unit tests specified by FILE_REGEX and added to the startup.nsh script
with RUN_TESTS=TRUE have finished execution.
TRUE: The system will automaticaly shutdown after booting to shell or running all unit tests
FALSE: The system will not automatically shutdown (default)
EMPTY_DRIVE
Boolean string value to control plugin creation of virtual drive folder and emptying the folder before copying contents. When running automated tests multiple times they may write some state to the virtual drive which may change their execution. Sometimes that is desired and this option allows the plugin to copy new files to the virtual drive but not delete files.
TRUE: delete all drive contents before copying new content FALSE: don't delete all drive content before copying new content (default)
TPM Emulation
For more information on QEMU tpm, see the QEMU TPM Documentation.
The QEMU TPM relies on a seperate program to emulate the TPM. Currently, this is only supported on Linux using the swtpm program. Swtpm can be installed from the linux package managers. Note that Swtpm is installed by default in the Docker container. It is recommended to use the Docker container whenever possible such that software versioning matches that of CI during development.
sudo apt-get install swtpm
To run using this TPM, build and run with the following options. SWTPM_ENABLE enables the swtpm emulator that is
started automatically by QemuRunner.py. SWTPM_ENABLE is TRUE by default.
for the Q35 platform:
stuart_build -c Platforms/QemuQ35Pkg/PlatformBuild.py --flashrom TOOL_CHAIN_TAG=GCC5 BLD_*_TPM2_ENABLE=TRUE
for the Arm Virt platform:
stuart_build -c Platforms/QemuArmVirtPkg/PlatformBuild.py --flashrom TOOL_CHAIN_TAG=GCC5 BLD_*_TPM2_ENABLE=TRUE
Mu Telemetry / WHEA
Todo
Platform Package Testing
PlatformTest.py is used to compile and execute host based unit tests for tests associated with a platform. In the
pre-build phase, host-based unit tests are validated for currency using a straightforward method. This method ensures
that any host-based unit test sharing a source file with an INF (Library or Driver) utilized by the platform is also
included in the platform's list of host-based unit tests to compile and execute. If a host based unit test is found to
be missing, it will stop the build. It should be noted that this is not perfect, as there are tests for protocol
interfaces or other miscellaneous scenarios that won't be caught because the source files are not present in the host
based unit test's INF.
This method of compiling and running host-based unit tests is different than the typical method, which is to use
stuart_ci_build with the target (-t) of NOOPT. This is to support the pre-build step of validating that the
host-based unit test DSC is up to date, and to allow for differences in how code coverage results are created, which
will be looked at next.
Code Coverage
By default, code coverage is disabled. It is enabled via the command line by adding CODE_COVERAGE=TRUE when building
with PlatformTest.py. Code coverage does require additional tools to be installed, which are verified in a pre-build
step. The required tools are noted below, per operating system:
-
Windows Prerequisite
- OpenCppCoverage: Download and install https://github.com/OpenCppCoverage/OpenCppCoverage/releases
- pygount: (if using the --full command) pip install pygount
-
Linux Prerequisite
- lcov: sudo apt-get install -y lcov
- lcov_cobertura: pip install lcov_cobertura
- pygount: (if using the --full command) pip install pygount
A coverage report will be generated at Build/<PKG_NAME>/HostTest/NOOPT_<TOOL_CHAIN>/<PKG_NAME>_coverage.xml. Other
optional config knobs are CC_FLATTEN=TRUE, which removes duplicate source file coverage information, which happens
when multiple INFs refer to the same source files. The second is CC_FULL=TRUE, which will create xml data for source
files used by the platform that do not have any existing coverage information. This provides a more accurate view of
overall code coverage for a platform.
There are a plethora of open source tools for generating reports from cobertura xml files, which is why it was selected
as the output file format. Tools such as pycobertura (pip install pycobertura) and
reportgenerator can be utilized to generate
different report types, such as html reports. VSCode extensions such as
Coverage Gutters can highlight
coverage results directly in source files, and cloud tools such as CodeCov can consume
cobertura files to provide PR checks and general code coverage statistics for the repository.
If you have reportgenerator installed, you can additionally set REPORTTYPES to any report type that
reportgenerator can generate, and those reports will be generated at
Build/QemuArmVirtPkg/HostTest/NOOPT_<TOOL_CHAIN>/Coverage/*. This parameter supports a comma separated list such as
REPORTTYPES=HtmlSummary,JsonSummary.
CodeQL
Overview
CodeQL is open source and free for open-source projects. It is maintained by GitHub and naturally has excellent integration with GitHub projects. CodeQL uses a semantic code analysis engine to discover vulnerabilities in a number of programming languages (both compiled and interpreted).
Project Mu (and TianoCore) use CodeQL C/C++ queries to find common programming errors and security vulnerabilities in
firmware code. This platform leverages the CodeQL build plugin from Mu Basecore that makes it very easy to run CodeQL
against this platform. You simply use provide the --codeql argument in your normal stuart_update and stuart_build
commands.
CodeQL Command-Line Interface (CLI)
Because of CodeQL's integration with GitHub, it is often run in projects hosted on GitHub via an officially supported GitHub Action (codeql-action).
However, a CodeQL CLI application is also available that provides a command-line interface to CodeQL. This facilitates a local developer workflow by using the CLI application to perform two main tasks:
- Generate a CodeQL database
- Analyze the CodeQL database
There's ample documentation written on creating CodeQL databases and analyzing CodeQL databases.
Our unique firmware build environment poses several challenges and further integrating the CLI with the stuart tool set can be daunting for those unfamiliar with stuart's internals.
Therefore, Project Mu and, by extension, this platform, use a set of CodeQL plugins from Mu Basecore to simplify CodeQL usage.
CodeQL Plugins
The CodeQL plugins are described in the plugin readme. This readme does not repeat information and instead focuses on explaining the context of the plugins within this platform.
Put simply, the plugins allow a single command-line argument (--codeql) to be provided to the normal stuart commands
already used in this platform to run CodeQL.
For example:
stuart_update --codeql- Downloads the appropriate CodeQL CLI for your operating system.stuart_build --codeql- Generates a CodeQL database using that CodeQL during the build. In post-build, the database is automatically analyzed and a SARIF file is generated.
Be aware that these commands will take a long time. The CodeQL CLI is several hundred megabytes in size and hooking CodeQL into the build (1) forces a clean build (2) adds additional CodeQL database logic, both of which increase the overall time of the build.
Note: The CodeQL queries run during analysis by default are those in MuCodeQlQueries.qls.
The CodeQL plugin readme describes how to change the queries run and change how the plugin interprets the results. It also describes how to view SARIF results conveniently in an IDE such as Visual Studio Code.
Also by default, this platform shows CodeQL result from those queries but does not fail the build if there are any errors.
CodeQL Database and Result Locations
Although the database and result directory locations are documented in the plugin readme, they are repeated here for convenience.
The CodeQL database is written to a directory unique to the package and target being built:
Build/codeql-db-<package>-<target>-<instance>
For example: Build/codeql-db-qemuq35pkg-debug-0
The plugin does not delete or overwrite existing databases, the instance value is simply increased. This is because databases are large, take a long time to generate, and are important for reproducing analysis results. The user is responsible for deleting database directories when they are no longer needed.
Similarly, analysis results are written to a directory unique to the package and target. For analysis, results are stored in individual files so those files are stored in a single directory.
For example, all analysis results for the above package and target will be stored in: codeql-analysis-qemuq35pkg-debug
CodeQL results are stored in SARIF (Static Analysis Results Interchange Format) (CodeQL SARIF documentation) files. Each SARIF file corresponding to a database will be stored in a file with an instance matching the database instance.
For example, the analysis result file for the above database would be stored in this file:
codeql-analysis-qemuq35pkg-debug/codeql-db-qemuq35pkg-debug-0.sarif
The SARIF Viewer extension for VS Code can open the .sarif file generated by this plugin and allow you to click links directly to the problem area in source files.
ColorBar Display Device States
Overview
Color Bars are used to show current device state for quick reference of the system firmware. The Color Bars supported by Q35 are listed below.
Color Bar Legend
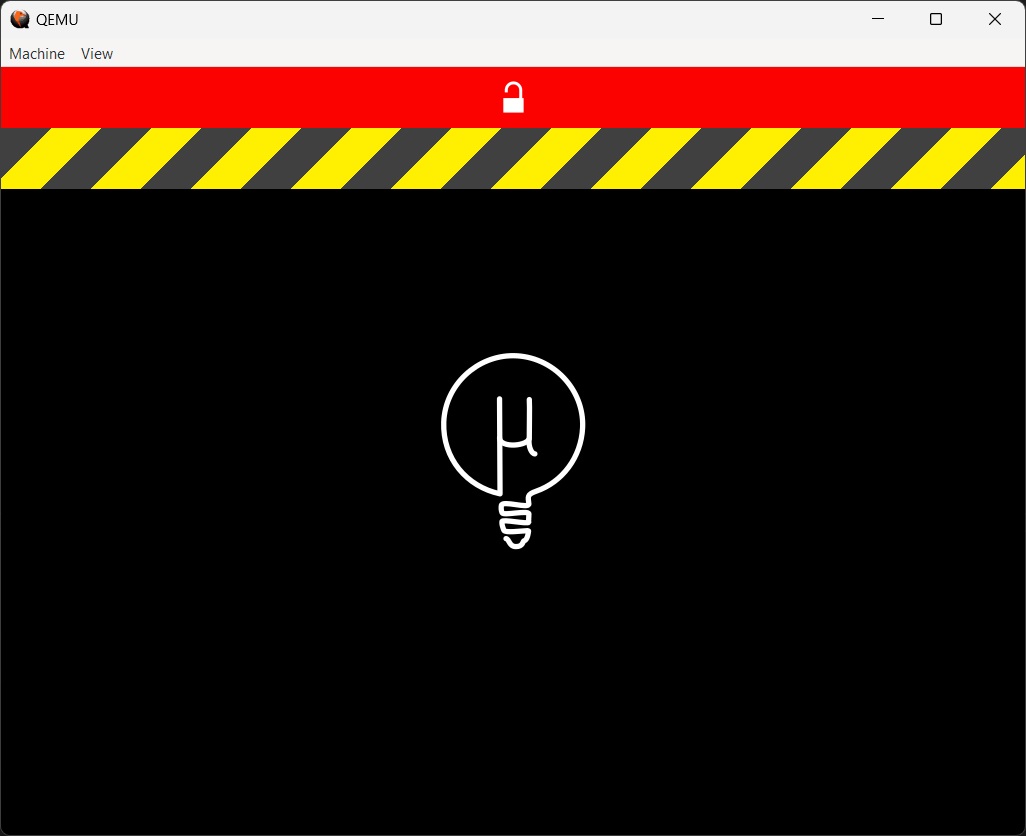
| Color | Description | Location where Device State is set |
|---|---|---|
| Red | Secure Boot Disabled | MU_OEM_SAMPLE\OemPkg\DeviceStatePei\DeviceStatePei.c |
| Yellow and Grey Caution | Unit Test Mode (Unit Tests Compiled into Firmware) | Platforms\QemuQ35Pkg\QemuQ35Pkg.dsc |
UEFI Configuration Platform Guide
The UEFI configuration is a Project MU feature intended to streamline the injection of configuration with better scalability.
Configuration Logistics
This sections describes the design logistics on how the platforms should integrate configuration framework into the features they desire to configure.
Overview
A platform could author as many as hundreds of features to be configured/changed for various purposes. For example, silicon drivers could configure the number of USB ports to overdrive the current, the index of PCIe ports to be powered, etc. These flexibilities could be used for hardware validation for silicon features and/or exposed to end users/admins to configure the system to comply with various marketing/regulatory needs.
However, the silicon validation features are not (always) identical to the configuration knobs exposed to the end users. For example, the chipset could contain 4 USB controllers and all of them are configurable through silicon validation phase. But on a given platform, only the first 2 controllers can be configured by the end user because only these 2 controllers have physical outlets. This is where the differences between policy and configuration start to emerge.
Policy Data
Policy, in this context, refers to the PolicyServicePkg in MU_BASECORE. This framework creates volatile GUIDed database during boot time and supports notification at data creation time. This data structure is defined by the feature module and should be published during early boot time with initial values desirable for the platform to boot properly. This data should also be consumed by the feature module to configure the hardware or other entities as needed.
Configuration Data
Configuration, in contrast, is defined by the platform with their discretion. This means that the end design of configuration knobs is not 1:1 mapped into the corresponding policy data. Thus the platform could selectively expose a few configuration knobs from policy data structure and allow the end user/admin to configure through configuration framework. Or alternatively, coalesce a group of policy switches into a single configuration knob.
In this case, the platform module is responsible for consuming the injected configuration data (in the format of UFEI variables) then translating and applying the change on top of existing policy data so the feature module can consume the modified policy data according to configuration data.
Configuration Data Delivery
A more detailed description of how configuration data is delivered to UEFI variable storage is described in the feature repo here.
Feature Integration Guidance
This section describes the workflow, from the platform feature owner's perspective, on how to integrate the configuration framework into a single feature. To simplify the language, this flow uses the GFX configuration knob as an example to explain the expected workflow.
Author/Modify the Final Consumer Module Around Policy Package
For a feature that needs to be configured through this framework, the end module should be updated to consume the data described in PolicyServicePkg.
In the example of GFX module,
QemuPkg/QemuVideoDxe/QemuVideoDxe.inf
is updated to check against the published policy data (GFX_POLICY_DATA) to enable/disable the applicable VGA
controller during the driver binding event.
Author the Initial Policy Publisher
As mentioned above, given the GFX module is updated to consume the policy data, a module is needed to publish the initial values for the feature module to proceed properly. Per platform discretion, this module could either be a silicon module if a general default policy data is applicable, or a platform module when the platform would like to apply customizations to the inital policy value.
In the example of GFX module, this initial value is handled by
QemuQ35Pkg/ConfigKnobs/ConfigKnobs.inf,
which publishes a policy blob under GUID gPolicyDataGFXGuid to enable all GFX controllers by default.
Author the Platform Configuration Consumer
Once the initial policy data is published, the platform driver should check the configuration data, as defined by platform configuratuin definition files (i.e. XML) to translate the data and apply them on top of the GFX policy data.
In the example of GFX module, this translation and data application is also handled by QemuQ35Pkg/ConfigKnobs/ConfigKnobs.inf.
Note that with the support of GUIDed policy database and notification, the platform configuration consumer does not
always need to be the same driver as the policy publisher, but can instead be a module with a Depex on the published
policy data GUID (in this case, gPolicyDataGFXGuid).
This way, when QemuPkg/QemuVideoDxe/QemuVideoDxe.inf enters the driver binding event, it will check against the updated policy database and enable/disable the VGA controller accordingly.
Platform Runtime Mechanism (PRM)
Overview
Platform Runtime Mechanism (PRM) introduces the capability of moving certain classes of SMM code out of SMM and into a code module that executes within OS context. Generally, SMM code that does not depend upon SMM execution privileges is a candidate for conversion to PRM. The PRM conversion process involves porting code from SMM modules into code modules that execute at CPL0 and are directly invoked by host OS kernel components. These code modules are called PRM Modules. Functions within a PRM Module exposed to the OS for runtime execution are called PRM Handlers.
End-to-end PRM support on a system requires firmware and OS support. The firmware must provide an initial set of PRM modules for the OS to use along with an ACPI tabled called PRMT that describes those modules. The OS uses this information to invoke PRM functionality when requested by a kernel component. PRM has two high-level invocation paths either directly from an OS driver (direct call) or by interacting with an ACPI OpRegion (ACPI call).
PRM Goal in QemuQ35Pkg
The goals of the PRM feature within QemuQ35Pkg are:
- To serve as an open source example of how to integrate PRM into a platform firmware.
- To serve as a test vehicle for generic PRM infrastructure and new PRM handlers testable in a virtual system.
- To provide an easily accessible virtual environment in open source that lends to PRM feature experimentation.
For more information about the PRM feature and to access the platform agnostic PRM code/documentation visit edk2-staging/PlatformRuntimeMechanism.
PRM Platform Agnostic Feature Code
The official edk2 support for PRM is being developed in edk2-staging/PlatformRuntimeMechanism.
All of the content in that branch is agnostic to any particular platform and should be considered the single source for PRM firmware infrastructure in an edk2 based firmware.
PRM Modules Overview
PRM is adopted in a particular platform by including platform-agnostic components from PrmPkg and then supplementing
that with the PRM Modules that perform some platform-specific work.
The following are key platform agnostic modules.
-
PrmLoaderDxe- Discovers PRM Modules loaded into memory by the platform (e.g. an FV with PRM Modules is installed) and places those modules and the PRM Handlers within those modules into the PRMT ACPI table so the PRM configuration for the platform is described to the operating system. -
PrmConfigDxe- Configures PRM Module settings during the boot services environment.Some modules need special configuration and others do not. For example, if a module needs MMIO ranges to be converted it would describe those MMIO ranges during boot services so they are converted in the virtual memory address change event. Another example would be a module that allocates a static data buffer and then populates it with some data like that from a Setup menu item or a RAW section in a FV so it's accessible to a PRM Handler later.
Often each PRM Module links a configuration library against this module to perform the configuration work needed for the module. The PRM Module could also choose to create a dedicated DXE configuration driver if that's preferred.
For example, here's the configuration libraries currently linked against
PrmConfigDxeinQemuQ35Pkg:PrmPkg/PrmConfigDxe/PrmConfigDxe.inf { <LibraryClasses> NULL|PrmPkg/Samples/PrmSampleAcpiParameterBufferModule/Library/DxeAcpiParameterBufferModuleConfigLib/DxeAcpiParameterBufferModuleConfigLib.inf NULL|PrmPkg/Samples/PrmSampleContextBufferModule/Library/DxeContextBufferModuleConfigLib/DxeContextBufferModuleConfigLib.inf NULL|PrmPkg/Samples/PrmSampleHardwareAccessModule/Library/DxeHardwareAccessModuleConfigLib/DxeHardwareAccessModuleConfigLib.inf } -
PrmSsdtInstallDxe- Installs the PRM SSDT. The SSDT inPrmPkgis a reference SSDT and a platform owner should inspect the SSDT to determine whether any changes are required. If the platform will not trigger PRM Handlers from ACPI code at all (only use direct call), this driver can be excluded from the platform firmware. -
PrmInfo- An optional UEFI application that reports information about the PRM configuration currently loaded in the system. The application can be used to confirm PRM Modules are discovered correctly and to exercise PRM Handlers in a lightweight manner (some activities like updating parameter buffers cannot be performed).
In order to incorporate some PRM Modules into the boot flow, the sample PRM Modules provided by PrmPkg are loaded by
QemuQ35Pkg.
PRM Libraries Overview
Some aspects of the generic PRM Modules in PrmPkg are customizable with libraries. It is not expected a platform needs
to provide custom libraries but it is possible if needed. Those libraries are briefly noted below.
-
PrmContextBufferLib- Provides a general abstraction for PRM context buffer management. -
PrmModuleDiscoveryLib- Provides functionality to discover PRM modules loaded in the system boot. -
PrmPeCoffLib- Provides functionality to support additional PE/COFF functionality needed to use Platform Runtime Mechanism (PRM) modules.
TPM Replay
Overview
This feature provides the ability to replay TPM measurements from a custom-made event log. The primary purpose is for testing operating system features dependent on measurements. This feature allows OS (and FW) developers to easily create scenarios like edge cases and bug repros related to measurements from firmware with minimal overhead.
For more information about the generic TPM replay feature including how it interacts with the TPM, visit the TPM Replay documentation.
TPM Replay in QEMU
Since TPM Replay changes the default behavior for extending TPM measurements from UEFI firmware, it is disabled by
default. It can be enabled either by changing the TPM_REPLAY_ENABLED value to TRUE in the platform DSC file:
DEFINE TPM_REPLAY_ENABLED = TRUE
Or, as a stuart_build argument:
> stuart_build -c Platforms/QemuQ35Pkg/PlatformBuild.py --flashrom TOOL_CHAIN_TAG=GCC5 BLD_*_TPM2_ENABLE=TRUE \
               BLD_*_TPM_REPLAY_ENABLED=TRUE
Note that the TPM driver stack is also disabled by default in QEMU firmware. It requires a TPM emulator and currently has only been enabled/tested on Linux. The command above also shows how to enable TPM. For more information about enabling TPM, refer to the TPM feature readme document.
The
# yaml-language-server: $schema=<schemapath>modeline at the top of the file points to the schema for the TPM Replay event log. Eventually, the schema is planned to be submitted to the JSON Schema Store. That is on hold while the final schema materializes.After that happens, popular YAML tools like the Red Hat YAML extension for VS Code will automatically apply the schema. Until then, the file needs to be referenced at the top of the file as shown below to get the benefits of IDE documentation and YAML validation.
The URL is provided in the example since that will be constant across machines, a local relative (to the YAML file) or absolute path is also acceptable.
Creating a TPM Replay Event Log
Event logs can be created in either a YAML or JSON file.
Here's a quick example of a YAML event log description file. It is intended to show a variety of different keywords and options to define event entries.
# yaml-language-server: $schema=https://raw.githubusercontent.com/microsoft/mu_plus/HEAD/TpmTestingPkg/TpmReplayPei/Tool/TpmReplaySchema.json
events:
  - type: EV_S_CRTM_VERSION
    description: "Descriptions are optional. Hash the UTF-8 string with SHA256 in PCR0."
    pcr: 0
    hash:
      - sha256
      - sha384
    data:
      type: string
      value: |-
        Example event data

  - type: EV_S_CRTM_VERSION
    description:
      "Descriptions are optional. Hash the UTF-16 string with null character data with SHA256 & SHA384 in PCR0."
    pcr: 0
    hash:
      - sha256
      - sha384
    data:
      type: string
      encoding: utf-16
      include_null_char: true
      value: |-
        More example data

  - type: EV_S_CRTM_VERSION
    description: "Descriptions are optional. Hash the UTF-8 string with SHA256 in PCR7."
    pcr: 7
    hash:
      - sha256
    data:
      type: string
      encoding: utf-8
      value: |-
        Data in PCR7 to prevent UEFI var measurements

  - type: EV_S_CRTM_VERSION
    description:
      "Descriptions are optional. Use a pre-hash SHA256 value. Event data is a UTF-16 string without a null character."
    pcr: 0
    prehash:
      sha256: "0xF97326281EABD9A5B64DD757540355165D4BED9A35B13126ED36D3A9F28A10AB"
    data:
      type: string
      encoding: utf-16
      value: |-
        Some more example data

  - type: EV_NO_ACTION
    description: "Descriptions are optional. Hash the base64 data with SHA256 and SHA394 in PCR6."
    pcr: 6
    hash:
      - sha256
      - sha384
    data:
      type: base64
      value: |-
        U2FtcGxlIGV2ZW50AA==

  - type: EV_NO_ACTION
    description: "Descriptions are optional. Hash the base64 data with SHA256 and SHA394 in PCR6."
    pcr: 4
    hash:
      - sha256
      - sha384
    data:
      type: base64
      value: |-
        U2FtcGxlIGV2ZW50AA==
Loading a TPM Replay Event Log
After the log is authored in a human readable YAML or JSON file, it needs to be converted into a binary file understood by the firmware so the firmware can replay the log during boot. That is done with a Python tool called TpmReplay.py.
The arguments for the tool can be found by passing the --help argument:
> python TpmReplay.py --help
Producing the binary is simple, just specify the input file with -i and the output file with -o:
> python TpmReplay.py -i InputLog.yml -o OutputBinary.bin
The binary can be provided to the firmware three ways:
- In the firmware build
- Through a UEFI variable
- With the QEMU Firmware Configuration (fw_cfg) Device interface
More details about these are covered in the "Input Channels" section of the main TPM Replay feature documentation.
FW CFG Example
This option allows a new log to be passed to QEMU from the host machine easily without rebuilding firmware.
An additional argument to QEMU can be passed in the runner plugin.
The args variable can be updated with the fw_cfg item:
args += " -fw_cfg name=opt/org.mu/tpm_replay/event_log,file=/replaylog.bin"`
Converting a Binary Back to a Human Readable File
It may be useful to view what's in a binary. That is also possible using TpmReplay.py.
> python TpmReplay.py -e InputBinary.bin -o OutputLog.yml
Usage Overview
The examples in this section are meant to illustrate how the process works in practice.
Example: YAML to Binary and Binary Back to YAML
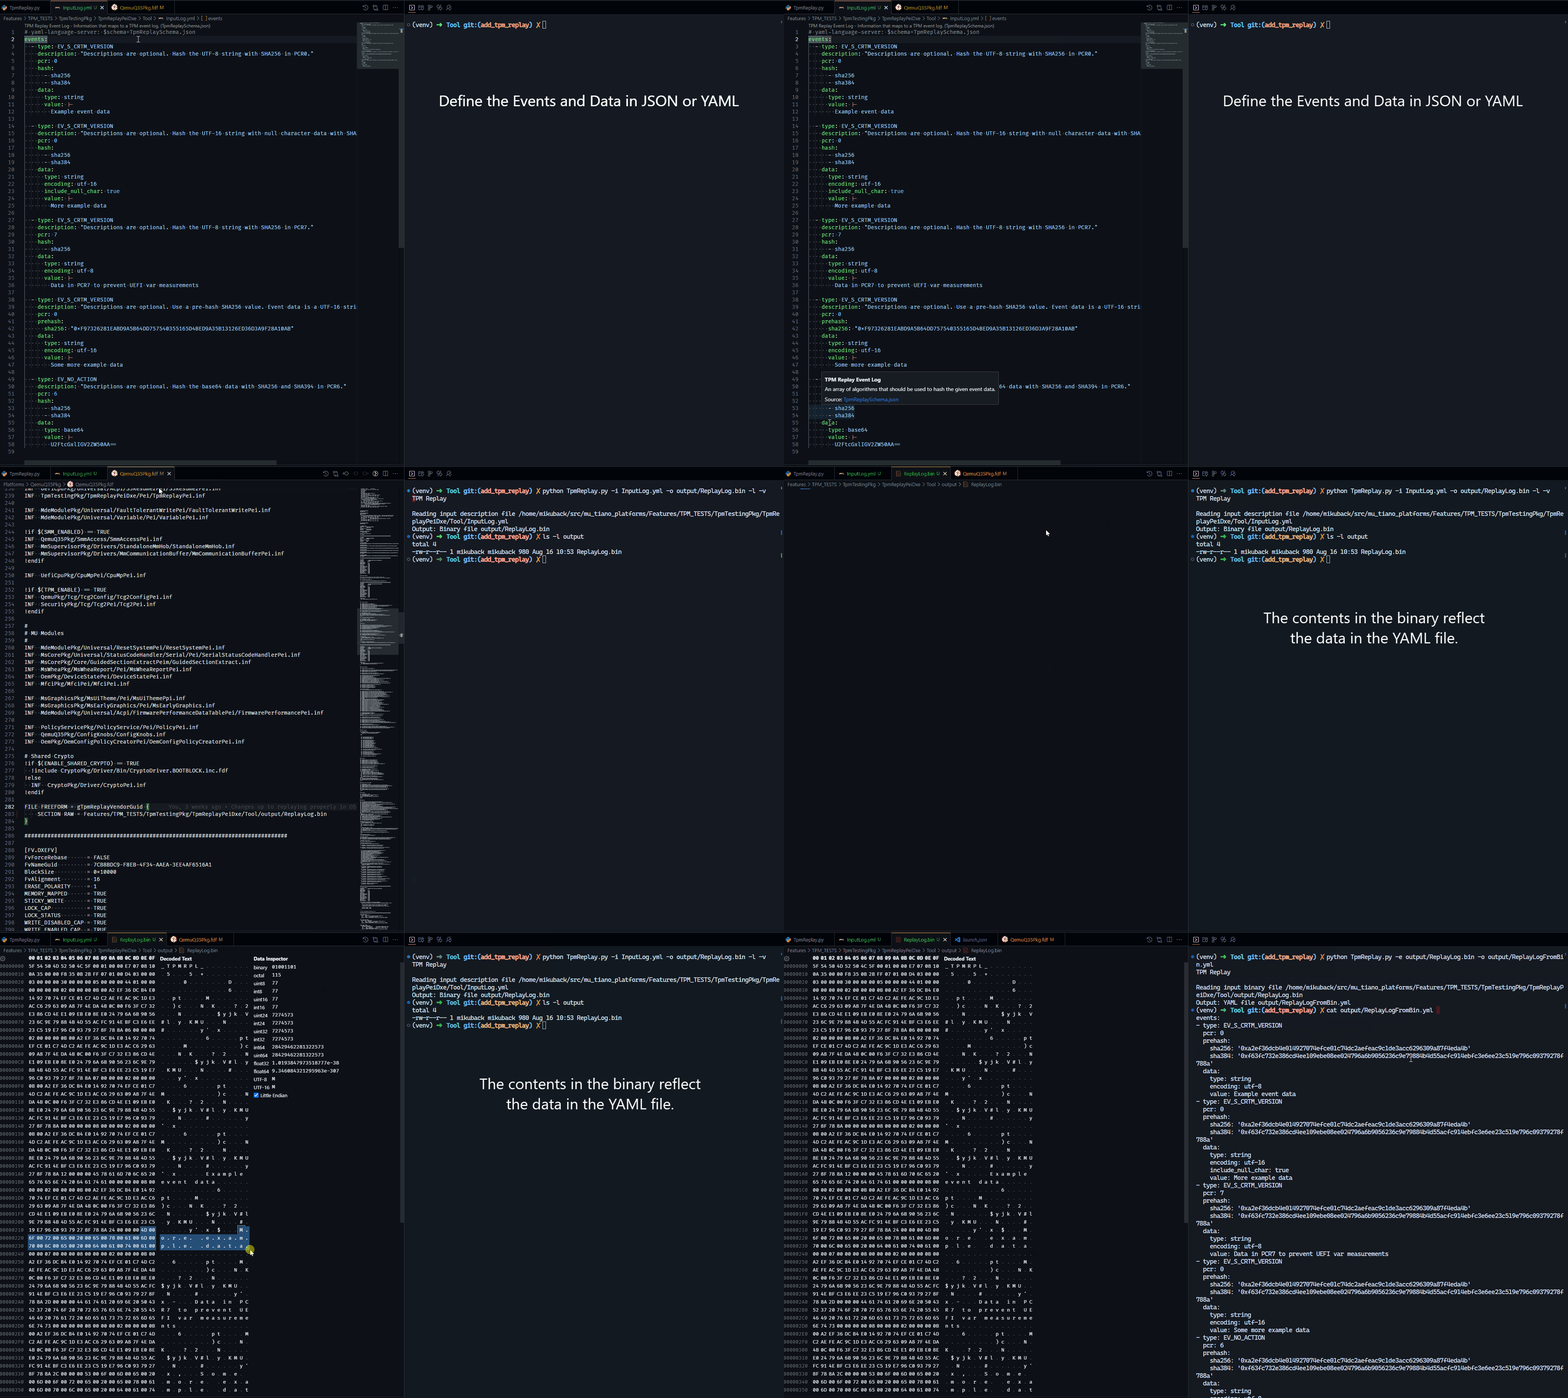 (click the image to enlarge it)
Example: Viewing the Replayed Log in Windows
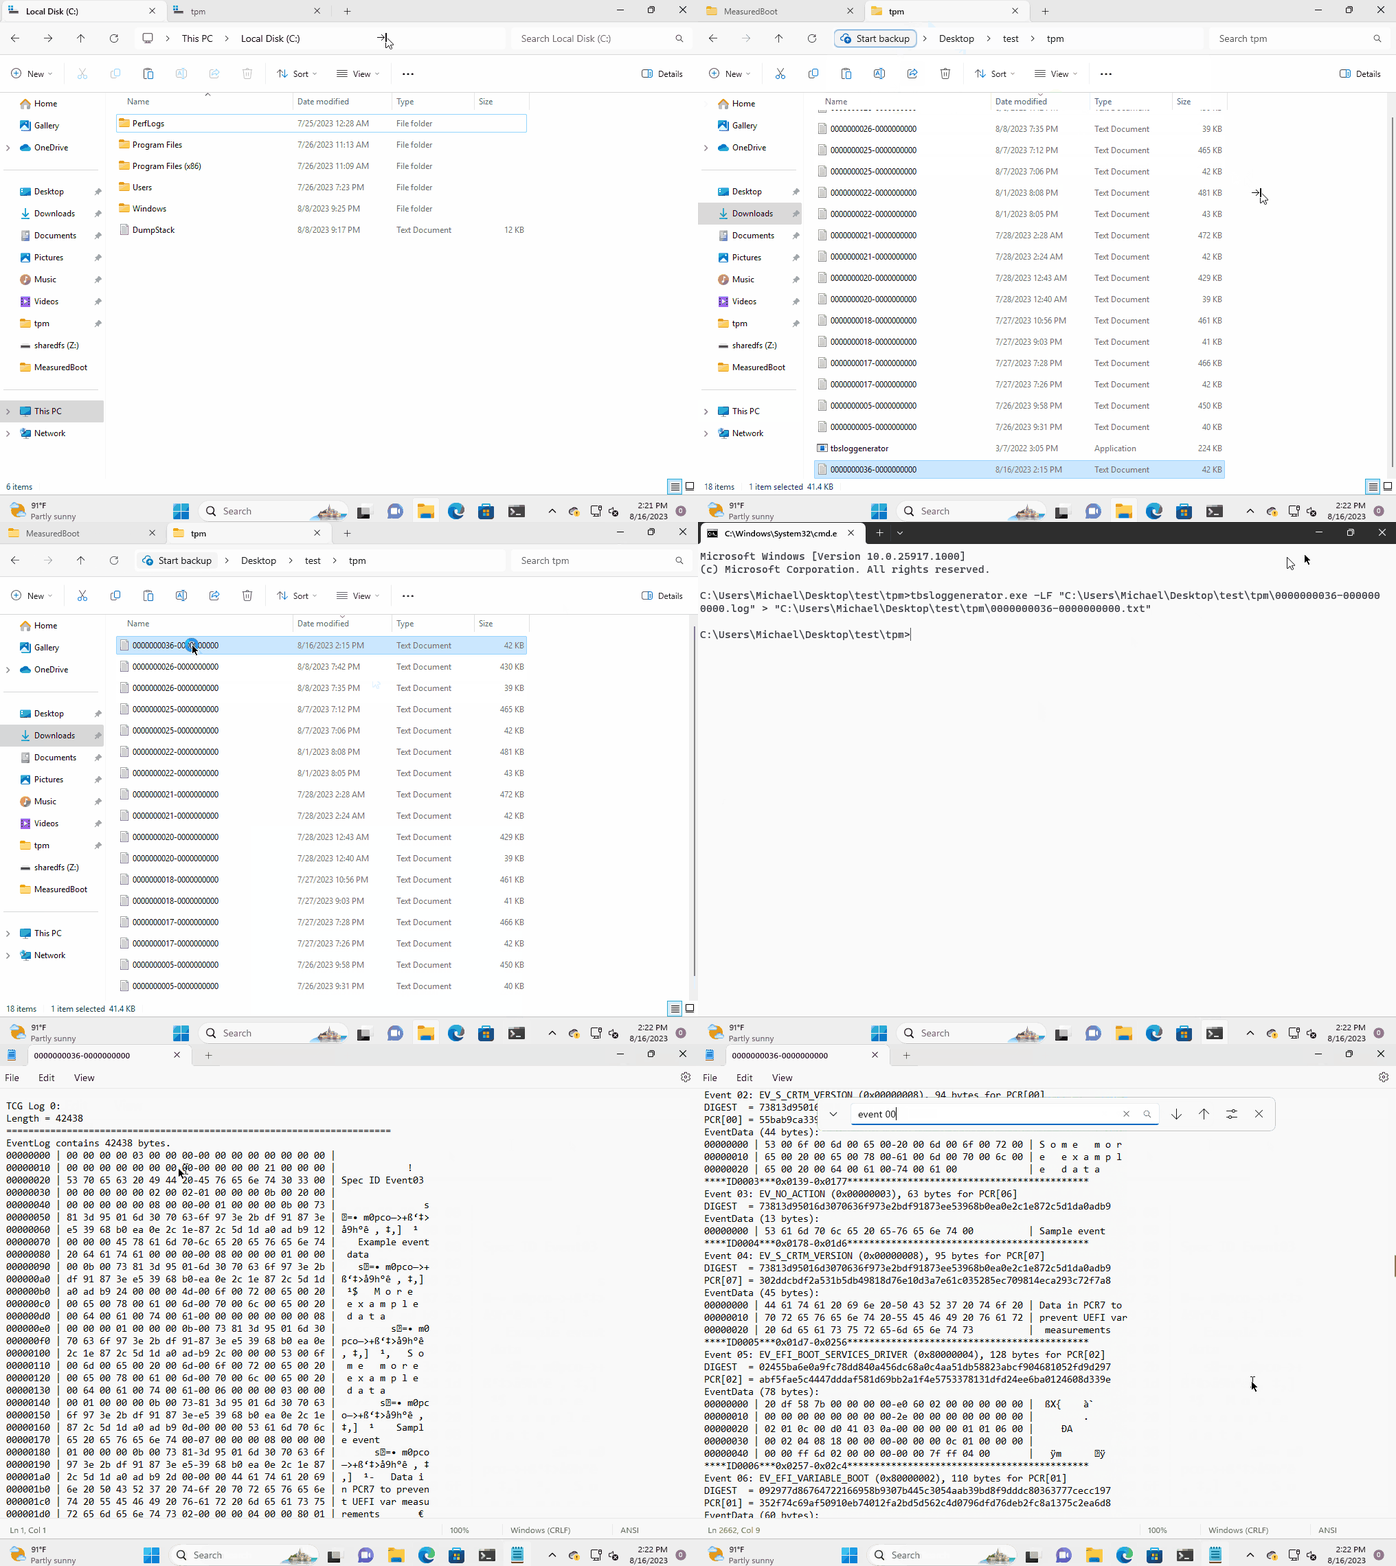 (click the image to enlarge it)
it)_
(click the image to enlarge it)
it)_
TPM on QEMU Q35
This document describes the TPM 2.0 architecture for the QEMU Q35 platform. Q35 uses a direct CRB/FIFO path between firmware and the TPM device.
Table of Contents
- Requirements
- Build Configuration
- Platform Memory Layout
- Architecture Overview
- TPM Device Library Stack
- Hash Library Architecture
- Physical Presence Interface
- swtpm Setup
- Communication Flow
- PCDs Reference
Requirements
| Requirement | Notes |
|---|---|
| Host OS | Linux (native) or WSL on Windows. Native Windows is not supported. |
| swtpm | TPM 2.0 emulator. Install via your distro's package manager (e.g. apt install swtpm swtpm-tools). |
| QEMU | Built with tpm-tis device support (standard upstream QEMU includes this). |
| Build host | Same Linux/WSL environment used to run stuart_build and launch QEMU. |
See swtpm Setup for the full setup commands.
Build Configuration
The TPM is disabled by default. To enable it, set BLD_*_TPM2_ENABLE=TRUE on the command line or in a BuildConfig.conf
file placed at the root level of the repo:
stuart_build -c Platforms/QemuQ35Pkg/PlatformBuild.py --FlashRom BLD_*_TPM2_ENABLE=TRUE
The following defines control TPM behavior in QemuQ35Pkg.dsc:
| Define | Default | Purpose |
|---|---|---|
TPM2_ENABLE | FALSE | Master switch. Guards all TPM drivers, libraries, and PCDs. |
TPM_CONFIG_ENABLE | FALSE | Enables Tcg2ConfigDxe HII configuration UI. |
TPM_REPLAY_ENABLED | FALSE | Enables TPM Replay overrides (uses TpmTestingPkg variants of Tcg2Dxe and DxeTpm2MeasureBootLib). |
Platform Memory Layout
Q35 uses the standard x86 TPM memory-mapped I/O region:
| Region | Address | Size | Interface |
|---|---|---|---|
| TPM TIS/CRB | 0xFED40000 | 0x5000 (20 KiB) | CRB or TIS (auto-detected) |
The firmware communicates directly with the TPM device via MMIO, and QEMU forwards the I/O to swtpm over a Unix socket.
The base address comes from the SecurityPkg package declaration default (PcdTpmBaseAddress = 0xFED40000). The Q35 DSC
does not override it explicitly. The Tcg2ConfigPei driver detects the TPM at this address during PEI.
Architecture Overview
┌──────────────────────────────────────────────────────────────────────────────────┐
│ UEFI Firmware (x86_64)                                                           │
│                                                                                  │
│  ┌─── PEI Phase ──────────────────────────────────────────────────────────────┐  │
│  │                                                                            │  │
│  │  Tcg2ConfigPei                                                             │  │
│  │    │ 1. Detect TPM 1.2 vs 2.0 at 0xFED40000                                │  │
│  │    │ 2. Set PcdTpmInstanceGuid                                             │  │
│  │    ▼                                                                       │  │
│  │  HashLibBaseCryptoRouterPei + HashInstanceLib*                             │  │
│  │    │ 1. Constructors register each enabled hash algorithm                  │  │
│  │    │ 2. Filtered by PcdTpm2HashMask → PcdTcg2HashAlgorithmBitmap           │  │
│  │    ▼                                                                       │  │
│  │  Tcg2Pei                                                                   │  │
│  │    │ 1. Tpm2RequestUseTpm()                                                │  │
│  │    │ 2. Tpm2Startup(TPM_SU_CLEAR)                                          │  │
│  │    │ 3. SyncPcrAllocationsAndPcrMask()                                     │  │
│  │    │ 4. Tpm2SelfTest()                                                     │  │
│  │    │ 5. Measure firmware volumes (CRTM) into PCR[0-7]                      │  │
│  │    │ 6. Install TpmInitializedPpi                                          │  │
│  └────┼───────────────────────────────────────────────────────────────────────┘  │
│       ▼                                                                          │
│  ┌─── DXE Phase ──────────────────────────────────────────────────────────────┐  │
│  │                                                                            │  │
│  │  HashLibBaseCryptoRouterDxe + HashInstanceLib*                             │  │
│  │    │ 1. Constructors register each enabled hash algorithm                  │  │
│  │    │ 2. Filtered by PcdTpm2HashMask → PcdTcg2HashAlgorithmBitmap           │  │
│  │    ▼                                                                       │  │
│  │  Tcg2Dxe                                                                   │  │
│  │    │ 1. Verify PcdTpmInstanceGuid is TPM 2.0                               │  │
│  │    │ 2. Verify no TpmErrorHob is present                                   │  │
│  │    │ 3. Tpm2RequestUseTpm()                                                │  │
│  │    │ 4. Query TPM capabilities                                             │  │
│  │    │     ├── Manufacturer                                                  │  │
│  │    │     ├── Firmware version                                              │  │
│  │    │     └── Max cmd/resp size                                             │  │
│  │    │ 5. Get supported/active PCR banks filtered by → HashAlgorithmBitmap   │  │
│  │    │ 6. Decide SupportedEventLogs (TCG_1_2 only if SHA1 active)            │  │
│  │    │ 7. SetupEventLog                                                      │  │
│  │    │     ├── Allocate log area(s)                                          │  │
│  │    │     └── Acquire and log pre-DXE HOB(s)                                │  │
│  │    │ 8. Register events                                                    │  │
│  │    │     ├── ReadyToBoot                                                   │  │
│  │    │     ├── ExitBootServices                                              │  │
│  │    │     └── ExitBootServices Failed                                       │  │
│  │    │ 9. Register protocol notifies                                         │  │
│  │    │     ├── VariableWriteArch (SecureBoot)                                │  │
│  │    │     └── ResetNotification (TPM shutdown)                              │  │
│  │    │ 10. Install Tcg2Protocol                                              │  │
│  └────┼───────────────────────────────────────────────────────────────────────┘  │
│       ▼                                                                          │
│  ┌─── BDS Phase ──────────────────────────────────────────────────────────────┐  │
│  │                                                                            │  │
│  │  DeviceBootManagerAfterConsole                                             │  │
│  │    │ 1. Tcg2PhysicalPresenceLibProcessRequest (NULL)                       │  │
│  │    │ 2. Process any pending PP request before shell launch                 │  │
│  │    │ 3. Create TCG2_PHYSICAL_PRESENCE_VARIABLE if it doesn't exist         │  │
│  └────┼───────────────────────────────────────────────────────────────────────┘  │
│       ▼                                                                          │
│  ┌─── UEFI Shell ─────────────────────────────────────────────────────────────┐  │
│  │                                                                            │  │
│  │  UEFI Shell / OS / TpmShellApp                                             │  │
│  │    │ 1. gBS->LocateProtocol(&gEfiTcg2ProtocolGuid)                         │  │
│  │    │ 2. Tcg2Protocol->GetCapability / SetActivePcrBanks / etc.             │  │
│  └────┼───────────────────────────────────────────────────────────────────────┘  │
│       ▼                                                                          │
│  Tpm2DeviceLibDTpm ─ direct MMIO reads/writes to 0xFED40000                      │
│       │                                                                          │
├───────┼──────────────────────────────────────────────────────────────────────────┤
│       ▼                                                                          │
│  QEMU TPM TIS device (-device tpm-tis,tpmdev=tpm0)                               │
│       │                                                                          │
│       ▼                                                                          │
│  Unix socket ─ swtpm process (--tpm2)                                            │
└──────────────────────────────────────────────────────────────────────────────────┘
TPM Device Library Stack
Q35 uses two different patterns for accessing the TPM, depending on the firmware phase:
PEI Phase: Direct MMIO (Tpm2DeviceLibDTpm)
Tcg2Pei
  │ Tpm2SubmitCommand()
  ▼
Tpm2DeviceLibDTpm
  │ Auto-detects CRB vs TIS vs FIFO via InterfaceId register
  │ DTpm2SubmitCommand() dispatches:
  │   CRB  → PtpCrbTpmCommand()
  │   FIFO → Tpm2TisTpmCommand()
  │   TIS  → Tpm2TisTpmCommand()
  ▼
Direct MMIO to 0xFED40000
Tpm2DeviceLibDTpm reads the InterfaceId register at PcdTpmBaseAddress + 0x30 to determine the interface type.
QEMU's tpm-tis device presents a TIS/FIFO interface.
DXE Phase: Router Pattern (Tpm2DeviceLibRouter)
Tcg2Dxe
  │ Tpm2SubmitCommand()
  ▼
Tpm2DeviceLibRouterDxe
  │ Delegates to registered TPM2_DEVICE_INTERFACE
  ▼
Tpm2InstanceLibDTpm (constructor registers with router)
  │ DTpm2SubmitCommand() — same dispatch as PEI
  ▼
Direct MMIO to 0xFED40000
The router pattern exists to support future scenarios where multiple TPM device types could coexist. The router accepts
only the instance whose ProviderGuid matches PcdTpmInstanceGuid.
Other DXE Drivers: TCG2 Protocol (Tpm2DeviceLibTcg2)
Most DXE drivers that need TPM access use Tpm2DeviceLibTcg2, which goes through the TCG2 Protocol rather than direct
MMIO. Only Tcg2Dxe itself uses Tpm2DeviceLibRouter with direct MMIO.
CRB Register Layout
If the TPM presents a CRB interface (as opposed to TIS/FIFO), the register layout is defined by the TCG PC Client Platform TPM Profile (PTP) specification. See:
- TCG PC Client Platform TPM Profile (PTP) Specification — Section 6 "Command Response Buffer Interface"
describes
LocalityState,LocalityControl,InterfaceId,CrbControlRequest,CrbControlStart,CrbControlCommand*/CrbControlResponse*, and the sharedCrbDataBuffer.
The key register for this platform is InterfaceId at PcdTpmBaseAddress + 0x30, which Tpm2DeviceLibDTpm reads to
decide between CRB and TIS/FIFO dispatch paths.
TIS Register Layout
QEMU's tpm-tis device presents a TIS (TPM Interface Specification) / FIFO interface. The register layout is defined
by:
- TCG PC Client Specific TPM Interface Specification (TIS) — defines
Access,IntEnable/IntVector,STS(withcommandReady,tpmGo,dataAvail,burstCount),DataFifo, and theVid/Did/Rididentification registers.
The TIS flow uses BurstCount from the STS register to pace reads and writes through the DataFifo register, one burst
at a time.
Hash Library Architecture
Tcg2Dxe uses HashLibBaseCryptoRouterDxe while Tcg2Pei uses HashLibBaseCryptoRouterPei with all hash instance
libraries included.
Registration Flow
HashLibBaseCryptoRouterConstructorresetsPcdTcg2HashAlgorithmBitmapto 0.- Each
HashInstanceLibconstructor callsRegisterHashInterfaceLib(). RegisterHashInterfaceLib()checks the algorithm againstPcdTpm2HashMask(0x02= SHA256 only). Algorithms not in the mask returnEFI_UNSUPPORTED.
Hash Algorithm Bitmask Values
The bit positions used in PcdTpm2HashMask, PcdTcg2HashAlgorithmBitmap, and the
EFI_TCG2_BOOT_SERVICE_CAPABILITY.HashAlgorithmBitmap field are defined by the EFI TCG2 protocol and the TCG algorithm
registry:
- UEFI TCG2 Protocol Specification — see
EFI_TCG2_BOOT_HASH_ALG_*(SHA1= BIT0,SHA256= BIT1,SHA384= BIT2,SHA512= BIT3,SM3_256= BIT4). - TCG Algorithm Registry — canonical list of TPM hash algorithm IDs.
For this platform, PcdTpm2HashMask = 0x02 enables SHA256 only.
Filtering Chain
PcdTpm2HashMask (0x02)
        │
        ▼
RegisterHashInterfaceLib() ── gates which HashInstanceLibs register
        │
        ▼
PcdTcg2HashAlgorithmBitmap ── result of all successful registrations
        │
        ▼
Tcg2Dxe intersects with TPM-reported capabilities
        │
        ▼
Final ActivePcrBanks / HashAlgorithmBitmap in EFI_TCG2_BOOT_SERVICE_CAPABILITY
Physical Presence Interface
Library Selection
TPM2_ENABLE | Library | Behavior |
|---|---|---|
FALSE | Tcg2PhysicalPresenceLibNull | All functions stubbed |
TRUE | DxeTcg2PhysicalPresenceMinimumLib | Auto-confirms Clear; rejects all other operations |
The MinimumLib implementation:
- Auto-confirms TPM Clear operations without user prompting.
- Rejects SET_PCR_BANKS, LOG_ALL_DIGESTS, and other operations with
TCG_PP_RETURN_TPM_OPERATION_RESPONSE_FAILURE. - Does not create or use
TCG2_PHYSICAL_PRESENCE_FLAGS_VARIABLE.
ProcessRequest in BDS
Tcg2PhysicalPresenceLibProcessRequest() is invoked from the platform's DeviceBootManagerLib during
DeviceBootManagerAfterConsole(), before the shell launches. It:
- Reads the
Tcg2PhysicalPresenceNV variable (creates it if missing). - Executes any pending PP request stored in the variable.
- Stores the result back for
ReturnOperationResponseToOsFunction()to report.
swtpm Setup
Installation
swtpm requires Unix sockets, so it must run in a Linux environment. On Windows, use WSL (Windows Subsystem for Linux).
# Windows (from a WSL terminal)
wsl --install          # if WSL is not yet enabled
wsl                    # enter the WSL environment

# Ubuntu/Debian (native or WSL)
sudo apt install swtpm swtpm-tools

# Fedora
sudo dnf install swtpm swtpm-tools
Manual Setup
Create the TPM state directory and start swtpm before launching QEMU:
mkdir -p /tmp/mytpm1
swtpm socket \
  --tpmstate dir=/tmp/mytpm1 \
  --ctrl type=unixio,path=/tmp/mytpm1/swtpm-sock \
  --tpm2 \
  --log level=20
Automatic Setup (QemuRunner)
When SWTPM_ENABLE=TRUE, QemuRunner.py automatically starts swtpm as a subprocess before launching QEMU. The swtpm
state directory is set to BUILD_OUTPUT_BASE and the Unix socket is placed at {BUILD_OUTPUT_BASE}/swtpm-sock:
# Platforms/QemuQ35Pkg/Plugins/QemuRunner/QemuRunner.py
@staticmethod
def StartSwTpm(tpm_dir, tpm_sock):
    """Starts the swtpm emulator and returns its Popen handle."""
    cmd = [
        "swtpm", "socket",
        "--tpmstate", f"dir={tpm_dir}",
        "--ctrl", f"type=unixio,path={tpm_sock}",
        "--tpm2",
        "--log", "level=1",
    ]
    return subprocess.Popen(cmd)
swtpm is started before QEMU launches. QemuRunner then waits (up to 30 seconds) for the Unix socket to appear before
starting QEMU, and terminates the swtpm process so it doesn't outlive the run. SWTPM is enabled by default. Disable it
by setting SWTPM_ENABLE=FALSE on the command line or in the BuildConfig.conf file.
SWTPM is only available on Linux builds. QemuRunner automatically disables it on Windows
hosts even if SWTPM_ENABLE=TRUE.
QEMU Arguments
When SWTPM_ENABLE=TRUE, QemuRunner.py adds the following to the QEMU command line (with the socket path under
BUILD_OUTPUT_BASE):
-chardev socket,id=chrtpm,path={BUILD_OUTPUT_BASE}/swtpm-sock
-tpmdev emulator,id=tpm0,chardev=chrtpm
-device tpm-tis,tpmdev=tpm0
The -device tpm-tis argument is Q35-specific — it attaches a TIS-compatible TPM device to the Q35 chipset at the
standard address 0xFED40000.
Communication Flow
Complete path from a shell application to swtpm:
TpmShellApp (UEFI Shell)
  │ gBS->LocateProtocol(&gEfiTcg2ProtocolGuid)
  │ Tcg2Protocol->SetActivePcrBanks(0x02)
  ▼
Tcg2Dxe (EFI_TCG2_PROTOCOL)
  │ Validates bank mask against HashAlgorithmBitmap
  │ Calls Tcg2PhysicalPresenceLibSubmitRequestToPreOSFunction()
  │   ├── MinimumLib: rejects SET_PCR_BANKS → returns EFI_UNSUPPORTED
  │   └── MinimumLib: NO_ACTION (already-active) → writes NV variable → EFI_SUCCESS
  ▼
Tpm2CommandLib (for direct TPM commands like GetCapability)
  │ Serializes TPM2 command structure into byte buffer
  │ Calls Tpm2SubmitCommand(cmdBuffer, cmdSize, rspBuffer, &rspSize)
  ▼
Tpm2DeviceLibRouter → Tpm2InstanceLibDTpm
  │ DTpm2SubmitCommand() — detects interface type (TIS on QEMU)
  ▼
Tpm2TisTpmCommand (Tpm2Tis.c)
  │ 1. TisPcPrepareCommand: set TIS_PC_STS_COMMAND_READY
  │ 2. Write command bytes to DataFifo (paced by BurstCount)
  │ 3. Set TIS_PC_STS_GO to start execution
  │ 4. Poll STS for DataAvail (90 second timeout)
  │ 5. Read response header from DataFifo
  │ 6. Read remaining response bytes (paced by BurstCount)
  │ 7. Set TIS_PC_STS_READY (return to idle)
  ▼
MMIO to 0xFED40000 (QEMU TIS device)
  │
  ▼
QEMU tpm-tis device ──── Unix socket ──── swtpm process
PCDs Reference
Required PCDs (set when TPM2_ENABLE=TRUE)
| PCD | Value | Type | Purpose |
|---|---|---|---|
PcdTpmBaseAddress | 0xFED40000 (package default) | DynamicDefault | TPM TIS/CRB MMIO base address |
PcdTpm2HashMask | 0x02 | DynamicDefault | Hash algorithm filter (SHA256 only) |
PcdTpmInstanceGuid | gEfiTpmDeviceInstanceTpm20DtpmGuid | DynamicDefault | Selects discrete TPM 2.0 device type (set by Tcg2ConfigPei at runtime) |
PcdTpm2AcpiTableRev | 4 | DynamicHii | ACPI TPM2 table revision |
PcdUserPhysicalPresence | FALSE | FixedAtBuild | No physical user presence assertion |
Memory Type PCDs
| PCD | Value (pages) | Purpose |
|---|---|---|
PcdMemoryTypeEfiACPIReclaimMemory | 0x2B (43) | Includes TPM ACPI tables |
PcdMemoryTypeEfiACPIMemoryNVS | 0x80 (128) | ACPI NVS memory |
PcdMemoryTypeEfiReservedMemoryType | 0x510 | Reserved memory |
PcdMemoryTypeEfiRuntimeServicesCode | 0x100 | Runtime code |
PcdMemoryTypeEfiRuntimeServicesData | 0x700 | Runtime data |
Conditional PCDs (TPM_CONFIG_ENABLE=TRUE)
| PCD | Value | Purpose |
|---|---|---|
PcdTcgPhysicalPresenceInterfaceVer | "1.3" | TCG PPI specification version reported to OS |
TPM on QEMU Arm Virt
This document describes the TPM 2.0 architecture for the QEMU Arm Virt platform. Arm Virt uses a dual-CRB design with an FF-A (Firmware Framework for Arm A-Profile) mediated communication path between the normal world and the secure world.
Table of Contents
- Requirements
- Build Configuration
- Platform Memory Layout
- Architecture Overview
- Secure Partitions
- CRB Regions
- FF-A Communication Protocol
- Hash Library Architecture
- Physical Presence Interface
- ACPI Integration
- swtpm Setup
- Communication Flow
- PCDs Reference
Requirements
| Requirement | Notes |
|---|---|
| Host OS | Linux (native) or WSL on Windows. Native Windows is not supported. |
| swtpm | TPM 2.0 emulator. Install via your distro's package manager (e.g. apt install swtpm swtpm-tools). |
| QEMU | Built with tpm-tis-device support (standard upstream QEMU includes this). |
| Build host | Same Linux/WSL environment used to run stuart_build and launch QEMU. |
See swtpm Setup for the full setup commands.
Build Configuration
The TPM is disabled by default. To enable it, set BLD_*_TPM2_ENABLE=TRUE on the command line or in a BuildConfig.conf
file placed at the root level of the repo:
stuart_build -c Platforms/QemuArmVirtPkg/PlatformBuild.py --FlashRom BLD_*_TPM2_ENABLE=TRUE
The following defines control TPM behavior in QemuArmVirtPkg.dsc:
| Define | Default | Purpose |
|---|---|---|
TPM2_ENABLE | FALSE | Master switch. Guards all TPM drivers, libraries, and PCDs. |
TPM2_CONFIG_ENABLE | FALSE | Enables Tcg2ConfigDxe HII configuration UI. |
When TPM2_ENABLE=TRUE, the build additionally passes -DTPM2_ENABLE to the C compiler via build options, allowing C
code to use #ifdef TPM2_ENABLE guards.
Platform Memory Layout
The Arm Virt platform defines two distinct TPM memory regions:
| Region | Address | Size | Visibility |
|---|---|---|---|
| Internal CRB | 0x40200000 | 0x10 pages | Normal world + Secure world |
| External CRB | 0x0c000000 | 0x10 pages | Secure world only |
The Internal CRB address is published via PCDs:
PcdTpmBaseAddress=0x40200000PcdTpmMaxAddress=0x40204FFF(5 localities × 0x1000)
The Internal CRB is marked as EfiACPIMemoryNVS via a HOB in
ArmPlatformLibQemu.c
so the OS can locate it through the ACPI TPM2 table.
Architecture Overview
┌──────────────────────────────────────────────────────────────────────────────────┐
│ UEFI Firmware (AARCH64)                                                          │
│                                                                                  │
│  ┌─── SEC Phase ──────────────────────────────────────────────────────────────┐  │
│  │                                                                            │  │
│  │  Tpm2StartupLib                                                            │  │
│  │    │ 1. Tpm2RequestUseTpm()                                                │  │
│  │    │ 2. Tpm2Startup(TPM_SU_CLEAR)                                          │  │
│  └────┼───────────────────────────────────────────────────────────────────────┘  │
│       ▼                                                                          │
│  ┌─── DXE Phase ──────────────────────────────────────────────────────────────┐  │
│  │                                                                            │  │
│  │  HashLibBaseCryptoRouterDxe + HashInstanceLib*                             │  │
│  │    │ 1. Constructors register each enabled hash algorithm                  │  │
│  │    │ 2. Filtered by PcdTpm2HashMask → PcdTcg2HashAlgorithmBitmap           │  │
│  │    ▼                                                                       │  │
│  │  Tcg2Dxe                                                                   │  │
│  │    │ 1. Verify PcdTpmInstanceGuid is TPM 2.0                               │  │
│  │    │ 2. Verify no TpmErrorHob is present                                   │  │
│  │    │ 3. Tpm2RequestUseTpm()                                                │  │
│  │    │ 4. Query TPM capabilities                                             │  │
│  │    │     ├── Manufacturer                                                  │  │
│  │    │     ├── Firmware version                                              │  │
│  │    │     └── Max cmd/resp size                                             │  │
│  │    │ 5. Get supported/active PCR banks filtered by → HashAlgorithmBitmap   │  │
│  │    │ 6. Decide SupportedEventLogs (TCG_1_2 only if SHA1 active)            │  │
│  │    │ 7. SetupEventLog                                                      │  │
│  │    │     ├── Allocate log area(s)                                          │  │
│  │    │     └── Acquire and log pre-DXE HOB(s)                                │  │
│  │    │ 8. Register events                                                    │  │
│  │    │     ├── ReadyToBoot                                                   │  │
│  │    │     ├── ExitBootServices                                              │  │
│  │    │     └── ExitBootServices Failed                                       │  │
│  │    │ 9. Register protocol notifies                                         │  │
│  │    │     ├── VariableWriteArch (SecureBoot)                                │  │
│  │    │     └── ResetNotification (TPM shutdown)                              │  │
│  │    │ 10. Install Tcg2Protocol                                              │  │
│  │    ▼                                                                       │  │
│  │  Tcg2AcpiFfa                                                               │  │
│  │    │ 1. Publish TPM2 ACPI table                                            │  │
│  │    │ 2. Publish SSDT with TPM0 device node                                 │  │
│  └────┼───────────────────────────────────────────────────────────────────────┘  │
│       ▼                                                                          │
│  ┌─── BDS Phase ──────────────────────────────────────────────────────────────┐  │
│  │                                                                            │  │
│  │  DeviceBootManagerAfterConsole                                             │  │
│  │    │ 1. Tcg2PhysicalPresenceLibProcessRequest (NULL)                       │  │
│  │    │ 2. Process any pending PP request before shell launch                 │  │
│  │    │ 3. Create TCG2_PHYSICAL_PRESENCE_VARIABLE if it doesn't exist         │  │
│  └────┼───────────────────────────────────────────────────────────────────────┘  │
│       ▼                                                                          │
│  ┌─── UEFI Shell ─────────────────────────────────────────────────────────────┐  │
│  │                                                                            │  │
│  │  UEFI Shell / OS / TpmShellApp                                             │  │
│  │    │ 1. gBS->LocateProtocol(&gEfiTcg2ProtocolGuid)                         │  │
│  │    │ 2. Tcg2Protocol->GetCapability / SetActivePcrBanks / etc.             │  │
│  └────┼───────────────────────────────────────────────────────────────────────┘  │
│       ▼                                                                          │
│  Tpm2DeviceLibFfa ─ writes to Internal CRB @ 0x40200000                          │
│       │             then sends FF-A DirectReq2 to the TpmService                 │
│       │                                                                          │
├───────┼──────────────────────────────────────────────────────────────────────────┤
│ EL3 (SPMC / TF-A) ─ routes FF-A message to partition 0x8002                      │
├───────┼──────────────────────────────────────────────────────────────────────────┤
│       ▼                                                                          │
│ SECURE WORLD (SEL1)                                                              │
│                                                                                  │
│  MSSP (MsSecurePartition, id=0x8002)                                             │
│       │                                                                          │
│       ▼                                                                          │
│  TpmServiceLib ─ State machine (IDLE → READY → COMPLETE → IDLE)                  │
│       │                                                                          │
│       ▼                                                                          │
│  TpmServiceStateTranslationLib ─ Translates CRB style communications             │
│       │                          to the style supported by the TPM               │
│       │                          i.e. FIFO for QEMU Arm Virt                     │
│       │  Library Responsibilities:                                               │
│       │  1. Copy command from Internal CRB → local buffer                        │
│       │  2. Write command to External CRB @ 0x0c000000                           │
│       │  3. Trigger execution on external TPM through the CRB MMIO               │
│       │  4. Read response from External CRB                                      │
│       │  5. Copy response back to Internal CRB                                   │
│       │                                                                          │
├───────┼──────────────────────────────────────────────────────────────────────────┤
│       ▼                                                                          │
│  QEMU TPM device (MMIO @ 0x0c000000)                                             │
│       │                                                                          │
│       ▼                                                                          │
│  Unix socket ─ swtpm process (--tpm2)                                            │
└──────────────────────────────────────────────────────────────────────────────────┘
Secure Partitions
Two FF-A Secure Partitions are involved in TPM operations.
MSSP — Microsoft Secure Services Partition (id=0x8002)
Configured in Platforms/QemuArmVirtPkg/fdts/qemu_virt_mssp_rust_config.dts:
| Property | Value |
|---|---|
| Partition ID | 0x8002 |
| Exception Level | SEL1 |
| Execution State | AARCH64 |
| Load Address | 0x0e700000 |
| Image Size | 4 MiB |
| Boot Order | 2 |
The MSSP hosts the TPM service and is granted access to both CRB regions:
device-regions {
    internal_tpm_crb {
        base-address = <0x40200000>;
        pages-count = <0x10>;
        attributes = <SECURE_RW>;
    };
    external_tpm_crb {
        base-address = <0x0c000000>;
        pages-count = <0x10>;
        attributes = <SECURE_RW>;
    };
};
The MSSP publishes three service UUIDs. The TPM service UUID is:
17b862a4-1806-4faf-86b3-089a58353861
Key libraries running inside the MSSP:
- TpmServiceLib — handles incoming FF-A messages, implements the CRB state machine (IDLE → cmdReady → READY → start → COMPLETE → goIdle → IDLE). Note that this service is based on the CRB over FF-A specification released by ARM. See: TPM Service Command Response Buffer Interface Over FF-A
- TpmServiceStateTranslationLib — translates between the Internal CRB (CRB interface) and the External CRB (which may be CRB or FIFO depending on QEMU configuration). On QEMU Arm Virt the external interface is FIFO.
StMM — Standalone MM Partition (id=0x8001)
Configured in Platforms/QemuArmVirtPkg/fdts/qemu_virt_stmm_config.dts:
| Property | Value |
|---|---|
| Partition ID | 0x8001 |
| Exception Level | SEL0 |
| Execution State | AARCH64 |
| Load Address | 0x0e400000 |
| Image Size | 3 MiB |
| Boot Order | 0 |
The StMM partition hosts secure variable storage (FTW, VariableRuntimeDxe), and the Tcg2StandaloneMmArm driver which
processes Physical Presence Interface commands from the normal world for NV variable access.
CRB Regions
CRB Register Layout (PTP CRB Interface)
Each locality occupies 0x1000 bytes. The CRB register layout is defined by the TCG PC Client Platform TPM Profile (PTP)
specification (and mirrored in TpmPtp.h):
- TCG PC Client Platform TPM Profile (PTP) Specification — Section 6 "Command Response Buffer Interface"
describes
LocalityState,LocalityControl,InterfaceId,CrbControlRequest,CrbControlStart,CrbControlCommand*/CrbControlResponse*, and the sharedCrbDataBuffer.
Internal CRB (0x40200000)
This is the CRB visible to normal-world firmware (DXE drivers and UEFI applications). Tpm2DeviceLibFfa writes TPM
commands into this CRB's data buffer and reads responses from it. The Internal CRB uses the standard CRB register
interface. It is the TPM service's responsibility to set up and maintain this region. The goal is for this region to
mimic a normal MMIO CRB region, with the added caveat that an FF-A message must be sent for any register modification to
take effect.
The normal-world code performs MMIO writes to the CRB control registers (cmdReady, Start, goIdle) and then sends FF-A messages to notify the secure partition. The secure partition reads the command data from the Internal CRB, proxies it to the External CRB, and writes the response back.
External CRB (0x0c000000)
This is the QEMU-emulated TPM device MMIO region. It is only accessible from the secure world i.e. the TPM Service
within the MSSP secure partition. On QEMU Arm Virt, this region presents a FIFO interface (not CRB), which the
TpmServiceStateTranslationLib handles by detecting the interface type at initialization and using the appropriate FIFO
command/response protocol (burst-count reads, data register writes).
The external CRB connects to the swtpm process through QEMU's chardev/tpmdev infrastructure:
QEMU args: -chardev socket,id=chrtpm,path={BUILD_OUTPUT_BASE}/swtpm-sock
           -tpmdev emulator,id=tpm0,chardev=chrtpm
FF-A Communication Protocol
All TPM commands from normal world to secure world use FF-A Direct Request/Response messaging (FFA_MSG_SEND_DIRECT_REQ2 / FFA_MSG_SEND_DIRECT_RESP2) to/from the TPM Service.
Service Discovery
On first use, Tpm2DeviceLibFfa discovers the TPM service partition:
ArmFfaLibGetPartitionInfo(&gTpm2ServiceFfaGuid, &TpmPartInfo);
This queries the SPMC (EL3) for the partition hosting UUID 17b862a4-1806-4faf-86b3-089a58353861, which returns
partition ID 0x8002. This information can be found in the manifest of the secure partition.
Function IDs
| ID | Name | Direction | Supported |
|---|---|---|---|
0x0f000001 | TPM2_FFA_GET_INTERFACE_VERSION | NW → SW | YES |
0x0f000101 | TPM2_FFA_GET_FEATURE_INFO | NW → SW | NO |
0x0f000201 | TPM2_FFA_START | NW → SW | YES |
0x0f000301 | TPM2_FFA_REGISTER_FOR_NOTIFICATION | NW → SW | NO |
0x0f000401 | TPM2_FFA_UNREGISTER_FROM_NOTIFICATION | NW → SW | NO |
0x0f000501 | TPM2_FFA_FINISH_NOTIFIED | NW → SW | NO |
0x1f000001 | TPM2_FFA_MANAGE_LOCALITY | TF-A → SW only | YES |
The TPM2_FFA_START function carries a qualifier in Arg1:
| Qualifier | Value | Purpose |
|---|---|---|
TPM2_FFA_START_FUNC_QUALIFIER_COMMAND | 0x0 | Execute a CRB state transition (cmdReady, start, or goIdle) |
TPM2_FFA_START_FUNC_QUALIFIER_LOCALITY | 0x1 | Request or relinquish locality access |
The TPM2_FFA_MANAGE_LOCALITY function carries a qualifier in Arg1:
| Qualifier | Value | Purpose |
|---|---|---|
TPM2_FFA_MANAGE_LOCALITY_OPEN | 0x0 | Allows access to a locality |
TPM2_FFA_MANAGE_LOCALITY_CLOSE | 0x1 | Prevents access to a locality |
Note that for both TPM2_FFA_START and TPM2_FFA_MANAGE_LOCALITY Arg2 specifies the locality to take action upon.
FF-A Message Sequence (Per TPM Command)
A locality must first be requested before any commands can be sent to the TPM via that locality's CRB region. The
active locality must be relinquished before another locality is requested. The entity currently engaging with the
TPM is responsible for relinquishing the active locality when it is no longer in use. If the locality being requested is
CLOSED, a DENIED error is returned. If the locality being relinquished is not the current active locality, a DENIED
error is returned.
A single TPM command requires multiple FF-A round trips:
sequenceDiagram
    participant NW as Normal World
    participant SW as Secure World (MSSP)

    Note over NW: Write LocalityControl = request access
    NW->>SW: FFA DirectReq2(START, LOCALITY)
    Note over SW: LocalityX becomes active
    SW-->>NW: FFA DirectResp2(SUCCESS)

    Note over NW: Write CrbControlRequest = cmdReady
    NW->>SW: FFA DirectReq2(START, COMMAND)
    Note over SW: State: IDLE → READY<br/>(prepare external TPM)
    SW-->>NW: FFA DirectResp2(SUCCESS)

    Note over NW: Write command to CrbDataBuffer<br/>Write CrbControlStart = 1
    NW->>SW: FFA DirectReq2(START, COMMAND)
    Note over SW: State: READY → COMPLETE<br/>• Copy cmd from Internal CRB<br/>• Write cmd to External CRB<br/>• Trigger external TPM<br/>• Read response from External CRB<br/>• Copy response to Internal CRB
    SW-->>NW: FFA DirectResp2(SUCCESS)

    Note over NW: Read response from CrbDataBuffer<br/>Write CrbControlRequest = goIdle
    NW->>SW: FFA DirectReq2(START, COMMAND)
    Note over SW: State: COMPLETE → IDLE<br/>(idle external TPM)
    SW-->>NW: FFA DirectResp2(SUCCESS)

    rect rgba(200, 200, 200, 0.2)
        Note over NW,SW: OPTIONAL
        Note over NW: Write LocalityControl = relinquish access
        NW->>SW: FFA DirectReq2(START, LOCALITY)
        Note over SW: LocalityX is relinquished
        SW-->>NW: FFA DirectResp2(SUCCESS)
    end
If the secure partition is preempted by a non-secure interrupt during processing, the FF-A call returns
EFI_INTERRUPT_PENDING. The normal-world code handles this by calling ArmFfaLibRun() in a loop until the operation
completes. Note that this can only happen if ns-interrupts-action in the secure partition's manifest is set to 0x02,
otherwise, the non-secure interrupt is queued and the service continues execution until it completes or responds with a
YIELD.
Hash Library Architecture
Tcg2Dxe uses HashLibBaseCryptoRouterDxe with all hash instance libraries included.
Registration Flow
HashLibBaseCryptoRouterConstructorresetsPcdTcg2HashAlgorithmBitmapto 0.- Each
HashInstanceLibconstructor callsRegisterHashInterfaceLib(). RegisterHashInterfaceLib()checks the algorithm againstPcdTpm2HashMask(0x02= SHA256 only). Algorithms not in the mask returnEFI_UNSUPPORTED.
Hash Algorithm Bitmask Values
The bit positions used in PcdTpm2HashMask, PcdTcg2HashAlgorithmBitmap, and the
EFI_TCG2_BOOT_SERVICE_CAPABILITY.HashAlgorithmBitmap field are defined by the EFI TCG2 protocol and the TCG algorithm
registry:
- UEFI TCG2 Protocol Specification — see
EFI_TCG2_BOOT_HASH_ALG_*(SHA1= BIT0,SHA256= BIT1,SHA384= BIT2,SHA512= BIT3,SM3_256= BIT4). - TCG Algorithm Registry — canonical list of TPM hash algorithm IDs.
For this platform, PcdTpm2HashMask = 0x02 enables SHA256 only.
Filtering Chain
PcdTpm2HashMask (0x02)
        │
        ▼
RegisterHashInterfaceLib() ── gates which HashInstanceLibs register
        │
        ▼
PcdTcg2HashAlgorithmBitmap ── result of all successful registrations
        │
        ▼
Tcg2Dxe intersects with TPM-reported capabilities
        │
        ▼
Final ActivePcrBanks / HashAlgorithmBitmap in EFI_TCG2_BOOT_SERVICE_CAPABILITY
Physical Presence Interface
Library Selection
TPM2_ENABLE | Library | Behavior |
|---|---|---|
FALSE | Tcg2PhysicalPresenceLibNull | All functions stubbed |
TRUE | DxeTcg2PhysicalPresenceMinimumLib | Auto-confirms Clear; rejects all other operations |
The MinimumLib implementation:
- Auto-confirms TPM Clear operations without user prompting.
- Rejects SET_PCR_BANKS, LOG_ALL_DIGESTS, and other operations with
TCG_PP_RETURN_TPM_OPERATION_RESPONSE_FAILURE. - Does not create or use
TCG2_PHYSICAL_PRESENCE_FLAGS_VARIABLE.
ProcessRequest in BDS
Tcg2PhysicalPresenceLibProcessRequest() is invoked from the platform's DeviceBootManagerLib during
DeviceBootManagerAfterConsole(), before the shell launches. It:
- Reads the
Tcg2PhysicalPresenceNV variable (creates it if missing). - Executes any pending PP request stored in the variable.
- Stores the result back for
ReturnOperationResponseToOsFunction()to report.
Tcg2StandaloneMmArm (Secure World)
The Tcg2StandaloneMmArm driver runs in the StMM partition (id=0x8001). It handles Physical Presence NV variable
operations when called from the DXE-phase PP library via MM communicate. This is necessary because NV variable writes go
through the secure variable store in StMM.
ACPI Integration
TPM2 ACPI Table
Published by Tcg2AcpiFfa.c:
| Field | Value |
|---|---|
| Start Method | CRB with FF-A (0x0C) |
| Control Area Address | PcdTpmBaseAddress + 0x40 |
| Command Buffer | PcdTpmBaseAddress + 0x80, size 0xF80 |
| Response Buffer | PcdTpmBaseAddress + 0x80, size 0xF80 |
| Platform Parameters | Partition ID from PcdTpmServiceFfaPartitionId |
TPM ACPI Device (SSDT)
An SSDT is published with a TPM0 device node containing:
_HIDpatched with the TPM manufacturer ID read from hardware._CRSwith a QWordMemory resource pointing toPcdTpmBaseAddressthroughPcdTpmMaxAddress._DSMimplementing TCG PPI operations 1–8 for OS-initiated Physical Presence requests.- An
FFixedHwOperationRegion for FF-A DirectReq2 passthrough from the OS.
swtpm Setup
Installation
swtpm requires Unix sockets, so it must run in a Linux environment. On Windows, use WSL (Windows Subsystem for Linux).
# Windows (from a WSL terminal)
wsl --install          # if WSL is not yet enabled
wsl                    # enter the WSL environment

# Ubuntu/Debian (native or WSL)
sudo apt install swtpm swtpm-tools

# Fedora
sudo dnf install swtpm swtpm-tools
Manual Setup
Create the TPM state directory and start swtpm before launching QEMU:
mkdir -p /tmp/mytpm1
swtpm socket \
  --tpmstate dir=/tmp/mytpm1 \
  --ctrl type=unixio,path=/tmp/mytpm1/swtpm-sock \
  --tpm2 \
  --log level=20
Automatic Setup (QemuRunner)
When SWTPM_ENABLE=TRUE, QemuRunner.py automatically starts swtpm as a subprocess before launching QEMU. The swtpm
state directory is set to BUILD_OUTPUT_BASE and the Unix socket is placed at {BUILD_OUTPUT_BASE}/swtpm-sock:
# Platforms/QemuArmVirtPkg/Plugins/QemuRunner/QemuRunner.py
@staticmethod
def StartSwTpm(tpm_dir, tpm_sock):
    """Starts the swtpm emulator and returns its Popen handle."""
    cmd = [
        "swtpm", "socket",
        "--tpmstate", f"dir={tpm_dir}",
        "--ctrl", f"type=unixio,path={tpm_sock}",
        "--tpm2",
        "--log", "level=1",
    ]
    return subprocess.Popen(cmd)
swtpm is started before QEMU launches. QemuRunner then waits (up to 30 seconds) for the Unix socket to appear before
starting QEMU, and terminates the swtpm process so it doesn't outlive the run. SWTPM is enabled by default. Disable it
by setting SWTPM_ENABLE=FALSE on the command line or in the BuildConfig.conf file.
SWTPM is only available on Linux builds. QemuRunner automatically disables it on Windows
hosts even if SWTPM_ENABLE=TRUE.
QEMU Arguments
When SWTPM_ENABLE=TRUE, QemuRunner.py adds the following to the QEMU command line (with the socket path under
BUILD_OUTPUT_BASE):
-chardev socket,id=chrtpm,path={BUILD_OUTPUT_BASE}/swtpm-sock
-tpmdev emulator,id=tpm0,chardev=chrtpm
-device tpm-tis-device,tpmdev=tpm0
The -device tpm-tis-device argument is Arm-specific. It attaches a sysbus TIS-compatible TPM device to the Arm Virt
machine at the Internal CRB address 0x40200000. This differs from Q35, which uses the ISA/PCI tpm-tis device instead
(see TPM on QEMU Q35).
Communication Flow
Complete path from a shell application to swtpm:
TpmShellApp (UEFI Shell)
  │ gBS->LocateProtocol(&gEfiTcg2ProtocolGuid)
  │ Tcg2Protocol->SetActivePcrBanks(0x02)
  ▼
Tcg2Dxe (EFI_TCG2_PROTOCOL)
  │ Validates bank mask against HashAlgorithmBitmap
  │ Calls Tcg2PhysicalPresenceLibSubmitRequestToPreOSFunction()
  │   ├── MinimumLib: rejects SET_PCR_BANKS → returns EFI_UNSUPPORTED
  │   └── MinimumLib: NO_ACTION (already-active) → writes to NV variable → EFI_SUCCESS
  ▼
Tpm2CommandLib (for direct TPM commands like GetCapability)
  │ Serializes TPM2_CC command structure into byte buffer
  │ Calls Tpm2SubmitCommand(cmdBuffer, cmdSize, rspBuffer, &rspSize)
  ▼
Tpm2DeviceLibFfa — FfaTpm2SubmitCommand()
  │ PtpCrbTpmCommand(CrbReg = PcdTpmBaseAddress)
  │
  │ ┌─ STEP 1: cmdReady ──────────────────────────────────────────┐
  │ │  MmioWrite32(&CrbReg->CrbControlRequest, PTP_CRB_CONTROL    │
  │ │              _AREA_REQUEST_COMMAND_READY)                   │
  │ │  Tpm2ServiceStart(QUALIFIER_COMMAND, 0) ── FF-A ──► MSSP    │
  │ └─────────────────────────────────────────────────────────────┘
  │
  │ ┌─ STEP 2: submit ────────────────────────────────────────────┐
  │ │  CopyMem(CrbReg->CrbDataBuffer, cmdBuffer, cmdSize)         │
  │ │  MmioWrite32(&CrbReg->CrbControlStart, 1)                   │
  │ │  Tpm2ServiceStart(QUALIFIER_COMMAND, 0) ── FF-A ──► MSSP    │
  │ └─────────────────────────────────────────────────────────────┘
  │
  │                    ════ WORLD SWITCH ════
  │
  │   MSSP (secure world, partition 0x8002):
  │     TpmServiceLib: state READY → execute
  │     TpmServiceStateTranslationLib:
  │       1. Read command from Internal CRB data buffer
  │       2. CopyCommandData() → write to External CRB @ 0x0c000000 (FIFO)
  │       3. StartCommand() → trigger TPM execution
  │       4. CopyResponseData() → read response from External CRB
  │       5. Write response to Internal CRB data buffer
  │
  │                    ════ QEMU MMIO ════
  │
  │     QEMU TPM device @ 0x0c000000
  │       └── Unix socket ──── swtpm process
  │
  │                    ════ WORLD SWITCH BACK ════
  │
  │ ┌─ STEP 3: goIdle ────────────────────────────────────────────┐
  │ │  Read response from CrbReg->CrbDataBuffer                   │
  │ │  MmioWrite32(&CrbReg->CrbControlRequest, PTP_CRB_CONTROL    │
  │ │              _AREA_REQUEST_GO_IDLE)                         │
  │ │  Tpm2ServiceStart(QUALIFIER_COMMAND, 0) ── FF-A ──► MSSP    │
  │ └─────────────────────────────────────────────────────────────┘
  ▼
Response returned to caller
PCDs Reference
Required PCDs (set when TPM2_ENABLE=TRUE)
| PCD | Value | Type | Purpose |
|---|---|---|---|
PcdTpmBaseAddress | 0x40200000 | FixedAtBuild | Internal CRB base address |
PcdTpmMaxAddress | 0x40204FFF | FixedAtBuild | Internal CRB end address (5 localities) |
PcdTpm2HashMask | 0x02 | DynamicDefault | Hash algorithm filter (SHA256 only) |
PcdTpmInstanceGuid | gEfiTpmDeviceInstanceTpm20DtpmGuid | FixedAtBuild | Selects discrete TPM 2.0 device type |
PcdTpm2AcpiTableRev | 5 | DynamicHii | ACPI TPM2 table revision |
PcdUserPhysicalPresence | FALSE | FixedAtBuild | No physical user presence assertion |
Memory Type PCDs
| PCD | Value | Purpose |
|---|---|---|
PcdMemoryTypeEfiACPIReclaimMemory | 0x143 | ACPI reclaim memory pages (includes TPM ACPI tables) |
PcdMemoryTypeEfiACPIMemoryNVS | 0x3C | ACPI NVS pages (includes CRB region) |
PcdMemoryTypeEfiRuntimeServicesData | 0x642 | Runtime services data pages |
PcdMemoryTypeEfiRuntimeServicesCode | 0x424 | Runtime services code pages |
PcdMemoryTypeEfiReservedMemoryType | 0x505 | Reserved memory pages |
Conditional PCDs (TPM2_CONFIG_ENABLE=TRUE)
| PCD | Value | Purpose |
|---|---|---|
PcdTcgPhysicalPresenceInterfaceVer | "1.3" | TCG PPI specification version reported to OS |
TpmShellApp on QEMU Platforms
Platform-specific guidance for running TpmShellApp on the QEMU Q35 and Arm Virt platforms.
Table of Contents
- FDF Placement
- Protocol Availability
- Running on QEMU Arm Virt
- Running on QEMU Q35
- Hash Algorithm Configuration
- Expected Behavior with MinimumLib
- Event Log and Replay
- Findings
FDF Placement
On Arm Virt, add the INF to FV.FvMain. On Q35, add it to FV.DXEFV:
INF SecurityPkg/Applications/TpmShellApp/TpmShellApp.inf
Protocol Availability
The EFI_TCG2_PROTOCOL is installed by Tcg2Dxe.efi, which only loads when TPM2_ENABLE=TRUE.
Running on QEMU Arm Virt
On QEMU Arm Virt, the TpmShellApp is placed directly in the firmware volume, which is mapped as an FSx: device in the
UEFI shell. Build with:
stuart_build -c Platforms/QemuArmVirtPkg/PlatformBuild.py --FlashRom BLD_*_TPM2_ENABLE=TRUE
At the UEFI shell, run:
Shell> TpmShellApp.efi help
Shell> TpmShellApp.efi info
Shell> TpmShellApp.efi eventlog
Shell> TpmShellApp.efi replay
Or navigate to the correct FS mapping first:
Shell> map -r
Shell> FS0:
FS0:\> TpmShellApp.efi info
Running on QEMU Q35
On Q35, shell applications are loaded from a virtual drive (FAT filesystem image), not directly from the firmware
volume. The FILE_REGEX build parameter controls which binaries are copied to the virtual drive:
stuart_build -c Platforms/QemuQ35Pkg/PlatformBuild.py --FlashRom \
  BLD_*_TPM2_ENABLE=TRUE \
  FILE_REGEX=TpmShellApp.efi
At the UEFI shell, find the virtual drive's FS mapping (typically backed by a PCI device, not Fv(...)) and run:
Shell> map -r
Shell> FS0:
FS0:\> TpmShellApp.efi info
If the app is not found, verify the virtual drive was created with the binary:
Shell> FS0:
FS0:\> dir
Hash Algorithm Configuration
Both QEMU platforms set PcdTpm2HashMask to 0x02 (SHA256 only). This means the app will typically only see SHA256 as
supported and active, even though swtpm may support all five algorithms. To see additional algorithms, update
PcdTpm2HashMask in the platform DSC.
Expected Behavior with MinimumLib
Both QEMU platforms use DxeTcg2PhysicalPresenceMinimumLib when TPM is enabled. This library has specific behaviors
that affect TpmShellApp results:
setpcr with Already-Active Banks
When the requested banks match the currently active banks, Tcg2Dxe sends TCG2_PHYSICAL_PRESENCE_NO_ACTION to the PP
library. MinimumLib processes NO_ACTION successfully, returning EFI_SUCCESS.
Shell> TpmShellApp setpcr 0x2    (SHA256 already active)
Submitting SetActivePcrBanks with parameter 2
Status: Success
Request submitted. Changes will take effect after reboot.
setpcr with Different Banks
When the requested banks differ from active banks, Tcg2Dxe sends TCG2_PHYSICAL_PRESENCE_SET_PCR_BANKS to the PP
library. MinimumLib rejects this operation as it only supports Clear operations.
Shell> TpmShellApp setpcr 0x4    (SHA384, not currently active)
Submitting SetActivePcrBanks with parameter 4
Status: Unsupported
SetActivePcrBanks failed.
This is expected and correct behavior — MinimumLib is designed to block PCR bank changes.
logall Expected Behavior
If the platform only has SHA256 registered (default), logall requests the same bank that's already active, resulting
in a NO_ACTION → EFI_SUCCESS. If additional algorithms were registered, it would request banks different from the
active set, triggering a SET_PCR_BANKS rejection.
lastresponse Expected Behavior
Reports the result stored in the Tcg2PhysicalPresence NV variable by ProcessRequest. If no prior SetActivePcrBanks
was processed through a reboot cycle, the response will show no operation present.
Shell> TpmShellApp lastresponse
  Operation present: NO
  Response code:     0
Event Log and Replay
eventlog on QEMU
The eventlog command dumps the crypto-agile TCG2 event log. On QEMU with the default SHA256-only configuration, each
event contains a single SHA256 digest.
Shell> TpmShellApp.efi eventlog

[TCG2 Event Log]

Spec ID Event: 1 algorithm(s)
  SHA256 (alg 0xb, digest 32 bytes)

Event 1: PCR 0 EV_S_CRTM_VERSION (0x8)
  SHA256: ab cd ef ...
  Event data: 2 bytes
Event 2: PCR 0 EV_EFI_PLATFORM_FIRMWARE_BLOB (0x80000008)
  SHA256: 01 23 45 ...
  Event data: 16 bytes
...
Total: N event(s)
If PcdTpm2HashMask is updated to enable additional algorithms (e.g., 0x06 for SHA256 + SHA384), each event will
contain multiple digests — one per active algorithm.
replay on QEMU
The replay command replays extend operations from the event log to compute expected PCR values, then reads the actual
PCR values from the TPM via SubmitCommand and compares them.
Shell> TpmShellApp.efi replay

[Event Log Replay]

Replayed N event(s) across 1 algorithm(s).

PCR 0:
  SHA256 Replayed: aa bb cc ...
  SHA256 Actual:   aa bb cc ...
  Result: PASS

PCR 1:
  SHA256 Replayed: 11 22 33 ...
  SHA256 Actual:   11 22 33 ...
  Result: PASS

...
Summary: M PCR bank(s) verified, M PASS, 0 FAIL
On a freshly booted QEMU platform with swtpm, all PCRs should show PASS. A FAIL indicates that either the event log
is incomplete (e.g., truncated) or an extend operation occurred outside the logged event flow.
Replay with Multiple Algorithms
When multiple hash algorithms are active, the replay verifies each algorithm independently. Algorithms not supported by
BaseCryptLib (e.g., SM3_256) are skipped with a message:
PCR 0:
  SHA256 Replayed: ...
  SHA256 Actual:   ...
  Result: PASS
  SM3_256: (replay not supported, skipped)
Truncated Event Log
If the firmware's event log buffer was exhausted, the eventlog and replay commands print a warning:
Warning: Event log was truncated.
For replay, a truncated log means the replayed PCR values will not include all extensions, so mismatches are expected.
Findings
April 2026:
Manually updating Tpm2HashMask in the platform .dsc is dangerous. On Q35, PEI picks up
the change and automatically enables/disables any PCR banks that differ from the current
active banks in the TPM (see Tcg2Pei - SyncPcrAllocationsAndPcrMask). If the platform also
disables (i.e. removes) any of the supported hashing algorithms from the platform .dsc,
there are no safeguards to prevent the TPM from enabling/disabling active banks based on
platform support. Because of this, there can be active banks that show up as active when
querying the TPM directly but do not show up as active in the Tcg2Protocol call.
Example:
-
Tpm2HashMaskis updated to0x06(i.e. SHA256 + SHA384 supported). -
SHA384 support is removed from
Tcg2PeiandTcg2Dxe. -
Build/Run the Q35 platform.
-
TPM reports SHA256 as the only active PCR bank.
-
Tcg2Peirecognizes there is a mismatch between platform support (i.e.Tpm2HashMask) and TPM active banks. It activates SHA384 and triggers aResetCold. -
TPM reports SHA256 + SHA384 as active PCR banks.
-
HashLibBaseCryptoRouterPeiandHashLibBaseCryptoRouterDxesetPcdTcg2HashAlgorithmBitmapbased on successfully registered hash algorithms. -
Tcg2Peiregisters SHA256 but is unable to register SHA384. -
Tcg2Dxeregisters SHA256 but is unable to register SHA384. -
Tcg2Dxesets local variables based on what the TPM reports andPcdTcg2HashAlgorithmBitmap.mTcgDxeData.BsCap.HashAlgorithmBitmap = TpmHashAlgorithmBitmap & PcdGet32 (PcdTcg2HashAlgorithmBitmap); mTcgDxeData.BsCap.ActivePcrBanks = ActivePCRBanks & PcdGet32 (PcdTcg2HashAlgorithmBitmap); -
Tcg2Protocolis installed with only SHA256 support reported even though SHA384 is active.
BranchReadme [Name of Branch]
Describe the goal of your project.
What are you trying to showcase?
Branched from: {Release you forked from - ie 202005}
Branched on: {Date you branched}
Author: {Email}
What's unique about this branch
Fill in with more detail about the technical differences between this branch and the release branch you forked from.
Roadmap
Fill in your expected roadmap, what do you hope to accomplish? What still needs to be done?
Expected lifetime of your branch
The goal of feature branches in mu_tiano_platforms is to showcase a feature and allow for development of that feature.
Branches shouldn't linger on unnecessarily. They exist as proofs of concept and should try to become ready to be merged
into a release branch or be archived as a useful learning exercise.