quick-authentication
Sign-in users with a Microsoft Account to iOS apps using Microsoft Quick Authentication
| Getting Started| Reference | |–|–|
On iOS, Microsoft Quick Authentication offers a library that makes it easy to add Sign in with Microsoft support to your mobile native app. Quick Authentication uses the Microsoft Authentication Library (MSAL) for iOS to handle authentication and authorization for users with personal Microsoft accounts.
Microsoft Quick Authentication is in public preview. This preview is provided without a service-level agreement and isn’t recommended for production workloads. Some features might be unsupported or have constrained capabilities. For more information, see Supplemental terms of use for Microsoft Azure previews.
How it works
Microsoft Quick Authentication allows you to easily add a fully functioning sign-in button to your iOS application that will take the user through the sign-in workflow with a personal Microsoft Account (MSA). Additionally, Quick Authentication allows you to sign-in your users silently whenever possible, to let them sign out of your application, and to perform more advanced tasks such as requesting an access token to retrieve additional account information.
To enable Quick Authentication in your application, you will need to follow these high level steps. Each step is further detailed in the rest of this document.
- First register your application for iOS on Azure (you can reuse the same Azure registration that you created for your web site).
- Install Microsoft Quick Authentication SDK and import the required header files in your application.
- Create a Quick Authentication sign-in client object (
MSQASignInClient) with the proper configuration. - Add an Quick Authentication sign-in button somewhere in your application storyboard or XIB file.
- Set a callback on the sign-in button to be notified when the user has completed the sign-in workflow.
- Implement the callback to integrate the user account with your own identity system.
Quick Authentication will show a fully functioning sign-in button, looking as follows in its default form, and customizable with Quick Authentication for the web. In its default appearance, the button looks like this:

Note that at this time, the personalization of the user experience available with Quick Authentication for the web is not available to iOS native apps. However, your users will still be able to sign-in using the button shown above, and benefit from SSO in some circumstances.
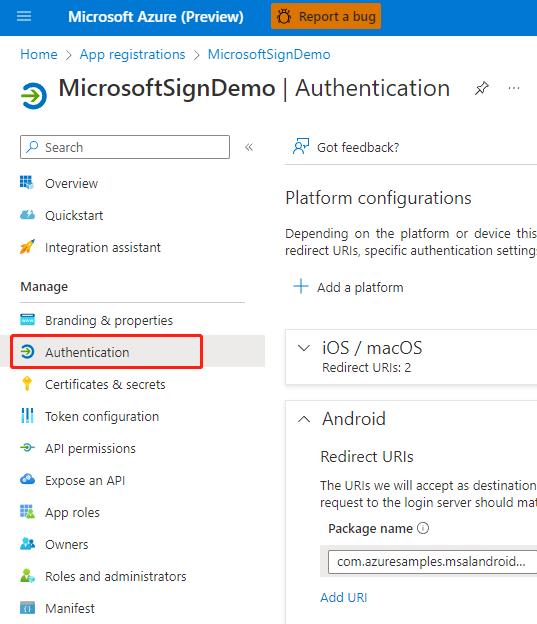
Registering your application
If you have already registered a single-page web or an Android application, you can reuse the same application registration. To find that registration go to Microsoft | App registrations and select your existing application registration in the list. This will open a page describing your application registration.
If you have not yet registered an application or wish to use a new registration, complete the steps in Register an application with the Microsoft identity platform.
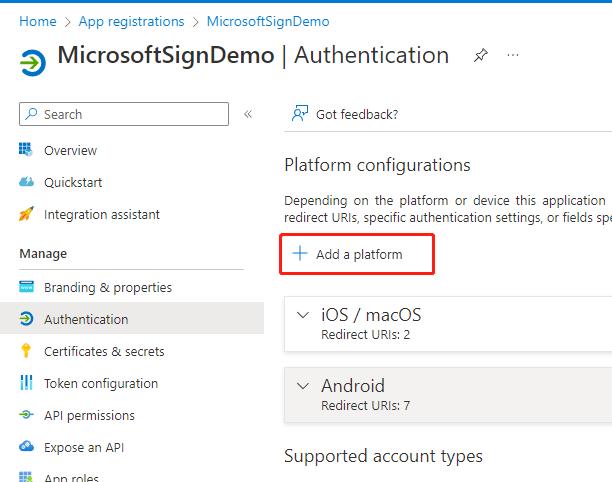
Now that you have created an application registration, you can extend it to iOS as follows. On the Azure page describing your app registration:
- Open the Authentication tab on the left of that page
- Click Add Platform
- Select iOS / MacOS
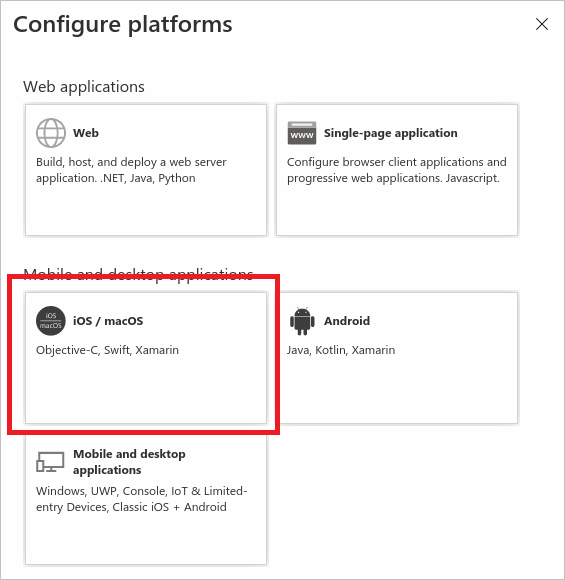
- Enter your app’s Bundle ID, which can be found in XCode in the Info.plist or “Build Settings”.
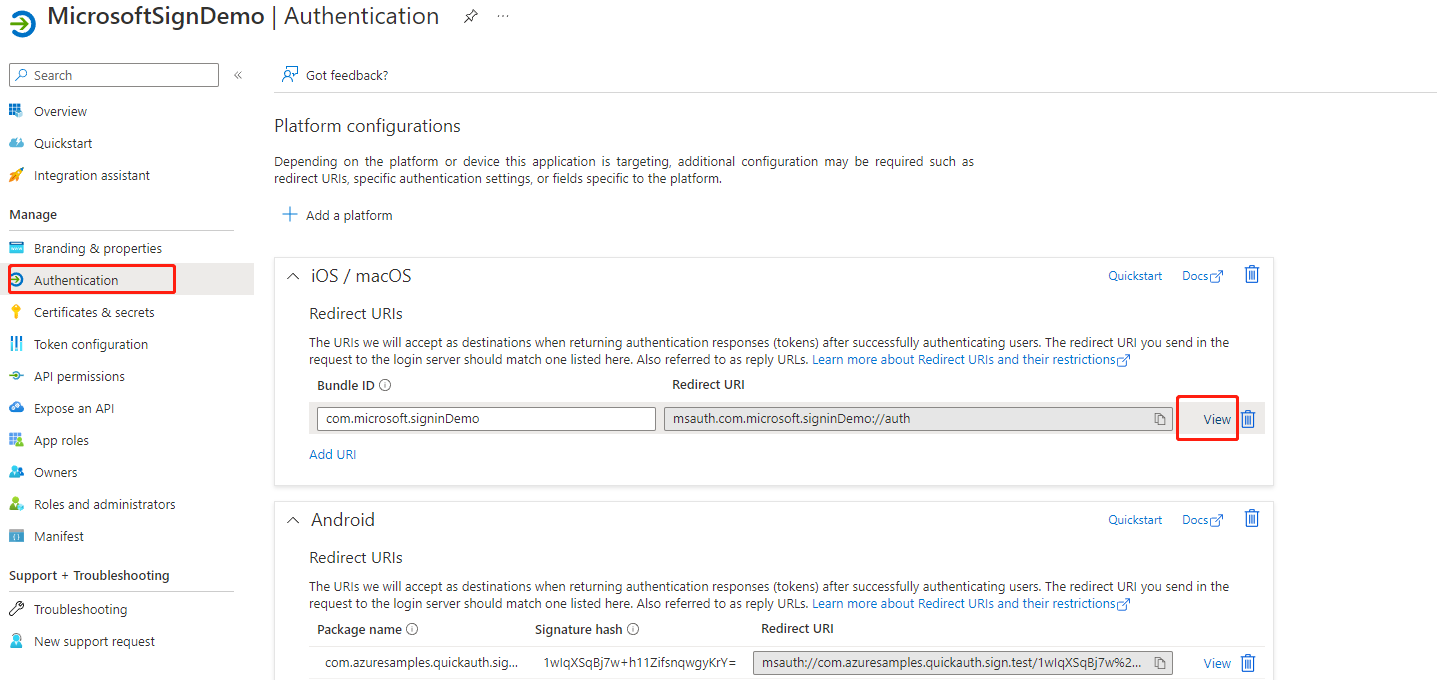
- Click Configure
Installing Microsoft Quick Authentication SDK
To install the Microsoft Quick Authentication SDK in your development environment using CocoaPods, proceed as follows:
- Install CocoaPods following the instructions in the Getting Started guide
- Create a
Podfilefor your application and addMicrosoftQuickAuthorMicrosoftQuickAuthSwiftSupportunder your target:
Objective-C:
use_frameworks!

target 'your-target-here' do
  pod 'MicrosoftQuickAuth'
end
SwiftUI:
use_frameworks!

target 'your-target-here' do
  pod 'MicrosoftQuickAuthSwiftSupport'
end
- Install the dependency:
$ pod install
Initializing your application
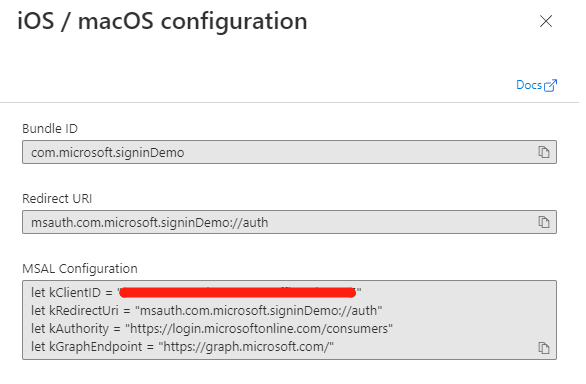
Create a MSQAConfiguration object to set the client ID for your application, which you will find in the Azure registration for your application.
Objective-C:
#import <MSQA/MSQASignInClient.h>

MSQAConfiguration *config = [[MSQAConfiguration alloc]
      initWithClientID:@"YOUR_IOS_CLIENT_ID"];
Swift:
let config = MSQAConfiguration(clientID: "YOUR_IOS_CLIENT_ID")
and initialize a new instance of MSQASignInClient as follows:
Objective-C:
NSError *error = nil;
MSQASignInClient *msSignInClient = [[MSQASignInClient alloc] initWithConfiguration:config
                                                                             error:&error];
Swift:
var error: NSError?
let client = MSQASignInClient(configuration: config, error: &error)
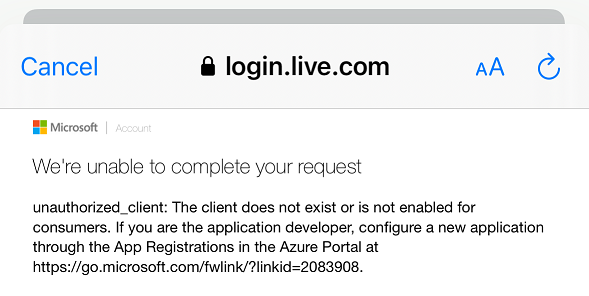
If an error occured, msSignInClient returned will be nil and the error parameter will contain the error details.
If the client ID is invalid, a later attempt to sign-in or acquire an access token will fail. The error will be reported to the user as follows:
Configuring the application
Because Microsoft Quick Auth SDK builds on top of MSAL library, you will need to make the following MSAL configurations:
- Add a new keychain group, named com.microsoft.adalcache, to your project Capabilities:
 )
)
- Add your application’s redirect URL scheme to your Info.plist file: ```xml
3.	Add LSApplicationQueriesSchemes to Info.plist. This will allow your application to open Microsoft Authenticator if installed. Note that scheme “msauthv3” is needed when compiling your app with Xcode 11 or later.
```xml
<key>LSApplicationQueriesSchemes</key>
<array>
  <string>msauthv2</string>
  <string>msauthv3</string>
</array>
- To handle the sign-in callback, implement the following AppDelegate method to call
MSQASignInClient’shandleURLto open a resource specified by the URL, and returnsYESif theMSQASignInClientsuccessfully handled the request
Objective-C:
- (BOOL)application:(UIApplication *)app
            openURL:(NSURL *)url
            options:(NSDictionary<UIApplicationOpenURLOptionsKey,id> *)options {
      return [_msSignInClient
              handleURL:url
      sourceApplication:
          options[UIApplicationOpenURLOptionsSourceApplicationKey]];
}
Swift:
func application(
  _ app: UIApplication, open url: URL, options: [UIApplication.OpenURLOptionsKey: Any] = [:]
) -> Bool {
  let sourceApplication = options[UIApplication.OpenURLOptionsKey.sourceApplication] as? String
  if sourceApplication != nil {
    return client.handle(
      url, sourceApplication: sourceApplication!)
  }
  return false
}
Adding a sign-in button to your application
Microsoft Quick Authentication allows you to add a fully functional sign-in button to your application. To do that, add a View to your storyboard or XIB file and set its custom class as MSQASignInButton.
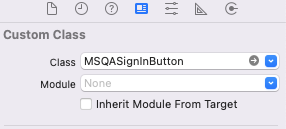
This will generate a sign-in button in your application as follows:
Alternatively, you can also add the button programmatically at runtime with the following code:
Objective-C:
- (void)viewDidLoad {
  [super viewDidLoad];

  CGRect buttonFrame = CGRectMake(10, 280, 100, 30);
  MSQASignInButton *button =
      [[MSQASignInButton alloc] initWithFrame:buttonFrame];
  [self.view addSubview:button];
}
It is possible to customize the appearance of the button. Refer to the reference guide for details.
For SwiftUI, you should create a MSQASignInButtonViewModel object first, setting the completion block to be called after sign-in flow is done as below:
var signInButtonViewModel = MSQASignInButtonViewModel(
  signInClient: MSQASignInClient(
    configuration: MSQAConfiguration(clientID: "YOUR_IOS_CLIENT_ID"), error: nil
  ), presentingViewController: self,
  completionBlock: { (account, error) in
    if (account != nil) {
      // Use account.
    }
    if (error != nil) {
      // Handle errors.
    }
  })
then add the button with the following code:
var body: some View {
  Spacer()
  MSQASignInButton(viewModel: signInButtonViewModel)
    .accessibilityIdentifier("MSQASignInButton")
    .padding()
}
Getting a call back after the user has signed-in
To get a callback after the user has completed the sign-in flow, or an error has occurred, set the completion block to be called using the setSignInClient:viewController:completionBlock method of MSQASignInButton, and return YES if setting the completion block is successful.
Objective-C:
BOOL success =
    [msSignInButton setSignInClient:_msSignInClient
                      viewController:self
                     completionBlock:^(MSQAAccountInfo *_Nullable account,
                                      NSError *_Nullable error) {
                       if (account) {
                         // Use account
                       } else if (error) {
                         // Handle errors, e.g., not initialized.
                         NSLog(@"%@", error.localizedDescription);
                       }
                     }];
On success, the completion block will be invoked with the MSQAAccountInfo containing the following information:
@interface MSQAAccountInfo : NSObject <NSCopying>

// MSA user's full name.
@property(nonatomic, readonly) NSString *fullName;

// MSA user's email address or phone.
@property(nonatomic, readonly) NSString *userName;

// CID for MSA account.
@property(nonatomic, readonly) NSString *userId;

// The user profile photo in Base64 encoded, will be nil if none.
@property(nonatomic, readonly, nullable) NSString *base64Photo;

// MSA account id token.
@property(nonatomic, readonly, nullable) NSString *idToken;

/// MSA user's surname.
@property(nonatomic, readonly, nullable) NSString *surname;

/// MSA user's given name.
@property(nonatomic, readonly, nullable) NSString *givenName;

/// MSA user's email.
@property(nonatomic, readonly, nullable) NSString *email;

@end
For swift, please refer to Adding a sign-in button to your application to check how to create a MSQASignInButtonViewModel object to set the completion block.
Handling sign out
To allow the user to sign out, in your application, connect a button to a method in the ViewController (called signOut in the example below) and call MSQASignInClient’s method signOutWithCompletionBlock:
Objective-C:
- (IBAction)signOut:(id)sender {
  [_msSignInClient
      signOutWithCompletionBlock:^(NSError *_Nullable error) {
        if (error)
          NSLog(@"Error:%@", error.description);
      }];
}
Swift:
client.signOut(completionBlock: { (error) in
  if let error = error as? NSError {
    print(error.description)
  }
})
Troubleshoot specific errors
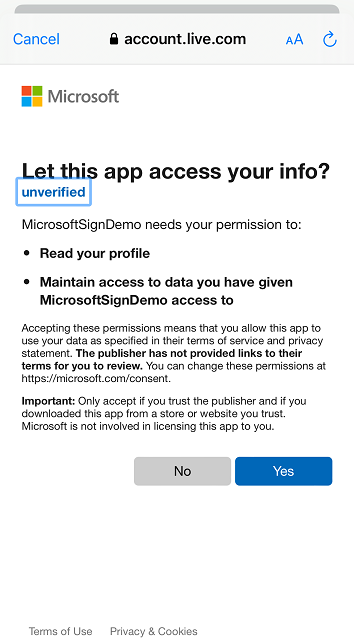
Application showing up as “unverified”.
If your application shows up as “unverified” as in the image below, please look at this document on steps of how to resolve it, you can also reference Publisher verification.