

This page covers information about a Windows MIDI Services feature and application that will be released to consumers in November 2026. It’s currently available for developers.
Windows MIDI Glass lets you build your own MIDI controller on screen. You put faders, knobs, buttons, pads and keys on a page, choose what each one sends, and then play it with your fingers, a pen or a mouse. It’s at its best on a touch screen, or on a second monitor next to your keyboard, but it works on any PC.
Each design is called a layout. A layout can have several pages and send to several devices. Its controls can also move and light up when your gear or your DAW sends something back.
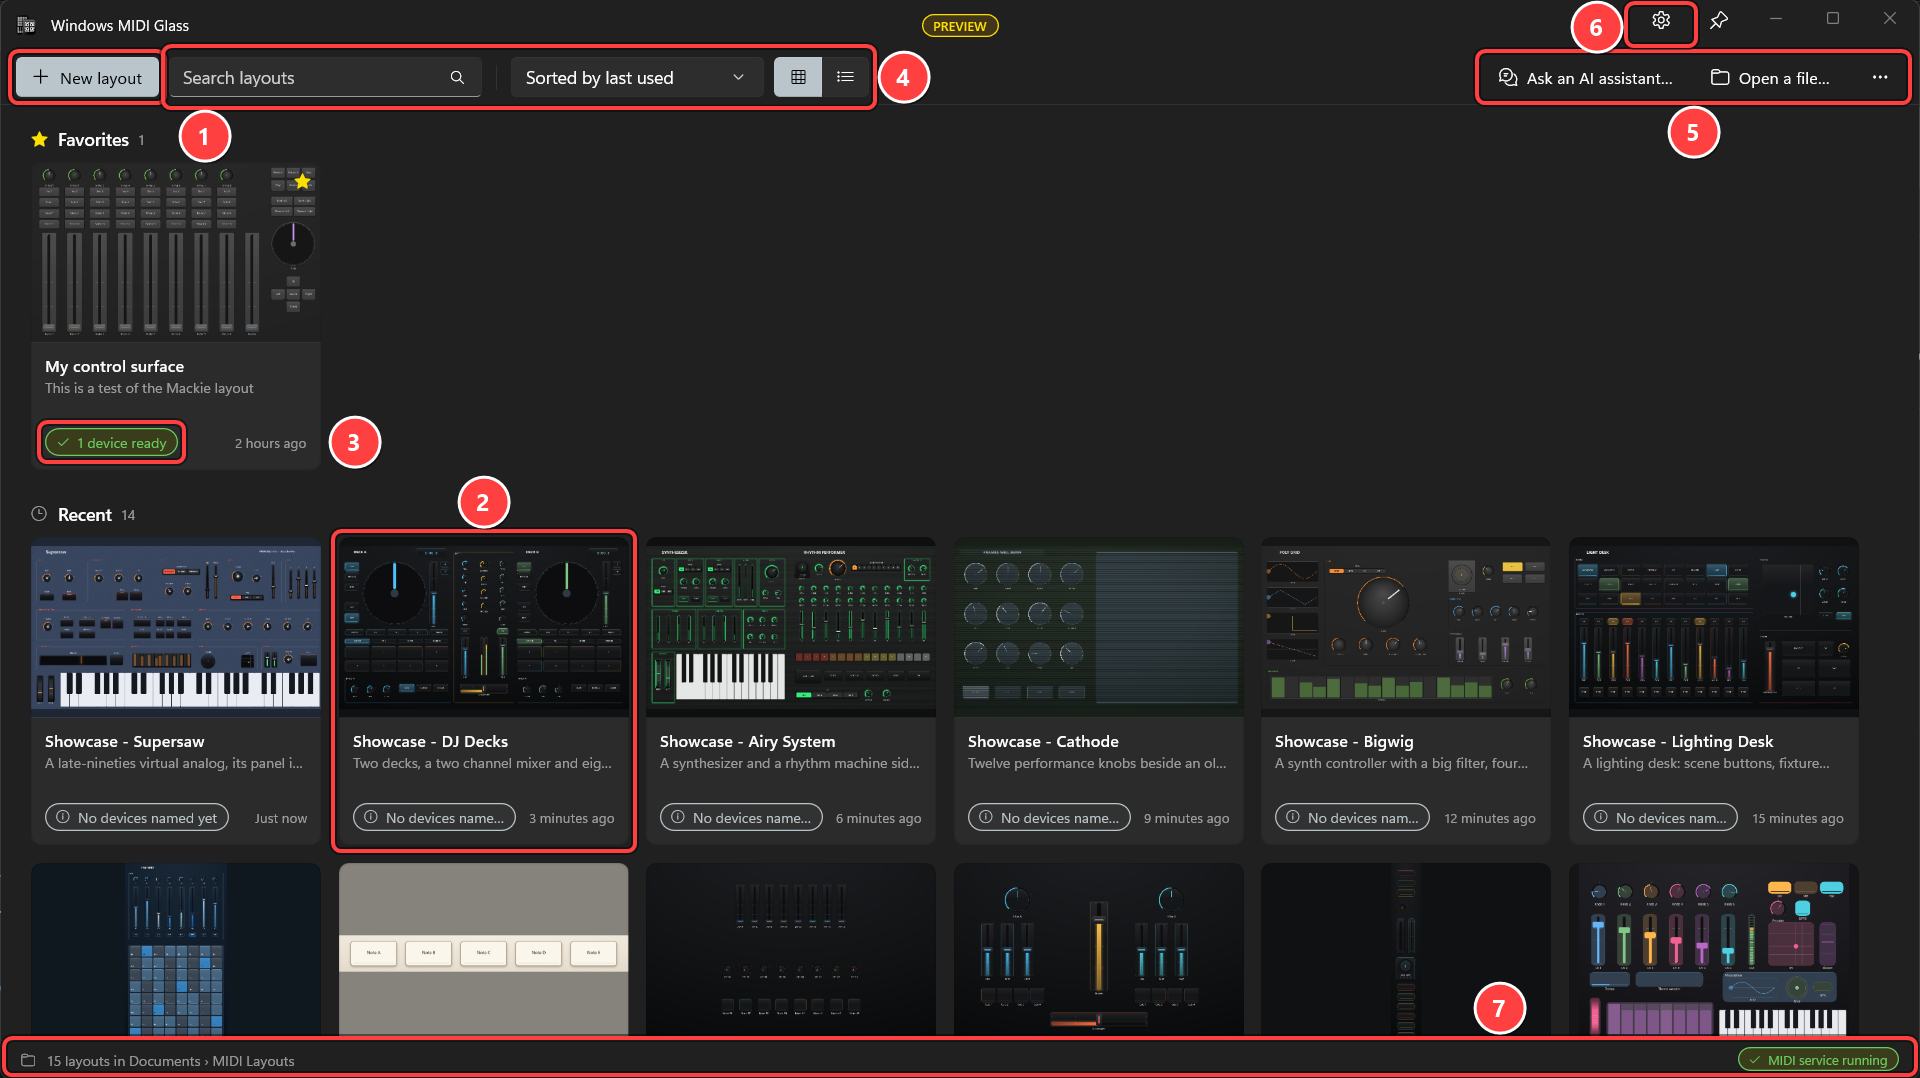
Windows MIDI Glass opens to the library, where all your layouts are.
To play an app on the same PC, such as a DAW, pick Default App Loopback (A) under Send to. Then set the app to listen to Default App Loopback (B). A loopback passes whatever goes into one side out of the other side.
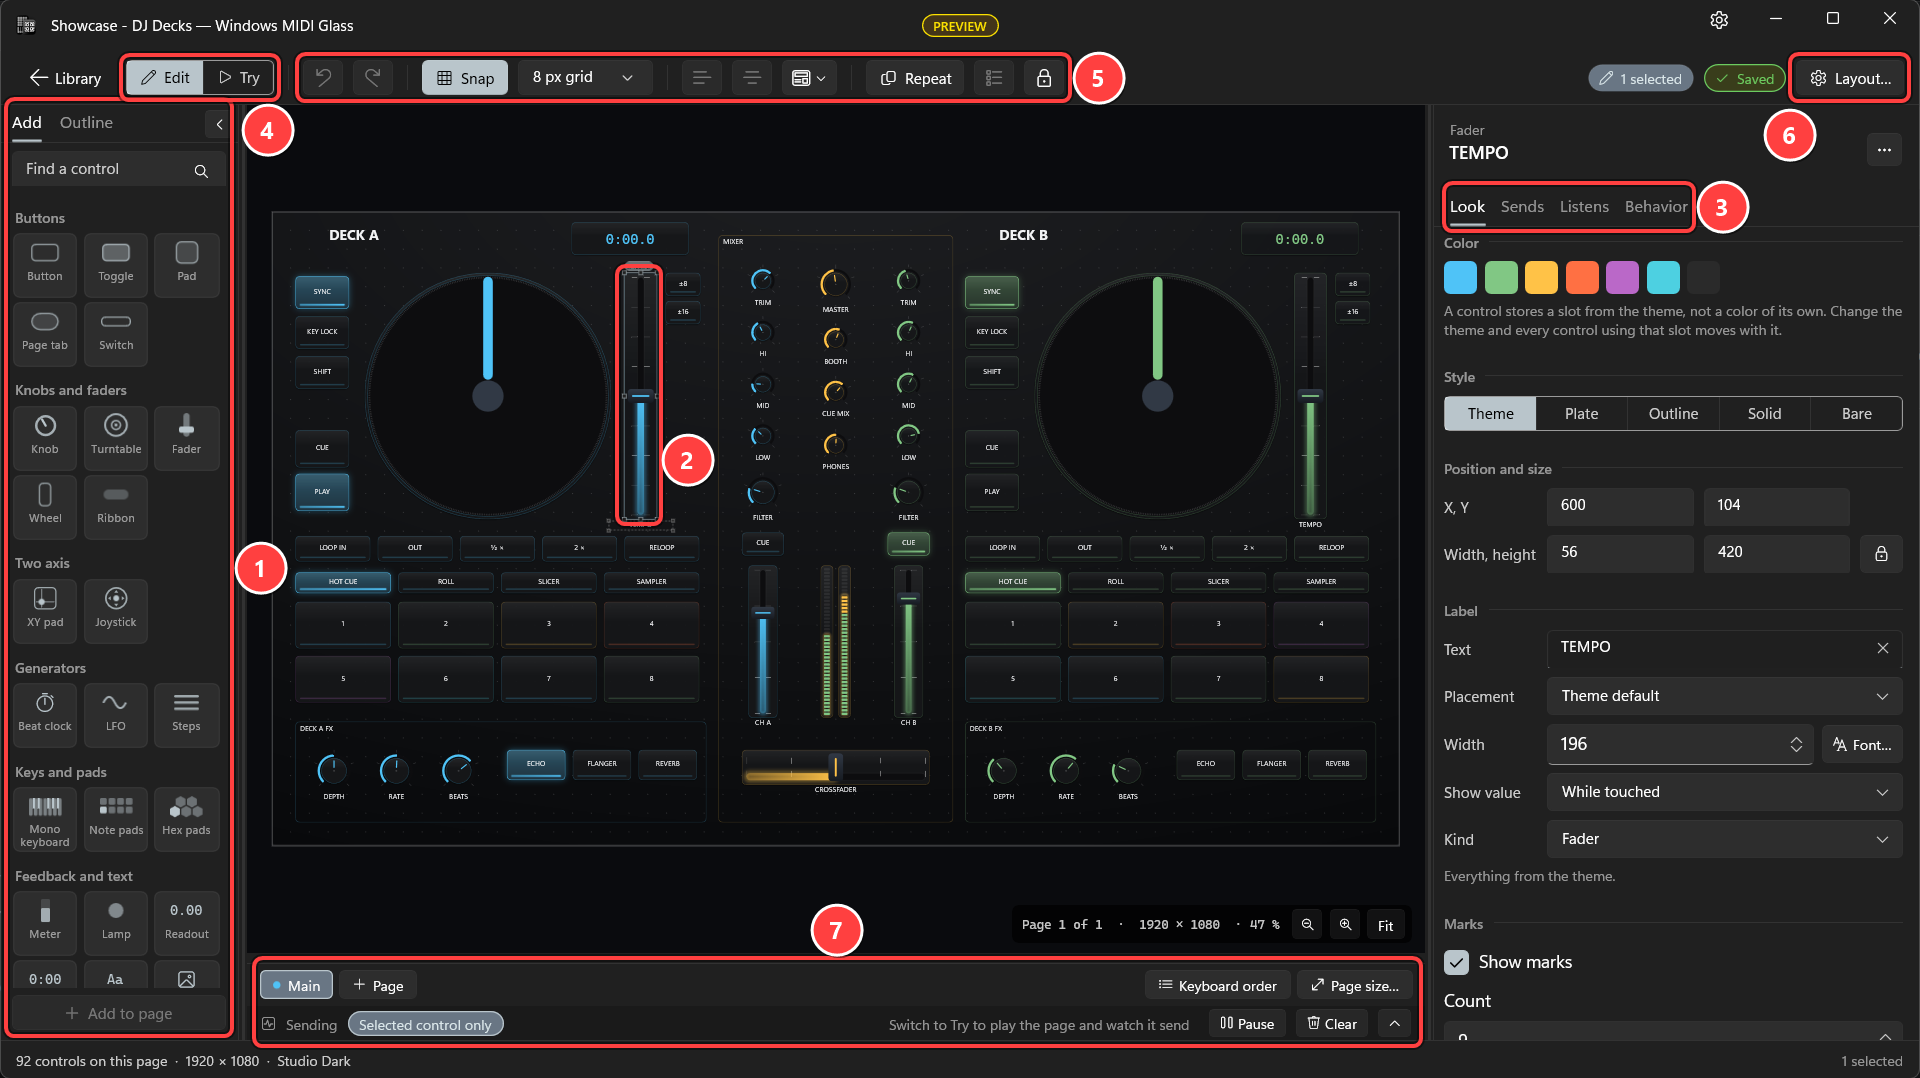
Windows MIDI Glass saves your layout a moment after each change. The chip near the top right says Saved once it’s done. Press Ctrl+S to save right away.
New layout asks for three things:
| Template | What you get |
|---|---|
| Mixer | Eight faders, eight knobs and eight pads on one page. |
| DJ deck | Two decks with filters, three band EQ, cue pads and a crossfader. |
| Drum pads | A four by four grid on channel 10, with the lowest note at the bottom left. |
| Transport | Play, stop, record and loop, plus eight track faders. |
| Mackie Control | Eight channel strips, a master fader, transport and a jog wheel, for a DAW set up to use a Mackie Control surface. See How to control your DAW with Mackie Control in Windows MIDI Glass. |
| Horizontal toolbar | Eight buttons in a see-through strip that stays in front of your other apps. |
| Vertical toolbar | Eight buttons in a see-through column that stays in front of your other apps. |
| Floating palette | Sixteen buttons in a see-through square that stays in front of your other apps. |
| Blank | An empty page, ready for you to build on. |
The toolbar and palette templates are explained in How to make a floating toolbar or palette in Windows MIDI Glass.
If no devices show up under Send to, plug one in, or make a loopback with Windows MIDI Loopback Setup.
The Add pane groups the controls by what they do.
| Group | Controls |
|---|---|
| Buttons | Button, Toggle, Pad, Page tab, Switch |
| Knobs and faders | Knob, Turntable, Fader, Wheel, Ribbon |
| Two axis | XY pad, Joystick |
| Generators | Beat clock, LFO, Steps |
| Keys and pads | Mono keyboard, Note pads, Hex pads |
| Feedback and text | Meter, Lamp, Readout, Stopwatch, Text, Image |
| Grouping | Group, Line |
A few of them need a word of explanation:
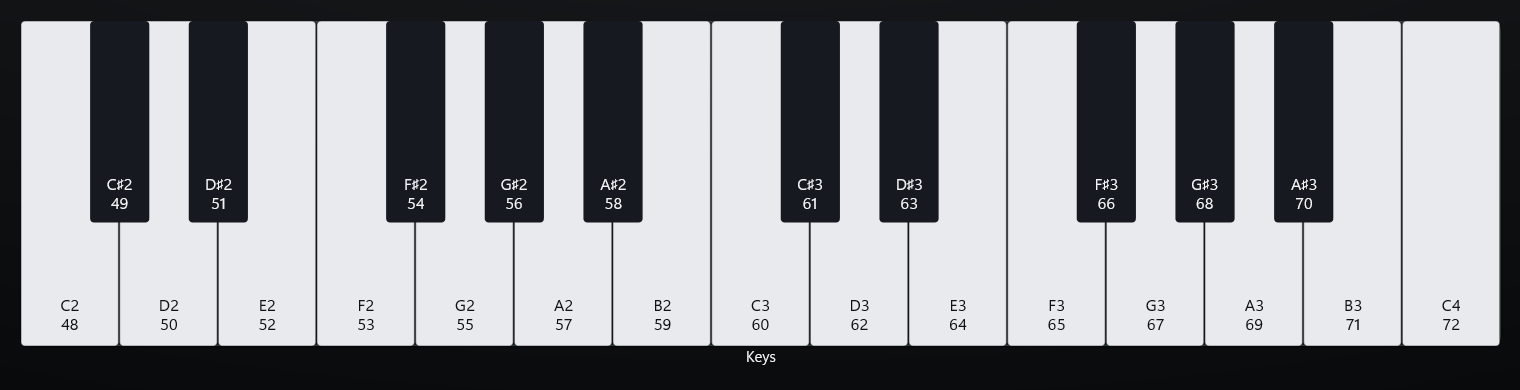
Type in Find a control to narrow the list. To add a control without the mouse, pick it with the keyboard and select Add to page. Add to page stays off until you pick a control.
| Keys | What they do |
|---|---|
| Ctrl+Z, Ctrl+Y | Undo, redo |
| Ctrl+C, Ctrl+X, Ctrl+V | Copy, cut, paste |
| Ctrl+D | Duplicate the selection |
| Delete | Delete the selection |
| Arrow keys | Move the selection one pixel |
| Shift+arrow keys | Move the selection one grid square |
| F2 | Rename the selected control |
| Esc | Put away the control you picked in Add |
| Ctrl+Enter | Switch between Edit and Try |
| Ctrl+S | Save now |
The Sends tab has an Action list. Each row in it says when to send, what to send, and where to send it.
A few types need more than a number:
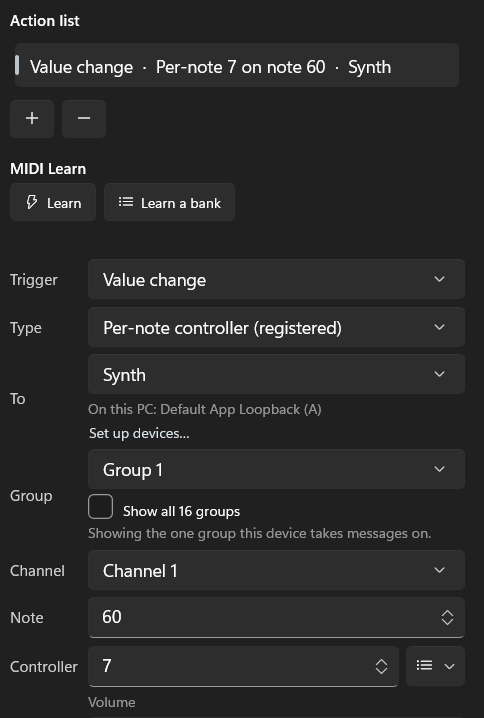
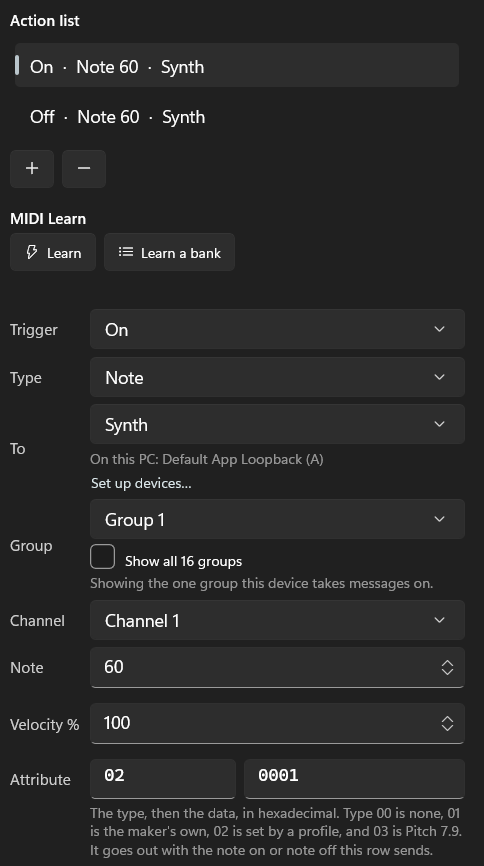
Windows MIDI Glass names notes the same way the rest of Windows MIDI Services does: note 60, middle C, is C3.
The fastest way to fill in a row is MIDI Learn. Turn on Learn, then move a knob or press a key on your hardware, and Windows MIDI Glass copies what it sends. Learn a bank fills several controls in a row: touch the knobs on your hardware one after another, and each one fills the next control in keyboard order. MIDI Learn listens to the devices in the layout’s device list, so add your hardware there first.
Each device has a Protocol setting: MIDI 2.0, MIDI 1.0 or Mackie Control. It decides how you type values on the Sends tab. How Windows MIDI Glass talks to each device explains the choices.
On the Listens tab, turn on MIDI follow and the control moves or lights up when a device sends something, not only when you touch it. Under Follow mode, pick one of these:
A fader that follows the DAW can be a long way from your finger when you touch it. On the Behavior tab, Pickup decides what happens then, for a fader, an XY pad, a joystick or a ribbon. Jump goes straight to your finger. Catch waits until your finger reaches the value, so nothing jumps. Relative moves the value by as far as your finger moves.
Try turns the page on without leaving the editor. Every control sends for real, so you can check that a fader sends what you expect before you go any further. Ctrl+Enter switches back to Edit.
The Sending list under the page shows each message as it goes out. Selected control only narrows the list to the control you’re working on. Pause freezes the list so you can read it, and Clear empties it. The arrow at the right end folds the list away to give the page more room.
A layout can have as many pages as you like. The tabs under the page switch between them in the editor, and + Page adds one. To let people change pages while the layout runs, put a Page tab control on each page.
Open Layout…, then Pages and devices…, to rename pages and change their order. To make a band, open a page’s … menu there and select Always on screen. A band is a page whose controls show on top of every other page while the layout runs, such as a transport row, a panic button or your page tabs, so you only build it once. You don’t switch to a band the way you switch pages, so leave room for its controls on your other pages. In the editor, you edit a band like any other page.
Layout…, then Page size…, sets how big the page is, in pixels. Pick a size close to the screen the layout will run on.
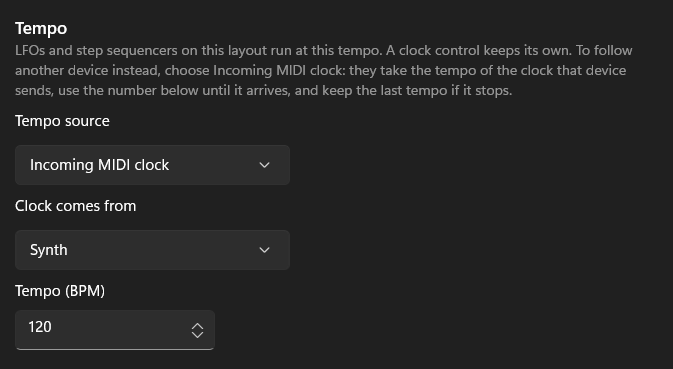
LFO and Steps controls run at the layout’s tempo. To set it, open Layout…, then Pages and devices…, and select Behavior. A Beat clock keeps its own tempo.
To follow another device instead, such as your DAW, set Tempo source to Incoming MIDI clock and pick the device under Clock comes from. The LFOs and Steps controls then follow the speed of the clock it sends. Until the clock arrives they use the tempo you typed, and if the clock stops they keep the last tempo they had. They follow only the clock’s speed. They don’t start or stop when the clock does, and they don’t line up with its beat.
To run a layout, click its card in the library, or select Run on the card. You can also double-click a layout file in File Explorer. The first time you do, Windows asks which app to open it with, so pick Windows MIDI Glass.
A running layout has its own window. The bar along the top has:
You can move more than one control at once with more than one finger: two faders, or a fader and a pad.
The bar also says whether the devices the layout sends to are connected. If one is missing, it says Waiting for and the device’s name. Plug the device back in and the layout picks it up again by itself.
If a layout runs for a long time while nobody touches the PC, such as one that only shows meters or plays a beat clock, Windows may turn the screen off or go to sleep. To stop that, select … (More options) in the library and turn on Keep this PC awake while a layout runs.
A layout keeps its own list of devices. Each one has a name, and the controls send to that name rather than straight to the hardware. So if you move to a different MIDI interface, you only change the device in one place, and every control follows.
Open Layout…, then Pages and devices…, and select Outputs to see the list. You can add a device, change which hardware one points to, and set how Windows MIDI Glass talks to it.
A device that isn’t connected is normal, not an error. The library card says how many are missing, and the layout sends to the rest. The status bar in the library says whether the MIDI service is running. If it isn’t, nothing can be sent.
A theme sets how the whole layout looks: the page behind the controls, how each kind of control is drawn, and six colors. Open Layout…, then Theme and colors…, to pick one. Changing the theme changes every control at once, and you can change it as often as you like.
Each control uses one of the theme’s six colors, chosen on its Look tab. A control remembers which of the six it uses, not the color itself. So when you change the theme, the colors change along with it and still mean the same thing.
Layout…, then Background image…, puts a picture or a video behind the controls. You can set how it fits the page and how see-through it is.
Above the gallery, the page says which theme the layout uses and who made it. Select About this theme… next to it to see everything the theme’s file says.
The theme gallery shows who made each theme under its name. Group themes by, above the gallery, sorts the themes by who made them or by who signed them. Right-click a theme to see About this theme…, or, for one of your own, Pack for sharing….
How Windows MIDI Glass themes work covers every theme setting, where theme files go, and how to make your own.
Layouts are saved in Documents › MIDI Layouts, one file per layout. The files end in .midilayout. A picture or a video you add to a layout is copied next to it, so the layout and its pictures stay together.
To have an AI assistant build a layout for you, select Ask an AI assistant… in the library, next to Open a file…. It shows a starting prompt to paste into the AI assistant you use, such as a chat in your web browser. The prompt has the link to Windows MIDI Glass layout files, a guide for AI agents, the names of your MIDI devices, and the themes you have, so the layout the assistant makes can find your devices. Windows MIDI Glass doesn’t send anything itself. If you’d rather not see it, open Appearance and settings and turn off Ask an AI assistant.
To give a layout to someone else, or move it to another PC, select Pack for sharing… on its card’s … menu. In the editor, open Layout…, then Pages and devices…, and select Export…. Windows MIDI Glass makes a pack: one .midilayoutpack file that holds the layout, every picture and video it uses, and the theme it uses if that theme is one of yours. To share a theme on its own, right-click it in the theme gallery and select Pack for sharing…. That makes a .midithemepack file.
A pack lists every file inside it, with its size and a fingerprint called a SHA-256 hash. When someone imports the pack, Windows MIDI Glass checks every file against that list, so it can tell if anything was changed or added after the pack was made.
Each layout and theme can say who made it: a name, a company or group, a website, a license, a version, and whether AI was used to make it. Windows MIDI Glass fills this in for everything you make, from Your info for sharing… on the library’s … (More options) menu. Other Windows MIDI Services tools use the same info. Before you pack something, Windows MIDI Glass shows what it says and lets you change it.
To see what a layout says about who made it, select About this layout… on its card’s … menu. For a theme, right-click it in the theme gallery and select About this theme….
Anyone can type any name into a file. So unless a signature backs it, Windows MIDI Glass shows the name with (unverified) after it.
A publisher, such as an instrument maker, can sign a pack with a code-signing certificate. The signature proves who published the pack and that nothing in it changed since. It doesn’t mean the layout is safe or that it works.
Select … (More options) > Import a pack… in the library. For a theme pack, you can also use Import a theme… on the Appearance page in the editor. Windows MIDI Glass shows what’s in the pack, who made it, and whether it’s signed, before it writes anything. If you already have the same layout or theme, it asks whether to replace it or keep both.
Windows MIDI Glass still imports the .zip layout packages that earlier versions made.
A layout made by a newer version of Windows MIDI Glass says From a newer version on its card. You can run it, and you can open it in the editor to look around and try it. Windows MIDI Glass won’t save changes to it, so nothing the newer version added gets lost. That’s also why Duplicate, Rename… and Edit description… are turned off for it. A control this version doesn’t have shows as a dashed outline with its name. It doesn’t respond to touch and doesn’t send anything. To change the layout, update Windows MIDI Glass.
On a running layout, the Tab key moves from control to control, and a screen reader reads each control’s name. The keyboard order decides the order Tab moves through the controls, and the order a screen reader reads them.
To set it, open Layout…, then Set the keyboard order…, and click the controls in the order you want. Keyboard order, under the page, sets the order from where the controls are on the page. You can also move a control up or down in the Outline.
Open Layout…, then Pages and devices…, and select Accessibility check to see whether the colors are easy to tell apart and whether every control has a label a screen reader can say.
Windows MIDI Services is an open source project with all source available on GitHub. We have a great community on Discord as well. Between GitHub and Discord, you should find the information you are looking for.
