

This page covers information about a Windows MIDI Services feature and application that will be released to consumers in November 2026. It’s currently available for developers.
Windows MIDI Loopback Setup creates loopback MIDI endpoints: virtual MIDI connections that exist only on this PC, with no cable and no hardware. Send MIDI to one and it arrives back in another app, which is how you get a sequencer talking to a software synth, a lighting program listening to your DAW, or a controller mapping tool sitting in between two other apps.
If you’ve used a third-party loopback or “virtual MIDI cable” driver before, this is the same idea, built into Windows MIDI Services. You can bring your loopbacks over from the other tool.
Loopbacks you create here belong to the PC, not to the app that made them. They’re there for every app, they show up in Windows like any other MIDI device, and they come back after a restart unless you ask for one that doesn’t.
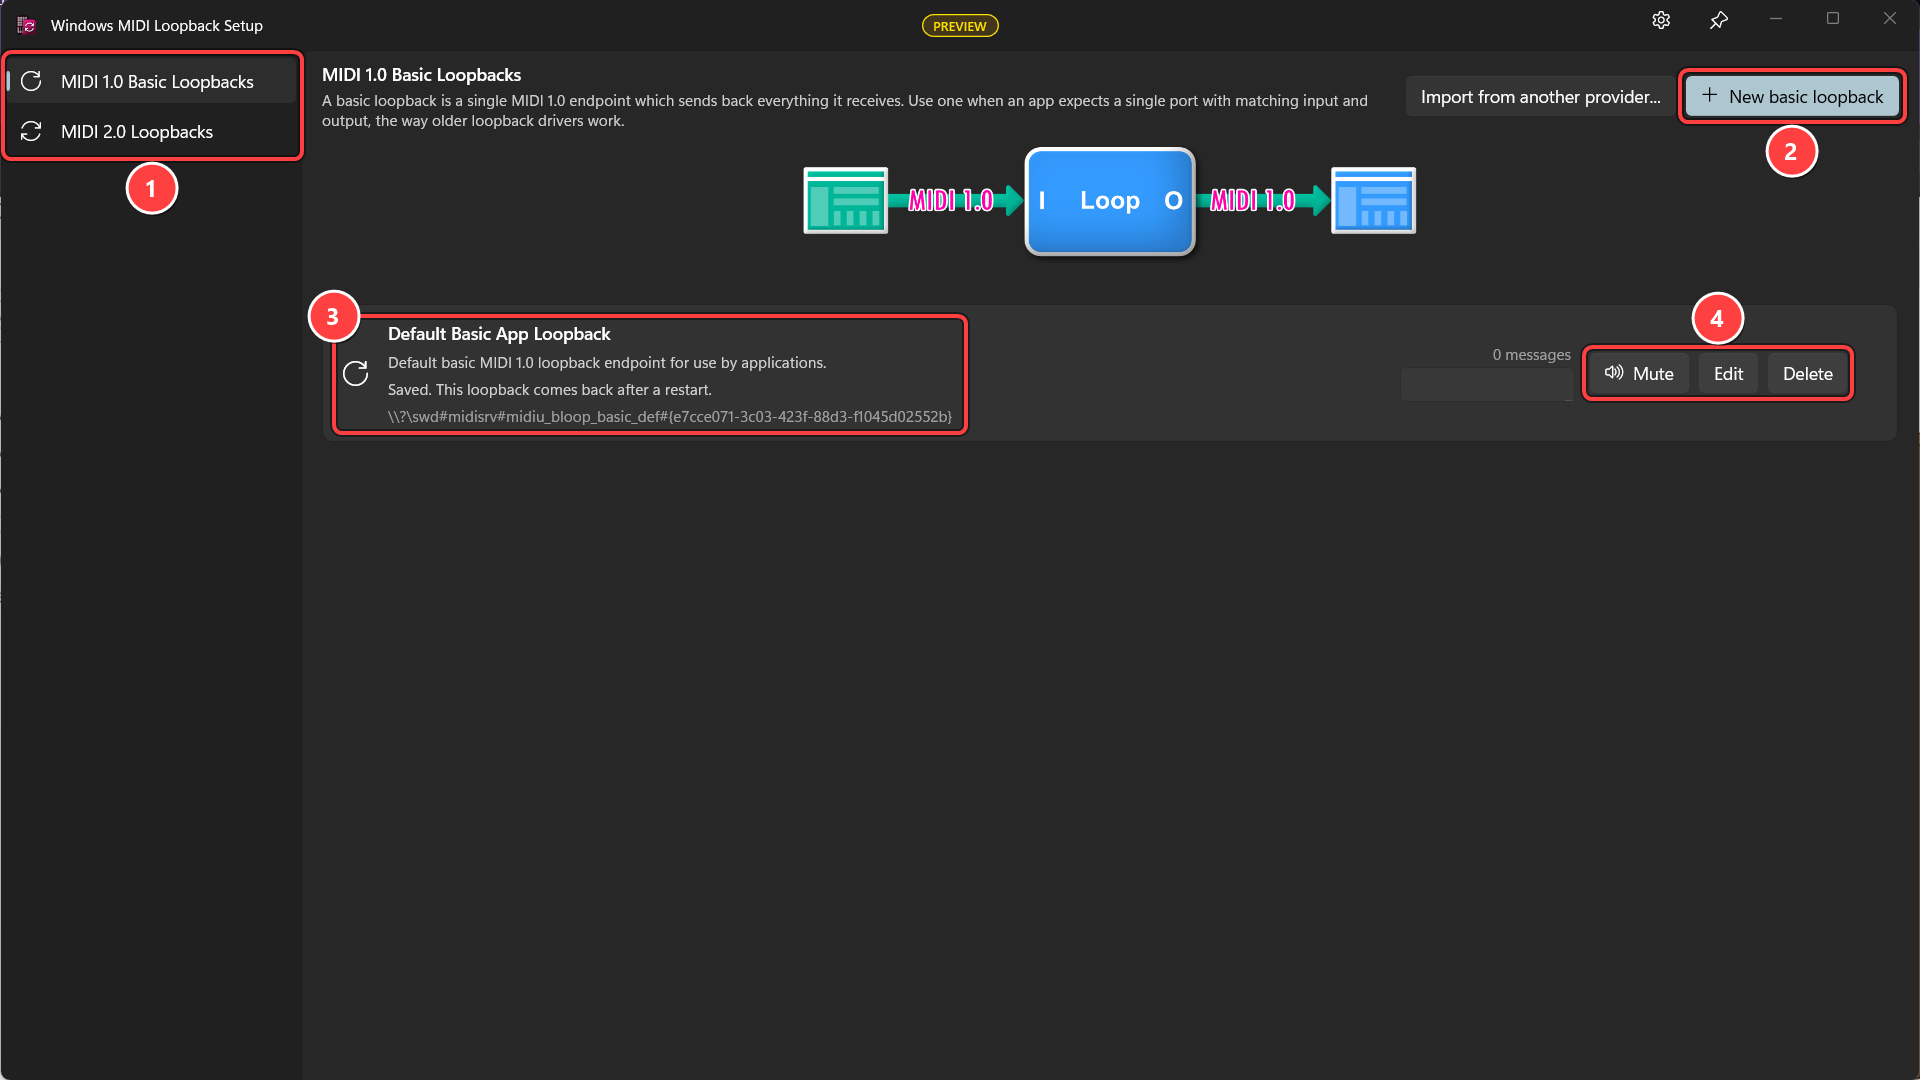
Once you’ve made a loopback, it shows up in your DAW and your other MIDI apps like any other MIDI device.
This app is here to create and remove loopbacks. It doesn’t carry any MIDI data, and nothing depends on it once you’ve closed it.
The loopbacks themselves are part of Windows MIDI Services, so everything passing through one goes through the MIDI service, not through this window. Make what you need, close the app, and your loopbacks carry on working. A saved loopback is there again after you restart the PC, with nothing to launch and nothing sitting in the notification area. Even a loopback you chose not to save is unaffected by closing this app: it lasts until the MIDI service restarts, which is a different thing entirely.
That’s worth knowing if you’ve used a third-party virtual MIDI cable tool before, because several of those have to stay open for their ports to exist at all.
Open this app again when you want to add, rename, mute, or remove a loopback. The rest of the time it can stay closed.
There are two, one on each page, and the difference is what the other app sees.
MIDI 1.0 Basic Loopbacks give you a single endpoint whose output feeds straight back into its own input. One name, one port, matching input and output. This is how older loopback drivers work, so it’s the one to pick when an app expects to see a single port, or when you’re following instructions written for another loopback tool.
MIDI 2.0 Loopbacks give you a pair of endpoints, an A side and a B side, wired to each other. What one app sends to A arrives at B, and what an app sends to B arrives at A. Two separate names show up in your MIDI device lists.
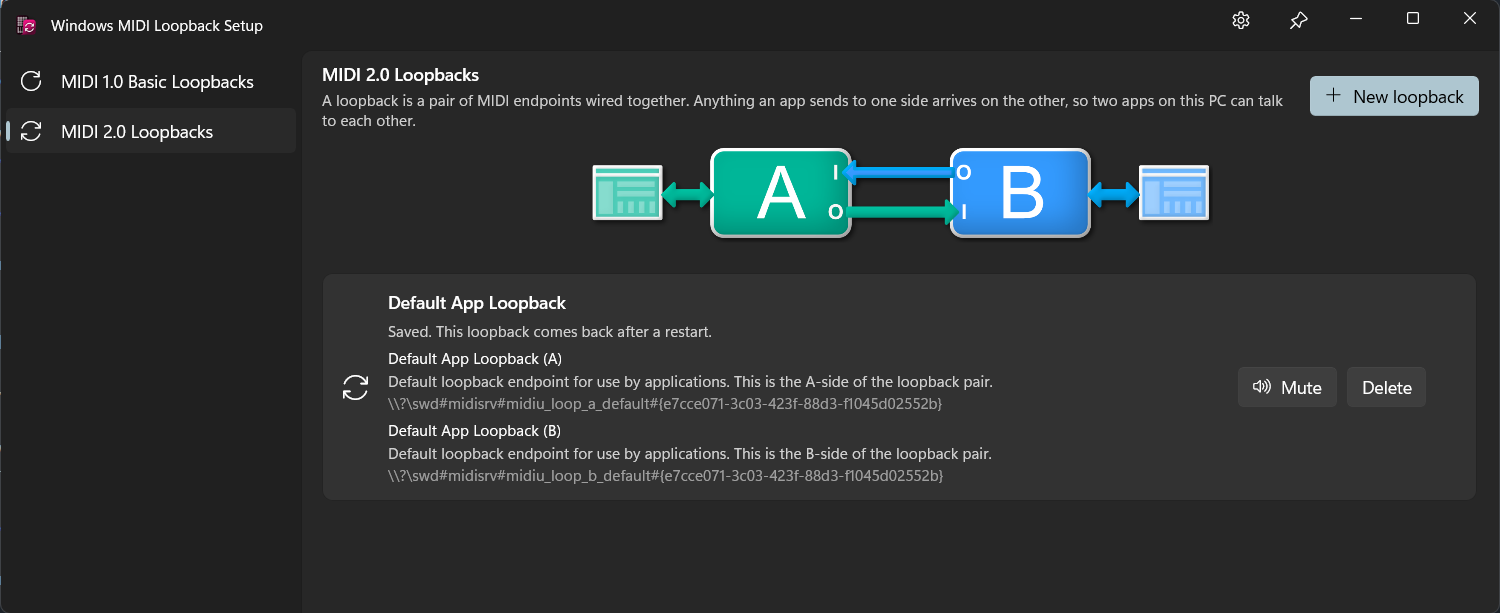
The pair is the better choice for anything new and MIDI 2.0-aware. The two ends are clearly separate, so it’s obvious in each app which direction you’re pointing at, and the endpoints carry full MIDI 2.0 traffic rather than only what MIDI 1.0 can express.
Pick the basic kind when an app needs it to look like the old thing. Pick the pair otherwise.
Each page has a diagram of what it makes, and the two pages are independent: what you create on one has nothing to do with the other.
Both types of loopbacks create MIDI 1.0 API ports. The Basic Loopback creates an In (Source) and Out (Destination) pair of ports. The MIDI 2.0 style loopback creates two Sources and two Destinations. Send to Destination A and it comes in on Source B and vice versa.
Windows MIDI Services has one well-known loopback of each kind, and a lot of apps and tutorials expect them to be there. A normal install creates them for you, so most of the time there’s nothing to do.
If one is missing, because it was deleted or because the configuration was rebuilt, a Create default loopback or Create default basic loopback button appears next to the normal create button on that page. Select it and the loopback is recreated exactly as it shipped, with no dialog and nothing to fill in:
| Name | Identifier | |
|---|---|---|
| MIDI 1.0 Basic Loopbacks | Default Basic App Loopback | BASIC_DEF |
| MIDI 2.0 Loopbacks | Default App Loopback (A) and (B) | DEFAULT |
The names and identifiers are fixed, because that’s how apps find them. The identifier is the part that matters: an app that remembers DEFAULT finds the loopback again even though the name is only there for you to read.
Defaults are always saved to the configuration, since a default that disappeared on the next restart wouldn’t be much of a default. The button goes away as soon as the loopback exists, so if you don’t see one, you already have it.
Select New loopback or New basic loopback.
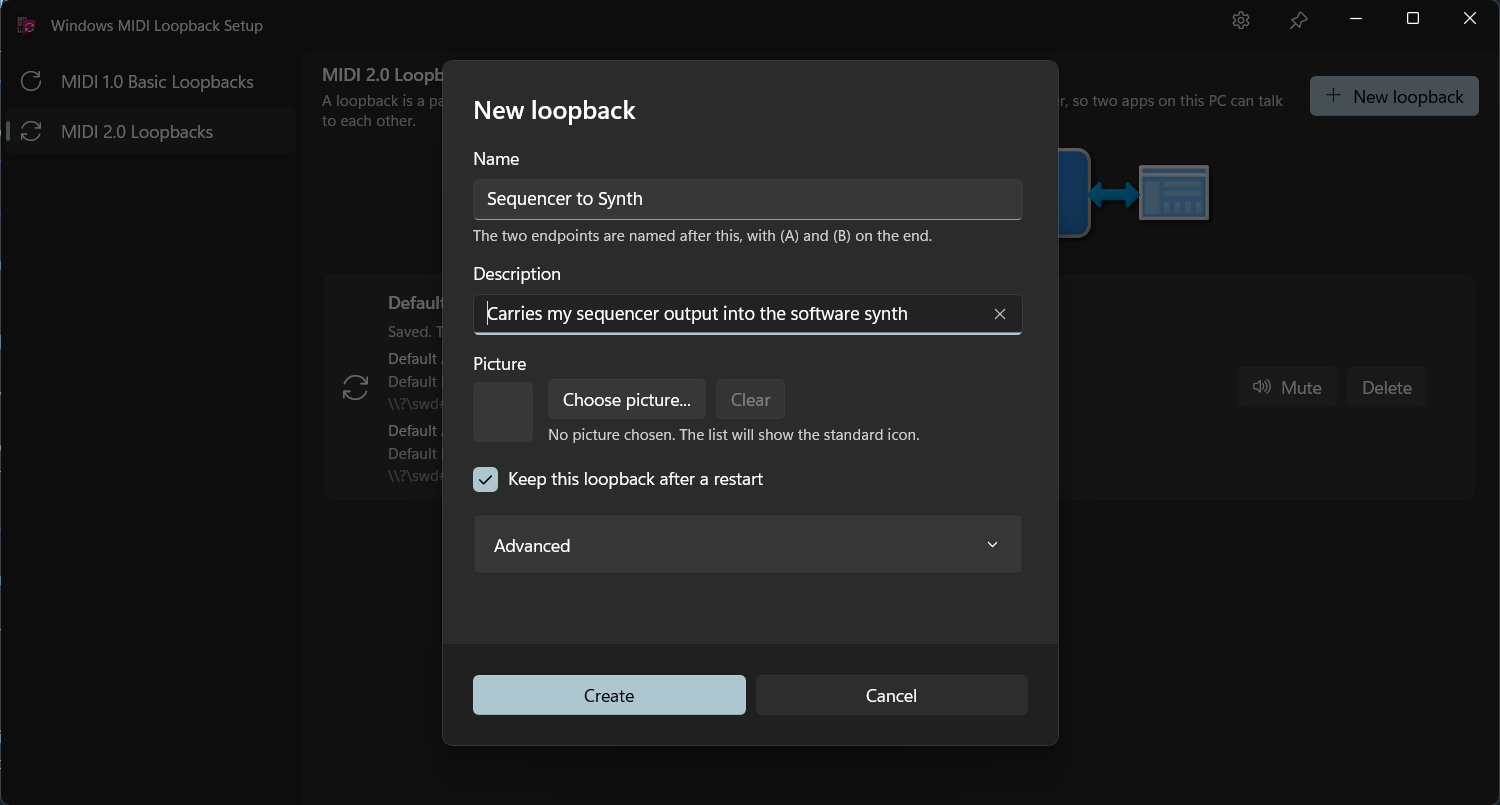
Name is what you’ll see in your DAW and everywhere else in Windows. Name it after the job it does rather than after the tool, because in six months “Sequencer to Synth” will tell you something and “Loopback 1” will not. For a MIDI 2.0 loopback the two endpoints are named after this with (A) and (B) on the end.
No two loopbacks may share a name, because a name is all an app has to tell them apart. That applies across both kinds, so a basic loopback and one side of a MIDI 2.0 pair cannot both be called the same thing. Sharing a name with a USB device or anything else on the PC is fine and always has been.
Description is optional, and shows under the name in apps that display one.
Picture lets you attach an image, which is then used as the icon for the endpoint. This is worth doing when you have several loopbacks and want to pick the right one at a glance. The section only appears if the version of Windows MIDI Services currently enabled on this PC supports endpoint pictures, so you aren’t offered a picture that would never show up.
For most customers, the ability to use images in MIDI 2.0 loopbacks will be enabled in January 2027, along with muting.
Keep this loopback after a restart is ticked by default, and is almost always what you want. The loopback is written to the Windows MIDI Services configuration and comes back on its own.
Untick it and the loopback is created but not saved: it works now and disappears the next time the MIDI service restarts or you reboot. That’s useful for a quick test you don’t want to clean up afterwards, and each row in the list tells you which kind it is, so nothing is a surprise later.
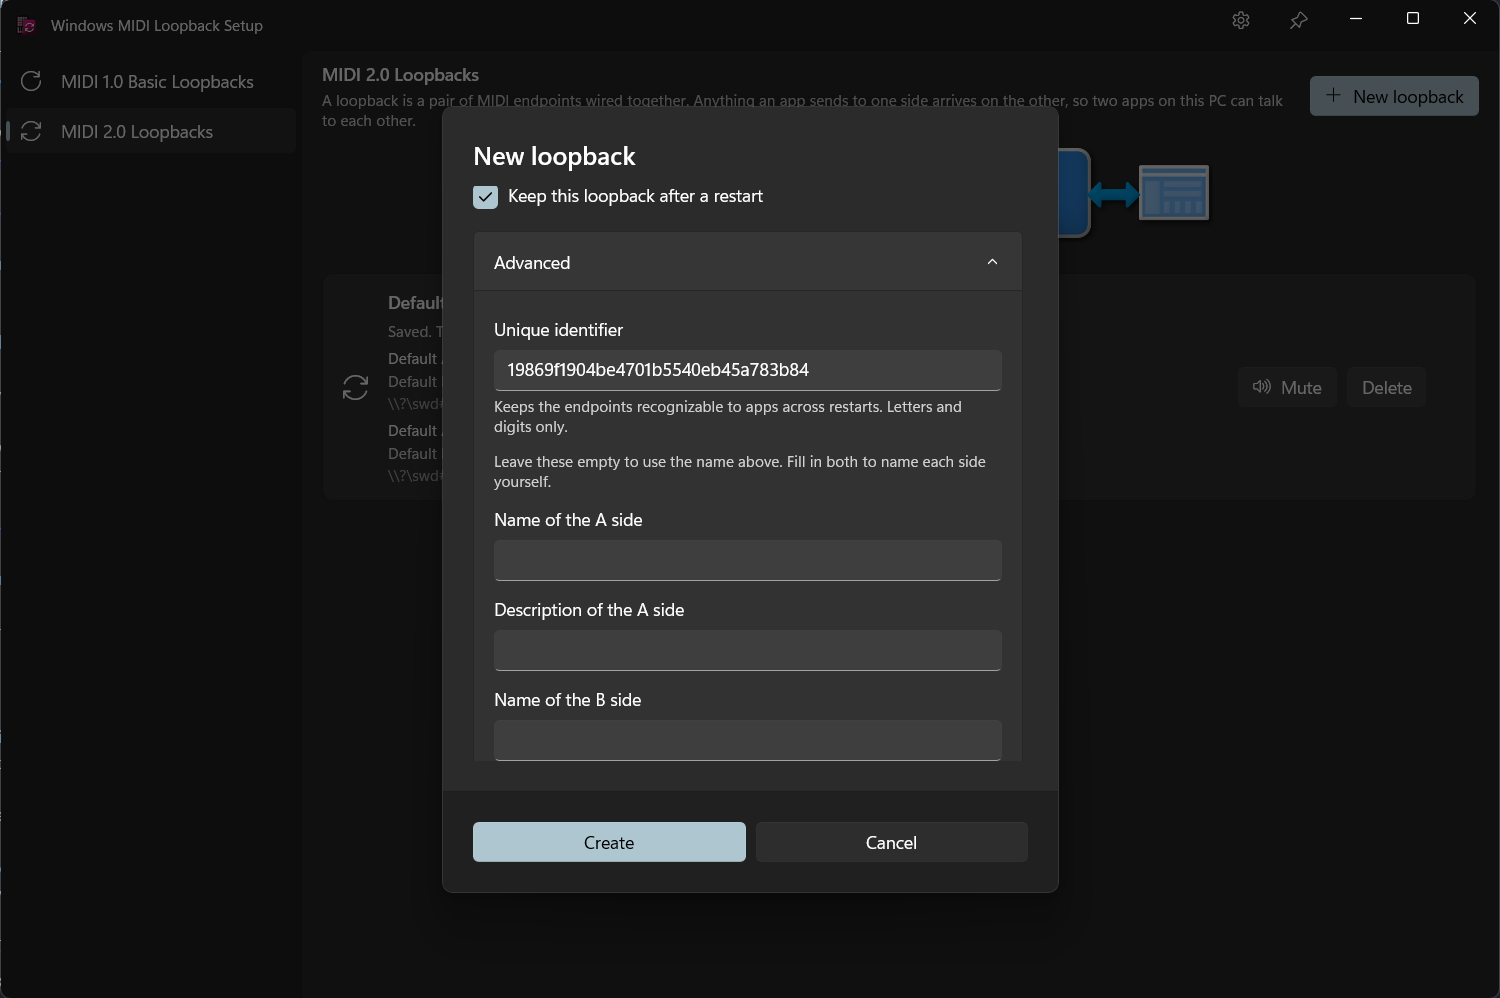
Unique identifier is filled in for you. It’s how apps recognize this endpoint as the same one across restarts without relying on the name, so if you have an app whose saved setup keeps pointing at the wrong port, this is the value that matters. Letters and digits only. Change it only if you’re deliberately recreating a loopback that another app already knows by that identifier.
Name of the A side and Name of the B side, on a MIDI 2.0 loopback, let you name each end yourself instead of taking the (A) and (B) endings. Leave both empty to use the name above, or fill in both. This is worth doing when the two ends mean different things: naming them “To Synth” and “From Synth” is clearer than “MyLoopback (A)” and “MyLoopback (B)”.
If you’ve been using another loopback or virtual MIDI cable tool, this app can make a basic loopback to match each of its ports, with the same name. Most apps remember a port by its name, so they find the new loopbacks the same way they found the old ones.
On the MIDI 1.0 Basic Loopbacks page, select Import from another provider… next to New basic loopback. Then:
Each port you tick becomes one basic loopback. Its description says which device it was imported from.
The list shows every MIDI port whose driver didn’t come with Windows. Most of those are loopbacks, but real hardware with its own driver shows up too, so check what you tick. If a port’s input and output have different names, the list tells you it’s probably not a loopback.
Some ports can’t be imported:
When the import is done, remove the matching loopbacks from the other tool, or uninstall it. Until you do, this PC has two ports with each name, and your apps can’t tell them apart. Some tools need a restart before their ports go away.
Each loopback is a row, showing its name, its description, whether it’s saved, and the full endpoint device id of each endpoint. That id is the long \\?\swd#midisrv#... string other MIDI tools ask for, and you can select it and copy it straight out of the row.
Mute stops a loopback carrying anything. The endpoints stay exactly where they are, so every app still sees them and nothing needs reconfiguring, but no messages get through. Reach for this instead of deleting when you want to cut a connection temporarily, or to prove that a loopback is the thing causing a MIDI feedback loop. A muted loopback shows a red badge on its icon and the button changes to Unmute.
Delete removes it. You’re asked to confirm first, because apps using that loopback lose the connection straight away.
You can also reorder the list, by dragging a row or by focusing one and pressing Ctrl+Shift+Up or Ctrl+Shift+Down. The order is only for your benefit in this window, but if you have a lot of loopbacks, grouping the related ones together makes it much easier to find the one you want.
The list refreshes on its own, so a loopback created by another tool appears here without you having to do anything.
A feedback loop happens when an app sends what it receives right back out to the same loopback. The same MIDI goes around and around, as fast as your PC can move it. Notes get stuck, controls jump around, and apps can slow down or stop responding. It’s an easy mistake to make, especially with a MIDI thru or echo setting turned on in a DAW.
Windows MIDI Services watches each loopback for this. When it finds a loop, it mutes the loopback, just as if you’d selected Mute yourself. That stops the loop right away. The endpoints stay where they are, so no app loses its ports.
When that happens:
To fix it, find the app that sends what it receives back to the same loopback, and turn that off. The usual suspects are MIDI thru, “echo MIDI input” and “soft thru” settings, and a routing app with its input and its output both set to the same loopback. Then select Unmute. If you unmute without fixing the loop, the loopback mutes itself again a moment later.
It’s designed not to. Plenty of normal MIDI is busy: clock, a controller updating its lights, a big SysEx dump. Busy traffic alone never mutes a loopback.
When the traffic looks like it might be a loop, Windows MIDI Services holds that loopback’s messages for a fraction of a second to see whether they stop coming. MIDI in a loop only keeps going because the loopback keeps delivering it, so a real loop dies down during the pause, while an app that’s really sending keeps on sending. Nothing is lost by the check. Whatever arrived during the pause is delivered, in order, right afterward.
There’s one kind of app it can’t tell apart from a loop: one that answers every message it gets by sending another one back, as fast as it can, over and over. That really is a loop, just a deliberate one. If you use an app like that, set its loopback to Do nothing.
Every loopback is protected unless you say otherwise. If MIDI feeds back into this loopback is in the dialog when you create a loopback, and in the dialog you get when you select Edit.
The option only appears if the version of Windows MIDI Services on this PC supports it.
To stop the notifications without turning off the protection, open the MIDI Settings app, select Notifications, and turn off Loopbacks muted because of feedback. Loopbacks still mute themselves. You just aren’t told about it until you open this app.
The gear button in the title bar opens the settings.
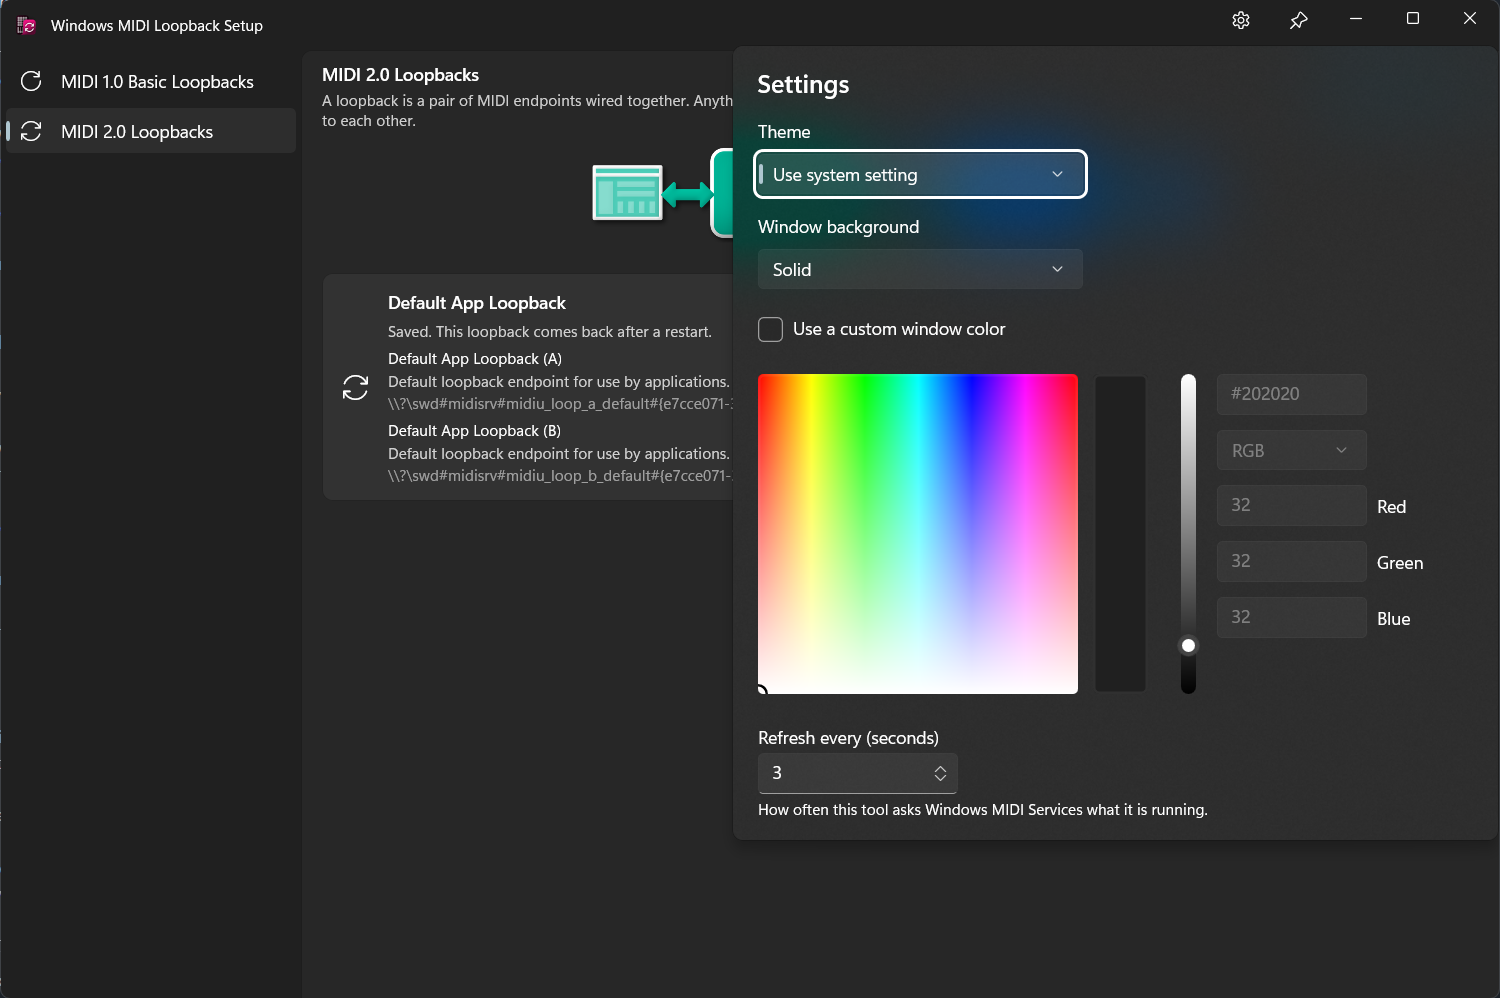
Theme and Window background control how the app looks. Mica and Acrylic pick up colors from your desktop; Acrylic lets what’s behind the window show through. Tick Use a custom window color to choose your own.
Refresh every (seconds) sets how often the tool asks Windows MIDI Services what it’s running. The default of 3 seconds is fine for normal use. The polling only happens while this window is open.
The pin button next to the minimize button keeps the window above your other windows.
Each kind of loopback is provided by its own part of Windows MIDI Services, and each page checks for its own. If a page tells you it isn’t available, either that part isn’t installed or enabled on this PC, or the version currently active isn’t compatible with this tool.
There’s nothing to do about it by hand. A compatible version arrives with a Windows update: for most customers the new loopback features land between November 2026 and January 2027. Updates to the existing MIDI 2.0 loopback come via a 30 day Controlled Feature Rollout, and the new MIDI 1.0-style Basic Loopback comes in the November update at the end of November 2026.
The two pages are checked separately, so it’s normal for one to work while the other doesn’t while we roll out the updates.
For help tracking down a feedback loop, see Why a loopback mutes itself.
For the technical detail of how each kind of loopback is implemented, and how they appear in the configuration file, see About the MIDI 2.0 Loopback Transport and About the MIDI 1.0 Basic Loopback Transport.
To create loopbacks from a script or a command prompt rather than from this app, use the loopback and basic-loopback commands in the MIDI Console. Loopbacks made that way are temporary, lasting only until the console session which created them ends, and the console is also where you work with the association id you need in order to remove a MIDI 2.0 pair again from a script.
To watch what’s actually traveling through a loopback, point MIDI Monitor at one end of it. To send something through by hand, use the MIDI Scratch Pad.
Windows MIDI Services is an open source project with all source available on GitHub. We have a great community on Discord as well. Between GitHub and Discord, you should find the information you are looking for.
