

This page covers information about a Windows MIDI Services feature and application that will be released to consumers in November 2026. It’s currently available for developers.
Windows MIDI Network Setup connects this PC to MIDI devices over your local network, with no traditional MIDI cables between them. If you have an interface, a synth, or another computer that speaks Network MIDI 2.0 over Ethernet or WiFi, this is where you set up the connection.
Once a connection is made, the device appears in Windows like any other MIDI device, so your DAW and other MIDI software can use it straight away.
Devices that announce themselves on your network appear on their own, so there’s nothing to scan or search for.
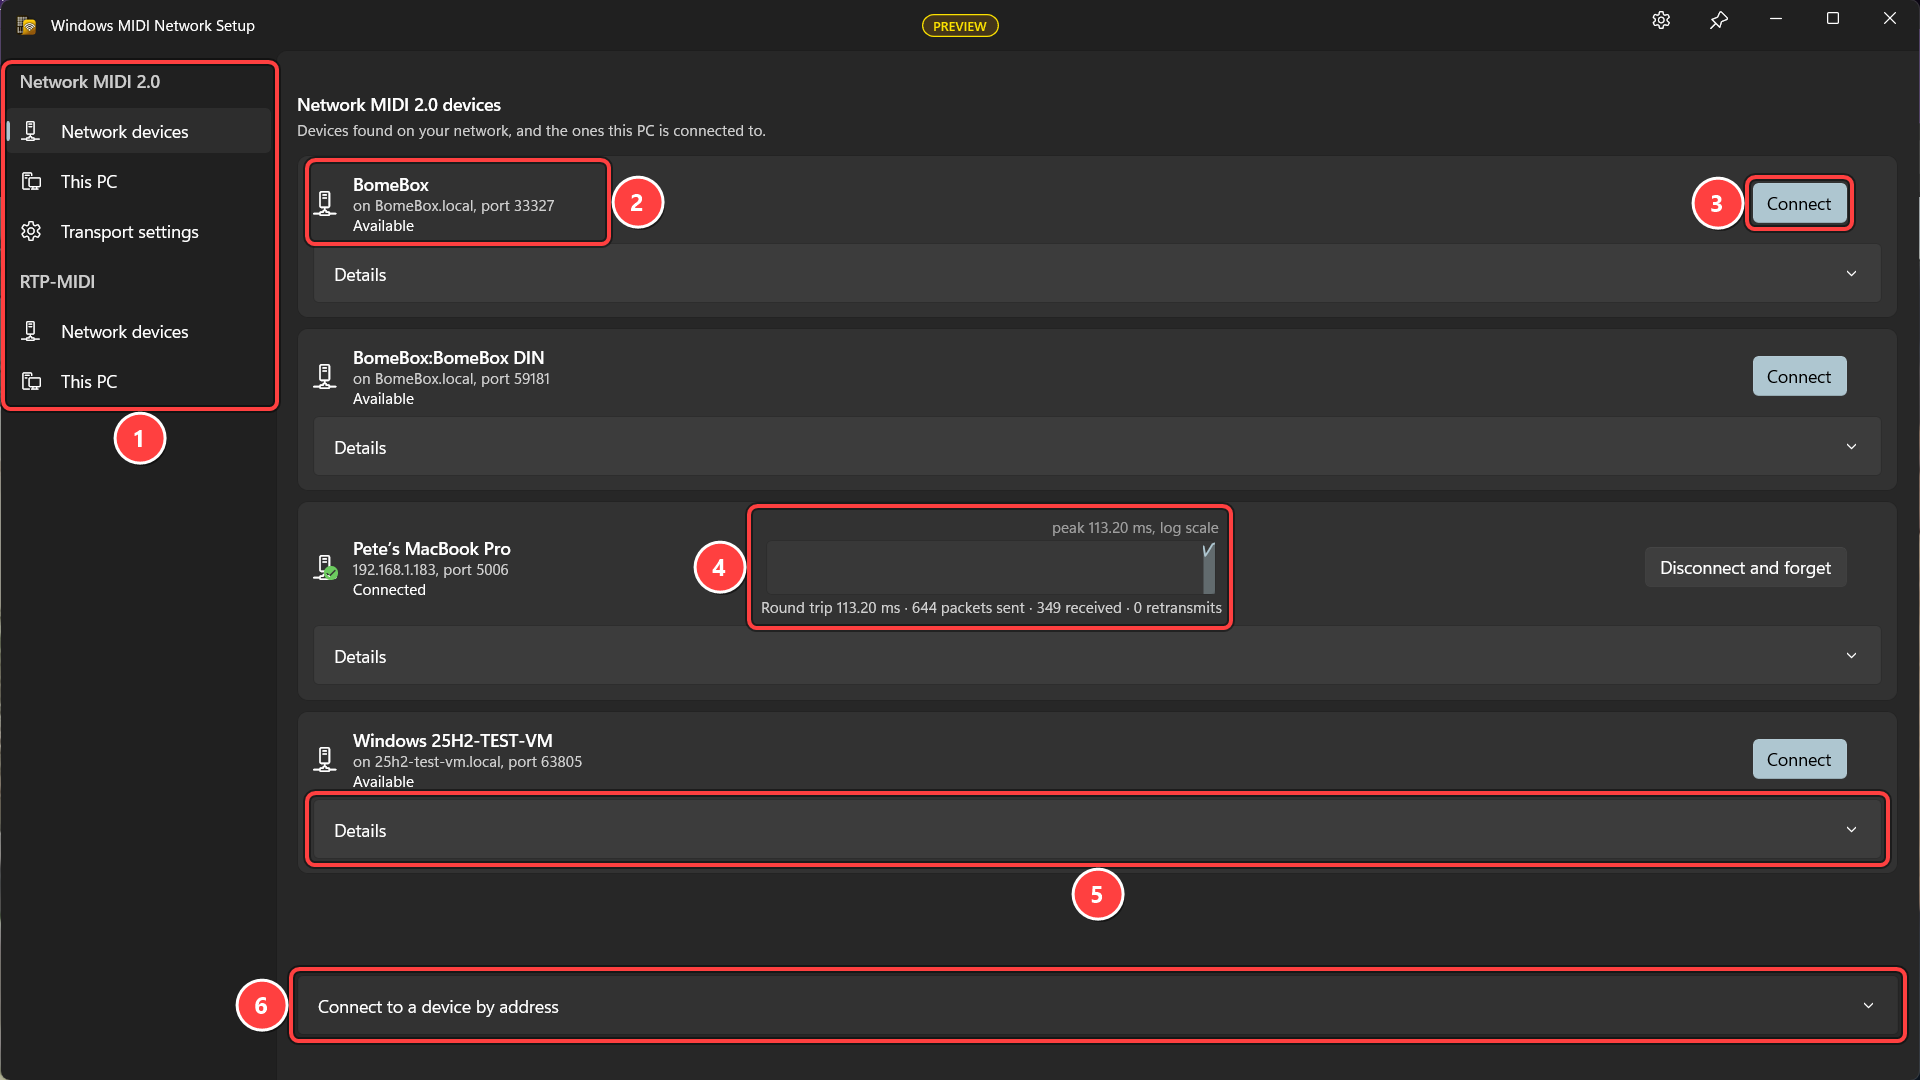
If a connection sits at Connecting, look at the other device. It may be waiting for you to allow the connection. See The other device may be waiting for you too.
Network devices and This PC have different but related jobs:
RTP-MIDI is the older network MIDI protocol that Apple devices and many network MIDI interfaces use. When the RTP-MIDI transport is installed, the app has a second Network devices page and a second This PC page for it, under an RTP-MIDI heading. They work the same way as the Network MIDI 2.0 pages. Without that transport, you won’t see them.
Some devices offer both. When they do, use Network MIDI 2.0. The RTP-MIDI page tells you when a device also offers Network MIDI 2.0, and asks you before it connects to that device over RTP-MIDI. Connecting both ways gives you two sets of endpoints for the same device, which is confusing in a DAW.
RTP-MIDI has one choice that Network MIDI 2.0 doesn’t: Help other devices recover notes lost on the network. It’s on unless you turn it off. Each packet then carries a short summary of recent notes, called the recovery journal, so a device that misses a packet can still end a note that would otherwise hang. Turn it off only for a device that plays extra notes, or notes that don’t stop, while it’s on. You’ll find it when you connect to a device, in Connect to a device by address, and under Advanced when you create a host. To change it later, select Disconnect and forget and connect again, or delete the host and create it again.
This app is here to set connections up. It doesn’t carry any MIDI data, and nothing depends on it once you’ve closed it.
Network MIDI 2.0 is part of Windows MIDI Services itself, so finding devices, connecting, reconnecting, and moving messages all happen in the MIDI service. Connect a device on this page, close this app, and the device stays connected and stays usable in your DAW. The connection is re-established on its own when the device comes back, and after you restart the PC, with nothing of ours running and nothing for you to remember to start. A host you create on the This PC page is the same: it stays on the network and keeps accepting devices with this window closed.
The one part that benefits from something running is approvals, and only if you’ve set a host to Ask me first. A device asking to connect then waits for your answer, and the place to answer it is this window, so you’d have to happen to have the app open or know to go and open it.
That’s what MIDI Notifications is for. It’s a small app that sits in the notification area, watches for devices waiting on your permission, and tells you when there is one. Select the notification and Network MIDI Setup opens on the waiting device, so you can allow or deny it. It also tells you when a host on this PC can’t start because the network adapter it uses is missing. See Choosing a network adapter.
It doesn’t carry any MIDI data either, and it isn’t required. Turn it on or off, and choose whether it starts with Windows, on the Notifications page of the MIDI Settings app. Without it nothing is broken: a device that asks to connect waits, and you answer it the next time you open this app. And if your hosts are set to Let any device connect, there’s nothing to approve and nothing to be notified about.
Devices that advertise themselves on your network appear on the Network devices page on their own. There’s nothing to scan or search: as long as the device is switched on and on the same network (and same subnet), it shows up within a few seconds.
Each device shows its name, where it is on the network, and whether you’re connected to it.
To connect, select Connect. You’ll be asked what to call the MIDI Endpoint for this device in Windows, and how fast to send to it.
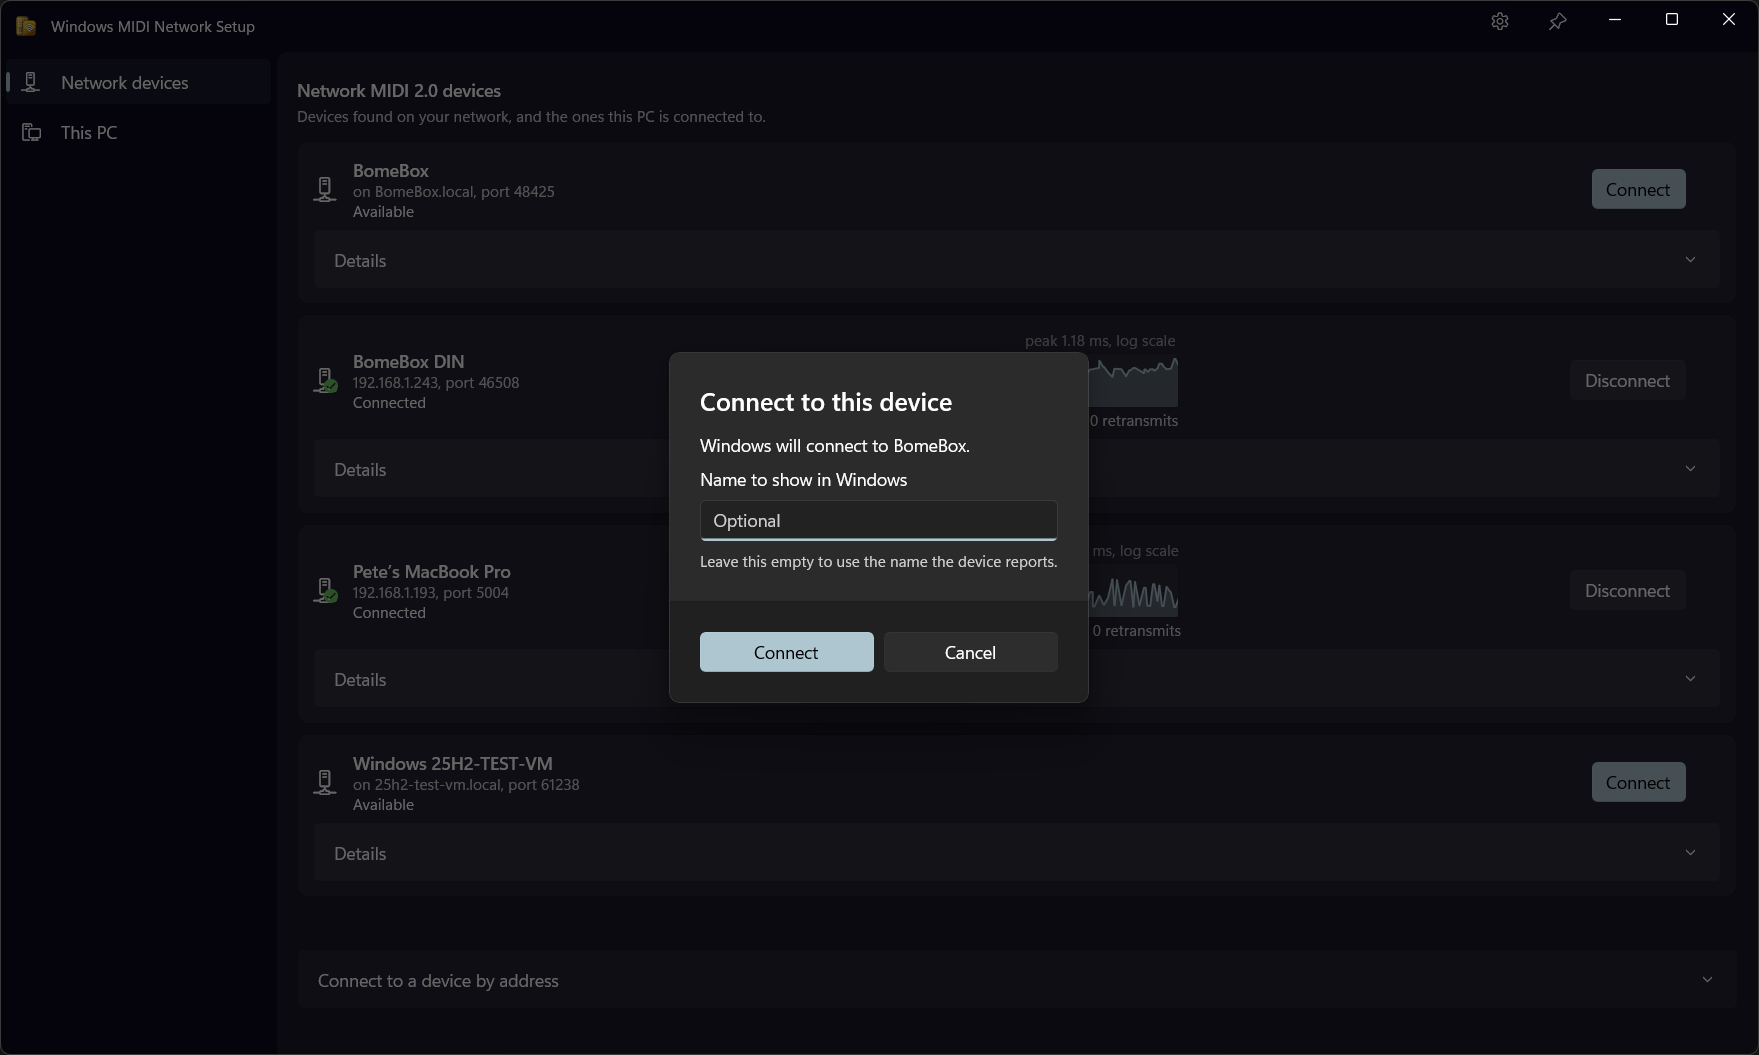
Leave the box empty and Windows uses whatever name the device reports for itself. Fill it in and that name is what you’ll see everywhere in Windows, including in your DAW’s device list. This is worth doing if you have several similar units, or if the device’s own name is cryptic.
Sending speed starts at Unlimited, which suits almost every device. Choose a slower speed for a device that loses data when a lot arrives at once. See Choosing a sending speed. Once you’re connected, the device’s row shows its sending speed, with a Change link next to it.
This is the step that catches people out. Connecting is a conversation between two devices, and plenty of devices will not simply accept an incoming connection. On the other end, something may be waiting for you to approve it:
If the connection sits at Connecting and doesn’t complete, that’s the first thing to check. Go and look at the device, its front panel, or its configuration page, and see whether it’s asking you a question. Windows will keep trying, so once you allow it on the other side the connection completes on its own.
Devices that let anything connect will simply connect straight away.
When a connection doesn’t work, the device’s row says why, for example The device did not answer. Windows will keep trying. A device that turns the connection down, or asks for a password, which Windows doesn’t support yet, isn’t tried again until you select Try again.
Once connected, each device shows a graph of round trip time, which is how long a message takes to get to the device and back.
The graph scrolls from right to left, with the newest measurement on the right, and covers roughly the last few minutes. Underneath it you’ll see the current round trip, how many network packets have gone each way, and how many had to be resent.
The vertical axis is logarithmic and re-scales itself to whatever the largest value in view is, which is noted above the graph. That sounds fussy, but it’s what lets you see a steady sub-millisecond connection and an occasional large spike in the same picture.
A flat, low trace is what a healthy wired connection looks like. Regular tall spikes usually mean the device is on Wi-Fi and its radio is going to sleep between messages; the first message after a quiet moment then has to wait for it to wake up. That’s normal for Wi-Fi, but it’s the reason a wired connection is worth having for anything timing-critical.
For MIDI, you normally want a situation where the round-trip latency is under 5 milliseconds. In general, the lower the better. Most wired networks will get you under a millisecond round trip latency.
If all your connections show high round-trip network latency, it’s worth looking at your network usage, and if you are saturating the same network with other audio or video. Most wired networks have plenty of bandwidth though, so the most common cause of high latency is using a WiFi connection instead of Wired. You may also find you have gaming-focused network accelerator software running, which may actually cause worse performance.
Select Disconnect and forget to end a connection. This also removes the device from this PC’s saved connections, so it will not reconnect on its own afterwards. The device stays visible in the list for as long as it is switched on and announcing itself, and you can connect to it again whenever you like. It doesn’t block anything.
Removing the saved connection is deliberate rather than a side effect. A device you merely disconnected would be reconnected by Windows the moment it announced itself again, so there would be nothing to see.
This is also how you get rid of an entry you no longer want. A device which is no longer on the network, or which has changed how it announces itself after a firmware update, shows as Not found on the network, and its button reads Forget because there is no connection to end. Select it and the entry disappears from the list.
Select Details under a device for the identifying information.
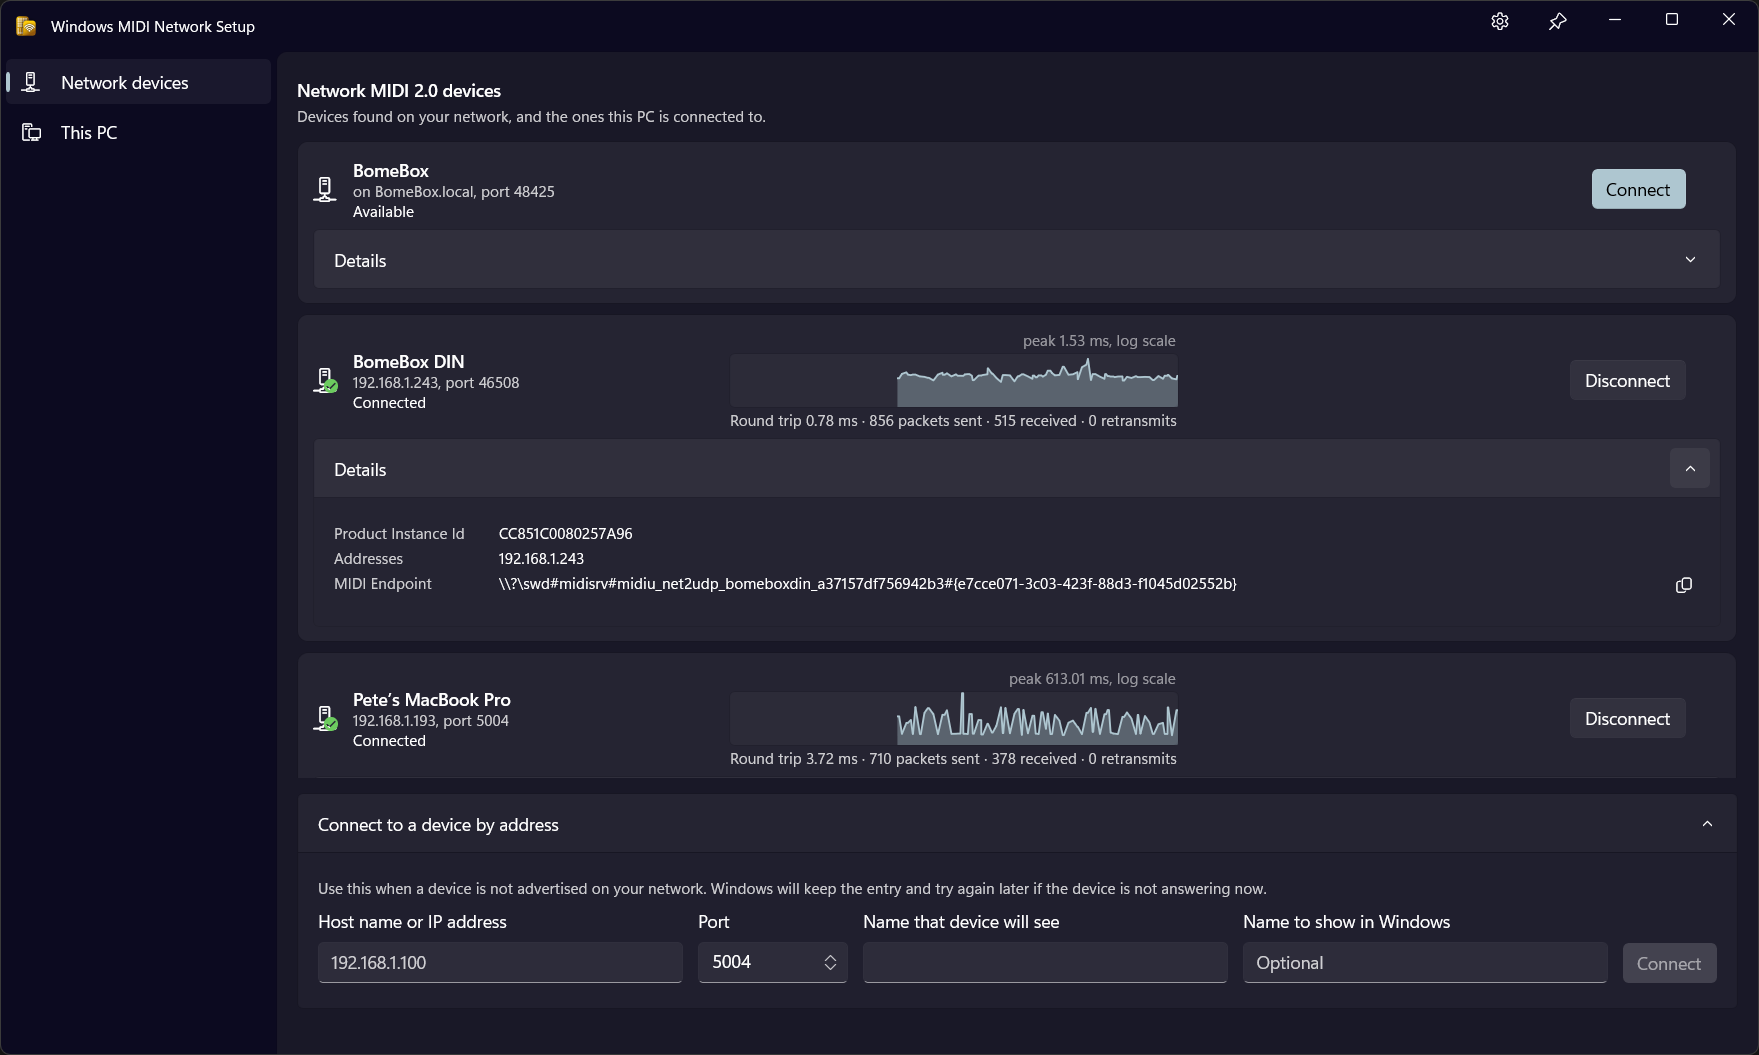
Product Instance Id is the device’s own serial-number-like identity. Addresses is where it is on the network. MIDI Endpoint is the Windows device id, which is what other MIDI tools and DAWs want when they ask you to identify a device. The small copy button on the right puts it on the clipboard.
Select Customize under a connected device to change how it appears in Windows.
Name, Description and Image are yours to set. Leave a box empty and Windows uses what the device reports about itself, which is usually what you want until two devices of the same model turn up and you need to tell them apart. Browsing for an image copies it into the shared endpoint images folder, so it keeps working from other machines’ tools and after the original file moves. Remove clears the image from the device without deleting the file.
The name you set here is the one your DAW sees, and it’s carried down to the MIDI 1.0 ports too.
Two settings control the MIDI 1.0 ports:
Sending speed is how fast this PC sends to the device, and Slow down when a device misses data lets Windows pick a slower speed by itself while the device is having trouble. Both apply straight away. See Choosing a sending speed.
Reset clears the name, description and image and goes back to what the device reports. It deliberately leaves the MIDI 1.0 port settings and the sending speed alone, so pressing it to clear a name doesn’t take your ports away as a side effect.
Some devices don’t announce themselves on the network, or are on a part of the network where those announcements don’t reach. You can still connect by typing the address in.
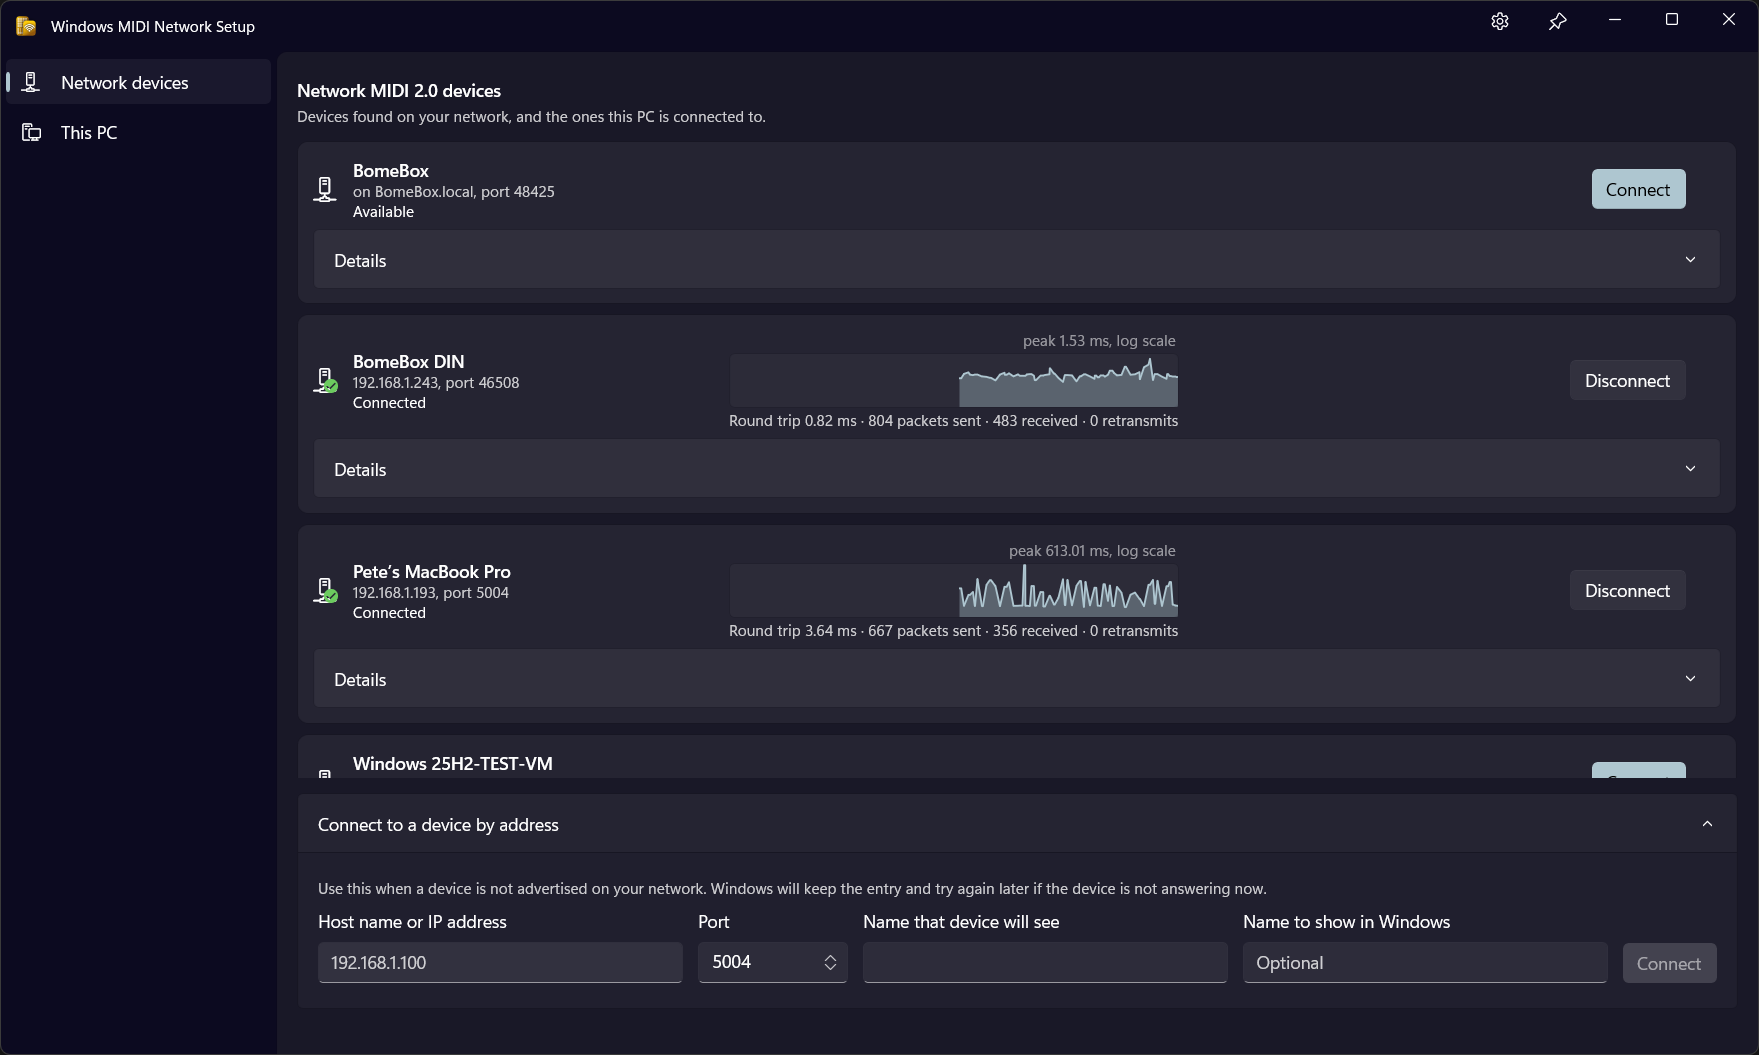
Enter the host name or IP address and the port, and optionally the two names: Name that device will see is how this PC introduces itself, and Name to show in Windows is what you’ll call the device here. You can also choose a Sending speed.
Windows keeps the entry and keeps trying, so if the device isn’t switched on yet it will connect later when it appears.
Connecting to devices by using mDNS / advertising is more efficient than by IP. When you connect by IP address or name, Windows must keep checking for a response at that address. But if the device advertizes using mDNS, we can simply wait until the ad appears on the network.
The This PC page is the other direction: making this computer something other devices can connect to. To do that, this PC needs a host.
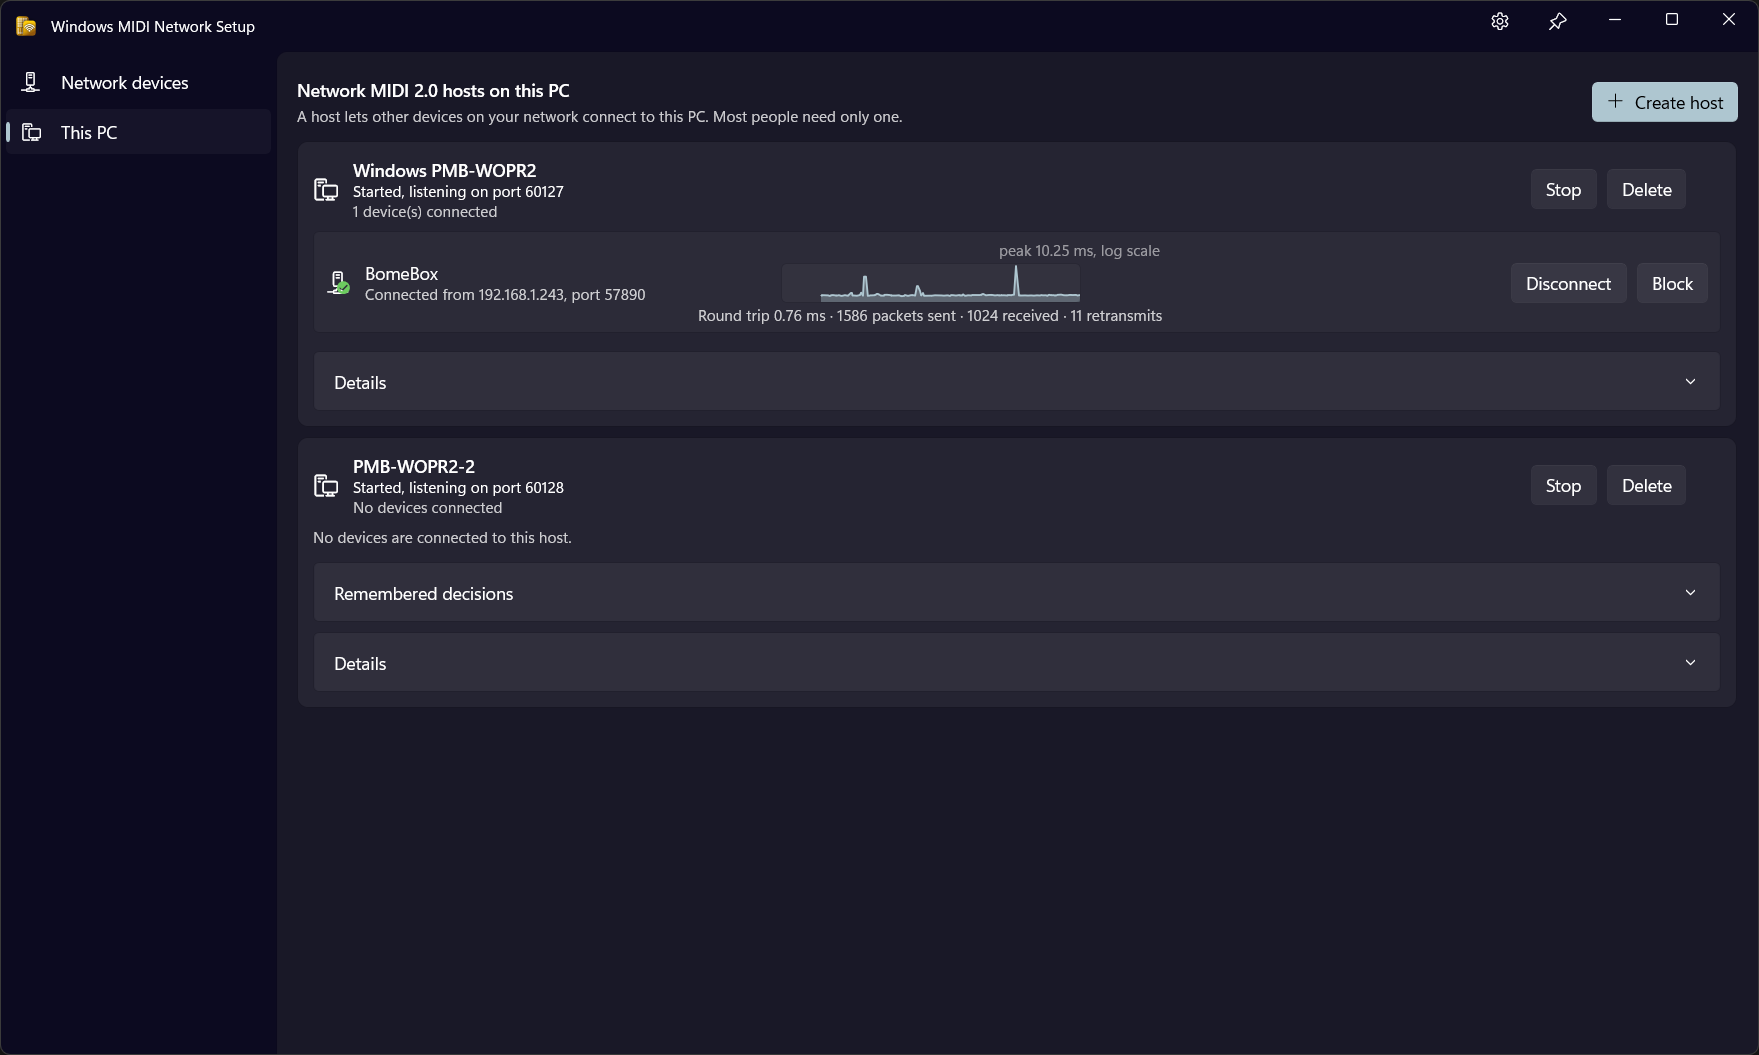
Most people need only one host, and it stays there once created.
Select Create host.
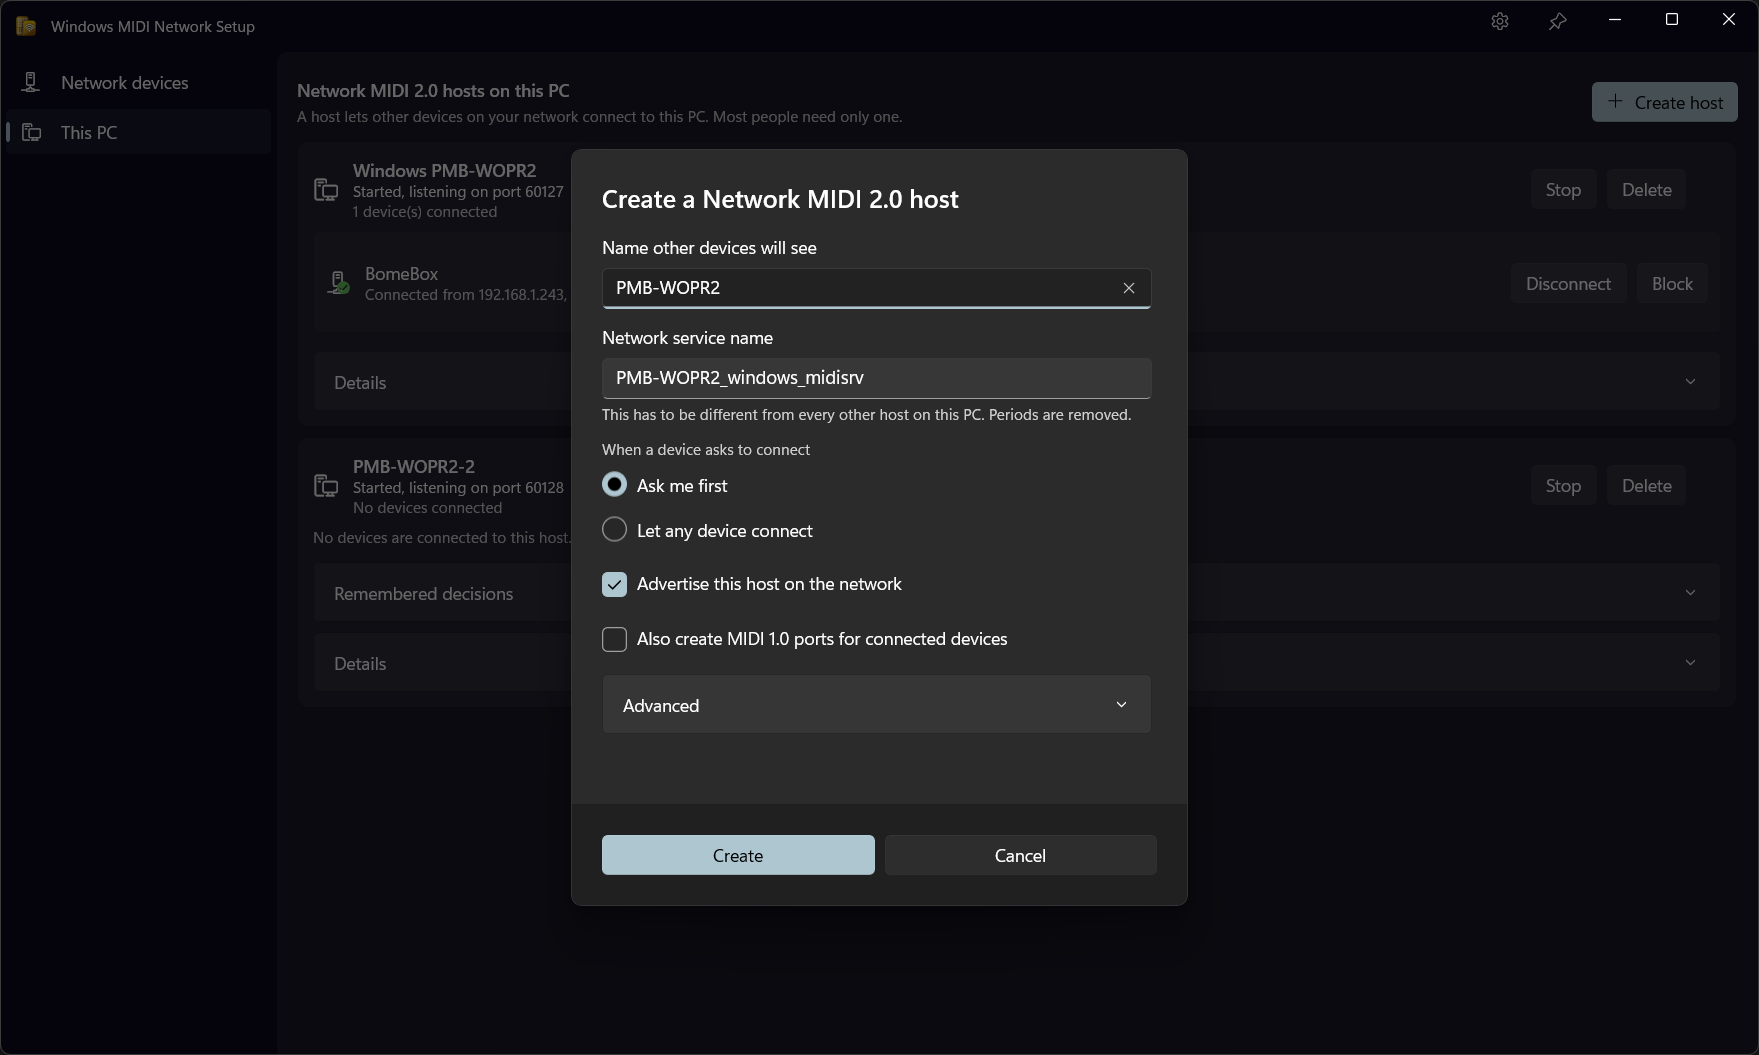
Name other devices will see is how this PC appears in the device list on your synth, laptop, or phone. The Network service name is the technical name used to announce this PC on the network, and it has to be different from every other host on this PC.
When a device asks to connect is the one worth thinking about:
On a home studio network, letting any device connect is convenient. Anywhere you don’t control who’s on the network, ask first.
There is no password option in this release. The Network MIDI 2.0 specification defines optional password and user authentication, and Windows MIDI Services does not support either yet. Ask me first is how you control who gets in. See How Network MIDI 2.0 works in Windows for what that means in practice.
Advertise this host on the network is what makes this PC appear in other devices’ lists. Switch it off and devices can still connect, but they’ll need the address typed in by hand.
Also create MIDI 1.0 ports for connected devices makes connected devices usable from older software that doesn’t understand the new combined MIDI 1.0/MIDI 2.0 API. Most apps today will fall under that category. It’s on by default, and you’d normally leave it that way.
Underneath it is MIDI 1.0 ports to create for a device that does not describe itself. Most devices say how many ports they have when Windows asks, and this number isn’t used for them. It only applies to a device that never answers, which would otherwise get no ports at all. One pair is the right answer for almost everything; raise it only if you know a particular device carries more than one cable’s worth of MIDI and doesn’t say so.
If you chose Ask me first, a prompt appears at the top of the window whenever a device wants to connect. It shows the device’s name and where it’s connecting from, and it’s visible on both pages so you won’t miss it.
You have four answers:
Because the prompt is in this window, a device can be waiting while you’re doing something else entirely. That’s what MIDI Notifications is for: it tells you a device is waiting, and opens this app on it.
Each host lists the devices currently connected to it, with the same round trip graph you get on the Network devices page.
Disconnect ends the connection but doesn’t stop the device reconnecting. Block ends it and refuses that device in future.
Each connected device also shows how fast the host sends to it, and whether that’s the host’s speed or one set for that device. Select Change next to it to give the device a speed of its own. See Choosing a sending speed.
Remembered decisions appears when you’ve used Always allow or Block, and lets you undo those choices. If a device is being turned away and you can’t work out why, look here first.
Devices with their own sending speed appears when you’ve given a device a speed of its own. It lists those devices even when they aren’t connected, so you can change a speed, or select Use the host’s speed to remove it.
Stop takes a host off the network without deleting it, and Delete removes it entirely.
A PC can be on more than one network at a time, like a wired network for your MIDI gear and Wi-Fi for everything else. A host is on all of them unless you say otherwise. To keep a host on just one, open Advanced when you create it, and pick the adapter under Network adapter. To change it later, open Details on the host and select Change next to Network adapter. RTP-MIDI hosts have the same choice.
A host on one adapter only advertises itself there, and only answers devices that reach it through that adapter. That’s handy at a show or in a studio, where you want your MIDI on the wired network and nothing else.
If this adapter is missing, use every adapter until it is back decides what happens when the adapter goes away, like when a USB network adapter is unplugged or Wi-Fi is turned off:
Either way, the host shows a warning that its adapter is missing, with a Choose adapter button so you can pick another one. If MIDI Notifications is running, it also tells you when a host is waiting, so you’re not left wondering why nothing can connect.
USB network adapters often show up as a new adapter when you plug them into a different USB port. Windows remembers the adapter’s hardware address too, so moving it to another port doesn’t count as missing.
Changing a host’s adapter restarts the host, so the devices connected to it are disconnected. Most devices connect again on their own.
A network is much faster than a MIDI 1.0 cable, and some devices can’t keep up when a lot of data arrives at once. A hardware synth taking a long SysEx dump is the usual example, and so is a network to DIN bridge. If a device misses messages, give it a slower sending speed.
The choices are Unlimited, which is the default, MIDI 1.0 wire speed, which is the speed of a DIN cable, and 2, 4, 8, 16 or 32 times that. Start with MIDI 1.0 wire speed for a device that was built for a cable, and go faster if it copes.
A single note or knob turn is never held back, at any speed. Only a large amount of data sent all at once is spaced out, so at MIDI 1.0 wire speed a SysEx dump takes about as long as it would on a cable. Nothing is dropped to keep to the speed.
For Network MIDI 2.0, Slow down when a device misses data lets Windows choose for you. When a device asks for data again, Windows sends to it more slowly, down to MIDI 1.0 wire speed, and speeds back up once the device stops asking. A connection that has slowed down says so in its status. RTP-MIDI devices can’t tell this PC when they miss data, so for those, choose the speed yourself.
A new speed applies straight away, and doesn’t disconnect anything.
The Transport settings page, under Network MIDI 2.0 in the list of pages, is different from the rest of the app. Its settings belong to the MIDI service, not to this app, and they apply to every Network MIDI 2.0 host and client on this PC. They stay changed whether or not this app is running.
The defaults suit almost every network. Change them only if you have a reason to.
| Setting | What it does | When it takes effect |
|---|---|---|
| Most devices allowed at once | How many remote devices any one host on this PC will accept at the same time | Right away. Devices already connected are not disconnected |
| How long to wait for your permission | How long a device asking to connect stays in the waiting list before it is dropped | The next device which asks. Devices already waiting keep the old timeout |
| How often to retry a device which is not answering | How often this PC tries again to reach a device you connected to by address while it is not answering | Within one retry, so up to the old interval from now |
| How often to check a quiet connection | How often a connection with nothing to send checks the other end is still there. Shorter notices a dropped device sooner and sends slightly more traffic | Reaches open connections within one interval |
| Repeated messages per packet | How many recently sent messages are repeated in each packet, so a lost packet can be recovered without asking again. Higher copes better with an unreliable network and makes each packet larger | New connections. Reconnect a device for it to apply there |
| Messages kept for resending | How many sent messages are held in case the other end asks for them again. Higher recovers from longer gaps and uses more memory per connection | New connections. Reconnect a device for it to apply there |
Each box shows the range it accepts. A value outside that range is corrected rather than rejected, so if a number changes after you type it, that is why. There’s no save button: a change is saved a moment after you make it. Restore defaults puts all six back.
The two that matter most in practice are How often to check a quiet connection, if you want a dropped device noticed sooner, and Repeated messages per packet, if you are on Wi-Fi or a busy network and are losing messages.
For the exact defaults, ranges, and the configuration file keys behind these, see How Network MIDI 2.0 works in Windows.
Other devices connect to this PC’s hosts through the MIDI service, and Windows Firewall blocks the service until you let it in. Most apps get a prompt from Windows the first time they listen on the network. The MIDI service runs in the background with no window, so it never gets that prompt. If Windows asked whether to let Network MIDI Setup through the firewall, your answer covers this app only, not the MIDI service.
The usual sign is a PC that other devices can see but can’t use. Windows announces this PC’s hosts on the network for the MIDI service, so they show up in other devices’ lists even while the firewall blocks the service. If a device lists this PC but can’t connect to it, or it connects and no MIDI ever arrives, check the firewall first.
The Firewall page, at the bottom of the list of pages, does this for you:
Windows treats a network as public until you mark it as private, so your home or studio network might be public. Only allow public networks if you trust the other devices on them. Private networks also covers a network your school or company runs, which Windows calls a domain network.
The button adds one rule to Windows Firewall, called Windows MIDI Service (network MIDI). It lets in only the kind of network traffic that Network MIDI 2.0 and RTP-MIDI use (UDP), and only for the MIDI service. To change which networks the rule covers, change your choices and select the button again. The button is only available when your choices are different from what the rule already covers. Rules you made yourself in Windows Firewall are left alone.
The page also tells you when the button can’t help:
The Firewall page changes Windows Firewall only. Some PCs use a firewall from another company instead, often one that comes with antivirus software. If yours does, follow that company’s instructions for letting a program accept incoming connections. The page shows the program to choose: midisrv.exe, and the folder it’s in.
To do the same thing by hand in Windows Firewall, see Adding Network MIDI 2 to your firewall.
The gear button in the title bar opens the settings.
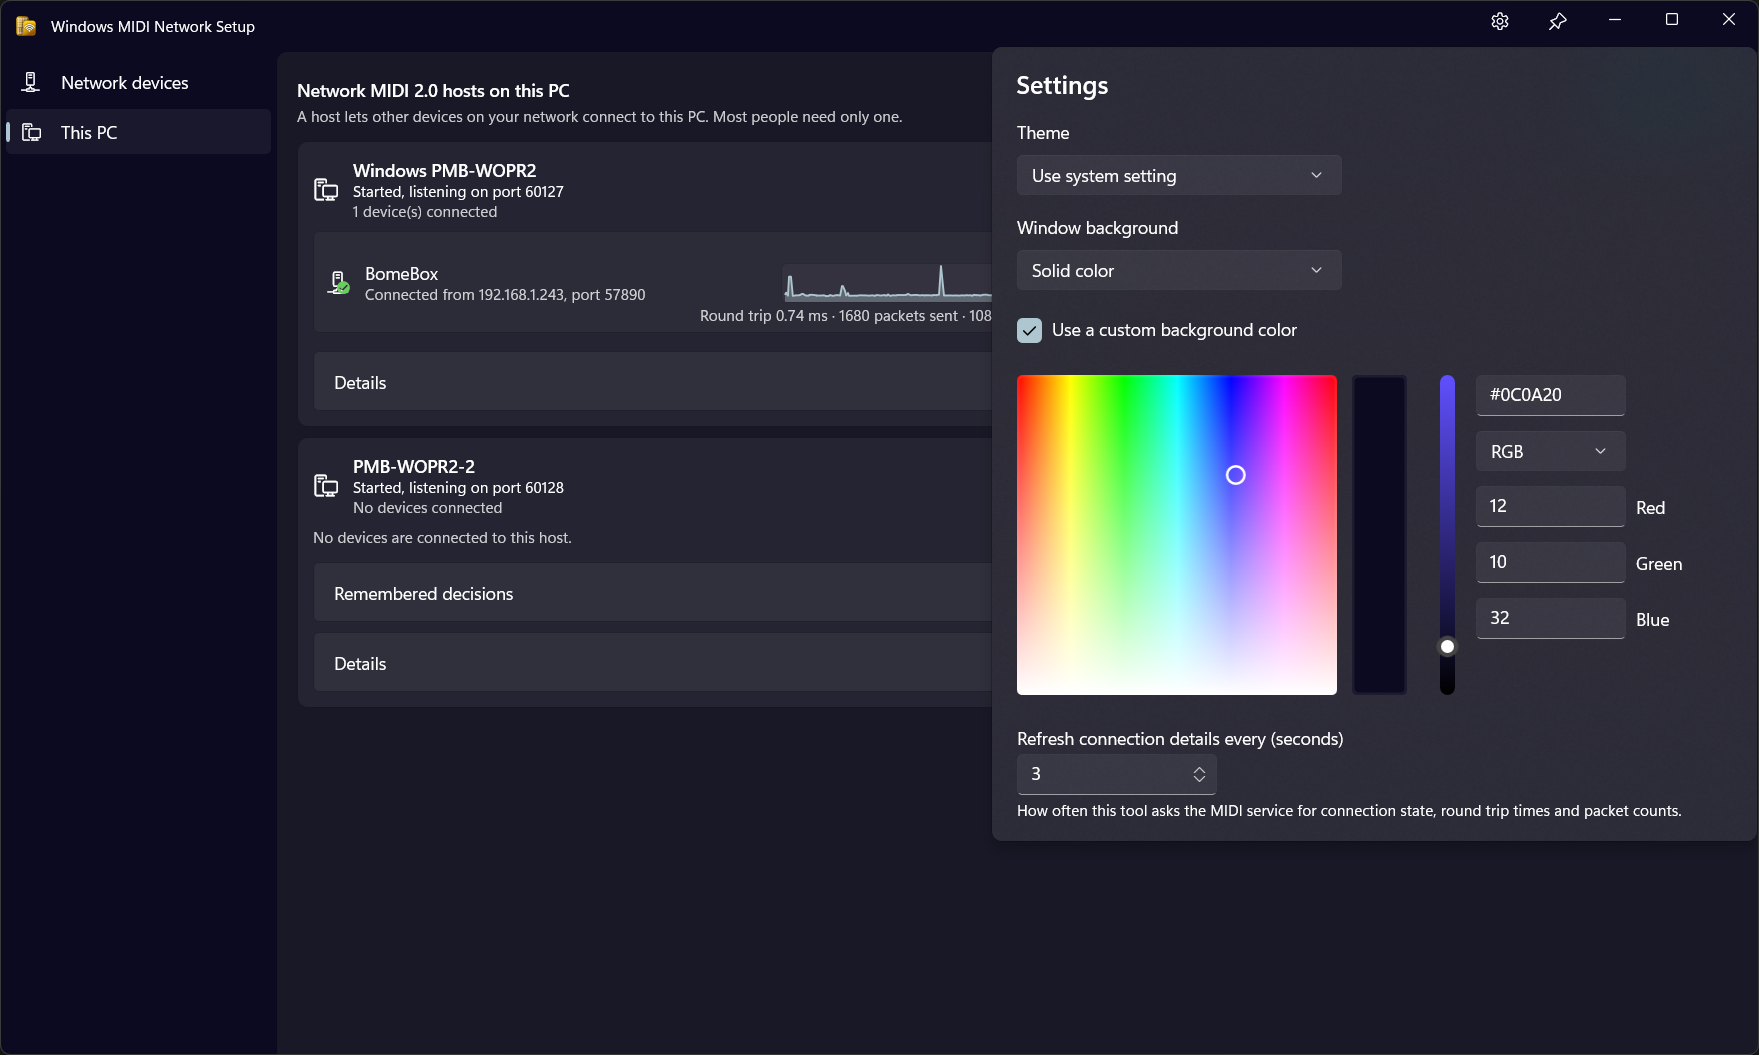
Theme and Window background control how the app looks. Mica and Acrylic pick up colors from your desktop; Acrylic lets what’s behind the window show through. Tick Use a custom background color to choose your own.
Refresh connection details every (seconds) sets how often the app asks the MIDI service for connection state, round trip times, and packet counts. Three to five seconds suits most people. A shorter interval gives a more detailed graph at the cost of asking the service more often. The polling only happens while this app is running.
The pin button next to the minimize button keeps the window above your other windows, which is handy while you’re setting a device up.
A few things to check, roughly in order:
Look at the other device. As above, it may be waiting for you to allow the connection there.
Check the firewall. If other devices can see this PC’s hosts but can’t connect to them, or they connect and no MIDI arrives, Windows Firewall is probably blocking the MIDI service. See Windows Firewall.
Check they’re on the same network and same subnet. Devices are found by announcing themselves locally, and those announcements don’t usually cross between separate networks, or between a guest network and your main one. Usually the product manual for the other device will have information about how to ensure the subnet is the same, or how to set the IP address so it matches the network your PC is on.
Try connecting by address. If the device works when you type its address but never appears in the list, the announcements aren’t reaching this PC even though the network path is fine.
Check whether it’s blocked. If you selected Block at some point, the device is refused silently. Look under Remembered decisions on the host.
If it connects but misses messages, especially during a SysEx transfer, give it a slower sending speed. See Choosing a sending speed.
If an RTP-MIDI device plays extra notes, or notes that don’t stop, turn off Help other devices recover notes lost on the network for that device. See RTP-MIDI.
If Network MIDI 2.0 isn’t installed or isn’t enabled on this PC, the app tells you so when it starts and the rest of the window stays empty. Nothing here will work until that’s sorted out.
Windows MIDI Services is an open source project with all source available on GitHub. We have a great community on Discord as well. Between GitHub and Discord, you should find the information you are looking for.
