Share Your Photos
Now that we have customized the app for our own event, why don’t we make it so that all attendees can view and share photos with other app users? We really don’t want to force all of our attendees to register for some service, so let’s use Imgur’s RESTful APIs to implement a way for all users of our app to share images with each other. We’ll take you through all the steps required to create your own anonymous album (anonymous meaning no sign-ins required), implement methods to take or add photos from the device, and upload/download the images from Imgur into the photos page! Just a note, when adding any photos to Imgur this way, they are public for the world to see – but only the users of your app will be able to contribute to the album!
Prerequisite: Getting Imgur API Key
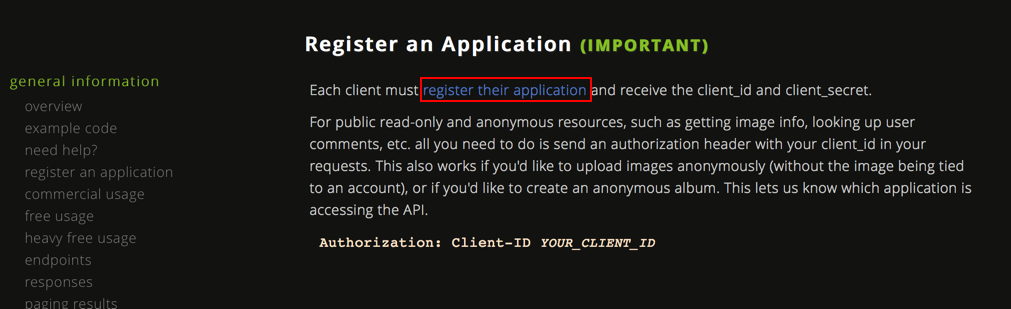
The first thing we have to do is register our application on Imgur to get our API Keys. When you sign up, you should get an email with the Client ID and Client Secret. Since we are trying to avoid any authentication (signing in), we should only need to use our Client ID – but keep both values handy just in case! To register, click here.
Download and Update Source
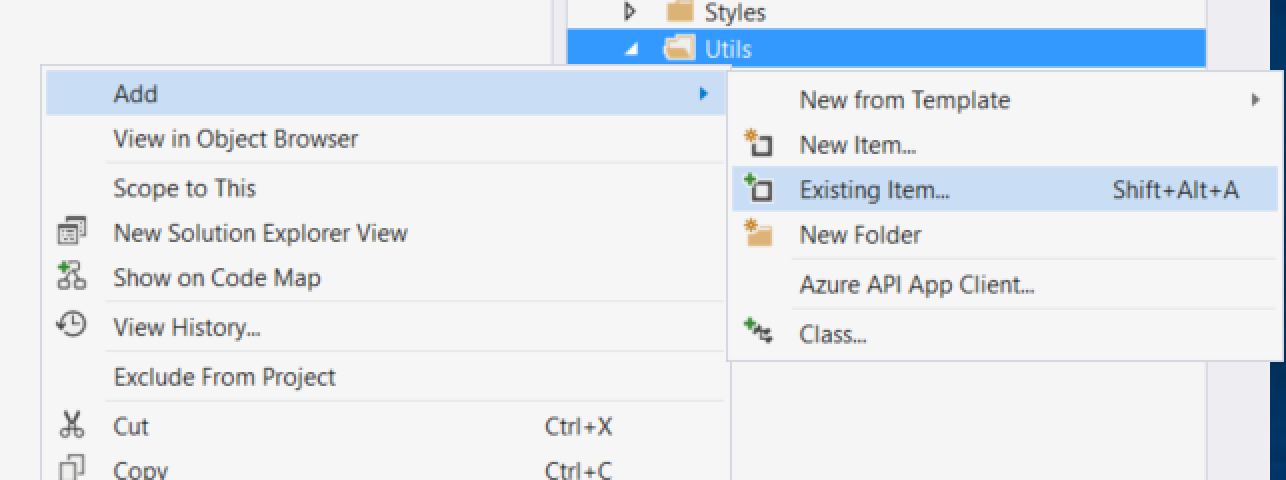
Now that we have our Imgur API Client Key, we can download the source code that will contain the Imgur interaction methods. You can find that code in our repo in the PhotoStreamUtil.cs class here. Go ahead and download this file and add it to your utils folder in your project. You can right click on Utils, click Add and then Existing item... Then select the file you just downloaded. Alternatively, add a new class named PhotoStreamUtil.cs and copy and paste the code in.
Once PhotoStreamUtil.cs is a part of your project, go ahead and open it up to view the code. At the top of the class, you'll notice there are three private string constants that are missing the right information. We can already fill in one piece of information though - the ImgurApiClientId is something that we got when we registered our application with Imgur. Take the client_id provided when you registered with Imgur and copy and paste it to be the value of the ImgurApiClientId string.
internal class PhotoStreamUtil{
        private const string ImgurApiClientId = "ENTER IMGUR API CLIENT ID HERE";
        private const string AlbumDeleteHash = "ENTER ALBUM DELETE HASH HERE";
        private const string AlbumId = "ENTER ALBUM ID HERE";
...}
Now that we have our Imgur client ID set, the only remaining info we need is an album ID and an album delete hash. The ID is what will let people view the photos, and the delete hash will be our private key that will let us (and only us) contribute to the album. To create an album, first open up PhotoStreamModel.cs and find the InitializePhotoCollection() method. Since we're going to be getting all of our images from Imgur going forward, just go ahead and delete the whole contents of the method. Inside of the method, add the following line of code: await PhotoStreamUtil.CreateAlbum();. Since this is an asynchronous method, you'll also need to add an async identifier to the method signature - it should now be: public async void InitializePhotoCollection(). Finally you'll need to add the following using statement to the top of the class: using UWPQuickStart.Utils;.
In order for us to record the album ID and album delete hash, we'll need to review the response given to use by the Imgur REST API call to create the album. The easiest way for us to do this with the current setup is to just set a breakpoint on the CreateAlbum() method call you just added. To add a breakpoint, you can right click on that line of code, find Breakpoint and click Insert Breakpoint. Now, press F5 to run the code. Navigate to the Photos page in the app by using the hamburger menu.
The breakpoint should immediately be triggered when you navigate to the Photos page. Press F11 to step into the code and the CreateAlbum method should be triggered in the PhotoStreamUtil.cs class that we added. Add another breakpoint to the very end of the method - on the curly bracket - and hit F5 to let the code resume. Once the next breakpoint is hit, find your Locals inspector. This is at the bottom of your editor by default, but you can open it via Quick Launch by pressing Ctrl + Q and typing Locals. In your Locals inspector, you should see both response and content. To the right of content you should see a magnifying glass. Click that and then click JSON Visualizer. Expand the data tab and you will have both your album delete hash and album ID!

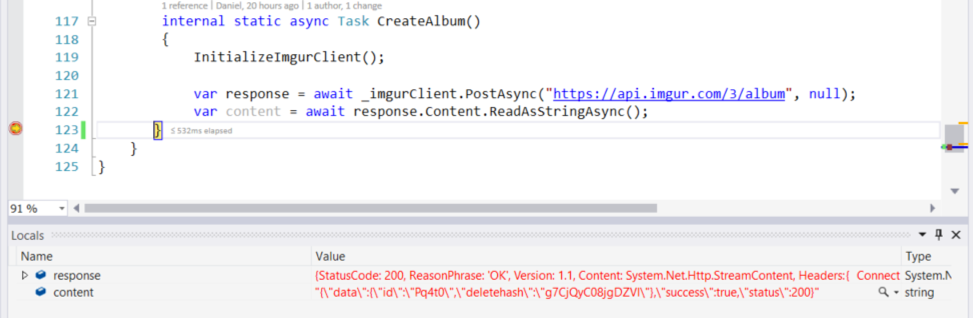
The last change we need to make to the source is to update the AlbumDeleteHash and AlbumId properties in the PhotoStreamUtil.cs class. Replace the values of both of these properties with the delete hash and album ID retrieved in the last step.
internal class PhotoStreamUtil{
        private const string ImgurApiClientId = "HIDDEN";
        private const string AlbumDeleteHash = "g7CjQyC08jgDZVl";
        private const string AlbumId = "Pq4t0";
...}
Add Pictures!
We're almost there! All that remains is to enable our users to add pictures, and make sure we retrieve pictures from the right source - in this case, Imgur! To start with, let's make sure our photos are getting initialized from the right place. In the PhotoStreamModel.cs class, let's update the public async void InitializePhotoCollection() method. Let's delete the line that we added earlier. Since our album is already created, we don't need to create albums anymore. Replace it with await PhotoStreamUtil.GetImagesFromImgur(this);.
public async void InitializePhotoCollection(){
    await PhotoStreamUtil.GetImagesFromImgur(this);
}
Now let's make it so our users can add photos. In the Photos.xaml page, let's add a new Grid RowDefinition with height Auto. Next we'll add a CommandBar control to our new row with two AppBarButton controls. One for taking a picture with my device's camera, and one for choosing a file that is already on my device. We can make the background of our CommandBar the same as our buttons for consistency by adding a Background="{StaticResource ButtonBrush}" property. To style the AppBarButton controls, we can assign the following properties. For the first button -
Icon="Camera"Label="Take Picture"Click="CameraButton_Click"
and for the second button -
Icon="OpenFile"Label="Add Picture"Click="AddPhotoButton_Click"
The final XAML snippet will look like the below.
...<Grid.RowDefinitions>
    <RowDefinition Height="Auto"/>
    <RowDefinition Height="*"/>
    <RowDefinition Height="Auto"/>
</Grid.RowDefinitions>
<CommandBar Background="{StaticResource ButtonBrush}" Grid.Row="2">
    <AppBarButton Icon="Camera" Label="Take Picture" Click="CameraButton_Click">
    <AppBarButton Icon="OpenFile" Label="Add Picture" Click="AddPhotoButton_Click">
</CommandBar>...Now that we have our buttons, we just need to hook them up to something. You can copy and paste the three methods below at the end of the Photos.xaml.cs class. They should follow the PhotoFlipViewMode_Checked method. You'll also need to update the using statements at the top of your class.
using System;
using System.ComponentModel;
using System.IO;
using Windows.Media.Capture;
using Windows.Storage;
using Windows.Storage.Pickers;
using Windows.Storage.Streams;
using Windows.UI.Xaml;
using Windows.UI.Xaml.Controls;
using UWPQuickStart.Models;
using UWPQuickStart.Utils;
...
private async void CameraButton_Click(object sender, RoutedEventArgs e){
    CameraCaptureUI captureUI = new CameraCaptureUI();
    captureUI.PhotoSettings.Format = CameraCaptureUIPhotoFormat.Jpeg;
    StorageFile photo = await captureUI.CaptureFileAsync(CameraCaptureUIMode.Photo);
    SavePhoto(photo);
}
private async void AddPhotoButton_Click(object sender, RoutedEventArgs e){
    FileOpenPicker filePicker = new FileOpenPicker();

    filePicker.FileTypeFilter.Add(".jpeg");
    filePicker.FileTypeFilter.Add(".png");
    filePicker.FileTypeFilter.Add(".bmp");
    filePicker.FileTypeFilter.Add(".jpg");

    StorageFilePhoto photo = await filePicker.PickSingleFileAsync();
    SavePhoto(photo);
}
private async void SavePhoto(StorageFile photo)
{
    if(photo == null)
    {
        //User cancelled photo capture
        return;
    }
    IRandomAccessStream stream = await photo.OpenAsync(FileAccessMode.Read);
    await PhotoStreamUtil.AddImage(stream.AsStream(), _photoStreamModel);
}Now run the app! You should be able to add photos from your device or take photos with your device's camera via the command bar at the bottom. These photos will automatically upload to your anonymous Imgur album. After the upload has completed, all users of your application should be able to see the photos!
