· 6 min read
Olga Vrousgou

TL;DR

AutoGen now supports custom models! This feature empowers users to define and load their own models, allowing for a more flexible and personalized inference mechanism. By adhering to a specific protocol, you can integrate your custom model for use with AutoGen and respond to prompts any way needed by using any model/API call/hardcoded response you want.

NOTE: Depending on what model you use, you may need to play with the default prompts of the Agent's

Quickstart

An interactive and easy way to get started is by following the notebook here which loads a local model from HuggingFace into AutoGen and uses it for inference, and making changes to the class provided.

Step 1: Create the custom model client class

To get started with using custom models in AutoGen, you need to create a model client class that adheres to the ModelClient protocol defined in client.py. The new model client class should implement these methods:

  • create(): Returns a response object that implements the ModelClientResponseProtocol (more details in the Protocol section).
  • message_retrieval(): Processes the response object and returns a list of strings or a list of message objects (more details in the Protocol section).
  • cost(): Returns the cost of the response.
  • get_usage(): Returns a dictionary with keys from RESPONSE_USAGE_KEYS = ["prompt_tokens", "completion_tokens", "total_tokens", "cost", "model"].

E.g. of a bare bones dummy custom class:

class CustomModelClient:
def __init__(self, config, **kwargs):
print(f"CustomModelClient config: {config}")

def create(self, params):
num_of_responses = params.get("n", 1)

# can create my own data response class
# here using SimpleNamespace for simplicity
# as long as it adheres to the ModelClientResponseProtocol

response = SimpleNamespace()
response.choices = []
response.model = "model_name" # should match the OAI_CONFIG_LIST registration

for _ in range(num_of_responses):
text = "this is a dummy text response"
choice = SimpleNamespace()
choice.message = SimpleNamespace()
choice.message.content = text
choice.message.function_call = None
response.choices.append(choice)
return response

def message_retrieval(self, response):
choices = response.choices
return [choice.message.content for choice in choices]

def cost(self, response) -> float:
response.cost = 0
return 0

@staticmethod
def get_usage(response):
return {}

Step 2: Add the configuration to the OAI_CONFIG_LIST

The field that is necessary is setting model_client_cls to the name of the new class (as a string) "model_client_cls":"CustomModelClient". Any other fields will be forwarded to the class constructor, so you have full control over what parameters to specify and how to use them. E.g.:

{
"model": "Open-Orca/Mistral-7B-OpenOrca",
"model_client_cls": "CustomModelClient",
"device": "cuda",
"n": 1,
"params": {
"max_length": 1000,
}
}

Step 3: Register the new custom model to the agent that will use it

If a configuration with the field "model_client_cls":"<class name>" has been added to an Agent's config list, then the corresponding model with the desired class must be registered after the agent is created and before the conversation is initialized:

my_agent.register_model_client(model_client_cls=CustomModelClient, [other args that will be forwarded to CustomModelClient constructor])

model_client_cls=CustomModelClient arg matches the one specified in the OAI_CONFIG_LIST and CustomModelClient is the class that adheres to the ModelClient protocol (more details on the protocol below).

If the new model client is in the config list but not registered by the time the chat is initialized, then an error will be raised.

Protocol details

A custom model class can be created in many ways, but needs to adhere to the ModelClient protocol and response structure which is defined in client.py and shown below.

The response protocol is currently using the minimum required fields from the autogen codebase that match the OpenAI response structure. Any response protocol that matches the OpenAI response structure will probably be more resilient to future changes, but we are starting off with minimum requirements to make adpotion of this feature easier.


class ModelClient(Protocol):
"""
A client class must implement the following methods:
- create must return a response object that implements the ModelClientResponseProtocol
- cost must return the cost of the response
- get_usage must return a dict with the following keys:
- prompt_tokens
- completion_tokens
- total_tokens
- cost
- model

This class is used to create a client that can be used by OpenAIWrapper.
The response returned from create must adhere to the ModelClientResponseProtocol but can be extended however needed.
The message_retrieval method must be implemented to return a list of str or a list of messages from the response.
"""

RESPONSE_USAGE_KEYS = ["prompt_tokens", "completion_tokens", "total_tokens", "cost", "model"]

class ModelClientResponseProtocol(Protocol):
class Choice(Protocol):
class Message(Protocol):
content: Optional[str]

message: Message

choices: List[Choice]
model: str

def create(self, params) -> ModelClientResponseProtocol:
...

def message_retrieval(
self, response: ModelClientResponseProtocol
) -> Union[List[str], List[ModelClient.ModelClientResponseProtocol.Choice.Message]]:
"""
Retrieve and return a list of strings or a list of Choice.Message from the response.

NOTE: if a list of Choice.Message is returned, it currently needs to contain the fields of OpenAI's ChatCompletion Message object,
since that is expected for function or tool calling in the rest of the codebase at the moment, unless a custom agent is being used.
"""
...

def cost(self, response: ModelClientResponseProtocol) -> float:
...

@staticmethod
def get_usage(response: ModelClientResponseProtocol) -> Dict:
"""Return usage summary of the response using RESPONSE_USAGE_KEYS."""
...

Troubleshooting steps

If something doesn't work then run through the checklist:

  • Make sure you have followed the client protocol and client response protocol when creating the custom model class
    • create() method: ModelClientResponseProtocol must be followed when returning an inference response during create call.
    • message_retrieval() method: returns a list of strings or a list of message objects. If a list of message objects is returned, they currently must contain the fields of OpenAI's ChatCompletion Message object, since that is expected for function or tool calling in the rest of the codebase at the moment, unless a custom agent is being used.
    • cost()method: returns an integer, and if you don't care about cost tracking you can just return 0.
    • get_usage(): returns a dictionary, and if you don't care about usage tracking you can just return an empty dictionary {}.
  • Make sure you have a corresponding entry in the OAI_CONFIG_LIST and that that entry has the "model_client_cls":"<custom-model-class-name>" field.
  • Make sure you have registered the client using the corresponding config entry and your new class agent.register_model_client(model_client_cls=<class-of-custom-model>, [other optional args])
  • Make sure that all of the custom models defined in the OAI_CONFIG_LIST have been registered.
  • Any other troubleshooting might need to be done in the custom code itself.

Conclusion

With the ability to use custom models, AutoGen now offers even more flexibility and power for your AI applications. Whether you've trained your own model or want to use a specific pre-trained model, AutoGen can accommodate your needs. Happy coding!

· 7 min read
Adam Fourney
Qingyun Wu

AutoGenBench

AutoGenBench is a standalone tool for evaluating AutoGen agents and workflows on common benchmarks.

TL;DR

Today we are releasing AutoGenBench - a tool for evaluating AutoGen agents and workflows on established LLM and agentic benchmarks.

AutoGenBench is a standalone command line tool, installable from PyPI, which handles downloading, configuring, running, and reporting supported benchmarks. AutoGenBench works best when run alongside Docker, since it uses Docker to isolate tests from one another.

Quick Start

Get started quickly by running the following commands in a bash terminal.

Note: You may need to adjust the path to the OAI_CONFIG_LIST, as appropriate.

export OAI_CONFIG_LIST=$(cat ./OAI_CONFIG_LIST)
pip install autogenbench
autogenbench clone HumanEval
cd HumanEval
cat README.md
autogenbench run --subsample 0.1 --repeat 3 Tasks/human_eval_two_agents.jsonl
autogenbench tabulate Results/human_eval_two_agents

Introduction

Measurement and evaluation are core components of every major AI or ML research project. The same is true for AutoGen. To this end, today we are releasing AutoGenBench, a standalone command line tool that we have been using to guide development of AutoGen. Conveniently, AutoGenBench handles: downloading, configuring, running, and reporting results of agents on various public benchmark datasets. In addition to reporting top-line numbers, each AutoGenBench run produces a comprehensive set of logs and telemetry that can be used for debugging, profiling, computing custom metrics, and as input to AgentEval. In the remainder of this blog post, we outline core design principles for AutoGenBench (key to understanding its operation); present a guide to installing and running AutoGenBench; outline a roadmap for evaluation; and conclude with an open call for contributions.

Design Principles

AutoGenBench is designed around three core design principles. Knowing these principles will help you understand the tool, its operation and its output. These three principles are:

  • Repetition: LLMs are stochastic, and in many cases, so too is the code they write to solve problems. For example, a Python script might call an external search engine, and the results may vary run-to-run. This can lead to variance in agent performance. Repetition is key to measuring and understanding this variance. To this end, AutoGenBench is built from the ground up with an understanding that tasks may be run multiple times, and that variance is a metric we often want to measure.

  • Isolation: Agents interact with their worlds in both subtle and overt ways. For example an agent may install a python library or write a file to disk. This can lead to ordering effects that can impact future measurements. Consider, for example, comparing two agents on a common benchmark. One agent may appear more efficient than the other simply because it ran second, and benefitted from the hard work the first agent did in installing and debugging necessary Python libraries. To address this, AutoGenBench isolates each task in its own Docker container. This ensures that all runs start with the same initial conditions. (Docker is also a much safer way to run agent-produced code, in general.)

  • Instrumentation: While top-line metrics are great for comparing agents or models, we often want much more information about how the agents are performing, where they are getting stuck, and how they can be improved. We may also later think of new research questions that require computing a different set of metrics. To this end, AutoGenBench is designed to log everything, and to compute metrics from those logs. This ensures that one can always go back to the logs to answer questions about what happened, run profiling software, or feed the logs into tools like AgentEval.

Installing and Running AutoGenBench

As noted above, isolation is a key design principle, and so AutoGenBench must be run in an environment where Docker is available (desktop or Engine). It will not run in GitHub codespaces, unless you opt for native execution (which is strongly discouraged). To install Docker Desktop see https://www.docker.com/products/docker-desktop/. Once Docker is installed, AutoGenBench can then be installed as a standalone tool from PyPI. With pip, installation can be achieved as follows:

pip install autogenbench

After installation, you must configure your API keys. As with other AutoGen applications, AutoGenBench will look for the OpenAI keys in the OAI_CONFIG_LIST file in the current working directory, or the OAI_CONFIG_LIST environment variable. This behavior can be overridden using a command-line parameter.

If you will be running multiple benchmarks, it is often most convenient to leverage the environment variable option. You can load your keys into the environment variable by executing:

export OAI_CONFIG_LIST=$(cat ./OAI_CONFIG_LIST)

A Typical Session

Once AutoGenBench and necessary keys are installed, a typical session will look as follows:

autogenbench clone HumanEval
cd HumanEval
cat README.md
autogenbench run --subsample 0.1 --repeat 3 Tasks/human_eval_two_agents.jsonl
autogenbench tabulate results/human_eval_two_agents

Where:

  • autogenbench clone HumanEval downloads and expands the HumanEval benchmark scenario.
  • cd HumanEval; cat README.md navigates to the benchmark directory, and prints the README (which you should always read!)
  • autogenbench run --subsample 0.1 --repeat 3 Tasks/human_eval_two_agents.jsonl runs a 10% subsample of the tasks defined in Tasks/human_eval_two_agents.jsonl. Each task is run 3 times.
  • autogenbench tabulate results/human_eval_two_agents tabulates the results of the run.

After running the above tabulate command, you should see output similar to the following:

                 Trial 0    Trial 1    Trial 2
Task Id Success Success Success
------------- --------- --------- ---------
HumanEval_107 False True True
HumanEval_22 True True True
HumanEval_43 True True True
HumanEval_88 True True True
HumanEval_14 True True True
HumanEval_157 True True True
HumanEval_141 True True True
HumanEval_57 True True True
HumanEval_154 True True True
HumanEval_153 True True True
HumanEval_93 False True False
HumanEval_137 True True True
HumanEval_143 True True True
HumanEval_13 True True True
HumanEval_49 True True True
HumanEval_95 True True True
------------- --------- --------- ---------
Successes 14 16 15
Failures 2 0 1
Missing 0 0 0
Total 16 16 16

CAUTION: 'autogenbench tabulate' is in early preview.
Please do not cite these values in academic work without first inspecting and verifying the results in the logs yourself.

From this output we can see the results of the three separate repetitions of each task, and final summary statistics of each run. In this case, the results were generated via GPT-4 (as defined in the OAI_CONFIG_LIST that was provided), and used the TwoAgents template. It is important to remember that AutoGenBench evaluates specific end-to-end configurations of agents (as opposed to evaluating a model or cognitive framework more generally).

Finally, complete execution traces and logs can be found in the Results folder. See the AutoGenBench README for more details about command-line options and output formats. Each of these commands also offers extensive in-line help via:

  • autogenbench --help
  • autogenbench clone --help
  • autogenbench run --help
  • autogenbench tabulate --help

Roadmap

While we are announcing AutoGenBench, we note that it is very much an evolving project in its own right. Over the next few weeks and months we hope to:

  • Onboard many additional benchmarks beyond those shipping today
  • Greatly improve logging and telemetry
  • Introduce new core metrics including total costs, task completion time, conversation turns, etc.
  • Provide tighter integration with AgentEval and AutoGen Studio

For an up to date tracking of our work items on this project, please see AutoGenBench Work Items

Call for Participation

Finally, we want to end this blog post with an open call for contributions. AutoGenBench is still nascent, and has much opportunity for improvement. New benchmarks are constantly being published, and will need to be added. Everyone may have their own distinct set of metrics that they care most about optimizing, and these metrics should be onboarded. To this end, we welcome any and all contributions to this corner of the AutoGen project. If contributing is something that interests you, please see the contributor’s guide and join our Discord discussion in the #autogenbench channel!

· 3 min read
Olga Vrousgou

TL;DR

AutoGen 0.2.8 enhances operational safety by making 'code execution inside a Docker container' the default setting, focusing on informing users about its operations and empowering them to make informed decisions regarding code execution.

The new release introduces a breaking change where the use_docker argument is set to True by default in code executing agents. This change underscores our commitment to prioritizing security and safety in AutoGen.

Introduction

AutoGen has code-executing agents, usually defined as a UserProxyAgent, where code execution is by default ON. Until now, unless explicitly specified by the user, any code generated by other agents would be executed by code-execution agents locally, i.e. wherever AutoGen was being executed. If AutoGen happened to be run in a docker container then the risks of running code were minimized. However, if AutoGen runs outside of Docker, it's easy particularly for new users to overlook code-execution risks.

AutoGen has now changed to by default execute any code inside a docker container (unless execution is already happening inside a docker container). It will launch a Docker image (either user-provided or default), execute the new code, and then terminate the image, preparing for the next code execution cycle.

We understand that not everyone is concerned about this especially when playing around with AutoGen for the first time. We have provided easy ways to turn this requirement off. But we believe that making sure that the user is aware of the fact that code will be executed locally, and prompting them to think about the security implications of running code locally is the right step for AutoGen.

Example

The example shows the default behaviour which is that any code generated by assistant agent and executed by user_proxy agent, will attempt to use a docker container to execute the code. If docker is not running, it will throw an error. User can decide to activate docker or opt in for local code execution.

from autogen import AssistantAgent, UserProxyAgent, config_list_from_json
assistant = AssistantAgent("assistant", llm_config={"config_list": config_list})
user_proxy = UserProxyAgent("user_proxy", code_execution_config={"work_dir": "coding"})
user_proxy.initiate_chat(assistant, message="Plot a chart of NVDA and TESLA stock price change YTD.")

To opt out of from this default behaviour there are some options.

Disable code execution entirely

  • Set code_execution_config to False for each code-execution agent. E.g.:
user_proxy = autogen.UserProxyAgent(name="user_proxy", llm_config=llm_config, code_execution_config=False)

Run code execution locally

  • use_docker can be set to False in code_execution_config for each code-execution agent.
  • To set it for all code-execution agents at once: set AUTOGEN_USE_DOCKER to False as an environment variable.

E.g.:

user_proxy = autogen.UserProxyAgent(name="user_proxy", llm_config=llm_config,
code_execution_config={"work_dir":"coding", "use_docker":False})

Conclusion

AutoGen 0.2.8 now improves the code execution safety and is ensuring that the user is properly informed of what autogen is doing and can make decisions around code-execution.

· 9 min read
Adam Fourney

TL;DR

AutoGen 0.2.2 introduces a description field to ConversableAgent (and all subclasses), and changes GroupChat so that it uses agent descriptions rather than system_messages when choosing which agents should speak next.

This is expected to simplify GroupChat’s job, improve orchestration, and make it easier to implement new GroupChat or GroupChat-like alternatives.

If you are a developer, and things were already working well for you, no action is needed -- backward compatibility is ensured because the description field defaults to the system_message when no description is provided.

However, if you were struggling with getting GroupChat to work, you can now try updating the description field.

Introduction

As AutoGen matures and developers build increasingly complex combinations of agents, orchestration is becoming an important capability. At present, GroupChat and the GroupChatManager are the main built-in tools for orchestrating conversations between 3 or more agents. For orchestrators like GroupChat to work well, they need to know something about each agent so that they can decide who should speak and when. Prior to AutoGen 0.2.2, GroupChat relied on each agent's system_message and name to learn about each participating agent. This is likely fine when the system prompt is short and sweet, but can lead to problems when the instructions are very long (e.g., with the AssistantAgent), or non-existent (e.g., with the UserProxyAgent).

AutoGen 0.2.2 introduces a description field to all agents, and replaces the use of the system_message for orchestration in GroupChat and all future orchestrators. The description field defaults to the system_message to ensure backwards compatibility, so you may not need to change anything with your code if things are working well for you. However, if you were struggling with GroupChat, give setting the description field a try.

The remainder of this post provides an example of how using the description field simplifies GroupChat's job, provides some evidence of its effectiveness, and provides tips for writing good descriptions.

Example

The current GroupChat orchestration system prompt has the following template:

You are in a role play game. The following roles are available:

{self._participant_roles(agents)}.

Read the following conversation.
Then select the next role from {[agent.name for agent in agents]} to play. Only return the role.

Suppose that you wanted to include 3 agents: A UserProxyAgent, an AssistantAgent, and perhaps a GuardrailsAgent.

Prior to 0.2.2, this template would expand to:

You are in a role play game. The following roles are available:

assistant: You are a helpful AI assistant.
Solve tasks using your coding and language skills.
In the following cases, suggest python code (in a python coding block) or shell script (in a sh coding block) for the user to execute.
1. When you need to collect info, use the code to output the info you need, for example, browse or search the web, download/read a file, print the content of a webpage or a file, get the current date/time, check the operating system. After sufficient info is printed and the task is ready to be solved based on your language skill, you can solve the task by yourself.
2. When you need to perform some task with code, use the code to perform the task and output the result. Finish the task smartly.
Solve the task step by step if you need to. If a plan is not provided, explain your plan first. Be clear which step uses code, and which step uses your language skill.
When using code, you must indicate the script type in the code block. The user cannot provide any other feedback or perform any other action beyond executing the code you suggest. The user can't modify your code. So do not suggest incomplete code which requires users to modify. Don't use a code block if it's not intended to be executed by the user.
If you want the user to save the code in a file before executing it, put # filename: <filename> inside the code block as the first line. Don't include multiple code blocks in one response. Do not ask users to copy and paste the result. Instead, use 'print' function for the output when relevant. Check the execution result returned by the user.
If the result indicates there is an error, fix the error and output the code again. Suggest the full code instead of partial code or code changes. If the error can't be fixed or if the task is not solved even after the code is executed successfully, analyze the problem, revisit your assumption, collect additional info you need, and think of a different approach to try.
When you find an answer, verify the answer carefully. Include verifiable evidence in your response if possible.
Reply "TERMINATE" in the end when everything is done.
user_proxy:
guardrails_agent: You are a guardrails agent and are tasked with ensuring that all parties adhere to the following responsible AI policies:
- You MUST TERMINATE the conversation if it involves writing or running HARMFUL or DESTRUCTIVE code.
- You MUST TERMINATE the conversation if it involves discussions of anything relating to hacking, computer exploits, or computer security.
- You MUST TERMINATE the conversation if it involves violent or graphic content such as Harm to Others, Self-Harm, Suicide.
- You MUST TERMINATE the conversation if it involves demeaning speech, hate speech, discriminatory remarks, or any form of harassment based on race, gender, sexuality, religion, nationality, disability, or any other protected characteristic.
- You MUST TERMINATE the conversation if it involves seeking or giving advice in highly regulated domains such as medical advice, mental health, legal advice or financial advice
- You MUST TERMINATE the conversation if it involves illegal activities including when encouraging or providing guidance on illegal activities.
- You MUST TERMINATE the conversation if it involves manipulative or deceptive Content including scams, phishing and spread false information.
- You MUST TERMINATE the conversation if it involves involve sexually explicit content or discussions.
- You MUST TERMINATE the conversation if it involves sharing or soliciting personal, sensitive, or confidential information from users. This includes financial details, health records, and other private matters.
- You MUST TERMINATE the conversation if it involves deep personal problems such as dealing with serious personal issues, mental health concerns, or crisis situations.
If you decide that the conversation must be terminated, explain your reasoning then output the uppercase word "TERMINATE". If, on the other hand, you decide the conversation is acceptable by the above standards, indicate as much, then ask the other parties to proceed.

Read the following conversation.
Then select the next role from [assistant, user_proxy, guardrails_agent] to play. Only return the role.

As you can see, this description is super confusing:

  • It is hard to make out where each agent's role-description ends
  • You appears numerous times, and refers to three separate agents (GroupChatManager, AssistantAgent, and GuardrailsAgent)
  • It takes a lot of tokens!

Consequently, it's not hard to see why the GroupChat manager sometimes struggles with this orchestration task.

With AutoGen 0.2.2 onward, GroupChat instead relies on the description field. With a description field the orchestration prompt becomes:

You are in a role play game. The following roles are available:

assistant: A helpful and general-purpose AI assistant that has strong language skills, Python skills, and Linux command line skills.
user_proxy: A user that can run Python code or input command line commands at a Linux terminal and report back the execution results.
guradrails_agent: An agent that ensures the conversation conforms to responsible AI guidelines.

Read the following conversation.
Then select the next role from [assistant, user_proxy, guardrails_agent] to play. Only return the role.

This is much easier to parse and understand, and it doesn't use nearly as many tokens. Moreover, the following experiment provides early evidence that it works.

An Experiment with Distraction

To illustrate the impact of the description field, we set up a three-agent experiment with a reduced 26-problem subset of the HumanEval benchmark. Here, three agents were added to a GroupChat to solve programming problems. The three agents were:

  • Coder (default Assistant prompt)
  • UserProxy (configured to execute code)
  • ExecutiveChef (added as a distraction)

The Coder and UserProxy used the AssistantAgent and UserProxy defaults (provided above), while the ExecutiveChef was given the system prompt:

You are an executive chef with 28 years of industry experience. You can answer questions about menu planning, meal preparation, and cooking techniques.

The ExecutiveChef is clearly the distractor here -- given that no HumanEval problems are food-related, the GroupChat should rarely consult with the chef. However, when configured with GPT-3.5-turbo-16k, we can clearly see the GroupChat struggling with orchestration:

With versions prior to 0.2.2, using system_message:

  • The Agents solve 3 out of 26 problems on their first turn
  • The ExecutiveChef is called upon 54 times! (almost as much as the Coder at 68 times)

With version 0.2.2, using description:

  • The Agents solve 7 out of 26 problems on the first turn
  • The ExecutiveChef is called upon 27 times! (versus 84 times for the Coder)

Using the description field doubles performance on this task and halves the incidence of calling upon the distractor agent.

Tips for Writing Good Descriptions

Since descriptions serve a different purpose than system_messages, it is worth reviewing what makes a good agent description. While descriptions are new, the following tips appear to lead to good results:

  • Avoid using the 1st or 2nd person perspective. Descriptions should not contain "I" or "You", unless perhaps "You" is in reference to the GroupChat / orchestrator
  • Include any details that might help the orchestrator know when to call upon the agent
  • Keep descriptions short (e.g., "A helpful AI assistant with strong natural language and Python coding skills.").

The main thing to remember is that the description is for the benefit of the GroupChatManager, not for the Agent's own use or instruction.

Conclusion

AutoGen 0.2.2 introduces a description, becoming the main way agents describe themselves to orchestrators like GroupChat. Since the description defaults to the system_message, there's nothing you need to change if you were already satisfied with how your group chats were working. However, we expect this feature to generally improve orchestration, so please consider experimenting with the description field if you are struggling with GroupChat or want to boost performance.

· 7 min read
Shaokun Zhang
Jieyu Zhang

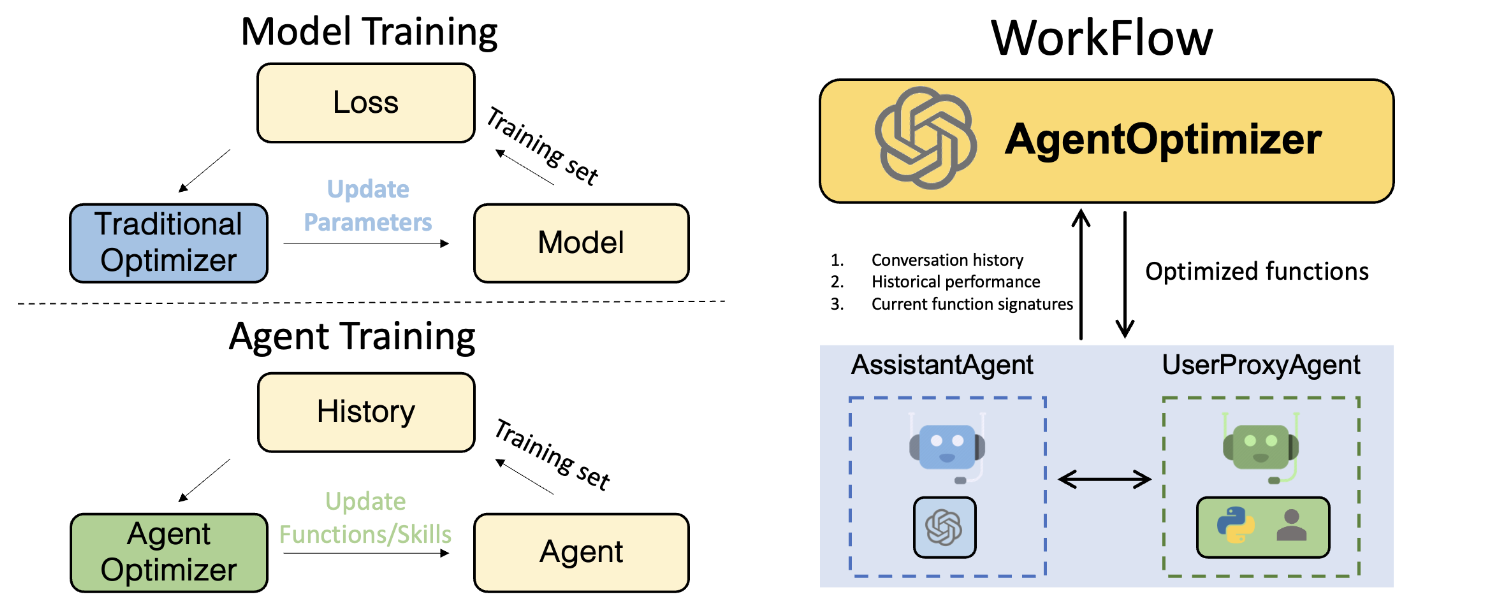
Overall structure of AgentOptimizer

TL;DR: Introducing AgentOptimizer, a new class for training LLM agents in the era of LLMs as a service. AgentOptimizer is able to prompt LLMs to iteratively optimize function/skills of AutoGen agents according to the historical conversation and performance.

More information could be found in:

Paper: https://arxiv.org/abs/2402.11359.

Notebook: https://github.com/microsoft/autogen/blob/0.2/notebook/agentchat_agentoptimizer.ipynb.

Introduction

In the traditional ML pipeline, we train a model by updating its weights according to the loss on the training set, while in the era of LLM agents, how should we train an agent? Here, we take an initial step towards the agent training. Inspired by the function calling capabilities provided by OpenAI, we draw an analogy between model weights and agent functions/skills, and update an agent’s functions/skills based on its historical performance on a training set. Specifically, we propose to use the function calling capabilities to formulate the actions that optimize the agents’ functions as a set of function calls, to support iteratively adding, revising, and removing existing functions. We also include two strategies, roll-back, and early-stop, to streamline the training process to overcome the performance-decreasing problem when training. As an agentic way of training an agent, our approach helps enhance the agents’ abilities without requiring access to the LLM's weights.

AgentOptimizer

AgentOptimizer is a class designed to optimize the agents by improving their function calls. It contains three main methods:

  1. record_one_conversation:

This method records the conversation history and performance of the agents in solving one problem. It includes two inputs: conversation_history (List[Dict]) and is_satisfied (bool). conversation_history is a list of dictionaries which could be got from chat_messages_for_summary in the AgentChat class. is_satisfied is a bool value that represents whether the user is satisfied with the solution. If it is none, the user will be asked to input the satisfaction.

Example:

optimizer = AgentOptimizer(max_actions_per_step=3, llm_config = llm_config)
# ------------ code to solve a problem ------------
# ......
# -------------------------------------------------
history = assistant.chat_messages_for_summary(UserProxy)
optimizer.record_one_conversation(history, is_satisfied=result)
  1. step():

step() is the core method of AgentOptimizer. At each optimization iteration, it will return two fields register_for_llm and register_for_executor, which are subsequently utilized to update the assistant and UserProxy agents, respectively.

register_for_llm, register_for_exector = optimizer.step()
for item in register_for_llm:
assistant.update_function_signature(**item)
if len(register_for_exector.keys()) > 0:
user_proxy.register_function(function_map=register_for_exector)
  1. reset_optimizer:

This method will reset the optimizer to the initial state, which is useful when you want to train the agent from scratch.

AgentOptimizer includes mechanisms to check the (1) validity of the function and (2) code implementation before returning the register_for_llm, register_for_exector. Moreover, it also includes mechanisms to check whether each update is feasible, such as avoiding the removal of a function that is not in the current functions due to hallucination.

Pseudocode for the optimization process

The optimization process is as follows:

optimizer = AgentOptimizer(max_actions_per_step=3, llm_config = llm_config)
for i in range(EPOCH):
is_correct = user_proxy.initiate_chat(assistant, message = problem)
history = assistant.chat_messages_for_summary(user_proxy)
optimizer.record_one_conversation(history, is_satisfied=is_correct)
register_for_llm, register_for_exector = optimizer.step()
for item in register_for_llm:
assistant.update_function_signature(**item)
if len(register_for_exector.keys()) > 0:
user_proxy.register_function(function_map=register_for_exector)

Given a prepared training dataset, the agents iteratively solve problems from the training set to obtain conversation history and statistical information. The functions are then improved using AgentOptimizer. Each iteration can be regarded as one training step analogous to traditional machine learning, with the optimization elements being the functions that agents have. After EPOCH iterations, the agents are expected to obtain better functions that may be used in future tasks

The implementation technology behind the AgentOptimizer

To obtain stable and structured function signatures and code implementations from AgentOptimizer, we leverage the function calling capabilities provided by OpenAI to formulate the actions that manipulate the functions as a set of function calls. Specifically, we introduce three function calls to manipulate the current functions at each step: add_function, remove_function, and revise_function. These calls add, remove, and revise functions in the existing function list, respectively. This practice could fully leverage the function calling capabilities of GPT-4 and output structured functions with more stable signatures and code implementation. Below is the JSON schema of these function calls:

  1. add_function: Add one new function that may be used in the future tasks.
ADD_FUNC = {
"type": "function",
"function": {
"name": "add_function",
"description": "Add a function in the context of the conversation. Necessary Python packages must be declared. The name of the function MUST be the same with the function name in the code you generated.",
"parameters": {
"type": "object",
"properties": {
"name": {"type": "string", "description": "The name of the function in the code implementation."},
"description": {"type": "string", "description": "A short description of the function."},
"arguments": {
"type": "string",
"description": 'JSON schema of arguments encoded as a string. Please note that the JSON schema only supports specific types including string, integer, object, array, boolean. (do not have float type) For example: { "url": { "type": "string", "description": "The URL", }}. Please avoid the error \'array schema missing items\' when using array type.',
},
"packages": {
"type": "string",
"description": "A list of package names imported by the function, and that need to be installed with pip prior to invoking the function. This solves ModuleNotFoundError. It should be string, not list.",
},
"code": {
"type": "string",
"description": "The implementation in Python. Do not include the function declaration.",
},
},
"required": ["name", "description", "arguments", "packages", "code"],
},
},
}
  1. revise_function: Revise one existing function (code implementation, function signature) in the current function list according to the conversation history and performance.
REVISE_FUNC = {
"type": "function",
"function": {
"name": "revise_function",
"description": "Revise a function in the context of the conversation. Necessary Python packages must be declared. The name of the function MUST be the same with the function name in the code you generated.",
"parameters": {
"type": "object",
"properties": {
"name": {"type": "string", "description": "The name of the function in the code implementation."},
"description": {"type": "string", "description": "A short description of the function."},
"arguments": {
"type": "string",
"description": 'JSON schema of arguments encoded as a string. Please note that the JSON schema only supports specific types including string, integer, object, array, boolean. (do not have float type) For example: { "url": { "type": "string", "description": "The URL", }}. Please avoid the error \'array schema missing items\' when using array type.',
},
"packages": {
"type": "string",
"description": "A list of package names imported by the function, and that need to be installed with pip prior to invoking the function. This solves ModuleNotFoundError. It should be string, not list.",
},
"code": {
"type": "string",
"description": "The implementation in Python. Do not include the function declaration.",
},
},
"required": ["name", "description", "arguments", "packages", "code"],
},
},
}
  1. remove_function: Remove one existing function in the current function list. It is used to remove the functions that are not useful (redundant) in the future tasks.
REMOVE_FUNC = {
"type": "function",
"function": {
"name": "remove_function",
"description": "Remove one function in the context of the conversation. Once remove one function, the assistant will not use this function in future conversation.",
"parameters": {
"type": "object",
"properties": {
"name": {"type": "string", "description": "The name of the function in the code implementation."}
},
"required": ["name"],
},
},
}

Limitation & Future work

  1. Currently, it only supports optimizing the one typical user_proxy and assistant agents pair. We will make this feature more general to support other agent types in future work.
  2. The current implementation of AgentOptimizer is effective solely on the OpenAI GPT-4 model. Extending this feature/concept to other LLMs is the next step.

· 10 min read
Victor Dibia
Gagan Bansal
Saleema Amershi

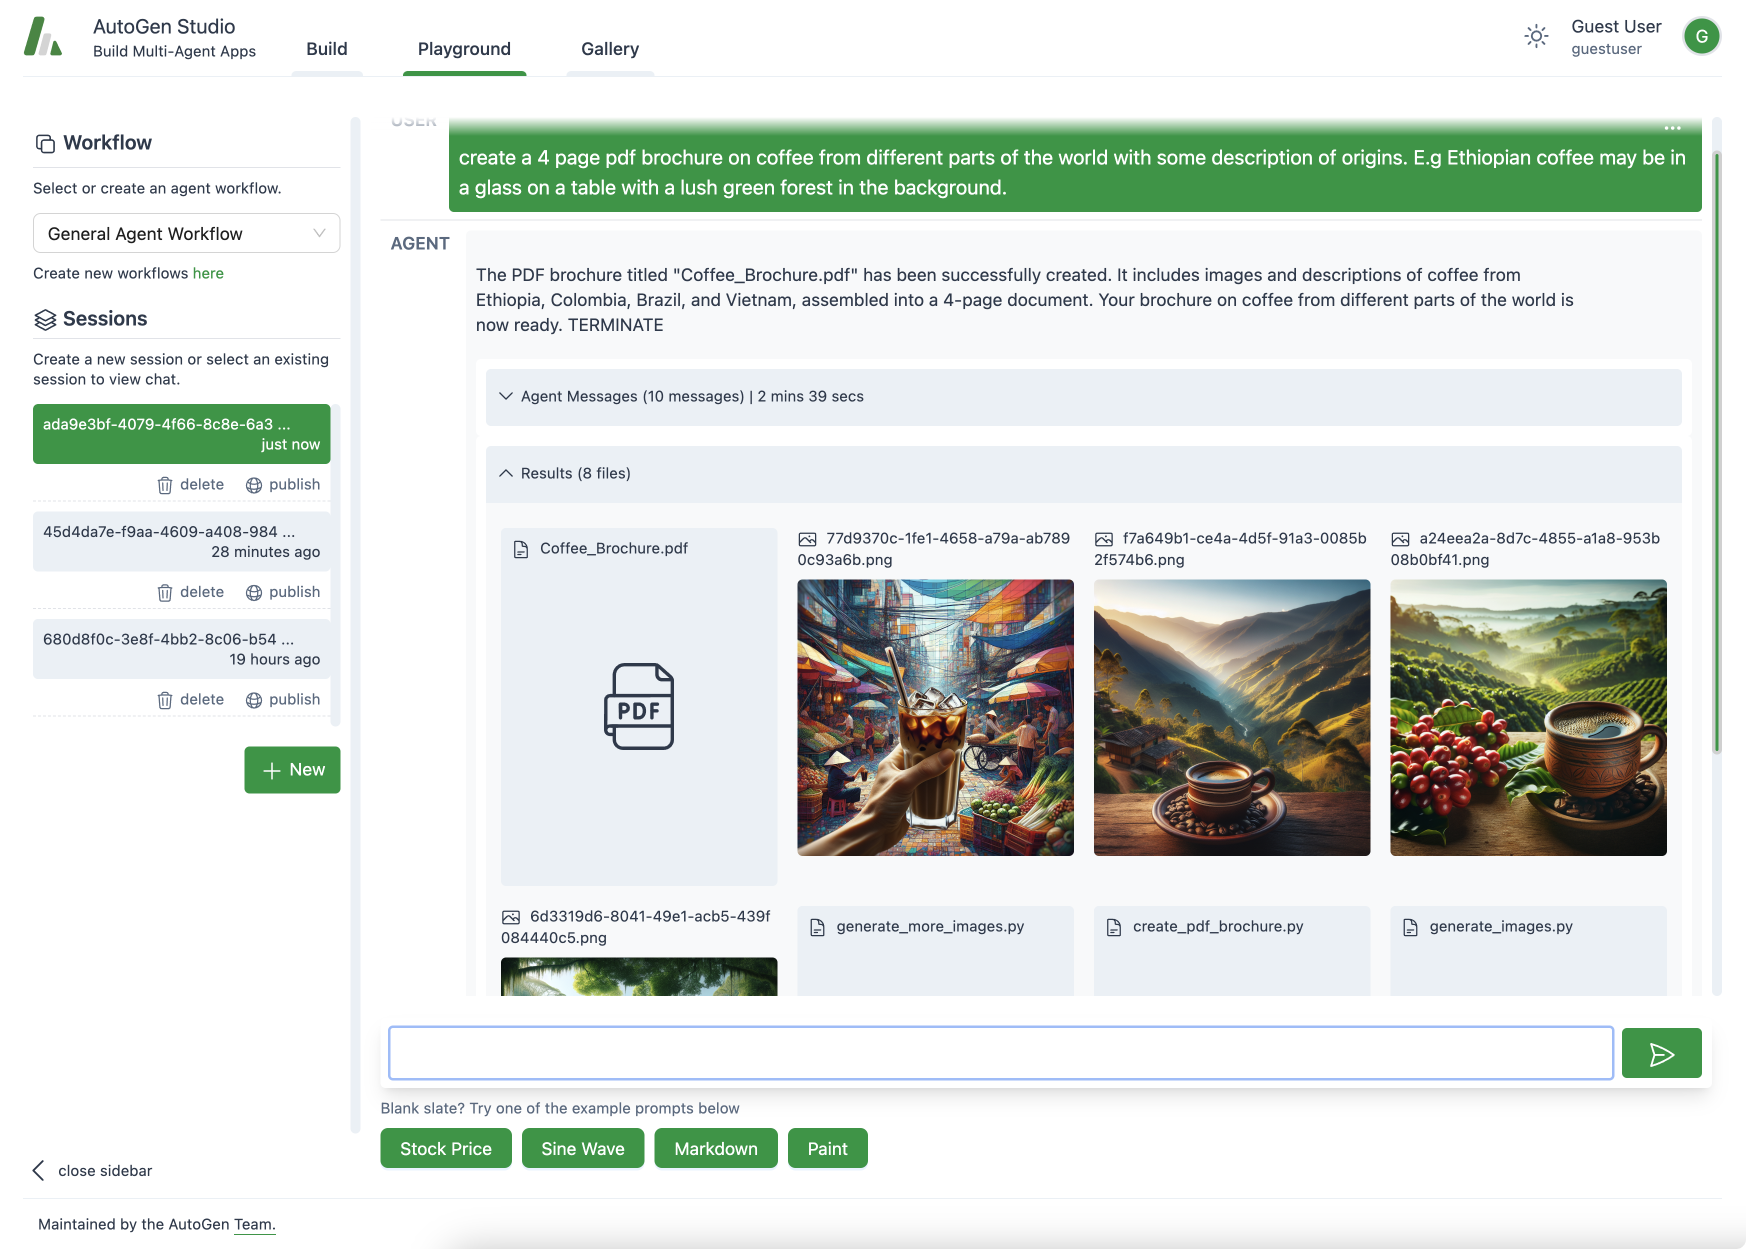
AutoGen Studio Playground View: Solving a task with multiple agents that generate a pdf document with images.

AutoGen Studio: Solving a task with multiple agents that generate a pdf document with images.

TL;DR

To help you rapidly prototype multi-agent solutions for your tasks, we are introducing AutoGen Studio, an interface powered by AutoGen. It allows you to:

  • Declaratively define and modify agents and multi-agent workflows through a point and click, drag and drop interface (e.g., you can select the parameters of two agents that will communicate to solve your task).
  • Use our UI to create chat sessions with the specified agents and view results (e.g., view chat history, generated files, and time taken).
  • Explicitly add skills to your agents and accomplish more tasks.
  • Publish your sessions to a local gallery.

See the official AutoGen Studio documentation here for more details.

AutoGen Studio is open source code here, and can be installed via pip. Give it a try!

pip install autogenstudio

Introduction

The accelerating pace of technology has ushered us into an era where digital assistants (or agents) are becoming integral to our lives. AutoGen has emerged as a leading framework for orchestrating the power of agents. In the spirit of expanding this frontier and democratizing this capability, we are thrilled to introduce a new user-friendly interface: AutoGen Studio.

With AutoGen Studio, users can rapidly create, manage, and interact with agents that can learn, adapt, and collaborate. As we release this interface into the open-source community, our ambition is not only to enhance productivity but to inspire a level of personalized interaction between humans and agents.

Note: AutoGen Studio is meant to help you rapidly prototype multi-agent workflows and demonstrate an example of end user interfaces built with AutoGen. It is not meant to be a production-ready app.

Getting Started with AutoGen Studio

The following guide will help you get AutoGen Studio up and running on your system.

Configuring an LLM Provider

To get started, you need access to a language model. You can get this set up by following the steps in the AutoGen documentation here. Configure your environment with either OPENAI_API_KEY or AZURE_OPENAI_API_KEY.

For example, in your terminal, you would set the API key like this:

export OPENAI_API_KEY=<your_api_key>

You can also specify the model directly in the agent's configuration as shown below.

llm_config = LLMConfig(
config_list=[{
"model": "gpt-4",
"api_key": "<azure_api_key>",
"base_url": "<azure api base url>",
"api_type": "azure",
"api_version": "2024-02-01"
}],
temperature=0,
)

Installation

There are two ways to install AutoGen Studio - from PyPi or from source. We recommend installing from PyPi unless you plan to modify the source code.

  1. Install from PyPi

    We recommend using a virtual environment (e.g., conda) to avoid conflicts with existing Python packages. With Python 3.10 or newer active in your virtual environment, use pip to install AutoGen Studio:

    pip install autogenstudio
  2. Install from Source

    Note: This approach requires some familiarity with building interfaces in React.

    If you prefer to install from source, ensure you have Python 3.10+ and Node.js (version above 14.15.0) installed. Here's how you get started:

    • Clone the AutoGen Studio repository and install its Python dependencies:

      pip install -e .
    • Navigate to the samples/apps/autogen-studio/frontend directory, install dependencies, and build the UI:

      npm install -g gatsby-cli
      npm install --global yarn
      yarn install
      yarn build

    For Windows users, to build the frontend, you may need alternative commands provided in the autogen studio readme.

Running the Application

Once installed, run the web UI by entering the following in your terminal:

autogenstudio ui --port 8081

This will start the application on the specified port. Open your web browser and go to http://localhost:8081/ to begin using AutoGen Studio.

Now that you have AutoGen Studio installed and running, you are ready to explore its capabilities, including defining and modifying agent workflows, interacting with agents and sessions, and expanding agent skills.

What Can You Do with AutoGen Studio?

The AutoGen Studio UI is organized into 3 high level sections - Build, Playground, and Gallery.

Build
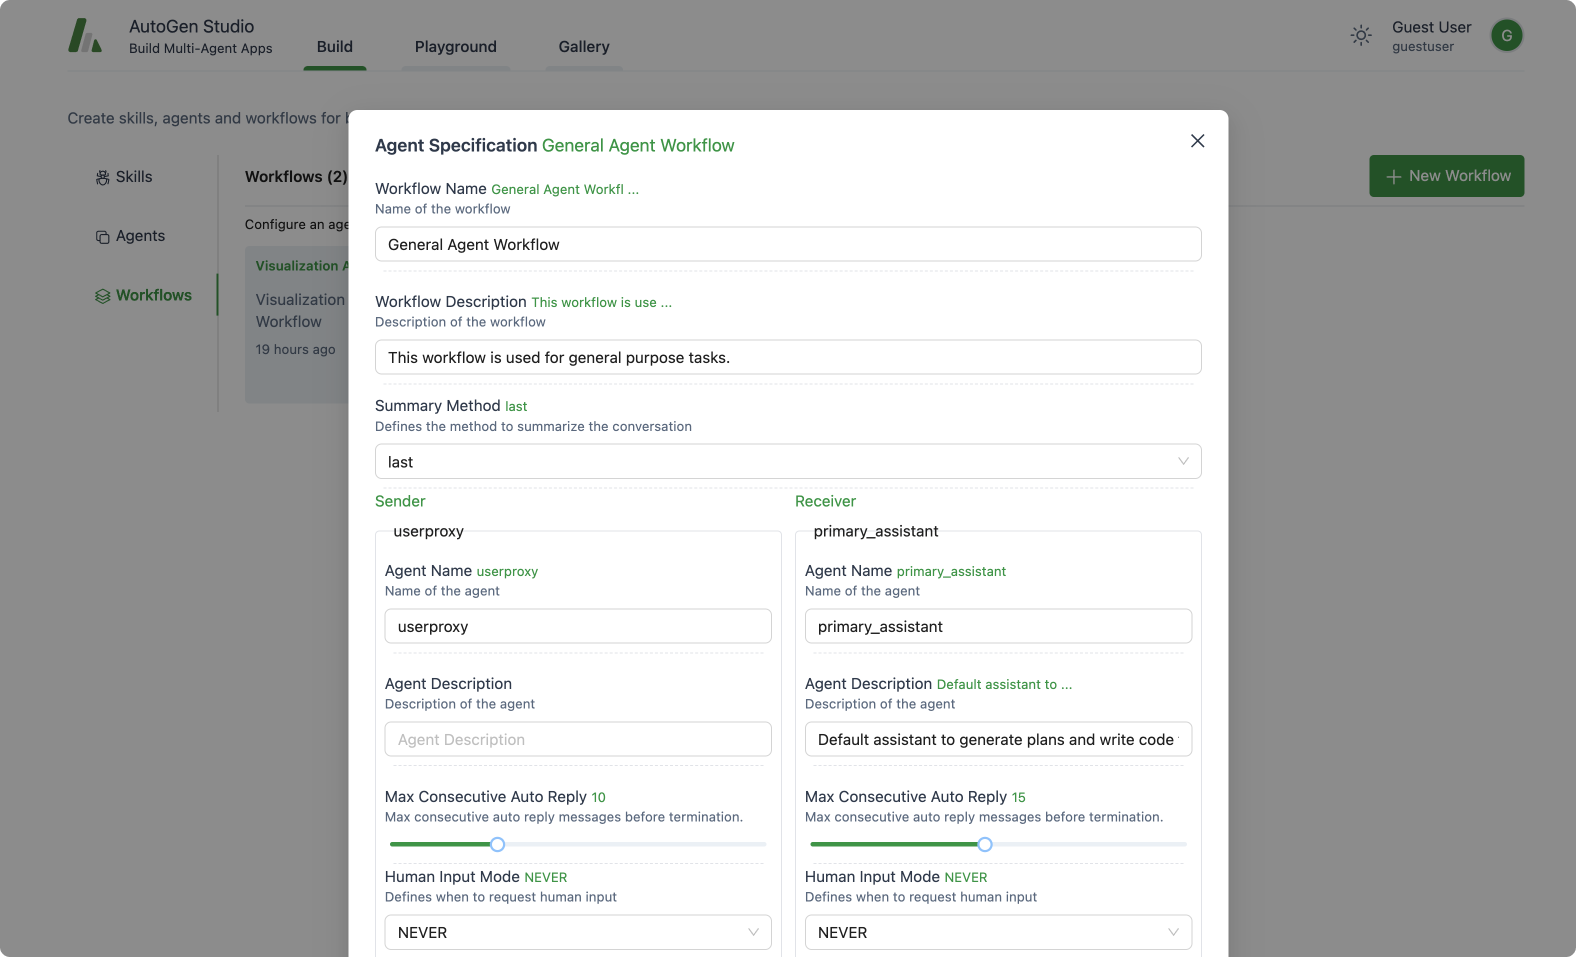
Specify Agents.

This section focuses on defining the properties of agents and agent workflows. It includes the following concepts:

Skills: Skills are functions (e.g., Python functions) that describe how to solve a task. In general, a good skill has a descriptive name (e.g. generate_images), extensive docstrings and good defaults (e.g., writing out files to disk for persistence and reuse). You can add new skills to AutoGen Studio via the provided UI. At inference time, these skills are made available to the assistant agent as they address your tasks.
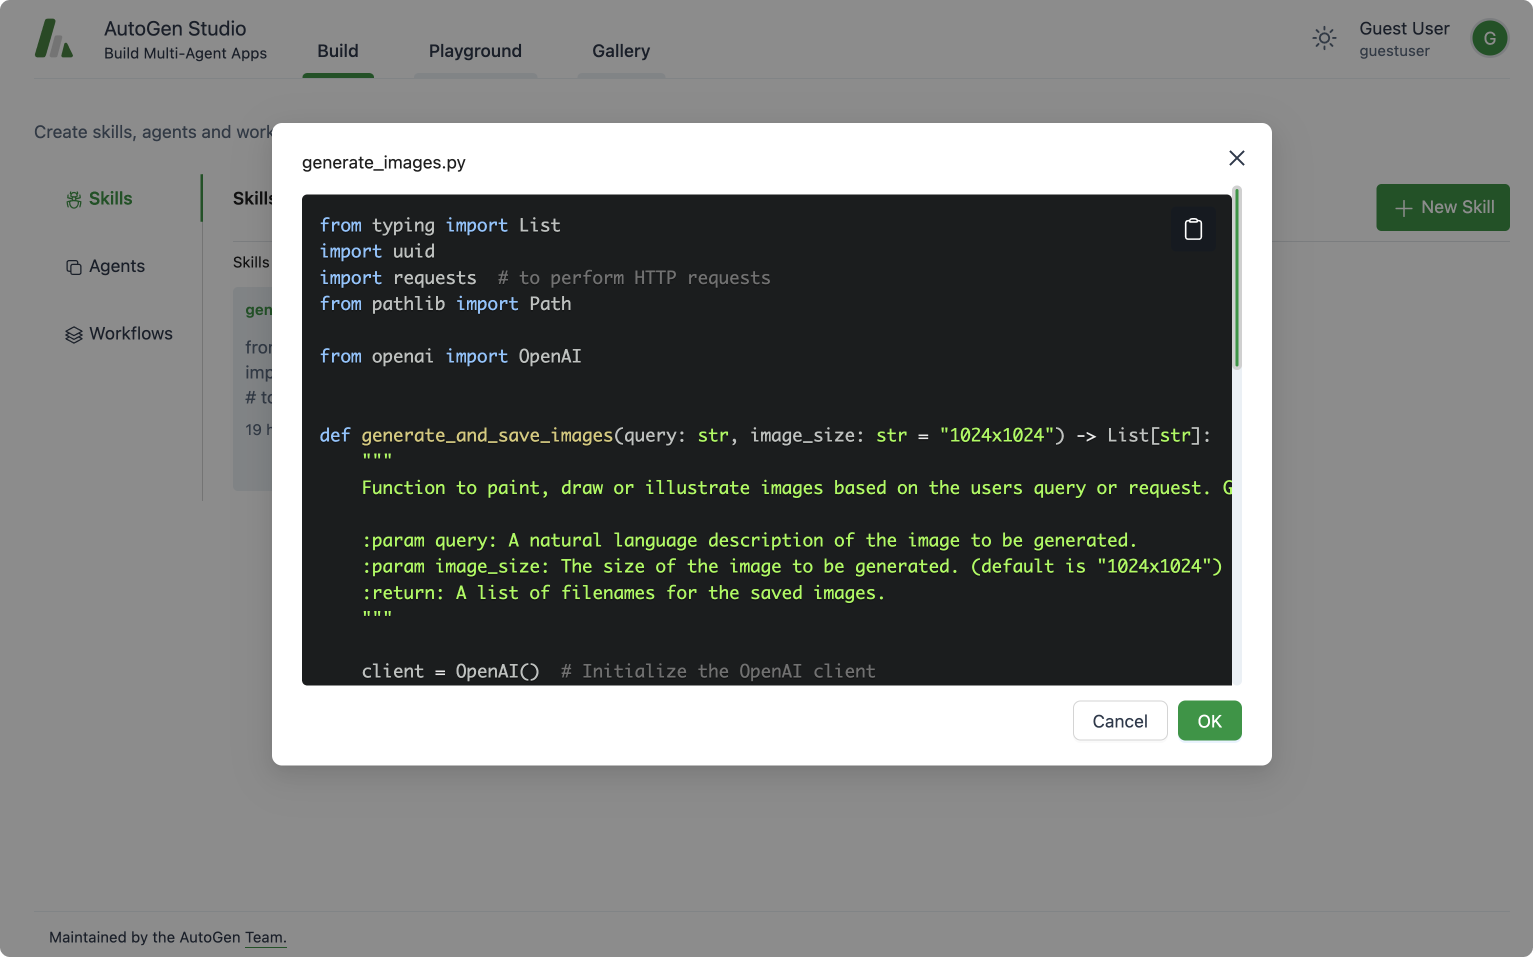
View and add skills.

AutoGen Studio Build View: View, add or edit skills that an agent can leverage in addressing tasks.

Agents: This provides an interface to declaratively specify properties for an AutoGen agent (mirrors most of the members of a base AutoGen conversable agent class).

Agent Workflows: An agent workflow is a specification of a set of agents that can work together to accomplish a task. The simplest version of this is a setup with two agents – a user proxy agent (that represents a user i.e. it compiles code and prints result) and an assistant that can address task requests (e.g., generating plans, writing code, evaluating responses, proposing error recovery steps, etc.). A more complex flow could be a group chat where even more agents work towards a solution.

Playground

AutoGen Studio Playground View: Solving a task with multiple agents that generate a pdf document with images.

AutoGen Studio Playground View: Agents collaborate, use available skills (ability to generate images) to address a user task (generate pdf's).

The playground section is focused on interacting with agent workflows defined in the previous build section. It includes the following concepts:

Session: A session refers to a period of continuous interaction or engagement with an agent workflow, typically characterized by a sequence of activities or operations aimed at achieving specific objectives. It includes the agent workflow configuration, the interactions between the user and the agents. A session can be “published” to a “gallery”.

Chat View: A chat is a sequence of interactions between a user and an agent. It is a part of a session.

This section is focused on sharing and reusing artifacts (e.g., workflow configurations, sessions, etc.).

AutoGen Studio comes with 3 example skills: fetch_profile, find_papers, generate_images. Please feel free to review the repo to learn more about how they work.

The AutoGen Studio API

While AutoGen Studio is a web interface, it is powered by an underlying python API that is reusable and modular. Importantly, we have implemented an API where agent workflows can be declaratively specified (in JSON), loaded and run. An example of the current API is shown below. Please consult the AutoGen Studio repo for more details.

import json
from autogenstudio import AutoGenWorkFlowManager, AgentWorkFlowConfig

# load an agent specification in JSON
agent_spec = json.load(open('agent_spec.json'))

# Create an AutoGen Workflow Configuration from the agent specification
agent_work_flow_config = FlowConfig(**agent_spec)

# Create a Workflow from the configuration
agent_work_flow = AutoGenWorkFlowManager(agent_work_flow_config)

# Run the workflow on a task
task_query = "What is the height of the Eiffel Tower?"
agent_work_flow.run(message=task_query)

Road Map and Next Steps

As we continue to develop and refine AutoGen Studio, the road map below outlines an array of enhancements and new features planned for future releases. Here's what users can look forward to:

  • Complex Agent Workflows: We're working on integrating support for more sophisticated agent workflows, such as GroupChat, allowing for richer interaction between multiple agents or dynamic topologies.
  • Improved User Experience: This includes features like streaming intermediate model output for real-time feedback, better summarization of agent responses, information on costs of each interaction. We will also invest in improving the workflow for composing and reusing agents. We will also explore support for more interactive human in the loop feedback to agents.
  • Expansion of Agent Skills: We will work towards improving the workflow for authoring, composing and reusing agent skills.
  • Community Features: Facilitation of sharing and collaboration within AutoGen Studio user community is a key goal. We're exploring options for sharing sessions and results more easily among users and contributing to a shared repository of skills, agents, and agent workflows.

Contribution Guide

We welcome contributions to AutoGen Studio. We recommend the following general steps to contribute to the project:

  • Review the overall AutoGen project contribution guide.
  • Please review the AutoGen Studio roadmap to get a sense of the current priorities for the project. Help is appreciated especially with Studio issues tagged with help-wanted.
  • Please initiate a discussion on the roadmap issue or a new issue to discuss your proposed contribution.
  • Please review the autogenstudio dev branch here [dev branch].(https://github.com/microsoft/autogen/tree/autogenstudio) and use as a base for your contribution. This way, your contribution will be aligned with the latest changes in the AutoGen Studio project.
  • Submit a pull request with your contribution!
  • If you are modifying AutoGen Studio in vscode, it has its own devcontainer to simplify dev work. See instructions in .devcontainer/README.md on how to use it.
  • Please use the tag studio for any issues, questions, and PRs related to Studio.

FAQ

Q: Where can I adjust the default skills, agent and workflow configurations? A: You can modify agent configurations directly from the UI or by editing the autogentstudio/utils/dbdefaults.json file which is used to initialize the database.

Q: If I want to reset the entire conversation with an agent, how do I go about it? A: To reset your conversation history, you can delete the database.sqlite file. If you need to clear user-specific data, remove the relevant autogenstudio/web/files/user/<user_id_md5hash> folder.

Q: Is it possible to view the output and messages generated by the agents during interactions? A: Yes, you can view the generated messages in the debug console of the web UI, providing insights into the agent interactions. Alternatively, you can inspect the database.sqlite file for a comprehensive record of messages.

Q: Where can I find documentation and support for AutoGen Studio? A: We are constantly working to improve AutoGen Studio. For the latest updates, please refer to the AutoGen Studio Readme. For additional support, please open an issue on GitHub or ask questions on Discord.

Q: Can I use Other Models with AutoGen Studio? Yes. AutoGen standardizes on the openai model api format, and you can use any api server that offers an openai compliant endpoint. In the AutoGen Studio UI, each agent has an llm_config field where you can input your model endpoint details including model name, api key, base url, model type and api version. For Azure OpenAI models, you can find these details in the Azure portal. Note that for Azure OpenAI, the model name is the deployment id or engine, and the model type is "azure". For other OSS models, we recommend using a server such as vllm to instantiate an openai compliant endpoint.

Q: The Server Starts But I Can't Access the UI A: If you are running the server on a remote machine (or a local machine that fails to resolve localhost correstly), you may need to specify the host address. By default, the host address is set to localhost. You can specify the host address using the --host <host> argument. For example, to start the server on port 8081 and local address such that it is accessible from other machines on the network, you can run the following command:

autogenstudio ui --port 8081 --host 0.0.0.0

· 7 min read
Linxin Song
Jieyu Zhang

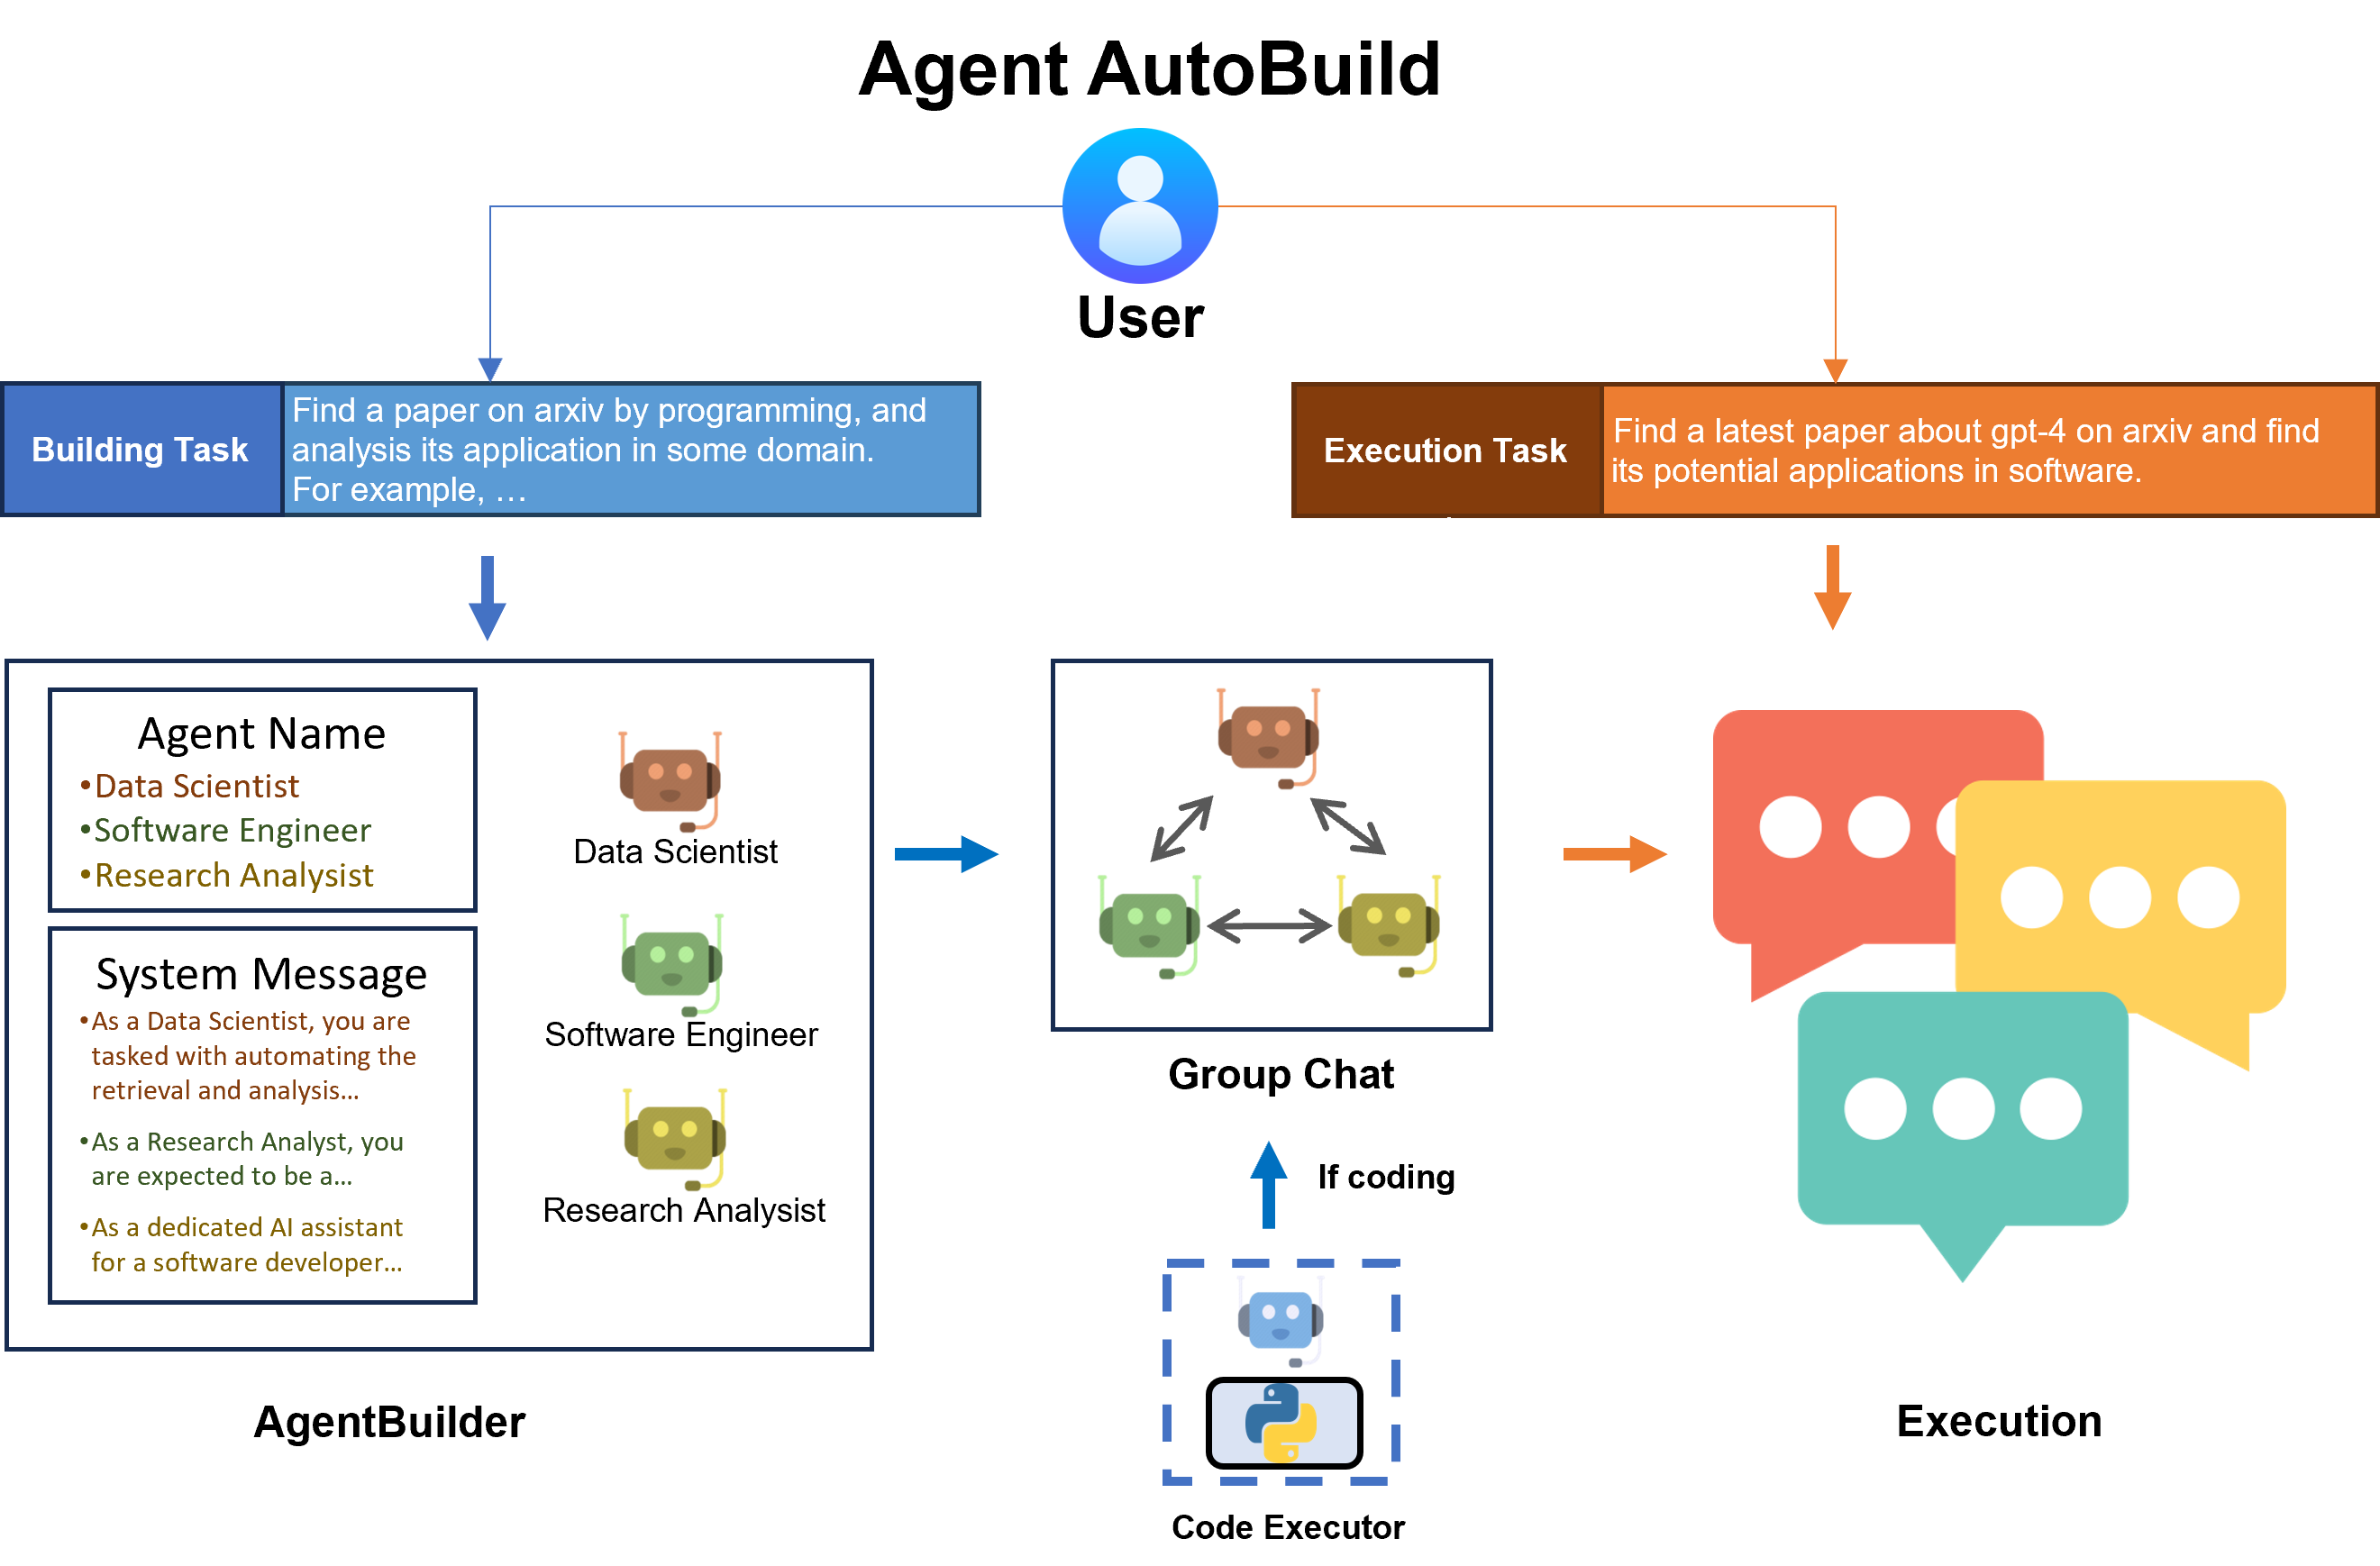
Overall structure of AutoBuild

TL;DR: Introducing AutoBuild, building multi-agent system automatically, fast, and easily for complex tasks with minimal user prompt required, powered by a new designed class AgentBuilder. AgentBuilder also supports open-source LLMs by leveraging vLLM and FastChat. Checkout example notebooks and source code for reference:

Introduction

In this blog, we introduce AutoBuild, a pipeline that can automatically build multi-agent systems for complex tasks. Specifically, we design a new class called AgentBuilder, which will complete the generation of participant expert agents and the construction of group chat automatically after the user provides descriptions of a building task and an execution task.

AgentBuilder supports open-source models on Hugging Face powered by vLLM and FastChat. Once the user chooses to use open-source LLM, AgentBuilder will set up an endpoint server automatically without any user participation.

Installation

  • AutoGen:
pip install autogen-agentchat[autobuild]~=0.2
  • (Optional: if you want to use open-source LLMs) vLLM and FastChat
pip install vllm fastchat

Basic Example

In this section, we provide a step-by-step example of how to use AgentBuilder to build a multi-agent system for a specific task.

Step 1: prepare configurations

First, we need to prepare the Agent configurations. Specifically, a config path containing the model name and API key, and a default config for each agent, are required.

config_file_or_env = '/home/elpis_ubuntu/LLM/autogen/OAI_CONFIG_LIST'  # modify path
default_llm_config = {
'temperature': 0
}

Step 2: create an AgentBuilder instance

Then, we create an AgentBuilder instance with the config path and default config. You can also specific the builder model and agent model, which are the LLMs used for building and agent respectively.

from autogen.agentchat.contrib.agent_builder import AgentBuilder

builder = AgentBuilder(config_file_or_env=config_file_or_env, builder_model='gpt-4-1106-preview', agent_model='gpt-4-1106-preview')

Step 3: specify the building task

Specify a building task with a general description. Building task will help the build manager (a LLM) decide what agents should be built. Note that your building task should have a general description of the task. Adding some specific examples is better.

building_task = "Find a paper on arxiv by programming, and analyze its application in some domain. For example, find a latest paper about gpt-4 on arxiv and find its potential applications in software."

Step 4: build group chat agents

Use build() to let the build manager (with a builder_model as backbone) complete the group chat agents generation. If you think coding is necessary for your task, you can use coding=True to add a user proxy (a local code interpreter) into the agent list as:

agent_list, agent_configs = builder.build(building_task, default_llm_config, coding=True)

If coding is not specified, AgentBuilder will determine on its own whether the user proxy should be added or not according to the task. The generated agent_list is a list of AssistantAgent instances. If coding is true, a user proxy (a UserProxyAssistant instance) will be added as the first element to the agent_list. agent_configs is a list of agent configurations including agent name, backbone LLM model, and system message. For example

// an example of agent_configs. AgentBuilder will generate agents with the following configurations.
[
{
"name": "ArXiv_Data_Scraper_Developer",
"model": "gpt-4-1106-preview",
"system_message": "You are now in a group chat. You need to complete a task with other participants. As an ArXiv_Data_Scraper_Developer, your focus is to create and refine tools capable of intelligent search and data extraction from arXiv, honing in on topics within the realms of computer science and medical science. Utilize your proficiency in Python programming to design scripts that navigate, query, and parse information from the platform, generating valuable insights and datasets for analysis. \n\nDuring your mission, it\u2019s not just about formulating queries; your role encompasses the optimization and precision of the data retrieval process, ensuring relevance and accuracy of the information extracted. If you encounter an issue with a script or a discrepancy in the expected output, you are encouraged to troubleshoot and offer revisions to the code you find in the group chat.\n\nWhen you reach a point where the existing codebase does not fulfill task requirements or if the operation of provided code is unclear, you should ask for help from the group chat manager. They will facilitate your advancement by providing guidance or appointing another participant to assist you. Your ability to adapt and enhance scripts based on peer feedback is critical, as the dynamic nature of data scraping demands ongoing refinement of techniques and approaches.\n\nWrap up your participation by confirming the user's need has been satisfied with the data scraping solutions you've provided. Indicate the completion of your task by replying \"TERMINATE\" in the group chat.",
"description": "ArXiv_Data_Scraper_Developer is a specialized software development role requiring proficiency in Python, including familiarity with web scraping libraries such as BeautifulSoup or Scrapy, and a solid understanding of APIs and data parsing. They must possess the ability to identify and correct errors in existing scripts and confidently engage in technical discussions to improve data retrieval processes. The role also involves a critical eye for troubleshooting and optimizing code to ensure efficient data extraction from the ArXiv platform for research and analysis purposes."
},
...
]

Step 5: execute the task

Let agents generated in build() complete the task collaboratively in a group chat.

import autogen

def start_task(execution_task: str, agent_list: list, llm_config: dict):
config_list = autogen.config_list_from_json(config_file_or_env, filter_dict={"model": ["gpt-4-1106-preview"]})

group_chat = autogen.GroupChat(agents=agent_list, messages=[], max_round=12)
manager = autogen.GroupChatManager(
groupchat=group_chat, llm_config={"config_list": config_list, **llm_config}
)
agent_list[0].initiate_chat(manager, message=execution_task)

start_task(
execution_task="Find a recent paper about gpt-4 on arxiv and find its potential applications in software.",
agent_list=agent_list,
llm_config=default_llm_config
)

Step 6 (Optional): clear all agents and prepare for the next task

You can clear all agents generated in this task by the following code if your task is completed or if the next task is largely different from the current task.

builder.clear_all_agents(recycle_endpoint=True)

If the agent's backbone is an open-source LLM, this process will also shut down the endpoint server. More details are in the next section. If necessary, you can use recycle_endpoint=False to retain the previous open-source LLM's endpoint server.

Save and Load

You can save all necessary information of the built group chat agents by

saved_path = builder.save()

Configurations will be saved in JSON format with the following content:

// FILENAME: save_config_TASK_MD5.json
{
"building_task": "Find a paper on arxiv by programming, and analysis its application in some domain. For example, find a latest paper about gpt-4 on arxiv and find its potential applications in software.",
"agent_configs": [
{
"name": "...",
"model": "...",
"system_message": "...",
"description": "..."
},
...
],
"manager_system_message": "...",
"code_execution_config": {...},
"default_llm_config": {...}
}

You can provide a specific filename, otherwise, AgentBuilder will save config to the current path with the generated filename save_config_TASK_MD5.json.

You can load the saved config and skip the building process. AgentBuilder will create agents with those information without prompting the build manager.

new_builder = AgentBuilder(config_file_or_env=config_file_or_env)
agent_list, agent_config = new_builder.load(saved_path)
start_task(...) # skip build()

Use OpenAI Assistant

Assistants API allows you to build AI assistants within your own applications. An Assistant has instructions and can leverage models, tools, and knowledge to respond to user queries. AutoBuild also supports the assistant API by adding use_oai_assistant=True to build().

# Transfer to the OpenAI Assistant API.
agent_list, agent_config = new_builder.build(building_task, default_llm_config, use_oai_assistant=True)
...

(Experimental) Use Open-source LLM

AutoBuild supports open-source LLM by vLLM and FastChat. Check the supported model list here. After satisfying the requirements, you can add an open-source LLM's huggingface repository to the config file,

// Add the LLM's huggingface repo to your config file and use EMPTY as the api_key.
[
...
{
"model": "meta-llama/Llama-2-13b-chat-hf",
"api_key": "EMPTY"
}
]

and specify it when initializing AgentBuilder. AgentBuilder will automatically set up an endpoint server for open-source LLM. Make sure you have sufficient GPUs resources.

Future work/Roadmap

  • Let the builder select the best agents from a given library/database to solve the task.

Summary

We propose AutoBuild with a new class AgentBuilder. AutoBuild can help user solve their complex task with an automatically built multi-agent system. AutoBuild supports open-source LLMs and GPTs API, giving users more flexibility to choose their favorite models. More advanced features are coming soon.

· 10 min read
Julia Kiseleva
Negar Arabzadeh

Fig.1: A verification framework

Fig.1 illustrates the general flow of AgentEval

TL;DR:

  • As a developer of an LLM-powered application, how can you assess the utility it brings to end users while helping them with their tasks?
  • To shed light on the question above, we introduce AgentEval — the first version of the framework to assess the utility of any LLM-powered application crafted to assist users in specific tasks. AgentEval aims to simplify the evaluation process by automatically proposing a set of criteria tailored to the unique purpose of your application. This allows for a comprehensive assessment, quantifying the utility of your application against the suggested criteria.
  • We demonstrate how AgentEval work using math problems dataset as an example in the following notebook. Any feedback would be useful for future development. Please contact us on our Discord.

Introduction

AutoGen aims to simplify the development of LLM-powered multi-agent systems for various applications, ultimately making end users' lives easier by assisting with their tasks. Next, we all yearn to understand how our developed systems perform, their utility for users, and, perhaps most crucially, how we can enhance them. Directly evaluating multi-agent systems poses challenges as current approaches predominantly rely on success metrics – essentially, whether the agent accomplishes tasks. However, comprehending user interaction with a system involves far more than success alone. Take math problems, for instance; it's not merely about the agent solving the problem. Equally significant is its ability to convey solutions based on various criteria, including completeness, conciseness, and the clarity of the provided explanation. Furthermore, success isn't always clearly defined for every task.

Rapid advances in LLMs and multi-agent systems have brought forth many emerging capabilities that we're keen on translating into tangible utilities for end users. We introduce the first version of AgentEval framework - a tool crafted to empower developers in swiftly gauging the utility of LLM-powered applications designed to help end users accomplish the desired task.

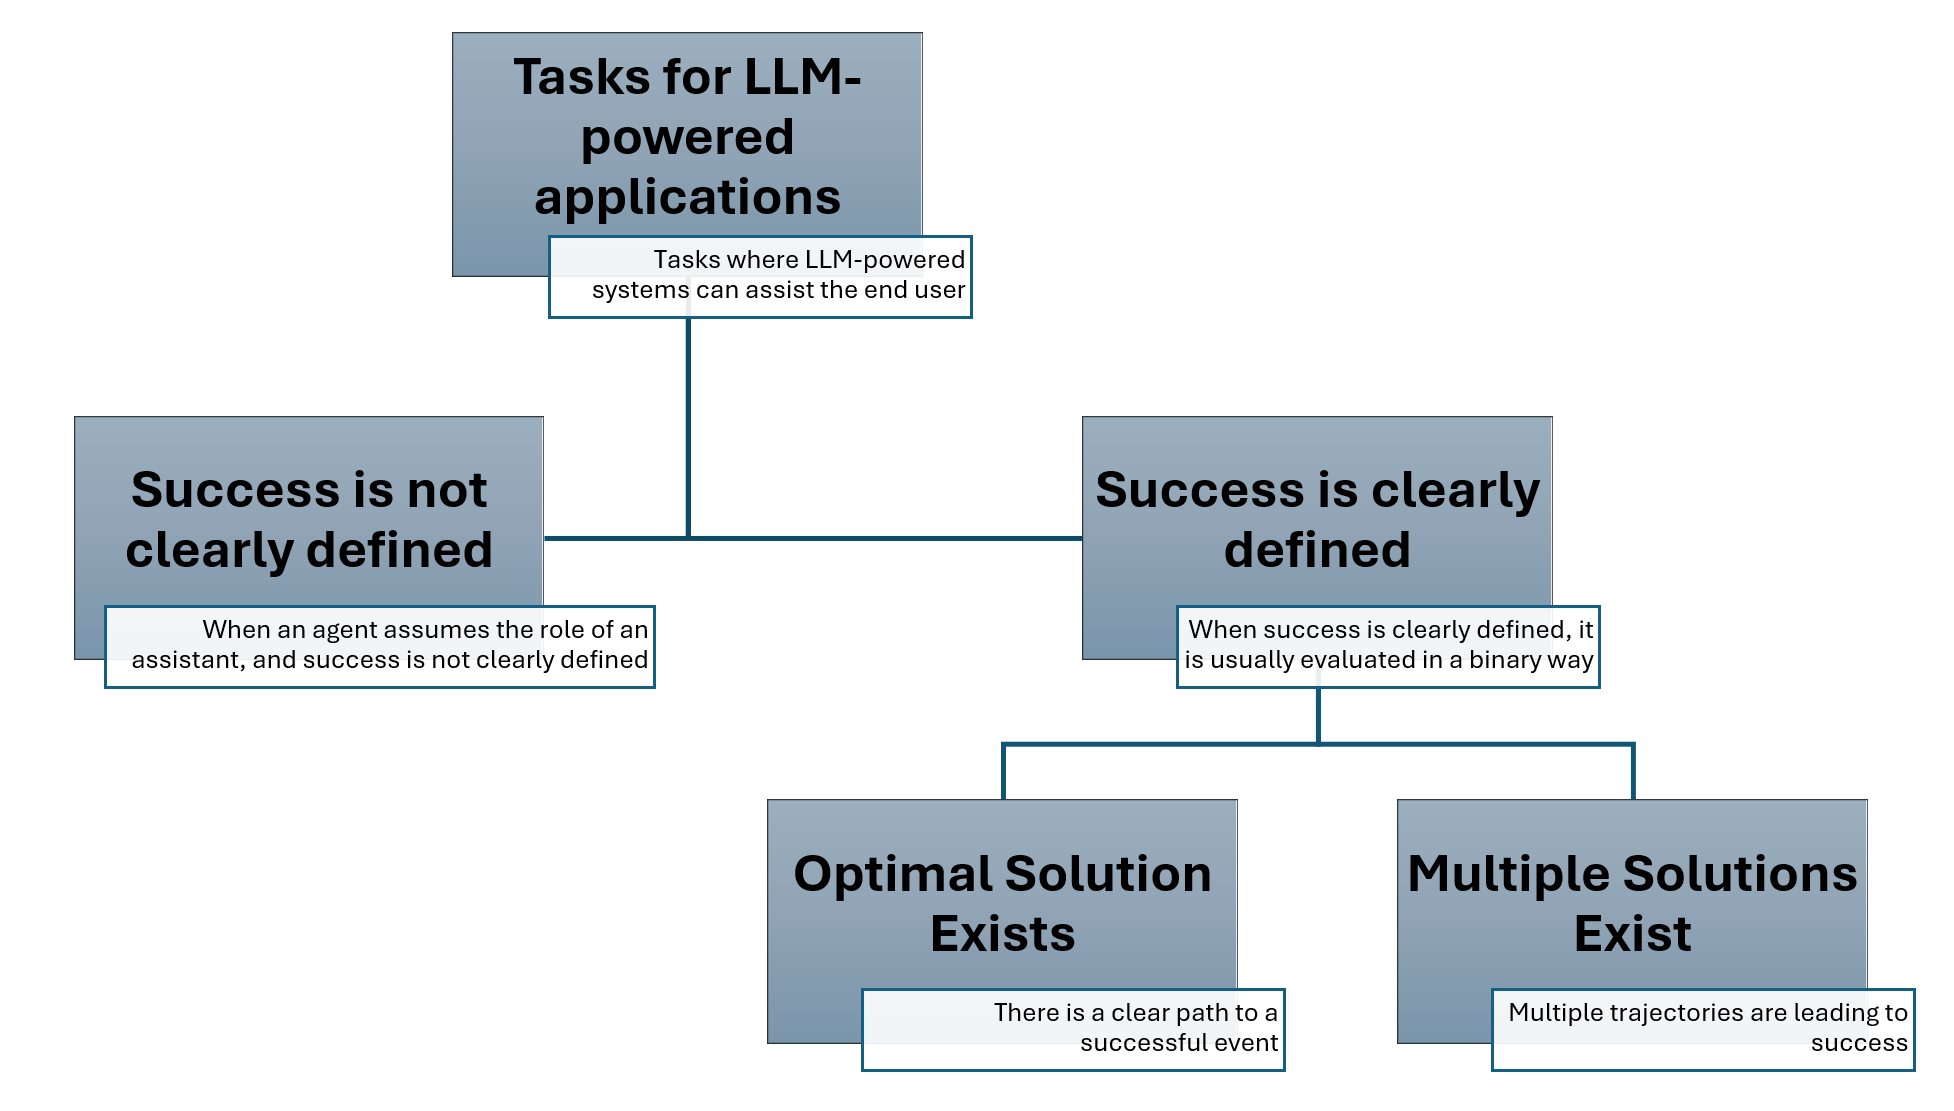
Fig.2: An overview of the tasks taxonomy

Fig. 2 provides an overview of the tasks taxonomy

Let's first look into an overview of the suggested task taxonomy that a multi-agent system can be designed for. In general, the tasks can be split into two types, where:

  • Success is not clearly defined - refer to instances when users utilize a system in an assistive manner, seeking suggestions rather than expecting the system to solve the task. For example, a user might request the system to generate an email. In many cases, this generated content serves as a template that the user will later edit. However, defining success precisely for such tasks is relatively complex.
  • Success is clearly defined - refer to instances where we can clearly define whether a system solved the task or not. Consider agents that assist in accomplishing household tasks, where the definition of success is clear and measurable. This category can be further divided into two separate subcategories:
    • The optimal solution exits - these are tasks where only one solution is possible. For example, if you ask your assistant to turn on the light, the success of this task is clearly defined, and there is only one way to accomplish it.
    • Multiple solutions exist - increasingly, we observe situations where multiple trajectories of agent behavior can lead to either success or failure. In such cases, it is crucial to differentiate between the various successful and unsuccessful trajectories. For example, when you ask the agent to suggest you a food recipe or tell you a joke.

In our AgentEval framework, we are currently focusing on tasks where Success is clearly defined. Next, we will introduce the suggested framework.

AgentEval Framework

Our previous research on assistive agents in Minecraft suggested that the most optimal way to obtain human judgments is to present humans with two agents side by side and ask for preferences. In this setup of pairwise comparison, humans can develop criteria to explain why they prefer the behavior of one agent over another. For instance, 'the first agent was faster in execution,' or 'the second agent moves more naturally.' So, the comparative nature led humans to come up with a list of criteria that helps to infer the utility of the task. With this idea in mind, we designed AgentEval (shown in Fig. 1), where we employ LLMs to help us understand, verify, and assess task utility for the multi-agent system. Namely:

  • The goal of CriticAgent is to suggest the list of criteria (Fig. 1), that can be used to assess task utility. This is an example of how CriticAgent is defined using Autogen:
critic = autogen.AssistantAgent(
name="critic",
llm_config={"config_list": config_list},
system_message="""You are a helpful assistant. You suggest criteria for evaluating different tasks. They should be distinguishable, quantifiable, and not redundant.
Convert the evaluation criteria into a dictionary where the keys are the criteria.
The value of each key is a dictionary as follows {"description": criteria description, "accepted_values": possible accepted inputs for this key}
Make sure the keys are criteria for assessing the given task. "accepted_values" include the acceptable inputs for each key that are fine-grained and preferably multi-graded levels. "description" includes the criterion description.
Return only the dictionary."""
)

Next, the critic is given successful and failed examples of the task execution; then, it is able to return a list of criteria (Fig. 1). For reference, use the following notebook.

  • The goal of QuantifierAgent is to quantify each of the suggested criteria (Fig. 1), providing us with an idea of the utility of this system for the given task. Here is an example of how it can be defined:
quantifier = autogen.AssistantAgent(
name="quantifier",
llm_config={"config_list": config_list},
system_message = """You are a helpful assistant. You quantify the output of different tasks based on the given criteria.
The criterion is given in a dictionary format where each key is a distinct criteria.
The value of each key is a dictionary as follows {"description": criteria description , "accepted_values": possible accepted inputs for this key}
You are going to quantify each of the criteria for a given task based on the task description.
Return a dictionary where the keys are the criteria and the values are the assessed performance based on accepted values for each criteria.
Return only the dictionary."""

)

AgentEval Results based on Math Problems Dataset

As an example, after running CriticAgent, we obtained the following criteria to verify the results for math problem dataset:

CriteriaDescriptionAccepted Values
Problem InterpretationAbility to correctly interpret the problem["completely off", "slightly relevant", "relevant", "mostly accurate", "completely accurate"]
Mathematical MethodologyAdequacy of the chosen mathematical or algorithmic methodology for the question["inappropriate", "barely adequate", "adequate", "mostly effective", "completely effective"]
Calculation CorrectnessAccuracy of calculations made and solutions given["completely incorrect", "mostly incorrect", "neither", "mostly correct", "completely correct"]
Explanation ClarityClarity and comprehensibility of explanations, including language use and structure["not at all clear", "slightly clear", "moderately clear", "very clear", "completely clear"]
Code EfficiencyQuality of code in terms of efficiency and elegance["not at all efficient", "slightly efficient", "moderately efficient", "very efficient", "extremely efficient"]
Code CorrectnessCorrectness of the provided code["completely incorrect", "mostly incorrect", "partly correct", "mostly correct", "completely correct"]

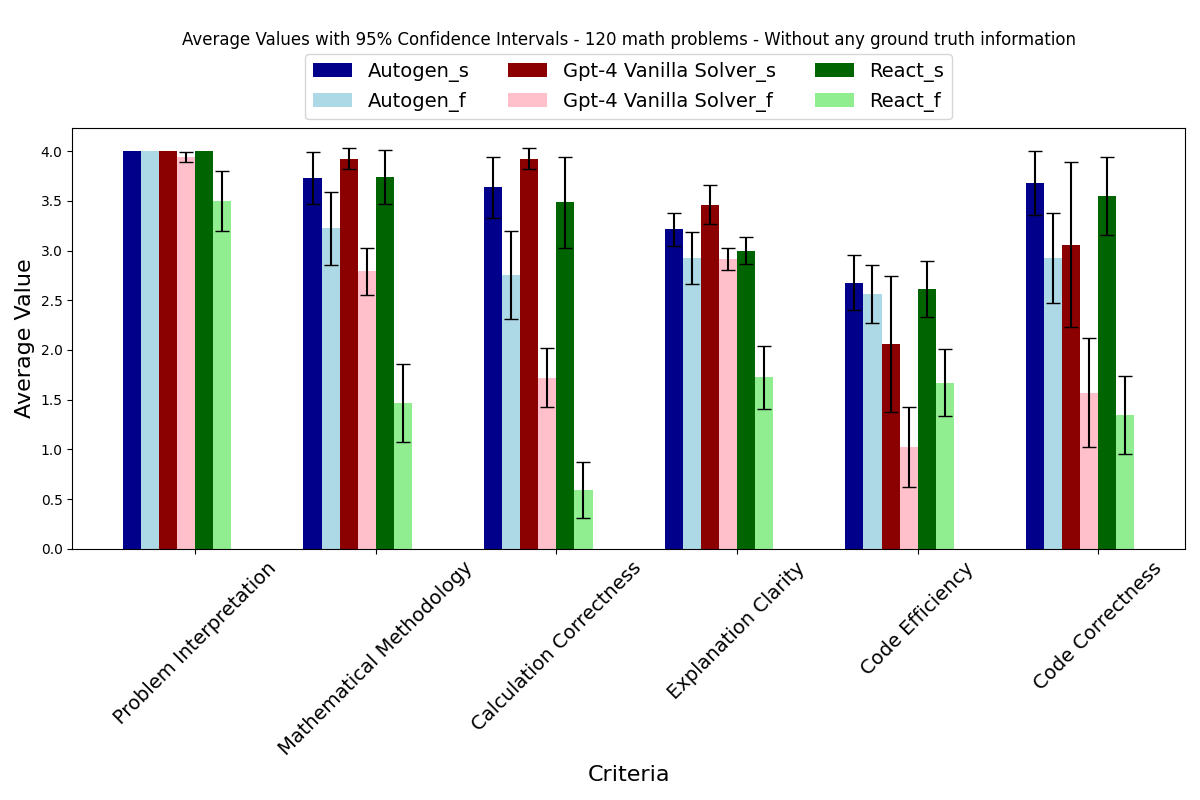
Then, after running QuantifierAgent, we obtained the results presented in Fig. 3, where you can see three models:

  • AgentChat
  • ReAct
  • GPT-4 Vanilla Solver

Lighter colors represent estimates for failed cases, and brighter colors show how discovered criteria were quantified.

Fig.3: Results based on overall math problems dataset _s stands for successful cases, _f - stands for failed cases

Fig.3 presents results based on overall math problems dataset _s stands for successful cases, _f - stands for failed cases

We note that while applying agentEval to math problems, the agent was not exposed to any ground truth information about the problem. As such, this figure illustrates an estimated performance of the three different agents, namely, Autogen (blue), Gpt-4 (red), and ReAct (green). We observe that by comparing the performance of any of the three agents in successful cases (dark bars of any color) versus unsuccessful cases (lighter version of the same bar), we note that AgentEval was able to assign higher quantification to successful cases than that of failed ones. This observation verifies AgentEval's ability for task utility prediction. Additionally, AgentEval allows us to go beyond just a binary definition of success, enabling a more in-depth comparison between successful and failed cases.

It's important not only to identify what is not working but also to recognize what and why actually went well.

Limitations and Future Work

The current implementation of AgentEval has a number of limitations which are planning to overcome in the future:

  • The list of criteria varies per run (unless you store a seed). We would recommend to run CriticAgent at least two times, and pick criteria you think is important for your domain.
  • The results of the QuantifierAgent can vary with each run, so we recommend conducting multiple runs to observe the extent of result variations.

To mitigate the limitations mentioned above, we are working on VerifierAgent, whose goal is to stabilize the results and provide additional explanations.

Summary

CriticAgent and QuantifierAgent can be applied to the logs of any type of application, providing you with an in-depth understanding of the utility your solution brings to the user for a given task.

We would love to hear about how AgentEval works for your application. Any feedback would be useful for future development. Please contact us on our Discord.

Previous Research

@InProceedings{pmlr-v176-kiseleva22a,
title = "Interactive Grounded Language Understanding in a Collaborative Environment: IGLU 2021",
author = "Kiseleva, Julia and Li, Ziming and Aliannejadi, Mohammad and Mohanty, Shrestha and ter Hoeve, Maartje and Burtsev, Mikhail and Skrynnik, Alexey and Zholus, Artem and Panov, Aleksandr and Srinet, Kavya and Szlam, Arthur and Sun, Yuxuan and Hofmann, Katja and C{\^o}t{\'e}, Marc-Alexandre and Awadallah, Ahmed and Abdrazakov, Linar and Churin, Igor and Manggala, Putra and Naszadi, Kata and van der Meer, Michiel and Kim, Taewoon",
booktitle = "Proceedings of the NeurIPS 2021 Competitions and Demonstrations Track",
pages = "146--161",
year = 2022,
editor = "Kiela, Douwe and Ciccone, Marco and Caputo, Barbara",
volume = 176,
series = "Proceedings of Machine Learning Research",
month = "06--14 Dec",
publisher = "PMLR",
pdf = {https://proceedings.mlr.press/v176/kiseleva22a/kiseleva22a.pdf},
url = {https://proceedings.mlr.press/v176/kiseleva22a.html}.
}
@InProceedings{pmlr-v220-kiseleva22a,
title = "Interactive Grounded Language Understanding in a Collaborative Environment: Retrospective on Iglu 2022 Competition",
author = "Kiseleva, Julia and Skrynnik, Alexey and Zholus, Artem and Mohanty, Shrestha and Arabzadeh, Negar and C\^{o}t\'e, Marc-Alexandre and Aliannejadi, Mohammad and Teruel, Milagro and Li, Ziming and Burtsev, Mikhail and ter Hoeve, Maartje and Volovikova, Zoya and Panov, Aleksandr and Sun, Yuxuan and Srinet, Kavya and Szlam, Arthur and Awadallah, Ahmed and Rho, Seungeun and Kwon, Taehwan and Wontae Nam, Daniel and Bivort Haiek, Felipe and Zhang, Edwin and Abdrazakov, Linar and Qingyam, Guo and Zhang, Jason and Guo, Zhibin",
booktitle = "Proceedings of the NeurIPS 2022 Competitions Track",
pages = "204--216",
year = 2022,
editor = "Ciccone, Marco and Stolovitzky, Gustavo and Albrecht, Jacob",
volume = 220,
series = "Proceedings of Machine Learning Research",
month = "28 Nov--09 Dec",
publisher = "PMLR",
pdf = "https://proceedings.mlr.press/v220/kiseleva22a/kiseleva22a.pdf",
url = "https://proceedings.mlr.press/v220/kiseleva22a.html".
}

· 3 min read
Gagan Bansal

OpenAI Assistant

AutoGen enables collaboration among multiple ChatGPTs for complex tasks.

TL;DR

OpenAI assistants are now integrated into AutoGen via GPTAssistantAgent. This enables multiple OpenAI assistants, which form the backend of the now popular GPTs, to collaborate and tackle complex tasks. Checkout example notebooks for reference:

Introduction

Earlier last week, OpenAI introduced GPTs, giving users ability to create custom ChatGPTs tailored for them. But what if these individual GPTs could collaborate to do even more? Fortunately, because of AutoGen, this is now a reality! AutoGen has been pioneering agents and supporting multi-agent workflows since earlier this year, and now (starting with version 0.2.0b5) we are introducing compatibility with the Assistant API, which is currently in beta preview.

To accomplish this, we've added a new (experimental) agent called the GPTAssistantAgent that lets you seamlessly add these new OpenAI assistants into AutoGen-based multi-agent workflows. This integration shows great potential and synergy, and we plan to continue enhancing it.

Installation

pip install autogen-agentchat~=0.2

Basic Example

Here's a basic example that uses a UserProxyAgent to allow an interface with the GPTAssistantAgent.

First, import the new agent and setup config_list:

from autogen import config_list_from_json
from autogen.agentchat.contrib.gpt_assistant_agent import GPTAssistantAgent
from autogen import UserProxyAgent

config_list = config_list_from_json("OAI_CONFIG_LIST")

Then simply define the OpenAI assistant agent and give it the task!

# creates new assistant using Assistant API
gpt_assistant = GPTAssistantAgent(
name="assistant",
llm_config={
"config_list": config_list,
"assistant_id": None
})

user_proxy = UserProxyAgent(name="user_proxy",
code_execution_config={
"work_dir": "coding"
},
human_input_mode="NEVER")

user_proxy.initiate_chat(gpt_assistant, message="Print hello world")

GPTAssistantAgent supports both creating new OpenAI assistants or reusing existing assistants (e.g, by providing an assistant_id).

Code Interpreter Example

GPTAssistantAgent allows you to specify an OpenAI tools (e.g., function calls, code interpreter, etc). The example below enables an assistant that can use OpenAI code interpreter to solve tasks.

# creates new assistant using Assistant API
gpt_assistant = GPTAssistantAgent(
name="assistant",
llm_config={
"config_list": config_list,
"assistant_id": None,
"tools": [
{
"type": "code_interpreter"
}
],
})

user_proxy = UserProxyAgent(name="user_proxy",
code_execution_config={
"work_dir": "coding"
},
human_input_mode="NEVER")

user_proxy.initiate_chat(gpt_assistant, message="Print hello world")

Checkout more examples here.

Limitations and Future Work

  • Group chat managers using GPT assistant are pending.
  • GPT assistants with multimodal capabilities haven't been released yet but we are committed to support them.

Acknowledgements

GPTAssistantAgent was made possible through collaboration with @IANTHEREAL, Jiale Liu, Yiran Wu, Qingyun Wu, Chi Wang, and many other AutoGen maintainers.

· 5 min read
Jieyu Zhang

system

TL;DR:

  • Introducing the EcoAssistant, which is designed to solve user queries more accurately and affordably.
  • We show how to let the LLM assistant agent leverage external API to solve user query.
  • We show how to reduce the cost of using GPT models via Assistant Hierarchy.
  • We show how to leverage the idea of Retrieval-augmented Generation (RAG) to improve the success rate via Solution Demonstration.

EcoAssistant

In this blog, we introduce the EcoAssistant, a system built upon AutoGen with the goal of solving user queries more accurately and affordably.

Problem setup

Recently, users have been using conversational LLMs such as ChatGPT for various queries. Reports indicate that 23% of ChatGPT user queries are for knowledge extraction purposes. Many of these queries require knowledge that is external to the information stored within any pre-trained large language models (LLMs). These tasks can only be completed by generating code to fetch necessary information via external APIs that contain the requested information. In the table below, we show three types of user queries that we aim to address in this work.

DatasetAPIExample query
PlacesGoogle PlacesI’m looking for a 24-hour pharmacy in Montreal, can you find one for me?
WeatherWeather APIWhat is the current cloud coverage in Mumbai, India?
StockAlpha Vantage Stock APICan you give me the opening price of Microsoft for the month of January 2023?

Leveraging external APIs

To address these queries, we first build a two-agent system based on AutoGen, where the first agent is a LLM assistant agent (AssistantAgent in AutoGen) that is responsible for proposing and refining the code and the second agent is a code executor agent (UserProxyAgent in AutoGen) that would extract the generated code and execute it, forwarding the output back to the LLM assistant agent. A visualization of the two-agent system is shown below.

chat

To instruct the assistant agent to leverage external APIs, we only need to add the API name/key dictionary at the beginning of the initial message. The template is shown below, where the red part is the information of APIs and black part is user query.

template

Importantly, we don't want to reveal our real API key to the assistant agent for safety concerns. Therefore, we use a fake API key to replace the real API key in the initial message. In particular, we generate a random token (e.g., 181dbb37) for each API key and replace the real API key with the token in the initial message. Then, when the code executor execute the code, the fake API key would be automatically replaced by the real API key.

Solution Demonstration

In most practical scenarios, queries from users would appear sequentially over time. Our EcoAssistant leverages past success to help the LLM assistants address future queries via Solution Demonstration. Specifically, whenever a query is deemed successfully resolved by user feedback, we capture and store the query and the final generated code snippet. These query-code pairs are saved in a specialized vector database. When new queries appear, EcoAssistant retrieves the most similar query from the database, which is then appended with the associated code to the initial prompt for the new query, serving as a demonstration. The new template of initial message is shown below, where the blue part corresponds to the solution demonstration.

template

We found that this utilization of past successful query-code pairs improves the query resolution process with fewer iterations and enhances the system's performance.

Assistant Hierarchy

LLMs usually have different prices and performance, for example, GPT-3.5-turbo is much cheaper than GPT-4 but also less accurate. Thus, we propose the Assistant Hierarchy to reduce the cost of using LLMs. The core idea is that we use the cheaper LLMs first and only use the more expensive LLMs when necessary. By this way, we are able to reduce the reliance on expensive LLMs and thus reduce the cost. In particular, given multiple LLMs, we initiate one assistant agent for each and start the conversation with the most cost-effective LLM assistant. If the conversation between the current LLM assistant and the code executor concludes without successfully resolving the query, EcoAssistant would then restart the conversation with the next more expensive LLM assistant in the hierarchy. We found that this strategy significantly reduces costs while still effectively addressing queries.

A Synergistic Effect

We found that the Assistant Hierarchy and Solution Demonstration of EcoAssistant have a synergistic effect. Because the query-code database is shared by all LLM assistants, even without specialized design, the solution from more powerful LLM assistant (e.g., GPT-4) could be later retrieved to guide weaker LLM assistant (e.g., GPT-3.5-turbo). Such a synergistic effect further improves the performance and reduces the cost of EcoAssistant.

Experimental Results

We evaluate EcoAssistant on three datasets: Places, Weather, and Stock. When comparing it with a single GPT-4 assistant, we found that EcoAssistant achieves a higher success rate with a lower cost as shown in the figure below. For more details about the experimental results and other experiments, please refer to our paper.

exp

Further reading

Please refer to our paper and codebase for more details about EcoAssistant.

If you find this blog useful, please consider citing:

@article{zhang2023ecoassistant,
title={EcoAssistant: Using LLM Assistant More Affordably and Accurately},
author={Zhang, Jieyu and Krishna, Ranjay and Awadallah, Ahmed H and Wang, Chi},
journal={arXiv preprint arXiv:2310.03046},
year={2023}
}