1. Task Masters
The following section will go into detail on how to create, manage and delete tasks from a user perspective. It will also explain the other features that are available on the Task Master page.
The Task Master page can be accessed in two ways. As shown in figure 1-1, it is accessible through the View Details link on the main page. The other way is to access it through the View Menu button shown in figure 1-2 and 1-3.
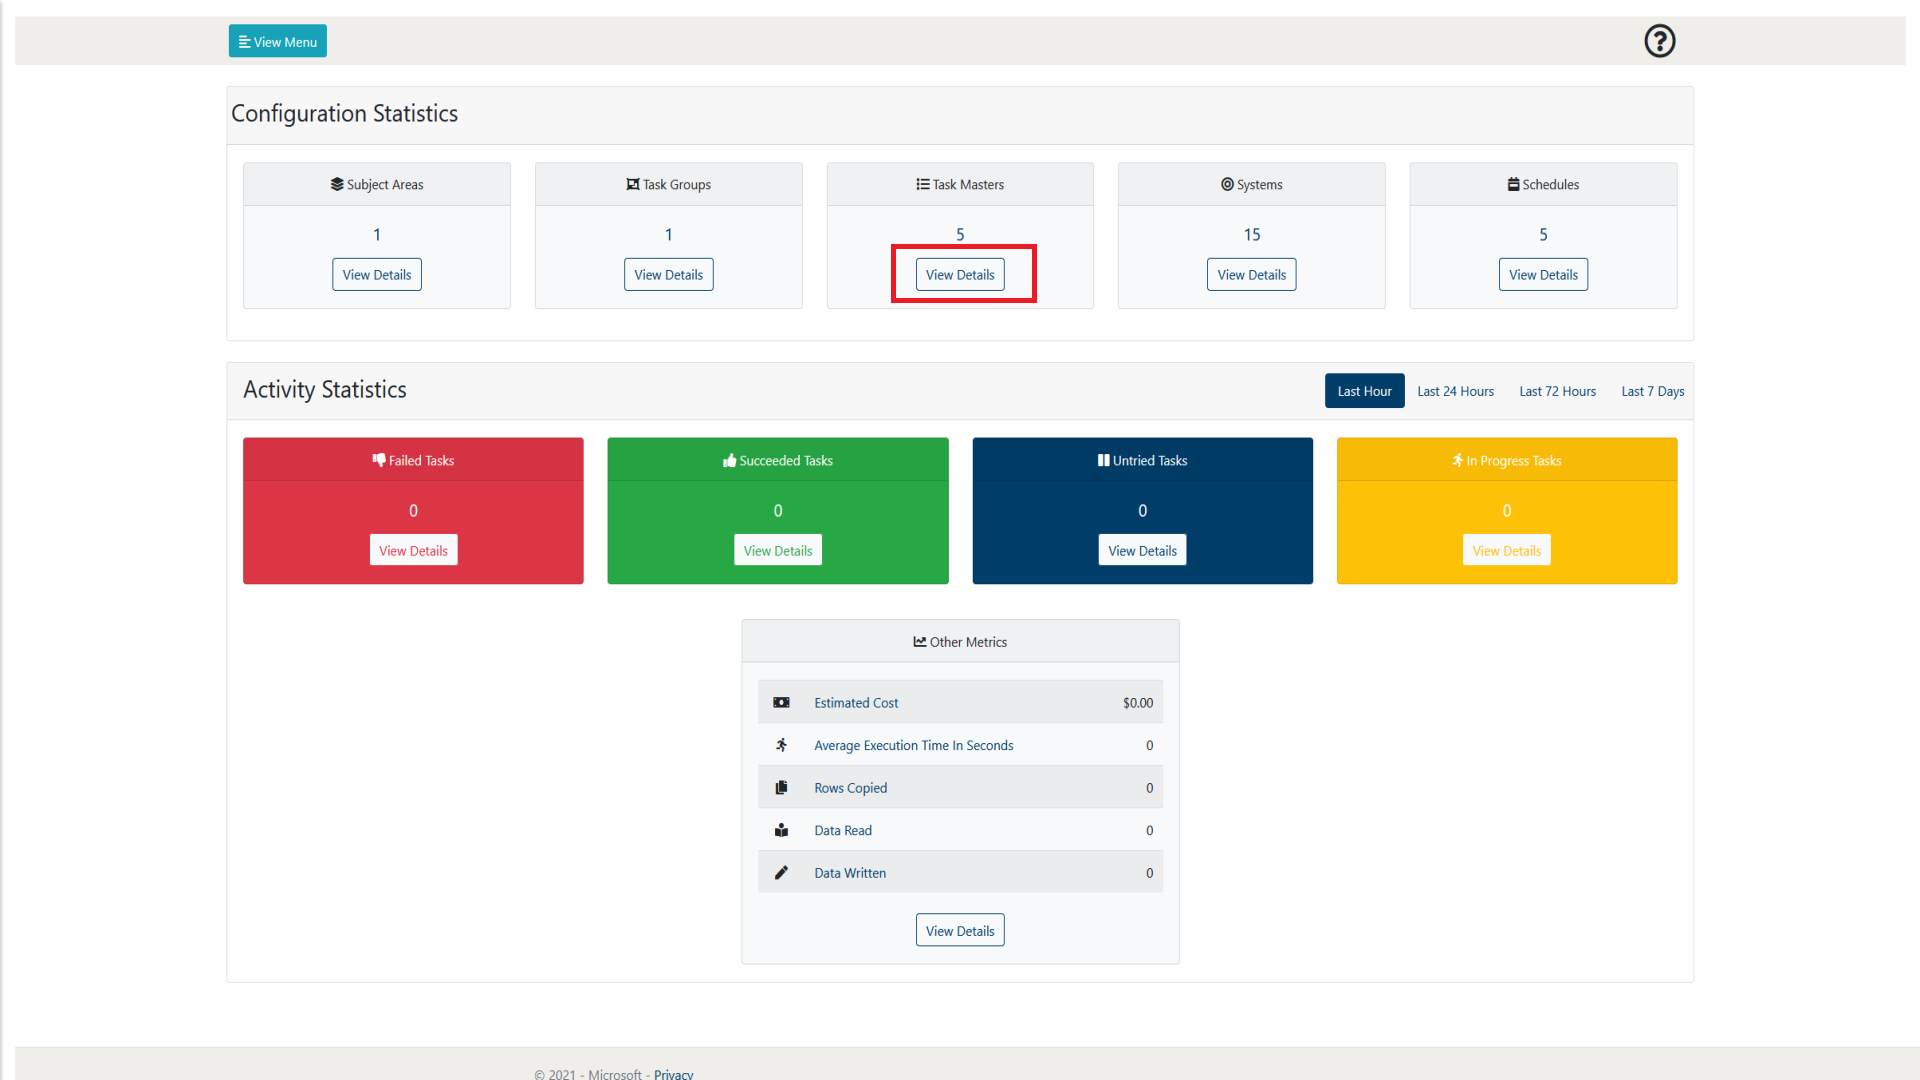
Figure 1-1: Lockbox WebApp Main Page - Task Masters View Details selection
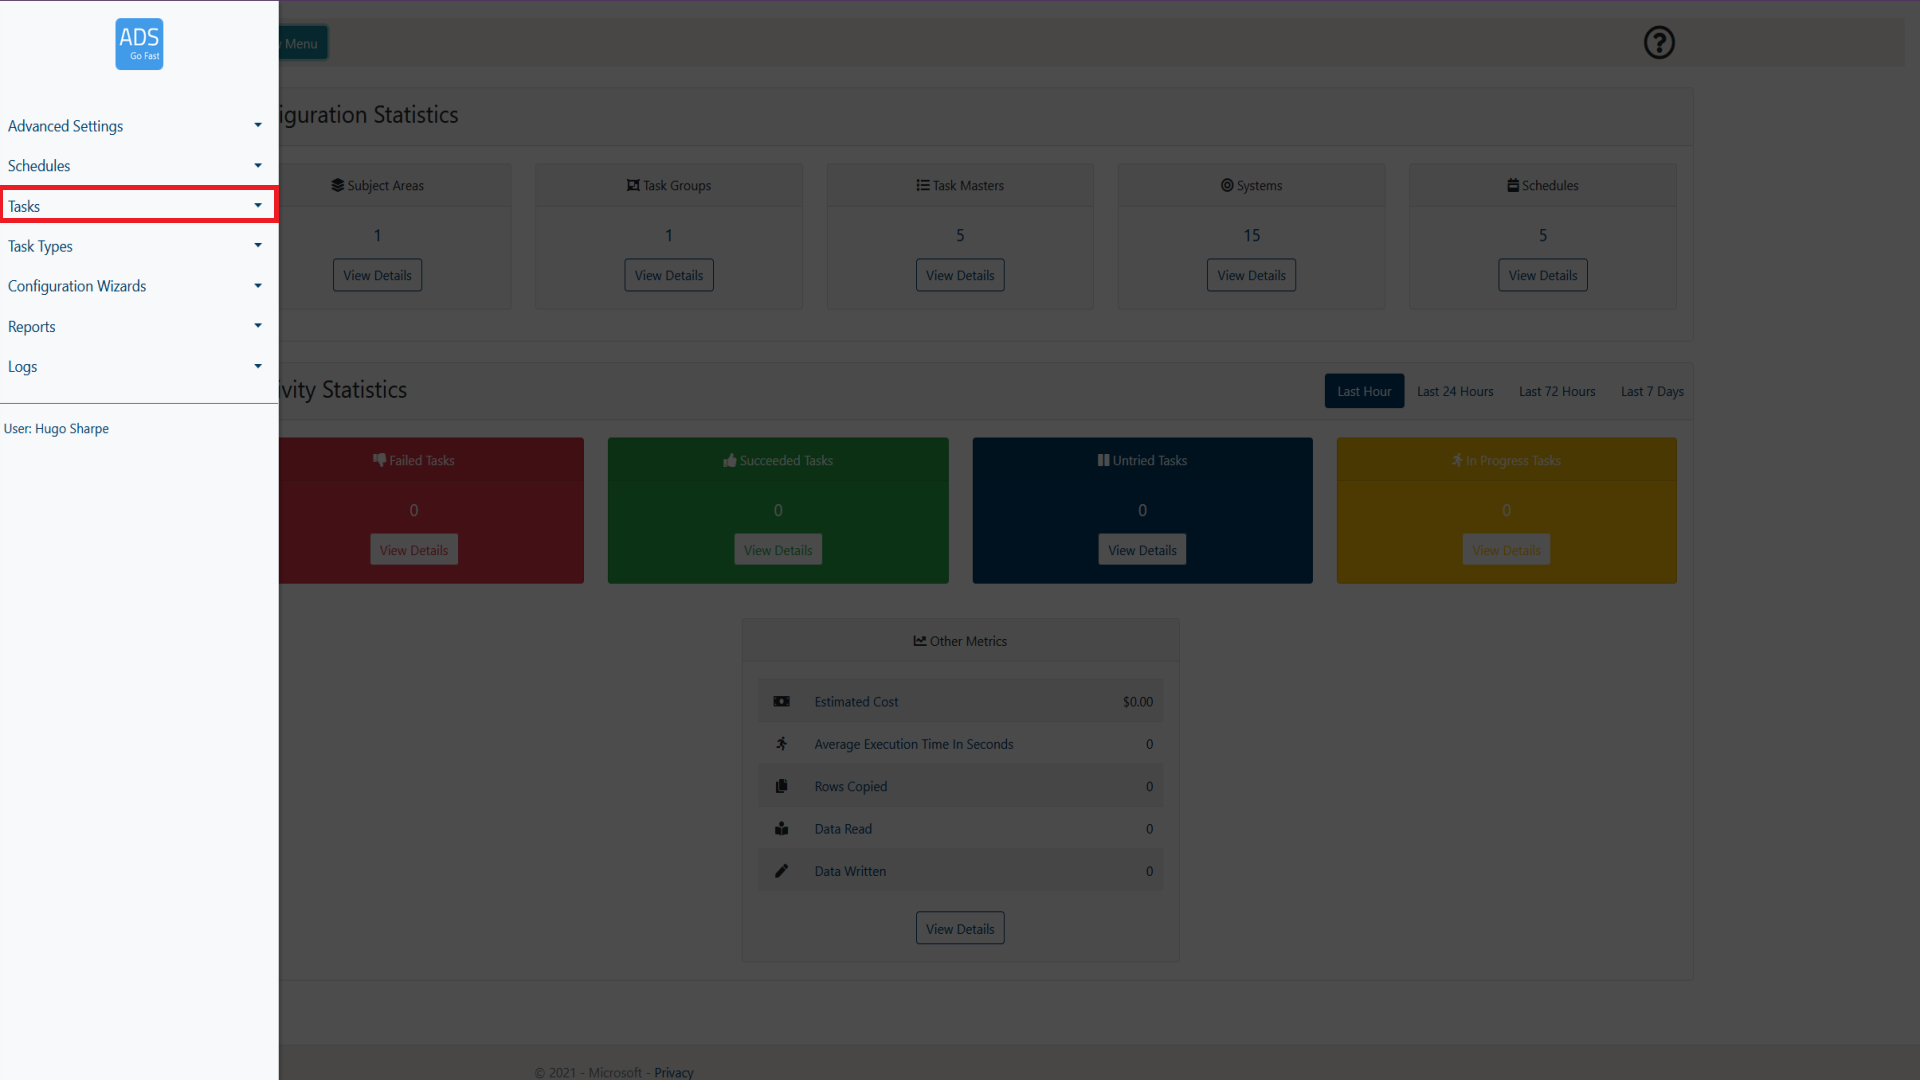
Figure 1-2: LockBox WebApp Main Menu - Tasks selection
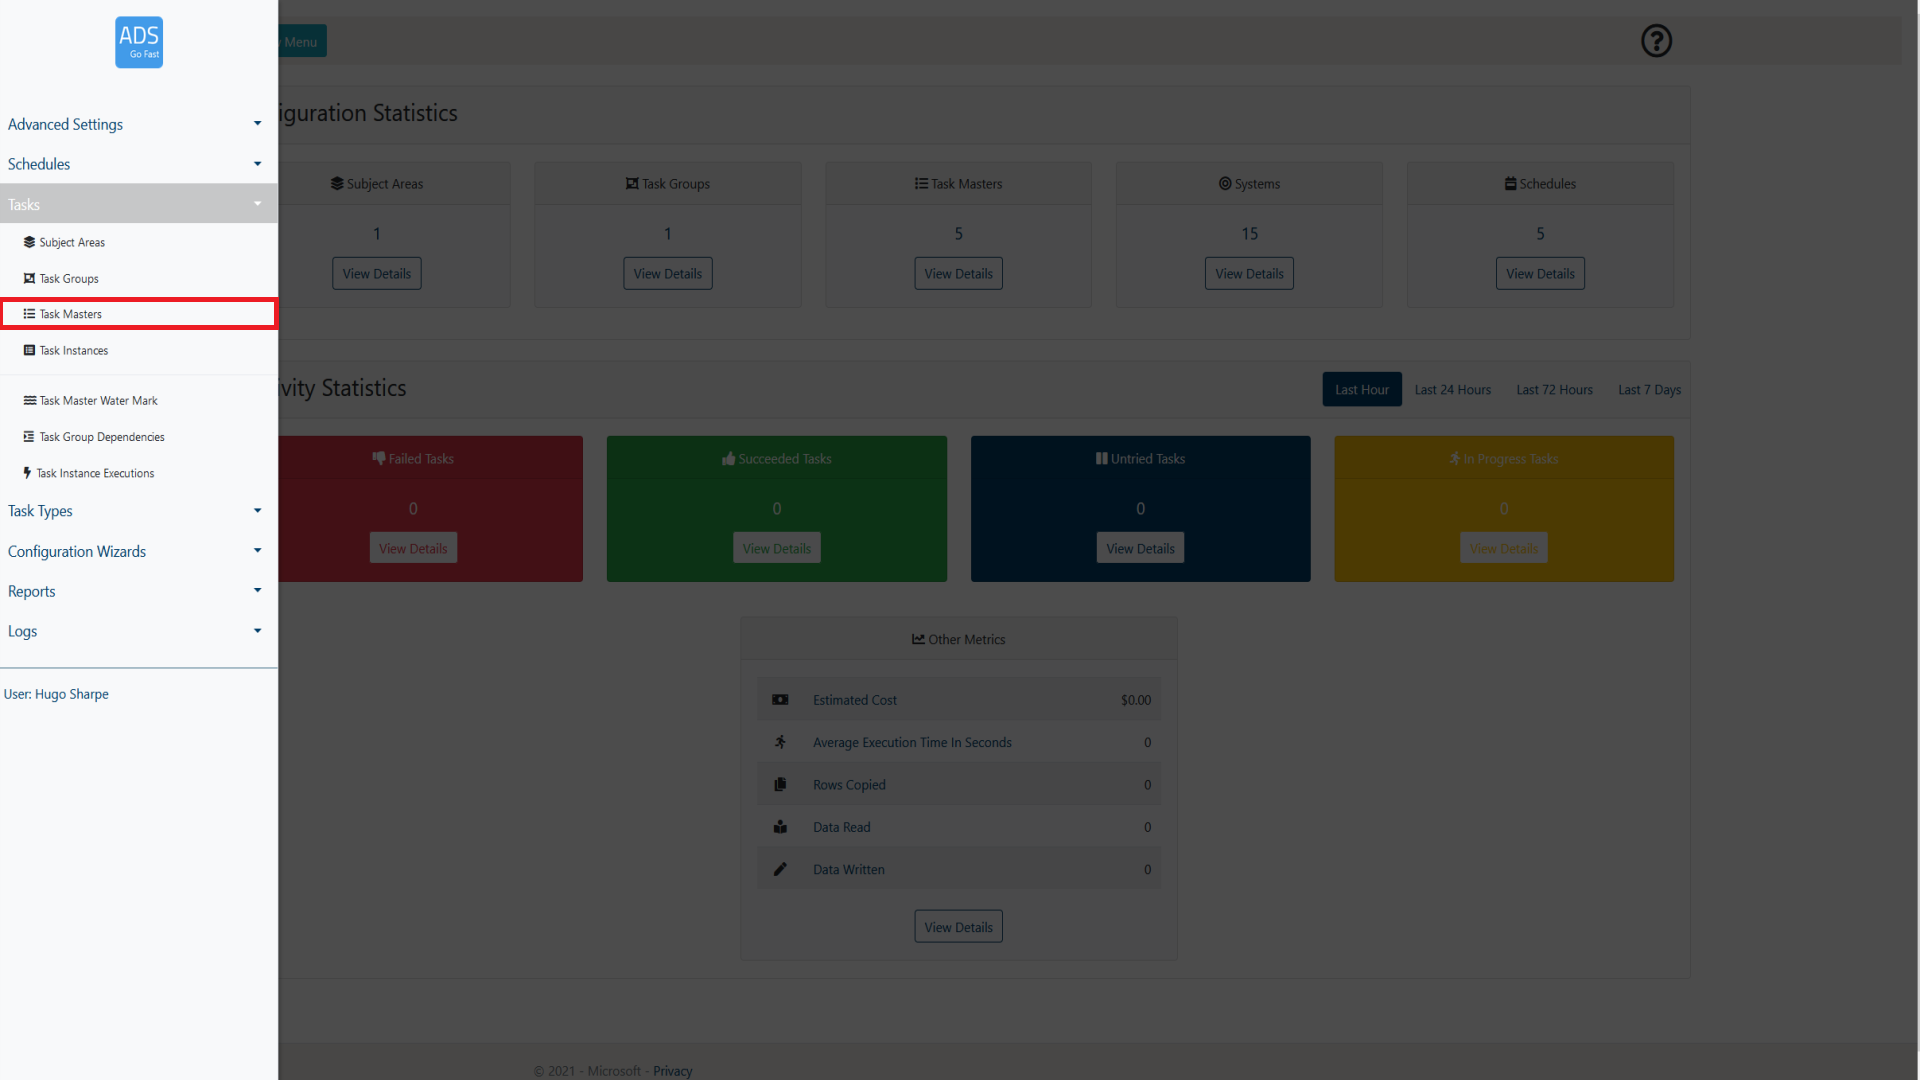
Figure 1-3: LockBox Menu Task Masters selection
What is a Task Master?
A Task Master can be thought of as a creation of a specific procedure or objective. You will define what specifically you want to do within a Task Master, whether it be a movement between storage devices, or something such as retrieving data from a SQL server. A Task Master holds the definition of the what's, where's, when's and who's.
1.1 Page overview
When browsing the Task Masters page, a layout similar to figure 1.1-1 will be shown to you. Following the figure some more details will be provided on what each of these items represent.
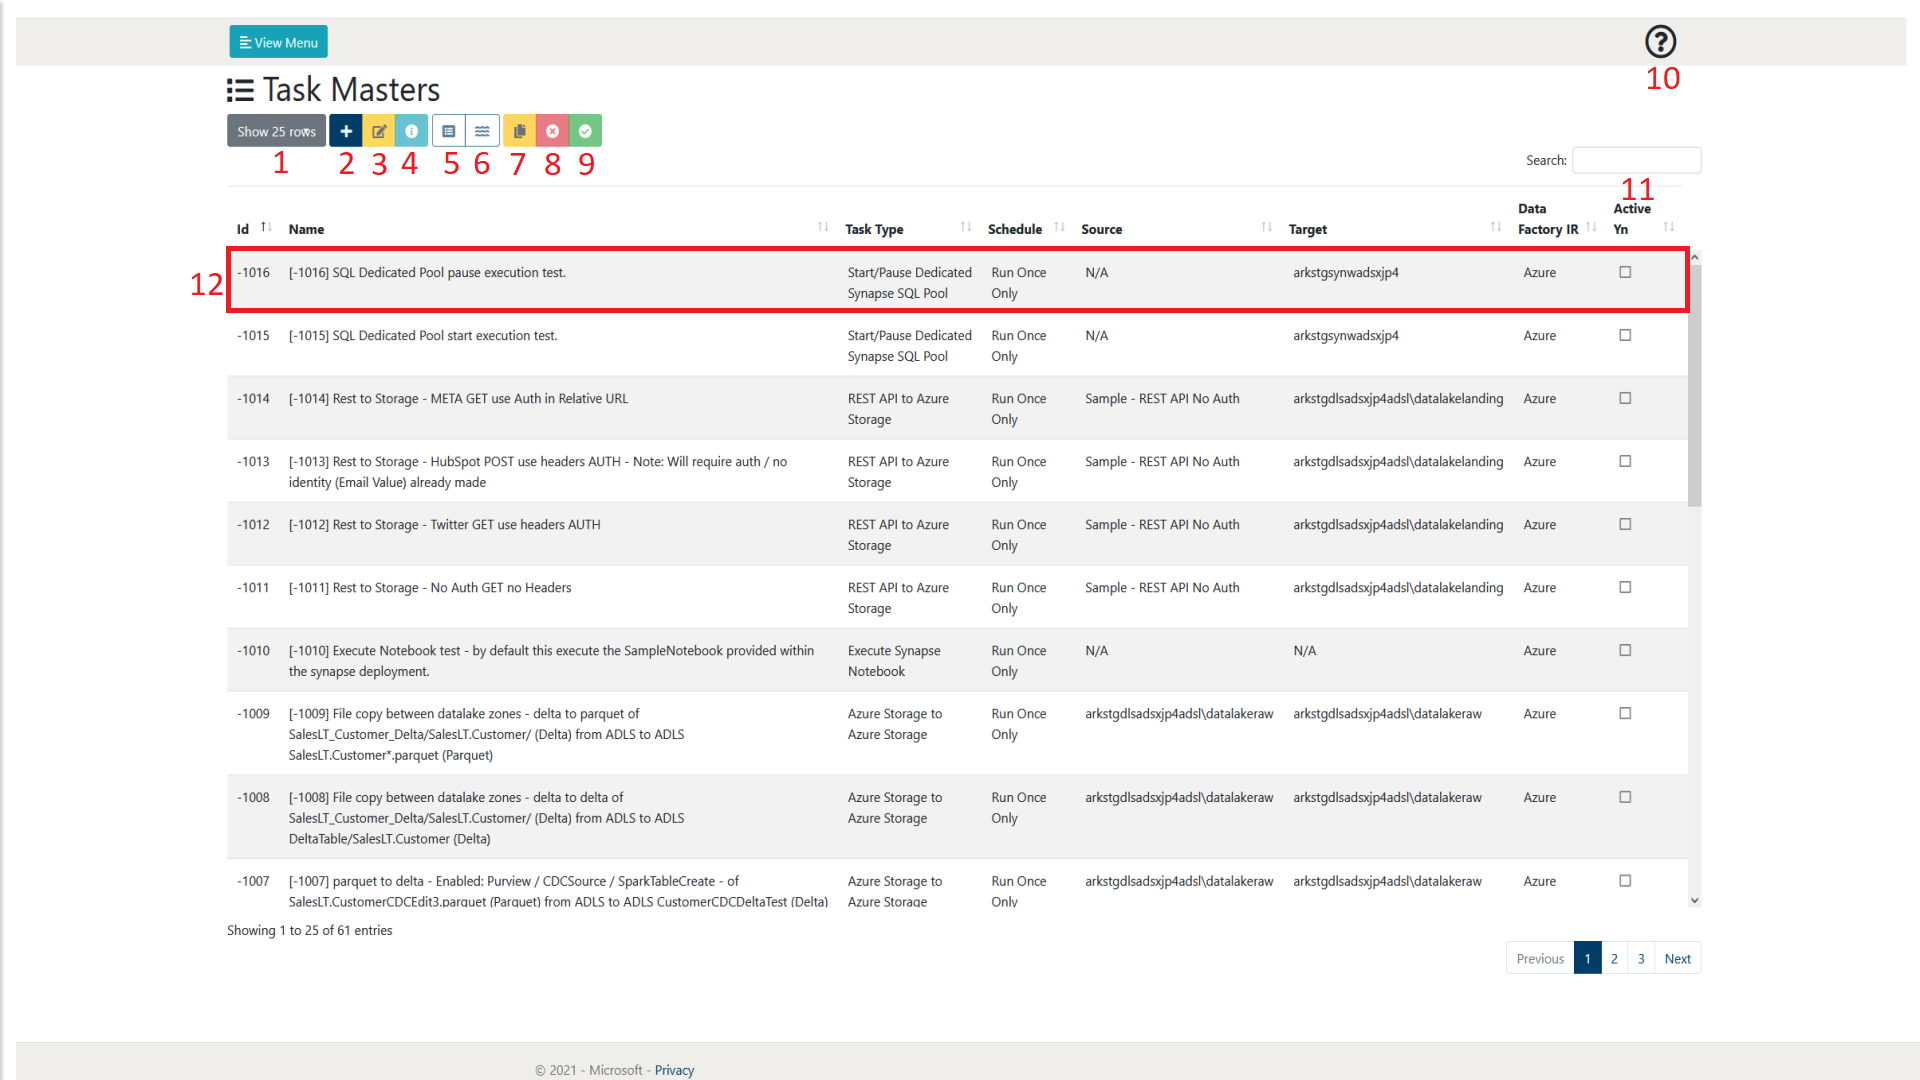
Figure 1.1-1: Task Masters page overview
| Number | Object Name | Description |
|---|---|---|
| 1 | Show rows selection | This allows the user to define how many rows of Task Masters they wish to view per page. At the time of writing, the selections available are 10, 25, 50 and 100. As can be seen in figure 1.1-1 at the bottom right of the page there is also a page selection to be able to browse through pages of created Task Masters |
| 2 | Add Item | This allows the user to create a new Task Master. Further details of the creation process can be found in section 1.2 Creating a Task Master and section 1.3 Task Types.
|
| 3 | Edit Item | This allows the user to modify an already existing Task Master. This will allow them to go back through the wizard and modify any details they wish to amend to the Task Master. Further details can be found in section 1.5 Modifying a Task Master. |
| 4 | View Details | This allows the user to view the details of an already existing and selected Task Master. Once interacted with, this displays a single page overview of the selected Task Master without having to go through the wizard to see each individual section. There is then the further option to edit the Task Master and further details of this process can be found in section 1.5 Modifying a Task Master.
|
| 5 | View Task Instances | This allows the user to view the Task Instances of the currently selected Task Master. Further details can be found in section 2 Task Instances.
|
| 6 | View Water Mark | This allows the user to view the Water Mark(s) of the currently selected Task Master. Further details can be found in section 1.4 Task Master Water Mark. |
| 7 | Copy Tasks | This allows the user to create a copy of the currently selected Task Master. Further details can be found in section 1.7 Copying a Task Master.
|
| 8 | Deactivate Tasks | This allows the user to deactivate the selected Task Master(s). Further details can be found in section 1.8 Activating / Deactivating a Task Master. |
| 9 | Activate Tasks | This allows the user to activate the selected Task Master(s). Further details can be found in section 1.8 Activating / Deactivating a Task Master. |
| 10 | Help | This allows the user to display some help text that gives a summary of the current web page. |
| 11 | Search | This allows the user to search for a Task Master by name. The Task Masters displayed will only be related to the search term input by the user. |
| 12 | Task Master | This is an example of a created Task Master. A Task Master will create Task Instances of itself which can be viewed in the Task Instances page or by selecting the View Task Instances button (5). The Task Master in this format contains an overview of the main parts of the itself. Further information can be obtained by selecting the task and either editing (3) or viewing its details (4). |
1.2 Creating a Task Master
This section will provide the user with an overview of the Task Master creation process. It will step through each part of the creation wizard and go into some detail on each part. Further details on certain properties may be provided in other sections of this document (and will be referenced at the appropriate location).
Following this will be a step by step process of how a Task Master is created. The example will be done using a Azure Storage to Azure Storage Task Type. More details about Task types can be found in section 1.3 Task Types.
1.2.1 Step 0 – Add Item
To initiate the creation process, we need add a new Task Master, this is done by selecting the ‘Add Item' button. This will then begin the Task Master creation wizard process. This is shown in figure 1.2.1-1.
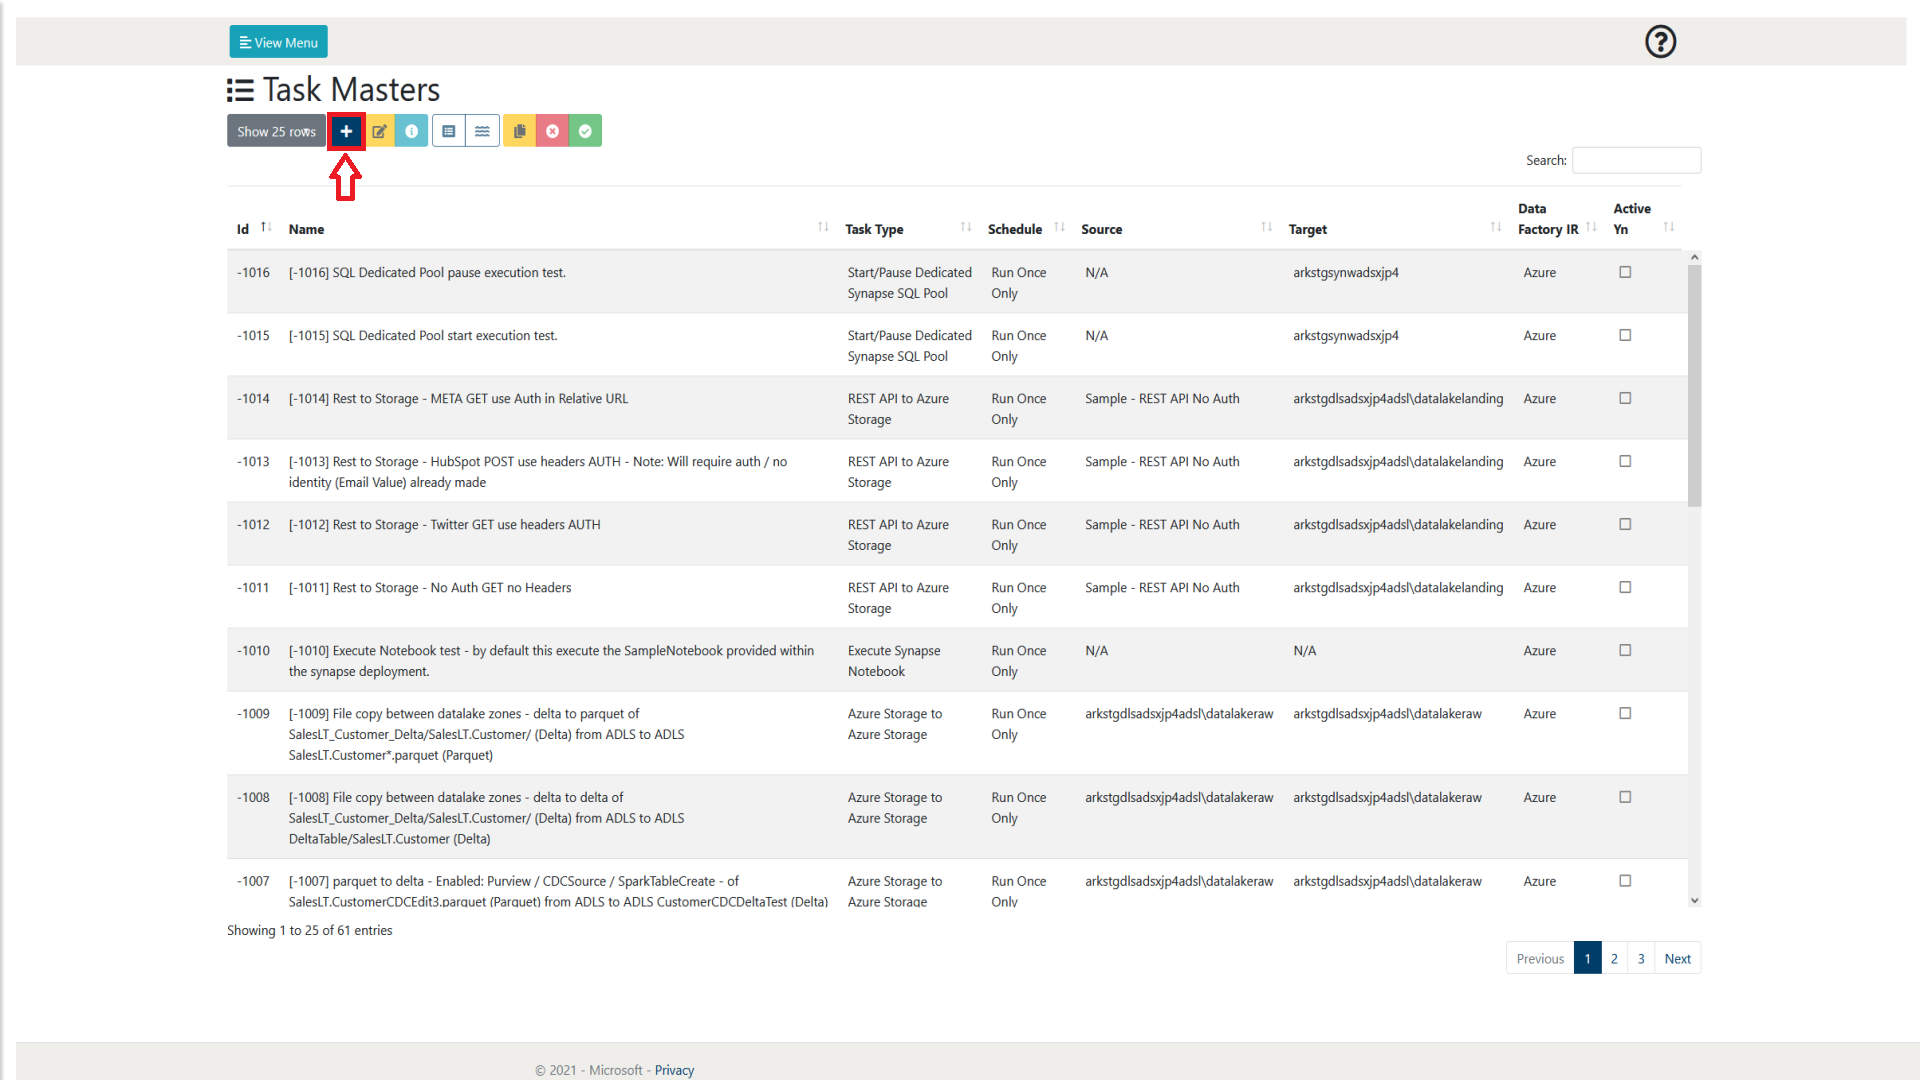
Figure 1.2.1-1: Task Masters Add Item overview
1.2.2 Step 1 – Task Name, Basic Settings and Type
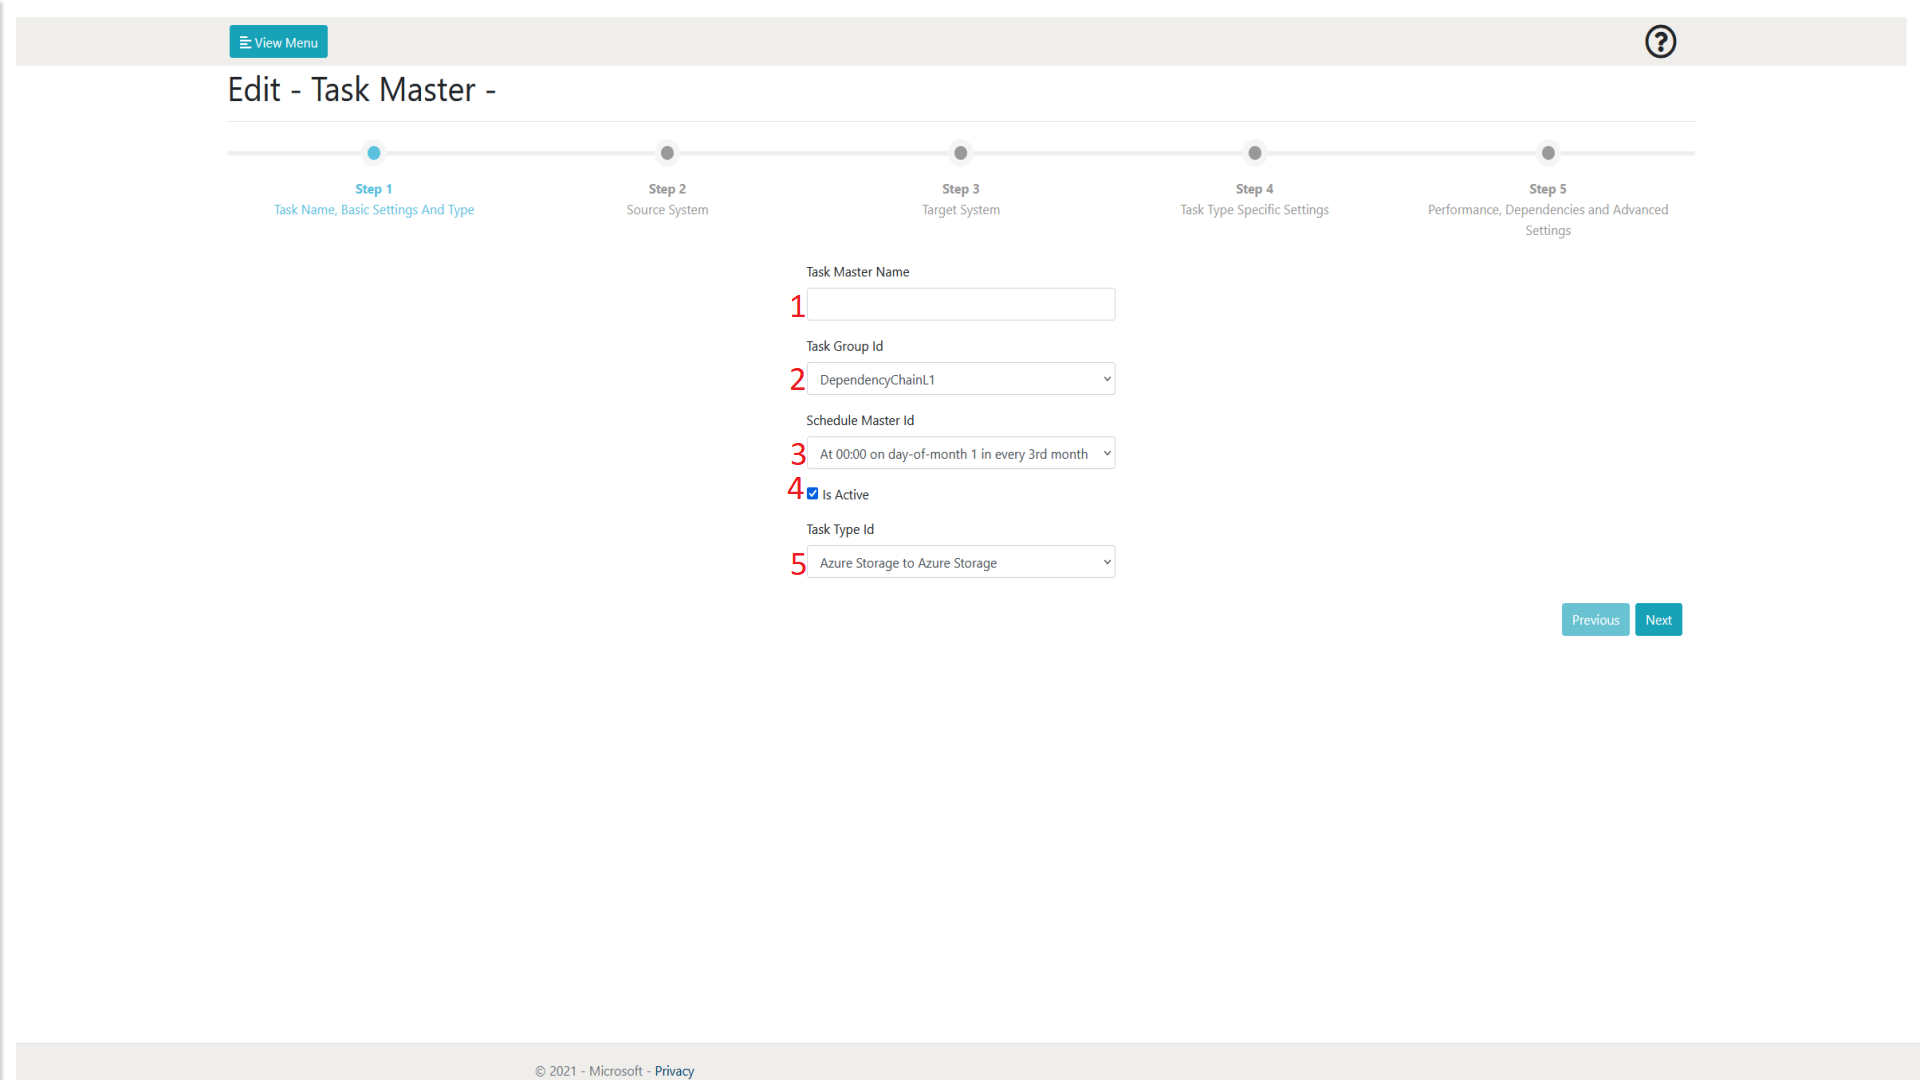
The following table references figure 1.2.2-1.
| Number | Object Name | Input Type | Description |
|---|---|---|---|
| 1 | Task Master Name | Text | This allows the user to enter a name for the Task Master. This currently has a 200 character limit. This is purely for the user's identification purposes. |
| 2 | Task Group Id | Dropdown | This allows the user to assign the Task Master to a Task Group. This can be used for further functionality and more details can be found within section 3 |
| 3 | Schedule Master Id | Dropdown | This allows the user to assign the Task Master to a schedule. By default the choices are:
More schedules can be created by the user in the Schedule Masters page and more details can be found within section 4 |
| 4 | IsActive | Checkbox | This allows the user to decide whether the Task Master will be initially active when it is created. An inactive Task Master will not create Task Instances of itself, meaning that it will not execute its activity. |
| 5 | Task Type Id | Dropdown | This allows the user to assign a Task Type to the Task Master. This will define the detail of the following steps of the creation process. The Task Type will categorise the type of activity you wish to execute. Further details about Task Types can be found in section 1.3. |
1.2.2-1
Figure 1.2.2-1: Task Masters creation wizard step 1
1.2.3 Step 2 – Source System
The following table references figure 1.2.3-1.
| Number | Object Name | Input Type | Description |
|---|---|---|---|
| 1 | Source System Id | Dropdown | This allows the user to select the source system to be used for the task being created. Depending on the Task Type, different source systems will be available to select. Source Systems are loaded from the MetadataDB table SourceAndTargetSystems. |
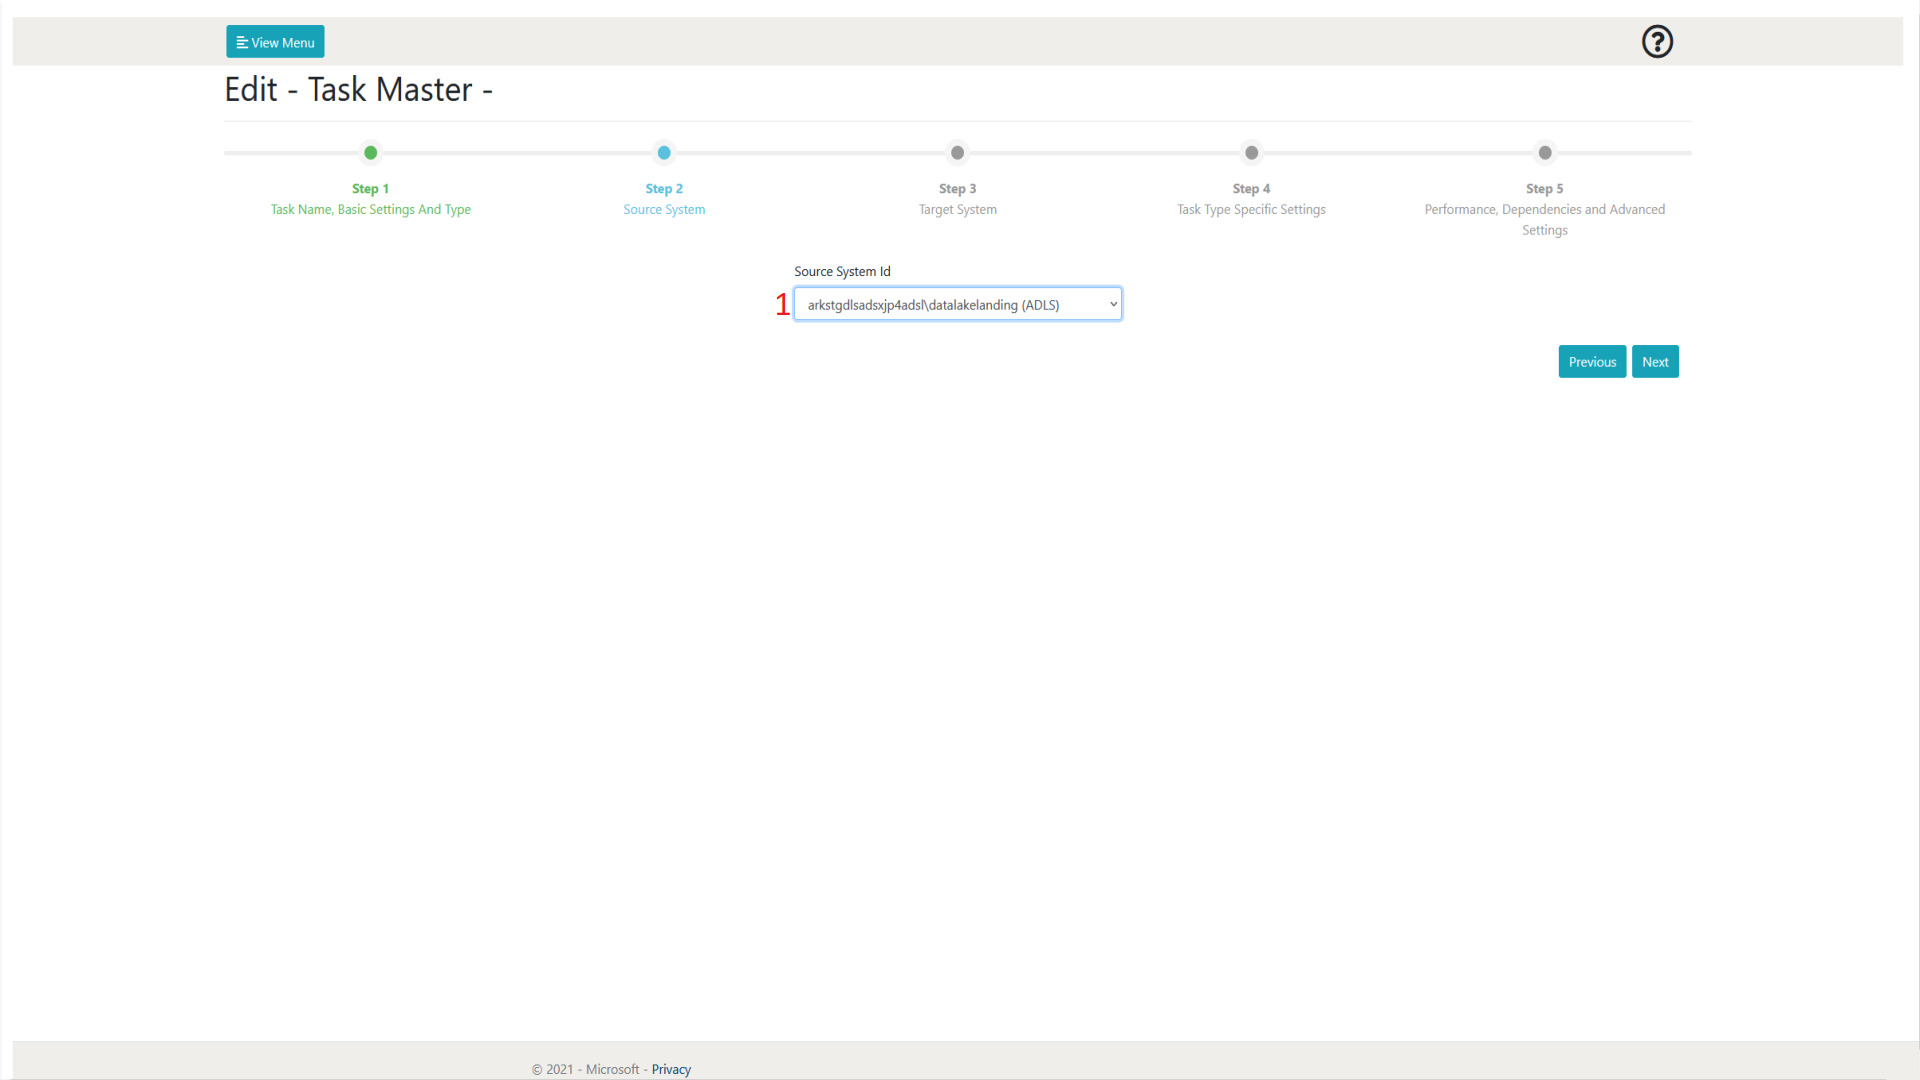
Figure 1.2.3-1: Task Masters creation wizard step 2
1.2.4 Step 3 – Target System
The following table references figure 1.2.4-1.
| Number | Object Name | Input Type | Description |
|---|---|---|---|
| 1 | Target System Id | Dropdown | This allows the user to select the target system to be used for the task being created. Depending on the Task Type, different target systems will be available to select. Target Systems are loaded from the MetadataDB table SourceAndTargetSystems. |
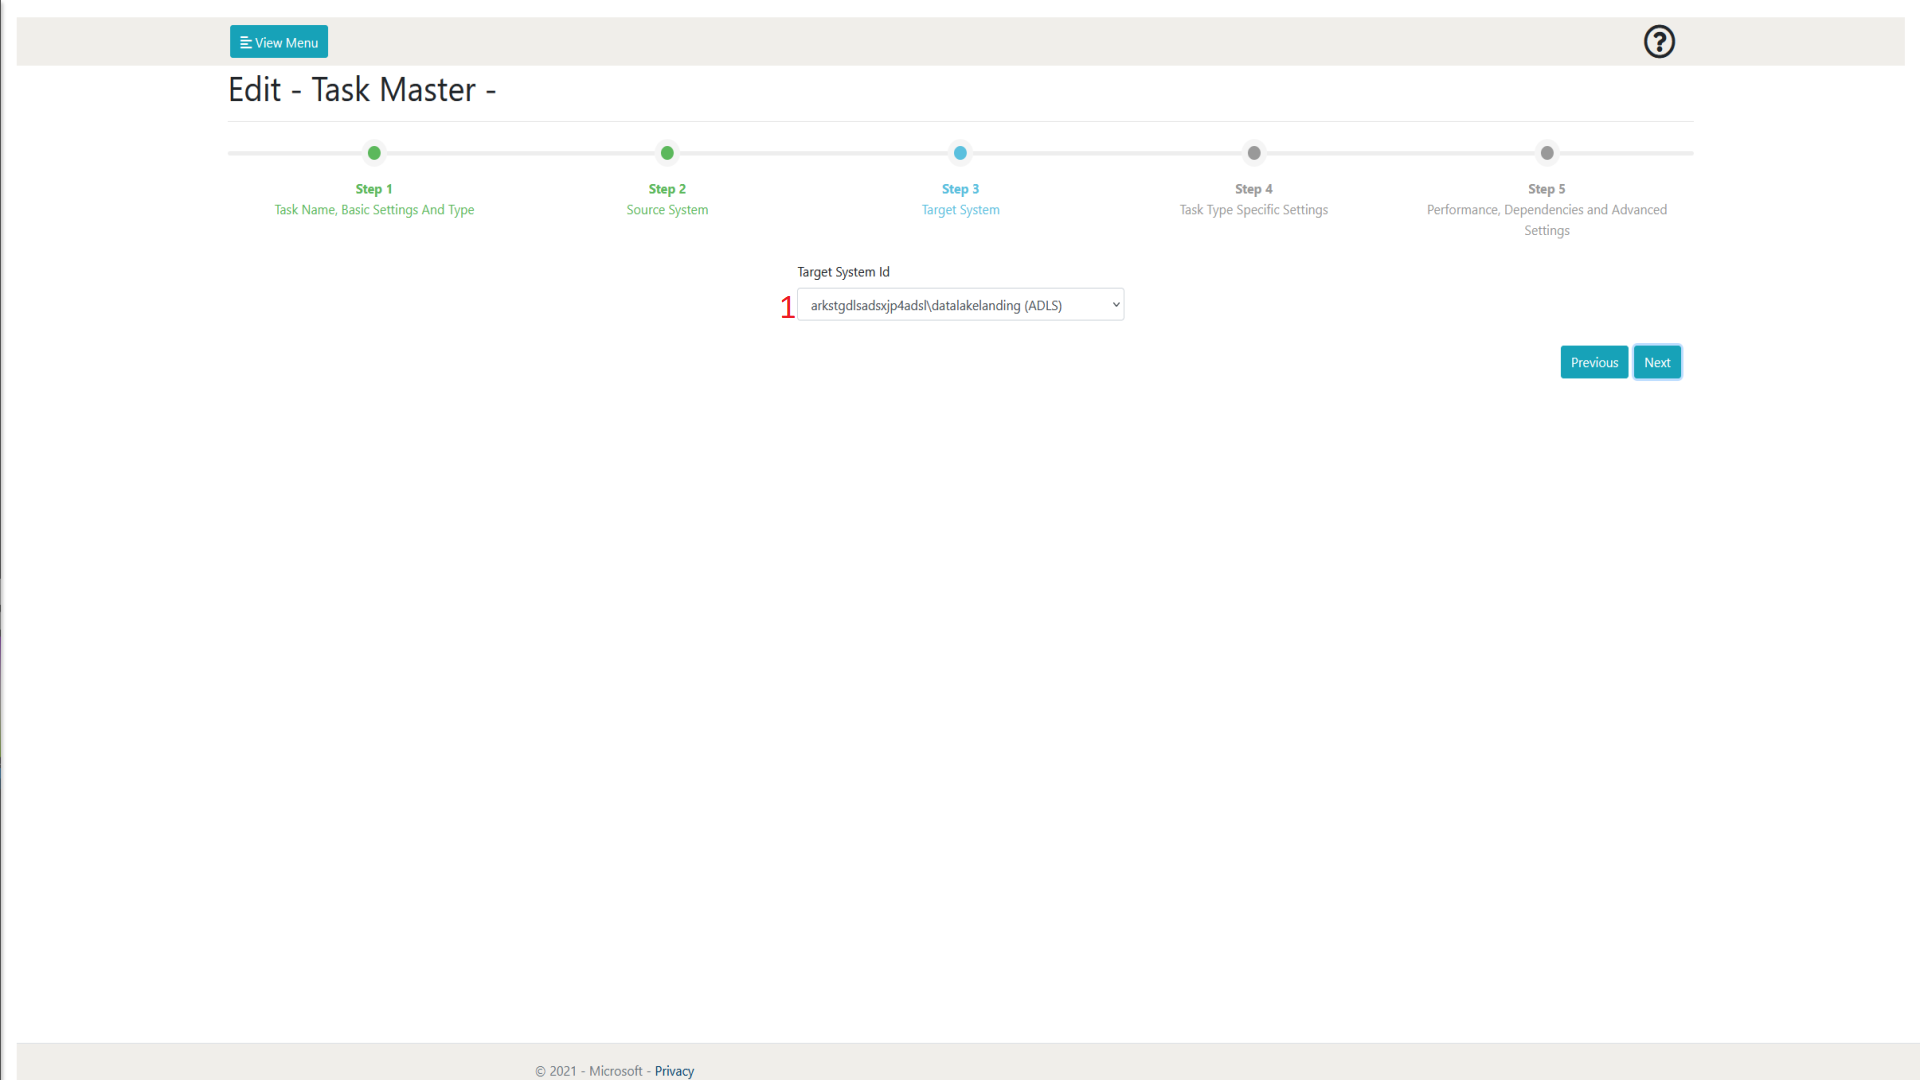
Figure 1.2.4-1: Task Masters creation wizard step 3
1.2.5 Step 4 – Task Type Specific Settings
The following table references figure 1.2.5-1.
| Number | Object Name | Input Type | Description |
|---|---|---|---|
| 1 | Source Sub-Type | Dropdown | This allows for the user to select a source sub-type (in this example image, file type) which will then prefill the TaskMasterJson with the inputs required to create the expected Task Master for the Task Type selected. Some of the inputs provided may be optional, which can be seen by hovering over the additional information. The sub-types will relate directly to the Task Type selected by the user and more details on Task Types can be found in section 1.3 Task Types. |
| 2 | Target Sub-Type | Dropdown | This allows for the user to select a target sub-type (in this case, file type) which will then prefill the TaskMasterJson with the inputs required to create the expected Task Master for the Task Type selected. Some of the inputs provided may be optional, which can be seen by hovering over the additional information. The sub-types will relate directly to the Task Type selected by the user and more details on Task Types can be found in section 1.3 Task Types. |
| 3 | TaskMasterJson | Multiple | This contains all of the data that will be compiled into the Task Master JSON file created with the Task Master. This JSON is integral to the activities run by the function app. This can be modified by either using the inputs prompted to the user (depending on Task Type and sub-type) to the user or by selecting the JSON button next to the TaskMasterJson title text to modify the JSON file directly as shown in figure 1.2.5-2. The properties button will allow the user to modify and add new properties as shown in figure 1.2.5-3. This may be useful for an activity such as a Custom Synapse Notebook execution if you wish for an additional parameter to be passed over. |
| 4 | Source | Multiple | This contains all of the data that will be compiled under the Source property within the Task Master JSON file. The data required for this property will differ depending on the Task Type. This can be modified by either using the inputs prompted (depending on Task Type) to the user or by selecting the JSON button next to the Source title text to modify the JSON file directly. The properties button will allow the user to modify and add new properties to the Source property within the Task Master JSON. |
| 5 | Target | Multiple | This contains all of the data that will be compiled under the Target property within the Task Master JSON file. The data required for this property will differ depending on the Task Type. This can be modified by either using the inputs prompted (depending on Task Type) to the user or by selecting the JSON button next to the Source title text to modify the JSON file directly. The properties button will allow the user to modify and add new properties to the Target property within the Task Master JSON. |
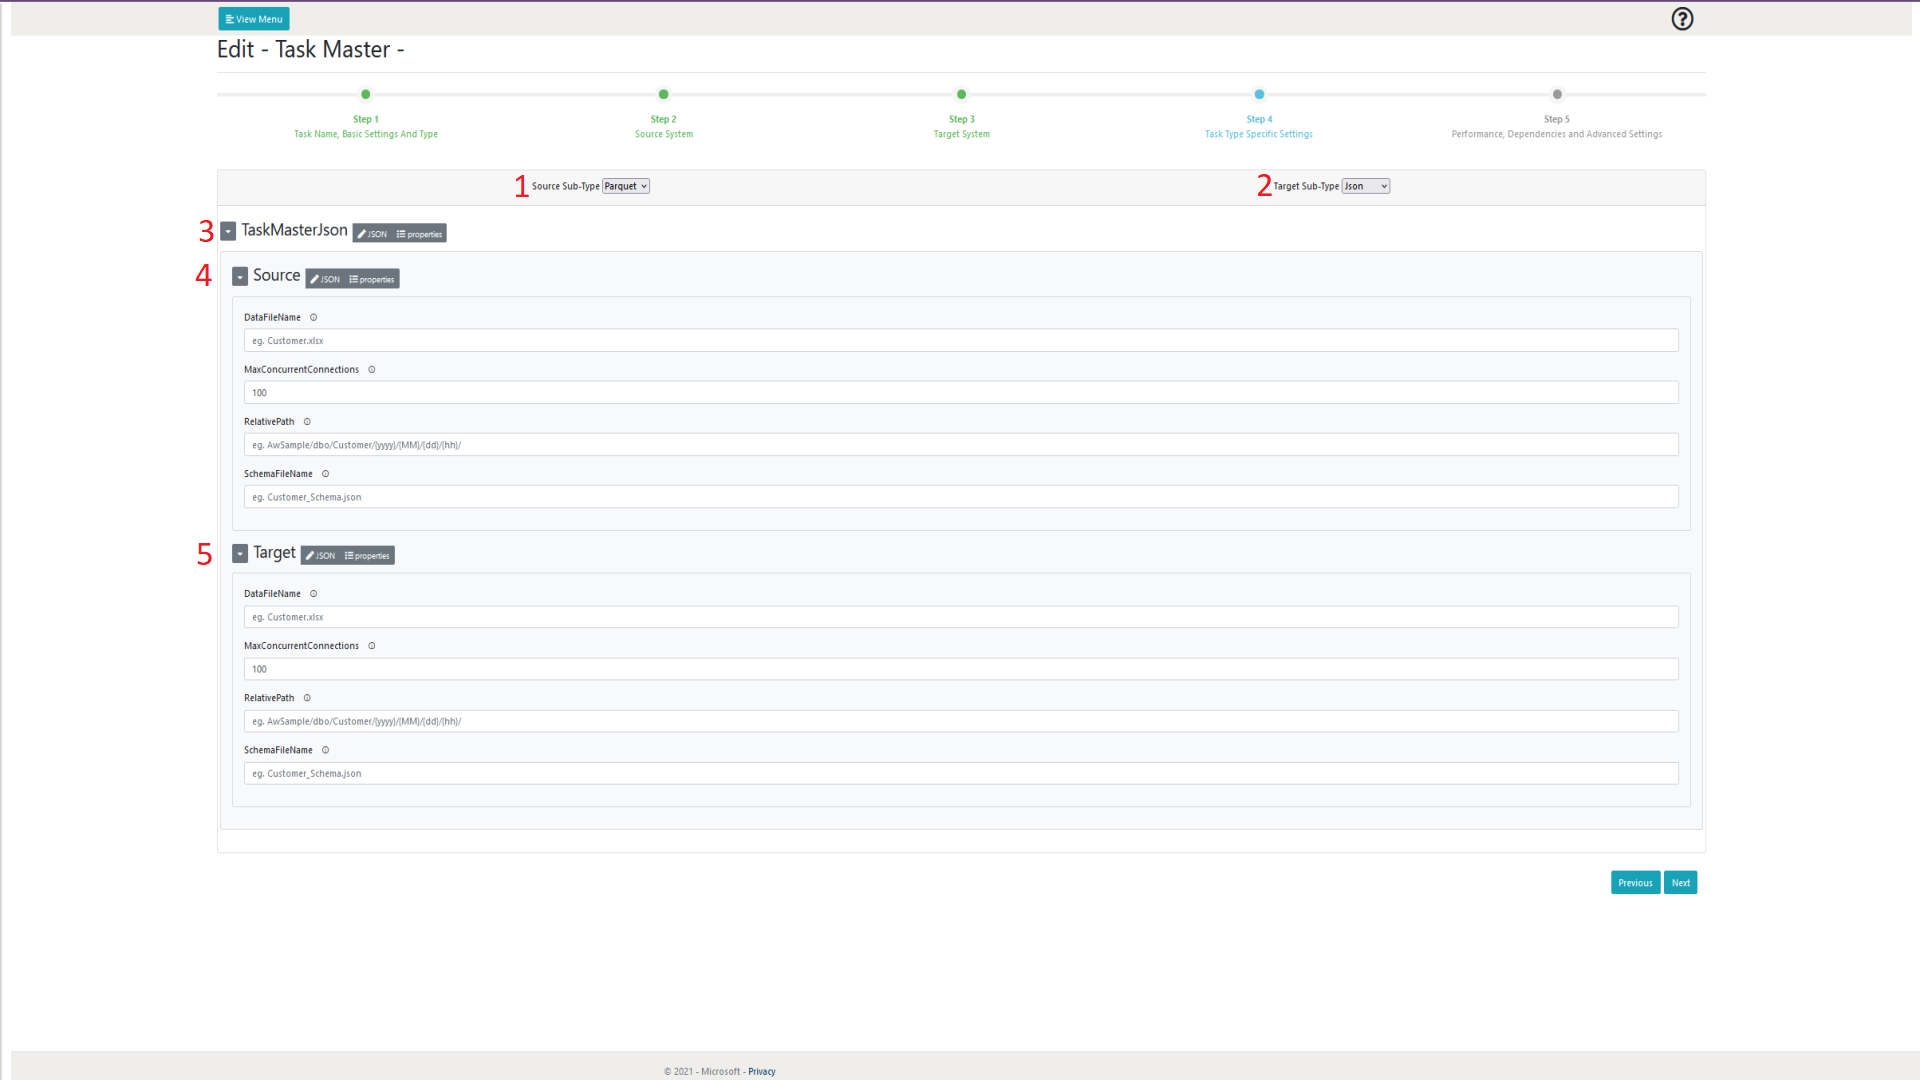
Figure 1.2.5-1: Task Masters creation wizard step 4

Figure 1.2.5-2: TaskMasterJson JSON button detail
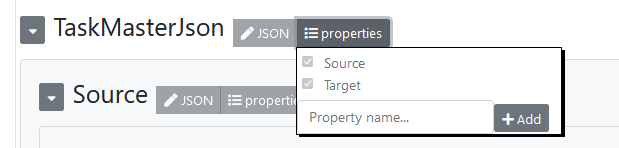
Figure 1.2.5-3: TaskMasterJson properties button detail
1.2.6 Step 5 – Performance, Dependencies and Advanced Settings
The following table references figure 1.2.6-1.
| Number | Object Name | Input Type | Description |
|---|---|---|---|
| 1 | Degree of Copy Parallelism | Integer | TBD |
| 2 | Allow Multiple Active Instances | Checkbox | This allows the user to specify whether the TaskMaster will allow itself to have multiple active instances at the same time. Further details on Task Instances can be found in section 2 Task Instance. |
| 3 | Task Datafactory Ir | Dropdown | This allows the user to select a specific Integration Runtime to be used to execute the task when it is active. The user will only be able to select a integrated runtime that are usable with both the source AND target. Further details on these mappings can be found within the IntegratedRuntimeMapping table within the MetadataDb. If you create a custom source or target, ensure that the IntegratedRunTimeMapping table has been updated with your new applicable mapping entries. |
| 4 | Dependency Chain Tag | Text | TBD |
| 5 | Engine Id | Dropdown | This allows the user to select a specific Execution Engine to be used for the task when it is active. For example, if the user has multiple datafactory instances registered, it will allow them to select the specific instance they wish to use. By default, there is a datafactory and synapse workspace available as an engine. Ensure that you do not select a Synapse Execution Engine for an ADF pipeline as that will throw an error (and vice versa). |
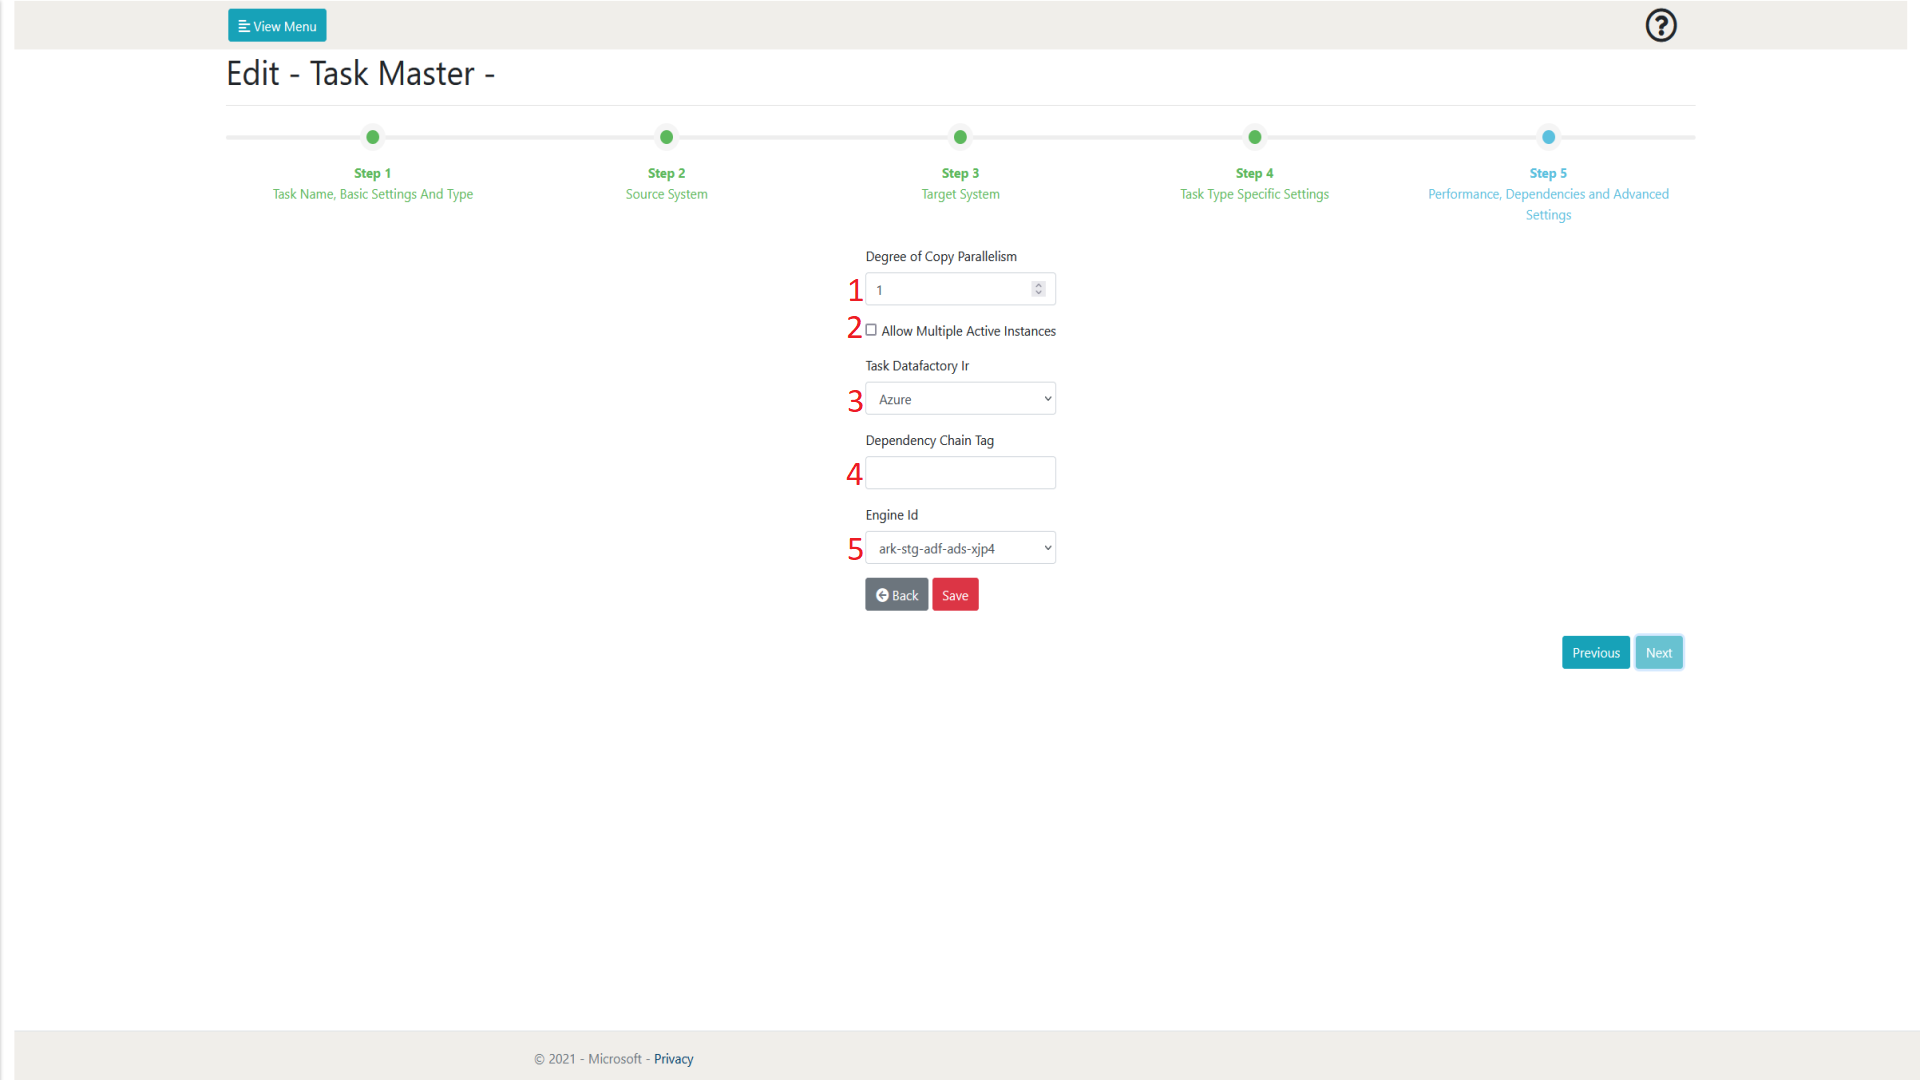
Figure 1.2.6-1: Task Masters creation wizard step 5
1.3 Task Types
The following section will go into further detail about each of the Task Types available at the time of the creation of this document. Task Types are used to define what the specific goal of the Task Master being created is. Depending on its purpose, different parameters need to be created and assigned by the user. The steps affected by the chosen Task Type include:
-
Step 2 – Depending on the Task Type, different source systems will be available to be selected.
-
Step 3 – Depending on the Task Type, different target systems will be available to be selected.
-
Step 4 – Depending on the Task Type, Source system and Target system chosen, different Source and Target Sub-types will be available to be selected.
A Glossary table for the terms of the following sections can be found in the Task Types Glossary Table section.
1.3.1 Azure Storage to Azure Storage
This Task Type allows for file transfers to be done from storage device to storage device. It is also possible to make modifications such as changing the file type.
1.3.1.1 Source and Target Systems
The user will be able to select a list of available storage containers. This can range from a blob storage within the deployed resource group or a registered on premises file server.
1.3.1.2 Source and Target Sub-types
| Source Sub-type | Target Sub-type | Task Master Sub-type Inputs |
|---|---|---|
Excel (ADF) | CSV/Parquet/Json |
|
Parquet (ADF) | Parquet/Json/Csv/Delta |
|
Binary (ADF) | Binary |
|
Csv (ADF) | Parquet/Json |
|
Json (ADF) | Parquet/Json |
|
Delta (SYN) | Delta/Parquet |
|
Below are the properties that are always present when a Delta sub-type (Source or Target) is selected:
|
(r) = required input to create Task Master.
(ADF) = This sub-type uses Azure Data Factory as its execution engine
(SYN) = This sub-type uses Synapse as its execution engine.
1.3.2 Azure Storage to SQL Database
This Task Type allows for file transfers to be done from storage device to a SQL database. The main modifications by the user will be dependent on any custom modifications they wish to make to the data when inputting it into the database.
1.3.2.1 Source and Target Systems
The user will be able to select a list of available storage containers as the Source and select any available SQL servers as the Target.
1.3.2.1 Source and Target Sub-types
| Sub-type Name | Sub-type | Task Master Sub-type Inputs |
|---|---|---|
Excel (ADF) | Source |
|
Csv (ADF) | Source |
|
Json (ADF) | Source |
|
Parquet (ADF) | Source |
|
Table (ADF) | Target |
|
(r) = required input to create Task Master.
(ADF) = This sub-type uses Azure Data Factory as its execution engine
(SYN) = This sub-type uses Synapse as its execution engine.
1.3.3 SQL Database to Azure Storage
This Task Type allows for file transfers to be done from a SQL database to a storage device. The main modifications by the user will be dependent on any the SQL statement they wish to make when extracting the data from the database.
If you wish to use a watermark with this Task Type, ensure that the watermark has been created and is active for the Task before it is executed otherwise it will not in the manner you hope or at all depending on the task set up. For more information on creating a watermark, refer to section 1.4.
1.3.3.1 Source and Target Systems
The user will be able to select a list of available SQL databases as the Source and select any available storage containers as the Target.
1.3.3.2 Source and Sub-types
| Sub-type Name | Sub-type | Task Master Sub-type Inputs |
|---|---|---|
Table / SQL (ADF) | Source |
|
Parquet (ADF) | Target |
|
(r) = required input to create Task Master.
(ADF) = This sub-type uses Azure Data Factory as its execution engine
(SYN) = This sub-type uses Synapse as its execution engine.
1.3.4 SQL Database CDC to Azure Storage
This Task Type allows for file transfers to be done from a SQL database with CDC enabled tables to a storage device.
The user must ensure that they create and attach a watermark (of the LSN format) to any task of this type as they will require this for the task to execute. To create a watermark, please refer to section 1.4. If you have an existing LSN you may use that as the ‘Watermark String Value' otherwise leave it blank as the task will generate an LSN after first task execution (assuming the task has a watermark of the LSN type created and active).
1.3.4.1 Source and Target Systems
The user will be able to select a list of available SQL databases as the Source and select any available storage containers as the Target. Be warned, if the referenced DB is not of the CDC type – this task will not work and you should use the Task Type of SQL Database to Azure Storage instead.
1.3.4.2 Source and Target Sub-types
| Sub-type Name | Sub-type | Task Master Sub-type Inputs |
|---|---|---|
Table (ADF) | Source |
|
Parquet (ADF) | Target |
|
(r) = required input to create Task Master.
(ADF) = This sub-type uses Azure Data Factory as its execution engine
(SYN) = This sub-type uses Synapse as its execution engine.
1.3.5 Execute ADF Pipeline
This Task has yet to be implemented and this section is a placeholder. Currently selecting this task will result in an error on the web application.
1.3.6 Execute SQL Statement
This Task Type allows the user to execute a SQL statement on one or two databases. Whilst it is required to have two sub types, the user may decide to leave one of them blank (the source or target) if they do not require the statement to be run against multiple databases.
Ensure that the last SQL statement returns at least one row or this task will throw an error.
1.3.6.1 Source and Target Systems
The user will be able to select a list of available SQL databases as the source and target systems. Whilst it is required to pick both a source and target, as stated above, you are not required to fill in the sub-type information for both. As long as the statement has at least one row returning, it will work properly.
1.3.6.2 Source and Target Sub-types
| Task Master Inputs (always present) |
|---|
|
| Sub-type Name | Sub-type | Task Master Sub-type Inputs |
|---|---|---|
NA (ADF) | Source / Target |
|
(r) = required input to create Task Master.
(ADF) = This sub-type uses Azure Data Factory as its execution engine
(SYN) = This sub-type uses Synapse as its execution engine.
1.3.7 REST API To Azure Storage
This Task Type allows the user to make a request to a specified REST API and store the result in a storage device. The modifications for this Task Type will be dependent on the user modifying the SourceAndTargetSystem table within the Metadata DB.
How to set up a REST API Source
To set up a REST API source type:
Create the REST API source within the SourceAndTargetSystems table using an insert SQL statement. This is a standard Source that corresponds the following properties
-
SystemId – The primary key (unique ID) of the row, ensure that it is unique.
-
SystemName – The name of the System, this will show in the web app when selecting it as a source. Up to the user.
-
SystemType – This MUST be ‘Rest' as this allows the Lockbox to associate this Rest type with the TaskType when selected in the web app.
-
SystemDescription – User description, only used in the database for personal reference.
-
SystemAuthType – ‘MSI'
-
SystemUserName – ‘' – Can leave blank
-
SystemSecretName- ‘' – Can leave blank
-
SystemKeyVaultBaseUrl – The base URL of your keyvault.
-
SystemJSON – The SystemJSON follows a schema which can be found in the SourceAndTargetSystems_JsonSchema table. Several examples have been provided with the Sample REST Sources within the SourceAndTargetSystems table. A breakdown of the JSON properties:
-
BaseUrl: Required, this is a string containing the BASE URL of the API you are looking to target.
-
headers: Required, this is a stringified JSON containing the headers you wish to use for the API you are targeting. If you do not require any headers (no authentication / other properties required) you can just leave this as "{}". An example of a header containing authentication is: "headers" : "{ \"Authorization\": \"Bearer $InsertSecret($KeyVault(ark-stg-kv-ads-xjp4).$SecretName(bearerToken).$LinkedServiceName(SLS_AzureKeyVault))$END\"}". This header would be used to authenticate the API call with a token that is stored within the keyvault being referenced. More information about inserting a secret for a REST API call will be detailed in the next section. NOTE: All " must be escaped with a \ (except the first and last) to ensure that the json is properly read.
-
NextPageUrlKey: Optional, this is a string representing the key within the response json from a REST API request that holds the FULL URL for the next rest request to continue getting results. This is used for pagination, usually in a GET request when you are expecting to receive large amounts of data in response to your request. This assumes that the value of this key value pair is the complete URL of the next page of the request. An example, a JSON contains a key called ‘next_page_url' and its corresponding value has the next FULL URL for the next request. You would put ‘next_page_url' as the value of ‘NextPageUrlKey' within your SystemJSON. Subsequently, when making the Task within the web application, you would select ‘NextPageUrlKey' for the ‘Pagination' option. This will allow the RestAPINotebook to recursively search the response JSON for the key ‘next_page_url' and will continue to make new requests until there are no longer any new pages for the original request. NOTE: This is currently experimental and may not work for some use cases, it can be modified and then you can specify the REST API Task Type to use your customised notebook instead of the default one. It will also NOT work for key value pairs that store partial URLs at the moment of writing this document.
-
-
ActiveYN – True or False
-
IsExternal – True
-
DataFactoryIR – ‘' – Can leave blank
How to use Secrets for a REST API
To ensure that authentication is not being stored in plain text, a way to reference API tokens for authentication has been made. There are two places you can reference a keyvault secret for a REST API Task Type.
- Within the headers (in the SystemJSON)
"headers" : "{ \"Authorization\": \"Bearer $InsertSecret($KeyVault(ark-stg-kv-ads-xjp4).$SecretName(bearerToken).$LinkedServiceName(SLS_AzureKeyVault))$END\"}"
- Within the relative URL (in the source sub task type)

To properly reference a secret, a strict syntax must be followed, this is:
$InsertSecret($KeyVault(KVName).$SecretName(SName).$LinkedServiceName(LSName))$END
Everything that has been bolded, must be replaced with your values.
KVName – The name of the keyvault that stores the secret you wish to reference
SName – The name of the secret you wish to reference
LSName – The name of the linked service to the Keyvault from your Synapse Workspace Execution Engine that will run the task. By Default, the linked service deployed in Synapse with the lockbox will be named ‘SLS_AzureKeyVault'.
1.3.7.1 Source and Target Systems
The user will be able to select a list of available REST API's as the source and select any available storage devices as the target system.
1.3.7.2 Source and Target Sub-types
| Task Master Inputs (always present) |
|---|
|
| Sub-type Name | Sub-type | Task Master Sub-type Inputs |
|---|---|---|
Rest (SYN) | Source |
|
Json (SYN) | Target |
|
(r) = required input to create Task Master.
(ADF) = This sub-type uses Azure Data Factory as its execution engine
(SYN) = This sub-type uses Synapse as its execution engine.
1.3.8 Execute Synapse Notebook
This task type allows for the user to execute a Synapse notebook of their choosing. There are no limitation on the source or target type and are able to select all relevant sub types to the source and target type of their choosing. The reason for the lack of limitation is to allow the user to pass along parameters to the notebook being executed. The notebook being executed will be passed the TaskMaster JSON as a parameter and are able to reference it as wanted.
1.3.8.1 Source and Target Systems
As defined above, this task type has no limitation on the source and target to select. In addition to this, they are able to select ‘N/A' as a source and target, if they do not wish to use a source or target.
1.3.8.2 Source and Target Sub-types
| Task Master Inputs (always present) |
|---|
|
| Sub-type Name | Sub-type | Task Master Sub-type Inputs |
|---|---|---|
Notebook-Optional (SYN) | Source / Target |
|
(r) = required input to create Task Master.
(ADF) = This sub-type uses Azure Data Factory as its execution engine
(SYN) = This sub-type uses Synapse as its execution engine.
Note: It is advised if you wish to add any fields to directly edit the TaskMasterJson.
1.3.9 Start/Pause Dedicated Synapse SQL Pool
This Task Type allows for a user to start or pause a Synapse Dedicated SQL Pool as a task. This task is designed to enable the ability to start or stop a SQL Pool without having to directly access the Synapse Workspace.
1.3.9.1 Source and Target Systems
There is no source system for this task type, it will be displayed as N/A. The targets allowed will be any Synapse Workspace that is available.
1.3.9.2 Source and Target Sub-types
The sub-types available for this task type is only "Not-Applicable". This is because the only parameters required for this action is the name of the pool you wish to reference and the action you want to take against it.
| Task Master Inputs (always present) |
|---|
|
(r) = required input to create Task Master.
(ADF) = This sub-type uses Azure Data Factory as its execution engine
(SYN) = This sub-type uses Synapse as its execution engine.
1.4 Task Master Water Mark
The Task Master Water Mark page can be accessed in a two different ways.
-
It can be accessed from the menu as shown in figure 1.4-1. This will load up an overview of all current Task Master water marks.
-
The other way is from the Task Master page. The user will select a Task Master they wish to view the current water marks of and then select the View Water Mark button as shown in figure 1.4-2. This will load up the current water marks for that specific Task Master object.
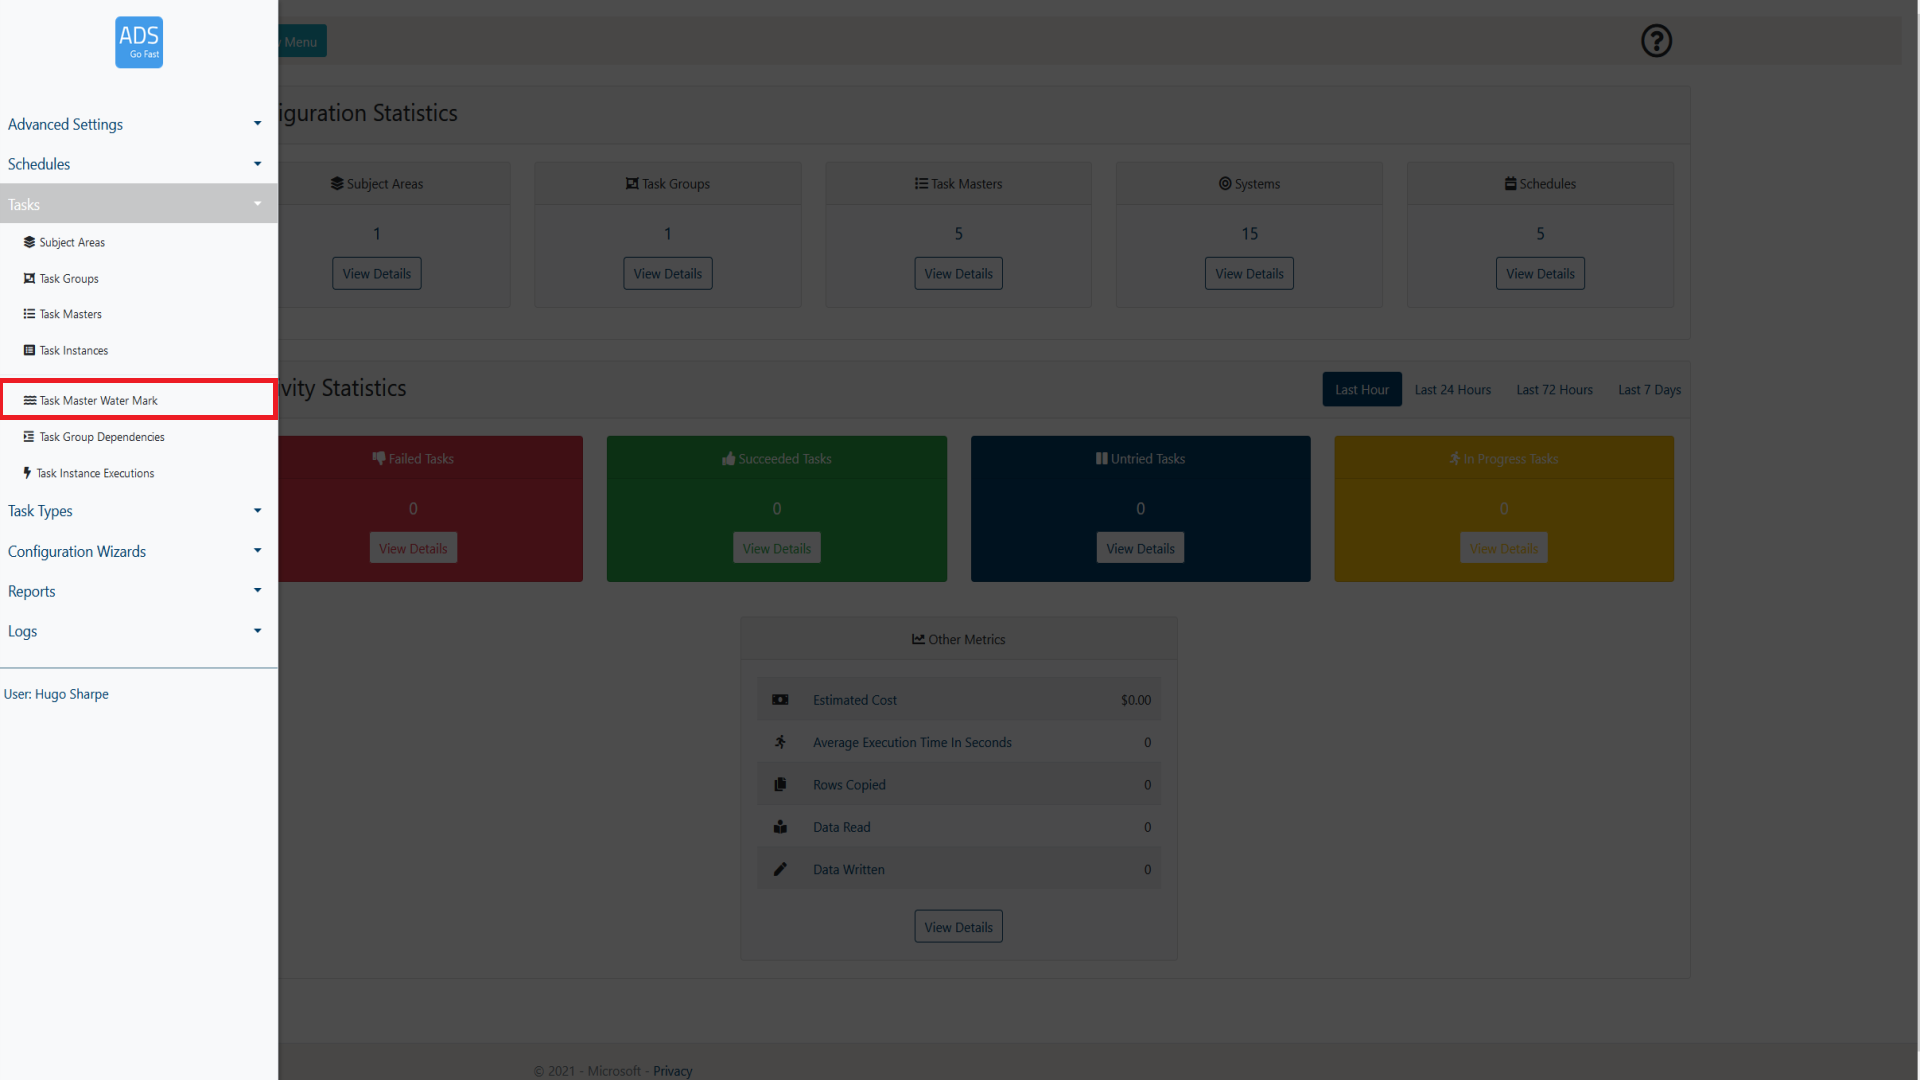
Figure 1.4-1: Task Master Water Mark menu access

Figure 1.4-2: Task Master Water Mark View Watermark access
1.4.1 Page overview
When browsing the Task Master Water Marks page, a layout similar to figure 1.1-1 will be shown to you. Following the figure some more details will be provided on what each of these items represent.
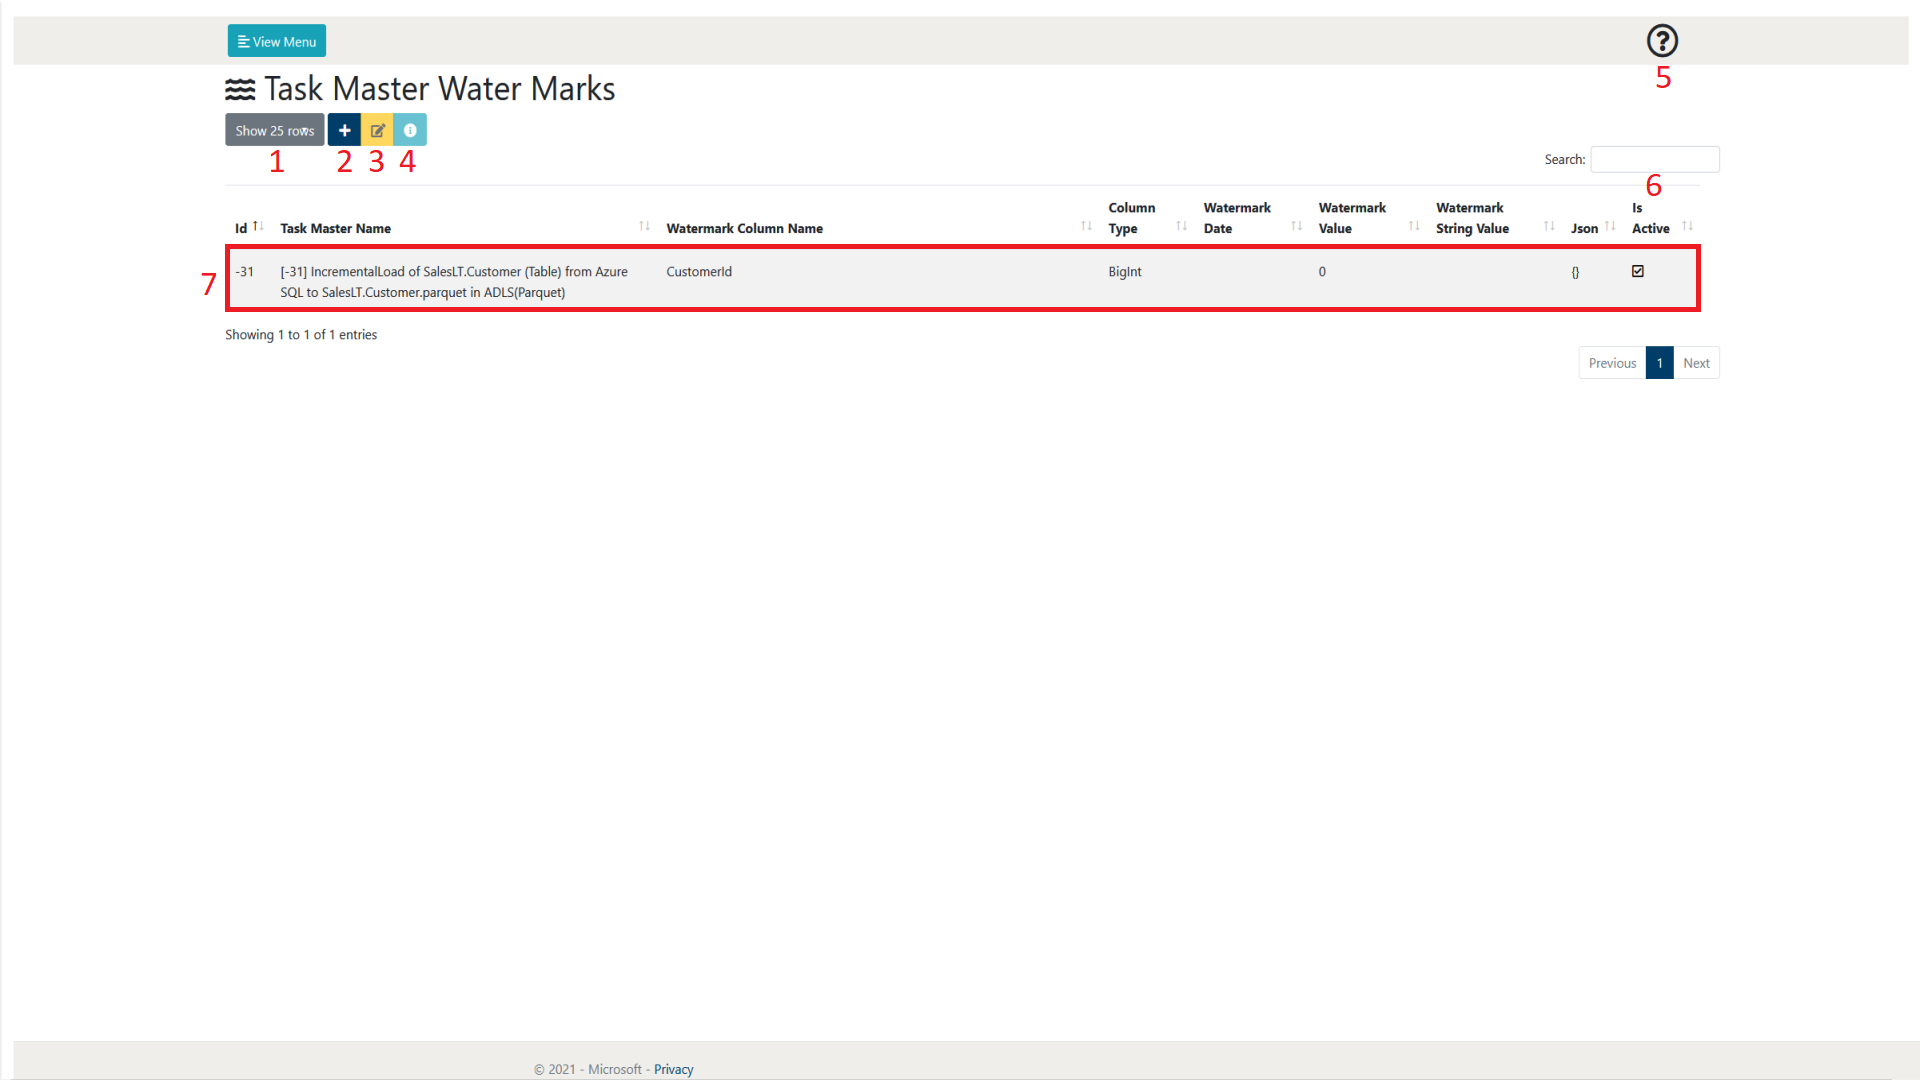
Figure 1.4.1-1: Task Master Water Marks page overview
| Number | Object Name | Description |
|---|---|---|
| 1 | Show rows selection | This allows the user to define how many rows of Task Masters they wish to view per page. At the time of writing, the selections available are 10, 25, 50 and 100. As can be seen in figure 1.1-1 at the bottom right of the page there is also a page selection to be able to browse through pages of created Task Masters |
| 2 | Add Item | This allows the user to create a new Task Master Water Mark. Further details of the creation process can be found in section 1.4.2 Creating a Water Mark. |
| 3 | Edit Item | This allows the user to modify an already existing Task Master Water Mark. This will allow them to go back through their inputs and modify any details they wish to amend to the Water Mark. |
| 4 | View Details | This allows the user to view the details of an already existing and selected Water Mark. Once interacted with, this displays a single page overview of the selected Water Mark. If you wish to edit the Water Mark you can select a button to do so from this page or do so from the Task Master Water Marks page (3). |
| 5 | Help | This allows the user to display some help text that gives a summary of the current web page. |
| 6 | Search | This allows the user to search for a Task Master Water Mark by Task Master Name. The Water Marks displayed will only be related to the search term input by the user. |
| 12 | Task Master Water Mark | This is an example of a created Task Master Water Mark. A Task Master Water Mark will have a specific column it references, and define what that column holds. For example, in a CDC column, that would be an LSN. |
1.4.2 Creating a Water Mark
To create a Task Master Water Mark, select the Add Item button on the Task Master Water Mark page. This can be seen in figure 1.4.2-1.
You will then be prompted to enter some details to create the water mark. Details on this is provided in figure figure 1.4.2-2 and table 1.4.2-1. Once this is completed, select create and your water mark will be created and assigned to the Task Master specified.
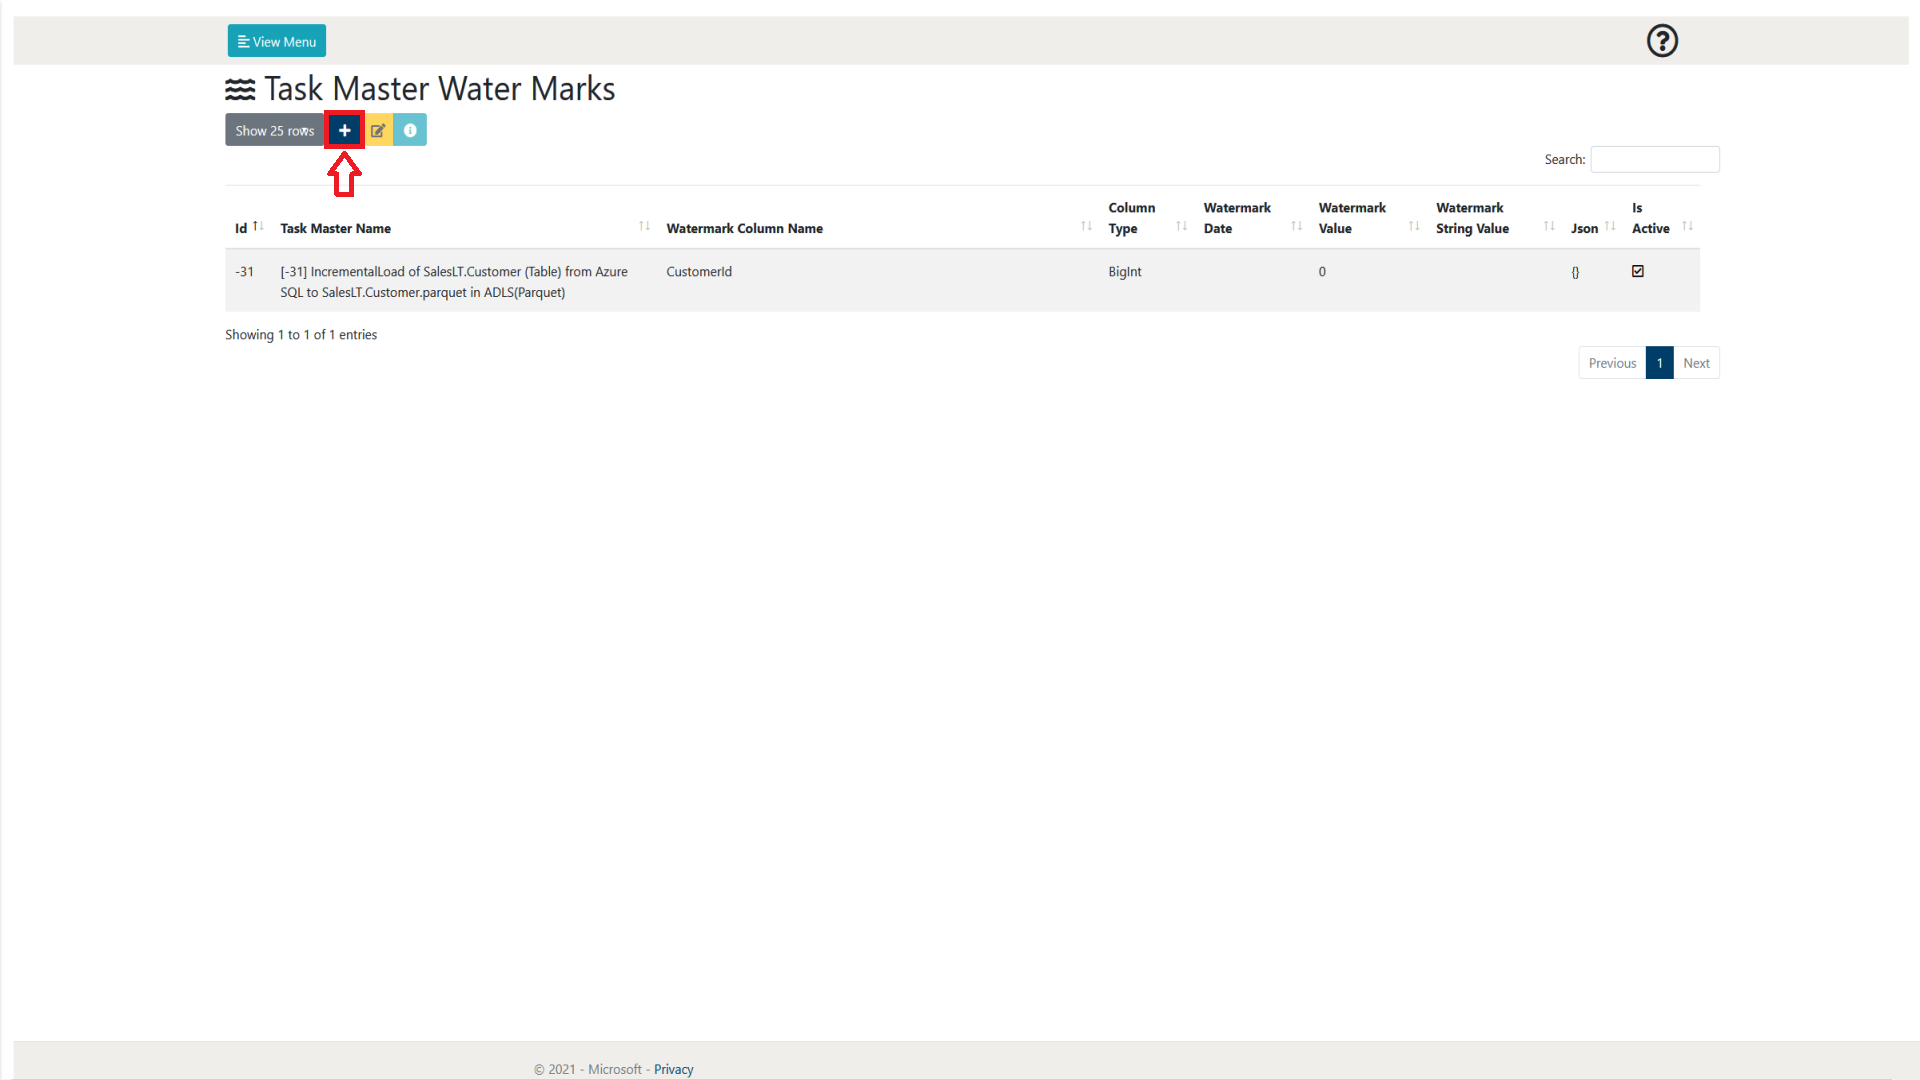
Figure 1.4.2-1: Task Master Water Marks Add Item overview
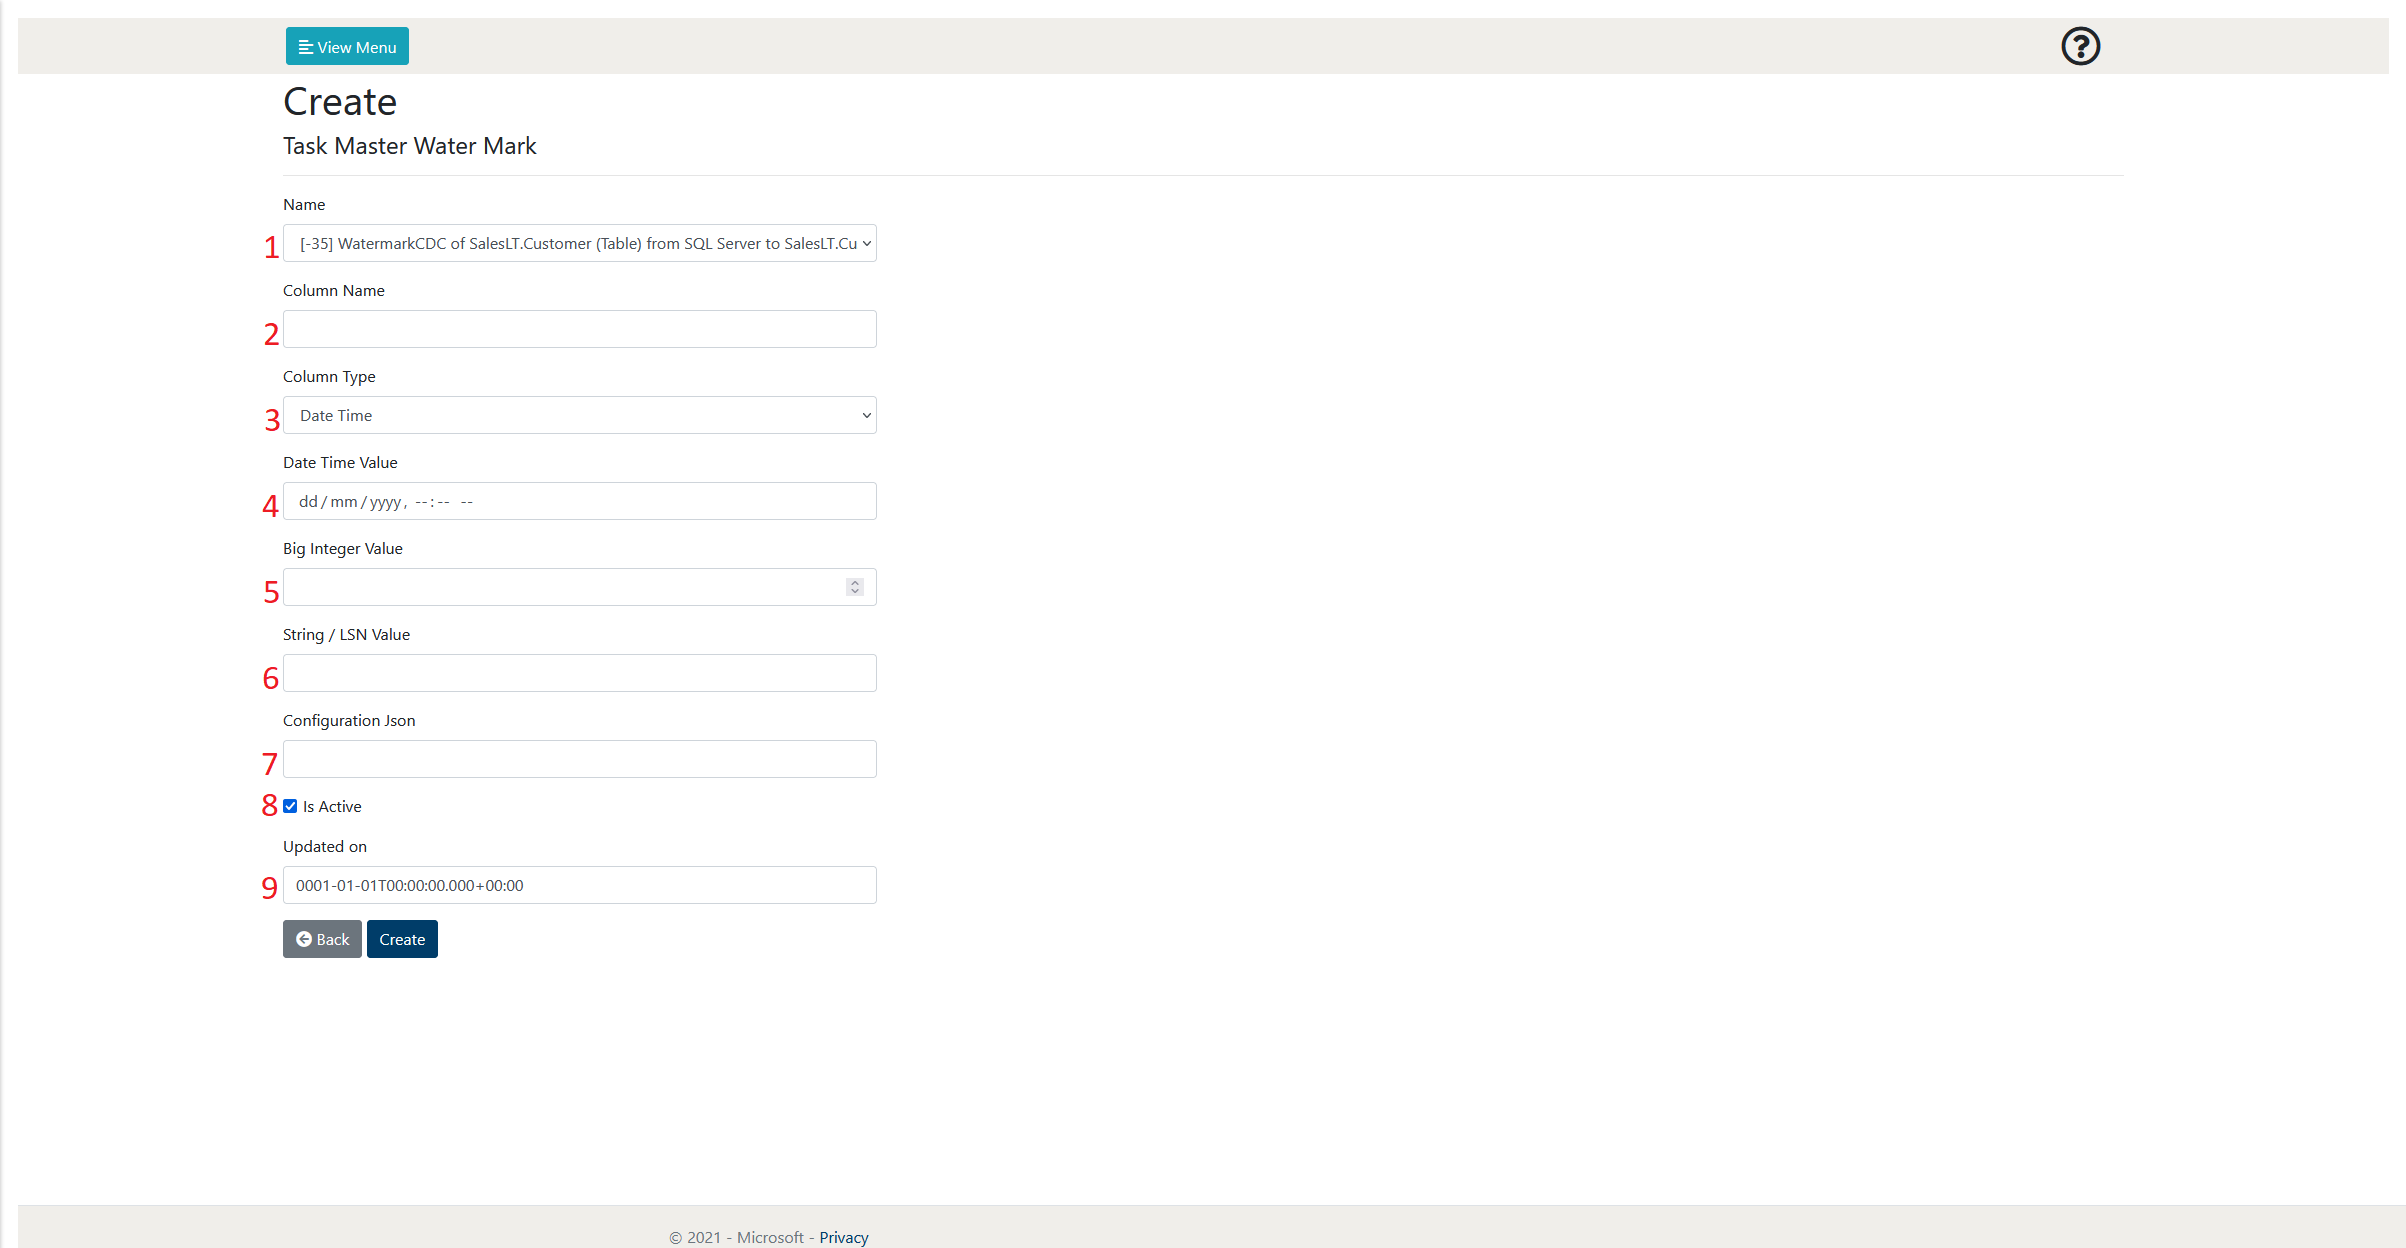
Figure 1.4.2-2: Task Master Water Marks Create Overview
| Number | Object Name | Input Type | Description |
|---|---|---|---|
| 1 | Name | Text / Dropdown | This allows the user to enter or select the name of the Task Master it is assigned to. |
| 2 | Column Name | Text | This allows the user to assign the column name for the water mark. |
| 3 | Column Type | Text | This allows the user to enter the name of the column type to be used with the water mark. This can be one of the following:
|
| 4 | Date Time Value | Date Time | This allows the user to assign a Date Time value to the water mark. Only used if the Column Type is ‘DateTime'. |
| 5 | Big Integer Value | Integer | This allows the user to assign a Big Integer value to the water mark. Only used if the Column Type is ‘BigInt'. |
| 6 | String / LSN Value | Text | This allows the user to assign a string or lsn value to the water mark. Only used if the Column Type is ‘lsn'. Note: Do not assign a value for the first run if you want a initial full update. |
| 7 | Configuration Json | JSON | This is a configuration file alongside the watermark. If not required, just enter ‘{}'. |
| 8 | Is Active | Checkbox | This allows the user to decide whether the Task Master Water Mark will be initially active when it is created. An inactive water mark will be ignored when the Task Master has an Instance of itself being executed. |
1.5 Modifying a Task Master
To modify an already existing Task Master, select the Task Master you wish to edit from the Task Master page and then select the ‘Edit Item' button as shown in figure 1.5-1. This will then prompt the user with the Task Master creation wizard and will allow them to modify the Task Master as required. For more information regarding the Task Master creation wizard refer to section 1.2 Creating a Task Master.

Figure 1.5-1: Task Master Edit Item overview
1.6 Deleting a Task Master
Currently the ability to delete a Task Master is disabled. This may be changed in the future. If you wish to delete a Task Master you can do so but deleting it from the Metadata DB in the TaskMaster table.
1.7 Copying a Task Master
To create a copy of an already existing Task Master(s), select the Task Master(s) you wish to copy from the Task Master page and then select the ‘Copy Tasks' button as shown in figure 1.7-1. This will then prompt the user and a copy of the tasks will be created with ‘Copy' as a suffix to their name.

Figure 1.7-1: Task Master Copy Tasks overview
1.8 Activating / Deactivating a Task Master
To activate or deactivate an existing Task Master(s), select the Task Master(s) you wish to activate or deactivate from the Task Master page and then select the corresponding ‘Deactivate Tasks' (red, left) or ‘Activate Tasks' (green, right) button as shown in figure 1.8-1. This will then prompt the user with a success message and the task will now be either active or inactive depending on the user choice.
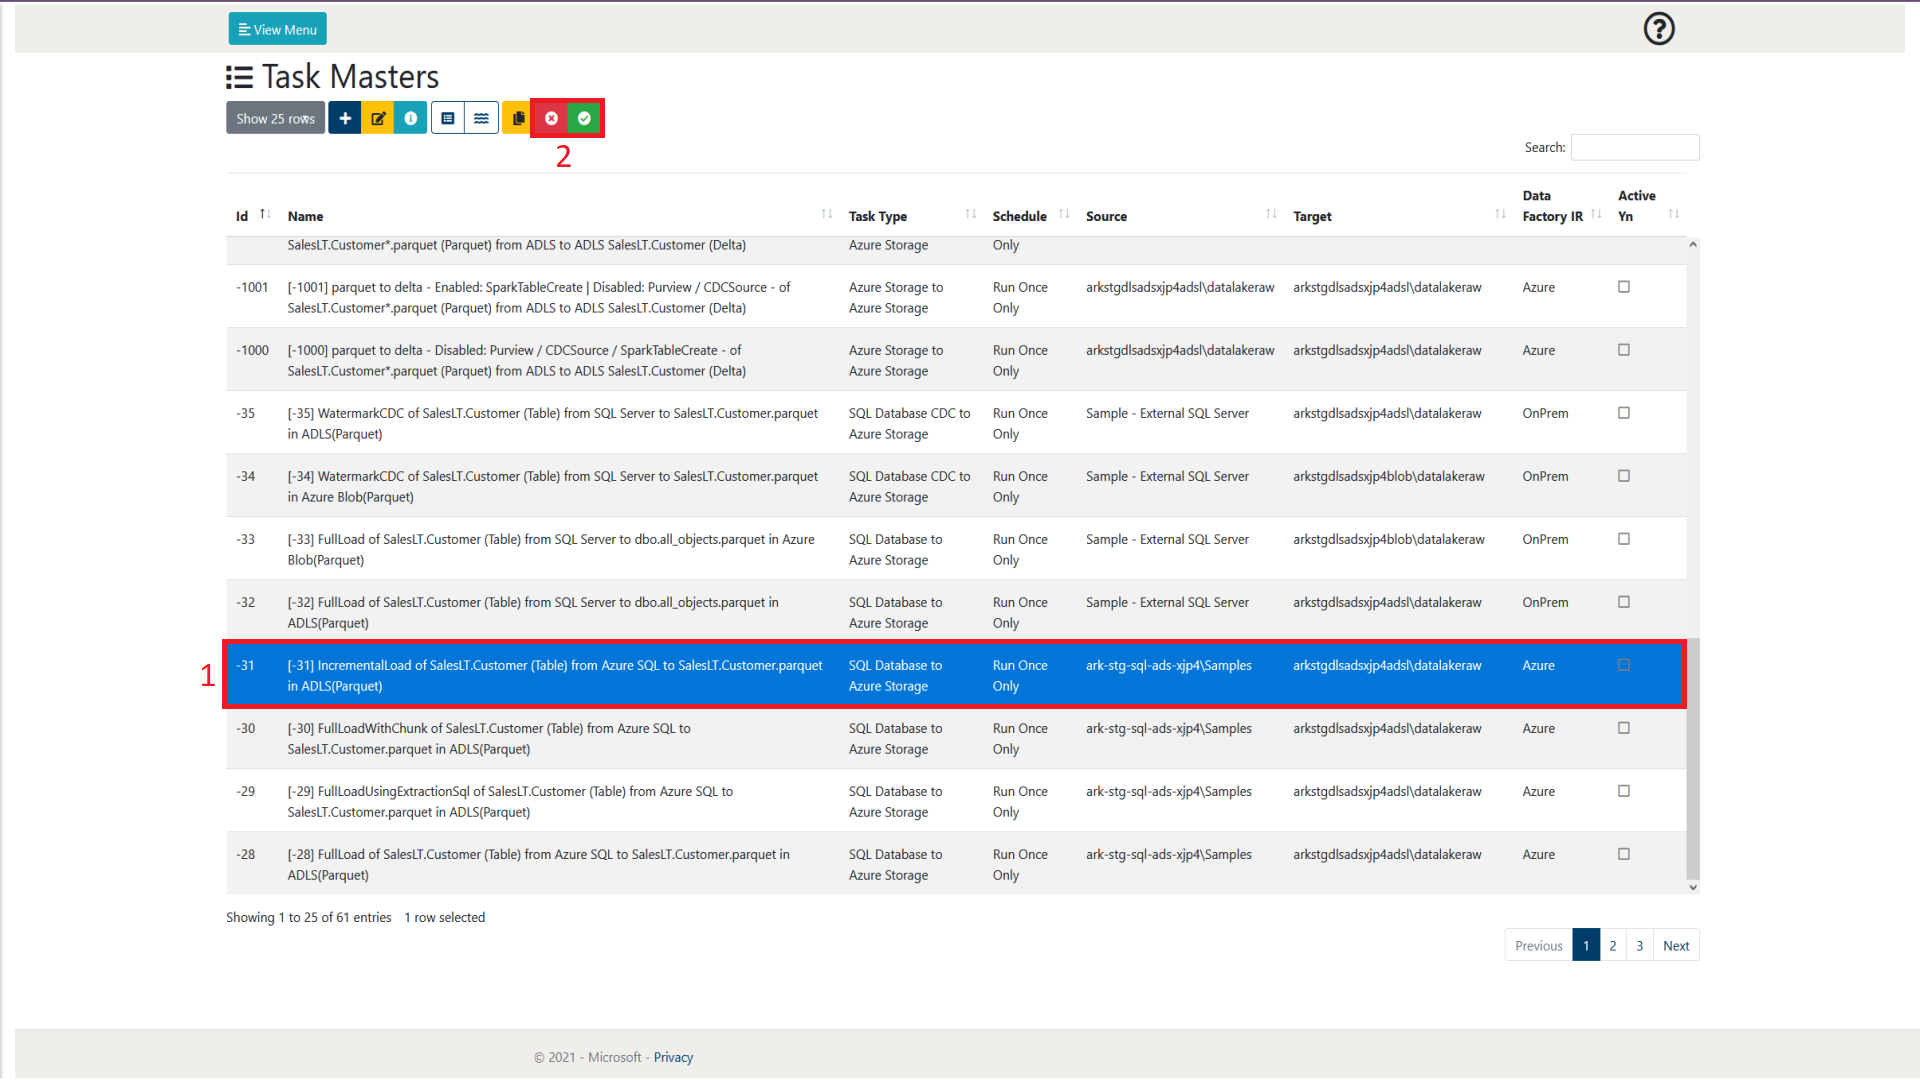
Figure 1.8-1: Task Master Activate/Deactivate Tasks overview