OpenAI proxy service
The solution consists of three parts; the proxy service, the proxy playground, with a similar look and feel to the official Azure OpenAI Playground, and event admin.
Deployment issues
- Deploying the AI Proxy Admin Portal does not work on macOS on Apple Silicon. The workaround for now is to deploy the admin portal on a Windows, Linux machine, or from GitHub Codespaces.
Setup
This repo is set up for deployment on Azure Container Apps using the configuration files in the infra folder.
Prerequisites
- An Azure subscription
- Deployed Azure OpenAI Models
Required software
Tested on Windows, macOS and Ubuntu 22.04.
Install:
Create an Entra app registration
The AI Proxy admin is secured using Entra. You first need to register an application in your organizations Entra directory.
- Log into the Azure Portal.
- Select
Microsoft Entra IDfrom the left-hand menu. - Select
+ Adddropdown, then selectApp registration. - Name the registration, ensure
Accounts in this organizational directory onlyis selected, and selectRegister. -
Navigate to
Overview, and make a note of theApplication (client) IDas you will need it when you deploy the solution.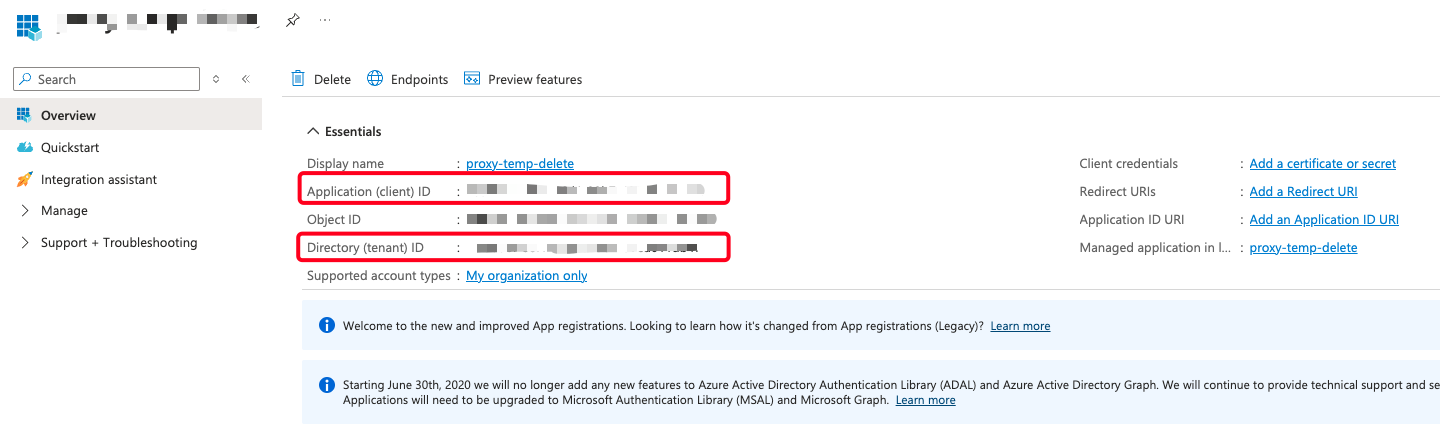
-
When you deploy the solution, you will need to create a client secret.
- After the solution has been deployed, you will need to amend the app registration to add the redirect URI and enable the
ID tokensunderAuthentication.
Deploying
The recommended way to deploy this app is with Dev Containers. Install the VS Code Remote Containers extension and Docker, open this repository in a container and you'll be ready to go.
Note
Deploying the AI Proxy Admin Portal does not work on macOS on Apple Silicon. The workaround for now, is to deploy the solution from a Windows/Linux machine on X64, or GitHub Codespaces.
- Ensure Docker is installed and running.
-
Clone the repo:
git clone https://github.com/microsoft/azure-openai-service-proxy.git -
Open the repo in VS Code.
- You will be prompted to
Reopen in Container, click the button to do so. This will build the container and open the repo in a container. -
In the VS Code dev container, open a terminal and run the following commands to authenticate with Azure:
azd auth login --use-device-codeaz login --use-device-code -
Provision and deploy the proxy solution by running the following command in the terminal:
azd upYou will be prompted for the following:
- The environment name, keep the name short, max 7 characters to avoid invalid resource names being generated.
- Select a subscription from your Azure account.
- Select a location (like "eastus" or "sweden central"). Then azd will provision the resources in your account and deploy the latest code. Recommend deploying the proxy to the same location you plan to deploy your models.
- Enter a value for the
authClientIdinfrastructure parameter. This is the Entra App RegistrationApplication (client) IDyou created. - You will be prompted for the
entraAuthorizationToken. Press ctrl+c to cancel the deployment. - Run the
azd upcommand again. You will be prompted for theauthClientSecretinfrastructure parameter again, but this time you will not be prompted for theentraAuthorizationToken. - Enter a value for the
principalNameinfrastructure parameter. This is the name of the PostgreSQL database admin user. Recommend using your email address. - Select the 'swaLocation' infrastructure parameter. Recommend selecting a location close to or the same as the Azure location you previously selected.
On completion, the following Azure resources will be provisioned:
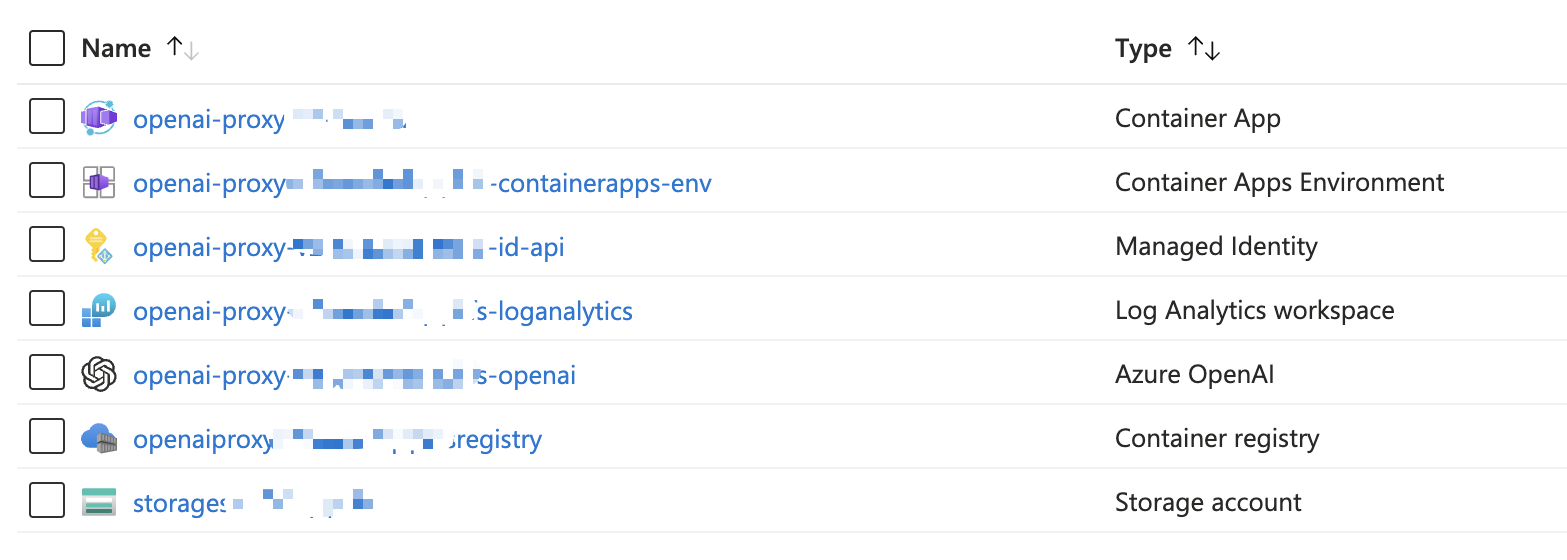
-
When
azdhas finished deploying you'll see a link to the Azure Resource Group created for the solution.The Admin and Playground links will be displayed when
azd upcompletes.
Entra App Registration
After the solution has been deployed, you may need to manually amend the app registration to add the redirect URI and enable the ID tokens under Authentication.
-
Navigate to the AI Proxy Admin portal URL. You'll find the URL from the output of the
azd upcommand underDeploying service admin. -
The log in will fail, but you will see the redirect URI in the error message. Copy the redirect URI, including the
/signin-oidcprefix as you will need it when you update the app registration in the Azure Portal.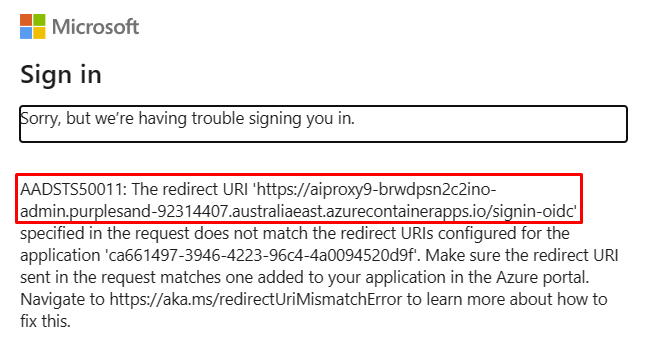
-
Log into the Azure Portal.
- Select
Microsoft Entra IDfrom the left-hand menu. - Select the app registration you created earlier.
- Navigate to
Authentication. - Add the redirect URI
https://<your-app-url>/signin-oidc. - Enable
ID tokensunderAdvanced settings. - Save the changes.
Updating the deployed app
To make any changes to the app code, just run:
azd deploy [admin | playground | proxy]
Next steps
- Deploy an Azure AI Resources
- Map AI Resources to the AI Proxy
- Create and manage events
- Capacity planning
Deploy an Azure AI Resources
- Open the Azure Portal.
- Create a Azure resource group for your models. Naming suggestions include
ai-proxy-resources. - Add AI resources to the resource group you created. See Create and deploy an Azure OpenAI Service resource for more information.
- Make a note of the
endpoint_keyandendpoint_urlas you'll need them when you configure resources for the AI Proxy.
Troubleshooting
If you encounter any issues deploying the solution, please raise an issue on the GitHub repo
azd up failure
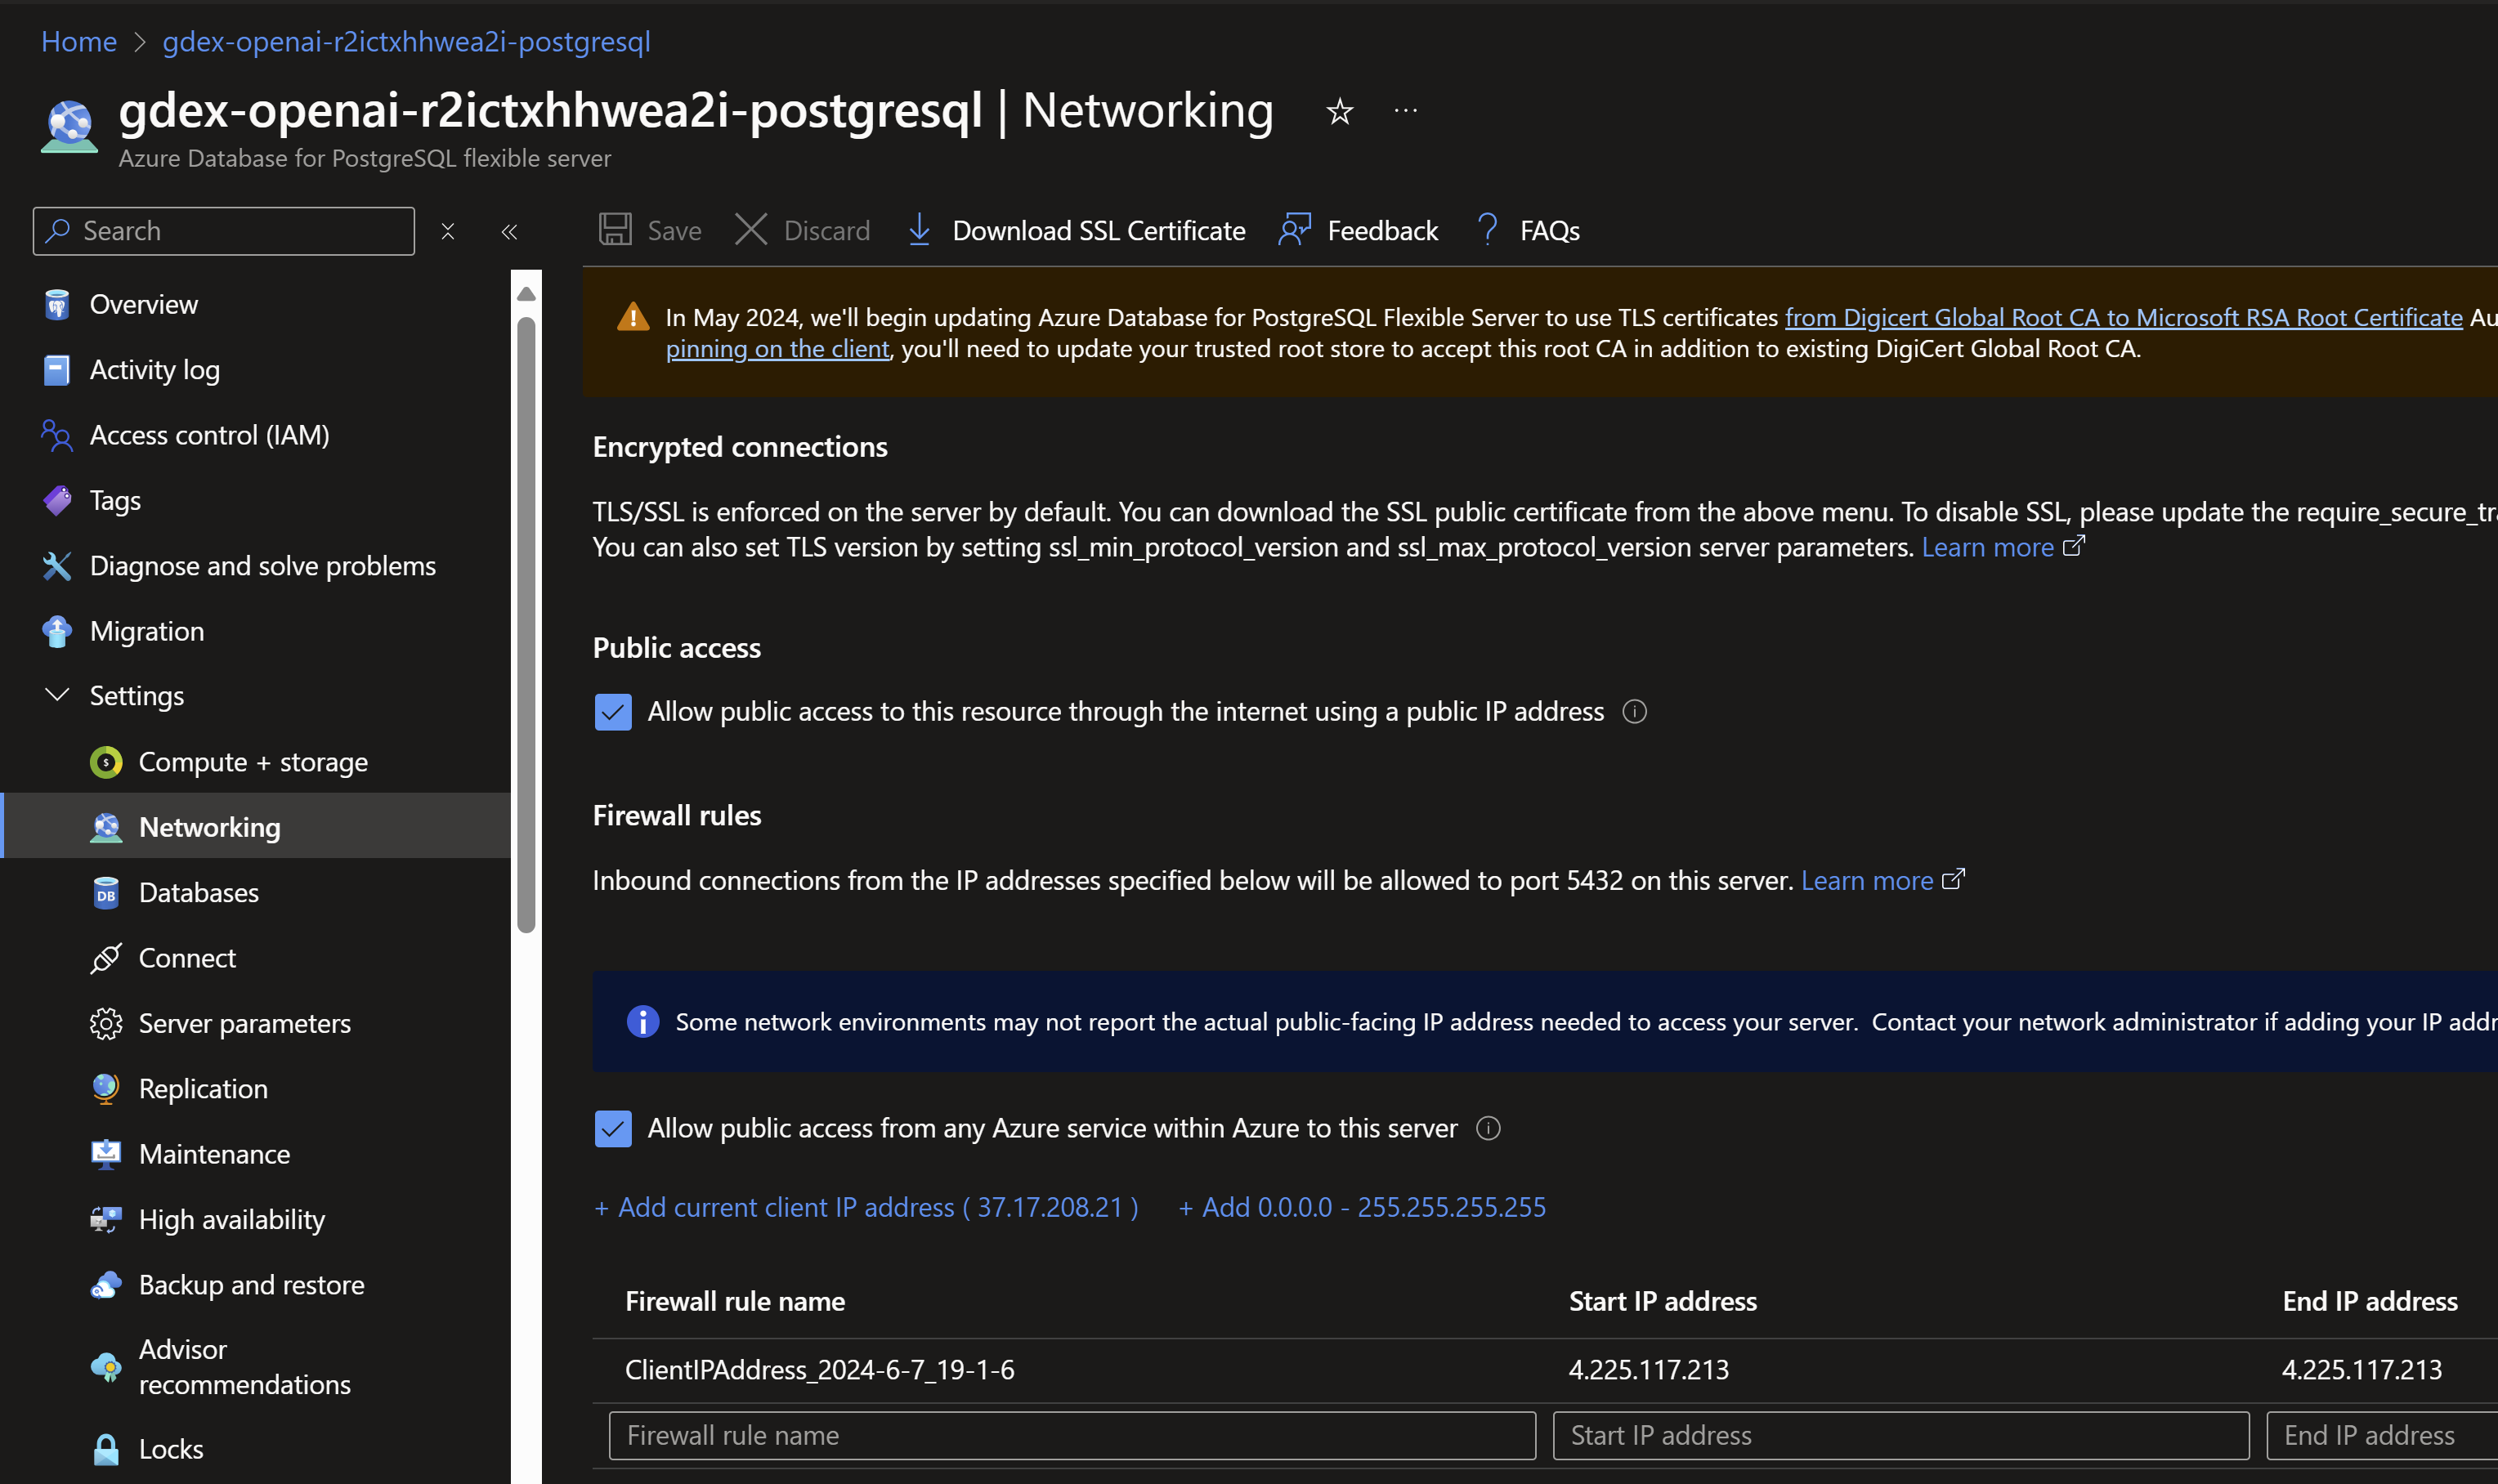
If the first deployment with azd up fails, the postgresql server is already locked down to the virtual network. Running another deployment will fail because you cannot reach the server and thus database anymore. Go to the Postgres Server and add the IP address that you are deploying from to the firewall rules. Example of the error messages below. Use the IP-address from the warning:
DeploymentScriptError: The provided script failed with multiple errors. First error:
Setting postgresql14 as the default version. Please refer to https://aka.ms/DeploymentScriptsTroubleshoot for more deployment script information.
DeploymentScriptError: * Setting postgresql14 as the default version
DeploymentScriptError: psql: error: connection to server at "gdex-openai-r2ictxhhwea2i-postgresql.database.azure.com" (4.225.117.213), port 5432 f is not valid for this server's tenant. Please acquire a new token for the tenant 43207ea0-2cda-4abb-9c84-efb8193dada8.
DeploymentScriptError: connection to server at "gdex-openai-r2ictxhhwea2i-postgresql.postgres.database.azure.com" (4.225.117.213), port 5432 failed: FATAL:
"4.225.117.213", user "gdex-openai-spn", database "postgres", no encryption
DeploymentScriptError: psql: error: connection to server at "gdex-openai-r2ictxhhwea2i-postgresql.postgres.database.azure.com" (4.225.117.213), port 5432 f is not valid for this server's tenant. Please acquire a new token for the tenant 43207ea0-2cda-4abb-9c84-efb8193dada8.
DeploymentScriptError: connection to server at "gdex-openai-r2ictxhhwea2i-postgresql.postgres.database.azure.com" (4.225.117.213), port 5432 failed: FATAL:
"4.225.117.213", user "gdex-openai-spn", database "aoai-proxy", no encryption
DeploymentScriptError: psql: error: connection to server at "gdex-openai-r2ictxhhwea2i-postgresql.database.azure.com" (4.225.117.213), port 5432 f is not valid for this server's tenant. Please acquire a new token for the tenant 43207ea0-2cda-4abb-9c84-efb8193dada8.
DeploymentScriptError: connection to server at "gdex-openai-r2ictxhhwea2i-postgresql.database.azure.com" (4.225.117.213), port 5432 failed: FATAL:
"4.225.117.213", user "gdex-openai-spn", database "aoai-proxy", no encryption
Warning
Do not forget to remove the Postgres network firewall rule after a successful deployment!