Wiring up the Jira (Atlassian) Remote MCP server in Copilot Studio in 5 mins
Classic agents
The Atlassian Remote MCP server uses Dynamic Client Registration. If you wire it up with Manual OAuth in Copilot Studio you'll waste an afternoon. Use Dynamic discovery and a few Atlassian admin toggles, and you're done in five minutes.
I spent way longer than I’d like to admit getting Atlassian’s Remote MCP server to talk to a Copilot Studio agent. The integration itself is dead simple — the issue is that the public docs (and a lot of well-meaning blog posts, including a draft I had on my own machine last week) push you straight at Manual OAuth 2.0 in the Copilot Studio MCP wizard, and that path is a dead end for this particular server.
Short version: turn on the right things on the Atlassian side, pick Dynamic discovery in the MCP wizard, paste the streamable endpoint, consent once. That’s it.
If you want the why, and a clean walkthrough that actually works in May 2026, keep reading.
What’s the Atlassian Remote MCP server?
Atlassian ships a hosted MCP server at https://mcp.atlassian.com/v1/sse that exposes Jira and Confluence tools — JQL search, issue creation, page lookups, the usual suspects. It’s a “Remote MCP” server, meaning you don’t install anything; the server runs in Atlassian’s cloud and you just point your client at the URL.
For Copilot Studio that’s perfect: no Azure, no container, no custom connector. Just an MCP tool with an HTTPS endpoint.
The catch is the auth model — and a couple of admin toggles on the Atlassian side that have to be on first.
Step 0: Get your Atlassian site ready
This is the part the OOTB Copilot Studio guidance can’t help you with, because it’s all on Atlassian’s side. None of these steps take more than a minute, but if any one of them is missing, the MCP handshake fails in confusing ways (usually a generic 401 or “no tools discovered”).
Pre-reqs on the Atlassian site:
-
You’re on Atlassian Cloud. Remote MCP is Cloud-only — Server and Data Center are not in scope. If your URL is
*.atlassian.net, you’re fine. - Rovo is enabled for the site. Atlassian’s Remote MCP server is gated by Rovo. A site admin needs to enable it from Atlassian Admin → Settings → Rovo (or accept the Rovo terms if it’s the first time). Without this, the MCP endpoint will respond, but every tool call returns “this site does not have Rovo enabled”.
- The Remote MCP server is enabled. In Atlassian Admin → Settings → Products → Remote MCP server (the exact path moves around as Atlassian iterates the UI), toggle the server on for the products you want exposed (Jira, Confluence, or both). This is per-site.
- External app access is allowed. Under Security → External app policies, make sure third-party OAuth apps are permitted for the users who will consent. Many enterprise tenants block this by default. If your org has a strict policy, you’ll need either an exception or a policy that explicitly allows the Atlassian MCP client.
- Your test user has product access. Sounds obvious, but if the user signing the consent doesn’t have a Jira or Confluence seat, the server returns an empty resource list and the agent has nothing to work with.
Once those five are in place, everything below “just works”.
Why Manual OAuth is the wrong answer in Copilot Studio
When you click Add a tool → Model Context Protocol → New tool in Copilot Studio, you get four authentication choices:
| Option | When to use it |
|---|---|
| None | Public servers, demos, anything without auth |
| API key | Servers that take a static bearer token |
| OAuth 2.0 | You have a pre-registered OAuth client (client ID, secret, fixed scopes) |
| Dynamic discovery | The server publishes its own OAuth metadata and supports Dynamic Client Registration |
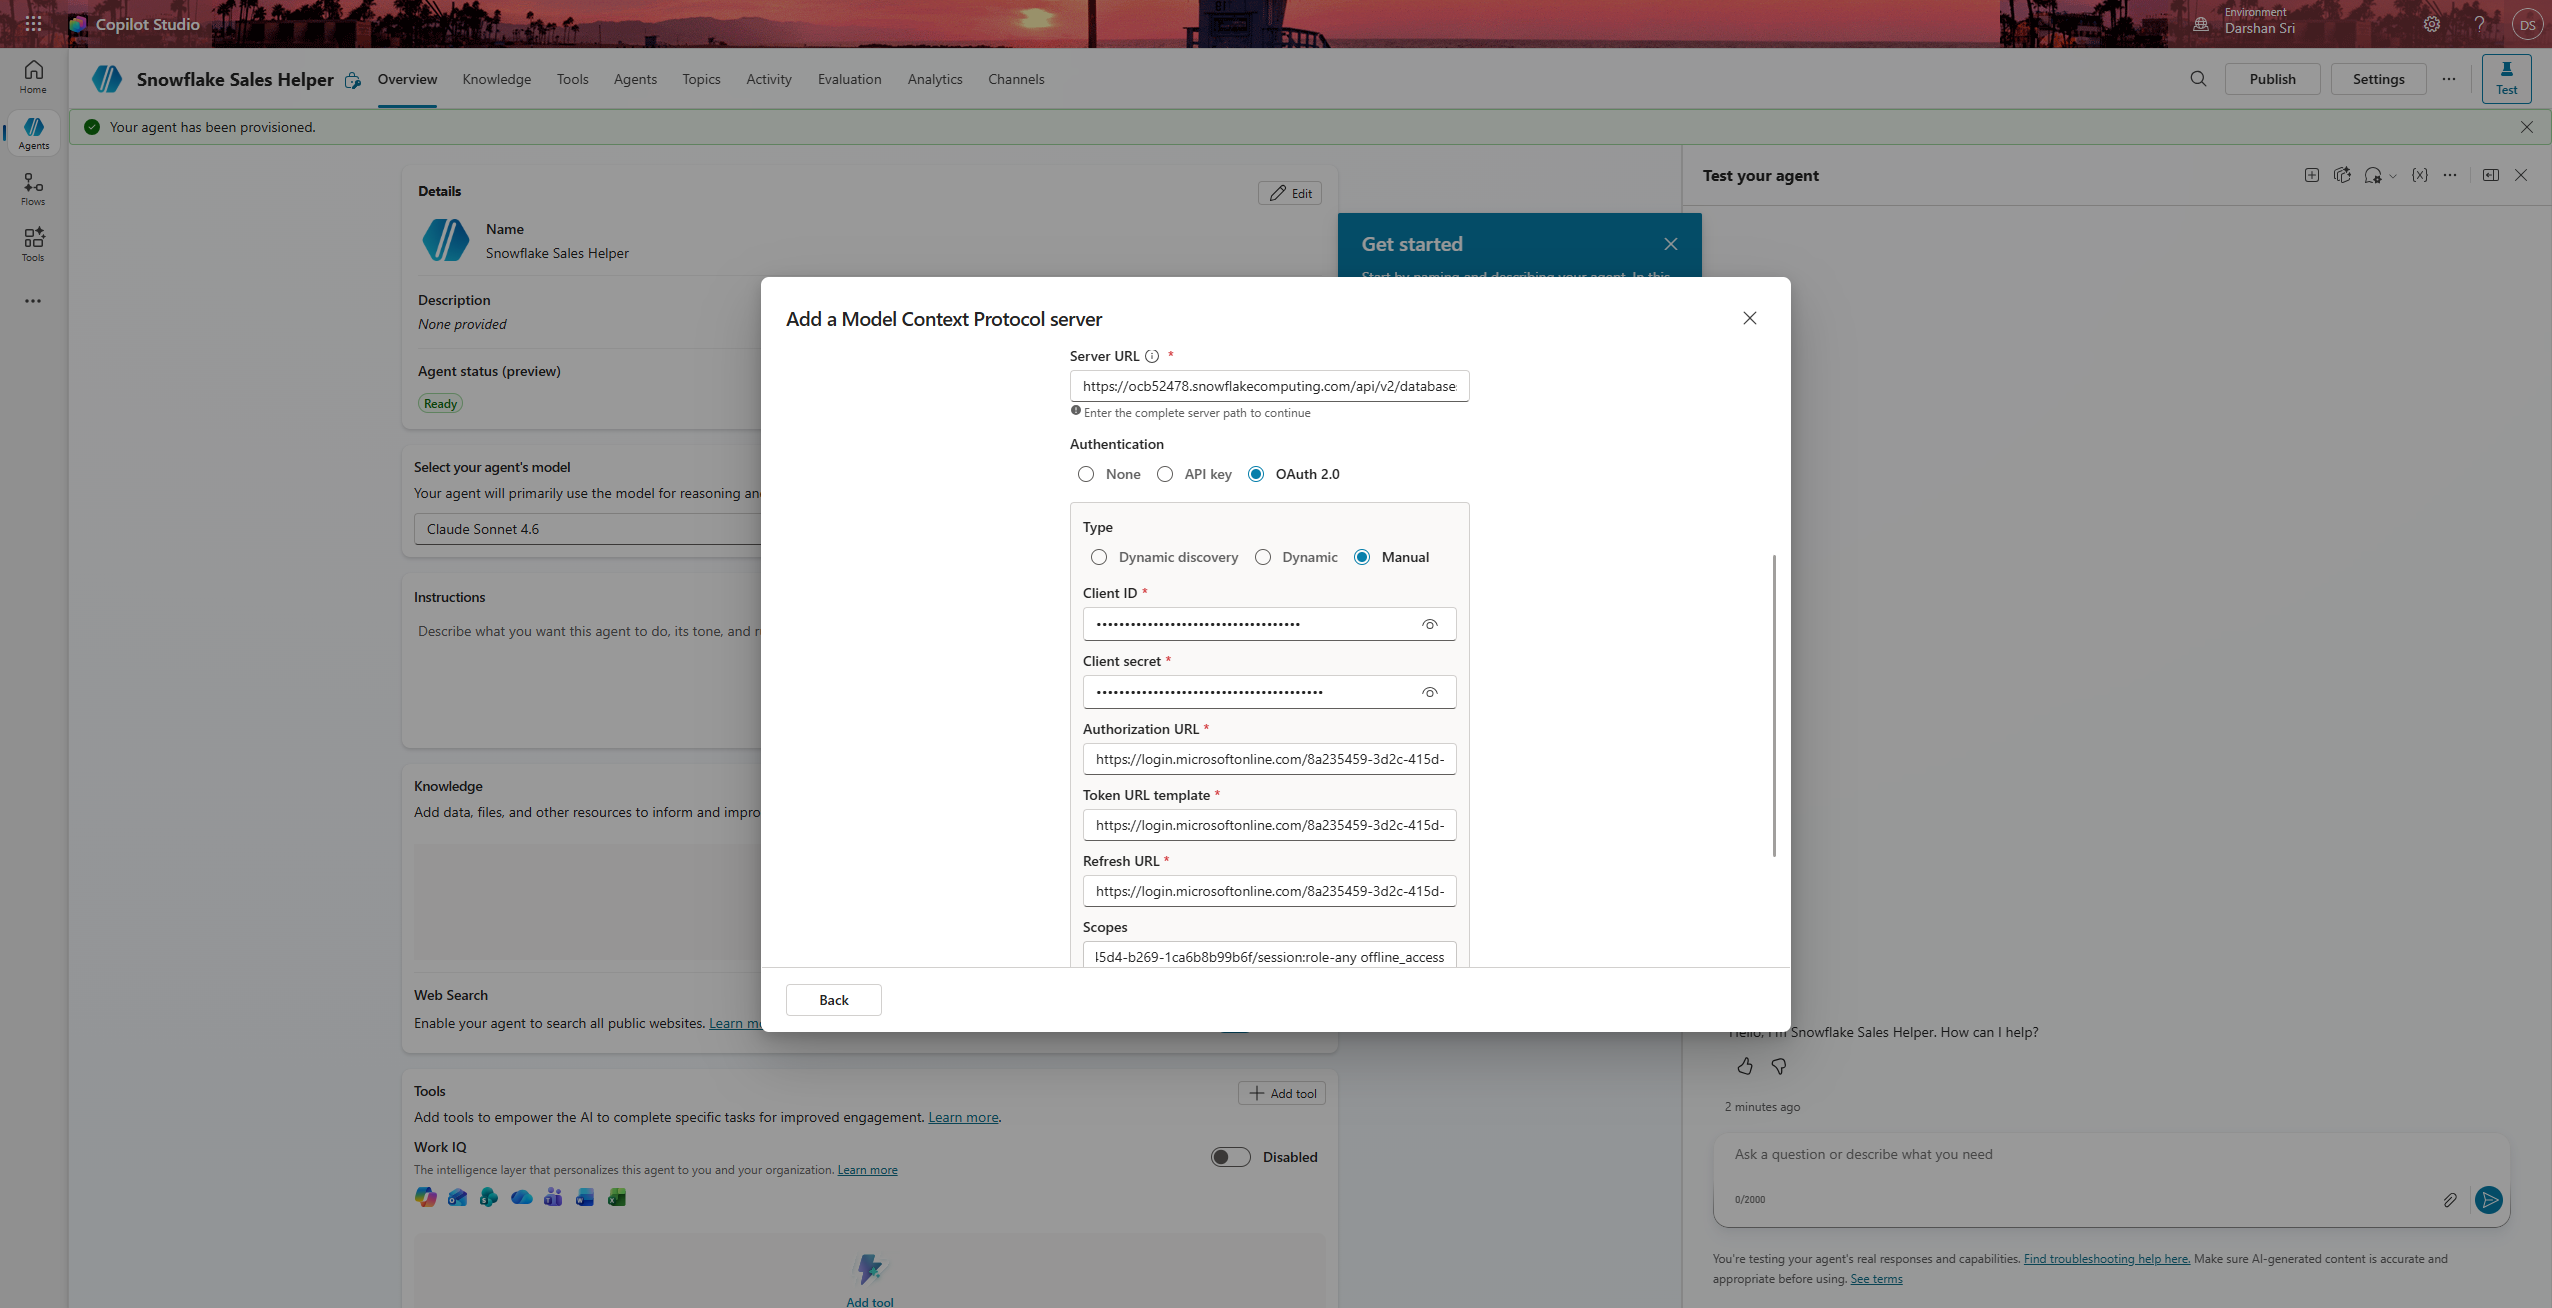 The MCP wizard’s authentication picker — Dynamic discovery is the one you want for Atlassian.
Picking OAuth 2.0 for Atlassian feels right. There is an OAuth flow. There are endpoints. The form is right there asking for them.
The problem is that Atlassian’s MCP server doesn’t have a static client to register against. Its OAuth flow is built on RFC 7591 Dynamic Client Registration — every MCP client that connects creates its own ephemeral OAuth client at runtime by POST-ing to /v1/register. There is no client ID for you to paste into the Manual form, because the client doesn’t exist until the handshake happens.
If you fill in the Manual OAuth form anyway with the discoverable endpoints:
- Authorization:
https://mcp.atlassian.com/v1/authorize - Token:
https://cf.mcp.atlassian.com/v1/token
…you’ll get past tool creation. You’ll even hit the consent screen on Atlassian’s side. But the connection will fail to refresh, the agent’s tool calls will throw 401s on the second turn, and you’ll spend an evening reading Fiddler traces wondering why a “successful” sign-in keeps logging you out. Ask me how I know.
The right answer: Dynamic discovery
Dynamic discovery in Copilot Studio is the option that knows how to do RFC 7591. You give it the MCP endpoint; it walks the well-known metadata, registers itself as a client on the fly, and stores the resulting credentials in the connection. From your perspective the form has exactly one auth-related decision: pick this radio button.
Here’s the full Copilot Studio side, end to end.
1. Prep the agent
Create a new Copilot Studio agent (or pick an existing one). Nothing exotic — the default generative orchestration is fine. Make sure you’re in an environment where you can create connections; this matters more than people realize, because the consent flow will land in the connections list of that environment.
2. Add the MCP tool
From the agent’s Tools tab, choose Add a tool → Model Context Protocol → New tool. Fill in:
-
Server name:
Atlassian(or whatever you want — this is just a label) - Server description: something like “Jira and Confluence via Atlassian’s Remote MCP server”
-
Server URL:
https://mcp.atlassian.com/v1/sse - Authentication: Dynamic discovery
Click Create. Copilot Studio will spin for a few seconds while it discovers and registers, then drop you into the tool’s detail view with the full list of Atlassian-provided tools (getAccessibleAtlassianResources, searchJiraIssuesUsingJql, createJiraIssue, the Confluence equivalents, etc.).
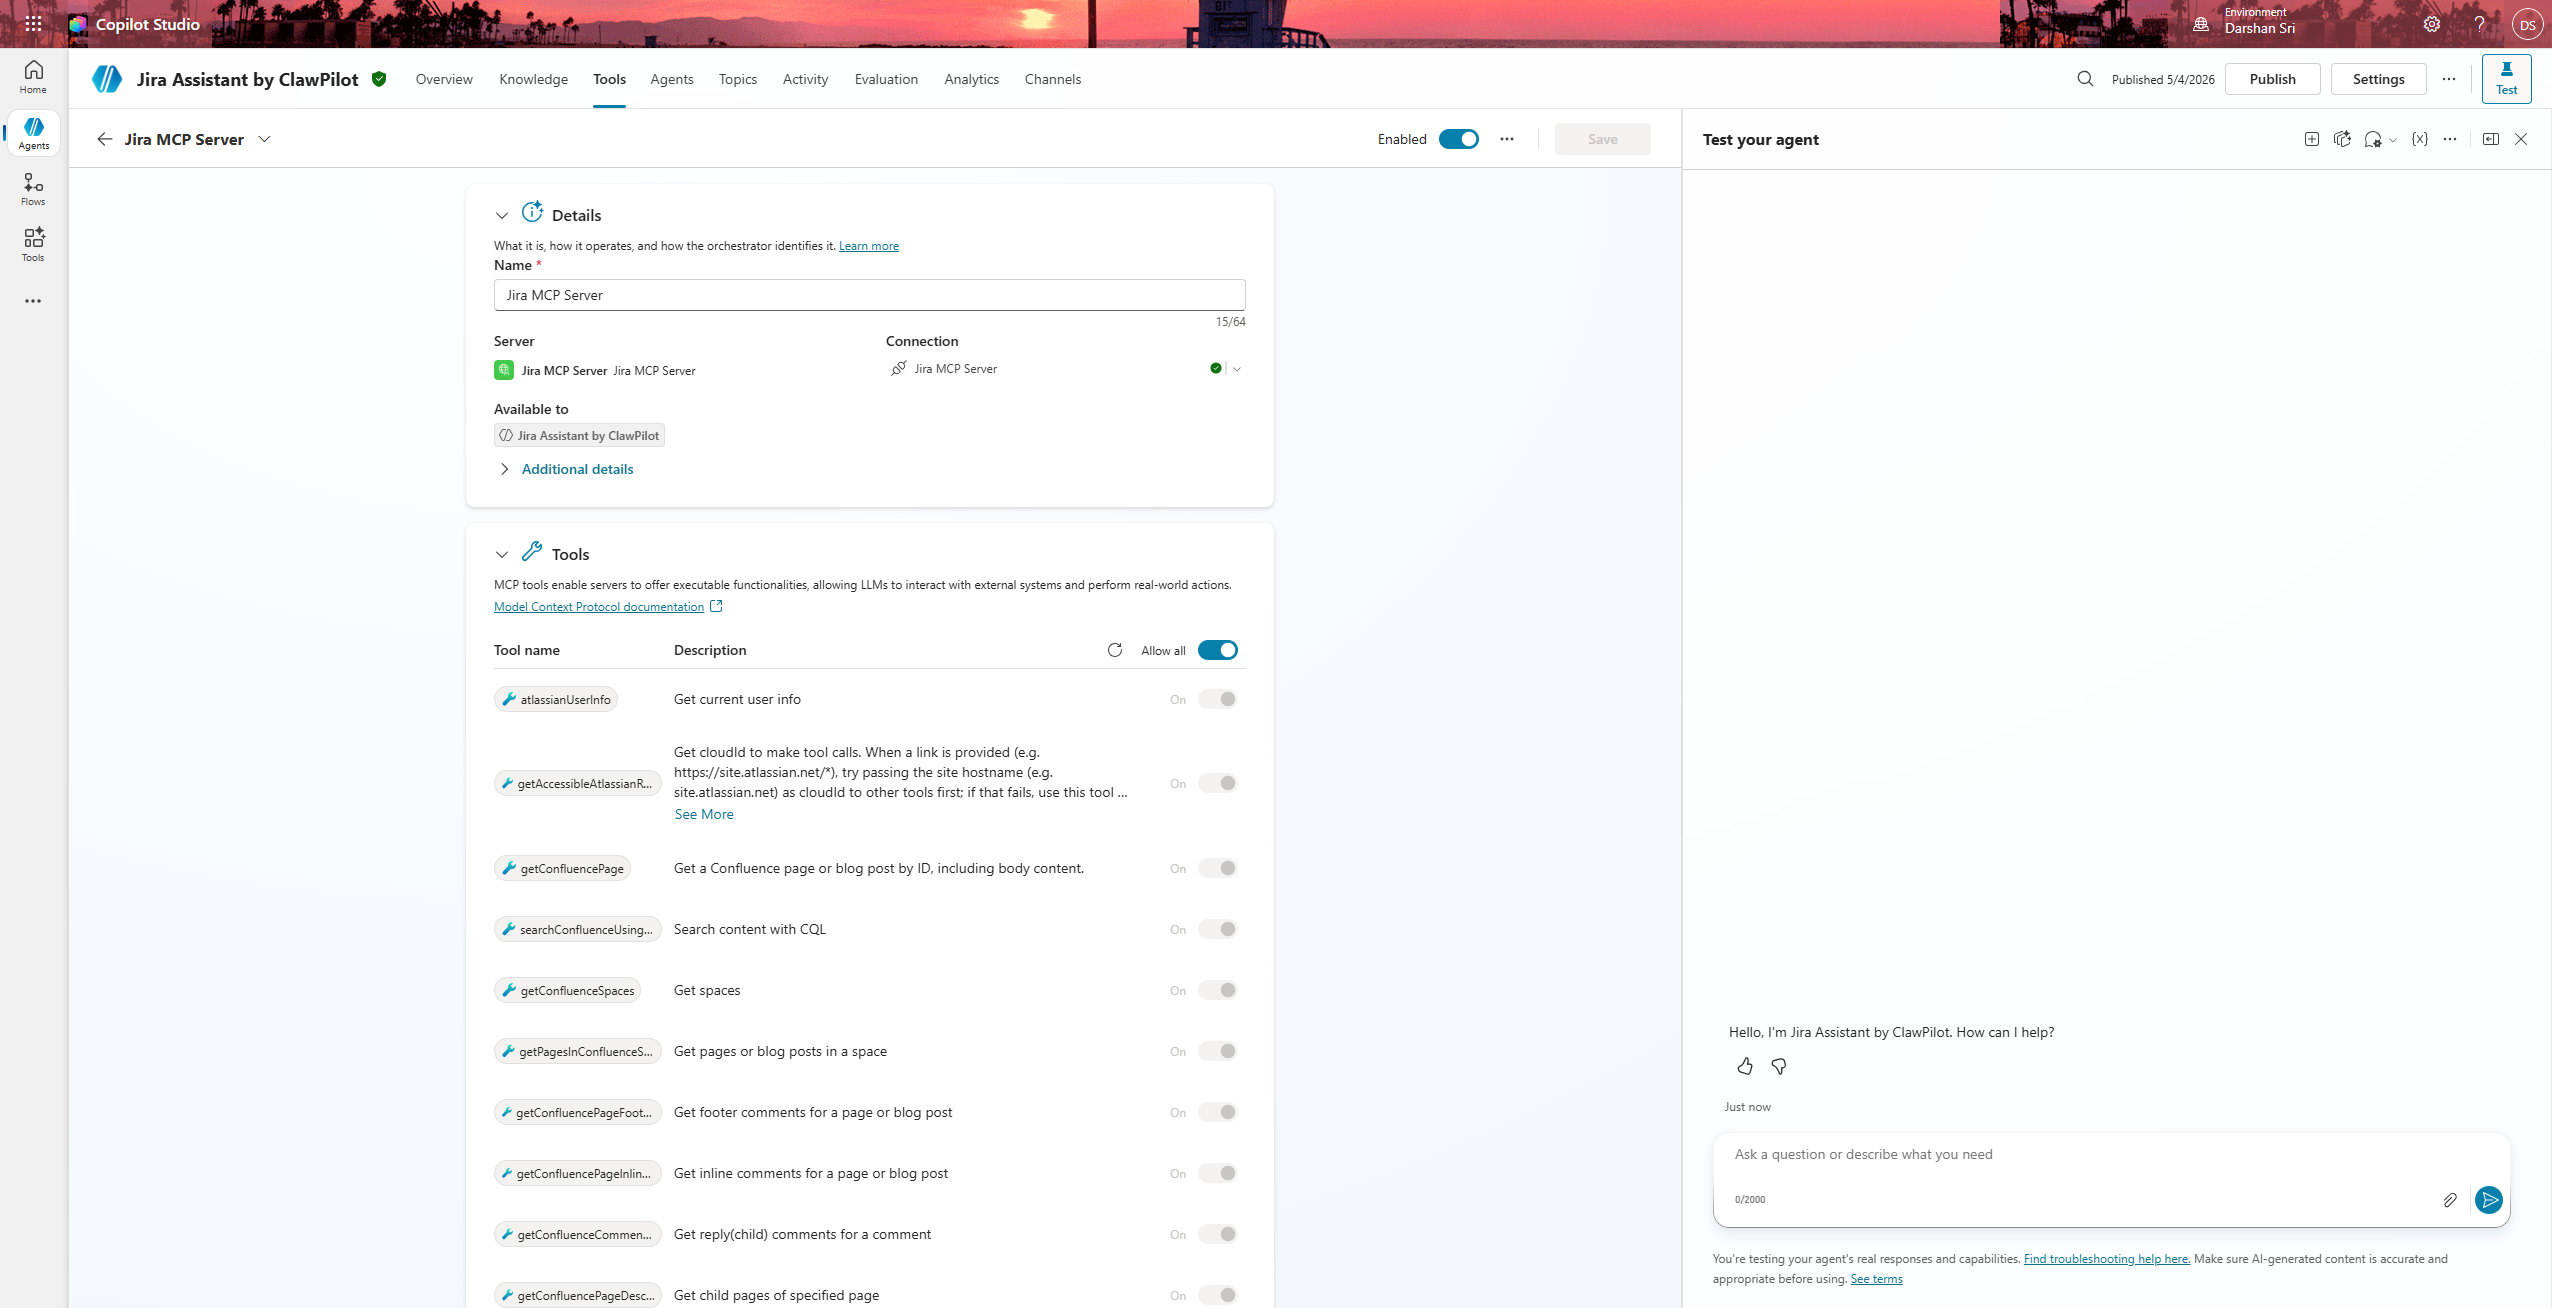 Right after creation: the tool detail page lists every Jira and Confluence operation Atlassian’s Remote MCP server exposes.
If the tool list comes up empty, the discovery probably hit a transient 5xx on Atlassian’s side, or one of the Step 0 toggles isn’t on yet. Check those, then refresh the tool detail page.
3. Create the connection (first-time consent)
Right after the tool is created, Copilot Studio drops you on the tool detail page and you’ll see a yellow banner along the lines of “You need a new connection to use this tool”, with a Create new connection button. Click it.
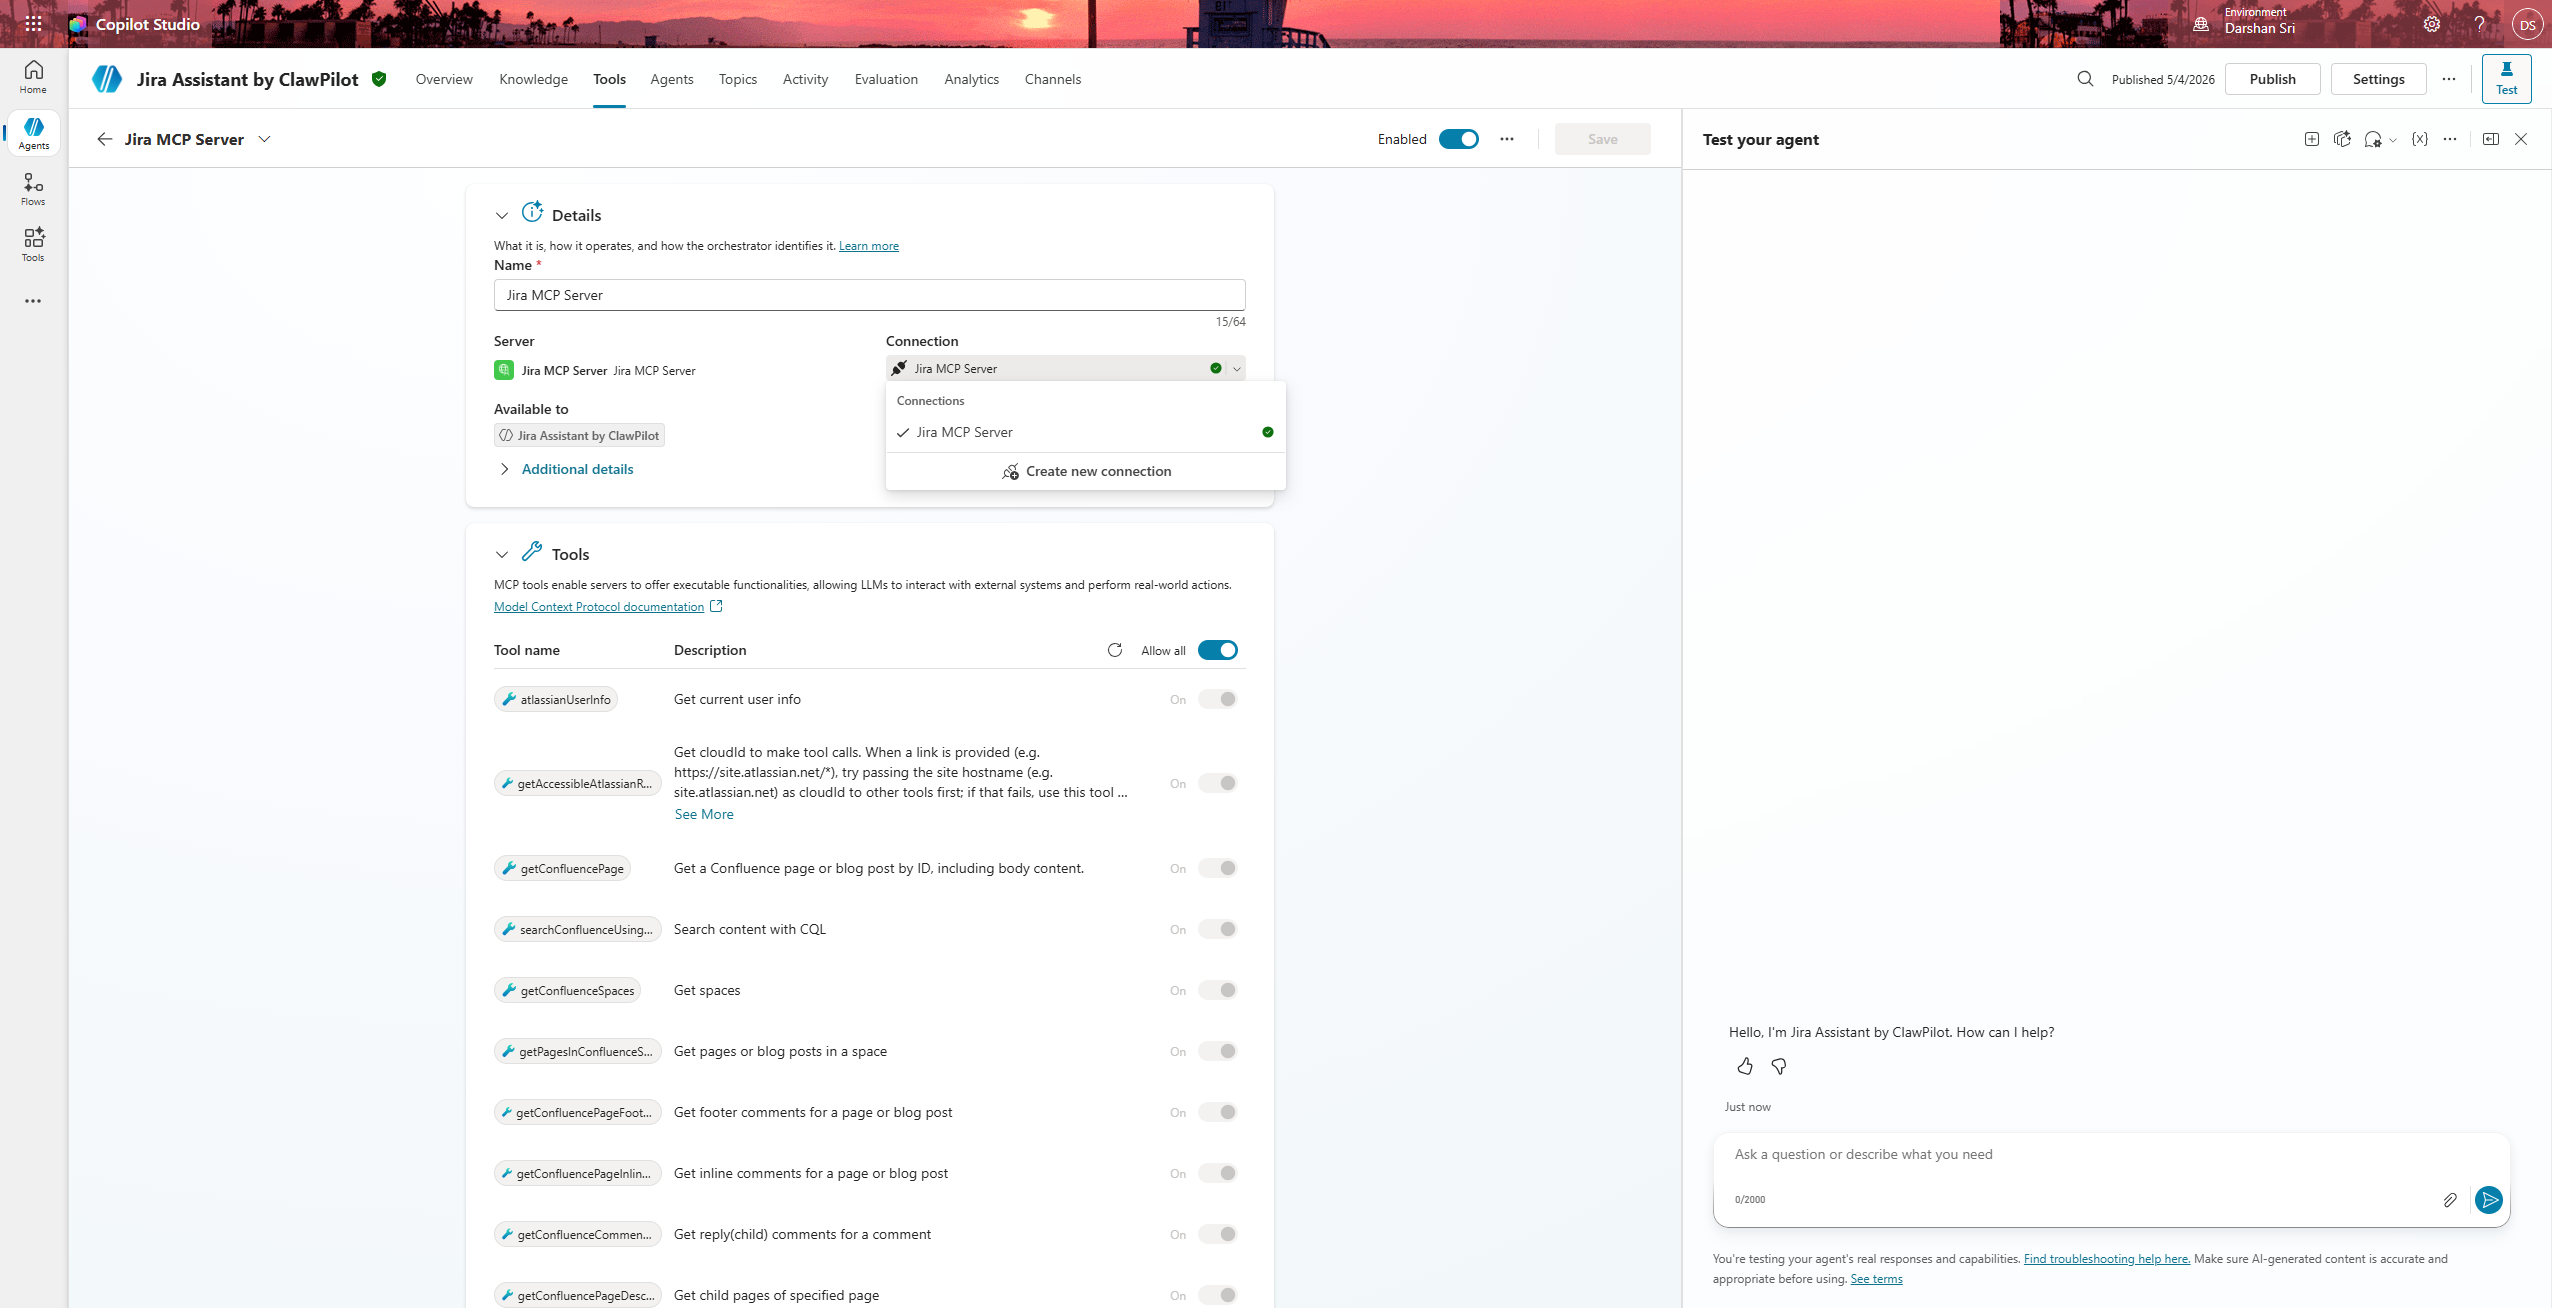 The connection picker on the tool detail page — Create new connection kicks off the first-time consent flow.
This pops the Power Platform connection dialog for the Atlassian MCP server. There are no credentials to type — Dynamic discovery already did the registration work. Just click Create, and a browser window opens to Atlassian’s standard OAuth consent screen — the same UI you’d see authorizing any third-party Atlassian app, except the “app” here was registered a few seconds ago by Copilot Studio.
Pick the Atlassian site you want to grant access to, accept the requested scopes, and the window closes itself.
4. Activate the connection and “Add and configure”
Back in Copilot Studio, the connection now shows in the dropdown but it isn’t wired into the tool yet. Two things to do:
- Activate the connection. Select the new connection from the picker (it’ll show your account/email next to a green dot). The status should flip to Connected.
- Click “Add and configure”. This is the button that actually attaches the live connection to this tool for this agent. Until you click it, the tool exists but the agent can’t call it. This trips people up because creating the connection feels like the finishing step — it isn’t. Add and configure is.
After Add and configure, the tool detail page should show the full list of Atlassian operations as available (no warning banners, no “needs connection” pills).
5. Open the agent’s test pane and verify
Now switch back to the agent’s main page and open the Test your agent pane on the right (or the Test button in the top bar, depending on your layout). Ask something Jira-shaped, like:
“List the Jira sites I have access to.”
The orchestrator picks getAccessibleAtlassianResources and uses the connection you just wired up. You should see something shaped like:
1
2
3
4
5

{
  "cloudId": "00000000-0000-0000-0000-000000000000",
  "url": "https://example.atlassian.net",
  "name": "Example"
}
(Values redacted — yours will be your own site’s cloudId and URL.)
Now run a JQL search to confirm tool calls actually work past auth:
“Find all open issues in my Jira site.”
You should get an HTTP 200 with a real (possibly empty) issue list — something like { "issues": [...], "isLast": true }. Empty array is fine; what you’re looking for is the 200 and a well-formed body. That’s the whole game.
6. Publish
Once the connection is healthy in test, publish the agent and add whatever channels you need. The connection moves with the agent — end users get prompted to consent the first time they trigger a Jira tool, and from then on it’s transparent.
Lessons learned
A handful of footguns, in case you’re hitting them right now:
- The connection lives in the environment, not the agent. If you delete the connection from Power Platform admin (or someone with broader perms does it for “cleanup”), every agent in that environment using Atlassian MCP will silently start failing. The fix is one re-consent, but the failure is silent until a user complains.
- Refresh tokens have a real expiry. If your agent goes idle for a long time, the first call after the gap may need a re-consent. This isn’t a bug, it’s just OAuth.
-
cloudIdis required for almost every Jira tool call. The orchestrator usually figures this out by callinggetAccessibleAtlassianResourcesfirst, but if you’re authoring topics manually and calling tools directly, remember to thread that ID through. - Don’t try to “save time” by reusing an Atlassian app registration you already have. Even if you’ve built custom Jira integrations in the past with a real client ID and secret, those credentials are for the REST API, not the MCP server. The MCP server only does Dynamic Client Registration. Manual OAuth with old credentials will look like it works and then fail in subtle ways.
- Rovo and Remote MCP are separate toggles. I conflated them on my first attempt. Rovo can be on while Remote MCP is off, and vice versa. You need both.
When you’d actually use Manual OAuth
Just to close the loop: Manual OAuth in the MCP wizard is the right pick when you control the OAuth server (or the server’s owner has handed you a client ID and secret to register against). For example, an internal MCP server fronted by your own Entra app registration. If the server uses Dynamic Client Registration — like Atlassian’s does — ignore Manual OAuth and let Dynamic discovery do its job.
TL;DR
- Atlassian side: Cloud site, Rovo on, Remote MCP server on, external apps allowed, user has product access.
- Copilot Studio side: MCP wizard → Dynamic discovery (not OAuth 2.0).
- Server URL:
https://mcp.atlassian.com/v1/sse. - Consent once from the test pane, verify with a JQL search, publish.
Five minutes, one radio button, and a few admin toggles — and you’re done.
What other Remote MCP servers are you hooking up to Copilot Studio? Drop a comment if you’ve found one that needs Manual OAuth instead — I’d love a list.