Asset Loading

June 29, 2017 by Eric Traut


We’ve received questions about how we handle assets (images, videos, sounds) in a way that works for both React Native and React JS (web).

Specifying Asset Locations

On the web, assets are simply referenced by URL and are loaded asynchronously by the browser.

<RX.Image source={ 'https://mydomain.com/images/appLogoSmall.jpg' }/>

React Native apps typically package assets in the app bundle, so they are loaded from the local device storage. In this case, the path is specified in the form of a relative file system path. However, instead of passing the path directly, you need to invoke the React Native packager by calling “require”.

<RX.Image source={ require('./images/appLogoSmall.jpg') }/>

The packager requires that the asset path is specified as a string literal. In other words, it cannot be constructed at runtime or returned by a helper method. For more details about this limitation, refer to the React Native documentation.

This makes it difficult to write cross-platform code that runs on both web and native platforms. Here’s how we solved this problem in the Skype app.

AppAssets Module

We created an “AppAssets” interface that includes an accessor method for each of the assets in our app.

// File: AppAssets.d.ts

declare module 'AppAssets' {
    interface IAppAssets {
        appLogoSmall: string;
        appLogoLarge: string;
        notificationIcon: string;
        // ... etc.
    }
    const Assets: IAppAssets;
}

We then implemented this interface for both web and native platforms.

// File: AppAssetsWeb.ts

import AppAssets = require('AppAssets');
import AppConfig = require('./AppConfig');

class AppAssetsImpl implements AppAssets.IAppAssets {
    appLogoSmall = AppConfig.getImagePath('skypeLogoSmall.png');
    appLogoLarge = AppConfig.getImagePath('skypeLogoLarge.png');
    notificationIcon = AppConfig.getImagePath('notificationIcon.gif');
    // ... etc.
}

export const Assets: AppAssets.IAppAssets = new AppAssetsImpl();
// File: AppAssetsNative.ts

import AppAssets = require('AppAssets');

class AppAssetsImpl implements IAppAssets.Collection {
    get appLogoSmall() { return require('..images/skypeLogoSmall.png'); }
    get appLogoLarge() { return require('..images/skypeLogoLarge.png'); }
    get notificationIcon() { return require('../images/notificationIcon.gif'); }
    // ... etc.
}

export const Assets: AppAssets.IAppAssets = new AppAssetsImpl();

There are a few things worth noting in the code above. First, we’re making use of an interface to ensure that the web and native implementations stay in sync. If you forget to add an asset to both files, the TypeScript compiler will detect the error at build time.

Second, the web implementation is using a helper method getImagePath to construct the full URL. It builds this using a dynamically-configurable domain name, allowing us to stage the app to a test web server or publish it to the production server.

Third, the native implementation makes use of accessors. This defers the loading of the asset until the first time it is first accessed. Without this trick, all assets would be loaded at the time the AppAssetsNative module was initialized, adding to app startup time.

Now we can reference the assets in a cross-platform way.

import AppAssets = require('AppAssets');

<RX.Image source={ AppAssets.Assets.appLogoSmall }/>

Aliasing

Now that we have two implementations (one for web and a second for native), how do we “link” the correct version based on the platform that we’re building? We do this through a lightweight “aliasing” step in our build process. This step replaces the require('AppAssets') with either require('./ts/AppAssetsWeb') or require('./ts/AppAssetsNative') depending on the platform being built.

I’ll provide examples in gulp syntax, but the same technique can be used in grunt or other task scripting runtimes.

var config = {
    aliasify: {
        src: './.temp/' + argv.platform,
        dest: getBuildPath() + 'js/',
        aliases: (argv.platform === 'web') ?
        // Web Aliases
        {
            'AppAssets': './ts/AppAssetsWeb'
        } :
        // Native Aliases
        {
            'AppAssets': './ts/AppAssetsNative'
        }
    }
}

function aliasify(aliases) {
    var reqPattern = new RegExp(/require\(['"]([^'"]+)['"]\)/g);

    // For all files in the stream, apply the replacement.
    return eventStream.map(function(file, done) {
        if (!file.isNull()) {
            var fileContent = file.contents.toString();
            if (reqPattern.test(fileContent)) {
                file.contents = new Buffer(fileContent.replace(reqPattern, function(req, oldPath) {
                    if (!aliases[oldPath]) {
                        return req;
                    }

                    return "require('" + aliases[oldPath] + "')";
                }));
            }
        }

        done(null, file);
    });
}

gulp.task('apply-aliases', function() {
    return gulp.src(path.join(config.aliasify.src, '**/*.js'))
        .pipe(aliasify(config.aliasify.aliases))
        .pipe(gulp.dest(config.aliasify.dest))
        .on('error', handleError);
});

// Here's our full build task pipeline. I haven't provided the task
// definitions for all of these stages, but you can see where the
// 'apply-aliases' task fits into the pipeline.
gulp.task('run', function(callback) {
    runSequence('clean', 'build', 'apply-aliases', 'watch', 'lint', callback);
});
Performance Tuning

May 24, 2017 by Eric Traut


Performance tuning is an important part of any app development effort. In this article, I’ll talk about some of the tools and techniques we used to identify and address performance bottlenecks within the ReactXP-based Skype app.

One of the benefits of a cross-platform code base is that many performance improvements benefit all platforms.

Measurement and Analysis

It has been said that you can’t improve what you can’t measure. This is especially true for performance tuning. We use a variety of tools to determine which code paths are performance-critical.

Regardless of the analysis tool, you may want to use the production build of the app when measuring performance. The React JavaScript code performs many expensive runtime checks when it executes in “dev mode”, and this can significantly distort your measurements.

Chrome Performance Tools

The Chrome browser offers excellent tracing and visualization tools. Open the Developer Tools window, click on the Performance tab, and click on the “record” button. Once you’re done recording, Chrome will display a detailed timeline with call hierarchies. Zoom in and out to determine where your time is going.

Systrace

React Native provides a way to enable and disable Systrace, a method-level trace recording facility. It records both native and JavaScript methods, so it provides a good overview of what’s happening throughout the app. To use Systrace, build and deploy a dev build to your device. Shake the device to display the developer menu (or press command-D if you’re running within the iOS simulator). Select “Start Systrace”, then perform the action that you want to measure. When you stop Systrace, an HTML trace file will be created. You can visualize and interact with this trace in Chrome. Recent versions of Chrome deprecated a feature used in the Systrace code, so you will need to edit it as follows. Simply add the following line to the head section of the generated HTML file.

<script src="https://rawgit.com/MaxArt2501/object-observe/master/dist/object-observe.min.js"></script>

Console Logging

Primitive console logging is often an effective way to measure performance. Log entries can be emitted with millisecond-resolution timestamps. Simply call Date.now() to get the current time. Durations of performance-critical operations (such as app startup) can also be computed and output in the log.

Instrumentation

Once your app is deployed at scale, it’s important to monitor performance of critical operations. To do this, we log instrumentation that is sent to our servers and aggregated across all users. We’re then able to visualize the data over time, by platform, by device type, etc.

Crossing the Bridge

React Native apps contain two separate execution environments — JavaScript and Native. These environments are relatively independent. They each run on separate threads and have access to their own data. All communication between the two environments takes place over the React Native “bridge”. You can think of the bridge as a bidirectional message queue. Messages are processed in the order in which they are placed on each of the queues.

Data is passed in a serialized form — UTF16 text in JSON format. All I/O occurs in the native environment. This means any storage or networking request initiated by the JavaScript code must go across the bridge, and the resulting data must then be serialized and sent back across the bridge in the other direction. This works fine for small pieces of data, but it is expensive once the data sizes or the message counts grow.

One way to mitigate this bottleneck is to avoid passing large pieces of data across the bridge. If it doesn’t require processing within the JavaScript environment, leave it on the native side. It can be represented as a “handle” within the JavaScript code. This is how we handle all images, sounds, and complex animation definitions.

Cooperative Multitasking

JavaScript runs on a single thread. If your app’s JavaScript code runs for long periods of time, it blocks execution of event handlers, message handlers, etc., and the app will feel non-responsive. If you need to do a long-running operation, you have several options:

  1. Implement it as a native module and run it on a separate thread (applicable only to React Native).
  2. Break the operation into smaller blocks and execute them as chained tasks.
  3. Compute only the portion of the result that is needed at the time.

Virtualization

When dealing with long lists of data that appear within a user interface, it is important to use some form of virtualization. A virtualized view renders only the visible contents. As the user scrolls through the list, newly-disclosed items are rendered. We looked at all of the available virtualized views, but we didn’t find any that provided both the speed and flexibility that we needed, so we ended up writing our own implementation. Our VirtualListView went through six major iterations before we landed on a design and implementation that we were happy with.

Launching Your Startup

App startup time is perhaps the biggest performance challenge with React Native apps. This is especially true on slower Android devices. We continue to struggle to reduce the startup times on such devices. Here are several tips that we learned along the way.

Defer Module Initialization

In TypeScript or JavaScript code, it’s common practice to include a bunch of import statements at the top of each module. For example, here’s what you’ll find at the top of the App.tsx file in the hello-world sample.

import RX = require('reactxp');
import MainPanel = require('./MainPanel');
import SecondPanel = require('./SecondPanel');

Each of these “require” calls initializes the specified module the first time it’s encountered. A reference to that module is then cached, so subequent calls to “require” the same module are almost free. At startup time, the first module requires several other modules, each of which requires several other modules, etc. This continues until the entire tree of module dependencies have been initialized. This all occurs before the first line of your first module executes. As the number of modules within your app increases, the initialization time increases.

The way to fix this problem is through deferred initialization. Why pay the cost of initializing a module for some seldom-used UI panel at startup? Just defer its initialization until it is needed. To do this, we make use of a babel plugin created by Facebook called inline-requires. Just download the script and create a “.babelrc” file that looks something like this:

{
   "presets": ["react-native"],
   "plugins": ["./build/inline-requires.js"]
}

What does this script do? It eliminates the require calls at the top of your modules. Whenever the imported variable is used within the file, it inserts a call to require. This means all modules are initialized immediately before their first use rather than at app startup time. For large apps, this can shave seconds from the app’s startup time on slower devices.

Minification

For production builds, it’s important to “minify” your JavaScript. This process eliminates extraneous whitespace and shortens variable and method names where possible. It reduces the size of your JavaScript bundle on disk and in memory and speeds up parsing of your code.

Native Module Initialization

React Native includes a number of built-in “native modules”. These provide functionality that you can invoke from JavaScript. Many apps will not make use of all of the default native modules. Each native module can add tens of milliseconds to the app initialization time, so it’s wasteful to initialize native modules that your app won’t use. On Android, you can eliminate this overhead by creating a subclass of MainReactPackage that is specific to your app. Copy the createViewManagers() method into your subclass and comment out the view managers that you don’t use. Then change the getPackages() method within your app’s ReactInstanceHost class to instantiate your custom class rather than the normal MainReactPackage. This technique can shave 100ms or more off the startup time on slow Android devices.

Additional Resources

For additional tips on performance tuning, refer to the Performance page on Facebook’s React Native documentation site. This blog also contains useful tips.

Building Skype on ReactXP

April 27, 2017 by Eric Traut


ReactXP was developed by the Skype team at Microsoft as a way to improve development agility and efficiency. In this article, I’ll talk more about the architecture of the new Skype app.

Skype application architecture

Implementing Stores with ReSub

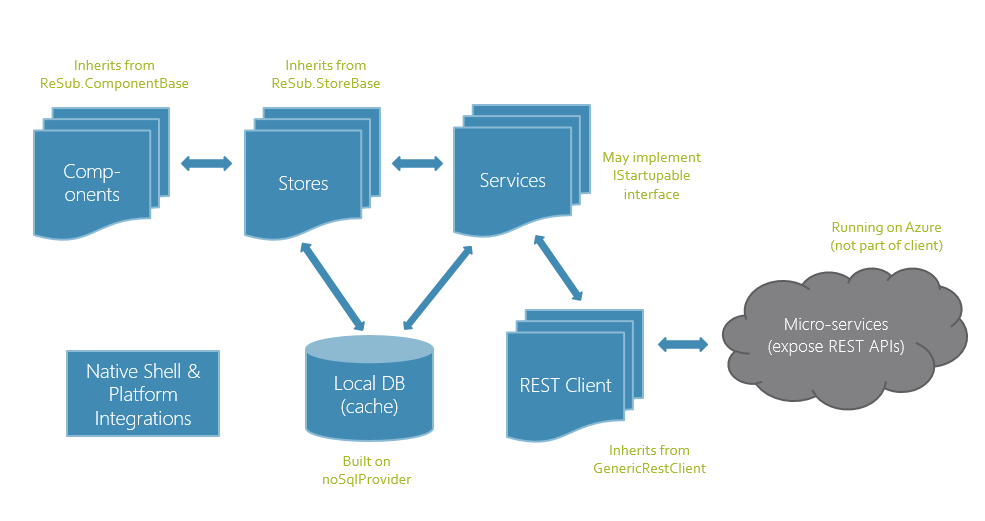
We initially tried using Flux, an architectural pattern created by Facebook engineers. We liked some of its properties, but we found it cumbersome because it required us to implement a bunch of helper classes (dispatcher, actions, action creators). State management also became hard to manage within our more complex components. For these reasons, we developed a new mechanism that we call ReSub, short for “React Subscriptions”. ReSub provides coarse-grained data binding between components and stores, and it automates the process of subscribing and unsubscribing. More details and sample code can be found on the ReSub github site.

Some stores within the app are singleton objects and are allocated — and perhaps even populated — at startup time. Others are allocated on demand and have a well-defined lifetime that corresponds to a user interaction or mode.

Caching Data Locally

Stores are responsible for maintaining in-memory data representations. We also had the need to persist data in a structured manner. Storing data locally allows the app to run in “offline” mode. It also allows for fast startup, since we don’t need to wait for data to download over the network.

For local storage, we developed a cross-platform no-SQL database abstraction. It uses the native database implementation for each platform (sqlite for iOS, indexDB for some browsers, etc.). The abstraction allows us to create and query multiple tables. Each table can have multiple indexes, including composite (multi-key) indexes. It also supports transactions and string indexing for full text searches.

Services & Startup Management

Background tasks, such as fetching new messages, are handled by modules we refer to as “Services”. These are singleton objects that are instantiated at app startup time. Some services are responsible for updating stores and saving information to the local database. Others are responsible for listening to one or more other stores and synthesizing information from those stores (e.g. notifications that are generated for incoming messages that require the user’s immediate attention).

In some cases, a service was so tightly bound to the operation of a particular store that we merged their functionality into a single module. For example, we created a ConfigurationStore to track app-level configuration settings (e.g. which features are enabled for a particular user). We could have implemented a corresponding ConfigurationService that fetches configuration updates, but we opted to implement this functionality within the ConfigurationStore out of pragmatism.

At startup time, the app needs to instantiate all of its singleton stores and services, some of which have dependencies on others. To facilitate this startup process, we created a startup manager. Each store or service that wants to be started must implement an interface called “IStartupable”, which includes a “startup” method that returns a promise. Modules register themselves with the startup manager and specify which other modules (if any) they depend upon. This allows the startup manager to run startup routines in parallel. Once a startup promise is resolved, it unblocks the startup of any dependent modules. This continues until all registered modules have been started.

Here is a startup routine that populates its store with data from the database. Note that the startup routine returns a promise, which isn’t resolved until after the async database access is completed.

startup(): SyncTasks.Promise<void> {
    return ClientDatabase.getRecentConversations().then(conversations => {
        this._conversations = conversations;
    });
}

Communicating with the REST of the World

Skype is built upon over a dozen different micro-services that run on Azure. For example, one micro-service handles message delivery, another handles the storage and retrieval of photos and videos, and yet another provides dynamic updates of emoticon packs. Each micro-service exposes its functionality through a simple REST API. For each service, we implement a REST Client that exposes the API to the rest of the app. Each REST Client is a subclass of the Simple REST Client, which handles retry logic, authentication, and setting of HTTP header values.

Responsive Behavior

The Skype app runs on a wide variety of devices from phones to desktop PCs with large screens. It is able to adapt to screen size (and orientation) changes at runtime. This is mostly the responsibility of components at the upper layers of the view hierarchy, which change their behavior based on the available screen width. They subscribe to a store that we call “ResponsiveWidthStore”. Despite its name, this store also tracks the screen (or window) height and the device orientation (landscape vs portrait).

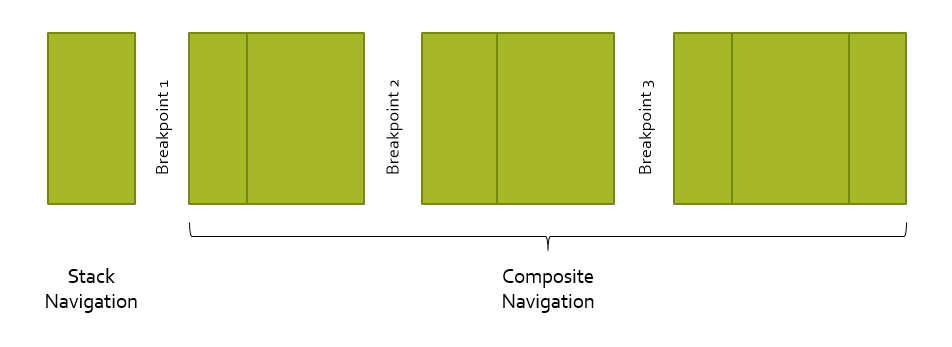
As is common with most responsive websites, we defined several “break point” widths. In our case, we chose three such break points, meaning that our app works in one of four different responsive “modes”.

Responsive breakpoints

In the narrowest mode, the app uses a “stack navigation” mode, where UI panels are stacked one on top of another. This is a typical navigation pattern for phones. For wider modes, the app uses a “composite navigation” mode, where panels are positioned beside each other, allowing for better use of the expanded screen real estate.

The app coordinates navigation changes through the use of a NavigationStateStore. Components can subscribe to this store to determine whether the app is currently in “stack navigation” or “composite navigation” mode. When in stack navigation mode, this store records the contents of the stack. When in composite navigation mode, it records which panels and sub-panels are currently displayed (and in some cases, which mode they are in). This is tracked through a NavigationContext object. The parts of the view hierarchy that respond to navigation changes each have a corresponding NavigationContext. Some context have references to other child contexts, reflecting the hierarchical nature of the UI. When the user performs an action that results in a navigation change, the NavigationAction module is responsible for updating the NavigationContext and writing it back to the NavigationStateStore. This, in turn, causes the UI to update.

Here is some code that demonstrates the typical flow. We start with an event handler within a button.

private _onClickConversationButton() {
    // Navigate to the conversation.
    NavigationActions.navigateToConversation(this.props.conversationId);
}

The NavigationActions module then updates the current navigation context. It needs to handle both the stack and composite cases.

navigateToConversation(conversationId: string) {
    let convContext = this.createConversationNavContext(conversationId);

    if (NavigationStateStore.isUsingStackNav()) {
        NavigationStateStore.pushNewStackContext(convContext);
    } else {
        NavigationStateStore.updateRightPanel(convContext);
    }
}

This causes the NavigationStateStore to update its internal state and trigger a change, which notifies any subscribers.

pushNewStackContext(context: NavigationContext) {
    this._navStack.push(context);

    // Tell subscribers that the nav context changed.
    this.trigger();
}

The primary subscriber to the NavigationStateStore is a component called RootNavigationView. It is responsible for rendering either a RootStackNavigationView or RootCompositeNavigationView.

protected _buildState(/* params omitted */): RootNavigationViewState {
    return {
        isStackNav: NavigationStateStore.isUsingStackNav(),
        compositeNavContext: NavigationStateStore.getCompositeNavContext(),
        stackNavContext: NavigationStateStore.getStackNavContext()
    };
}

render() {
    if (this.state.isStackNav) {
        return (
            <RootStackNavigationView navContext={ this.state.stackNavContext } />
        );
    } else {
        return (
            <RootCompositeNavigationView navContext={ this.state.compositeNavContext } />
        );
    }
}

Introducing ReactXP

April 6, 2017 by Eric Traut


The Skype team at Microsoft are happy to announce that we are open sourcing ReactXP, a library that we developed for cross-platform development. It builds upon React JS and React Native, allowing you to create apps that span both web and native with a single code base.

History of ReactXP

Skype runs on many platforms — desktops, laptops, mobile phones, tablets, browsers, and even TVs and cars. Historically, the UI for each Skype client was written from scratch in the “native” language of each platform (Objective C on iOS, Java on Android, HTML and javascript on the web, etc.). About a year ago, we embarked on an effort to reinvent Skype. We decided that we needed to take a fresh approach to client development - one that would maximize our engineering efficiency and agility. We wanted to move away from implementing each new feature multiple times in different code bases. We wanted to minimize duplication of effort. We explored a number of available options. Web wrappers like Cordova (PhoneGap) didn’t provide the performance or “native feel” we were looking for. Xamarin, which is a great solution for cross-platform mobile development, didn’t help us on the web. We ultimately decided to build our new client on top of React JS and React Native. ReactXP was our attempt to unify the behaviors and interfaces across React JS and the various React Native implementations. (We initially referred to it as ReactX, hence the references to this term within the sources.)

The Skype team also made many contributions to the React Native code base to fix bugs, improve performance, and eliminate behavioral differences between React JS and React Native. The biggest contribution was a major rework of the React Native layout engine. The original implementation loosely followed the W3C flexbox standard, but it differed from the standard in some important ways. The updated layout engine now reliably produces the same layout as all compliant web browsers.

ReactXP Design Philosophy

ReactXP was designed to be a thin, lightweight cross-platform abstraction layer on top of React and React Native. It implements a dozen or so foundational components that can be used to build more complex components. It also implements a collection of API namespaces that are required by most applications.

ReactXP currently supports the following platforms: web (React JS), iOS (React Native), Android (React Native) and Windows UWP (React Native). Windows UWP is still a work in progress, and some components and APIs are not yet complete.

The ReactXP “core” contains only general-purpose functionality. More specialized cross-platform functionality can be delivered in the form of ReactXP extensions. The Skype team has developed about twenty such extensions, and we plan to open source some of these over time. Extensions allow us to expand ReactXP without increasing its footprint or complexity.

When we were deciding which props and style attributes to expose in ReactXP, we tried to stick with those that could be implemented uniformly on all supported platforms. For example, we don’t expose any HTML-specific props or CSS-specific attributes that are not also supported in React Native. In a few cases, we decided to expose select platform-specific props or style attributes and documented them as being “no ops” on other platforms, but this was done only when we could find no other viable workaround.

Future of ReactXP

The Skype team will continue to maintain and build upon ReactXP. Other teams within Microsoft are also starting to use it and make contributions. Today we are opening it to the broader open source community. We hope that others will find it useful, and we welcome feedback and contributions.

We plan to snap a new version of ReactXP approximately monthly, roughly aligned to React Native releases.