🔒 User Authentication
At times agents must access secured online resources on behalf of the user, such as checking email, checking on flight status, or placing an order. To enable this, the user must authenticate their identity and grant consent for the application to access these resources. This process results in the application receiving a token, which the application can then use to access the permitted resources on the user's behalf.
This is an advanced guide. It is highly recommended that you are familiar with Teams Core Concepts before attempting this guide.
User authentication does not work with the developer tools setup. You have to run the app in Teams. Follow Quickstart: Register your app to register and sideload your bot.
It is possible to authenticate the user into other auth providers like Facebook, Github, Google, Dropbox, and so on.
Once you have configured your Azure Bot resource OAuth settings, as described in the official documentation, add the following code to your App:
Project Setup
Create an app with the graph template
Skip this step if you want to add the auth configurations to an existing app.
Use your terminal to run the following command:
teams project new typescript oauth-app --template graph
This command:
- Creates a new directory called
oauth-app. - Bootstraps the graph agent template files into it under
oauth-app/src.
Set up the OAuth connection
User authentication requires an Azure-managed bot (Teams-managed bots don't support OAuth connections). If you registered with --teams-managed, migrate first:
teams app bot migrate <appId> --subscription <id> --resource-group <your-resource-group>
Then follow the User Authentication Setup guide to configure the AAD app, create the Azure Bot OAuth connection, and update the manifest. The guide covers both SSO (silent token exchange) and generic OAuth.
If you'd rather have an AI coding assistant run the setup, install the teams-dev skill and ask it to "set up SSO for my Teams bot".
Configure the OAuth connection
import { App } from '@microsoft/teams.apps';
import * as endpoints from '@microsoft/teams.graph-endpoints';

const app = new App({
  oauth: {
    defaultConnectionName: 'graph',
  },
});
Make sure you use the same name you used when creating the OAuth connection in the Azure Bot Service resource.
In many templates, graph is the default name of the OAuth connection, but you can change that by supplying a different connection name in your app configuration.
Signing In
This uses the Single Sign-On (SSO) authentication flow. To learn more about all the available flows and their differences see the official documentation.
You must call the signin method inside your route handler, for example: to signin when receiving the /signin message:
app.message('/signin', async ({ signin, send }) => {
  if (await signin()) {
    await send('you are already signed in!');
  }
});
Subscribe to the SignIn event
You can subscribe to the signin event, that will be triggered once the OAuth flow completes.
app.event('signin', async ({ send, token }) => {
  await send(
    `Signed in using OAuth connection ${token.connectionName}. Please type **/whoami** to see your profile or **/signout** to sign out.`
  );
});
Start using the graph client
From this point, you can use the IsSignedIn flag and the userGraph client to query graph, for example to reply to the /whoami message, or in any other route.
The default OAuth configuration requests the User.ReadBasic.All permission. It is possible to request other permissions by modifying the App Registration for the bot on Azure.
import * as endpoints from '@microsoft/teams.graph-endpoints';

app.message('/whoami', async ({ send, userGraph, signin }) => {
  if (!await signin()) {
    return;
  }
  const me = await userGraph.call(endpoints.me.get);
  await send(
    `you are signed in as "${me.displayName}" and your email is "${me.mail || me.userPrincipalName}"`
  );
});

app.on('message', async ({ send, activity, signin }) => {
  if (await signin()) {
    await send(
      `You said: "${activity.text}". Please type **/whoami** to see your profile or **/signout** to sign out.`
    );
  } else {
    await send(`You said: "${activity.text}". Please type **/signin** to sign in.`);
  }
});
Signing Out
You can signout by calling the signout method, this will remove the token from the User Token service cache
app.message('/signout', async ({ send, signout, isSignedIn }) => {
  if (!isSignedIn) return;
  await signout();
  await send('you have been signed out!');
});
Resuming Pending Messages After Sign-In
When a user isn't signed in and your message handler calls the sign-in method, an OAuth card is sent and the current turn ends. The sign-in completes on a separate turn — meaning the original message text is not available in the sign-in success context.
To avoid ignoring what the user originally asked, store the pending message before initiating sign-in, then retrieve and process it once sign-in succeeds:
const pendingMessages = new Map<string, { text: string; activity: any }>();

app.on('message', async ({ signin, activity, send }) => {
  // signin() returns the token if already signed in, or undefined if OAuth card was sent
  const token = await signin({
    oauthCardText: 'To help with that, I need to sign you in first.',
  });

  if (!token) {
    // OAuth card sent — store the original message for later
    pendingMessages.set(activity.from.id, {
      text: activity.text,
      activity,
    });
    return;
  }

  // User is already signed in — process normally
  await processMessage(activity.text, { send });
});

app.event('signin', async ({ send, userGraph, activity }) => {
  const userId = activity.from.id;
  const pending = pendingMessages.get(userId);

  if (pending) {
    pendingMessages.delete(userId);
    await send('Successfully signed in! Processing your original request...');
    await processMessage(pending.text, { send, userGraph });
  } else {
    await send('You are now signed in!');
  }
});
For production apps, consider using a persistent store (database, Redis, etc.) instead of an in-memory map so pending messages survive restarts. You should also implement expiration or cleanup logic (e.g., a TTL) to discard stale entries when sign-in is cancelled, times out, or fails.
Handling Sign-In Failures
When using SSO, if the token exchange fails Teams sends a signin/failure invoke activity to your app. The SDK includes a built-in default handler that logs a warning with actionable troubleshooting guidance. You can optionally register your own handler to customize the behavior:
app.on('signin.failure', async ({ activity, send }) => {
  const { code, message } = activity.value;
  console.log(`Sign-in failed: ${code} - ${message}`);
  await send('Sign-in failed.');
});
The most common failure codes are installedappnotfound (bot app not installed for the user) and resourcematchfailed (Token Exchange URL doesn't match the Application ID URI). See SSO Setup - Troubleshooting for a full list of failure codes and troubleshooting steps.
Regional Configs
You may be building a regional bot that is deployed in a specific Azure region (such as West Europe, East US, etc.) rather than global. This is important for organizations that have data residency requirements or want to reduce latency by keeping data and authentication flows within a specific area.
These examples use West Europe, but follow the equivalent for other regions.
- Azure Portal
- Agents Toolkit
To configure a new regional bot in Azure, you must setup your resoures in the desired region. Your resource group must also be in the same region.
- Deploy a new App Registration in
westeurope. - Deploy and link a new Enterprise Application (Service Principal) on Microsoft Entra in
westeurope. - Deploy and link a new Azure Bot in
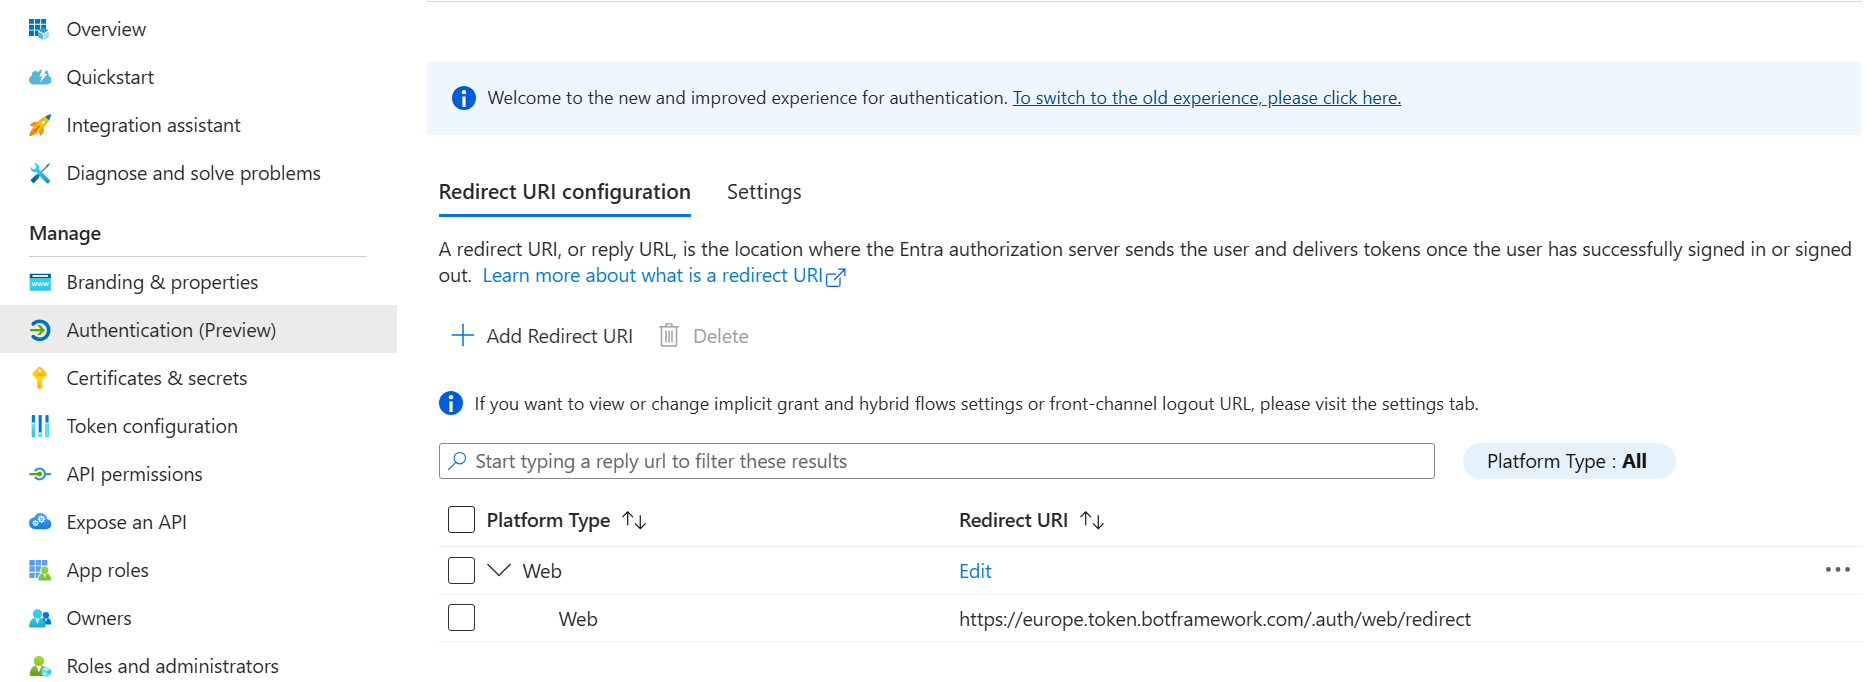
westeurope. - In your App Registration, in the
Authentication (Preview)tab, add aRedirect URIfor the Platform TypeWebto your regional endpoint (e.g.,https://europe.token.botframework.com/.auth/web/redirect)
- In your
.envfile (or wherever you set your environment variables), add yourOAUTH_URL. For example:OAUTH_URL=https://europe.token.botframework.com
To configure a new regional bot with ATK, you will need to make a few updates. Note that this assumes you have not yet deployed the bot previously.
- In
azurebot.bicep, replace allglobaloccurrences towesteurope - In
manifest.json, invalidDomains,*.botframework.comshould be replaced byeurope.token.botframework.com - In
aad.manifest.json, replacehttps://token.botframework.com/.auth/web/redirectwithhttps://europe.token.botframework.com/.auth/web/redirect - In your
.envfile, add yourOAUTH_URL. For example:OAUTH_URL=https://europe.token.botframework.com