Overview
Processing genomic data is not a monolithic task, instead it’s broken down into smaller dependent tasks that are run using different tools. These tasks are usually chained together to form a pipeline that is then run using on-prem, or cloud based clusters.
In order to ensure reproducibility and consistency in the pipeline output, some common best practices and standards have evolved over time. One of the most popular is the GATK from the Broad Institute. There are a couple of specific pipelines that are captured in the GATK, for our discussion we’ll focus on the two most commonly used: Germline short variant discovery(SNVs + Indels) and Somatic short variant discovery (SNVs + Indel).
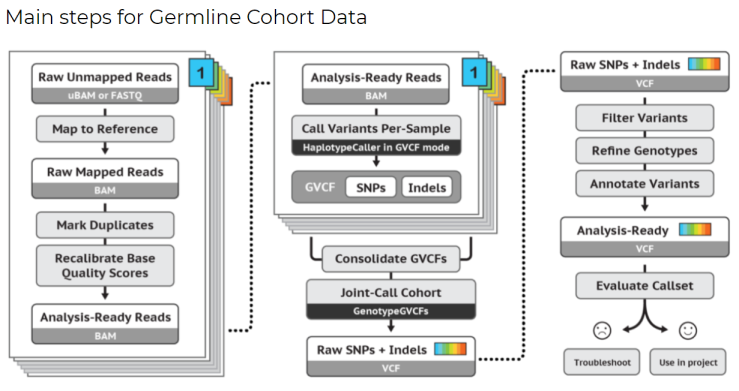
To highlight the complexity, here’s an example of the tasks/processes that run during the execution of these pipelines.
Germline

[Credit: Broad Institute][1]
Somatic

[Credit: Broad Institute][2]
Cromwell on Azure
As you can see from the illustrations above, processing genomic data is a fairly complex task. To add to the complexity, these tools usually have their own compute and runtime dependencies. This complexity in process has been compounded by the massive increase in data as genomics becomes more extensively used in clinical, research and pharma settings.
Scaling these systems and making sure researchers have the right type and amount of compute when needed led to a need to decouple the workflow definition from the compute required to execute them. This led to the growth of systems like Cromwell which came out of work at the Broad Institute. Cromwell is an open-source Workflow Management System for bioinformatics.
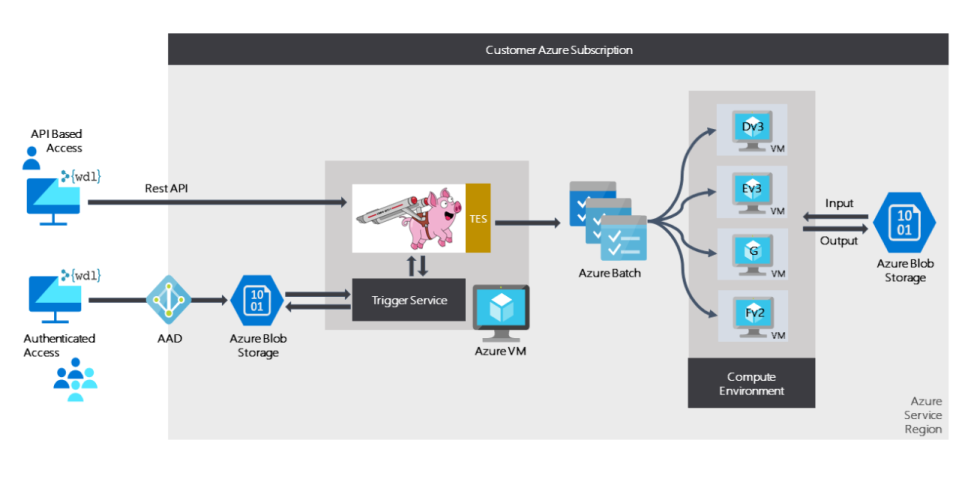
Cromwell on Azure is an open source implementation of Cromwell that allows you to run it natively on Azure. Cromwell on Azure uses the GA4GH Task Execution Service (TES) backend. To make managing compute easier, Cromwell on Azure orchestrates dynamic provisioning of compute resources via Azure Batch. As you scale up your workflows, the compute needed dynamically scales up to handle the increased load.
Crowmwell on Azure

Running Cromwell on Azure
This section includes the step-by-step links to setup Cromwell on Azure in your Azure environment. When this section is complete, you will have Cromwell running on your Azure environment and a test flow Hello World WDL test ran successfully.
- What is Cromwell on Azure?
- Steps to Deploy your instance of Cromwell on Azure
- Prerequisites to deploy Cromwell
- Download the deployment executable. NOTE Choose the latest and right runtime for your machine. NOTE Check out the Optional section if you want to build the executable yourself.
-
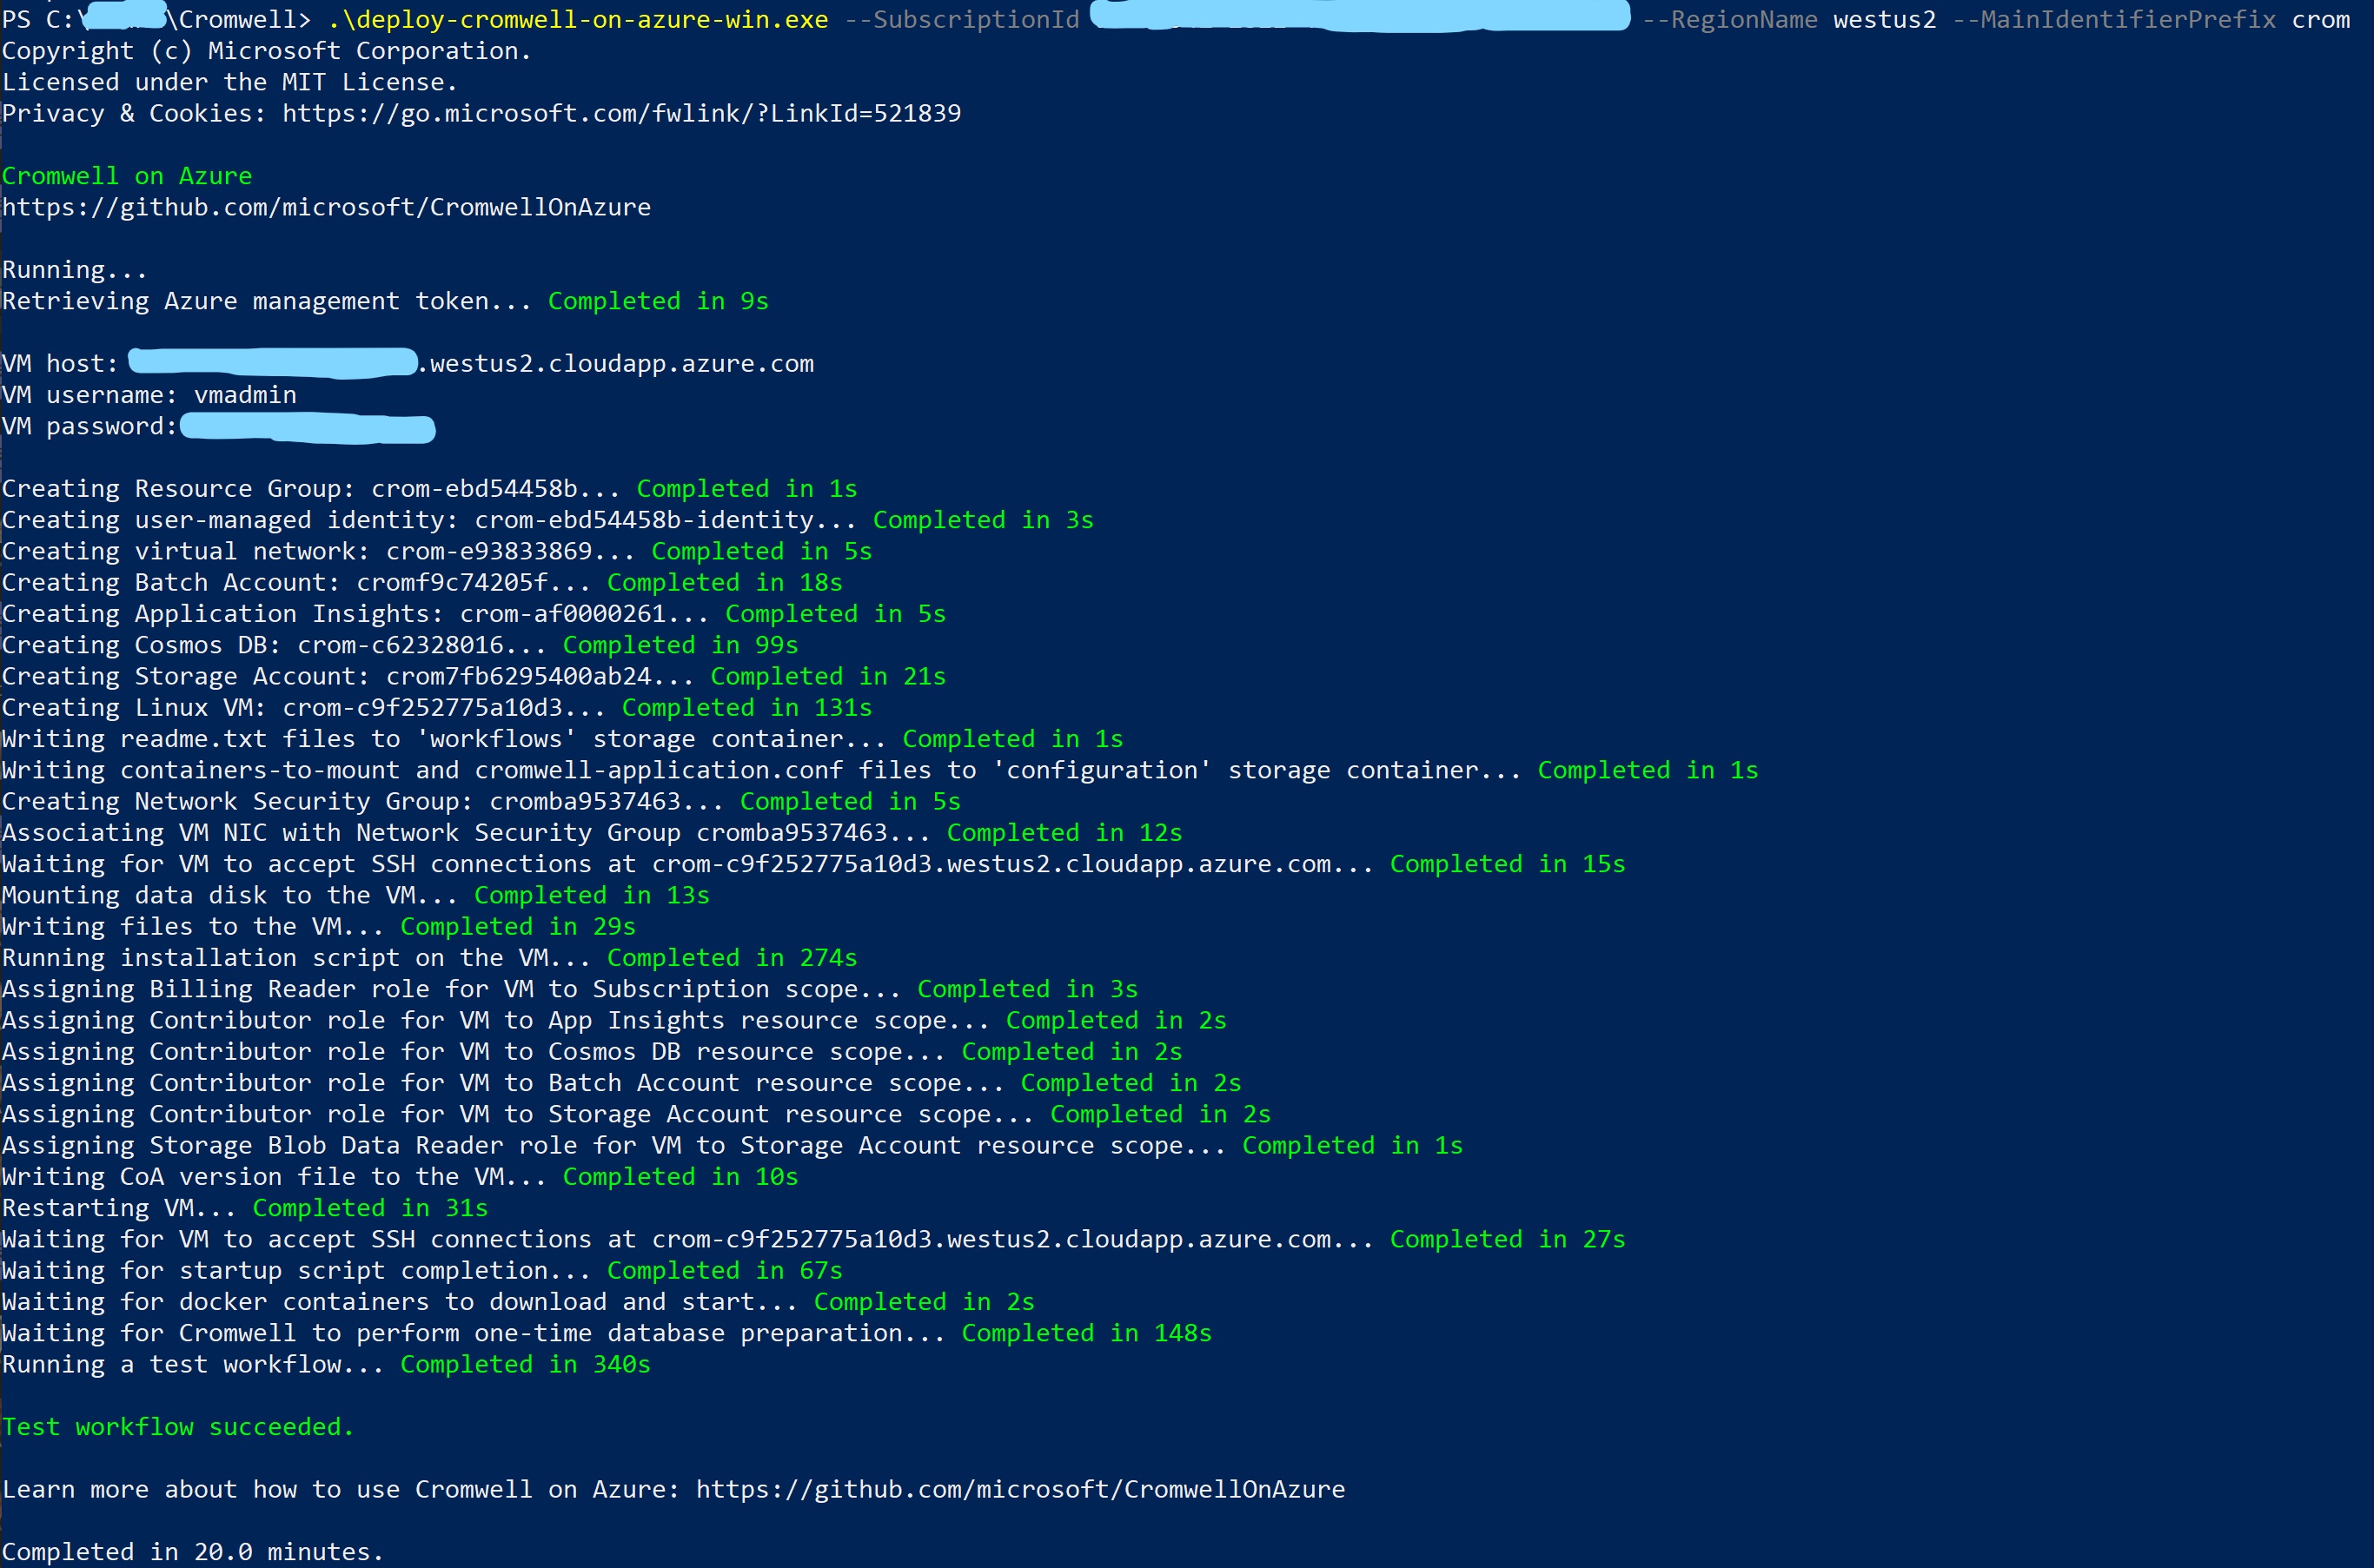
Run the deployment executable. NOTE Open PowerShell, log in using
Az Login, navigate to the folder where the executable was downloaded, then run the./deploy-cromwell-on-azure-win.execommand.Deployment takes ~20 minutes.

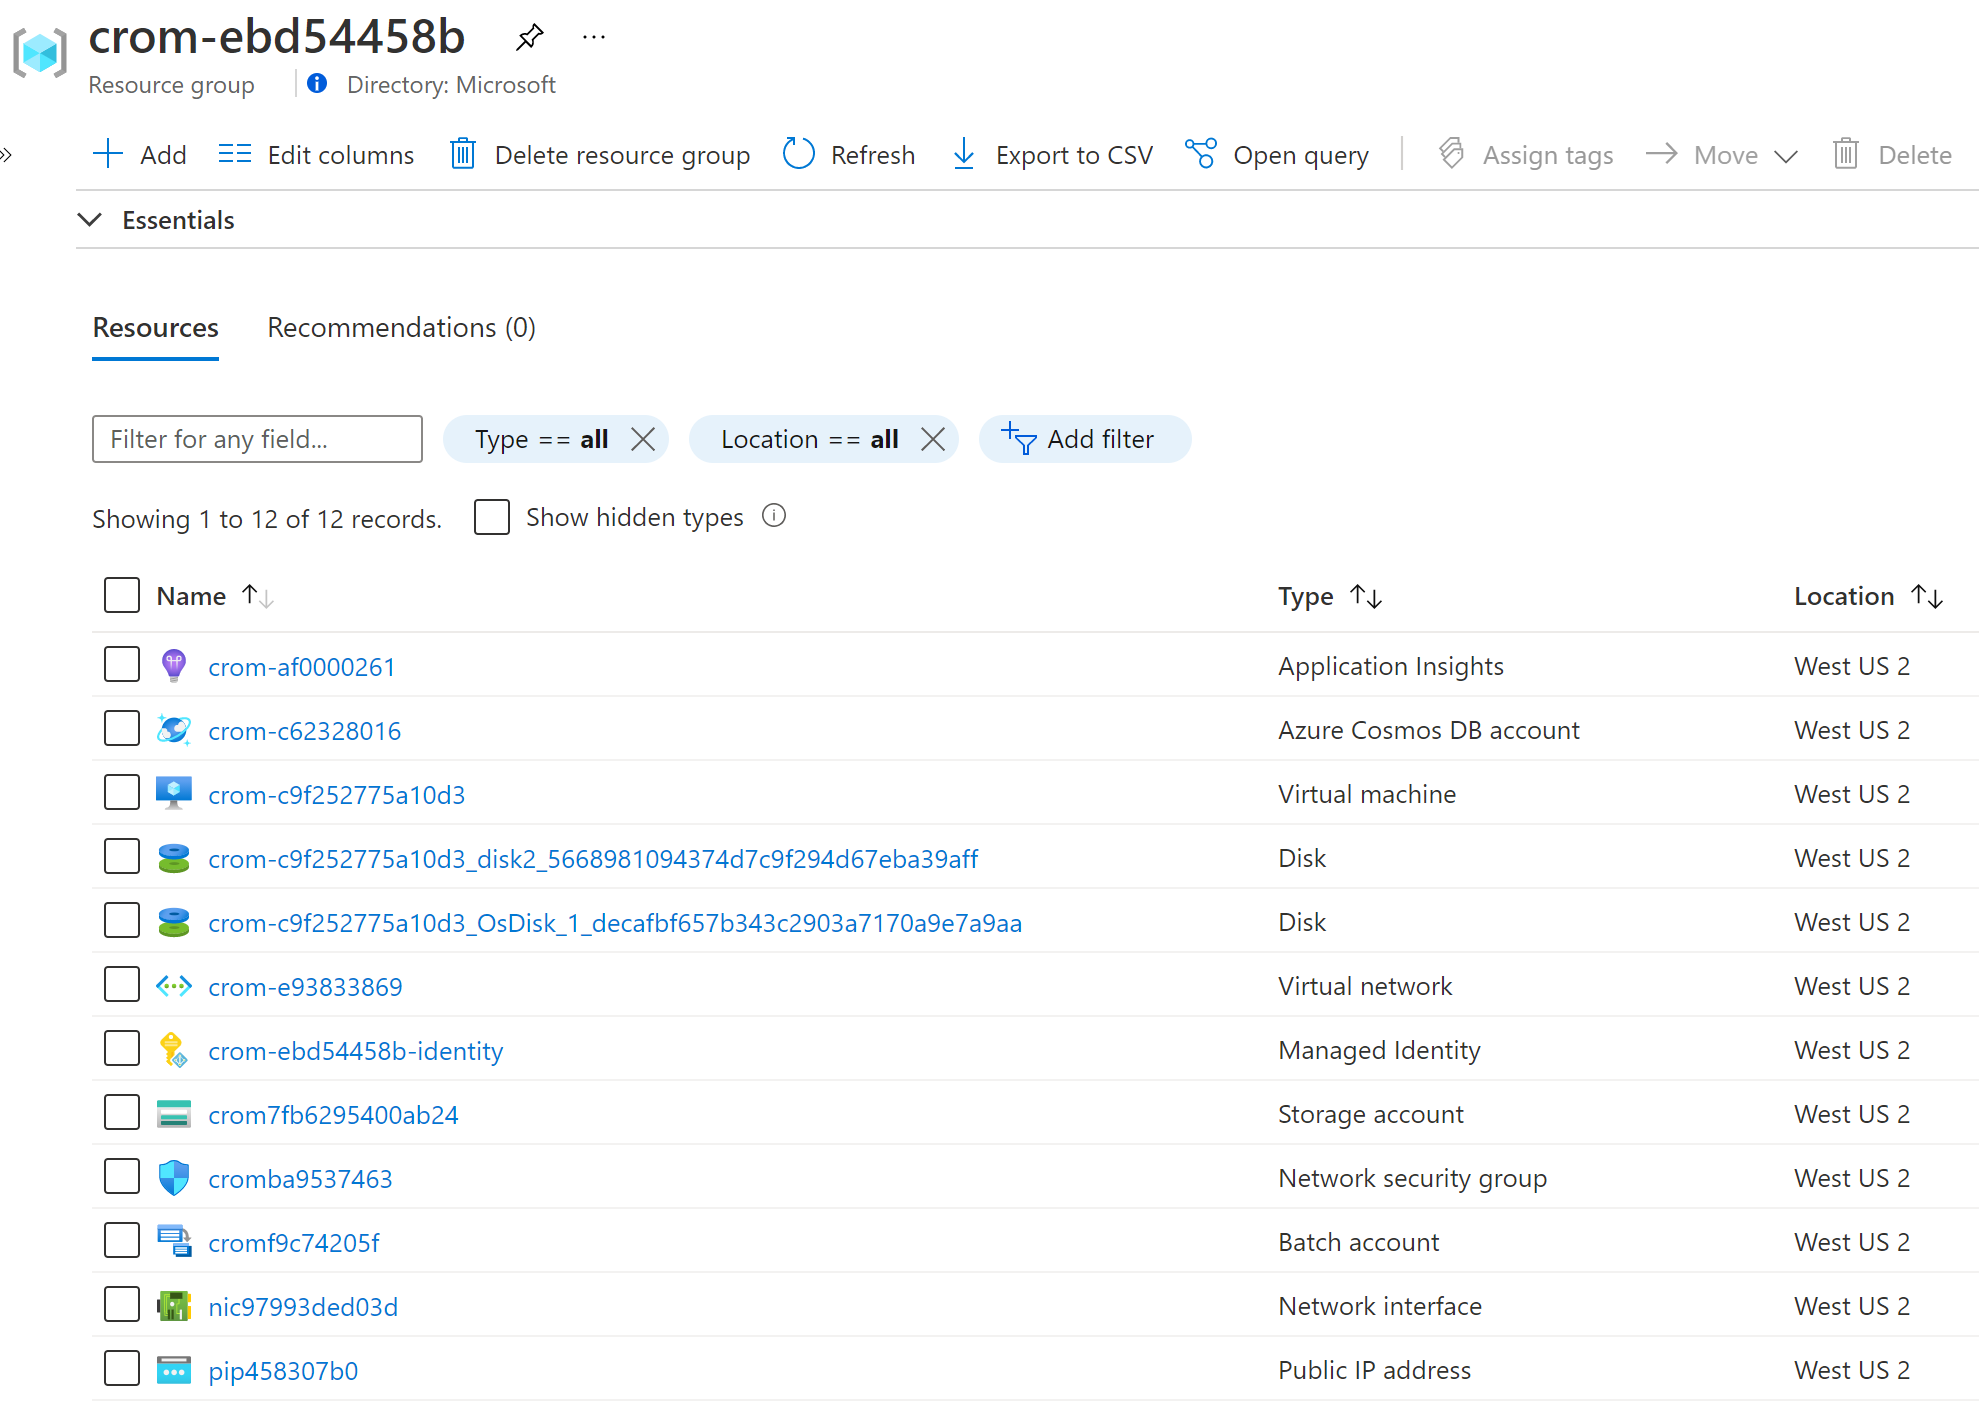
When complete, you will see these resources in Azure.

- The “Hello World” workflow is automatically run as a check in your default storage account.
- Input files including
test.wdl,inputFile.txtandtestInputs.jsonare found ininputs/testcontainer. - Output files are found in
cromwell-executionscontainer. - After completion, the trigger JSON will be in
workflowscontainer in thesucceededdirectory.
- Input files including
Running Germline alignment and variant calling pipeline on Azure
Here is an example of running the germline alignment and variant calling pipeline using Cromwell on Azure and which uses the Best Practices Genome Analysis Pipeline as documented by the Broad Institute of MIT and Harvard.
- Navigate to the germline Github with the above link.
- Download
WholeGenomeGermlineSingleSample.trigger.jsonand trigger the json file. - Start your workflow.
- Navigate to the default storage account created above.
- In the
workflowscontainer, place the trigger json fileWholeGenomeGermlineSingleSample.trigger.jsonin thenewdirectory via Azure Portal or Azure Storage Explorer. This initiates a Cromwell workflow. In the trigger json file,WorkflowUrlpoints to the WDL fileWholeGenomeGermlineSingleSample.wdlandWorkflowinputsUrlpoints to input fileWholeGenomeGermlineSingleSample.inputs.json, both of which are in the same Github. These files could be added as-is, or updated for your functionality to theinputscontainer and trigger the updated file to point to theinputcontainer. - Break-down of the WDL file
WholeGenomeGermlineSingleSample.wdl. This WDL pipeline implements data pre-processing and initial variant calling according to the GATK Best Practices for germline SNP and Indel discovery in human whole-genome data using 6 WDL files from the same Github:UnmappedBamToAlignedBam.wdl, AggregatedBamQC.wdl, Qc.wdl, BamToCram.wdl, VariantCalling.wdl, GermlineStructs.wdl. Within each of these WDL files are many sub WDL files. - The workflow returns a workflow ID that is appended to the trigger JSON file name and transferred to the
inprogressdirectory in the workflows container. - Once your workflow completes, you can view the output files of your workflow in the
cromwell-executionscontainer. 6 folders are created for the 6 import WDL files, and sub-folders within each for the sub-import WDL files and so on. - Additional output files from the Cromwell endpoint, including metadata and the timing file, are found in the
outputscontainer. The outputs.json file shows all outputs created and where they are stored. To learn more about Cromwell’s metadata and timing information, visit the Cromwell documentation. - To abort a workflow that is in-progress, navigate to
workflowscontainer, place an empty file in theabortvirtual directory named cromwellID.json, where “cromwellID” is the Cromwell workflow ID you wish to abort. - More details on starting the workflow.
Running Somatic short variant analysis pipeline on Azure
Here is an example of running the somatic short variant analysis pipeline using Cromwell on Azure and which uses the Best Practices Genome Analysis Pipeline as documented by the Broad Institute of MIT and Harvard.
- Navigate to the germline Github with the above link.
- Download
mutect2.trigger.jsonandmutect2_pon.trigger.jsontrigger json files. - Start your workflow.
- Navigate to the default storage account created above.
- In the
workflowscontainer, place the trigger json filesmutect2.trigger.jsonandmutect2_pon.trigger.jsonin thenewdirectory via Azure Portal or Azure Storage Explorer. This initiates a Cromwell workflow. In the triggermutect2.trigger.jsonfile,WorkflowUrlpoints to the WDL filemutect2.wdlandWorkflowinputsUrlpoints to input filemutect2.inputs.json. In the triggermutect2_pon.trigger.jsonfile,WorkflowUrlpoints to the WDL filemutect2_pon.wdlandWorkflowinputsUrlpoints to input filemutect2_pon.inputs.json. All these are in the same Github. These files could be added as-is or updated for your functionality to theinputscontainer and trigger the updated file to point to theinputcontainer. - The WDL file
mutect2.wdlruns GATK4 Mutect 2 on a single tumor-normal pair or on a single tumor sample, and performs additional filtering and functional annotation tasks. The WDL filemutect2_pon.wdlcreates a Mutect2 panel of normals. - The workflow returns a workflow ID that is appended to the trigger JSON file name and transferred to the
inprogressdirectory in the workflows container. - Once your workflow completes, you can view the output files of your workflow in the
cromwell-executionscontainer. - Additional output files from the Cromwell endpoint, including metadata and the timing file, are found in the
outputscontainer. The outputs.json file shows all outputs created and where they are stored. The trigger files each create one vcf file and its index with primary filtering applied. To learn more about Cromwell’s metadata and timing information, visit the Cromwell documentation. - To abort a workflow that is in-progress, navigate to
workflowscontainer, place an empty file in theabortvirtual directory named cromwellID.json, where “cromwellID” is the Cromwell workflow ID you wish to abort. - More details on starting the workflow.