

This is a very early preview. Windows MIDI Sequencer is new, and parts of it are still being built. Things will change, and some things don’t work yet. Save often, and keep a copy of any sequence you care about. If something goes wrong, or you’d like something changed, tell us on GitHub.
This page covers information about a Windows MIDI Services feature and application that will be released to consumers in Q1 CY 2027. It’s currently available for developers.
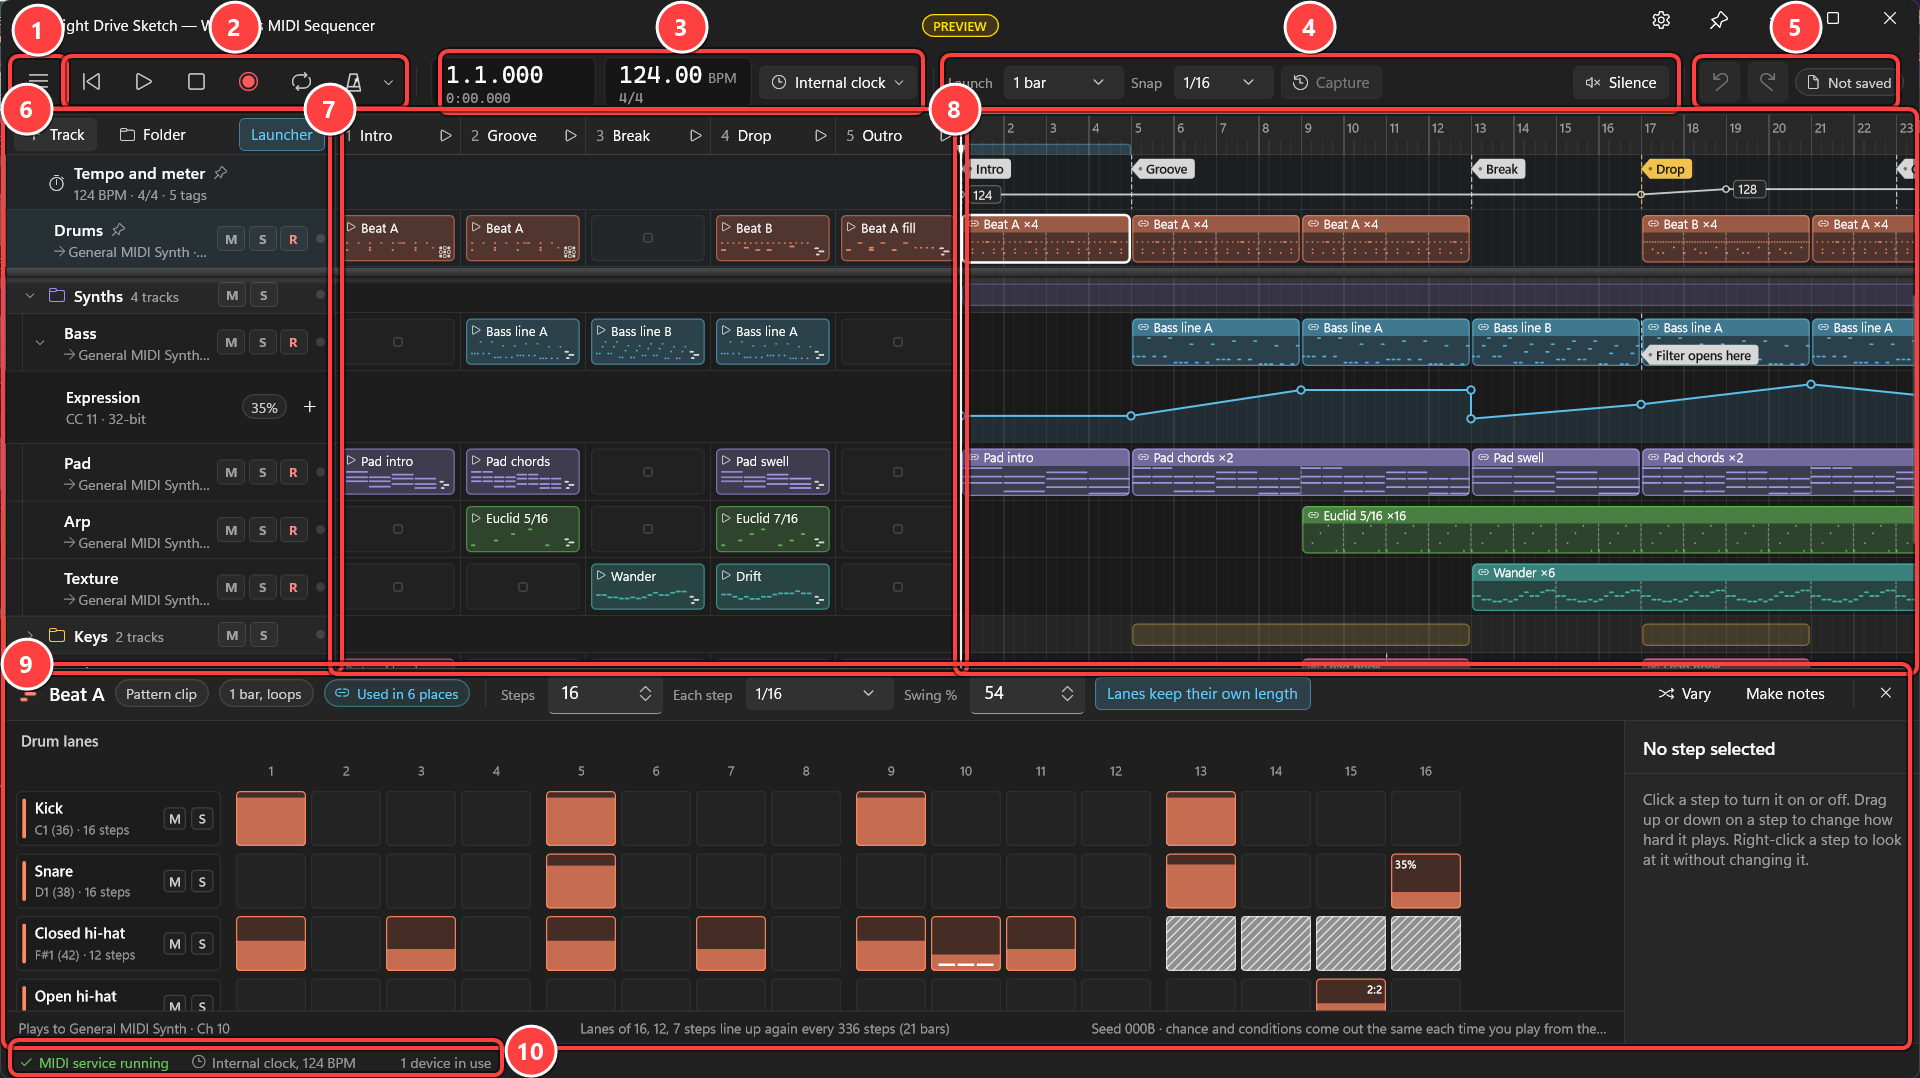
Windows MIDI Sequencer puts MIDI on a timeline, so you can build a song and play it back to your devices. Each track plays to one device. You can draw notes, set steps in a pattern, let a generator make a part for you, or record what you play. A clip launcher plays clips and scenes live, the way a groove box does.
It’s made for MIDI 2.0. Notes keep their full detail, such as 16-bit velocity, and devices that speak MIDI 2.0 get MIDI 2.0. Devices that only speak MIDI 1.0 still play everything they can.
It doesn’t record or play audio. To play sounds, it uses a synth or a device: the General MIDI Synth built into Windows, a hardware instrument, or a software instrument in another app.
To play a different device, select the track’s name to open Track setup, and pick the device there. To play an app on the same PC, such as a DAW, pick Default App Loopback (A), and set the app to listen to Default App Loopback (B).
To look around first, select File, then Open the sample sequence.
Each track plays to one device, on one group and channel. Track setup picks them. As is keeps each note on the channel it was recorded or drawn on. When a device has a timing offset set in MIDI Settings, the sequence sends to it a little early or late to line it up. You can turn that off in Clock and sync.
Folders keep tracks together. Muting or soloing a folder mutes or solos everything in it. Right-click a track for more, such as Pin to the top, which keeps a track above everything that scrolls.
There are three kinds of clips:
Right-click the timeline or an empty launcher slot to make any of them.
Select R on the tracks you want to record into, then select Record. A track records from the device set in its Track setup. To play into it from the screen, Record from MIDI Keyboard opens Windows MIDI Keyboard, already set up to play into the track.
If you played something good without recording, select Capture. It makes a clip from what you just played on the armed tracks.
Automation lanes change a controller, pitch bend, pressure or program over time. Right-click a track and select Add automation…, then draw on the new lane. The Tempo and meter track holds the tempo map. A tempo change can jump or ramp to the next one, and the meter can change at the start of any bar.
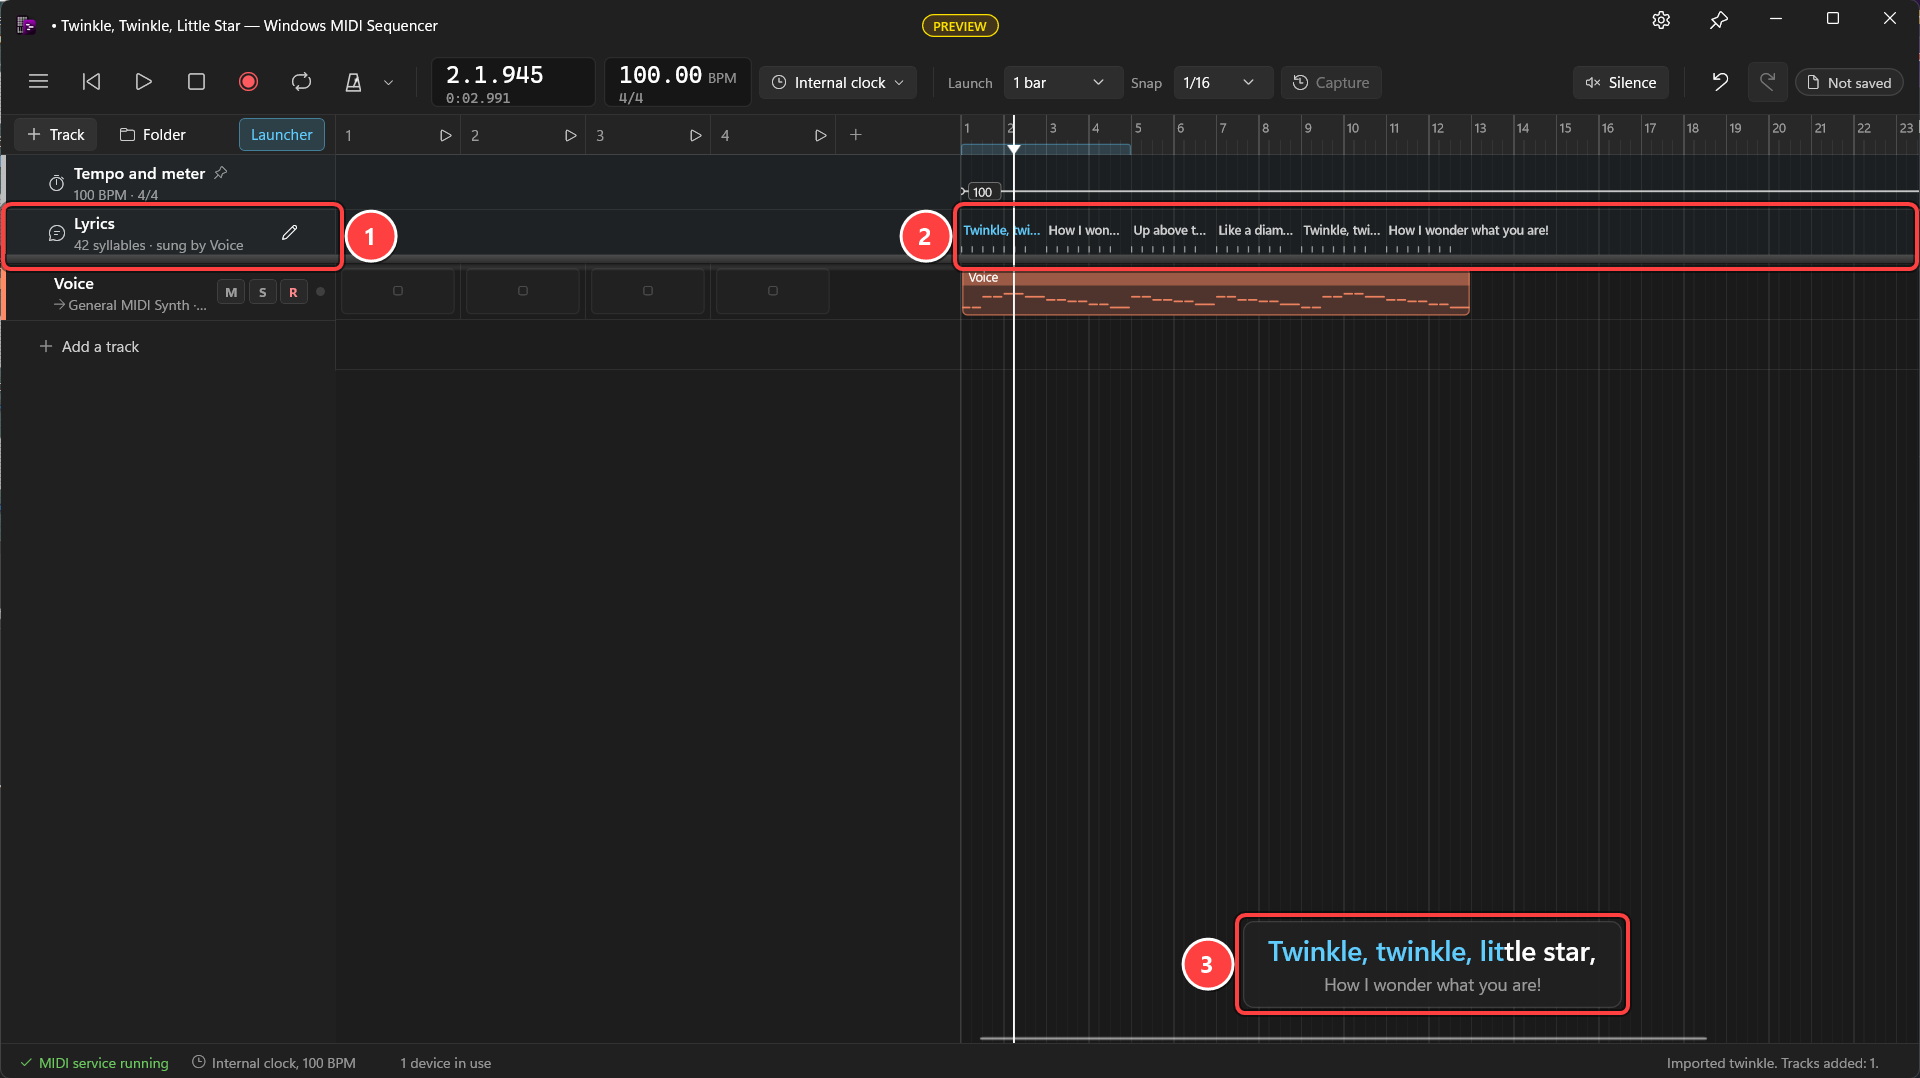
A sequence can have a lyrics track. Select File, then Lyrics…, and type the words.
When you type the words, put a hyphen between the syllables of a word, like hap-py birth-day. A space goes between words, each line of the song goes on its own line, and a blank line goes between verses. An underscore (_) holds a syllable over more than one note. Each syllable goes on the next note of the track that sings. If you change words that are already placed, the ones that were there keep their times.
Lyrics in a Standard MIDI File come in when you import it, including karaoke files (.kar). Exporting a Standard MIDI File writes them out again. While the sequence plays, the track that sings sends the words to its device as MIDI 2.0 lyric messages, if the device speaks MIDI 2.0. To use the lyrics in a music player or for subtitles, select File, then Export, then Lyrics with times (LRC)….
The launcher plays clips without following the timeline. Select Launcher to show it. Select a clip to play it on its track, and select it again to stop it. A track playing a launched clip shows Playing a launched clip across its timeline. Select Back to timeline to go back to the timeline. Launch sets when a launched clip starts: now, or at the next sixteenth note, beat, bar, or more.
Clock and sync opens from the clock button next to the tempo. It can follow another device’s MIDI clock, and it can send MIDI clock, song position and MIDI time code to other devices.
Remote control and MIDI Glass… on the File menu makes a MIDI endpoint for the sequencer, called MIDI Sequencer. A controller, another app, or a MIDI Glass layout can send to it to play, stop, launch clips and scenes, and mute, solo or arm tracks. The sequencer sends back what’s playing, so a surface can light up. That dialog can also make a Windows MIDI Glass layout for the sequence.
File, then Import, brings in:
.mid or .kar), with each of its tracks as a track. Its lyrics and copyright notice come too..midi2)..dawproject), which many DAWs can save. You pick a device for each of its instrument tracks.midi console (.csv), with a track for each group.File, then Export, writes a Standard MIDI File, a MIDI 2.0 clip file for each track, a DAWproject file, or the lyrics as an LRC file. Each format has room for some things and not others. For example, DAWproject has no place for lyrics, and a Standard MIDI File carries MIDI 1.0. The sequence file always keeps everything.
File, then About this sequence…, says who made the sequence and how. It’s the same information Windows MIDI Glass and Windows MIDI Patchbay save with what you make: your name, your company or group, your website, and a license. It’s what you say about your work. Windows doesn’t check it.
Copyright notice in exported files is the notice that Standard MIDI Files, clip files and DAWproject files carry.
How the sequence was made starts with a suggestion based on the clips. A sequence of recorded clips suggests Played and recorded, and a mix of kinds suggests A mix of things played, drawn and generated. If any part was made with generative AI, choose an option that says so.
Where the clips came from lists every clip and how it began: recorded, drawn, generated, or imported. An imported clip keeps the name of its file and the file’s copyright notice, which matters before you share or sell music that uses someone else’s work.
Sequences are saved as .midisequence files in Documents › MIDI Sequences. A sequence that has been saved once saves itself again as you work. A file from a newer version of the app opens, but it can’t be saved over, because it might hold settings this version doesn’t know about. Use Save as… to keep a copy.
This preview doesn’t have everything. These are known gaps:
Windows MIDI Services is an open source project with all source available on GitHub. We have a great community on Discord as well. Between GitHub and Discord, you should find the information you are looking for.
