

This page covers information about a Windows MIDI Services feature and application that will be released to consumers in 2027. It’s currently available for developers.
Windows MIDI Keyboard is an on-screen keyboard for playing MIDI instruments. It’s the quickest way to answer “is this thing making a sound?” without unpacking a controller, and it’s genuinely playable with a mouse, a touchscreen, or your computer keyboard.
It’s also the easiest way to test the parts of MIDI 2.0 that a MIDI 1.0 controller can’t send at all: high-resolution velocity and per-note controllers.
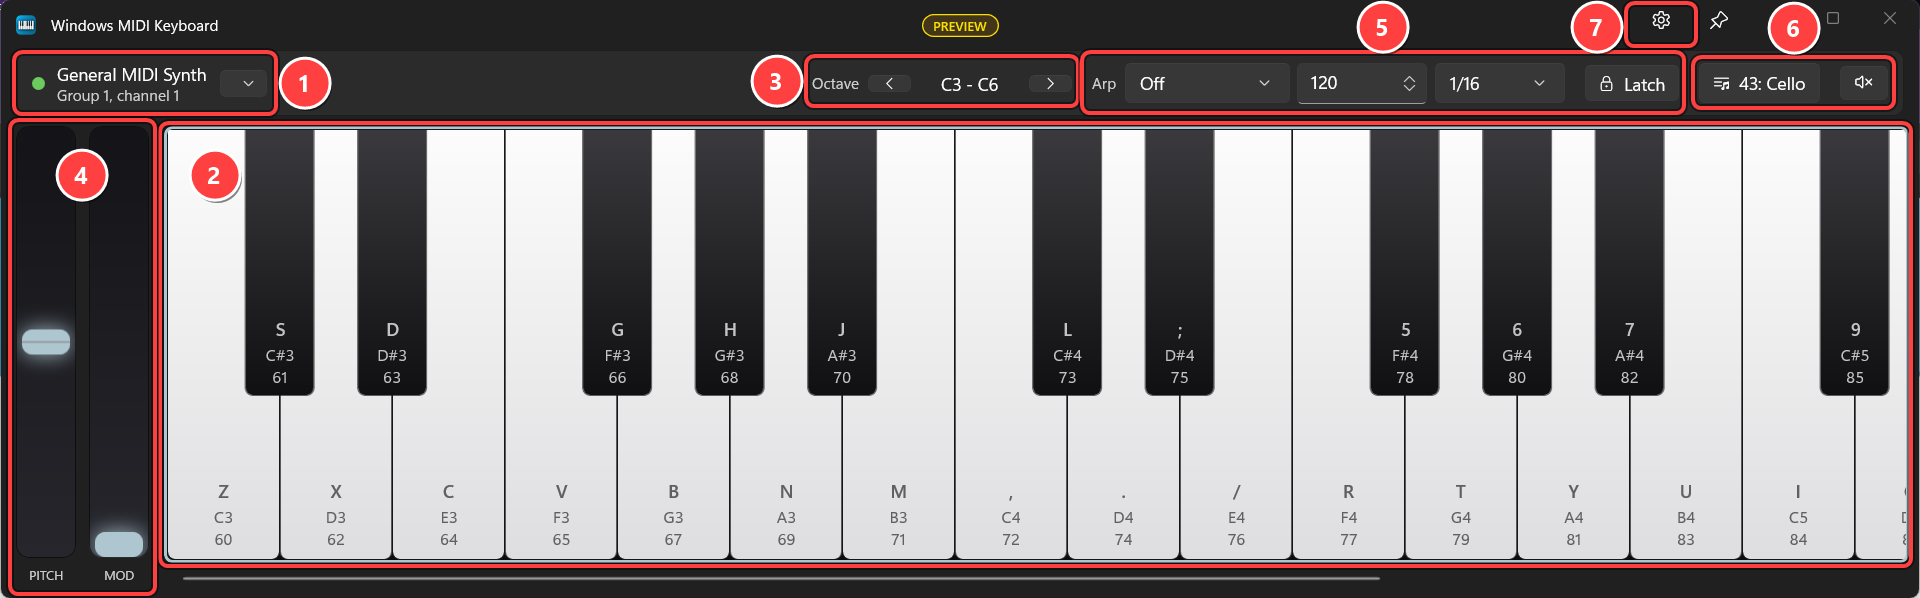
The top row of the toolbar decides where the notes go. Read it from left to right:
The words at the end of the row say whether the keyboard is connected. If the device goes away, its name stays in the box, dimmed, and the keyboard says it’s not available right now. It starts playing that device again as soon as it comes back, so unplugging a USB instrument doesn’t mean restarting the app.
When you switch to a device that doesn’t have the group you were using, the keyboard moves to that device’s first group. The group you see is always the group the notes go to.
With the mouse or a touchscreen. Click or tap a key. Where you strike it matters: by default, hitting near the top of a key is soft and near the bottom is hard, the way a weighted keyboard responds. Sliding sideways onto another key retriggers it, so you can glissando. On a touchscreen you can play several keys at once.
With your computer keyboard. The layout is the one trackers and DAWs have used for decades: the bottom two rows of letters play one octave up from the lowest key shown, and the top two rows play the octave above that. Turn the labels on in settings if you want to see which key is which.
  Q 2 W 3 E R 5 T 6 Y 7 U I 9 O 0 P       upper octave
  Z S X D C V G B H N J M , L . ; /       lower octave
Those are the letters on a US keyboard. The notes are mapped to the keys themselves, not to the letters on them, so on a German QWERTZ keyboard the lowest C is the key marked Y, on a French AZERTY keyboard it’s the key marked W, and in both cases the shape under your hands is the same. The labels drawn on the keys follow whichever keyboard layout Windows is using, and change as soon as you switch layouts.
If Windows is set to a different layout from the one printed on your keyboard, the labels won’t match your key caps. Computer keyboard layout in settings lets you pick which of your installed layouts to take the letters from. It changes the labels only, never which key plays which note.
When the keys stop playing. Clicking a text box or a list, such as the tempo or the arpeggiator mode, gives it the keystrokes, and the keyboard says so: the frame around the keys dims and a reminder appears over them. Press Esc, or click the keys, to start playing again.
Octave buttons. The Octave buttons at the top, and Page Up and Page Down, move the whole keyboard up or down an octave. The range shown between them tells you where you are.
Panic. The button at the right end of the toolbar stops every sounding note and puts the ribbons back to rest. Reach for it when something hangs.
Beside the keys are two vertical strips: PITCH for pitch bend, and MOD for modulation, which is controller 1. Drag them like the wheels on a hardware keyboard. Pitch springs back to center when you let go; mod stays where you leave it.
You can move the ribbons to the other side of the keys, or hide them, in settings under Expression.
Dragging up a key while it’s held sends expression, and what it sends is your choice. This is under Expression in settings.
| Setting | What it sends | When to use it |
|---|---|---|
| Nothing | Dragging does nothing | You keep triggering it by accident |
| Per-note controller | A MIDI 2.0 registered per-note controller of your choosing | Testing an instrument’s MIDI 2.0 per-note support |
| Channel pressure | Mono aftertouch, one value for the whole channel | The instrument only understands channel aftertouch |
| Poly pressure | Poly aftertouch, a separate value per note | The instrument responds to per-key aftertouch |
| Mod wheel | Controller 1, the same value the mod ribbon sends | Playing an instrument that uses the mod wheel for expression, without taking a hand off the keys |
Channel pressure and mod wheel are channel-wide, so with a chord held, several fingers are fighting over one value. Per-note controller and poly pressure are the two that give each note its own. Both channel-wide modes go back to zero when the last note is released, not when each one is, so lifting one finger of a chord leaves the value alone.
Velocity has three modes: from where the key is struck, a fixed value you choose, or off, which plays everything at full. When it comes from the strike position, the softest and hardest values are yours to set, so you can narrow the range on a small touchscreen where there isn’t much travel.
The Arp controls on the toolbar turn held notes into a pattern. Choose a direction — up, down, up and down, up and down with the ends repeated, random, or in the order you played them — then a tempo and a note length.
It’s useful well beyond making arpeggios: it gives you a steady, repeatable stream of notes for testing an instrument, a connection, or a latency measurement, without having to keep playing by hand.
Latch, next to the arpeggiator, keeps notes sounding after you let go of the keys. Turn it on, play a key, and the note stays on. Play more keys and they stack up into a chord you aren’t holding, which is the only way to build a chord when you’re playing with a mouse.
Press a latched key a second time to drop that one note. Switch Latch off to drop all of them at once, and Panic still clears everything.
With the arpeggiator running, the pattern keeps playing the latched notes, so you can set a chord going and use both hands for the tempo, the pattern, or the sound. It works just as well with the arpeggiator off, when it simply holds the keys down for you.
The Prog button on the toolbar is where you choose the sound.
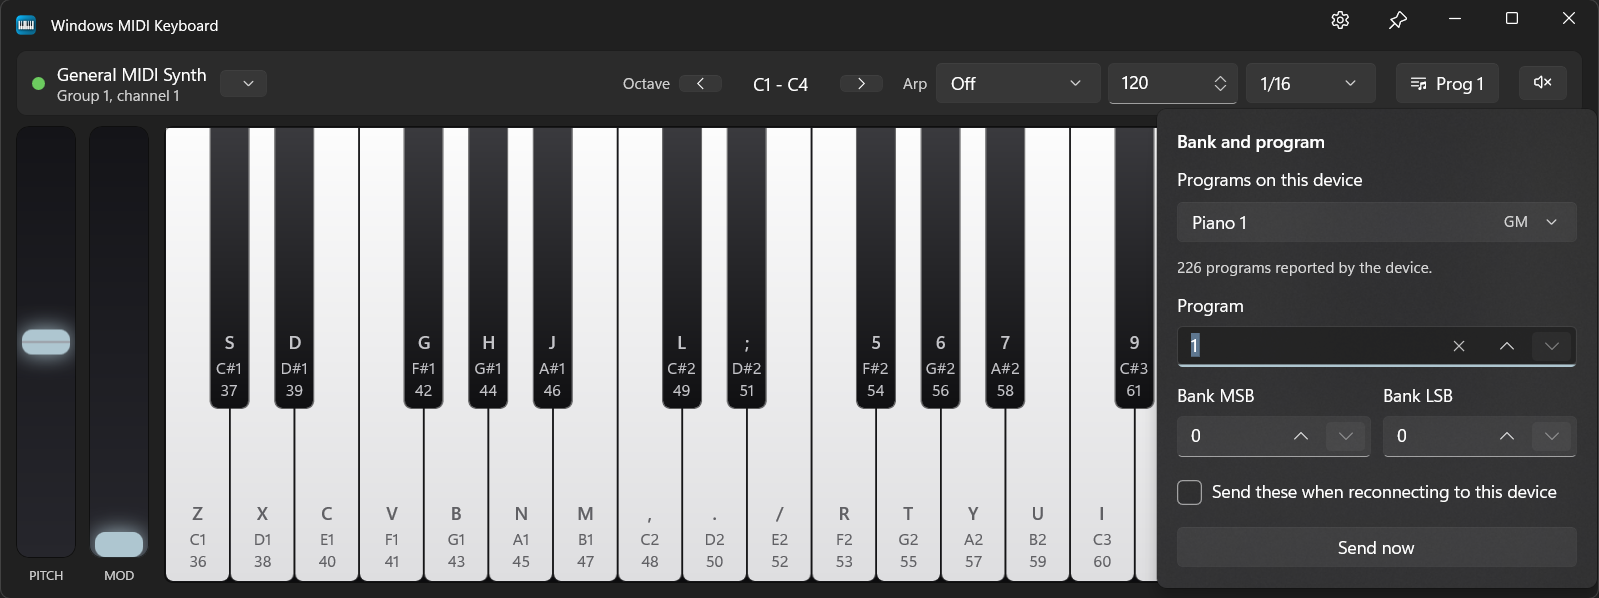
If the instrument answers MIDI Capability Inquiry, the keyboard asks it for its program list and fills in the Programs on this device list with real patch names as the device itself reports them. Point it at the built-in General MIDI synthesizer and you’ll get the full set of names and tags back.
Not every device answers, and the flyout tells you which case you’re in. When it doesn’t, type the numbers instead: program 1 to 128, and bank MSB and LSB 0 to 127. That always works, because it’s an ordinary bank select and program change either way.
Send these when reconnecting to this device re-sends your choice whenever the keyboard reconnects, which is what you want for a device that forgets its patch when it’s power-cycled. Send now sends it immediately.
The gear button at the top right opens the settings panel beside the keys.
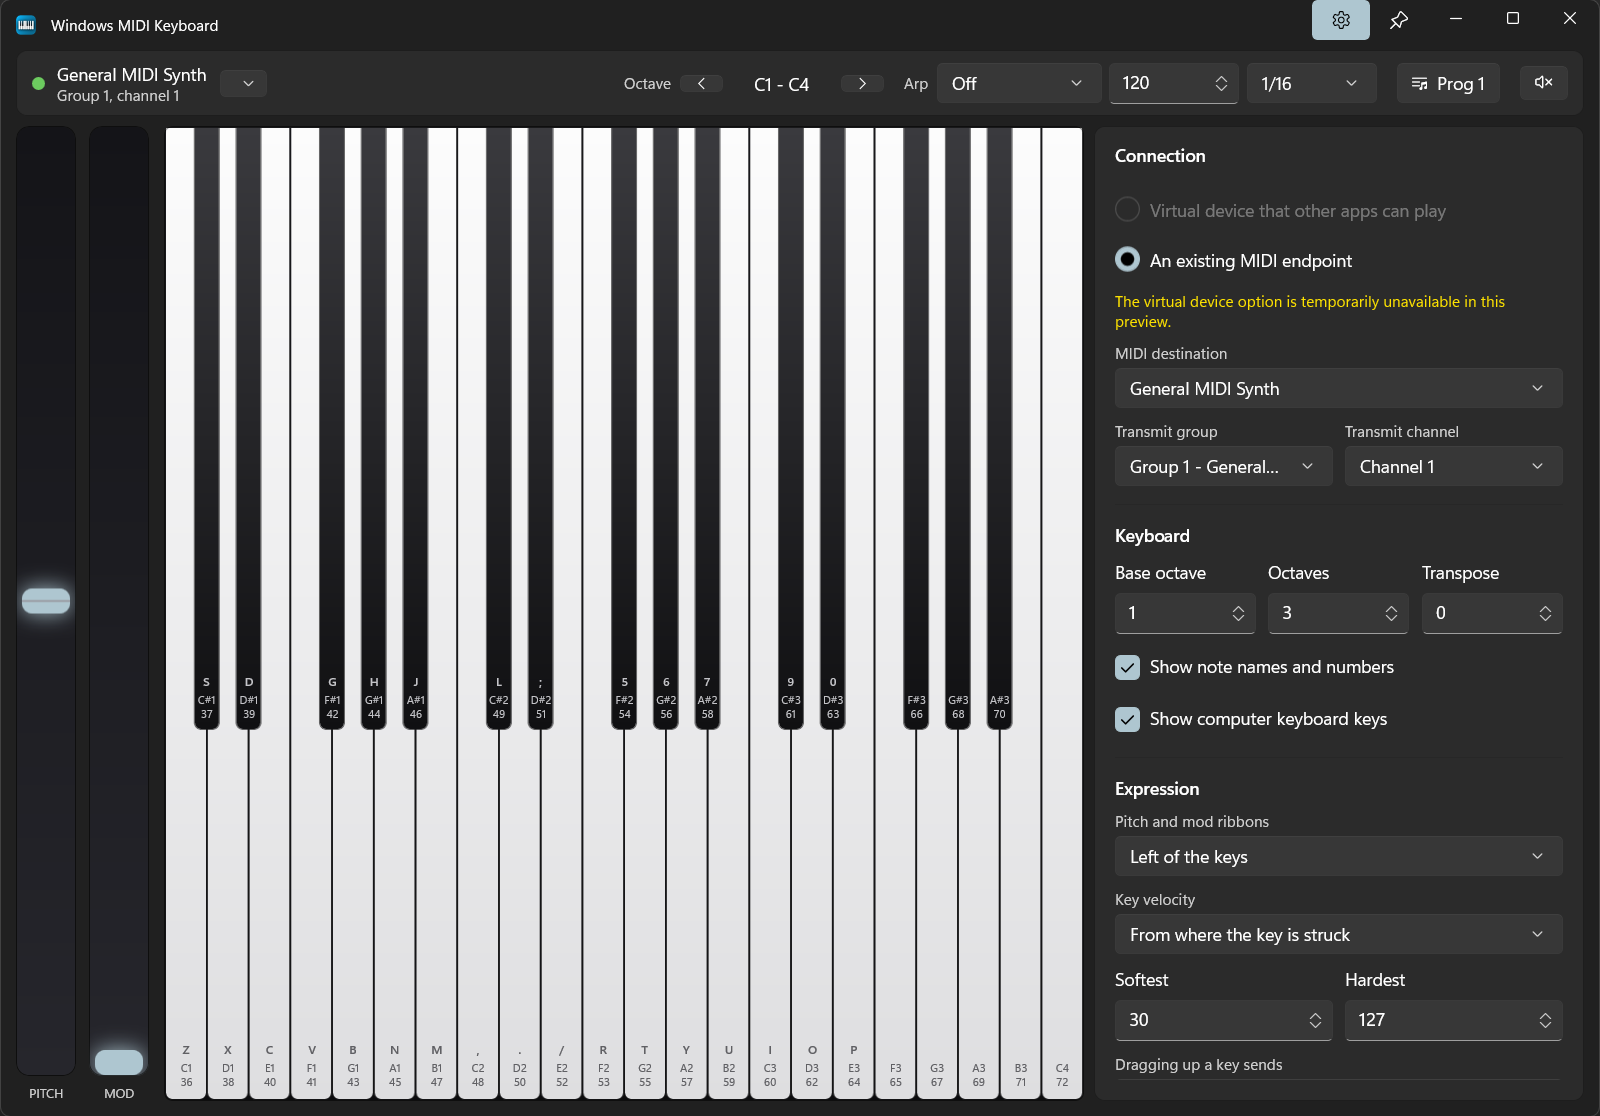
Keyboard sets the base octave, how many octaves are shown, and transposition in semitones. More octaves means smaller keys, so three is a reasonable default on a normal window. Transposition shifts what’s sent without moving the keys, which is how you play a part in a key that suits your hands. Computer keyboard layout chooses which layout’s letters are drawn on the keys, and is covered under Playing.
Expression holds the ribbon position, the velocity settings, and what dragging up a key sends, all covered above.
Appearance sets whether the app follows your Windows light or dark mode, and which window background to use. Its Black keys and White keys tabs let you pick your own color for each kind of key. The letters and note names on the keys switch between dark and light text on their own, so they stay easy to read whatever colors you choose.
The pin button next to the settings button keeps the keyboard above your other windows, which is what you want when you’re playing an instrument hosted in a DAW.
midikeyboard.exe [endpoint device id] [options]

  [endpoint device id]   Optional. The full endpoint device id to play.

  --group, -g  number    Optional. The group number, 1 through 16, to transmit
                         on. Only valid when an endpoint device id is supplied.

  --channel, -c number   Optional. The channel number, 1 through 16, to transmit
                         on. Only valid when an endpoint device id is supplied.

  --programs-from id     Optional. The full endpoint device id to ask for the
                         program list, when it isn't the endpoint being played.
                         Only valid when an endpoint device id is supplied.

  --programs-group number
                         Optional. The group number, 1 through 16, to ask for
                         the program list on. Only valid with --programs-from.
You can find the endpoint device id for a device using the MIDI Console or the MIDI Settings app.
--programs-from is for when the keys and the sounds are on different endpoints. For example, when you record into a track in Windows MIDI Sequencer, the keyboard plays into the sequencer through a loopback, but the sounds are on the device the track plays to. The sequencer starts the keyboard with --programs-from, so the Prog list shows that device’s sounds. Picking one sends the program change through the loopback, the same way the notes go, so the sequencer hears it and can record it.
Windows MIDI Services is an open source project with all source available on GitHub. We have a great community on Discord as well. Between GitHub and Discord, you should find the information you are looking for.
