

This page covers information about a Windows MIDI Services feature and application that will be released to consumers in 2027. It’s currently available for developers.
Windows MIDI Patchbay connects MIDI endpoints to each other. You drop the devices you care about onto a canvas, draw connections from one device’s Out to another device’s In, and from then on everything arriving on that connection point is passed along. Steps along the way can keep some messages out or change them, so one keyboard can play two instruments split at middle C, or a pedal that works backwards can be turned around.
It’s the software version of the patchbay in a studio rack: keys into a sound module, a drum machine into your DAW, one controller split across three instruments.
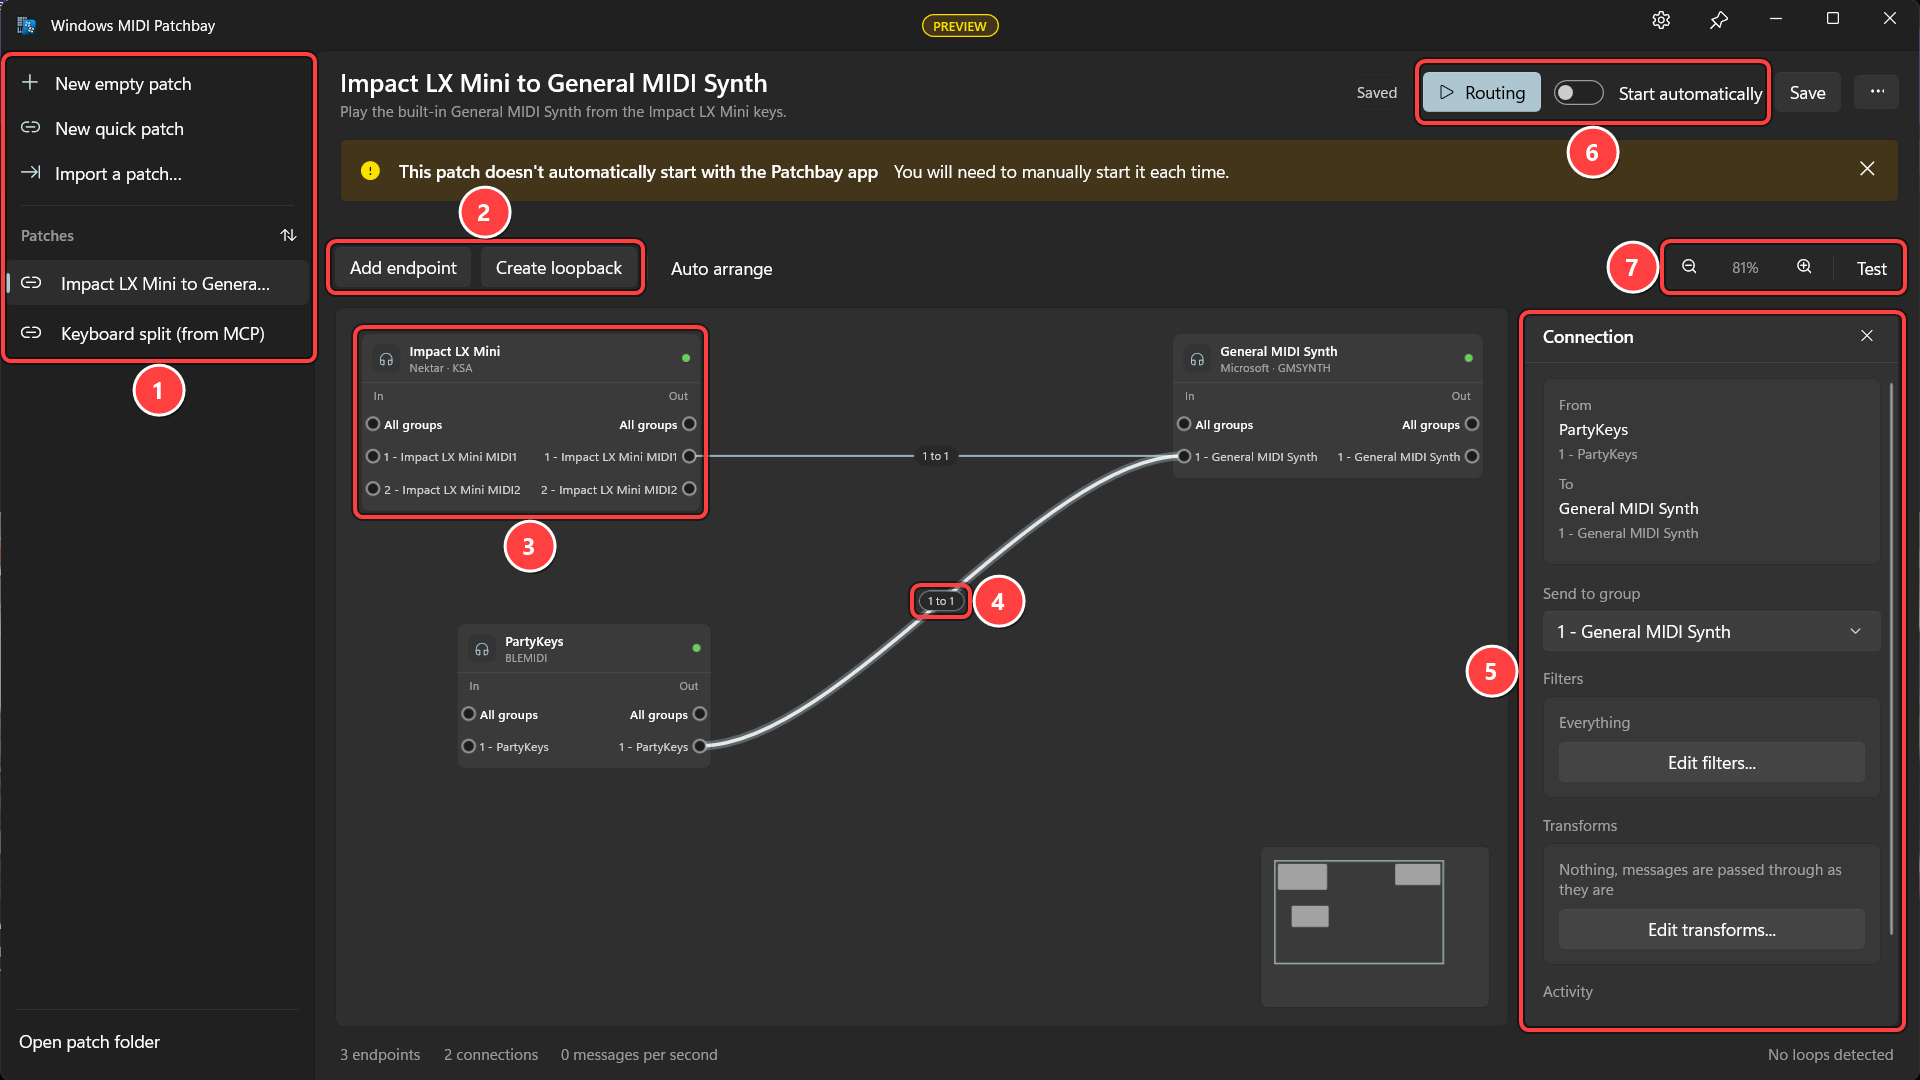
Routing happens only while Windows MIDI Patchbay is running. Routing only runs while Windows MIDI Patchbay is running explains how to keep it going in the background.
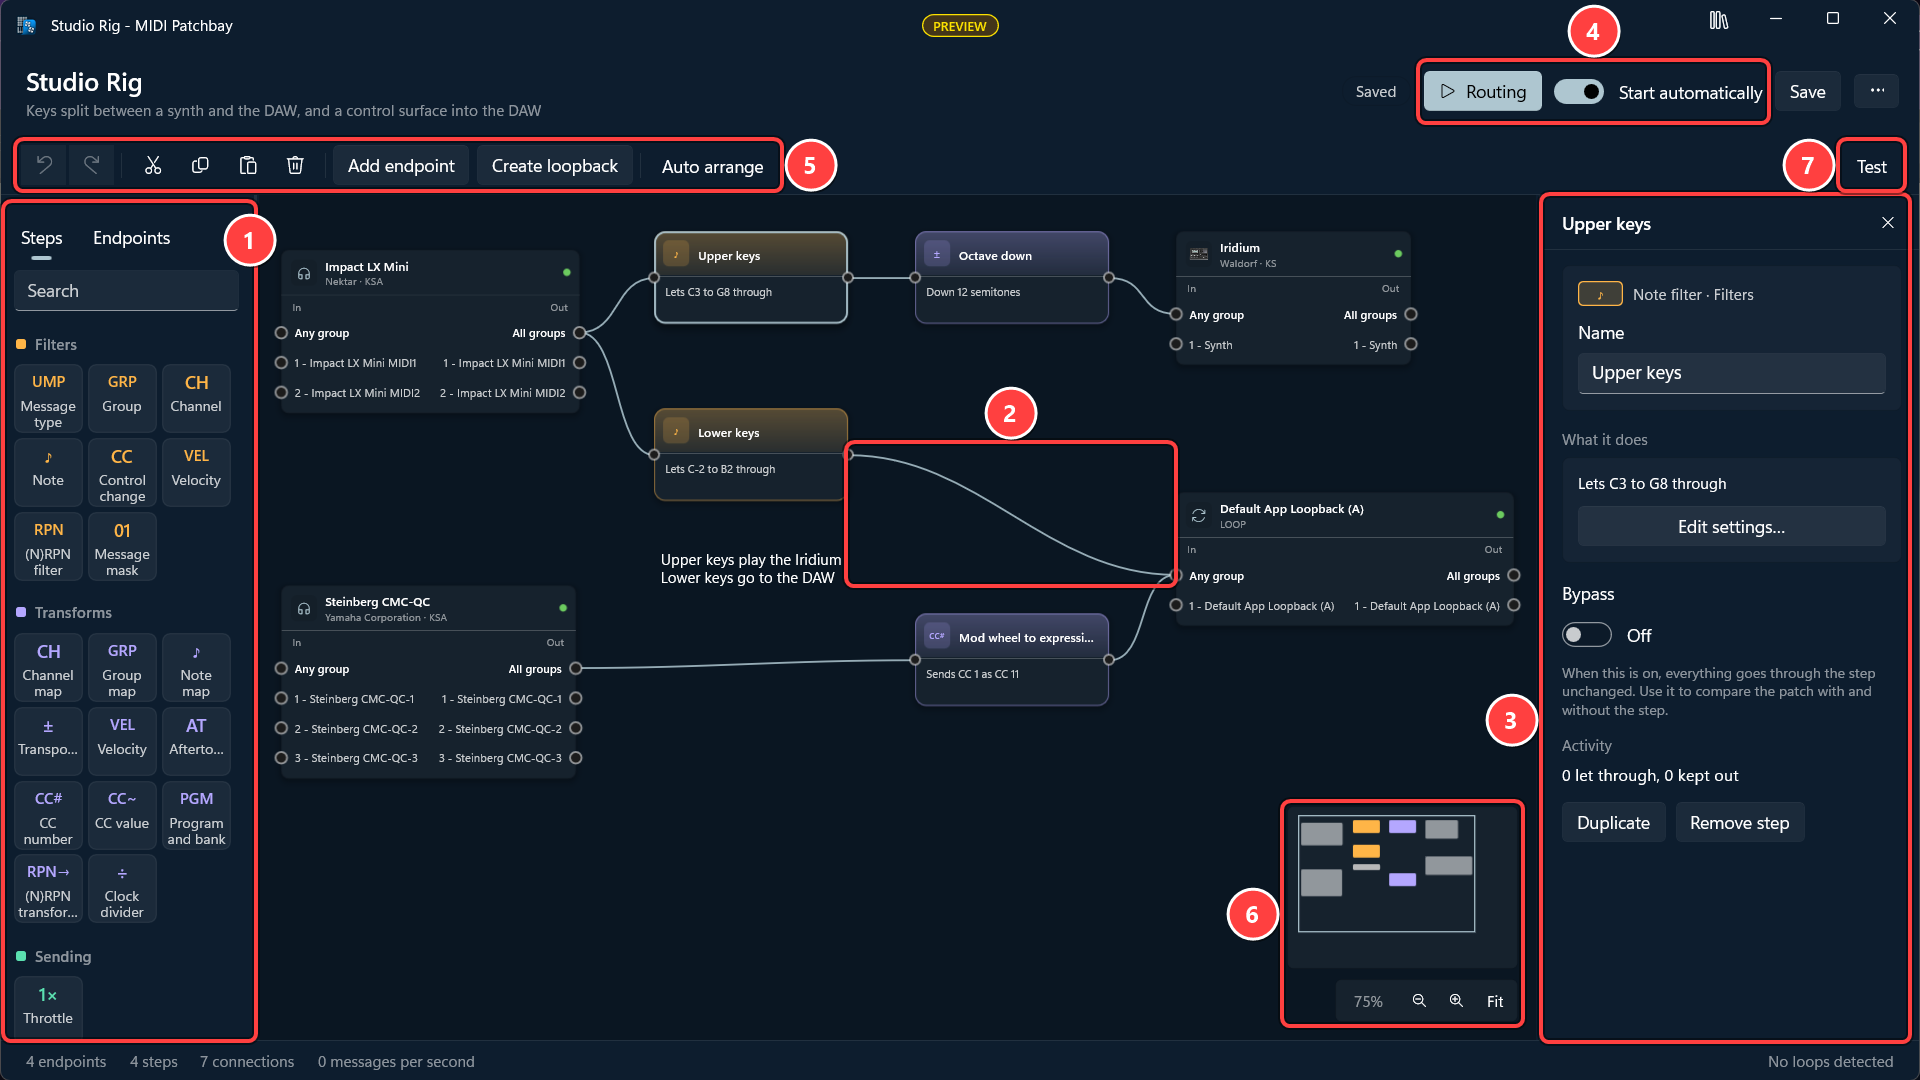
To give the canvas more room, or the panels more, drag the bar between the left panel and the canvas, or between the canvas and the details panel. Each patch window opens with the widths you last used.
A patch is one canvas: the endpoints on it, the steps, the connections between them, and a name. Patches are saved as files in Documents › MIDI Patches, one file per patch, so you can back one up or copy it to another PC.
The main Windows MIDI Patchbay window shows each patch as a tile. A tile has a map of the patch, its name and description, and words that say whether its devices are here, such as 4 devices ready or 1 device missing. A missing device is dashed and red on the map. A routing patch has a green edge, and the number in its corner is how many messages go through it each second. The power mark beside the device count means the patch starts automatically, and Not saved means the patch is temporary.
Turn on the switch on a tile to start that patch. To open a patch, select its tile, or point at the tile and select Edit. Right-click a tile, or select … on it, to duplicate the patch, find its file, or delete it.
All, Routing, Not routing, and Needs attention show only some of your patches. Needs attention is any patch with a missing device, a loop, or a problem that keeps it from routing. The search box finds a patch by its name, its description, or the devices on it. The sort list puts your patches in order by when they last changed or by name. The two buttons beside it switch between tiles and a list. The list fits more patches on the screen, and it also shows how many steps and connections each one has.
Patch files end in .midipatch. To add one that somebody sent you, or one an AI assistant saved in another folder, select Import patch… and pick the file. You can also double-click it in File Explorer. The first time you do, Windows asks which app to open it with, so pick Windows MIDI Patchbay. Either way, the patch is copied into your patches. It doesn’t route, and it doesn’t start automatically, until you turn those on. A file from somewhere else shouldn’t connect your devices before you’ve looked at it.
To have an AI assistant build a patch for you, select Ask an AI assistant… next to Import patch…. It shows a starting prompt to paste into the AI assistant you use, such as a chat in your web browser. The prompt has the link to Windows MIDI Patchbay patch files, a guide for AI agents, and the names of your MIDI devices and the groups they use, so the patch the assistant makes can find them. Windows MIDI Patchbay doesn’t send anything itself. If you’d rather not see it, turn off Ask an AI assistant in the appearance and settings flyout.
Older versions of Windows MIDI Patchbay named patch files .midipatch.json. The current version renames them to .midipatch the next time it starts. If a file with the new name is already there, the old one is left alone.
Older versions also kept patches in Documents › MIDI Patchbay. The current version moves them to MIDI Patches the first time it starts. If MIDI Patches already has a file with the same name, that file stays, and the older one is left in MIDI Patchbay. If another app has a file in the old folder open, the move waits until the next time Windows MIDI Patchbay starts, and the app uses the old folder until then.
You can have as many patches as you like, and more than one can be routing at the same time. Each patch opens in a window of its own, and a patch keeps routing after you close its window.
When a patch isn’t routing, a warning bar across the top of its window says so. Select Start routing on the bar to turn it on, and the bar goes away.
To have a saved patch start routing by itself every time Windows MIDI Patchbay starts, turn on Start automatically next to the routing button. While it’s off, another bar reminds you that you’ll need to start the patch yourself each time. You can close that reminder. A temporary patch can’t start by itself, so turning the switch on for one asks you to save it first. Turn off the Start patches automatically setting to stop every patch from starting by itself.
A patch you don’t name is temporary: it routes right now and disappears when Windows MIDI Patchbay closes. Nothing is written to disk. Give it a name and it sticks around.
New quick patch is the fastest way to get going: pick a source, pick a destination, and you have a patch with one connection in it. New patch gives you a blank canvas to build on instead.
Earlier versions of Windows MIDI Patchbay kept the filters, the changes, and the sending speed of a connection on the connection itself. Now each of those is a step on the canvas. When you open a patch made with an earlier version, Windows MIDI Patchbay turns them into steps, and the patch routes exactly the way it did. A bar across the top of the patch says so.
Windows MIDI Patchbay keeps a copy of the original file in Documents › MIDI Patches › Earlier versions. Select Show the original on the bar to find it. Earlier versions of Windows MIDI Patchbay can’t open the new files, so keep that copy if you might go back.
In a few rare cases, a note mapping next to a transpose can’t be carried over exactly, because the transpose would push the note past the top or bottom of the keyboard. The bar lists any note that’s affected.
A patch made by a newer version of Windows MIDI Patchbay can have steps this version doesn’t know. It still opens, and you can look at it and route it, but the steps it doesn’t know are left out, along with their connections. A bar across the top of the patch says so, and its tile says From a newer version.
Windows MIDI Patchbay never saves a patch like that, because saving would lose what it couldn’t read. Changes you make to it are lost when the app closes, and it doesn’t start by itself when the app starts. Update Windows MIDI Services to change it.
Each endpoint on the canvas has two columns.
There’s a row for each group the endpoint declares, labeled with the group’s number and the name the device gives that group. The name comes from the device’s function blocks, or from its group terminal blocks when no function block names the group. Each endpoint grows wide enough to show its longest name. If a name is longer still, point at the row to see all of it. Above them is an All groups row: connect that and everything passes through with its group untouched, which is usually what you want when you just mean “send this device to that one”.
Connect a specific group to a different specific group and Windows MIDI Patchbay rewrites the group as the message goes past. That’s how you fold four groups of one device onto one group of another.
A step has one In and one Out, and both carry every group. A Branch and a Switch are different: they have an Out for each way a message can go. See Logic steps.
You can draw a connection by dragging from an Out point to an In point, or by clicking the Out point and then clicking the In point. The second way also works from the keyboard. You don’t have to land exactly on the point — get close and the connection snaps to it.
To change where an existing connection goes, drag the end of the cord onto a different point. Drag an endpoint or a step by its title bar to move it out of the way. Select a connection, an endpoint, or a step and press Delete to remove it. The first time, Windows MIDI Patchbay asks, and offers to stop asking.
The zoom controls at the bottom right of the canvas go from 10% to 400%. Fit shows everything on the patch at once, as large as the window allows. To type a zoom level, click the percentage. The overview above the zoom controls shows the whole patch, with a box around the part on screen. Drag the box to move around, or click anywhere in the overview to jump there.
Every change to a patch can be undone. Undo (Ctrl+Z) and Redo (Ctrl+Y) are on the toolbar of the patch window. Each patch window keeps its own list of changes, back to when you opened it.
To work with more than one endpoint or step at once, hold Ctrl or Shift and click each one, or drag a box around them, starting on an empty part of the canvas. Anything the box touches is selected. Hold Ctrl or Shift as you start the box to add to what’s already selected. The connections between the selected endpoints and steps are highlighted too. Then you can move them together, or Copy (Ctrl+C), Cut (Ctrl+X), and Paste (Ctrl+V) them, in the same patch or in another one. The connections between them come along. Duplicate (Ctrl+D) copies and pastes in one go, and Ctrl+A selects everything. Pasted steps are new copies, with settings of their own. A pasted endpoint that’s already on the patch isn’t added twice: the pasted connections use the one that’s there.
Steps sit between the endpoints and do something to the messages that pass through them. Drag one from the Steps tab on the left, or select a connection and choose Add a step here. Drop a step on a connection and the connection is split in two, with the step in the middle. A generator, a game controller step, or an annotation is never put into a connection, so it’s added on its own instead.
There are eight kinds:
The Steps tab also has Annotation, a note on the canvas. It isn’t a step. See Annotations.
Messages go through the steps in the order the connections lead them, and each step only sees what the steps before it let through. When an Out leads to more than one place, each one gets its own copy of every message, so a step on one path never changes what another path carries. When more than one connection leads into the same In, their messages are merged.
Select a step to see what it does, in a sentence, under Behavior. When a step’s settings are short, they’re right there in the panel on the right, and a change takes effect as soon as you make it: the channel, group, and velocity filters, transpose, the channel, group, note, control change, and program and bank mappers, the message converter, the message throttler, the clock divider, the note distributor, the logic steps except the gate, the MIDI-CI responder and filter, MIDI clock, MIDI Time Code, and the game controller steps. Double-click one of those, and the panel is ready for you to change it. For the other steps, Edit settings…, or a double-click, opens their settings, as large as the patch window allows, so on a big screen a step with a lot of settings fits without scrolling. Nothing changes until you select Apply, and Reset puts the step back the way it started. Under Name, you can give a step a name of its own, such as “Bass side”.
Bypass lets everything through a step unchanged, so you can hear the patch with and without it. A bypassed generator or game controller step sends nothing.
Steps can’t be connected in a circle, because nothing would ever leave it. Windows MIDI Patchbay won’t draw a connection that would close one.
The note filter and the control change filter can also Learn. Turn it on and play the notes, or move the controls, on your device. Learn listens to the devices connected to the step’s In, through any steps before it, so connect the step first.
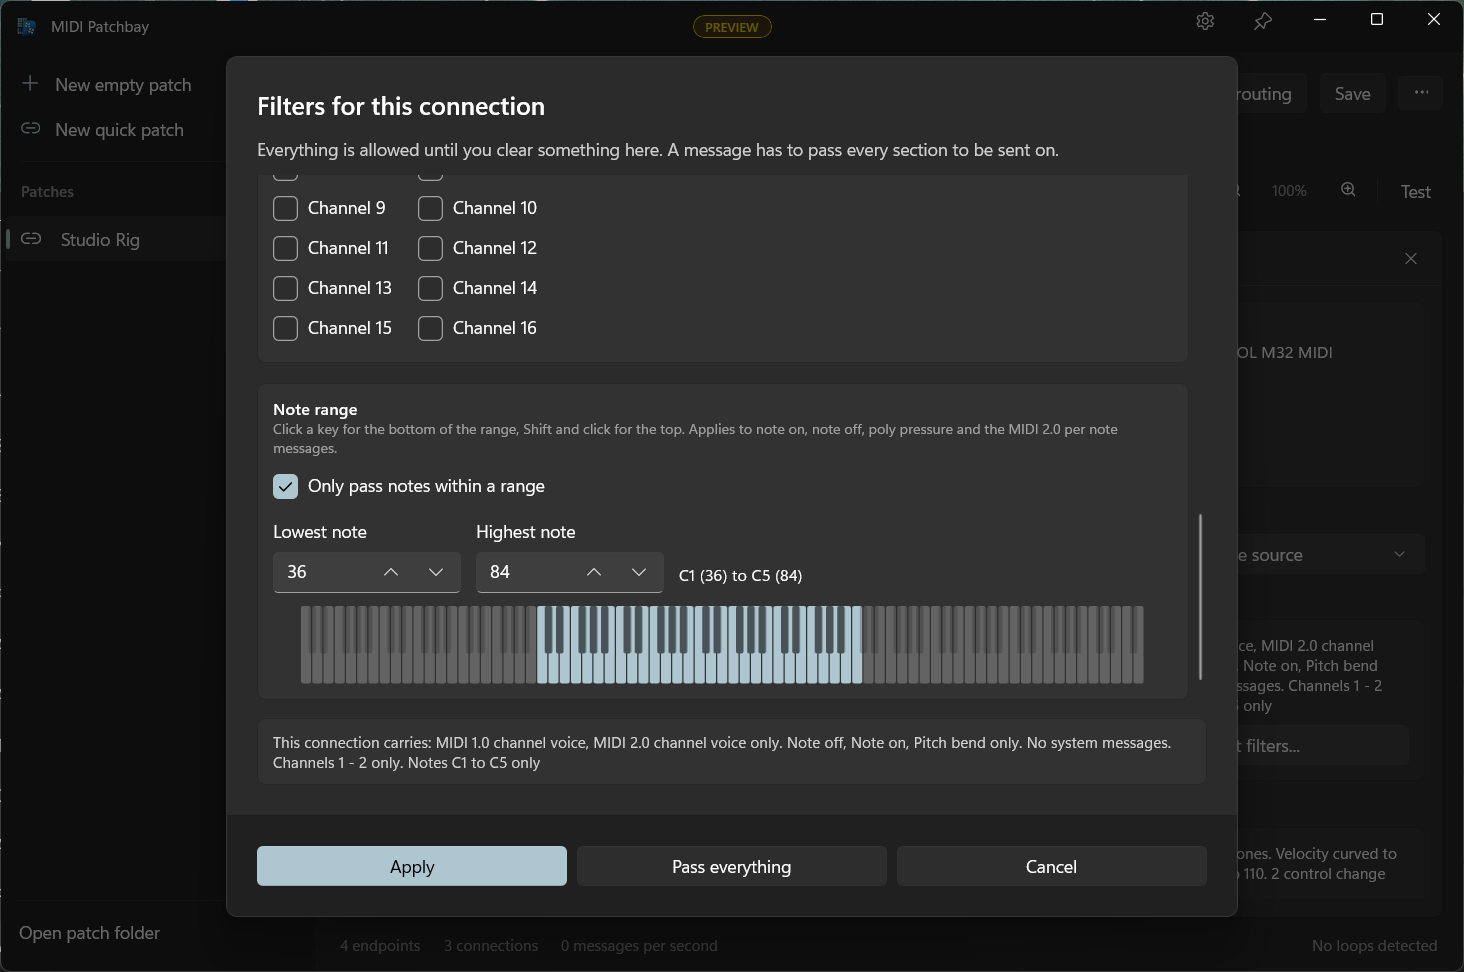
To split a keyboard across two instruments, connect the keyboard to two note filters, one for the notes below the split and one for the notes above it, and connect each filter to its instrument.
Transforms change messages on the way past. Between them they do everything the old Windows MIDI Mapper did, and quite a lot it couldn’t.
Each rule in a Control change values step names one controller and says what happens to its value. A small graph beside the rule shows the result: the dashed line is the value going in, and the solid line is what comes out. Some everyday fixes:
Invert happens before the curve, so a backwards pedal is put the right way round first and then shaped like any other pedal. If you type the ends of a range high to low, that range runs backwards, so the numbers always mean what they say.
A rule applies to the controller number as it arrives at the step. If a control change mapper before it moves CC 1 to CC 11, the rule for CC 11 is the one that shapes it. MIDI 2.0 controllers are shaped at their full resolution.
Rules work on one message at a time. Some controllers split a value across two controller numbers for extra detail, such as CC 1 with CC 33. Those are best left without a rule, because each half would be shaped on its own.
Some DAW controllers send a note from a pad where the DAW wants a control change, or the other way around. A Message converter step fixes that. Each row says what to listen for, under When it gets, and what to send instead, under Turn it into. The first row that matches a message is used. A message that no row matches goes through unchanged.
To turn note 27 on channel 3 into control change 27 with a value of 50 on channel 4:
What it listens for. A note, a control change, a program change, pitch bend, channel pressure, or poly pressure, on any channel or on one. For notes, controllers, and programs, a row can listen for one number or a range of them.
What it sends. A note, a control change, a program change, pitch bend, channel pressure, poly pressure, an RPN, an NRPN, Start, Continue, Stop, or a message typed in hex. Same channel, Same number, and Same value copy that part from the message that came in, so one row can turn a whole range of notes into the controllers with the same numbers. A value keeps its share of the range, so a note played at full velocity sends a controller at full value. Message format keeps the format the message came in with, or always sends MIDI 1.0 or MIDI 2.0. An RPN or an NRPN always goes out as MIDI 2.0, and Windows converts it for a MIDI 1.0 device.
Letting go. A note off, or a MIDI 1.0 note on with velocity 0, means you let go of the pad. When a row turns a note into a note or into a value, such as a control change, pick what letting go does under When you let go:
A controller as a button. A control change, pitch bend, or pressure usually moves smoothly. Under Read it as, pick A button to treat it as one. Pressed at and above counts as pressed, and anything below it counts as let go. Only a change from one to the other sends anything, so a sustain pedal can play a note. Pressed at is shown in the step’s Value format, as 0 to 127 or as a percentage.
Something that never lets go. A program change, or a value read as A value that moves, has no release. When a row turns one into a note, the note off is sent right after the note on, so no note is left sounding.
Program changes. Under Program to send, a row can send one program, or the next or the previous one in a range you set. Check Go around at the ends to start over at the other end. The step keeps one place in the range for each group and channel, and every row in the step shares it, so one footswitch can go up and another down.
What the message converter can’t do:
MIDI 2.0 carries velocity in sixteen bits and controller values in thirty-two, so a percentage is what those values really mean, and that’s how Windows MIDI Patchbay stores them. But plenty of controllers give each of the 128 MIDI 1.0 steps its own meaning, such as a pad color, and typing 0.79% when you mean step 1 is no fun.
So the settings for the velocity rescaler, the aftertouch rescaler, and control change values steps start with a choice: 0 to 127 or Percentage. The value is the same either way; only the way you type it changes. A patch saved before this choice existed opens as 0 to 127, because that’s all it could have meant. A new step starts as a percentage.
A MIDI 2.0 note on can say exactly which pitch to play, down to a fraction of a semitone. That makes its note number an address rather than a pitch, and moving one without moving the other would produce a message asking for one note and the pitch of another.
Leave Bypass exact-pitch notes clear and the pitch moves with the note, so the transpose and note mapper steps both stay honest. Check it and those notes are passed through untouched, which is what you want when the note number means a drum pad or a key on a controller rather than a pitch.
These decide where a message goes, rather than changing it.
Logic steps look at what’s in a message and decide what happens to it. They can also remember something from one message for the messages that come after it. That’s how a footswitch can pick which synth a keyboard plays, or how hard notes and soft notes can go to different places with one step.
To play notes only while a sequencer is playing, connect the sequencer’s clock and the keyboard into a gate left as it starts: it opens on Start and closes on Stop.
Tags and memories have names. Type a name, such as Scene, in the step that sets it, and pick the same name in the steps that read it. Capital letters don’t matter. A patch can have up to 64 tags and 64 memories.
Notes stay together. A Branch or a Switch sends a note off the same way its note on went, even when the note off wouldn’t pass the test on its own. A sustain pedal let go reaches every way it went down on, and the rest of a long message, such as system exclusive, follows its first packet.
Missing value. A Branch that tests the note can get a control change, and a memory can be empty. Under Missing value, choose what happens to those messages: send them every way, send them one way, or keep them out. Every way is the default, the same as two filters side by side would do.
Bypass. A bypassed Branch or Switch sends messages every way, or only its first way, as you choose under Bypass behavior.
What logic steps can’t do:
MIDI-CI lets an app ask a device what it is and what it can do. A MIDI 2.0 device answers for itself. A MIDI 1.0 device can’t, so Windows MIDI Patchbay can answer for it.
Where the answers go. A responder’s answers don’t go out its Out. They go straight back to the endpoint the question came in from, on the group the question came in on. The steps between that endpoint and the responder don’t touch them, so a filter or a group mapper on the way in doesn’t change an answer. On the canvas, a dashed line runs from the dot at the bottom of the responder back to that endpoint’s In, on its Any group row. Select the responder to see the endpoint under Answer destination. A responder answers even while the device it leads to isn’t plugged in.
Use a loopback pair, not a basic loopback. A basic loopback sends everything that goes into it back out to every app that has it open, and that includes Windows MIDI Patchbay. So the app hears everything it sends, and the notes and controllers in a MIDI message report come back into the patch and go on to the device again. With a MIDI 2.0 loopback pair, what goes into one side comes out of the other, so nothing comes back. When a basic loopback feeds a responder, the responder’s details panel says so.
With Answer MIDI message reports on, a responder tells an app which notes are playing, and where each channel’s controllers, program, pitch bend, and channel pressure are. It only knows what went through it since the patch started routing, so a change made on the device itself doesn’t show.
Profiles and properties. A MIDI-CI file tells the responder which profiles the device follows, such as one for drawbar organs, and gives an app properties to read, such as the device’s program list. Put the file in the patch folder, then type its name under MIDI-CI file, or select Choose…. A file from somewhere else is copied into the patch folder first. Open patch folder opens the folder in File Explorer. While the patch routes, changes to the file are picked up straight away.
The file is JSON. Windows MIDI Patchbay patch files, a guide for AI agents describes it, and an AI assistant can write one for you from the device’s manual.
Under Activity, a responder shows what its file adds, any problems in the file, its MUID, and the last questions it answered.
Things a responder can’t do:
Generators make messages of their own. MIDI clock and MIDI Time Code only have an Out. An LFO also has an In, for a clock to follow. A generator runs for as long as its patch is routing: it starts when you start the patch and stops when you stop it. Connect it to everything that should get what it sends, straight or through other steps.
Keeping an LFO in step with a clock. Connect a clock to the LFO’s In: a device that sends MIDI clock, a MIDI clock step, or a clock divider. The LFO then follows that clock instead of its own tempo. One pass takes that many beats of the clock, a Start from the clock puts the LFO back at the beginning of a pass, and when the clock stops, the LFO stops moving. Only timing clock, Start, Continue, Stop and Song Position reach the LFO. Anything else that comes in stops there. With nothing connected to its In, an LFO keeps its own tempo. A muted connection still counts, so muting the clock holds the LFO still.
With Start and stop with the clock checked, the LFO waits for a Start or Continue before it moves, and a Stop holds it until the next one. It goes back to the middle on Stop if Return to center when routing stops is checked. Without it, the LFO moves with every timing clock, whether the music is playing or not.
The clock and the time code go out on the group you pick. A connection to one group or port of an endpoint sends them there instead.
One clock for a whole setup. Put a MIDI clock step on a patch and connect it to every device that should follow it. A device that should run at half speed gets its clock through a Clock divider set to 2. An LFO connected to the same clock sweeps in time with it. Make a patch like this for each project, each with its own tempo, and start the one you need.
Changing a generator while its patch is routing doesn’t start it again. A new tempo, more or less swing, and every change to an LFO take effect right away. Changing the clock’s group, its Swing note value, or Send Start and Stop messages, or anything about the time code, starts it again from the top. So does connecting a clock to an LFO, or taking it away.
MIDI clock and MIDI Time Code don’t follow a clock that comes in from a device, and messages don’t start or stop them. They run whenever their patch routes.
Game controller steps turn a game controller into a MIDI controller. Press a button to play a note or hold the sustain pedal, run through programs with the D-pad, bend pitch with a stick, or set the volume with a joystick’s throttle. They work with Xbox controllers, including the Xbox Adaptive Controller, and with the joysticks, flight sticks, wheels, and gamepads that Windows lists in Game Controllers in Control Panel.
Each step uses one control, so add a step for each control you want to use. Like a generator, a game controller step only has an Out, and it runs for as long as its patch is routing. It keeps working while another app, such as a game or a DAW, is in front.
Which controller. Pick an Xbox controller by its number, or any other controller by its name. Windows numbers Xbox controllers 1 to 4 in the order they were plugged in, so if you plug them in again in a different order, a step can follow a different controller. Any other controller is found by its name and the USB port it’s plugged into. Plug it into another port and it’s still found, unless you have two of the same. Select the step to see whether its controller is connected.
Joysticks and other controllers. Their buttons have numbers, the same numbers Windows shows in Game Controllers in Control Panel. Their axes have the names Windows gives them. On most joysticks, X axis and Y axis are the stick, Z rotation is twisting it, and Slider is the throttle lever. The hat switch, the small thumb pad on top of many joysticks, works like a D-pad. In a Controller button step, either end of an axis can be a button too.
Learn. Select Learn, then press the button, or move the stick or trigger, that you want. The step picks the controller and the control for you.
What a button sends. Pick a message under When pressed, send:
Messages go out as MIDI 2.0, with the finest steps, and Windows converts them for a MIDI 1.0 device. To send MIDI 1.0 messages instead, choose MIDI 1.0 under Message format. An RPN or an NRPN always goes as MIDI 2.0.
Holding a button. Under When held, send, pick a second message. It goes once you’ve held the button for the time you set. With Repeat while held, it goes again and again until you let go. That’s handy on the D-pad: tap it to move one program, and hold it to run through them. With Tap or hold, not both, a short press sends only the pressed message, and a long press sends only the held message. The pressed message then waits until you let go, so it comes a little later.
On and off. With Switch on and off with each press, one press sends the pressed message and the next press ends it, like a latching pedal. The held message isn’t used.
Sticks and triggers. A stick or trigger step only sends when the control moves, so nothing goes out when the patch starts.
When it stops. When the patch stops routing or the controller goes away, a note a button started gets its note off, a value gets its value for letting go, and a button that’s switched on is switched off. A stick or trigger step with Send where it rests when routing stops or the controller goes away checked sends where the control rests, so a pitch bend isn’t left bent.
The Xbox Adaptive Controller. A switch in one of its jacks works like the button the jack is named for, so a switch in the A jack is the A button. The X1 and X2 jacks are different. A joystick in X1 is the left stick, and one in X2 is the right stick. A switch in X1 is left stick up, and one in X2 is left stick down, unless you changed them in the Xbox Accessories app. To use those switches, pick Left stick up or Left stick down in a Controller button step, or use Learn.
Things game controller steps can’t do:
An annotation is a note on the canvas about the patch, such as which keyboard is which or what a split is for. Drag Annotation from the Steps tab onto the canvas, and type the text in the details panel on the right. The canvas shows it as you type. Press Enter to start a new line. Lines break only where you press Enter, so a long line stays on one line. An annotation can hold up to 1,000 characters.
The details panel also sets the font, its size, bold, italic, and underline, and the color. The font list has the fonts every Windows PC has. Show all fonts lists every font on your PC, but if you share the patch, a PC without that font shows the annotation in the standard font.
An annotation has no In or Out, so nothing connects to it, and it doesn’t change what routes. It isn’t counted with the steps in the status bar, and Auto arrange leaves it where you put it. To change the text later, double-click the annotation, or right-click it and choose Edit text.
A USB or network connection can carry MIDI many times faster than the 5-pin DIN cable most MIDI hardware was built around. Some devices can’t keep up when a lot of data arrives at once. A synth taking a long SysEx dump, a device with a small buffer, or one with a slow processor can lose messages, play notes late, or stop responding.
Filters are often the first fix. Keeping out messages a device doesn’t use, such as clock, active sensing, or aftertouch, leaves more room for the ones it needs. When that isn’t enough, put a Message throttler step in front of the device and pick its speed:
Start with MIDI 1.0 wire speed for a device that was built for a DIN cable, and go faster if it copes. These are the same choices Network MIDI Setup offers for network MIDI devices.
Put the throttler last, right before the device, so its speed is spent only on the messages that actually go there. Speed is counted in the bytes the same messages would take on a MIDI 1.0 cable.
A single note or knob turn is never held back. After a quiet moment, a short burst goes out right away: 64 bytes at MIDI 1.0 wire speed, and twice that at twice the speed. Only what comes after that is spaced out. So playing a keyboard feels the same, while a 3,000-byte SysEx dump at MIDI 1.0 wire speed takes about a second, just as it would over a cable.
Windows MIDI Patchbay holds the messages that are waiting and sends them as fast as the speed allows. It never slows down the device or app that’s sending to it. Select the throttler to see how many messages are waiting, under Activity. A throttler can hold minutes’ worth of messages at MIDI 1.0 wire speed. If even more arrives, the newest messages are dropped, and Activity says how many.
A throttler that falls behind thins out fast moves. When more than about a tenth of a second of messages is waiting, it skips some of the steps in the middle of each control change, pressure or pitch bend move, so the device catches up. Where each move starts, every point where it turns around, and where it ends are always sent, and so is the value right before and after each note. Notes, program changes and SysEx are never skipped. Activity says how many in-between values were skipped. Short moves are always sent in full, so an endless knob that sends how far it turned, rather than where it is, keeps working in nearly every case. To be sure every message gets through, turn off Skip in-between values to catch up for that throttler.
Everything connected into one throttler shares its speed. Connect everything that goes to a slow device through one throttler, and the device never gets more than that. Two throttlers in front of the same device each send at their own speed, so together they can send it twice as much. A patch from an earlier version gets a throttler for each connection that had a sending speed, so it works the way it did.
When the routing changes, such as when you edit a step or a connection, Windows MIDI Patchbay keeps its connections to devices open, but messages that are still waiting to be sent are dropped. Let a long transfer finish before you change things.
When an app sends MIDI, it can ask Windows to wait until the device’s driver has taken each message before the app sends the next one. That keeps a fast app from piling messages up in front of a slow device. Older apps that use the Windows multimedia MIDI API (WinMM) always wait like this.
That waiting stops at a loopback, though. An app sending to a loopback only waits for the loopback, and Windows MIDI Patchbay then passes the messages on to the device as fast as they come. To put the waiting back, open the patch’s … menu and turn on Wait for send complete. Windows MIDI Patchbay then waits until the device’s driver has taken each message before it sends the next one.
It applies to every connection in the patch, because it changes how Windows MIDI Patchbay connects to each device. Like a throttler, it never holds up the device or app that’s sending to Windows MIDI Patchbay. The app holds the messages that are waiting, and Activity shows how many there are.
You can use both together. The throttler sets the most it sends in a second, and waiting makes sure the device has taken each message before the next one goes.
This is the important limitation. Windows MIDI Patchbay routes by receiving messages in its own process and sending them back out, so the routes exist only while the app is open. Two settings in the appearance and settings flyout, in the main Windows MIDI Patchbay window, deal with that:
Both are off unless you turn them on. Windows MIDI Patchbay doesn’t put itself in the notification area uninvited.
Closing a patch’s own window never stops it routing. Closing the main window with Run in notification area off closes Windows MIDI Patchbay, so it asks first when a patch is routing.
Because Windows MIDI Patchbay works inside its own process, it can only route from a message source to a message destination. It can’t reach inside another app. A loopback is how you bridge that gap: it’s a real MIDI endpoint on the PC that any app can open, so your DAW connects to the loopback and Windows MIDI Patchbay feeds the loopback.
Create loopback on the toolbar of a patch window, or at the bottom of the Endpoints tab, makes one without leaving the canvas, and drops it straight onto the patch. There are two kinds:
Create loopback uses the same Windows MIDI Services feature that MIDI Loopback Setup does, so a loopback made here is a normal endpoint that every app sees, and it can stick around after Windows MIDI Patchbay closes.
Tip: Some apps remember a device by its name. To filter what one of those apps receives from a device without breaking that, give a loopback the device’s name. First rename the device with Customize in MIDI Settings. Older apps see the device’s MIDI 1.0 ports rather than the device itself, so rename those too, with Edit port names. New port names take effect when the MIDI service restarts. Then create a MIDI 1.0 basic loopback with the device’s original name, connect the device’s Out to the loopback’s In, and put the filter steps you want between them. The app finds the loopback under the name it remembers, and gets only what your filters let through.
This works best for a device the app only listens to. A basic loopback sends whatever it’s given straight back out, so anything the app sends to that name comes back to the app instead of reaching the device.
Gear gets unplugged. That’s a normal state, not an error.
An endpoint that isn’t connected right now is drawn with a dashed outline and a warning badge, its patch’s tile says a device is missing, and the connections to it sit idle. Everything else in the patch keeps routing. The moment the device comes back, its connections start carrying messages again without you doing anything.
If the device came back with a different identity — a USB device with no serial number moved to another port, for example — Windows MIDI Patchbay notices a likely match and offers it. It never binds to a different device on its own.
Selecting an endpoint shows Match by in the details panel:
Sending a device’s output back to its own input, directly or the long way around, floods every device on the path within a second. Windows MIDI Patchbay walks the patch after every change and looks for that.
When the circle is certain — when every endpoint on it is a loopback, so it’s known that what goes in comes back out — the connection that closes it is left in place but held muted, and the whole circle is drawn in red. The message names the hops in order so you can see which one to remove.
When the circle only closes if a piece of hardware echoes what it receives, which Windows MIDI Patchbay can’t see from outside, it says so and mutes nothing.
Windows MIDI Patchbay only knows about the connections it routes itself. A DIN cable between two devices, or another routing app, can close a circle it can’t see. That’s why the status bar says “no loops detected” rather than “no loops”.
Steps can’t be connected in a circle at all. Windows MIDI Patchbay won’t draw a connection that would close one, and a patch file that has one doesn’t route until it’s fixed.
Right-click an endpoint, or use Test on the toolbar, to open MIDI Monitor, the MIDI keyboard or the scratch pad already pointed at that endpoint. Selecting a connection shows a running count of what it has forwarded, and selecting a step shows how much it let through and kept out. That’s how you tell “nothing is arriving” apart from “arriving and going nowhere”.
Show live routing, under Test, lights up each connection and step as messages go through it, and then fades it out. Play a few notes on a keyboard and watch where they go. When a MIDI-CI responder answers, its dashed line back to the endpoint lights up too.
It only shows a patch that’s routing, and it waits while a trace is on the canvas. It redraws the canvas many times a second, so turn it off when you’re done. It’s off each time you open a patch.
Trace messages…, under Test, shows where messages go in the patch, one step at a time, without sending anything to a device. It works on a patch that isn’t routing, and on devices that aren’t plugged in.
The canvas shows where the first message went. The connections and steps it went through are drawn in green, a step that kept it out has a red edge, and everything else fades. The bar at the top says which devices it reached, and what it looked like when it got there. Next and Previous step through the list, and Change messages opens the list again. Close the bar to put the canvas back. Any change to the patch puts the canvas back too.
The messages in a trace go through the patch one after another, the same way they would while it routes. A note off goes where its note on went, and memories start empty and carry from one message to the next. So to see how a footswitch changes where notes go, trace the footswitch message, then a note.
A trace doesn’t run generators, and it doesn’t wait for a message throttler. What comes after a throttler is shown at once.
Windows MIDI Services is an open source project with all source available on GitHub. We have a great community on Discord as well. Between GitHub and Discord, you should find the information you are looking for.
