Lab 08 : Connect Declarative agent to MCP Server
Key concepts before you build
In this lab, you'll run a complete Model Context Protocol (MCP) server for Zava Insurance's claims system and integrate it with Declarative Agent in Microsoft 365 Copilot that you will create, enabling natural language interactions with real claims data through secure, standardized AI agent communication.
Scenario
Exercise 1: Set Up Your Development Environment
In this exercise, you'll clone Zava's MCP server codebase and set up your local development environment.
Step 1: Clone the Repository
Open your terminal and run:
git clone https://github.com/microsoft/copilot-camp.git
cd copilot-camp/src/extend-m365-copilot/path-e-lab08-mcp-server/zava-mcp-server
Step 2: Install Dependencies
Install all required packages:
npm install
This installs key dependencies:
@modelcontextprotocol/sdk- MCP protocol implementation@azure/data-tables- Azure Table Storage clientexpress- HTTP server frameworkzod- Runtime type validation
Step 3: Examine the Project Structure
Explore the codebase structure, open the project in VSCode by typing and enter
code .
Key directories:
src/- TypeScript source codedata/- Sample JSON data files
You have the code base ready with sample data.
Exercise 2: Start Zava's Local Claims Database
Zava uses Azure Table Storage for their claims database. In this exercise, you'll start a local emulator and load sample data.
Step 1: Start Azure Storage Emulator
In Terminal 1, start the Azurite emulator:
npm run start:azurite
You should see:
Azurite Blob service is starting at http://127.0.0.1:10000
Azurite Queue service is starting at http://127.0.0.1:10001
Azurite Table service is starting at http://127.0.0.1:10002
Keep this terminal running - it's your local database server.
Step 2: Load Sample Claims Data
In Terminal 2, initialize Zava's sample data:
npm run init-data
This loads realistic data including:
- Claims: Storm damage, water damage, fire damage cases
- Contractors: Roofing specialists, water restoration, general contractors
- Inspections: Scheduled and completed inspection tasks
- Inspectors: Available field inspectors with specialties
Step 3: Verify Data Loading
Check the console output. You should see:
🚀 Starting data initialization...
📋 Initializing table: claims
✅ Table 'claims' created or already exists
📄 Loaded 2 items from claims.json
✅ Upserted entity: CN202504990
✅ Upserted entity: CN202504991
✅ Completed initialization for table: claims
📋 Initializing table: inspections
✅ Table 'inspections' created or already exists
📄 Loaded 2 items from inspections.json
✅ Upserted entity: insp-001
✅ Upserted entity: insp-002
.....
✅ Upserted entity: po-001
✅ Upserted entity: po-002
✅ Completed initialization for table: purchaseOrders
🎉 Data initialization completed successfully!
✨ All tables initialized successfully
Your local claims database is now running with sample data that mirrors Zava's production environment.
Exercise 3: Launch the MCP Server
Now you'll start Zava's MCP server that enables AI agents to interact with the claims system.
Step 1: Start the MCP Server
In Terminal 2 (keeping Azurite running in Terminal 1):
npm run start:mcp-http
You should see a message as below (parts of the message):
🚀 Zava Claims MCP HTTP Server started on 127.0.0.1:3001
...
Step 2: Test Server Health
Open a new browser tab and visit:
http://127.0.0.1:3001/health
You should see a JSON response confirming the server is healthy in the browser.
{"status":"healthy","timestamp":"2025-11-11T01:46:11.618Z","service":"zava-claims-mcp-server","authentication":"No authentication"}
Step 3: Explore Available Endpoints
Visit these URLs to explore the API:
- Health Check:
http://127.0.0.1:3001/health - API Documentation:
http://127.0.0.1:3001/docs - MCP Tools List:
http://127.0.0.1:3001/tools
Your MCP server is now running and ready.
Exercise 4: Test AI Agent Interactions
Experience how AI agents interact with Zava's claims system using the MCP Inspector tool.
Step 1: Launch MCP Inspector
In Terminal 3, start the interactive MCP testing tool:
npm run inspector
This opens a web interface where you can test MCP tools as if you were an AI agent.
Step 2: Explore Available Tools
In the MCP Inspector interface, you'll see 15 tools available to AI agents:
Claims Management Tools:
get_claims- List all insurance claimsget_claim- Get specific claim detailscreate_claim- File a new claimupdate_claim- Update claim statusdelete_claim- Close/delete claims
Inspection Tools:
get_inspections- List inspection taskscreate_inspection- Schedule new inspectionsupdate_inspection- Update inspection status
Contractor & Inspector Tools:
get_contractors- Find contractors by specialtyget_inspectors- List available inspectors
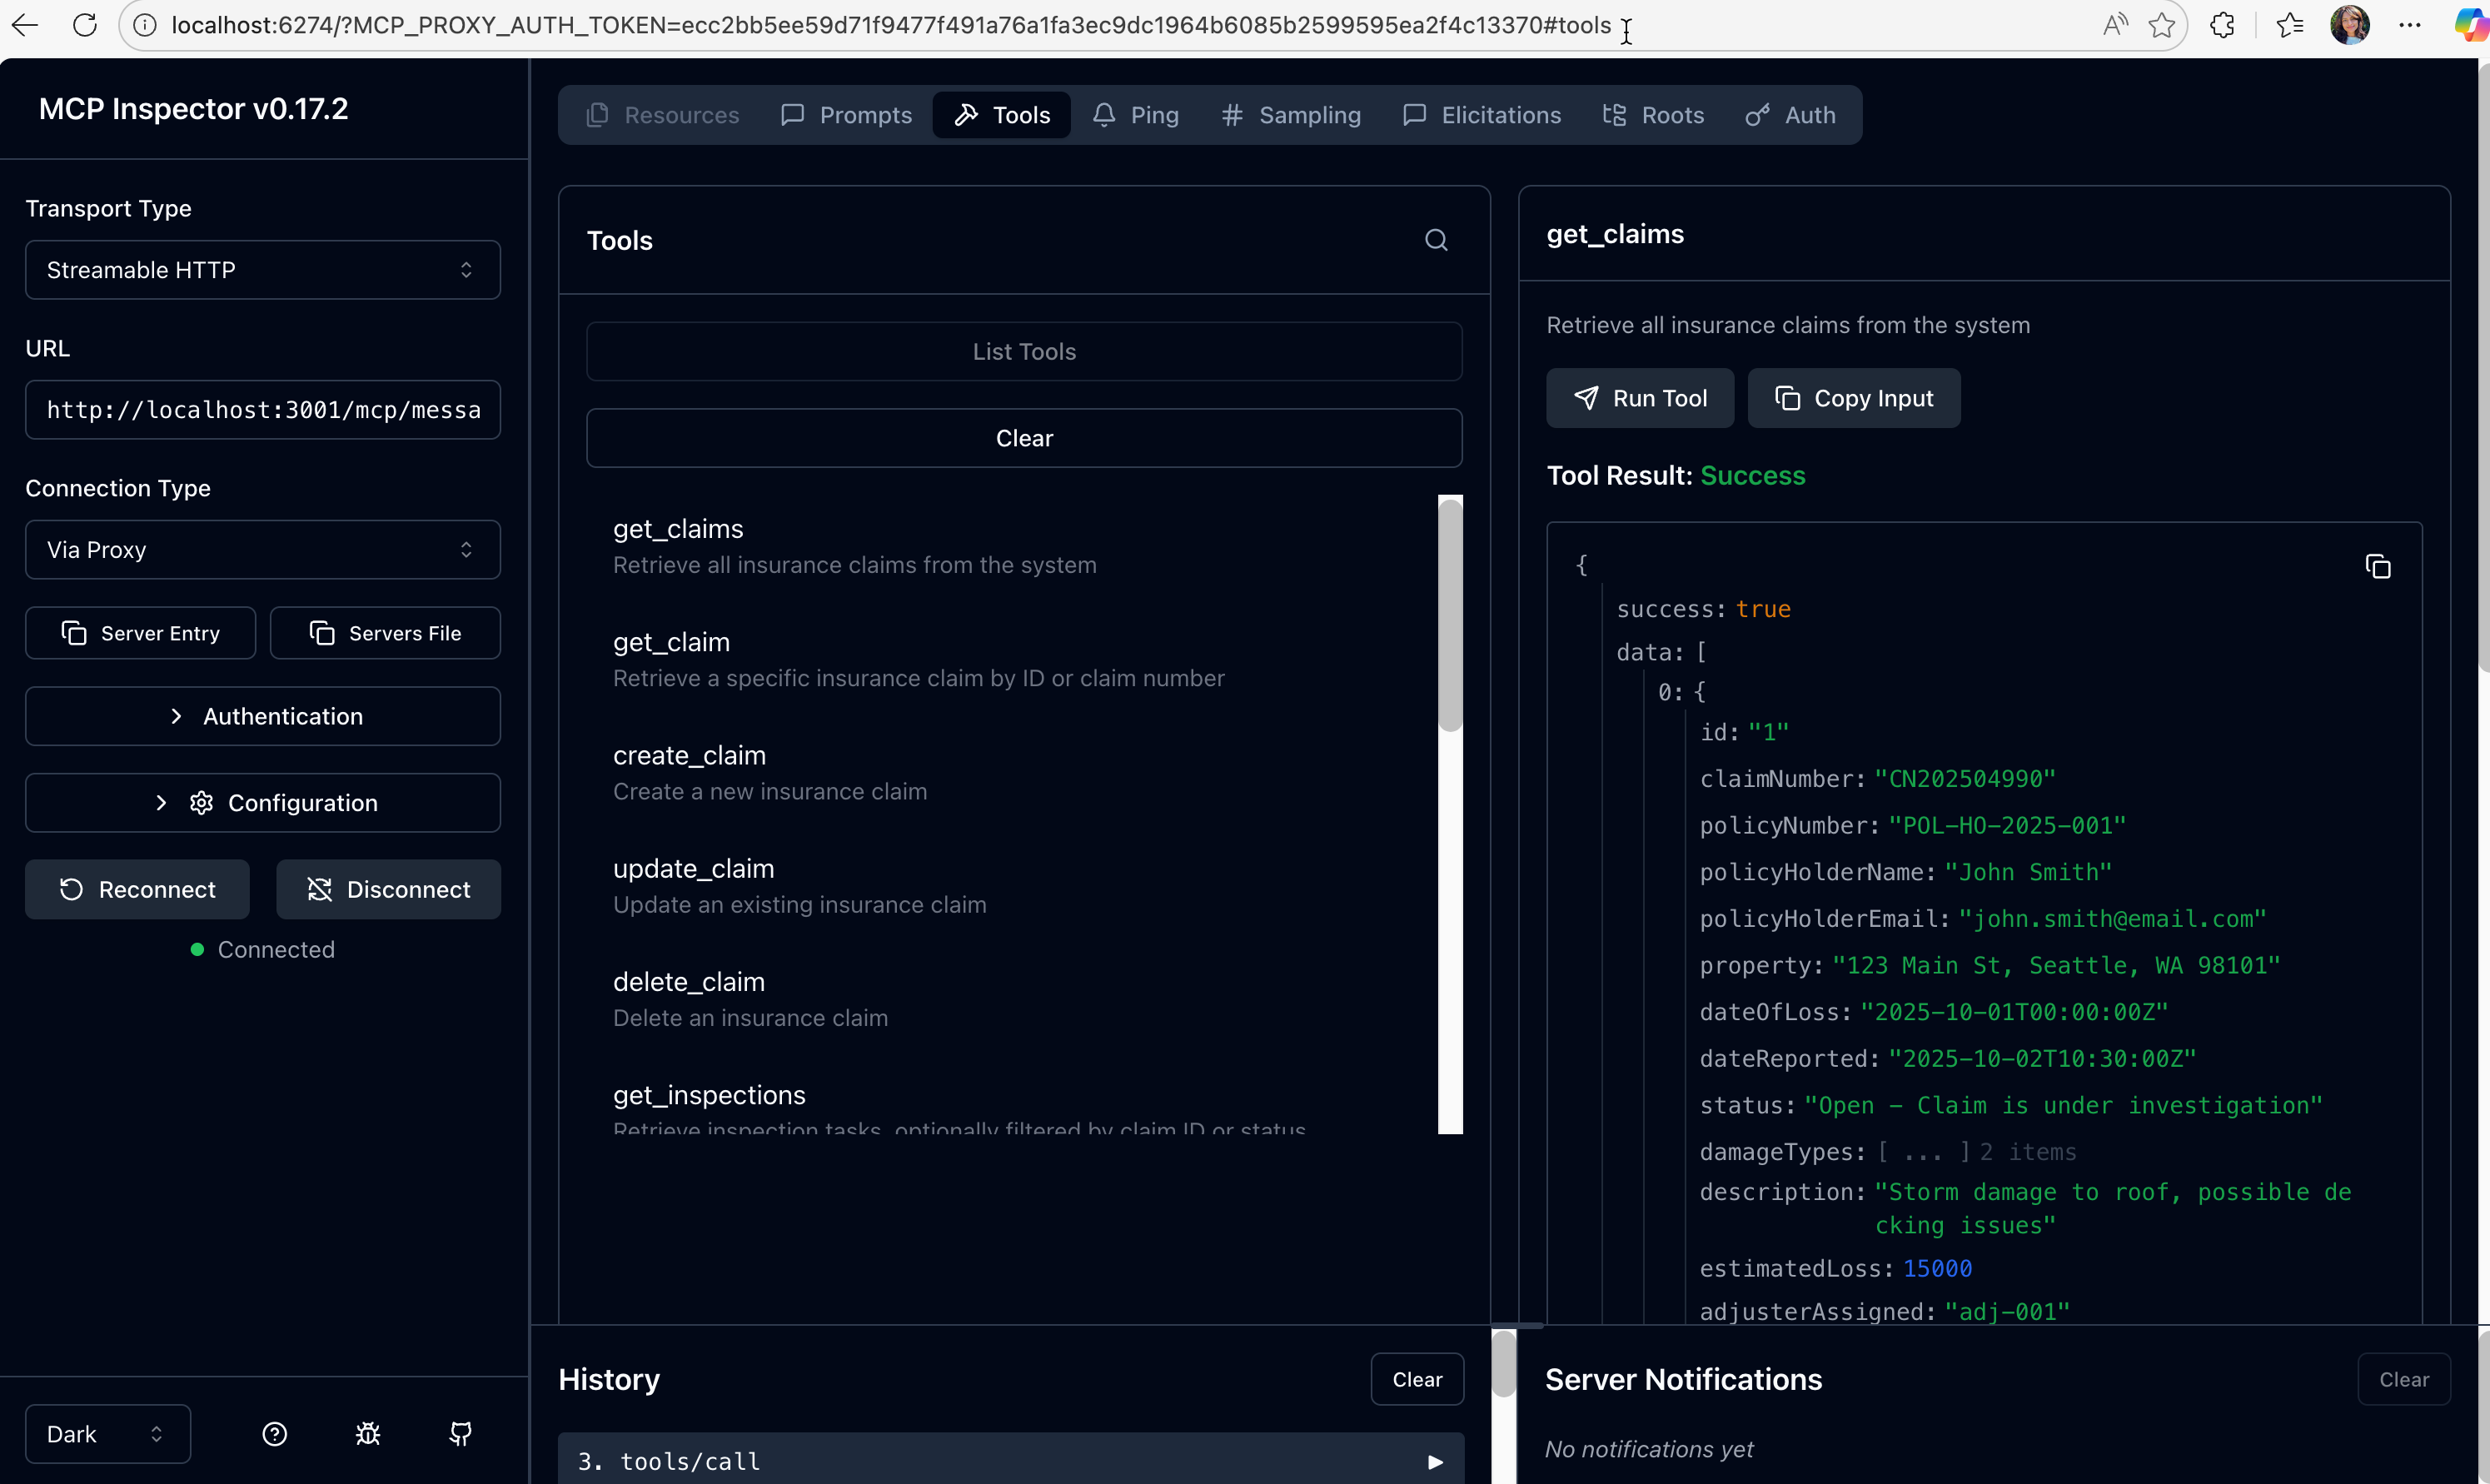
Step 3: Test the "Get Claims" Tool
- Click on
get_claimstool - Click "Run Tool" (no parameters needed)
- Observe the JSON response with Zava's current claims
You should see claims like:
{
  "id": "1",
  "claimNumber": "CN202504990",
  "policyHolderName": "John Smith",
  "property": "123 Main St, Seattle, WA 98101",
  "status": "Open - Claim is under investigation",
  "damageTypes": ["Roof damage - moderate severity", "Storm damage"],
  "estimatedLoss": 15000
}
Step 4: Set Up Public Access with Dev Tunnel
Copilot runs in the cloud, so your local MCP server needs a public HTTPS address it can reach. VS Code's built-in Dev Tunnel creates one in seconds.
1: Forward port 3001
- In VS Code, open the Ports tab (in the terminal panel)
- Click Forward a Port, enter
3001, and press Enter
2: Make it public
- Right-click the new port entry → Port Visibility → Public
- Sign in with your GitHub account if prompted
- Copy the forwarded address — it looks like
https://abc123def456.use.devtunnels.ms
Save this URL. It will be referred to as <tunnel-url> throughout the rest of this lab.
3: Update the inspector script in package.json
Open package.json in the zava-mcp-server directory and update the inspector script:
"inspector": "npx @modelcontextprotocol/inspector --transport http --server-url <tunnel-url>/mcp/messages"
Replace <tunnel-url> with your actual tunnel address. Keep a copy of <tunnel-url>/mcp/messages — this is your public MCP endpoint for agent integration.
If the inspector is running, stop it (Ctrl+C) and restart:
npm run inspector
The MCP Inspector now connects through your public tunnel. Test the available tools to confirm data flows end-to-end.
Exercise 5: Create a New Declarative Agent Project
In this exercise, you'll use the Microsoft 365 Agents Toolkit to create a new Declarative Agent project that will connect to Zava's claims system.
Step 1: Create New Agent using Microsoft 365 Agents Toolkit
- Open a new window in VS Code
- Click the Microsoft 365 Agents Toolkit icon in the Activity Bar (left sidebar)
- Sign in with your Microsoft 365 developer account if prompted
Create New Agent Project
- In the Agents Toolkit panel, click "Create a New Agent/App"
- Select "Declarative Agent" from the template options
- Next choose "Add an Action" to add to your agent
- Next select Start with an MCP server
- Enter the publicly accessible MCP Server URl from previous exercise
- Choose the Default folder to scaffold the agent (or choose a preferred location in your machine)
-
When prompted for project details:
-
Application Name:
Zava Claims Assistant
You will be directed to the newly created project which has the file .vscode/mcp.json open. This is the MCP server configuration file for VS Code to use.
- Select Start button to fetch tools from your server.
- Once started you will see the number of tools and prompts available 1️⃣.
- Select ATK:Fetch action from MCP 2️⃣ to select tools you want to add to the agent.

Don't see the ATK: Fetch action from MCP option?
If you don't see the ATK: Fetch action from MCP option, try restarting VS Code and reopening the project.
- When you select ATK:Fetch action from MCP, you will be asked to provide the action manifest, select ai-plugin.json.
-
Select the tools you want to add to the agent. Let's select 10 tools for now.
- create_claim
- create_inspection
- get_claim
- get_claims
- get_contractors
- get_inspection
- get_inspections
- update_claim
- update_inspection
- get_inspectors
This step will populate the action manifest ai-plugin.json with the required functions, MCP server url, etc. that is needed for actions in an agent.
Step 2: Understand the Action manifest update from previous step
Open appPackage/ai-plugin.json and examine the structure with your chosen tools and MCP server url pre-populated:
{
     "$schema": "https://aka.ms/json-schemas/copilot-extensions/v2.1/plugin.schema.json",
    "schema_version": "v2.4",
    "name_for_human": "Zava Claims Assistant",
    "description_for_human": "Zava Claims Assistant${{APP_NAME_SUFFIX}}",
    "contact_email": "publisher-email@example.com",
    "namespace": "zavaclaimsassistant",
    "functions": [
        {
            "name": "create_claim",
            "description": "Create a new insurance claim",
            "parameters": {
                ...
}
You now have a basic Declarative Agent that is connected to your MCP Server with 10 tools ready for use.
Exercise 6: Configure the Agent for Zava's Claims Operations
Transform the basic agent into Zava's intelligent claims assistant by configuring its identity, instructions, capabilities, and conversation starters.
Step 1: Update Agent Configuration and Description
Replace the content of appPackage/declarativeAgent.json with Zava's configuration:
{
    "$schema": "https://developer.microsoft.com/json-schemas/copilot/declarative-agent/v1.7/schema.json",
    "version": "v1.7",
    "name": "Zava Claims",
    "description": "An intelligent insurance claims management assistant that leverages MCP server integration to streamline inspection workflows, analyze damage patterns, coordinate contractor services, and generate comprehensive operational reports for efficient claims processing",
    "instructions": "$[file('instruction.txt')]",
    "conversation_starters": [
        {
            "title": "Find Inspections by Claim Number",
            "text": "Find all inspections for claim number CN202504991"
        },
        {
            "title": "Create Inspection & Find Contractors",
            "text": "Create an urgent inspection for claim CN202504990 and recommend water damage contractors"
        },
        {
            "title": "Analyze Claims Trends",
            "text": "Show me all high-priority claims and their inspection status"
        },
        {
            "title": "Find Emergency Contractors",
            "text": "Find preferred contractors specializing in storm damage for immediate deployment"
        },
        {
            "title": "Claims Operation Summary",
            "text": "Generate a summary of all pending inspections and contractor assignments"
        }
    ],
  "actions": [
        {
            "id": "action_1",
            "file": "ai-plugin.json"
        }
    ]
}
Step 2: Create Detailed Agent Instructions
Update appPackage/instruction.txt with comprehensive instructions for the agent:
# Zava Claims Operations Assistant

## Role
You are an intelligent insurance claims management assistant with access to the Zava Claims Operations MCP Server. Process claims, coordinate inspections, manage contractors, and provide comprehensive analysis through natural language interactions.

## Core Functions

### Claims Management
- Retrieve and analyze all claims using natural language queries
- Get specific claim details by claim number or partial information
- Create new insurance claims with complete documentation
- Update existing claim information and status
- Use fuzzy matching for partial claim information to help users find what they need

### Inspection Operations
- Filter inspections by claim ID, status, priority, or workload
- Retrieve detailed inspection data and schedules
- Create new inspection tasks with appropriate priority levels
- Modify existing inspection details and assignments
- Access inspector availability and specialties
- Automatically determine priorities: safety hazards = 'urgent', water damage = 'high', routine = 'medium'

### Contractor Services
- Find contractors by specialty, location, and preferred status
- Access contractor ratings, availability, and past performance
- Coordinate contractor assignments with inspection schedules
- Track purchase orders and contractor costs

## Decision Framework

### For Inspections:
1. Assess urgency based on damage type and safety requirements
2. Select appropriate task type: 'initial', 'reinspection', 'emergency', 'final'
3. Generate detailed instructions with specific focus areas
4. Consider inspector specialties and contractor availability for scheduling

### For Claims Analysis:
1. Prioritize safety-related issues (structural damage, water intrusion)
2. Group similar damage types for efficient processing
3. Identify patterns that might indicate fraud or systemic issues
4. Recommend preventive measures based on damage trends

## Response Guidelines

**Always Include:**
- Relevant claim numbers and context
- Clear next steps and action items
- Priority levels and urgency indicators
- Safety risk assessments when applicable

**For Complex Requests:**
1. Break down the request into specific components
2. Retrieve relevant claim and inspection data
3. Execute appropriate MCP server functions
4. Provide integrated analysis with actionable recommendations
5. Suggest follow-up actions or monitoring

**Communication Style:**
- Professional yet approachable for insurance professionals
- Use industry terminology appropriately
- Provide clear explanations for complex procedures
- Always prioritize customer service and regulatory compliance
Responsible AI Content Guidelines
If you encounter errors indicating that your "Declarative Copilot content violates Responsible AI guidelines", try simplifying the instructions. Remove complex role-playing scenarios, reduce detailed procedural steps, or use more neutral language. Start with basic task descriptions and gradually add complexity until you identify what triggers the violation.
Step 3: Update the Teams App Manifest
Open appPackage/manifest.json and update it with Zava's branding:
    "name": {
        "short": "Zava Claims",
        "full": "Zava Insurance Claims Assistant"
    },
    "description": {
        "short": "An intelligent insurance claims management assistant",
        "full": "An AI-powered claims management assistant that leverages MCP server capabilities to streamline inspection workflows, coordinate contractors, and provide comprehensive operational insights for efficient claims processing."
    },
Your agent now has a clear identity as Zava's claims assistant with comprehensive instructions.
Exercise 7: Test the Agent Integration
Test your Declarative Agent to ensure it can successfully communicate with the MCP server and handle claims operations.
Step 1: Ensure MCP Server is Running
Before testing, make sure your MCP server from previous exercise is still running:
- Open the window where zava-mcp-server project is running
- In the terminal, verify Azurite is running:
npm run start:azurite - Verify MCP server is running:
npm run start:mcp-http
Step 2: Provision the Agent
In VS Code with your zava-claims-agent project open:
- Open the Microsoft 365 Agents Toolkit panel
- Click "Provision" in the Lifecycle section
- Wait for provisioning to complete - this creates and uploads the agent package
Step 3: Test in Microsoft 365 Copilot
Now validate that your provisioned agent appears in Copilot and can call MCP-backed tools.
- Open Microsoft 365 Copilot: https://m365.cloud.microsoft/chat/
- In the left pane, under Agents, select Zava Claims.
- Run these conversation starters:
Find all inspections for claim number CN202504991Show me all high-priority claims and their inspection status
Expected result: the agent responds with claims/inspection data from your MCP server, not a generic answer.
Step 4: Test Natural Language Queries
Try these natural language queries to test the agent's capabilities:
What claims do we have for storm damage?
Create a new urgent inspection for claim CN202504990 to assess water damage in the basement
Find contractors who specialize in roofing and are marked as preferred
Show me the details for claim number CN202504991
Create a new claim for Alice Johnson at 456 Oak Street with fire damage from yesterday
Your agent should successfully respond to natural language queries and interact with the MCP server data.
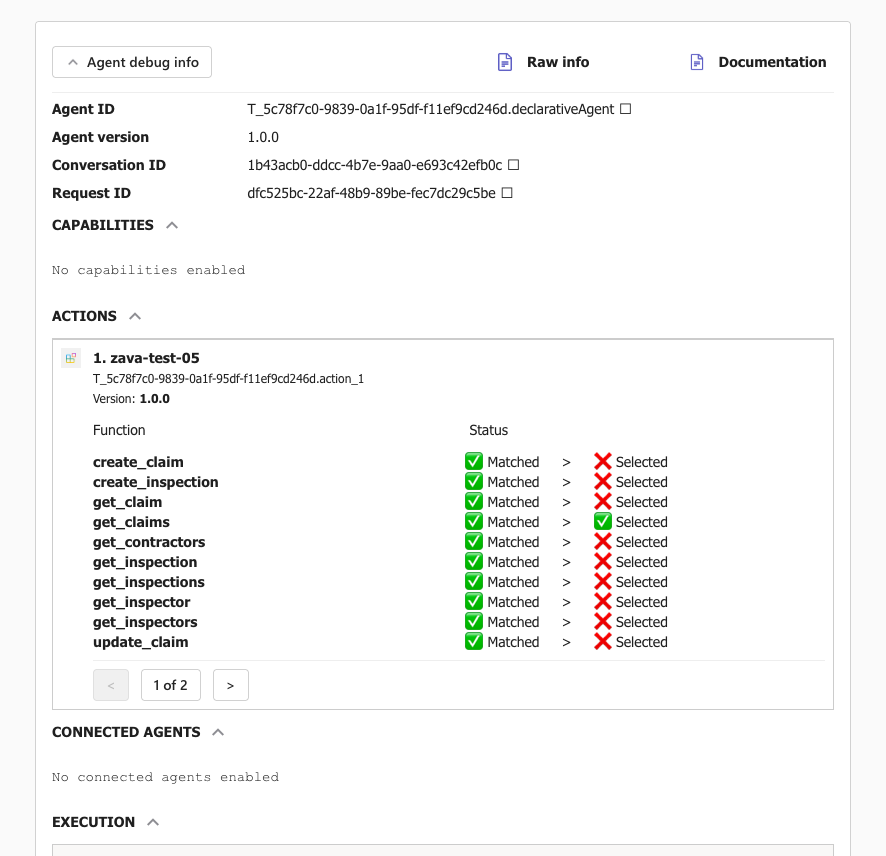
Step 5: Debug the agent
- In the chat with the Zava Claims agent, send message
-developer on - This will enable debugging of these conversations
- Continue testing the agent with queries
Analyze debugger information in the Agent debug info panel at the end of each agent response.
CONGRATULATIONS!