Lab CWRK03 - Add Entra SSO Authentication to a Cowork Plugin

Do these labs if you want to extend Copilot Cowork
Table of Contents
In this lab, you'll take the Zava Claims MCP server from Lab E10 and wire it up to a Cowork plugin with Microsoft Entra SSO authentication. By the end, Cowork will authenticate users with their existing Microsoft 365 credentials — no extra sign-in prompts, no secrets sitting in plain text.
The pattern here is the same one you'd use for any Entra-secured API: register an app, create an SSO auth config, update the app registration with the new URI, and point your plugin at it. The Zava claims scenario is just the concrete example.
Prerequisites
- Access to Azure Portal with permissions to manage app registrations
- Access to Teams Developer Portal
- Access to Copilot Cowork
Why this lab matters
Most organizations have sensitive data locked behind authenticated APIs — claims records, financial transactions, patient data. Getting that data into a usable format typically means manual exports, copy-paste workflows, and formatting spreadsheets by hand. Every time.
In this lab, you'll solve three problems at once:
-
Secure access without friction — Users authenticate once via Microsoft Entra SSO. No client secrets, no API keys in config files, no extra sign-in prompts. The token flows silently from that point on, and access is governed by your existing Entra ID policies.
-
Skills that transform data consistently — Instead of relying on users to remember formatting rules or calculation logic, you encode that knowledge in a Cowork skill. The skill takes raw claims data and produces a structured Excel report with the right calculations every time — no human error, no variation.
-
Repeatable value across teams — Here's the real payoff: once you build this skill, any department can use it. Finance needs the same claims data in their format? Legal needs a compliance view? Create a new skill or reuse the existing one — the secure MCP connection and the plugin infrastructure stay the same. One investment, many consumers.
Zava Insurance has claims data served by an authenticated MCP server. You'll connect Cowork to that server with SSO, then use a skill to transform raw data into a formatted Excel report:
| Before skill | After skill |
|---|---|
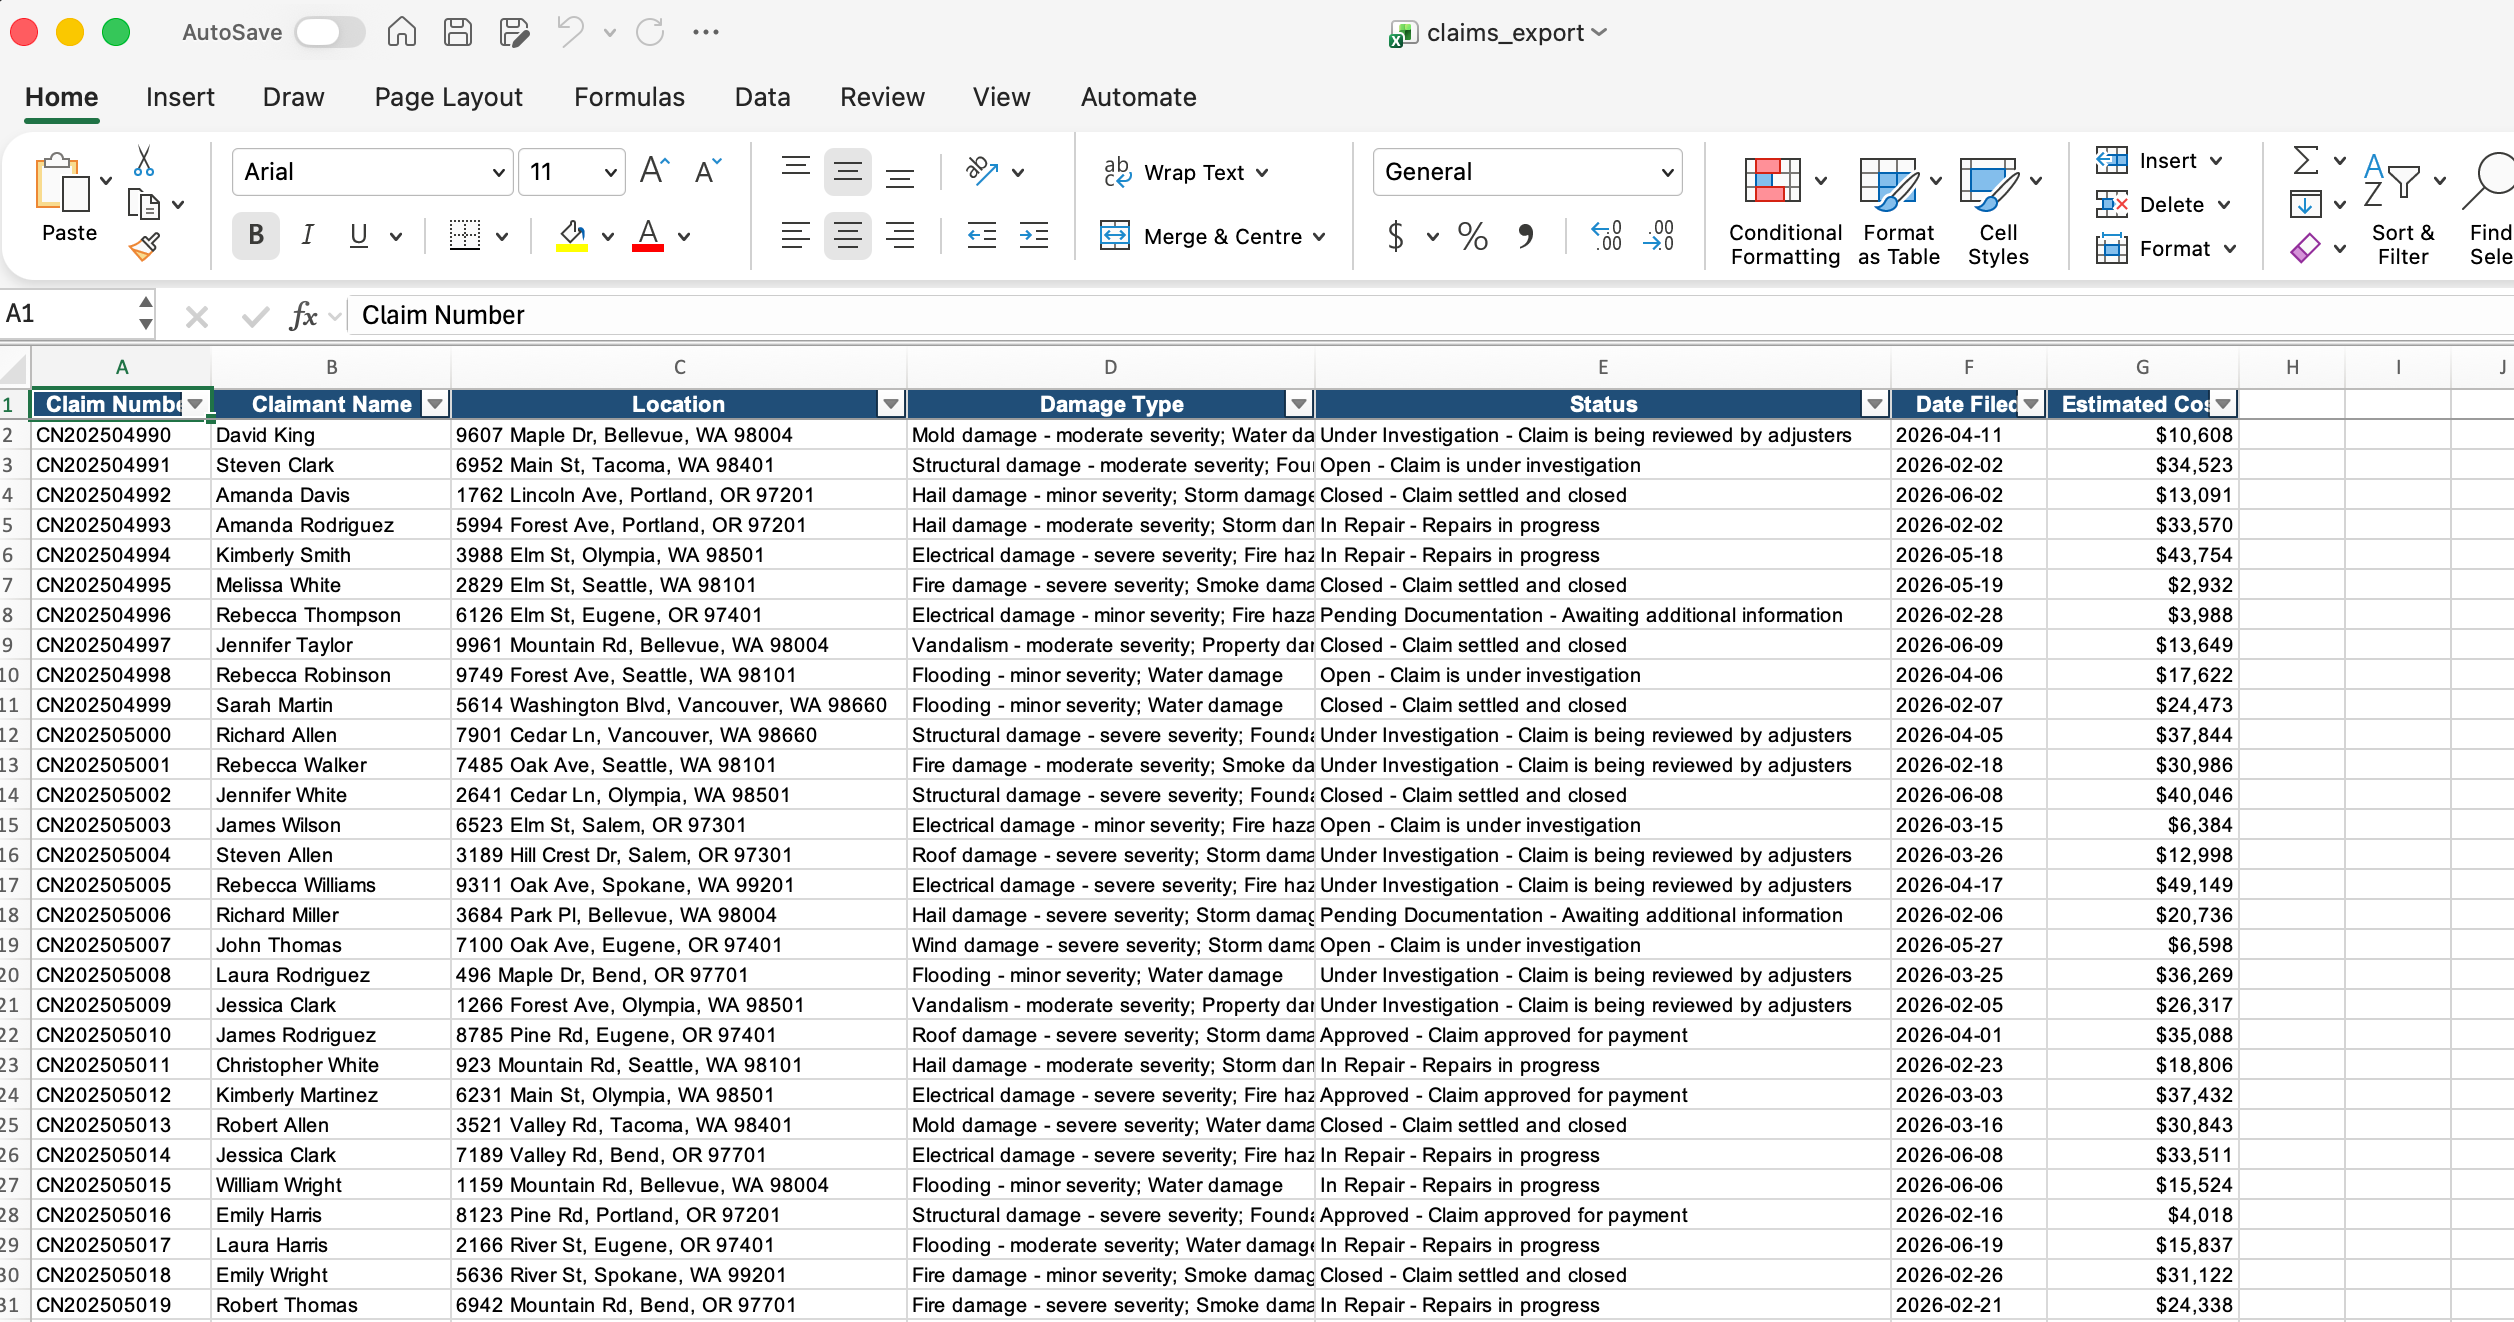 |
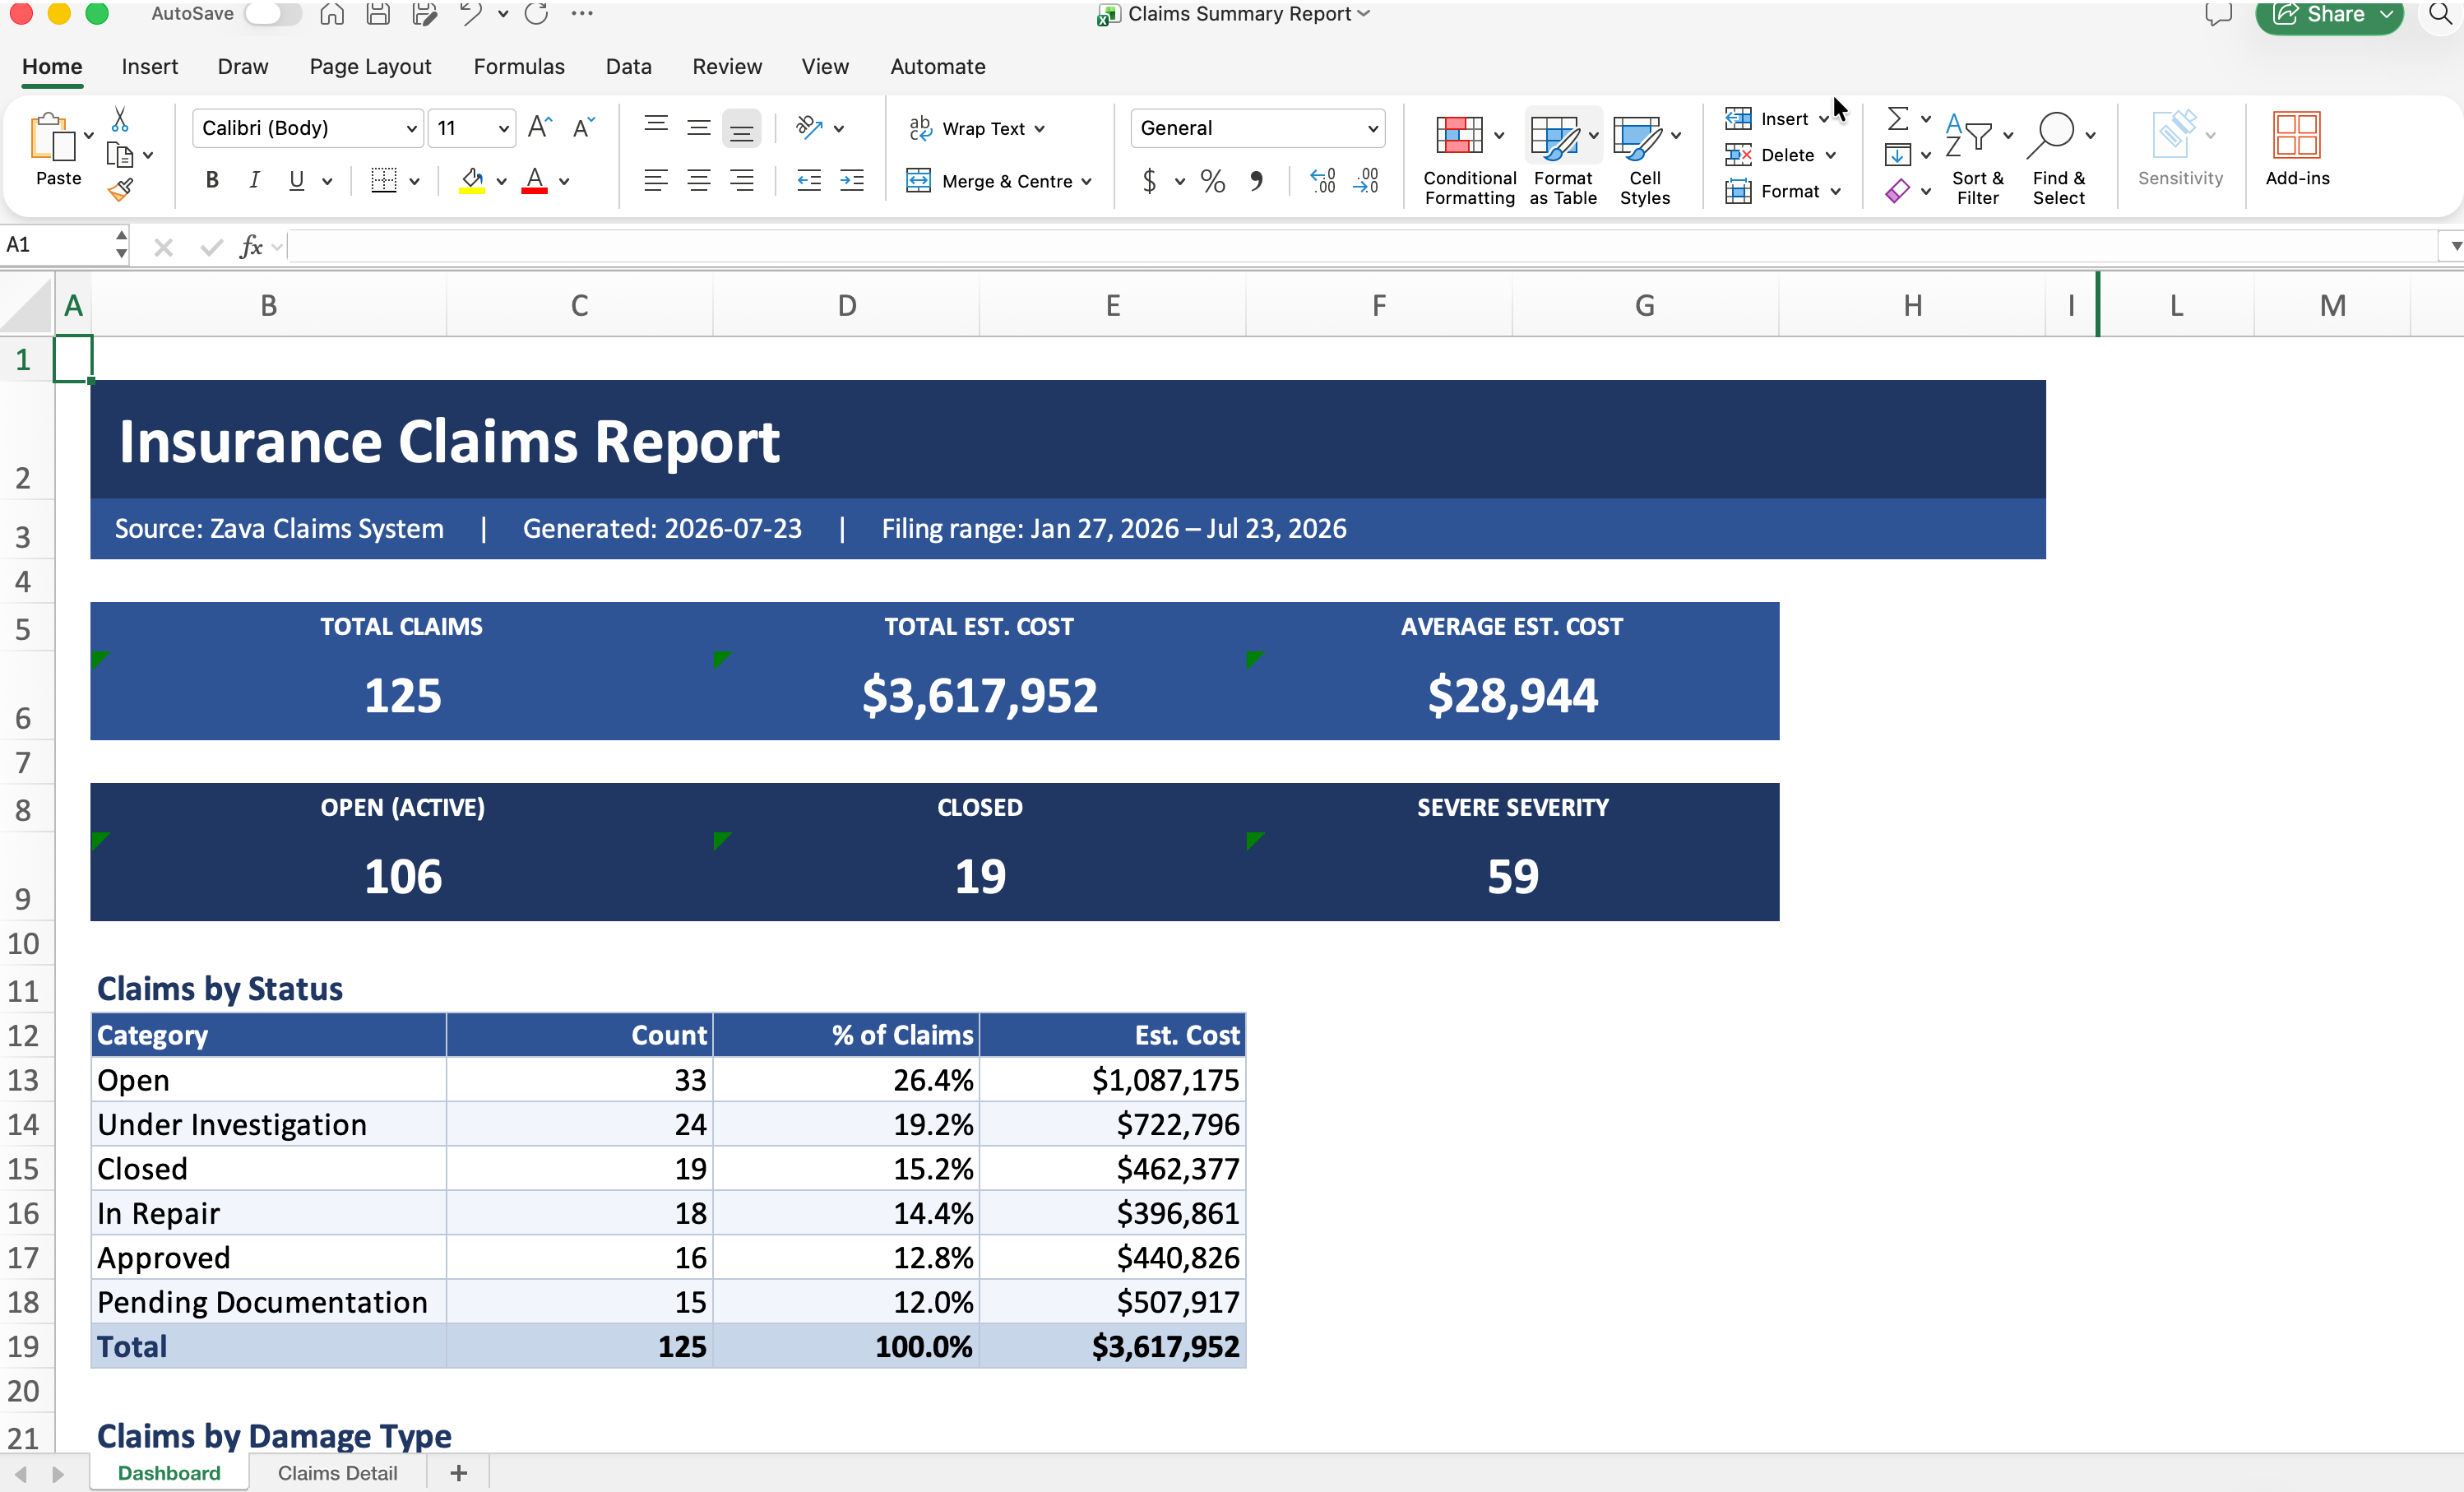 |
How the pieces fit together
Before diving into steps, understand what you're building:
sequenceDiagram
    participant User
    participant Copilot as Microsoft 365 Copilot<br/>(or Cowork)
    participant TokenStore as Enterprise Token Store<br/>(ab3be6b7-...)
    participant Entra as Microsoft Entra ID
    participant API as Your MCP Server / API

    User->>Copilot: Invokes plugin
    Copilot->>TokenStore: "Get me a token for this auth config ID"
    TokenStore->>Entra: SSO token request (on behalf of user)
    Entra-->>TokenStore: Access token (audience = your API)
    TokenStore-->>Copilot: Access token
    Copilot->>API: API call + Bearer token
    API->>API: Validate token (audience, scope, issuer)
    API-->>Copilot: Response data
Copilot-->>User: Formatted answer| Component | What it does | Where you configure it |
|---|---|---|
| Entra app registration | Defines your API's identity, scopes, and who can call it | Azure Portal / Entra admin center |
| Auth config (SSO registration) | Tells the token store how to get tokens for your API | Teams Developer Portal |
| Your API's token validation | Accepts and validates the tokens that arrive | Your server code's environment config |
Exercise 1: Project setup
In this exercise you'll get the authenticated MCP server running and grab the plugin source code that you'll wire up with SSO.
Step 1: Get the MCP server code
If you already have the Zava MCP server from Lab E10, navigate to that directory. Otherwise, clone the repo and navigate to the server:
git clone https://github.com/microsoft/copilot-camp.git
cd copilot-camp/src/extend-m365-copilot/path-e-lab10-mcp-auth/zava-mcp-server
npm install
Open this folder in VS Code:
code .
This will be your MCP server window — keep it open for the rest of the lab.
Step 2: Run the server and Dev Tunnel
In your MCP server VS Code window, you need the server accessible over a public URL so Cowork can reach it.
-
Start Azurite (local storage emulator) in one terminal:
npm run start:azurite -
Load sample data (if you haven't already):
npm run init-data -
In VS Code's terminal panel, select the Ports tab, forward port
3001, then right-click the address and set Port Visibility → Public. Copy the tunnel URL — you'll need it shortly. -
Build and start the MCP server:
npm run build
npm run start:mcp-http
Verify it's running by visiting http://127.0.0.1:3001/health — you should see "authentication": "OAuth enabled" in the response.
Save your tunnel URL
You'll use this URL multiple times in the following exercises. Keep it handy — for example: https://abc123def456.use.devtunnels.ms
Step 3: Get the plugin source
The plugin code is already in this repo at src/cowork/zava-claims-sso. Open it in a separate VS Code window (so you can keep the MCP server running in the first one):
cd copilot-camp/src/cowork/zava-claims-sso
code .
Take a look at the structure:
zava-claims-sso/
├── manifest.json
├── color.png
├── outline.png
├── package.json
└── skills/
    └── zava-claims-export/
        └── SKILL.md
This is a standard Cowork plugin — a manifest, icons, and a skill that knows how to turn raw claims data into a formatted Excel report.
Step 4: Update the MCP server URL in the plugin
Open manifest.json and find the agentConnectors section. Replace the mcpServerUrl value with your Dev Tunnel URL + /mcp/messages:
"mcpServerUrl": "https://<YOUR_DEVTUNNEL>.devtunnels.ms/mcp/messages"
Don't touch the authorization section yet — that's coming in Exercise 3.
Exercise 2: Create the Entra SSO app registration
This is the identity plumbing. You're telling Microsoft Entra "here's my API, here's who's allowed to call it, and here's the scope they need." If you already have the Entra app registration from Lab E10, you can reuse it — just make sure the redirect URI and scope are configured as described below.
Step 1: Register the app in Entra ID
- Go to Azure Portal → Microsoft Entra ID → App registrations
- Click New registration
- Configure:
- Name:
Zava Claims MCP Server(or reuse your existing one from Lab E10) - Supported account types: Accounts in any organizational directory (Any Microsoft Entra ID tenant - Multitenant)
- Redirect URI: Platform = Web, URI =
https://teams.microsoft.com/api/platform/v1.0/oAuthConsentRedirect
- Name:
- Click Register
- Copy the Application (client) ID — you need this in the next steps
Why multitenant?
Multitenant lets users from any Microsoft 365 organization authenticate. For internal-only scenarios, you can restrict to your tenant later.
Step 2: Create the SSO registration in Teams Developer Portal
Before exposing an API scope, you need the Application ID URI that the Teams Developer Portal generates. This URI becomes your API's identity — so you'll set it up in Entra after you get it here.
- Open Teams Developer Portal → Tools → Microsoft Entra SSO client ID registration
- Click Register client ID (or New client registration if you have existing ones)
- Fill in:
- Registration name:
zava-cowork-sso - Base URL:
https://<YOUR_DEVTUNNEL>.devtunnels.ms/mcp/messages(your tunnel URL + path) - Restrict usage by organization: Any Microsoft 365 organization
- Restrict usage by Teams app: Any Teams app (for testing and store validation only)
- Client (application) ID: Paste the client ID from your Entra app registration
- Registration name:
- Click Save
- The portal generates an Application ID URI — copy this value
Don't skip copying the Application ID URI
You need this in the next step to set up Expose an API in your Entra app registration. This is the URI that tokens will be issued against.
Step 3: Expose an API using the Application ID URI
Now you'll configure the Entra app to use the Application ID URI from the Teams Developer Portal and expose a scope.
- Go back to Azure Portal → your app registration
- Go to Expose an API
- Click Add next to Application ID URI. Replace the default value with the Application ID URI you copied from the Teams Developer Portal in Step 2
- Click Save
- Click Add a scope:
- Scope name:
access_as_user - Who can consent: Admins and users
- Admin consent display name:
Access Zava Claims - Admin consent description:
Allows the app to access Zava Claims data on behalf of the signed-in user - User consent display name:
Access Zava Claims - User consent description:
Allows this app to access your Zava Claims data on your behalf - State: Enabled
- Scope name:
- Click Add scope
-
Now click Add a client application and add:
ab3be6b7-f5df-413d-ac2d-abf1e3fd9c0bCheck the box for your
access_as_userscope and click Add application.
What's that client ID?
ab3be6b7-f5df-413d-ac2d-abf1e3fd9c0b is the Microsoft Enterprise token store. This is the service that Cowork uses to obtain tokens on behalf of the user. It's always this value — hardcoded by Microsoft.
Your full scope value will look like: <APPLICATION_ID_URI>/access_as_user — copy it for the next step.
Step 4: Complete the SSO registration with the scope
- Go back to Teams Developer Portal → Tools → Microsoft Entra SSO client ID registration
- Open your
zava-cowork-ssoregistration - Paste the full scope value from the previous step into the Scope field (e.g.,
<APPLICATION_ID_URI>/access_as_user) - Click Save
- Copy the Microsoft Entra SSO registration ID — this is your
OAuthPluginVaultreference ID
This reference ID is what goes into your plugin manifest. No secrets in your code, just a pointer to where the real credentials live.
Exercise 3: Update the plugin with authentication
Three moves from anonymous to authenticated. You have the reference ID — now plug it in.
Step 1: Update manifest.json with the reference ID
Open manifest.json in the zava-claims-sso folder. Find the authorization section in agentConnectors and replace the placeholder:
"authorization": {
    "type": "OAuthPluginVault",
    "referenceId": "<YOUR_SSO_REGISTRATION_ID>"
}
Paste your real Microsoft Entra SSO registration ID where you see the placeholder. That's it — the type is already OAuthPluginVault, you're just filling in the reference.
Step 2: Package the plugin
Zip all files in the plugin folder (not the folder itself — the contents):
On macOS/Linux:
npm run package:unix
On Windows:
npm run package
This produces zava-claims-cowork-plugin.zip with manifest.json, icons, and the skills/ folder at the root level.
Validate before uploading
Quick sanity check: unzip the file and confirm manifest.json is at the root (not inside a subfolder). A nested folder structure will cause upload failures.
Exercise 4: Test the authenticated plugin in Cowork
Time to see it work. You need the MCP server configured to accept the SSO tokens, then upload your plugin and test.
Step 1: Update the MCP server environment for SSO
Go to your Zava MCP server directory and update the env/.env.dev file with the SSO-specific values:
# OAuth 2.0 Resource Server
OAUTH_ACCEPTED_ISSUERS=https://login.microsoftonline.com/common/v2.0
OAUTH_ACCEPTED_AUDIENCES=<APPLICATION_ID_URI_FROM_TEAMS_PORTAL>
OAUTH_REQUIRED_SCOPES=<FULL_SCOPE_VALUE>
OAUTH_VALIDATE_ISSUER=false
OAUTH_ACCEPTED_TENANT_IDS=<YOUR_TENANT_ID>
OAUTH_JWKS_URIS=https://login.microsoftonline.com/common/discovery/v2.0/keys

# Authorization endpoints for MCP client discovery
OAUTH_AUTHORIZATION_ENDPOINT=https://login.microsoftonline.com/common/oauth2/v2.0/authorize
OAUTH_TOKEN_ENDPOINT=https://login.microsoftonline.com/common/oauth2/v2.0/token

# Server
RESOURCE_IDENTIFIER=https://<YOUR_DEVTUNNEL>.devtunnels.ms
SERVER_BASE_URL=https://<YOUR_DEVTUNNEL>.devtunnels.ms
PORT=3001
HOST=127.0.0.1
NODE_ENV=development

# CORS (comma-separated origins)
ADDITIONAL_ALLOWED_ORIGINS=http://localhost:6274,https://<YOUR_DEVTUNNEL>.devtunnels.ms

# Azure Table Storage (Azurite for local dev)
AZURE_STORAGE_CONNECTION_STRING="UseDevelopmentStorage=true"
Replace the placeholders:
| Placeholder | Value |
|---|---|
<APPLICATION_ID_URI_FROM_TEAMS_PORTAL> |
The Application ID URI generated in Exercise 2, Step 2 |
<FULL_SCOPE_VALUE> |
The complete scope from Exercise 2, Step 3 (e.g., <APPLICATION_ID_URI>/access_as_user) |
<YOUR_TENANT_ID> |
Your Microsoft 365 tenant ID |
<YOUR_DEVTUNNEL> |
Your Dev Tunnel URL (no trailing slash) |
Single audience
Since you set the Application ID URI from the Teams Developer Portal directly on your Entra app (instead of using the default api://<client-id>), the token will always arrive with that single audience. No need to list multiple values.
Restart the MCP server after updating:
npm run build
npm run start:mcp-http
Step 2: Upload the plugin to Cowork
- Open Copilot Cowork
- Click the + icon
- Scroll down to Customize (manage skills and plugins)
- On the Customize page, upload your
zava-claims-cowork-plugin.zipfile
That's it — no additional connect step. Once uploaded, Cowork picks it up immediately.
Step 3: Test with an authenticated prompt
Type this prompt in Cowork:
Create a claims report in Excel
Cowork will display a tool approval dialog — this is a one-time consent step that authorizes Cowork to call the MCP server's tools on your behalf. Click Approve to continue.
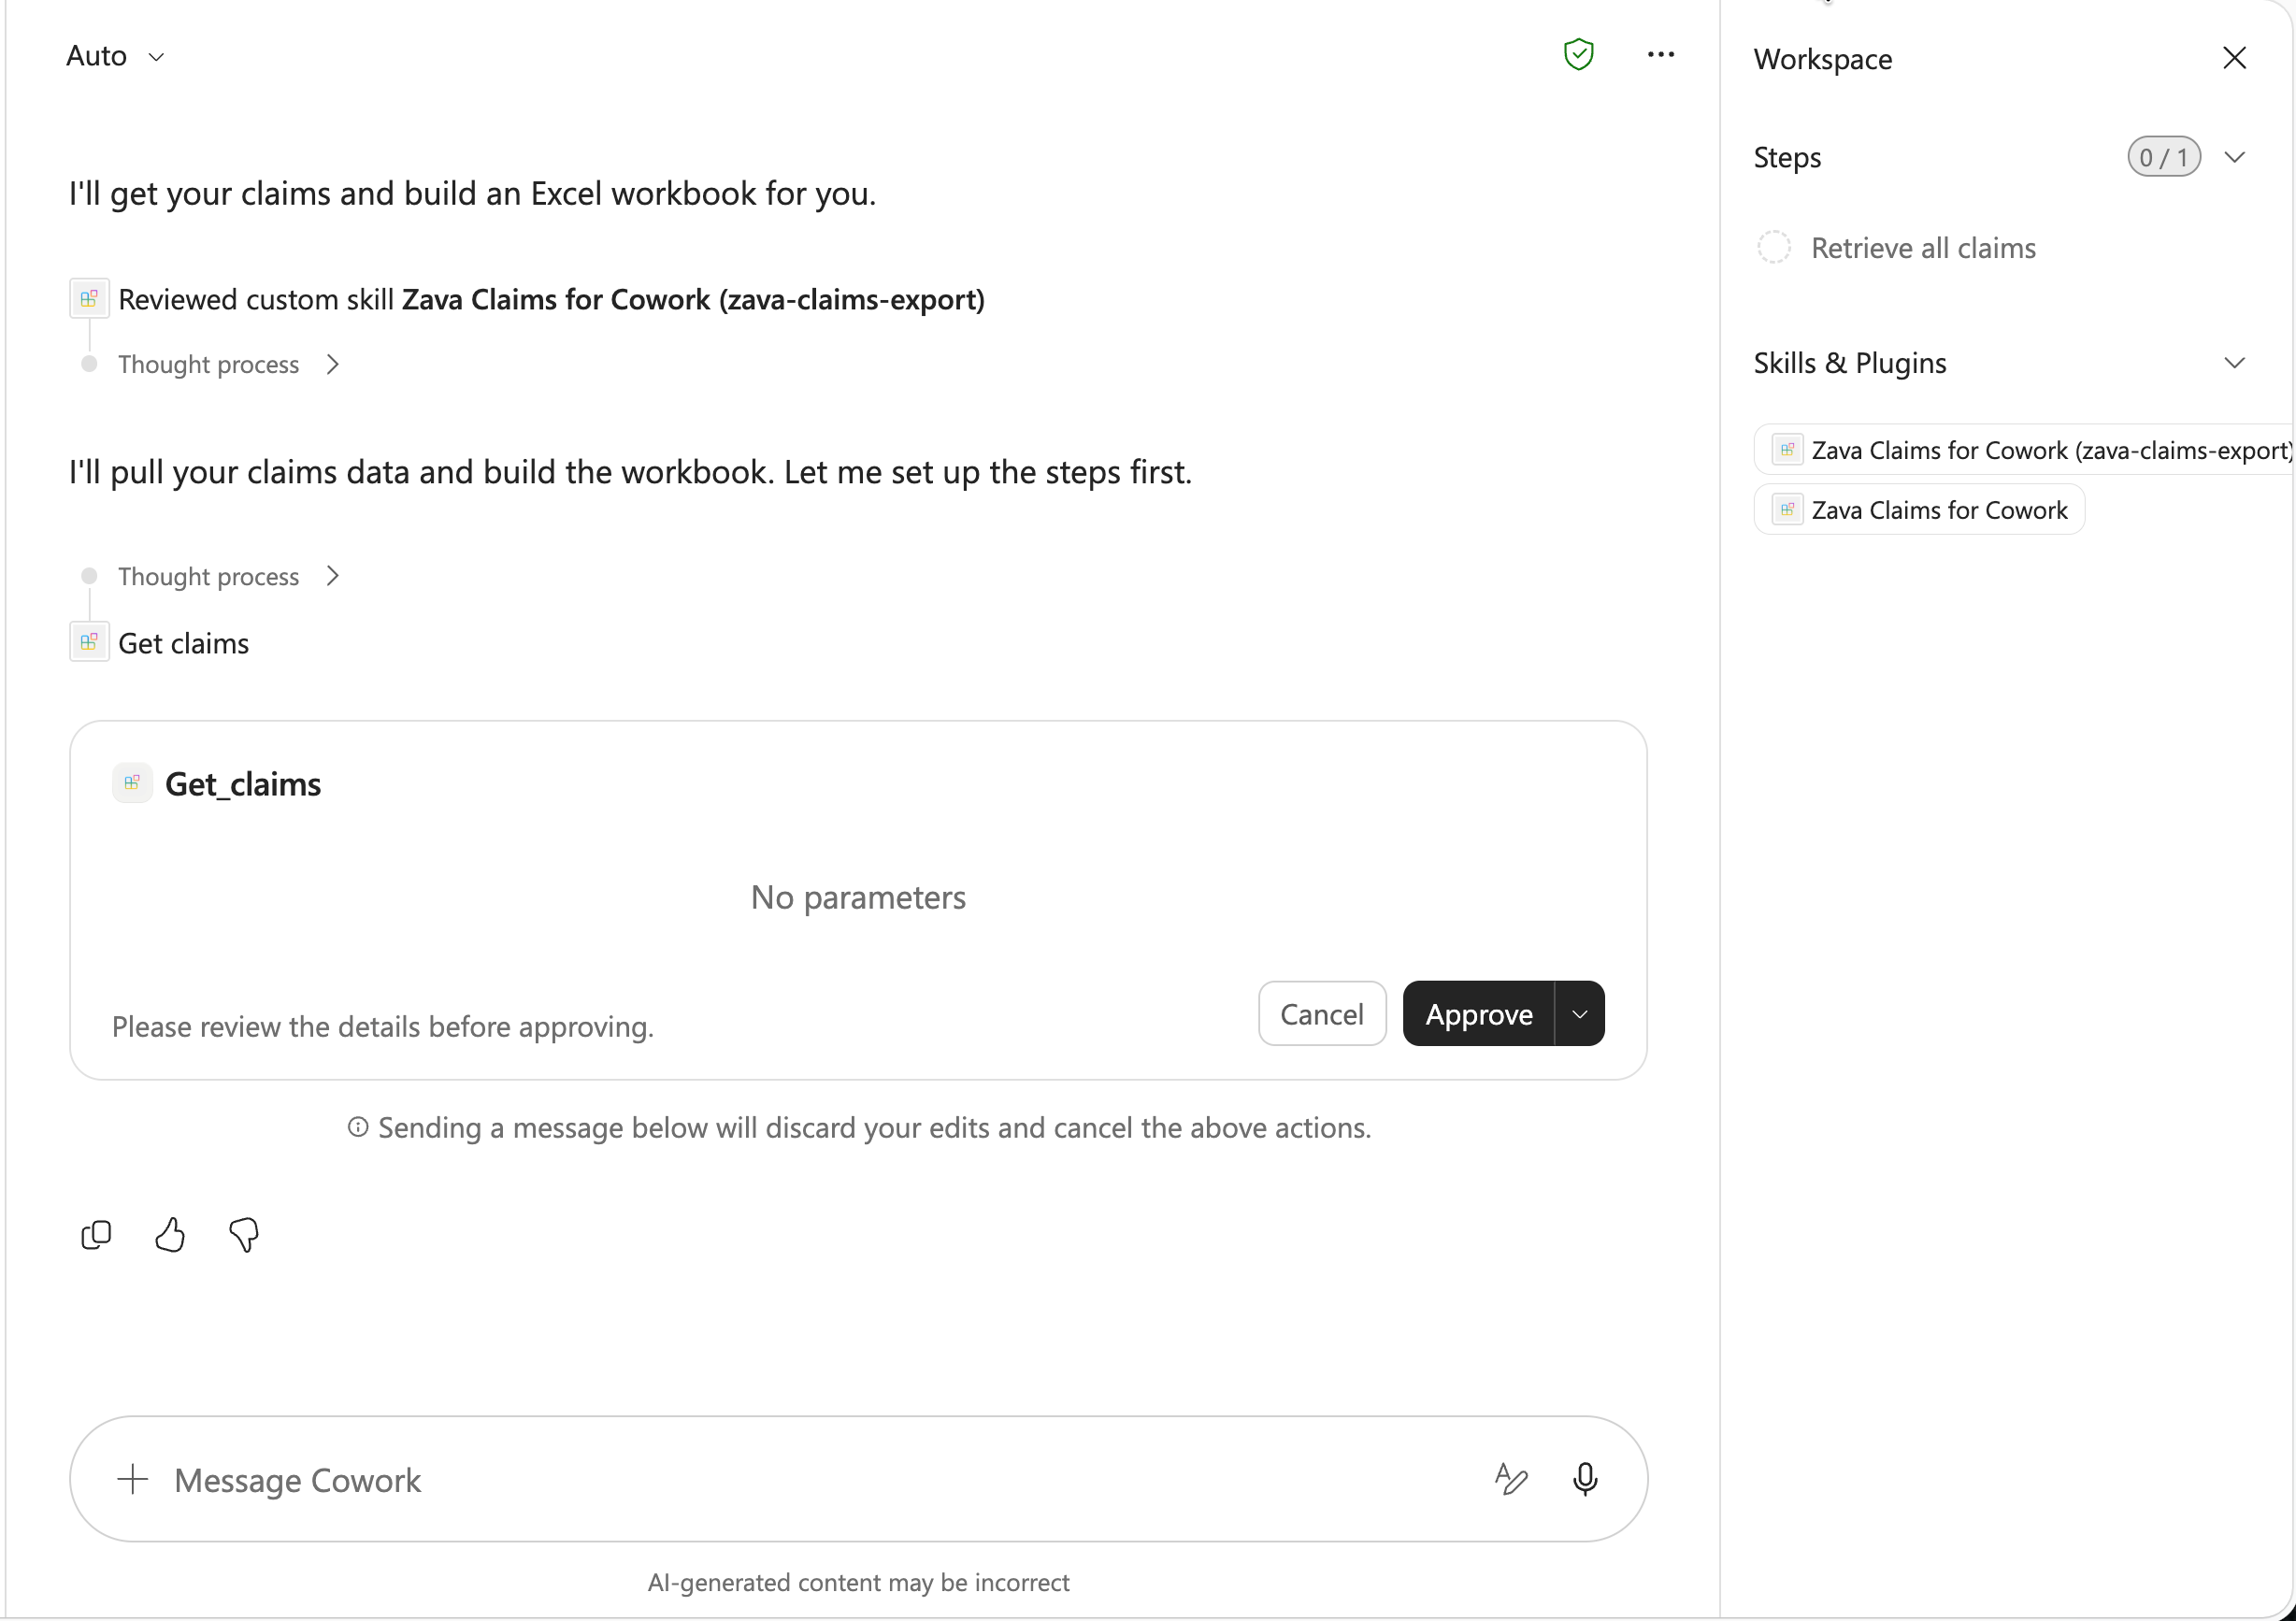
Once approved, the flow completes end-to-end: Cowork authenticates via SSO, calls the Zava MCP server with a valid token, retrieves the claims data, and your skill transforms it into a formatted Excel report. No manual data export, no reformatting — just the finished output.
If sign-in fails
Check three things: (1) your Dev Tunnel is still running and public, (2) the OAUTH_ACCEPTED_AUDIENCES in .env.dev matches the Application ID URI from the Teams Developer Portal, and (3) the redirect URI https://teams.microsoft.com/api/platform/v1.0/oAuthConsentRedirect is configured in your Entra app's Authentication section.
CONGRATULATIONS!
You have completed Lab CWRK03 - Copilot Cowork