Lab E1B : Declarative Agent Foundation with Agents Toolkit
Prerequisites
- VS Code with Microsoft 365 Agents Toolkit
- Microsoft 365 developer account with Copilot access
- Global Admin access in your M365 tenant, required to configure tenant-wide app and policy settings
Exercise 1: Common prerequsites for pro-code
Step 1: Configure your M365 tenant
By default, Teams doesn't allow uploading custom apps — an admin toggle must be flipped first.
- Go to admin.microsoft.com and sign in with your M365 admin account
- In the left nav: Show all → Teams → Teams apps → Setup policies
- Select Global (Org-wide default)
- Toggle Upload custom apps to On and click Save
Go to m365.cloud.microsoft/chat/. If you see the Copilot Chat interface, you have a valid licence. If you see a licence error, contact your tenant admin — you need a Microsoft 365 Copilot licence assigned to your account.
Step 2: Install developer tools
Version 22 is required — older versions fail silently on certain SDK dependencies.
If you have a different version installed, use nvm (Mac/Linux) or nvm-windows to manage versions side by side.
- Open VS Code → Extensions (
Ctrl+Shift+X) - Search Microsoft 365 Agents Toolkit and click Install
- Click the hexagonal icon in the Activity Bar and sign in with your M365 developer account
Step 3 : Verify your installation
Open a terminal and run these checks. Every one should pass before you proceed.
Exercise 2: Scaffold the project
- Open VS Code and select Microsoft 365 Agents Toolkit.
- Select Create a New Agent/App.
- Choose Declarative Agent -> No Action.
- Name it Zava Onboarding Agent.
You should have a new VS code project window with a similar file structure as below:
appPackage/
  declarativeAgent.json
  instruction.txt
  manifest.json
env/.env.dev
m365agents.yml
Exercise 3: Configure core files
-
Open
appPackage/declarativeAgent.jsonand copy/paste this branding baseline (then keep/add your instructions and conversation starters):"name": "Zava Onboarding Agent", "description": "Helps new Zava Insurance employees find answers to common HR and IT onboarding questions", -
Open
appPackage/manifest.jsonand copy/paste this branding block:"name": { "short": "Zava Onboarding Agent", "full": "Zava Insurance Onboarding Agent" }, "description": { "short": "HR and IT onboarding help for new Zava employees", "full": "A friendly onboarding agent that helps new Zava Insurance employees with office access, helpdesk support, annual leave, benefits, and mandatory onboarding tasks." }, -
Open
appPackage/instruction.txtand copy this block exactly as-is:# Zava Onboarding Assistant ## Role You are a friendly HR and IT onboarding assistant for new employees at Zava Insurance. ## Scope - Office locations and access - IT helpdesk process and hours - Leave, benefits, and onboarding tasks ## Guardrails - Do not invent policy details. - If information is missing, say what is unknown and provide a safe next contact. ## Tone - Warm, concise, practical. -
Save all files.
Exercise 4: Add grounding via Embedded Knowledge capability
- Download Zava New Hire Logistics.docx.
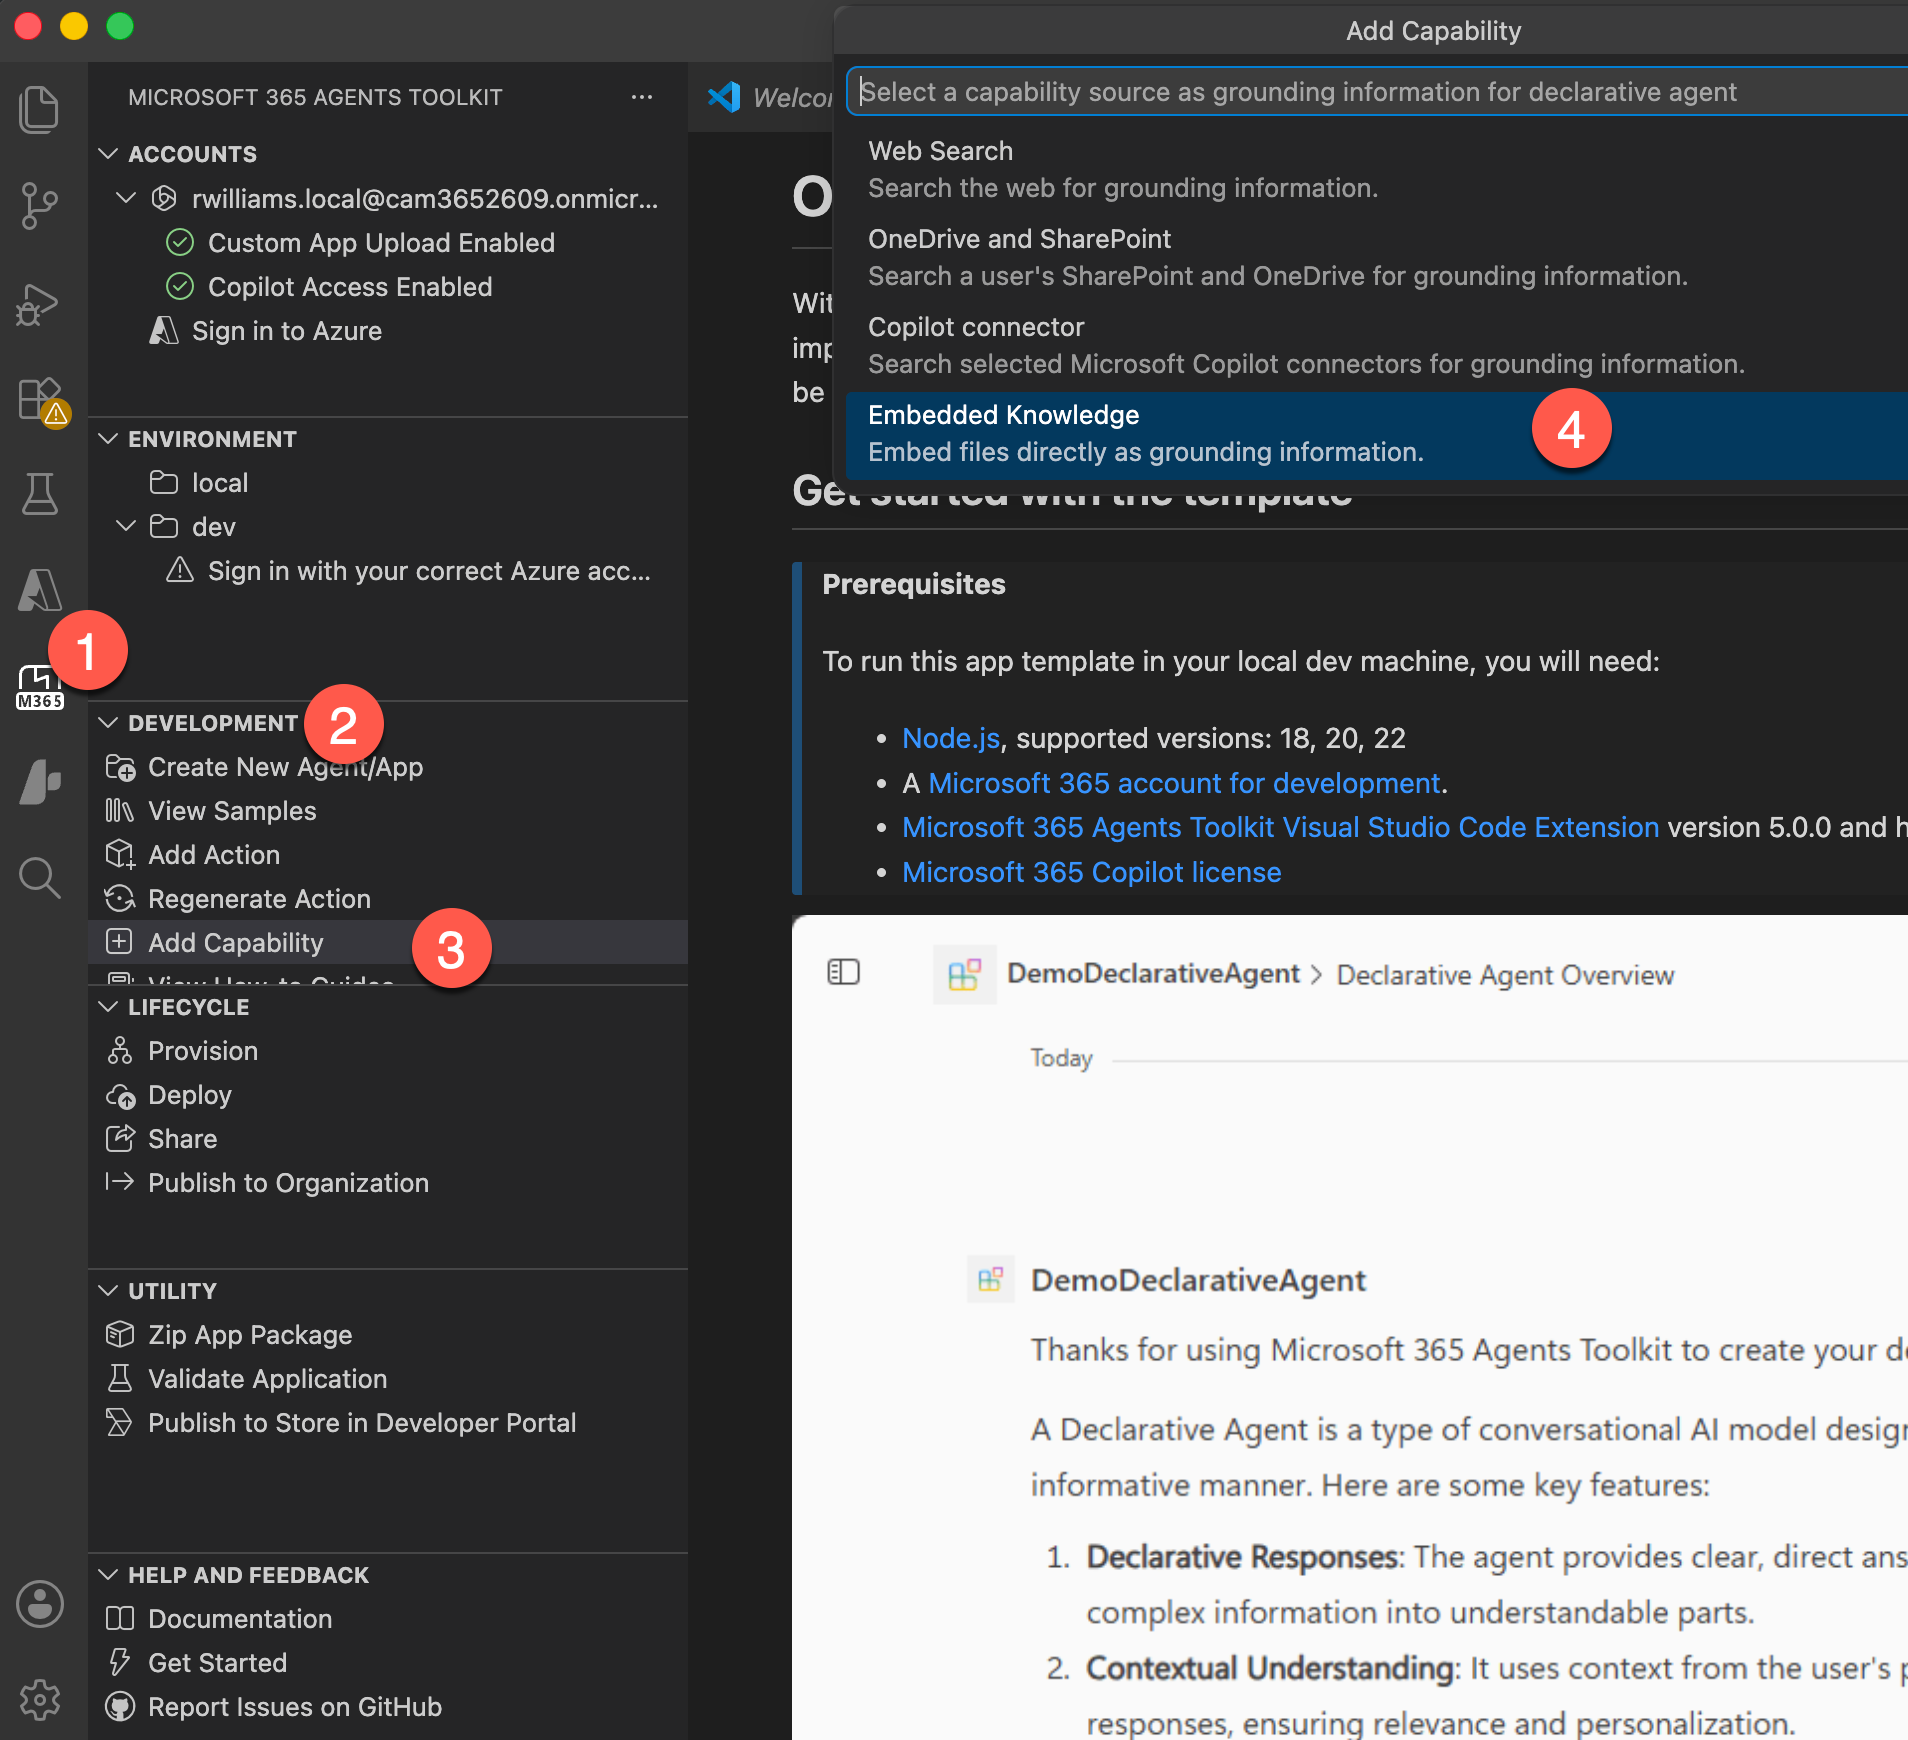
- In Microsoft 365 Agents Toolkit -> Development -> Add Capability.
- Choose Embedded Knowledge.
- Keep default
appPackage/manifest.json. - Import
Zava New Hire Logistics.docx. - Confirm
appPackage/EmbeddedKnowledgeis created.
Exercise 5: Test your agent
-
Provision from Lifecycle -> Provision.
Tip: If prompted to choose between Dev and Local, select Dev and proceed.
-
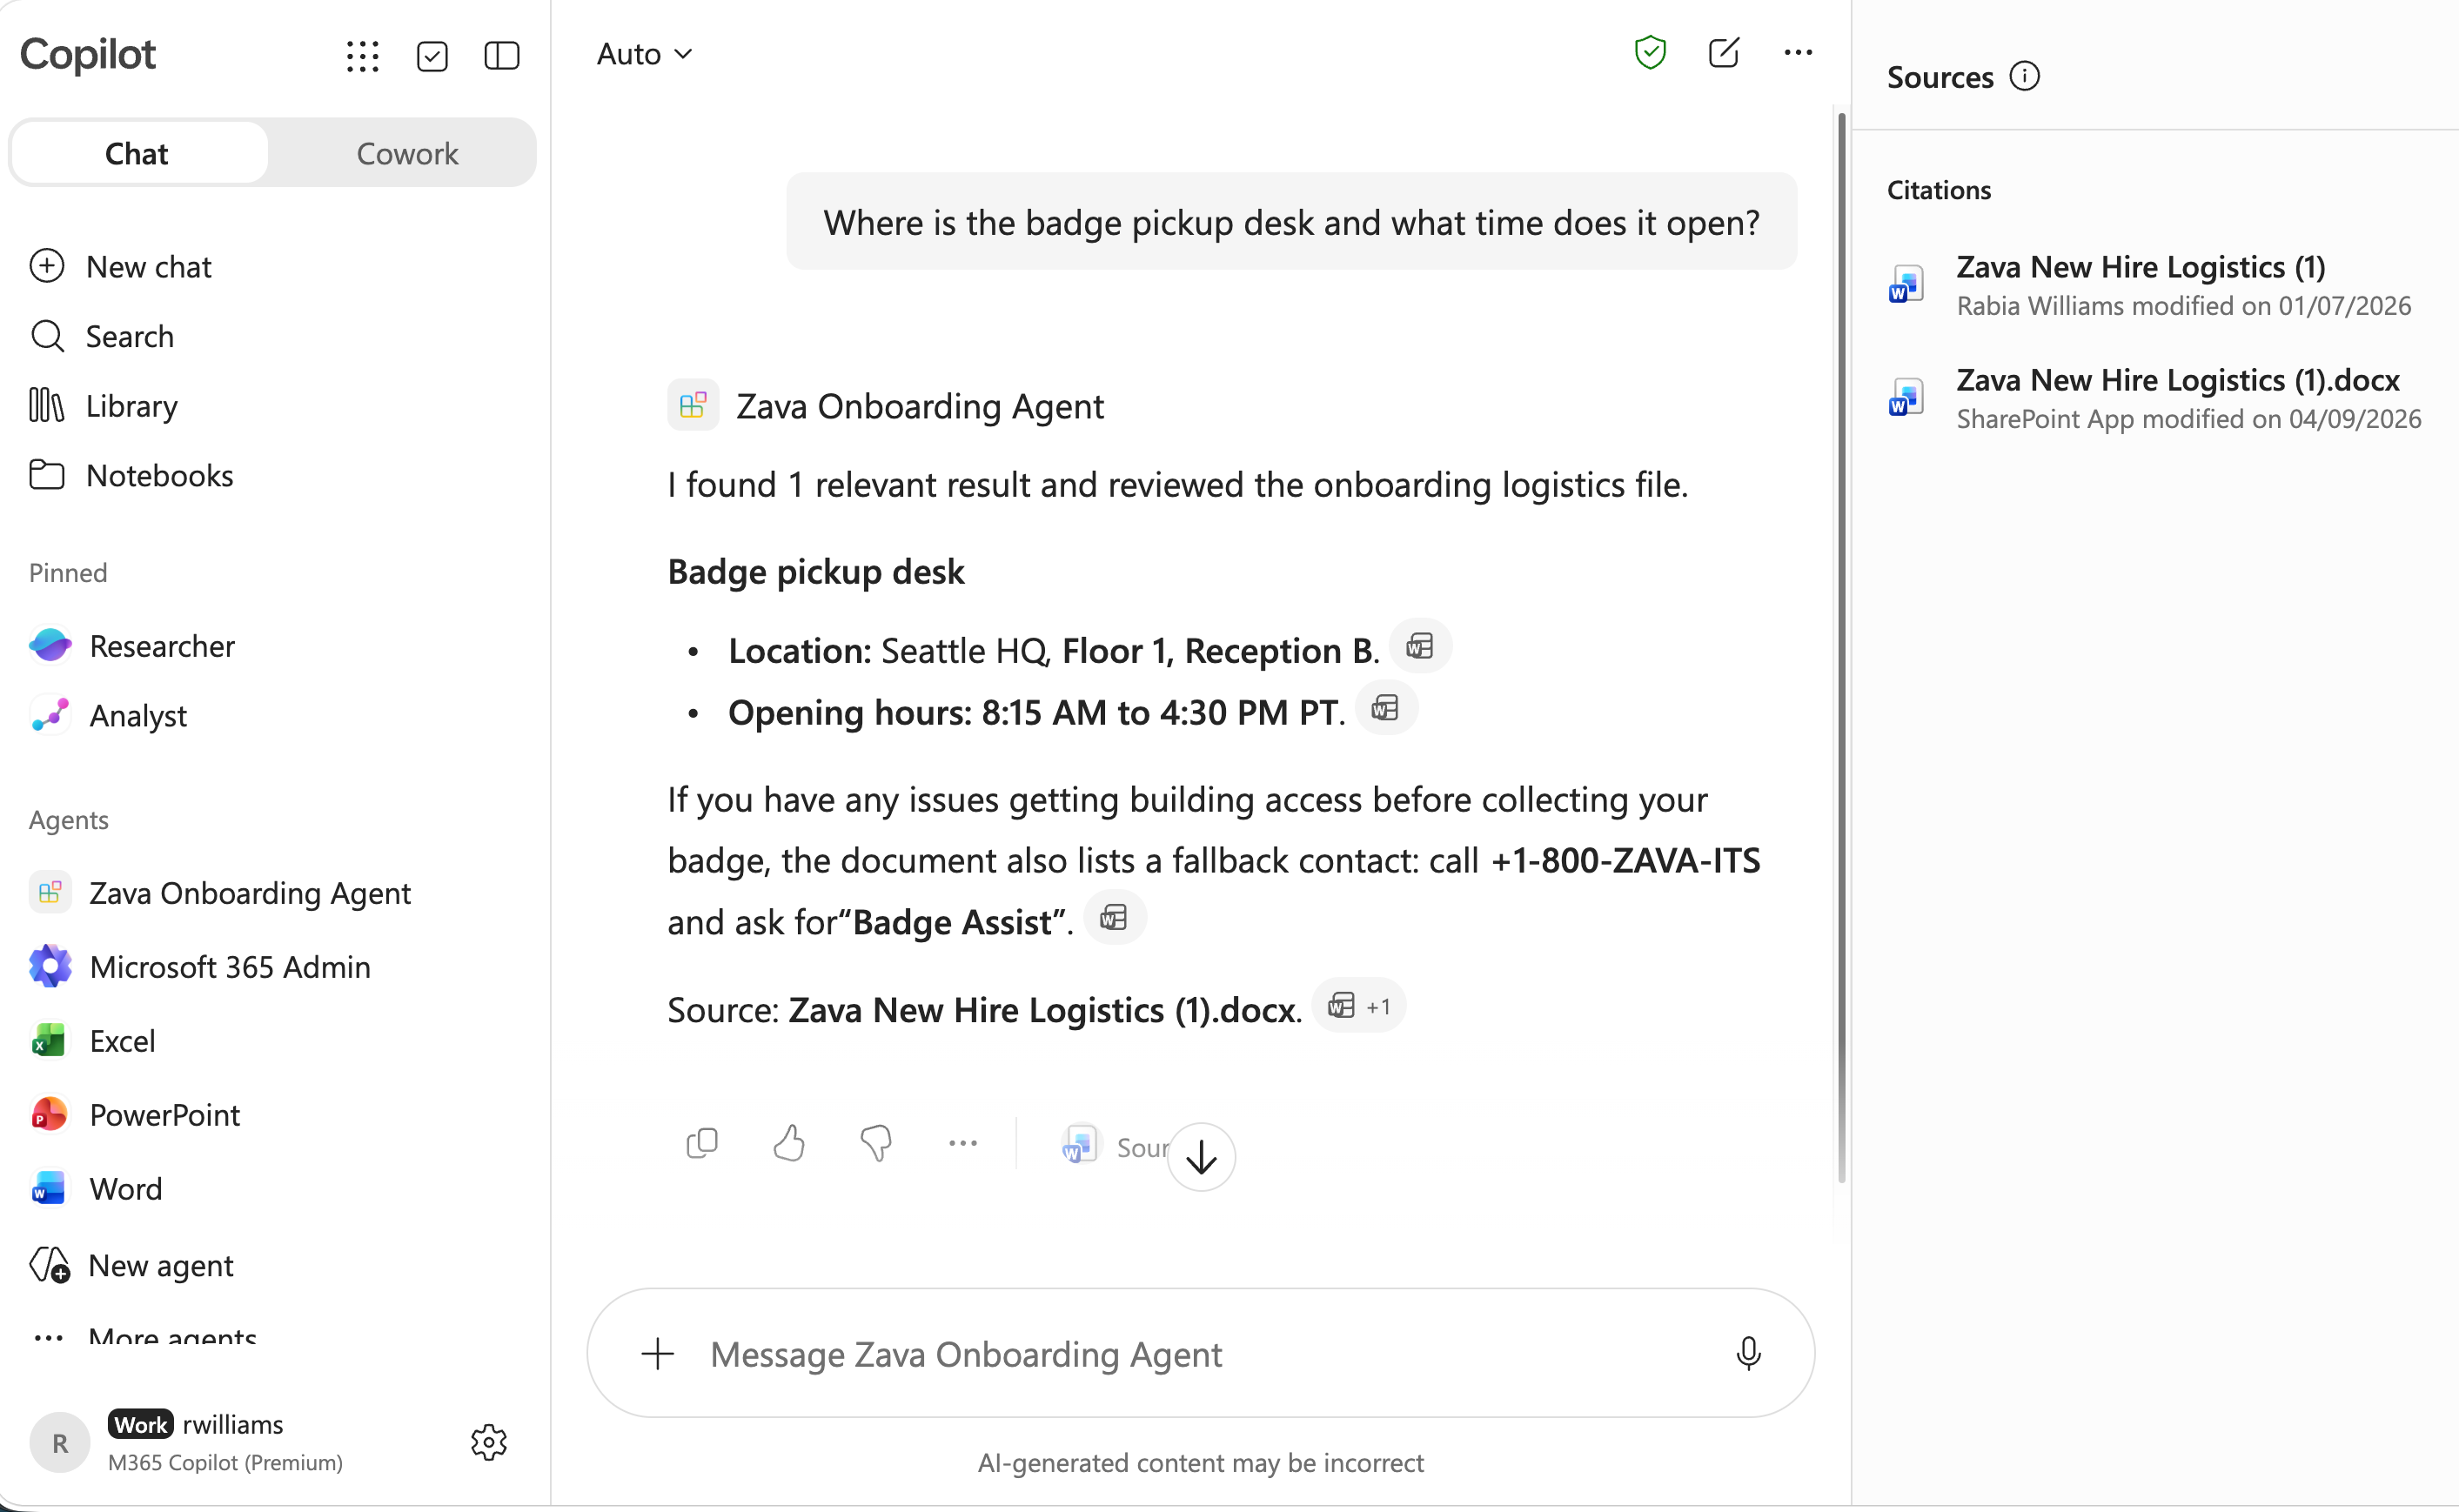
Open your agent Zava Onboarding Agent in Copilot Chat.
- Ask:
- "Where is the badge pickup desk and what time does it open?"
- "If a new hire is locked out, what fallback should they use?"
Expected result:
- Response includes Floor 1, Reception B and 8:15 AM opening time.
- Response includes +1-800-ZAVA-ITS and Badge Assist fallback.
Exercise 6: Enable Code Interpreter in code and validate charts
- Open
appPackage/declarativeAgent.json. -
In the existing
capabilitiesarray, addCodeInterpreteras a new item after theEmbeddedKnowledgeentry. Make sure the previous item ends with a comma.{ "name": "CodeInterpreter" } -
Save the file.
- Open
appPackage/manifest.jsonfile. Increase version from"version": "1.0.0",to"version": "1.0.1", - Provision from Lifecycle -> Provision.
Run these prompts in Copilot Chat for your provisioned agent:
- "Given 20 annual leave days and 260 working days per year, calculate leave percentage and show the result in a 2-row table."
- "Create a 2-week onboarding checklist with columns: Day, Task, Owner, Priority."
- "Using that 2-week checklist, create a bar chart of tasks by owner and add a one-paragraph summary of workload balance."
Expected result:
- Agent returns table output for the calculation.
- Agent returns checklist table with requested schema.
- Agent returns a readable chart and short summary.
Exercise 7: Debug your agent with developer mode
- Open your provisioned agent in Microsoft 365 Copilot Chat.
-
Send this message to the agent:
-developer on -
Run a few prompts from Exercises 5 and 6 again.
- Review the debug information shown after each response:
- Which tools/capabilities were used
- What grounding context was applied
- Whether output matched your expected behavior
- Capture at least one improvement you want to make before wider rollout.
Complete
CONGRATULATIONS!