Lab E12 - Build Agent with Skill using Agent Builder
In this lab, you'll create a generic Demo Planning Agent in Agent Builder and extend it with a reusable skill. The skill generates realistic business scenarios for demos, workshops, hackathons, presentations, and customer conversations.
Why skills in an agent?
A skill is a focused capability that the agent loads when the user's task matches its description. This progressive disclosure keeps specialized guidance out of the agent's standing context until it is relevant.
Skills provide several benefits:
- Smaller always-on instructions: Keep the agent's core role, tone, and safety guidance concise instead of loading every task-specific procedure on every turn.
- Focused behavior: Give each specialized task its own instructions and supporting resources without crowding the agent's general instructions.
- Predictable activation: Use the skill description to define which requests should load the capability and which requests the agent should handle normally.
- Easier maintenance and reuse: Update a focused skill independently and reuse the same package across agents.
Use agent-level instructions for behavior that applies to nearly every interaction. Use a skill for specialized guidance or knowledge needed only for matching tasks.
Scenario
Compelling demos begin with a business challenge, not a list of technology features. You need a repeatable way to turn topics such as Microsoft 365 Copilot, Declarative Agents, Model Context Protocol (MCP), Microsoft Graph, Teams applications, and Power Platform into stories that an audience can understand and evaluate.
The Demo Planning Agent will handle general planning requests. When a user asks for a demo idea, business scenario, use case, customer story, or workshop example, its Demo Scenario Generator skill will identify the requested topic, create a realistic business problem, describe the users and solution, and define measurable outcomes.
Lab objectives
By the end of this lab, you'll be able to:
- Create and package a custom
SKILL.mdfile - Create a Declarative Agent in Agent Builder
- Keep the agent's core instructions generic
- Upload a custom skill package and add suggested prompts
- Publish the agent and validate selective skill invocation
Prerequisites
- A plain-text editor, such as Notepad on Windows, TextEdit on macOS, or Visual Studio Code
- A Microsoft 365 account with a qualifying Microsoft 365 Copilot license or pay-as-you-go access
- An organization enrolled in the Microsoft Frontier Program
- Permission to create agents in your tenant
Tip: Custom skills in Declarative Agents are currently available in preview through the Microsoft Frontier Program, with general availability planned soon. Agent Builder supports up to eight skills per agent, and each compressed skill package can be up to 50 MB.
Exercise 1: Create the skill package
In this exercise, you'll create the Demo Scenario Generator skill and package it as a ZIP file that Agent Builder can upload.
Step 1: Create the skill file
- Create a folder named
demo-scenario-generatorin a location you can easily find. -
Create a new plain-text document using the instructions for your operating system:
- Windows with Notepad: Open Notepad and create a new document.
- macOS with TextEdit: Open TextEdit and create a new document. Before entering or pasting any content, select Format > Make Plain Text, or press Shift+Command+T. Open the Format menu again and confirm that it now shows Make Rich Text. This confirms that the current document is in plain-text mode.
- Another editor: Create a new plain-text document. Do not use a rich-text or word-processing document.
Important for TextEdit: TextEdit creates rich-text documents by default. Renaming a rich-text document to
SKILL.mddoes not convert it to Markdown. You must select Make Plain Text before pasting the skill content. -
Paste the following content into the plain-text document:
--- name: demo-scenario-generator description: | Creates realistic business scenarios for demos, workshops, hackathons, and presentations. Use when users ask for demo ideas, business scenarios, use cases, customer stories, workshop examples, or sample projects. --- When activated: 1. Identify the technology or topic. 2. Pick the "after" metric first - the specific number or outcome the solution produces (e.g. "cart abandonment drops from 47% to 28%") - then build the business problem backward from it, so the "before" state is exactly what would produce that number. This is what makes a scenario survive a follow-up question instead of collapsing into "improves efficiency." 3. Create a realistic business problem consistent with that number. 4. Describe who the users are. 5. Explain how the solution helps. 6. Include measurable outcomes, stated as the same concrete numbers from step 2. Return results using the following format: ## Scenario ## Users ## Challenge ## Solution ## Success Criteria -
Save the document inside the
demo-scenario-generatorfolder:- Windows with Notepad: Select File > Save As. Enter
"SKILL.md"in File name, select All files for Save as type, select UTF-8 for Encoding, and then select Save. Quotation marks prevent Notepad from adding.txtto the file name. - macOS with TextEdit: Select File > Save, enter
SKILL.md, choose thedemo-scenario-generatorfolder, and then select Save. If TextEdit asks whether to use.mdor.txt, select Use .md. - Another editor: Save the document as a UTF-8 plain-text file named exactly
SKILL.md. Do not save it as rich text or asSKILL.md.txt.
- Windows with Notepad: Select File > Save As. Enter
-
Reopen
SKILL.mdin your editor and confirm:- The first line is
---. - The content appears exactly as shown, without formatting codes.
- The file does not begin with
{\rtf1. If it does, it is still a rich-text file. Create a new document, convert it to plain text, and paste the skill content again. - The file name is exactly
SKILL.md, notSKILL.md.txt.
- The first line is
The YAML frontmatter controls skill discovery. The name identifies the skill, and the description tells Copilot which requests should activate it.
Step 2: Create the ZIP package
Follow the instructions for your operating system.
macOS
- In Finder, open the
demo-scenario-generatorfolder. - Control-click
SKILL.md, and then select Compress "SKILL.md". - Rename the resulting archive from
SKILL.md.ziptodemo-scenario-generator.zip. - Move
demo-scenario-generator.zipbeside thedemo-scenario-generatorfolder so it is easy to locate for upload.
Windows
- In File Explorer, open the
demo-scenario-generatorfolder. - Right-click
SKILL.md, select Compress to ZIP file, and name the archivedemo-scenario-generator.zip. - If Compress to ZIP file isn't available, select Send to > Compressed (zipped) folder, and then rename the archive to
demo-scenario-generator.zip. - Move
demo-scenario-generator.zipbeside thedemo-scenario-generatorfolder so it is easy to locate for upload.
The archive must contain SKILL.md at its root, not inside an additional folder.
Step 3: Verify the package
- Open
demo-scenario-generator.zipwith the archive viewer for your operating system. - Confirm that
SKILL.mdis visible at the root of the archive. - Confirm that the archive does not contain a nested
demo-scenario-generatorfolder.
Agent Builder requires the complete ZIP package. Do not upload the Markdown file by itself.
Exercise 2: Build the agent in Agent Builder
In this exercise, you'll configure the agent's general behavior, upload the skill, and add suggested prompts.
Step 1: Start a new agent
- Open Microsoft 365 Copilot Chat and sign in.
- In the left navigation, under Agents, select the + New agent icon.
- Select Skip to bypass the conversational builder experience and open the configuration experience for a new agent.
Step 2: Configure the agent
- Enter
Demo Planning Agentfor the name. - Enter the following description:
Helps users plan professional demos, workshops, hackathons, presentations, and customer conversations.
- Add the following instructions:
# Demo Planning Agent

## Role

Help users plan professional demos, workshops, hackathons, presentations,
and customer conversations.

## Skill routing

- Review the available skills for every request.
- Use a skill when its description matches the user's intent.
- Follow the selected skill's instructions and output format.
- Do not apply a skill's specialized format to unrelated requests.
- If no skill matches, respond using the general instructions or ask a concise
    clarifying question.

## General behavior

- Be concise, credible, and practical.
- Do not invent product capabilities.
- State important assumptions.
These instructions define behavior that applies to the whole agent. Keep the scenario-generation workflow and output format in SKILL.md so they are loaded only for matching requests.
Step 3: Upload the skill package
- In the configuration experience, expand Skills and select Add.
- Upload
demo-scenario-generator.zip. - Review the skill details and confirm that the name is demo-scenario-generator.
- Confirm that the description mentions demo ideas, business scenarios, use cases, customer stories, workshop examples, and sample projects.
If Agent Builder reports a package error, reopen the ZIP and verify that SKILL.md is at its root and includes valid YAML frontmatter.
Step 4: Add suggested prompts and create the agent
Add the following suggested prompts:
| Title | Prompt |
|---|---|
| Declarative Agent demo | Create a demo scenario for Declarative Agents. |
| Copilot workshop | Give me a workshop scenario for Microsoft 365 Copilot. |
| MCP customer story | Create a customer story for an MCP-enabled agent. |
| Plan a rehearsal | Help me plan the rehearsal schedule and presenter handoffs for a customer demo next week. |
Review the configuration, and then select Create.
Exercise 3: Publish and test the skill
In this exercise, you'll publish the agent and verify both positive and negative skill matching.
Step 1: Publish the agent
- When agent creation is complete, select Publish.
- Review the agent details and confirm the publish action.
- Wait for publishing to finish, and then open Demo Planning Agent in Microsoft 365 Copilot.
Publishing and sharing options can vary by tenant policy. Use the audience permitted by your organization for this lab.
Step 2: Test skill activation
Start a new conversation for each prompt:
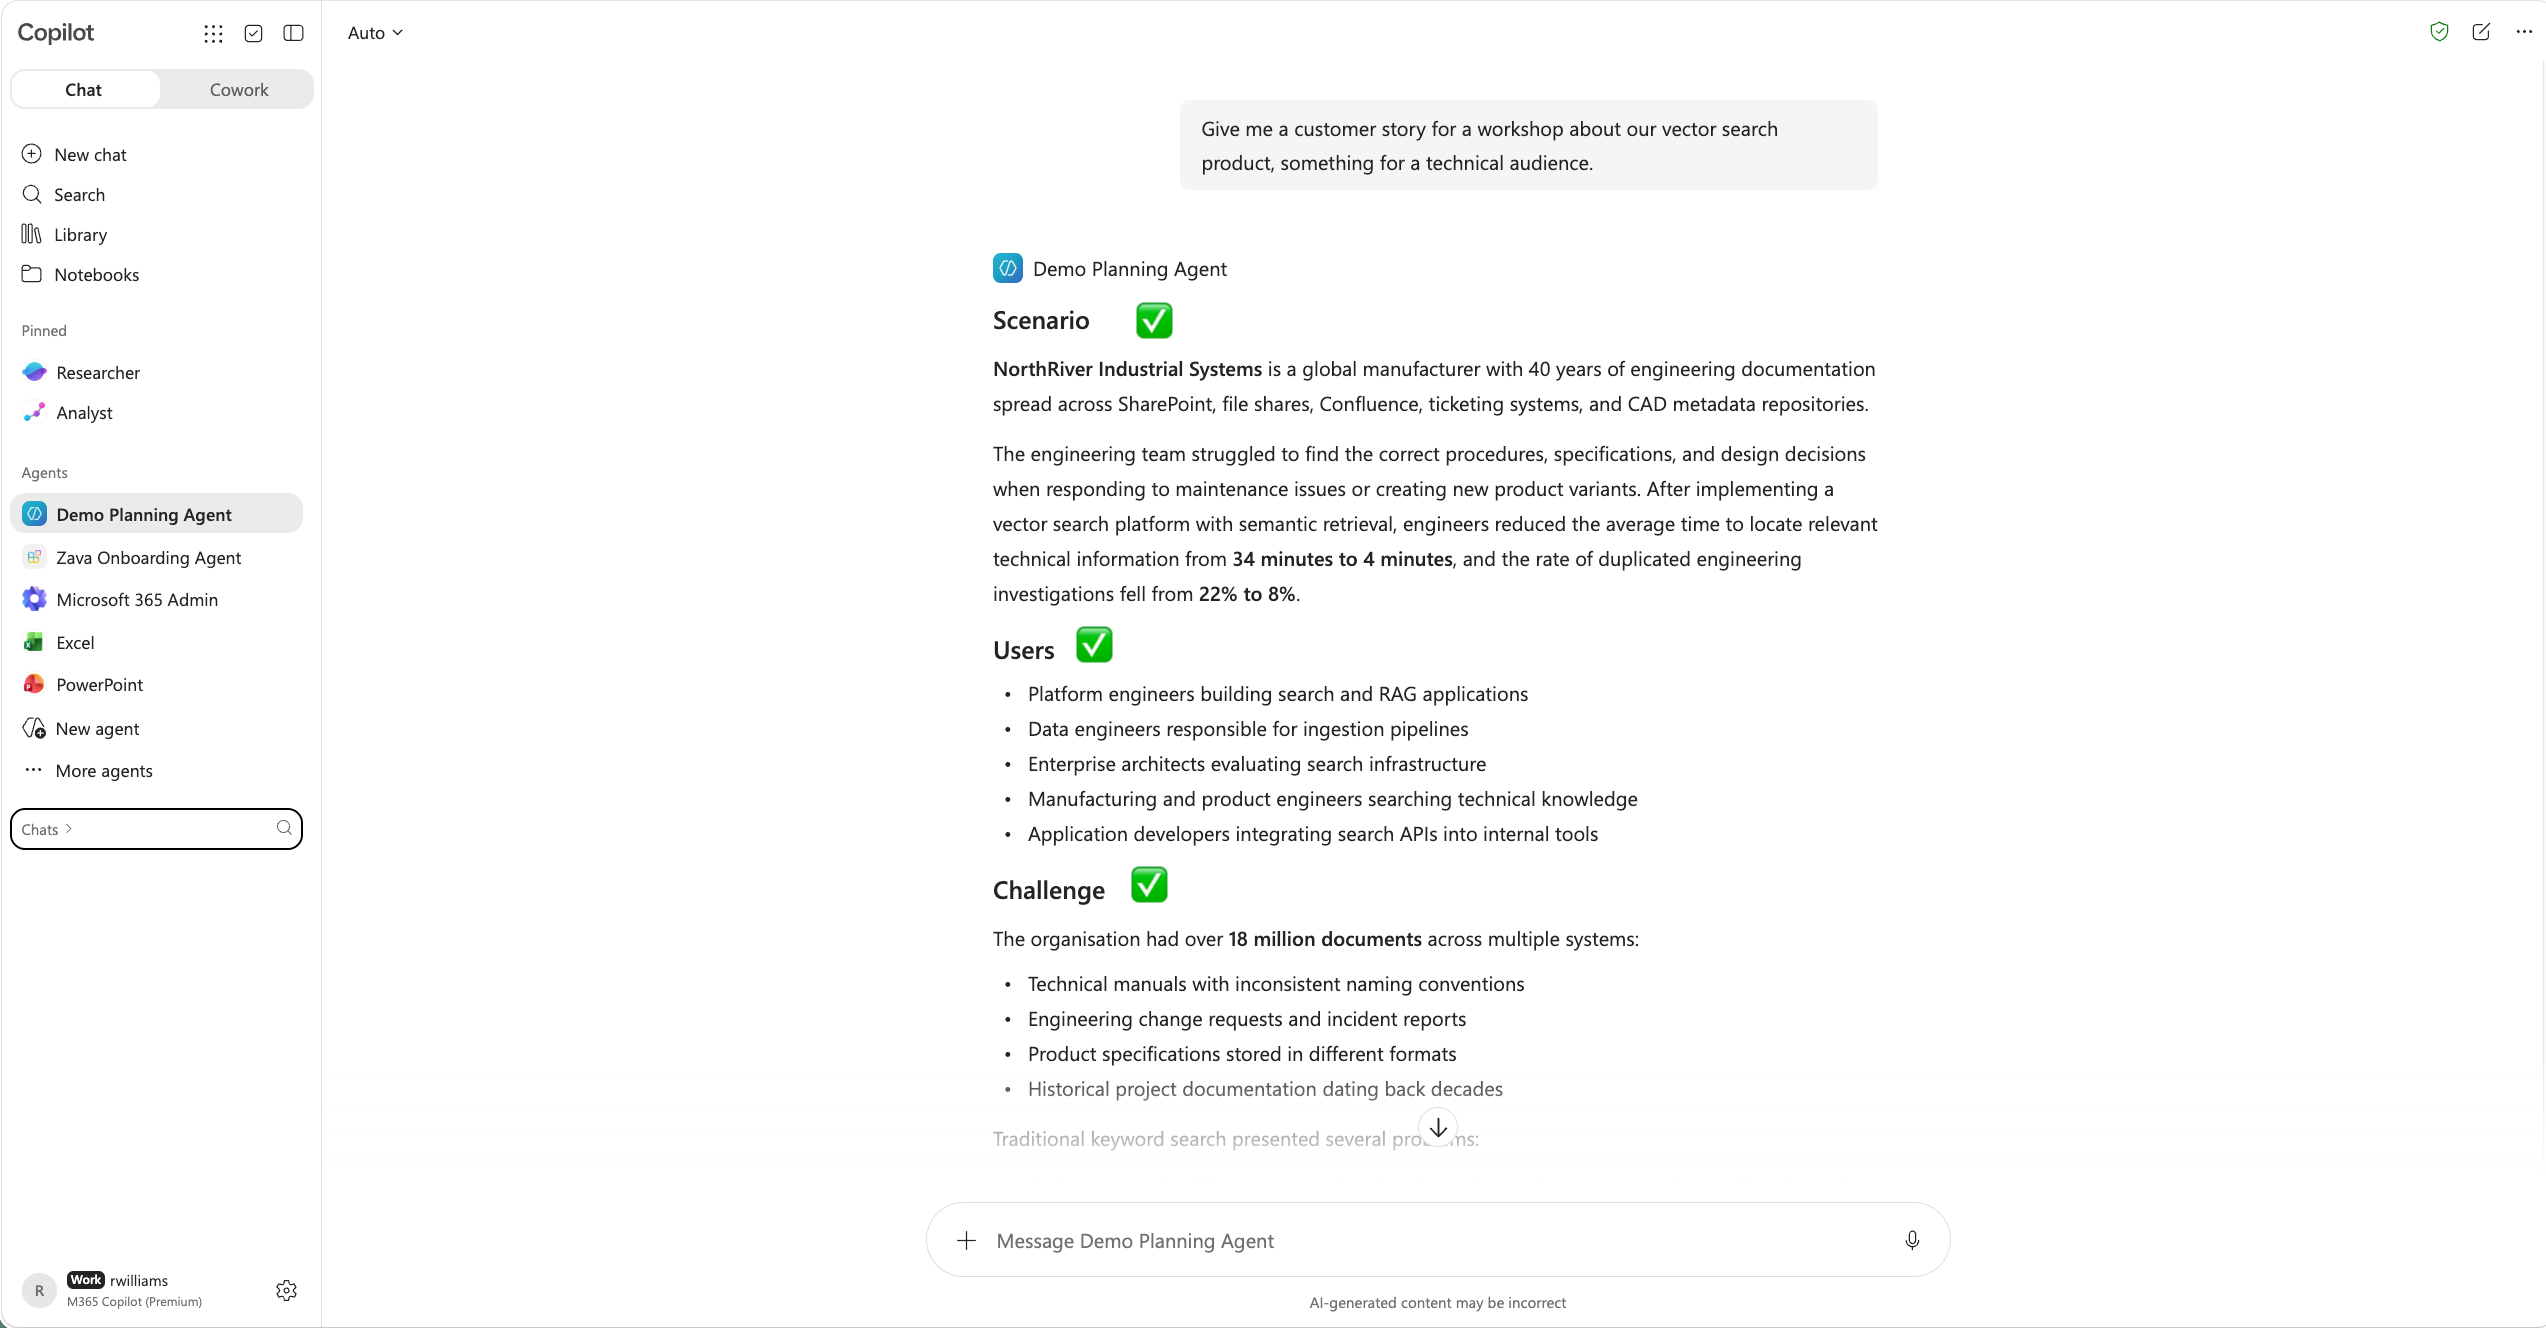
Give me a customer story for a workshop about our vector search product, something for a technical audience.
Create a demo scenario for Declarative Agents.
Give me a workshop scenario for Microsoft 365 Copilot.
Create a customer story for an MCP-enabled agent.
For each response, confirm that the agent uses the five headings ✅ from SKILL.md, creates a scenario relevant to the requested topic, and uses consistent concrete numbers in the challenge and success criteria.
Step 3: Test the skill boundary
Send this request:
Help me plan the rehearsal schedule and presenter handoffs for a customer demo next week.
Confirm that the agent provides practical rehearsal or handoff guidance without using the scenario skill's five-section format. The request is in the agent's general scope, but it does not ask for a demo idea, business scenario, use case, customer story, workshop example, or sample project.
This boundary test demonstrates that the skill is loaded only when its description matches the request.
Step 4: Compare the result with the expected structure
A response to Create a demo scenario for Declarative Agents. should use this structure:
## Scenario

## Users

## Challenge

## Solution

## Success Criteria
The wording can vary. Validate the structure, business relevance, intended users, solution value, and measurable outcomes rather than expecting an exact response.
Congratulations
You created a generic Declarative Agent in Agent Builder, added a packaged custom skill, and verified both positive and negative skill matching.