ALM for Copilot Studio Agents: The Foundation
Classic agents
The fundamentals of Application Lifecycle Management for Copilot Studio agents: environments, solutions, publishers, and pipelines - the safe baseline every maker should have in place.

Why This Matters
Copilot Studio makes it remarkably fast to go from idea to working agent. That speed is one of the platform’s greatest strengths, but it also means an agent can be in front of real users before anyone has thought about how to change it safely. The moment you want to work on a version 2 without breaking the version 1 people are already using, you need a place to make changes that isn’t production, and a reliable way to move those changes forward.
That is what Application Lifecycle Management (ALM) gives you. This post lays out the fundamentals: the safe baseline every maker should have in place before an agent matters to anyone but themselves. It is deliberately not exhaustive. It is the set of decisions that keep you out of trouble, explained for people who do not come from a Power Platform background.
This is the first post in a short series. The goal here is the safe baseline, not every advanced pattern. Later posts will go deeper with a soon-to-be-announced agenda.
Start With Environments
The foundation of any ALM strategy is environment isolation. The most tried-and-tested pattern in Power Platform is three environments: Development, Test, and Production. Dev is where makers author. Test is where you validate. Production is where users interact with the live agent. Changes flow in one direction - Dev to Test to Prod - which is what keeps production stable and predictable.
If you are new to the platform, start with the Power Platform environments overview to understand what an environment actually is. You create them in the Power Platform Admin Center, and that part is straightforward.
This three-environment model is not a hard requirement imposed by the platform. For a throwaway proof-of-concept, a single environment is fine. But the separation pays for itself the instant you want to build the next version of an agent while the current one keeps serving users. Without it, every edit you make is an edit to production.
Coming later in the series: Once Dev/Test/Prod is working, mature agents often add a preview environment on an early-release ring to catch platform regressions before they reach production, and a production-aligned environment for emergency hotfixes that don’t disturb in-progress work. Those are resilience patterns, not fundamentals, so they get their own post.
| Environment | What lives here | Why |
|---|---|---|
| Dev | Unmanaged solution (active work) | Daily authoring |
| Test | Managed solution | Validation, UAT |
| Production | Managed solution | Live users |
Start here. Add more environments only when a real problem demands them.
Solutions: The Unit of Deployment
If environments are where your agent lives, solutions are how it travels between them. A solution is a container that holds every component your agent depends on and makes the whole set portable as a single unit.
If you are coming from software development, a solution is conceptually similar to a project or a package: it groups related assets so they can be versioned, exported, and imported as one coherent artifact. Read the solution concepts in Power Platform ALM for the full model.
Create a Publisher First
Before you create a solution, create a custom publisher with a custom prefix. This is a genuine best practice, not a formality. The publisher’s prefix (for example contoso_) is stamped onto the schema name of everything you create, which keeps your components clearly identifiable and avoids the generic default publisher. You set the prefix once, and it follows your components for life, so it is worth doing deliberately. See create a solution publisher.
What Goes Inside a Solution
Everything your agent depends on must live inside one solution. In practice, that means the agent and its components as you see them in the Copilot Studio maker experience:
- Topics - the conversational logic
- Tools - the actions the agent can call
- Knowledge sources - the content the agent grounds its answers in
Alongside those, a few Power Platform components typically travel with the agent:
- Custom connectors - your own API definitions the agent or its flows call
- Connection references - a solution-aware pointer to a connection, so the actual credential is bound per environment rather than hardcoded
- Environment variables - configuration values that differ per environment (more on these below)
- Workflows - Power Automate flows that run logic on the agent’s behalf
Anything created outside a solution is invisible to your deployment pipeline and cannot be promoted cleanly. This is the single most common mistake teams make early on: building components in the default solution, then discovering they cannot move them. Avoid it by creating your solution first and authoring everything inside it. Here’s how to author agents in a solution.
Managed vs. Unmanaged
Solutions exist in two forms:
| Type | Where it lives | What you do with it |
|---|---|---|
| Unmanaged | Development | Add, edit, and remove components freely while you author |
| Managed | Test, Production | The deployable artifact - imported, not authored |
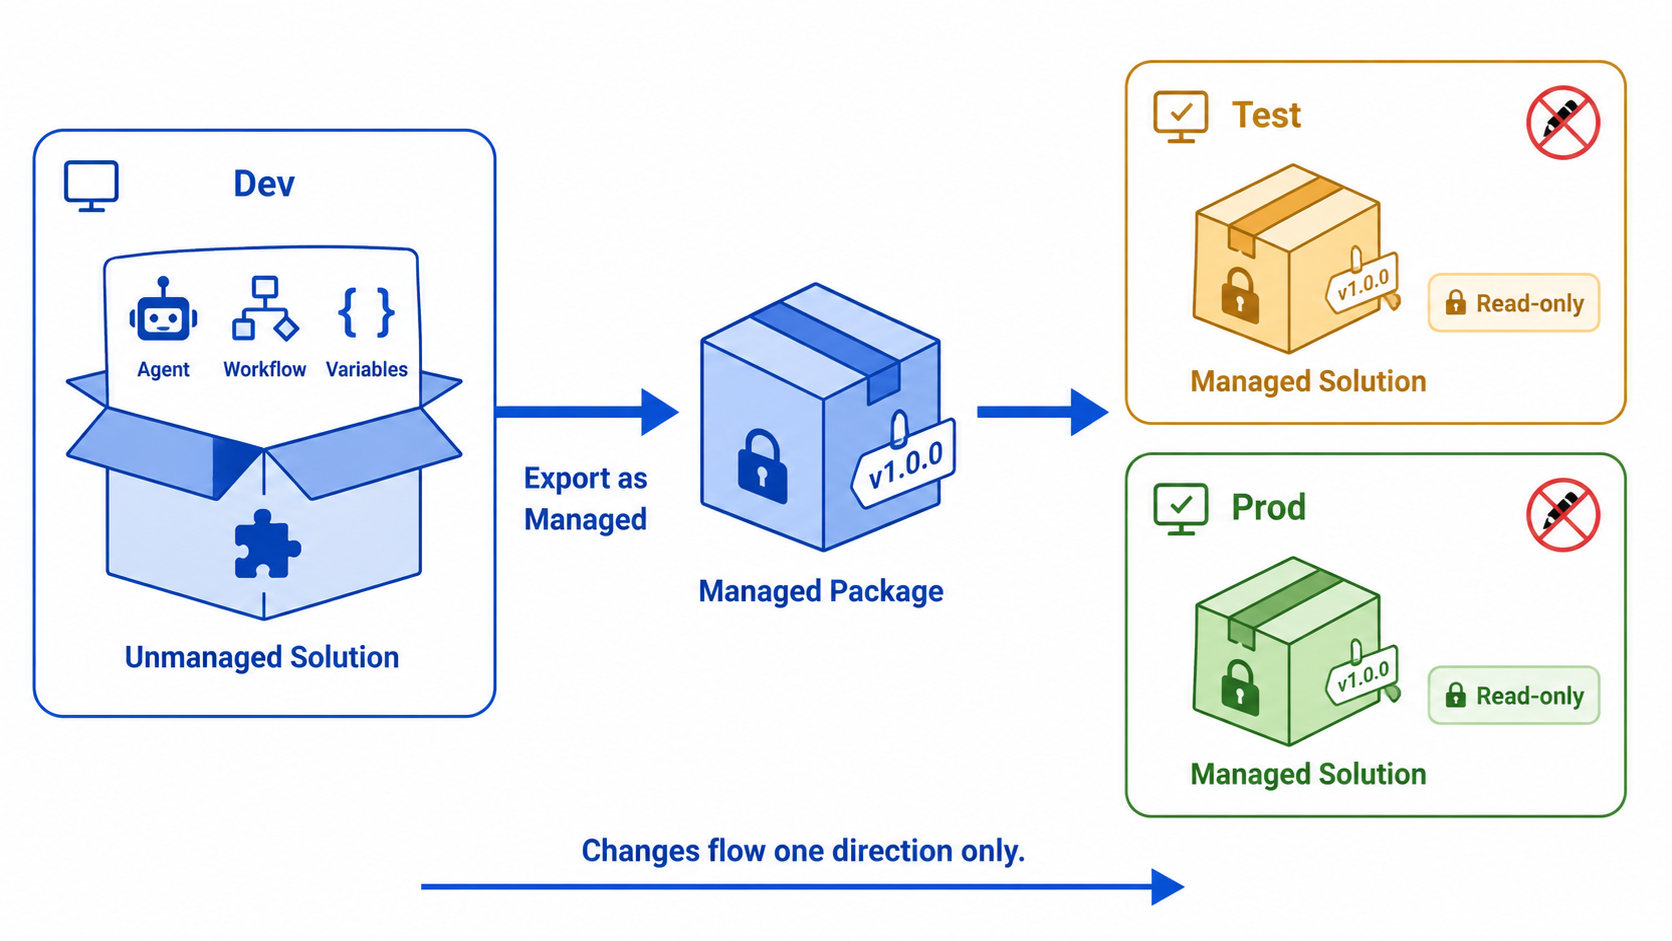 In Dev, components like agents, workflows, and variables live inside an unmanaged solution where makers freely edit them. The solution is exported as a versioned managed package and deployed to Test and then Production, where it arrives as a managed solution. Changes flow in one direction only: from Dev, through the package, to downstream environments.
The best practice when moving your agent forward is to export it from Dev as a managed package and import that into Test and later Production. Managed solutions are meant to be the read-only deployable artifact: if a change is needed, you make it in Dev, re-export, and re-deploy.
A managed solution is not truly sealed. In a target environment you can still create an unmanaged layer on top of managed components and override them in place. It’s possible, and it is the source of the worst ALM messes, because those local edits get silently clobbered on the next deployment. Two things keep you safe: turn on the environment setting to block unmanaged customizations in Test and Production, and remove maker/admin access from those environments so nobody is editing there in the first place. (The block setting still permits a few operations like toggling flows on/off, so access hygiene matters too.)
Set It as Your Preferred Solution
Create your solution in Dev before creating any agent assets, then set it as your preferred solution so new components land in it automatically instead of floating in the default solution where they get forgotten.
Pipelines: Moving the Solution Safely
With your environments established and your solution holding all the agent’s assets, the next question is: how does the solution actually move from Dev to Test to Prod?
You could do it manually - export a .zip from Dev, import it into Test, repeat for Prod. That works, but it is error-prone and leaves no record of what was deployed, when, or by whom.
Power Platform Pipelines solve this. A pipeline is a pre-configured promotion path that connects your environments in sequence. Promoting becomes a single action: select the solution, select the next stage, and deploy. Importantly, the same solution version that was deployed to Test is the one promoted to Production - the pipeline carries that exact artifact forward rather than re-exporting from Dev.
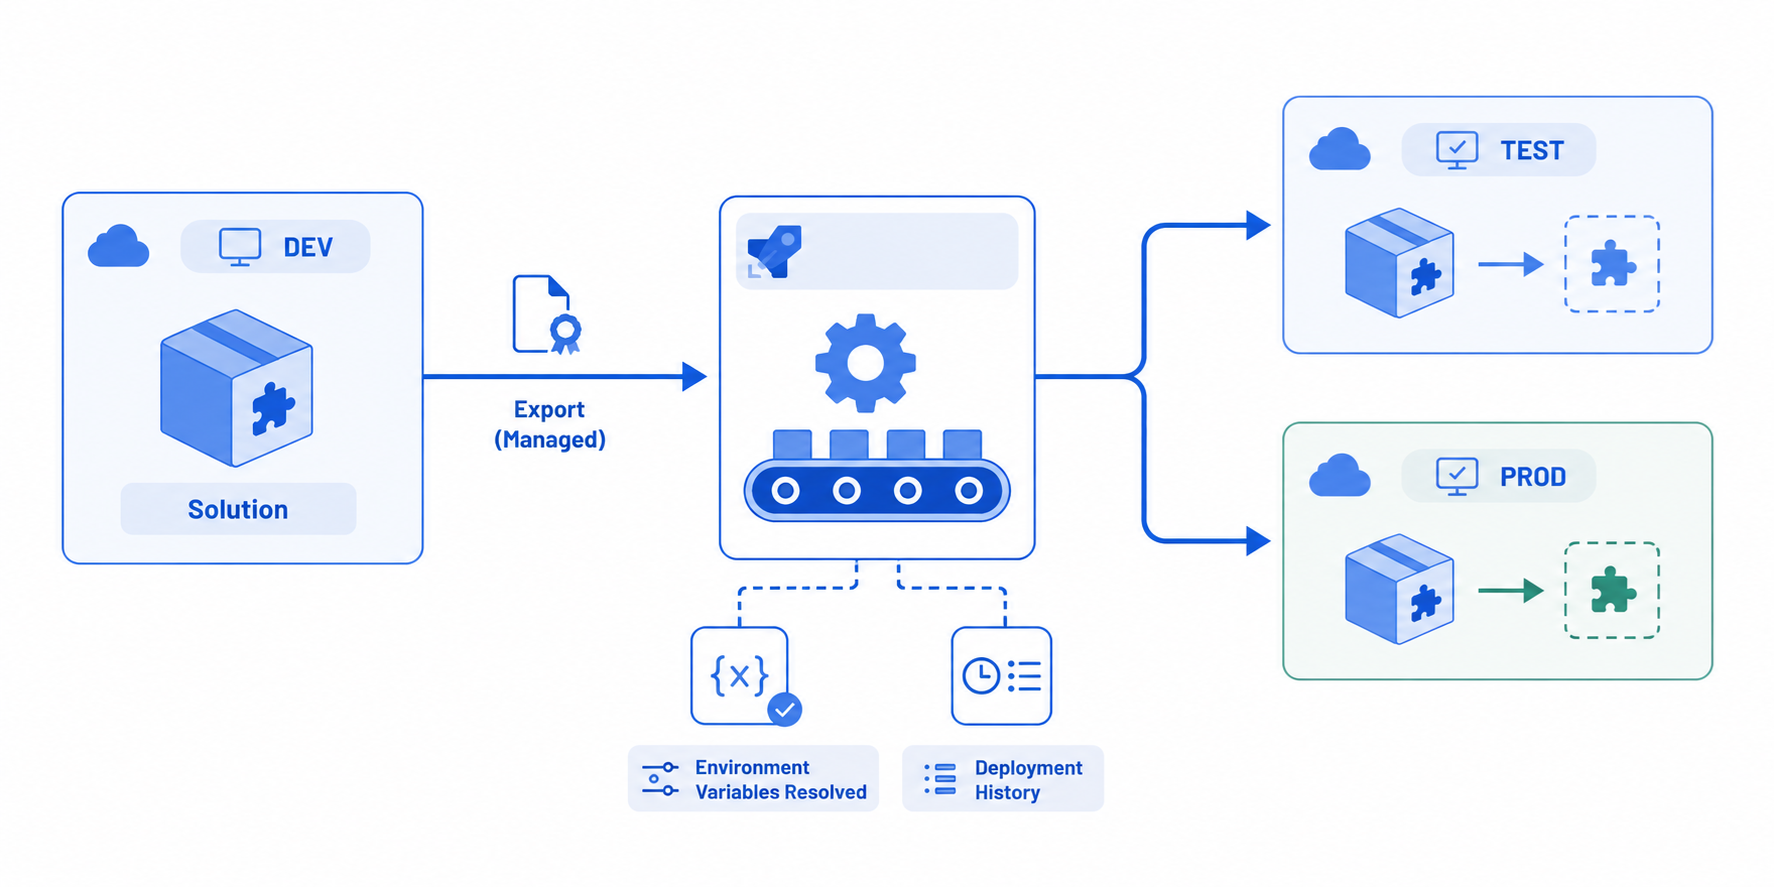 A solution in Dev is exported as a managed package and fed into a pipeline, which deploys it to Test and then Prod. The pipeline resolves per-environment configuration during deployment and records each deployment in its history.
Deployment is also where configuration gets bound to the target environment. During a pipeline deployment you can supply the values that differ per environment:
- Connections for your tools, custom connectors, MCP servers, and workflows - mapped through connection references so each environment uses its own credential
- Environment variable values for the target environment
What a pipeline gives you:
- Repeatability - the same process every time, no manual steps to forget
- Audit trail - who deployed what, when, and to which environment
- Version visibility - deployment history shows exactly which version is in each environment
- Guardrails - you can require approvals before a deployment proceeds to the next stage
Deployment history gives you visibility into versions, but it is not a one-click rollback. Uninstalling a managed solution removes its components - including the agent. “Rolling back” usually means deploying a previous managed version or restoring an environment backup, so plan for it rather than assuming you can simply undo.
For setup details, see set up pipelines in Power Platform.
Configuration: Environment Variables
The principle is simple: nothing environment-specific gets hardcoded. API endpoints, SharePoint URLs, thresholds, feature flags - all go into environment variables.
An environment variable has two parts:
- Definition - the schema (name, data type, description). This always travels with the solution.
- Value - the actual content for a given environment.
By default you keep values out of the solution so each environment supplies its own, and that is the right call for anything genuinely environment-specific (a Test endpoint should not ship to Prod). But you are not forced to: you can choose to include a value with the solution so it travels too. Whether you do depends on the use case - a default that is the same everywhere is a fine candidate to include.
Values are supplied at deployment time, not before the solution arrives. That ordering matters: you can’t set a value for a variable whose definition doesn’t exist yet, and the definition shows up when the solution is imported. So a pipeline prompts you for values during deployment (or, for unattended scenarios, reads them from a deployment settings file). On a first deployment the definition arrives with the solution; on later upgrades the definition is already there, so values can be pre-configured in the target ahead of time.
Secrets - API keys, tokens, credentials - belong in Azure Key Vault, referenced through a secret environment variable. The agent references the secret by name and the platform resolves it at runtime, so rotating a key means updating Key Vault, with no redeployment. The pipeline maps the reference per environment; it does not store the secret value itself.
Coming later in the series: For fully unattended CI/CD (Azure DevOps or GitHub Actions), values come from a deployment settings file generated with
pac solution. That mechanism, and the broader connection-reference story, gets its own configuration-focused post.
Knowing It Works: Evaluations
Deploying correctly does not guarantee behaving correctly. An evaluation is a defined set of test inputs and expected outputs that measures whether your agent is selecting the right tools and producing acceptable responses. Treat it as your quality gate: run evals in Dev before you export, and again in the target after import to confirm the deployment landed cleanly.
You don’t have to do this by hand. The agentic improvement loop shows how to iterate on quality, and automated evaluations in Azure DevOps shows how to turn evals into an enforced gate that blocks a change when quality drops. Wiring evals into your promotion flow is the subject of the automation post in this series.
Before You Promote: A Checklist
- A custom publisher and prefix are in place
- All agent assets live inside one solution
- That solution is set as the preferred solution in Dev
- No environment-specific values are hardcoded - they’re in environment variables
- Secrets are in Key Vault, referenced via secret environment variables
- Test and Production block unmanaged customizations, with maker/admin access removed
- A pipeline is configured with the correct stage sequence
- The solution is exported as managed for Test and Prod
- Evaluations pass in Dev before export, and again in the target after import
The Payoff
When the foundation is in place, moving your agent forward is a single pipeline action. Production stays stable because nobody edits it directly. Configuration binds itself to the right environment automatically. Secrets rotate without a redeployment. And you always know exactly which version is running where.
That is the baseline. Get it solid, and the advanced patterns in the rest of this series - early-release validation, hotfix environments, source control, and automated quality gates - have something dependable to build on.
What does your ALM setup look like today, and which part of the foundation bit you first? Let me know in the comments.