SSO Setup
This section describes how to configure the Azure Bot Service (ABS), the Entra App Registration and the Teams manifest to enable Single-Sign-On (SSO) for your Teams app.
The teams-dev skill can orchestrate the full SSO setup for you — install it in your AI coding assistant and say "set up SSO for my Teams bot".
Prerequisites
Before starting SSO configuration, ensure you have:
-
An Azure-managed Azure Bot Service resource and its associated Entra App Registration (Application ID / Client ID and Tenant ID).
-
To set up using CLIs: the
azCLI and the Teams Developer CLI installed and authenticated.CLI users: migrate first if your bot is Teams-managedSSO requires an Azure-managed bot because the OAuth connection lives in Azure Bot Service. If you registered with
teams app create(default Teams-managed), migrate your bot first:teams app bot migrate <appId> --subscription <id> --resource-group <rg>Your
CLIENT_ID,CLIENT_SECRET, andTENANT_IDstay the same. See Bot Locations for details.
SSO with User-Assigned Managed Identity
If your bot uses User-Assigned Managed Identity (MI) authentication, the bot ID is the MI's client ID. Since managed identities don't have client secrets, you need a separate Entra App Registration for the OAuth connection used in SSO. In this setup, the IDs map differently:
| Configuration | Value |
|---|---|
| Application ID URI (Expose an API) | api://botid-{botId} (where botId = MI client ID) |
webApplicationInfo.id in manifest | The auth app's client ID (not the bot/MI ID) |
webApplicationInfo.resource in manifest | api://botid-{botId} (must match the Application ID URI) |
OAuth connection ClientId / ClientSecret | From the auth app registration |
OAuth connection tokenExchangeUrl | api://botid-{botId} (must match the Application ID URI) |
The Application ID URI on the auth app must use the bot ID (MI client ID), not the auth app's own client ID. Teams requires the botid- prefix format and matches this URI across the manifest, OAuth connection, and Entra app registration.
Configure the Entra App Registration for SSO
You need an Entra ID App Registration to configure the OAuth Connection in Azure Bot Service. If you don't already have one, follow the Create the Entra App Registration guide first.
- Azure Portal
- Azure CLI
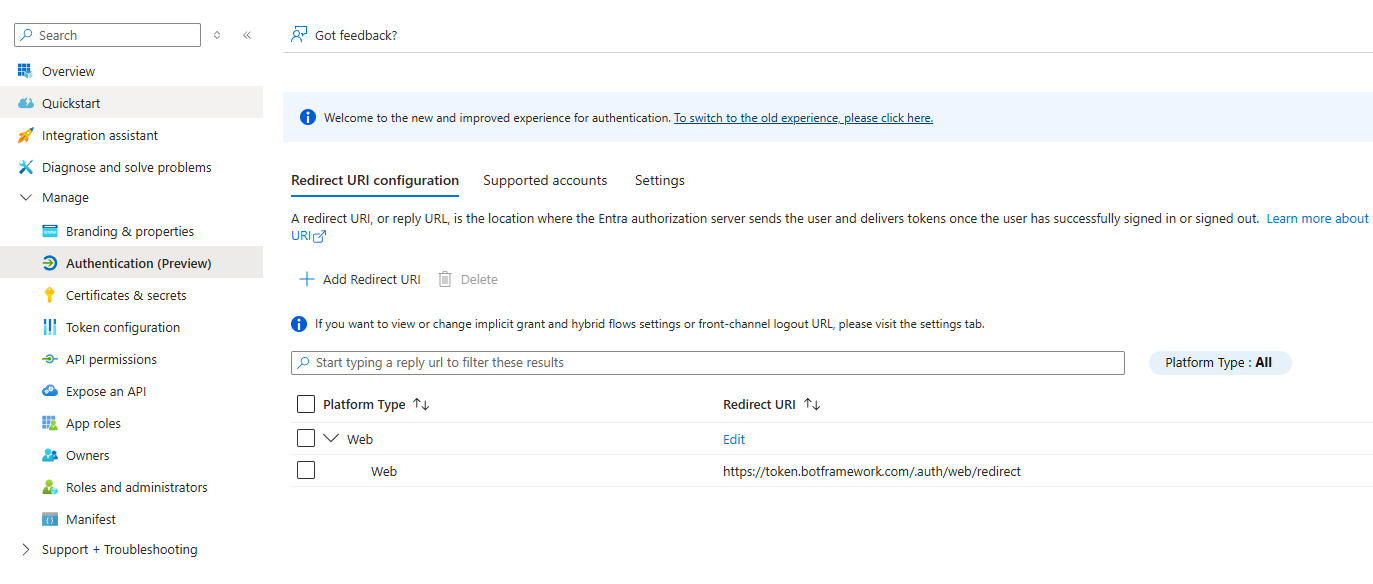
- Add the Bot Framework redirect URI. From your App Registration, navigate to Authentication and add a Web platform redirect URI with the value
https://token.botframework.com/.auth/web/redirect
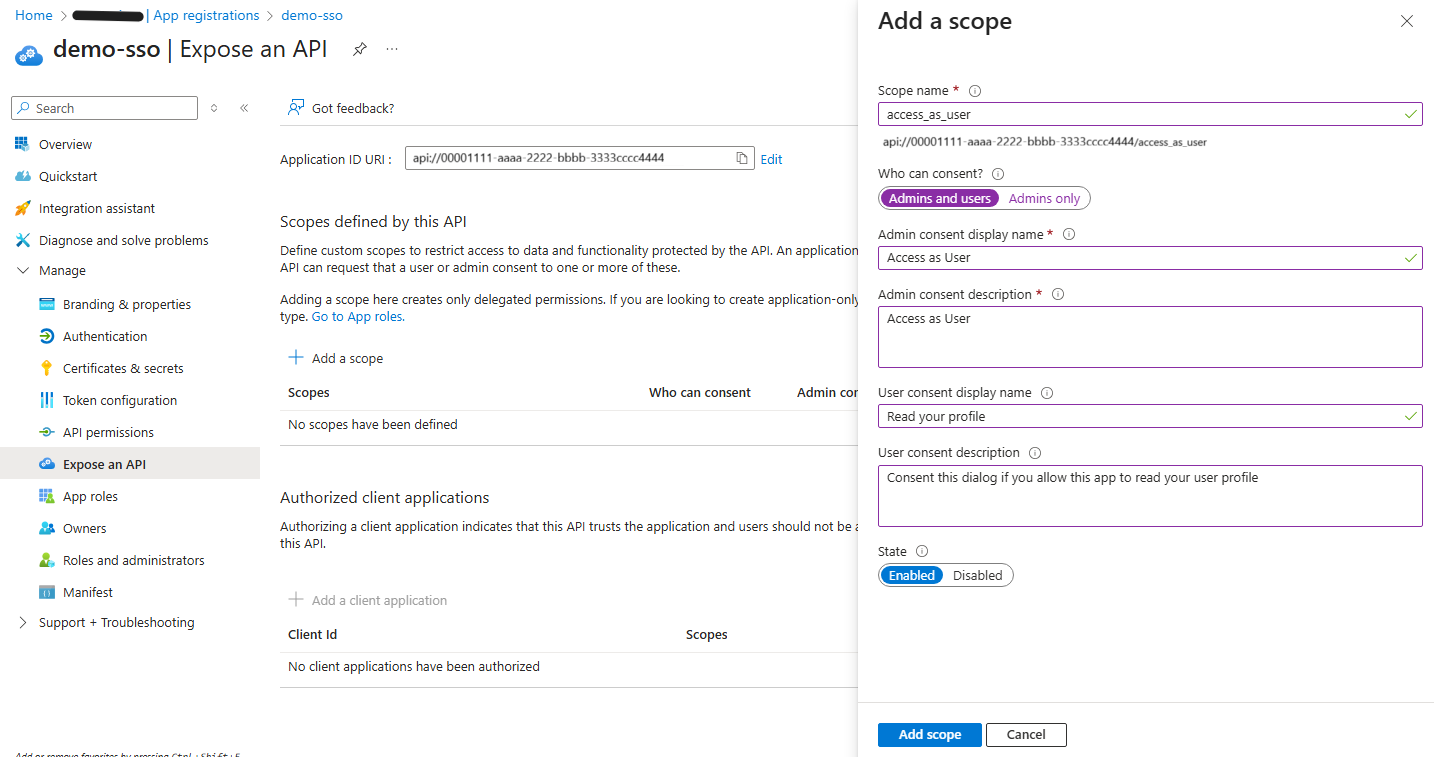
- Configure the API. From
Expose an API, clickAddto Application ID URI and set the value toapi://<Your-Application-Id>. Add the scopeaccess_as_userand select who can consent.
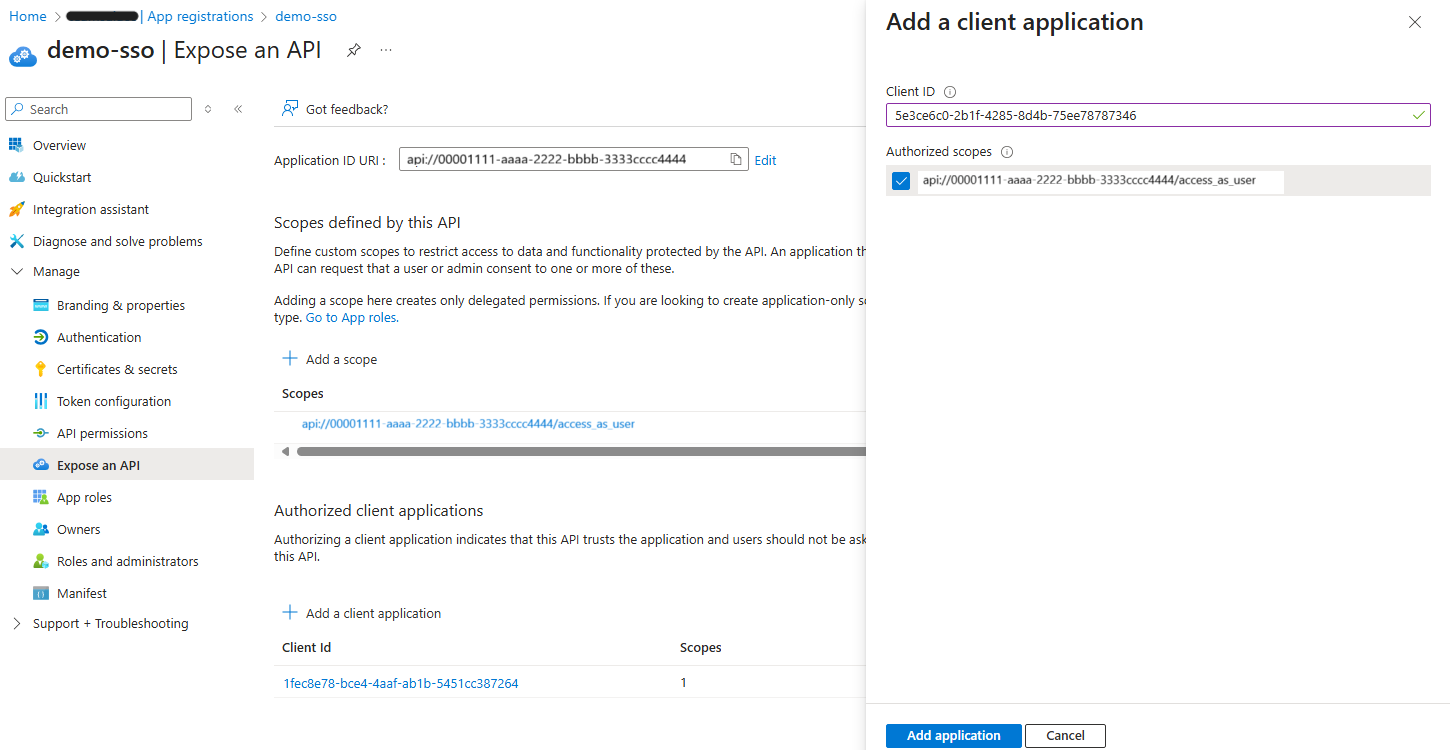
- Authorize the client applications for SSO. To enable the Teams clients, desktop and web, to perform the SSO flow you must add the following client applications to the scope defined before: Teams Desktop
1fec8e78-bce4-4aaf-ab1b-5451cc387264and Teams Web5e3ce6c0-2b1f-4285-8d4b-75ee78787346
The full SSO setup involves several steps the Teams Developer CLI doesn't handle directly (creating the access_as_user scope, pre-authorizing Teams clients, configuring the OAuth connection in Azure Bot Service, updating webApplicationInfo in the manifest). The teams-dev skill orchestrates all of this for you — install it in your AI coding assistant and say "set up SSO for my Teams bot".
Step 1: Look Up the AAD App Object ID
The Microsoft Graph object ID differs from the app's Client ID. Query it using the az CLI:
az rest \
  --method GET \
  --uri "https://graph.microsoft.com/v1.0/applications?\$filter=appId eq '$appId'" \
  --query "value[0].id" \
  --output tsv
Save the result as your objectId.
Step 2: Generate a Scope UUID
The access_as_user scope needs a stable unique identifier. Generate one with PowerShell, bash, or any UUID tool:
# PowerShell
[guid]::NewGuid().ToString()

# bash / macOS / Linux
uuidgen
Save the result as your scopeId.
Step 3: Configure the AAD App (Identifier URI, Scope, Redirect URI)
Substitute your appId and scopeId into the following command:
az rest \
  --method PATCH \
  --uri "https://graph.microsoft.com/v1.0/applications/$objectId" \
  --headers "Content-Type=application/json" \
  --body "{
    \"identifierUris\": [\"api://botid-$appId\"],
    \"api\": {
      \"requestedAccessTokenVersion\": 2,
      \"oauth2PermissionScopes\": [{
        \"id\": \"$scopeId\",
        \"adminConsentDescription\": \"Allow the application to access the bot on behalf of the signed-in user.\",
        \"adminConsentDisplayName\": \"Access as user\",
        \"userConsentDescription\": \"Allow the application to access the bot on your behalf.\",
        \"userConsentDisplayName\": \"Access as user\",
        \"isEnabled\": true,
        \"type\": \"User\",
        \"value\": \"access_as_user\"
      }]
    },
    \"web\": {
      \"redirectUris\": [\"https://token.botframework.com/.auth/web/redirect\"]
    }
  }"
Step 4: Pre-Authorize Teams Clients
Pre-authorize the Teams desktop and web clients so they can silently acquire SSO tokens. Substitute your scopeId:
az rest \
  --method PATCH \
  --uri "https://graph.microsoft.com/v1.0/applications/$objectId" \
  --headers "Content-Type=application/json" \
  --body "{
    \"api\": {
      \"oauth2PermissionScopes\": [{
        \"id\": \"$scopeId\",
        \"adminConsentDescription\": \"Allow the application to access the bot on behalf of the signed-in user.\",
        \"adminConsentDisplayName\": \"Access as user\",
        \"userConsentDescription\": \"Allow the application to access the bot on your behalf.\",
        \"userConsentDisplayName\": \"Access as user\",
        \"isEnabled\": true,
        \"type\": \"User\",
        \"value\": \"access_as_user\"
      }],
      \"preAuthorizedApplications\": [
        {
          \"appId\": \"1fec8e78-bce4-4aaf-ab1b-5451cc387264\",
          \"delegatedPermissionIds\": [\"$scopeId\"]
        },
        {
          \"appId\": \"5e3ce6c0-2b1f-4285-8d4b-75ee78787346\",
          \"delegatedPermissionIds\": [\"$scopeId\"]
        }
      ]
    }
  }"
The pre-authorization patch must run after the scope patch because the pre-authorized apps reference the scopeId, which must exist first. If it fails with a scope-not-found error, wait 15 seconds (AAD replication lag) and retry.
Create the OAuth connection in Azure Bot Service
You need to add a new OAuth connection to your Azure Bot Service resource.
- Azure Portal
- Azure CLI
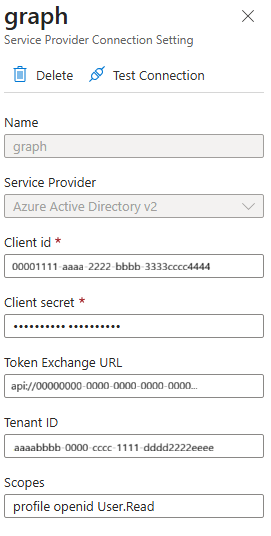
- From the Bot service resource in the Azure Portal, navigate to
Settings/ConfigurationandAdd OAuth Connection settings. - Provide a name for your connection e.g.
graph, and select the Service ProviderAzure Active Directory v2 - Populate the
TenantId/ClientId/ClientSecretfrom the values obtained in the previous section. Configure the Token Exchange URL with the Application ID URI (e.g.api://<Your-Application-Id>), and add the Scopes you need e.g.User.Read
Use the az bot authsetting create command to create the OAuth connection. The --setting-name is the OAuth connection name — "graph" is used here as an example since Microsoft Graph is the most common scenario. Replace the other placeholders with your values:
az bot authsetting create \
  --resource-group $resourceGroup \
  --name $botName \
  --setting-name "graph" \
  --client-id $appId \
  --client-secret $clientSecret \
  --provider-scope-string "User.Read" \
  --service "Aadv2" \
  --parameters tenantId=$tenantId tokenExchangeUrl=api://botid-$appId
To include additional permissions (Graph, SharePoint, etc.), space-delimit them: "User.Read Mail.Read Sites.Read.All".
Configure the App Manifest
The Teams application manifest needs to be updated to include webApplicationInfo with the Application Id and Application ID URI.
- Manifest JSON
- Teams Developer CLI
Add *.botframework.com to validDomains and add the webApplicationInfo section to your manifest.json:
"validDomains": [
    ...
    "*.botframework.com"
 ],
 "webApplicationInfo": {
    "id": "<Your-Application-Id>",
    "resource": "api://<Your-Application-Id>"
  }
This option is available if your app was created using the Teams Developer CLI.
You can set the webApplicationInfo fields directly without downloading and re-uploading the manifest:
teams app update $teamsAppId \
  --web-app-info-id "$appId" \
  --web-app-info-resource "api://botid-$appId"
You can then verify the full SSO configuration with the doctor command:
teams app doctor $teamsAppId
Expected — all SSO checks pass:
- Identifier URI:
api://botid-<appId>✔ access_as_userscope ✔- Teams clients pre-authorized ✔
- Bot Framework redirect URI present ✔
- OAuth connection — URIs aligned ✔
Cross-Tenant Considerations
If your Entra auth app lives in a different tenant than where the Teams app is installed, see Cross-Tenant Considerations in the troubleshooting guide.
Troubleshooting
If you encounter SSO errors, see the Troubleshooting guide for common issues and solutions.