Task 01 - Enable vector search in Azure Cosmos DB for NoSQL (10 minutes)
Introduction
Vector search is a technique that allows items to be found based on their data characteristics instead of exact matches on a specific property field. Instead of requiring exact matches, vector search enables you to find items based on their vector representations. This technique is advantageous when performing similarity searches and is particularly valuable in applications that need to search for information within large blocks of text, such as Consoso Suites’ applications.
The Azure Cosmos DB for NoSQL API includes a vector search feature that provides a robust method for managing and querying high-dimensional vectors. This capability is essential for AI-driven applications requiring an integrated vector search capability.
Description
In this task, you will enable the Vector Search feature in your Azure Cosmos DB for NoSQL database, then define a container vector policy and specify an indexing policy on a Cosmos DB container you will create for storing property maintenance request data.
Success Criteria
- You have enabled the Vector Search for NoSQL API feature in your Azure Cosmos DB instance.
- You have defined a vector policy for the
MaintenanceRequestscontainer in theContosoSuitesdatabase in Azure Cosmos DB. - You have specified an appropriate vector indexing policy on the container to improve similarity search efficiency.
Learning Resources
- What is vector search?
- What is a vector database?
- Vector Search in Azure Cosmos DB for NoSQL
- Vector indexes
- What are distance functions?
Key Tasks
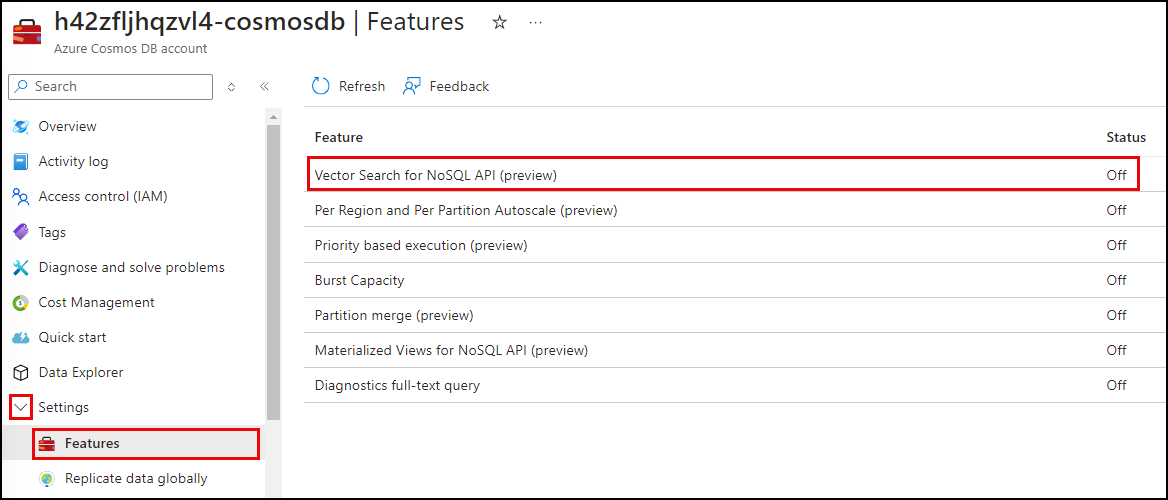
01: Enable Vector Search
Enable the Vector Search feature in Azure Cosmos DB for NoSQL.
Expand this section to view the solution
Enabling the Vector Search for NoSQL API feature in Azure Cosmos DB can be done via the Azure portal or the Azure CLI. The steps for each technique are listed below. Note that enabling the feature may take several minutes to take effect.
The steps for enabling the feature in the Azure portal are as follows:
- Navigate to your Azure Cosmos DB for NoSQL resource in the Azure portal.
-
Expand the Settings item in the left-hand menu, select Features, and on the Features page, select Vector Search for NoSQL API.
-
In the Vector Search for NoSQL API dialog, review the feature description and select Enable.
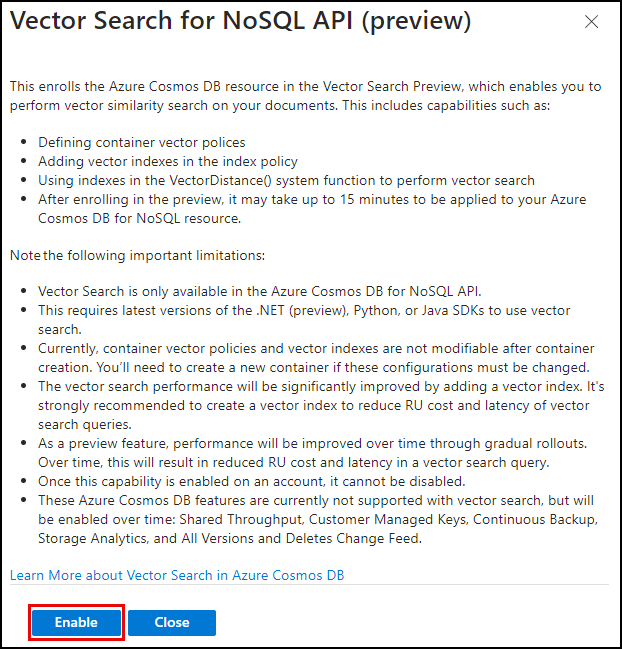
- Wait for the notification that the feature was successfully enabled. You should see the Status of the Vector Search for NoSQL API change to On.
To enable Vector Search via the Azure CLI:
- From the toolbar in the Azure portal, open the Azure Cloud Shell.
- Ensure the cloud shell is using the subscription you are using for this exercise by running
az account set -s <YOUR_SUBSCRIPTION_ID>, replacing the<YOUR_SUBSCRIPTION_ID>token with the id of the subscription you are using for this exercise. -
Execute the following command from the Azure Cloud Shell. Ensure you replace the
<resource-group-name>and<account-name>tokens with the appropriate values from your deployed resource group.az cosmosdb update \ --resource-group <resource-group-name> \ --name <account-name> \ --capabilities EnableNoSQLVectorSearch - Wait for the command to run successfully before leaving the Azure Cloud Shell.
02: Create maintenance requests container
Create a container named “MaintenanceRequests” in the ContosoSuites database, using the hotel_id field as the partition key. During container creation, define a container vector policy using the cosine distance function and assign an appropriate vector index type. Designate the field for storing vector data as request_vector.
Expand this section to view the solution
Container vector policies and vector indexing policies must be defined at the time of container creation. In order to create a new container, perform the following steps:
- In the Azure portal, navigate to your Cosmos DB resource.
- Select Data Explorer in the left-hand menu.
- On the Data Explorer page, select New Container
- In the New Container dialog:
- Select Use existing under Database id and select the ContosoSuites database from the dropdown list.
- Enter “MaintenanceRequests” into the Container id box.
- Enter “/hotel_id” into the Partition key box.
- Expand the Container Vectory Policy section of the dialog, select Add vector embedding, and then enter the following values into the specified fields:
- Path: Enter “/request_vector”.
- Data type: Select float32.
- Distance function: Select cosine.
- Dimensions: Enter 1536. This is based on the number of dimensions generated by the
ada-text-embedding-002model in Azure OpenAI. - Index type: Select diskANN. Given the number of dimensions being specified, 1536, the
flatindex type will not work, as it only supports a maximum of 505 dimensions for vectors. ThequantizedFlatindex could also be used here.diskANNis a more efficient index type, but given the amount of data we are working with in this lab, you likely will not notice any difference in performance.
- Select OK to create the container.
If you receive an error message that “A Container Vector Policy has been provided, but the capability has not been enabled on your account,” wait another 5-10 minutes before trying again.
03: Create leases container
The Azure Function is going to use the Change Feed Processor of CosmosDB to get the new items and vectorize them. This feature needs a leases collection to synchronize the work, that is usually automatically created by using the CreateLeaseContainerIfNotExists = true attribute. But, you cannot use this when combined with a Managed Identity connection *. We need to manually create a collection called leases with partition key /id.
Expand this section to view the solution
In order to create a new container named leases, perform the following steps:
- In the Azure portal, navigate to your Cosmos DB resource.
- Select Data Explorer in the left-hand menu.
- On the Data Explorer page, select New Container
- In the New Container dialog:
- Select Use existing under Database id and select the ContosoSuites database from the dropdown list.
- Enter “leases” into the Container id box.
- Enter “/id” into the Partition key box.
- Select OK to create the container.