Task 01 - Import an Azure OpenAI API and manage token consumption (25 minutes)
Introduction
When developing GenAI applications, managing token consumption is crucial. The Azure OpenAI Service assigns a quota for your model deployments, expressed in tokens-per-minute (TPM), which is distributed across your model consumers. In the prototype you are building for Consoto Suites, you would like to be able to track token consumption by client IP address and ensure a single client cannot consume the entire TPM quota, leaving other clients with no option to take advantage of GenAI functionality.
Description
In this task, you will import your Azure OpenAI service as an API in Azure API Management (APIM), implement a token limit policy, and emit token usage metrics to manage token consumption effectively.
Success Criteria
- You have imported your Azure OpenAI service resource as an API in Azure API Management.
- You have created a policy in APIM that limits token consumption to 500 TPM per client IP address and outputs token usage values in API response headers.
- You are emitting token usage metrics to log the consumed total, completion, and prompt tokens using a policy defined in APIM.
- You have tested the API and policies within the Azure API Management service’s APIs page in the Azure portal and can view token metrics in your Application Insights instance.
Learning Resources
- Overview of generative AI gateway capabilities in Azure API Management
- Import an Azure OpenAI API
- Policies in Azure API Management
- How to set or edit Azure API Management policies
- Limit Azure OpenAI API token usage
- Emit metrics for consumption of Azure OpenAI tokens
Tips
-
If you receive authentication errors for Cosmos DB when running your Web API project, it may be that internal policies have disabled key-based authentication. To fix this:
Navigate to the
src\InfrastructureAsCodefolder to Visual Studio Code and right-click theDeployAzureResources.bicepfile. Then, select Deploy Bicep File… in the context menu. This will update your Azure Cosmos DB instance to re-enable key-based authentication.The update may take up to 10 minutes before you see the change apply.
-
If you receive a 500 internal server error indicating that the managed identity is not set to use authentication-managed-identity, first make sure that you have the following in the policy:
<authentication-managed-identity resource="https://cognitiveservices.azure.com/" />If that line is in the policy you have created, try to add an OpenAPI specification for the Azure OpenAI REST API manually.
Key Tasks
01: Import Azure OpenAI service resource
Import your Azure OpenAI Service resource as an API in Azure API Management.
- Assign a display name of “Azure OpenAI API” and a name of “azure-openai-api.”
- Ensure APIM accesses your Azure OpenAI service using a managed identity.
Expand this section to view the solution
To import your Azure OpenAI service resource as an API in Azure API Management and define token limit and emit policies:
- Open a web browser and navigate to your Azure API Management resource in the Azure portal.
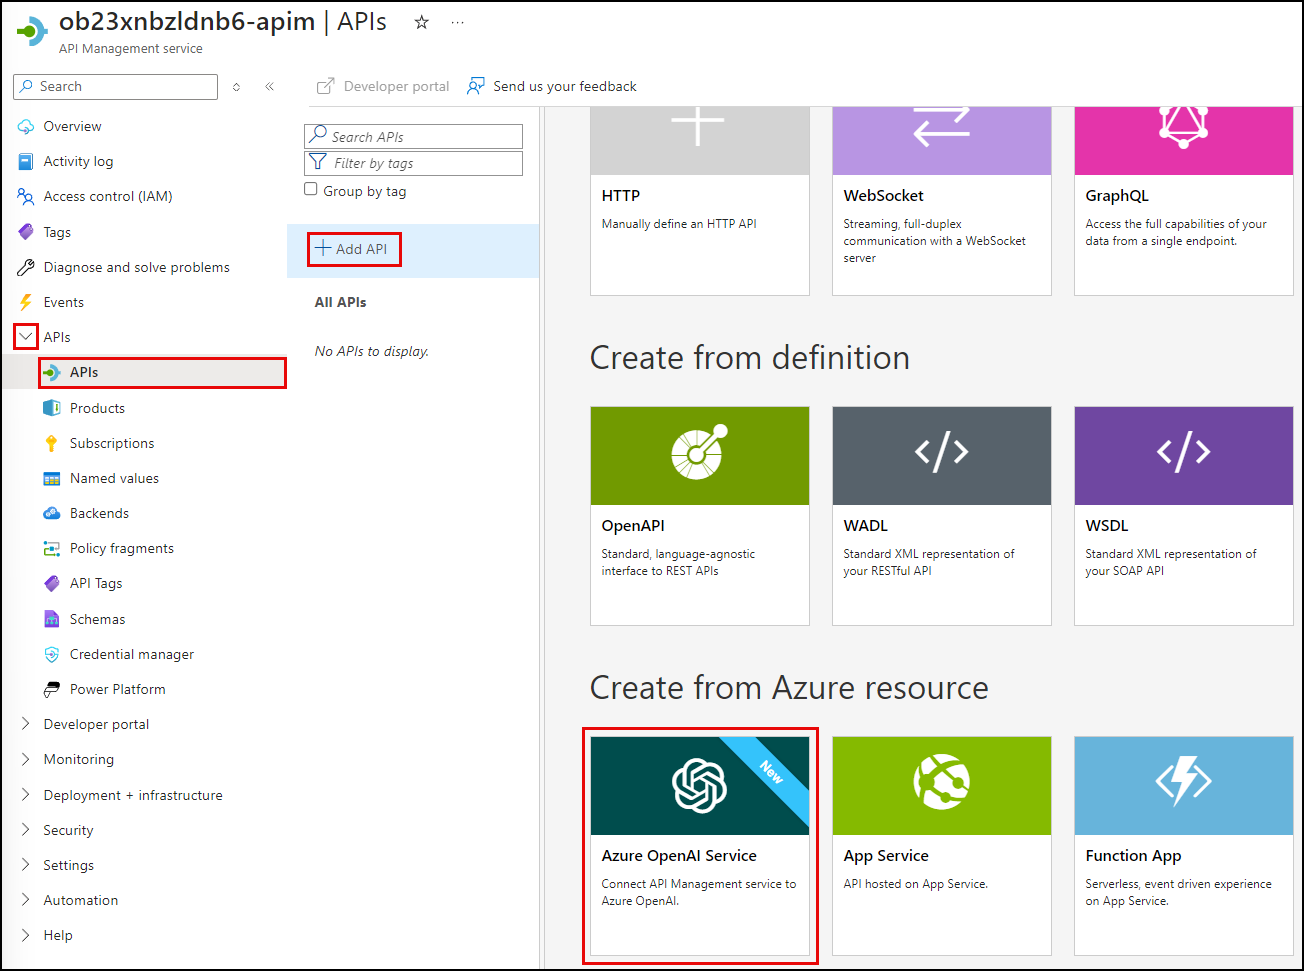
- Expand the APIs menu on the API Management service page and select APIs.
-
On the APIs page, select Add API and select Azure OpenAI Service under Create from Azure resource.
- On the Create from Azure OpenAI service Basics tab, set the following values:
- Azure OpenAI instance: Choose the Azure OpenAI service resource you are using for this exercise.
- Azure OpenAI API version: Accept the default value, which is the latest production-ready version.
- Display name: Enter “Azure OpenAI API.”
- Name: This value with be automatically populated with “azure-openai-api,” based on the display name you entered. You can edit this, but you should accept the generated value for this exercise.
- Description: This is optional, so you can leave it blank or enter a description, such as “Azure OpenAI API.”
- Base URL: This will be automatically created based on the Name of your API. Accept the generated value.
- Improve SDK compatibility: Check this box.
- Products: Leave this empty.
You will continue this work in the next key task.
02: Define token limit and emit policies
Define a token limit policy to protect the API from overuse and to control Azure OpenAI costs.
- Use a TPM value of 500 per client IP address.
- Factor estimated prompt tokens into rate-limiting.
- Add consumed and remaining token headers to API responses.
Then, track token usage with an emit policy to log the consumed total, completion, and prompt tokens. Be sure to include custom dimensions of “API ID” and “Client IP address.”
Expand this section to view the solution
While still on the Basics tab, select Next: Policies and on the Policies tab and define the token limit and emitting policies.
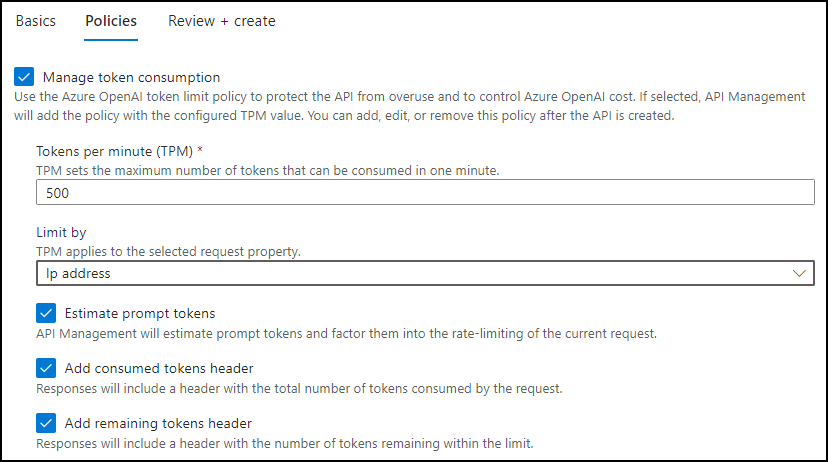
- To create a token limit policy, check the Manage token consumption box and set the following:
- Enter a token limit of 500 tokens per minute (TPM).
- Limit tokens by “IP address.”
- Check the box to include estimated prompt tokens.
-
Check the boxes to include the headers for the consumed and remaining tokens.
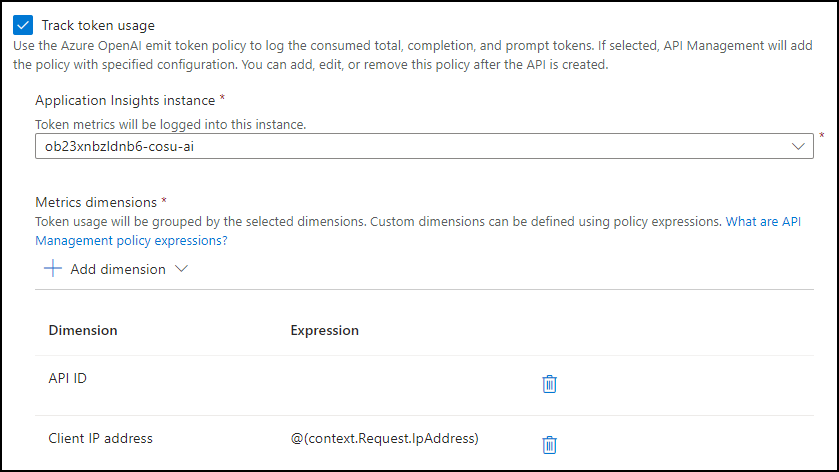
- To use the Azure OpenAI emit token policy to log the consumed total, completion, and prompt tokens, check the Track token usage box and configure the following:
- Choose the Application Insights instance associated with the resource group you are using for this exercise.
-
Add metric dimensions for API ID and Client IP address.
-
Select Review + create, then select Create. Importing your Azure OpenAI service using the above method automatically enables managed identity access to your Azure OpenAI resource from APIM.

-
The finished policies should look like the following in the policy editor:
 <policies>
     <inbound>
         <set-backend-service id="apim-generated-policy" backend-id="azure-openai-api-openai-endpoint" />
         <azure-openai-token-limit tokens-per-minute="500" counter-key="@(context.Request.IpAddress)" estimate-prompt-tokens="true" tokens-consumed-header-name="consumed-tokens" remaining-tokens-header-name="remaining-tokens" />
         <azure-openai-emit-token-metric>
             <dimension name="API ID" />
             <dimension name="Client IP address" value="@(context.Request.IpAddress)" />
         </azure-openai-emit-token-metric>
         <authentication-managed-identity resource="https://cognitiveservices.azure.com/" />
         <base />
     </inbound>
 </policies>
03: Test the API
Test the API and review the impact of the assigned policies.
- Call the chat completions API endpoint and inspect the headers and “usage” property in the response body.
- In the headers, locate and review the values assigned to the consumed-tokens and remaining-tokens headers added by your token limiting policy.
- In the response body JSON, locate and review the “usage” element appended to the response.
- Navigate to the Application Insights instance associated with your APIM service and use Kusto queries against the
customMetricstable to analyze token usage per request.
Expand this section to view the solution
To test the API, select Azure OpenAI API from the list of APIs on your API Management service’s APIs page.
- Select the Test tab, then select the Creates a completion for the chat message endpoint.
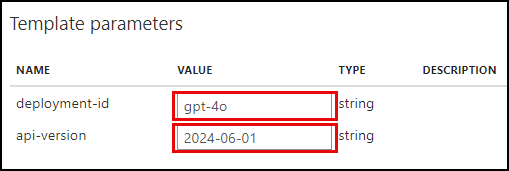
- On the Creates a completion for the chat message page, enter the following under Template parameters:
- deployment-id: Enter “gpt-4o”
-
api-version: Enter “2024-06-01”
-
Scroll down to the Request body section, ensure Raw is selected, and paste the following into the text box.
 {
     "messages":[
         {"role": "system", "content": "You are a sarcastic unhelpful assistant."},
         {"role": "user", "content": "Tell me a story about AI."}
     ]
 }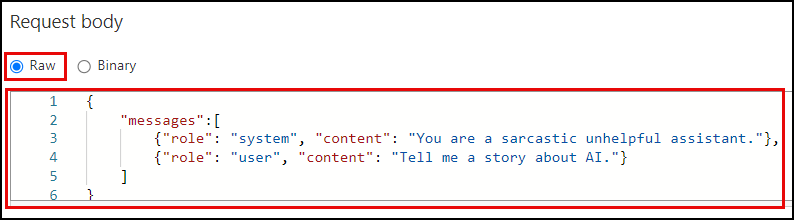
- Select Send at the bottom of the page.
- Scroll to the page’s HTTP response section and review the output on the Message tab.
- In the headers, locate and review the consumed-tokens and remaining-tokens headers added by your token limiting policy.
-
In the response body JSON, locate the “usage” element appended to the response. This element provides token usage data to help you monitor and manage your Azure OpenAI API consumption. It includes the number of tokens used for the completion and prompt and the total token consumption.
  "usage": {
      "completion_tokens": 161,
      "prompt_tokens": 28,
      "total_tokens": 189
  }
-
Next, select Send several times rapidly until you see an HTTP response containing a 429 Too Many Requests status code.
The response header will look similar to the following:
 HTTP/1.1 429 Too Many Requests
 content-length: 85
 content-type: application/json
 date: Tue, 17 Sep 2024 00:05:47 GMT
 remaining-tokens: 0
 request-context: appId=cid-v1:28064454-b368-42b8-a293-4e597441f43f
 retry-after: 55
 vary: Origin
The response body will contain the following:
{ "statusCode": 429, "message": "Token limit is exceeded. Try again in 55 seconds." } - To view the output of your token emitting policy, you will use Application Insights.
- From your API Management service in the Azure portal, expand the Monitoring menu and select Application Insights, then select your Application Insights instance from the list.
- On the Application Insights page, expand the Monitoring menu and select Logs.
-
On the Logs page, execute the following Kusto query to look for records in the
customMetricstable:customMetrics | where timestamp > ago(1h) | where name in ('Completion Tokens', 'Prompt Tokens', 'Total Tokens') | extend ItemId = substring(itemId, 24), ApiId = tostring(customDimensions['API ID']), ClientIpAddress = tostring(customDimensions['Client IP address']) | summarize CompletionTokens = sumif(value, name == 'Completion Tokens'), PromptTokens = sumif(value, name == 'Prompt Tokens'), TotalTokens = sumif(value, name == 'Total Tokens') by ItemId, ApiId, ClientIpAddress
-
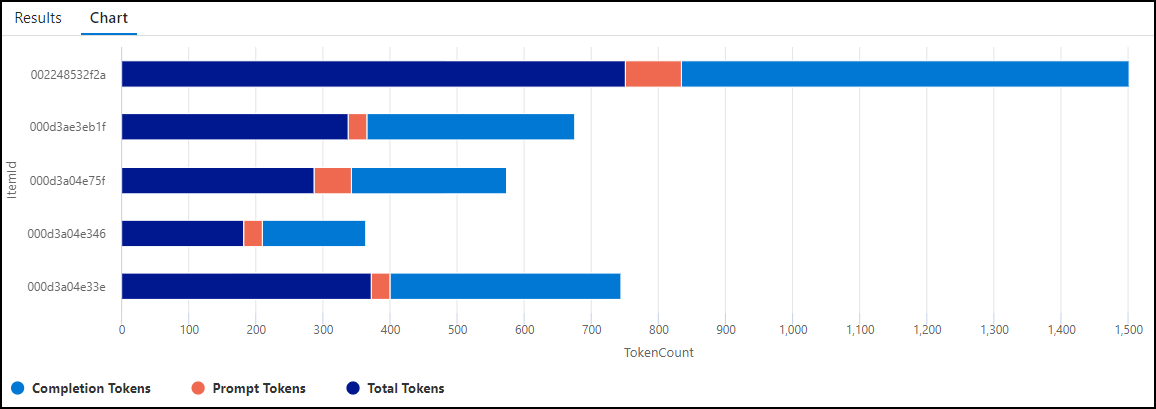
You can also visualize token consumption using a chart with the following Kusto query:
 customMetrics
 | where timestamp > ago(1h)
 | where name in ('Completion Tokens', 'Prompt Tokens', 'Total Tokens')
 | extend ItemId = substring(itemId, 24)
 | summarize TokenCount = sum(value) by ItemId, name
 | order by ItemId
 | render barchart with (kind=stacked)