Task 02 - Integrate APIs managed by API Management into GenAI applications (25 minutes)
Introduction
In the rapidly evolving landscape of artificial intelligence, integrating APIs into generative AI (GenAI) applications has become a crucial step for developers seeking to enhance functionality and streamline processes. Azure API Management (APIM) provides a robust framework for managing, securing, and optimizing APIs, making it an ideal choice for integrating diverse APIs into GenAI applications.
Description
The previous exercises sent all calls to perform text embedding and chat completions directly to your Azure OpenAI service’s API endpoint. In this task, you will integrate the Azure OpenAI API managed by API Management into the Contoso Suites Web API, sending chat completion and embedding requests through APIM and enabling the GenAI gateway capabilities and policies you enabled in the previous task to be applied.
Success Criteria
- You have created a product named “Contoso Web API” in APIM that requires a subscription and has been added to the Azure OpenAI API.
- You have updated the token limit policy for the Azure OpenAI API in APIM to allow a TPM of 4000 and have disabled prompt token estimation.
- You have added secrets named
ApiManagement:EndpointandApiManagement:ApiKeyto the user secrets collection of theContosoSuitesWebAPIproject. - You have updated the
ContosoSuitesWebAPIproject to route all chat completion and embedding calls through the Azure OpenAI API endpoint defined in APIM. - You have successfully used the Maintenance Request Copilot on the Copilot Chat Streamlit page to generate a maintenance request.
- You have inspected the logs in Application Insights to view the token consumption of interactions with the copilot.
- If possible, you have completed the bonus task of provisioning a second Azure OpenAI instance and adding round-robin load balancing to your Azure OpenAI API exposed through APIM.
Learning Resources
- API Management Products
- Tutorial: Create and publish a product
- Subscriptions in Azure API Management
- Create subscriptions in Azure API Management
- Load-balanced pool in Azure API Management
- Load balancing options
Tips
-
If you receive authentication errors for Cosmos DB when running your Web API project, it may be that internal policies have disabled key-based authentication. To fix this:
Navigate to the
src\InfrastructureAsCodefolder to Visual Studio Code and right-click theDeployAzureResources.bicepfile. Then, select Deploy Bicep File… in the context menu. This will update your Azure Cosmos DB instance to re-enable key-based authentication.The update may take up to 10 minutes before you see the change apply.
Key Tasks
01: Publish a protected Contoso Web API product
Publish a protected product named “Contoso Web API” in APIM and add it to your Azure OpenAI API.
Expand this section to view the solution
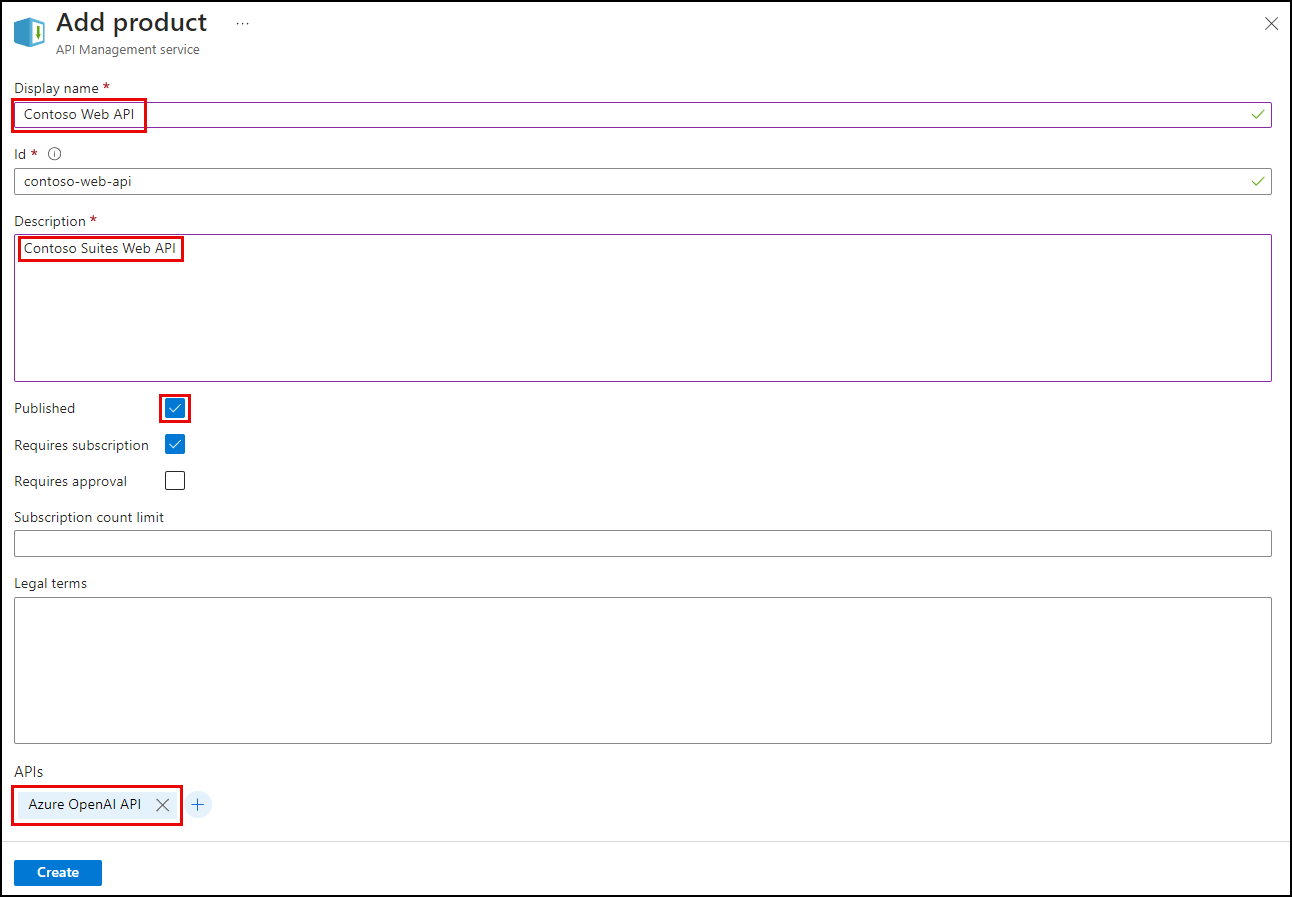
To create and publish a protected product in APIM and add it to your Azure OpenAI API:
- Navigate to your APIM instance in the Azure portal, then select Products under the APIs menu.
- Select Add to create a new product.
- In the Add product dialog:
- Enter a display name of “Contoso Web API,” which will automatically set the Id field to “contoso-web-api.”
- Enter a description, such as “Contoso Suites Web API.”
- Check the Published box.
- Ensure the Requires subscription box is checked. This flag specifies that the product is protected, meaning a subscription key will be required to access the product.
- Select the + below APIs at the bottom of the dialog and select the Azure OpenAI API. Adding an API allows it to be accessed using the subscription key associated with the Contoso Web API product.
-
Select Create.
- After creating the product, select it from the Products list.
- On the Contoso Web API project page, select Subscriptions from the left-hand menu, then select Add subscription on the toolbar.
- In the New Subscription dialog, enter “contoso-web-api” into the Name field, “Contoso Web API” into the Display name field, and then select Create.
02: Update token limiting policy
Update the token limiting policy in APIM. First, increase the TPM limit to 4000 for the Web API to allow the copilot sufficient capacity to perform its duties. Then, set estimate-prompt-tokens to false.
Leaving the
estimate-prompt-tokensflag set totruecan result in errors where the policy cannot parse and estimate tokens for the incoming request when using a Semantic Kernel copilot agent, which may generate a chat history containing empty messages.
Expand this section to view the solution
To update the token limit policy applied to the Azure OpenAI API in APIM:
- Navigate to your API Management service’s APIs page in the Azure portal and select the Azure OpenAI API.
-
Select All operations in the design panel, then open the inbound processing policies by selecting the
<\>link within that panel.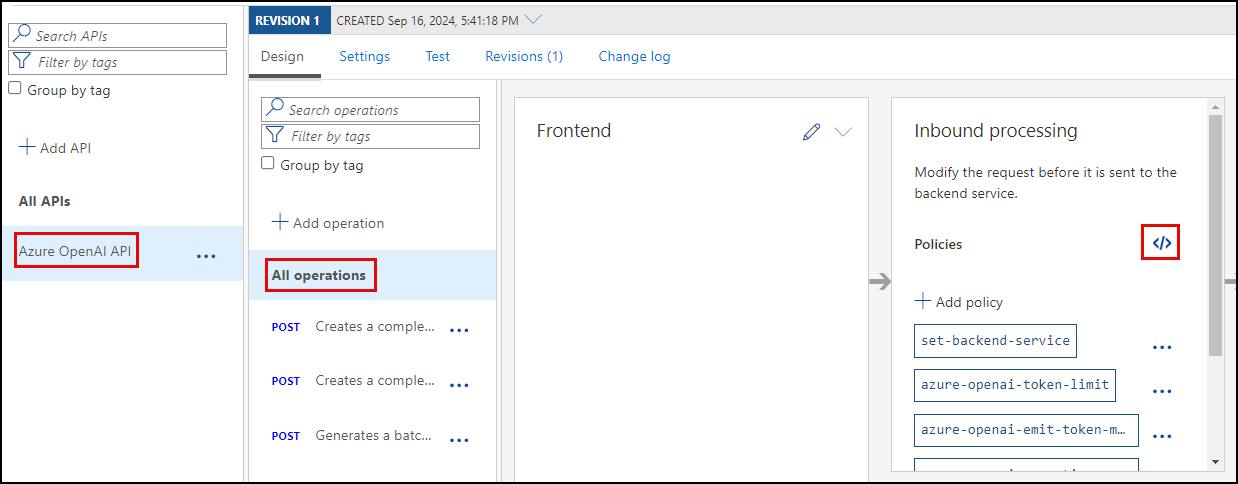
- In the Policies XML document, locate the
azure-openai-token-limitpolicy definition within the<inbound>processing section.- Update the
tokens-per-minutevalue to4000. -
Set the
estimate-prompt-tokensproperty tofalse.Leaving this flag set to
truecan result in errors where the policy is unable to parse and estimate tokens for the incoming request when using a Semantic Kernel copilot agent, which may generate a chat history with empty messages.
- Update the
-
The updated policy definition should look like the following:
<azure-openai-token-limit tokens-per-minute="4000" counter-key="@(context.Request.IpAddress)" estimate-prompt-tokens="false" tokens-consumed-header-name="consumed-tokens" remaining-tokens-header-name="remaining-tokens" /> - Select Save.
03: Add new secrets
Add new secrets named ApiManagement:Endpoint and ApiManagement:ApiKey to the user-secrets collection in the ContosoSuitesWebAPI project. The values assigned to these secrets are the Azure OpenAI API endpoint exposed by APIM and the “Contoso Web API” product subscription key, respectively.
Expand this section to view the solution
To add new user secrets for the API Management endpoint and key:
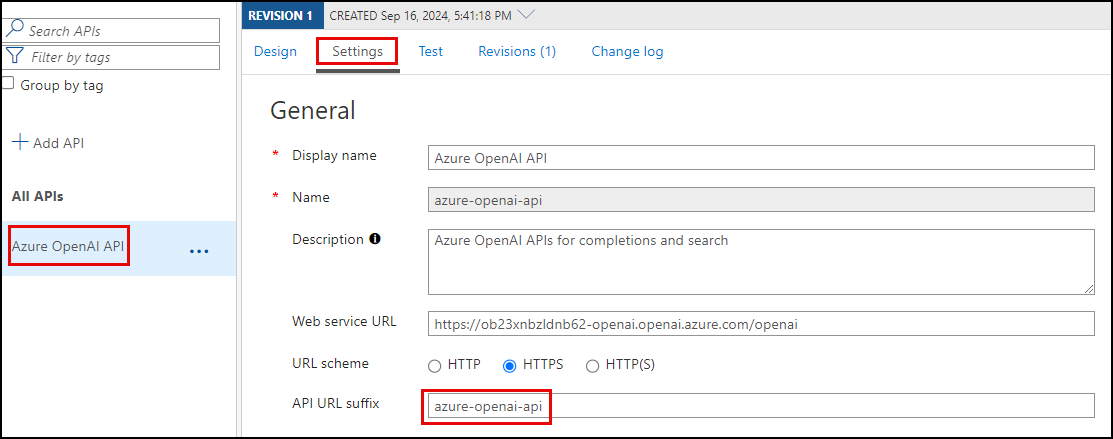
- Navigate to your APIM instance in the Azure portal.
- On the Overview page, copy the Gateway URL from the Essentials panel. Save the value into a text edit, such as Notepad, for use below.
-
Select APIs from the APIs menu of your APIM instance, then select Settings tab of the Azure OpenAI API. Copy the API URL suffix and save it to a text editor for use below.
-
In Visual Studio Code, open a new terminal and change directories to the
ContosoSuitesWebAPIfolder. Then, run the following command to create a new secret in theuser-secretscollection, replacing the{YOUR_API_MANAGEMENT_ENDPOINT}and{YOUR_AZURE_OPENAI_API_URL_SUFFIX}tokens with the gateway URL and API URL suffix values you copied above, respectively.dotnet user-secrets set "ApiManagement:Endpoint" "{YOUR_API_MANAGEMENT_ENDPOINT}/{YOUR_AZURE_OPENAI_API_URL_SUFFIX}" - Return to your APIM instance in the Azure portal, and select Subscriptions under the APIs menu.
- On the Subscriptions page, select the ellipsis at the end of the Contoso Web API subscription and select Show/hide keys in the context menu.
- Copy the Primary key value.
-
Next, you will create another secret in the
user-secretscollection of the Web API project. Return to the terminal window in Visual Studio Code you used in the previous step and run the following command, replacing the{YOUR_API_MANAGEMENT_SUBSCRIPTION_KEY}with the Primary key value you copied above.dotnet user-secrets set "ApiManagement:ApiKey" "{YOUR_API_MANAGEMENT_SUBSCRIPTION_KEY}"
04: Route chat completions through APIM
Update the ContosoSuitesWebAPI project to route all chat completion and embedding calls through the Azure OpenAI API endpoint defined in APIM.
Expand this section to view the solution
To update the Contoso Suites Web API to use the Azure OpenAI API exposed through Azure API Management, you must update the Kernel builder in the Program.cs file to use the APIM endpoint and key for all text embedding and chat completion calls.
- In Visual Studio Code, navigate to the
ContosoSuitesWebAPIfolder and open theProgram.csfile. - The Kernel builder defined in
Program.cscontains calls to add chat completion and text embedding capabilities to the kernel. -
Within the
kernelBuilder.AddAzureOpenAIChatCompletion()function, replace theAzureOpenAIconfiguration values used for theendpointandapiKeyproperties to referenceApiManagement:EndpointandApiManagement:ApiKey, respectively. The updated function call should look like this:kernelBuilder.AddAzureOpenAIChatCompletion( deploymentName: builder.Configuration["AzureOpenAI:DeploymentName"]!, endpoint: builder.Configuration["ApiManagement:Endpoint"]!, apiKey: builder.Configuration["ApiManagement:ApiKey"]! ); -
In the
kernelBuilder.AddAzureOpenAITextEmbeddingGeneration()function, update theendpointandapiKeyproperties to retrieve theApiManagement:EndpointandApiManagement:ApiKey, respectively. The updated function call, including the#pragma warningdirectives wrapping it, will look similar to the following:#pragma warning disable SKEXP0010 // Type is for evaluation purposes only and is subject to change or removal in future updates. Suppress this diagnostic to proceed. kernelBuilder.AddAzureOpenAITextEmbeddingGeneration( deploymentName: builder.Configuration["AzureOpenAI:EmbeddingDeploymentName"]!, endpoint: builder.Configuration["ApiManagement:Endpoint"]!, apiKey: builder.Configuration["ApiManagement:ApiKey"]! ); #pragma warning restore SKEXP0010 // Type is for evaluation purposes only and is subject to change or removal in future updates. Suppress this diagnostic to proceed.
05: Test chat completion
Confirm you can successfully make chat completion calls via the web API by creating a new maintenance request using the Maintenance Request Copilot on the Streamlit Chat Streamlit page.
Expand this section to view the solution
To confirm that you can successfully make chat completion calls via the web API, use the Maintenance Request Copilot in the Copilot Chat Streamlit UI to create a new maintenance request.
-
Run the API locally by opening a new terminal window in Visual Studio code, navigating to the
src\ContosoSuitesWebAPIdirectory, and starting the API using the following command:dotnet run -
Open another terminal window, navigate to the
src\ContosoSuitesDashboarddirectory, and run the following command to start the Streamlit dashboard:python -m streamlit run Index.py -
Select the Copilot Chat page using the left-hand menu, then submit the following conversational prompts:
- First, send a message requesting help filing an issue, such as: “Please help me create a maintenance request for a room at the Grand Regency.”
- You should get a response asking for more information.
- Next, provide details about the issue to the copilot, such as: “There is a leak coming from under the kitchen sink. The customer reported it when returning to the room after being out most of the day. The carpet in the room is soaked.”
- You should get a reply asking for the room number.
- Provide a room number, such as: “It is in room 303.”
- You should get a reply that the request was created successfully.
- Send a final message, asking the copilot to provide you with the ID of the maintenance request it created.
If you receive a 429 error message at any point during the conversation, you may need to go back into the
azure-openai-token-limitpolicy definition in APIM and increase thetokens-per-minutevalue. - First, send a message requesting help filing an issue, such as: “Please help me create a maintenance request for a room at the Grand Regency.”
06: Inspect token consumption metrics
Inspect the token consumption metrics emitted by the APIM policy in Application Insights. The existence of these metrics helps to verify that Azure OpenAI API calls are going through your APIM instance and that the policies you defined are working correctly.
Expand this section to view the solution
To inspect the token consumption metrics emitted by the APIM policy in Application Insights:
- From your API Management service in the Azure portal, expand the Monitoring menu and select Application Insights, then select your Application Insights instance from the list.
- On the Application Insights page, expand the Monitoring menu and select Logs.
-
On the Logs page, execute the following Kusto query to look for records in the
customMetricstable:customMetrics | where timestamp > ago(1h) | where name in ('Completion Tokens', 'Prompt Tokens', 'Total Tokens') | extend ItemId = substring(itemId, 24), ApiId = tostring(customDimensions['API ID']), ClientIpAddress = tostring(customDimensions['Client IP address']) | summarize CompletionTokens = sumif(value, name == 'Completion Tokens'), PromptTokens = sumif(value, name == 'Prompt Tokens'), TotalTokens = sumif(value, name == 'Total Tokens') by ItemId, ApiId, ClientIpAddress
Bonus Tasks (if time allows)
This bonus task allows you to explore API Management’s support of backend pools when you want to implement multiple backends for an API and load-balance requests across those backends. You will implement a load-balanced pool to distribute the LLM workload across two instances of Azure OpenAI.
Resource quotas may prohibit you from deploying a second instance of Azure OpenAI in the same subscription or region, so it may not be possible for everyone to complete this bonus activity.
01: Deploy a second Azure OpenAI instance
Deploy a second Azure OpenAI instance in a new resource group using the DeployAzureOpenAIResource.bicep script. It is also recommended that you select a region different from your primary resource group.
Expand this section to view the solution
To deploy a second Azure OpenAI service into a new resource group using a Bicep script:
-
Create a new resource group in your subscription. This subscription must have access to Azure OpenAI, and you should deploy the resource group to a region that supports GPT-4o.
Important: You must deploy to an Azure region that supports the GPT-4o, 2024-05-13 model. You must create your Azure OpenAI resource in one of the supported regions.
-
Right-click the
DeployAzureOpenAI.bicepscript in thesrc/InfrastructureAsCode/folder, select Deploy Bicep File…, and follow the prompts to provide a deployment name and select the new resource group you created above. This script has no associated parameter file, so select None at that prompt.The Bicep script will deploy an Azure OpenAI service and create deployments for the
gpt-4oandtext-embedding-ada-002models within that instance that match what is in the primary service instance. The models deployed between load-balanced services must have the same name and version.
02: Import the new service resource
Import the new Azure OpenAI service resource as an API in Azure API Management.
Expand this section to view the solution
To import the new Azure OpenAI service resource as an API in APIM, follow the same steps you used when importing your primary Azure OpenAI service in Exercise 6 Task 1, but provide a different name to the API, such as “Secondary Azure OpenAI API.”
- Add the “Contoso Web API” product to the API, allowing it to be accessible using the same subscription key.
- When configuring the token consumption management policy, assign a TPM value of “4000” or higher if you adjusted that during the Maintenance Request Copilot testing.
03: Configure a load balancing policy
Configure a round-robin load balancing policy to swap requests between the backends.
Expand this section to view the solution
To create a backend load balancing pool:
- Open the Azure OpenAI API design window, select All operations, then open the Inbound policies XML document.
-
At the top of the
<inbound>processing section, insert the following variable declarations and policy snippets:<!-- Create a backend counter variable that is persistent in the local cache between requests --> <cache-lookup-value key="backend-counter" variable-name="backend-counter" /> <choose> <when condition="@(!context.Variables.ContainsKey("backend-counter"))"> <set-variable name="backend-counter" value="0" /> <cache-store-value key="backend-counter" value="0" duration="100" /> </when> </choose> <!-- Choose the backend service based on the backend variable --> <choose> <when condition="@(context.Variables.GetValueOrDefault<string>("backend-counter") == "0")"> <set-backend-service id="primary-backend" backend-id="azure-openai-api-openai-endpoint" /> <set-variable name="backend-counter" value="1" /> <cache-store-value key="backend-counter" value="1" duration="100" /> </when> <otherwise> <set-backend-service id="secondary-backend" backend-id="secondary-azure-openai-api-openai-endpoint" /> <set-variable name="backend-counter" value="0" /> <cache-store-value key="backend-counter" value="0" duration="100" /> </otherwise> </choose> - Select Save.
04: Test the policy
Test the policy using the Test tab for the Creates a completion for the chat message API endpoint. Use the Trace button to send the request and inspect the set-backend-service block within the Inbound section and the set-backend-service block within the Backend section to determine which backend was used.
Expand this section to view the solution
To test the API, select Azure OpenAI API from the list of APIs on your API Management service’s APIs page.
- Select the Test tab, then select the Creates a completion for the chat message endpoint.
- On the Creates a completion for the chat message page, enter the following under Template parameters:
- deployment-id: Enter “gpt-4o”
- api-version: Enter “2024-06-01”
-
Scroll down to the Request body section, ensure Raw is selected, and paste the following into the text box.
{ "messages":[ {"role": "system", "content": "You are a sarcastic unhelpful assistant."}, {"role": "user", "content": "Tell me a story about AI."} ] } - Select Trace at the bottom of the page.
- Scroll to the page’s HTTP response section.
- Select the Trace tab.
-
Use the Backend link to jump to the backend section of the trace output and locate the
set-backend-serviceblock. Within this block, note theoldBackendServiceUrland thenewBackendServiceUrlvalues. If they are the same, the primary instance was used. If they differ, the secondary Azure OpenAI instance was used.After the first request, the value looks like this, where the old and new backend services URLs are the same:
 {
     "message": "Backend service URL was changed.",
     "oldBackendServiceUrl": "https://ob23xnbzldnb62-openai.openai.azure.com/openai",
     "newBackendServiceUrl": "https://ob23xnbzldnb62-openai.openai.azure.com/openai",
     "request": {
         "url": "https://ob23xnbzldnb62-openai.openai.azure.com/openai/deployments/gpt-4o/chat/completions?api-version=2024-06-01"
     }
 }
After the second request, the
newBackendServiceUrlvalue has changed to the secondary Azure OpenAI instance:{ "message": "Backend service URL was changed.", "oldBackendServiceUrl": "https://ob23xnbzldnb62-openai.openai.azure.com/openai", "newBackendServiceUrl": "https://hqfycfwt6hjh4-openai.openai.azure.com/openai", "request": { "url": "https://hqfycfwt6hjh4-openai.openai.azure.com/openai/deployments/gpt-4o/chat/completions?api-version=2024-06-01" } }Each subsequent request will round-robin requests back and forth between the two instances.
Because the Contoso Suites Web API is already configured to send requests through APIM, the application does not need additional configuration changes to take advantage of load balancing across multiple Azure OpenAI instances.