Lab 10: Connect Declarative Agent to OAuth-Protected MCP Server
Key concepts before you build
In this lab, you'll run an OAuth 2.0 protected Model Context Protocol (MCP) server for Zava Insurance's claims system and integrate it with a Declarative Agent in Microsoft 365 Copilot. While Lab 08 demonstrates an anonymous MCP server, this lab adds Microsoft Entra ID authentication with Dynamic Client Registration (DCR) for secure, enterprise-grade access to claims data. With Agents Toolkit (ATK) 6.12.0+, the toolkit handles client registration automatically via RFC 7591, and dynamic tools resolve at runtime—so you never need to manually declare tools in your manifest.
Scenario
Exercise 1: Set Up Your Development Environment
In this exercise, you'll clone Zava's authenticated MCP server codebase and set up your local development environment.
Step 1: Clone the Repository
Open your terminal and run:
git clone https://github.com/microsoft/copilot-camp.git
cd copilot-camp/src/extend-m365-copilot/path-e-lab10-mcp-auth/zava-mcp-server
Step 2: Install Dependencies
Install all required packages:
npm install
This installs key dependencies.
Step 3: Examine the Project Structure
Open the project in VS Code:
code .
Key directories:
src/- TypeScript source codesrc/auth/- OAuth authentication module (new in this lab)data/- Sample JSON data files
The src/auth/oauth.ts file contains the OAuth 2.0 implementation for token validation and protected resource metadata.
Your codebase is now ready with sample data and authentication support.
Exercise 2: Create Microsoft Entra ID App Registration
Before running the authenticated MCP server, you need to register an application in Microsoft Entra ID to handle OAuth 2.0 authentication.
Step 1: Create App Registration
- Go to Azure Portal → Microsoft Entra ID → App registrations
- Click New registration
- Configure:
- Name:
Zava Claims MCP Server - Supported account types:
Accounts in any organizational directory (Any Microsoft Entra ID tenant - Multitenant) and personal Microsoft accounts (e.g. Skype, Xbox) - Redirect URI: Leave blank for now (we'll configure this in the next step)
- Click Register
- Copy the Application (client) ID and Directory (tenant) ID - you'll need this later
Step 2: Configure Platform Redirect URIs
After registration, configure redirect URIs for different platforms. Redirect URIs are critical in OAuth 2.0 authentication—they specify where Microsoft Entra ID sends the user (along with authorization tokens) after successful authentication. Each redirect URI must exactly match a URL your application uses to receive these tokens, ensuring that authorization codes and tokens are only sent to legitimate, registered endpoints.
-
Go to Authentication in the left navigation
-
Add the Web redirect URI:
- Click Add a platform (or if using the new preview UI, click Add redirect URI)
- Select Web
- Add the redirect URI:
https://teams.microsoft.com/api/platform/v1.0/oAuthRedirect -
Click Configure
-
Verify your configuration:
- Go back to Authentication
- Under Platform configurations → Web, confirm the redirect URI is listed:
https://teams.microsoft.com/api/platform/v1.0/oAuthRedirect
- Under Implicit grant and hybrid flows, ensure both options remain unchecked (disabled)
Step 3: Create Client Secret
- Go to Certificates & secrets → Client secrets
- Click New client secret
- Add description (e.g.,
zava-mcp-secret) and select expiration (recommended: 24 months) - Click Add
- Copy the secret value immediately - it won't be shown again!
Step 4: Expose an API
- Go to Expose an API
- Click Add next to Application ID URI and accept the default format:
api://your-client-id - Click Add a scope and configure:
- Scope name:
access_as_user - Who can consent: Admins and users
- Admin consent display name:
Access Zava Claims System - Admin consent description:
Allows the app to access Zava Claims data on behalf of the signed-in user - User consent display name:
Access Zava Claims System - User consent description:
Allows this app to access your Zava Claims data on your behalf - State: Enabled
- Click Add scope
Your Microsoft Entra ID app registration is now complete!
Exercise 3: Configure Environment and Start Local Database
In this exercise, you'll configure the OAuth environment variables and start the local database.
Step 1: Set Up Public Access with Dev Tunnel
Copilot and OAuth clients need a public HTTPS address to reach your local MCP server. Create that endpoint first using VS Code Dev Tunnel.
1: Forward port 3001
- In VS Code's terminal panel, select the Ports tab.
- Click Forward a Port and enter port
3001.
2: Make it public
- Right-click the forwarded port address and select Port Visibility → Public.
- Copy the tunnel URL (for example:
https://abc123def456.use.devtunnels.ms).
Save this URL. You'll use it in the next step for environment configuration.
Step 2: Configure Environment Variables
Create a new folder env and inside it create a .env.dev file in the root of the zava-mcp-server directory (at the same level as package.json, not inside the src folder):
Important: File location matters
The .env.dev file must be created in the project root directory. If you create it inside the src folder or elsewhere, the environment variables will not be loaded correctly.
# OAuth 2.0 Resource Server
# Single-tenant: use your tenant ID in the issuer URL and set OAUTH_VALIDATE_ISSUER=true
# Multitenant: use /common in the issuer URL, set OAUTH_VALIDATE_ISSUER=false, and provide OAUTH_ACCEPTED_TENANT_IDS
OAUTH_ACCEPTED_ISSUERS=https://login.microsoftonline.com/<YOUR_TENANT_ID_OR_common>/v2.0
OAUTH_ACCEPTED_AUDIENCES=api://<YOUR_CLIENT_ID>
OAUTH_REQUIRED_SCOPES=api://<YOUR_CLIENT_ID>/access_as_user
OAUTH_VALIDATE_ISSUER=false
OAUTH_ACCEPTED_TENANT_IDS=<YOUR_TENANT_ID>
OAUTH_JWKS_URIS=https://login.microsoftonline.com/<YOUR_TENANT_ID_OR_common>/discovery/v2.0/keys

# Client credentials for DCR token exchange
OAUTH_CLIENT_ID=<YOUR_CLIENT_ID>
OAUTH_CLIENT_SECRET=<YOUR_CLIENT_SECRET>

# Authorization endpoints for MCP client discovery
OAUTH_AUTHORIZATION_ENDPOINT=https://login.microsoftonline.com/<YOUR_TENANT_ID_OR_common>/oauth2/v2.0/authorize
OAUTH_TOKEN_ENDPOINT=https://login.microsoftonline.com/<YOUR_TENANT_ID_OR_common>/oauth2/v2.0/token

# Server
RESOURCE_IDENTIFIER=https://<YOUR_DEVTUNNEL_OR_DOMAIN>
SERVER_BASE_URL=https://<YOUR_DEVTUNNEL_OR_DOMAIN>
PORT=3001
HOST=127.0.0.1
NODE_ENV=development

# CORS (comma-separated origins)
ADDITIONAL_ALLOWED_ORIGINS=http://localhost:6274,https://<YOUR_DEVTUNNEL_OR_DOMAIN>

# Azure Table Storage (Azurite for local dev)
AZURE_STORAGE_CONNECTION_STRING="UseDevelopmentStorage=true"
Replace the placeholders:
<YOUR_CLIENT_ID>- Application (client) ID from Entra ID app registration<YOUR_CLIENT_SECRET>- Client secret value from Exercise 2, Step 3<YOUR_DEVTUNNEL_OR_DOMAIN>- Dev tunnel URL from Step 1 (e.g.,https://abc123def456.use.devtunnels.ms)<YOUR_TENANT_ID>- Directory (tenant) ID from Entra ID app registration
Step 3: Start Azure Storage Emulator
In Terminal 1, start the Azurite emulator:
npm run start:azurite
You should see:
Azurite Blob service is starting at http://127.0.0.1:10000
Azurite Queue service is starting at http://127.0.0.1:10001
Azurite Table service is starting at http://127.0.0.1:10002
Keep this terminal running - it's your local database server.
Step 4: Load Sample Claims Data
In Terminal 2, initialize Zava's sample data:
npm run init-data
This loads realistic data including:
- Claims - Storm damage, water damage, fire damage cases
- Contractors - Roofing specialists, water restoration, general contractors
- Inspections - Scheduled and completed inspection tasks
- Inspectors - Available field inspectors with specialties
You should see confirmation messages for all tables being initialized.
Exercise 4: Launch the OAuth-Protected MCP Server
Now you'll start Zava's authenticated MCP server that validates OAuth tokens before allowing access.
Step 1: Build and Start the MCP Server
Before building, confirm that your env/.env.dev file includes the OAUTH_CLIENT_ID and OAUTH_CLIENT_SECRET values from Exercise 2. The MCP server needs these credentials to complete the DCR token exchange with Microsoft Entra ID.
In Terminal 2 (keeping Azurite running in Terminal 1):
npm run build
npm run start:mcp-http
You should see a message indicating OAuth is enabled:
🚀 Zava Claims MCP HTTP Server started on 127.0.0.1:3001
Security: OAuth 2.0 authentication enabled
...
🔍 Protected Resource Metadata Endpoints (RFC 9728):
    GET  /.well-known/oauth-authorization-server - Standard OAuth metadata
...
Step 2: Verify OAuth is Enabled
Open a browser and visit your Dev Tunnel health endpoint:
https://<YOUR_DEVTUNNEL_HOST>/health
You should see a JSON response confirming OAuth is enabled:
{
  "status": "healthy",
  "timestamp": "2025-01-21T10:00:00.000Z",
  "service": "zava-claims-mcp-server",
  "authentication": "OAuth enabled"
}
Notice the "authentication": "OAuth enabled" - this confirms the server is running in authenticated mode and reachable via your public tunnel URL.
Step 3: Copy the Well-Known Authorization Server URL
Visit the OAuth discovery endpoint using your Dev Tunnel host:
https://<YOUR_DEVTUNNEL_HOST>/.well-known/oauth-authorization-server
You should see OAuth metadata including:
issuer- Your server's base URLauthorization_endpoint- Microsoft login URLtoken_endpoint- Token exchange URLregistration_endpoint- DCR endpoint for dynamic client registration (RFC 7591)scopes_supported- Available OAuth scopes
Copy this full URL (https://<YOUR_DEVTUNNEL_HOST>/.well-known/oauth-authorization-server). You'll need it in Exercise 5 when updating the wellKnownAuthorizationServer value in m365agents.yml for DCR.
This RFC 9728 compliant endpoint allows MCP clients (and ATK) to discover authentication requirements and perform Dynamic Client Registration.
Step 4: Verify Authentication is Required
Try accessing the MCP tools without authentication:
curl -X POST "http://127.0.0.1:3001/mcp/tools/call" \
  -H "Content-Type: application/json" \
  -d '{"name":"get_claims","arguments":{}}'
You should receive a 401 Unauthorized response with a WWW-Authenticate header:
{
  "error": "Missing Authorization header",
  "description": "Please include Bearer token in Authorization header",
  "auth_url": "https://your-tunnel-url/oauth/authorize",
  "resource_metadata_url": "https://your-tunnel-url/.well-known/oauth-authorization-server"
}
This confirms that authentication is working correctly.
Exercise 5: Create a New Declarative Agent Project
In this exercise, you'll use the Microsoft 365 Agents Toolkit to create a new Declarative Agent project that connects to Zava's authenticated claims system. With ATK 6.12.0+, the toolkit supports Dynamic Client Registration (DCR) per RFC 7591 and dynamic tools by default—so the agent scaffolding handles OAuth registration and tool discovery automatically.
Step 1: Create New Agent using Microsoft 365 Agents Toolkit
- Open a new window in VS Code
- Click the Microsoft 365 Agents Toolkit icon in the Activity Bar (left sidebar)
- Sign in with your Microsoft 365 developer account if prompted
- In the Agents Toolkit panel, click Create a New Agent/App
- Select Declarative Agent from the template options
- Choose Add an Action to add to your agent
- Select Start with an MCP server
- Enter the publicly accessible MCP Server URL from Exercise 3 (your tunnel URL +
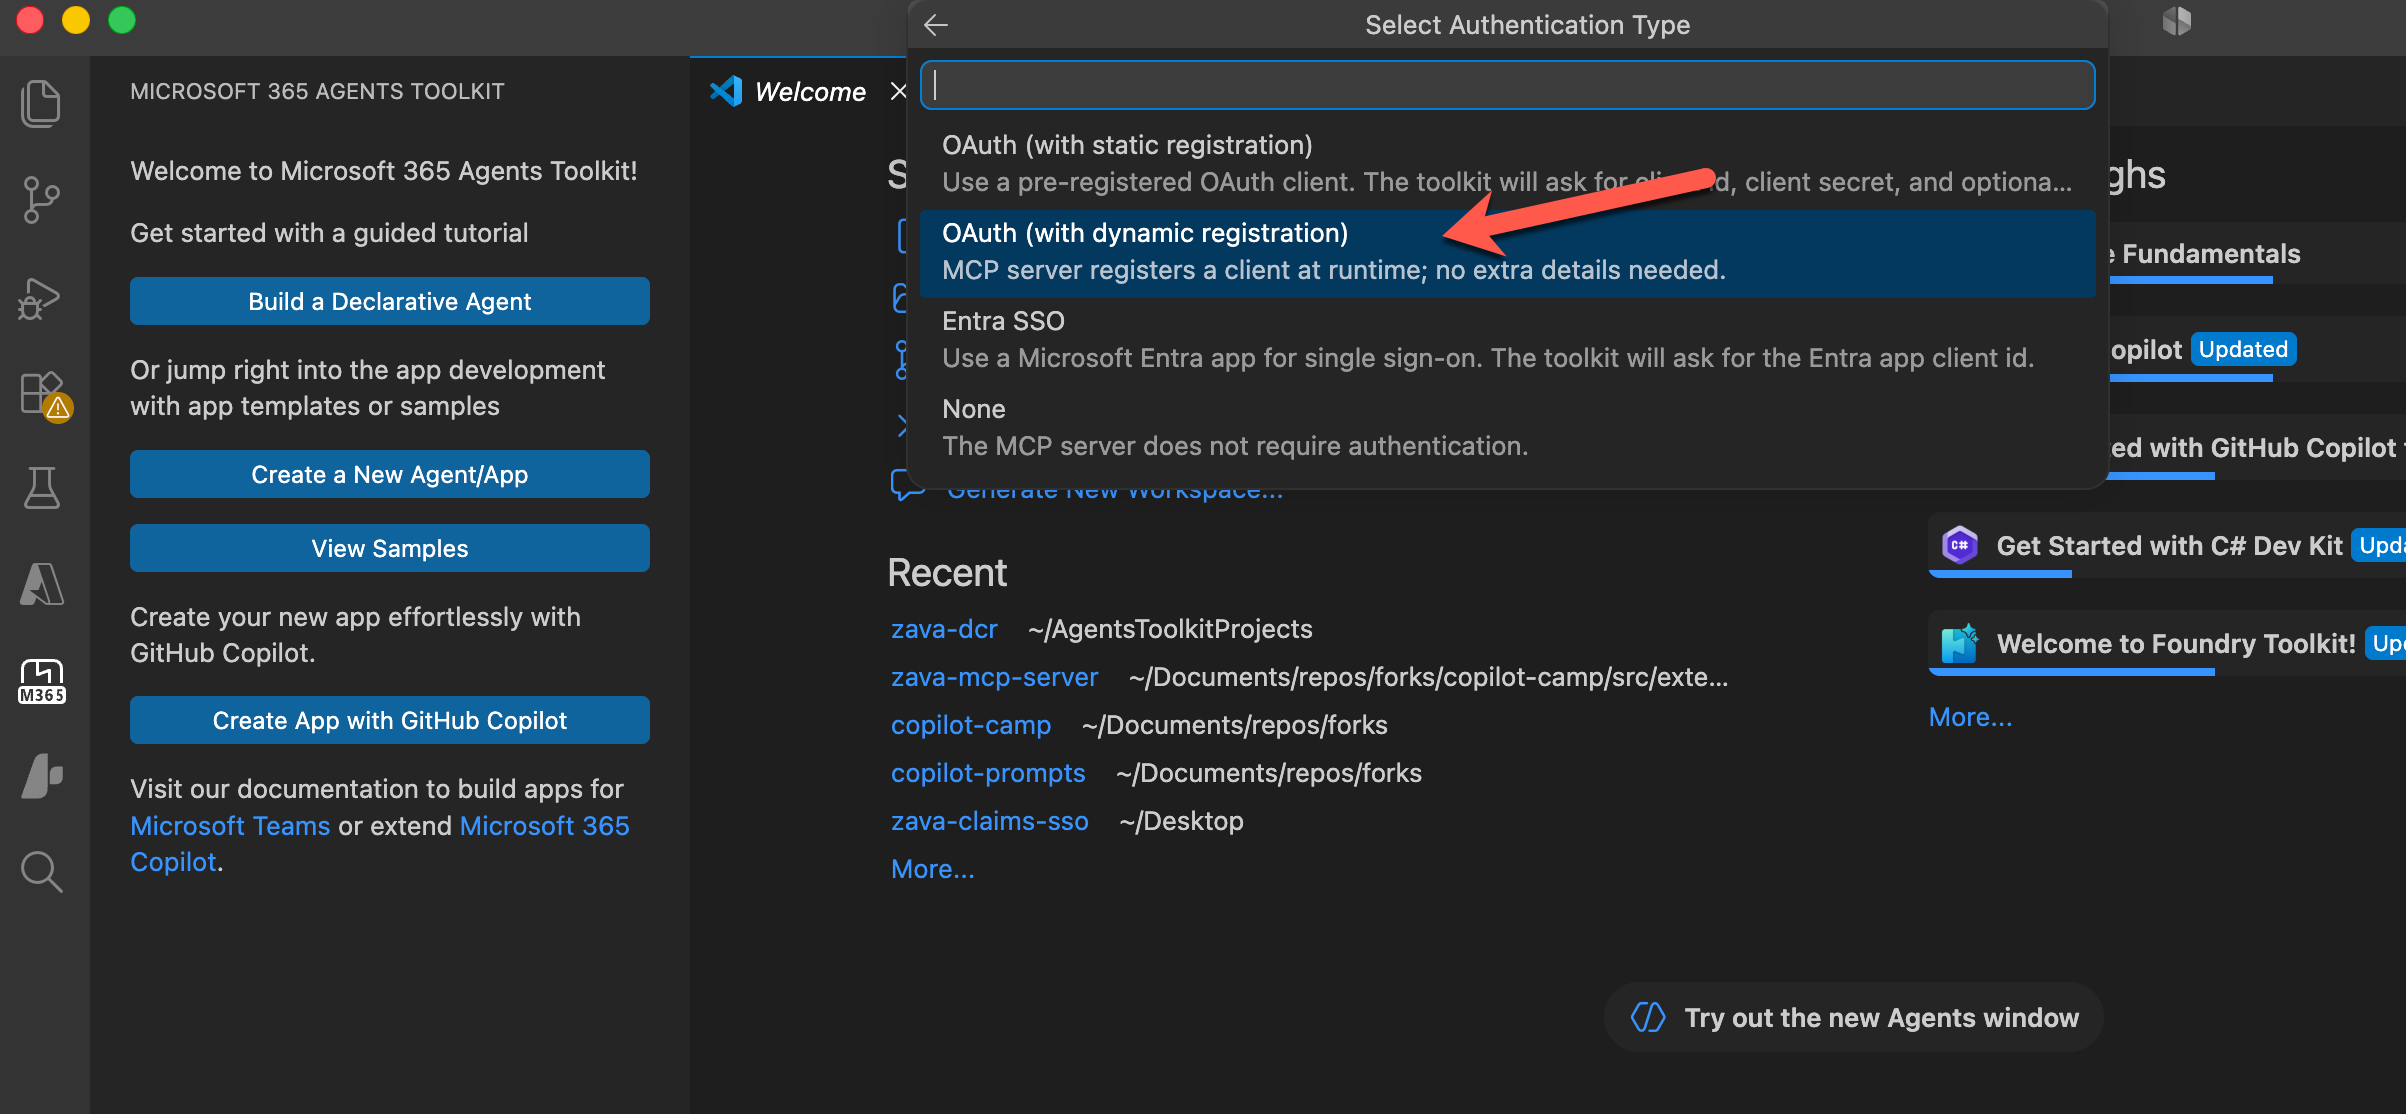
/mcp/messages) - Choose Authentication Type OAuth(with dynamic registration)
- Choose the default folder to scaffold the agent (or choose a preferred location)
- When prompted for project details, enter:
- Application Name:
Zava Claims Assistant (Auth)
- Application Name:
ATK auto-generates a DT-ready manifest that resolves the server's tools (including any MCP-app UI widgets) at runtime. You don't need to manually declare individual tools—dynamic tools are on by default.
After the project is scaffolded, open m365agents.yml in the project root. Find the dcr/register action and replace the wellKnownAuthorizationServer placeholder with the URL you copied in Exercise 4, Step 3:
- uses: dcr/register
  with:
    wellKnownAuthorizationServer: https://<YOUR_DEVTUNNEL_HOST>/.well-known/oauth-authorization-server
Step 2: Provision the Agent
- Open the Microsoft 365 Agents Toolkit panel
- Click Provision in the Lifecycle section
ATK reads the server's .well-known endpoint, registers the client, creates the auth config in the Enterprise token store, and updates the manifest—all automatically.
Once provisioned, the Developer Portal token is automatically created for the agent and appears in the .env.dev file as a variable like MCP_DA_AUTH_ID_XXXX.
OAuth registration in Developer Portal
Read more about configuring OAuth registration in Developer Portal. With DCR, Agents Toolkit handles this configuration automatically.
You now have a Declarative Agent connected to your OAuth-protected MCP Server with Dynamic Client Registration.
Exercise 6: Test the Authenticated Agent Integration
Test your Declarative Agent to ensure it can successfully authenticate and communicate with the OAuth-protected MCP server.
Step 1: Ensure MCP Server is Running
Before testing, verify your MCP server from previous exercises is still running:
- Open the window where the zava-mcp-server project is running
- Verify Azurite is running:
npm run start:azurite - Verify MCP server is running:
npm run start:mcp-http - Verify the Dev Tunnel port forwarding is active
Step 2: Test in Microsoft 365 Copilot
- Open Copilot at https://m365.cloud.microsoft/chat/
- In the left sidebar under Agents, find and select Zava Claims Assistant (Auth)
- Type a prompt like: "Find all claims"
- Copilot may first ask you to confirm sending data to the plugin. Select Confirm or Allow to proceed
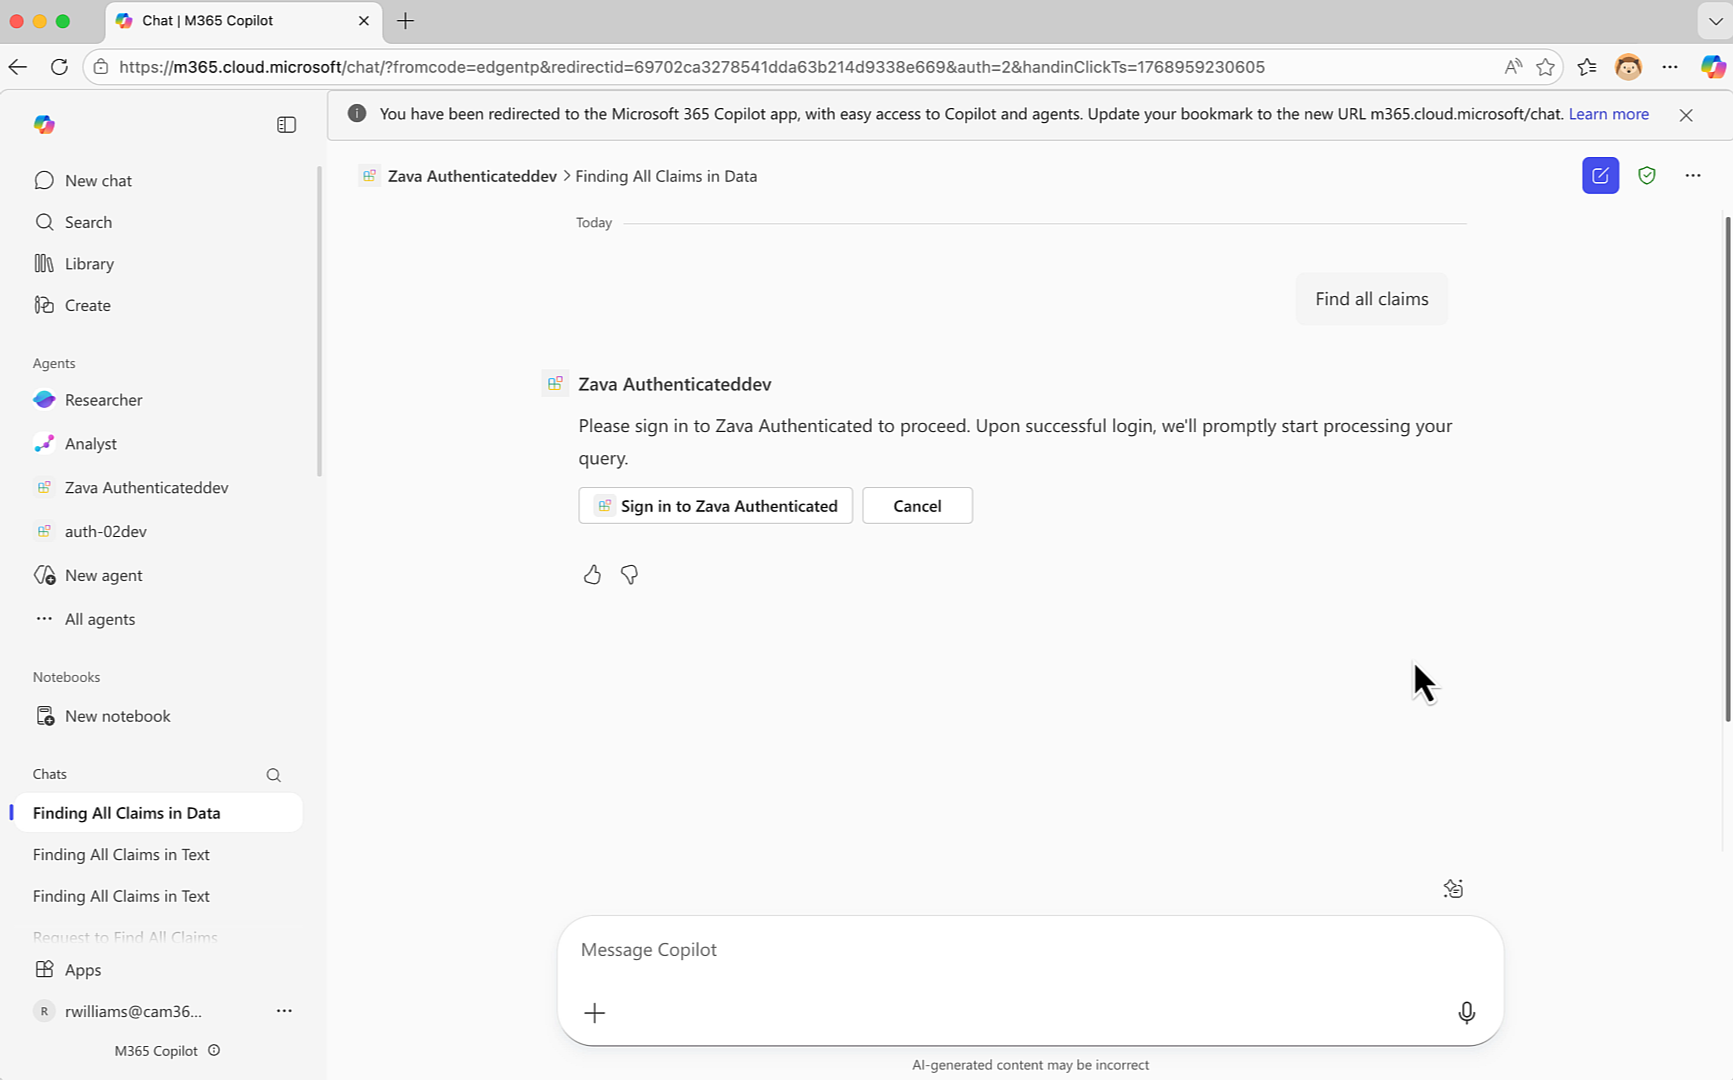
- The agent then prompts you to sign in before fetching data. Select Sign in
- After signing in, the agent responds with the claims information
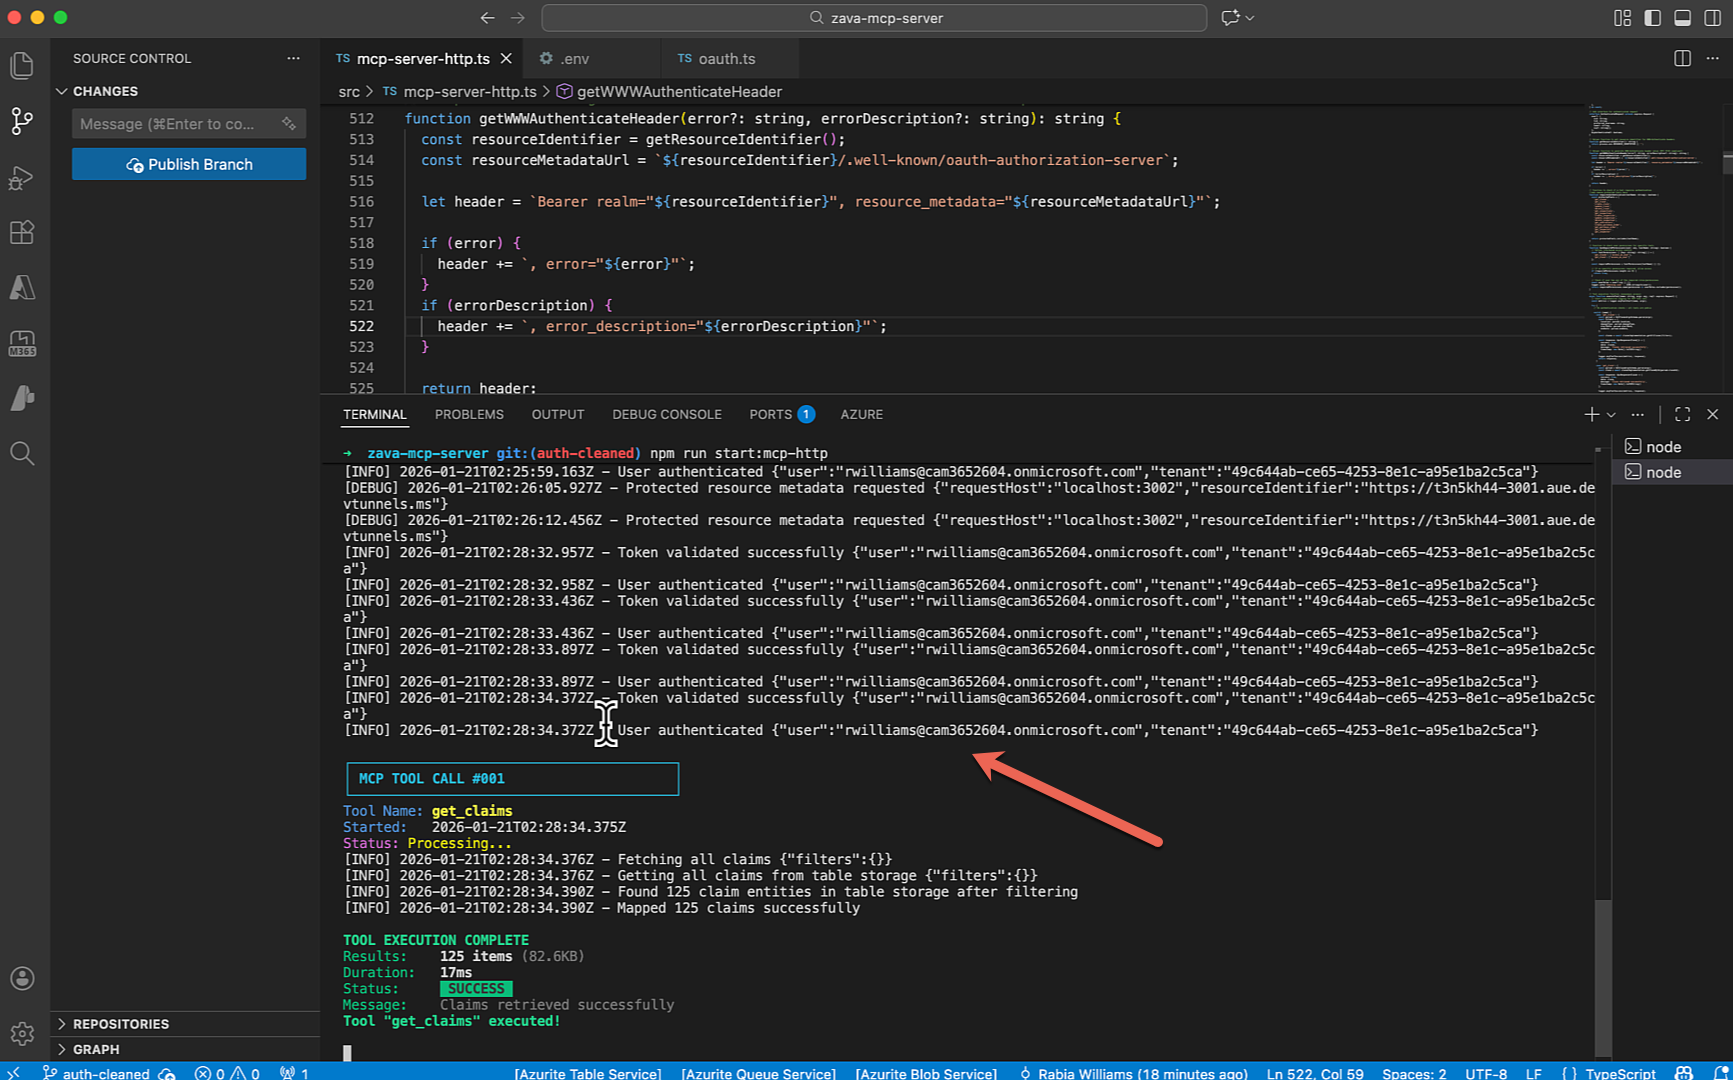
- Check the MCP Server project's terminal - you'll see the successful authentication and tool call
CONGRATULATIONS!