Quick Start: Create Your First Azure Cosmos DB Garnet Cache
This guide will walk you through creating and connecting to your first Azure Cosmos DB Garnet Cache.
Prerequisites
- An active Azure subscription
- Confirmed registration to the expanded Private Preview. If your subscription isn't already registered, sign up.
- Access to the Azure portal and the Azure CLI
- Permissions to create the cluster. Your identity needs
Microsoft.DocumentDB/garnetClusters/writeandMicrosoft.Network/virtualNetworks/subnets/join/actionon the subnet the cluster uses. The built-in Owner and Contributor roles include both permissions; Cosmos DB-specific roles don't. See permissions to create and manage a cluster. - Required role assignment permissions.
- For successful provisioning, you must have Microsoft.Authorization/roleAssignments/write permissions at either the Subscription or Resource Group scope. Example built-in roles are Owner and User Access Administrator, or you can use a custom role with this permission.
Step 1: Create an Azure Cosmos DB Garnet Cache
During provisioning, you must either create a new virtual network for your cache or use an existing one. All application access to the cache must be from within this virtual network.
- Sign in to the Azure portal.
- Click Create a resource and search for Azure Cosmos DB Garnet Cache.
- Select Azure Cosmos DB Garnet Cache and click Create.
- Fill in the required information:
- Subscription: Select your Azure subscription. This subscription must be enrolled in the expanded Private Preview. For access, sign up here.
- Resource Group: Create new or select existing.
- Region: Select the region closest to your application. See the list of supported regions.
- Cluster Name: Choose a unique name for your cache.
- Virtual Network: Select Create a new virtual network then enter your network name, and optionally, customize the address space and subnet. If you're using an existing virtual network, ensure the proper outbound network rules are configured. Your identity must have
Microsoft.Network/virtualNetworks/subnets/join/actionon the selected subnet. See permissions to create and manage a cluster. - Enable outbound access: Shown when you create a new virtual network. A new VNet needs outbound access for provisioning to reach the required destinations, and provisioning fails without it. Only uncheck it if you'll configure an explicit outbound method, such as a NAT gateway, yourself. See outbound access.
- Assign Roles: Leave this option checked for successful provisioning. This grants the Azure Cosmos DB service principal the Network Contributor role on the virtual network and subnet so the managed service can deploy and manage cache nodes in your network. Ensure you have Microsoft.Authorization/roleAssignments/write permissions at either the Subscription or Resource Group scope for role assignment to succeed. This assignment applies to the service, and is separate from your own permissions: your identity still needs
Microsoft.DocumentDB/garnetClusters/writeandMicrosoft.Network/virtualNetworks/subnets/join/actionto create the cluster. - Availability Zone: Optional. Select to enable availability zones, meaning nodes will be distributed across zones. See availability zone support.
- Cluster Type: Either Dev/Test or Production. This determines the SKUs that will be available and the performance characteristics to expect from your cache. See cluster configuration.
- SKU Size: Once cluster type is selected, you can select your SKU. All nodes in the cluster will be provisioned on a Virtual Machine of this SKU. See SKU details.
- Shard Count: The number of shards in your cluster, corresponding to the number of primary nodes. The memory footprint of your cache is determined by the total memory across all primary nodes. Learn when to scale out vs. scale up.
- Replication Factor: Determines the number of nodes in each shard. 1x is primary nodes only with no replicas; use 2x or higher for high availability. The replication factor can't be changed after provisioning. See replication.
- Total Node Count: To modify, adjust the Shard Count. The total number of nodes in the cluster is calculated by Shard Count x Replication Factor.
- Optionally, fill in the Advanced tab information:
- Persistence mode: Optional. Choose No Persistence (in-memory only) or Append Only File (AOF) and Redis Database (RDB), which combines AOF operation logs with RDB snapshots for data persistence. The persistence mode can only be configured at provisioning time and can't be changed afterward.
- Disk SKU: Not configurable. When data persistence is enabled, disk size is automatically selected based on the compute SKU chosen.
- Click Review + Create and then Create
Step 2: Configure Data Access with RBAC
Azure Cosmos DB Garnet Cache uses Azure RBAC to grant access to supported Redis commands. Assigning Microsoft Entra ID RBAC roles is required to use data plane operations. No roles are assigned by default, including to the resource creator. There are several built-in roles, see data plane built-in roles to choose the most appropriate role assignments for each user. Role assignments can take 5-10 minutes to become effective.
Roles can be assigned at various scopes, in both examples below we will assign the Garnet Data Contributor role at the Azure Cosmos DB Garnet Cache resource scope. To assign Azure roles, you must have Microsoft.Authorization/roleAssignments/write permissions, such as Owner or User Access Administrator.
Set up in the Azure Portal
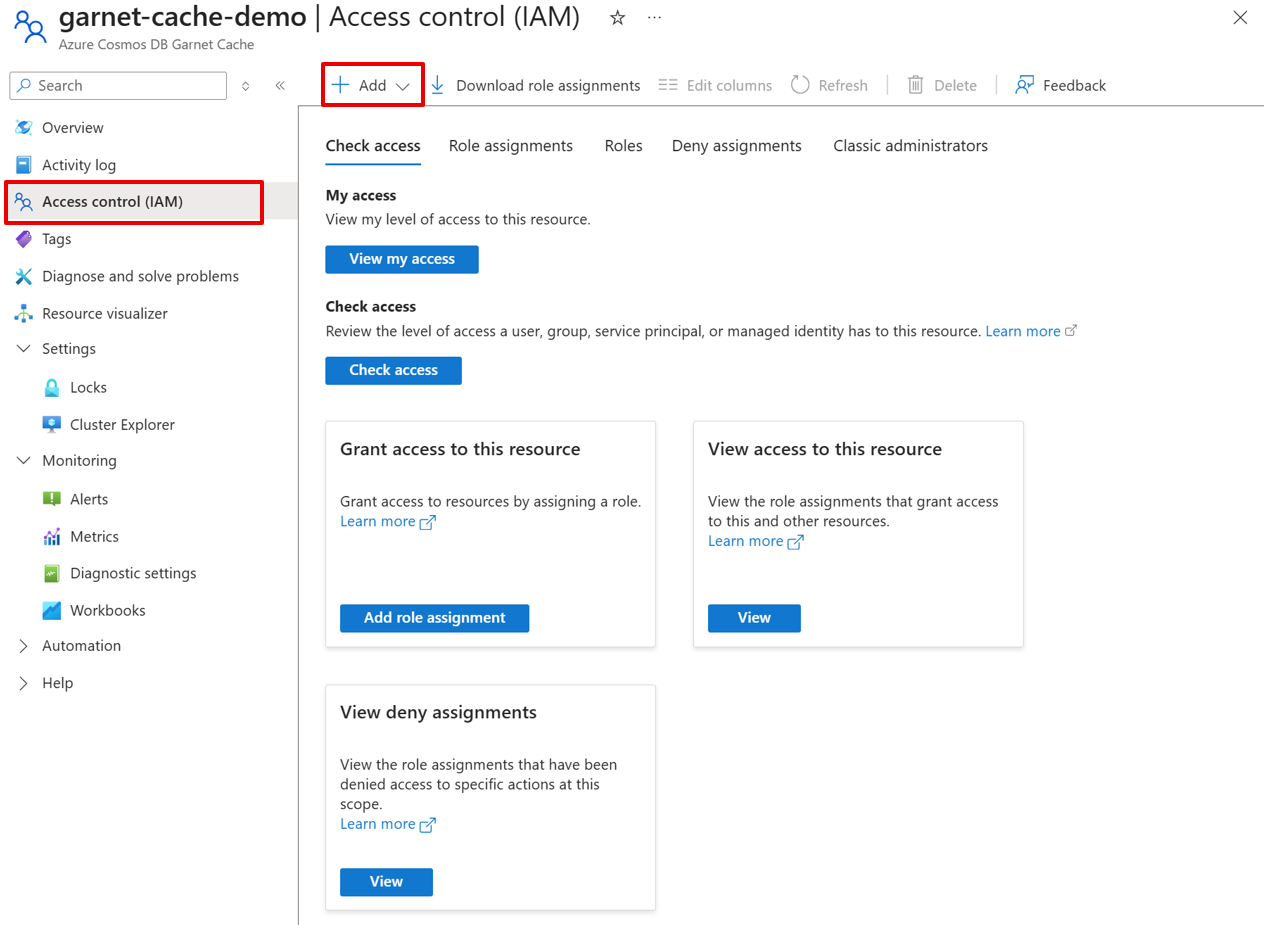
You can assign data access roles for the Azure Cosmos DB Garnet Cache clusters using the Access control (IAM) page.
- Sign in to the Azure portal.
- Navigate to the Access control (IAM) page of your Azure Cosmos DB Garnet Cache resource and select Add > Add role assignment.
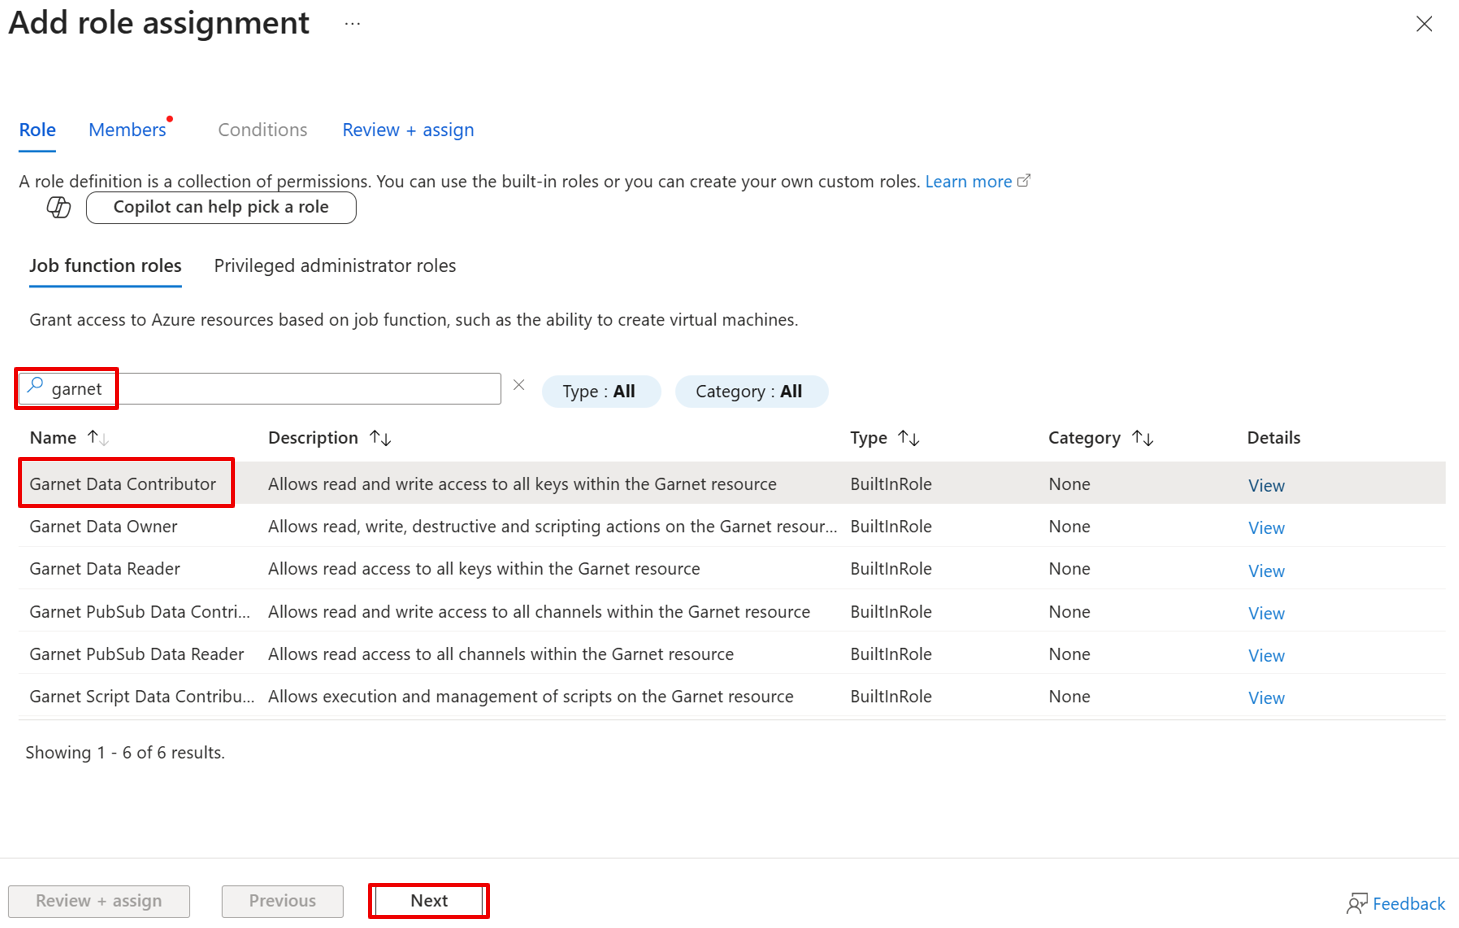
- In the Add role assignment page, enter garnet in the search box.
- Select the role you would like to assign and then select Next. In this example, we’re adding the Garnet Data Contributor role. See details for all built-in roles.
- On the Members page, select User, group or service principal to assign the selected role to one or more Microsoft Entra users, groups or service principals (applications). Select Managed identity to assign the selected role to one or more managed identities.
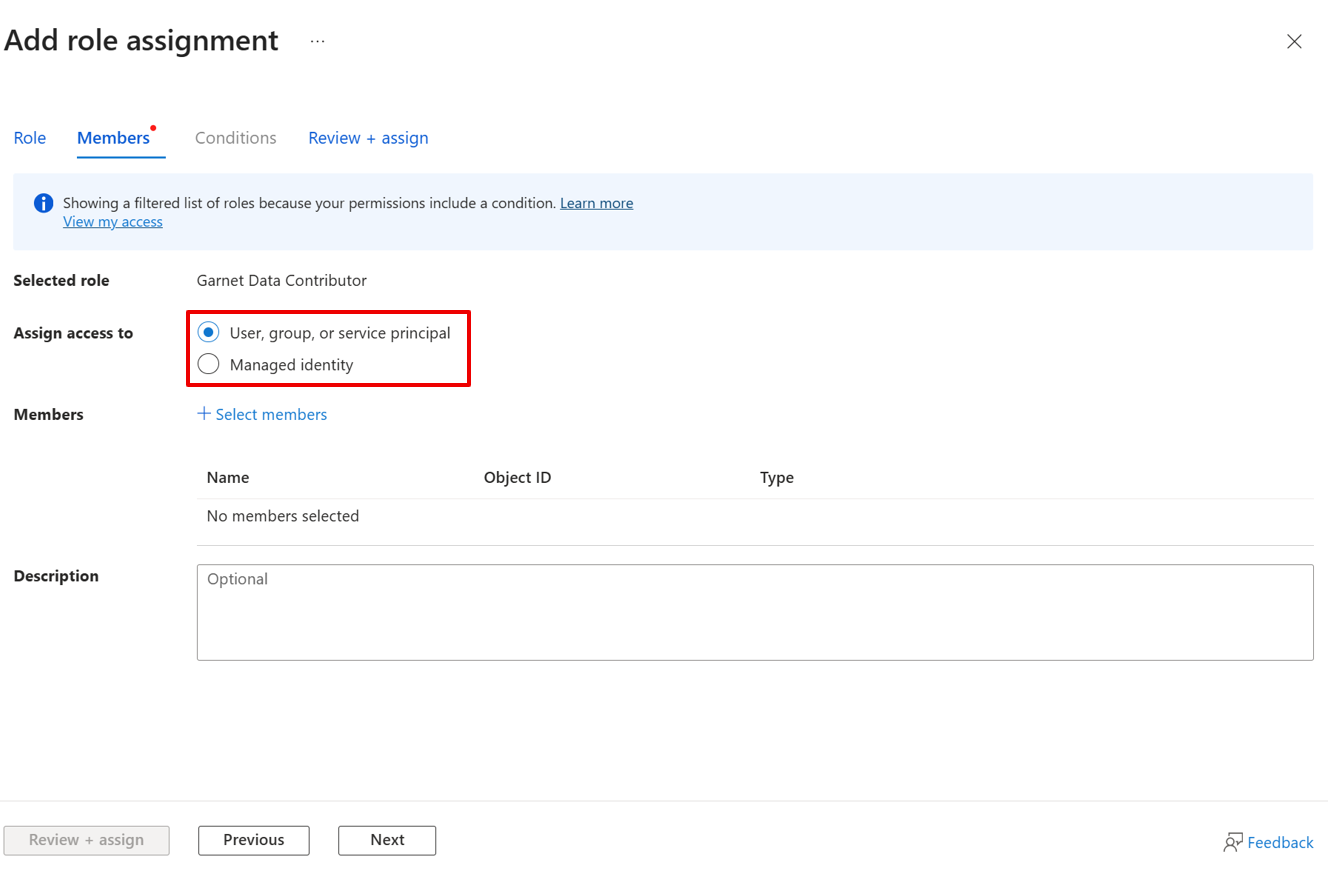
- Click Select members to search for users, groups, service principals, or managed identities for role assignment.
- After adding all security principles, select Review + assign.
Set up using the Azure CLI
You can assign data access roles for the Azure Cosmos DB Garnet Cache clusters using the Azure CLI.
- Sign in the the Azure CLI.
az login
- Find your user Object ID.
# Get your own Object ID
az ad signed-in-user show --query id -o tsv

# Or get another user's Object ID
az ad user show --id "user@company.com" --query id -o tsv
- Assign RBAC Roles. This example uses the Garnet Data Contributor role. See details for all built-in roles.
# Set your parameters
userObjectId="your-object-id-from-step-1"
subscriptionId="your-subscription-id"
resourceGroup="your-garnet-cache-resource-group"
cacheName="your-garnet-cache-name"

# Assign Garnet Data Contributor to yourself
az role assignment create \
  --assignee $userObjectId \
  --role "Garnet Data Contributor" \
  --scope "/subscriptions/$subscriptionId/resourceGroups/$resourceGroup/providers/Microsoft.DocumentDB/garnetClusters/$cacheName"
Step 3: Set Up Network Access
Azure Cosmos DB Garnet Cache does not provide public IP addresses or DNS and can't be accessed from the public internet. Cache nodes are provisioned on the virtual network provided during cluster creation. They are accessible via the internal IP addresses from the same virtual network. Your client machine must use the same network.
Create a New Virtual Machine
You can create a new virtual machine in the same virtual network as your Azure Cosmos DB Garnet cache.
Use Existing Infrastructure
You can use an existing VM or host machine in the same virtual network as your Azure Cosmos DB Garnet Cache. If your VM is in a different virtual network, set up virtual network peering. Ensure that the IP address spaces of the two virtual networks do not overlap. Once peering is established successfully, the client application in one virtual network can access the cache endpoints on the other network using their local IP addresses.
Step 4: Connect and Test
Now you're ready to connect to your Azure Cosmos DB Garnet Cache!
- Find your user Object ID. Save this for a future step.
# Get your own Object ID
az login
az ad signed-in-user show --query id -o tsv
- Get an access token, and save this for a future step. Access tokens have an expiry window. Regenerate the token if it has expired. You can learn more about access tokens here.
az account get-access-token --scope https://cosmos.azure.com/.default --query accessToken -o tsv
-
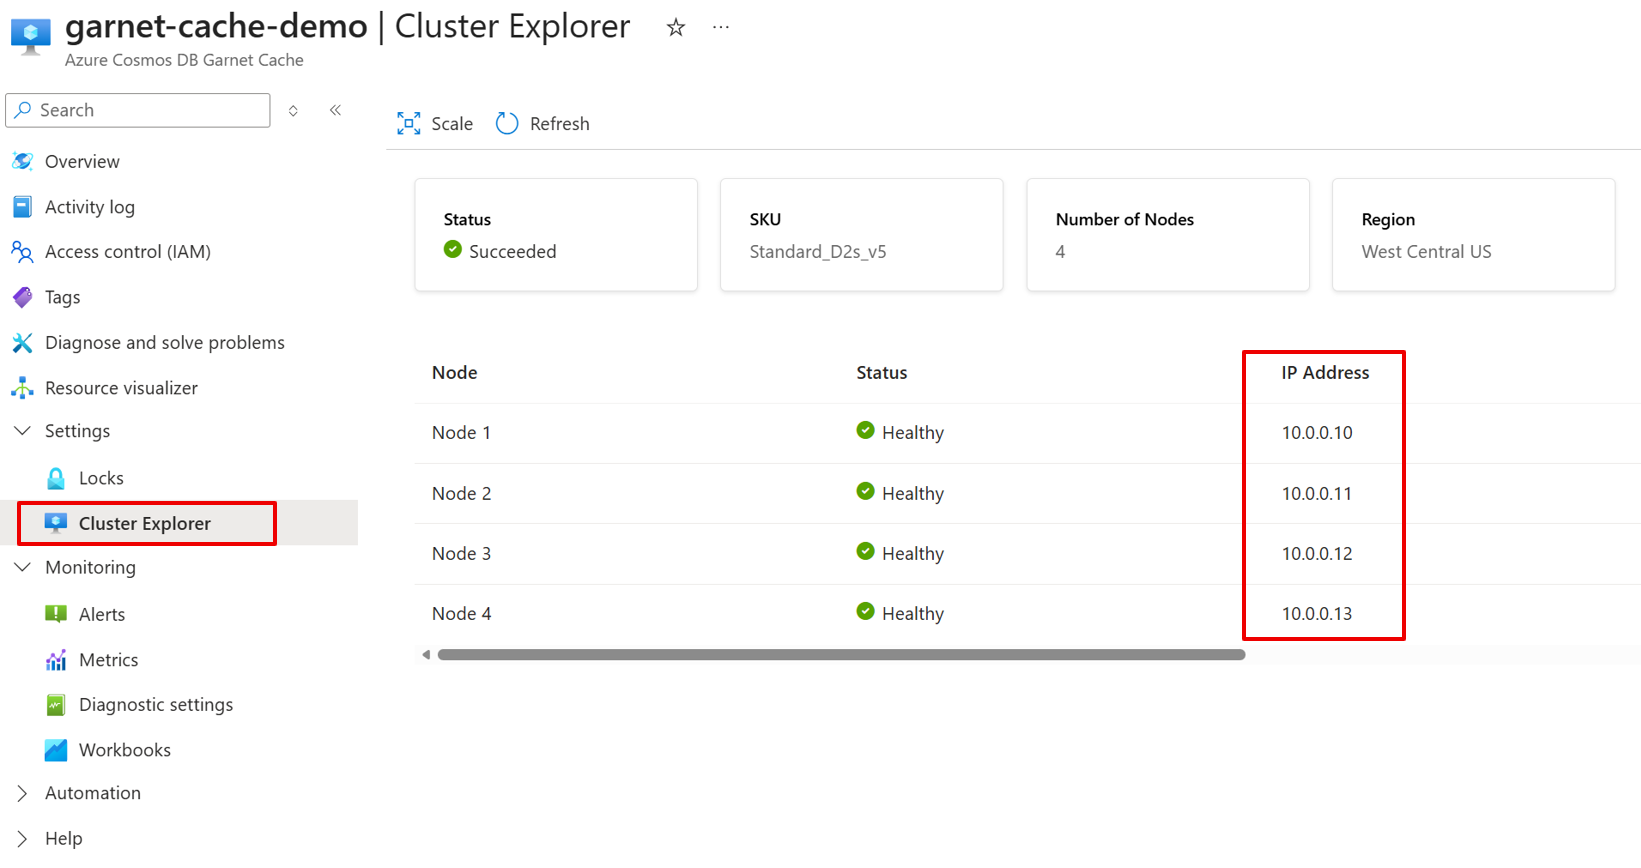
Find the IP address of your cache nodes. Redis clients can connect to one of the node IP addresses and get the list of all replicas and ports automatically.
- Sign in to the Azure portal.
- Navigate to the Settings > Cluster Explorer page of your Azure Cosmos DB Garnet Cache resource.
- Find the IP addresses of all nodes in your cluster. Save them for a future step.
-
Connect using a Redis client. You can use any Redis client of your choice to connect to the cluster. Connecting with the Redis CLI is optional, and it provides a quick way to test data access for your cache.
- Install the Redis CLI on your machine. If you're using a Linux machine, run the following command.
sudo apt-get install redis-tools- Connect to your cluster using the Redis CLI.
# Replace with your actual valuesexport USER_OBJECT_ID="your-object-id-from-step-1"export ACCESS_TOKEN="your-access-token-from-step-2"export GARNET_HOST="10.0.0.5" # Any IP from step 3export GARNET_PORT="6379"# Connectredis-cli -h $GARNET_HOST -p $GARNET_PORT --tls -c --user $USER_OBJECT_ID --pass $ACCESS_TOKEN- Test basic operations using the Redis CLI. Once connected, try these commands. Explore the list of supported commands.
# Test connectionPING# Set and get valuesSET mykey "Hello Garnet Cache!"GET mykey# Explore cluster topologyCLUSTER NODESCLUSTER INFO# Test data typesHSET user:1 name "John" age 30HGET user:1 name