Task 03: Add an OpenAPI plugin to the Teams Toolkit
Introduction
Best For You Organics’s ITSM team uses a bespoke ticketing system. Integrating it will let Copilot surface ticket data in context.
Description
In this task, you’ll learn how to add a plugin to a declarative agent by using the pro-code approach in Visual Studio Code with Teams Toolkit. This approach is critical for extending a declarative agent’s capabilities beyond the default Microsoft 365 Copilot features.
While plugins are not part of the core M365 Copilot experience, they are essential for enhancing declarative agents. These agents, customizable to perform specialized tasks, use plugins to interface with external systems, such as APIs.
It’s important to note that recent updates to Teams Toolkit have changed how plugins are added. Previously, plugins could be created directly from the Toolkit menu. Now, plugins are added exclusively through declarative agents, offering a more structured and configurable development experience.
Follow these steps and you’ll have successfully integrated a plugin into a declarative agent, enabling it to connect with external systems like ticketing platforms:
-
Add an OpenAPI plugin to a declarative agent.
-
Configure the plugin to interact with a sample API.
-
Deploy and test the updated declarative agent to confirm functionality.
Success criteria
- ai-plugin_1.json is generated and GET/POST operations are selected.
- The plugin description is updated to “This plugin can be used to manage IT tickets.”
Key steps
01: Import the OpenAPI description
Expand this section to view the solution
-
Open Visual Studio Code.
-
In Visual Studio Code, in the left pane, select EXPLORER. You should see the files for the agent you created in Exercise 2 Task 3.
-
In the left pane, select Microsoft 365 Agents Toolkit.
-
In the left pane, expand the DEVELOPMENT node.
-
Select Add Plugin and then select Start with an OpenAPI Description Document.

-
Select Enter OpenAPI Description Document Location or Open File.
-
In the OpenAPI Description Document field, enter the following URL and select Enter.
https://ticket-copilot.azurewebsites.net/api/swagger.jsonAfter you press Enter, Visual Studio Code will validate the connection. You may see an error about an incompatible connection. This indicates that the API is not currently reachable.

If you see this error, you have two options:
- Instead of entering the URL for the API you can browse to C:\Users\Admin\Downloads\TicketApi\swagger.json and use the sample Swagger file. If you use this option, in Task 4 you will not be able to successfully test the agent after publishing it.
- Coaches or learners can deploy the API to Azure and share the URL with others. In the @lab.VirtualMachine(CLIENT01).SelectLink VM, In the Downloads\TicketAPI folder, read How to deploy TicketAPI.txt for more information.

-
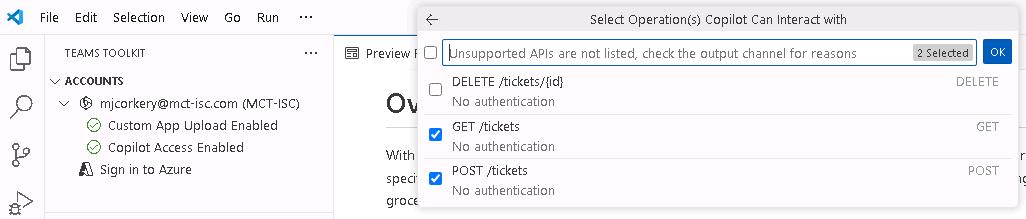
Select the GET and POST check boxes and then select OK. This allows Copilot to interact with GET and POST operations.
-
Select manifest.json from the dropdown list.

02: Update the plugin manifest
Expand this section to view the solution
-
Open the ai-plugin_1.json file.
-
Locate line 5 in the code. Modify the description_for_human field by adding the following description:
This plugin can be used to manage IT tickets.
-
Review the GetTickets section of the code (lines 32-43) for details about how the plugin supports retrieving tickets and creating new tickets.
The Adaptive Card definition shows how ticket information is displayed.
-
Scroll down to the runtimes section (lines 45-59) and review the code. You can see that the plugin implements the OpenAPI specification.
This specification is included in the project files so that Copilot can understand how the API works. You can find it in: \appPackage\apiSpecificationFile\openapi_1.json
-
Select Enter to save your changes and proceed.