
Add a Configurable Tab
Important!
This lab builds on the completed solution to lab A03-after-apply-styling.md, which is the last of the "core" labs. If you haven't done them, you can start here.
Up to this point, the Northwind Teams application has had only "static" tabs. Static tabs are for personal use, and aren't part of a Teams channel or group chat. Each static tab has a single, static URL.
"Configurable" tabs are for sharing; they run in Teams channels and group chats. The idea is that a group of people shares the configuration, so there's shared context. In this lab you will add a configurable tab that displays a specific product category so, for example, the Beverages product team can share a tab with a list of beverages. This saves them navigating through the app every time they want to see Beverages.
The Teams manifest for a static tab includes the tab's URL, but for a configurable tab it includes the URL of the tab's configuration page. The configuration page will allow users to configure what information is shown on the tab; based on this the configuration page saves the actual tab URL and a unique entity ID using the Teams JavaScript SDK. This URL can lead users directly to the information they want, or the tab to a page that looks at the entity ID to decide what to display. In this lab, the tab URL will display the product category directly, so the entity ID isn't really used.
Configuration pages don't just work for tabs; they can also be used as setup pages for Message Extensions or Connectors, so they're worth learning about!
In this lab you will learn to:
- Create a configurable tab with accompanying configuration page
- Add a configurable page to your Teams application
Video briefing
Features
- Microsoft Teams configurable tab to display a product category
Exercise 1: Create a configuration page
Step 1: Add the configuration page markup
Create a new file /client/pages/tabconfig.html and add this markup (or copy it from here):
<!doctype html>
<html>

<head>
    <meta charset="UTF-8" />
    <title>Tab Configuration</title>
    <link rel="stylesheet" href="/northwind.css" />
    <link rel="icon" href="data:;base64,="> <!-- Suppress favicon error -->
</head>

<body>

    <br /><br />
    <p>Please select a product category to display in this tab</p>
    <select id="categorySelect">
        <option disabled="disabled" selected="selected">Select a category</option>
    </select>
    <div id="message" class="errorMessage"></div>

    <script type="module" src="tabConfig.js"></script>

</body>

</html>
Step 2: Add the configuration page script
Create a new file, /client/pages/tabconfig.js, and paste in this code (or copy it from here):
import 'https://res.cdn.office.net/teams-js/2.0.0/js/MicrosoftTeams.min.js';
import { ensureTeamsSdkInitialized } from '../modules/teamsHelpers.js';
import { getLoggedInEmployee } from '../identity/identityClient.js';

import {
    getCategories
} from '../modules/northwindDataService.js';

async function displayUI() {

    const categorySelect = document.getElementById('categorySelect');
    const messageDiv = document.getElementById('message');

    try {

        const employee = await getLoggedInEmployee();
        if (!employee) {
            // Nobody was logged in, redirect to login page
            window.location.href = "/identity/aadLogin.html";
        }
        let selectedCategoryId = 0;
        let selectedCategoryName = '';

        if (employee) {

            await ensureTeamsSdkInitialized();

            // Set up the save handler for when they save the config
            microsoftTeams.pages.config.registerOnSaveHandler((saveEvent) => {

                const url = `${window.location.origin}/pages/categoryDetail.html?categoryId=${selectedCategoryId}`;
                const entityId = `ProductCategory ${selectedCategoryId}`;
                microsoftTeams.settings.setSettings({
                    "suggestedDisplayName": selectedCategoryName,
                    "entityId": entityId,
                    "contentUrl": url,
                    "websiteUrl": url
                });
                saveEvent.notifySuccess();
            });

            // Populate the dropdown so they can choose a config
            const categories = await getCategories();
            categories.forEach((category) => {
                const option = document.createElement('option');
                option.value = category.categoryId;
                option.innerText = category.displayName;
                categorySelect.appendChild(option);
            });

            // When a category is selected, it's OK to save
            categorySelect.addEventListener('change', (ev) => {
                selectedCategoryName = ev.target.options[ev.target.selectedIndex].innerText;
                selectedCategoryId = ev.target.value;
                microsoftTeams.settings.setValidityState(true);
            });
        }

    }
    catch (error) {            // If here, we had some other error
        messageDiv.innerText = `Error: ${JSON.stringify(error.message)}`;
    }
}

displayUI();
Exercise 2: Add the configurable tab to your app manifest
Step 1: Update the manifest template
In your code editor, open the manifest/manifest.template.json file.
Update the version number so it's greater than it was; for example if your manifest was version 1.4, make it 1.4.1 or 1.5.0. This is required in order for you to update the app in Teams.
"version": "1.5.0"
NOTE: Make each new version greater than the last so you can update the application in Teams!
Now, immediately under the "accentColor" property, add a new property for "configurableTabs":
  "configurableTabs": [
    {
        "configurationUrl": "https://<HOST_NAME>/pages/tabConfig.html",
        "canUpdateConfiguration": true,
        "scopes": [
            "team",
            "groupchat"
        ]
    }
],
Step 2: Rebuild your application package
Open a command line tool in your working folder and type
npm run package
This will generate a new manifest.json file and a new application package (northwind.zip).
Exercise 3: Test your configurable tab
Step 1: Ensure you have a Team to test in
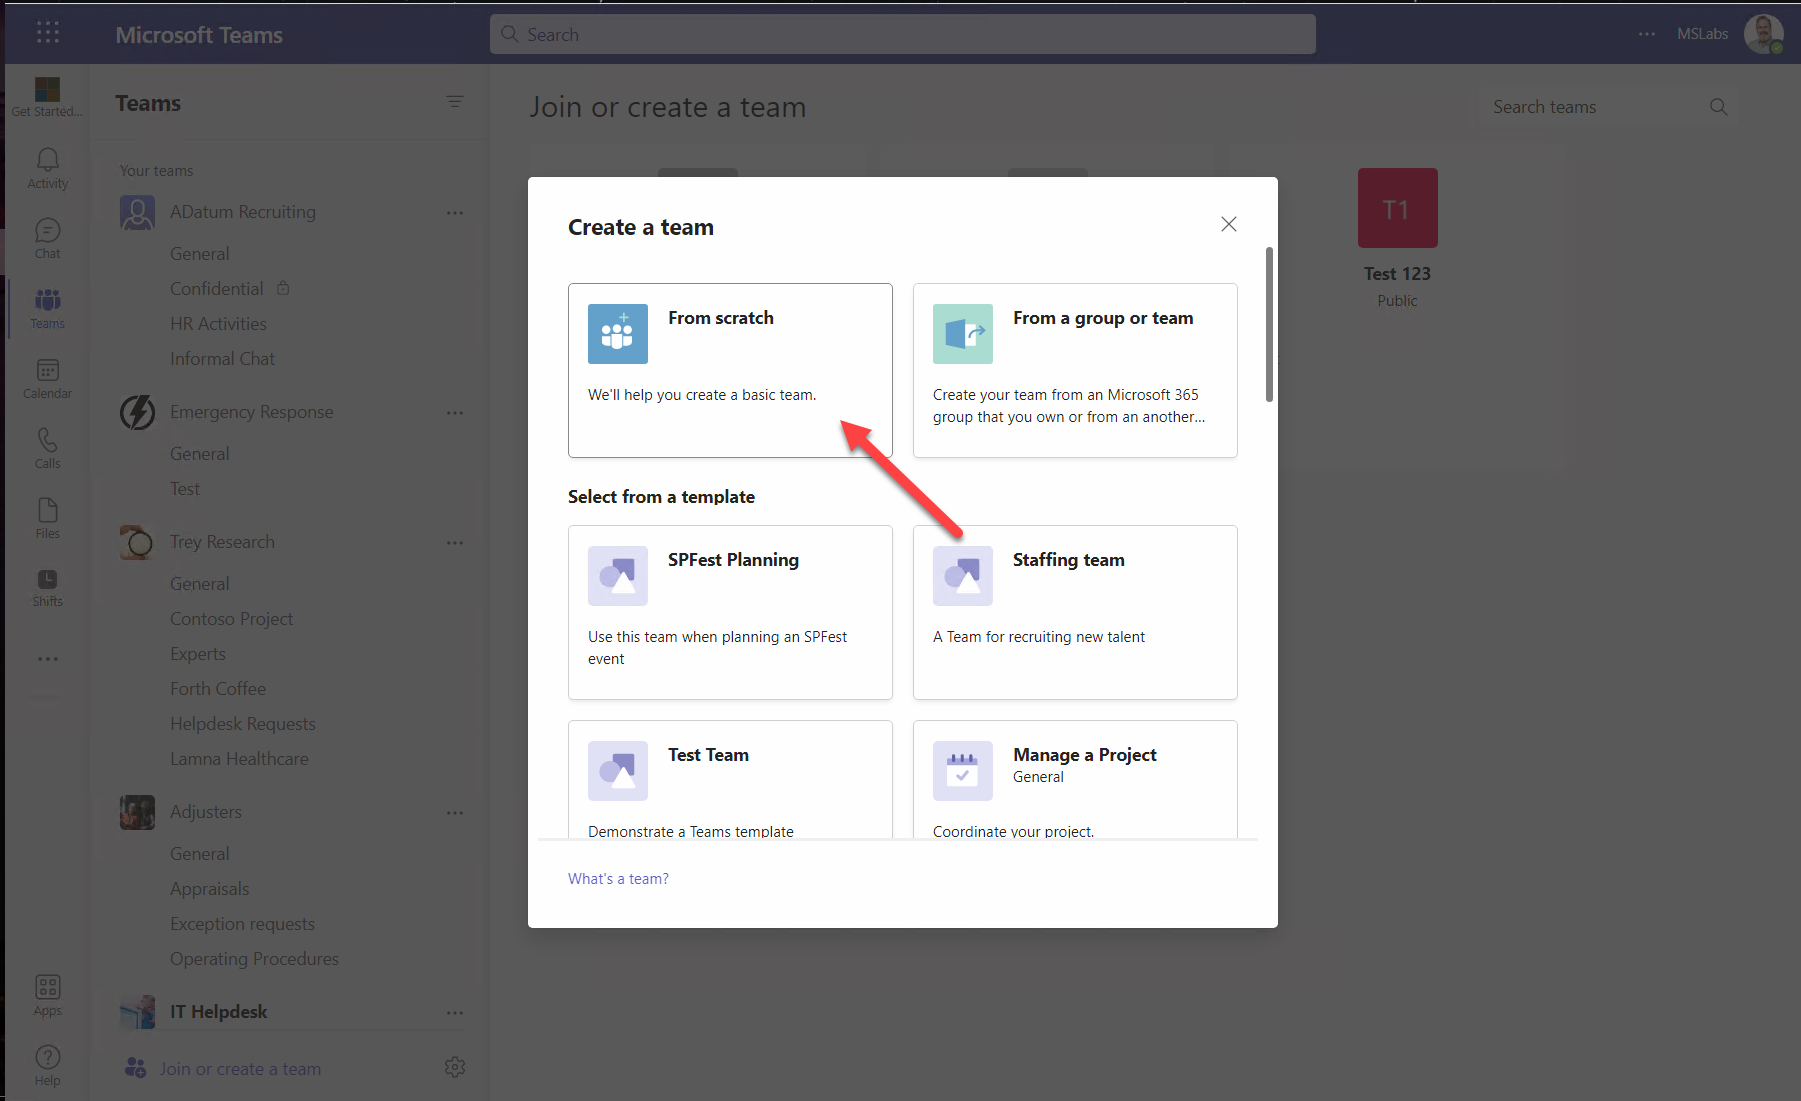
If you already have a Team you can test with, skip to the next step. If not, begin by clicking the "Join or create a Team" button 1️⃣ and then "Create a team" 2️⃣.
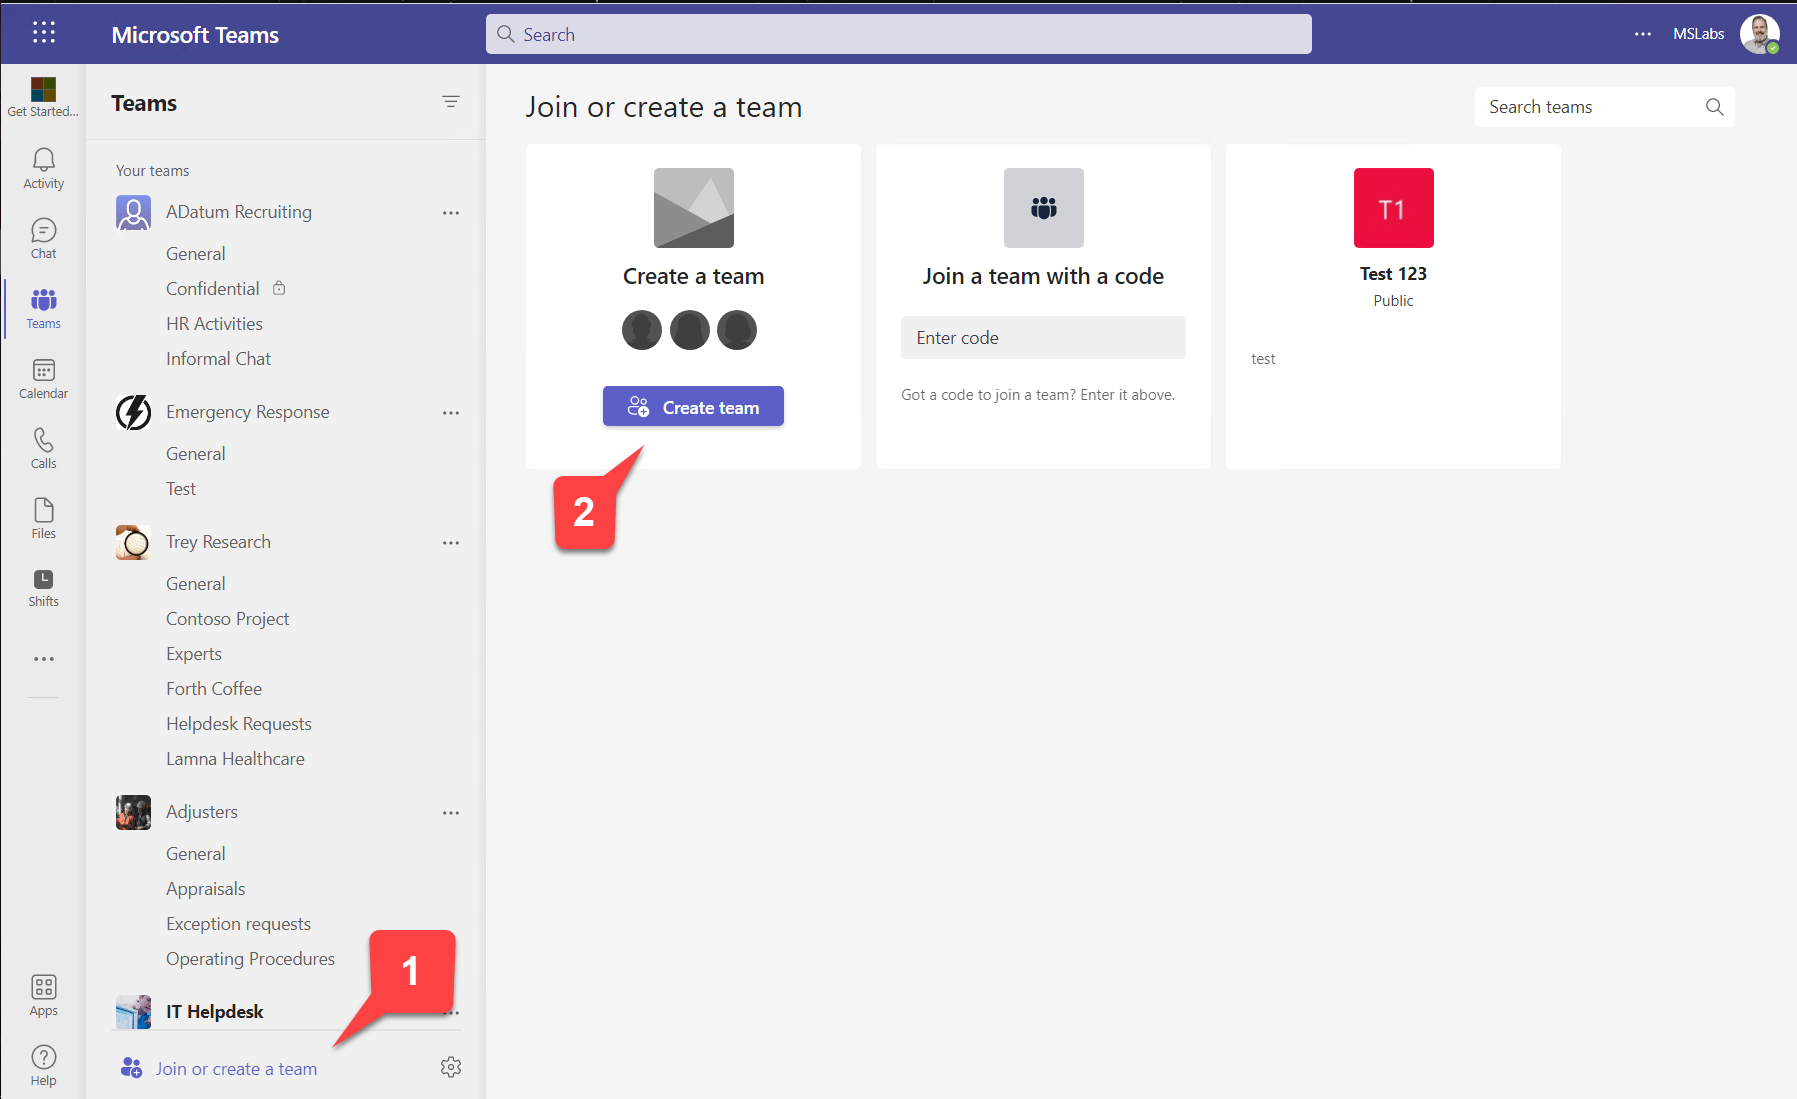
Click "From scratch".
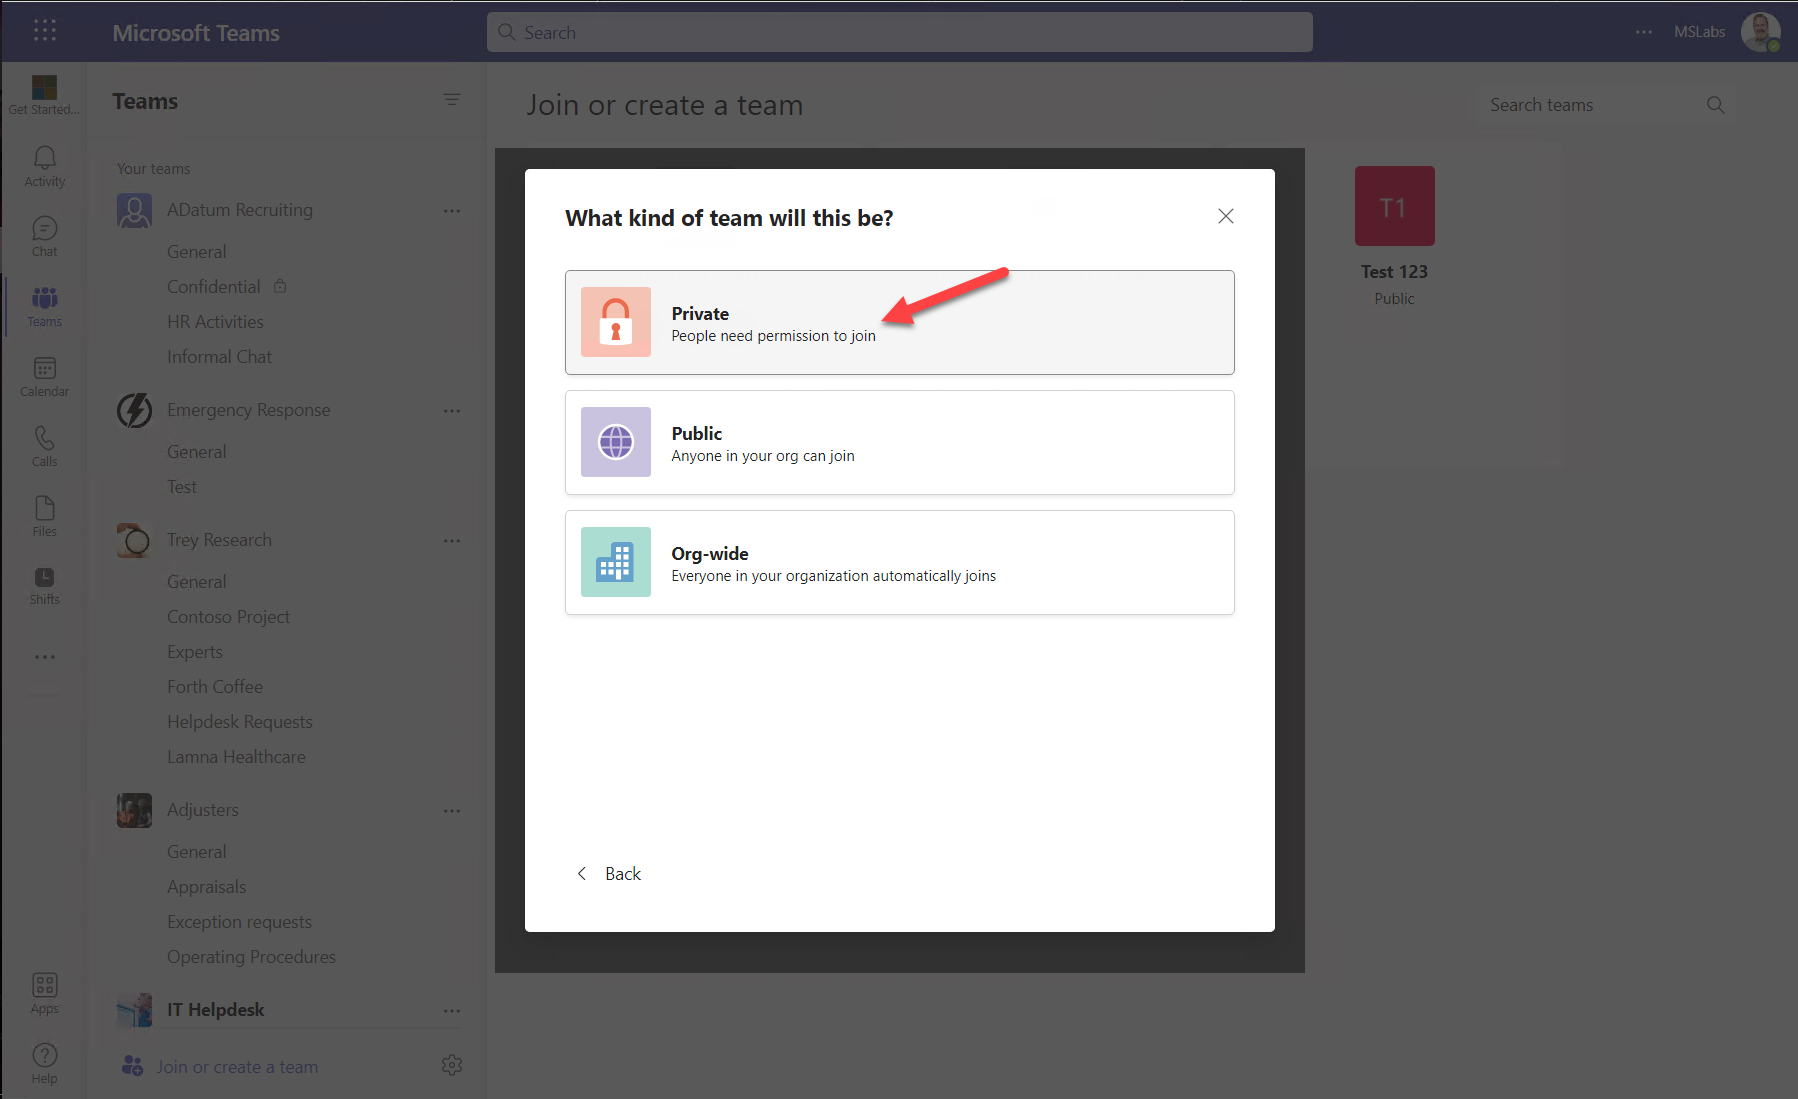
Then click your choice of "Private" or "Public". "Org-wide" is OK too but be aware this only works for Teams administrators and you can only have 5 of them in your tenant.
Then follow the wizard to give your Team a name and description and optionally add some members so you don't have to collaborate all by yourself.
Step 2: Run your app
In your working directory run this command to start the application
npm start
Step 3: Upload the app package
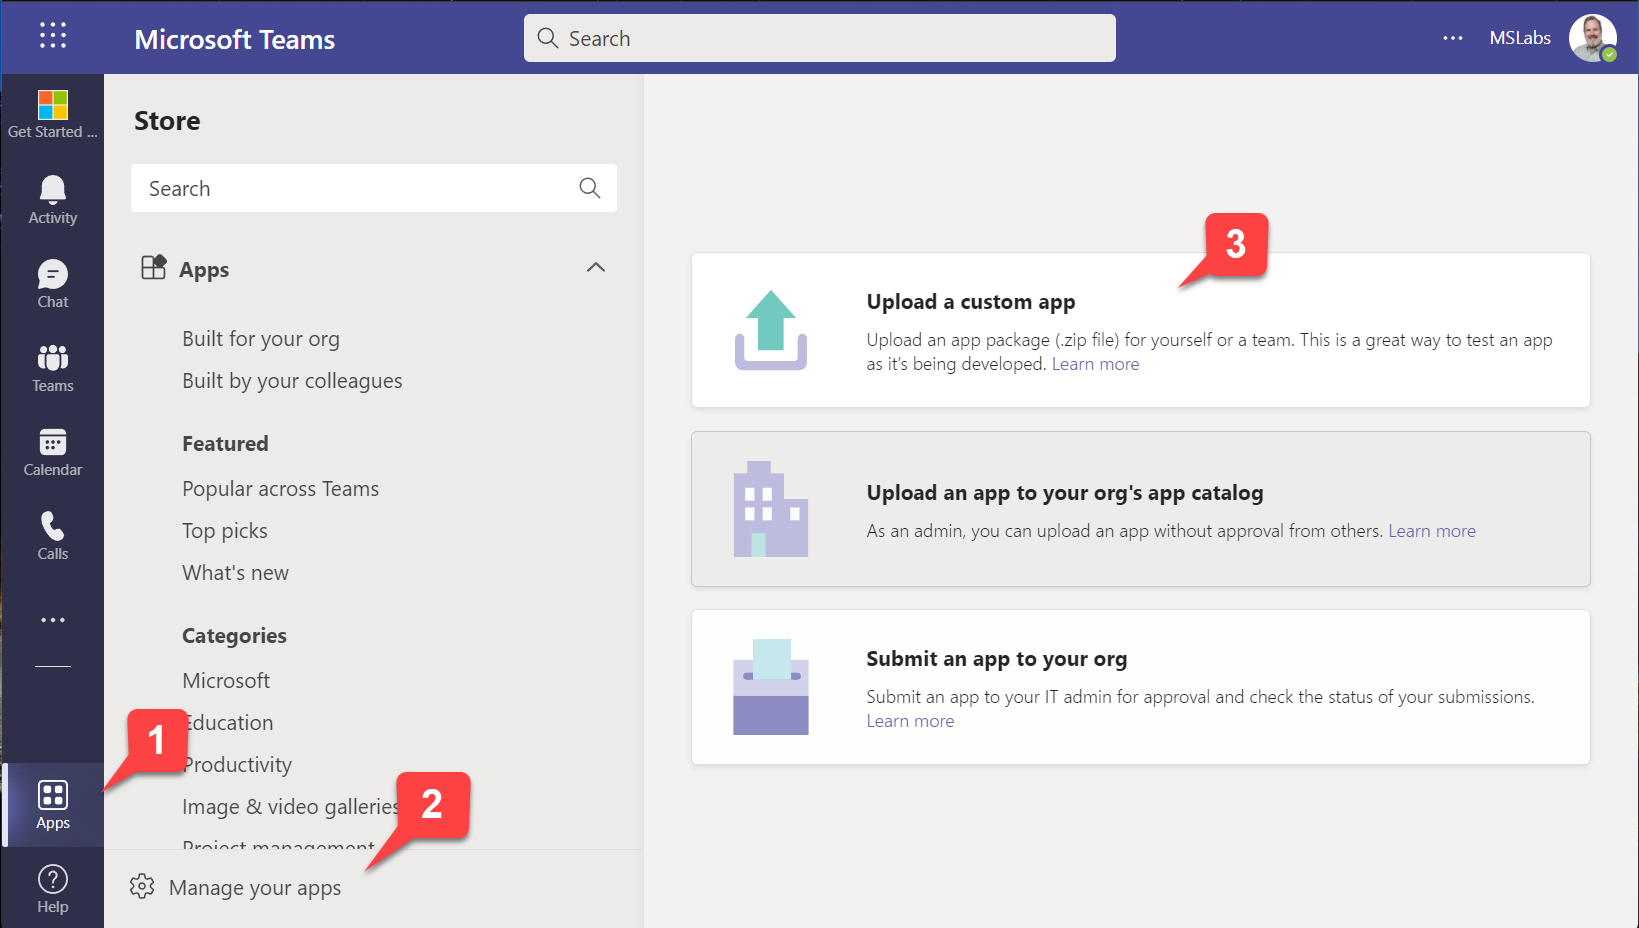
In the Teams web or desktop UI, click "Apps" in the sidebar 1️⃣, then "Manage your apps" 2️⃣. At this point you have three choices:
- Upload a custom app (upload the app for yourself or a specific team or group chat) - this only appears if you have enabled "Upload custom apps" in your setup policy; this was a step in the previous lab
- Upload an app to your org's app catalog (upload the app for use within your organization) - this only appears if you are a tenant administrator
- Submit an app to your org (initiate a workflow asking a tenant administrator to install your app) - this appears for everyone
In this case, choose the first option 3️⃣.
Navigate to the Northwind.zip file in your manifest directory and upload it. Although the application is already installed, you are providing a newer version so it will update the application.
This time the "Add" button will have a little arrow in it so you can add the app to a particular Team or Group Chat. Click the little arrow 1️⃣ and then "Add to a Team" 2️⃣.
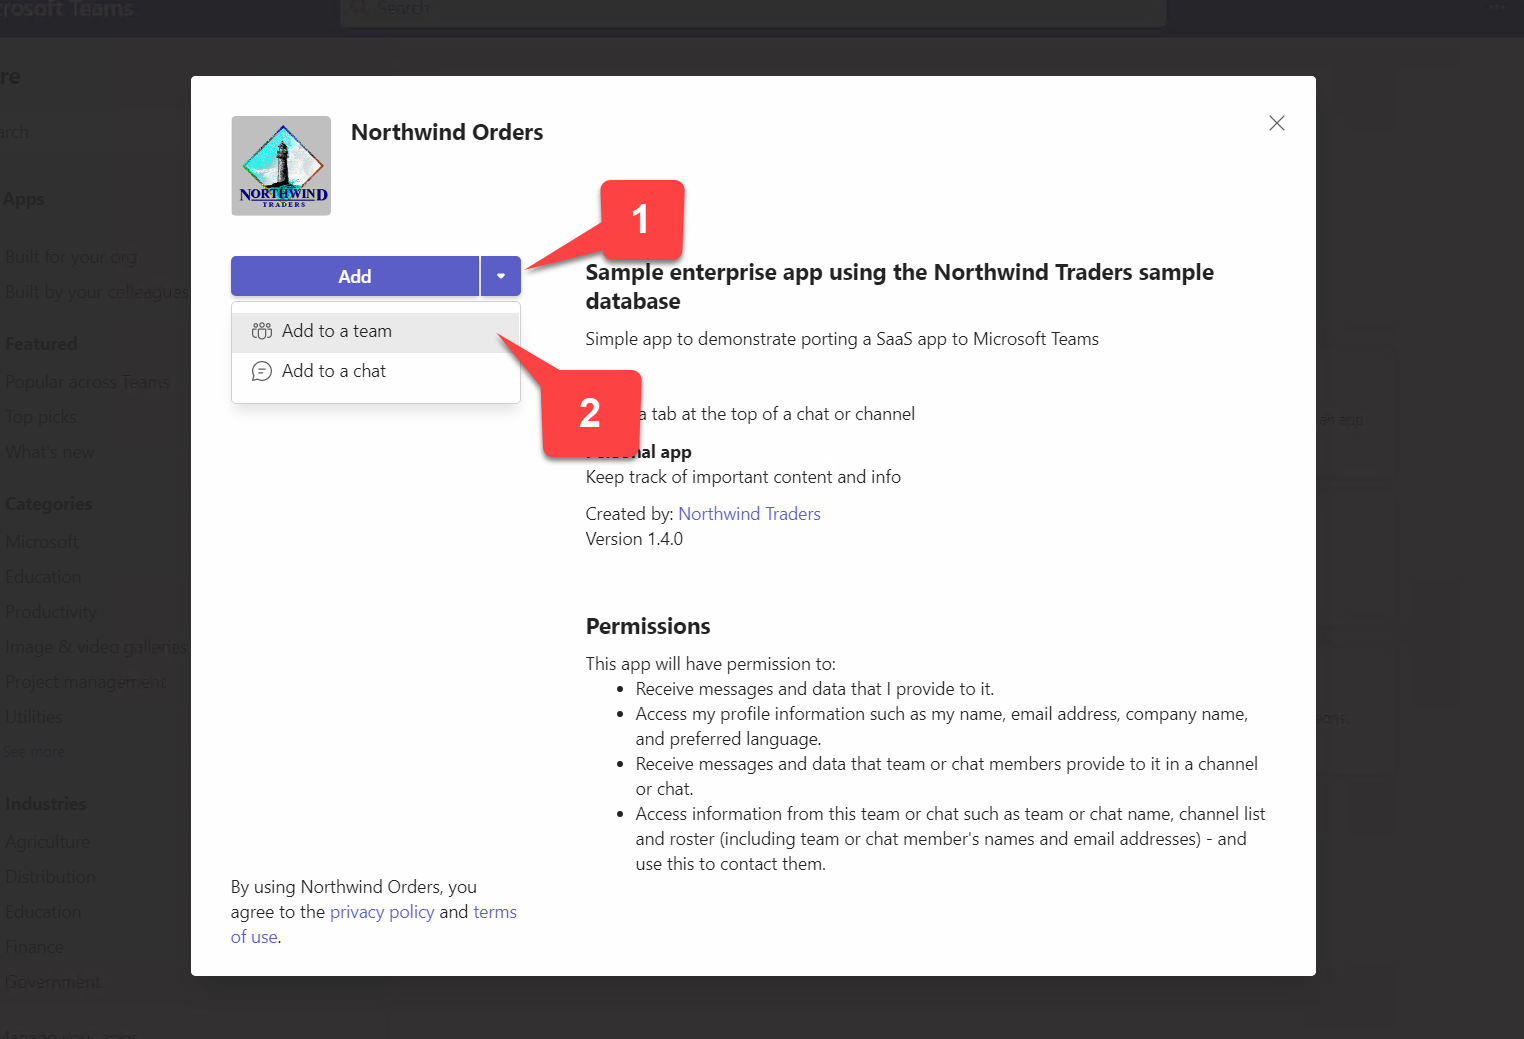
Type the name of a Team or channel in the search box 1️⃣ and select the one where you want to add the application 2️⃣. This will enable the "Set up" button 3️⃣; click it to add your app to the Team.

You should now see your configuration page, which provides the ability to select one product category 1️⃣ from the Northwind database. When you select one, the save event handler you declared with registerOnSaveHandler() runs and validates the form. If it's valid (it will always be in this case), the code calls notifySuccess(). which enables the "Save" button 2️⃣.
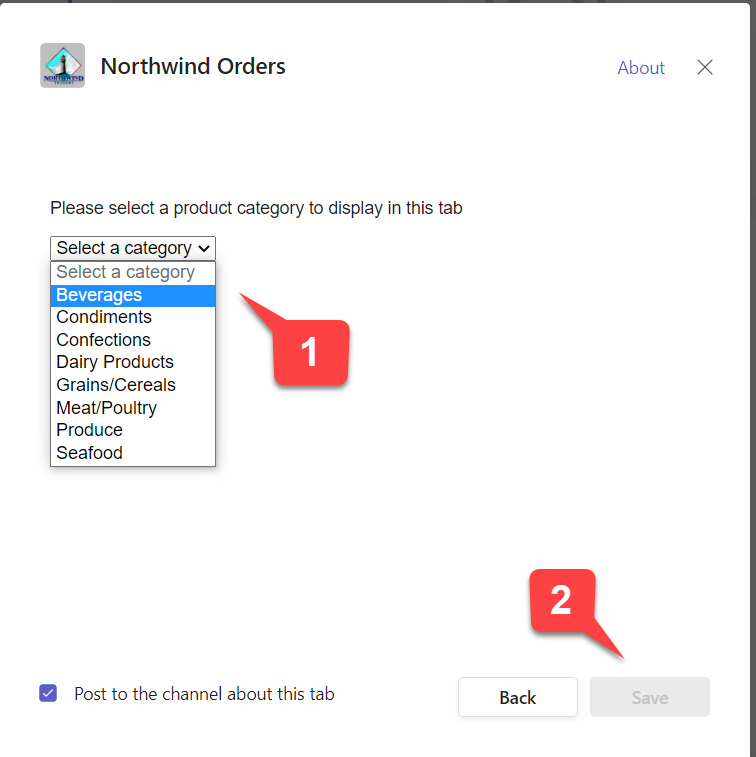
Click the Save button to view your new tab.
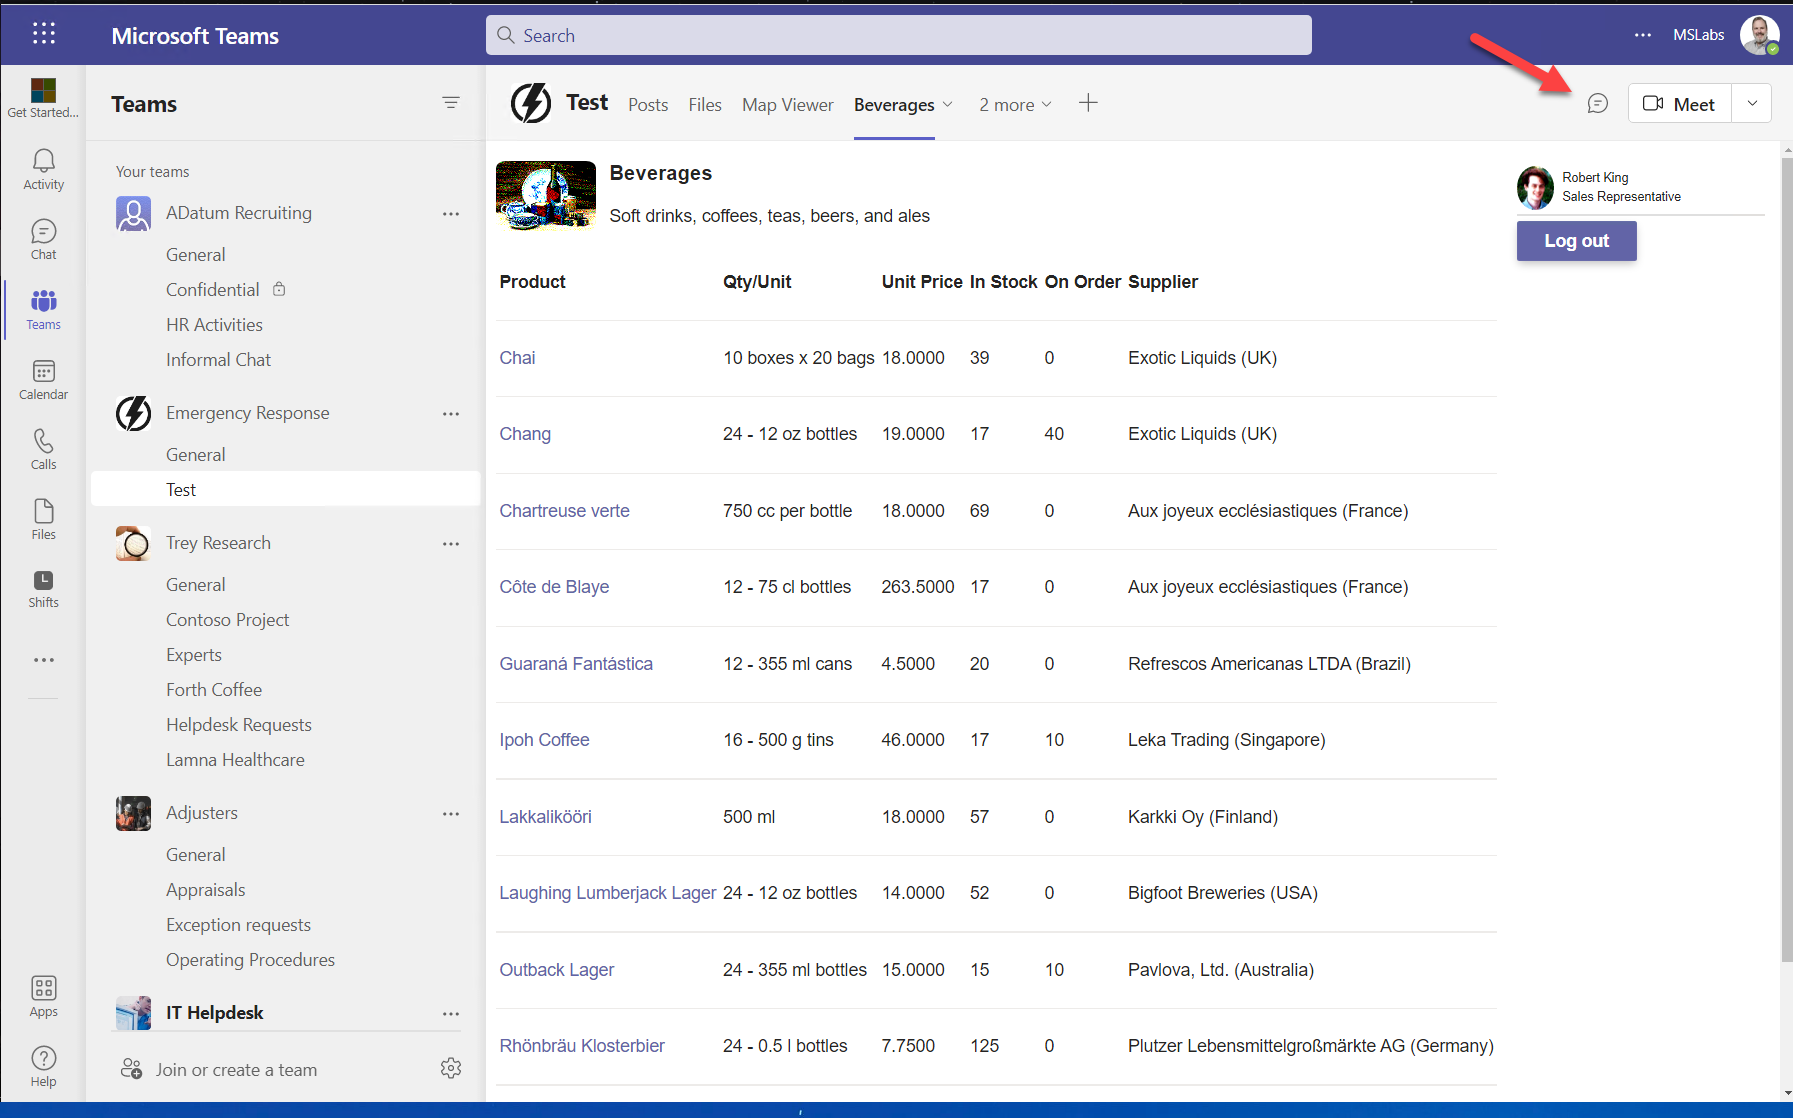
You can click the talk bubble in the upper left of the screen to open the chat; now people in the channel can chat about your app while they use it! This is a lot easier than navigating back and forth between the tab and the chat.
Step 4: Run it again
If you click the small arrow to the right of the tab name and choose "Settings", Teams will open the configuration page again so you can change the settings. This is possible because in the the Teams app manifest the "canUpdateConfiguration" property is set to true; if you set it to false, the settings option will not be available.
Congratulations!
No personal information is collected; we only want to count how many people have completed the labs so we can continue to fund this work!
Known issues
For the latest issues, or to file a bug report, see the GitHub issues list for this repository.
References
Next steps
After completing this lab, you may continue with additional extended labs!
- Add a Configurable Tab
- Add a Deep link to a personal Tab
- Add a Dialog
- Add a Meeting app
- Add a Message Extension
- Selling Your SaaS-based Teams Extension
- Extend your Teams app to Outlook and Microsoft365 app