
Application-Specific Configuration Steps
Manual setup reference for application-specific configuration steps.
Application-Specific Configuration Steps
With the Azure resources provisioned, proceed with configuring the application itself. Perform these steps in order.
Setting Up Authentication (Azure AD / Entra ID)
The application uses Azure Active Directory (Entra ID) for user authentication and role management.
-
Register an Application in Azure AD:
-
Navigate to Azure Active Directory > App registrations > + New registration.
-
Give it a name (e.g.,
SimpleChatApp-Prod). -
Select Accounts in this organizational directory only (or adjust if multi-tenant access is needed).
-
Set the Redirect URI:
-
Select Web platform.
-
Enter the URI:
https://<your-app-service-name>.azurewebsites.net/.auth/login/aad/callback(Replace<your-app-service-name>with your actual App Service name).
-
-
Click Register.
-
Note the Application (client) ID and Directory (tenant) ID. These are needed for the
.envfile (CLIENT_ID,TENANT_ID). -
Next, click the Authentication link in the Manage section
-
In the Web Redirect URIs section of the page click Add URI
-
Enter the URI:
https://<your-app-service-name>.azurewebsites.net/getAToken(Replace<your-app-service-name>with your actual App Service name). -
Next in the Front-channel logout URL section of the page
-
Enter the URI:
https://<your-app-service-name>.azurewebsites.net/logout(Replace<your-app-service-name>with your actual App Service name). -
Now look at the Implicit grant and hybrid flows section
-
Make sure the checked for *ID tokens (used for implicit and hybrid flows) is checked
-
Click the Save button
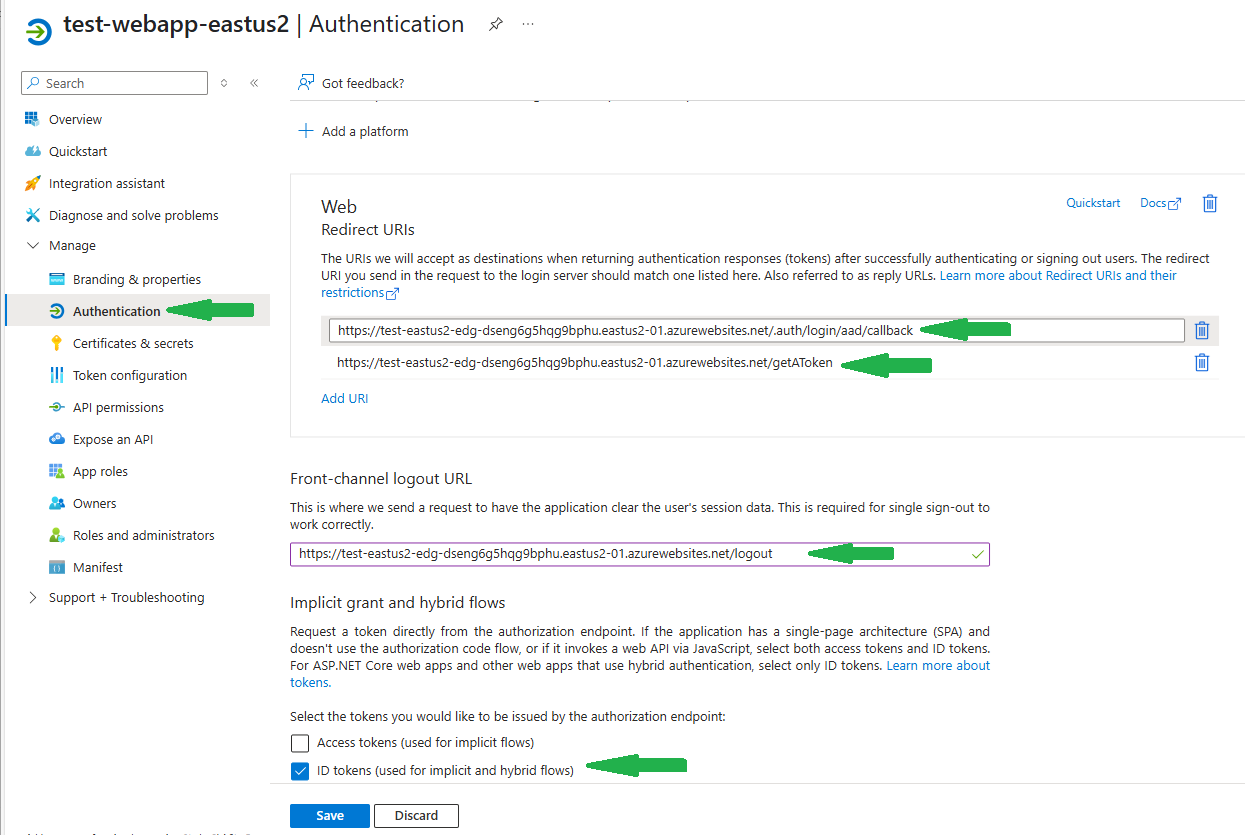 (Note: Image shows general area, details might differ slightly)
-
Click on the Certificates and secrets link in the manage section
-
Click on Client Secrets
-
Verify that there is a Secret Named MICROSOFT_PROVIDER_AUTHENTICATION_SECRET
-
If there is not, click on New Client Secret to create a new secret using MICROSOFT_PROVIDER_AUTHENTICATION_SECRET as the name.
-
Make sure you copy the Value before you leave this page.
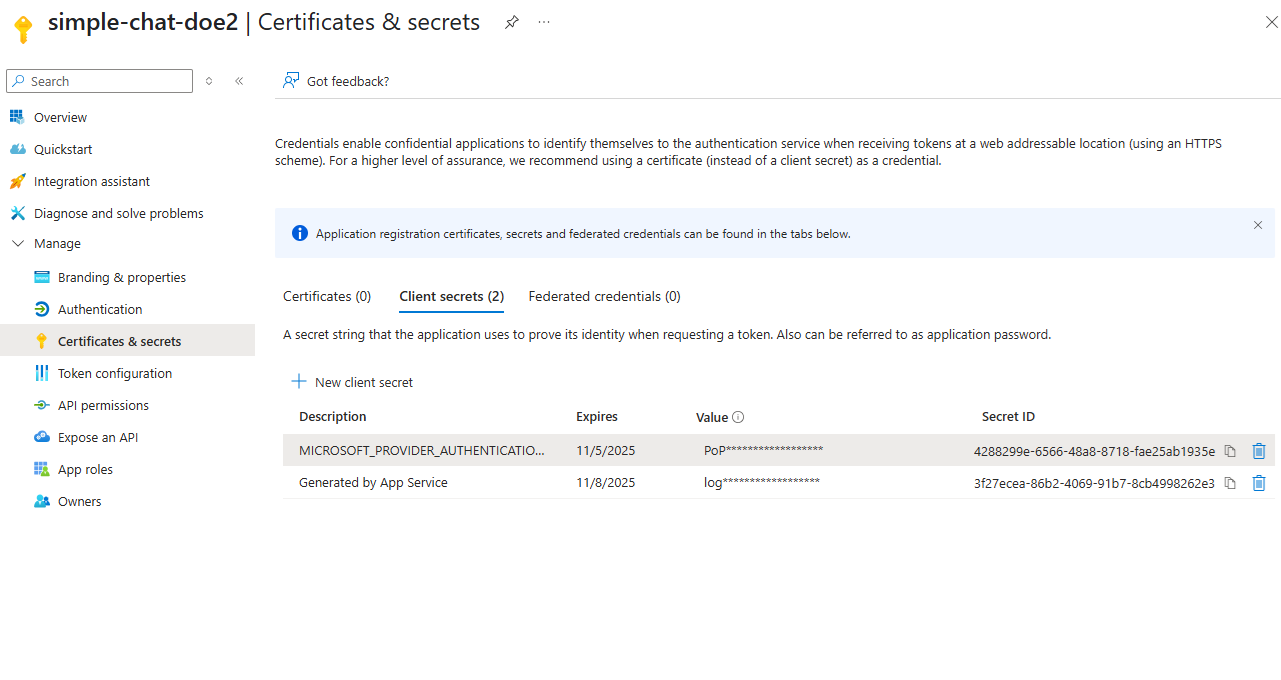 (Note: Image shows general area, details might differ slightly)
 -
-
Configure App Service Authentication:
-
Go to your App Service in the Azure portal.
-
Navigate to Settings > Authentication.
-
Click Add identity provider.
-
Identity provider: Microsoft
-
App registration type: Pick an existing app registration in this directory.
-
Select the App registration you just created.
-
Restrict access: Require authentication.
-
Unauthenticated requests: HTTP 302 Found redirect: recommended for web apps.
-
Click Add. This configures the built-in App Service Authentication (Easy Auth).
-
⚠️ Important ⚠️: After adding the provider, go back into the Authentication settings for the App Service, click Edit on the Microsoft provider.
-
Ensure the Issuer URL is correct (usually
https://login.microsoftonline.com/<your-tenant-id>/v2.0orhttps://sts.windows.net/<your-tenant-id>/v2.0). -
Note the Client Secret Setting Name value shown here. This secret (
MICROSOFT_PROVIDER_AUTHENTICATION_SECRET) is often automatically added to App Service Application Settings. If the name is not there (or a different name is there) click on Click to edit secret value -
Click on Add, for the name use
MICROSOFT_PROVIDER_AUTHENTICATION_SECRETfor the value enter the Key that you copied in the previous step -
Click Apply, the click Apply again
-
Return to the Edit identity provider page and now select
MICROSOFT_PROVIDER_AUTHENTICATION_SECRETfor the Client Secret setting name. (It may take a minute for that name to appear)
-
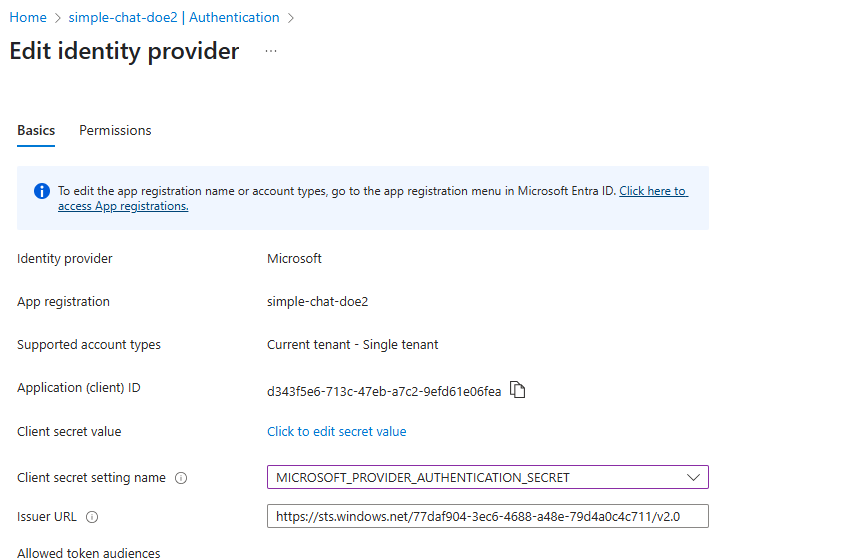 (Note: Image shows general area, details might differ slightly)
 -
-
Configure API Permissions:
-
Go back to your App Registration in Azure AD.
-
Navigate to API permissions.
-
Click + Add a permission.
-
Select Microsoft Graph.
-
Select Delegated permissions.
-
Add the following permissions:
-
email -
offline_access -
openid -
profile -
User.Read(Allows sign-in and reading the user’s profile) -
User.ReadBasic.All(Allows reading basic profiles of all users - often needed for people pickers if not usingPeople.Read.All) -
(Conditional)
People.Read.All: Required if you enable the My Groups feature, as it’s used to search for users within your tenant to add to groups. Add this permission if needed. -
(Conditional)
Group.Read.All: Required if you enable the My Groups feature or need to read group memberships and group details for group workspaces. This permission allows the app to list groups and read group properties and memberships in your organization. Add this permission if group-based collaboration or group document access is needed.
-
-
After adding permissions, click Grant admin consent for [Your Tenant Name]. This is crucial, especially for
*.Allpermissions.
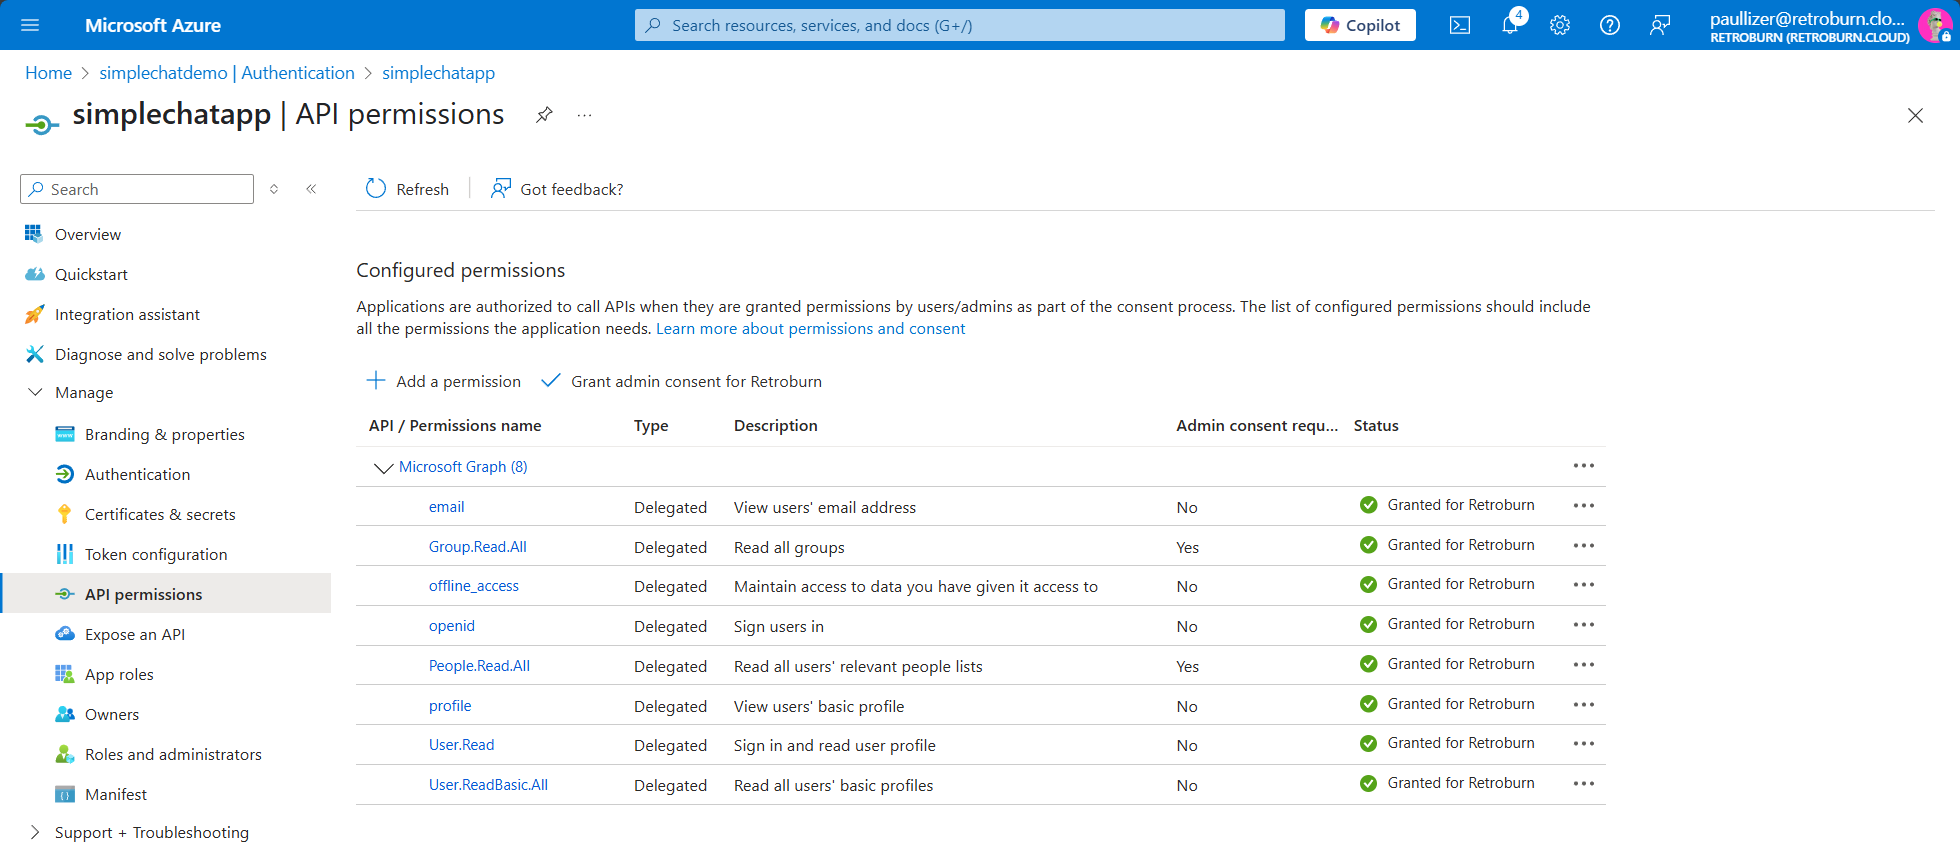
-
-
Configure App Roles:
-
In your App Registration, navigate to App roles.
-
Click + Create app role.
-
Create roles based on the following table. Repeat for each role:
Display Name Allowed member types Value Description Do you want to enable this app role? | :————————- | :——————- | :——————— | :———————————————– | :———————————– |
Admins Users/Groups AdminAllows access to Admin Settings page. Yes Users Users/Groups UserStandard user access to chat features. Yes Create Group Users/Groups CreateGroupsAllows user to create new groups (if enabled). Yes Chat File Upload User Users/Groups ChatFileUploadUserAllows chat file uploads when role enforcement is enabled. Yes Workflow User Users/Groups WorkflowUserAllows personal workflow access when role enforcement is enabled. Yes Safety Violation Admin Users/Groups SafetyViolationAdminAllows access to view content safety violations. Yes Feedback Admin Users/Groups FeedbackAdminAllows access to view user feedback admin page. Yes 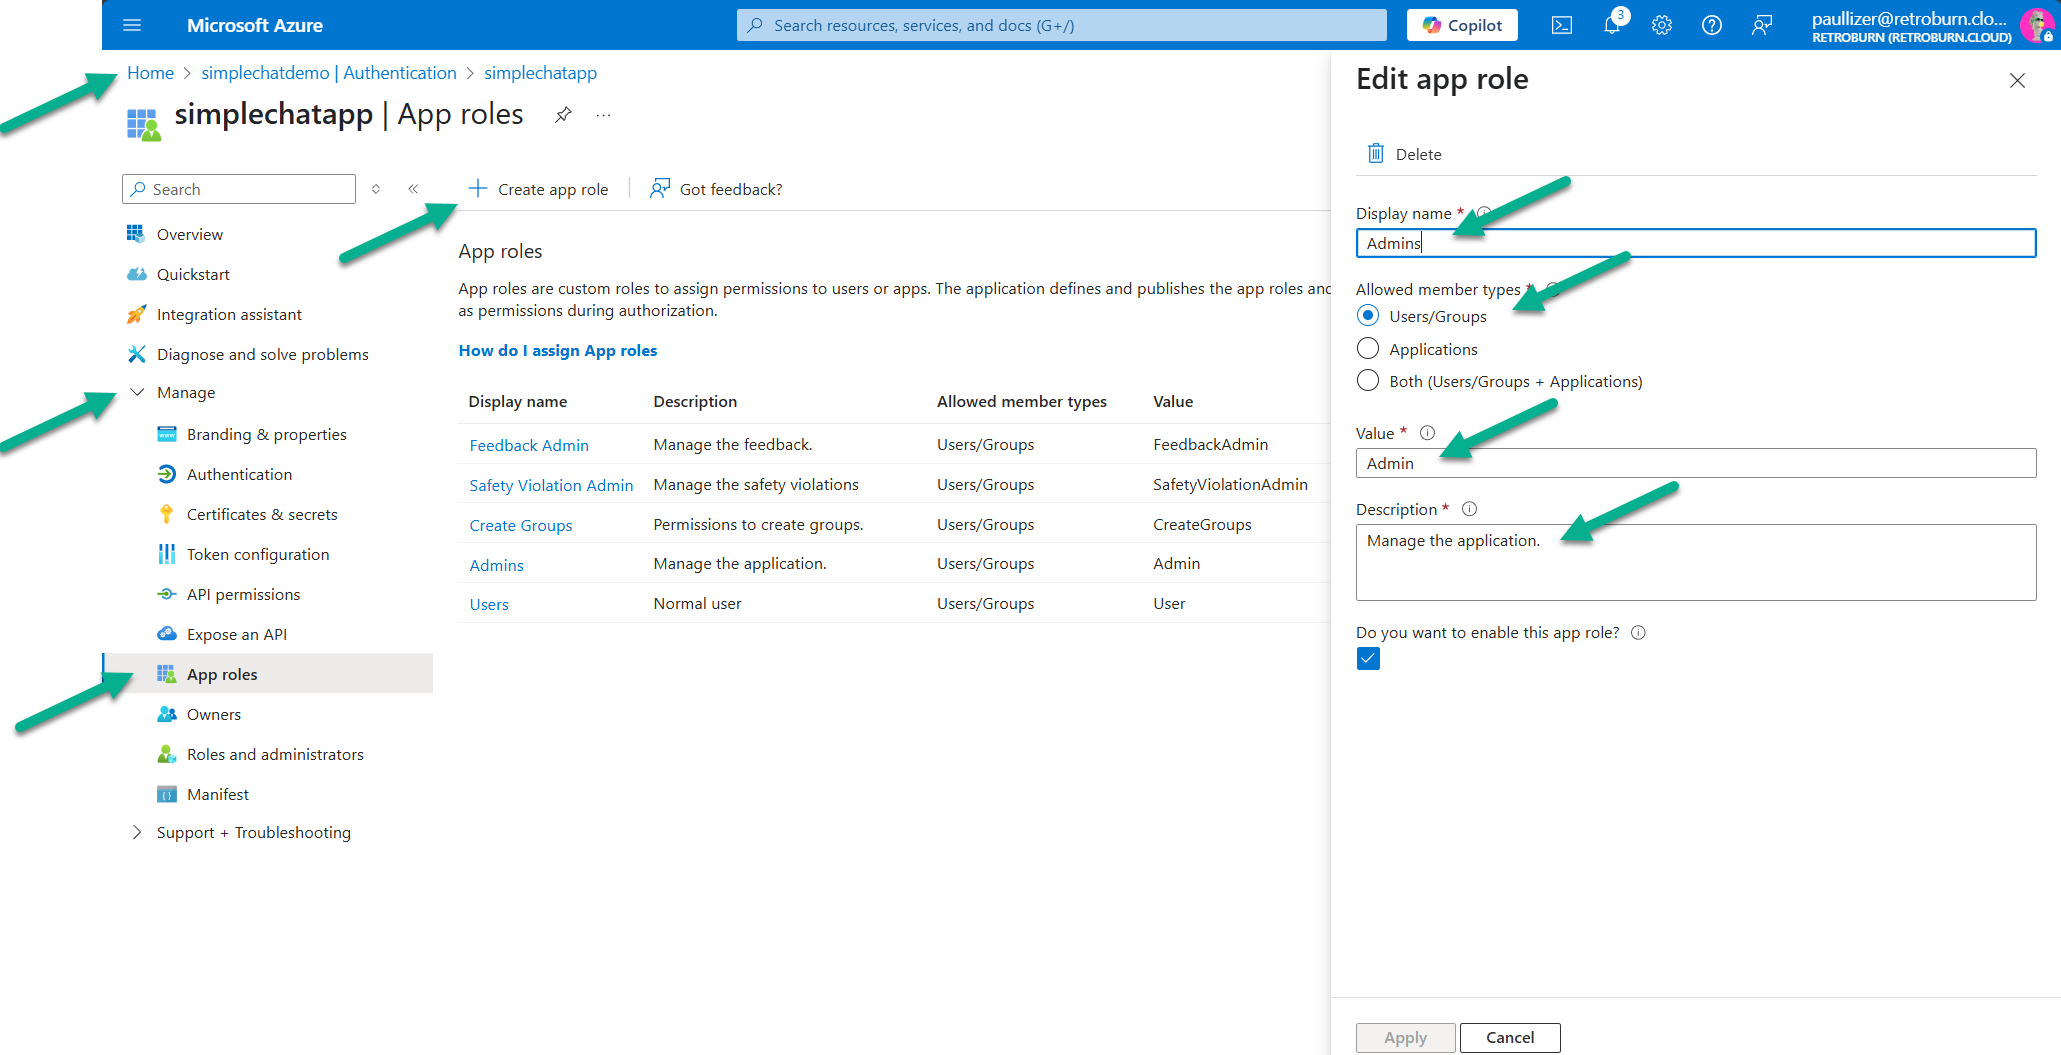
-
-
Assign Users/Groups to Roles via Enterprise Application:
-
App Roles are assigned through the Enterprise Application associated with your App Registration.
-
Navigate to Azure Active Directory > Enterprise applications.
-
Find the application with the same name as your App Registration (or search by Application ID).
-
Select your Enterprise Application.
-
Go to Users and groups.
-
Click + Add user/group.
-
Select the users or security groups you want to grant access.
-
Under Select a role, choose the appropriate App Role (
Admins,Users, etc.) you defined. -
Click Assign. Only assigned users/groups will be able to log in (if “Assignment required?” is enabled on the Enterprise App, which is recommended).
-
Grant App Registration Access to Azure OpenAI (for Model Fetching)
The application needs permission to list the available models deployed in your Azure OpenAI resource(s). This uses the App Registration’s Service Principal.
-
Go to each Azure OpenAI service resource in the Azure portal.
-
Select Access control (IAM).
-
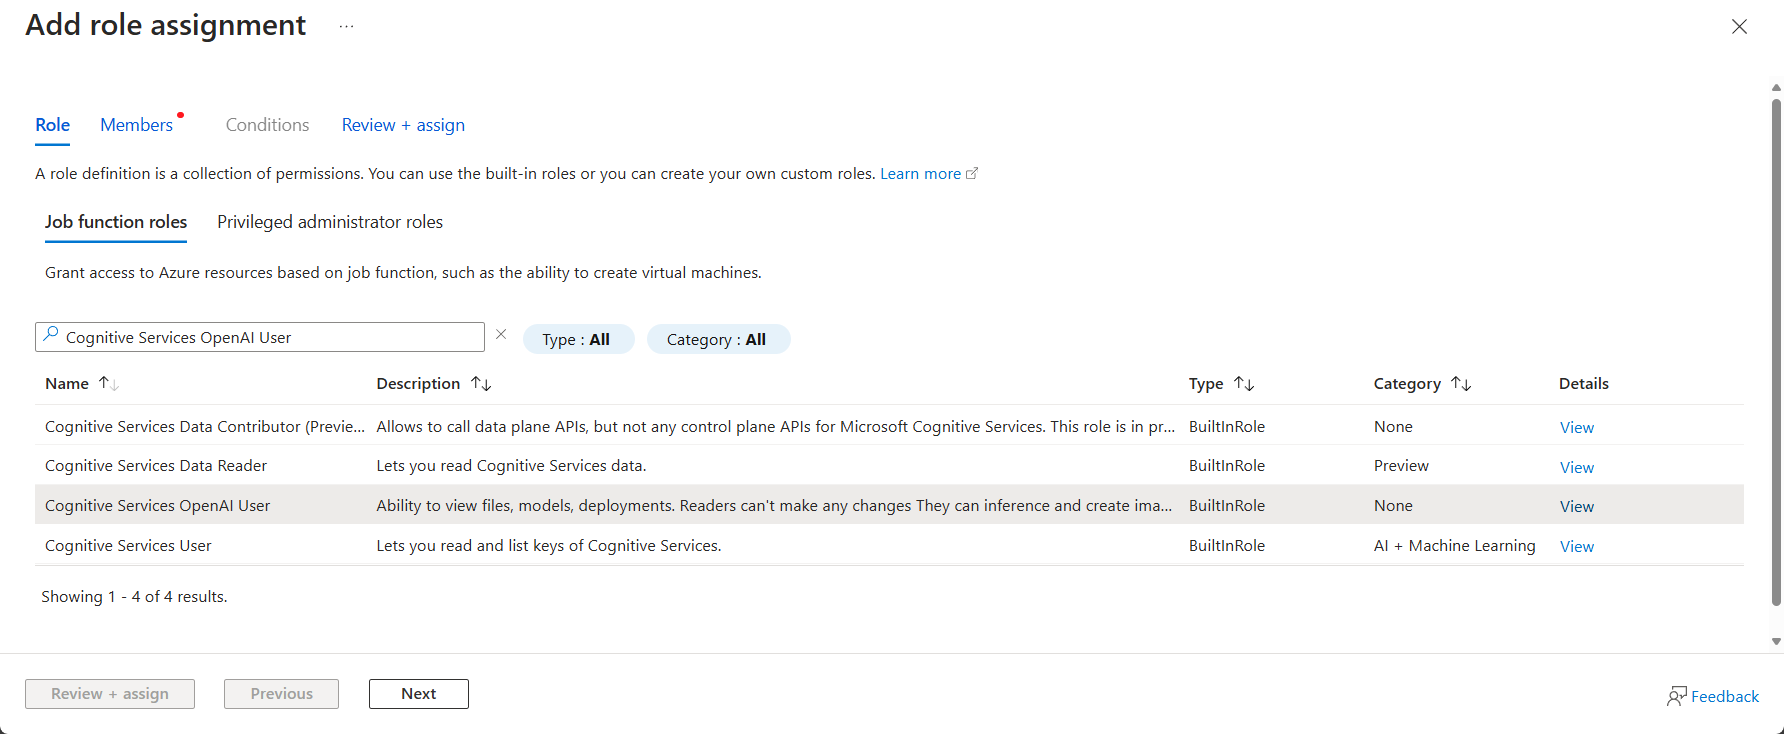
Click + Add > Add role assignment.
-
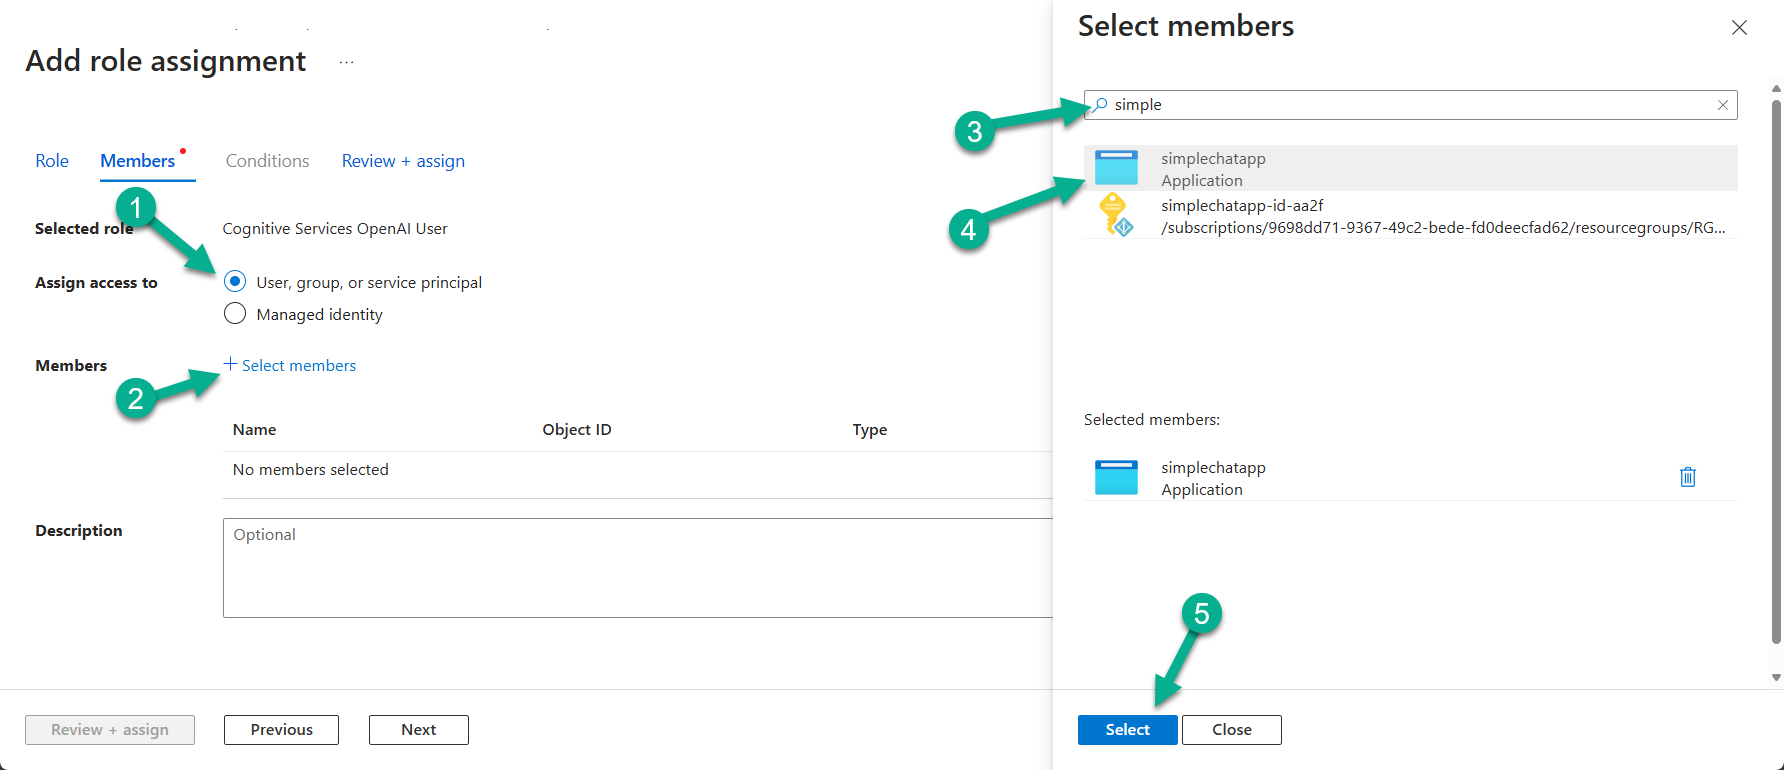
Search for and select the role Cognitive Services OpenAI User. Click Next.
-
Assign access to: Select User, group, or service principal.
-
Members: Click + Select members.
-
Search for the name of your App Registration (e.g.,
SimpleChatApp-Prod). Select it. -
Click Select, then Next.
-
Click Review + assign.
-
Repeat for all Azure OpenAI resources used by the application (GPT, Embedding, Image Gen if separate).
Clone the Repository
Get the application code onto your local machine.
-
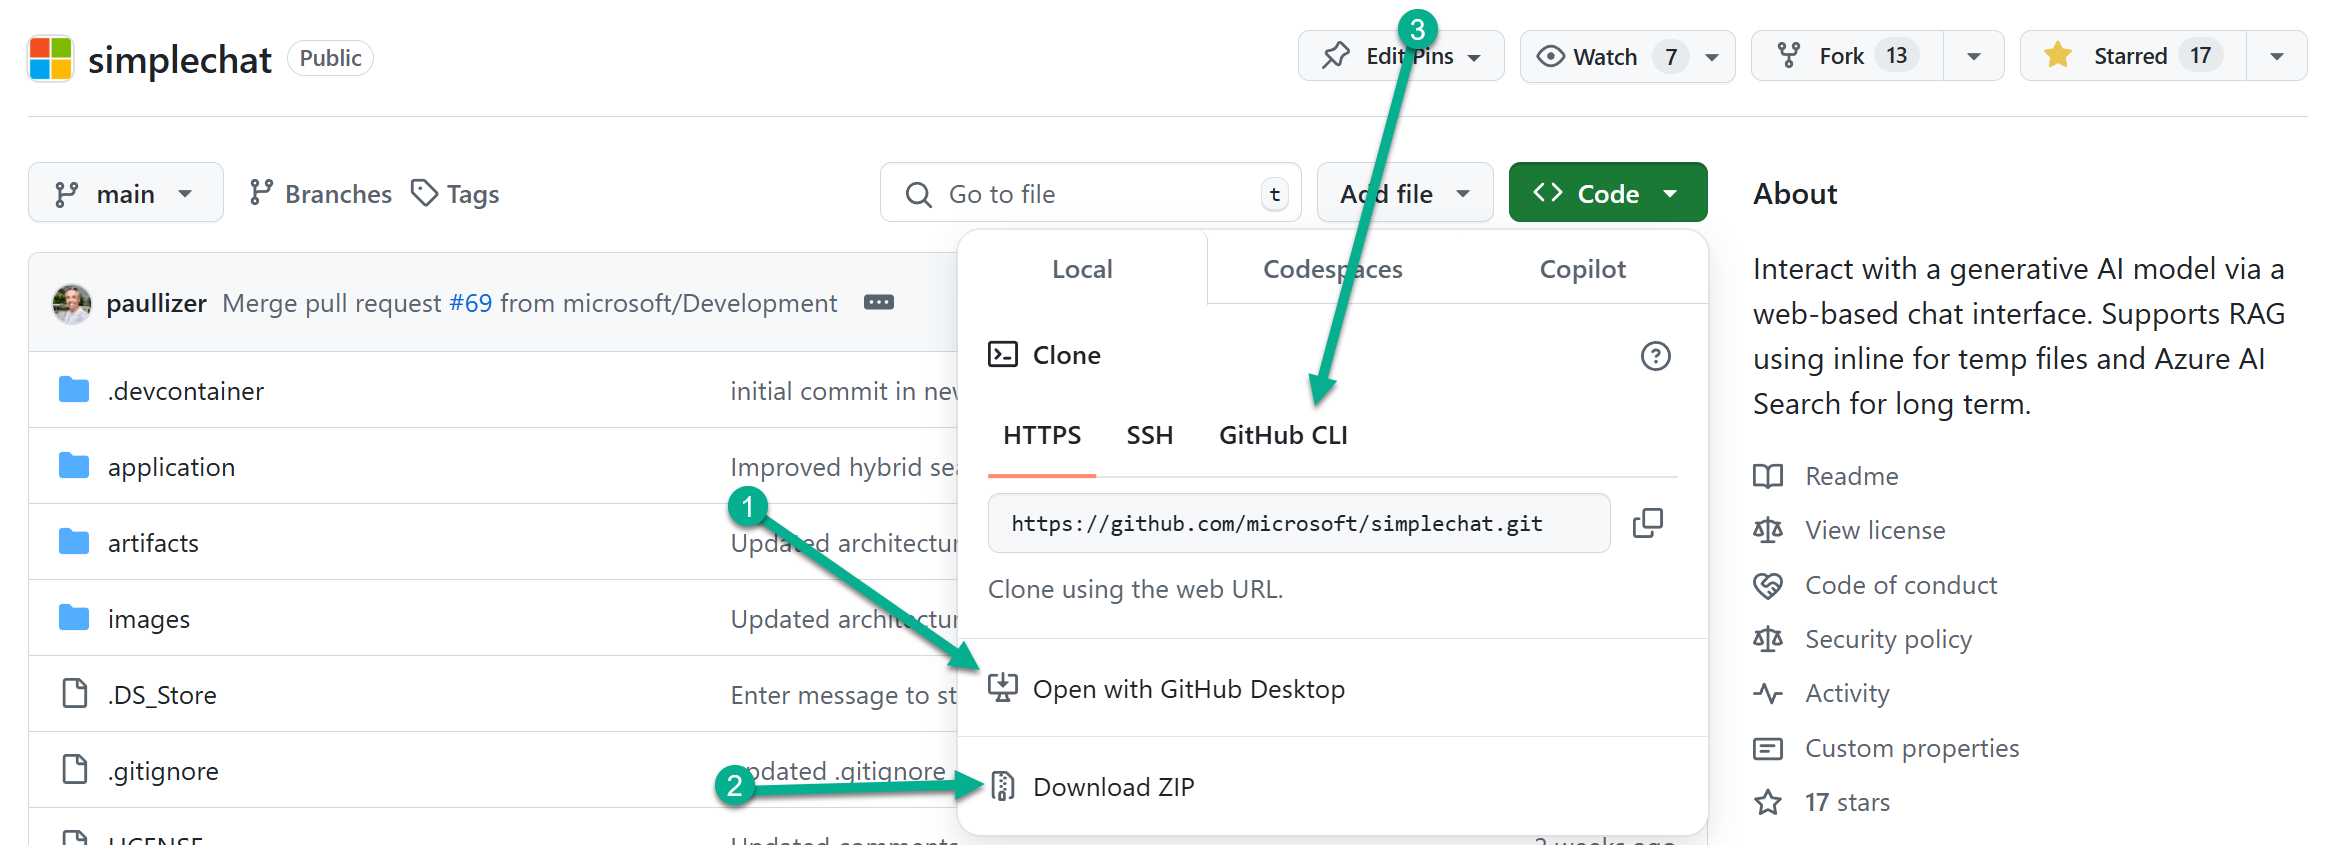
Open a terminal or command prompt.
-
Use Git to clone the repository:
git clone <repository-url>

cd <repository-folder>
(Replace
<repository-url>and<repository-folder>accordingly).Alternatively, use GitHub Desktop or download the ZIP and extract it.
Configure Environment Variables (.env File)
Core configuration values are managed via environment variables, typically set in the Azure App Service Application Settings. A .env file is used locally and can be uploaded to populate these settings.
-
Create
.envfrom Example:-
Find the
example.envfile in the cloned repository. -
Rename or copy it to
.env.
-
-
Edit
.env:-
Open the
.envfile in a text editor (like VS Code). -
Fill in the placeholder values with your actual service details:
# Azure Cosmos DB # Use connection string OR endpoint/key OR managed identity # e.g., https://mycosmosdb.documents.azure.com:443/ AZURE_COSMOS_ENDPOINT="<your-cosmosdb-account-uri>" AZURE_COSMOS_KEY="<your-cosmosdb-primary-key>" # Options: "key", "connection_string", "managed_identity" AZURE_COSMOS_AUTHENTICATION_TYPE="key" # Azure AD Authentication (Required) CLIENT_ID="<your-app-registration-client-id>" TENANT_ID="<your-azure-ad-tenant-id>" # SECRET_KEY should be a long, random, secret string (e.g., 32+ chars) used for Flask session signing. Generate one securely. SECRET_KEY="Generate-A-Strong-Random-Secret-Key-Here!" # AZURE_ENVIRONMENT: Set based on your cloud environment # Options: "public", "usgovernment", "custom" AZURE_ENVIRONMENT="public" -
-
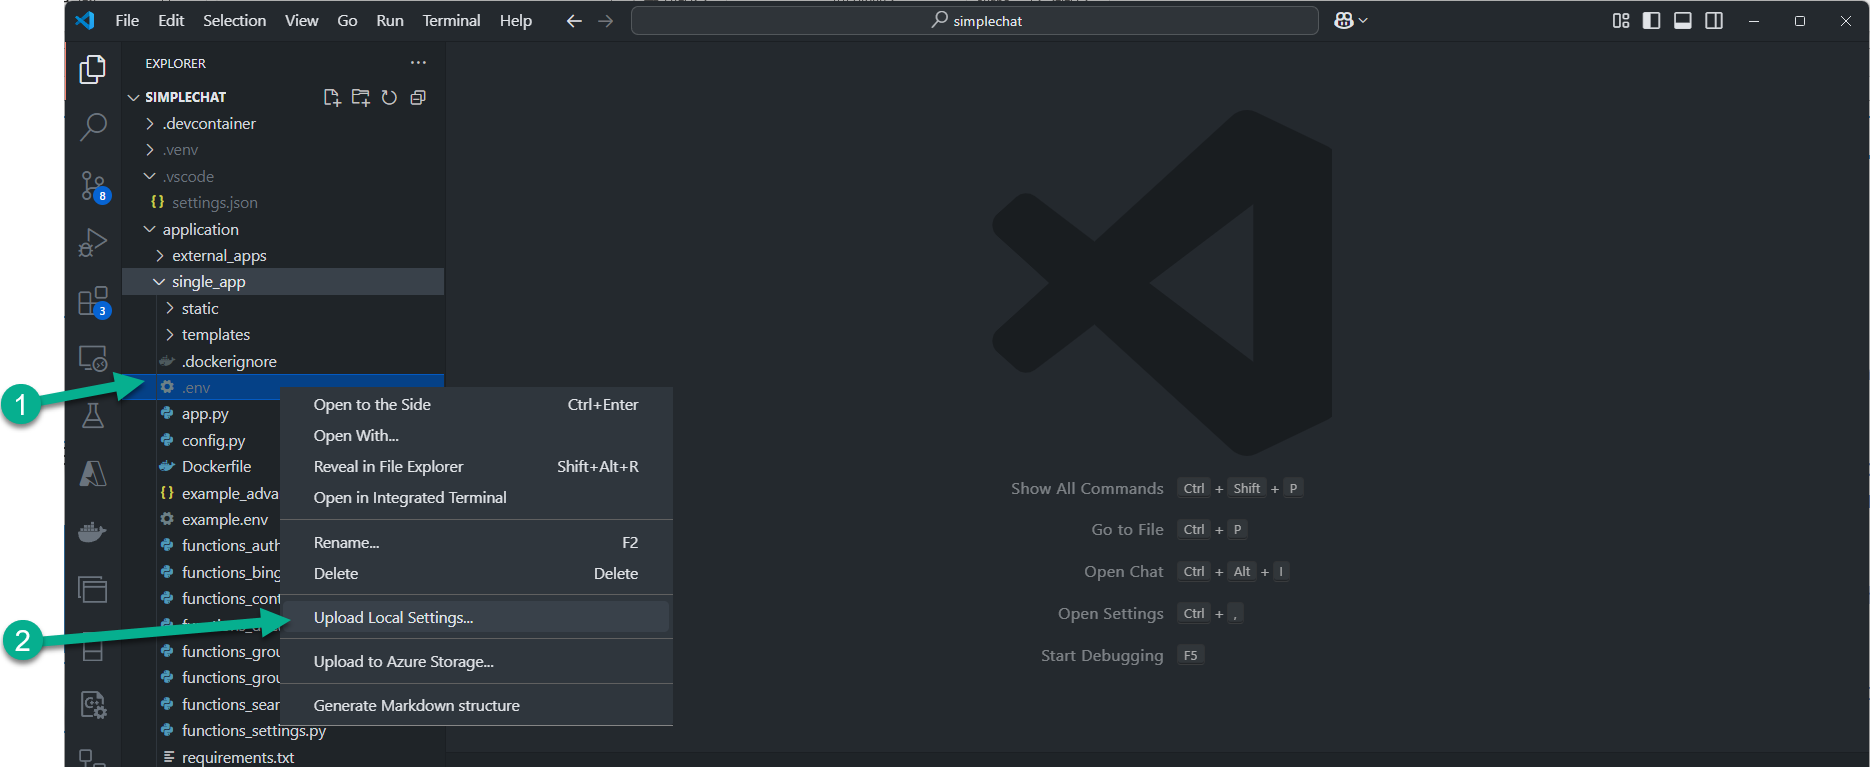
Upload Settings to Azure App Service (Recommended using VS Code):
-
Ensure the
.envfile is saved and closed. -
In VS Code, with the Azure App Service extension installed and signed in:
-
Option 1 (Command Palette): Press
Ctrl+Shift+P(orCmd+Shift+P), typeAzure App Service: Upload Local Settings, select your subscription and App Service instance, then choose the.envfile. -
Option 2 (File Explorer): Right-click the
.envfile in the VS Code explorer, selectAzure App Service: Upload Local Settings, and follow the prompts.
-
-
This action reads your
.envfile and sets the corresponding Application Settings in the Azure App Service configuration blade.

-
-
(Optional) Download Settings from Azure App Service:
-
To verify or synchronize settings from Azure back to a local
.envfile: -
Press
Ctrl+Shift+P, typeAzure App Service: Download Remote Settings, select your App Service, and choose where to save the file (e.g., overwrite your local.env). This is useful to capture settings automatically added by Azure (likeAPPLICATIONINSIGHTS_CONNECTION_STRINGorWEBSITE_AUTH_AAD_ALLOWED_TENANTS).

-
-
First-Time Configuration Wizard:
-
When you first access the admin settings page, a configuration wizard will guide you through the required and optional settings.
-
The wizard will help you configure:
-
Application basics: Title and logo customization
-
GPT API settings: Configure Azure OpenAI endpoints and models
-
Workspace settings: Enable personal and group workspaces
-
Additional services: Configure embedding, AI Search, Document Intelligence, and other required services
-
Optional features: Content safety, user feedback, conversation archiving, and other optional features
-
-
Required settings are clearly marked, ensuring that you configure all necessary components for your deployment scenario.
-
Local VS Code Developer Environment
If you want to run Simple Chat locally in VS Code before deploying to Azure App Service, use a repo-local .venv created with Python 3.12.
From the repo root on Windows:
py -3.12 -m venv .venv

.\.venv\Scripts\Activate.ps1

pip install --upgrade pip

pip install -r application/single_app/requirements.txt
Then in VS Code run Python: Select Interpreter and choose the Python 3.12 interpreter inside .venv.
For the full local development workflow, including FLASK_DEBUG guidance and when to use Docker or WSL2 for Gunicorn validation, see Running Simple Chat Locally.
Alternate Method: Update App Settings via JSON (Advanced)
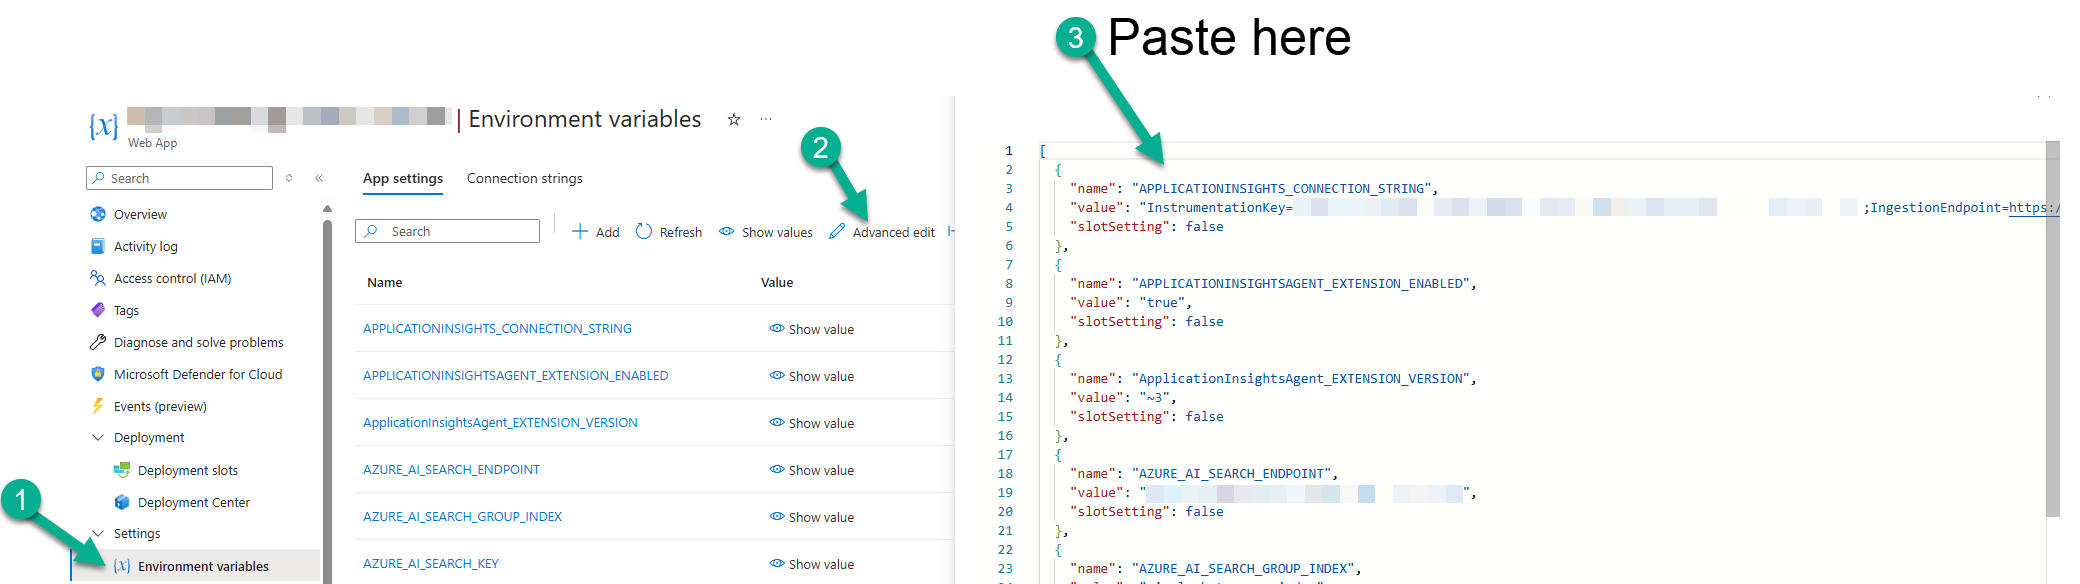
You can directly edit Application Settings in the Azure portal using the “Advanced edit” feature, pasting a JSON array. This is useful for bulk updates but requires care not to overwrite essential settings added by Azure.
-
Navigate to your App Service > Settings > Configuration > Application settings.
-
Backup Existing Values: Before pasting, copy the current values for critical settings like
MICROSOFT_PROVIDER_AUTHENTICATION_SECRET,APPLICATIONINSIGHTS_CONNECTION_STRING, andWEBSITE_AUTH_AAD_ALLOWED_TENANTS. -
Prepare JSON: Create a JSON array similar to the example below, inserting your specific values and the backed-up Azure-managed values.
-
Click Advanced edit.
-
Carefully replace the existing JSON content with your prepared JSON.
-
Click OK, then Save.
Example JSON Structure:
[

    // --- Azure Managed / Essential Settings ---

    { "name": "APPLICATIONINSIGHTS_CONNECTION_STRING", "value": "<your-appinsights-connection-string>", "slotSetting": false },

    { "name": "APPINSIGHTS_INSTRUMENTATIONKEY", "value": "<your-appinsights-instrumentation-key>", "slotSetting": false }, // Often same key as connection string contains

    { "name": "MICROSOFT_PROVIDER_AUTHENTICATION_SECRET", "value": "<app-service-auth-secret>", "slotSetting": true }, // CRITICAL - Get from portal if unsure

    { "name": "WEBSITE_AUTH_AAD_ALLOWED_TENANTS", "value": "<your-tenant-id>", "slotSetting": false }, // Usually set by Auth config

    { "name": "WEBSITE_AUTH_ENABLED", "value": "True", "slotSetting": true }, // Should be set by Auth config

    { "name": "WEBSITE_AUTH_DEFAULT_PROVIDER", "value": "AzureActiveDirectory", "slotSetting": true }, // Should be set by Auth config


    // --- Your Application Settings (from .env) ---

    { "name": "AZURE_COSMOS_ENDPOINT", "value": "<your-cosmosdb-endpoint>", "slotSetting": false },

    { "name": "AZURE_COSMOS_KEY", "value": "<your-cosmosdb-key>", "slotSetting": false },

    { "name": "AZURE_COSMOS_DATABASE", "value": "SimpleChat", "slotSetting": false },

    { "name": "AZURE_COSMOS_AUTHENTICATION_TYPE", "value": "key", "slotSetting": false }, // or "managed_identity"

    { "name": "CLIENT_ID", "value": "<your-app-registration-client-id>", "slotSetting": false },

    { "name": "TENANT_ID", "value": "<your-azure-ad-tenant-id>", "slotSetting": false },

    { "name": "SECRET_KEY", "value": "<your-flask-secret-key>", "slotSetting": false },

    { "name": "AZURE_ENVIRONMENT", "value": "public", "slotSetting": false }, // or "usgovernment", or "custom"


    // --- Build & Runtime Settings ---

    { "name": "SCM_DO_BUILD_DURING_DEPLOYMENT", "value": "true", "slotSetting": false }, // Ensures requirements.txt is processed

    { "name": "WEBSITE_HTTPLOGGING_RETENTION_DAYS", "value": "7", "slotSetting": false },


    // --- Optional App Insights Advanced Settings (Defaults usually fine) ---

    { "name": "ApplicationInsightsAgent_EXTENSION_VERSION", "value": "~3", "slotSetting": false },

    { "name": "APPLICATIONINSIGHTSAGENT_EXTENSION_ENABLED", "value": "true", "slotSetting": false },

    { "name": "XDT_MicrosoftApplicationInsights_Mode", "value": "default", "slotSetting": false },

    { "name": "APPINSIGHTS_PROFILERFEATURE_VERSION", "value": "1.0.0", "slotSetting": false },

    { "name": "APPINSIGHTS_SNAPSHOTFEATURE_VERSION", "value": "1.0.0", "slotSetting": false },

    { "name": "SnapshotDebugger_EXTENSION_VERSION", "value": "disabled", "slotSetting": false },

    { "name": "InstrumentationEngine_EXTENSION_VERSION", "value": "disabled", "slotSetting": false },

    { "name": "XDT_MicrosoftApplicationInsights_BaseExtensions", "value": "disabled", "slotSetting": false },

    { "name": "XDT_MicrosoftApplicationInsights_PreemptSdk", "value": "disabled", "slotSetting": false }

]
[!WARNING]
Editing Application Settings via JSON is powerful but risky. Incorrectly modifying or omitting settings managed by Azure (especially Authentication or App Insights integration) can break functionality. Proceed with caution and always back up existing values. Using the .env upload method is generally safer.
Initializing Indexes in Azure AI Search
The application requires two Azure AI Search indexes: one for personal user documents and one for shared group documents. The schemas are defined in JSON files within the repository.
-
Locate Index Schema Files:
-
In your cloned repository, find the artifacts/ai_search_index/ directory.
-
It contains ai_search-index-user.json and ai_search-index-group.json.
📁 SimpleChat └── 📁 artifacts └── 📁 ai_search_index ├── ai_search-index-group.json └── ai_search-index-user.json -
-
Access Azure AI Search in Azure Portal:
-
Navigate to your Azure AI Search service resource.
-
Under Search management, select Indexes.
-
-
Create Indexes from JSON:
-
Click + Add index.
-
Change the creation method from Enter index name to Import from JSON.
-
User Index:
-
Open ai_search-index-user.json locally, copy its entire content.
-
Paste the JSON into the Index definition (JSON) editor in the portal.
-
The Index Name should automatically populate as simplechat-user-index.
-
Click Save.
-
-
Group Index:
-
Click + Add index again and choose Import from JSON.
-
Open ai_search-index-group.json locally, copy its content.
-
Paste the JSON into the editor.
-
The Index Name should populate as simplechat-group-index.
-
Click Save.
-
-
-
Verify Indexes:
- You should now see simplechat-user-index and simplechat-group-index listed under Indexes.
[!NOTE]
Automatic Schema Update Feature: If you happen to miss this step or deploy an updated version of the application with new required index fields, the application includes a mechanism to help. When an Admin user navigates to the Admin > App Settings page, the application backend checks the schemas of the existing simplechat-user-index and simplechat-group-index against the expected schema. If missing fields are detected, notification buttons will appear at the top of the Admin Settings page: “Add missing user fields” and “Add missing group fields”. Clicking these buttons will automatically add the missing fields to your Azure AI Search indexes without data loss. While this feature provides resilience, it’s still recommended to create the indexes correctly using the JSON definitions initially.