Task 1.3: Data ingestion
There are multiple ways to ingest data in Lakehouse.
Method 1-Using Data Pipelines/Data Flow ‘No Code-Low Code experience’
-
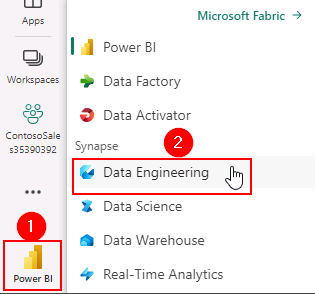
In Power BI tab, in the ContosoSales@lab.LabInstance.Id workspace, select the left bottom icon and select Data Engineering.

-
In Data Engineering, select Data pipeline.

-
In the pipeline Name box, enter Azure SQL DB Pipeline and select Create.
-
Select Copy data.
-
In the pop-up, scroll down through the resources, select Azure SQL Database and then select Next.
-
Select Create new connection, if not selected.
-
In the Server field paste the value and , select @lab.Variable(sqlEndpoint) and in the Database field , select SalesDb.
-
Scroll down and select Basic for Authentication kind, select labsqladmin as the Username, Smoothie@2023 as the Password, keep Use encrypted connection check box on/checked and finally select Next.
Close any pop-up that you see and wait for the connection to be created.
-
Select Tables, select the checkbox for the First Table below the Select all option, and then select Next.
-
Scroll down and select Lakehouse and then select Next.
-
Select Existing Lakehouse, select the dropdown, select lakehouseBronze and then select Next.
-
Select Load to new table, select the checkbox beside Source and then select Next.
-
Select Save + Run.
-
Select the Notifications Icon at the top right of the screen, select Notifications.
-
Verify the Running status of the pipeline.
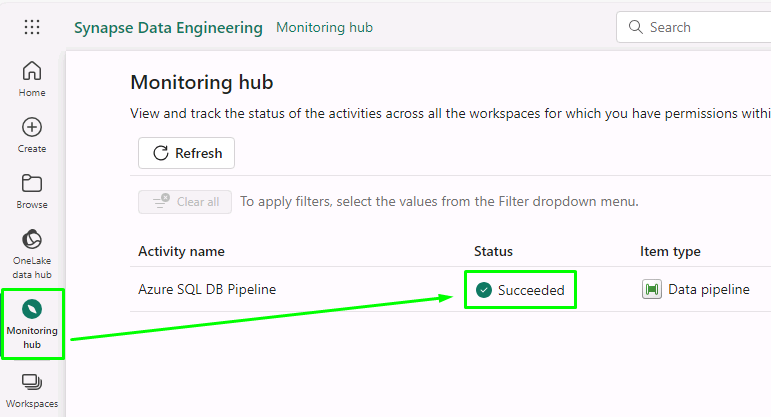
Please wait for the pipeline to execute. If the notification continues to say running after 10 minutes, check the monitoring hub for a “succeeded” status.

-
Once the status shows Run Succeeded, your data has been transferred from Azure SQL Database to Lakehouse.
-
Similarly you can get data into the lakehouses using pipelines from various other sources like Snowflake, Dataverse, etc.
Method 2-Using the OneLake Shortcuts option from external data sources
This is something exciting! You will see how easy it is to create shortcuts without actually moving the data. That is the power of OneLake! In this exercise you will easily ingest the curated marketing data as well as product reviews data from ADLS Gen2. Let’s see how!
-
In Power BI tab, select Workspaces and select the ContosoSales@lab.LabInstance.Id workspace.
-
In the ContosoSales@lab.LabInstance.Id workspace, select the lakehouseBronze Lakehouse.
There will be 3 options for lakehouseBronze, namely Lakehouse, Dataset (default) and SQL endpoint. Make sure to select the Lakehouse option.

-
Right-click Files in the left explorer.
-
Select New shortcut.
-
In the pop-up window, under External sources, select the Azure Data Lake Storage Gen2 source.
Wait for the screen to load.
-
We need to enter the connection details for the ADLS Gen2 shortcut. For this, we need to get the details from the Storage Account resource.
-
In the URL field above, paste the endpoint , select https://storage@lab.LabInstance.Id.dfs.core.windows.net/ URL field.
-
In the Authentication kind dropdown, select Account Key.
-
Paste the account key , select @lab.Variable(storageAccountKey).
Wait for the paste action to complete. You will know it is done when the cursor displays as blinking.
-
Select Next.
-
Under Shortcut Name, enter data.
-
Under Sub Path, select /adlsfabricshortcut.
-
Select Create.
Litware Inc. has curated marketing data and sales data processed by Azure Databricks and stored in the gold layer in ADLS Gen2. You can easily create a shortcut in Microsoft Fabric without moving this data. We will now create another shortcut for Litware Inc. data.
-
Right-click Files in the left explorer.
-
Select New shortcut.
-
In the pop-up window, under External sources, select the Azure Data Lake Storage Gen2 source.
Wait for the screen to load.
-
In the URL field above, paste the endpoint under the URL field , select https://storage@lab.LabInstance.Id.dfs.core.windows.net/
The details entered earlier will be auto fetched. If not, the previous shortcut steps.
-
In the Authentication kind dropdown, select Account Key.
If the account key has already been populated, you do not need to enter it again.
-
Paste the account key , select @lab.Variable(storageAccountKey).
Wait for the storage AccountKey to be field automatically.
-
Select Next.
-
Under Shortcut Name, type , select sales-transaction-litware.
-
Under Sub Path, select /bronzeshortcutdata.
-
Select Create.