Redlining Documents with the New Copilot Studio Experience
GHCP harness
Compare documents using Microsoft Word's Native Redlining Track Changes.

Get the skill: Download and install redlining-content from the CAT Agent Skills gallery.
“What changed?” A vendor emails you a contract with their edits buried somewhere inside, and you want to see every difference clearly, marked up with Track Changes you can Accept or Reject. Sounds easy, right? By hand it can take hours, and even our first automated attempt was painfully slow. We eventually got a 100-page document down to seconds.
First, how Track Changes actually works. A Word .docx file is really just a zip full of XML, text wrapped in tags that describe it. When you turn on Track Changes and edit, Word doesn’t just change the text; it wraps your edits in special XML tags: w:ins around anything you added, and w:del around anything you removed (the deleted words are kept, just marked as struck out). Each tag also records who made the change and when.
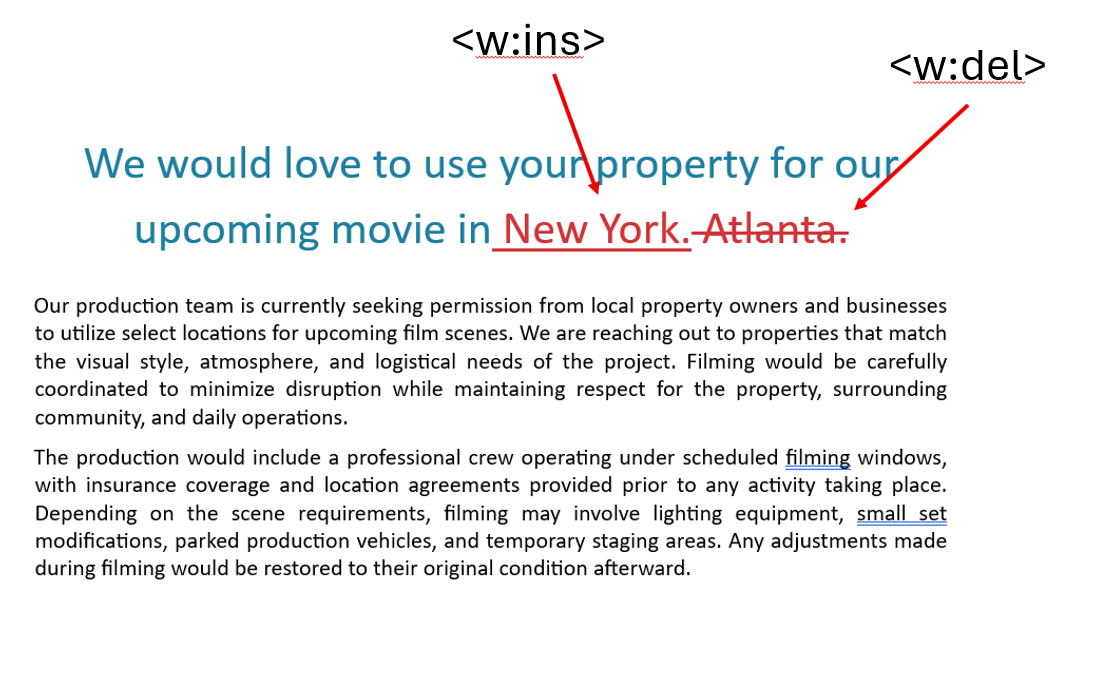 Inside a
 .docx, a tracked change is just text wrapped in w:ins and w:del tags.
That’s all a “tracked change” is, tagged text with OOXML markup that Word knows how to display as a Tracked Change and lets you Accept or Reject.
Simple to describe, brutal to build. The output has to be a .docx where each edit lands as genuine OOXML markup, w:ins for insertions and w:del for deletions, while the original’s exact formatting survives so it opens cleanly in Microsoft Word. A centered title stays centered. A 14pt heading stays 14pt. A table stays a table. Get fidelity wrong and the “redline” is just a worse copy of the document.
This is the story of building that redlining-content skill for the new Copilot Studio orchestrator. The first working version took fifteen minutes per document. The version we landed on takes fifteen seconds. Here’s how the agentic loop got us from one to the other.
How the Loop Wrote Its Own Python Reference Script
We needed a process that could compare a .docx or a .dotx file to either a .docx or a .pdf file. To do that we used Python. The most important thing we built wasn’t the Python. It was the process that discovered the Python. We never sat down and authored a redline engine from a blank file. We let the agentic loop do it, then codified what survived.
It went in four distinct phases, and each one taught the next.
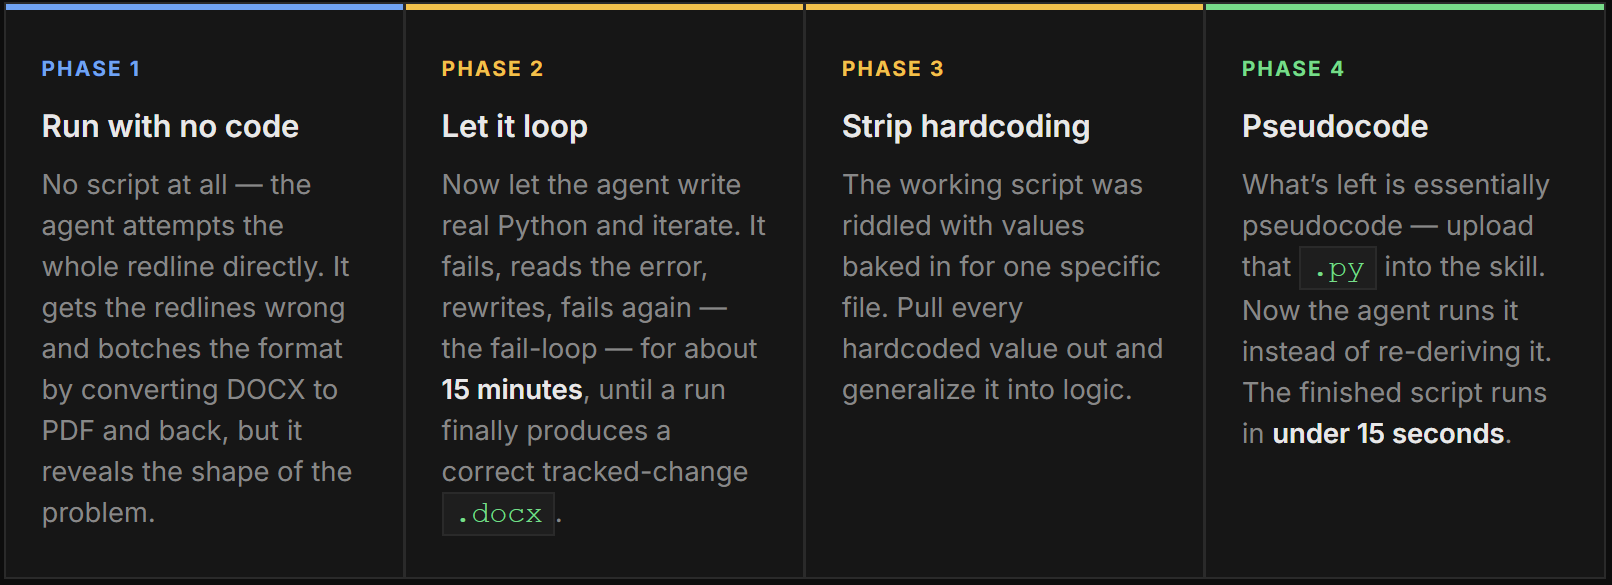 The four phases that took the Skill from a blank file to a codified reference script.
Phase 1: Run with No Code
The best move was starting with no code.
The agent tried to produce the redline directly, reasoning over the two files with no script to lean on. It got the redlines wrong. The worst failure was that it tried to bridge the two file types by converting to PDF, pushing both the DOCX template and the uploaded PDF through a format conversion. Going from DOCX to PDF and back destroyed the formatting entirely. The layout shifted, spacing changed, and when Track Changes ran on top of that mangled result, it “redlined” paragraph breaks and spacing differences that no human ever made. The output was full of noise and nothing a reviewer could trust. This is not what we wanted, but it showed us exactly what to avoid: don’t convert between formats at all.
We have a template either in DOCX or DOTX, just use that initial template and update with the changes!
Phase 2: Let It Loop
Once we knew conversion was detrimental, we turned the agent loose to write Python that redlines directly, and just let it loop. This is where the agentic loop earns its name. The agent writes a script, runs it, hits an error, reads the traceback, rewrites, and runs again, over and over, with no intervention from us. Each failure was a teacher. It looped through crashes from lxml, malformed XML, wrong element nesting, and revision IDs that collided. The whole fail/rewrite cycle took about fifteen minutes. Then a run finally emitted a .docx that opened cleanly, with real tracked changes and a redline that was actually correct.
The failures aren’t waste, they’re the iteration. Every traceback the loop reads narrows the space of correct code. Our job wasn’t to write the engine; it was to give the loop a clear target and let it converge on the implementation by trial and error.
Phase 3: Strip the Hardcoding
Finally, the agent output a correct redlined document. It was full of hardcoded values: specific paragraph indexes, literal strings, fixed IDs, a baked-in file path. It had the uploaded file names and the template file names directly in the script. So we gave the agent one more instruction: strip out every hardcoded value and generalize. The specific paragraph index became “the paragraph this word maps back to.” The literal replacement string became a diff between template and submission.
Phase 4: Pseudocode
What came out of stripping the constants was essentially light pseudocode with no hardcoded values, not actual file-specific code, but a reusable head-start for when the agent is trying to figure out what to write. It went straight into the skill as scripts/redline.py. That’s the whole trick. Before, the agent had to re-derive the solution through that fail/rewrite loop on every request. After, the agent simply runs the codified script. The expensive part, the agentic experimental loop trying to write the correct code, is now handled up front by real instructions from our pseudocode.
 The meta-lesson: codify what the agentic loop discovers into a reusable script.
Same output, roughly 60x faster. Codifying the loop’s discovery into a script turned a fifteen-minute reasoning marathon into a fifteen-second function call.
The Wall: No pip install
Every interesting constraint in this project traces back to one fact, the new Copilot Studio runtime does not let you install Python packages. What ships in the container is what you get. While pdf2docx might have been great to convert PDF to DOCX it was not available. It isn’t there, and there’s no pip install.
Here’s the path we took before shipping, every PDF-to-DOCX approach we tried and where each one landed:
| Approach | Formatting | Tables | Alignment | Verdict |
|---|---|---|---|---|
| Extract text → rebuild doc | Lost | Flat text | Lost | Fail |
pdf2docx |
N/A | N/A | N/A | Not available |
pymupdf |
N/A | N/A | N/A | Not available |
python-docx (build output) |
Good | OK | Wiped on style | Too abstracted |
pypdfium2 + rebuild |
Exact | Real tables | Exact | Image only |
Use template + word diff (pdfplumber reads PDFs, no conversion) |
Byte-perfect | Cell-level | Native | Shipped |
The approaches we tried for turning a PDF into a redline. Converting to DOCX either failed or wasn’t available; reading the PDF’s text with pdfplumber and diffing against the template was the approach that worked.
As we were iterating we went through multiple Python packages trying to convert PDF to DOCX. But the obvious answer was there all along: pdfplumber is available, and it reads a PDF’s text directly. So keep it simple: don’t convert the initial template at all. Keep it DOTX or DOCX, use pdfplumber to pull the submission’s words, and update the template with the redlining changes.
The skills that are available in Copilot Studio today may change in the future.
We kept trying to convert a PDF into a Word document. That looked like the problem at first, until we realized we don’t have to convert at all. What is there is pdfplumber, a layout-aware text extractor (the same building block behind page-level PDF citations), and that turned out to be all we needed. The skill never converts anything. It uses pdfplumber to read the submission’s words, then builds the redline directly on the Word template you already own.
After the Breakthrough
That reframing became the skill as it ships today. The output is the actual initial template, with revisions injected directly as w:ins / w:del elements. No conversions, no headaches, no inherited styles to trigger redlining when it’s not necessary.
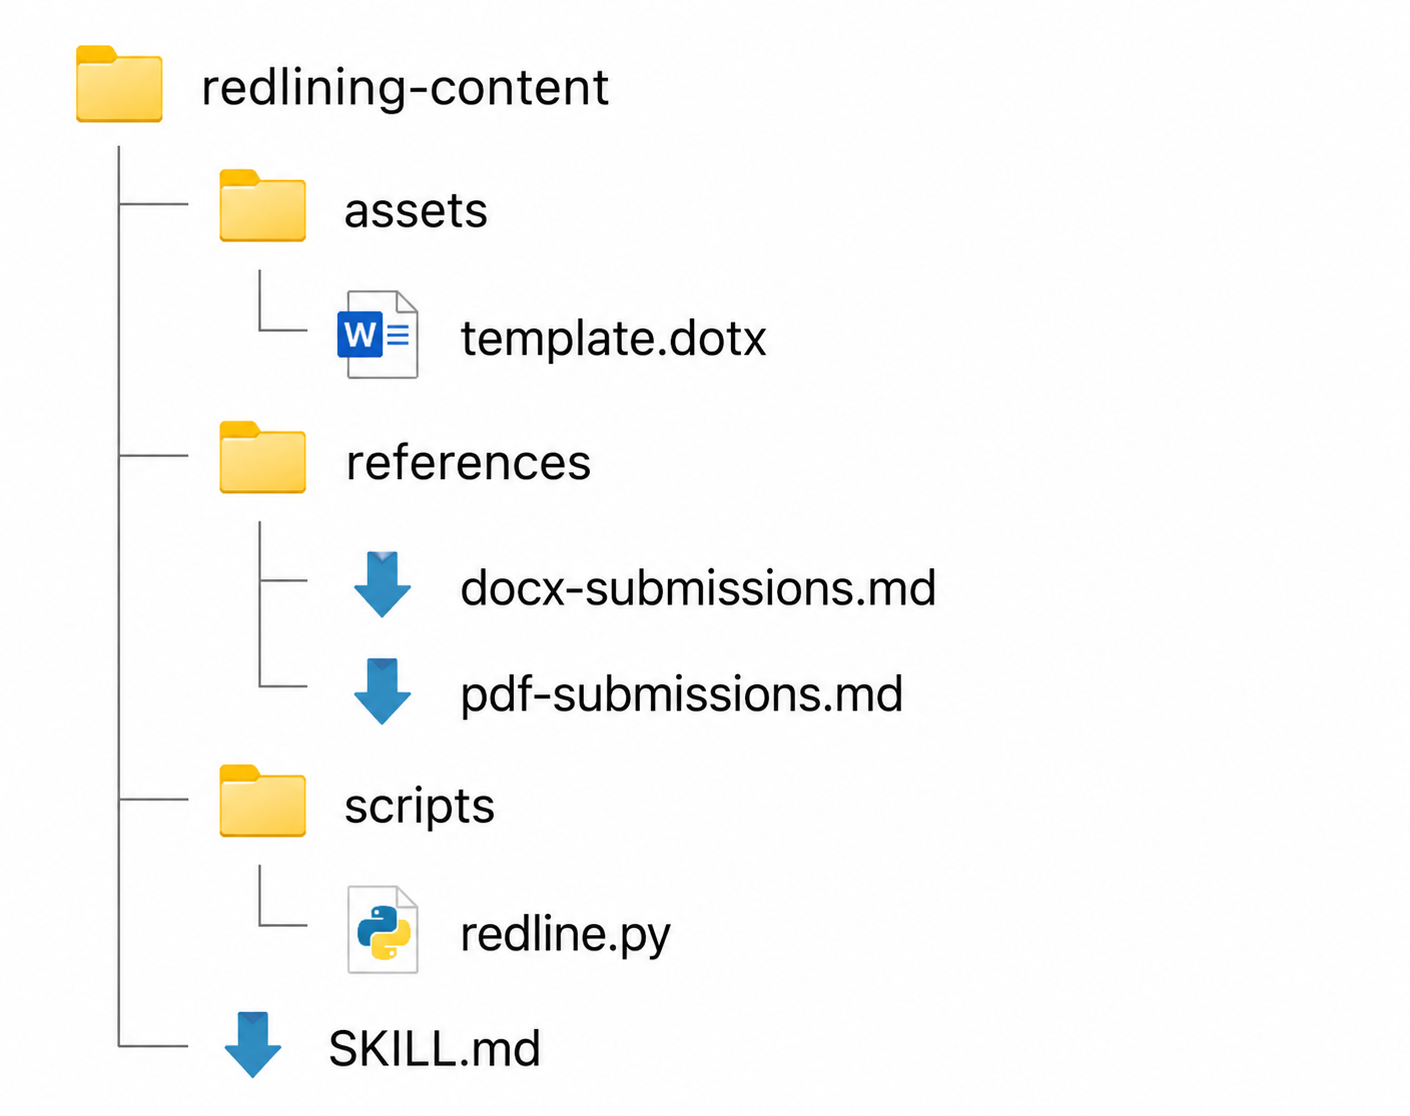 The final folder structure of the redlining-content Skill.
Here is the final file structure:
-
Assets folder —
template.dotx -
References folder —
docx-submissions.md,pdf-submissions.md -
Scripts folder —
redline.py - SKILL.MD — the instructions that tie it all together
And here’s what the skill actually does at runtime:
- Uses two files: a template (either DOTX or DOCX) which is the baseline, bundled in the Skill Assets Folder, then a user uploads a submission (DOCX or PDF).
- The agent then reads the words out of each file — straight paragraph text for Word files, and
pdfplumbertext extraction for PDFs (never converts the PDF to Word). - The agent is directed to read one of the two included references,
docx-submissions.mdorpdf-submissions.md, depending on the submitted document type. - Compares them once as two flat word lists using
difflib.SequenceMatcher, so line wraps and page breaks don’t create false differences — only real word changes count. - Keeps unchanged paragraphs byte-for-byte (all original formatting intact) and only rebuilds the paragraphs that actually changed.
- Marks every difference as a Word tracked change — insertions wrapped in
<w:ins>, deletions in<w:del>. - Every change is authored by “Copilot Studio AI”.
- Handles tables (for DOCX submissions) by diffing cell-by-cell while preserving each cell’s width/borders/shading; PDF tables pass through untouched.
- Outputs a normal DOCX with Track Changes turned on — marking all changes and deletions.
Treat a PDF redline as a best-effort draft to review, not a character-perfect compare. A
.docxsubmission is the high-fidelity path, because its words and tables carry real structure.
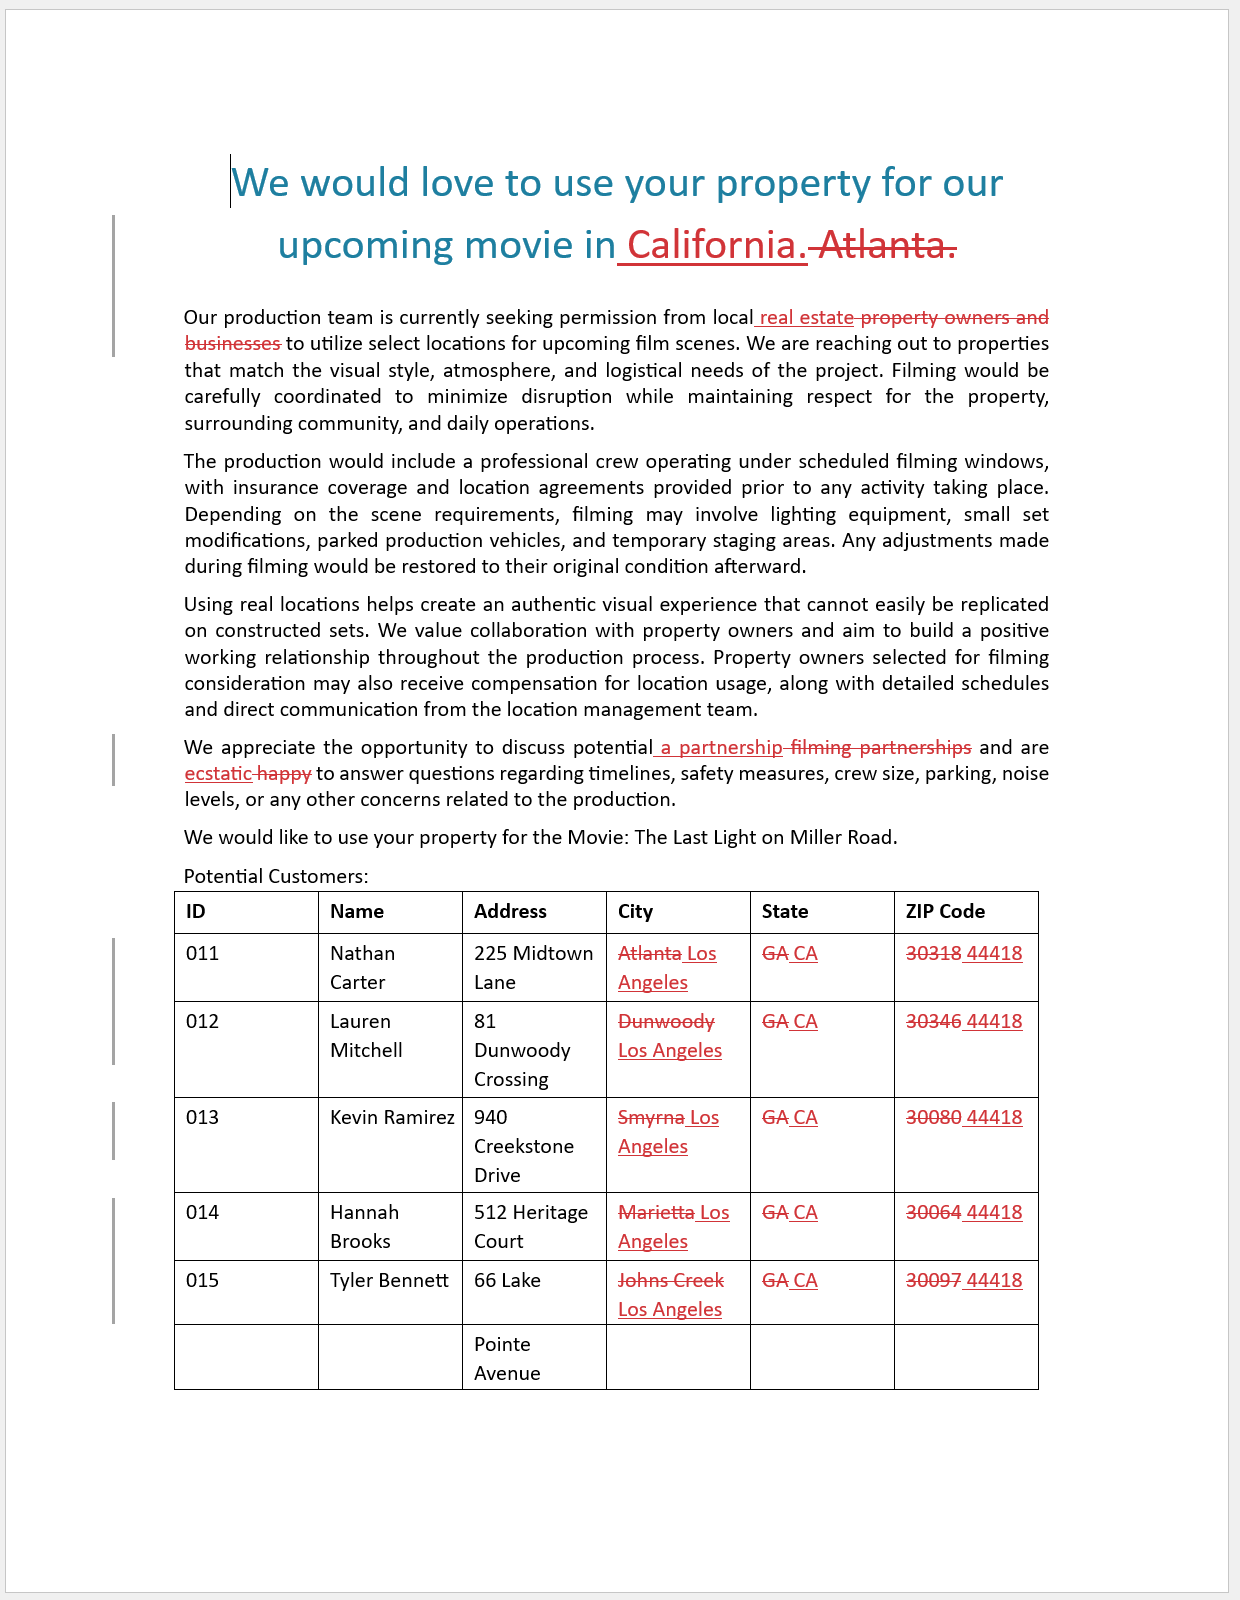 This skill was tested on documents over 100 pages.
But Is This For Copilot Studio or Cowork?
At a high level, it comes down to whether there’s a business process wrapped around the task. If the job really is just “compare these two documents and redline them,” with no larger workflow attached, Cowork is probably the better match, you point it at the files and let it work.
But the moment you’re operating in the context of specific documents and a specific process, Copilot Studio pulls ahead. Think of a fixed template you always redline against, or the need to intercept incoming submissions from email, route them, apply your rules, and hand back a tracked-changes document every time. That’s not a one-off, it’s a repeatable pipeline, and that’s exactly where an authored MCS skill shines.
So this one is Copilot Studio, on purpose. We let the agentic loop do the Cowork-style discovery once during development, then froze it into a deterministic skill that runs the same way on every request. That said, nothing stops you from taking this same approach into Cowork if that’s your preferred method, use whichever fits your business needs.
Key Takeaways
Let the loop write the correct code. Run without code first, then let the agent fail-loop its way to a working script. The failures are the key to this iterative approach.
Then de-hardcode and codify. A working script is hardcoded to one input. Strip every literal into logic, then upload the generalized pseudocode into the skill so the agent executes instead of re-derives. That’s what turns fifteen minutes into fifteen seconds.
Using native Accept/Reject. Every change is redlined by “Copilot Studio AI” and can be accepted or rejected.
Don’t convert what’s already perfect. The template is a flawless Word document. Injecting revisions or converting isn’t always necessary and it beats reconstructing it every time.
Have you tried letting an agentic loop write your script instead of authoring it yourself? We’d love to hear how it went in the comments.