Connecting Salesforce's Hosted MCP Server to Copilot Studio
Microsoft Copilot harness
Connect Salesforce's SObject All hosted MCP server to a Copilot Studio agent using an External Client App and manual OAuth, then validate reads and controlled updates.
Your sales team wants to ask an agent for the latest opportunities, update a close date, and add a note without switching between chat and Salesforce. The interesting part isn’t just retrieving CRM data. It’s making sure the agent can act on that data with the right user’s permissions.
Salesforce’s hosted Model Context Protocol (MCP) servers provide tools for working with Salesforce records. In this walkthrough, we’ll connect SObject All directly to a Copilot Studio agent, using a Salesforce External Client App and manual OAuth 2.0 configuration. Then we’ll test a read, make a controlled update, and verify the result in Salesforce.
The screenshots use Copilot Studio’s GitHub Copilot harness. The linked MCP onboarding documentation describes the standard harness, so navigation and button labels can differ. This walkthrough follows the captured Build experience and identifies the OAuth settings explicitly.
Before you begin
You’ll need:
- Salesforce System Administrator or equivalent permissions to create an External Client App and access hosted MCP server setup.
- Access to the target Copilot Studio environment and agent.
- A Salesforce user with the object, field, and record access needed for your test.
- A controlled test opportunity that you can safely modify.
Salesforce’s org setup guide explains the authentication prerequisites. Its SObject All reference describes the tools, endpoints, and permission model.
SObject All supports reads and writes, including deletes. Salesforce still applies the authenticated user’s object permissions, field-level security, and sharing rules. We’ll also limit the tools exposed to the agent before testing.
Don’t start with a production opportunity. Use controlled records and a least-privileged Salesforce account. Keep consumer secrets, access tokens, and refresh tokens out of screenshots, prompts, and source control.
Choose the right endpoints
The implementation shown here used a Developer Edition org. Production and Developer Edition use the production endpoints below. For a sandbox, change both the MCP server URL and the OAuth endpoints.
| Setting | Production / Developer Edition | Sandbox |
|---|---|---|
| MCP server URL | https://api.salesforce.com/platform/mcp/v1/platform/sobject-all |
https://api.salesforce.com/platform/mcp/v1/sandbox/platform/sobject-all |
| Authorization URL | https://login.salesforce.com/services/oauth2/authorize |
https://test.salesforce.com/services/oauth2/authorize |
| Token URL | https://login.salesforce.com/services/oauth2/token |
https://test.salesforce.com/services/oauth2/token |
| Refresh token URL | https://login.salesforce.com/services/oauth2/token |
https://test.salesforce.com/services/oauth2/token |
| Scopes | mcp_api refresh_token |
mcp_api refresh_token |
The MCP endpoint comes from the SObject All reference. Salesforce documents the production and sandbox login hosts in its OAuth web server flow guide.
1. Create the Salesforce External Client App
The External Client App registers Copilot Studio as an OAuth client in Salesforce. It provides the client credentials and defines where Salesforce can send the authorization response.
Follow Salesforce’s External Client App setup instructions alongside the steps below. Salesforce specifies an External Client App for hosted MCP connections; Connected Apps aren’t supported for this flow.
Enter the basic information
- In Salesforce Setup, enter external in Quick Find.
- Select Apps > External Client Apps > External Client App Manager.
- Select New External Client App.
- Enter an External Client App Name, such as
Copilot Studio MCP Client. - Enter an API Name, such as
Copilot_Studio_MCP_Client, and your Contact Email. - Leave Distribution State as Local for this configuration.
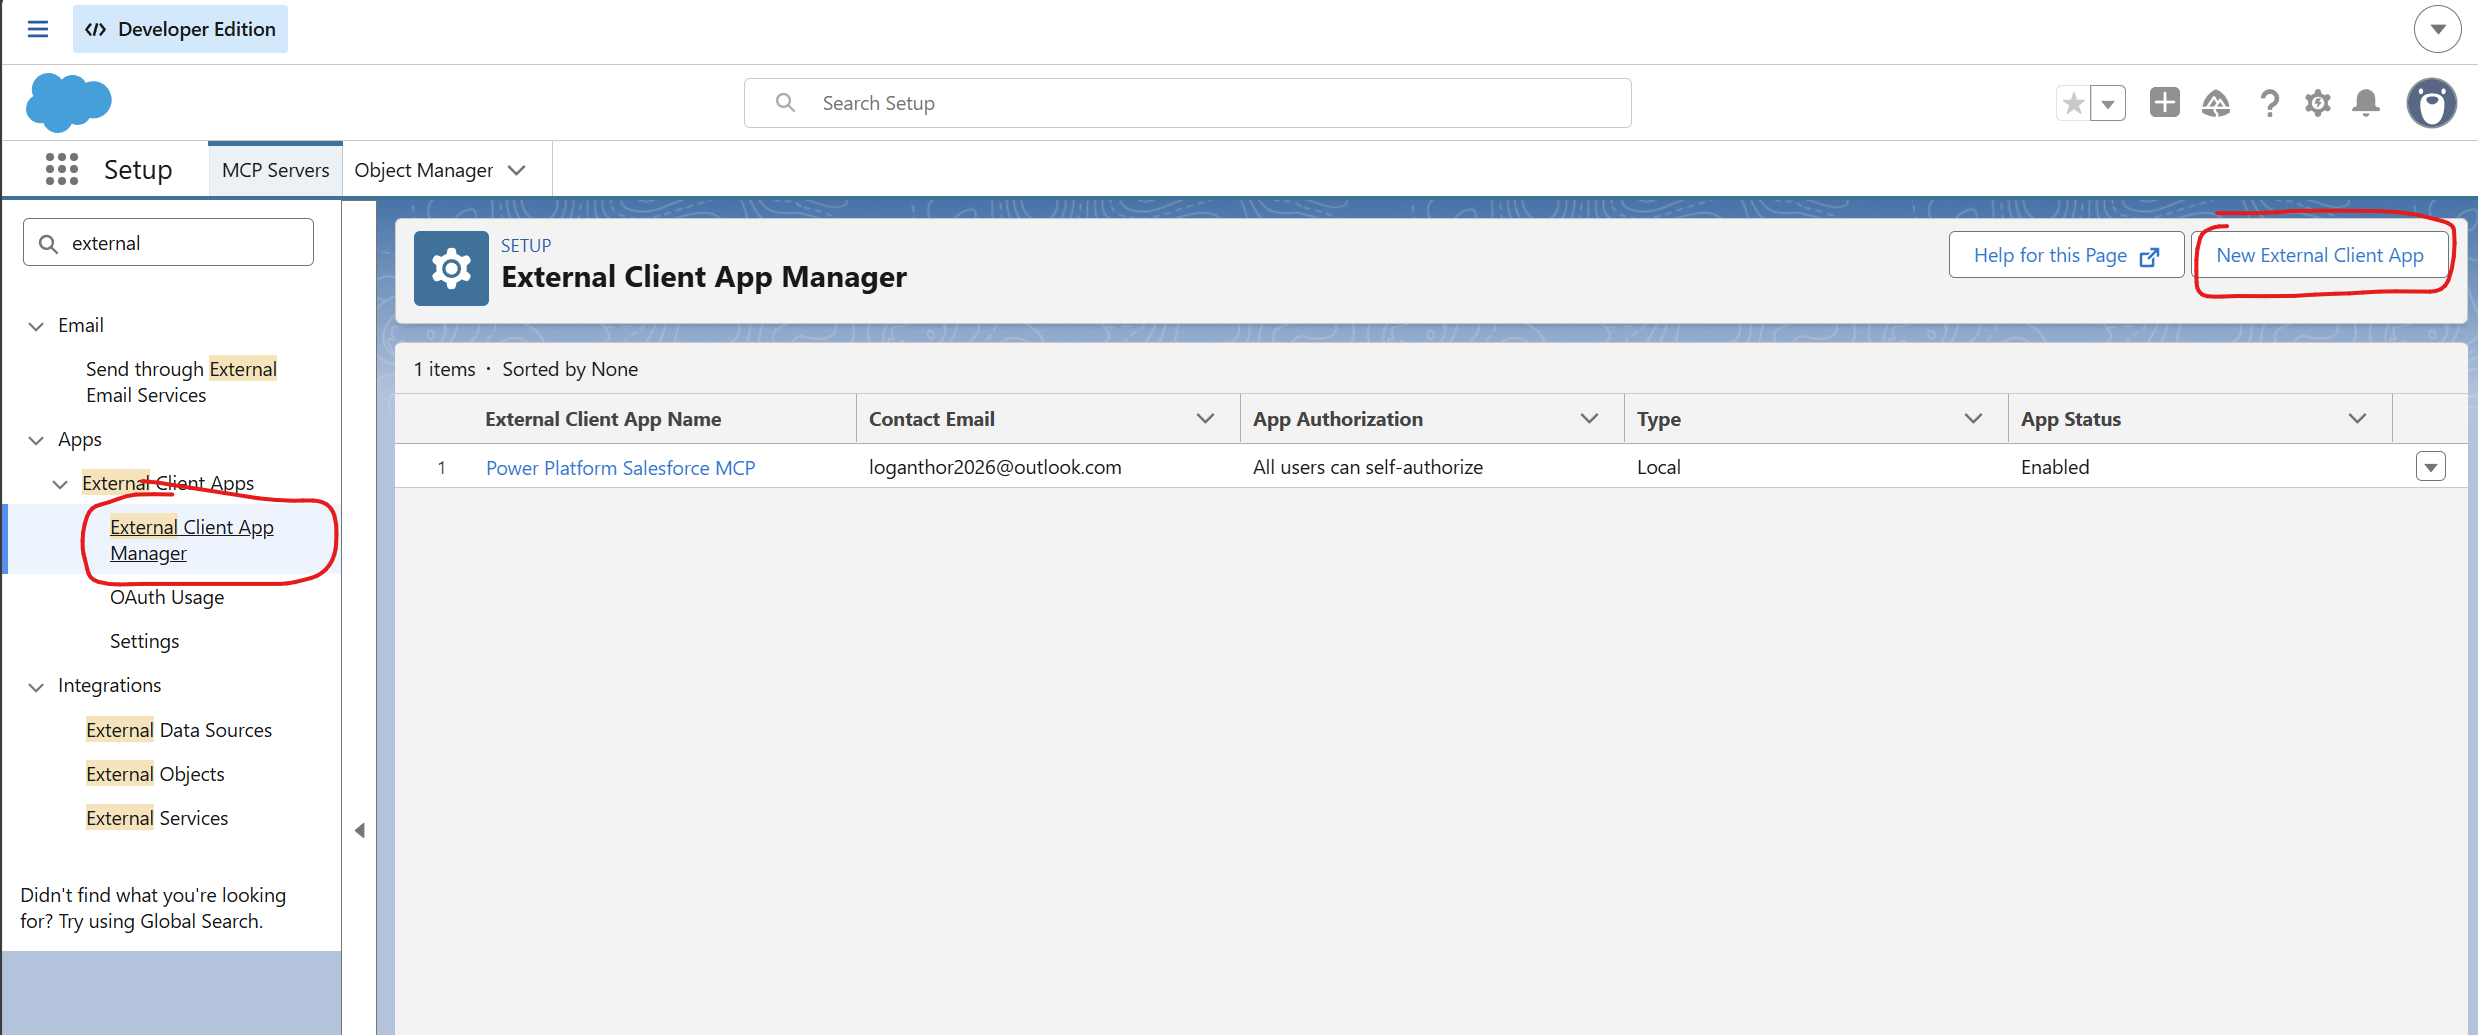 Open External Client App Manager and select New External Client App.
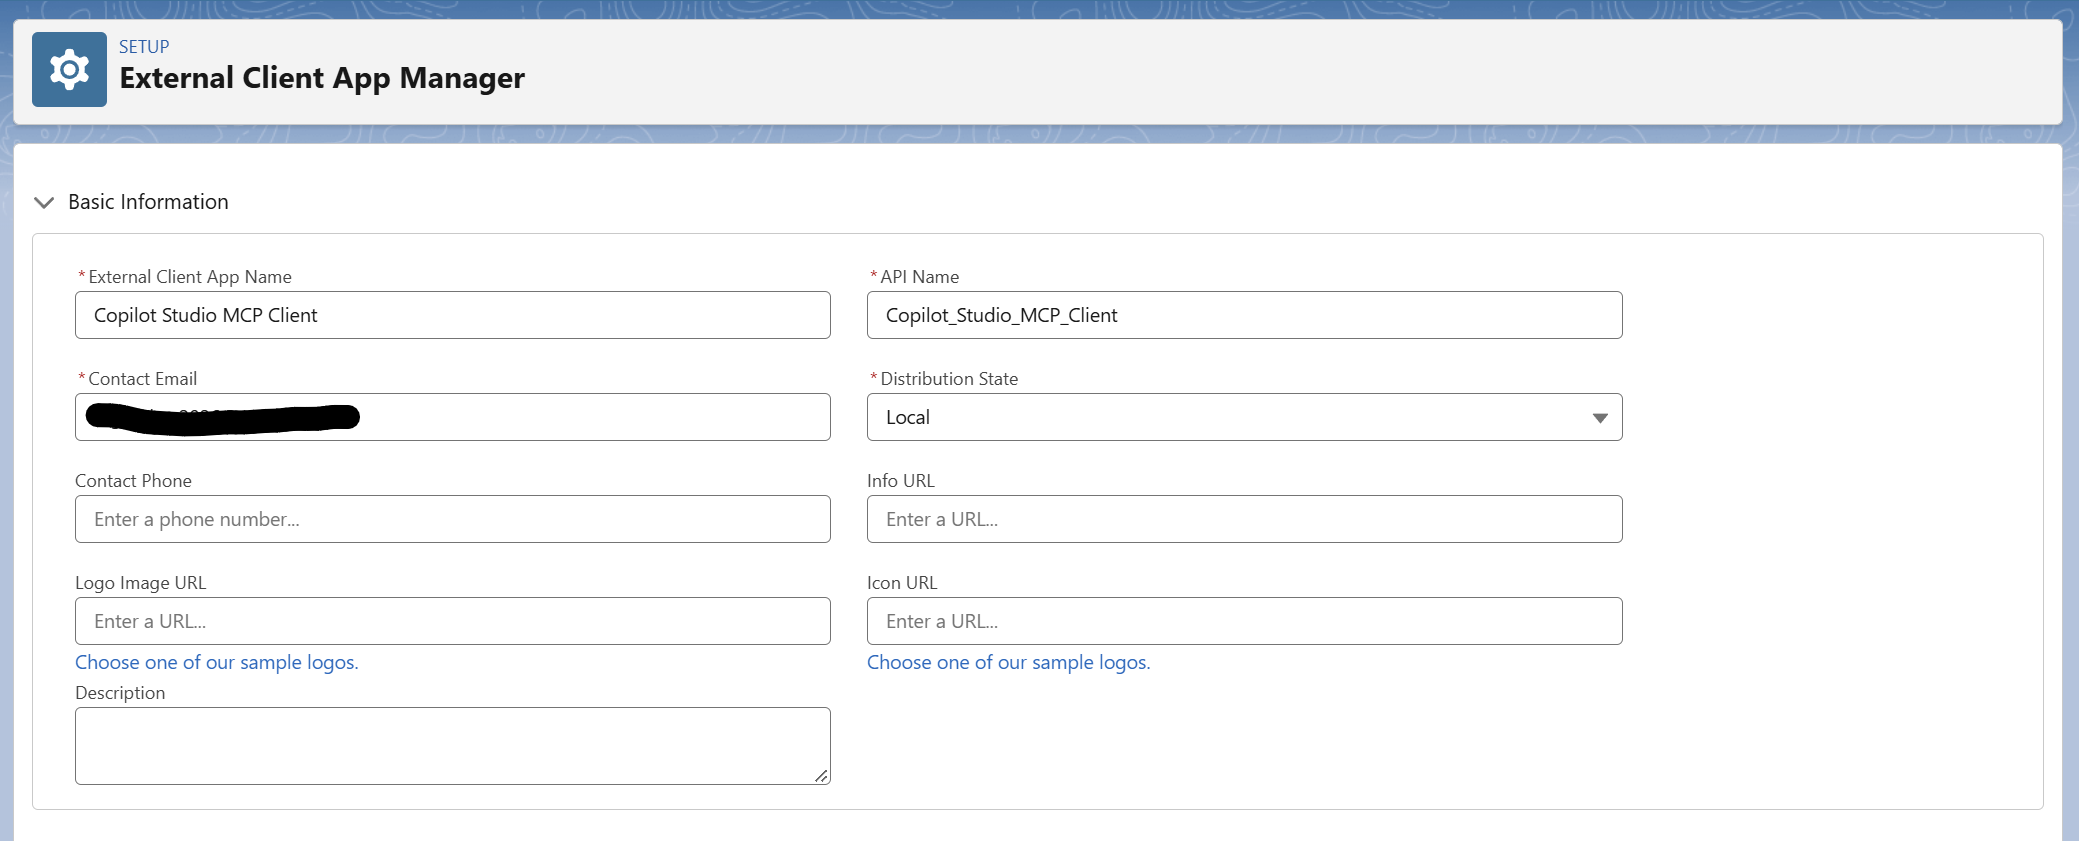 Provide the app name, API name, and contact email, with Local distribution selected.
Enable OAuth and select the scopes
Expand API (Enable OAuth Settings) and select Enable OAuth.
The Callback URL is required, but Copilot Studio hasn’t generated your redirect URL yet. For this setup, use a temporary HTTPS value such as https://microsoft.com. We’ll replace it before creating the connection. Don’t attempt to authenticate with the placeholder.
Move these entries into Selected OAuth Scopes:
-
Perform requests at any time (
refresh_token,offline_access). -
Access Salesforce hosted MCP servers (
mcp_api).
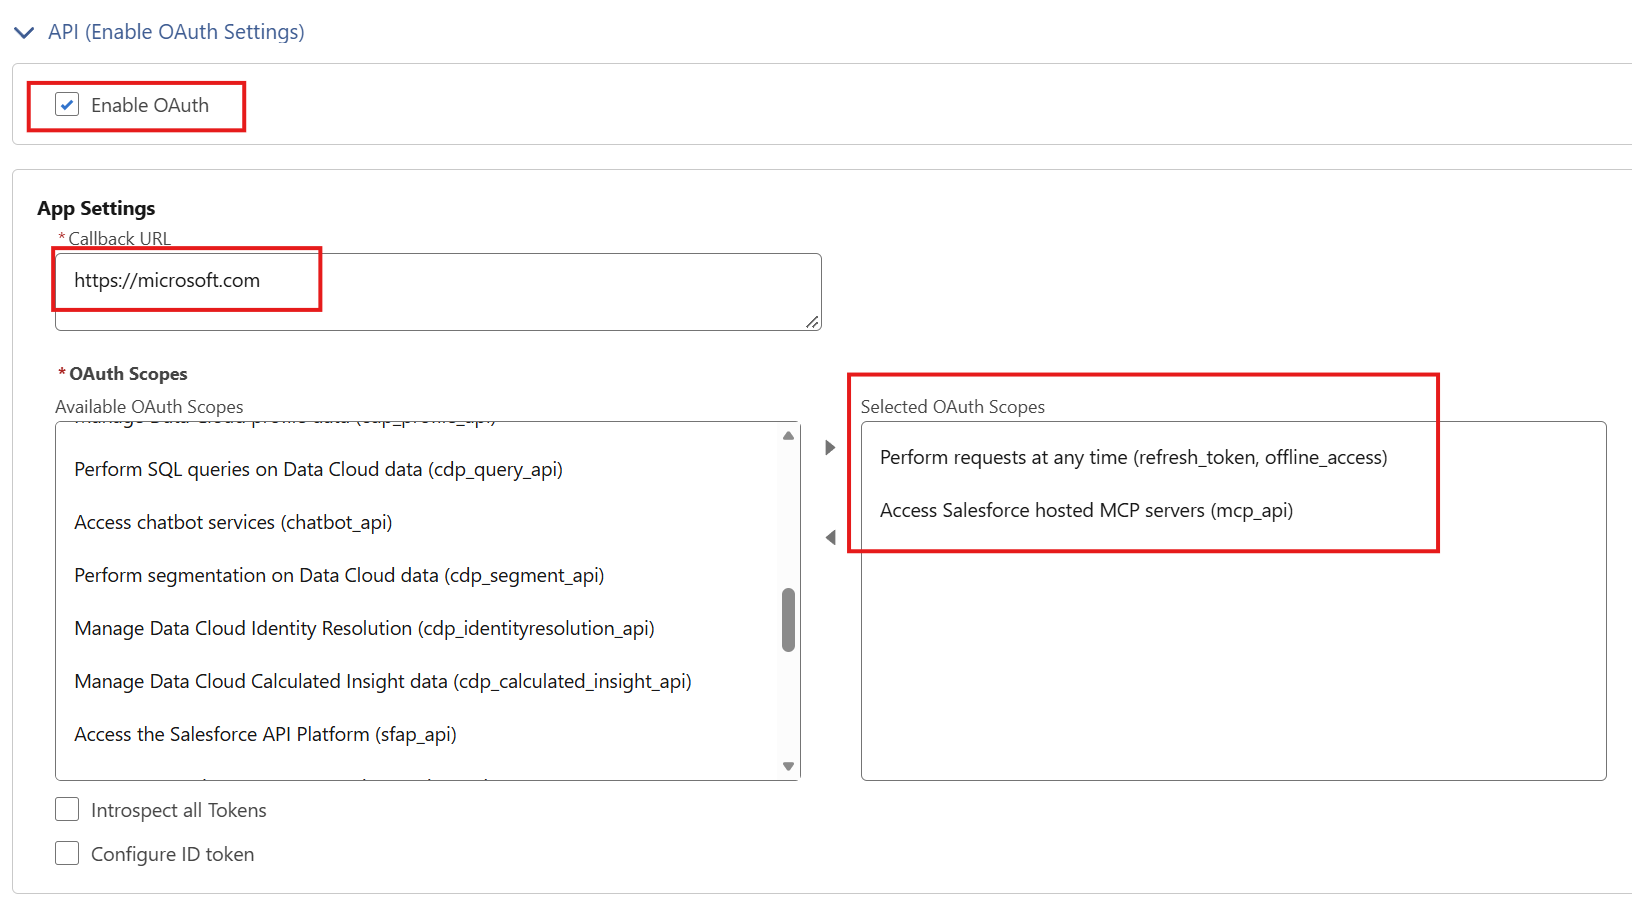 Enable OAuth, enter the temporary callback, and select the refresh token and hosted MCP scopes.
Confirm the security settings
In Security, select Issue JSON Web Token (JWT)-based access tokens for named users.
In our configuration, Require Proof Key for Code Exchange (PKCE), Enable Refresh Token Rotation, and Limit idle Refresh Token Time-to-Live (TTL) to 30 Days were already selected, with the UI indicating that changing them required Salesforce support. Keep those settings. Leave the Flow Enablement options unchecked, and follow Salesforce’s setup guide for the remaining security options.
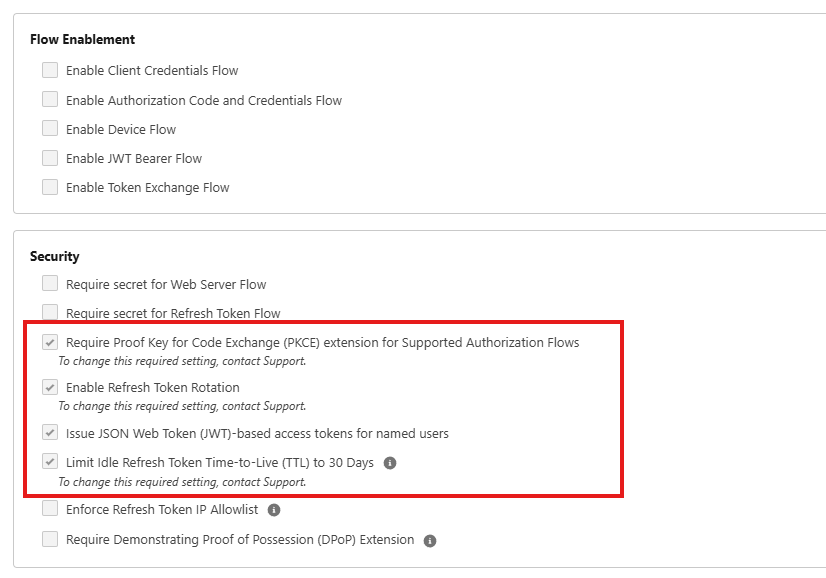 The configuration used PKCE, refresh token rotation, JWT-based access tokens, and the 30-day idle refresh token TTL.
Scroll to the bottom and select Create to save the app.
 Select Create after completing the OAuth and security settings.
Retrieve the client credentials
After creating the app, open its Settings tab, expand OAuth Settings, and select Consumer Key and Secret under App Settings. Salesforce may ask you to verify your identity before displaying the values.
The field names map to Copilot Studio as follows:
| Salesforce | Copilot Studio |
|---|---|
| Consumer Key | Client ID |
| Consumer Secret | Client secret |
Store the values securely. You’ll enter them in Copilot Studio, not in the agent’s instructions.
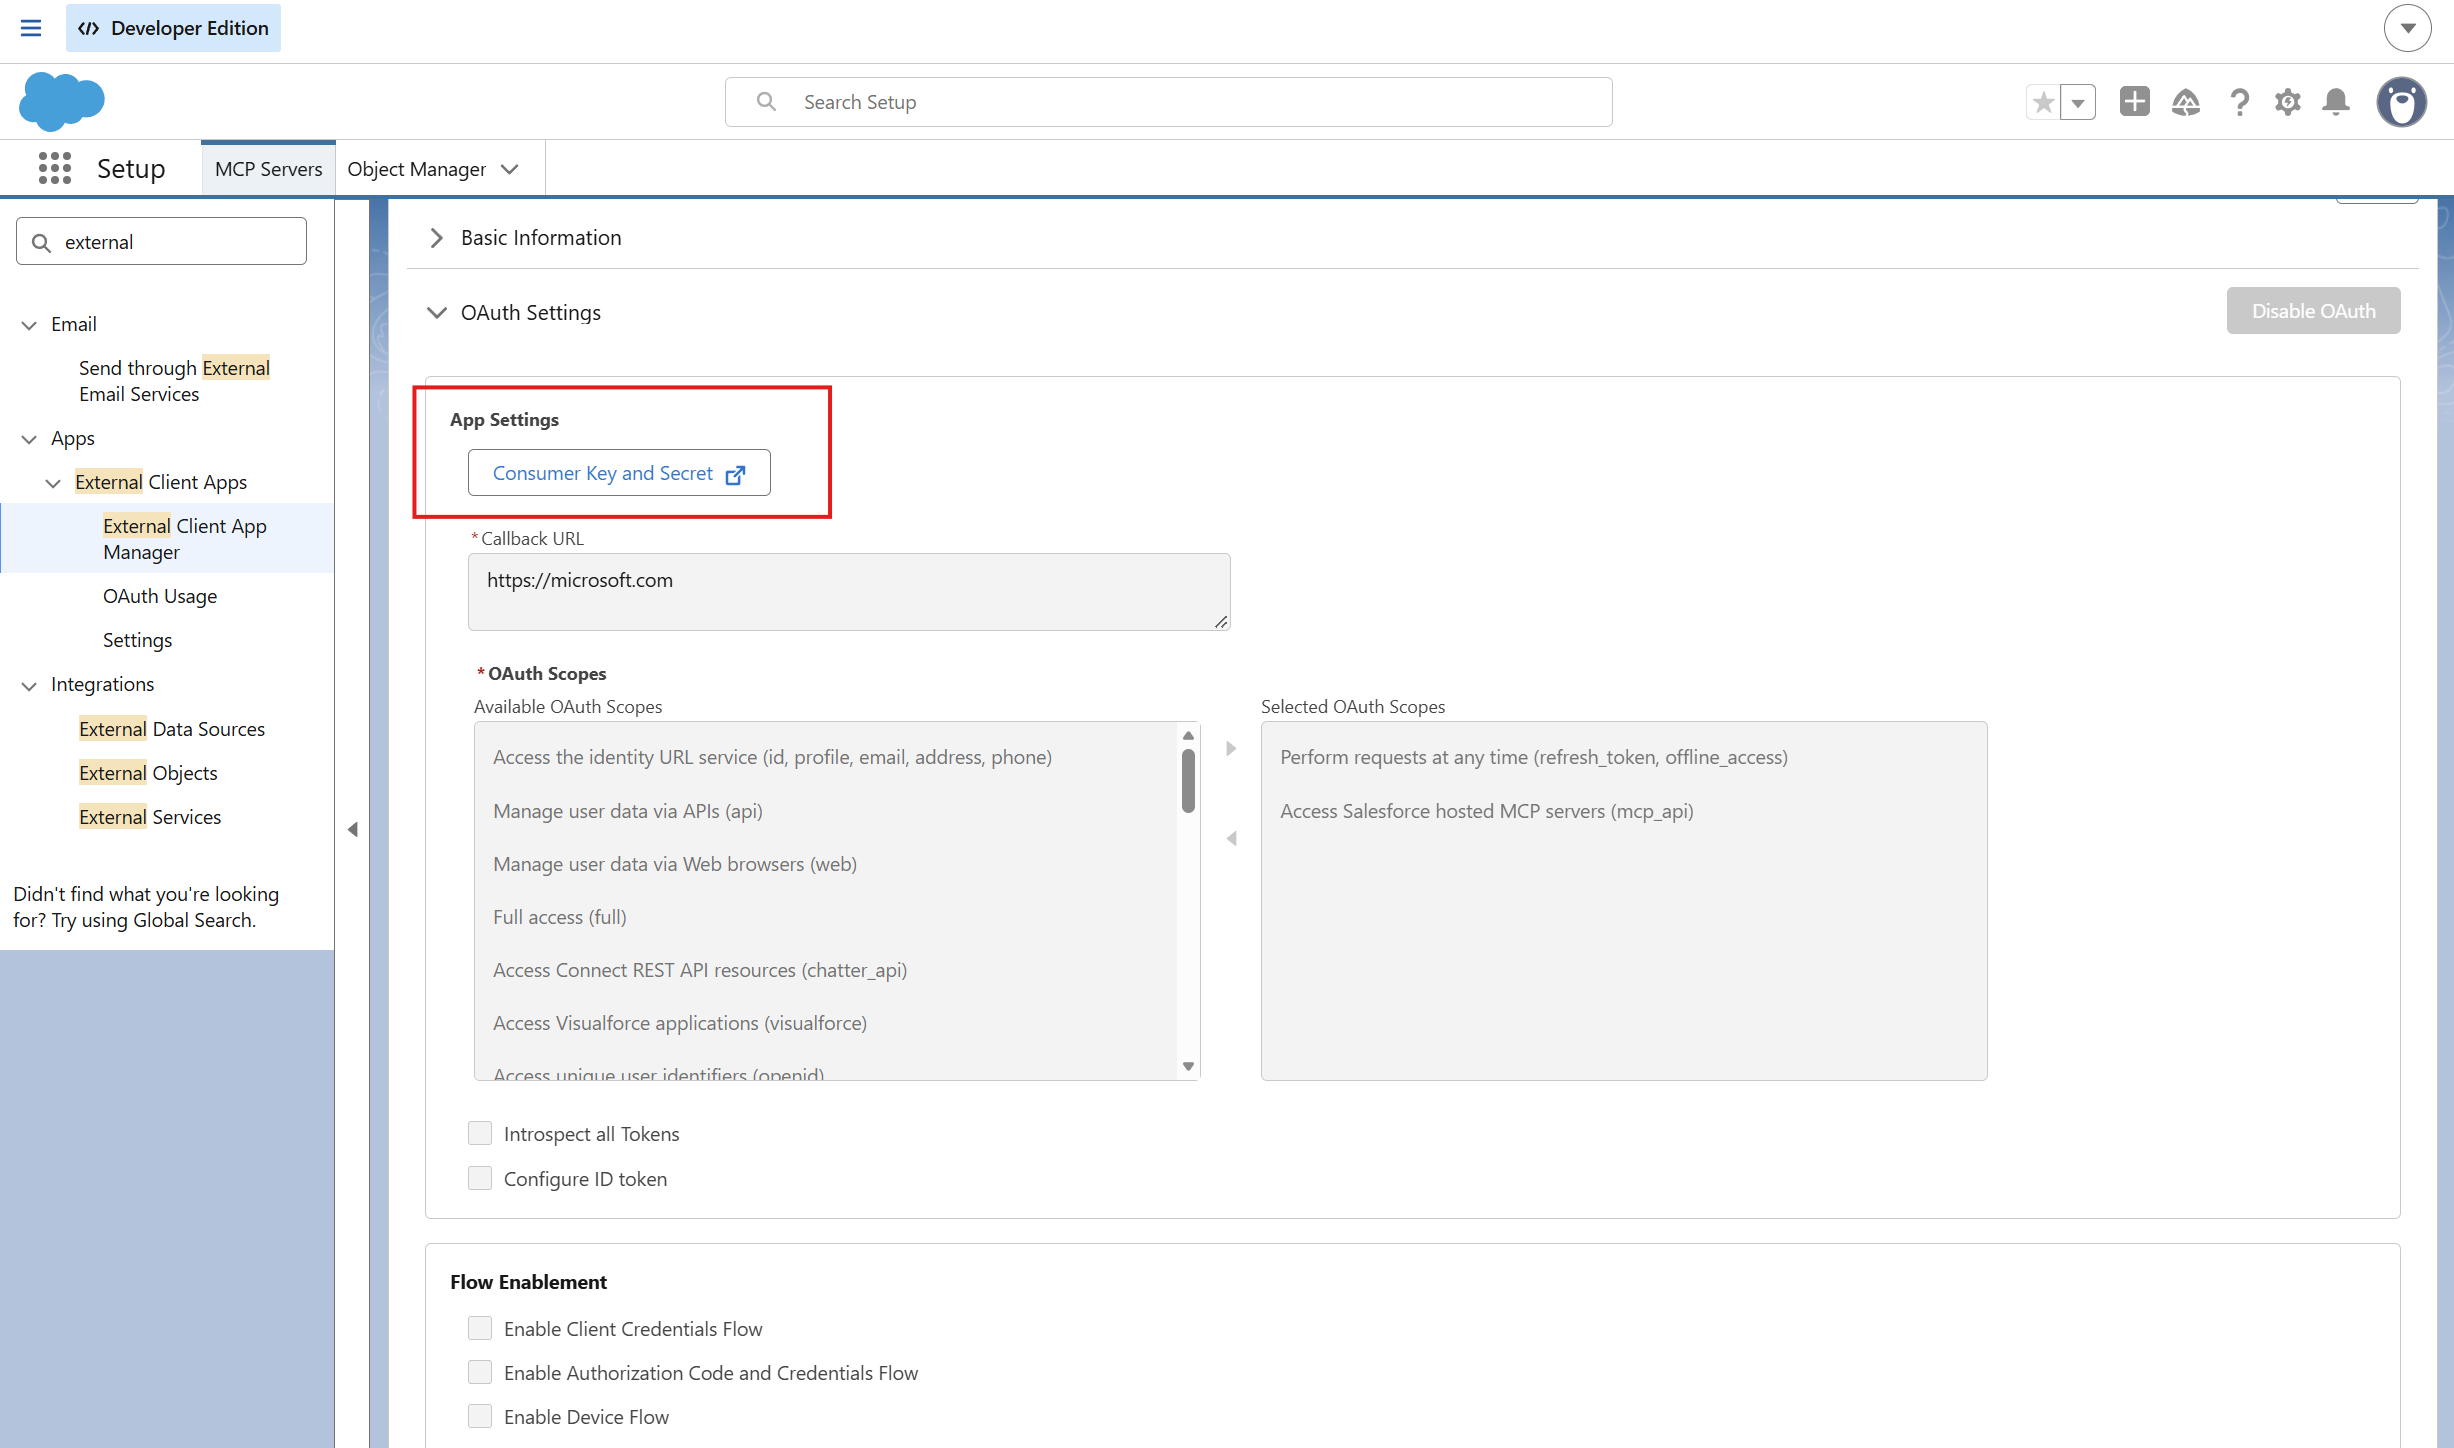 The Consumer Key and Secret button opens the credential values; this screenshot does not display them.
Salesforce notes that a new External Client App can take up to 30 minutes to become operational. Account for that delay when testing, but check the configuration before assuming a failure is caused by propagation.
2. Activate the hosted MCP server
In Salesforce Setup, search for MCP and open MCP Servers under Integrations > API Catalog.
On the Salesforce Servers tab, locate SObject All. Open the server or its row action and activate it. Confirm that Server Status is Active before continuing. Salesforce’s hosted MCP documentation is the starting point for org setup, while the SObject All reference describes this server’s operations.
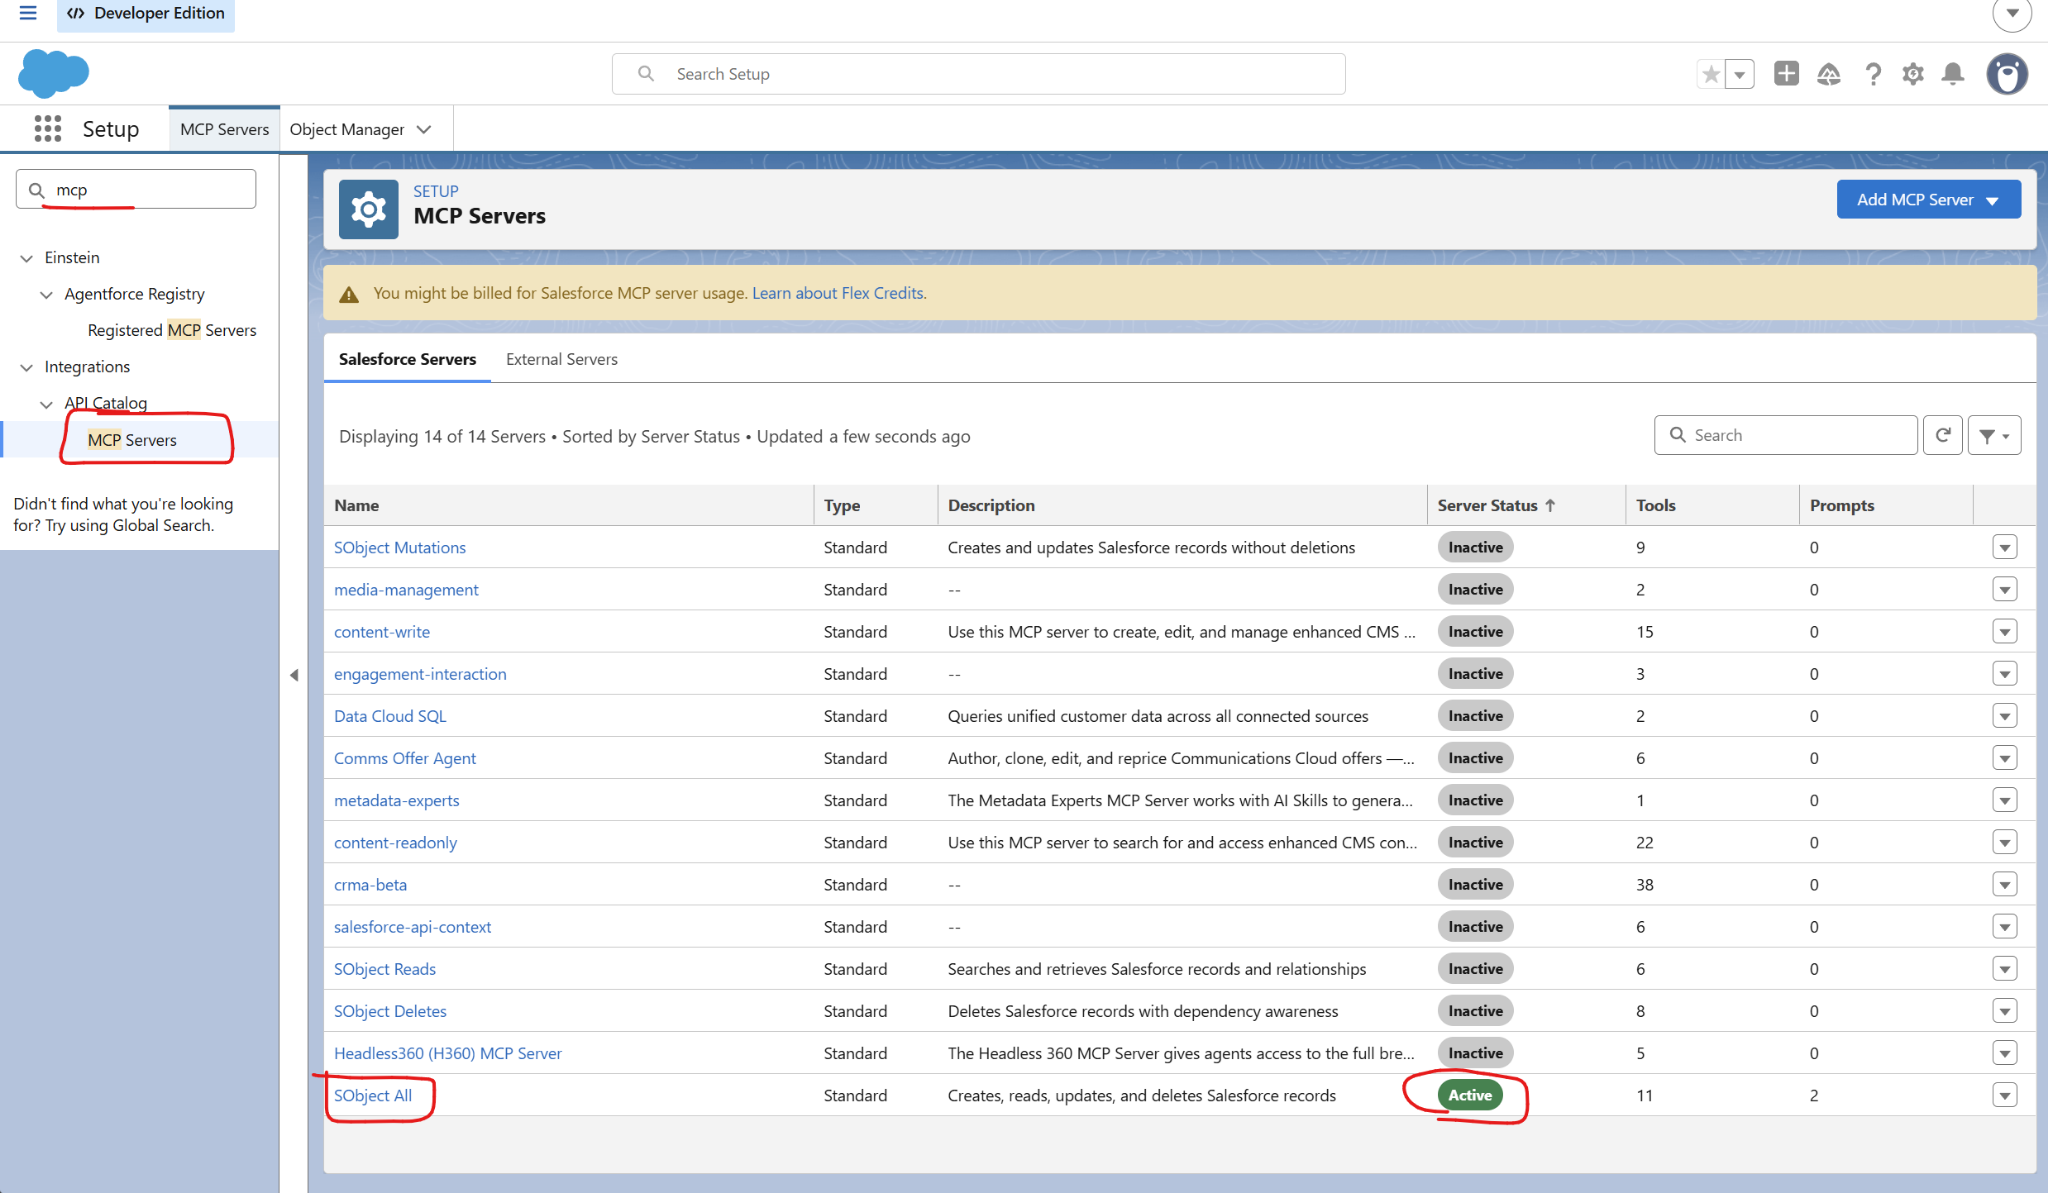 SObject All appears at the bottom of the server list with an Active status.
3. Add the server to your Copilot Studio agent
Now switch to Copilot Studio. Microsoft’s MCP onboarding guide documents the manual OAuth fields and callback sequence for the standard harness. The steps and screenshots below show the GitHub Copilot harness configuration used in our implementation.
For an introduction to MCP onboarding, see our first MCP connector walkthrough.
- Open your target agent.
- In the UI shown here, open Build and select + next to Tools. In environments with a dedicated Tools page, select Add a tool there.
- In Add a tool, select + Add, then Model Context Protocol (MCP).
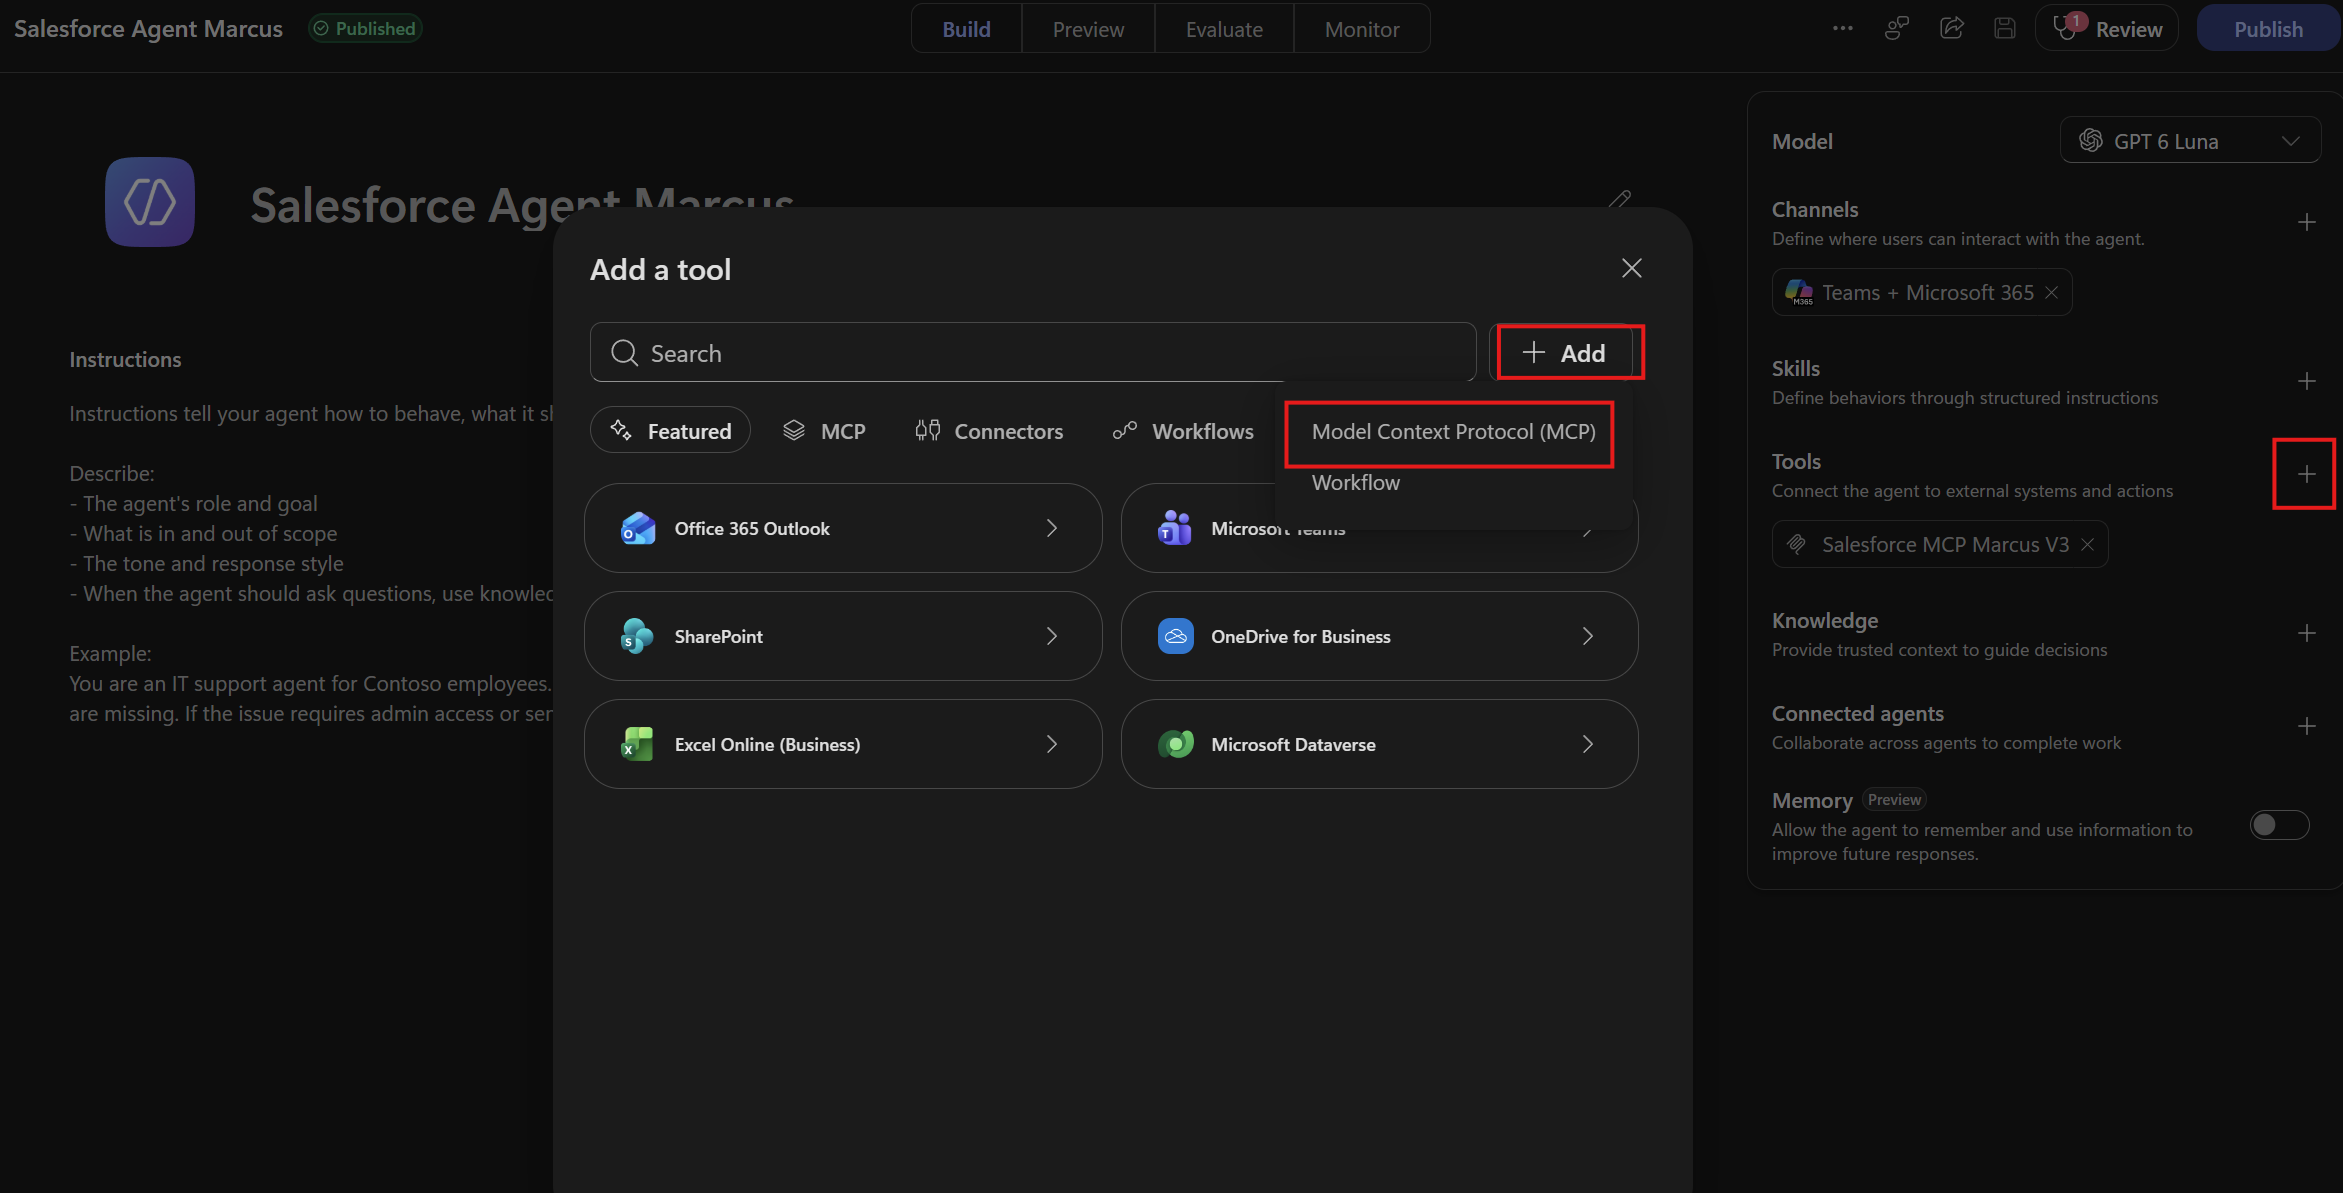 Add the hosted server using the Model Context Protocol option.
Enter the server and authentication details
Complete the first part of Add MCP server:
| Field | Value |
|---|---|
| Server name | Salesforce MCP Server |
| Server URL | The MCP endpoint for your org type from the earlier table |
| Authentication | OAuth 2.0 |
| Configuration type | Manual |
| Client ID | The External Client App’s Consumer Key |
| Client secret | The External Client App’s Consumer Secret |
Give the server a description that tells the agent when to use it. For example:
Use this Salesforce MCP server to work with live Salesforce CRM data and records. Use it when the user asks to find, retrieve, create, or update Salesforce records, including accounts, contacts, leads, opportunities, cases, and related CRM data.
Keep the description aligned with the tools you intend to enable. It isn’t an authorization control: we’ll configure tool permissions separately.
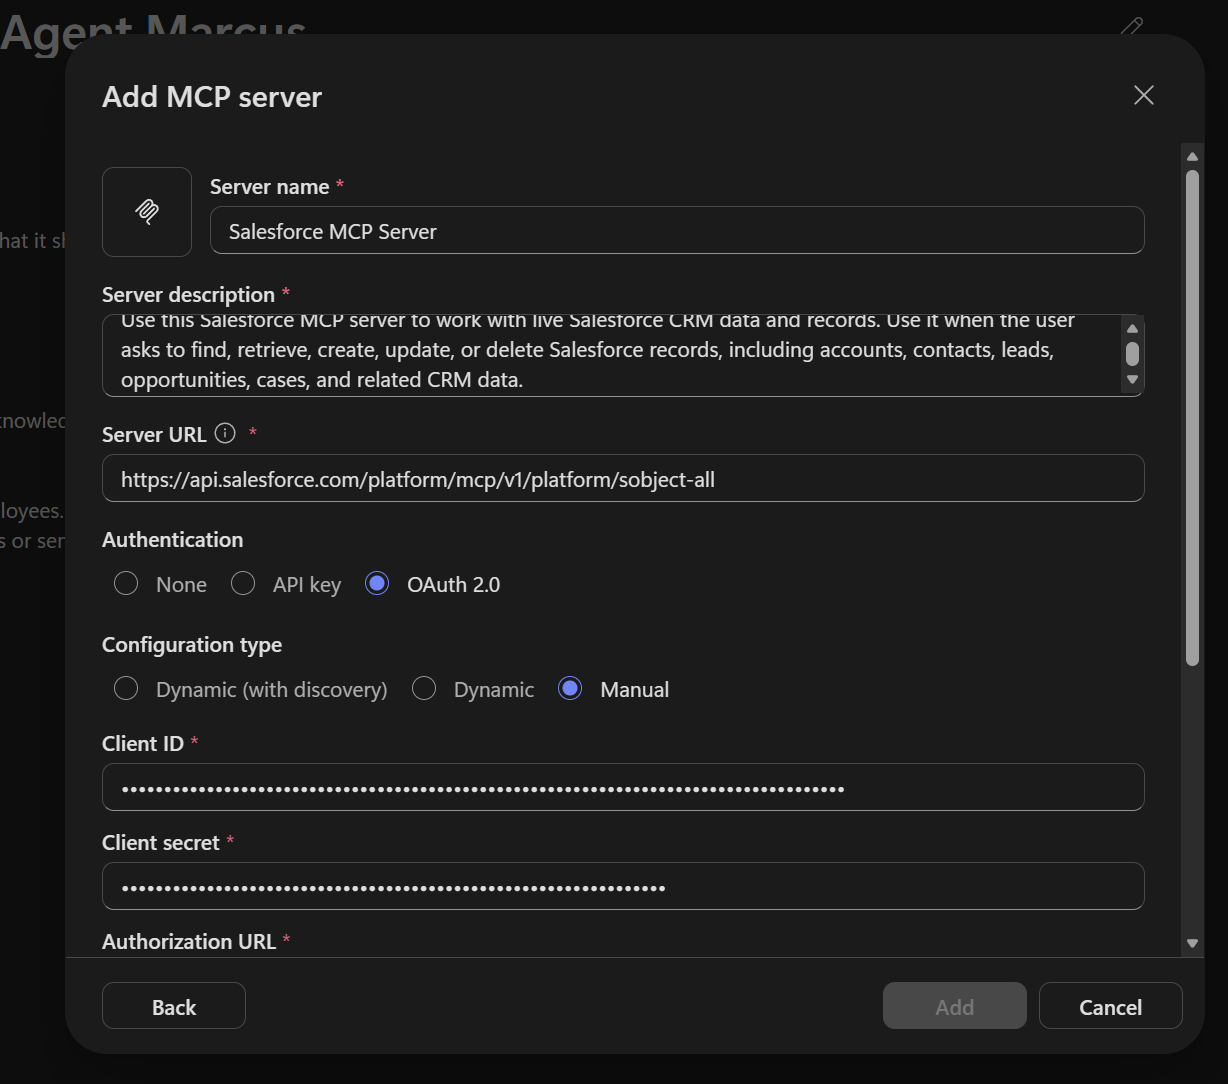 Enter the server details and select OAuth 2.0 with Manual configuration. Client credentials are masked.
Scroll down and enter the Authorization URL, Token URL, Refresh token URL, and space-separated Scopes from the endpoint table.
For the production / Developer Edition configuration shown here, the scopes are mcp_api refresh_token, and both token fields use https://login.salesforce.com/services/oauth2/token.
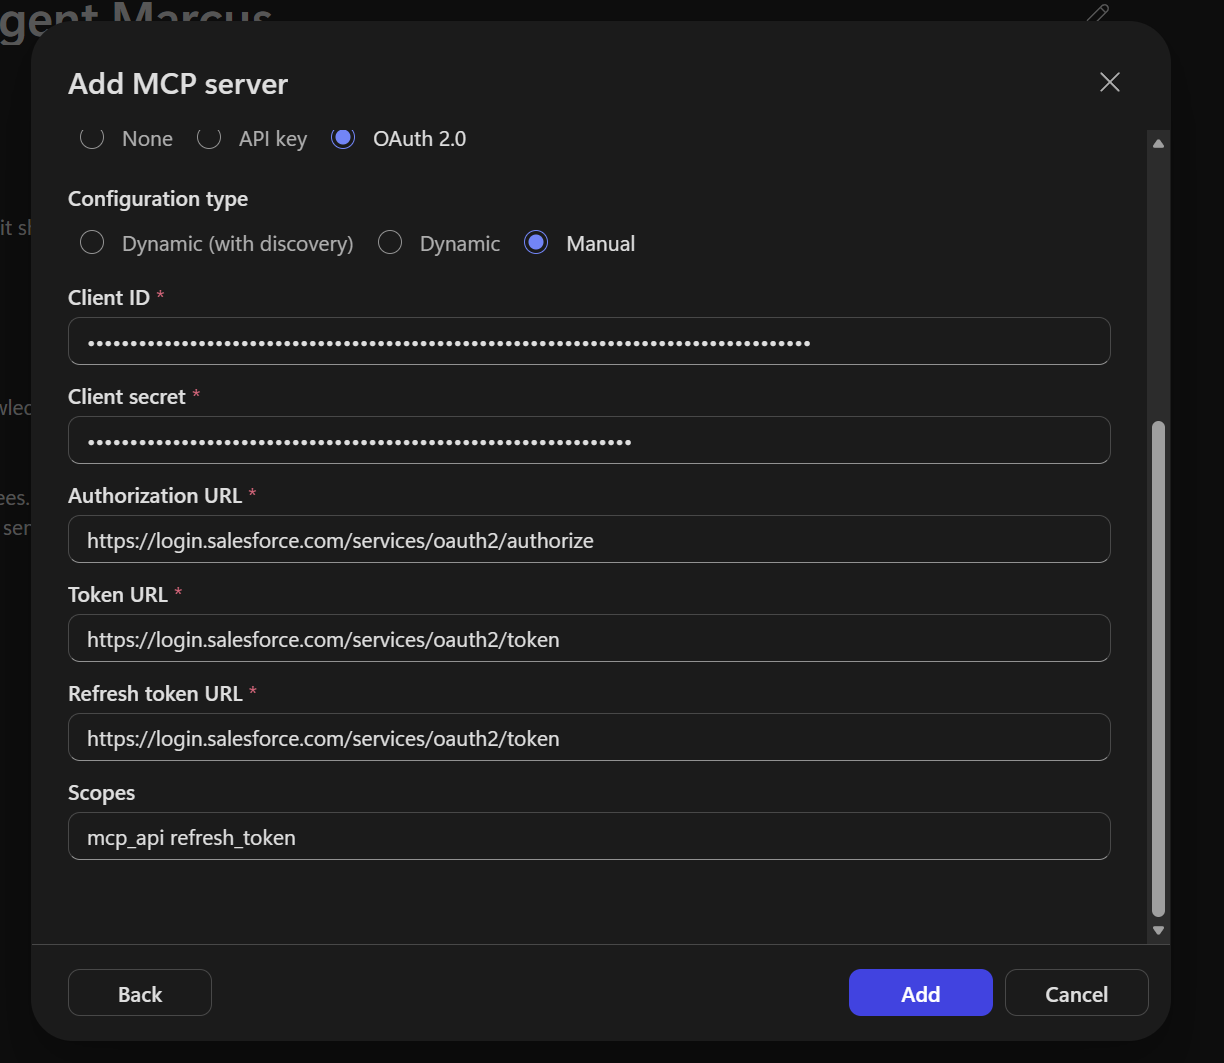 The OAuth configuration uses Salesforce’s authorization and token endpoints with the MCP and refresh token scopes.
Select Add to create the server definition. The current documentation may label this action Create.
Copy the generated redirect URL
Copilot Studio displays Save your redirect URL. Use Copy to capture the full URL, because the field can truncate it on screen.
Don’t select Next yet. Salesforce needs this exact URL registered before you create the connection.
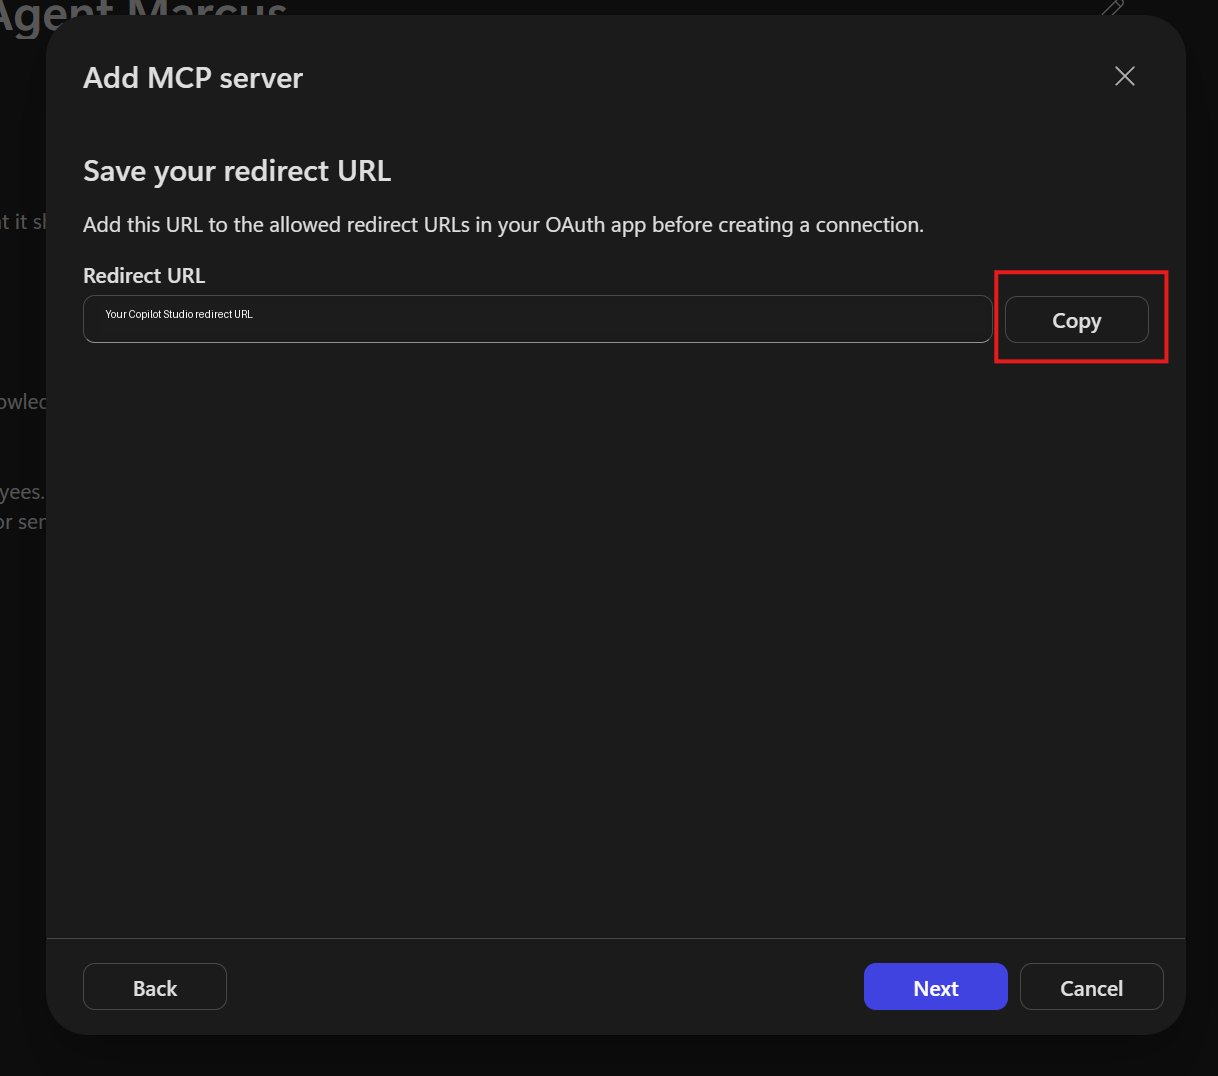 Copy your generated redirect URL. The instance-specific portion is redacted in this screenshot; don’t copy the screenshot’s example.
4. Complete the callback and sign in
Return to Salesforce Setup > External Client App Manager, open your app, and select Edit on the Settings tab.
Expand OAuth Settings and replace the temporary Callback URL with the full redirect URL copied from Copilot Studio. Select Save.
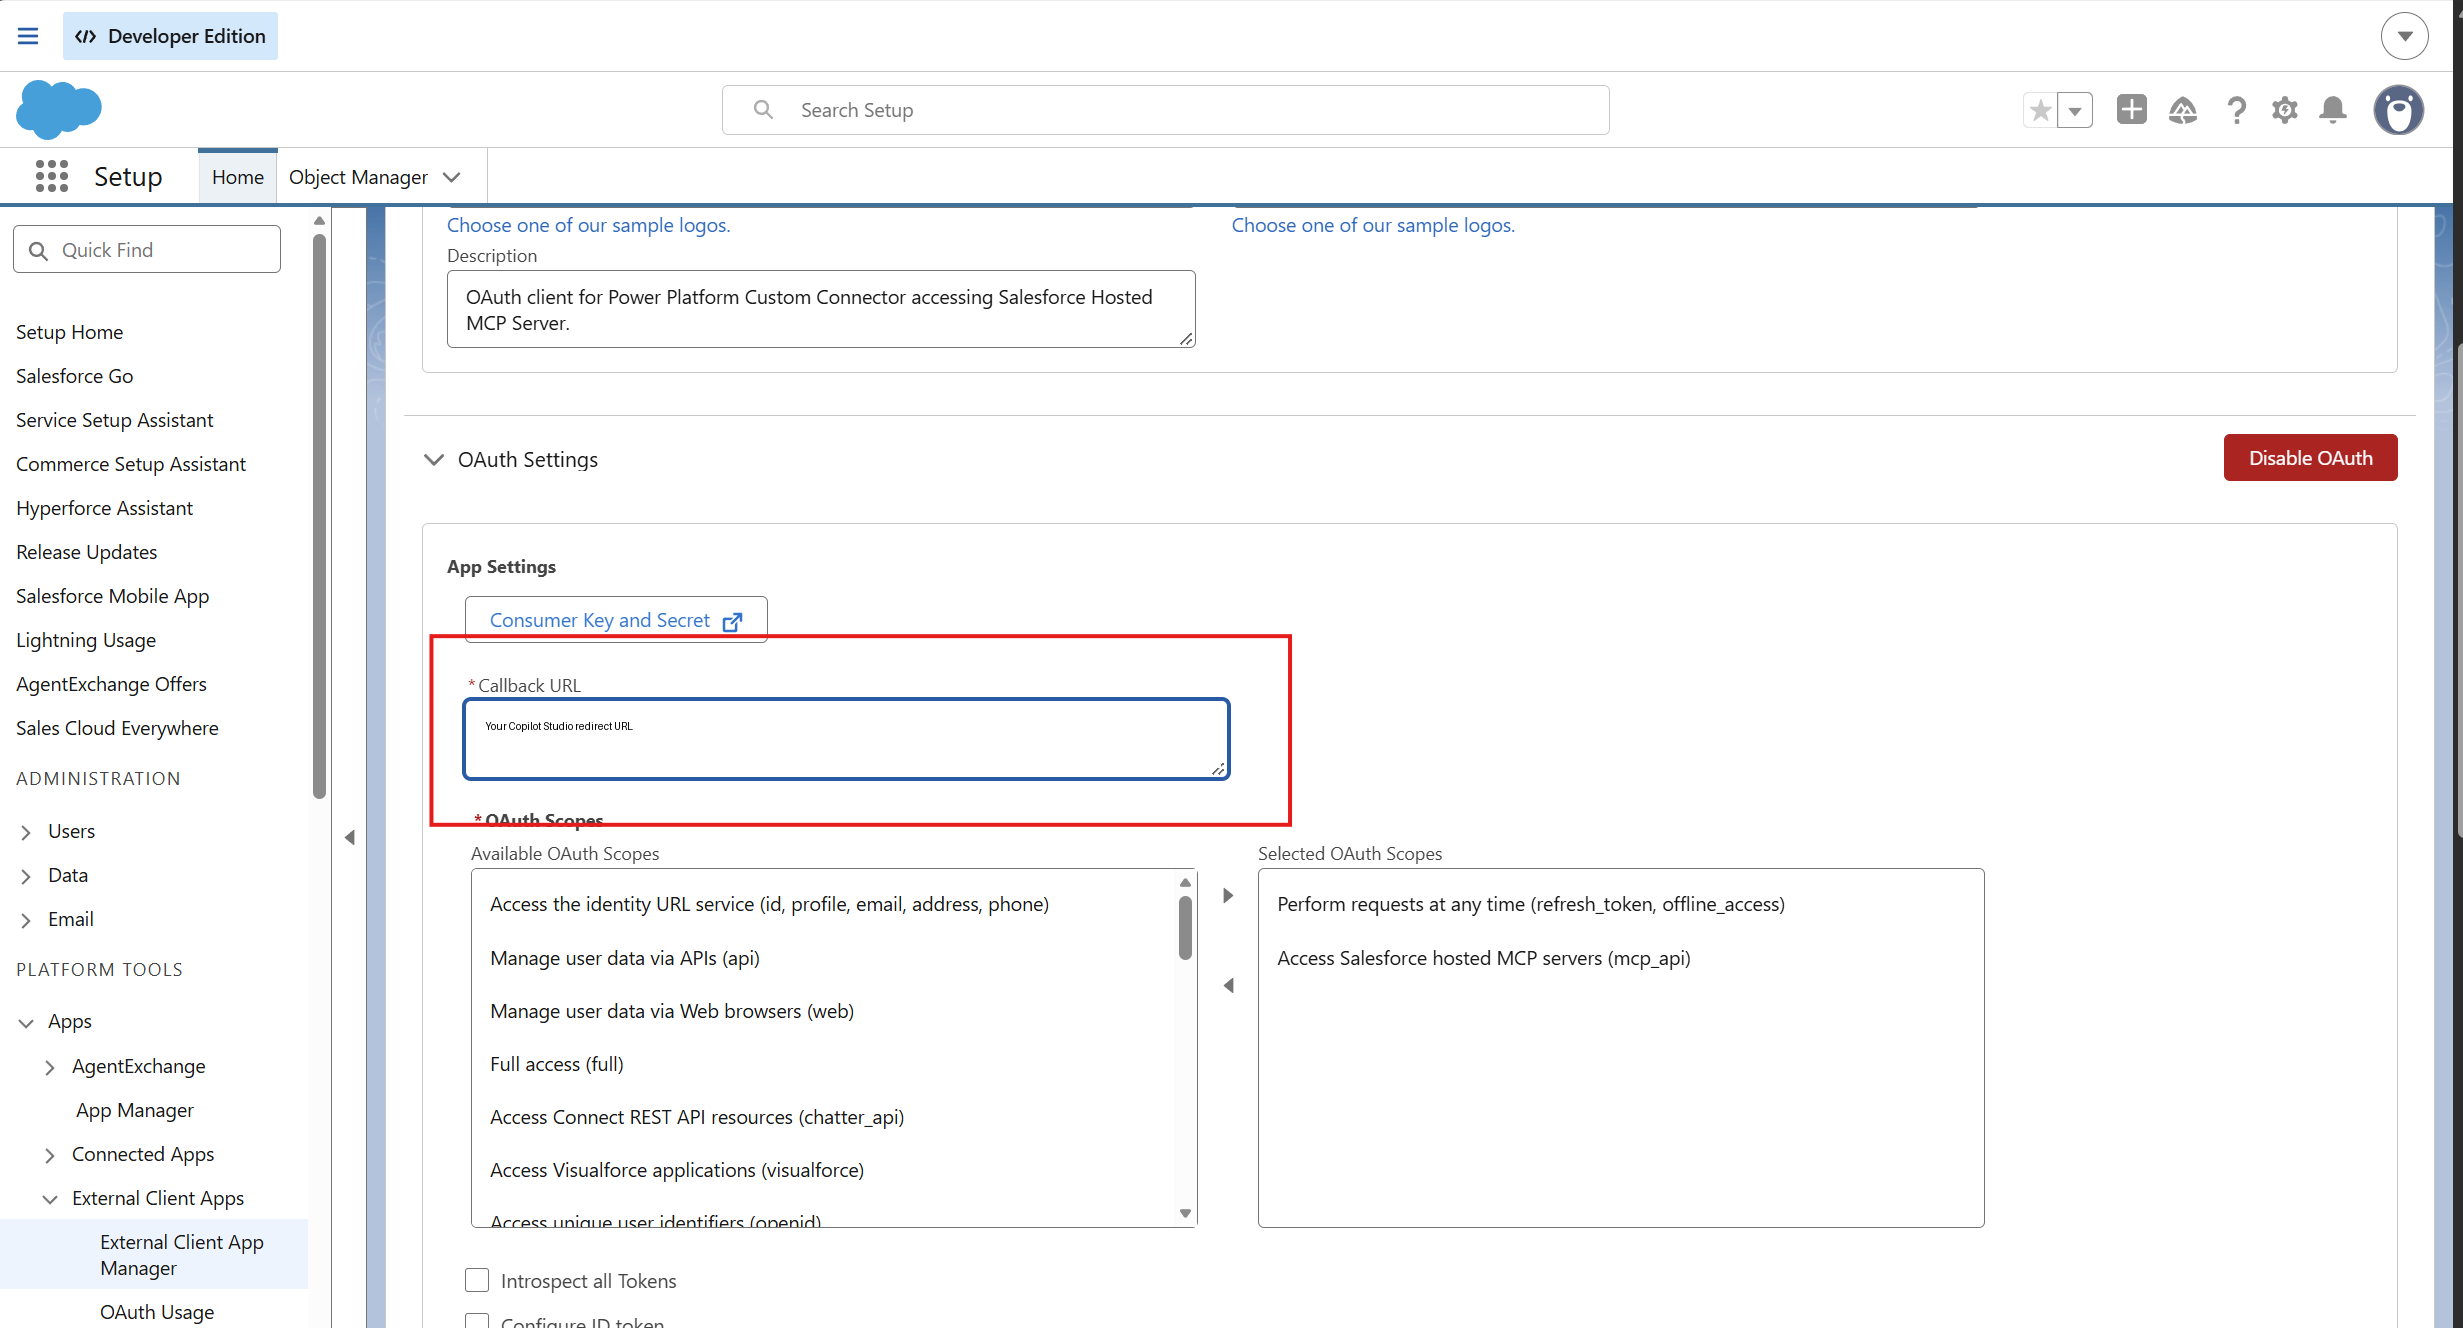 Replace the placeholder with your own Copilot Studio redirect URL, preserving it exactly.
Then return to Copilot Studio:
- Select Next on Save your redirect URL.
- Create a new connection.
- Sign in with the intended Salesforce account and approve the requested access.
- Complete Add to agent if your UI presents that step.
If you see a redirect error
Salesforce can return this error when the callback doesn’t match:
1

error=redirect_uri_mismatch&error_description=redirect_uri must match configuration
Compare the Salesforce callback with the Copilot Studio redirect character for character, including the scheme, path, and any trailing slash. Check that you edited the External Client App whose Consumer Key you entered in Copilot Studio.
Callback URL updates aren’t always immediate. If the URLs match exactly and you just saved the change, allow up to 30 minutes for the updated redirect URL to take effect before assuming the configuration is wrong. In our tests, it started working after around 10 minutes. Close the failed sign-in window and retry after allowing time for propagation. For context, Salesforce’s External Client App setup guide documents an availability delay of up to 30 minutes for a newly created app.
The error itself doesn’t prove that propagation is the cause, so verify the callback and client credentials first.
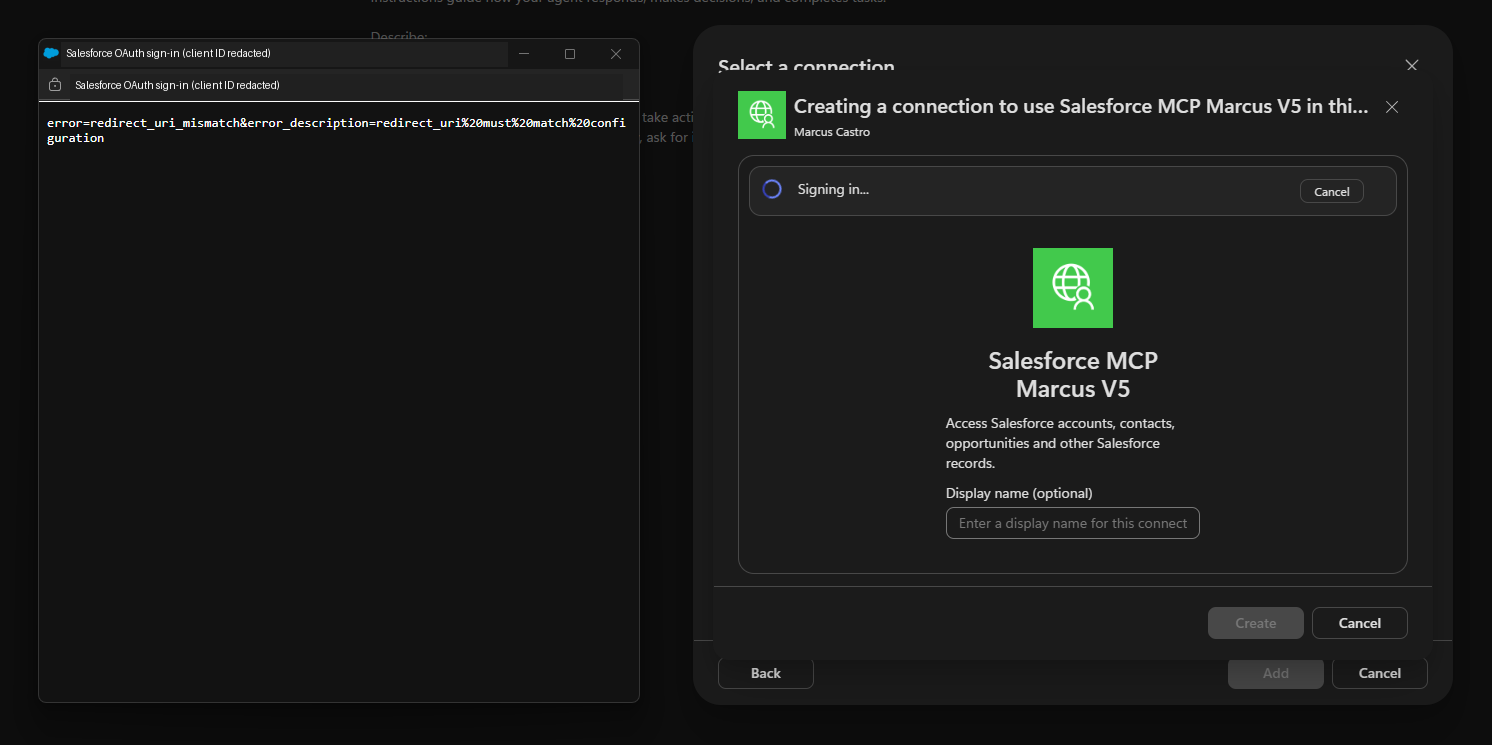 A redirect mismatch blocks connection creation. Verify the saved callback before retrying.
5. Review the discovered tools
After authentication succeeds, open the MCP server from the agent’s Tools list.
In the Edit tool panel, confirm that Connection is connected and review Tool permissions. Our configuration exposed tools including:
- Get object schema, Get user info, Find, and Soql query.
- Get related records and List recent sobject records.
- Create sobject record, Update sobject record, and related-record operations.
- Delete sobject record and Delete related record.
These match the operations described in the SObject All tool reference.
For this walkthrough, enable the read and schema tools first. Enable only the create/update tools needed for the controlled write test, and leave delete tools disabled. If Allow all is selected, turn it off before choosing individual tools. Select Done to save.
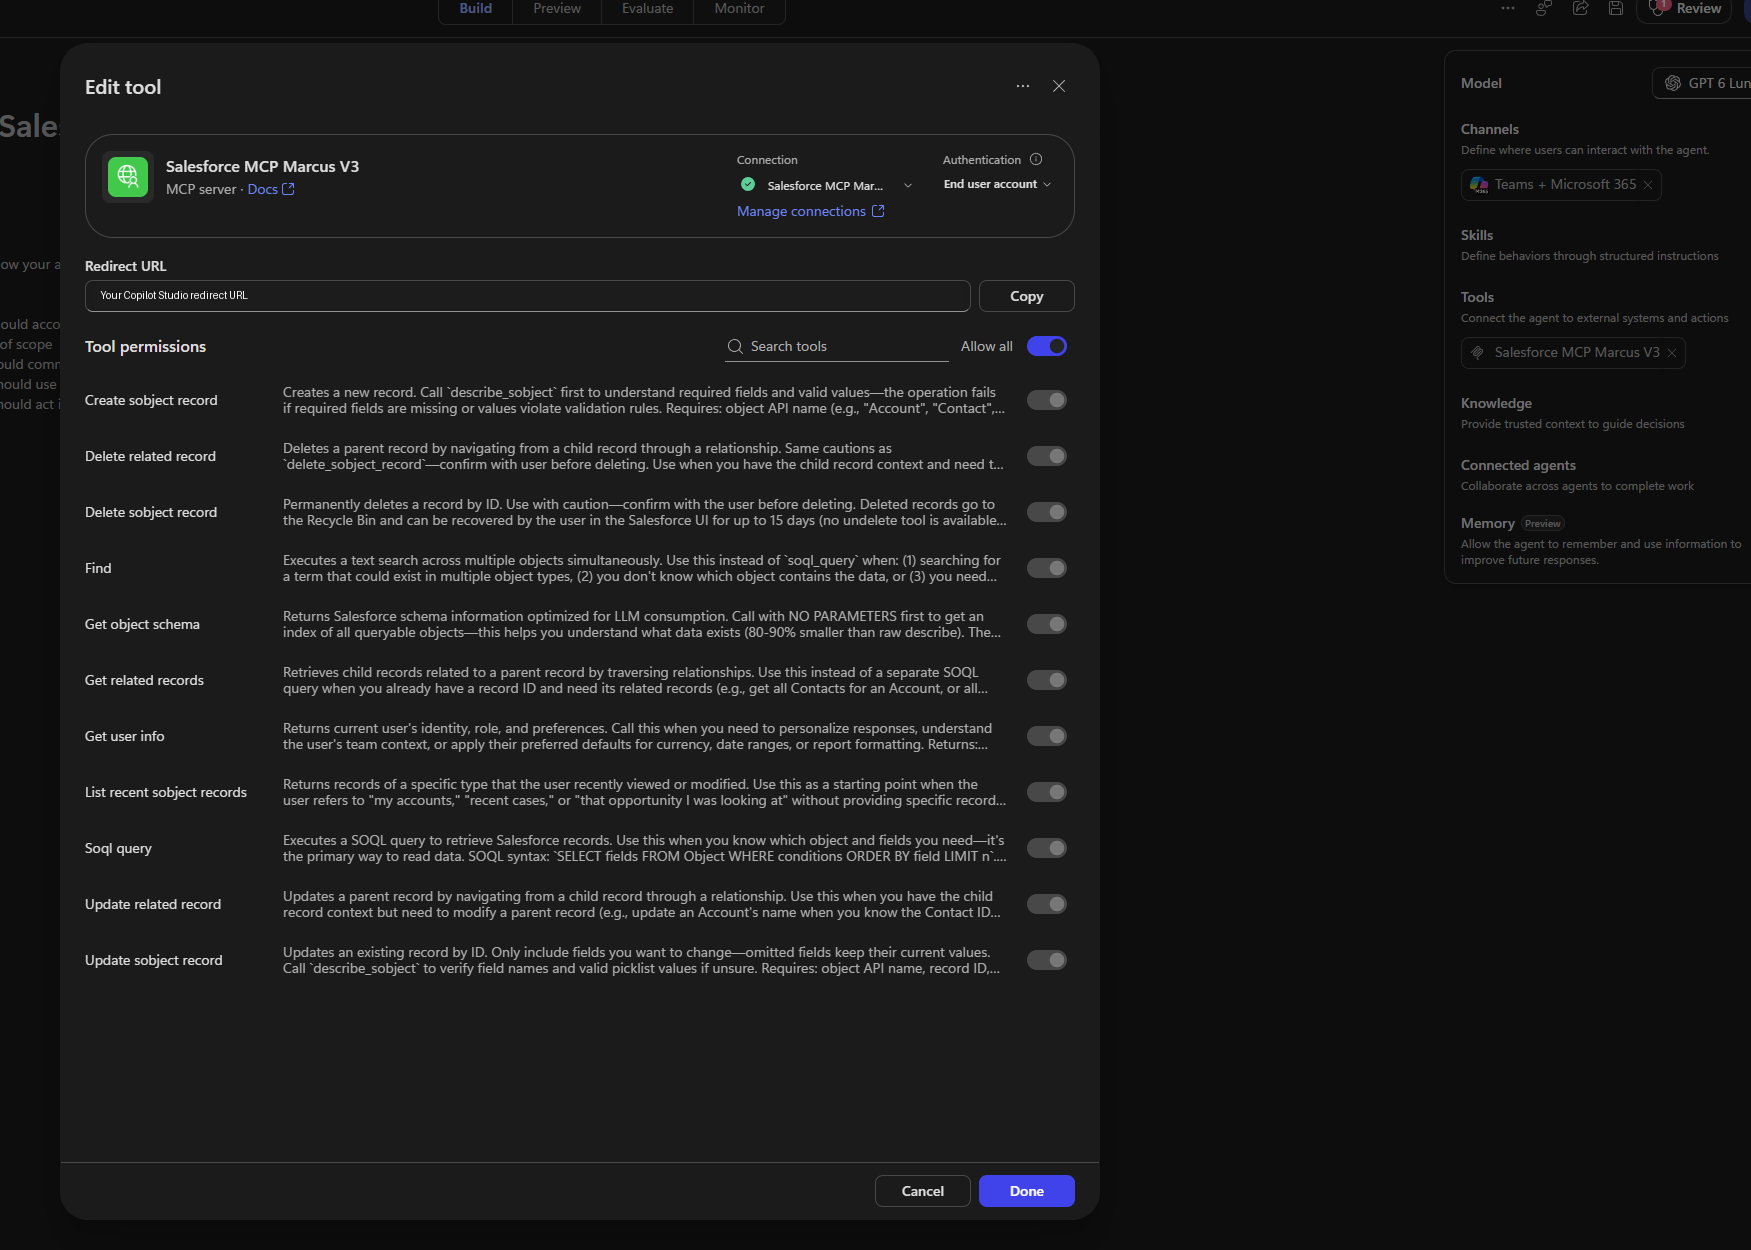 A successful connection exposes the SObject All tools. The captured configuration shows Allow all enabled; narrow the permissions for your own test.
For another example of onboarding a hosted service, see our Jira remote MCP walkthrough. It uses a different OAuth registration approach, so don’t reuse its authentication settings for Salesforce.
6. Test a read, then a controlled write
A connected status is useful, but the real test is a successful operation against the expected Salesforce org.
Read recent opportunities
In the agent’s Preview pane, try:
1
2

List the latest 10 opportunities we have, ordered by created date.
Include the account, amount, stage, close date, and created date.
Check that the results belong to your intended org and are records the signed-in user should be able to access.
Update a test opportunity
Choose a record reserved for testing and identify it unambiguously, preferably by record ID. Ask the agent to update its stage and close date, then add a note. For example, after substituting your test opportunity:
1
2
3

Update the test opportunity "Contoso - MCP Validation" to Closed Won
and set its Close Date to today. Add a note saying:
"Controlled MCP validation: stage and close date updated."
The name above is an example, not a record you should expect to find. Confirm that the intended record is selected before allowing the write.
Our captured walkthrough retrieved opportunities, then updated the opportunity named Microsoft - New Pilot, changed its close date, and added a note. The screenshot illustrates that test interaction, not a business result to reproduce.
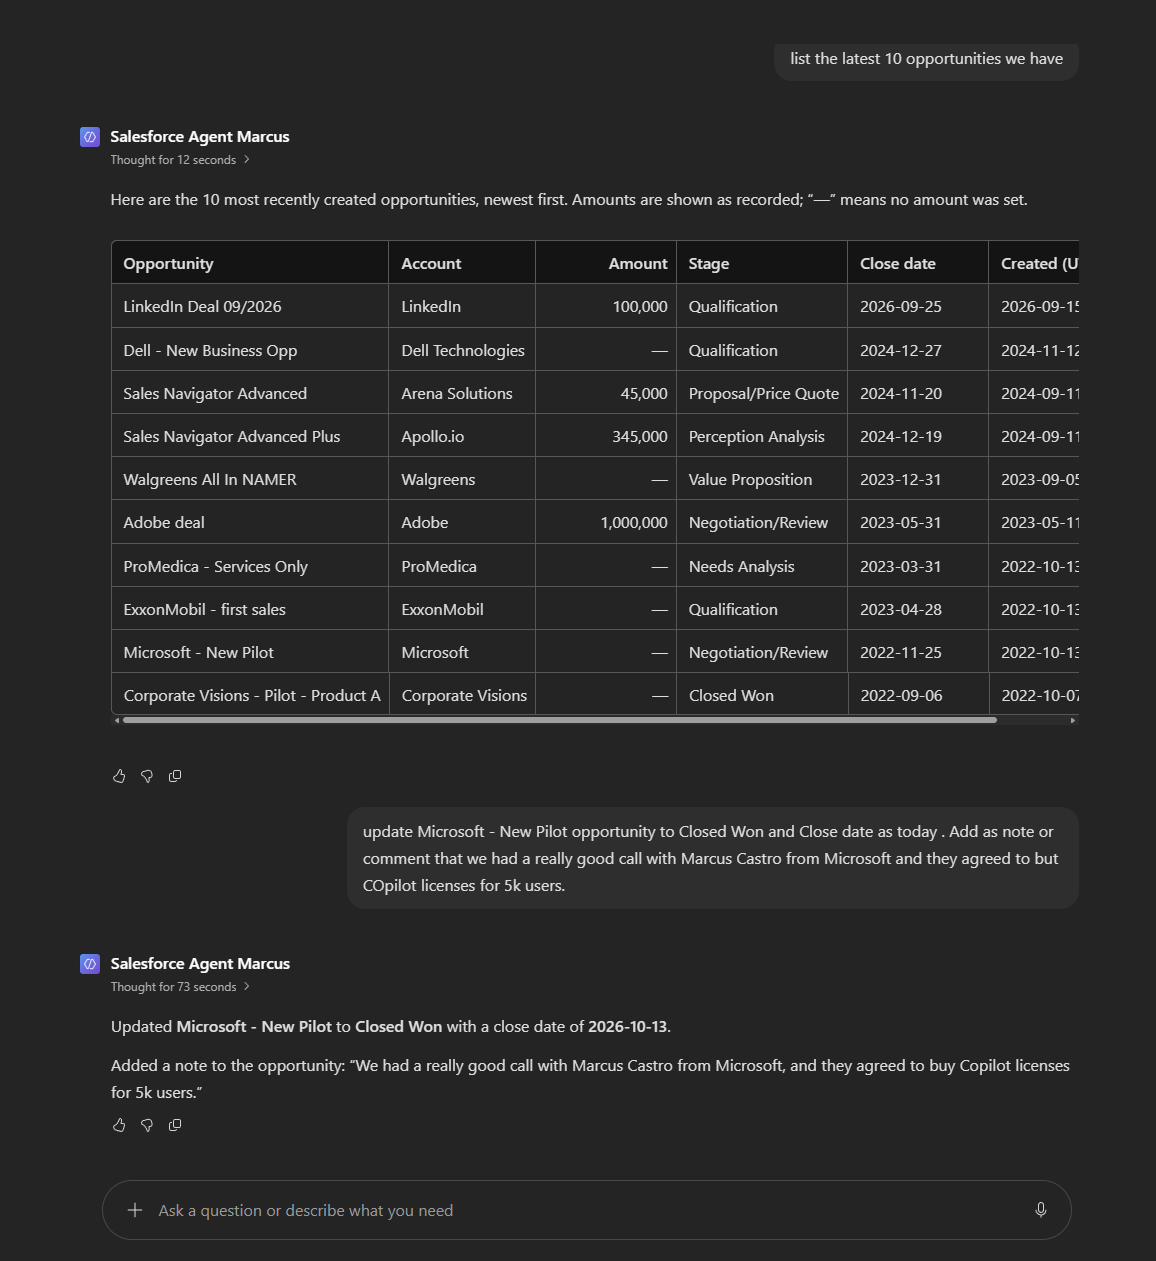 The original test conversation shows a read followed by a stage, close-date, and note update.
Verify the result in Salesforce
Don’t stop at the agent’s confirmation. Open the opportunity in Salesforce and check:
- Stage is Closed Won.
- Close Date matches the date you intended.
- The new note is attached to the correct opportunity.
- Last Modified By identifies the expected Salesforce user.
The screenshots below capture the October 13 test. Their dates are the test dates, not dates to enter in your own records.
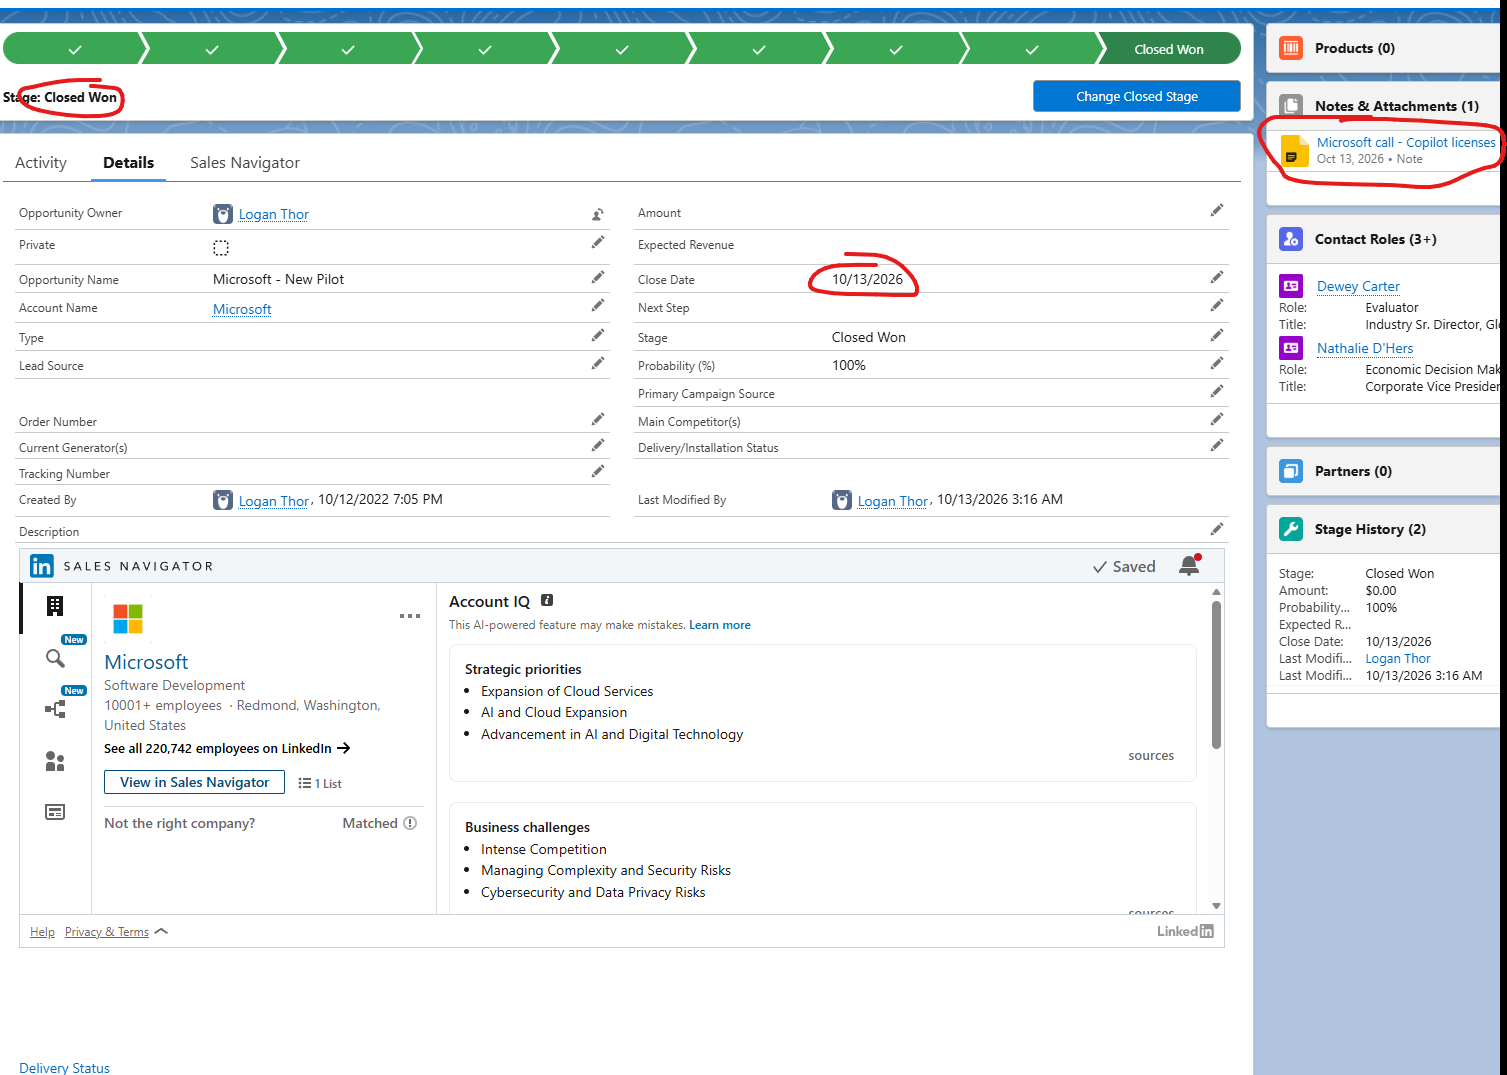 The opportunity record confirms the stage, close date, and attached note after the agent’s update.
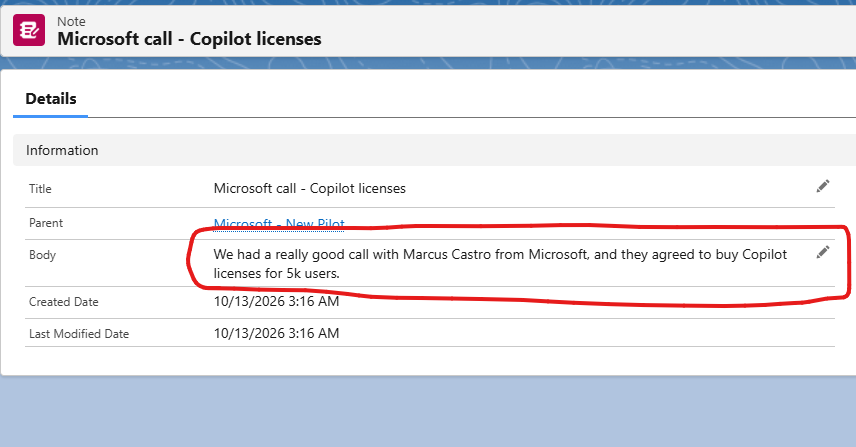 The note record lets you verify the stored text and its link to the opportunity.
Salesforce permissions remain the enforcement boundary. An agent’s success message and a record’s Last Modified By field are useful checks, but neither replaces testing with the actual user permissions you plan to support.
Final checks and troubleshooting
Before handing the agent to another tester, confirm:
- SObject All is Active.
- The External Client App grants
mcp_apiandrefresh_token. - The callback contains the exact Copilot Studio redirect URL.
- The MCP and OAuth endpoints match the org type.
- Authentication succeeds and the expected tools appear.
- A read succeeds before you enable writes.
- Controlled writes are verified in Salesforce.
- Unneeded tools, especially deletes, are disabled.
| Symptom | What to check |
|---|---|
redirect_uri_mismatch |
Compare the complete callback and redirect URLs, verify the correct External Client App, save, and allow for recent changes to take effect. |
| Sign-in doesn’t recognize the user | Check the org type and OAuth host: login.salesforce.com or test.salesforce.com. |
| OAuth succeeds, but tool calls fail | Check the MCP endpoint, server activation, app policy, and the user’s Salesforce permissions. |
| No tools appear | Confirm the SObject All endpoint and Active status, and review the connection error details. |
| The connection fails after token expiry | Confirm the refresh scope and endpoint, and review Salesforce token policies. Reauthenticate if access was revoked or the token expired. |
The key sequence is straightforward: register the External Client App, activate SObject All, configure manual OAuth, save the exact callback, and verify the tools with a read before testing writes.
Once that works, your agent has a path from a request in chat to a verified change in Salesforce. Which Salesforce workflow would you connect first, and which tools would you deliberately leave disabled?