About
As a prerequisite for training a reinforcement learning algorithms is to supply it with certain information about the simulation environment. The Reinforcement Learning (RL) experiment provides a platform-agnostic framework for declaring these necessary components in any given RL training setup. Each of these are sometimes referred to as “spaces”.
The types of spaces include:
- Configuration: the inputs that are assigned at the start of each run to set the initial model state
- These are functionally similar to traditional model parameters
- Observation: the variables representing the current state of the simulation at any point in model time (static values, results of calculations, model outputs, model time, etc.)
- The set (or a subset) of these variables are passed to the brain to determine the action; they can also be used as part of your reward or goal functions, or as part of the terminal condition
- Action: the variables that the brain passes back to the simulation, in response to the current observation, for the relevant action the model should perform
From your perspective (as a modeler), the significance of the RL experiment is to generalize, simplify, and centralize all the simulation-related hooks and behaviors that the RL algorithms need to properly function. In other words, its purpose is to define the characteristics of the simulation in relation to RL training.
Implementation
-
To create an RL experiment:
-
In the Projects view, right-click (or Ctrl + click) the model’s name and choose New >
 Experiment from the context menu.
 -
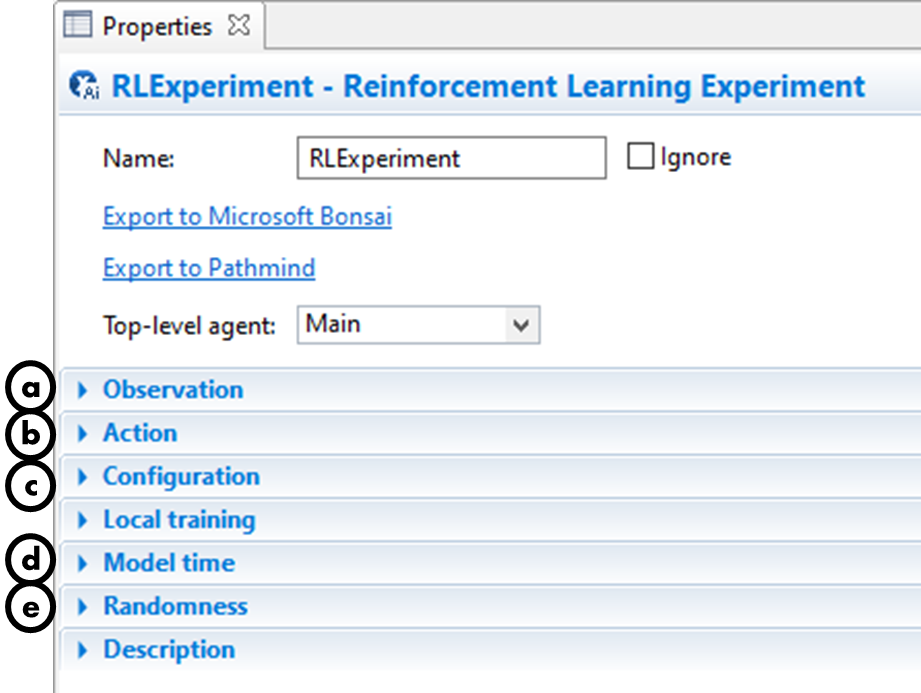
The New Experiment dialog box opens up; select the
 Reinforcement Learning option in the Experiment Type list.
 -
Specify the experiment name in the Name edit box.
-
Choose the top-level agent of the experiment from the Top-level agent drop-down list.
-
Depending on your preferences, configure the Copy model time settings from checkbox and relevant drop-down.
-
Click Finish.
-
-
Fill out the sections in the RL Experiment, as described by each labeled section below.
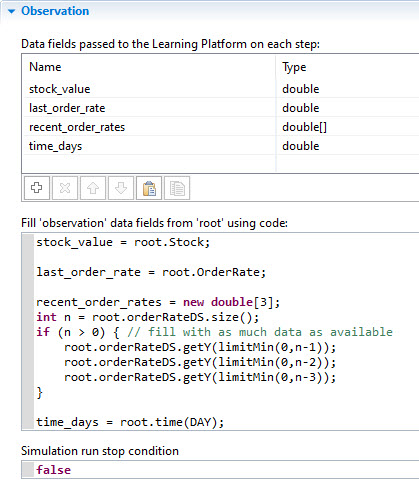
In the table, add the fields and their data type which make up your Observation space. Adding entries can be done by clicking on the next empty row or using the provided controls.
- The names you specify will be what is referenced later on in your Inkling code.
- The types column has some options in the dropdown, but you can type in any data type, as long as it is JSON-serializable. For more information about valid options, refer to the Allowed data types for the RL Experiment page.
In the code field, assign the fields you specified to their relevant value in the model, referring to your top-level agent by the `root` parameter.
false).During runtime, when an iteration is triggered, AnyLogic will call the code you write here and send the subsequent data to Bonsai to request an action to take.
Example:
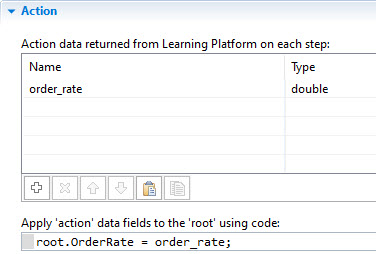
In the table, add the fields and their data type which make up your Action space. Adding entries can be done by clicking on the next empty row or using the provided controls.
- The names you specify will be what is referenced later on in your Inkling code.
- The types column has some options in the dropdown, but you can type in any data type, as long as it is JSON-serializable. For more information about valid options, refer to the Allowed data types for the RL Experiment page.
The code field here will get executed when Bonsai sends an action for your model to take. You should apply the values to your model, referencing your top-level agent via the `root` parameter.
Example:
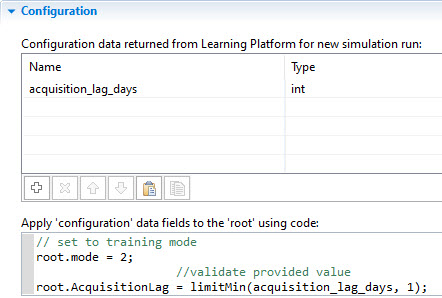
In the table, add the fields and their data type which make up your Configuration space. Adding new entries can be done by clicking on the next empty row or using the provided controls.
- The names you specify will be what is referenced later on in your Inkling code.
- The types column has some options in the dropdown, but you can type in any data type, as long as it is JSON-serializable. For more information about valid options, refer to the Allowed data types for the RL Experiment page.
The code field here will get executed when Bonsai sends a configuration for your model to be setup with. You should apply the values to your model, referencing your top-level agent via the `root` parameter.
set_ functions). Failing to do this will result in model errors.Example:
If desired, configure the model's start time/date.
Check that the stop time is set to "Never".
This section allows you to configure the settings for the random number generator used in each simulation run.
Using a random seed value results in unique simulation runs (when the model involves stochasticity), providing different experiences to the RL algorithms across its training, even for the same actions.
By specifying the fixed seed value, you initialize the model's random number generator with the same value each run. This causes each simulation run to produce the same sequence of "random" values. While useful for testing purposes in simplified scenarios, it lacks the variability that is needed for an approach that considers the real-world examples.
For advanced users, you can also substitute AnyLogic's default Random class used with your own generator.