With a partially or fully trained brain, you will naturally wish to test its performance. This can be done in two different ways:
-
By using Bonsai’s built-in assessment feature
This is optimal when you want to see how the brain is performing in the context of the training regimen. Setting up custom assessments provides detailed statistics on the brain’s performance, including the state and actions from each test episode.
You can read more about it on the Bonsai documentation pages, Evaluate brain assessment data, and on Assess trained brains with managed simulators.
-
By using a trained brain in a model running locally or in AnyLogic Cloud
This is accomplished by exporting the brain and requesting actions from it. You can see how it performs in novel scenarios, outside of the training scope, and within the realm of everything you can do with an AnyLogic model.
The remainder of this page focuses on this use-case.
Exporting a brain
Bonsai brains are exported as Docker images that run as web apps which you can request actions from using an HTTP endpoint. Three ways to host the brain include:
-
Locally (requires Docker to be installed)
For instructions, see the Bonsai documentation page, Export and run a trained brain.
-
Hosted in an Azure web app
For instructions, there are instructions in the webinar, Project Bonsai End-to-End Workflow.
Important: The process of making an RL-ready model described by the linked video (‘wrapping’) is outdated. All other aspects are still relevant. -
Deployed with Azure IoT
For instructions, see the Bonsai documentation page, Deploy Brain brains with Azure IoT.
Using an exported brain
Regardless of the method you used to host the exported brain, you should have an endpoint that can be used to make predictions.
The domain may be localhost (and may include a port number) or follow the <appname>.azurewebsites.net format, and will have a path like /v1/prediction or follow the format /v2/clients/<clientID>/predict. Some examples:
-
localhost:5000/v1/prediction -
https://myapp.azurewebsites.net/v2/clients/sim01/predict
Playback feature in the Bonsai Connector
The Bonsai Connector provides a feature called “Playback” which allows
you to enter in a URL of an exported brain. When you execute a model
with the connector and its playback option enabled, it will query
actions from the exported brain whenever calls to the RL Experiment’s
takeAction function is called.
This process may be slightly different depending on if you implemented the optional “mode” parameter.
-
Check the properties of your Bonsai Connector on your top-level agent. Ensure that all these conditions are met:
a. The options for “Enable connector” and “Playback” are either selected or will evaluate to true when you execute the Simulation experiment.
b. The option for “Exported brain address” is set to a Java string, or a String parameter, of the hosted brain at the appropriate prediction endpoint.
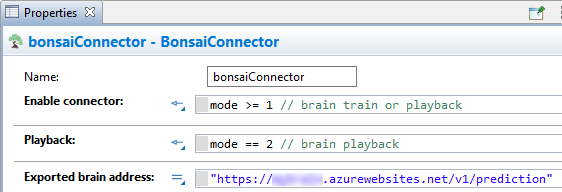
As long as the Simulation is executed with 'mode' set to 2, both options will be enabled -
Within the properties of the Simulation experiment you plan on executing, verify the following:
a. If using the “mode” parameter, ensure it will execute with the appropriate option selected.
b. Set any other parameters that you wish to execute the testing scenario with.
c. Set the model time and randomness settings, as desired.
Tip: If the training had used a time-based termination criterion (e.g., after 6 months), it may be good to initially set the Simulation experiment to have a matching stop time. You may also intentionally test the brain in never seen before scenarios. -
Execute the relevant Simulation experiment!
When executing with Playback enabled, the Bonsai Connector will query the brain at the specified endpoint whenever the RL Experiment’s takeAction function is called. Similar to training, when this function executes, the simulation will pause itself long enough to build an observation, send it to the brain, receive an action in response, and apply the action.
takeAction is called is not currently differentiated with user-triggered pausing (either by pressing the button in the model’s UI or by calling pauseSimulation). Therefore, attempting to pause the simulation run will trigger a call to takeAction!Programmatically querying
To perform automated headless experiments with a connected brain, you currently need to programmatically query it. This is accomplished using the (built-in) Java library “Jetty”.
-
In the properties of your top-level agent (typically Main), under the Advanced Java section, copy/paste the following into the Imports section code field:
import com.fasterxml.jackson.databind.ObjectMapper;
import com.fasterxml.jackson.core.JsonProcessingException;
import org.eclipse.jetty.util.ssl.SslContextFactory;
import org.eclipse.jetty.http.HttpHeader;
import org.eclipse.jetty.client.HttpClient;
import org.eclipse.jetty.client.api.ContentResponse;
import org.eclipse.jetty.client.api.Request;
import org.eclipse.jetty.client.util.StringContentProvider;
Note: Doing this adds certain Java classes from the Jackson and Jetty libraries that will be used in the followed steps. -
In the same section described in step 1, copy/paste the following into the Additional class code field:
ObjectMapper mapper = new ObjectMapper();
HttpClient httpClient = new HttpClient(new SslContextFactory());
{
 try {
 	httpClient.setFollowRedirects(false);
 	httpClient.start();
 } catch (Exception exc) { error(exc, "Problem starting HTTP client"); }
}
Note: This adds two variables to your model - one used to convert Java objects to JSON strings (ObjectMapper) and one used to send HTTP requests to the brain (HttpClient). You could add Variable objects to your model and run the try-catch block (without the surrounding brackets) in the ‘On startup’ callback; having it here puts it out of the way of your other logic though. -
Add a new function to your model.
-
It will be used to make the brain request and apply the action, so name it appropriately (e.g., “manualBrainAction”).
-
Add one argument, naming it “root” and set its type to your top-level agent.
Important: The naming here needs to be exact, as code added in the next step will refer to this. -
In the function body, copy/paste the following code to start:
// create an Observation object RLExperiment.Observation observation = new RLExperiment.Observation(); // ... try { // convert Observation object to json string String json = mapper.writeValueAsString(observation); // send request Request request = httpClient.POST("...") .header(HttpHeader.CONTENT_TYPE, "application/json") .header(HttpHeader.ACCEPT, "application/json") .content(new StringContentProvider(json, "utf-8")); ContentResponse response = request.send(); String content = new String(response.getContent()); // convert string response to Action object RLExperiment.Action action = mapper.readValue(content, RLExperiment.Action.class); // apply Action to model // ... } catch (Exception exc) { // "catch-all" exception for simplicity (not good practice though) error(exc, "Problem requesting action from brain."); }-
Then make the following changes:
-
Replace the 4 uses of
RLExperimentwith the name of your RL Experiment (if it differs)Note: Two are near the top and two are near the bottom; both sets are on the same line -
In place of the first
// ...(under the line starting withRLExperiment.Observation), copy/paste the code from the Observation section of your RL Experiment.Important: Any references to the Observation data fields need to be prefixed withobservation. -
In place of the
...in the Java String (of the line starting withRequest request), put the URL to your exported brain.Note: You can also put a parameter reference if your want to parameterize it (i.e., change it later without refactoring). -
In place of the last
// ...(a few lines after the one starting withRLExperiment.Action), copy/paste the code from the Action section of your RL Experiment.Important: Any references to the Action data fields need to be prefixed withaction.
-
-
-
If you have conditional logic in your iteration trigger that depends on the mode, modify it to instead call the function during playback, passing the top-level agent as an argument.
Tip: If the iteration trigger is inside the top-level agent, you can refer to itself via the Java keywordthis
Example
You can see an example below, showing the RL Experiment, function implementation, and modified iteration trigger (left-to-right, respectively).

In this implementation, note the highlighted sections showing…
-
The default experiment name, RLExperiment, was used, so nothing needed to be changed
-
The Observation/Action fields referred to the fields directly, so the copy/pasted code was modified to prefix them with
observation.andaction. -
The brain endpoint was parameterized, so the name of the parameter was used instead of the Java string
-
The iteration trigger (the event named “actionEvent”) is inside Main (next to the function), so
thisis used to refer to Main (i.e., root)
Other remarks
As stated, this is simply one way to implement this feature. There are optional tweaks that you can make depending on your preferences:
-
If you want the function to be argumentless, after you paste the Observation/Action, you can remove the
root. -
If you don’t want to prefix your data fields with
observation./action., you can instead copy/paste the autogenerated Java code of the RL experiment:-
Build your model (click
 from the top bar) then right-click your RL experiment in the Projects panel > Open with > Java editor.
 -
Scroll down to the definition of
getObservationand copy the code within this function, to be pasted as described in step 2 above. -
Do the same for the action, using the body of the
applyActionfunction (right below the observation function).
-