Temperature + MQTT
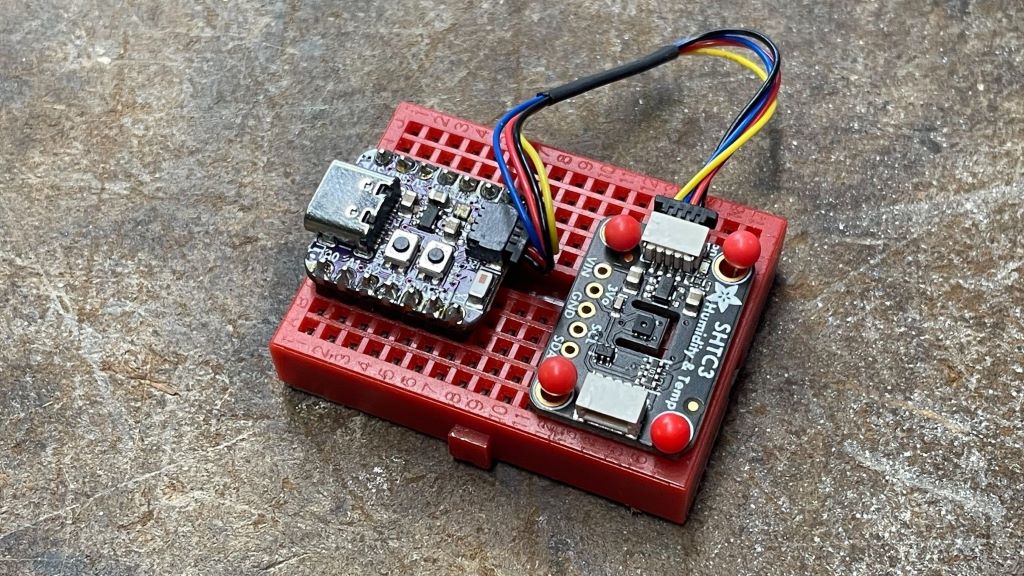
This sample uses an ESP32-C3 board Adafruit QT Py C3 and a SHTC3 sensor to publish a temperature reading to the Adafruit.io MQTT APIs every minute.
Reading temperature
We start by configuring the script for the QT Py and adding a scheduled interval to read the temperature from the SHTC3 sensor every 60 seconds.
// hardware configuration and drivers
import "@dsboard/adafruit_qt_py_c3"
import { startSHTC3 } from "@devicescript/drivers"
import { schedule } from "@devicescript/runtime"

// mounting a temperature server for the SHTC3 sensor
const { temperature } = await startSHTC3()

schedule(
    async () => {
        // read data from temperature sensor
        const value = await temperature.reading.read()
    },
    { timeout: 1000, interval: 60000 }
)
Configuration and Secrets
To connect to Adafruit.io, you will to get an account with https://io.adafruit.com
and store your username and password in the settings
as the IO_USERNAME and IO_KEY keys (make sure your key is in env.local).
Also create a feed and update the feed key in the example below.
import { readSetting } from "@devicescript/settings"

// TODO: update feed key
const feed = "temperature"
const username = await readSetting("IO_USERNAME")
// this secret is stored in the .env.local and uploaded to the device settings
const password = await readSetting("IO_KEY")
Starting the MQTT client
Following the Adafruit documentation, we start a MQTT connection and craft a topic that will route the data to our account.
In the
import { startMQTTClient } from "@devicescript/net"

...

const mqtt = await startMQTTClient({
    host: `io.adafruit.com`,
    proto: "tls",
    port: 8883,
    username,
    password,
})
const topic = `${username}/feeds/${feed}/json`
Publish data
With the MQTT client and the topic, we can add a call to mqtt.publish in the scheduled worker
to upload the data to Adafruit (note that { value } expands to JSON { "value": value } automatically)
schedule(
    async () => {
        ...
        // publish data to Adafruit
        await mqtt.publish(topic, { value })
    },
    { timeout: 1000, interval: 60000 }
)
All together
Putting all the pieces together we get the following program.
// hardware configuration and drivers
import "@dsboard/adafruit_qt_py_c3"
import { startSHTC3 } from "@devicescript/drivers"
import { startMQTTClient } from "@devicescript/net"
// extra APIs
import { readSetting } from "@devicescript/settings"
import { schedule } from "@devicescript/runtime"

// mounting a temperature server for the SHTC3 sensor
const { temperature } = await startSHTC3()

// update feed key
const feed = "temperature"
const username = await readSetting("IO_USERNAME")
// this secret is stored in the .env.local and uploaded to the device settings
const password = await readSetting("IO_KEY")

const mqtt = await startMQTTClient({
    host: `io.adafruit.com`,
    proto: "tls",
    port: 8883,
    username,
    password,
})
// https://io.adafruit.com/api/docs/mqtt.html#feed-topic-format
const topic = `${username}/feeds/${feed}/json`

schedule(
    async () => {
        // read data from temperature sensor
        const value = await temperature.reading.read()
        // publish to feed topic
        await mqtt.publish(topic, { value })
    },
    { timeout: 1000, interval: 60000 }
)
Extra points: Filtering data
You could use observables to smooth the sensor data. For example, apply an exponentially moving average on the feed of temperature readings.
import { ewma, auditTime } from "@devicescript/observables"
...
temperature.reading
    .pipe(ewma(0.5), auditTime(60000))
    .subscribe(async value => await mqtt.publish(topic, { value }))