🔨 Developer Guide
This is guide for “developers”, or anyone who is looking to contribute code to the wpa R package.
Please also read our CONTRIBUTING document on details regarding our Contributor License Agreement (CLA).
Pre-requisites
You should have the following installed before starting:
- R
- RStudio Desktop
- GitHub Desktop (Highly recommended, unless you are very familiar with git)
You should also have the following packages installed. These should all be available from CRAN: 1. devtools 2. tidyverse 3. roxygen2
Once these are all installed, you should be ready to get started.
Design Principles
Please try to adhere to the following package design principles before proceeding with code contribution.
- Simple: the functions ought to be simple and intuitive to maximise adoption.
- Practical: the functions should prioritise delivering against the most frequently used outputs and analyses.
- Consistency: functions should share a broadly consistent set of input arguments and naming conventions. This will help minimise unexpected results and errors when using the package.
- Parsimony: in creating the package, as much of the existing code should be re-used if possible to minimise duplication of work and to make analysis reproducible.
-
Tidy: the functions from the package are designed to be consistent with tidy principles, and work well with a dplyr pipe (
%>%) workflow.
🔨 Quick start guide - For developers
1. Cloning or forking the package
To get started, you will need to fork and clone the wpa repository on your local machine. You will need to have either git or GitHub Desktop set up on your local machine (see Pre-requisites).
Here are the steps if you do not have repository access to microsoft/wpa (if you have been granted direct access, you can clone directly):
- On the top right of the repository page, click ‘Fork’.
- This will create a repository called
<YOURUSERNAME>/wpa. - After this, you can either use GitHub Desktop or git to clone this repository to your local machine.
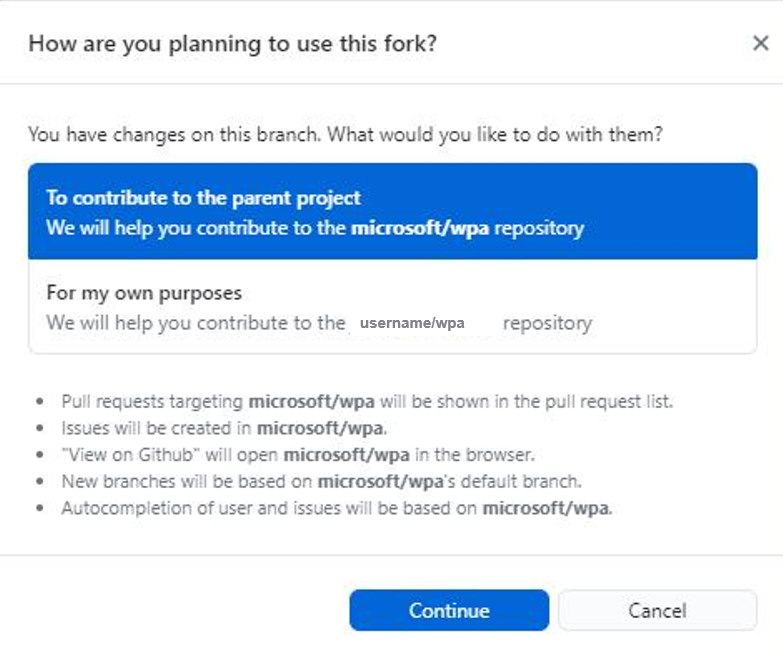
When creating a fork on GitHub, you may be asked whether you are looking to contribute to the parent project or for your own purposes (see screenshot). Please select contribute to the parent project.
Using GitHub Desktop
- Click on the big green
Codebutton on the repository page, and click ‘Open with GitHub Desktop’. - Follow the instructions on GitHub Desktop to clone the repository to a folder on your local machine.
Using git
You may prefer to use git because it is more flexible, or because you have repository access and you are trying to directly clone the package from microsoft/wpa and are failing to do so with GitHub Desktop. There is a known issue with GitHub Desktop that it could fail with 2FA authentication, in which case you can use git to authenticate properly.
Here are the steps:
- Ensure you have git installed. If not, you can download this from Git - Downloads (git-scm.com).
- Once installed, open up Git Bash. This should open up a Command Line interface.
- Decide which folder you would like to clone the
wparepository, and copy the path to the folder. It is highly recommended that you create a new folder and name itwpa. An example of this path would beC:\My Documents\GitHub\wpa. - Type
cd, and followed (separated with a space) by the path to the local folder above. You will need to add quotes, so the full command would look something likecd "C:/My Documents/GitHub/wpa". See How to change folder with git bash? - Stack Overflow if you have issues changing directories. - Once Git Bash is showing the correct file path to your
wparepository, run the commandgit init. This command initializes your folder as a git repository. In other words, it sets it up to do version control. - Next, run
git remote add origin https://github.com/microsoft/wpa.git. This will “connect” your local folder with the Git repository. You may get some prompts for authentication somewhere around here. Rungit remote -vto check whether this has been successfully applied. - You can now use your standard git commands to commit, pull, push, etc. See git cheat sheet for some useful git commands.
If you are in the situation where you are simply trying to overcome the authentication issue with GitHub Desktop, please read this paragraph. Once the authentication through Git Bash is set up, you may now go back to the GitHub Desktop GUI window. Go to File > Add local repository and choose the wpa folder that you have just set up. You may be asked to login again, but this should now allow you to fetch or pull from the repository. You are now set up!
2. Adding / changing a function
After creating a copy of the repository on your local machine and having installed the repository version, you can start working with R.
- Let us assume that you have written a new function, e.g. a checking function that returns TRUE if
PersonIdexists, and returns FALSE if it does not). - Once you check the function and ensure that it works, save this into a R file under the “R” folder of the package directory.
- Ensure that your current working directory is set to the package directory. You can either open the RStudio session with the package .Rproj file, or run
setwd()to change you working directory. Rungetwd()to check what your current working directory is. - Ensure that the relevant roxygen headers are present (see here for more reference).
- Whilst it is possible to have more than one function saved in a single R file, we recommend saving them in their own files with their own names for clarity. For instance, the function
collaboration_dist()would be saved in a file called collaboration_dist.R.
- Ensure that your current working directory is set to the package directory. You can either open the RStudio session with the package .Rproj file, or run
- Run
devtools::load_all(). This will simulate loading the package with the function in it. Run the function with some example data to ensure that it works. - Follow the steps in the next section to generate the documentation (
roxygen2::roxygenise()), check the package (devtools::check()), and install the package (devtools::install()).
3. Update package and installing to local directory
There are certain tricks which are helpful to know with developing or changing an R function, such as how to test the function and how to generate R documentation. This section will provide more information.
Once you’ve made changes to a script, here is how to update the package and install it locally on your computer. Run:
3.1. Generating documentation
roxygen2::roxygenise()roxygenise() generates documentation files for the R package, and makes them available to the user.
3.2. R CMD Checks
Next, run this to build and check the package. You will need devtools installed.
devtools::check()This step runs a R CMD check against the package, to check that there will be no errors and issues if somebody installs the package. This step can take around 5 minutes long, and usually it is worth running this only after you’ve implemented all the desired changes towards the end.
3.3. Install the package
If everything runs smoothly, run this final line to install the local package. Make sure that your working directory is set to the package!
devtools::install()Other installation methods
Note that devtools::install() would install the package directly from the directory in your local machine, i.e. the version that you are developing. If you would like to install the stable GitHub version from the main branch, you will need to run:
devtools::install_git(url = "https://github.com/microsoft/wpa.git")If you’d like to install from a particular branch or install vignettes, you can leverage the additional arguments available with devtools::install_git(), for example:
devtools::install_git(url = "https://github.com/microsoft/wpa.git",
                      branch = "feature/network-functions",
                      build_vignettes = TRUE)
4. Pushing changes to GitHub
Once you are sure that everything works, you can push your changes to GitHub either with git or GitHub Desktop. Depending on the set-up, the method to merge is different:
- If you are pushing to your forked repository, you can push directly to the master/main branch.
- If you are pushing to the official repository at
microsoft/wpa(assuming you have access), you are recommended to either create a new branch or push the changes to an existing patch branch that is not the main repository. It is recommended that you never push changes directly to themainbranch so that you do not introduce any breaking changes.
For commit messages, we would ask you to add an intuitive commit message so others will know what you have changed to the code. Please see the wiki page of this repo for a style guide on the commit messages.
The next step is to create a pull request to merge your changes to microsoft/wpa. The repository itself provides a pull request template on what information you should include in the pull request. A maintainer will reply and review your pull request once it has been successfully submitted.
To increment or change a package version
Each package release has a corresponding package version (e.g. 1.4.2.) To change that package version number for a particular release, simply go into the DESCRIPTION at the project root folder of the wpa package. You can edit this with any notepad software or RStudio.
Change the values that come after Version: to change the package version. Prior to incrementing the package version, please align with the main developer team on the agreed version release details.
How to release a package version
Our current protocol for package release is to distribute it as a zipped file or a tar ball. The advantage of this approach is that users do not need to have a GitHub account, and this package release can be distributed via SharePoint or even email. Our current approach is to offer both options for installation.
Once you are happy with the package and all checks have passed, you can run the following to generate a zipped distribution of the package. If your platform is Windows, this should generate a zipped file one level above your project directory:
devtools::build(binary = TRUE)The code to generate a tarball distribution is similar:
devtools::build(binary = FALSE)After the zipped file and the tarball files have been generated, they are ready for distribution.
How to build the PDF documentation
It is good practice to distribute a package with an updated version of the documentation, so users won’t be using outdated documentation. You can generate the familiar PDF documentation by running the following:
devtools::build_manual()Documenting functions with {roxygen2}
We recommend Karl Broman’s guide on Writing documentation with Roxygen2.