Service-side Auto-Labeling Playbook⚓︎
Introduction⚓︎
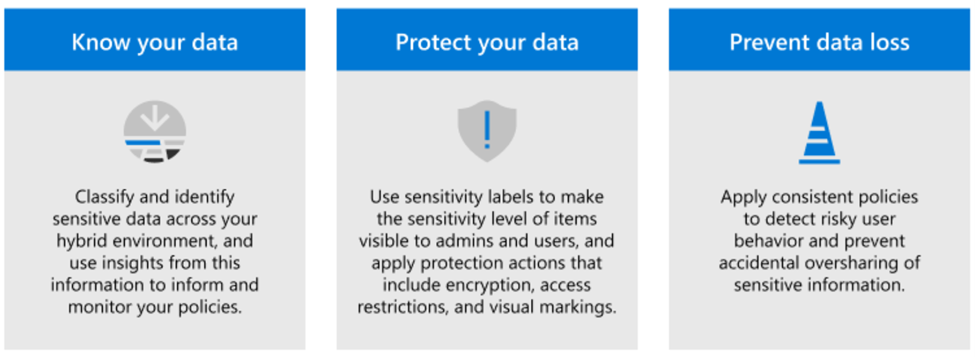
Microsoft Information Protection (MIP) is a built-in, intelligent, unified, and extensible solution to protect sensitive data across your enterprise – in Microsoft 365 cloud services, on-premises, third-party SaaS applications, and more. MIP provides a unified set of capabilities to know your data, protect your data, and protect against data loss across Microsoft 365 apps (e.g., Word, PowerPoint, Excel, Outlook) and services (e.g., Microsoft Teams, SharePoint, and Exchange).
Some of the key MIP capabilities include Sensitive information types (SIT), Trainable classifiers, Data classification, Sensitivity labels, Data loss prevention, Endpoint data loss prevention etc.
Info
For more information: Microsoft Information Protection in Microsoft 365 - Microsoft 365 Compliance | Microsoft Docs
MIP Overview⚓︎
The foundation of MIP is the ability to classify data by our Data Classification Service, please see the MIP constellation below to view how the MIP functionalities all work together.
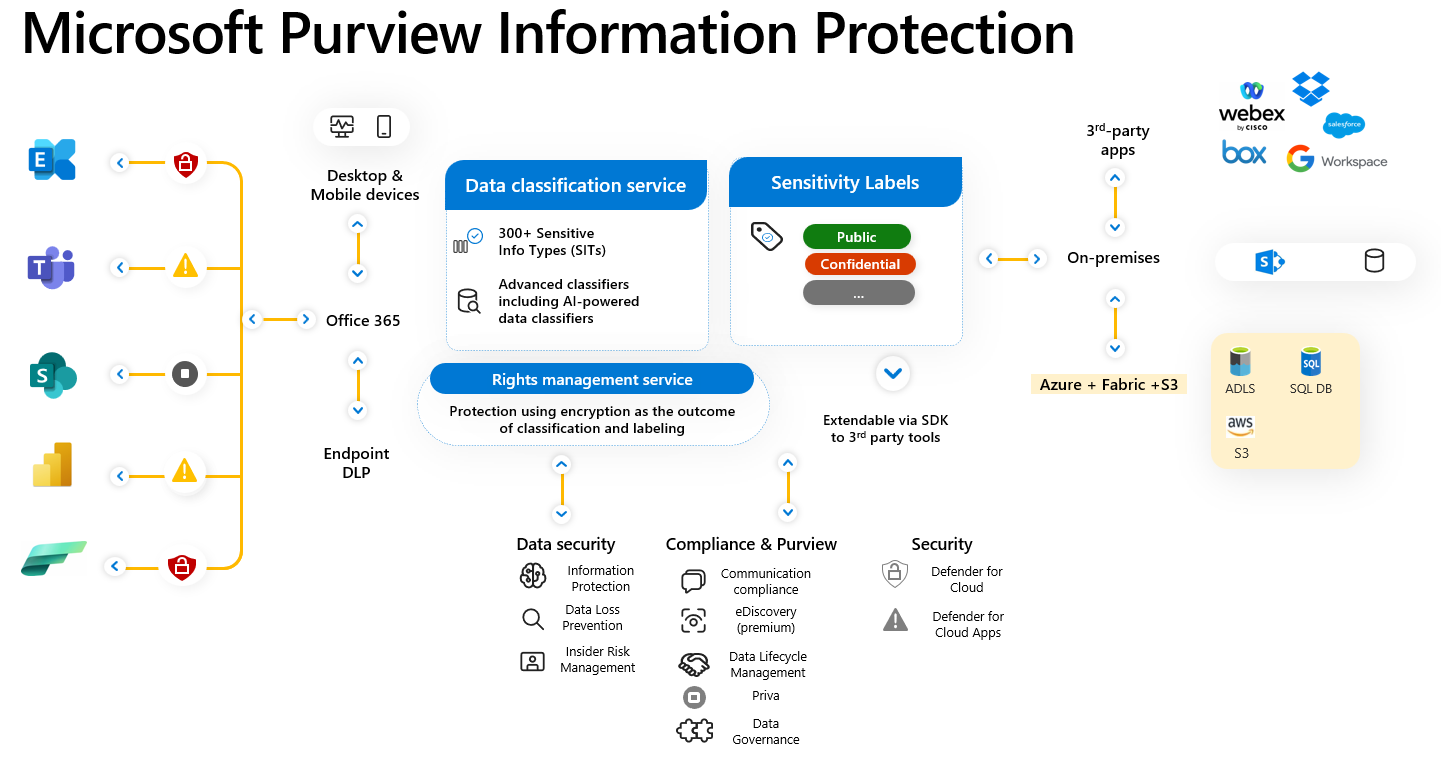
Identifying and classifying sensitive items that are under your organization's control is the first step in the Information Protection discipline. Foundational to Microsoft are its classification capabilities—from out-of-the-box sensitive information types to machine learning trainable classifiers to automatically finding and classifying sensitive content at scale. Sensitive Information Types are pattern-based classifiers which detect sensitive information like social security, credit card or bank account numbers within a tenant, and help customers to identify, evaluate, and protect their data. Data Classification Service and specifically Sensitive Information Types allow customers to define and identify what information is considered sensitive in their environments. Once you identify what sensitive content is important to you, you can leverage this data classification across your Microsoft 365 Compliance features including, but not limited to: Data Loss Prevention, Communication Compliance, Insider Risk Management, Auto-Labeling, Retention, and Sensitivity Labels.
We announced several key enhancements to the intelligence and built-in capabilities of MIP across Microsoft 365 applications and services. These capabilities help organizations reduce the number of false positives as they accurately classify ever-increasing amounts of data. These capabilities also increase the coverage of classified data as they go across Microsoft 365 services and workloads.
Info
For more information: Microsoft Information Protection: Announcing Enhanced Automatic Classification Capabilities! - Microsoft Tech Community.
Per the scope of this playbook, we’ll focus on auto-labeling overview with some basic understanding of the capabilities:
Sensitivity labels are at their basic level a tag, that is customizable, persistent, accessible to applications, and visible to users. Labels once applied to documents and email become the basis for enforcing data protection policies throughout the tenants’ digital estate. When a label is applied to a file or email it is persisted as document metadata. When a label is applied to a SharePoint site or OneDrive for business the label persists as container metadata.
Auto-Labeling Overview⚓︎
There are multiple methods for automatically applying a label to emails and documents based on their content in Microsoft 365, two of the key ones are:
Default SharePoint document library labels: When SharePoint is enabled for sensitivity labels, you can configure a default label for document libraries. Then, any new files uploaded to that library, or existing files edited in the library will have that label applied if they don't already have a sensitivity label, or they have a sensitivity label but with lower priority.
Label API: Label API is a pay per use API that can label up to 75k files a day. It can be used to override manual labeled files.
Client-side auto-labeling: Client-side auto-labeling happens on the client workstation as the user creates or edits a document or email using Word, Excel, PowerPoint, Outlook, and Office web applications (OWA). Depending on the content detected, the label is applied automatically or recommended to the users based on the properties of the label. A default label can also be assigned to documents and emails. This form of client-side labeling does not evaluate document content based on conditions defined on a global policy, but it is based on properties defined for each label.
Service-side auto-labeling: Service-side auto-labeling is sometimes referred to as auto-labeling for data at rest and data in transit. Unlike client-side auto-labeling, service side auto labeling does not depend on the client to analyze the document content while it is being created. Instead, service-side auto-labeling reviews content that is stored (at-rest) in SharePoint or OneDrive document libraries, or that is "in-flight" or being sent within Exchange. For instance, when a message is submitted to transport. All policy review and application are done within the service. Service-side auto-labeling policies are created and configured from the Information Protection section of the Compliance Center under the Auto-labeling policy tab. Auto-labeling policies don't support recommended labeling because the user doesn't interact with the labeling process. Instead, the administrator runs the policies in simulation mode to help ensure the correct labeling of content before applying the label.
Comparison of auto-labeling solutions: The table below provides a comparison of Service-side, Client-side, and Defender for cloud apps auto-labeling solutions that can help you identify when a particular solution is appropriate for labeling needs.
| Capabilities | Service side | Client side | Defender for cloud apps (MCAS) |
|---|---|---|---|
| Application support | SharePoint, OneDrive and Exchange Online | Word, PowerPoint, Excel or Outlook Microsoft 365 apps, or AIP plugin for Office | SharePoint, OneDrive and third-party services supported by Defender for cloud apps |
| File types supported | .docx, .xlsx, .pptx and related formats | .docx, .xlsx, .pptx and related formats | .docx, .xlsx, .pptx and related formats, PDF |
| Policy scoping | By site, group or user, admin units | By label | By service, site, folder |
| Classification options | Standard Sensitive Info Types; Custom Sensitive Info Types (incl. dictionaries); Exact Data Matching Trainable classifiers (in private preview) | Standard Sensitive Info Types; Custom Sensitive Info Types (incl. dictionaries); Exact Data Matching; Trainable Classifiers | Standard Sensitive Info Types; Custom Sensitive Info Types (incl. dictionaries); Exact Data Matching; Trainable Classifiers; Fingerprint; Regular Expression |
| Labeling conditions | Sensitive content; Content is shared; Recipient properties; Sender properties; Email subject; Document title; Attachment extension; Attachment can't be scanned; Attachment is encrypted; Email headers | Sensitive content in document or email body; Sensitive content in attachment | Sensitive content; Access level; App; Content is shared; Creation time; File ID; File type; File owner; MIME type; Parent folder; Quarantine status; Existing sensitivity label; Document title; File extension |
| Interaction with users | Label visible after user opens document | Automatic labeling: user can override; Recommended label: user can accept or dismiss | Label visible after user opens document. Content markings are applied on save |
| Applied to | New and existing documents (including simulation mode); New emails | Content that's created or edited by users | New and existing documents (file policy); Content being downloaded; Content being uploaded |
| Behaviors | Label is applied; Outbound email is protected; Outbound attachment is protected (Office and PDF documents); Protection is applied to document; Content markings are applied after user opens document and saves it | Label is applied; Document is protected; Email is protected; Attachment is protected (Office attachment only); Content marking is applied | Label is applied; Protection is applied; Content markings are applied after user opens document and saves it |
| Label external incoming emails | Yes | On reply or forward | N/A |
| Labeling limits | 25k documents labeled per day | None | 100 documents labeled per day (can be extended upon request) |
For more information on the comparison of client vs. service auto-labeling, we have documentation here: Automatically apply a sensitivity label to content in Microsoft 365 - Microsoft 365 Compliance | Microsoft Docs
How does client and service side labeling work in different labeling scenarios? A principle we have is that client/end user provided labels always overrides service basedservice-based ones. In addition, label priority is used in determining when and how an automatic label will be applied. The following table lists some common labeling scenarios, the label setting (i.e., auto or recommended label) and the expected outcome or behavior.
| Scenario | Label Setting | Behavior |
|---|---|---|
| Content has no label | Client-side recommendation | Recommend new label |
| Client-side auto labeling | Apply new label | |
| Service-side auto labeling | Apply new label | |
| Content has label manually applied | Client-side recommendation | Recommend new label if higher sensitivity |
| Client-side auto labeling | No action. Manually applied label takes precedence | |
| Service-side auto labeling | No action. Manually applied label takes precedence | |
| Content has default label applied (Label policy) | Client-side recommendation | Recommend new label if higher sensitivity |
| Client-side auto labeling | Apply new label if higher sensitivity | |
| Service-side auto labeling | Apply new label if higher sensitivity | |
| Content has default SPO doc library label applied | Client-side recommendation | Recommend new label if higher sensitivity |
| Client-side auto labeling | Apply new label if higher sensitivity | |
| Service-side auto labeling | Apply new label if higher sensitivity | |
| Content has auto label applied | Client-side recommendation | Recommend new label if higher sensitivity |
| Client-side auto labeling | Apply new label if higher sensitivity | |
| Service-side auto labeling | Apply new label if higher sensitivity |
Licensing Requirements⚓︎
To understand your licensing requirements and options for MIP, see the Information Protection section from the Microsoft 365 licensing documentation. Below is the sensitivity labeling licensing info for your quick reference, however, we encourage you to reference the M365 licensing documentation for up-to-date information.
For manual sensitivity labeling, the following licenses provide user rights:
-
Microsoft 365 E5/A5/G5/E3/A3/G3/F1/F3/Business Premium
-
Enterprise Mobility + Security E3/E5
-
Office 365 E5/A5/E3/A3/F3
-
AIP Plan 1
-
AIP Plan 2
For both client and service-side automatic sensitivity labeling, the following licenses provide user rights:
-
Microsoft 365 E5/A5/G5
-
F5 Compliance
-
F5 Security & Compliance
-
Microsoft 365 E5/A5/G5 Information Protection and Governance
-
Office 365 E5
For client-side automatic sensitivity labeling only, the following license provides user rights:
-
Enterprise Mobility + Security E5/A5/G5
-
AIP Plan 2
To apply and view sensitivity labels in Power BI and to protect data when it's exported from Power BI to Excel, PowerPoint, or PDF, the following licenses provide user rights:
-
Microsoft 365 E5/A5/G5/E3/A3/G3/F1/F3/Business Premium
-
Enterprise Mobility + Security E3/E5
-
AIP Plan 1
-
AIP Plan 2
Note
G3 and G5 are the Office 365 services/plans for Government organizations. For feature-level licensing requirements please refer to Licensing PDF file.
Role Requirements⚓︎
Sensitivity labels from the MIP solution let you classify and protect your organization's data, while making sure that user productivity and their ability to collaborate isn't hindered. Members of your compliance team who will create sensitivity labels need permissions to the Microsoft 365 compliance center.
By default, Global Administrators for your tenant have access to this admin center and can give compliance officers and other people access, without giving them all the permissions of a tenant admin. For this delegated limited admin access, add users to the Compliance Data Administrator, Compliance Administrator, or Security Administrator role group.
Alternatively, using the default roles, you can create a new role group and add either Sensitivity Label Administrator or Organization Configuration roles to this group. For a read-only role, use Sensitivity Label Reader.
These permissions are required only to create and configure sensitivity labels and their label policies. They are not required to apply the labels in apps or services. If additional permissions are needed for specific configurations that relate to sensitivity labels, those permissions will be listed in their respective documentation instructions.
To be able to review matched items we find while in simulation mode (process before deployment that allows you to verify what items we will help you label if you turn on the policy), make sure you have the following permissions:
-
Content Explorer List viewer: Membership in this role group allows you to see each item and its location in list view. The data classification list viewer role has been pre-assigned to this role group.
-
Content Explorer Content viewer: Membership in this role group allows you to view the contents of each item in the list. The data classification content viewer role has been pre-assigned to this role group.
For instructions to add users to the default roles or create your own role groups, see Permissions in the Microsoft 365 compliance center.
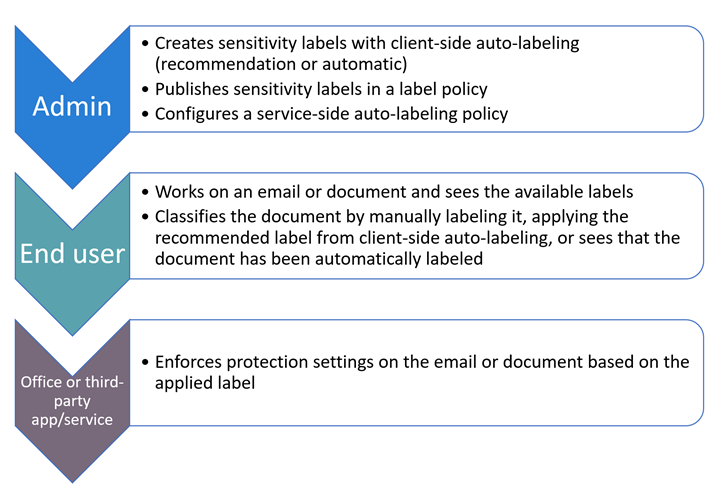
The basic flow for deploying and applying sensitivity labels:
MIP Service Auto-Labeling in depth⚓︎
Auto labeling is a built-in Microsoft service that triggers off sensitive content found in files in SharePoint Online, OneDrive for Business and emails in Exchange Online. Define what sensitive information you want us to protect using regulatory templates, 200+ out of box sensitive info or custom types, named entities, Exact Data Match and ML models in an auto labeling policy. We will simulate what files are detected that match your auto-labeling policy in our simulation mode, so you can review and be confident in our matches before agreeing to allow us to automatically label those documents.
Protecting Sensitive Information in SharePoint/OneDrive⚓︎
Sensitive files are automatically detected and labeled at rest.
-
PDF documents and Office files for Word (.docx), PowerPoint (.pptx), and Excel (.xlsx) are supported.
- These files can be auto-labeled at rest before or after the auto-labeling policies are created. Files cannot be auto-labeled if they are part of an open session (the file is open).
- Currently, attachments to list items aren't supported and won't be auto-labeled.
-
Maximum of 25,000 automatically labeled files in your tenant per day. Requests to increase labeling speed can be made via support ticket with business justification and financial impact to Microsoft. Please note that Microsoft has final approval of requests and approved limit increase will take 6-8 weeks to take effect.
-
Maximum of 100 auto-labeling policies per tenant, each targeting up to 100 locations (SharePoint sites or OneDrive individual users or groups) when you specify specific locations by using the Included or Excluded options. If you keep the default configuration of All, this configuration is exempt from the 100 locations maximum.
-
Existing values for modified, modified by, and the date are not changed because of auto-labeling policies—for both simulation mode and when labels are applied.
- When the label applies encryption, the Rights Management issuer and Rights Management owner is the account that last modified the file. If this account is no longer in Azure Active Directory, the label won't be applied because these values can't be set.
Protecting Sensitive Information in Exchange⚓︎
Sensitive emails are automatically detected and labeled in transit/ as they are sent. For Exchange, it does not include emails at rest (mailboxes).
Note
Emails detected in simulation mode will not be labeled when the policy is turned on, as we only label emails in transit and those emails were sent before the policy was enforced.
-
Unlike manual labeling or auto-labeling with Office apps, PDF attachments as well as Office attachments are also scanned for the conditions you specify in your auto-labeling policy. When there is a match, the email is labeled but not the attachment.
- For PDF files, if the label applies encryption, these files are encrypted by using Office 365 Message Encryption (OME) when your tenant is enabled for PDF attachments.
- For these Office files, Word, PowerPoint, and Excel are supported. If the label applies encryption, they are encrypted by using Office 365 Message Encryption (OME).
-
If you have Exchange mail flow rules or data loss prevention (DLP) policies that apply IRM encryption: When content is identified by these rules or policies and an auto-labeling policy, the label is applied. If that label applies encryption, the IRM settings from the Exchange mail flow rules or DLP policies are ignored. However, if that label doesn't apply encryption, the IRM settings from the mail flow rules or DLP policies are applied in addition to the label.
-
Email that has IRM encryption with no label will be replaced by a label with any encryption settings when there is a match by using auto-labeling.
-
Incoming email is labeled when there is a match with your auto-labeling conditions. For this outcome to apply to senders outside your organization, the Exchange location must be set to All included and None excluded. If the label is configured for encryption:
- That encryption is always applied when the sender is from your organization.
- By default, that encryption isn't applied when the sender is outside your organization but can be applied by configuring Additional settings for email and specifying a Rights Management owner.
-
When the label applies encryption, the Rights Management issuer and Rights Management owner is the person who sends the email. There currently isn't a way to set a Rights Manager owner for all incoming email messages that are automatically encrypted.
Requirements for configuring Service-side Auto-labeling⚓︎
- Simulation mode:
- Auditing for Microsoft 365 must be turned on. If you need to turn on auditing or you're not sure whether auditing is already on, see Turn audit log search on or off.
- To view file or email contents in the source view, you must have the Data Classification Content Viewer role, which is included in the Content Explorer Content Viewer role group, or Information Protection and Information Protection Investigators role groups. Without the required role, you don't see the preview pane when you select an item from the Items to review tab. Global admins don't have this role by default.
- To auto-label files in SharePoint and OneDrive:
- You have enabled sensitivity labels for Office files in SharePoint and OneDrive.
- At the time the auto-labeling policy runs, the file mustn't be open by another process or user. A file that's checked out for editing falls into this category.
-
If you plan to use sensitive information types:
- The sensitive information types you select will apply only to content that's created or modified after these information types are created or modified. This restriction applies to all custom sensitive information types and any new built-in information types.
- To test new custom sensitive information types, create them before you create your auto-labeling policy, and then create new documents with sample data for testing.
- If you plan to use document properties as a condition (Document property is), this option uses SharePoint managed properties. The preparation for DLP policies equally applies for when you use this condition with auto-labeling policies
-
One or more sensitivity labels created and published (to at least one user) that you can select for your auto-labeling policies. For these labels:
- It doesn't matter if the auto-labeling in Office apps label setting is turned on or off, because that label setting supplements auto-labeling policies, as explained in the introduction.
- If the labels you want to use for auto-labeling are configured to use visual markings (headers, footers, watermarks), note that these aren't applied to documents.
- If the labels apply encryption
- When the auto-labeling policy includes locations for SharePoint or OneDrive, the label must be configured for the Assign permissions now setting, and User access to content expires must be set to Never.
- When the auto-labeling policy is just for Exchange, the label can be configured for either Assign permissions now or Let users assign permissions (for the Do Not Forward or Encrypt-Only options). You can't auto-apply a label that's configured to apply S/MIME protection.
Creating a MIP auto-labeling policy⚓︎
Step 1: Create and publish sensitivity labels⚓︎
-
One or more sensitivity labels created and published (to at least one user) that you can select for your auto-labeling policies. For these labels:
-
It does not matter if the auto-labeling in Office apps label setting is turned on or off, because that label setting supplements auto-labeling policies
-
If the labels you want to use for auto-labeling are configured to use visual markings (headers, footers, watermarks), note that these are not applied to documents.
-
-
We recommend that you have your label taxonomy and hierarchy defined in a label policy applied to all users to help them get started with manual labeling from the information worker side.
-
[Optional] While it is important to have your label taxonomy mostly defined, this does not include the need to define protection actions like encyrption. Encryption can be added to the label properties after the fact. Since protections are checked every time a document is opened, changes in protections to labels will be enforced.
-
If the labels apply encryption: - When the auto-labeling policy includes locations for SharePoint or OneDrive, the label must be configured for the Assign permissions now setting. - When the auto-labeling policy is just for Exchange, the label can be configured for either Assign permissions now or Let users assign permissions (for the Do Not Forward or Encrypt-Only options).
- In defining your labels, you can set up in-app auto-labeling recommendations, where you define what sensitive information you are concerned about, and information workers will see a banner that says that recommends them to label this document with that label if your defined sensitive information is found in the document they are working with.
- You can define a default label in your label policy that is automatically applied to files and emails in use that have not been manually labeled.
You can easily get started with all things labeling by using our easy set-up of default label schema, label policy, and auto-labeling policy.
-
In the Microsoft 365 compliance center, navigate to sensitivity labels:
- Solutions > Information protection
Tip
If you don't immediately see this option, first select Show all.
-
In the Overview tab you should see the following banner:
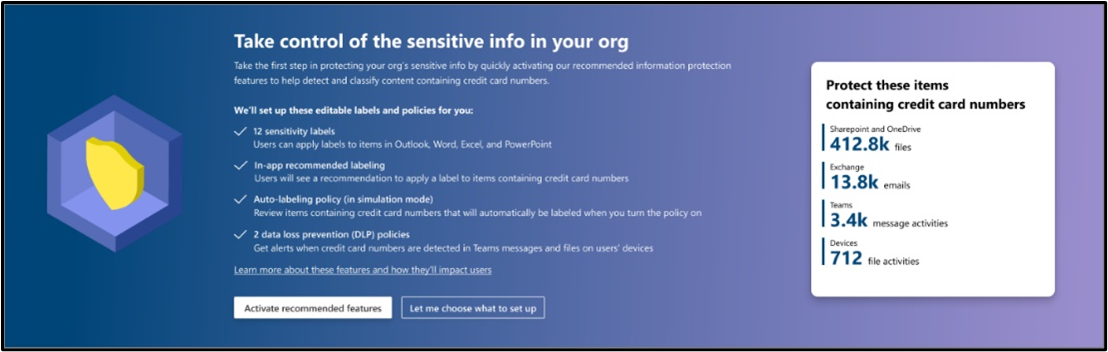
Figure 4: Banner for easy set-up of default policies located on the MIP overview page -
Activate recommended features to set up our default policy configurations designed to protect credit card numbers. You will only see this option if you have not set up labeling, in-app labeling recommendation, auto-labeling policy, Teams DLP, or DLP for devices. If you have already set up an auto-labeling policy, you will not be shown this banner but can configure our default auto-labeling policy on your own: Learn about the default labels and policies for Microsoft Information Protection - Microsoft 365 Compliance | Microsoft Docs
Step 2: Create an auto-labeling policy⚓︎
Get started with auto-labeling with our default auto-labeling policy protecting credit card numbers on SharePoint, OneDrive, and Exchange
If you already have your labels set up but have not create any auto-labeling policies
-
In the Microsoft 365 compliance center, navigate to sensitivity labels:
- Solutions > Information protection
Tip
If you don't immediately see this option, first select Show all.
-
In the Overview tab you should see the following banner:
Figure 5: Banner for easy set-up of default policies located on the MIP overview page -
Activate recommended features to set up our default policy configurations designed to protect credit card numbers.
-
You will be asked to pick two of your existing labels to use in the auto-labeling policy in simulation mode. We recommend using a “Confidential” like sublabel for both, with the higher count auto-labeling credit card policy having more protections than the low count.
Note
If you have already set up an auto-labeling policy you will not be shown this banner but can configure our default auto-labeling policy on your own: Learn about the default labels and policies for Microsoft Information Protection - Microsoft 365 Compliance | Microsoft Docs.
Extend DLP policies covering Exchange to auto-labeling
-
In the Microsoft 365 compliance center, navigate to sensitivity labels:
-
Solutions > Data Loss Prevention
Tip
If you don't immediately see this option, first select Show all.
-
In the Overview tab you should see the following banner:
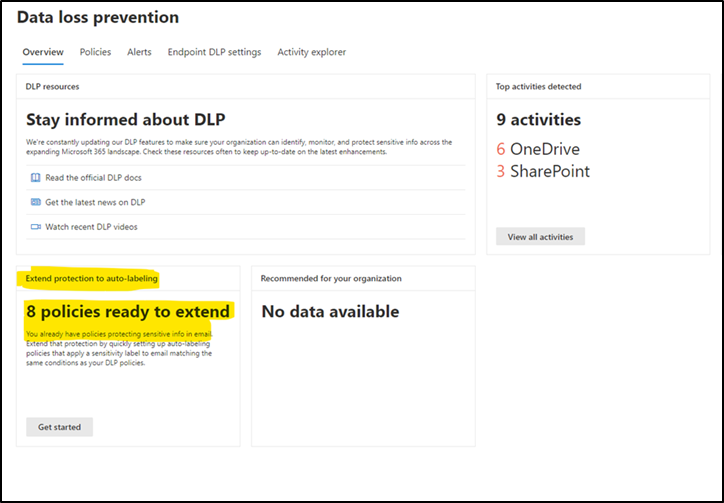
Figure 6: Extend Exchange Online DLP policy to auto-labeling -
Extend your Exchange DLP policy to an auto-labeling policy in simulation mode.
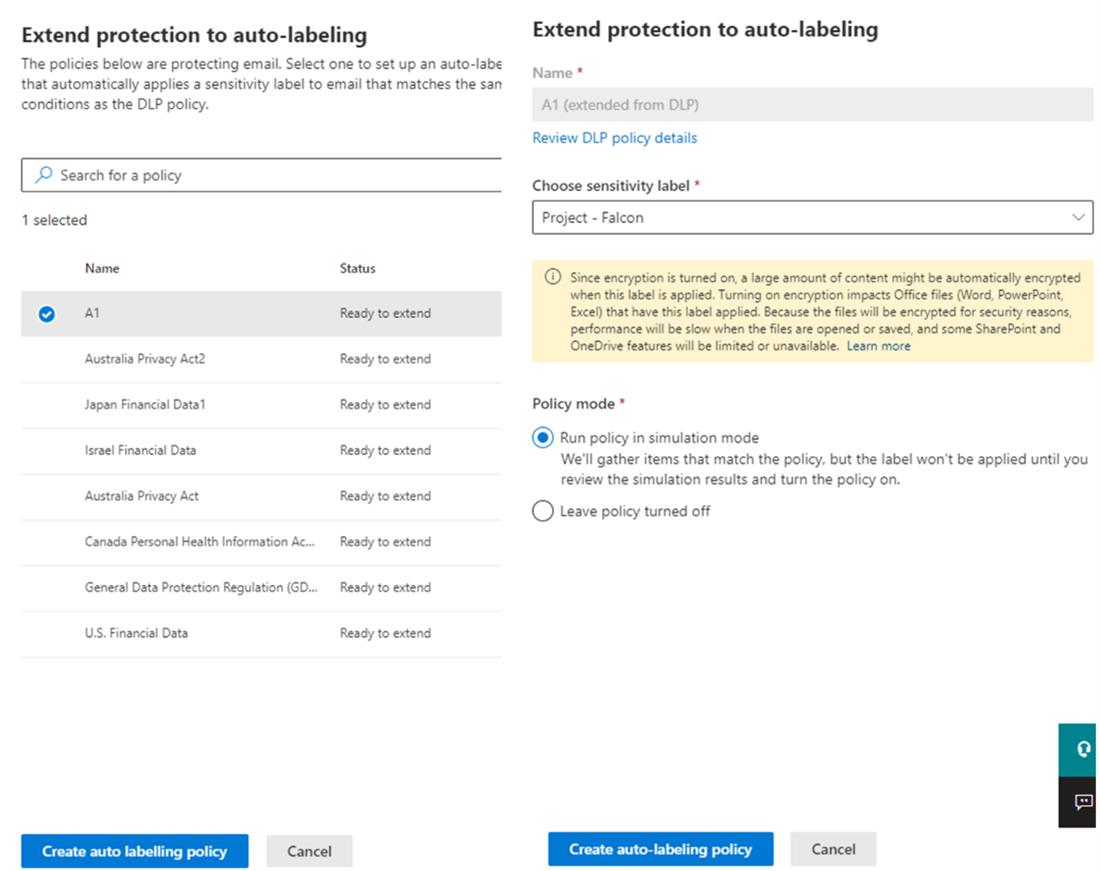
Figure 7: Select your existing Exchange Online DLP policy to convert to auto-labeling simulation
Create your own auto-labeling policy
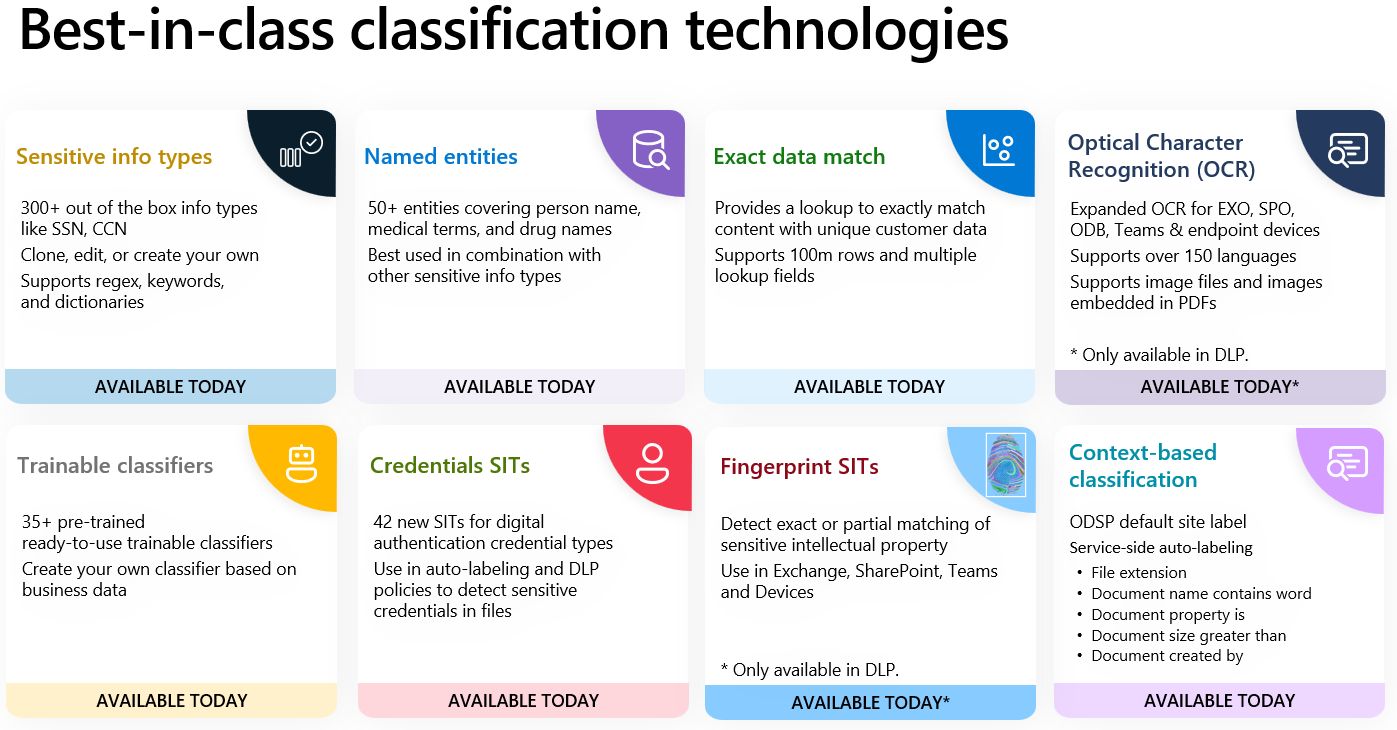
You want to protect the sensitive data in your organization. What is sensitive in your organization? Start with our sensitive information types. We have 200+ out of the box sensitive information types that we help detect in your organization. Check content explorer to see which sensitive information types we are finding.
So, what information is there? Do you detect a lot of sensitive information that needs to be protected with labeling?
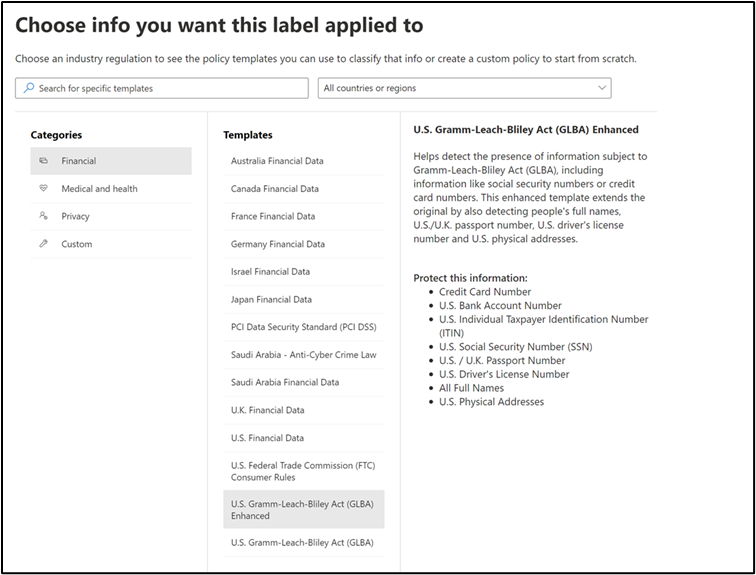
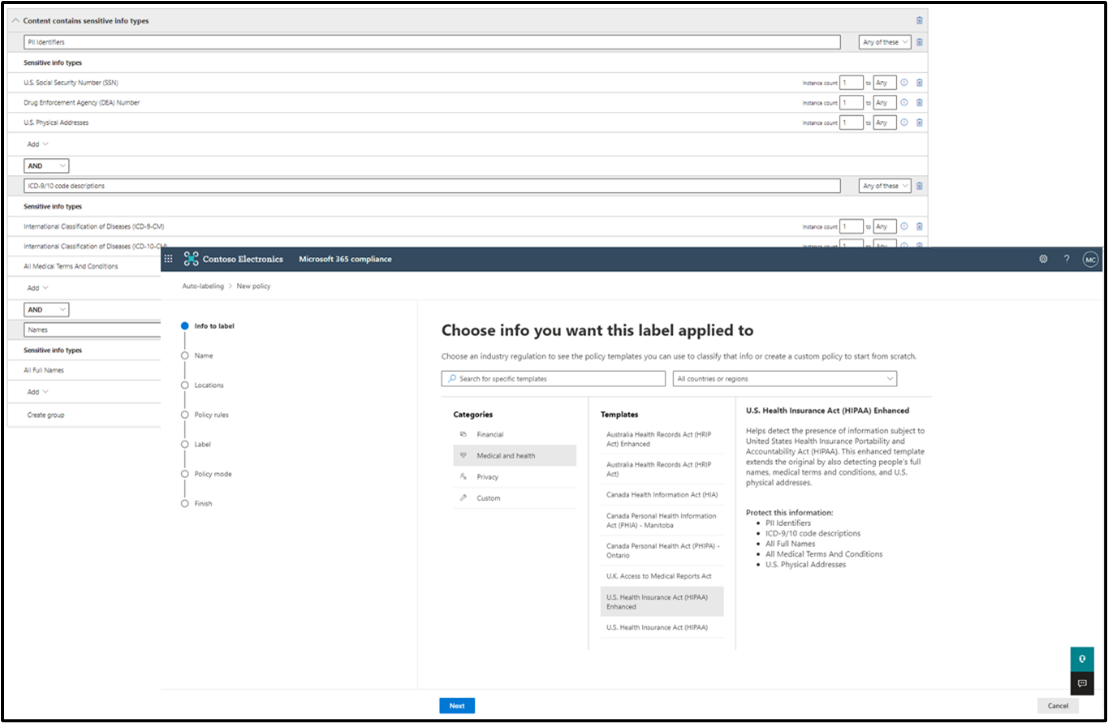
If you are unsure of what data to protect or how to get started, look at our provided Financial, Medical and Health, and Privacy templates. These provide a great baseline of sensitive information types to protect given different regulations and industries. You can customize these templates to add more sensitive information types you are concerned with.
Named entities recognition (NER) allows you to be able to identify entities like physical address, names, and more with other sensitive information types to be more confident that it is something you are looking for. This works great to reduce false positives.
As you get more advanced or have more business use cases, you can also explore things like exact data matching which looks at your specific customer data that you are passing in detects and labels for this customer's information. This is a more complex process that requires more time to configure and execute but can bring your false positive rates to near zero allowing you to be more assertive with auto-labeling policies.
Another option is trainable classifiers where we use machine learning, to understand what content in your organization looks like from business files like resumes to source code and protect that information.
These different classifier types are not mutually exclusive to each other. You can and in fact we encourage you to try out combinations of different types of classifiers. For example, you can use a sensitive information type (SIT) for PII together with named entity recognition for person's names in a policy trying to detect large amounts of identity information in a table, or you can use trainable classifiers together with a custom SIT to detect invoices above a certain amount. You can also use EDM as an exclusion to a rule based on a regular SIT to avoid identifying employee PII as potential customer PII, etc.
Our advanced classifiers allow you to protect found credentials in files and intellectual property and other important business documents with trainable classifiers.
In addition
-
Pick your scope:
-
Option 1: ALL – SharePoint sites, OneDrive users/groups and Email users
-
Option 2: Subset of sites or accounts – can use PowerShell for longer lists
-
-
Select a label to use for auto-labeling, but note:
-
This label will not go into effect until you turn on your policy from simulation mode.
-
You can always simulate the policy. Check the matches, and then go back and edit the label used for the policy.
-
The protections of the label you select will then apply to every document automatically labeled.
-
Step 3: Simulate⚓︎
After 12 hours, you can analyze the results of our auto-labeling simulation. You will be shown files and emails that match your auto-labeling policy configurations that would be labeled if your policy was turned on. Review these matches to make sure they match with what you are expecting. Try simulating different variations of your policies (higher/lower confidence, different combination of conditions, higher/lower instance counts) to find the right configuration for your organization.
Step 4: Refine Policy⚓︎
Fine tuning your policy
If you are seeing high amounts of false positives, fine-tune your policy with the following recommendations:
-
Increase the thresholds of sensitive information types found to determine severity
- It is okay to use different thresholds for individual classifiers (higher or lower the instance counts)
-
Understand confidence levels and how they are defined
- Low confidence may be good!
- Try using a low confidence with high threshold or a higher confidence level
-
Group like information types together
- Combine multiple SITs to detect combinations that matter (e.g. a Social Security Number on its own may not be relevant without a person associated, but an SSN together with an account number, a person's name or a medical condition may be).
- Switch from looking for “Any of these” to “All of these”
-
Use Boolean operators to combine groups
- Look for SSN AND Driver’s License instead of SSN OR driver’s License

Figure 9: Example of how to use Boolean operators to combine groups of sensitive information -
Leverage our trainable classifiers to help lower false positives
- Combine different conditions: mix content contains sensitive info type with other contextual conditions like document is created by or document is shared externally
Advanced refinement More advanced refinement strategies if the above don’t work:
-
Switch this policy to be for client-side auto labeling, since false positives are much less problematic with client-side since the user can take care of the "mistake" with one click
-
Use EDM to eliminate false positives by matching only known sensitive information (ex. actual customer PII)
-
Clone and modify the built-in SITs to include additional conditions, such as keywords, more stringent matching of values or stronger formatting requirements.
-
Modify a custom SIT to exclude known prefixes, suffixes or patterns. For example, a custom SIT to detect phone numbers might trigger for every email if your email signatures or document headers include your offices phone numbers. Excluding the sequences common to your company's phones as prefixes to your custom SIT can prevent the rule from triggering for every email or document.
-
Include additional dictionary-based SITs as conditions to narrow down the matches to those that talk about the relevant topics. ex. a rule for matching patient diagnostics may be enhanced by requiring the presence of words like diagnostic, diagnosis, condition, symptom, patient, etc.
Step 5: Enforce⚓︎
When you are confident in the matches you see in simulation, turn on your policy from simulation mode so that we can start auto labeling the files and emails in your organization. You can see what’s getting labeled through activity explorer.
Auto labeling use cases from our customers⚓︎
New scenarios leveraging contextual conditions
-
Migrating from a 3rd party to Microsoft labels If your third party like Titus write their labels into document properties, you can leverage Document property is to read those 3rd party labels and automatically map it to your Purview sensitivity labels.
How to configure:
This predicate requires additional configuration before the policy can even be created if used on OneDrive or SharePoint locations. Please refer to this DLP documentation: Create a DLP policy to protect documents - Microsoft Purview (compliance) | Microsoft Learn to learn how to create a managed property to use for “Document property is”. This predicate can be configured both in advanced or common rules.
How to test: We recommend following the above steps to ensure proper configuration and testing this predicate first in DLP with a small subset of files to make sure it’s accurately detecting the document property you’re looking for. Then test with auto-labeling in simulation to verify the results match.
Limitations: After the managed schema is configured as a property in SharePoint and OneDrive, the policy will only be able to detect content that’s been indexed (the content is newly uploaded or if that content is old but edited after managed schema was configured). Custom document properties aren’t crawled for labels with encryption. Remove the encryption and the crawled property will show up. There is an option to re-index a whole site, but this can cause massive load on the search system and does not have a defined SLA for re-indexing as SharePoint and OneDrive will re-index files as they can to ensure the system isn’t throttled.
-
Apply a default label to files at rest Leverage the contextual condition of “File extension is” to label all labelable files at rest. In addition, you can combine with “file size is greater than” to cover files that are too large for classification (we can classify up to 150 MB) or you can use this to protect spreadsheets or PowerPoint decks sent externally.
How to configure:
Applies label to documents and email attachments that have specific file extensions. This predicate can be configured both in advanced or common rules.
How to test: You can scope to all file types applicable to extend default labels for data at rest. In simulation mode, you can customize columns to show file type for testing.
Limitations: Note that SharePoint and OneDrive will only label files with docx, .xlsx, .pptx, or .pdf extensions. Additional file extensions you include will only apply to attachments.
-
Label and protect large files Leverage the contextual condition of “Document size equals or is greater than” to ensure large files are protected when sent externally or if they can’t be classified due to size limitation.
How to configure:
Applies label to Word, Excel, PowerPoint, and PDF files that are a specific size or larger. If you added the condition 'Content contains > Sensitive info types', the label will only be applied to files that are 150 MB or less.
How to test: You can use auto-labeling to: - label large files that can’t be classified (150MB or greater) - large files sent externally - large files with detected sensitive information types
-
Protect files pertaining to specific projects or that contain the word Confidential Leverage the contextual condition of “Document name contains words or phrases” to protect and label all documents that mention HR/ a specific department or project or include the word Confidential.
How to configure:
Applies label to attachments or documents where the file name contains any of the words or phrases you specify.
How to test: You can use auto-labeling to: - label all files that have the word confidential or other label name - label files that mention specific project names
-
Automatically label files created by C-suite or someone who’s submitted their notice Leverage the contextual condition of “Document created by” to protect and label all documents created by select users. This condition is only available in advanced rules.
How to test: You can use auto-labeling to: - label all files created by someone in the C-Suite - label files created by someone who has submitted their notice
Standard scenarios for protecting sensitive information⚓︎
Scenario 1: Protecting payment information of customers⚓︎
A lot of customers have an interest in protecting their financial data surrounding payment data to comply with financial regulations. This usually entails a combination of bank account numbers, PII (Personal Identifiable Information) of customers, credit card numbers and account information.
Recommendation
-
Use our U.S. Gramm-Leach Bliley Act (GLBA) Enhanced template
-
On ALL locations (SharePoint, OneDrive, Exchange)
-
Label guidance on which to apply:
- Label published to all users
- Confidential Label Priority (2nd highest parent label)
- Internal Only
Scenario 2: Complying with HIPPA regulations on health care data⚓︎
Another field that we’ve seen a lot of interest in protecting is health care data information to comply with HIPPA regulations.
Recommendation
-
Use our U.S. Health Insurance Act (HIPPA) Enhanced template
-
On ALL locations (SharePoint, OneDrive, Exchange)
-
Label guidance on which to apply:
- Label published to all users
- Confidential Label Priority (2nd highest parent label)
- Internal Only
Scenario 3: Protecting personal data⚓︎
Similarly, we have seen an interest in protecting the personal data of both customers and employees. We have auto-labeling templates to protect U.S. Personally Identifiable Information (PII) Data, General Data Protection Regulation (GDPR), and more.
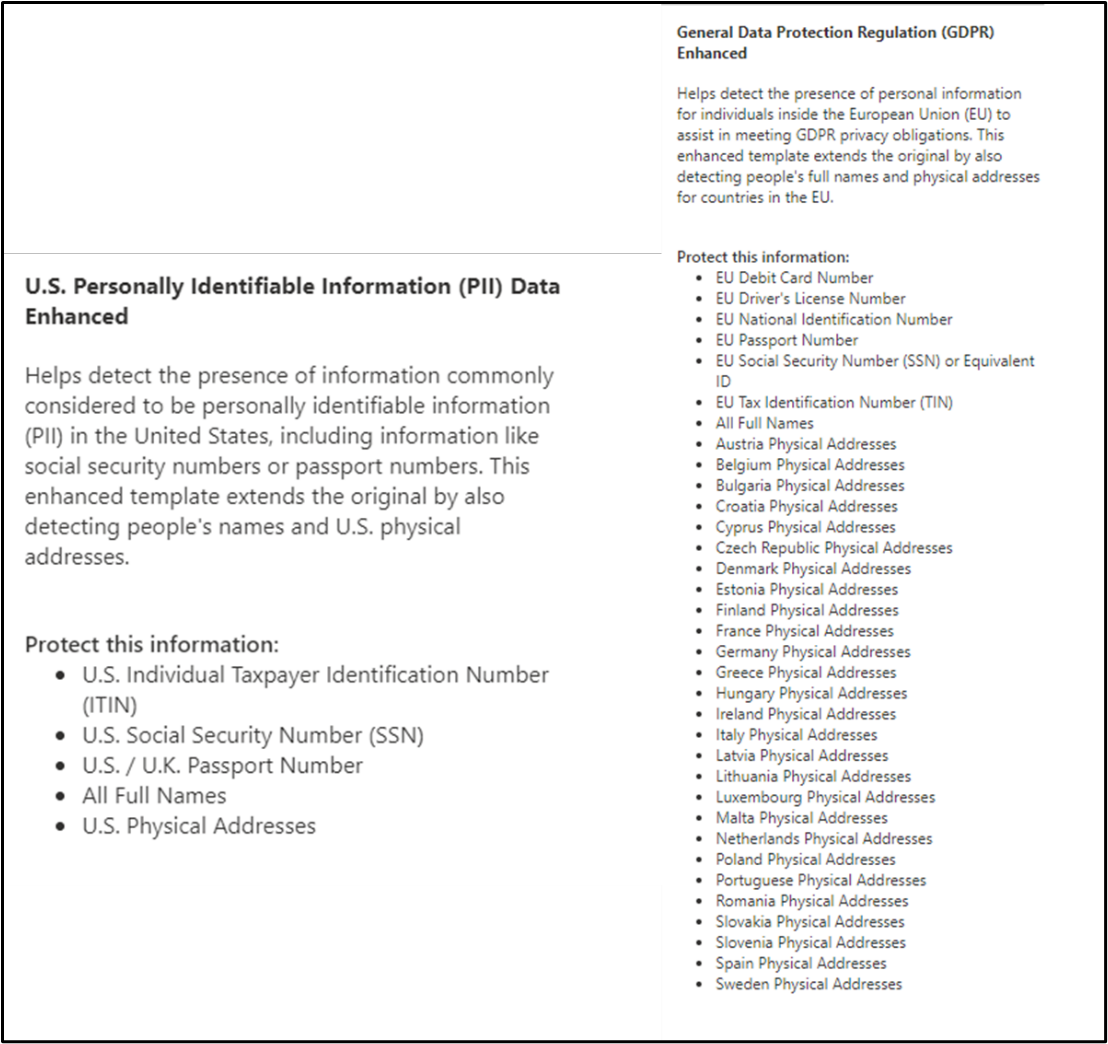
Recommendation
-
Use our U.S. PII Data Enhanced or GDPR Enhanced template
-
On ALL locations (SharePoint, OneDrive, Exchange)
-
Label guidance on which to apply:
- Label published to all users
- Confidential Label Priority (2nd highest parent label)
- Internal Only
Advanced Scenario
Consider using exact data matching (EDM) to identify patient healthcare data.
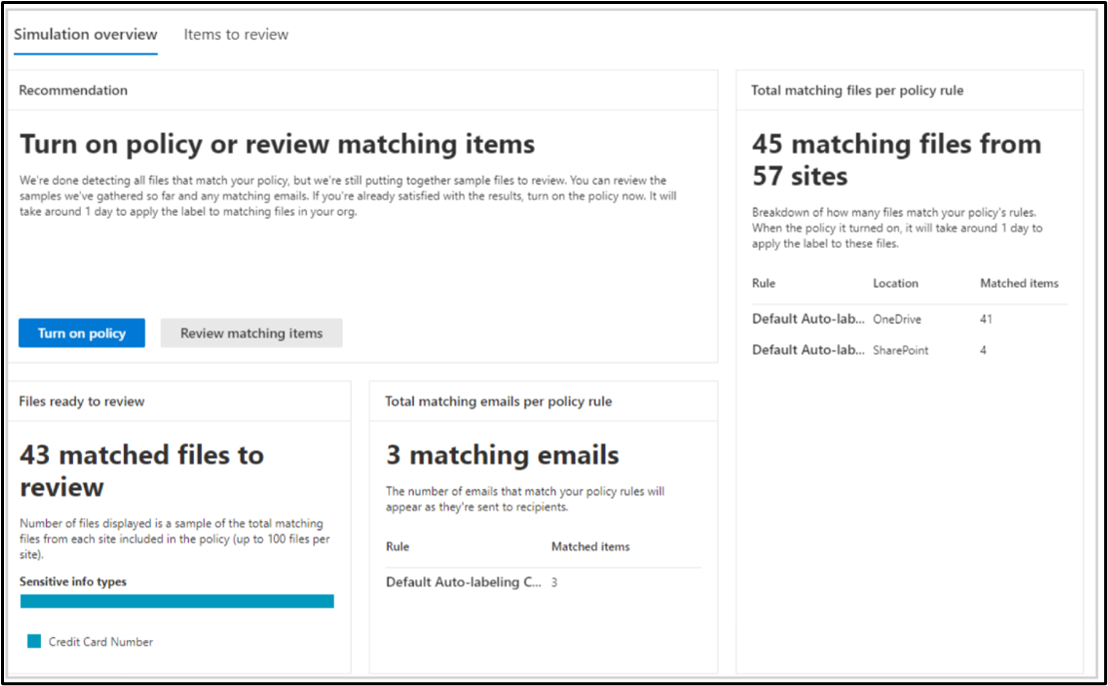
Reports⚓︎
Simulation results showing number of files and emails matched in how which locations are available when you click on the auto-labeling policy for more details.
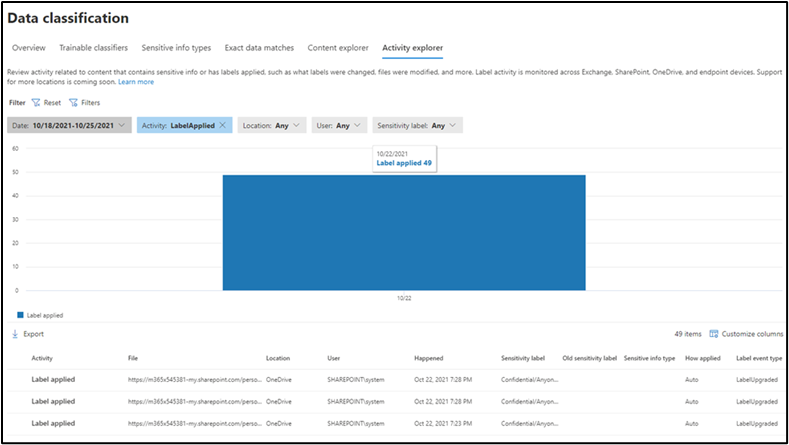
After an auto-labeling policy is enabled, you can view the labeling activity in Activity Explorer:
Implementation Strategy⚓︎
-
If you do not have labels set up yet, set up all things labeling with our default policies and configurations.
-
If you have labels, and an Exchange DLP policy, extend your Exchange DLP policy to auto-labeling.
-
If you have client-side auto-labeling set up, but no service side auto-labeling policy:
- Use client-side auto labeling or recommendations and service-side auto labeling in combination, with the same conditions but with different thresholds, ex. use high confidence matches for service-side auto labeling and use low or medium confidence for a client-side recommendation, which gives the user an option to dismiss the label if it isn't appropriate for the content and apply a different label.
-
If you have labels set up, but no service side auto-labeling policy:
-
Get started with auto-labeling with our default auto-labeling policy
-
Create auto labeling policies that trigger for different confidence levels of the SITs with different counts (ex. one high confidence count or multiple medium confidence count) to avoid false positives without risking leakage of large amounts of sensitive data that may not meet the most stringent conditions of higher confidence.
Tip
Use content explorer to understand where data is present that may need to be included in an auto-labeling policy.
-
FAQ⚓︎
How should I finetune for false positives?⚓︎
-
Increase the thresholds of sensitive information types found to determine severity
- It is okay to use different thresholds for individual classifiers
-
Understand confidence levels and how they are defined
- Low confidence may be good!
- Try using a low confidence with high threshold or a higher confidence level
-
Group like information types together
- Switch from looking for “Any of these” to “All of these”
-
Use Boolean operators to combine groups
- Look for SSN AND Driver’s License instead of SSN OR driver’s License
Figure 15: Example of how to use Boolean operators to combine groups of sensitive information -
Advanced method:
- Use Exact Data Matching to only look for a specific set of data like your specific customer information (this is a more complex process that takes time to configure)
What do I do if I have over 1 million matched files and cannot enforce my auto-labeling policy?⚓︎
-
Since we have a limit of 25,000 files being labeled a day on SharePoint/OneDrive, we want to make sure it does not take us that long to label all the matches from your policy.
-
First check to make sure all the matches are accurate. If not, please finetune the policy for false positives.
-
If the matches all look accurate but the matches still exceed 1 million, scope your policies to a smaller subset of locations first and enforce that policy. Then go in and create another identical policy scoped to the remaining locations.
How does changing label protections affect auto-labeling?⚓︎
-
For SharePoint and OneDrive, when a file is open, we retrieve the updated protection actions of the labels. Therefore, any updates to the label protections will be reflected on the document the next time it is opened.
-
For Exchange, emails are stamped with the label and associated protections at the time of the email being sent. If a label protection is modified, previously labeled emails with that label will retain the old permissions, but any new emails sent will have the new label protections.
What happens if I need to change my label schema after enforcing an auto-labeling policy?⚓︎
We recommend that you have your established label schema in place before continuing to auto-labeling, but understand that sometimes minds change and revisions are needed.
-
Decide what your new label schema is
-
Create the new label schema. Edit existing labels if possible to fit the new label hierarchy, but do not delete any old labels yet.
-
Determine if the label you used for auto-labeling is still appropriate?
-
If so, you are all set.
-
If not, determine the replacement label you would like to use.
-
Make sure the replacement label has a higher label priority than the original label.
-
Edit the auto-labeling policy to use the new label with higher label priority
-
Delete original label if no longer part of your new label schema
-
-
What is simulation mode?⚓︎
Simulation mode is a process between configuring the policy and enforcing it. It allows you to see what matches we find that match your policy configuration that will be labeled if you enforced your policy. No labeling is done in simulation mode. It serves as a reassurance assessment of our sensitive information type detection before we apply any labels for you automatically.
What happens when I turn on a policy?⚓︎
-
Files and emails will start getting labeled according to your auto-labeling policy. You can view what is being labeled in activity explorer.
-
We have a limit of 25,000 files being labeled a day on SharePoint/OneDrive, so labeling might span the course of several days depending on how many matched files we found in simulation mode.
Abbreviations⚓︎
| Acronym | Definition |
|---|---|
| EDM | Exact Data Match |
| EXO | Exchange Online |
| MIP | Microsoft Information Protection |
| NER | Named Entity Recognition |
| ODB | OneDrive for Business |
| OWA | Office Web Applications |
| PII | Personally Identifiable Information |
| SIT | Sensitive Information Type |
| SPO | SharePoint Online |
| TC | Trainable Classifiers |