Task 03 - Prepare datasets
Introduction
Now that you have deployed and configured the necessary Azure resources, the next step is to prepare the datasets that you will use in this training. In this scenario, Zava has product catalog data in Cosmos DB. We will use vector storage within Comsos DB to surface this data for models.
Description
In this task, you will prepare the dataset needed for the rest of this training. This includes loading data into Cosmos DB and creating a vector index to access the data.
Success Criteria
- You have loaded data into Cosmos DB.
Learning Resources
- Create a container in Azure Cosmos DB for NoSQL
- Use the Azure Cosmos DB Data Explorer to manage your data
Key Tasks
01: Create a Cosmos DB container
The data that you will use in this training is located in src/data/product_catalog.json. This JSON file contains product catalog data for Zava, including product names, descriptions, categories, prices, and image URLs. You will load this data into the Cosmos DB instance that you created in the first task of this exercise.
Expand this section to view the solution
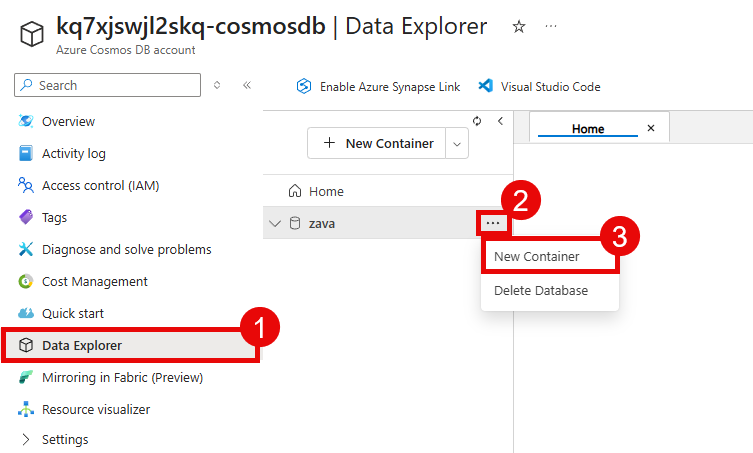
Navigate to the Azure portal and open the Cosmos DB account that you created in the first task of this exercise. Then, navigate to the Data Explorer section of your Cosmos DB account from the left-hand menu. In the Data Explorer, you can see a zava database that was created as part of the deployment process. Select the ellipsis (…) next to the zava database and choose New Container.
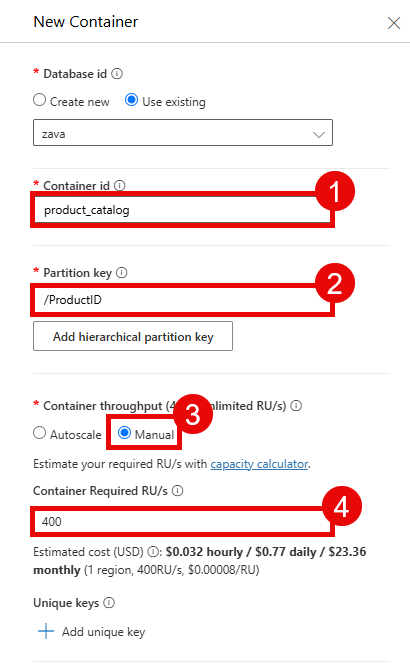
In the New Container pane, ensure that the database ID is zava and enter product_catalog for the container ID. Then, enter /ProductID for the partition key. Set the container throughput to Manual and enter 400 RU/s.
Select the Container Vectory Policy option and then choose Add vector embedding. The value for Path should be /request_vector with a Data type of float32 and Distance function of cosine. To take advantage of the large embedding model, set Dimensions to 3072. Finally, set the Index type to diskANN.
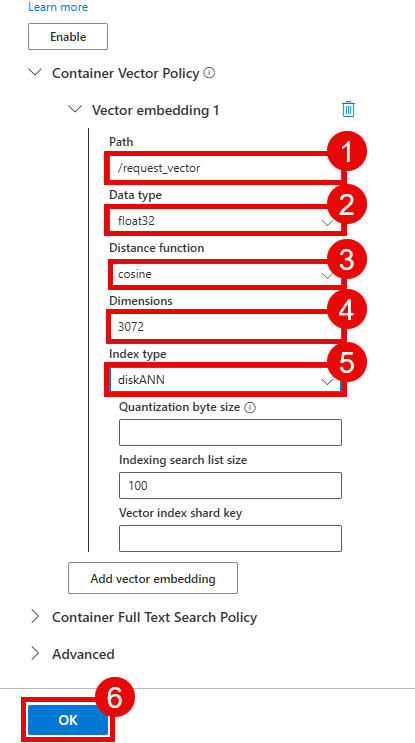
Select the OK button to create the container.
If you receive an error creating the vector index, it is possible that your account does not have the Vector Search for NoSQL API feature enabled. If you have enabled this feature, it can take 15 minutes for the setting to propagate, during which time the feature will be marked as “On” but you will still receive an error as though the feature were off. Wait several minutes and restart the process of creating a new container, closing the New container blade in the meantime.
02: Create a virtual environment and install dependencies
Before you can run the script to load data into Cosmos DB, you should create a Python virtual environment. This will allow you to install the necessary Python packages without affecting your global Python installation.
Expand this section to view the solution
Open a terminal and navigate to the root directory of the repository that you cloned in the first task. Then, run the following commands to create a virtual environment and install dependencies using uv:
# Navigate to the /src/ directory
cd src

# Create a virtual environment and install dependencies
uv sync
# Force Agent Framework core to be the last package installed,
# to avoid an import error in Exercise 3.
uv pip install --force-reinstall --no-deps agent-framework-core==1.0.0
If you do not have uv installed, you can install it by following the instructions at https://docs.astral.sh/uv/getting-started/installation/.
Once you have installed the dependencies, activate the virtual environment if it is not already active:
# Activate the virtual environment
# On Windows
.venv\Scripts\activate.bat
# On Windows (PowerShell)
.venv\Scripts\Activate.ps1
# On macOS/Linux (e.g., GitHub Codespace machine)
source .venv/bin/activate
03: Import data into the Cosmos DB container
Now that you have created the Cosmos DB container, the next step is to import the product catalog data into the container. There is a Python script in src/pipelines/ingest_to_cosmos.py that you can use to load the data from the CSV file into the Cosmos DB container.
Expand this section to view the solution
Use the same terminal window where you created and activated the virtual environment in the previous step. Ensure that you are still in the src directory of the repository and that your virtual environment is active.
Ensure that you are current logged into Azure:
az login
After that, run the following command to execute the ingestion script:
python pipelines/ingest_to_cosmos.py
You may receive an error message that “Local Authorization is disabled. Use an AAD token to authorize all requests.” There are two common causes. The first is that you are not logged into the Azure CLI, and the solution is to ensure that you are logged in with the correct account, and then try again. The second common cause is that your Cosmos DB public network access is disabled, and thus your Codespace VM or local machine cannot access the Cosmos DB database. To resolve this, navigate to the Cosmos DB account in the Azure portal, select Networking from the Settings menu, and ensure that Public network access is set to All networks. After saving this change, give the service a few minutes to update and then try running the ingestion script again.
04: Confirm that the data was imported
After the ingestion script has completed, you can confirm that the data was successfully imported into the Cosmos DB container by using the Data Explorer in the Azure portal.
Expand this section to view the solution
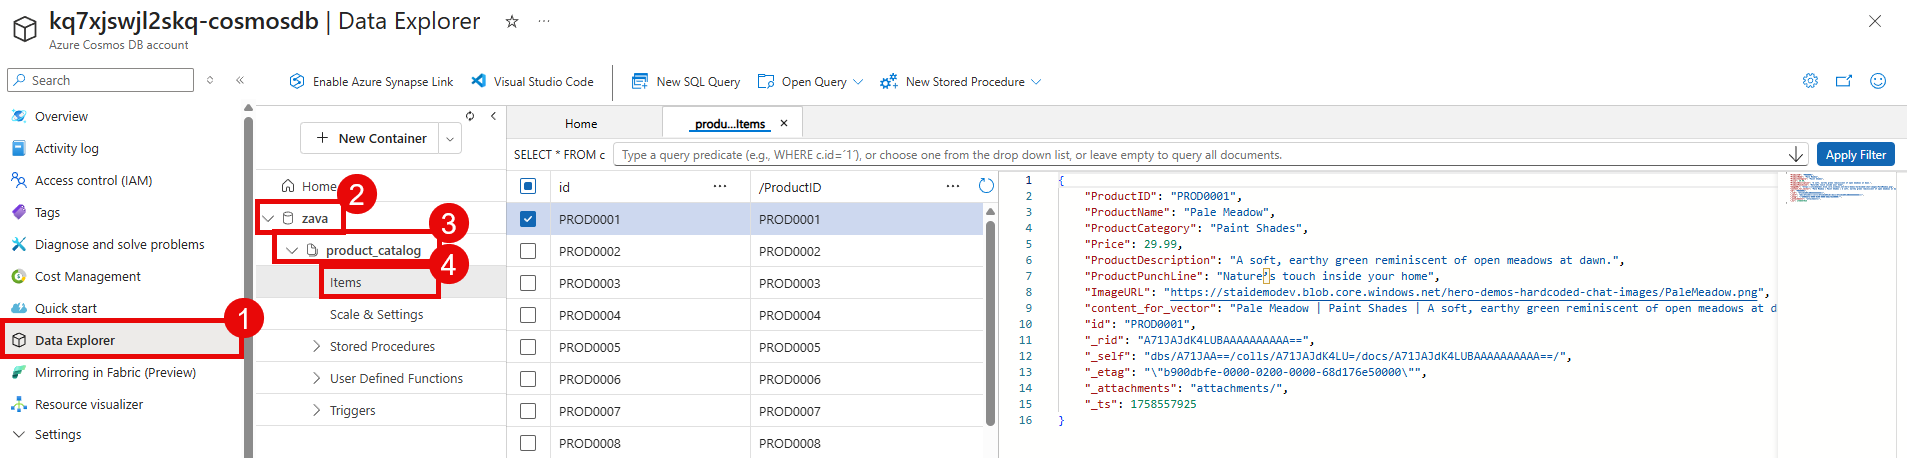
Navigate to the Azure portal and open the Cosmos DB account that you created in the first task of this exercise. Then, navigate to the Data Explorer section from the left-hand menu.
In the Data Explorer, you should see the zava database. Inside of it is the product_catalog container that you created earlier. You can expand the container to view the imported data.
Select the Items option under the product_catalog container to view the documents that were imported. You should see multiple documents representing the products in the catalog.