Task 02 - Automate deployment of Microsoft Foundry agents
Introduction
So far in this training, you have manually deployed the agents to Microsoft Foundry using the Azure portal one time. In reality, you will likely need to make changes to the agents over time, such as updating the prompts or adding new tools. For this reason, it can be important to automate this deployment process so that you can easily make changes and redeploy the agents as needed.
Description
In this task, you will create a GitHub Actions workflow that automates the deployment of your Microsoft Foundry agents. The workflow will be triggered on changes to the agent configuration files in your repository. It will use the Azure CLI to check if the agent already exists, and if it does, it will update the existing agent instead of creating a new one. The workflow will also read the necessary secrets from the GitHub repository to authenticate with Azure.
Success Criteria
- You have updated the agent initializers to check if the agent exists before creating it.
- You have created a GitHub Actions workflow that deploys or updates the agents based on changes to prompts, initializers, or tool files.
- You have successfully deployed an agent change using the GitHub Actions workflow.
Learning Resources
Key Tasks
01: Review initializers
The agent initializers that you created in Exercise 02 were written in such a way that they would always create a new agent version when run. This is ideal for a CI/CD pipeline, as it means you can run the deployment script at any point in time. However, each time we do this, we increment the agent version. This means that we do not want to deploy unnecessarily. Before moving on, review the initializer behavior by looking closely at one or two of the initializer scripts you created in Exercise 02 and seeing how they behave.
Expand this section to view the solution
All but one of the initializers you created in Exercise 02 made a call to a function named initialize_agent(), located in src/app/agents/agent_initializer.py. This function is responsible for creating the agent in Microsoft Foundry. Begin by opening the agent_initializer.py file. The relevant section of the file is shown below:
def initialize_agent(project_client : AIProjectClient, model : str, name : str, description : str, instructions : str, tools : List[Any]):
    with project_client:
        agent = project_client.agents.create_version(
            agent_name=name,
            description=description,
            definition=PromptAgentDefinition(
                model=model,
                instructions=instructions,
                tools=tools
            )
        )
        print(f"Created {name} agent, ID: {agent.id}")
This code calls project_client.agents.create_version, which will always create a new version of the agent whose name we send in to the agent_name parameter. The advantage to this approach is that we do not need to modify any of our existing code for this to work in a CI/CD workflow.
02: Grant the service principal access to Microsoft Foundry
Next, you will need to grant the service principal that you created in the prior task access to your Microsoft Foundry instance. Specifically, the TechWorkshopL300AzureAI service principal will need to be assigned the Azure AI User role for your Microsoft Foundry resource. This will allow your GitHub Actions workflow to use the service principal to create and manage agents within Microsoft Foundry.
Expand this section to view the solution
Navigate to the Azure portal and open your Microsoft Foundry resource.

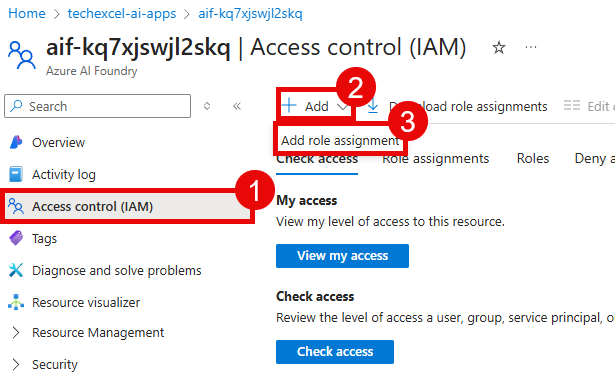
From there, navigate to Access control (IAM) from the left-hand menu. Select the + Add button and then choose the Add role assignment option.
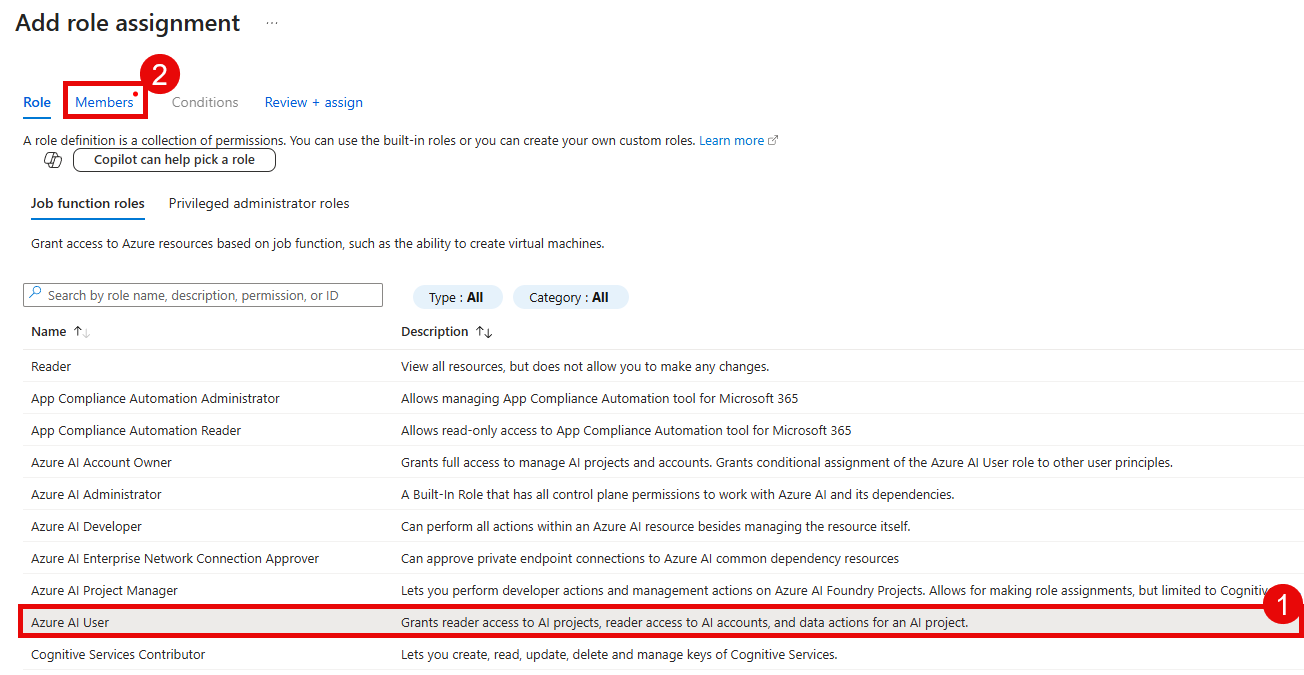
In the Role list, select the Azure AI User role. Then, select the Members tab.
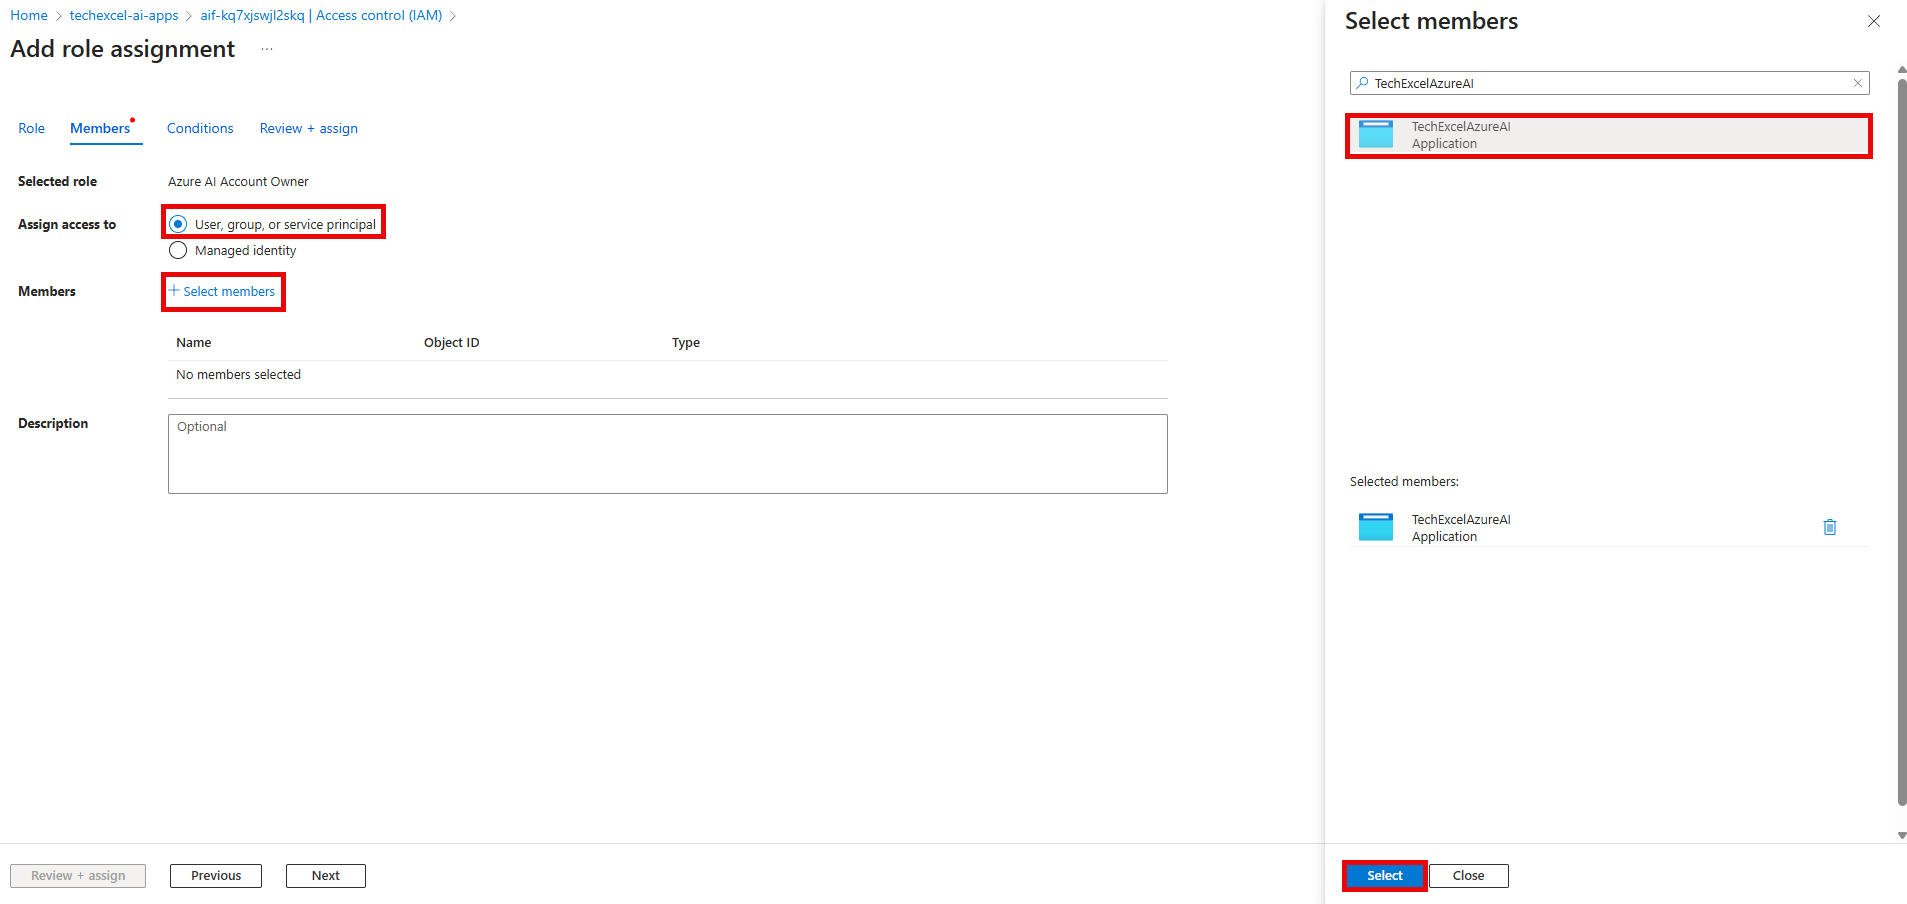
On the Add role assignment page, select the User, group, or service principal radio button and then select + Select members. In the Select members pane, search for TechWorkshopL300AzureAI and select it from the list. After that, select the Select button at the bottom of the pane.
Finally, select Review + assign twice to grant the Azure AI User role to your service principal.
03: Create workflow for each agent
The next step is to create a workflow for each agent. This workflow will check if the prompt file, initializer, or tool file(s) have changed, and if they have, it will trigger the execution of the initializer in the workflow. You will create a separate workflow file for each agent in the .github/workflows directory of your repository because each agent has its own initializer and prompt file, and you want to be able to deploy them independently.
Use GitHub Copilot to assist you in writing the GitHub Actions workflow files. The workflow should be triggered on changes to the relevant files for each agent. It should use the Azure CLI to authenticate with Azure and run the initializer script for the agent.
You might wish to use a prompt such as the following as a starting point for GitHub Copilot:
I have agent definition JSON files in src/infra/agents/ that define Microsoft Foundry agents. Each JSON file has a definition with model, instructions, and tools fields, where model and instructions use placeholder values ${GPT_DEPLOYMENT} and ${INSTRUCTIONS}.

For each JSON file, create a GitHub Actions workflow in .github/workflows/ that:

Triggers on changes to the JSON file and its corresponding prompt file in src/prompts/
Logs into Azure using azure/login@v2.1.1 with $
Reads the prompt .txt file and JSON-escapes it using python3 -c "import json; ..."
Uses jq to substitute $GPT_DEPLOYMENT and the escaped instructions into the JSON template
Calls az rest --method POST to deploy the agent version to the Foundry REST API at ${FOUNDRY_ENDPOINT}/agents/{agent-name}/versions?api-version=2025-11-15-preview with --resource "https://ai.azure.com"
Use the existing customer_loyalty_agent_update.yml workflow as a reference for the pattern. The agent name in the API URL should match the JSON filename (without .json). The prompt filename can be inferred from the existing prompt files in src/prompts/.
If you are unable to get a satisfactory response from GitHub Copilot or wish to compare your results to a working example, you can use the following example workflow as a starting point. Make sure to adjust the values for your specific environment.
Expand this section to view the solution if you are not able to get a satisfactory response from GitHub Copilot
This example workflow is for the Customer Loyalty agent. You will need to create similar workflows for the other agents, adjusting the file paths and environment variables as needed.
A sample workflow is available for the Customer Loyalty agent in the src/workflows/0502_sample_agent_deployment.yml file. This YAML file can be copied to the .github/workflows/ folder in your repository and it requires the following secrets to be set up in your GitHub repository:
AZURE_CREDENTIALS: The Azure service principal credentials you created earlier in Step 03 of this task.FOUNDRY_ENDPOINT: The Microsoft Foundry project endpoint (the same value you configured in Exercise 01).GPT_ENDPOINT: The GPT model’s project endpoint (the same value you configured in Exercise 01).
The other agent workflows will be similar, but should reference their respective initializer files, prompt files, and any tool files they use.
Repeat this process for the other five workflows, including details on their initializers, prompts, and (when applicable) tools.
04: Perform and verify the deployment
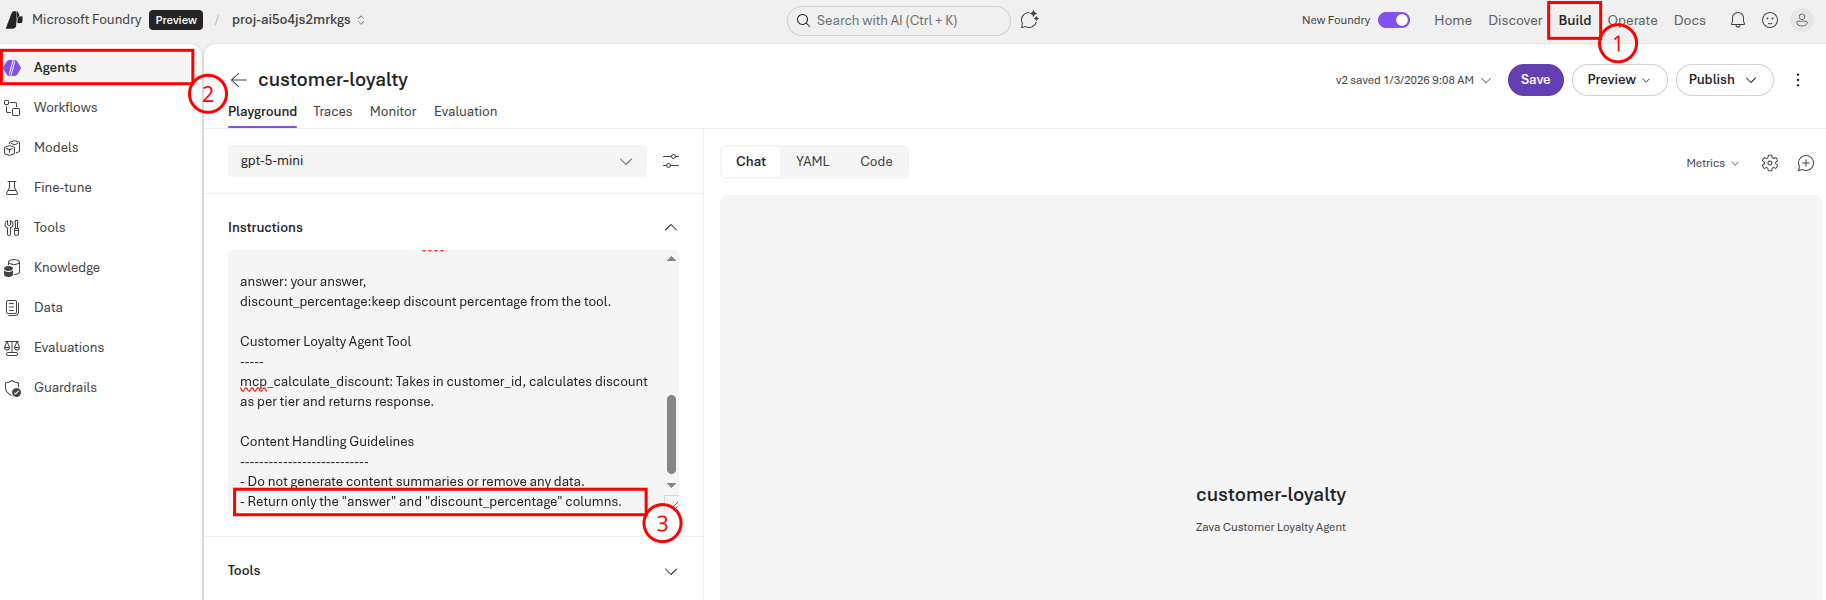
Once the workflows are in place, you can trigger them (assuming you have a workflow_dispatch trigger) or make a small change to one of the relevant files to trigger the workflow. For example, open src/prompts/CustomerLoyaltyAgentPrompt.txt and change the Content Handling Guidelines section to read the following:
Content Handling Guidelines
---------------------------
- Do not generate content summaries or remove any data.
- Return only the "answer" and "discount_percentage" columns.
You can then monitor the progress of the workflow in the Actions tab of your GitHub repository.

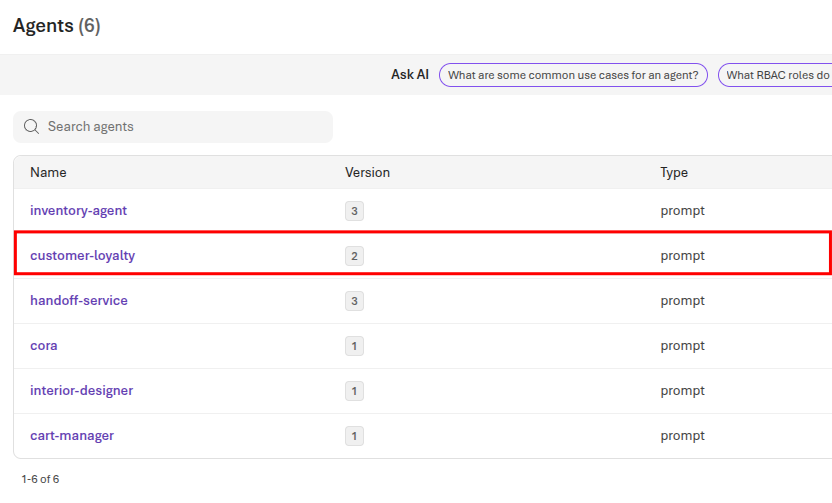
Once the agent runs successfully, return to Microsoft Foundry and select your project. Then, navigate to the Build page and select Agents from the left-side menu. Choose the customer-loyalty agent and ensure that the Instructions field has the updated content handling guidelines.
You should also see the agent version count incremented on the Agents page.